
Applies ToWindows 11 Windows 10
Чтобы узнать, сколько ядер и логических процессоров имеет процессор на устройстве с Windows, выполните следующие действия.
-
Щелкните правой кнопкой мыши меню Пуск и выберите Диспетчер задач.
Совет: При нажатии клавиш CTRL + SHIFT + ESC на клавиатуре также открывается диспетчер задач.
-
Когда откроется окно диспетчера задач , выберите вкладку Производительность в левой части окна, а затем убедитесь, что выбран параметр ЦП .
-
Количество ядер и логических процессоров на устройстве с Windows указано рядом со следующими значениями:
-
Ядер:
-
Логические процессоры:
-
Нужна дополнительная помощь?
Нужны дополнительные параметры?
Изучите преимущества подписки, просмотрите учебные курсы, узнайте, как защитить свое устройство и т. д.
Используем Диспетчер задач, Диспетчер устройств и дополнительное ПО для поиска информации о процессоре
Ядро процессора — физический блок, находящийся внутри процессора, который предназначен для вычисления арифметических операций. Чем больше ядер, тем быстрее процессор обрабатывает информацию.
Существует несколько способов, чтобы узнать сколько ядер в процессоре на нашем ПК, но самый простой — через диспетчер задач.
Способ 1. Диспетчер задач
Вызываем диспетчер задач, нажав одновременно клавиши «Ctrl+Shift+Esc». Затем переходим во вкладку «Производительность» и на закладке «ЦП» (активность ЦП) находим информацию о ядрах процессора.
Способ 2. Диспетчер устройств
В окне «Выполнить» (запускаем через «Win+R») вводим команду «devmgmt.msc» и нажимаем клавишу «Enter».
Откроется окно со списком устройств, для отображения списка ядер разворачиваем раздел «Процессоры». Число строк = количеству ядер.
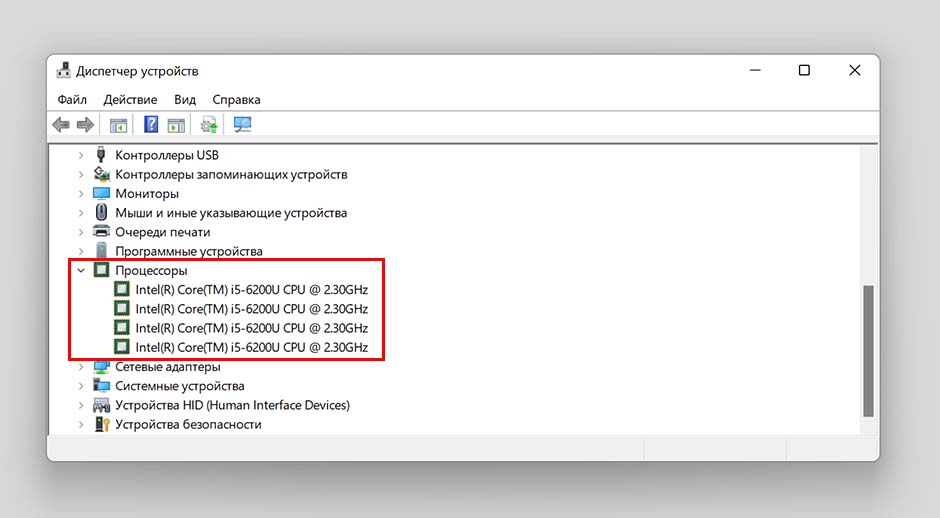
Почему количество ядер различается в диспетчере задач и диспетчере устройств? Дело в том, что в диспетчере устройств отображается 4 потока, то есть на 1 ядро приходится 2 виртуальных, в итоге реальное количество ядер = 2. В названии процессора чаще всего уже имеется подсказка о количестве ядер.
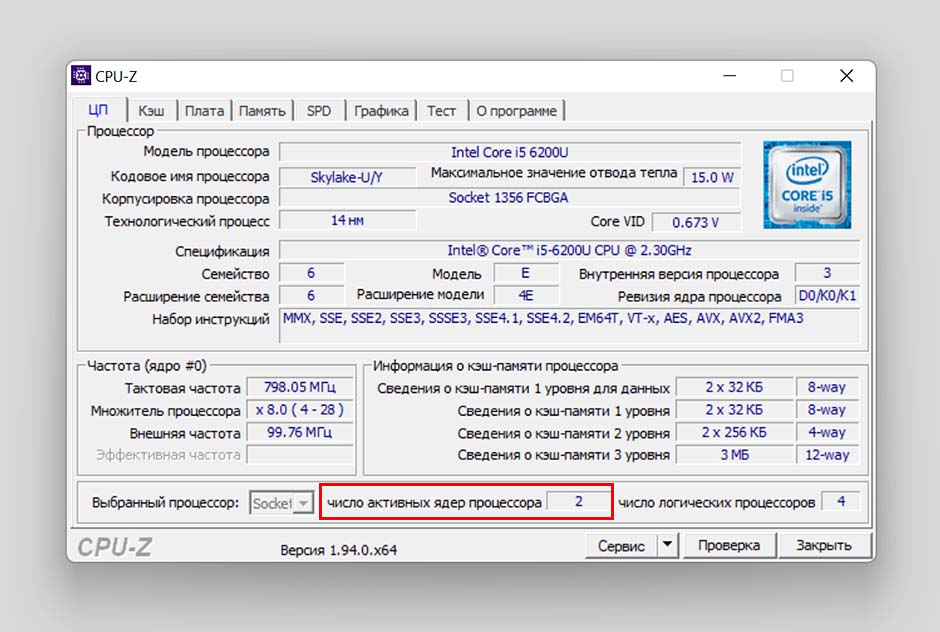
Способ 3. Стороннее программное обеспечение
Число ядер процессора можно узнать в таких ПО, как — «CPU-Z», «AIDA64», «HWiNFO», «Hardinfo» и другие.
Например, в CPU-Z число задействованных в работе ядер можно увидеть в разделе «ЦП», там же справа — число логических процессов.
On several occasions, you may need to Check Number of Cores in CPU of the PC you are using for various reasons. Especially, when you buy a new PC a thought might come to mind to verify the specification claimed by manufacturer. If you are running Windows 10 or 11, then the OS provides you with a few simple ways to find out the core count.
In the era of modernization where Intel is looking forward to releasing Cannon Lake, Kaby Lake and Coffee Lake at soonest, it is much easier for a user to afford a Quad Core computer. However, we have already got an idea of Intel’s upcoming processors with the latest technology. It’s time to know the core of the processor that you are using.
Check Number of Cores in CPU on Windows 11 and 10
Before we start to instruct the ways to Check Number of Cores in CPU on Windows 11 or 10, it is relevant to collect information about the same. See what it meant for –
What does Core refer to?
A computer incorporates a number of significant components altogether termed as Hardware. Among all these elements, the most important part is a CPU (viz. Central Processing Unit). In a computing operation, CPU is the one to get the information first to perform a calculation. This processor contains a set of instructions. Here comes the term core. If the processor has only 1 set of instructions, we call it a single core processor.
With the passage of time, Intel has made tremendous modifications in the processor instructions. As we said earlier, based on the number of instructions, a processor is named. In case of 2 sets of instructions, we call it a Dual Core processor. Similarly, 4 sets is a Quad Core, 6 sets is a Hexa-Core and the latest one is Octa-Core as it has 8 sets of instructions. By this time we have already come to know about the core. Now let’s go to Check number of Cores in CPU.
There are different methods to determine the core and let us explore them one by one.
You can use either Task Manager, or System Information tool or take assistance from Google or third-party software as well. Here, we will discuss every method in a sequence of steps to make you understand clearly.
Ways to Check Number of Cores in CPU on Windows 10 –
Way 1 – Through System Information
System Information is an alternate method that lets you Check Number of Cores in CPU without involving any software. For this reason, the steps are:
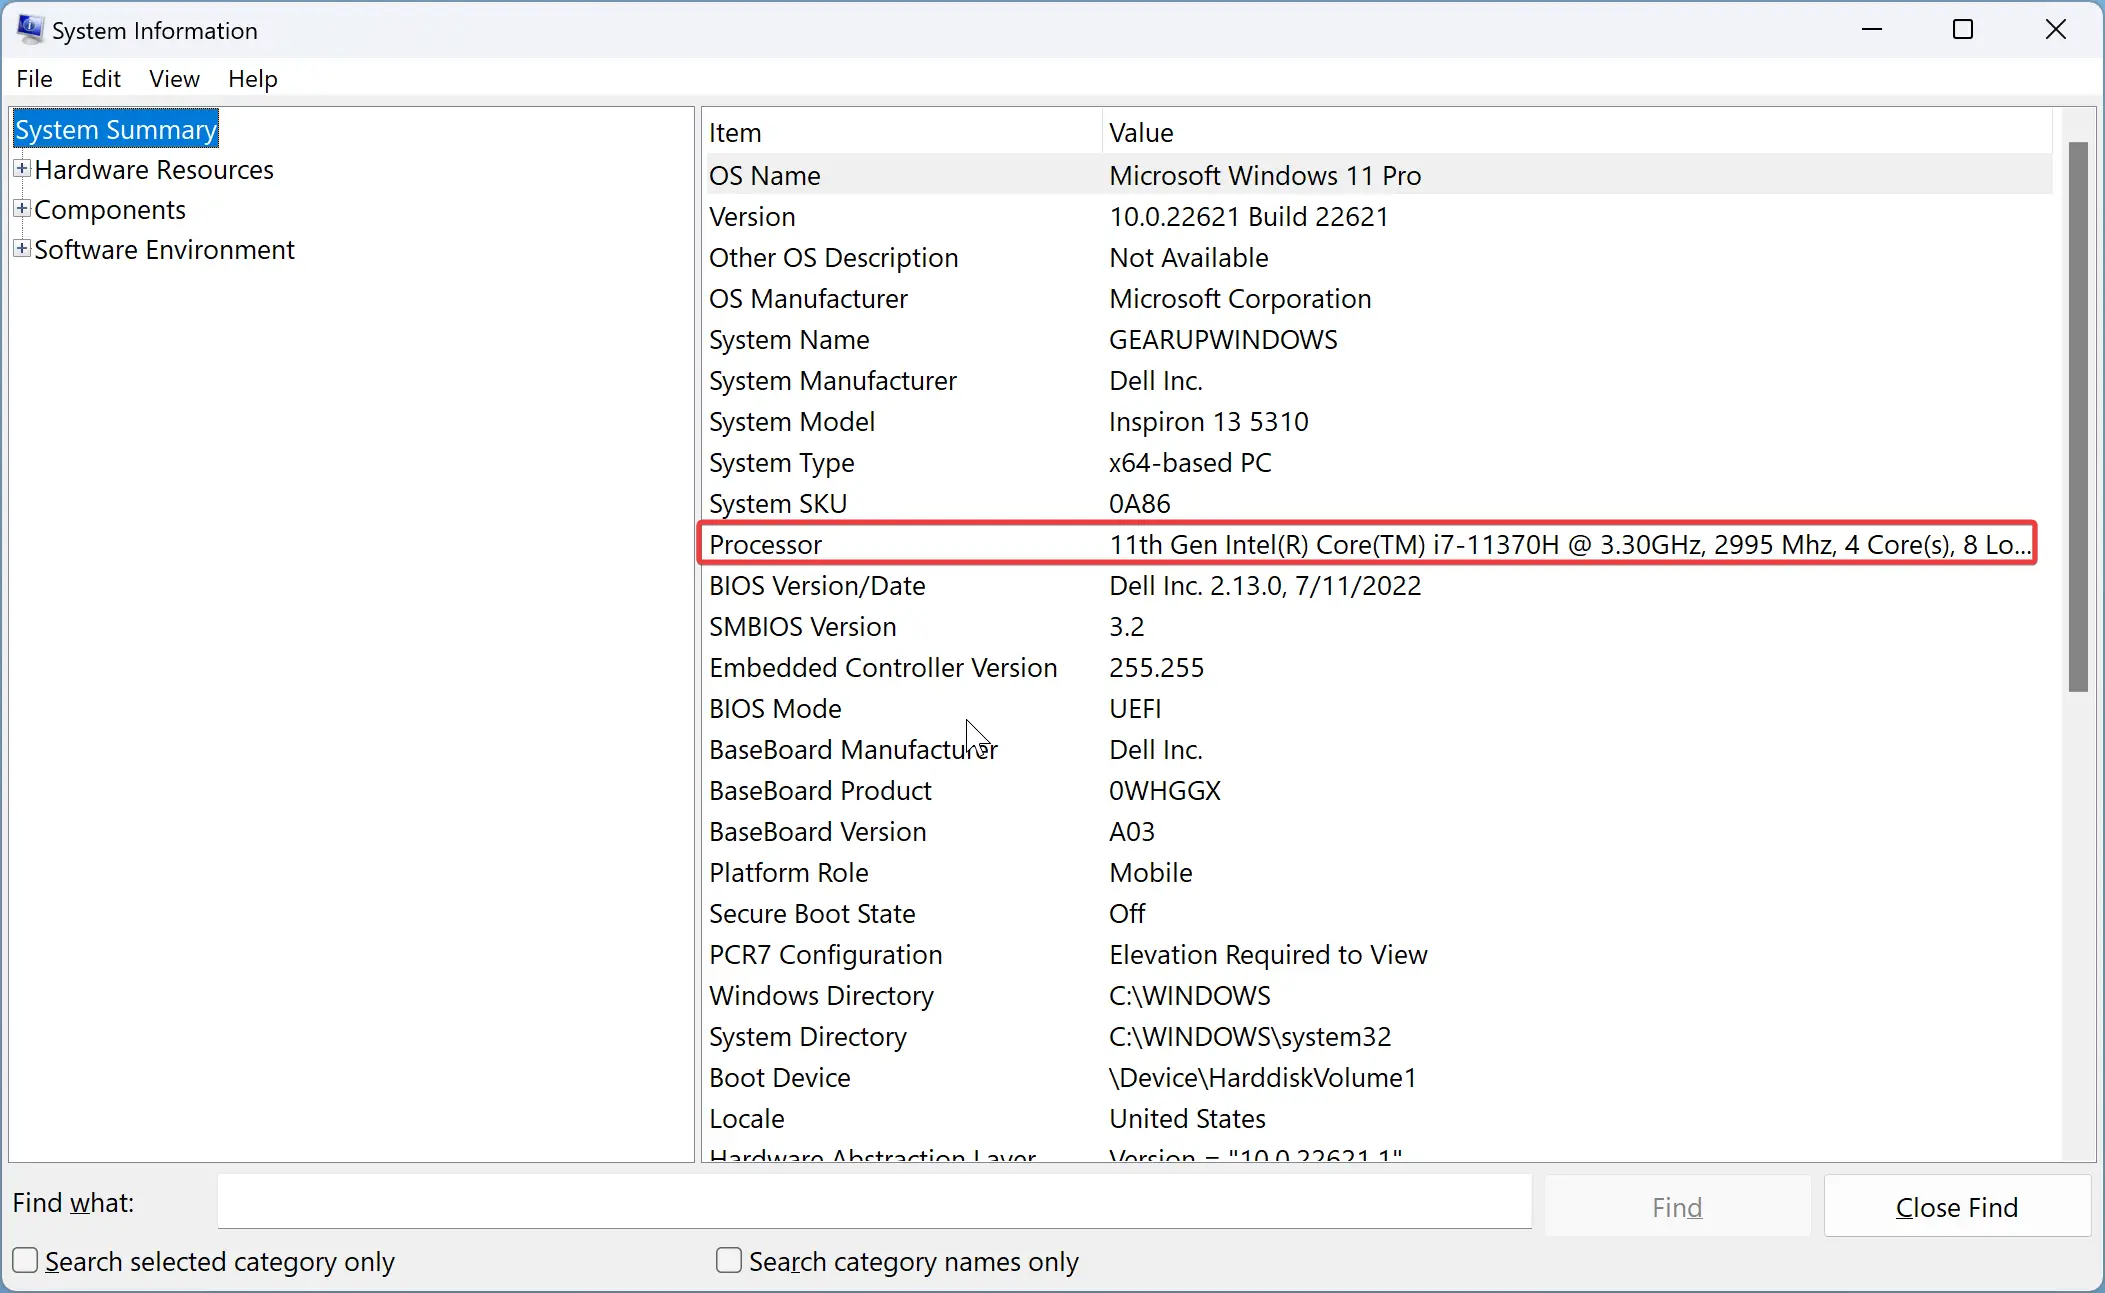
Step-1: Click on the Start Menu on your computer and in the search box, type system information. Press Enter to open the System Information app. By default, System Summary is selected.
Step-2: On the right pane, you can see a list of items that describes every detail of your PC. Come down slowly checking the items until you see the Processor on the list. In any case, if you have two processors, the list shows both of them separately. Carefully, look at the Value of Processor and you can see the number of Cores (see screenshot).
Way 2 – Use Task Manager
Among all the procedures to check the number of cores in CPU, the quickest one is to verify it using the Task Manager. To accomplish the whole task, pursue the given steps.
Step-1: Launch Task Manager on your computer and there are two ways to achieve it. You can press CTRL + SHIFT + ESC shortcut keys altogether to open it. Instead, you can put a right-click on the Start Menu and from the list of options, choose “Task Manager“.
Step-2: In the Task Manager, you can notice see some tabs, switch to the Performance Tab. Here, you can see some graphs for CPU, Memory, Ethernet, and Disk 0, Disk 1, etc. on the left sidebar.
Step-3: Click on the CPU graph and it opens a graph with additional information on the right side pane.
Step-4: Just below the graph, you can notice information such as Base speed, Sockets, Cores and so on. So, here locate the number next to Cores, for example – in the below image it displays 2 which means the PC has a Dual Core.
Usually, it shows a single graph and you can change it according to your choice too. For this, you need to put a right click on the graph. You see few options, hover over Change graph to and from the submenu choose “Logical processors“.
You will be happy to know that in Windows 11 or 10, there is no need to change the graph actually. Because, it automatically tells about the number of Cores, Sockets as well as Logical processors present in the system.
Additionally, it also provides information about the caches like L1, L2, and L3 caches. In some cases, special caches are used in CPU of computers in order to give faster processing performance.
Way 3 – Via Google Search
Google search also assists you to Check Number of Cores in CPU pretty effortlessly if you are aware of the CPU model number. If you don’t know the number, you can obtain it from either Task Manager or System Information (see above methods).
For example, I Googled core – i34005U and out of various results, when you open anyone, you get a spec sheet. The sheet contains every detail of the processor. Locate Core and you can see the number.
Way 4 – Third-Party Applications
You can also use some third-party applications to know the detailed information about your processor and these applications or programs are free. Along with the processor details, the apps also inform you about the CPU support virtualization, SSSE3 as well as vt- x etc. These are really effective and equally helpful to know the hardware information.
We have a collection of a few Best System Info tools – Know motherboard, CPU detail of Computer here.
Hence, the above-mentioned are the few easy and simple ways to know the number of cores in your CPU. Remember that, if you are going to buy a computer having more than one processor, Windows 11 or 10 Pro for Workstations is the best choice. Though, it is not available on the market yet. However, it is generally uncommon that a user needs two processors at the same time.
For additional information, Windows 11 or 10 is competent enough to support up to 32 cores for 32-bit Windows. If you choose 64-bits, it can support up to 256 cores. We really cannot expect these much cores in our lifetime!
Conclusion
While using a computer, you should know about the details of the device and it is really helpful to determine the performance as well as to work professionally. Knowing the number of cores in the CPU is a must and Windows 11 or 10 makes it easy. As a matter of fact, we feel the necessity to know the methods to find this information by simpler means. So, give a shot to the above methods to Check Number of Cores in CPU and if you are aware of more tips, do write them to us.
This gearupwindows article will guide you through several methods to find out how many CPU cores and threads are in a Windows 11 or 10 PC. The number of CPU cores and threads (Logical Processor(s)) on Windows 11/10 can be found in several ways, and we’ll explain the most popular ones.
Everyone eventually discovers that a CPU has a variable number of cores, and that number influences its performance. The next logical step is to figure out how many cores your CPU has. Windows 11 and 10 make that process extremely simple.
Based on its model, core count, generation, and whether it supports simultaneous multithreading (SMT) like hyperthreading, your CPU will have a different number of threads. Since newer generation processors have more cores, they have more threads than older generation CPUs. Having more threads means your CPU has more workers (resources) available to it, so the better the performance is. An increased thread count is advisable when multitasking, playing multithreaded games and rendering professional videos.
How to Find CPU Cores and Threads in Windows 11 or 10?
There are multiple ways to find CPU cores and threads in Windows 11/10. Follow these steps to find CPU cores and threads in Windows 11/10:-
Using the System Information panel
As the name implies, the System Information panel displays all information regarding your system hardware, including the processor, so it is probably the easiest way to find the CPU cores and threads on Windows 11 or 10.
Here’s how to find the CPU cores and threads in Windows 11/10:-
Step 1. Open System Information panel.
To do that, press Windows + R on the keyboard to open the Run dialog box. Type msinfo32 in the dialog box and press Enter.
Step 2. Select System Summary on the left sidebar, and next to Processor, you’ll find the CPU cores and threads (Logical Processor(s)).
Through Task Manager
Task Manager displays a variety of information about your computer, whether it’s about the hardware or the software. Here’s how to locate CPU cores and threads in Task Manager:-
Step 1. Open Task Manager on your computer.
Select Task Manager from the menu by right-clicking on the Start button. Or, a Task Manager window can also be accessed by pressing Ctrl + Shift + Esc keys.
Step 2. Then, click on Performance tab.
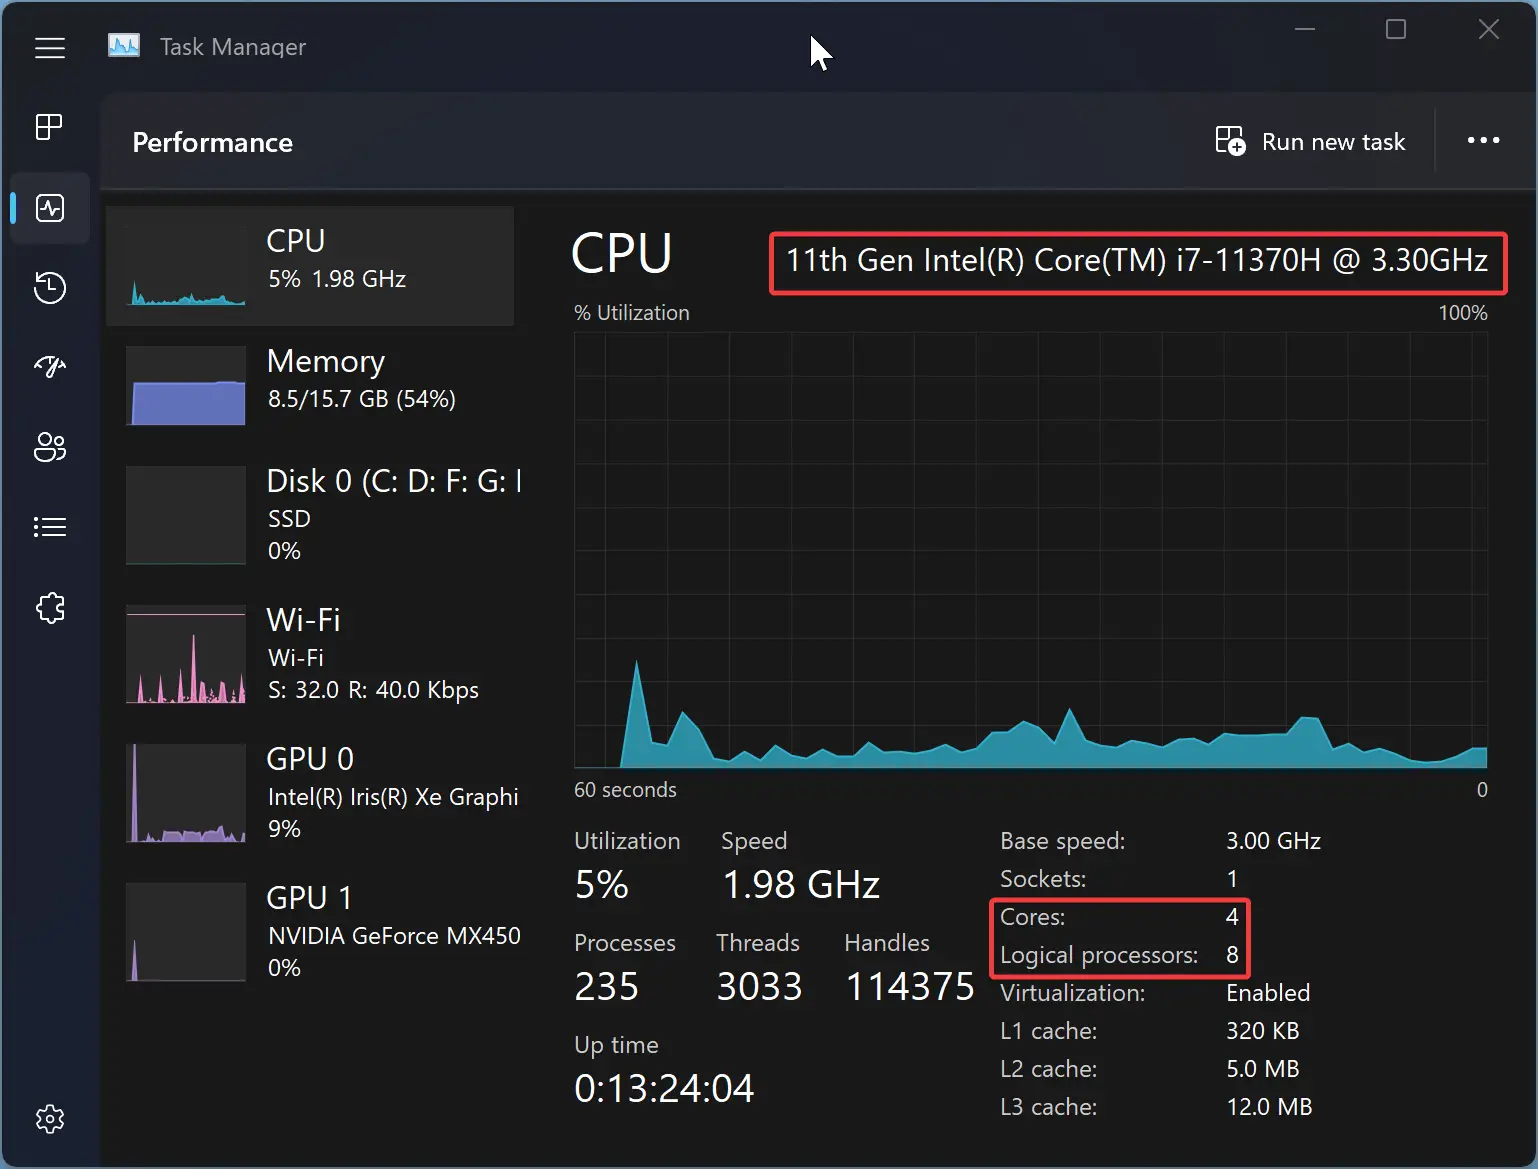
Step 3. At the top right of the window, you’ll see your processor’s name and the number of cores. You’ll also see a graph of your CPU’s usage in real time, along with more detailed information, like the base clock speed, the number of cores, and the number of logical processors (also known as threads).
By Windows PowerShell
This information is also available through Windows PowerShell. To get it, follow these steps:-
Step 1. Open Windows PowerShell as an administrator.
On the taskbar, click the Start button and enter Windows PowerShell. Right-click on the Windows PowerShell entry and select the Run as administrator option.
Step 2. Then, enter WMIC CPU Get NumberOfCores and hit Enter to determine the number of CPU cores.

Step 3. Now, enter WMIC CPU Get NumberOfLogicalProcessors to determine the number of threads.
With Command Prompt
The same WMIC command that you used above in Windows PowerShell can also be used on the Command Prompt to find CPU information. The steps are as follows:-
Step 1. Open Command Prompt as an administrator.
On the taskbar, click the Start button and enter Command Prompt. Right-click on the Command Prompt entry and select the Run as administrator option.
Step 2. Then, enter WMIC CPU Get NumberOfCores and hit Enter to determine the number of CPU cores.
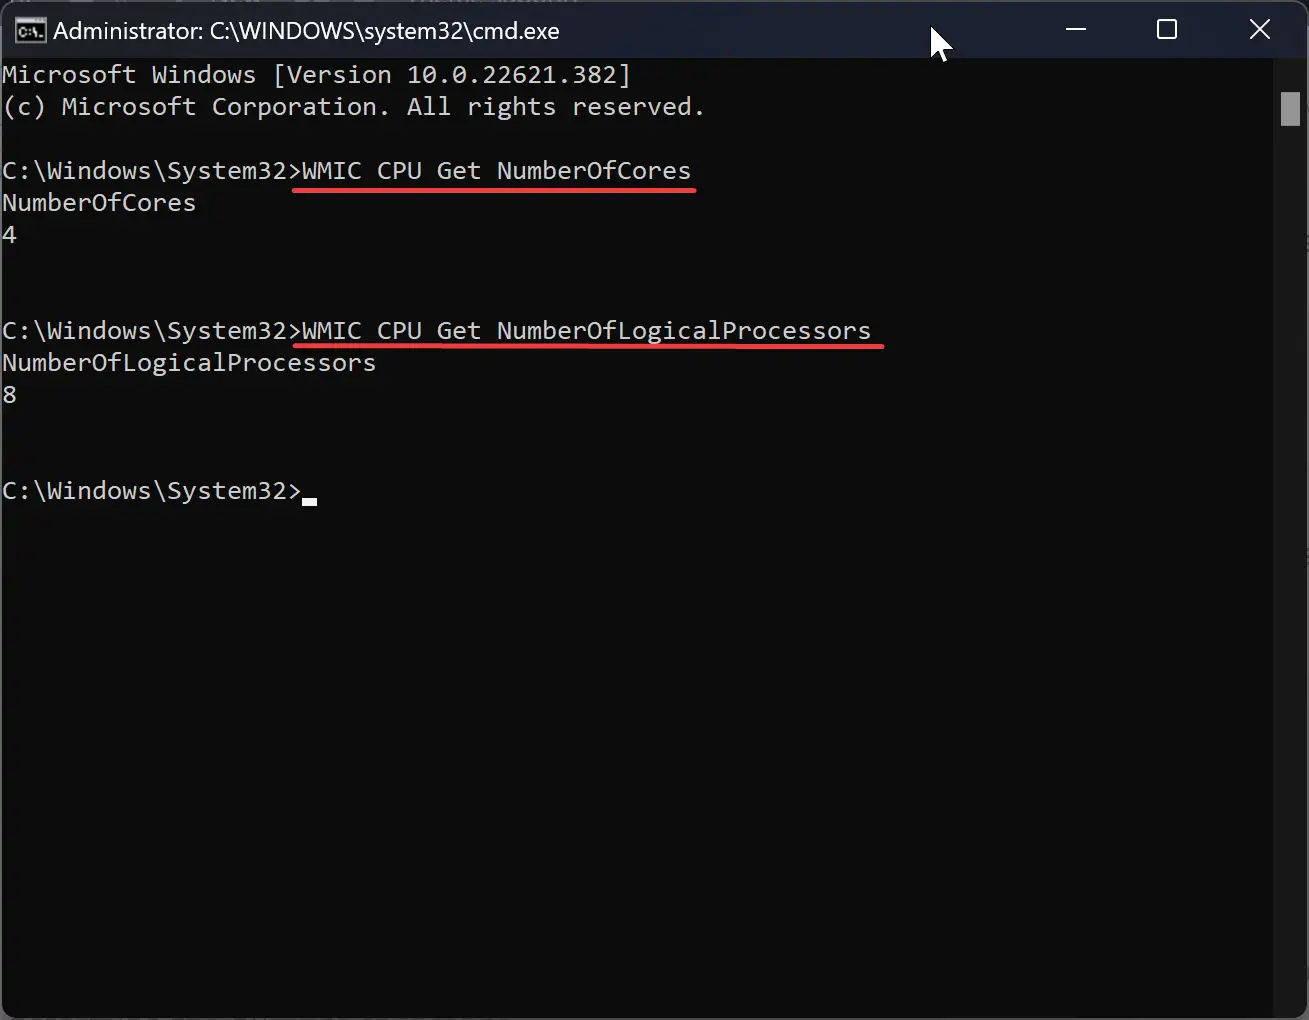
Step 3. Now, enter WMIC CPU Get NumberOfLogicalProcessors to determine the number of threads.
Using Third-Party Software
It is also possible to learn about the hardware of your PC, including the CPU, by using free third-party software like CPU-Z and HWiNFO. Although you do have to download and install these, they are some of the most comprehensive free tools out there if you want to learn every single detail about your system. In general, third-party software is dense with information and is used by professionals.
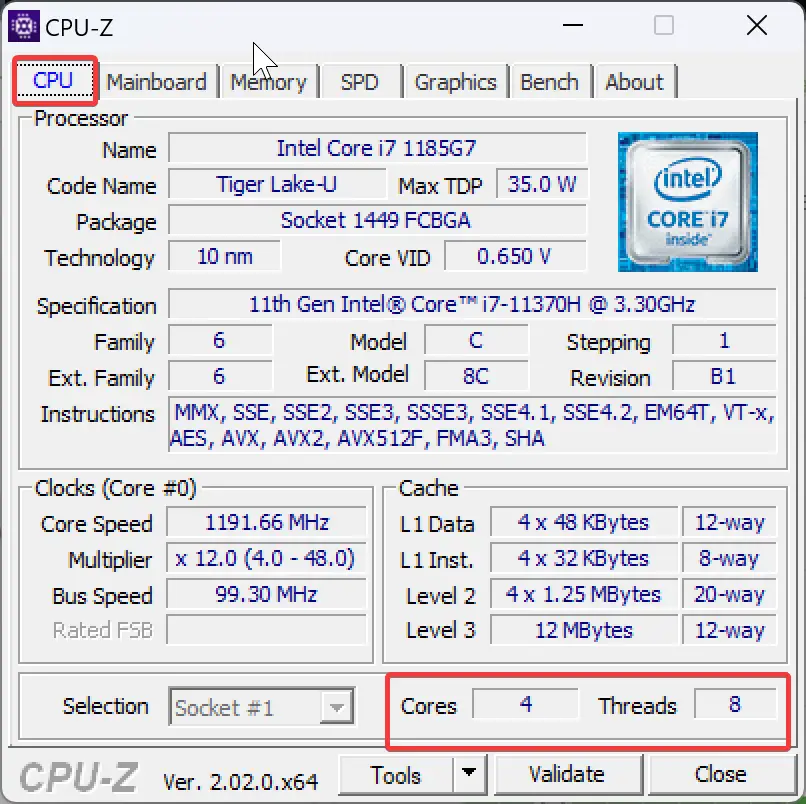
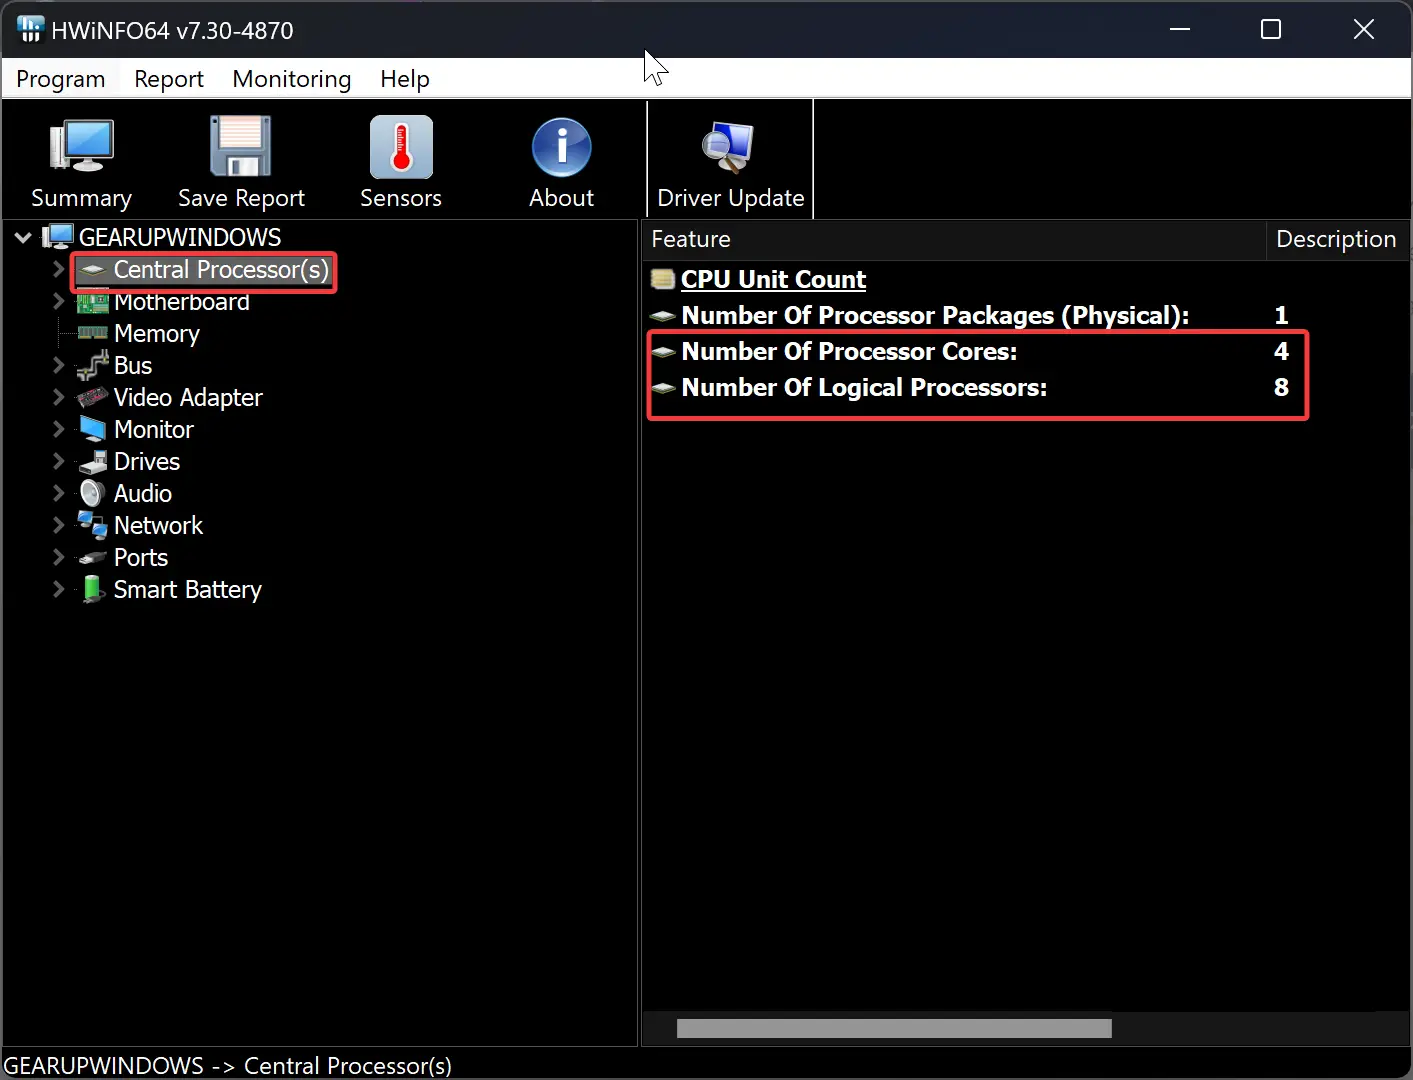
In the CPU-Z application, you can find cores and threads in the CPU tab. Whereas the HWiNFO tool displays information about cores and threats after selecting the “Central Processor(s)” option in the left sidebar.
Conclusion
In conclusion, knowing the number of CPU cores and threads is important for optimizing your computer’s performance, especially when multitasking, playing multithreaded games, or rendering videos. Fortunately, Windows 11 and 10 provide various ways to find this information. You can use the System Information panel, Task Manager, Windows PowerShell, or Command Prompt. Alternatively, third-party software like CPU-Z and HWiNFO can provide comprehensive details about your system’s hardware. By following these simple steps, you can quickly and easily find out how many CPU cores and threads your Windows 11 or 10 PC has.
- To determine a processor core count on Windows, open Task Manager’s Performance tab, click on “CPU,” and check the core number in the details.
- You can also use Command Prompt and PowerShell to find out this information.
UPDATED 1/28/2025: Windows 11 and 10 offer several ways to check how many cores your computer’s processor has. In this guide, I’ll outline three simple methods to find this information.
Most modern computers come with processors that have multiple physical cores, allowing them to process multiple instructions simultaneously. For example:
- A dual-core processor has “2” cores and can handle two sets of instructions at once.
- A quad-core processor has “4” cores and can process four sets of instructions simultaneously.
This scaling continues with processors featuring 6, 8, 10, 12, 16, 18, 24, 28, or even 32 cores.
In addition to physical cores, many CPUs (Central Processing Units) support Hyper-Threading. This technology, available on Intel, Qualcomm, and AMD processors (AMD calls it “threads”), enables each core to handle two instructions simultaneously. If your processor supports this feature, it will also have logical processors, effectively doubling the number of available threads.
Knowing the number of cores and logical processors in the processor is useful in various scenarios, such as running virtual machines or optimizing performance for apps that benefit from multi-core processing.
Whatever the reason, Windows 11, as well as Windows 10, provide multiple built-in tools to check your processor’s core count. You can use Task Manager, Command Prompt, or PowerShell to find this information quickly.
In this guide, I will teach you how to determine the number of cores your Intel, AMD, or ARM processor has on Windows. (You can also use these instructions to find out if your computer has an NPU (Neural Processing Unit).)
- Check CPU core count from Task Manager
- Check CPU core count from Command Prompt
- Check CPU core count from PowerShell
Check CPU core count from Task Manager
To determine the number of cores your processor has on Windows 11 (and 10) through Task Manager, use these steps:
-
Open Start.
-
Search for Task Manager and click the top result to open the app.
-
Click the Performance tab.
-
Click on CPU from the left pane.
-
Check the core count at the bottom of the page.

Quick tip: If your processor has hyper-threading, you can also see the number of “Logical processors,” which is usually twice as many as the number of physical cores.

Once you complete the steps, you’ll understand your computer’s physical cores and logical processors.
Check CPU core count from Command Prompt
To check how many cores your CPU has through Command Prompt, use these steps:
-
Open Start.
-
Search for Command Prompt and click the top result to open the console.
-
Type the following command to find out how many cores your CPU has, and press Enter:
wmic cpu get NumberOfCores,NumberOfLogicalProcessors

-
Check the CPU core count and logical processors.

After you complete the steps, you’ll know the number of cores and logical processors on your machine.
Check CPU core count from PowerShell
To find out the processor core count through PowerShell, use these steps:
-
Open Start.
-
Search for PowerShell and click the top result to open the console.
-
Type the following command to find out how many cores your CPU has, and press Enter:
Get-WmiObject –class Win32_processor | ft NumberOfCores,NumberOfLogicalProcessors
- Check the processor core count and logical processors.

Once you complete the steps, the command will output the number of physical cores and logical processors on your computer (if it has hyperthreading).
Update January 28, 2025: This guide has been updated to ensure accuracy and reflect changes to the process.