
The human brain is divided into two hemispheres. The right side of the brain is more creative and artsy, while the left side is more analytical and rational. Where a computer is concerned, the CPU, or central processing unit, is the analytical part, and the GPU, or graphics processing unit, is the creative part. Learn more about the beauty of your device’s GPU does and how to check for it on Windows 11.
What is a GPU?
Your computer’s GPU helps your PC or laptop handle visuals like graphics and videos. There are two different types of GPUs, and the type you have in your computer may vary due to the type of device and your specific computing needs.
Discrete GPU
These are standalone chips that are mounted on their own circuit board and are embedded alongside the CPU on a computer’s motherboard. They are larger and use more power than integrated GPUs, but they are an excellent choice for tasks that involve a lot of processing like video editing, design, and gaming. Due to their larger size, discrete GPUs can require a dedicated cooling apparatus, like a fan, to ensure that the chip won’t overheat and will continue to perform as it should.
Integrated GPU
These GPUs are built into your PCs motherboard. They’re smaller and lighter, but they also use less power. So while they’re great for portability and frequently appear in laptops, they aren’t always as powerful as discrete GPUs. They still do the job for gaming and video or photo editing, and they tend to be less expensive.
Why do I need to know my GPU?
Simply put, the more powerful your GPU, the better your graphics will be. This can affect your video and photo editing, content creation, gaming, and watching TV shows, and movies. Better graphics performance means that your video games can be played at a higher resolution and with faster frame rates, improving your overall experience.
How to check GPU in Windows
If you’re curious about what type of GPU you have in your device, Windows 11 makes it easy to find out. This information can come in handy if you use a lot of graphics-heavy applications like gaming and photo editing. Knowing what kind of GPU you’re working with can help you determine if you have enough power to make a program work as well as it could. These two simple ways will help you identify the GPU in your device:
Check GPU from Settings
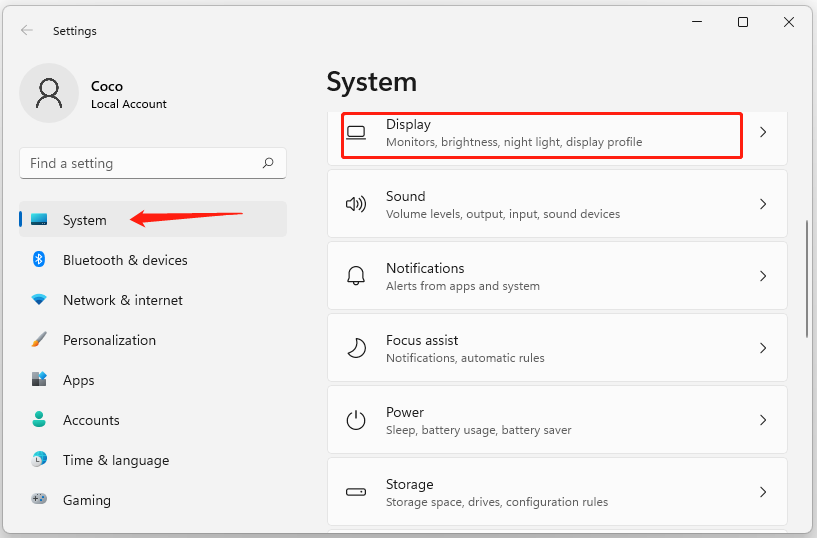
- Select Settings > System.
- Select Display and scroll down to Related settings.
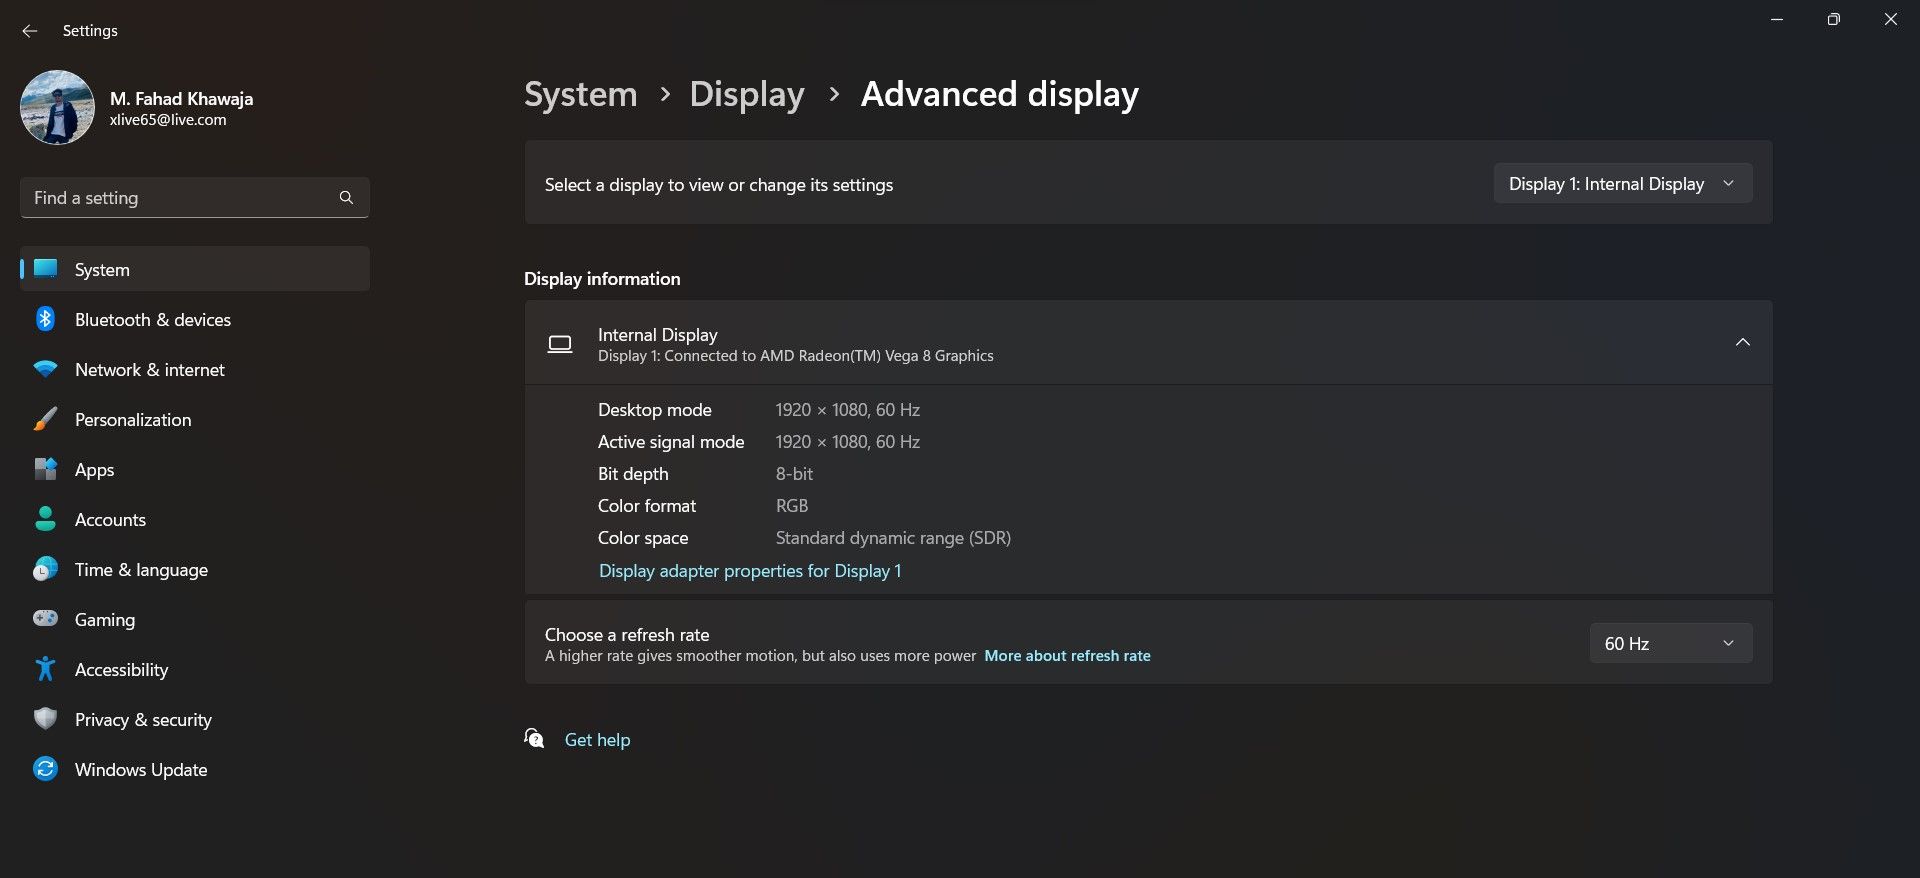
- Select Advanced display. Your GPU’s make and model should be shown under Display information.
Check GPU from Task Manager
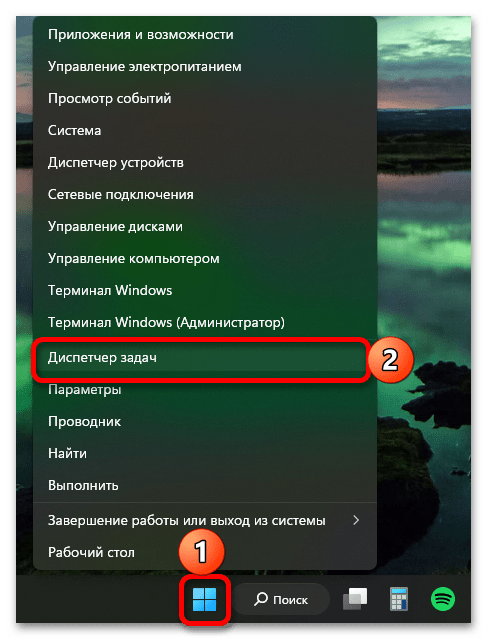
- In Windows 11, right-click on the Start button.
- Select Task Manager from the menu.
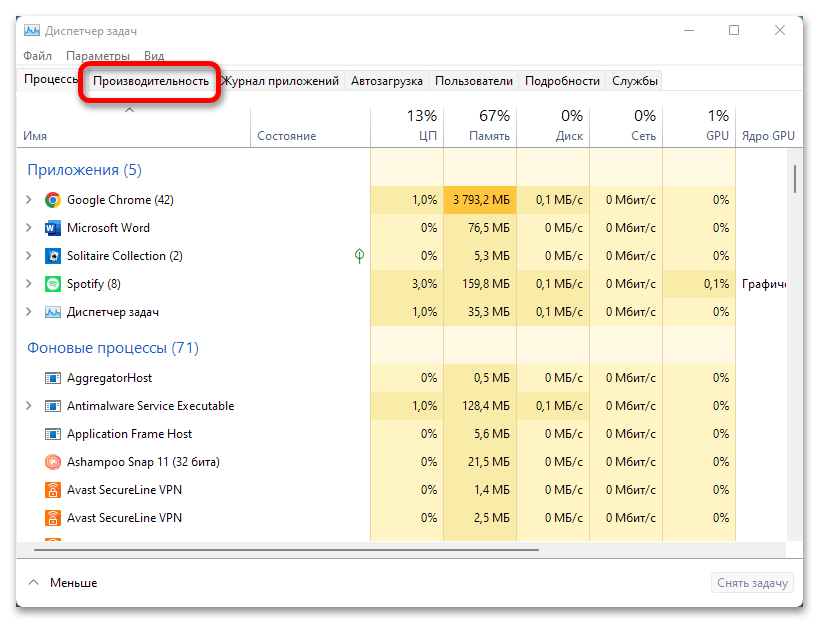
- Select Performance.
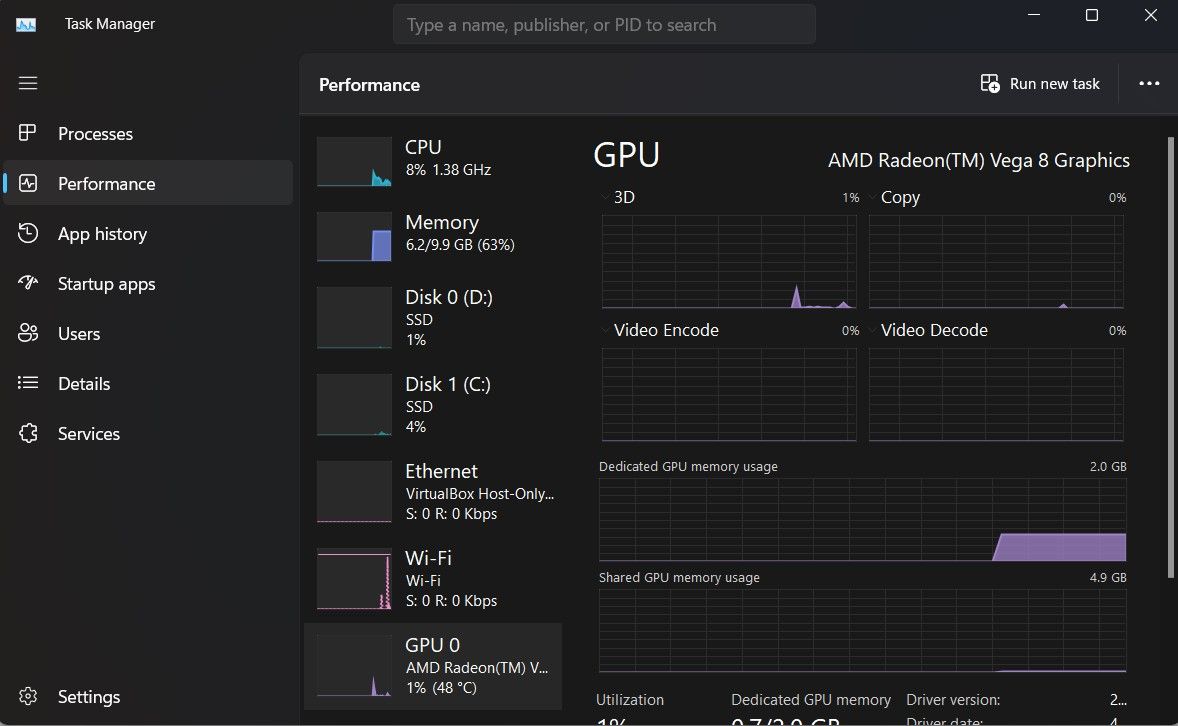
- In the last pane of the tab, choose GPU. If this option is available, it will likely be at the bottom of the list.
- In the top right corner of the GPU selection, information about your computer’s GPU will be visible.
When you recognize the value of GPU, you can make smart choices about how much you need. If you need a better GPU, let us help you find the Windows device to meet your needs. If you’re using that powerful GPU for the best gaming experience possible, don’t forget that Windows 11 is designed with gaming in mind.
Sign in to your MUO account

The graphics processing unit (GPU) plays an integral part in your overall Windows experience, all the way from gaming to video editing. A high-performing graphic card can be a key deciding factor in your user experience.
You may know all of the significant graphic card manufacturers, such as AMD, Nvidia, Intel, and ASUS… but what model is your GPU, exactly? Here’s how to check your graphics card model on a Windows 11 PC.
1. How to Check Your Graphics Card Model via Windows 11’s Task Manager
The Task Manager was redesigned in Windows 11 and now boasts a sleek interface that complements its functionality. While users typically use the Task Manager to keep track of running applications and services, you can also use it to figure out your graphic card model name and specs.
To check the installed graphics card or GPU of your Windows 11 PC:
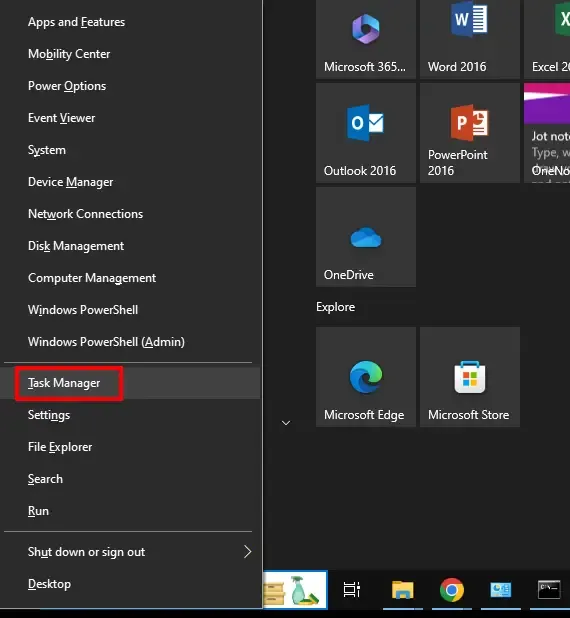
- Right-click the Start menu and select Task Manager.
-
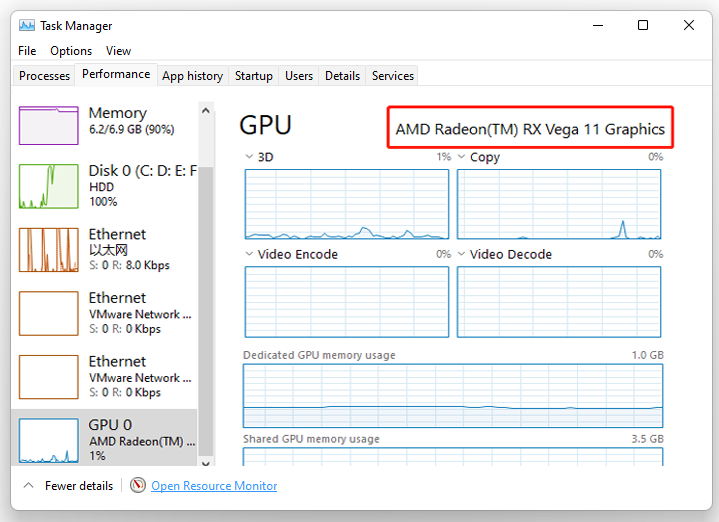
From the side menu, choose Performance and then GPU 0. If you have more than one GPU installed, you’ll see them labeled GPU 1, GPU 2, etc. Alternatively, if you don’t know any GPU option, it’s possible you may not have a graphics card on your system, or you may not have configured it correctly.

- The Task Manager window will list the name of your graphics card in the top right corner. You can also find the Driver and DirectX versions in the bottom right corner.
Check out how to use the Windows Task Manager for more in-depth instructions on this tool.
2. How to Find Your GPU Model Using DirectX on Windows 11
You can use the DirectX Diagnostics Tool to get detailed specs of your PC. You can find system details such as the processor, total available RAM, BIOS version, GPU, sound, and even the details of input devices configured to your PC.
To find the details of your Windows 11 GPU using the DirectX Diagnostics Tool:
-
Launch the Start menu, search for dxdiag, and select the Best match.

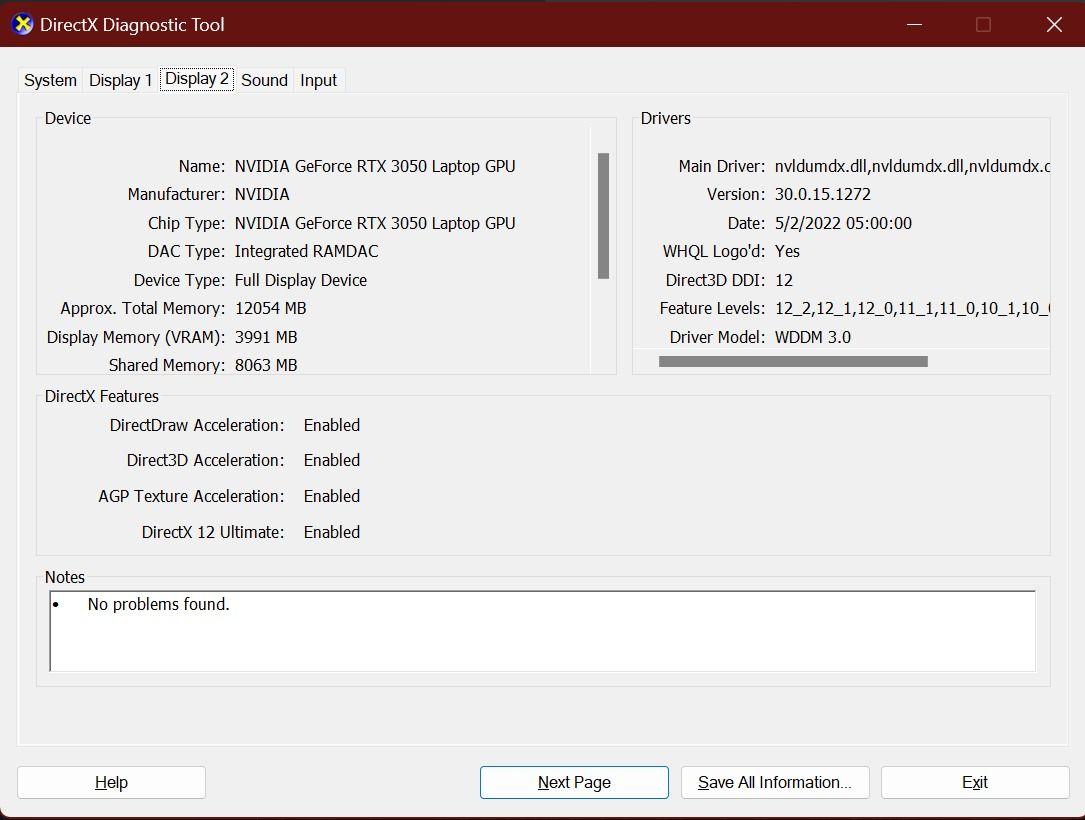
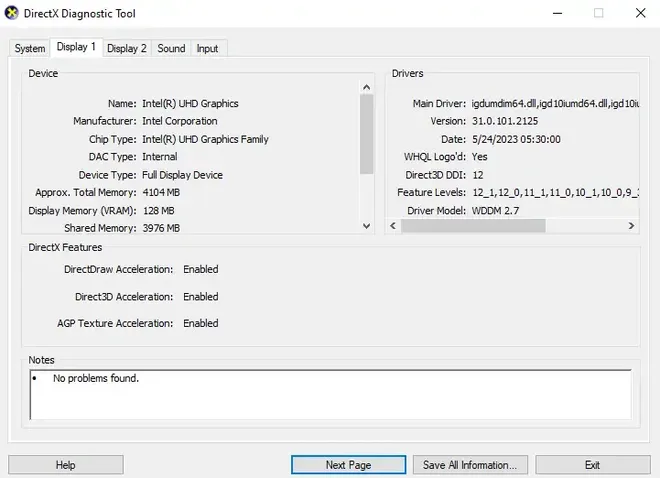
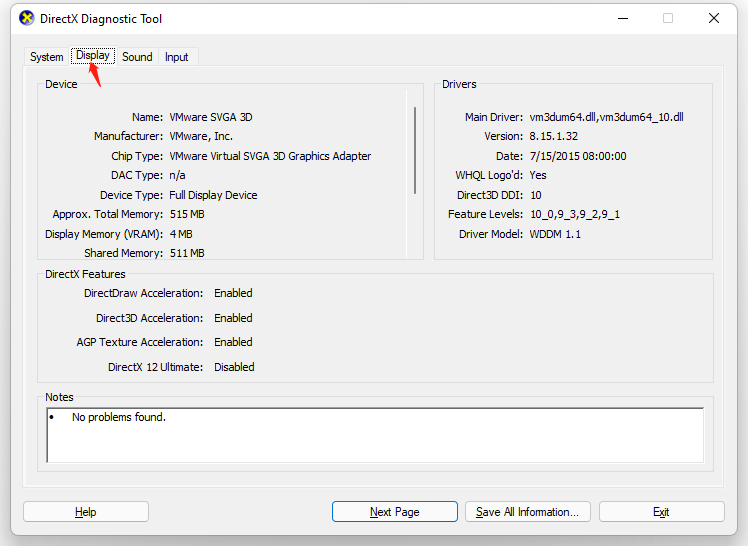
- Select the Display tab to view details of your GPU, including the GPU manufacturer, chip type, dedicated display memory, etc. If you have more than one GPU on your PC, you will see multiple Display tabs with details of each GPU.
3. How to Confirm Your Graphics Card Model via the Windows 11 Settings App
While you may have used the Settings app to configure different aspects of your PC, you can also use it to view the specs of the graphic card installed in your system. You can also view other display settings, such as the screen resolution and display type.
To check the advanced display settings of your Windows 11 PC, including GPU specs:
- Launch the Settings app through the Start menu.
- From the side menu, select System and then Display.
-
Under Related settings, select Advanced display.

-
You can see your GPU make and model under the Display information tab.

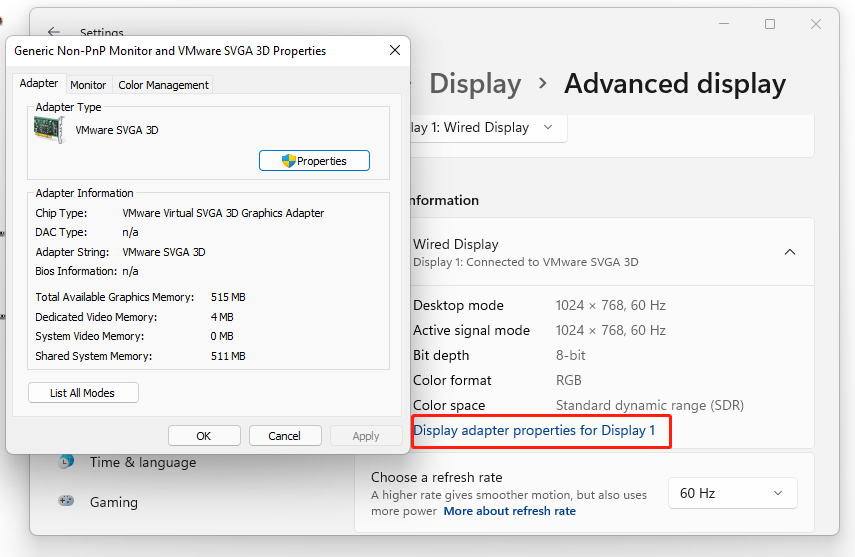
- For more details, select Display adapter properties for Display.

Get to Know Your GPU Model Better on Windows 11
Whether you want to double-check your system requirements for a new game, or you want to update your GPU’s drivers properly, knowing your graphics card’s model is essential. Now you know how to quickly find out which card you have on Windows 11.
Все способы:
- Вариант 1: Системные средства
- Способ 1: «Параметры»
- Способ 2: «Диспетчер устройств»
- Способ 3: «Диспетчер задач»
- Способ 4: «Средство диагностики DirectX»
- Способ 5: «Сведения о системе»
- Вариант 2: Софт производителя видеокарты
- NVIDIA
- AMD
- Вариант 3: Сторонние программы
- Способ 1: HWMonitor
- Способ 2: Speccy
- Вопросы и ответы: 1
Вариант 1: Системные средства
В ОС Windows 11 существует сразу несколько стандартных способов получения информации об установленном в компьютере или ноутбуке графическом адаптере. Рассмотрим каждый из них.
Способ 1: «Параметры»
Узнать такие сведения о видеокарте, как ее производитель и модель, можно в системных настройках операционной системы.
- Откройте «Параметры» Виндовс 11. Наиболее простой способ – сочетание клавиш «Win+I», но также можете воспользоваться основным или дополнительным меню кнопки «Пуск».
- Из открывшейся по умолчанию вкладки «Система» перейдите к разделу «Дисплей».

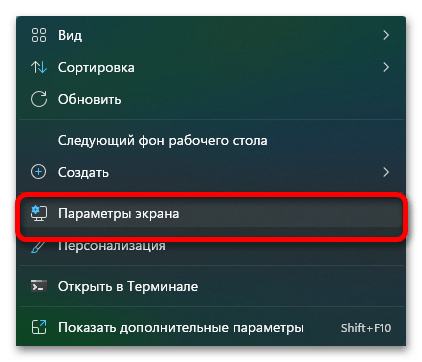
Примечание: Вместо выполнения этого и предыдущего пунктов инструкции можете нажать правой кнопкой мышки (ПКМ) по пустому месту Рабочего стола и выбрать в контекстном меню пункт «Параметры экрана».
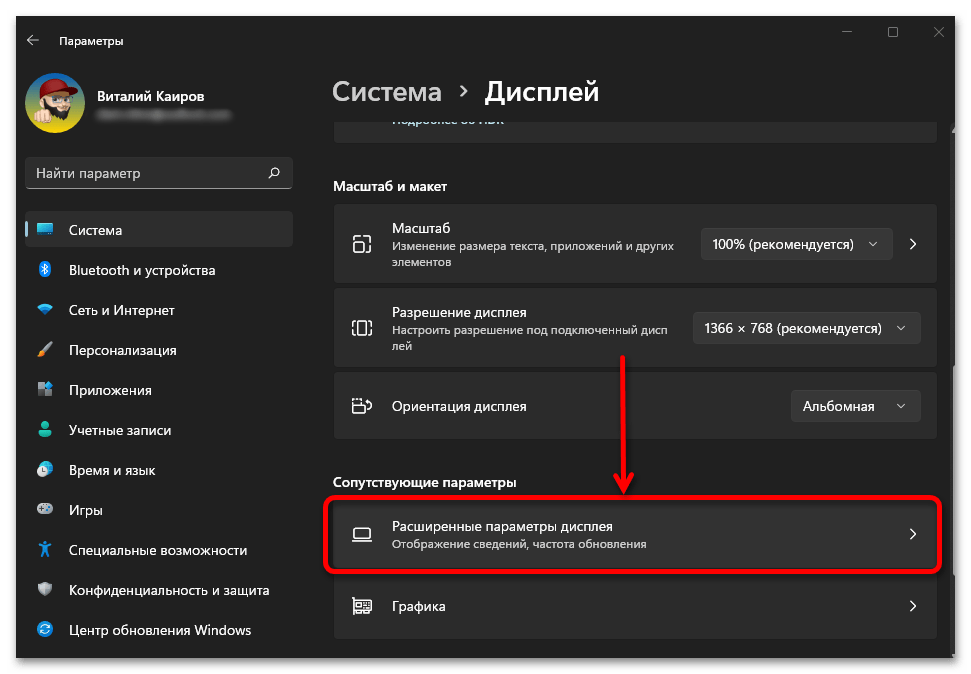
- Пролистайте вниз список доступных подразделов и разверните «Расширенные параметры дисплея».
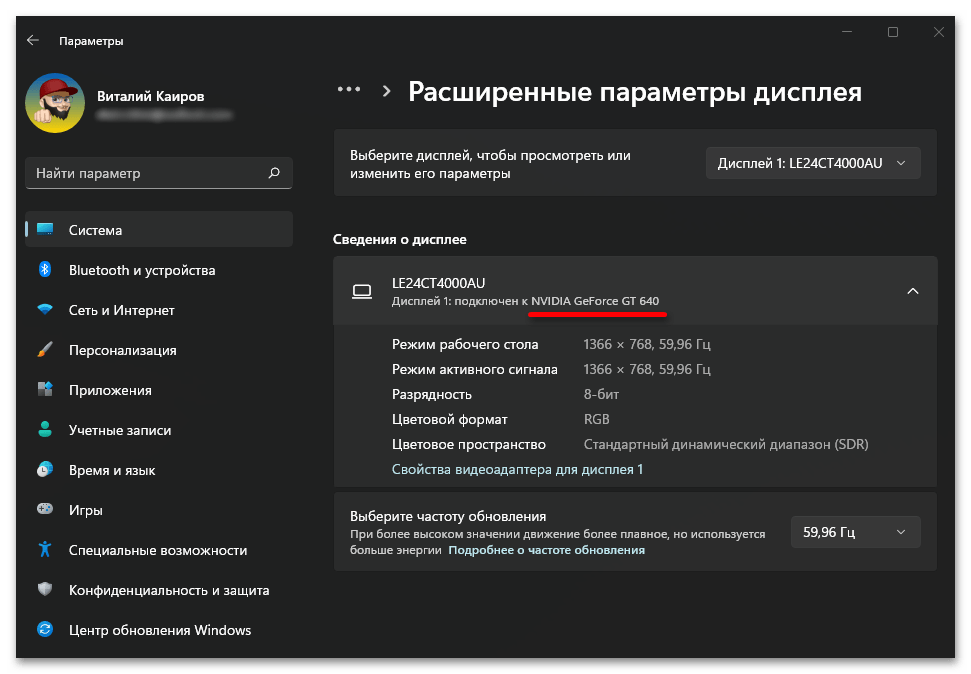
- В блоке «Сведения о системе» под названием дисплея будет указано то, к какой видеокарте он подключен – ее производитель и модель.


Способ 2: «Диспетчер устройств»
Информация об основных аппаратных компонентах ПК или ноутбука, включая графический адаптер, также представлена в «Диспетчере устройств».
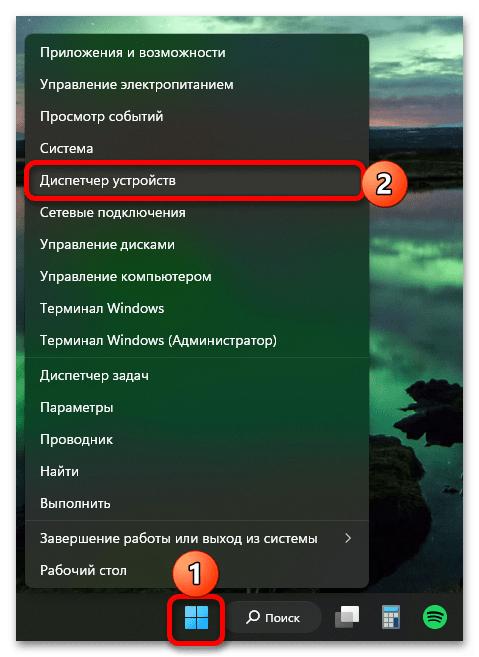
- Нажмите ПКМ по кнопке «Пуск» на панели задач и выберите обозначенный пункт.
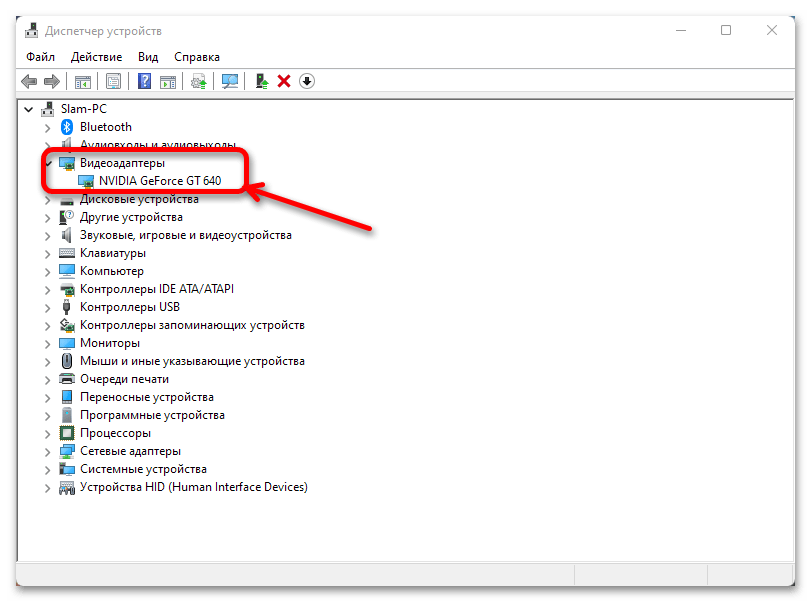
- Разверните список «Видеоадаптеры» и ознакомьтесь со сведениями о соответствующем оборудовании.
Способ 3: «Диспетчер задач»
В одном из разделов «Диспетчера задач» (ДЗ), который чаще всего используется для мониторинга операционной системы и принудительной остановки программ и процессов, также можно узнать об используемой видеокарте.
- Задействовав поиск, контекстное меню элемента «Пуск» или сочетание клавиш «Ctrl+Shift+Esc», откройте ДЗ.
- Перейдите на вкладку «Производительность» и пролистайте вниз список представленных в ней разделов с названиями аппаратных компонентов.
- Выделите блок «Графический процессор» — искомые сведения будут указаны сразу в двух частях окна.

Читайте также: Как открыть «Диспетчер задач» в Виндовс 11
Способ 4: «Средство диагностики DirectX»
Еще один из системных компонентов Windows 11, предоставляющий подробную информацию об установленных аппаратных компонентах и графических драйверах.
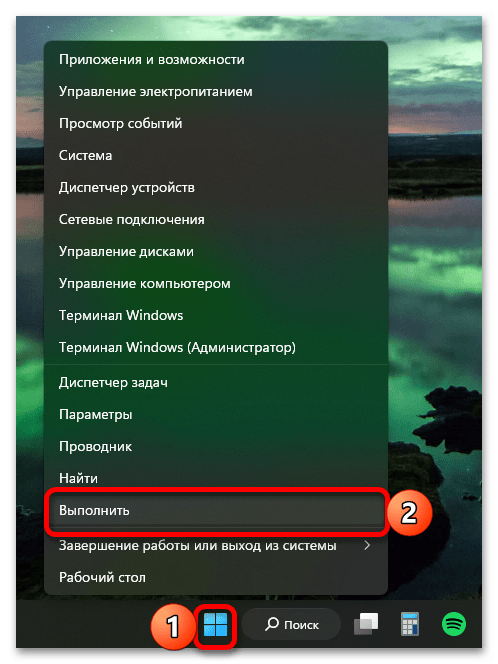
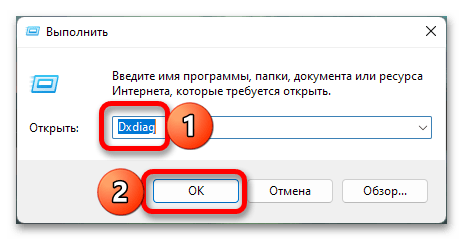
- С помощью клавиш «Win+R» или контекстного меню кнопки «Пуск» откройте окно «Выполнить».
- Введите указанную ниже команду и нажмите «Enter» или «ОК» для ее выполнения.
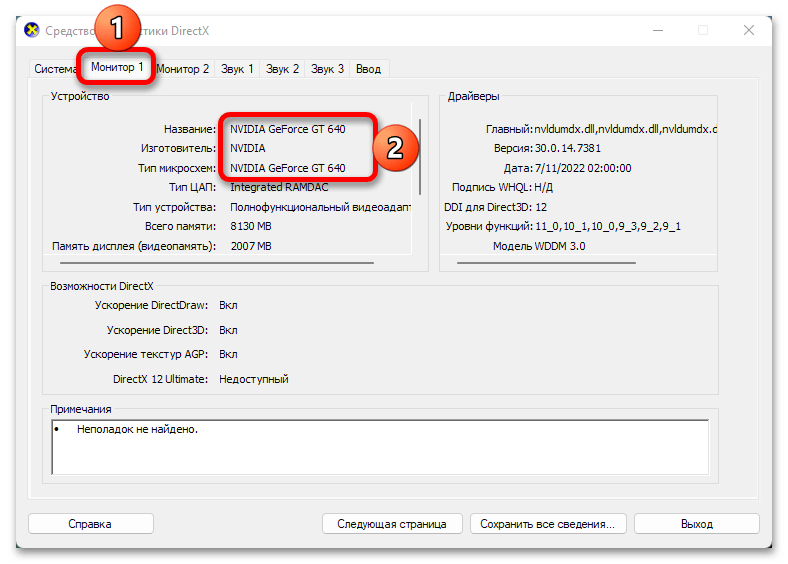
Dxdiag - Подождите, пока завершится непродолжительная загрузка, затем перейдите во вкладку «Монитор» и ознакомьтесь с информаций напротив трех первых строк в блоке «Устройство».
Способ 5: «Сведения о системе»
Системное приложение с говорящим названием является еще одним решением поставленной перед нами задачи.
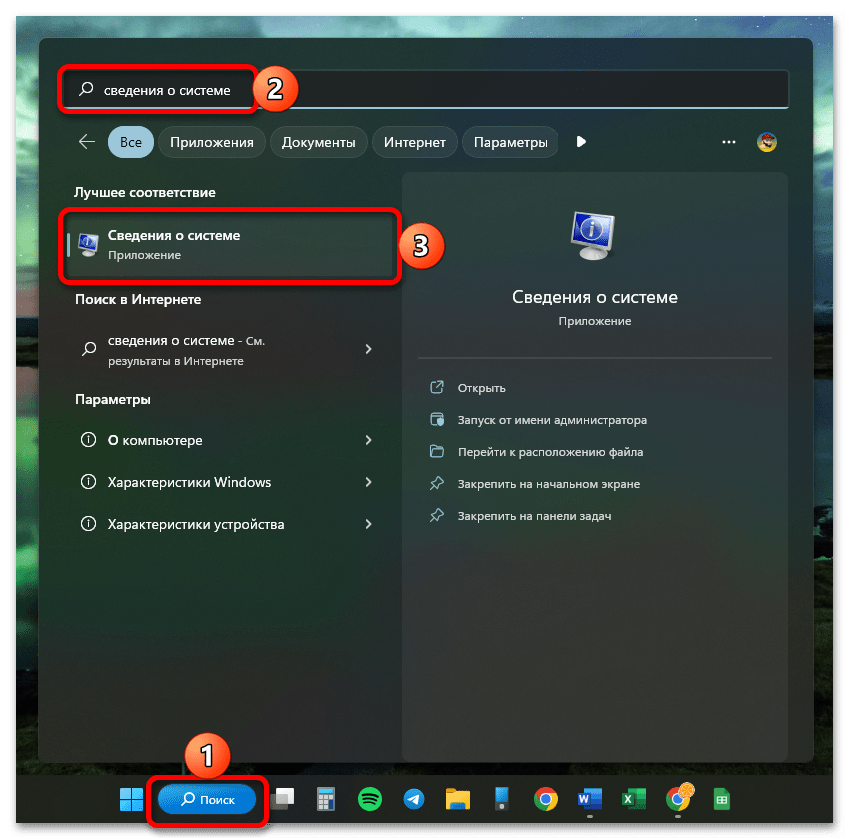
- Вызовите окно поиска, нажав на соответствующий элемент в панели задач или воспользовавшись клавишами «Win+S», и начните вводить запрос
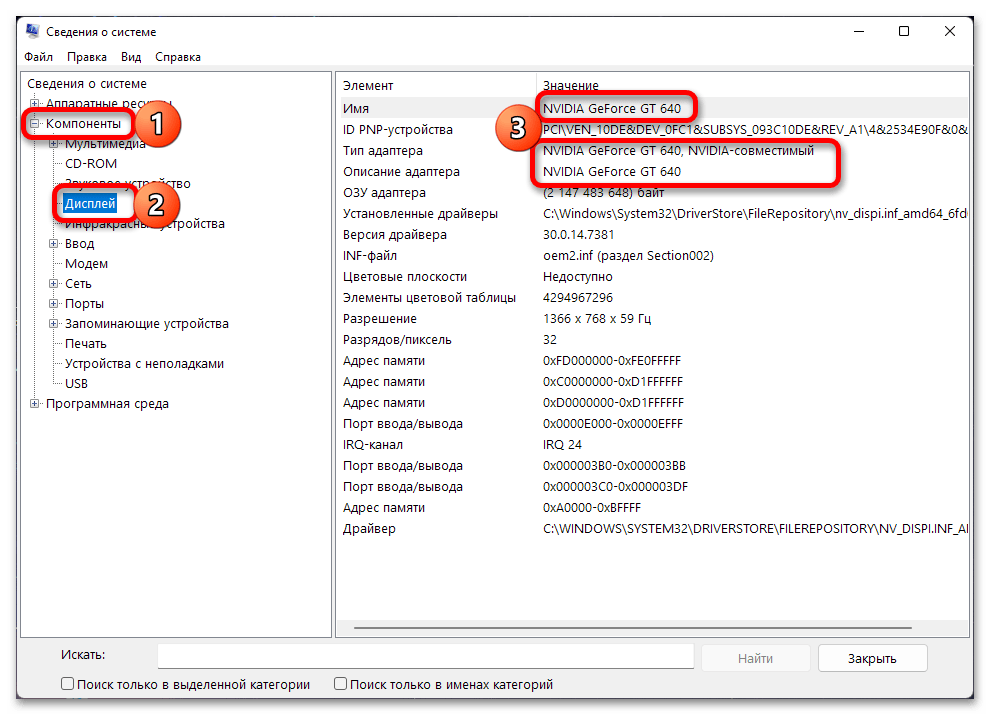
«Сведения о системе». Когда искомый компонент появится в блоке «Лучшее соответствие», откройте его. - Разверните расположенный слева перечень опций «Компоненты», затем выделите «Дисплей» и ознакомьтесь с информацией в первой, третьей и четвертой строках основной области – это и будет производитель и модель видеокарты.
Вариант 2: Софт производителя видеокарты
Фирменное программное обеспечение от двух конкурирующих производителей графических адаптеров также позволяет узнать интересующие нас сведения.
NVIDIA
Для обладателей «зеленой» видеокарты доступно сразу два варианта просмотра видеокарты – через панель управления NVIDIA и приложение GeForce Experience. Конечно, при условии, что они установлены на компьютере или ноутбуке.
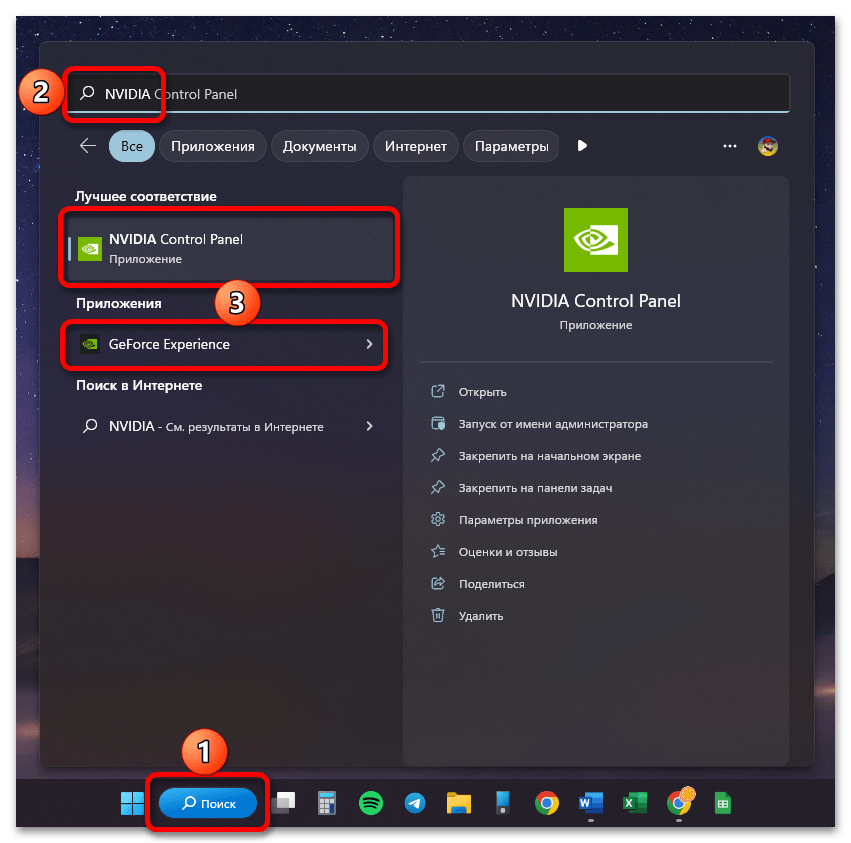
- Введите в поиск по системе запрос
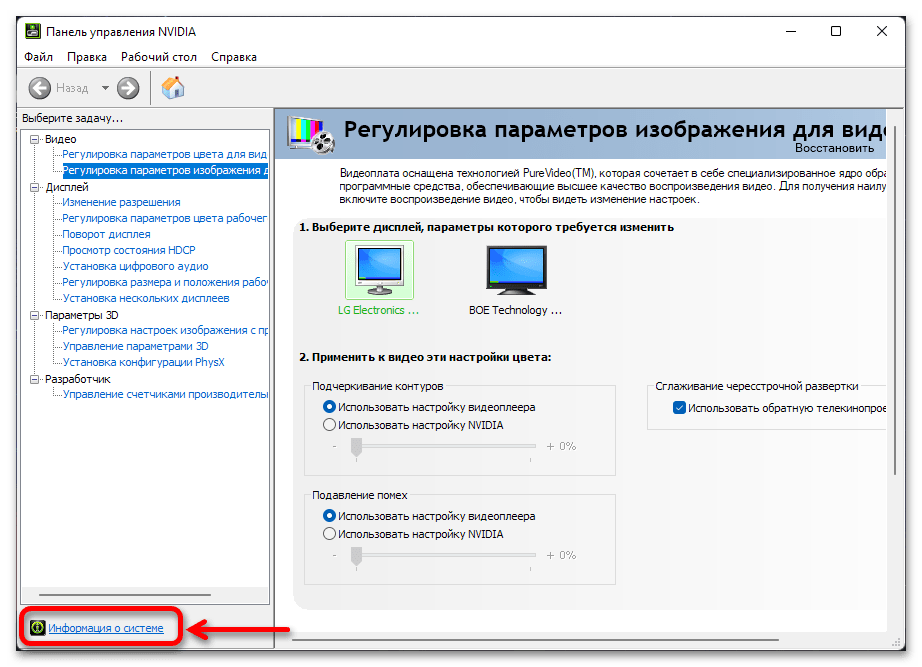
«NVIDIA»и откройте любое из представленных в выдаче приложений. - В «NVIDIA Control Panel» кликните по расположенной в нижнем левом углу ссылке «Информация о системе».

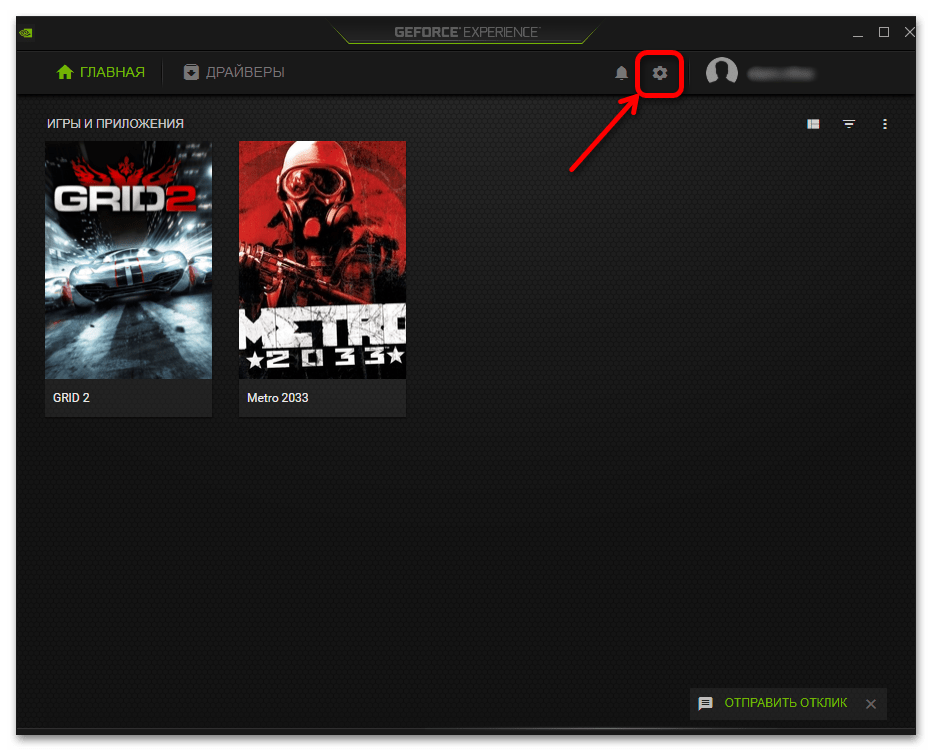
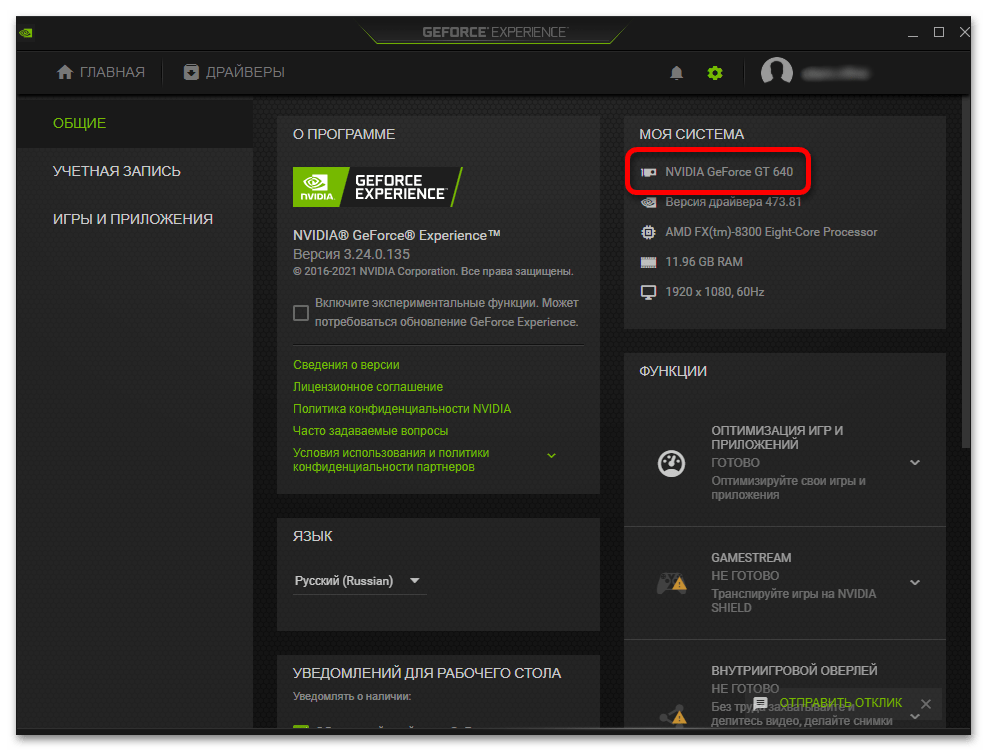
В GeForce Experience откройте «Настройки», кликнув по значку с изображением шестеренки вверху.
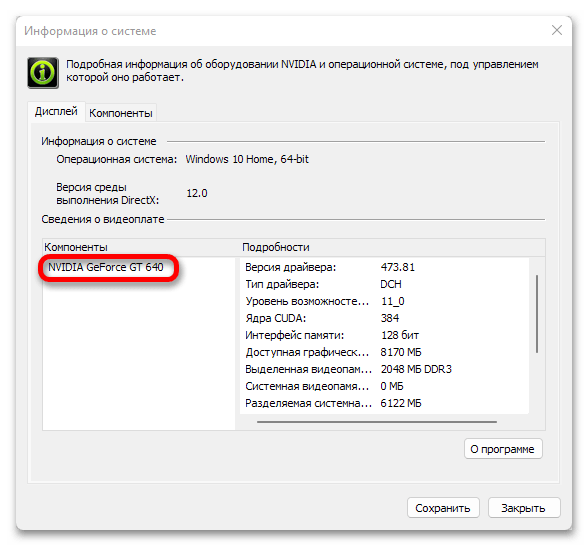
- Данные о графическом адаптере будут указаны в областях,

обозначенных нами на этих изображениях.
Примечание: Запустить любое из рассмотренных в данной части статьи приложений можно и через системный трей – достаточно кликнуть по значку NVIDIA правой кнопкой мышки и выбрать предпочтительный вариант.
AMD
Если в вашем ПК или ноутбуке установлена «красная» видеокарта, чтобы узнать ее название, выполните следующее:
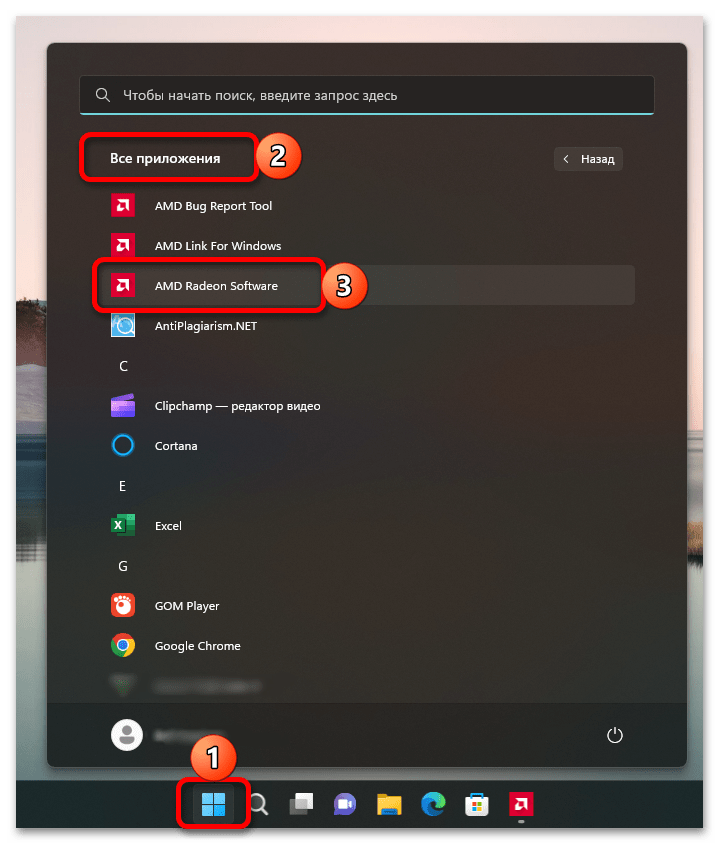
- Используя поиск или список «Все приложения» в меню «Пуск», откройте «AMD Radeon Software».
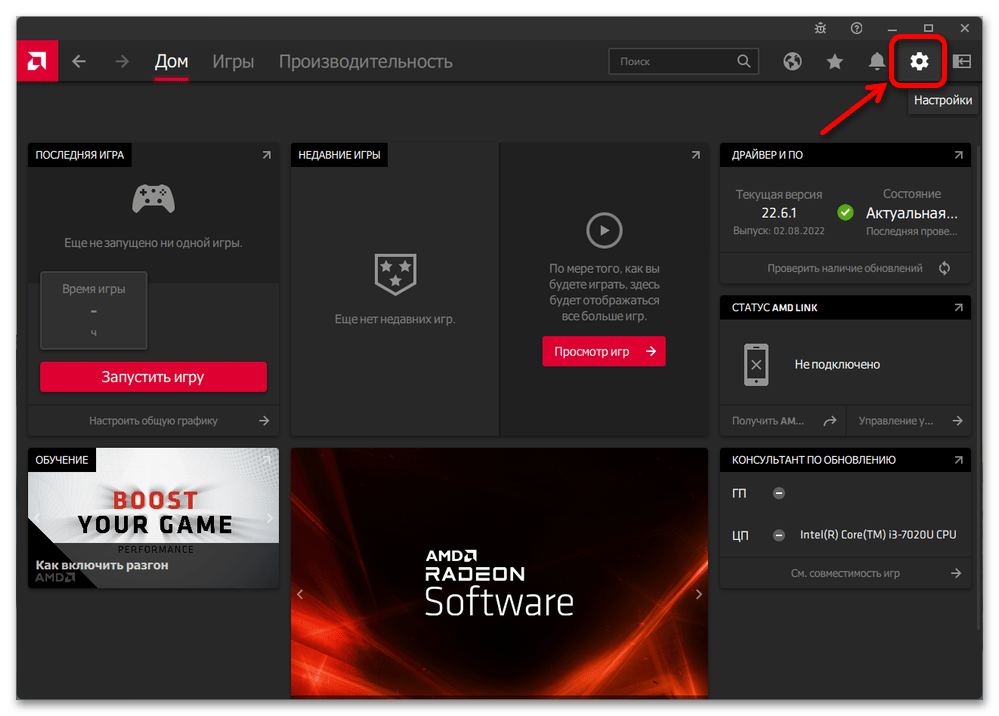
- Когда программа будет запущена, перейдите в ее настройки, нажав для этого по кнопке с изображением шестеренки, расположенной в правом верхнем углу.
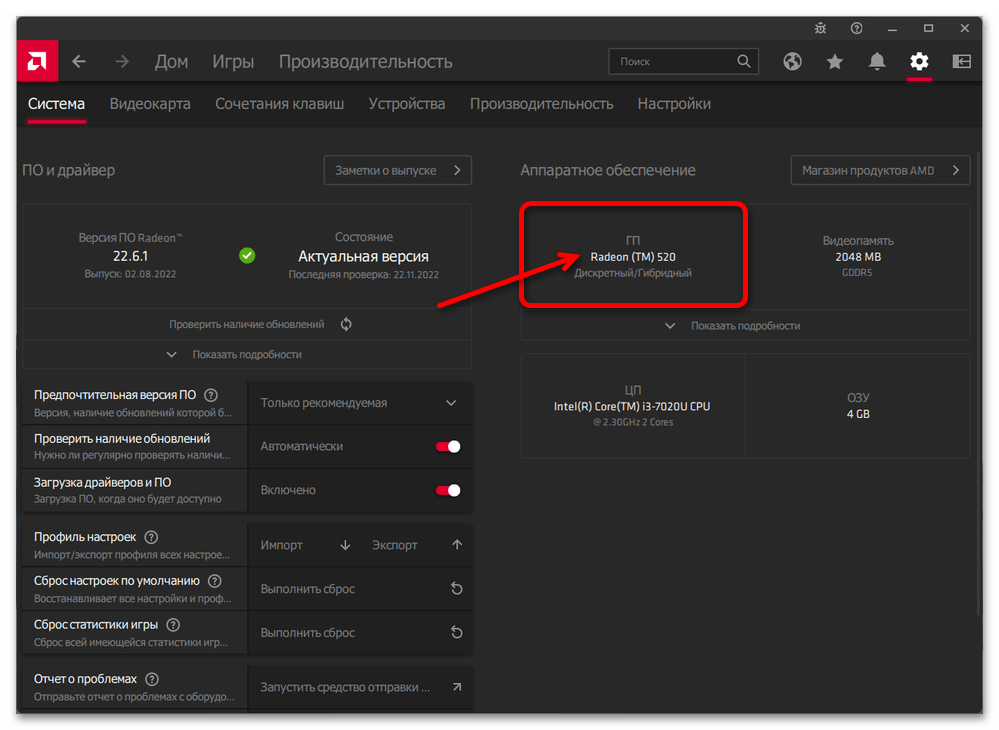
- Сведения о графическом адаптере будут представлены в блоке «Аппаратное обеспечение», его подразделе «ГП».
Вариант 3: Сторонние программы
Существует довольно много популярных программ от сторонних разработчиков, позволяющих узнать технические характеристики компьютера. Одним из наиболее популярных представителей данного сегмента является платное решение AIDA64, но есть и другие – бесплатные и более простые в использовании. Именно их мы и рассмотрим далее.

Читайте также: Программы для определения железа ПК
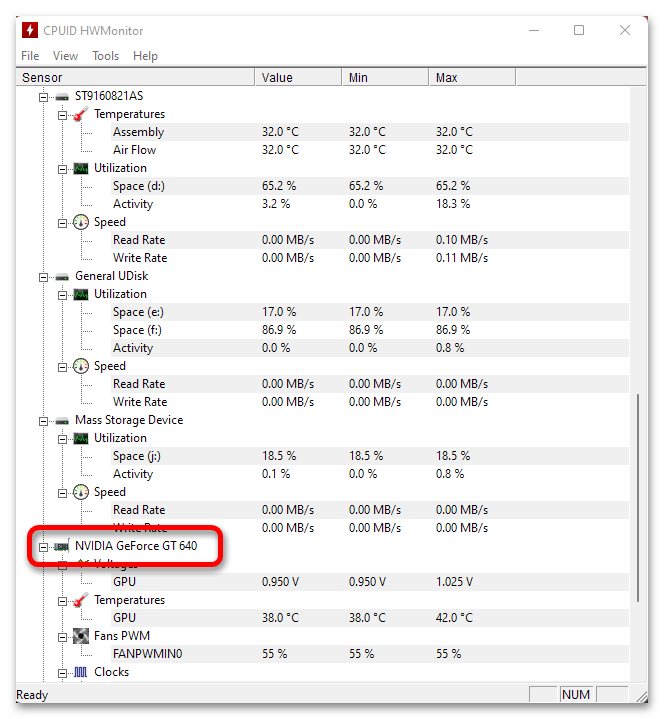
Способ 1: HWMonitor
Приложение для мониторинга состояния аппаратных компонентов компьютера, которое помимо сведений о нагрузке, температуре и потреблении энергии, также отображает и общие данные.
Скачать CPUID HWMonitor
Скачайте программу по указанной выше ссылке, установите и запустите ее. Пролистайте перечень доступных в основном окне разделов и найдите тот, что обозначен значком видеокарты – справа от него будут указаны производитель и модель устройства.
Способ 2: Speccy
Приложение от разработчиков популярного чистильщика CCleaner также позволяет получить информацию об операционной системе и аппаратных компонентах ПК.
Скачать Speccy
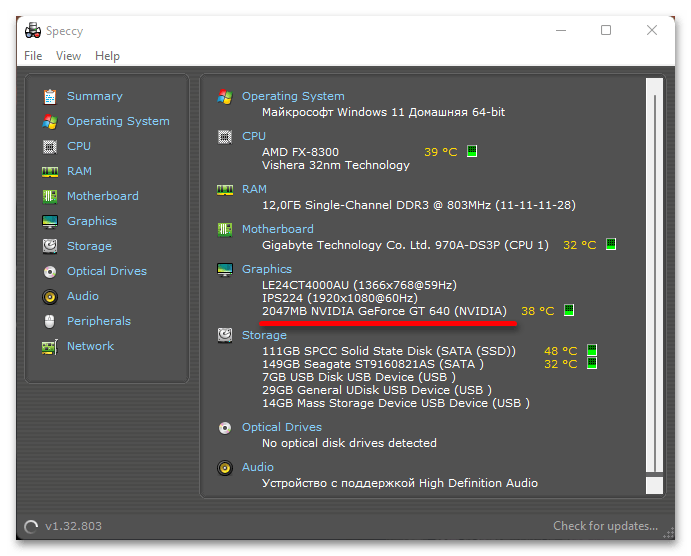
Установите и запустите программу, подождите несколько секунд, пока она проанализирует ОС, после чего ознакомьтесь со сведениями под строкой «Graphics» — первым(и) в ней будет указано название монитора, а ниже – объем графической памяти, производитель и модель адаптера.
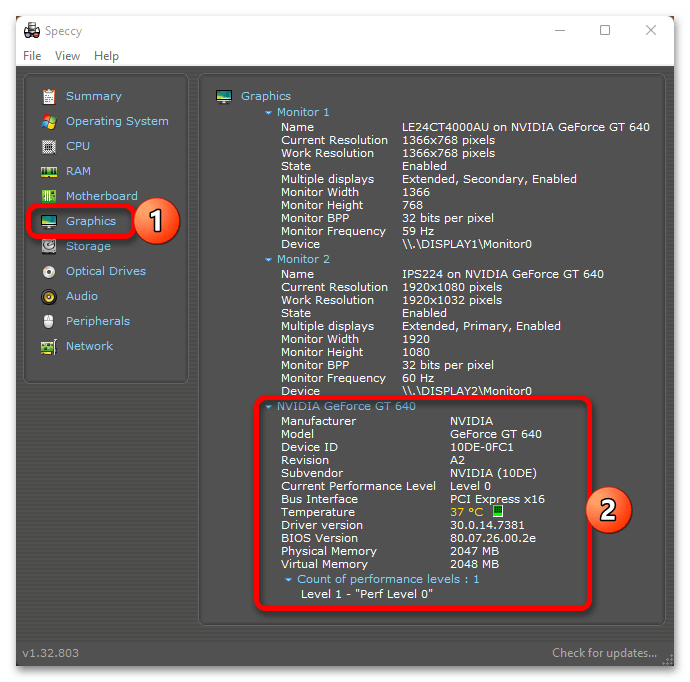
Если же перейти в одноименную вкладку на боковой панели, можно узнать более детальные сведения и о дисплее, и о видеокарте.
Читайте также:
Как узнать герцовку монитора в Виндовс 11
Как узнать модель материнской платы в Виндовс 11
Наша группа в TelegramПолезные советы и помощь
Understanding your computer’s Graphics Card (GPU) is essential to performing certain tasks like gaming, running software or editing videos. Whether you’re a Windows 10 or Windows 11 user, checking your Graphics Card’s specification is not tricky. In this guide, we’re going to discuss some of the most easiest and hassle-free methods to understand how you can check what graphics card is installed in your Windows PC.
Table of Content
- Why does it Matter?
- What is a GPU
- Method 1: Check GPU Using Task Manager (Windows 10 and Windows 11)
- Method 2: Check GPU Using System Information (Windows 10 and Windows 11)
- Method 3: Using PowerShell to Check GPU
- Method 4: Check GPU Using DxDiag (Windows 10 and Windows 11)
- Method 5: Check GPU Using Device Manager (Windows 10 and Windows 11)
- Method 6: Check GPU Info Using Third-Party Tools (Windows 10 and Windows 11)
- What are the GPU Specifications
- Best GPU At a Glance (Industry-wise)
- Troubleshooting Tips
Before we jump in, let’s understand some of the basics first:
Why does it Matter?
Your GPU is responsible for rendering images, videos and animations. It’s an essential component for everything — from gaming to performing any productive task.
What is a GPU
A graphic card is responsible for real-time images, animations and video rendering. These cards are intended to help the PC run quicker and more proficiently than it would without them.
Method 1: Check GPU Using Task Manager (Windows 10 and Windows 11)
The Windows Task Manager is a tool included in the operating system that allows you to conveniently access information, about your GPU and monitor its usage. To check your GPU using the Task Manager follow these steps:
Step 1: Open the Task Manager
Press Ctrl + Shift + Esc to open the task manager or alternatively you can Press Win + X and select «Task Manager»
Step 2: Navigate to the Performance Tab and click on GPU
On the top menu bar, you’ll find a tab «Performance», click on it and navigate to the CPU from the left hand panel.
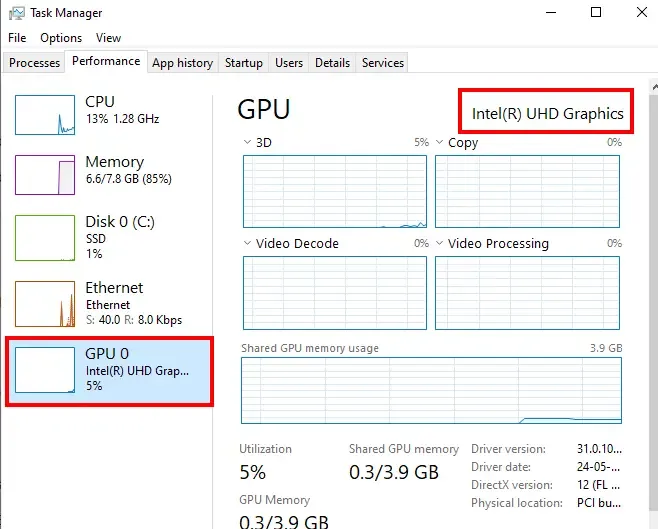
Here, you can check temperature, current usage, etc. and in case of multiple GPU’s you will find multiple entries such as GPU 1, GPU 2, and so on and this method is suitable for both Windows 10 and Windows 11.
Method 2: Check GPU Using System Information (Windows 10 and Windows 11)
You can also view your Graphic card details of your Windows PC by navigating through the System Information. This section will provide you detailed overview of your Windows System. Here’s how you can do it:
Step 1: Open System Information
Use Windows Shortcut key i.e. Win + R and type msconfig and hit the enter button. Alternatively, you go to the Start Menu and type «System Information» and hit the enter button.
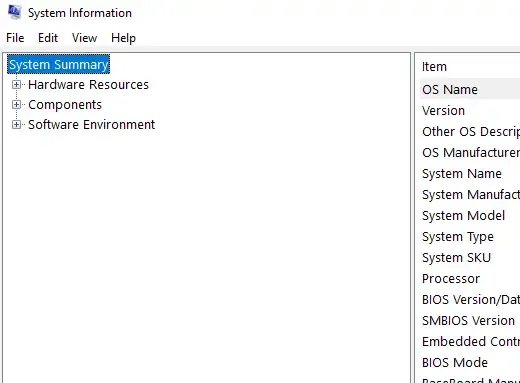
Step 2: Navigate to Display
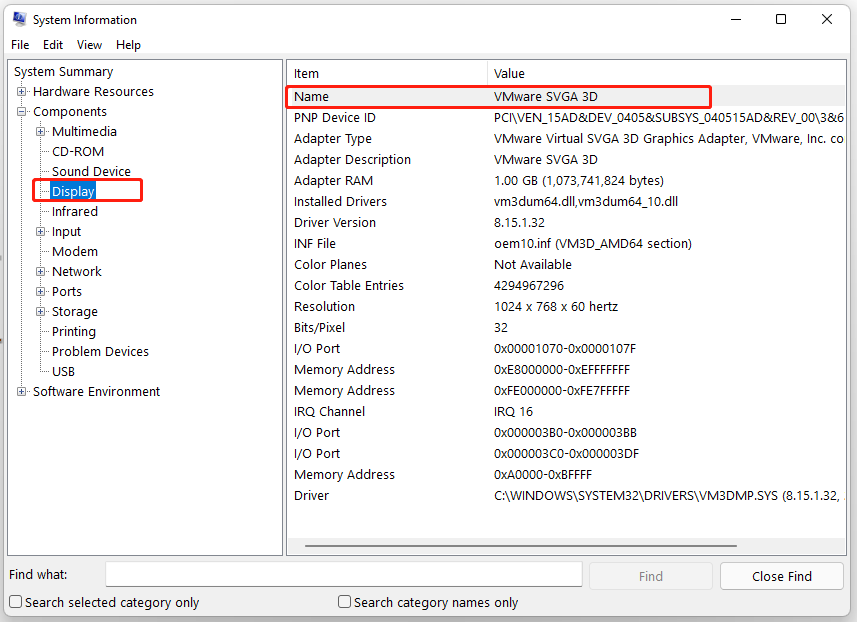
On the left hand menu, click on the Components and navigate to Display.
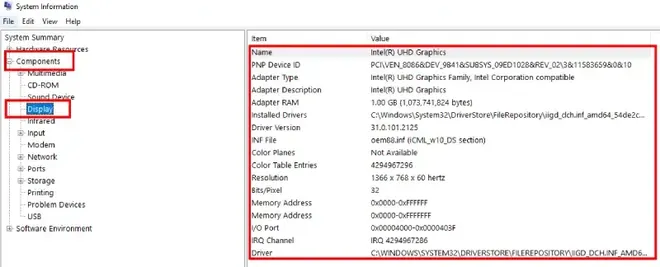
You will be able to see GPU name, VRAM (video memory), Driver additional details, etc. and this method is suitbale for both Windows 10 and Windows 11.
Method 3: Using PowerShell to Check GPU
This method is suitable for those who are comfortable in exploring tech-savvy methods for such methods. Here’s how you can use this option to check GPU in Windows 10 and 11.
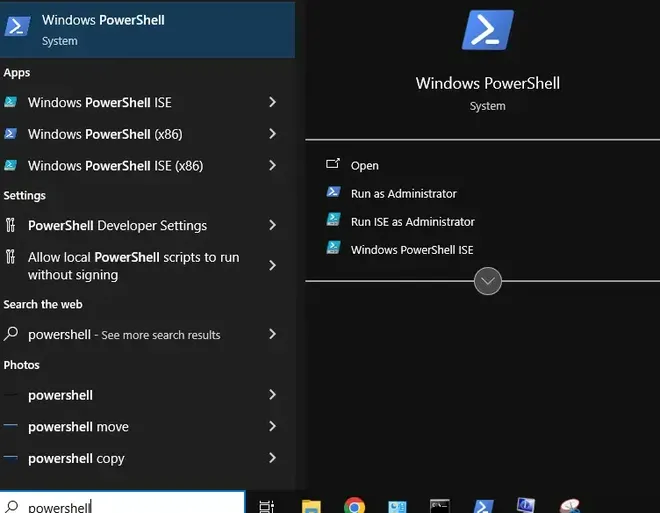
Step 1: Access Windows PowerShell
Press Win + S and type «PowerShell» in the search box and hit the enter button or you can press Win + X and select «PowerShell» and click to open it.
Step 2: Run the Program to Display GPU details
Now, type the following command:
Get-CimInstance Win32_VideoController
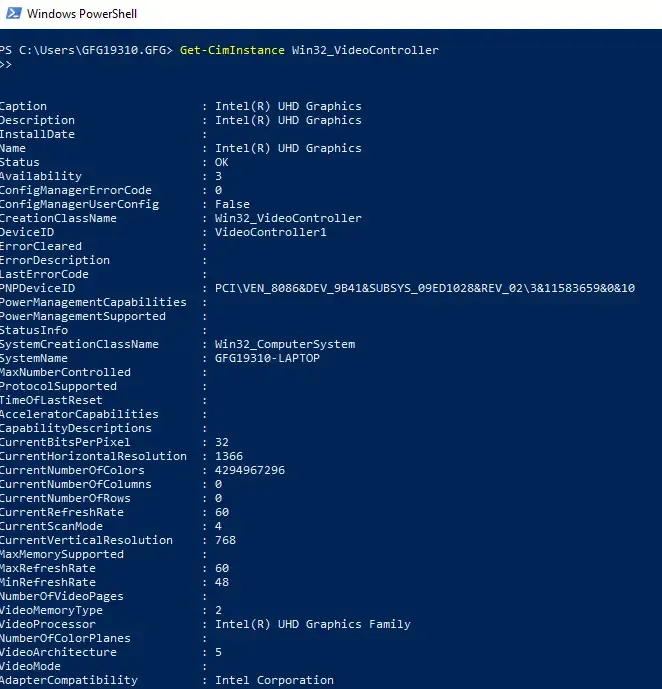
Note: Once you hit the enter button, all the system details will appear here, including GPU name.
Method 4: Check GPU Using DxDiag (Windows 10 and Windows 11)
DxDiag or DirectX Diagnostic Tool is an in-built tool that can be used to identify GPU and other system details. Here’s how to perform this action.
Step 1: Open Run Dialog & Open DirectX Diagnostic Tool
Press Win + R and type «dxdiag» in the run dialog and hit the enter button or Press Win + S and type «CMD» and type «dxdiag» and hit the enter button.
Step 2: Navigate to the Display Option
Navigate to the «Display» Tab. Under the Device section, you can see graphics cards and their info
Note: If you’re looking to troubleshoot graphics related issues, this can be a useful method.
Method 5: Check GPU Using Device Manager (Windows 10 and Windows 11)
If you’re looking for any alternate method to check you Graphics Card for Windows 10 or Windows 11, then you can also use the Windows Device Manager. Here’s how and what needs to be done to perform this action:
Step 1: Open the Device Manager
Press Win + X and select the Device Manager or make a right-click on the Start Menu and select the Device Manager.
Step 2: Expand the Display Adapters
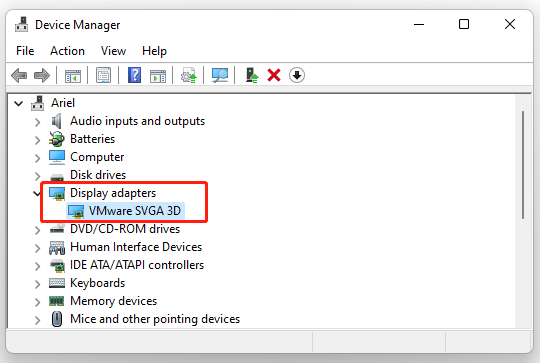
Click the arrow next to Display Adapters to view the GPU info.
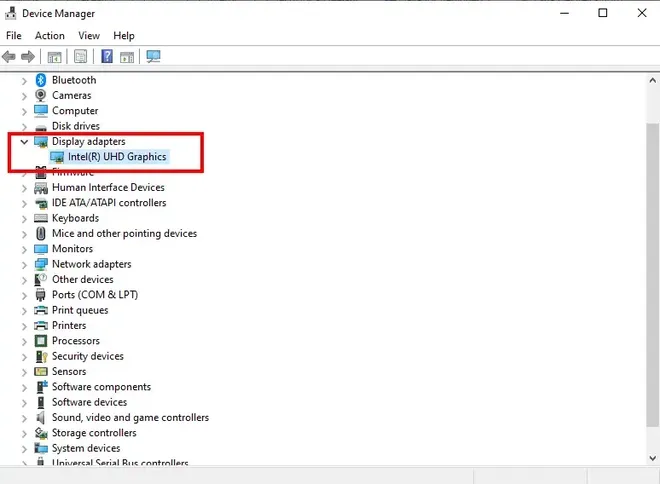
Step 3: View GPU info
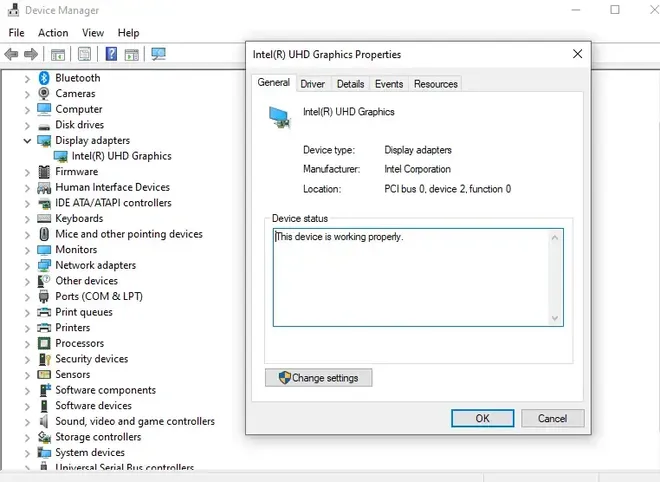
Make a right-click on your GPU and select Properties to view additional details (such as Manufacturer details, model, etc.)
You can also get any trusted third-party tool to get detailed insight and and if you’re a gamer, it becomes easy for you to pick the best GPU for gaming for rich experience.
- HWiNFO64
- GPU-Z
- Speccy
What are the GPU Specifications
Once you’ve identified your GPU, you can look up for its specifications to understand it’s capabilities. Below are three major aspects to look into:
- GPU Model
- Video RAM or VRAM
- Driver Version
Best GPU At a Glance (Industry-wise)
Below, is now the table featuring some of the best GPUs in different segments, considering factors of performance, prices and requirement.
| Category | Best GPU | Manufacturer | Why to Pick? |
|---|---|---|---|
| Best GPU for Gaming | NVIDIA GeForce RTX 4090 | NVIDIA | Exceptional performance with high frame rates, 4K gaming, and Ray Tracing. Ideal for AAA titles. |
| Best Budget GPU | AMD Radeon RX 6600 XT | AMD | Offers great 1080p gaming performance at a budget-friendly price. |
| Best GPU for Content Creation | NVIDIA GeForce RTX 3080 | NVIDIA | Excellent for video editing, 3D rendering, and AI workloads with CUDA support. |
| Best GPU for Professionals | NVIDIA Quadro RTX 8000 | NVIDIA | Top-tier GPU for professional workloads in CAD, 3D rendering, and scientific applications. |
| Best GPU for Streaming | AMD Radeon RX 6800 XT | AMD | Great for streaming with powerful performance and efficiency in gaming and multitasking. |
| Best GPU for VR | NVIDIA GeForce RTX 3080 | NVIDIA | Excellent performance in VR gaming with Ray Tracing and high frame rates. |
| Best GPU for Budget Gaming | NVIDIA GTX 1660 Super | NVIDIA | Great performance for 1080p gaming without breaking the bank. |
| Best GPU for 4K Gaming | NVIDIA GeForce RTX 4090 | NVIDIA | Leading GPU for 4K gaming with ultra-high settings and Ray Tracing. |
| Best GPU for Machine Learning | NVIDIA A100 Tensor Core GPU | NVIDIA | Superior GPU for AI/ML workloads with Tensor cores optimized for deep learning tasks. |
| Best GPU for Laptop Gaming | NVIDIA GeForce RTX 3080 Laptop GPU | NVIDIA | High performance in laptops for gaming and heavy tasks with a mobile form factor. |
Troubleshooting Tips
If you encounter any performance related or graphic related issue with your GPU, you can try out some of these troubleshooting steps:
- Try updating your GPU Drivers
- Check if it’s overheating
- Use Device Manager to Run Diagnostics
- If possible, try to reinstall your GPU Driver
- Make adjustments with your GPU settings.
Knowing how to check your graphics card is an essential skill for optimizing your PC’s performance while ensuring its compatibility. Whether you’re using Windows 10 or Windows 11, the above outlined methods are suitable for both Windows versions.
Once you identify you system’s GPU, you can make adjustments with your GPU, like if you’re a gamer then you might look for the best GPU for gaming, or if you’re a visual creator then you can look for the best GPU for editing.
Also Read
- AMD vs. Nvidia GPU in 2025: Who is the King of Graphic Cards?
-
Home
-
Partition Manager
- How to Check Graphics Card in Windows 11? [5 Ways]
By Ariel | Follow |
Last Updated
Sometimes you may need to get the graphics card model or manufacturer. Do you know how to check graphics card in Windows 11? In this post, MiniTool summarizes 5 simple ways to help you check graphics card Windows 11.
A graphics card, known as GPU, is an important hardware device that manages the performance of the video and graphics. Sometimes, you may want to know if your graphics card is compatible with a game, a hardware device, or due to other reasons. Here comes a question: how to check your graphics card in Windows 11? If you are looking for this answer, you can get 5 simple methods.
Way 1. Check Graphics Card Windows 11 from Task Manager
If you want to check your graphics card model and monitor GPU usage, then Task Manager is a good choice. Here’s how to do that:
Step 1. Press Ctrl + Shift + ESC keys to open Task Manager and click on More details. Also, you can right-click the Start menu and select Task Manager.
Step 2. Go to the Performance tab, and then scroll down the list to the GPU section and you can check the model and manufacturer of your graphics card. If you have multiple graphics cards, you can select the one you want to check.
Way 2. Check Graphics Card Windows 11 from Display Settings
Another simple method on the graphics card check in Windows 11 is to use the settings app. But this method only applies to a single graphics card on your PC.
Step 1. Press Win + I keys to access the Settings app, and then select System from the left sidebar and click on Display from the right side.
Step 2. Navigate to the Advanced display category, and click on it and you will see the manufacturer and model number of your graphics card under the Display information section. To know more details of this graphics card, you can click on Display adapter properties for Display 1.
Way 3. Check Graphics Card Windows 11 from System Information
If you just want to know the manufacturer and model of your graphics card, you can view the system information. Here’s how:
Step 1. Press Win + R keys to open the Run box, and then type msinfo32 in it and hit Enter.

Step 2. Expand the Components category and select Display. Then you can check the installed graphics card from the right pane.
Way 4. Check Graphics Card Windows 11 from Device Manager
As you know, the Device Manager is capable of handling all the I/O devices that you can check information related to the hardware. Here’s how to check graphics card in Windows 11 via Device Manager.
Step 1. Open the Run dialog box again, and then type devmgmt.msc in it and hit Enter.
Step 2. Expand the Display adapters category and then you can view the list of installed graphics cards on your PC. Also, you can right-click the graphics card and select Properties to get more details.
How to check GPU in Windows 11? The last way is to use the DirectX Diagnostic Tool. To do so, follow the steps below.
Step 1. Open the Run dialog box again, and then type dxdiag in it and hit Enter. Then click on Yes in the prompted confirmation window.
Step 2. Navigate to the Display tab. Then you can view all related information of your graphics card, including Name, Chip type, Manufacturer, DAC type, Driver model, etc. If you have multiple graphics cards, it will show like in the forms of Display 1 and Display 2.
About The Author
Position: Columnist
Ariel has been working as a highly professional computer-relevant technology editor at MiniTool for many years. She has a strong passion for researching all knowledge related to the computer’s disk, partition, and Windows OS. Up till now, she has finished thousands of articles covering a broad range of topics and helped lots of users fix various problems. She focuses on the fields of disk management, OS backup, and PDF editing and provides her readers with insightful and informative content.