
Updated on Apr 28, 2025
M.2 is an SSD or solid-state drives form factor. It is small in size and faster when compared to conventional SSDs. Apart from being faster, it also takes up less space and thus is being used in gaming laptops. Most people may be curious about can SSD overheat and have this confusion when it comes to M.2 temperature:
I can’t find anything concerning m.2 temps in Asus BIOS and I have seen people say that it is measured in voltage. Is there any program or way I can see what temp my m.2 is? — from Reddit
M.2 temperature refers to the temperature range the form factor can tolerate while performing efficiently. In this article, we will discuss the m.2 temperature monitor and learn more about the matter!
What Temp Should an M.2 Be
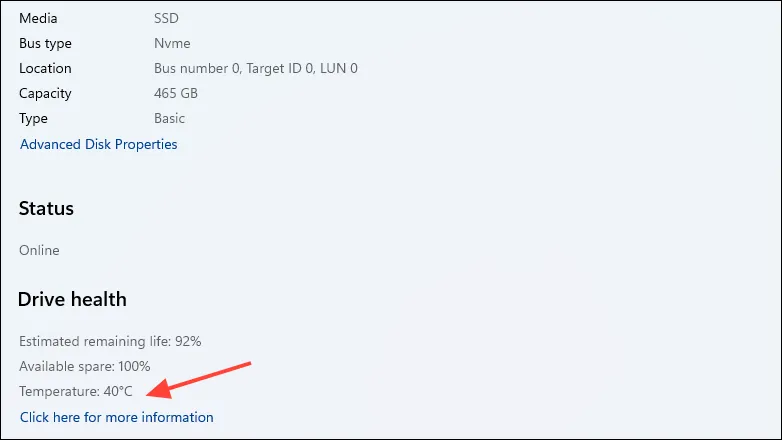
The average temperature range for an M.2 is around 35-40°C. In case of a heavy workload, it stretches to around 60-70°C. In fact, it is normal for M.2 SDDs to get hotter compared to SATA. Overheating of your M.2 is a cause for concern. Several issues can arise when there is an increase in the temperature range.
- High heat cycles lead to a reduction in the overall device performance.
- Overheating can also lead to data loss, slow loading speed, and data corruption.
- Another aspect that overheating affects is the longevity of the system.
Warranties do not cover heat damages. That is why the M.2 temperature monitor is of immense importance. Otherwise, you would find yourself forking out more money for another M.2
Further Reading: SSD Temperature Range: Everything You Should Know
To ensure the health of M.2, monitoring its temperature is necessary. Here, we have discussed two solutions you can follow to keep an eye on the M.2 temperature.
Way 1. Check M.2 Temperature via EaseUS Partition Master
Are you worried about the M.2 temperature? In that case, there’s an easy solution! EaseUS Partition Master is a great tool to monitor M.2 temperature. It is a professional and user-friendly software allowing users to check and optimize disk performance.
Take a look at how you can use EaseUS Partition Master to monitor M.2 temperature.
Step 1. Launch EaseUS Partition Master and click the blue arrow to activate the «Disk Health» feature under the «Discovery» section.
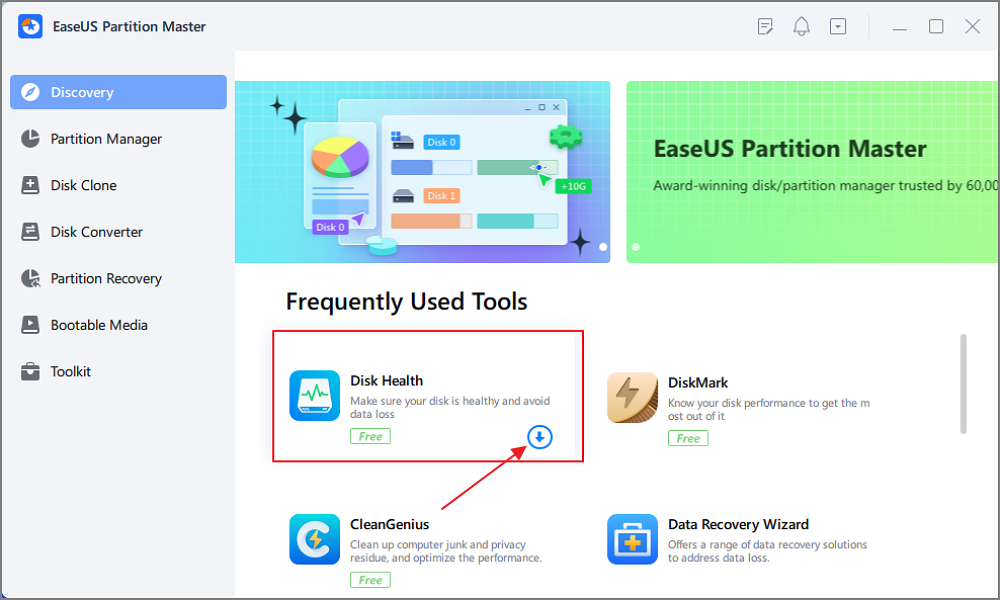
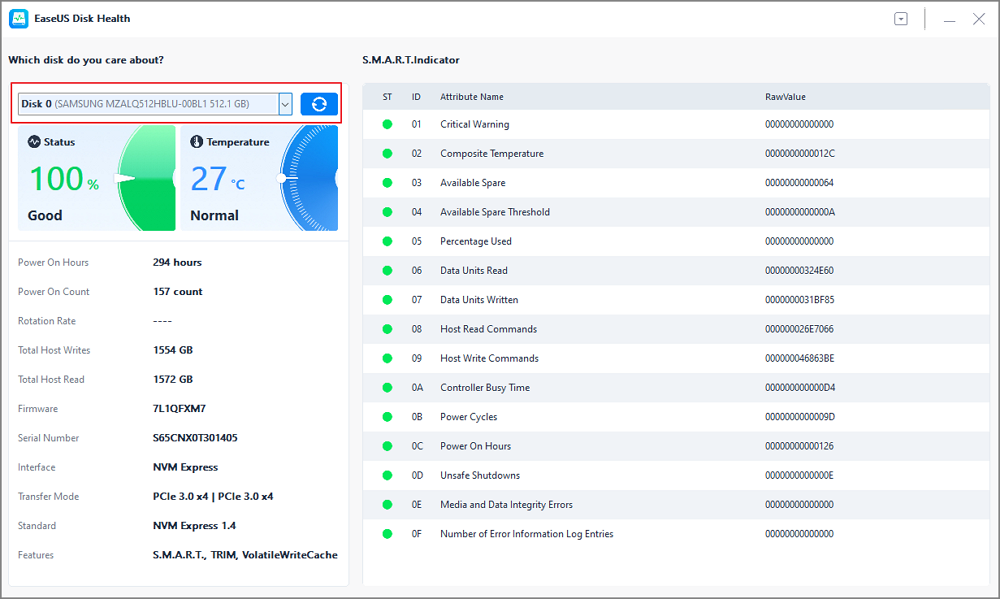
Step 2. Select the target disk and click the «Refresh» button. Then, you can see the health condition of your disk.
Besides checking the M.2 temperature, the tool also offers other features:
- Check hard drive health and SSD health
- Test SSD speed, such as testing NVMe speed
- Run disk surface test to check bad sectors
- Solve why my SSD so full error
- Extend or resize a partition to optimize disk space usage
Haven’t you used EaseUS Partition Master? What are you waiting for? Check out this reliable program today!
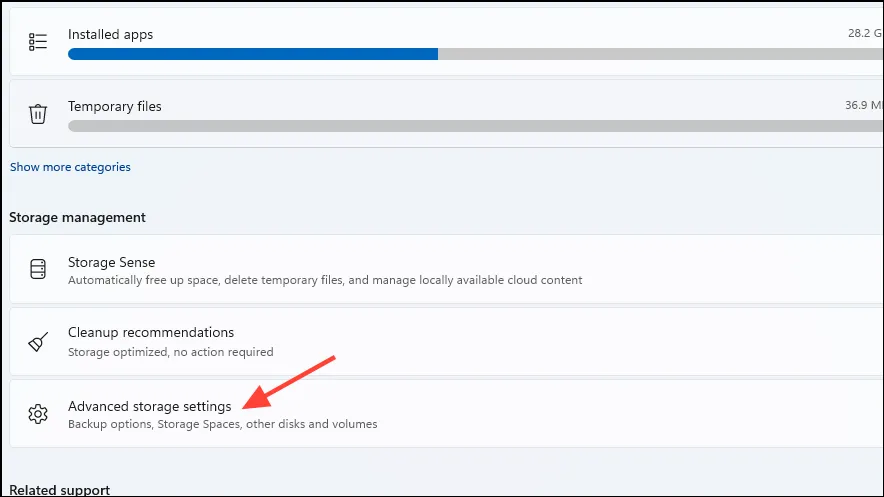
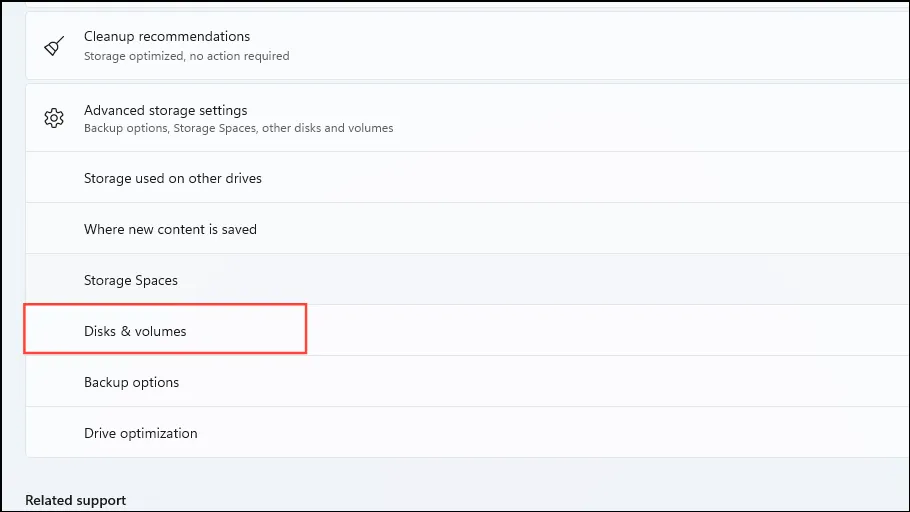
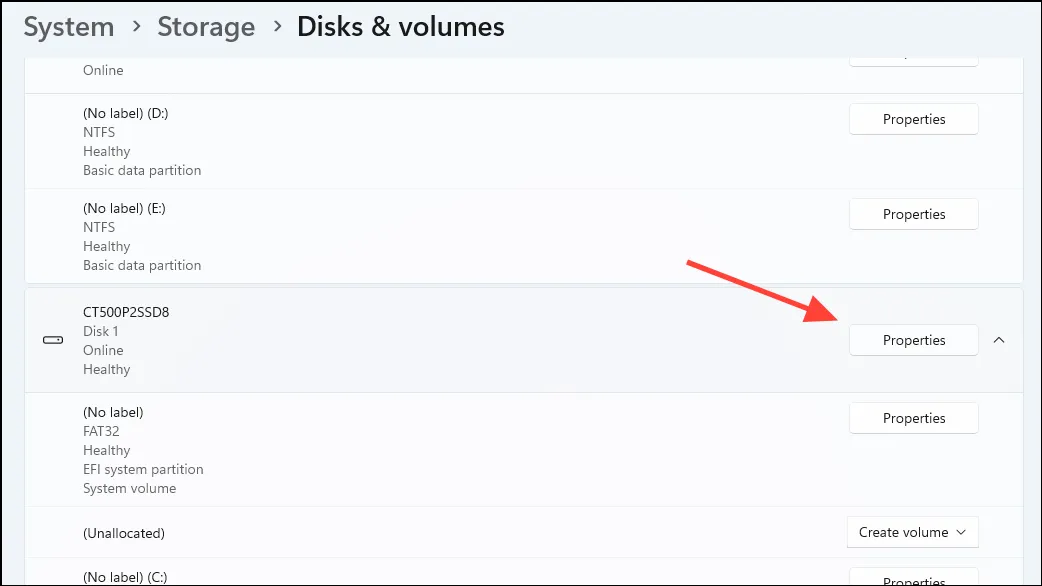
Way 2. Check M.2 Temperature via Manage Disks and Volumes
Another way to check M.2 temperature is by using the Manage Disks and Volumes feature. It is vital to monitor the temperature range to prevent the degradation of the M.2. Take a look at the steps you need to follow:
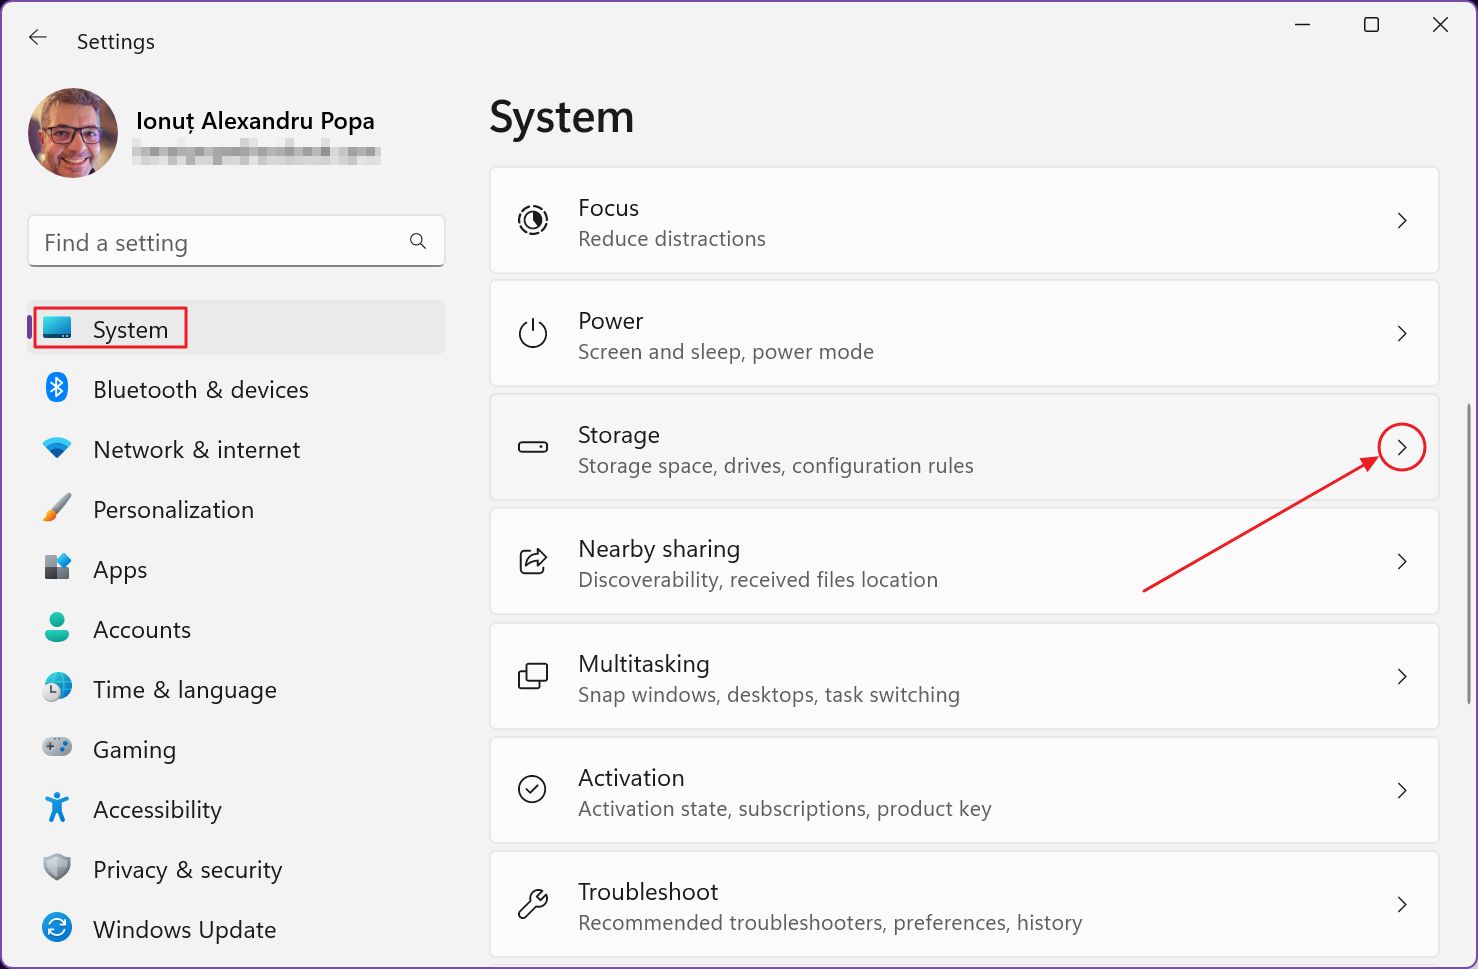
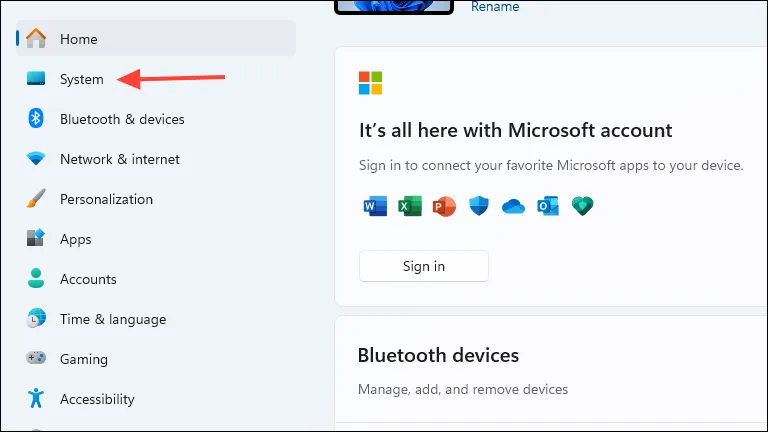
Step 1: Go to Start and click on Settings.
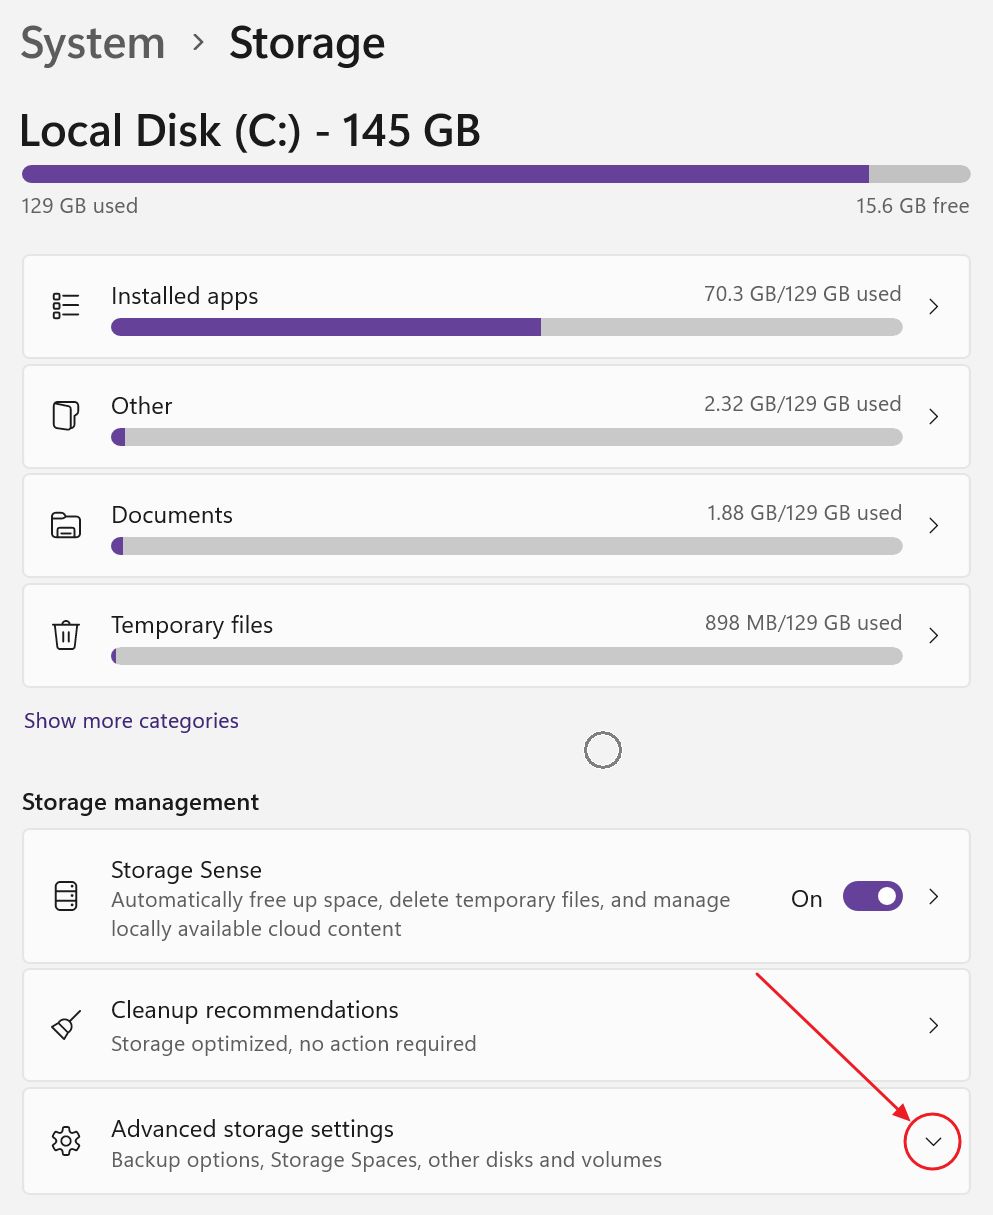
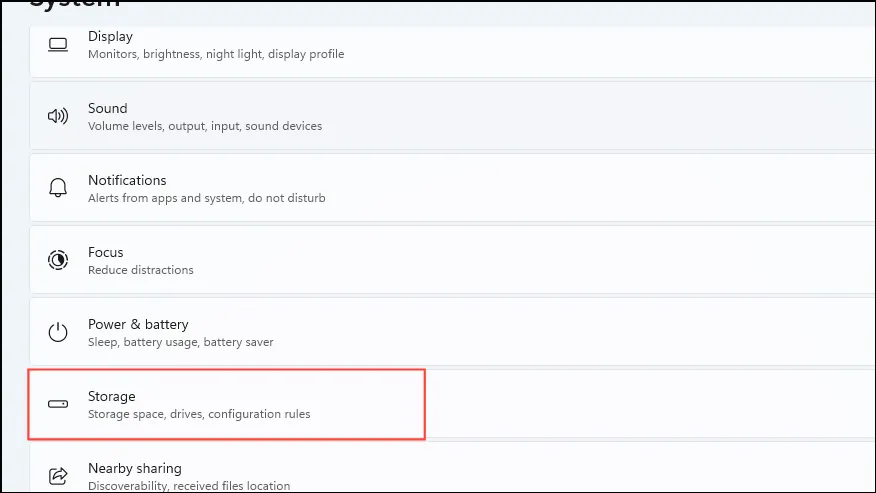
Step 2: Select System. Click on Storage. Now, select Manage Disks and Volumes.
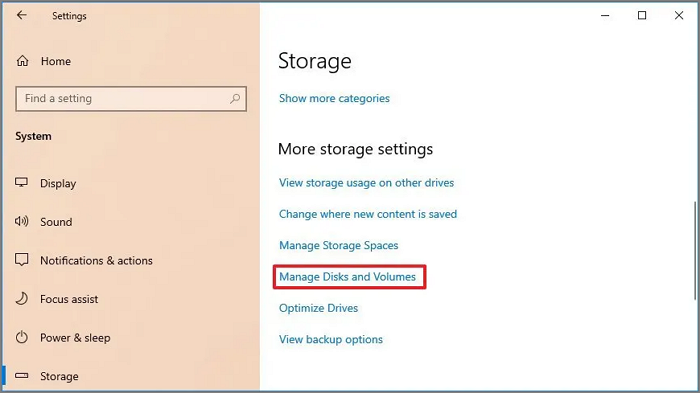
Step 3: You need to search the drive whose temperature you want to view. Click on the arrow button.
Step 4: Click on Properties. Go to Drive health and check the temperature.

Conclusion
Knowing how to check M.2 temperate is of utmost importance. There are two different ways you can monitor the temperature. Firstly, you can use the Manage Disks & Volumes feature. Another way is to opt for EaseUS Partition Master.
The EaseUS Partition Master is a professional, user-friendly, and reliable tool to check M.2 temperature. You can also use the tool to resize partitions, back up data, and much more! Download this software and check it out now!
FAQs About M.2 Temperature Monitor
Checking the M.2 temperature at periodic intervals is essential. To attain more knowledge on the matter, read the questions and answers listed below —
1. How do I check my m 2 SSD temp?
To check your M.2 SSD temperature, go to Windows Settings. After that, navigate to Manage Disks and Volumes. You will come across the a of storage devices. Choose the drive you want and select Properties to see the temperature.
2. How hot is too hot for SSD?
Most SSDs have a tolerance to a temperature range of 0- 70ºC. Anything more than this can cause overheating. However, the parameters are different for industrial-grade SSDs. In that case, the temperature range is -40-85ºC. Higher temperatures can cause decreased performance and potentially permanent damage to the drive.
3. Can an M.2 SSD overheat?
Yes, an M.2 SSD can overheat. It is vital to understand that the speed of M.2 SSDs is higher than traditional SSDs. As such, they are prone to frequent overheating. Overheating can cause thermal throttling, which slows down the SSD to prevent further heat damage.
-
-
#2
Now isn’t that special? I always have to go looking for my 3rd party portable app on usb which isn’t always handy.. I had absolutely no idea drive temp could be be checked within windows. Do you just know stuff, Shawn. Is it all in your little pointy alien head or do you have it written down or databased somewhere?
Good to know this. .
-
- OS
- Windows 11 Pro 24H2 26100.3775
- Computer type
- PC/Desktop
- Manufacturer/Model
- Dell Optiplex 7080
- CPU
- i9-10900 10 core 20 threads
- Motherboard
- DELL 0J37VM
- Memory
- 32 gb
- Graphics Card(s)
- none-Intel UHD Graphics 630
- Sound Card
- Integrated Realtek
- Monitor(s) Displays
- Benq 27
- Screen Resolution
- 2560×1440
- Hard Drives
- 1tb Solidigm m.2 nvme+256gb SKHynix m.2 nvme /External drives 512gb Samsung m.2 sata+1tb Kingston m2.nvme+ 4gb Solidigm nvme
- PSU
- 500w
- Case
- MT
- Cooling
- Dell Premium
- Keyboard
- Logitech wired
- Mouse
- Logitech wireless
- Internet Speed
- so slow I’m too embarrassed to tell
- Browser
- #1 Edge #2 Firefox
- Antivirus
- Defender+MWB Premium
-
- Operating System
- Windows 11 Pro 24H2 26100.3775
- Computer type
- PC/Desktop
- Manufacturer/Model
- Dell Optiplex 9020
- CPU
- i7-4770
- Motherboard
- stock Dell
- Memory
- 24 gb
- Graphics card(s)
- integrated
- Sound Card
- integrated
- Monitor(s) Displays
- Benq 27
- Screen Resolution
- 2560×1440
- Hard Drives
- 256 gb Toshiba BG4 M.2 NVE SSB and 1 tb hdd
- PSU
- 500w
- Case
- MT
- Cooling
- Dell factory
- Mouse
- Logitech wireless
- Keyboard
- Logitech wired
- Internet Speed
- still too embarrassed to tell
- Browser
- Firefox
- Antivirus
- Defender
-
-
#3
great!
I was using crystal. now can run inside Windows.
-
- OS
- Windows 7/11
- Computer type
- PC/Desktop
- Manufacturer/Model
- HP/Lenovo/Asus
- CPU
- Intel i7-11800H
- Motherboard
- Lenovo Legion 5i Pro Gen 6
- Memory
- 32GB DDR4 3200MHz
- Graphics Card(s)
- NVIDIA GeForce RTX 3070
- Hard Drives
- 1TB PCIe SSD
-
-
#4
Somebody with a non-nvme (sata) bus type please indicate what is seen with the above.
-
- OS
- Windows 10
- Computer type
- Laptop
- Manufacturer/Model
- HP
- CPU
- Intel(R) Core(TM) i7-4800MQ CPU @ 2.70GHz
- Motherboard
- Product : 190A Version : KBC Version 94.56
- Memory
- 16 GB Total: Manufacturer : Samsung MemoryType : DDR3 FormFactor : SODIMM Capacity : 8GB Speed : 1600
- Graphics Card(s)
- NVIDIA Quadro K3100M; Intel(R) HD Graphics 4600
- Sound Card
- IDT High Definition Audio CODEC; PNP Device ID HDAUDIO\FUNC_01&VEN_111D&DEV_76E0
- Hard Drives
- Model Hitachi HTS727575A9E364
- Antivirus
- Microsoft Defender
- Other Info
- Mobile Workstation
-
-
#5
I prefer CrystalDiskInfo’s real time monitoring.

-
- OS
- Win 11 Home & Pro
- Computer type
- Laptop
- Manufacturer/Model
- ASUS Vivobook
- CPU
- AMD Ryzen™ 7 7730U
- Motherboard
- M1605YA
- Memory
- 15.0GB Dual-Channel DDR4 @ 1596MHz (22-22-22-52)
- Graphics Card(s)
- 512MB ATI AMD Radeon Graphics (ASUStek Computer Inc)
- Monitor(s) Displays
- Generic PnP Monitor (1920×1200@60Hz) — P1 PLUS (1920×1080@59Hz)
- Screen Resolution
- 1920 X 1200
- Hard Drives
- 953GB Western Digital WD
- PSU
- 45 Watts
- Mouse
- Lenovo Bluetooth.
- Internet Speed
- 500 Mbps
- Browser
- Edge
- Antivirus
- Defender
-
- Operating System
- Windows 11
- Computer type
- Laptop
- Manufacturer/Model
- ACER NITRO
- CPU
- AMD Ryzen 7 5800H / 3.2 GHz
- Motherboard
- CZ Scala_CAS (FP6)
- Memory
- 32 GB DDR4 SDRAM 3200 MHz
- Graphics card(s)
- NVIDIA GeForce RTX 3060 6 GB GDDR6 SDRAM
- Sound Card
- Realtek Audio. NVIDIA High Definition Audio
- Monitor(s) Displays
- 15.6″ LED backlight 1920 x 1080 (Full HD) 144 Hz
- Screen Resolution
- 1920 x 1080 (Full HD)
- Hard Drives
- Samsung 970 Evo Plus 2TB NVMe M.2
- PSU
- 180 Watt, 19.5 V
- Mouse
- Lenovo Bluetooth
- Internet Speed
- 500 Mbps
- Browser
- Edge
- Antivirus
- Defender
-
-
#6
Если у чьего-то сиденья нет nvme (sata), пожалуйста, расскажите, что вы видите выше.
Ничего

-
- OS
- Windows 11 Stable, Release Preview, Beta (both), Dev, Canary
- Computer type
- PC/Desktop
- Manufacturer/Model
- Micro-Star International Co., Ltd. MS-7D54
- CPU
- AMD Ryzen 9 PRO 5950X
- Motherboard
- MSI MAG X570S Tomahawk Max WiFi (MS-7D54) (2 PCI-E x1, 2 PCI-E x16, 2 M.2, 4 DDR4 DIMM, Audio, Video, 2.5GbE LAN, WiFi)
- Memory
- 128 Gb
- Graphics Card(s)
- Intel(R) Arc(TM) A380 Graphics (2 ГБ)
- Sound Card
- Устройство с поддержкой High Definition Audio
- Monitor(s) Displays
- HP X34 [34″ LCD] (6CM1300J5J) {2021}
- Screen Resolution
- 3440×1440
- Hard Drives
- KINGSTON SFYRD2000G (2000 ГБ, PCI-E 4.0 x4)
- PSU
- Be Quiet! Dark Rock Pro 4
- Case
- Cooler Master HAF XB EVO
- Internet Speed
- 1000 Mb/s
- Browser
- Chrome
- Antivirus
- Windows Defender
-
-
#7
I prefer CrystalDiskInfo’s real time monitoring.
I think that disk usage is more useful, since it can help to detect 100% lags.
You can not really do much about the temperatures, especially on NVMe.
-
capture_09292024_101148.jpg
101 KB
· Views: 29
-
- OS
- Windows 11 Home
- Computer type
- PC/Desktop
- CPU
- AMD Ryzen 5 8600G (07/24)
- Motherboard
- ASROCK B650M-HDV/M.2 3.20 (07/24)
- Memory
- 2x32GB Kingston FURY DDR5 5600 MHz CL36 @5200 CL40 (07/24)
- Graphics Card(s)
- ASROCK Radeon RX 6600 Challenger D 8G @48FPS (08/24)
- Sound Card
- Creative Sound BlasterX AE-5 Plus (05/24)
- Monitor(s) Displays
- 24″ Philips 24M1N3200ZS/00 (05/24)
- Screen Resolution
- 1920×1080@165Hz via DP1.4
- Hard Drives
- Kingston KC3000 NVMe 2TB (05/24)
ADATA XPG GAMMIX S11 Pro 512GB (07/19)
- PSU
- Seasonic Core GM 550 Gold (04/24)
- Case
- Fractal Design Define 7 Mini with 3x Noctua NF-P14s/12@555rpm (04/24)
- Cooling
- Noctua NH-U12S with Noctua NF-P12 (04/24)
- Keyboard
- HP Pavilion Wired Keyboard 300 (07/24) + Rabalux 76017 Parker (01/24)
- Mouse
- Logitech M330 Silent Plus (04/23)
- Internet Speed
- 500/100 Mbps via RouterOS (05/21) & TCP Optimizer
- Browser
- Edge & Brave for YouTube & LibreWolf for FB
- Antivirus
- NextDNS blocking 99% TLDs
- Other Info
- Backup: Hasleo Backup Suite (PreOS)
Headphones: Sennheiser RS170 (09/10)
Phone: Samsung Galaxy Xcover 7 (02/24)
Chair: Huzaro Force 4.4 Grey Mesh (05/24)
Notifier: Xiaomi Mi Band 9 Milanese (10/24)
2nd Monitor: AOC G2460VQ6 @75Hz (02/19)
-
-
#8
Ничего = nothing
So no disk health information and no temperature for sata or non-nvme drive?
-
- OS
- Windows 10
- Computer type
- Laptop
- Manufacturer/Model
- HP
- CPU
- Intel(R) Core(TM) i7-4800MQ CPU @ 2.70GHz
- Motherboard
- Product : 190A Version : KBC Version 94.56
- Memory
- 16 GB Total: Manufacturer : Samsung MemoryType : DDR3 FormFactor : SODIMM Capacity : 8GB Speed : 1600
- Graphics Card(s)
- NVIDIA Quadro K3100M; Intel(R) HD Graphics 4600
- Sound Card
- IDT High Definition Audio CODEC; PNP Device ID HDAUDIO\FUNC_01&VEN_111D&DEV_76E0
- Hard Drives
- Model Hitachi HTS727575A9E364
- Antivirus
- Microsoft Defender
- Other Info
- Mobile Workstation
-
-
#9
No,
Crystal does. see my pic below.

Ничего = nothing
So no disk health information and no temperature for sata or non-nvme drive?
-
- OS
- Windows 7/11
- Computer type
- PC/Desktop
- Manufacturer/Model
- HP/Lenovo/Asus
- CPU
- Intel i7-11800H
- Motherboard
- Lenovo Legion 5i Pro Gen 6
- Memory
- 32GB DDR4 3200MHz
- Graphics Card(s)
- NVIDIA GeForce RTX 3070
- Hard Drives
- 1TB PCIe SSD
-
-
#10
нет информации о состоянии диска и нет температуры для SATA
Да
-
- OS
- Windows 11 Stable, Release Preview, Beta (both), Dev, Canary
- Computer type
- PC/Desktop
- Manufacturer/Model
- Micro-Star International Co., Ltd. MS-7D54
- CPU
- AMD Ryzen 9 PRO 5950X
- Motherboard
- MSI MAG X570S Tomahawk Max WiFi (MS-7D54) (2 PCI-E x1, 2 PCI-E x16, 2 M.2, 4 DDR4 DIMM, Audio, Video, 2.5GbE LAN, WiFi)
- Memory
- 128 Gb
- Graphics Card(s)
- Intel(R) Arc(TM) A380 Graphics (2 ГБ)
- Sound Card
- Устройство с поддержкой High Definition Audio
- Monitor(s) Displays
- HP X34 [34″ LCD] (6CM1300J5J) {2021}
- Screen Resolution
- 3440×1440
- Hard Drives
- KINGSTON SFYRD2000G (2000 ГБ, PCI-E 4.0 x4)
- PSU
- Be Quiet! Dark Rock Pro 4
- Case
- Cooler Master HAF XB EVO
- Internet Speed
- 1000 Mb/s
- Browser
- Chrome
- Antivirus
- Windows Defender
-
-
#11
No,
Crystal does. see my pic below.
View attachment 110409
Third party software can display temperature for HD, SSD, various bus types.
(crystal disk, hd sentinel, hwmonitor, speccy, speedfan, etc.)
For the tutorial steps Dronix reported «nothing» for SSD with sata bus.
-
- OS
- Windows 10
- Computer type
- Laptop
- Manufacturer/Model
- HP
- CPU
- Intel(R) Core(TM) i7-4800MQ CPU @ 2.70GHz
- Motherboard
- Product : 190A Version : KBC Version 94.56
- Memory
- 16 GB Total: Manufacturer : Samsung MemoryType : DDR3 FormFactor : SODIMM Capacity : 8GB Speed : 1600
- Graphics Card(s)
- NVIDIA Quadro K3100M; Intel(R) HD Graphics 4600
- Sound Card
- IDT High Definition Audio CODEC; PNP Device ID HDAUDIO\FUNC_01&VEN_111D&DEV_76E0
- Hard Drives
- Model Hitachi HTS727575A9E364
- Antivirus
- Microsoft Defender
- Other Info
- Mobile Workstation
-
-
#12
(crystal disk, hd sentinel, hwmonitor, speccy, speedfan, etc.)
I use hd sentinel.
-
- OS
- Windows 11 Stable, Release Preview, Beta (both), Dev, Canary
- Computer type
- PC/Desktop
- Manufacturer/Model
- Micro-Star International Co., Ltd. MS-7D54
- CPU
- AMD Ryzen 9 PRO 5950X
- Motherboard
- MSI MAG X570S Tomahawk Max WiFi (MS-7D54) (2 PCI-E x1, 2 PCI-E x16, 2 M.2, 4 DDR4 DIMM, Audio, Video, 2.5GbE LAN, WiFi)
- Memory
- 128 Gb
- Graphics Card(s)
- Intel(R) Arc(TM) A380 Graphics (2 ГБ)
- Sound Card
- Устройство с поддержкой High Definition Audio
- Monitor(s) Displays
- HP X34 [34″ LCD] (6CM1300J5J) {2021}
- Screen Resolution
- 3440×1440
- Hard Drives
- KINGSTON SFYRD2000G (2000 ГБ, PCI-E 4.0 x4)
- PSU
- Be Quiet! Dark Rock Pro 4
- Case
- Cooler Master HAF XB EVO
- Internet Speed
- 1000 Mb/s
- Browser
- Chrome
- Antivirus
- Windows Defender
-
-
#13
Is there a way to create a shortcut for this — too many clicks to remember.
-
- OS
- Windows 11 Pro + Win11 Canary VM.
- Computer type
- Laptop
- Manufacturer/Model
- ASUS Zenbook 14
- CPU
- I9 13th gen i9-13900H 2.60 GHZ
- Motherboard
- Yep, Laptop has one.
- Memory
- 16 GB soldered
- Graphics Card(s)
- Integrated Intel Iris XE
- Sound Card
- Realtek built in
- Monitor(s) Displays
- laptop OLED screen
- Screen Resolution
- 2880×1800 touchscreen
- Hard Drives
- 1 TB NVME SSD (only weakness is only one slot)
- PSU
- Internal + 65W thunderbolt USB4 charger
- Case
- Yep, got one
- Cooling
- Stella Artois (UK pint cans — 568 ml) — extra cost.
- Keyboard
- Built in UK keybd
- Mouse
- Bluetooth , wireless dongled, wired
- Internet Speed
- 900 mbs (ethernet), wifi 6 typical 350-450 mb/s both up and down
- Browser
- Edge
- Antivirus
- Defender
- Other Info
- TPM 2.0, 2xUSB4 thunderbolt, 1xUsb3 (usb a), 1xUsb-c, hdmi out, 3.5 mm audio out/in combo, ASUS backlit trackpad (inc. switchable number pad)
Macrium Reflect Home V8
Office 365 Family (6 users each 1TB onedrive space)
Hyper-V (a vm runs almost as fast as my older laptop)
-
-
#14
Is there a way to create a shortcut for this — too many clicks to remember.
This is as close as I could get you.
I couldn’t make a direct shortcut for some odd reason it wouldn’t accept the path. But you can do the following.
This Batch will open Settings > System Storage > Advanced storage settings > Disks & volumes
Copy and paste the following code into Notepad:
Batch:
@echo off
start explorer.exe ms-settings:disksandvolumes
Save the file with a .bat extension, for example, DisksAndVolumes.bat
You could then create a shortcut to the batch file if you wanted to.
-
- OS
- Windows 11 Pro 23H2 Build 22631.5039
- Computer type
- PC/Desktop
- Manufacturer/Model
- Sin-built
- CPU
- Intel(R) Core(TM) i7-4770K CPU @ 3.50GHz (4th Gen?)
- Motherboard
- ASUS ROG Maximus VI Formula
- Memory
- 32.0 GB of I forget and the box is in storage.
- Graphics Card(s)
- Gigabyte nVidia GeForce GTX 1660 Super OC 6GB
- Sound Card
- Onboard
- Monitor(s) Displays
- 5 x LG 25MS500-B — 1 x 24MK430H-B — 1 x Wacom Pro 22″ Tablet
- Screen Resolution
- All over the place
- Hard Drives
- Too many to list.
OS on Samsung 1TB 870 QVO SATA
- PSU
- Silverstone 1500
- Case
- NZXT Phantom 820 Full-Tower Case
- Cooling
- Noctua NH-D15 Elite Class Dual Tower CPU Cooler / 6 x EziDIY 120mm / 2 x Corsair 140mm somethings / 1 x 140mm Thermaltake something / 2 x 200mm Corsair.
- Keyboard
- Corsair K95 / Logitech diNovo Edge Wireless
- Mouse
- Logitech: G402 / G502 / Mx Masters / MX Air Cordless
- Internet Speed
- 1000/400Mbps
- Browser
- All sorts
- Antivirus
- Kaspersky Premium
- Other Info
- I’m on a horse.
-
- Operating System
- Windows 11 Pro 23H2 Build: 22631.4249
- Computer type
- Laptop
- Manufacturer/Model
- LENOVO Yoga 7i EVO OLED 14″ Touchscreen i5 12 Core 16GB/512GB
- CPU
- Intel Core 12th Gen i5-1240P Processor (1.7 — 4.4GHz)
- Memory
- 16GB LPDDR5 RAM
- Graphics card(s)
- Intel Iris Xe Graphics Processor
- Sound Card
- Optimized with Dolby Atmos®
- Screen Resolution
- QHD 2880 x 1800 OLED
- Hard Drives
- M.2 512GB
- Antivirus
- Defender / Malwarebytes
- Other Info
- …still on a horse.
-
-
#15
I couldn’t make a direct shortcut for some odd reason it wouldn’t accept the path.
And if so?
-
- OS
- Windows 11 Stable, Release Preview, Beta (both), Dev, Canary
- Computer type
- PC/Desktop
- Manufacturer/Model
- Micro-Star International Co., Ltd. MS-7D54
- CPU
- AMD Ryzen 9 PRO 5950X
- Motherboard
- MSI MAG X570S Tomahawk Max WiFi (MS-7D54) (2 PCI-E x1, 2 PCI-E x16, 2 M.2, 4 DDR4 DIMM, Audio, Video, 2.5GbE LAN, WiFi)
- Memory
- 128 Gb
- Graphics Card(s)
- Intel(R) Arc(TM) A380 Graphics (2 ГБ)
- Sound Card
- Устройство с поддержкой High Definition Audio
- Monitor(s) Displays
- HP X34 [34″ LCD] (6CM1300J5J) {2021}
- Screen Resolution
- 3440×1440
- Hard Drives
- KINGSTON SFYRD2000G (2000 ГБ, PCI-E 4.0 x4)
- PSU
- Be Quiet! Dark Rock Pro 4
- Case
- Cooler Master HAF XB EVO
- Internet Speed
- 1000 Mb/s
- Browser
- Chrome
- Antivirus
- Windows Defender
-
-
#16
Hey?
Not sure what and if so means, Dronix???
This is as close as I could get you.
I couldn’t make a direct shortcut for some odd reason it wouldn’t accept the path. But you can do the following.
This Batch will open Settings > System Storage > Advanced storage settings > Disks & volumes
Copy and paste the following code into Notepad:
Batch:
@echo off
start explorer.exe ms-settings:disksandvolumes
Save the file with a .bat extension, for example, DisksAndVolumes.bat
You could then create a shortcut to the batch file if you wanted to.
I disabled my external 5 SSD hub and the shortcut version worked. Not sure what was preventing the shortcut from working. Perhaps because 50 million SSD’s on this computer. Exaggerated by a couple of drives.
Trying to write the batch to open the properties section for a designated disk, ex. Disk 0, either in the batch or a separate diskpart text file linked to the batch, but I fail.
Maybe @Brink knows?
-
- OS
- Windows 11 Pro 23H2 Build 22631.5039
- Computer type
- PC/Desktop
- Manufacturer/Model
- Sin-built
- CPU
- Intel(R) Core(TM) i7-4770K CPU @ 3.50GHz (4th Gen?)
- Motherboard
- ASUS ROG Maximus VI Formula
- Memory
- 32.0 GB of I forget and the box is in storage.
- Graphics Card(s)
- Gigabyte nVidia GeForce GTX 1660 Super OC 6GB
- Sound Card
- Onboard
- Monitor(s) Displays
- 5 x LG 25MS500-B — 1 x 24MK430H-B — 1 x Wacom Pro 22″ Tablet
- Screen Resolution
- All over the place
- Hard Drives
- Too many to list.
OS on Samsung 1TB 870 QVO SATA
- PSU
- Silverstone 1500
- Case
- NZXT Phantom 820 Full-Tower Case
- Cooling
- Noctua NH-D15 Elite Class Dual Tower CPU Cooler / 6 x EziDIY 120mm / 2 x Corsair 140mm somethings / 1 x 140mm Thermaltake something / 2 x 200mm Corsair.
- Keyboard
- Corsair K95 / Logitech diNovo Edge Wireless
- Mouse
- Logitech: G402 / G502 / Mx Masters / MX Air Cordless
- Internet Speed
- 1000/400Mbps
- Browser
- All sorts
- Antivirus
- Kaspersky Premium
- Other Info
- I’m on a horse.
-
- Operating System
- Windows 11 Pro 23H2 Build: 22631.4249
- Computer type
- Laptop
- Manufacturer/Model
- LENOVO Yoga 7i EVO OLED 14″ Touchscreen i5 12 Core 16GB/512GB
- CPU
- Intel Core 12th Gen i5-1240P Processor (1.7 — 4.4GHz)
- Memory
- 16GB LPDDR5 RAM
- Graphics card(s)
- Intel Iris Xe Graphics Processor
- Sound Card
- Optimized with Dolby Atmos®
- Screen Resolution
- QHD 2880 x 1800 OLED
- Hard Drives
- M.2 512GB
- Antivirus
- Defender / Malwarebytes
- Other Info
- …still on a horse.
-
-
#17
I think that disk usage is more useful, since it can help to detect 100% lags.
You can not really do much about the temperatures, especially on NVMe.
I agree but temp monitoring is handy when creating images on externals so as to keep an eye out for overheating (alarm levels appropriately set) so you can stop the process if temp goes to hot. Hasn’t happened yet but I allow up to 75℃ for alarm.
I also use HWINFO 64 at times.
-
- OS
- Win 11 Home & Pro
- Computer type
- Laptop
- Manufacturer/Model
- ASUS Vivobook
- CPU
- AMD Ryzen™ 7 7730U
- Motherboard
- M1605YA
- Memory
- 15.0GB Dual-Channel DDR4 @ 1596MHz (22-22-22-52)
- Graphics Card(s)
- 512MB ATI AMD Radeon Graphics (ASUStek Computer Inc)
- Monitor(s) Displays
- Generic PnP Monitor (1920×1200@60Hz) — P1 PLUS (1920×1080@59Hz)
- Screen Resolution
- 1920 X 1200
- Hard Drives
- 953GB Western Digital WD
- PSU
- 45 Watts
- Mouse
- Lenovo Bluetooth.
- Internet Speed
- 500 Mbps
- Browser
- Edge
- Antivirus
- Defender
-
- Operating System
- Windows 11
- Computer type
- Laptop
- Manufacturer/Model
- ACER NITRO
- CPU
- AMD Ryzen 7 5800H / 3.2 GHz
- Motherboard
- CZ Scala_CAS (FP6)
- Memory
- 32 GB DDR4 SDRAM 3200 MHz
- Graphics card(s)
- NVIDIA GeForce RTX 3060 6 GB GDDR6 SDRAM
- Sound Card
- Realtek Audio. NVIDIA High Definition Audio
- Monitor(s) Displays
- 15.6″ LED backlight 1920 x 1080 (Full HD) 144 Hz
- Screen Resolution
- 1920 x 1080 (Full HD)
- Hard Drives
- Samsung 970 Evo Plus 2TB NVMe M.2
- PSU
- 180 Watt, 19.5 V
- Mouse
- Lenovo Bluetooth
- Internet Speed
- 500 Mbps
- Browser
- Edge
- Antivirus
- Defender
-
-
#18
Not sure what and if so means, Dronix???
You’ll have to excuse my «super-English», but that’s how the translator failed to translate it. What I meant was that you can create a shortcut with the command ms-settings:disksandvolumes without start explorer.exe.
-
- OS
- Windows 11 Stable, Release Preview, Beta (both), Dev, Canary
- Computer type
- PC/Desktop
- Manufacturer/Model
- Micro-Star International Co., Ltd. MS-7D54
- CPU
- AMD Ryzen 9 PRO 5950X
- Motherboard
- MSI MAG X570S Tomahawk Max WiFi (MS-7D54) (2 PCI-E x1, 2 PCI-E x16, 2 M.2, 4 DDR4 DIMM, Audio, Video, 2.5GbE LAN, WiFi)
- Memory
- 128 Gb
- Graphics Card(s)
- Intel(R) Arc(TM) A380 Graphics (2 ГБ)
- Sound Card
- Устройство с поддержкой High Definition Audio
- Monitor(s) Displays
- HP X34 [34″ LCD] (6CM1300J5J) {2021}
- Screen Resolution
- 3440×1440
- Hard Drives
- KINGSTON SFYRD2000G (2000 ГБ, PCI-E 4.0 x4)
- PSU
- Be Quiet! Dark Rock Pro 4
- Case
- Cooler Master HAF XB EVO
- Internet Speed
- 1000 Mb/s
- Browser
- Chrome
- Antivirus
- Windows Defender
-
-
#19
You’ll have to excuse my «super-English», but that’s how the translator failed to translate it. What I meant was that you can create a shortcut with the command ms-settings:disksandvolumes without start explorer.exe.
Ahh OK sorry.
Yes, that’s what I originally did. The failing is somehow linked to an External 4 slot SSD Hub.
start explorer.exe is only used un the batch.
-
- OS
- Windows 11 Pro 23H2 Build 22631.5039
- Computer type
- PC/Desktop
- Manufacturer/Model
- Sin-built
- CPU
- Intel(R) Core(TM) i7-4770K CPU @ 3.50GHz (4th Gen?)
- Motherboard
- ASUS ROG Maximus VI Formula
- Memory
- 32.0 GB of I forget and the box is in storage.
- Graphics Card(s)
- Gigabyte nVidia GeForce GTX 1660 Super OC 6GB
- Sound Card
- Onboard
- Monitor(s) Displays
- 5 x LG 25MS500-B — 1 x 24MK430H-B — 1 x Wacom Pro 22″ Tablet
- Screen Resolution
- All over the place
- Hard Drives
- Too many to list.
OS on Samsung 1TB 870 QVO SATA
- PSU
- Silverstone 1500
- Case
- NZXT Phantom 820 Full-Tower Case
- Cooling
- Noctua NH-D15 Elite Class Dual Tower CPU Cooler / 6 x EziDIY 120mm / 2 x Corsair 140mm somethings / 1 x 140mm Thermaltake something / 2 x 200mm Corsair.
- Keyboard
- Corsair K95 / Logitech diNovo Edge Wireless
- Mouse
- Logitech: G402 / G502 / Mx Masters / MX Air Cordless
- Internet Speed
- 1000/400Mbps
- Browser
- All sorts
- Antivirus
- Kaspersky Premium
- Other Info
- I’m on a horse.
-
- Operating System
- Windows 11 Pro 23H2 Build: 22631.4249
- Computer type
- Laptop
- Manufacturer/Model
- LENOVO Yoga 7i EVO OLED 14″ Touchscreen i5 12 Core 16GB/512GB
- CPU
- Intel Core 12th Gen i5-1240P Processor (1.7 — 4.4GHz)
- Memory
- 16GB LPDDR5 RAM
- Graphics card(s)
- Intel Iris Xe Graphics Processor
- Sound Card
- Optimized with Dolby Atmos®
- Screen Resolution
- QHD 2880 x 1800 OLED
- Hard Drives
- M.2 512GB
- Antivirus
- Defender / Malwarebytes
- Other Info
- …still on a horse.
-
-
#20
Isn’t it enough in the bat file before the ms-settings:disksandvolumes command to just start or just explorer? It worked for me.
-
- OS
- Windows 11 Stable, Release Preview, Beta (both), Dev, Canary
- Computer type
- PC/Desktop
- Manufacturer/Model
- Micro-Star International Co., Ltd. MS-7D54
- CPU
- AMD Ryzen 9 PRO 5950X
- Motherboard
- MSI MAG X570S Tomahawk Max WiFi (MS-7D54) (2 PCI-E x1, 2 PCI-E x16, 2 M.2, 4 DDR4 DIMM, Audio, Video, 2.5GbE LAN, WiFi)
- Memory
- 128 Gb
- Graphics Card(s)
- Intel(R) Arc(TM) A380 Graphics (2 ГБ)
- Sound Card
- Устройство с поддержкой High Definition Audio
- Monitor(s) Displays
- HP X34 [34″ LCD] (6CM1300J5J) {2021}
- Screen Resolution
- 3440×1440
- Hard Drives
- KINGSTON SFYRD2000G (2000 ГБ, PCI-E 4.0 x4)
- PSU
- Be Quiet! Dark Rock Pro 4
- Case
- Cooler Master HAF XB EVO
- Internet Speed
- 1000 Mb/s
- Browser
- Chrome
- Antivirus
- Windows Defender
Keeping your NVMe SSD (Non-Volatile Memory Express Solid State Drive) at optimal temperatures is crucial for maintaining its performance, longevity, and overall health. Overheating can lead to reduced speed, data corruption, and even drive failure. In this comprehensive tutorial, we’ll guide you through the various methods to check NVMe SSD disk drive temperature in Windows 11, ensuring your system runs smoothly and efficiently.
Table of Contents
- Why Monitor NVMe SSD Temperature?
- Method 1: Using Windows 11 Task Manager
- Method 2: Using Third-Party Software
- CrystalDiskInfo
- HWMonitor
- Samsung Magician (for Samsung SSDs)
- Method 3: Using BIOS/UEFI
- Tips to Keep Your NVMe SSD Cool
- Conclusion
- Frequently Asked Questions
Why Monitor NVMe SSD Temperature?
Monitoring the temperature of your NVMe SSD is essential for several reasons:
- Performance Optimization: High temperatures can throttle your SSD’s performance to prevent overheating.
- Longevity: Consistently high temperatures can shorten the lifespan of your SSD.
- Data Integrity: Overheating can lead to data corruption and loss.
- System Stability: Prevent unexpected shutdowns or crashes caused by thermal issues.
By regularly checking your SSD’s temperature, you can take proactive measures to maintain optimal operating conditions.
Also Read- How To Enable Or Disable Administrator Protection For Admin Approval Mode In Windows 11
Method 1: Using Windows 11 Task Manager
Windows 11 Task Manager offers a basic overview of your system’s performance, including storage device temperatures if supported by your hardware.
- Open Task Manager:
- Press
Ctrl + Shift + Escto launch Task Manager. - Alternatively, right-click the Start button and select Task Manager.
- Press
- Navigate to the Performance Tab:
- Click on the Performance tab.
- Select Disk from the left sidebar to view disk performance metrics.
- Check Temperature (If Available):
- Some NVMe SSDs and their drivers support temperature monitoring directly in Task Manager.
- If available, you’ll see the temperature displayed alongside other disk information.
Note: This feature depends on your SSD manufacturer and the drivers installed. If temperature isn’t displayed, consider using third-party software.
Also Read- How To Change Game Installation Options In Microsoft Store And Xbox App on Windows 11
Method 2: Using Third-Party Software
For more detailed and reliable temperature monitoring, third-party applications are recommended. Here are some of the best tools available:
CrystalDiskInfo
CrystalDiskInfo is a free, user-friendly tool that provides comprehensive information about your SSD, including temperature.
- Download and Install:
- Visit the CrystalDiskInfo website and download the latest version.
- Install the application following the on-screen instructions.
- Launch CrystalDiskInfo:
- Open the application to view detailed information about all connected drives.
- Check SSD Temperature:
- Locate your NVMe SSD in the list.
- The temperature is displayed prominently under the Temperature column.
HWMonitor
HWMonitor is a powerful hardware monitoring tool that tracks various system temperatures, including your NVMe SSD.
- Download and Install:
- Visit the HWMonitor website and download the free version.
- Install and launch the application.
- View Temperature Details:
- Navigate to the Sensors section.
- Find your NVMe SSD listed among the storage devices.
- The temperature is displayed alongside other sensor data.
Samsung Magician (for Samsung SSDs)
If you own a Samsung NVMe SSD, Samsung Magician offers specialized features for monitoring and optimizing your drive.
- Download and Install:
- Visit the Samsung Magician website and download the software.
- Install and open the application.
- Check SSD Temperature:
- Select your Samsung NVMe SSD from the list.
- The temperature is displayed under the Drive Details section.
Note: Samsung Magician is specifically designed for Samsung SSDs and may not support other brands.
Method 3: Using BIOS/UEFI
Accessing your system’s BIOS or UEFI can provide temperature information for various hardware components, including NVMe SSDs.
- Restart Your Computer:
- Save all work and restart your PC.
- Enter BIOS/UEFI:
- During the boot process, press the designated key (commonly
F2,Delete, orEsc) to enter BIOS/UEFI settings.
- During the boot process, press the designated key (commonly
- Navigate to Hardware Monitoring:
- Look for sections like Hardware Monitor, System Health, or PC Health Status.
- Find your NVMe SSD listed among the components.
- Check Temperature:
- The temperature will be displayed alongside other hardware metrics.
Note: The availability of SSD temperature readings in BIOS/UEFI varies based on motherboard and SSD compatibility.
Also Read- How To Enable Or Disable Fullscreen Optimizations For Games In Windows 11
Tips to Keep Your NVMe SSD Cool
Maintaining optimal SSD temperatures can extend its lifespan and ensure consistent performance. Here are some tips to keep your NVMe SSD cool:
- Ensure Proper Airflow:
- Make sure your PC case has adequate ventilation.
- Use additional case fans if necessary to improve airflow around the SSD.
- Use Heatsinks:
- Install an NVMe SSD heatsink to dissipate heat more effectively.
- Many high-performance motherboards offer dedicated heatsink solutions for NVMe slots.
- Avoid Overloading:
- Limit intensive tasks that constantly read/write to the SSD.
- Ensure your system isn’t overheating, as this can indirectly affect SSD temperatures.
- Monitor Regularly:
- Keep an eye on your SSD’s temperature using the methods outlined above.
- Address any temperature spikes promptly to prevent potential damage.
Conclusion
Monitoring the temperature of your NVMe SSD in Windows 11 is essential for maintaining optimal performance and extending the drive’s lifespan. Whether you use built-in tools like Task Manager, reliable third-party software such as CrystalDiskInfo or HWMonitor, or access BIOS/UEFI settings, keeping track of your SSD’s temperature is straightforward and highly beneficial. Additionally, implementing cooling strategies ensures your NVMe SSD remains efficient and reliable, safeguarding your data and enhancing your overall computing experience.
Stay Proactive: Regularly check your NVMe SSD’s temperature and follow best practices to keep it cool. This proactive approach will help you avoid potential issues and ensure your system runs smoothly for years to come.
Neil S
Neil is a highly qualified Technical Writer with an M.Sc(IT) degree and an impressive range of IT and Support certifications including MCSE, CCNA, ACA(Adobe Certified Associates), and PG Dip (IT). With over 10 years of hands-on experience as an IT support engineer across Windows, Mac, iOS, and Linux Server platforms, Neil possesses the expertise to create comprehensive and user-friendly documentation that simplifies complex technical concepts for a wide audience.
- Modern SSDs are fast, especially NVMe models that can reach speeds over 10 GB/s, but that often comes at a cost of high temperatures.
- It’s important to check the SSD temperature in Windows to ensure it’s operating in a safe temperature range before you put your data in danger.
- Learn how to check SSD temperature in Windows without software and with third-party free utilities that open the door for better monitoring.
Windows 11 now includes SSD and HDD temperature monitoring directly in the Settings app: System > Storage > Advanced Storage Settings > Disks & Volumes > Properties > Drive Health. There are also free utilities you can use for continuous monitoring.
If you care about your data, you should care about the temperature of your SSD. Too high and you may end up with a drive that’s impossible to recover. Sure, you should always back up your data (see our dedicated Windows Backup section), but it’s no fun to replace a broken SSD.
Modern SSDs, be they SATA, NVMe, M.2, or PCI Express, do have mechanisms in place to self-diagnose in case of a problem (the so-called SMART technology), but from experience, I can tell you that a drive failure rarely comes with a warning.
That’s why I recommend you keep an eye on your SSD temperature. I’m not advocating for constant monitoring but check up on what the drive is doing from time to time.
Why?
Just to make sure it’s not overheating, especially if you’re constantly writing or reading to the flash memory on these long hot summer days.
I have three methods for checking the SSD temperature in Windows 10 and 11 for you, one using the included functionality of the OS, one with a free and simple-to-use utility, plus a more complex monitoring solution, also free.
Let’s get started:
CONTENTS
- Check the Current SSD Temperature with the Windows Disks and Volumes
- Use HWMonitor to Check SSD Temperatures with Ease
- Monitor SSD Temperatures in System Tray and Display Graphs with HWiNFO
Check the Current SSD Temperature with the Windows Disks and Volumes
Let’s start with the option that doesn’t require you to install any software. This method works in both Windows 10 and Windows 11 and involves the Settings app. The images below are for Windows 11, but follow the same steps in Windows 10 and you’ll be just fine:
1. Press the Win + I keyboard shortcut to open the Settings app.
2. Navigate to the System section.
3. Find the Storage sub-section and expand.
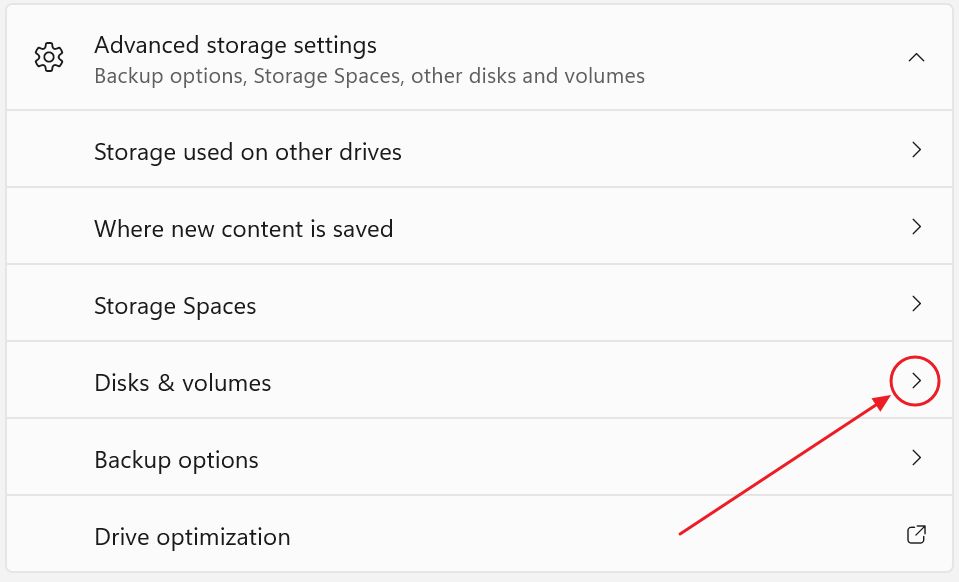
4. Scroll into Storage until you get to the Storage Management sub-heading. Here there’s an option called Advanced storage settings. Expand to show a bunch of other options.
5. Click on the one called Disks & volumes.
6. You will now see a list of disks installed on your PC (SSDs and HDDs grouped together). Under each disk, there’s also a list of partitions, as you had set them up.
Each entry has a Properties button right next to it. Just make sure you click on the one next to an SSD, not a partition.
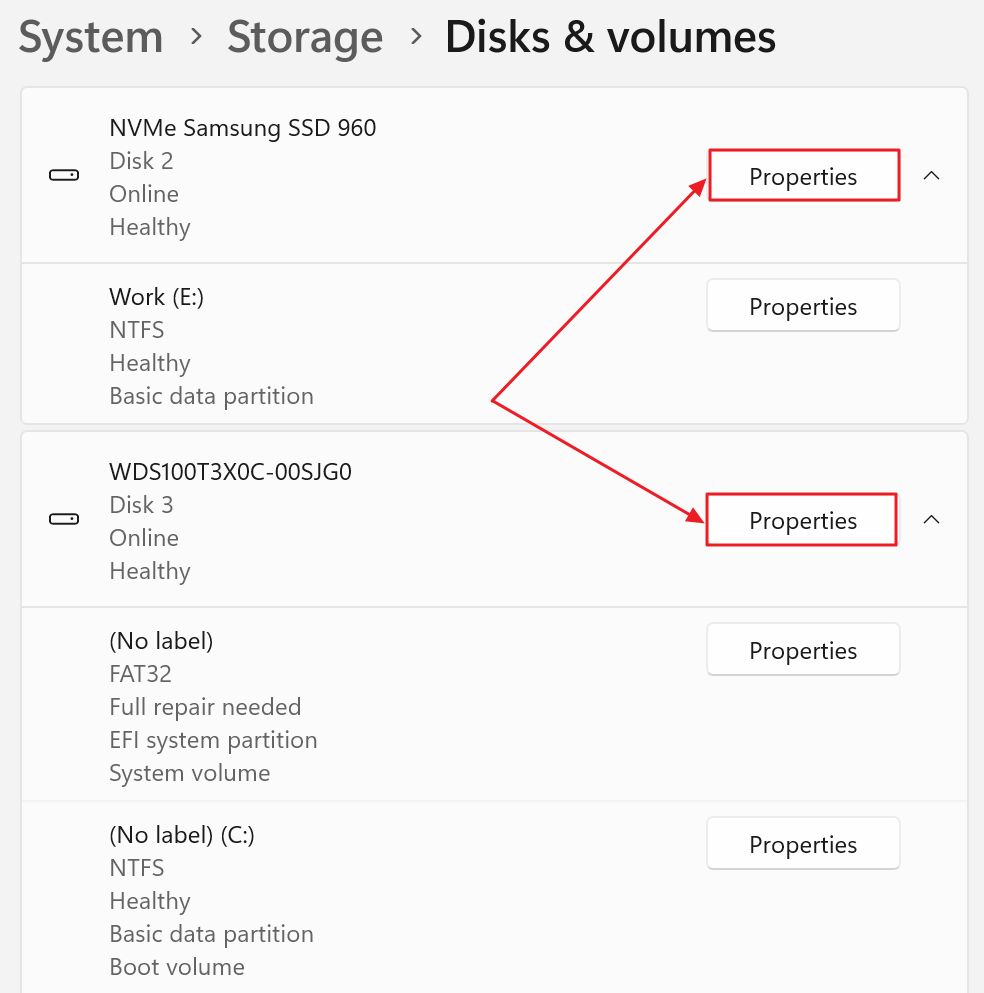
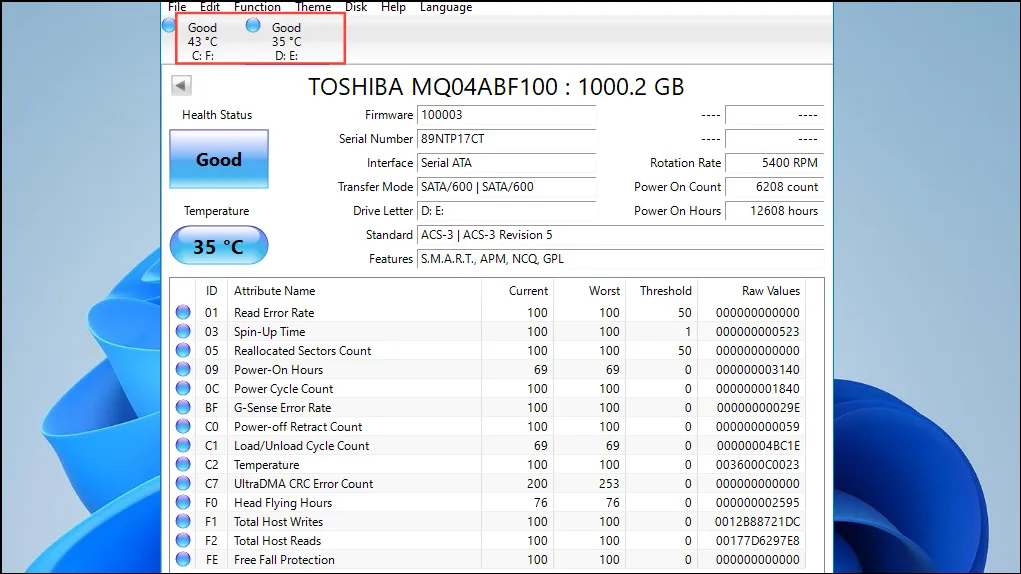
7. Here are the details for my aging Samsung 960 EVO SSD. Under Drive health you can check the SSD estimated remaining life (works only for NVMe drives!). I lost 5% in 5 years, which is not bad.
There’s also an indication of the available saved-up flash space, which is 100%, meaning no flash cells have deteriorated to the point at which they need to be relocated to a different address.
Lastly, there’s the current SSD temperature reading.
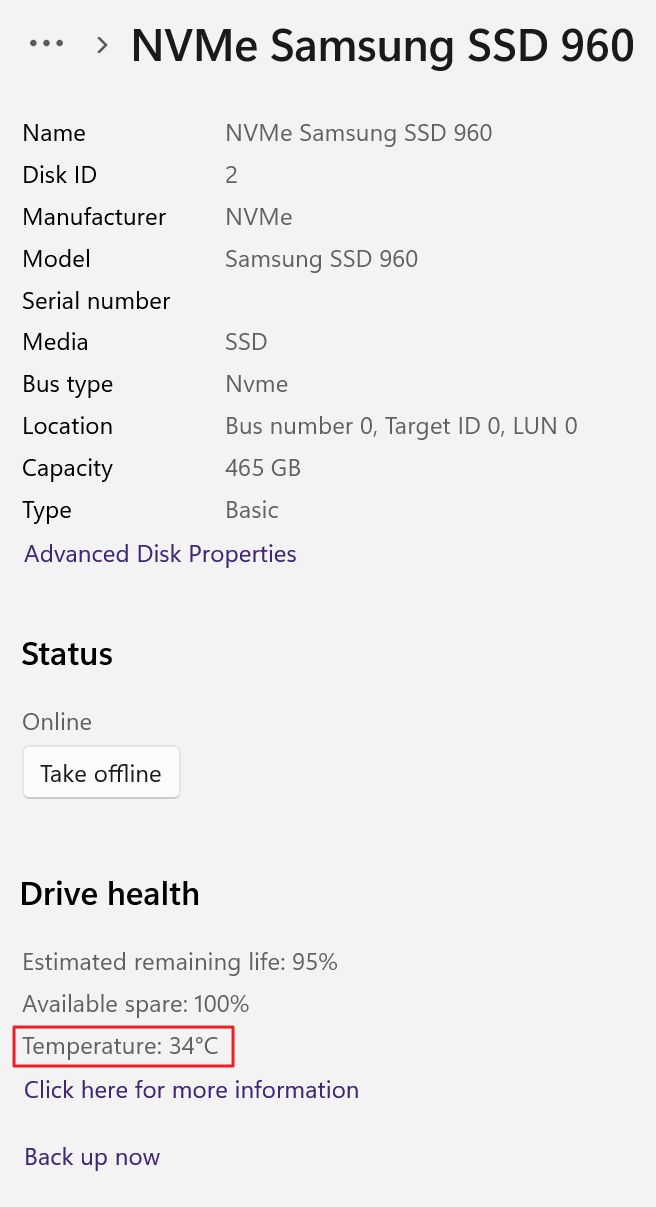
This method works but is a bit inconvenient if you want to see all temperatures at the same time. I have four drives in my system, so yeah, clicking each drive in the Settings app is not ideal.
I would have expected to see the temperature reading in the Task Manager, just like you get for your GPU temperature in Windows. This lack of cohesion with Microsoft’s OS is hard for me to comprehend sometimes.
Use HWMonitor to Check SSD Temperatures with Ease
One of the simple free hardware monitoring programs I always recommend is HWMonitor.
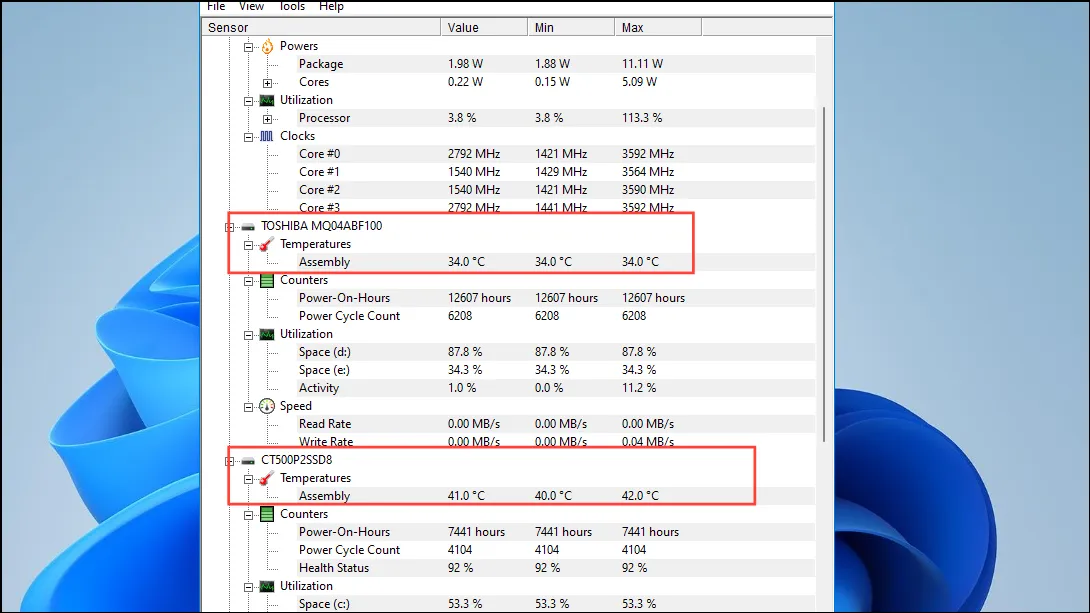
The app can display the most important stats for all major PC components. You get current, minimum, and maximum temperatures for your SSD, together with a bunch of other stats.
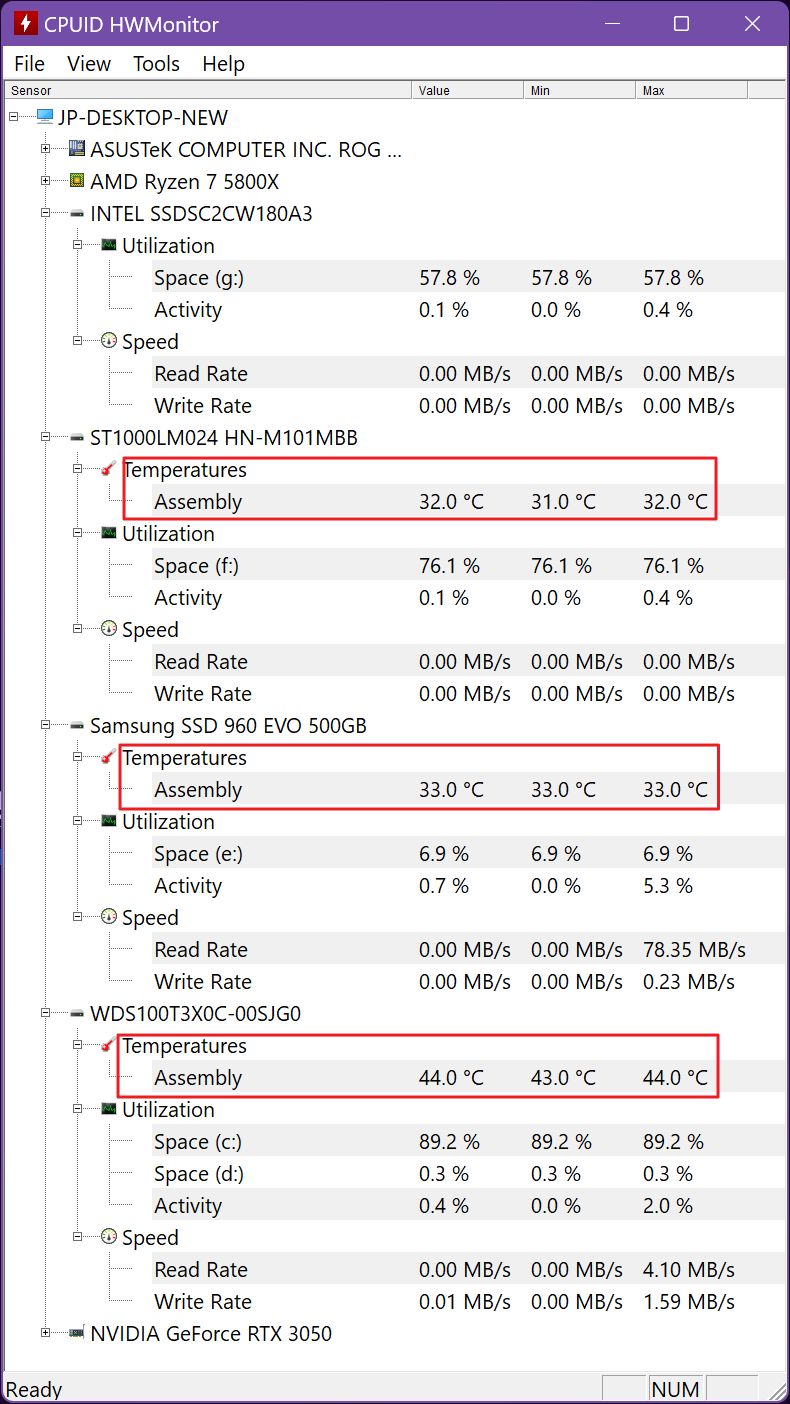
What more could you want?
Monitor SSD Temperatures in System Tray and Display Graphs with HWiNFO
If the answer is that you want to have the current temperature shown in the System Tray or you want to check the evolution of your SSD temperature during various tasks, then you need to download HWiNFO.
Let’s say the app is a bit more complicated. But that’s a good thing because it can do a lot more.
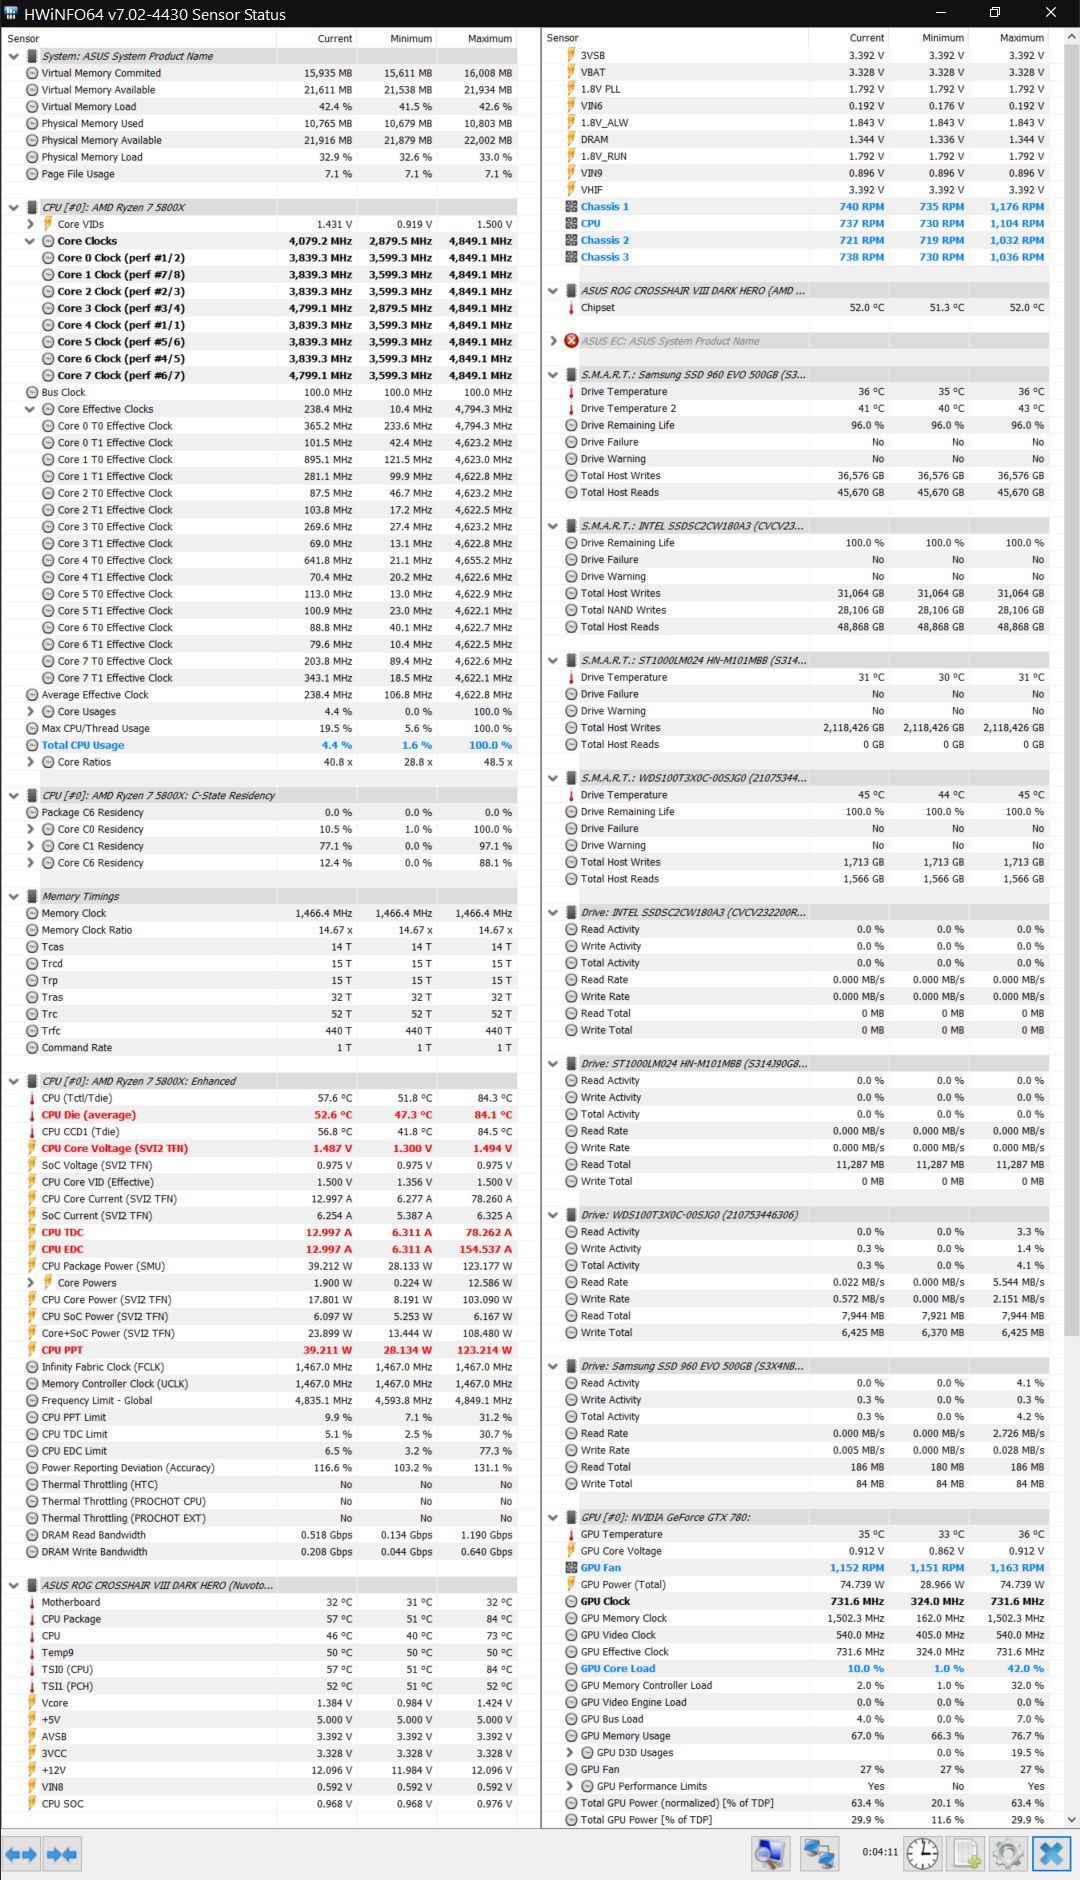
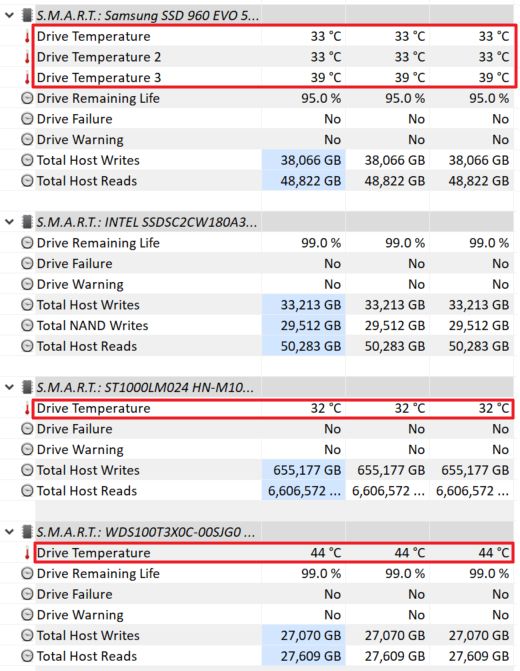
Don’t be alarmed. Just scroll the HWiNFO sensor panels to the S.M.A.R.T. section, where you’ll get a heading with the SSD (and HDD) model name for each disk detected in your system.
For my Samsung 960 EVO SSD HWiNFO is capable of reading not one, but three sensors. Is that cool? Yes. Does it really matter? Probably not.
Anyway, just right-click on any of the sensor readings you’re interested to monitor.
If you choose the Show Graph option you get a floating window that you can move anywhere on the desktop. Repeat for all the sensors you’re interesting to check.
If you don’t want the temperature reading to take that much space (graphs are resizeable though), let’s choose Add to tray, which would put the SSD temperature reading in the System Tray area.
Make sure you don’t add too many sensors there, as it can get crowded quickly. Also, customize the text and background color to easily distinguish between the various sensors you’re showing there.
These are the three methods to check your SSD temperature in Windows. Which one you prefer, and why? Let me know in the comments.
Frequently Asked Questions
What SSD Temperature is Considered Too High?
For modern SSDs, anything above 70 degrees Celsius (158 Fahrenheit) is considered too much. The SSD will start to throttle down, significantly dropping in speed as it approaches the temperature limit.
Not only that, but high temperatures will deteriorate the memory cells faster, shortening their lifespan.
The actual maximum operating temperature for an SSD varies from model to model, so you should always check the manufacturer’s specifications.
What is the Normal SSD Temperature Range it Should Run At?
The normal correct temperature range for an SSD is about 30-40 degrees Celsius (86 – 104 F) at IDLE and 55 – 60 degrees Celsius (131 – 140 F) under load. These numbers are a bit higher than what you would see with a mechanical hard disk drive.
SSD temperature ranges vary greatly with the type of load you put on your SSD, how long are you hammering it with reads/writes, and the cooling you have at your disposal.
Also, it’s normal for flash memory chips to run at higher temperatures than the SSD controller. Cooling down the memory chips too much is not optimal in terms of performance and long-term reliability.
How to Bring Down the SSD Temperature?
The quickest way to lower the temperature of your SSD is to stop copying or writing to it. It’s not practical, of course, so what you can do is ensure proper ventilation is supplied in the SSD area by case fans (if it’s mounted inside a PC case).
Also, adding a small radiator can make wonders in terms of temperature spikes, as I tested with my Samsung NVMe SSD a few years ago. I saw between 15 and 20 degrees C lower temperatures.
Most motherboards now have NVMe M.2 SSD shields that act as heatsinks, which makes SSD overheating a non-issue.
If it’s a laptop SSD you may not have room inside the laptop case to add a radiator, nor would you want to take on this DIY task. In such a case, your only option is to replace the SSD with a better-cooled one. The old SSD can always be used in an external SSD enclosure or in a ventilated PC case.
What is SSD Operating vs SSD Non-Operating Temperature?
The SSD Operating temperature is the safe temperature range when the computer is ON and the SSD is powered and active.
The SSD Non-Operating temperature is the range of temperatures the SSD can be stored when non-functioning, not connected, and not powered.
The Non-Operating temperature range for an SSD is typically wider than the operating temperature range, as you can imagine.
Typical operating ranges are between 0 and 70° C (32° to 158° F), while non-operating temperature ranges are -55°C to 85°C (-67°F to 185°F). Always double-check the manufacturer’s spec sheet if in doubt.
I’m a writer and Editor-in-Chief at BinaryFork. I am passionate about technology, science, space exploration, and movies. I started writing about tech more than 20 years ago, after graduating in Computer Science.
С SSD вам не нужно беспокоиться о потере данных так сильно, как с традиционными жесткими дисками или HDDS, поскольку у них нет движущихся частей и, следовательно, они не так легко повреждаются. Тем не менее, вам все равно нужно обращать внимание на определенные вещи, чтобы поддерживать SSD в хорошем состоянии. Одной из самых важных среди них является температура, поскольку SSD могут повреждаться при более высоких температурах. Вот почему вам всегда следует следить за температурой SSD и следить за тем, чтобы она оставалась в приемлемых пределах.
Метод 1: Использование управления дисками и томами
Откройте приложение «Настройки» с помощью Win+Iярлыка и нажмите «Система» слева.
На странице «Система» нажмите на опцию «Хранилище».
На следующей странице нажмите «Расширенные параметры хранилища».
Затем нажмите «Диски и тома», чтобы просмотреть всю информацию, связанную с различными дисками в вашей системе.
На следующей странице будет список всех ваших дисков. Найдите свой SSD и нажмите кнопку «Свойства» справа.
Вы увидите температуру SSD под разделом «Состояние диска». Однако, используя этот метод, вы можете увидеть температуру только для одного диска за раз.
Метод 2: с помощью HWMonitor
HWMonitor — бесплатное приложение, которое поможет вам просмотреть ряд важных показателей вашего ПК, включая температуру.
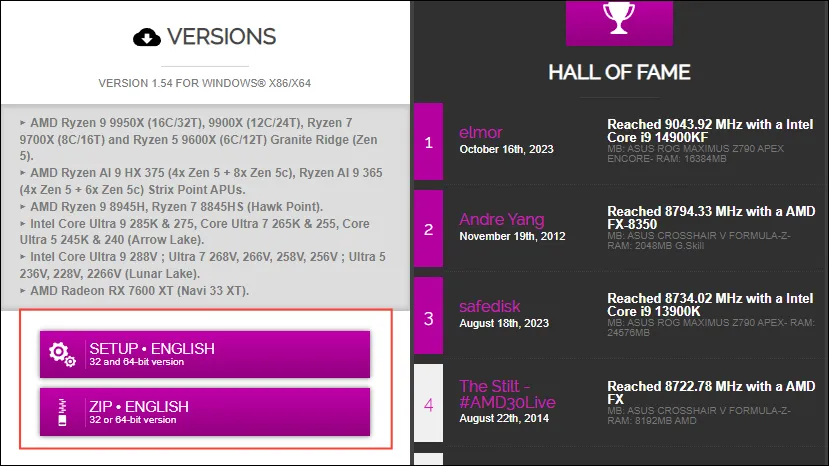
Перейдите по этой ссылке, прокрутите страницу вниз и нажмите кнопку «Настройка» или «Zip», чтобы загрузить установщик.exe или.zip в зависимости от ваших предпочтений.
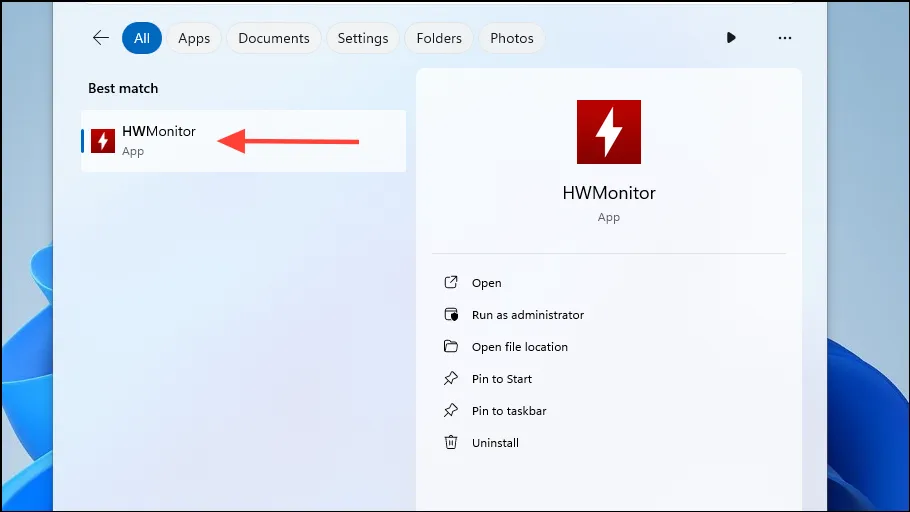
После загрузки установщика откройте его и установите программу на свой компьютер. Затем найдите «HWMonitor» в меню «Пуск» и откройте его.
Когда программа откроется, вы увидите много информации на экране. Температура для всех ваших дисков будет указана отдельно, что означает, что вы можете легко проверить температуру вашего SSD. Более того, в отличие от предыдущего метода, HWINFO позволяет вам просматривать температуру для нескольких дисков одновременно.
Метод 3: Использование информации CrystalDisk
Еще один инструмент, который вы можете использовать для просмотра температуры SSD-накопителя, — CrystalDiskInfo.
Загрузите CrystalInfoDisk info по этой ссылке и установите его на свой ПК.
После установки приложения откройте его и вы увидите температуру SSD слева под надписью «Состояние здоровья».
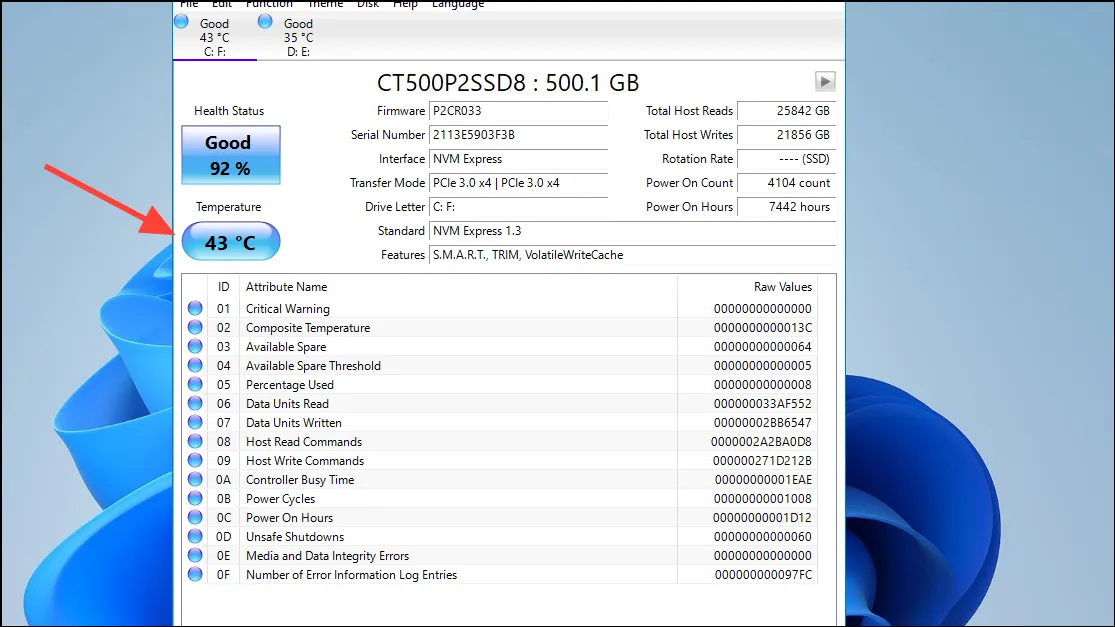
Если у вас несколько дисков, вы можете переключаться между ними с помощью вкладок в верхней части.
Что нужно знать
- Идеальный температурный диапазон для SSD составляет от 20 до 60 градусов по Цельсию. Если температура накопителя часто превышает 60 градусов, возможно, проблема в нем или в вашем ПК.
- Если температура вашего SSD-накопителя будет оставаться на уровне 70 градусов по Цельсию или выше в течение длительного периода времени, это может привести к таким проблемам, как сбой и зависание вашего ПК, а также к потере данных.
- Температура вашего SSD может повышаться по нескольким причинам, например, из-за работы очень тяжелых приложений или игр в течение длительного периода, а также из-за неправильной вентиляции и воздушного потока. Это не обязательно означает, что с вашим SSD проблема, поэтому вам следует рассмотреть и другие факторы, прежде чем принять решение о его замене.
- В случае возникновения проблем с SSD-накопителем вы можете увидеть предупреждение, и вам следует как можно скорее создать резервную копию данных и начать поиск нового диска.
Просмотров: 221