
Remote Desktop Connection Manager is a powerful tool that allows users to manage multiple remote desktop sessions in one place. It offers convenience and efficiency by saving login credentials for various servers and connections. However, there may be instances where you need to view or retrieve a saved password from Remote Desktop Connection Manager. In this blog post, we will explore several methods on how to view saved passwords in Remote Desktop Connection Manager, providing you with the knowledge to conveniently access and manage your remote connections.
Video Tutorial:
Why You Need to View Saved Passwords in Remote Desktop Connection Manager
There are several reasons why you might need to view saved passwords in Remote Desktop Connection Manager. One common scenario is when you have forgotten a password and want to retrieve it from the application. By viewing saved passwords, you can quickly regain access to your remote connections without the hassle of resetting passwords or contacting system administrators.
Another reason is when you need to transfer your remote connections from one computer to another. By retrieving the saved passwords, you can seamlessly migrate your connections to a new device while preserving the login information. This saves time and effort in reconfiguring each connection with their respective credentials.
Additionally, viewing saved passwords can be crucial for security audits or compliance purposes. Organizations may need to monitor and document the login credentials used for remote connections. By accessing the saved passwords in Remote Desktop Connection Manager, administrators can ensure that the correct credentials are being utilized and make any necessary adjustments to enhance security measures.
Now that we understand the importance of viewing saved passwords in Remote Desktop Connection Manager, let’s explore the methods on how to accomplish this task.
Method 1: Via the User Interface
One of the easiest ways to view saved passwords in Remote Desktop Connection Manager is through the user interface. Remote Desktop Connection Manager provides a straightforward process to access and retrieve the saved passwords. Here’s how:
Step 1: Open Remote Desktop Connection Manager on your computer.
Step 2: In the left panel, locate the server or connection for which you want to view the saved password.
Step 3: Right-click on the server or connection and select «Properties» from the context menu.
Step 4: In the Properties window, navigate to the «Logon Credentials» tab.
Step 5: Under the «Logon Credentials» section, you will find the saved username and password for the selected server or connection.
Pros:
1. Easy and intuitive method to view saved passwords.
2. No additional tools or software required.
3. Allows you to quickly retrieve passwords for individual connections.
Cons:
1. May not be suitable for bulk password retrieval.
Method 1 Pros & Cons:
| Pros | Cons |
|---|---|
| 1. Easy and intuitive method to view saved passwords. | 1. May not be suitable for bulk password retrieval. |
| 2. No additional tools or software required. | |
| 3. Allows you to quickly retrieve passwords for individual connections. |
Method 2: Using PowerShell
Another method to view saved passwords in Remote Desktop Connection Manager is by utilizing PowerShell. PowerShell is a powerful scripting language that allows you to automate administrative tasks on Windows-based systems. By using PowerShell, you can retrieve the saved passwords from Remote Desktop Connection Manager in a centralized manner. Here’s how:
Step 1: Launch PowerShell on your computer.
Step 2: Run the following command to import the required module for accessing password information in Remote Desktop Connection Manager:
«`
Import-Module RemoteDesktopManager
«`
Step 3: Next, run the following command to retrieve the saved passwords:
«`
Get-RDMSavedPassword -ConnectionName «ConnectionName«
«`
Replace «ConnectionName» with the actual name of the server or connection for which you want to view the saved password.
Step 4: PowerShell will display the saved password for the specified connection.
Pros:
1. Provides a centralized method for retrieving saved passwords.
2. Allows automation and scripting for bulk password retrieval.
3. Suitable for advanced users or administrators managing multiple connections.
Cons:
1. Requires basic knowledge of PowerShell scripting.
2. Additional steps may be needed to install the Remote Desktop Connection Manager module.
Method 2 Pros & Cons:
| Pros | Cons |
|---|---|
| 1. Provides a centralized method for retrieving saved passwords. | 1. Requires basic knowledge of PowerShell scripting. |
| 2. Allows automation and scripting for bulk password retrieval. | 2. Additional steps may be needed to install the Remote Desktop Connection Manager module. |
| 3. Suitable for advanced users or administrators managing multiple connections. |
Method 3: Via the Credential Manager
The Credential Manager is a built-in Windows feature that securely stores credentials such as usernames and passwords. Remote Desktop Connection Manager integrates with the Credential Manager to securely save and retrieve passwords. By accessing the Credential Manager, you can view the saved passwords for Remote Desktop Connection Manager. Here’s how:
Step 1: Press the Windows key + R to open the Run dialog box.
Step 2: Type «control» and press Enter to open the Control Panel.
Step 3: In the Control Panel, navigate to the «User Accounts» section.
Step 4: Click on «Credential Manager.«
Step 5: Under the «Windows Credentials» section, you will find the saved username and password for Remote Desktop Connection Manager. Look for entries starting with «Remote Desktop Connection Manager.«
Pros:
1. Uses a built-in Windows feature, no additional software required.
2. Provides a secure mechanism for storing and retrieving passwords.
3. Allows access to saved passwords for Remote Desktop Connection Manager.
Cons:
1. May require manual search and identification of Remote Desktop Connection Manager entries in the Credential Manager.
Method 3 Pros & Cons:
| Pros | Cons |
|---|---|
| 1. Uses a built-in Windows feature, no additional software required. | 1. May require manual search and identification of Remote Desktop Connection Manager entries in the Credential Manager. |
| 2. Provides a secure mechanism for storing and retrieving passwords. | |
| 3. Allows access to saved passwords for Remote Desktop Connection Manager. |
Method 4: Using a Password Recovery Tool
If the above methods do not suffice or you encounter other difficulties, another option is to use a password recovery tool specifically designed for Remote Desktop Connection Manager. Password recovery tools can scan the application’s settings and extract the saved passwords for you. Here’s how to use a password recovery tool for Remote Desktop Connection Manager:
Step 1: Download and install a reliable Remote Desktop Connection Manager password recovery tool. There are several options available online, so choose one that suits your requirements.
Step 2: Launch the password recovery tool.
Step 3: Follow the provided instructions to scan and extract the saved passwords from Remote Desktop Connection Manager.
Step 4: The password recovery tool will display the retrieved passwords for you to access.
Pros:
1. Provides an alternative solution when other methods fail.
2. Dedicated tools specifically designed for Remote Desktop Connection Manager provide specialized features.
3. Can retrieve passwords that may be difficult to access using other methods.
Cons:
1. Requires downloading and installing additional software.
2. The reliability and effectiveness of password recovery tools may vary.
Method 4 Pros & Cons:
| Pros | Cons |
|---|---|
| 1. Provides an alternative solution when other methods fail. | 1. Requires downloading and installing additional software. |
| 2. Dedicated tools specifically designed for Remote Desktop Connection Manager provide specialized features. | 2. The reliability and effectiveness of password recovery tools may vary. |
| 3. Can retrieve passwords that may be difficult to access using other methods. |
What to Do If You Can’t View Saved Passwords in Remote Desktop Connection Manager
If you are unable to view saved passwords in Remote Desktop Connection Manager using the methods mentioned above, there are a few potential fixes to consider:
1. Verify that the password is indeed saved in Remote Desktop Connection Manager. Double-check the settings and ensure that the password was successfully saved for the respective server or connection.
2. Check your user permissions. Make sure you have the necessary rights to view saved passwords in Remote Desktop Connection Manager. Contact your system administrator if needed.
3. Update Remote Desktop Connection Manager to the latest version. Software updates often include bug fixes and improvements that may address issues with password retrieval.
4. Reset the password for the server or connection. If all else fails, resetting the password may be necessary to regain access to the remote connection.
Bonus Tips
Here are three bonus tips to enhance your experience with Remote Desktop Connection Manager:
1. Enable two-factor authentication (2FA) for added security. Two-factor authentication provides an extra layer of protection by requiring a second verification step, such as a code or fingerprint, in addition to the password.
2. Regularly backup your Remote Desktop Connection Manager settings. By creating backups of your settings, including saved passwords, you can easily restore them in case of data loss or when migrating to a new device.
3. Utilize groups and folders to organize your remote connections. Remote Desktop Connection Manager allows you to create groups and folders to categorize your connections. This helps in efficient management and navigation of your remote sessions.
5 FAQs
Q1: Can I recover passwords if I have forgotten the master password for Remote Desktop Connection Manager?
A: Unfortunately, if you have forgotten the master password for Remote Desktop Connection Manager, it is not possible to recover the saved passwords. The master password is used to encrypt and protect the saved passwords, and without it, they are unrecoverable.
Q2: Are saved passwords in Remote Desktop Connection Manager encrypted?
A: Yes, Remote Desktop Connection Manager utilizes encryption to secure the saved passwords. The master password and encryption key are required to access the stored credentials.
Q3: Can I export the saved passwords from Remote Desktop Connection Manager?
A: No, Remote Desktop Connection Manager does not have a built-in feature to export the saved passwords. However, you can use the methods mentioned earlier in this blog post to retrieve the passwords and then manually record them for future reference.
Q4: Is Remote Desktop Connection Manager available for macOS or Linux?
A: Unfortunately, Remote Desktop Connection Manager is only available for Windows operating systems. macOS and Linux users can consider using alternative remote desktop management tools compatible with their respective platforms.
Q5: Can I use Remote Desktop Connection Manager to connect to non-Windows servers?
A: Yes, Remote Desktop Connection Manager supports connecting to various servers, including Windows, Linux, and UNIX-based systems. It provides flexibility and convenience for managing multiple remote connections regardless of the server’s operating system.
Final Thoughts
Remote Desktop Connection Manager is a valuable tool for managing and accessing remote desktop sessions. While it securely saves passwords, there may be instances where you need to view or retrieve them for various reasons. By leveraging different methods such as the user interface, PowerShell, the Credential Manager, or password recovery tools, you can conveniently access and manage your saved passwords in Remote Desktop Connection Manager.
Remember to exercise caution and ensure the security of your saved passwords. Regularly update and use strong, unique passwords to protect your remote connections. By implementing best practices and utilizing the tips provided in this blog post, you can effectively navigate and secure your remote desktop sessions in Remote Desktop Connection Manager.
Встроенный RDP клиент Windows (mstsc.exe) позволяет сохранить на компьютере имя и пароль пользователя для подключения к удаленному рабочему столу. Благодаря этому пользователю не нужно каждый раз вводить пароль для подключения к удаленному RDP компьютеру/серверу. В этой статье мы рассмотрим, как разрешить сохранять учетные данные для RDP подключений в Windows, и что делать, если несмотря на все настройки, у пользователей не сохраняются пароли для RDP подключения (пароль запрашивается каждый раз)
Содержание:
- Как сохранить пароль для RDP подключения в Windows?
- Что делать, если в Windows не сохраняется пароль для RDP подключения?
- Политика проверки подлинности сервере не допускает подключение сохраненными учетными данными
- Credential Guard в Защитнике Windows не разрешает использовать сохраненные учетные данные
Как сохранить пароль для RDP подключения в Windows?
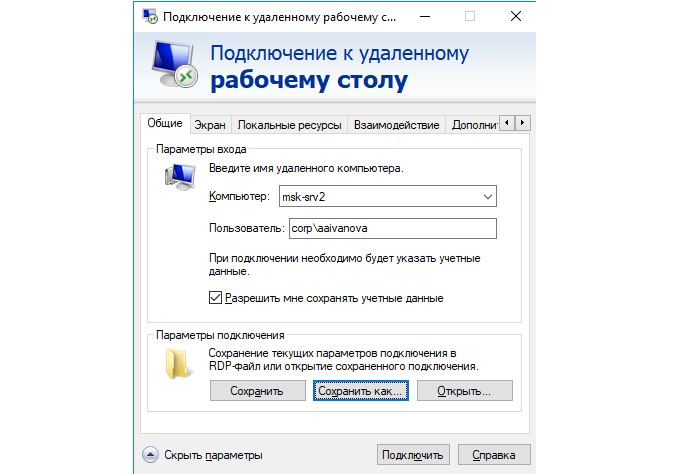
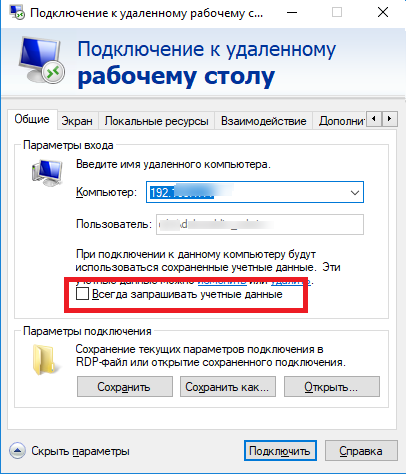
По умолчанию Windows разрешает пользователям сохранять пароли для RDP подключений. Для этого в окне клиента Remote Desktop Connection (mstsc.exe) пользователь должен ввести имя удаленного RDP компьютера, учетную запись и поставить галку “Разрешить мне сохранять учетные данные” (Allow me to save credential). После того, как пользователь нажимает кнопку “Подключить”, RDP сервер запрашивает пароль и компьютер сохраняет его в Windows Credential Manager (не в .RDP файл).
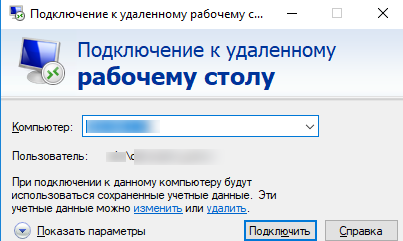
При следующем подключении к удаленному RDP серверу под этим же пользователем, клиент автоматически получит сохраненный пароль из менеджера паролей Windows и использует его для RDP-аутентификации.
Если для данного компьютера имеется сохраненный пароль, в окне RDP клиента будет указано:
При подключении к данному компьютеру будут использоваться сохранённые учетные данные. Эти учетные данные можно изменить или удалить.
Saved credentials will be used to connect to this computer. You can edit or delete these credentials.
В большинстве случаев администраторы не рекомендуют пользователям сохранять пароли подключений в Windows. Например, в домене Active Directory лучше настроить SSO (Single Sign-On) для прозрачной RDP аутентификации.
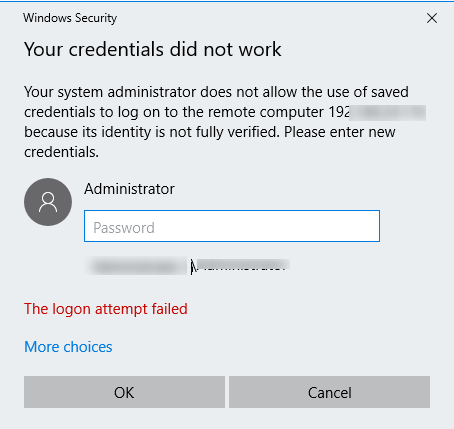
По умолчанию Windows не разрешает пользователю использовать сохраненный пароль RDP подключения с компьютера, добавленного в домен Active Directory, к компьютеру/серверу, который находится в другом домене или рабочей группе. Несмотря на то, что пароль для подключения сохранен в Credentials Manager, Windows не позволяет его использовать, и требует от пользователя каждый раз вводить пароль. Также Windows не разрешает использовать сохраненный пароль для RDP, если вы подключаетесь не под доменной, а под локальной учетной записью.
При попытке RDP подключения с сохраненным паролем в этой ситуации появляется окно с ошибкой:
Your Credentials did not work
Your system administrator does not allow the use of saved credentials to log on to the remote computer CompName because its identity is not fully verified. Please enter new credentials.
Или (в русской редакции Windows 10):
Недопустимые учетные данные
Системный администратор запретил использовать сохраненные учетные данные для входа в систему удаленного компьютера CompName, так как его подлинность проверена не полностью. Введите новые учетные данные.
Windows считает такое подключение небезопасным, т.к. отсутствуют доверительные отношения между этим компьютером и удаленным компьютером/сервером в другом домене (или рабочей группе).
Вы можете изменить эти настройки на компьютере, с которого выполняется RDP подключение:
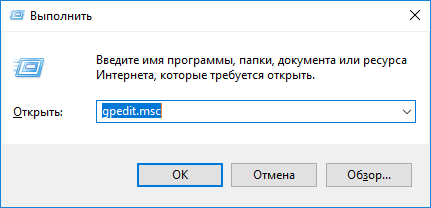
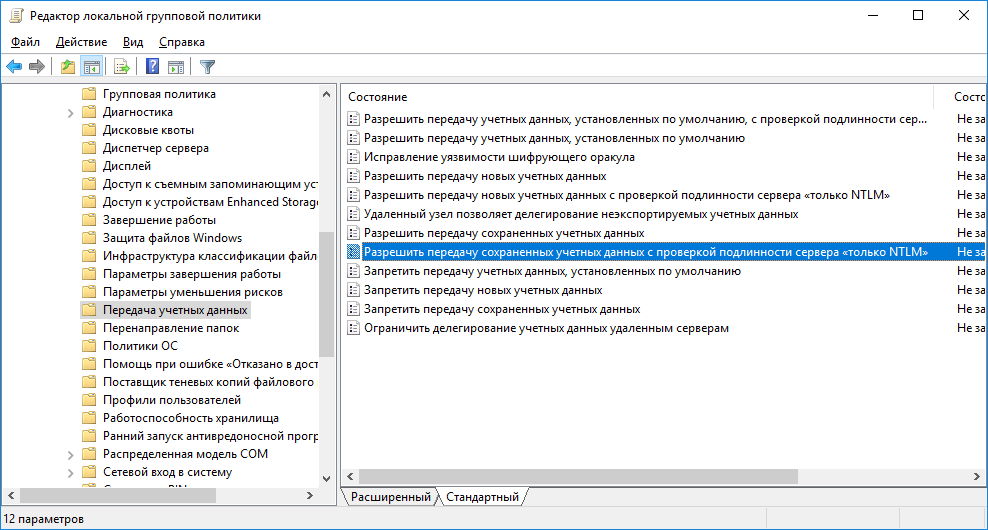
- Откройте редактор локальной GPO, нажав Win + R -> gpedit.msc ;

- В редакторе GPO перейдите в раздел Computer Configuration –> Administrative Templates –> System –> Credentials Delegation (Конфигурация компьютера -> Административные шаблоны -> Система -> Передача учетных данных). Найдите политику с именем Allow delegating saved credentials with NTLM-only server authentication (Разрешить передачу сохраненных учетных данных с проверкой подлинности сервера только NTLM);
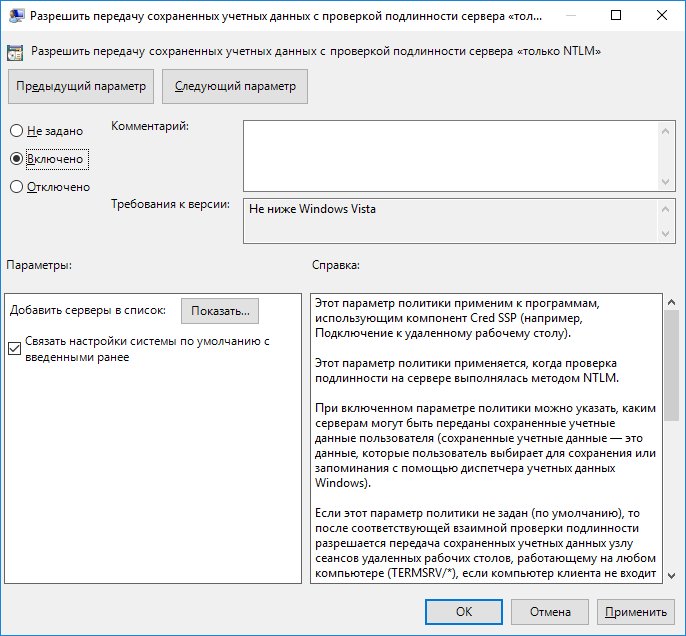
- Дважды щелкните по политике. Включите политику (Enable) и нажмите на кнопку Показать (Show);
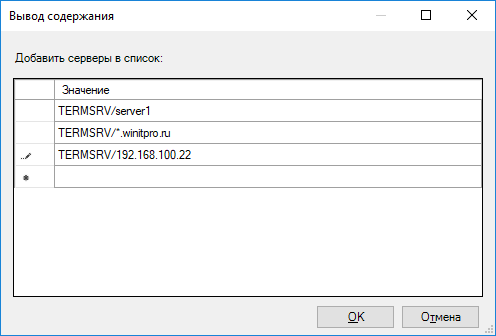
- В открывшемся окне нужно будет указать список удаленных компьютеров (серверов), для которых будет разрешено использовать сохранные пароли для RDP подключения. Список удаленных компьютеров нужно указать в следующих форматах:
-
TERMSRV/server1
— разрешить использование сохранённых паролей для RDP подключения к одному конкретному компьютеру/серверу; -
TERMSRV/*.winitpro.ru
— разрешить RDP подключение ко всем компьютерам в домене winitpro.ru; -
TERMSRV/*
— разрешить использование сохранённого пароля для подключения к любым компьютерам.
Примечание. TERMSRV нужно обязательно писать в верхнем регистре, а имя компьютера должно полностью соответствовать тому, которое вы указываете в поле подключения RDP клиента.
-
- Аналогичным образом включите и добавьте ваши значения TERMSRV/ в параметр Allow Delegating Saved Credentials (“Разрешить передачу сохранённых учетных данных”);
Этим настройкам GPO соответствуют следующие параметры реестра:
Windows Registry Editor Version 5.00
[HKEY_LOCAL_MACHINE\SOFTWARE\Policies\Microsoft\Windows\CredentialsDelegation]
"AllowSavedCredentialsWhenNTLMOnly"=dword:00000001
“AllowSavedCredentials”=dword:00000001
[HKEY_LOCAL_MACHINE\SOFTWARE\Policies\Microsoft\Windows\CredentialsDelegation\AllowSavedCredentialsWhenNTLMOnly]
"1"="TERMSRV/*"
[HKEY_LOCAL_MACHINE\SOFTWARE\Policies\Microsoft\Windows\CredentialsDelegation\AllowSavedCredentials]
"1"="TERMSRV/*"
[HKEY_LOCAL_MACHINE\SOFTWARE\WOW6432Node\Policies\Microsoft\Windows\CredentialsDelegation]
“AllowSavedCredentialsWhenNTLMOnly”=dword:00000001
“AllowSavedCredentials”=dword:00000001
[HKEY_LOCAL_MACHINE\SOFTWARE\WOW6432Node\Policies\Microsoft\Windows\CredentialsDelegation\AllowSavedCredentialsWhenNTLMOnly]
"1"="TERMSRV/*"
[HKEY_LOCAL_MACHINE\SOFTWARE\WOW6432Node\Policies\Microsoft\Windows\CredentialsDelegation\AllowSavedCredentials]
"1"="TERMSRV/*"
- Проверьте, что политика Deny delegating saved credentials / Запретить передачу сохраненных учетных данных отключена (или не настроена). Запретительные политики GPO имеют более высокий приоритет, чем разрешающие;
- Также должен быть отключен параметр Network access: Do not allow storage of passwords and credentials for network authentication (Computer Configuration -> Windows Settings -> Security Settings -> Local Policies -> Security Options); Если этот параметр включен, то при попытке сохранить пароль в хранилище пользователь получит ошибку:
Credential Manager ErrorUnable to save credentials.
 To save credentials in this vault, check your computer configuration.Error code: 0x80070520
Error Message: A specified logon session does not exist. It may already have been terminated.
- Сохраните изменения и обновите групповые политики командой
gpupdate /force
Теперь при выполнении RDP подключения клиент mstsc сможет использовать сохранённый пароль.
Вы можете вывести список сохранённых паролей для RDP подключений с помощью команды:
cmdkey /list ^| findstr "target=TERMSRV"
Чтобы очистить сохраненные пароли подключений, выполните команду:
For /F "tokens=1,2 delims= " %G in ('cmdkey /list ^| findstr "target=TERMSRV"') do cmdkey /delete %H
С помощью локального редактора групповых политик вы сможете переопределить политику только на локальном компьютере. Если вы хотите чтобы политика разрешения использования сохранённых паролей для RDP подключения действовала на множество компьютеров домена, используете доменные политики, которые настраиваются с помощью консоли gpmc.msc.
Что делать, если в Windows не сохраняется пароль для RDP подключения?
Если вы настроили Windows по инструкции выше, но клиент все равно при каждом повторном RDP подключении требует ввести пароль следует проверить следующее:
- В окне RDP подключения нажмите на кнопку “Показать параметры” и убедитесь, что опция “Всегда запрашивать учетные данные” (Always ask for credentials) не выбрана;
- Если вы используете для подключения сохранённый RDP файл, проверьте, что параметр “prompt for credentials” равен 0 (
prompt for credentials:i:0
); - Запустите редактор локальной групповой политики
gpedit.msc
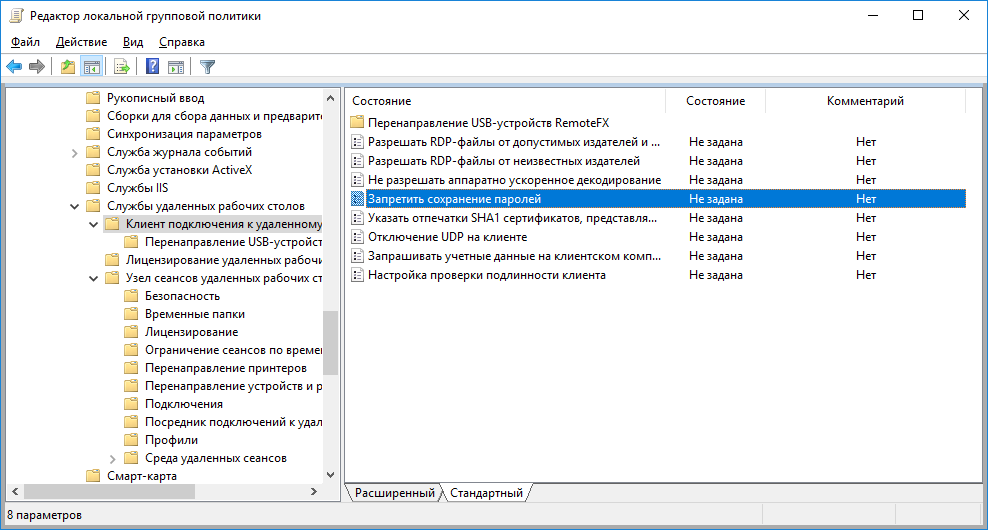
, перейдите в раздел Конфигурация компьютера -> Компоненты Windows -> Службы удаленных рабочих столов -> Клиент подключения к удаленному рабочему столу (Computer Configuration -> Administrative Templates -> Windows Components -> Remote Desktop Services -> Remote Desktop Connection Client). Параметры “Запретить сохранение паролей” (Do not allow passwords to be saved) и Prompt for credentials on the client computer должны быть не заданы или отключены. Также убедитесь, что он отключен в результирующей политике на вашем компьютере (html отчет с применёнными настройками доменных политик можно сформировать с помощью gpresult);
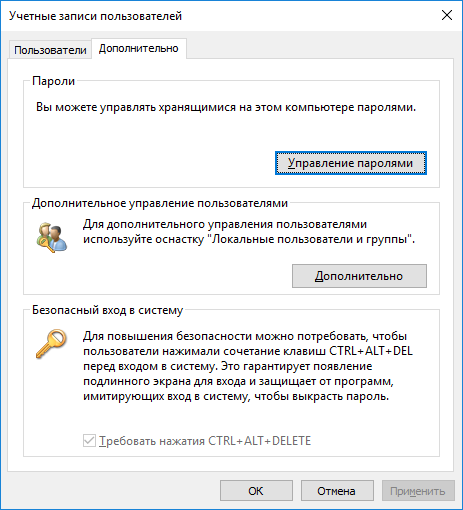
- Удалите все сохраненные пароли в менеджере паролей Windows (Credential Manager). Наберите
control userpasswords2
и в окне “Учетные записи пользователей” перейдите на вкладку “Дополнительно” и нажмите на кнопку “Управление паролями”;
В открывшемся окне выберите “Учетные данные Windows”. Найдите и удалите все сохраненные RDP пароли (начинаются с TERMSRV/…).
Из этого окна вы можете самостоятельно добавить учетных данные для RDP подключений. Обратите внимание, что имя удаленного RDP сервера (компьютера) нужно указывать в формате TERMSRV\server_name1. При очистке истории RDP подключений на компьютере, не забывайте удалять сохраненные пароли.
- Вход с сохраненным паролем также не будет работать, если удаленный RDP сервер давно не обновлялся и при подключении к нему появляется ошибка CredSSP encryption oracle remediation.


После этого, пользователи смогут использовать свои сохраненные пароли для rdp подключений.
Политика проверки подлинности сервере не допускает подключение сохраненными учетными данными
При подключении к RDP хосту или ферме RDS с помощью сохраненного пароля может появится ошибка:
Windows Security
Your credentials did not work
The server’s authentication policy does not allow connection requests using saved credentials. Please enter new credentials.
Политика проверки подлинности на сервере не допускает запросы на подключение с использованием сохраненных учетных данных.
В этом случае на удаленном сервере нужно отключить параметр “Always prompt for password upon connection” в разделе Computer Configuration -> Administrative Templates -> Windows Components -> Remote Desktop Services -> Remote Desktop Session Host -> Security.
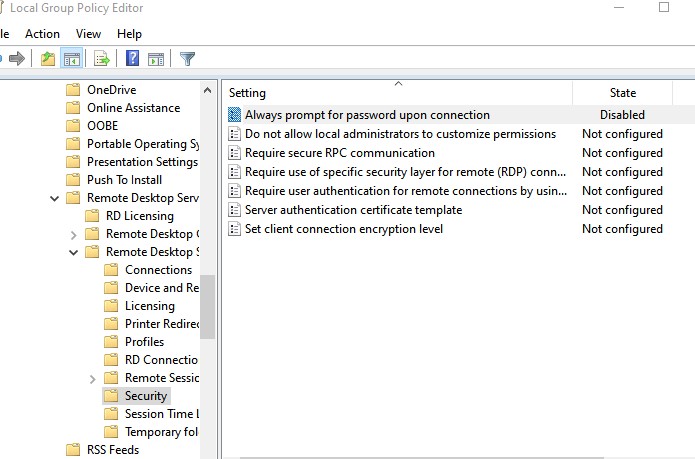
Если эта политика включена, RDP хост всегда запрашивает у клиента пароль для подключения.
Можно включить этот параметр через реестр:
REG add "HKLM\SOFTWARE\Policies\Microsoft\Windows NT\Terminal Services" /v fPromptForPassword /t REG_DWORD /d 0 /f
Credential Guard в Защитнике Windows не разрешает использовать сохраненные учетные данные
После обновления до Windows 11 22H2 пользователи стали жаловаться, что теперь они не могут использовать сохраненные пароли для RDP подключений:
Windows Security: Your credentials did not work
Windows Defender Credential Guard does not allow using saved credentials. Please enter your credentials.
Credential Guard в Защитнике Windows не разрешает использовать сохраненные учетные данные.
Представленные еще в Windows 10 1607 компонент Windows Defender Remote Credential Guard должен защищать ваши учетные данные для RDP подключений. В обновлении 22H2 по умолчанию он разрешает использовать сохраненные учетные данные только при использовании Kerberos аутентификации на RDP хосте. Если нельзя использовать Kerberos (контроллер домена не доступен, или вы подключаетесь к хосту в рабочей группе), Remote Credential Guard блокирует аутентификацию с помощью NTLM.
Для решения этой проблемы придется отключить Credential Guard через реестр:
New-ItemProperty -Path "HKLM:\System\CurrentControlSet\Control\LSA" -Name "LsaCfgFlags" -PropertyType "DWORD" -Value 0 -Force
Время на прочтение10 мин
Количество просмотров151K
Как известно, протокол удаленного рабочего стола (Remote Desktop Protocol или RDP) позволяет удаленно подключаться к компьютерам под управлением Windows и доступен любому пользователю Windows, если у него не версия Home, где есть только клиент RDP, но не хост. Это удобное, эффективное и практичное средство для удаленного доступа для целей администрирования или повседневной работы. В последнее время оно приглянулось майнерам, которые используют RDP для удаленного доступа к своим фермам. Поддержка RDP включена в ОС Windows, начиная еще с NT 4.0 и XP, однако далеко не все знают, как ею пользоваться. Между тем можно открывать удаленный рабочий стол Microsoft с компьютеров под Windows, Mac OS X, а также с мобильных устройств с ОС Android или с iPhone и iPad.

Если должным образом разбираться в настройках, то RDP будет хорошим средством удаленного доступа. Он дает возможность не только видеть удаленный рабочий стол, но и пользоваться ресурсами удаленного компьютера, подключать к нему локальные диски или периферийные устройства. При этом компьютер должен иметь внешний IP, (статический или динамический), или должна быть возможность «пробросить» порт с маршрутизатора с внешним IP-адресом.
Серверы RDP нередко применяют для совместной работы в системе 1С, или на них разворачивают рабочие места пользователей, позволяя им подключаться к своему рабочему месту удаленно. Клиент RDP позволяет дает возможность работать с текстовыми и графическими приложениями, удаленно получать какие-то данные с домашнего ПК. Для этого на роутере нужно пробросить порт 3389, чтобы через NAT получить доступ к домашней сети. Тоже относится к настройке RDP-сервера в организации.
RDP многие считают небезопасным способом удаленного доступа по сравнению с использованием специальных программ, таких как RAdmin, TeamViewer, VNC и пр. Другой предрассудок – большой трафик RDP. Однако на сегодня RDP не менее безопасен, чем любое другое решение для удаленного доступа (к вопросу безопасности мы еще вернемся), а с помощью настроек можно добиться высокой скорости реакции и небольшой потребности в полосе пропускания.
Как защитить RDP и настроить его производительность
| Шифрование и безопасность | Нужно открыть gpedit.msc, в «Конфигурация компьютера — Административные шаблоны — Компоненты Windows — Службы удаленных рабочих столов — Безопасность» задать параметр «Требовать использования специального уровня безопасности для удаленных подключений по методу RDP» и в «Уровень безопасности» выбрать «SSL TLS». В «Установить уровень шифрования для клиентских подключений» выберите «Высокий». Чтобы включить использование FIPS 140-1, нужно зайти в «Конфигурация компьютера — Конфигурация Windows — Параметры безопасности — Локальные политики — Параметры безопасности» и выбрать «Системная криптография: использовать FIPS-совместимые алгоритмы для шифрования, хэширования и подписывания». Параметр «Конфигурация компьютера — Параметры Windows — Параметры безопасности — Локальные политики — Параметры безопасности» параметр «Учетные записи: разрешать использование пустых паролей только при консольном входе» должен быть включен. Проверьте список пользователей, которые могут подключаться по RDP. |
| Оптимизация | Откройте «Конфигурация компьютера — Административные шаблоны — Компоненты Windows — Службы удаленных рабочих столов — Среда удаленных сеансов». В «Наибольшая глубина цвета» выберите 16 бит, этого достаточно. Снимите флажок «Принудительная отмена фонового рисунка удаленного рабочего стола». В «Задание алгоритма сжатия RDP» установите «Оптимизация использования полосы пропускания. В «Оптимизировать визуальные эффекты для сеансов служб удаленных рабочих столов» установите значение «Текст». Отключите «Сглаживание шрифтов». |
Базовая настройка выполнена. Как подключиться к удаленному рабочему столу?
Подключение к удаленному рабочему столу
Для подключения по RDP необходимо, на удаленном компьютере была учетная запись с паролем, в системе должны быть разрешены удаленные подключения, а чтобы не менять данные доступа при постоянно меняющемся динамическом IP-адресе, в настройках сети можно присвоить статический IP-адрес. Удаленный доступ возможен только на компьютерах с Windows Pro, Enterprise или Ultimate.
Для удаленного подключения к компьютеру нужно разрешить подключение в «Свойствах Системы» и задать пароль для текущего пользователя, либо создать для RDP нового пользователя. Пользователи обычных аккаунтов не имеют права самостоятельно предоставлять компьютер для удаленного управления. Такое право им может дать администратор. Препятствием использования протокола RDP может стать его блокировка антивирусами. В таком случае RDP нужно разрешить в настройках антивирусных программ.
Стоит отметить особенность некоторых серверных ОС: если один и тот же пользователь попытается зайти на сервер локально и удаленно, то локальный сеанс закроется и на том же месте откроется удаленный. И наоборот, при локальном входе закроется удаленный сеанс. Если же зайти локально под одним пользователем, а удаленно — под другим, то система завершит локальный сеанс.
Подключение по протоколу RDP осуществляется между компьютерами, находящимися в одной локальной сети, или по интернету, но для этого потребуются дополнительные действия – проброс порта 3389 на роутере, либо соединение с удаленным компьютером по VPN.
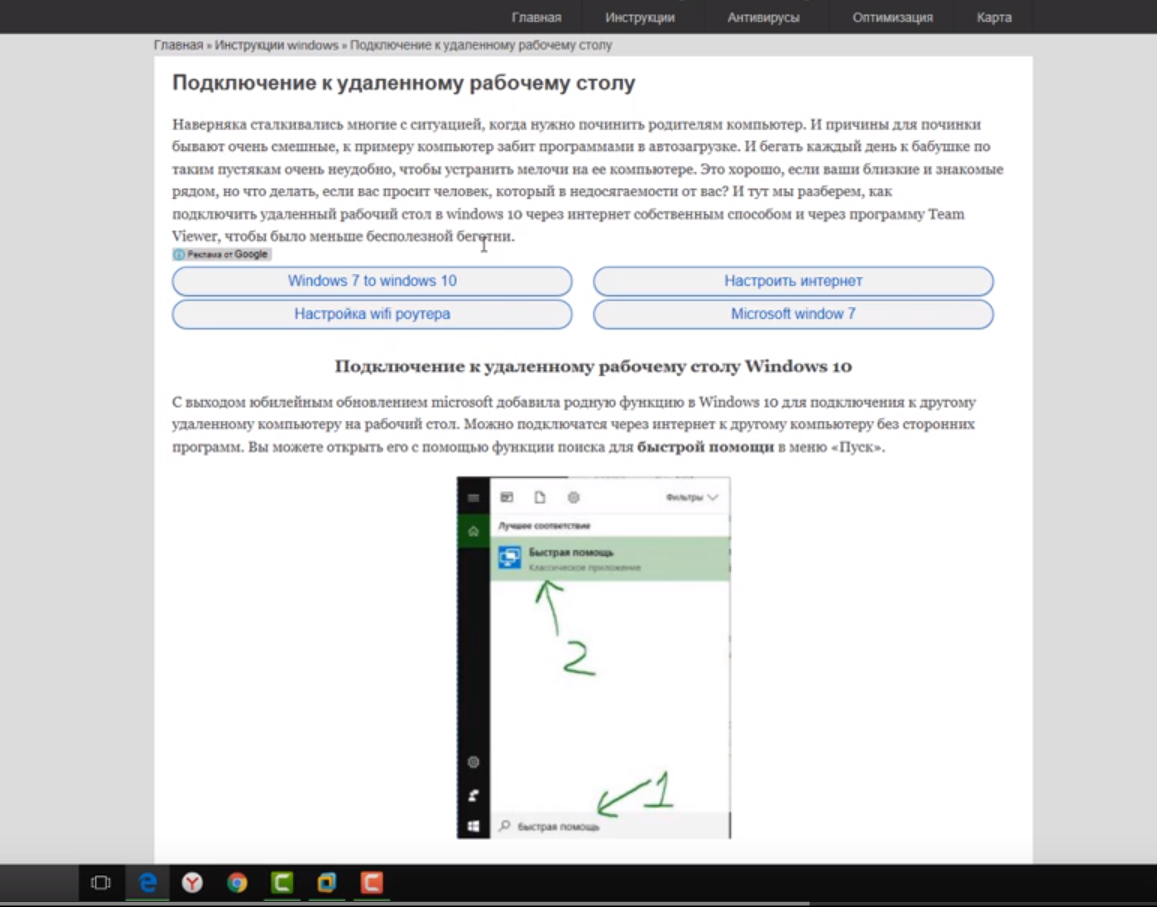
Чтобы подключиться к удаленному рабочему столу в Windows 10, можно разрешить удаленное подключение в «Параметры — Система — Удаленный рабочий стол» и указать пользователей, которым нужно предоставить доступ, либо создать отдельного пользователя для подключения. По умолчанию доступ имеют текущий пользователь и администратор. На удаленной системе запустите утилиту для подключения.
Нажмите Win+R, введите MSTSC и нажмите Enter. В окне введите IP-адрес или имя компьютера, выберите «Подключить», введите имя пользователя и пароль. Появится экран удаленного компьютера.

При подключении к удаленному рабочему столу через командную строку (MSTSC) можно задать дополнительные параметры RDP:
| Параметр | Значение |
| /v:<сервер[: порт]> | Удаленный компьютер, к которому выполняется подключение. |
| /admin | Подключение к сеансу для администрирования сервера. |
| /edit | Редактирование RDP-файла. |
| /f | Запуск удаленного рабочего стола на полном экране. |
| /w:<ширина> | Ширина окна удаленного рабочего стола. |
| /h:<высота> | Высота окна удаленного рабочего стола. |
| /public | Запуск удаленного рабочего стола в общем режиме. |
| /span | Сопоставление ширины и высоты удаленного рабочего стола с локальным виртуальным рабочим столом и развертывание на несколько мониторов. |
| /multimon | Настраивает размещение мониторов сеанса RDP в соответствии с текущей конфигурацией на стороне клиента. |
| /migrate | Миграция файлов подключения прежних версий в новые RDP-файлы. |
Для Mac OS компания Microsoft выпустила официальный RDP-клиент, который стабильно работает при подключении к любым версиям ОС Windows. В Mac OS X для подключения к компьютеру Windows нужно скачать из App Store приложение Microsoft Remote Desktop. В нем кнопкой «Плюс» можно добавить удаленный компьютер: введите его IP-адрес, имя пользователя и пароль. Двойной щелчок на имени удаленного рабочего стола в списке для подключения откроет рабочий стол Windows.
На смартфонах и планшетах под Android и iOS нужно установить приложение Microsoft Remote Desktop («Удаленный рабочий стол Майкрософт») и запустить его. Выберите «Добавить» введите параметры подключения — IP-адрес компьютера, логин и пароль для входа в Windows. Еще один способ — проброс на роутере порта 3389 на IP-адрес компьютера и подключение к публичному адресу роутера с указанием данного порта. Это делается с помощью опции Port Forwarding роутера. Выберите Add и введите:
Name: RDP
Type: TCP & UDP
Start port: 3389
End port: 3389
Server IP: IP-адрес компьютера для подключения.
А что насчет Linux? RDP –закрытый протокол Microsoft, она не выпускает RDP-клиентов для ОС Linux, но можно воспользоваться клиентом Remmina. Для пользователей Ubuntu есть специальные репозитории с Remmina и RDP.
Протокол RDP также используется для подключения к виртуальным машинам Hyper-V. В отличие от окна подключения гипервизора, при подключении по RDP виртуальная машина видит различные устройства, подсоединенных к физическому компьютеру, поддерживает работу со звуком, дает более качественное изображение рабочего стола гостевой ОС и т.д.
У провайдеров виртуального хостинга серверы VPS под Windows по умолчанию обычно также доступны для подключения по стандартному протоколу RDP. При использовании стандартной операционной системы Windows для подключения к серверу достаточно выбрать: «Пуск — Программы — Стандартные — Подключение к удаленному рабочему столу» или нажать Win+R и в открывшемся окне набрать MSTSC. В окне вводится IP-адрес VPS-сервера.
Нажав кнопку «Подключить», вы увидите окно с полями авторизации.
Чтобы серверу были доступны подключенные к вашему ПК USB-устройства и сетевые принтеры, при первом подключении к серверу выберите «Показать параметры» в левом нижнем углу. В окне откройте вкладку «Локальные ресурсы» и выберите требуемые параметры.
С помощью опции сохранения данных авторизации на удаленном компьютере параметры подключения (IP-адрес, имя пользователя и пароль) можно сохранить в отдельном RDP-файлом и использовать его на другом компьютере.
RDP также можно использовать для подключения к виртуальным машинам Azure.
Настройка другой функциональности удаленного доступа
В окне подключения к удаленному компьютеру есть вкладки с настраиваемыми параметрами.
| Вкладка | Назначение |
| «Экран» | Задает разрешение экрана удаленного компьютера, то есть окна утилиты после подключения. Можно установить низкое разрешение и пожертвовать глубиной цвета. |
| «Локальные ресурсы» | Для экономии системных ресурсов можно отключить воспроизведение звука на удаленном компьютере. В разделе локальных устройств и можно выбрать принтер и другие устройства основного компьютера, которые будут доступны на удаленном ПК, например, USB-устройства, карты памяти, внешние диски. |
Подробности настройки удаленного рабочего стола в Windows 10 – в этом видео. А теперь вернемся к безопасности RDP.
Как «угнать» сеанс RDP?
Можно ли перехватывать сеансы RDS? И как от этого защищаться? Про возможность угона RDP-сессии в Microsoft Windows известно с 2011 года, а год назад исследователь Александр Корзников в своем блоге детально описал методики угона. Оказывается, существует возможность подключиться к любой запущенной сессии в Windows (с любыми правами), будучи залогиненным под какой-либо другой.
Некоторые приемы позволяют перехватить сеанс без логина-пароля. Нужен лишь доступ к командной строке NT AUTHORITY/SYSTEM. Если вы запустите tscon.exe в качестве пользователя SYSTEM, то сможете подключиться к любой сессии без пароля. RDP не запрашивает пароль, он просто подключает вас к рабочему столу пользователя. Вы можете, например, сделать дамп памяти сервера и получить пароли пользователей. Простым запуском tscon.exe с номером сеанса можно получить рабочий стол указанного пользователя — без внешних инструментов. Таким образом, с помощью одной команды имеем взломанный сеанс RDP. Можно также использовать утилиту psexec.exe, если она была предварительно установлена:
psexec -s \\localhost cmdИли же можно создать службу, которая будет подключать атакуемую учетную запись, и запустить ее, после чего ваша сессия будет заменена целевой. Вот некоторые замечания о том, как далеко это позволяет зайти:
- Вы можете подключиться к отключенным сеансам. Поэтому, если кто-то вышел из системы пару дней назад, вы можете просто подключиться прямо к его сеансу и начать использовать его.
- Можно разблокировать заблокированные сеансы. Поэтому, пока пользователь находится вдали от своего рабочего места, вы входите в его сеанс, и он разблокируется без каких-либо учетных данных. Например, сотрудник входит в свою учетную запись, затем отлучается, заблокировав учетную запись (но не выйдя из нее). Сессия активна и все приложения останутся в прежнем состоянии. Если системный администратор входит в свою учетную запись на этом же компьютере, то получает доступ к учетной записи сотрудника, а значит, ко всем запущенным приложениям.
- Имея права локального администратора, можно атаковать учетную запись с правами администратора домена, т.е. более высокими, чем права атакующего.
- Можно подключиться к любой сессии. Если, например, это Helpdesk, вы можете подключиться к ней без какой-либо аутентификации. Если это администратор домена, вы станете админом. Благодаря возможности подключаться к отключенным сеансам вы получаете простой способ перемещения по сети. Таким образом, злоумышленники могут использовать эти методы как для проникновения, так и для дальнейшего продвижения внутри сети компании.
- Вы можете использовать эксплойты win32k, чтобы получить разрешения SYSTEM, а затем задействовать эту функцию. Если патчи не применяются должным образом, это доступно даже обычному пользователю.
- Если вы не знаете, что отслеживать, то вообще не будете знать, что происходит.
- Метод работает удаленно. Вы можете выполнять сеансы на удаленных компьютерах, даже если не зашли на сервер.
Этой угрозе подвержены многие серверные ОС, а количество серверов, использующих RDP, постоянно увеличивается. Оказались уязвимы Windows 2012 R2, Windows 2008, Windows 10 и Windows 7. Чтобы не допустить угона RDP-сессий, рекомендуется использовать двухфакторную аутентификацию. Обновленные Sysmon Framework для ArcSight и Sysmon Integration Framework для Splunk предупреждают администратора о запуске вредоносных команд с целью угнать RDP-сессию. Также можно воспользоваться утилитой Windows Security Monitor для мониторинга событий безопасности.
Наконец, рассмотрим, как удалить подключение к удаленному рабочему столу. Это полезная мера нужна, если необходимость в удаленном доступе пропала, или требуется запретить подключение посторонних к удаленному рабочему столу. Откройте «Панель управления – Система и безопасность – Система». В левой колонке кликните «Настройка удаленного доступа». В разделе «Удаленный рабочий стол» выберите «Не разрешать подключения к этому компьютеру». Теперь никто не сможет подключиться к вам через удаленный рабочий стол.
В завершение – еще несколько лайфхаков, которые могут пригодиться при работе с удаленным рабочим столом Windows 10, да и просто при удаленном доступе.
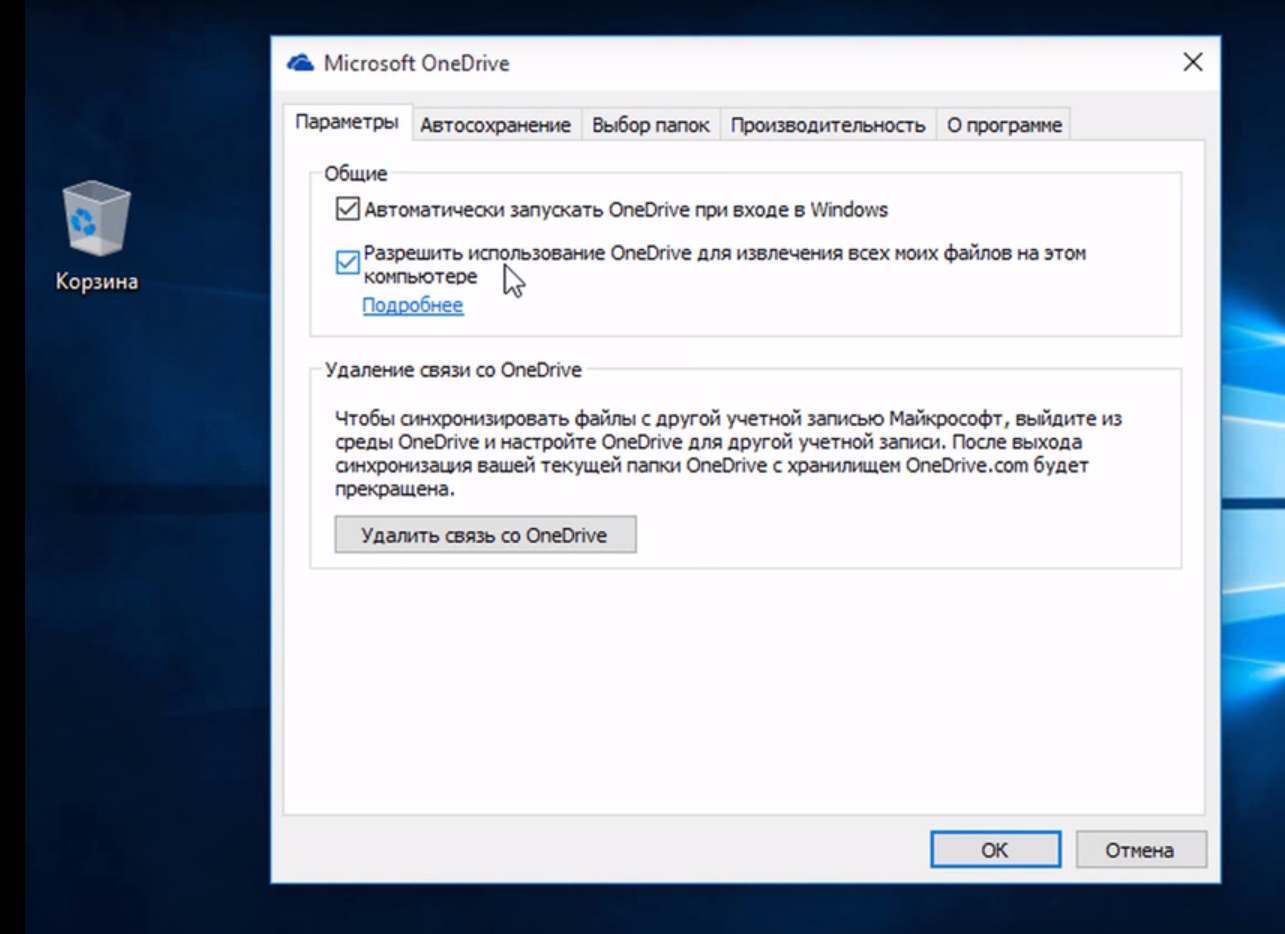
- Для доступа к файлам на удаленном компьютере можно использовать OneDrive:
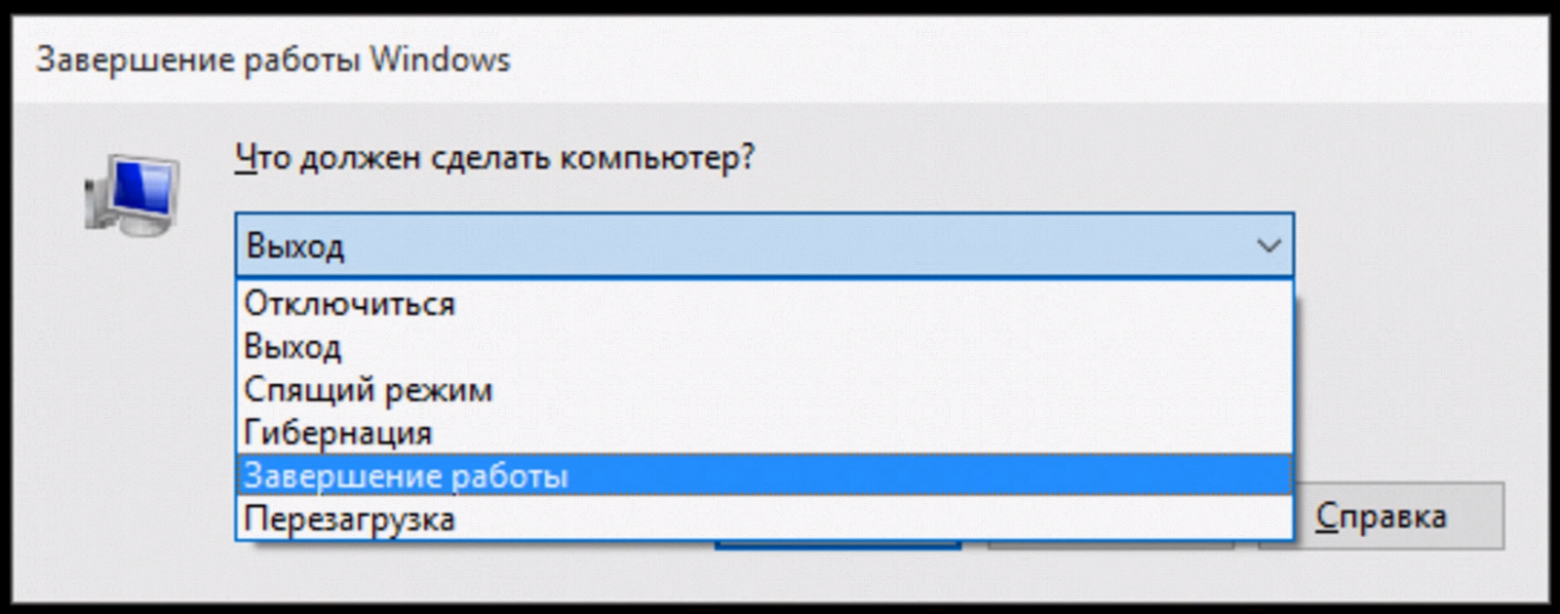
- Как перезагрузить удаленный ПК в Win10? Нажмите Alt+F4. Откроется окно:
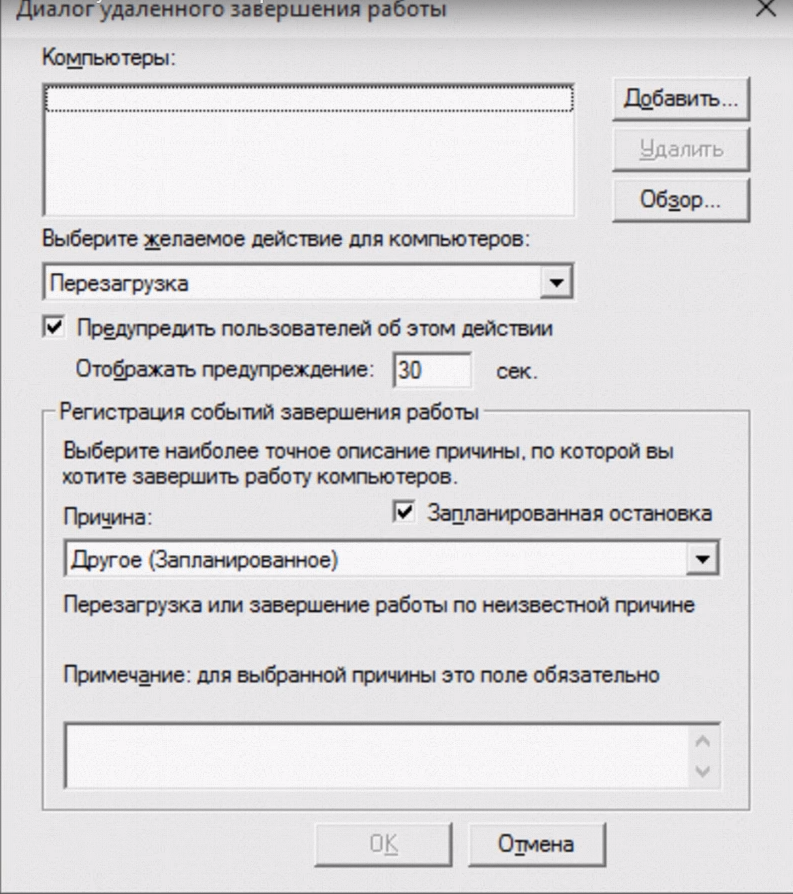
Альтернативный вариант — командная строка и команда shutdown.
Если в команде shutdown указать параметр /i, то появится окно:
- В Windows 10 Creators Update раздел «Система» стал богаче на еще один подраздел, где реализована возможность активации удаленного доступа к компьютеру с других ОС, в частности, с мобильных посредством приложения Microsoft Remote Desktop:
- По разным причинам может не работать подключение по RDP к виртуальной машине Windows Azure. Проблема может быть с сервисом удаленного рабочего стола на виртуальной машине, сетевым подключением или клиентом удаленного рабочего стола клиента на вашем компьютере. Некоторые из самых распространенных методов решения проблемы RDP-подключения приведены здесь.
- Из обычной версии Windows 10 вполне возможно сделать терминальный сервер, и тогда к обычному компьютеру смогут подключаться несколько пользователей по RDP и одновременно работать с ним. Как уже отмечалось выше, сейчас популярна работа нескольких пользователей с файловой базой 1С. Превратить Windows 10 в сервер терминалов поможет средство, которое хорошо себя зарекомендовало в Windows 7 — RDP Wrapper Library by Stas’M.
- В качестве «RDP с человеческим лицом» можно использовать Parallels Remote Application Server (RAS), но некоторые его особенности должны быть настроены на стороне Windows Server (либо в виртуальных машинах, которые вы используете).


Как видите, решений и возможностей, которые открывает удаленный доступ к компьютеру, множество. Не случайно им пользуется большинство предприятий, организаций, учреждений и офисов. Этот инструмент полезен не только системным администраторам, но и руководителям организаций, да и простым пользователям удаленный доступ тоже весьма полезен. Можно помочь починить или оптимизировать систему человеку, который в этом не разбирается, не вставая со стула, передавать данные или получить доступ к нужным файлам находясь в командировке или в отпуске в любой точке мира, работать за офисным компьютером из дома, управлять своим виртуальным сервером и т.д.
Удачи!

P.S. Мы ищем авторов для нашего блога на Хабрахабре.
Если у вас есть технические знания по работе с виртуальными серверами, вы умеете объяснить сложные вещи простыми словами, тогда команда RUVDS будет рада работать с вами, чтобы опубликовать ваш пост на Хабрахабре. Подробности по ссылке.

|
Remote Desktop PassView v1.02 — Recover the password of Remote Desktop Connection utility Copyright (c) 2006 — 2014 Nir Sofer |
Description
Remote Desktop PassView is a small utility that reveals the password stored by
Microsoft Remote Desktop Connection utility inside the .rdp files.
Notice: Currently, this tool doesn’t work with the latest versions of Remote Desktop Connection utility.
You can use the following tools to get the passwords stored by new versions of Remote Desktop Connection (6.0 or higher):
Network Password Recovery
CredentialsFileView
Versions History
- Version 1.02 — Removed the command-line options that export the passwords to a file from the official version. A version of this tool with full command-line support will be posted on separated Web page.
- Version 1.01 — The configuration is now saved to a file instead of the Registry.
- Version 1.00 — First release.
License
This utility is released as freeware.
You are allowed to freely distribute this utility via floppy disk, CD-ROM,
Internet, or in any other way, as long as you don’t charge anything for this.
If you distribute this utility, you must include all files in
the distribution package, without any modification !
Be aware that selling this utility as a part of a software package is not allowed !
Disclaimer
The software is provided «AS IS» without any warranty, either expressed or implied,
including, but not limited to, the implied warranties of merchantability and fitness
for a particular purpose. The author will not be liable for any special, incidental,
consequential or indirect damages due to loss of data or any other reason.
Using Remote Desktop PassView
Remote Desktop PassView doesn’t require any installation process or additional DLL files.
Just copy the executable (rdpv.exe) to any folder you like, and run it.
After you run rdpv.exe, the main window display the passwords of .rdp located under your
«My Documents» folder. The default .rdp file (Default.rdp) is usually stored in this location
If you want to recover that password of another .rdp file, just drag the file from Explorer into
the window of Remote Desktop PassView utility or use the «Open .rdp File» option from the File menu.
Be aware that Remote Desktop PassView can only recover the passwords created by your current
logged on user. It cannot recover the passwords of .rdp files created by other users.
Translating Remote Desktop PassView To Another Language
Remote Desktop PassView allows you to easily translate all menus, dialog-boxes, and other strings
to other languages.
In order to do that, follow the instructions below:
- Run Remote Desktop PassView with /savelangfile parameter:
rdpv.exe /savelangfile
A file named rdpv_lng.ini will be created in the folder of Remote Desktop PassView utility. - Open the created language file in Notepad or in any other text editor.
- Translate all menus, dialog-boxes, and string entries to the desired language.
- After you finish the translation, Run Remote Desktop PassView, and all translated
strings will be loaded from the language file.
If you want to run Remote Desktop PassView without the translation, simply rename the language file, or move
it to another folder.
Feedback
If you have any problem, suggestion, comment, or you found a bug in my utility,
you can send a message to nirsofer@yahoo.com
Remote Desktop PassView is also available in other languages. In order to change the language of
Remote Desktop PassView, download the appropriate language zip file, extract the ‘rdpv_lng.ini’,
and put it in the same folder that you Installed Remote Desktop PassView utility.
| Language | Translated By | Date | Version |
|---|---|---|---|
| Arabic | Abo Rehaam | 11/02/2011 | 1.01 |
| Bulgarian | Hristo Drumev | 13/01/2007 | |
| Dutch | Jan Verheijen | 23/02/2015 | 1.02 |
| French | PasswordOne | 21/02/2015 | |
| Galician | Xosé Antón Vicente rodríguez | 13/01/2007 | |
| German | «Latino» auf WinTotal.de | 18/09/2014 | 1.02 |
| Hebrew | peterg | 29/04/2011 | |
| Hungarian | ZityiSoft | 20/06/2009 | |
| Italian | Fabio Mastroianni | 13/01/2007 | |
| Italian | Maurizio Madaro | 12/01/2007 | |
| Persian | ( JAVAD JOURSARAEI Alashti ) | 06/08/2014 | |
| Persian | Amirreza Nasiri | 13/11/2015 | 1.02 |
| Romanian | Jaff (Oprea Nicolae) | 05/02/2016 | 1.02 |
| Russian | Sonya | 10/03/2010 | |
| Simplified Chinese | Rindz | 30/11/2013 | 1.04 |
| Slovak | František Fico | 09/02/2017 | 1.02 |
| Spanish | Spyn — Toño | 21/04/2009 | |
| Spanish | arquer.net | 20/05/2009 | |
| Taiwanese | Republic of Taiwan | 06/01/2007 | |
| Traditional Chinese | 繁體中文 | 23/03/2007 | |
| Turkish | Kitap Özetleri | 30/01/2009 | |
| Turkish | EFromm | 11/02/2009 |
Have you ever encountered a situation where you need to retrieve the password from an RDP (Remote Desktop Protocol) file? Maybe you’ve forgotten the password or need to access a remote machine, but don’t have the password readily available. In this tutorial, we will guide you through the steps to extract the password from an RDP file.
Step 1: Open the RDP file in a text editor such as Notepad or Sublime Text. Right-click on the RDP file and select “Open with” and choose your preferred text editor.
Step 2: Once the RDP file is opened in the text editor, look for the line that starts with “password 51:b” or “password 51:”.
Step 3: After finding the password line, select the text after the colon (:) and copy it.
Step 4: Now, open your preferred decryptor tool or website. There are various tools available online that can decrypt the encrypted password.
Step 5: Paste the copied password into the decryptor. Click on the decrypt button or execute the decrypt command to retrieve the original password.
Step 6: After decryption, you should see the actual password that was used in the RDP file.
Step 7: Finally, you can use this password to log in to the remote machine or perform any other necessary actions.
| Pros | Cons |
|---|---|
| 1. Allows you to retrieve a forgotten or lost password from an RDP file. | 1. Decrypting passwords may not be legal or ethical in certain scenarios. |
| 2. Simple and straightforward steps to follow. | 2. Decrypting the password might require some technical knowledge. |
| 3. Enables access to remote machines without the need for resetting or changing the password. | 3. The decrypted password may not work if the RDP file is outdated or corrupted. |
By following these steps, you can easily retrieve the password from an RDP file and regain access to a remote machine. However, it’s important to use this information responsibly and only for legitimate purposes. Make sure you have the necessary permissions and legal rights to access the remote machine before attempting to retrieve the password.
Video Tutorial: Where are the credentials manager files stored?
What do I do with an RDP file?
An RDP (Remote Desktop Protocol) file is typically used to initiate a remote desktop connection to a server or a remote computer. Here’s what you can do with an RDP file:
1. Remote Desktop Connection: With an RDP file, you can establish a remote desktop connection to a specific server or computer. This allows you to access and control the remote device as if you were physically present at that location.
2. Accessing Remote Resources: RDP files often provide additional functionality, such as the ability to access specific resources on the remote system. This can include shared drives, printers, audio devices, and more. By utilizing these features, you can work seamlessly with remote resources as if they were connected locally.
3. Store Connection Settings: RDP files can be used to store various connection settings, which can save you time and effort when setting up multiple connections. These settings may include the IP address or hostname of the remote device, display resolution preferences, authentication options, and more.
4. Sharing RDP Files: RDP files can be shared with other users, enabling them to quickly establish a remote desktop connection to the same device or server. This can be useful for collaboration, troubleshooting, or providing technical support to others.
To utilize an RDP file, follow these basic steps:
1. Open the RDP file: Locate the RDP file on your computer or in your email. Typically, double-clicking the file will open it with the default Remote Desktop Connection client on your operating system.
2. Adjust settings if necessary: Once the RDP file opens, review the connection settings. You may want to modify aspects like screen resolution, remote resource access, or authentication preferences based on your requirements.
3. Initiate the connection: Click on the “Connect” or similar button within the Remote Desktop Connection client to establish the remote desktop session using the RDP file. Provide any necessary login credentials if prompted.
4. Use the remote desktop session: Once connected, you can interact with the remote desktop as if you were physically present at that location. Open applications, access files, and perform tasks as needed.
Remember to ensure the security of your RDP connections by using strong and unique passwords, applying necessary security patches, and following best practices for remote access.
How can I open RDP file?
To open an RDP (Remote Desktop Protocol) file, follow these steps:
1. Ensure you have a Remote Desktop Client installed: Before opening an RDP file, check if you have a Remote Desktop Client application installed on your device. If not, you can download one from Microsoft’s official website or from trusted software sources.
2. Locate the RDP file: Find the RDP file you want to open. Usually, RDP files are saved with a .rdp file extension and can be easily identified.
3. Double-click on the RDP file: Once you’ve located the RDP file, simply double-click on it to launch your default Remote Desktop Client application.
4. Confirm the connection details: The Remote Desktop Client will open a dialogue box displaying the connection settings specified in the RDP file. Review the information to ensure it is correct and adjust any settings if necessary.
5. Connect to the remote desktop: After confirming the connection details, click on the “Connect” or “OK” button in the Remote Desktop Client application to establish the remote desktop connection. The client will then initiate the connection process and display the remote desktop on your screen.
Remember, to successfully connect to a remote desktop using an RDP file, you will need the appropriate credentials and permissions to access the remote system.
Please note that the steps provided may slightly vary depending on the specific Remote Desktop Client application you’re using.
How do I connect to remote desktop without password?
To connect to a remote desktop without a password, you can follow these steps:
1. Set up a Remote Desktop Protocol (RDP) server: Ensure that the computer you want to connect to has Remote Desktop enabled and is configured to allow remote connections. This involves accessing the System Properties settings on your computer, navigating to the Remote tab, and enabling the “Allow remote connections to this computer” option.
2. Obtain the IP address of the remote computer: You will need to know the IP address of the computer you want to connect to. You can find this information within the system settings of the remote computer or by using network scanning tools.
3. Establish a connection using Remote Desktop Client: On your local computer, open the Remote Desktop Connection app (built-in on Windows) or use a third-party RDP client if you’re on a different operating system. Enter the IP address of the remote computer and click “Connect.”
4. Input credentials or utilize Windows Hello for Business: By default, Remote Desktop will prompt you to enter the username and password of the remote computer. If you want to avoid entering a password, you can set up and use Windows Hello for Business on the remote computer. This includes features like facial recognition or fingerprint authentication, which can streamline the login process.
5. Ensure proper security measures: Although connecting without a password may increase convenience, it can also compromise security. To mitigate this risk, it is essential to maintain other security measures such as keeping your operating system and software up to date, using strong and unique passwords or biometric authentication for user accounts, and enabling a firewall to protect against unauthorized access.
Remember to exercise caution when attempting to connect to remote computers without a password, as security requirements may differ based on your network policies or specific use case.
What is remote access password?
A remote access password is a security credential used to authenticate and authorize a user to remotely connect to and access a computer or network. It acts as a barrier to prevent unauthorized access and ensures that only authorized individuals can connect to and control devices or systems remotely. Here are some key points to consider about remote access passwords:
1. Enable Secure Remote Access: Remote access allows users to connect and interact with a computer or network from a different location. To ensure security, it’s essential to set up a strong password to protect remote connections.
2. Password Complexity: When setting a remote access password, it’s crucial to adhere to password complexity guidelines. A strong password typically includes a combination of upper and lower case letters, numbers, and special characters. Avoid using common words, predictable patterns, or personal information that can be easily guessed.
3. Length of Password: Longer passwords are generally more secure than shorter ones. Aim for a password length of at least 8-12 characters or longer if the system allows it.
4. Unique Password: It is important to use a unique password for remote access that is not shared with other services or accounts. Using the same password across multiple platforms can increase the risk of unauthorized access if one account becomes compromised.
5. Regularly Update Passwords: It is advisable to update passwords periodically to ensure ongoing security. By changing passwords regularly, you can mitigate the risk of unauthorized access and maintain a higher level of security.
6. Two-Factor Authentication (2FA): Consider enabling an additional layer of security, such as 2FA, which requires another form of verification, like a code sent to your mobile device, in addition to the password. This helps protect against unauthorized access, even if the password is compromised.
7. Securing Remote Access Protocols: Ensure that the method used for remote access, such as Remote Desktop Protocol (RDP) or Virtual Private Network (VPN), is implemented securely. This includes using up-to-date encryption protocols, limiting access to authorized users, and keeping the remote access software or tools patched and updated to address any vulnerabilities.
Remember, the specific steps to set or configure a remote access password will vary based on the software, operating system, or network setup you are using. It is also essential to follow any guidelines or best practices provided by the software or service provider themselves for remote access security.
How do I find my password for Remote Desktop?
As a tech blogger, I can guide you on how to find your password for Remote Desktop without referencing my identity as an technical blogger. Here’s a step-by-step approach:
1. Check your saved credentials: If you have previously connected to Remote Desktop and saved your login credentials, the password might be stored on your device. You can check for saved passwords in the Windows Credential Manager or the macOS Keychain Access.
2. Retrieve password from credentials manager: In Windows, open the Control Panel and search for “Credential Manager.” Open it and review the list under “Web Credentials” or “Windows Credentials” for any entries related to Remote Desktop. Select the relevant entry and click “Show” or “Properties” to reveal the stored password.
3. Use a password recovery tool: If you don’t have any saved credentials, you can try using a password recovery tool specifically designed for Remote Desktop. These tools can help recover stored passwords on your device. Make sure to use a reputable tool and exercise caution while downloading and running any software.
4. Contact your system administrator: If you are accessing a Remote Desktop connection provided by your workplace or a remote server managed by a system administrator, they might have the password information. Reach out to them for assistance in retrieving or resetting the password.
Remember, it’s essential to follow security best practices and ensure that you have proper authorization to access Remote Desktop connections.