
В случае, если вам потребовался доступ из Windows к данным на разделе диска с файловой системой Linux — ext4/ext3/ext2, встроенными средствами системы сделать это не получится. Однако, возможности есть, причем реализовать это можно встроенными средствами системы или с помощью сторонних инструментов.
В этой инструкции подробно о способах подключить раздел диска в файловой системе Linux в Windows 11 и Windows 10 для доступа к данным на этом разделе как для чтения, так и для записи.
Ext2 File System Driver (Ext2Fsd) — самый простой способ открыть раздел ext4/ext3/ext2 в Windows
Ext2 File System Driver или Ext2Fsd — сторонний и полностью бесплатный драйвер для подключения разделов Linux во всех версиях Windows начиная с XP. Несмотря на название, поддерживаются не только разделы не только с файловой системой ext2, но и более новые ext4 и ext3.
Порядок использования Ext2 File System Driver для доступа к дискам Linux будет следующим:
- Загрузите установщик Ext2Fsd с сайта https://sourceforge.net/projects/ext2fsd/
- Установите драйвер, в параметрах установки как правило не требуется ничего изменять.
- По завершении установки вам будет предложено запустить Ext2 Volume Manager (менеджер томов), запустите его.
- Нажмите правой кнопкой мыши по разделу Linux ext4, ext3, ext2 и выберите пункт «Assign Drive Letter» — назначить букву диска.

- Для раздела будет автоматически назначена буква диска, и вы увидите раздел в Проводнике Windows с возможностью чтения и записи файлов на нём.


В дальнейшем вы тем же способом сможете удалить букву диска с раздела (опция «Change letter» — «Remove»).
Доступ к разделам Linux средствами Подсистемы Windows для Linux (WSL)
Подсистема Windows для Linux (WSL) также может быть использована для подключения дисков Linux в Windows таким образом, чтобы доступ к ним был возможен из проводника. Шаги будут следующими:
- Запустите командную строку, Терминал или PowerShell от имени администратора и по порядку введите команды
wsl --install
wsl --set-default-version 2
dism.exe /online /enable-feature /featurename:VirtualMachinePlatform /all /norestart
wsl --install -d Ubuntu

- После выполнения последней команды откроется окно консоли Linux (командную строку при этом не закрывайте, она еще пригодится) с предложением настроить имя пользователя и пароль, сделайте это. Если в окне консоли вы увидите сообщение об ошибке, скачайте и установите обновление WSL, перезагрузите компьютер и запустите Ubuntu из меню «Пуск».
- В консоли Ubuntu введите команду
sudo mkdir -p /mnt/ext-drives/
для создания папки, к которой будут монтироваться диски.

- В консоли Windows (командная строка, терминал, Powershell) введите команду
wmic diskdrive list brief
- Обратите внимание на DeviceID диска, который нужно подключить и введите команду (так же в консоли Windows) указав соответствующий номер в имени PHYSICALDRIVE
wsl --mount \\.\PHYSICALDRIVE

- В консоли Ubuntu введите команду lsblk — это отобразит список подключенных дисков, разделов на них и их размер. В следующей команде используем имя нужного раздела для монтирования:
sudo mount /dev/sdИМЯ /mnt/ext-drives/
- После успешного выполнения всех указанных шагов вы можете зайти в Проводник Windows, выбрать пункт «Linux» в панели быстрого доступа, перейти в папку mnt\ext-drives и получить доступ к файлам на подключенном разделе Linux с возможностью записи и чтения.


В дальнейшем для отключения диска от WSL можно использовать ту же команду, которая использовалась на 5-м шаге, заменив mount на unmount.
Есть и другие программы (драйверы) для доступа к разделам Linux из Windows, но не полностью бесплатные. Среди них:
- DiskInternals Linux Reader — в бесплатной версии доступно только чтение данных с разделов.
- Paragon Linux File Systems for Windows — бесплатная работа в течение пробной версии, затем необходимо приобретать лицензию.
Содержание статьи:
- Как «прочитать» информацию на разделах с файловыми системами Ext2, Ext3, Ext4
- Способ 1 (через спец. драйвер)
- Способ 2 (через дополнения к TC)
- Способ 3 (с помощью LiveCD)
- Вопросы и ответы: 4
Доброго дня!
К сожалению «обычная» версия Windows не позволяет работать с дисками, отформатированными в файловые системы (ФС) Ext2, Ext3, Ext4 (используются в Linux). Всё, что доступно — это узнать о их существовании в управлении дисками, а вот скопировать файл — уже проблема…
Что делать?
Наиболее сподручный и самый удобный вариант (на мой взгляд) — установить в Windows спец. драйвер, который позволит ОС работать с дисками Ext2/3/4 также, как если бы они были отформатированы в NTFS (скажем). Т.е. любая программа в Windows (тот же проводник) сможет в обычном режиме работать с диском. Удобно?
Теперь о том, «что» выбрать…
*
Как «прочитать» информацию на разделах с файловыми системами Ext2, Ext3, Ext4
Способ 1 (через спец. драйвер)
Подобные «драйверы» есть от нескольких производителей. Я бы выделил продукт от Paragon (ссылка на офиц. сайт с драйвером). Почему:
- поддержка ФС: Ext2, Ext3, Ext4 (чтение + запись); Btrfs, XFS (только чтение);
- после установки драйвера — ничего «делать» не нужно: просто Windows начинает видеть накопители с Ext4+;
- совместим с ОС Windows 7/8/10 (плюс есть пробный период, которого хватает для возникшей задачи (обычно)).
Драйвер от Paragon
Обратите внимание, что «ненужные» разделы диска можно откл. и не монтировать. Настройка драйвера позволяет это сделать.
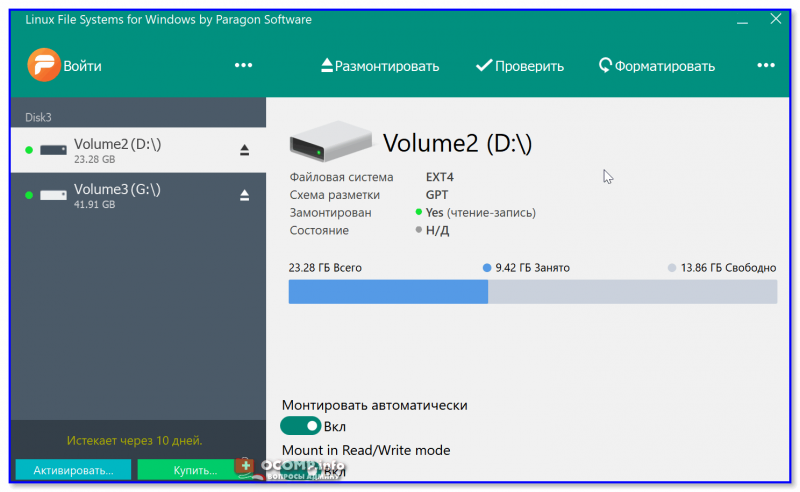
Главное окно (Linux File Systems for Windows by Paragon Software)
На скрине ниже привел окно проводника: как видите, раздел отображает как «обычный» — на него также можно что-нибудь скопировать / удалить.
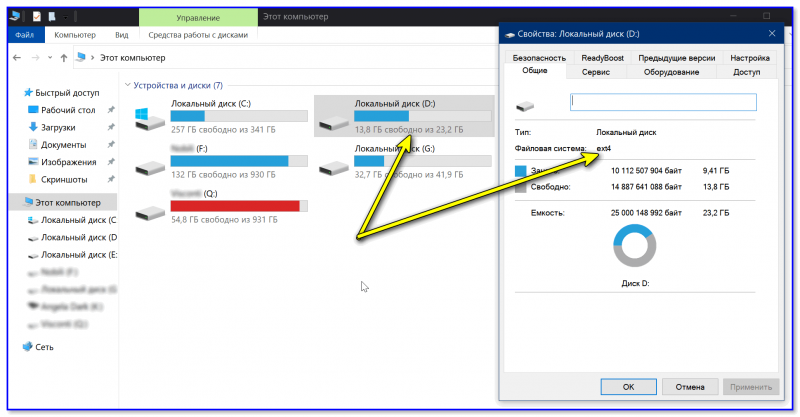
Этот компьютер — диски с ФС EXT4 появились в проводнике
👉 Дополнение!
На Sourceforge можно также найти бесплатный драйвер файловой системы Ext2/3/4 для Windows 7/8/10* (ориг. название: Ext2Fsd).
Сразу отмечу, что на некоторых ОС Windows 10 — драйвер этот ведет себя нестабильно, и не позволяет прочитать информацию с нужного раздела…
Продукт от Paragon, конечно, выигрывает…
*
Способ 2 (через дополнения к TC)
TC — это сокращенное название файлового коммандера Total Commander (некая замена проводнику). К этой программе есть очень много плагинов, и, разумеется, для чтения Ext2/3/4 ФС тоже есть!
Покажу по шагам, как в нем открыть подобный раздел диска…
1) Сначала устанавливаем сам Total Commander. Ссылка на офиц. сайт.
2) Далее необходимо загрузить плагин DiskInternals Reader с офиц. сайта (он идет в архиве ZIP — извлекать не нужно).
3) После необходимо запустить TC от имени администратора (просто кликните правой кнопкой мыши по значку…). 👇
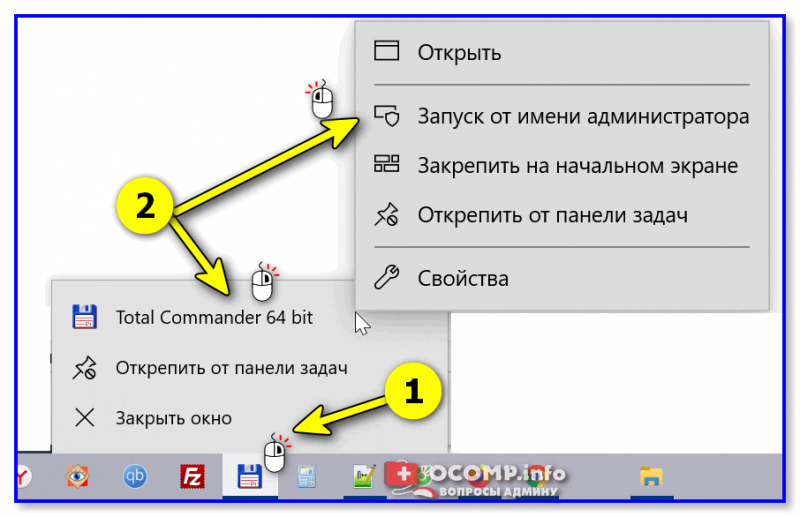
Запуск TC от имени админа
4) Затем необходимо открыть архив ZIP с плагином DiskInternals Reader в Total Commander — тогда он предложит вам установить плагин. Разумеется, соглашаетесь! 👌
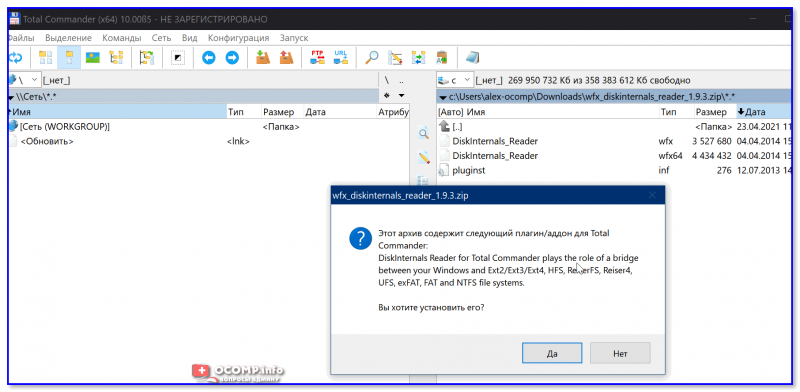
Установка плагина
5) Далее необходимо закрыть TC и снова его запустить от имени админа. В меню выбора диска укажите вариант «Сеть / FS-плагины» — далее кликните по значку DiskInternals Reader (см. стрелки 1, 2 на скрине ниже 👇).
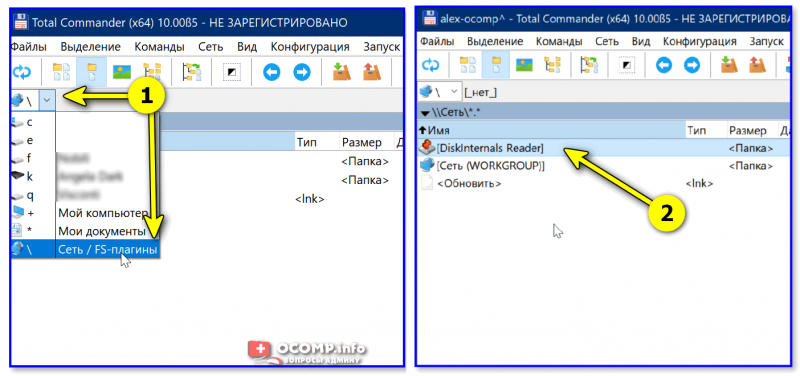
DiskInternals Reader
6) Собственно, далее появиться список всех дисков (в том числе и Ext2/3/4) — их можно открыть и скопировать с них нужную информацию. Задача решена?! 👌
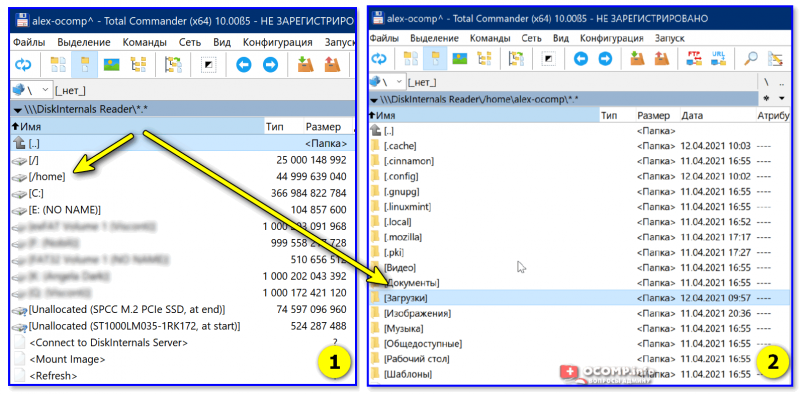
Файлы читаются, можно копировать
*
Способ 3 (с помощью LiveCD)
Вообще, этот вариант, конечно, не относится к работе из-под Windows… Однако, он вполне себе годен для какой-то разовой работы (например, для копирования и переноса папки с файлами). К тому же аварийный LiveCD с Linux никогда не помешает — вдруг чего… 👌
1) Дистрибутивы Linux с поддержкой работы LiveCD — 👉 можете найти в моей подборке
2) Загруженный ISO-файл с нужной версией дистрибутива Linux необходимо правильно записать на флешку.
3) Далее останется только загрузиться с этой флешки с помощью Boot Menu (вызывается сразу после вкл. ПК). Если вы выберите дистрибутив Linux для новичка — то работать с ним весьма просто (ничуть не сложнее, чем с проводником Windows).
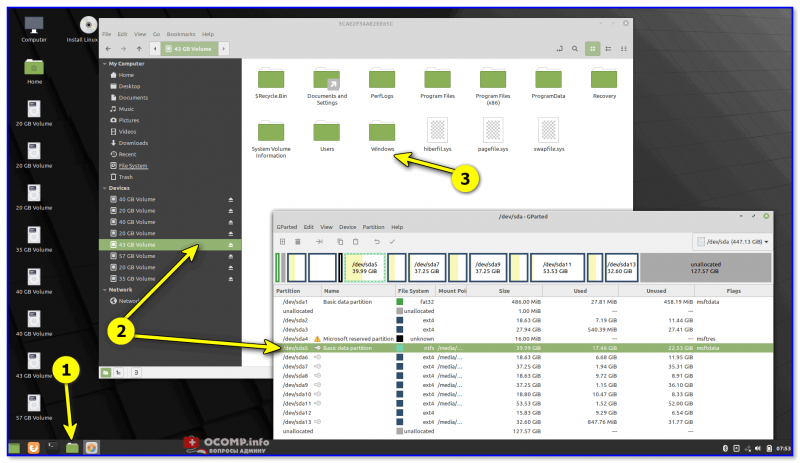
Linux Mint загружена с LiveCD
*
Дополнения приветствуются!
Успехов!
👌
Если у вас на одном из дисков установлена Linux и вы, будучи загруженным в Windows, хотите посмотреть содержимое этого диска, то окажется, что это не так-то просто. Потребуется установка дополнительного драйвера и программы.
В противном случае при подключении, например, флешки с Линуксом, нас встречает вот такое «радостное» сообщение, что «Чтобы использовать диск в дисководе сначала отформатируйте его».
Вчерашнее обновление архиватора
Ссылка скрыта от гостей
до версии 15.08 beta даёт нам возможность упростить эту задачу. 7-Zip теперь поддерживает извлечение образов ext3 и ext4 (файловая система Linux).
Мои тесты дали разные результаты, но общий вывод — новая функция прекрасно работает с разными дистрибутивами, кроме Kali Linux и CentOS (я не знаю почему).
Теперь прямо из Windows каждый может:
- открывать разделы Linux и копировать с них данные на диски Windows
- открывать виртуальные диски VirtualBox и VMware с установленной ОС Linux и копировать с них данные.
Если про распаковку образов VMDK, VDI вы пропустили, то посмотрите заметку «Бесплатная программа для распаковки архивов RAR5 и образов VMDK, VDI».
Открытие файловой системы ext3 и ext4 из Windows
Всё довольно просто.
Ссылка скрыта от гостей
версии 15.08 или более позднюю. Если ОС Linux установлена на раздел жёсткого диска или на флешку, то переходите в


Если вам нужно открыть образ с Linux, то работаете с ним как с обычным архивом:

Если нужно просмотреть содержимое виртуального жёсткого диска, на котором установлена Linux, то открываете этот виртуальный жёсткий диск как архив, доступные разделы представлены в виде образов:

Двойным кликом можно перейти внутрь этих образов и посмотреть/скопировать данные с них:

Скриншоты выше – это Linux Mint, далее скриншот с Debian:

Важная деталь — даже большие диски открываются очень быстро. Если виртуальный диск является динамическим, то никаких проблем это не вызывает.
Тем не менее, не всё так безоблачно.
Открытие разделов Kali Linux и CentOS из Windows с помощью 7-Zip
Заглянуть во внутрь разделов этих операционных систем мне не удалось.
Вместо открытия, 7-Zip пытался извлечь файлы образов во временную папку. Это вызывало у меня ошибку нехватки места на диске C. Когда эта ошибка была побеждена и я извлёк файл образа, 7-Zip всё равно не справился с его открытием, выдавалась ошибка «Файл образа диска повреждён».
Перенос временной папки 7-Zip в другое место
Раз уж заговорили об ошибке о переполнении диска C при работе архиватора 7-Zip, то опишу здесь пару способов, которыми её можно решить.
Стандартная настройка смены каталога, почему то, не срабатывает в последних бета версиях.
1й способ смены временной папки 7-Zip (мне он понравился больше)
Перейдите в двухпанельный режим (запустите 7zFM.exe и нажмите «F9»). Затем откройте нужный архив в левой панели и используйте «F5» или «Извлечь», чтобы распаковать архив в другую панель.
У меня этот способ прекрасно сработал.
2й способ смены временного каталога 7-Zip
Измените переменную окружения %Temp% на нужный вам каталог. Сделать это можно так: кликните правой кнопкой на Этот компьютер, затем выберите Свойства. Потом Дополнительные параметры системы, выберите вкладку Дополнительно, и на ней выберите Переменный среды.
Выберите %Temp% из списка и отредактируйте её под ваши нужды.
Все программы, которые используют временную директорию Temp, теперь будут использовать новый установленный путь.
Способ, что называется, на любителя.
Дополнительные материалы для знакомства с 7-Zip:
- Бесплатная программа для распаковки архивов RAR5 и образов VMDK, VDI
- Как установить 7zip на Linux
- Как создать зашифрованный zip файл на Linux
- Работа с архивами в Linux
Quick Links
-
DiskInternals Linux Reader
-
Linux File Systems For Windows
Summary
You must install a third-party application, like Linux Reader, Ext2explore, or Linux File Systems for Windows to view files on your Linux partitions from within Windows. You can also use Windows Subsystem for Linux 2 to view your Linux files on Windows if your Linux partition is on a separate drive.
If you’re dual-booting Windows and Linux, you’ll probably want to access files on your Linux system from Windows at some point. Linux has built-in support for Windows NTFS partitions, but Windows can’t usually read Linux partitions without third-party software.
We’ve rounded up some third-party software to help. This list is focused on applications that support the Ext4 file system, which most new Linux distributions use by default. These applications all support Ext2 and Ext3, too — and one of them even supports ReiserFS.
UPDATE: 9/8/22
This article previously recommended Ext2Fsd as one of these three options. Ext2fsd is still available on GitHub and SourceForge, and currently functions, but everything indicates that the project has been abandoned. You can use it for the present, but there is no telling if it will continue to work in the future without updates. We’ve swapped our recommendations to include only software that has been updated recently (or whose developers are still active), and we’ve confirmed works on Windows 10 and Windows 11.
What About WSL2?
You can also use the Windows Subsystem for Linux (WSL2) to mount Ext4 drives, but the drive with the Ext4 filesystem must be a different physical drive from your NTFS drive.
Additionally, Windows 10 doesn’t support the feature. Microsoft has gradually stopped pushing new WSL features to Windows 10, and that includes the
mount
command necessary for that method.
DiskInternals Linux Reader
Linux Reader is a freeware application from DiskInternals, developers of data recovery software. In addition to the Ext file systems, Linux Reader also supports ReiserFS and Apple’s HFS and HFS+ file systems. It’s read-only, so it can’t damage your Linux file system.
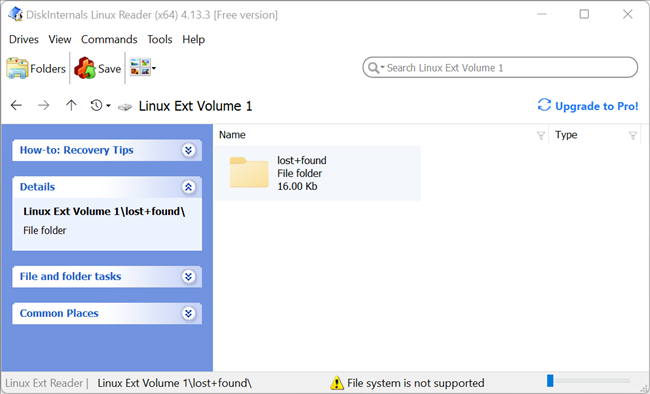
Linux Reader doesn’t provide access via a drive letter — instead, it’s a separate application you launch to browse your Linux partitions.
Linux Reader shows previews of your files, making it easy to find the right one.
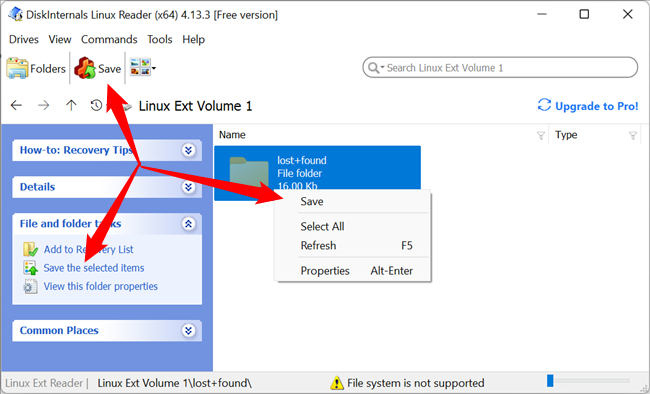
If you want to work with a file in Windows, you’ll have to save the file from your Linux partition to your Windows file system with the Save option. You can also save entire directories of files.
Ext2explore
Ext2explore hasn’t been updated since 2012, but as of September 2022, it works perfectly. Performance might be slow if you’re dealing with large (a few terabytes or bigger) hard drives, but it will get the job done.
We’ve covered Ext2explore in the past. It’s an open-source application that works similarly to DiskInternals Linux Reader — but only for Ext4, Ext3, and Ext2 partitions. It also lacks file previews, but it has one advantage: it doesn’t have to be installed; you can just download the .exe and run it.
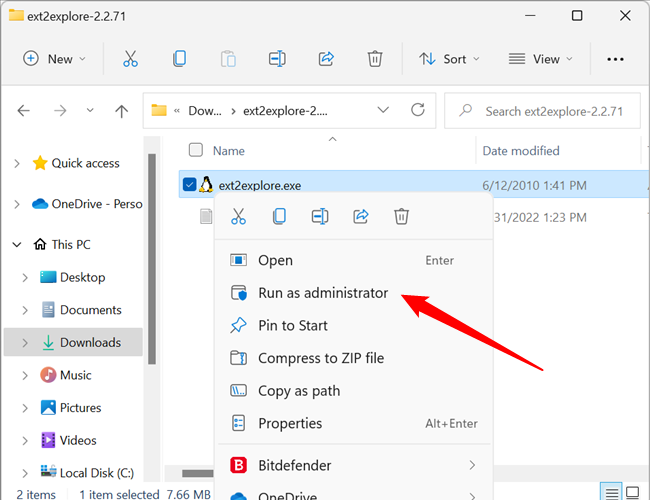
The Ext2explore.exe program must be run as administrator, though, or you’ll get an error. Extract the executable from the ZIP file using a file archiving program or File Explorer first. Then right-click the executable to access the context menu and click «Run as Administrator.»
You can enable the «Run This Program As An Administrator» to save some time in the future.
Right-click the executable, ext2explore.exe, then click «Properties.» Click on the «Compatibility» tab, tick the box next to «Run This Program As An Administrator,» then click «Apply.»
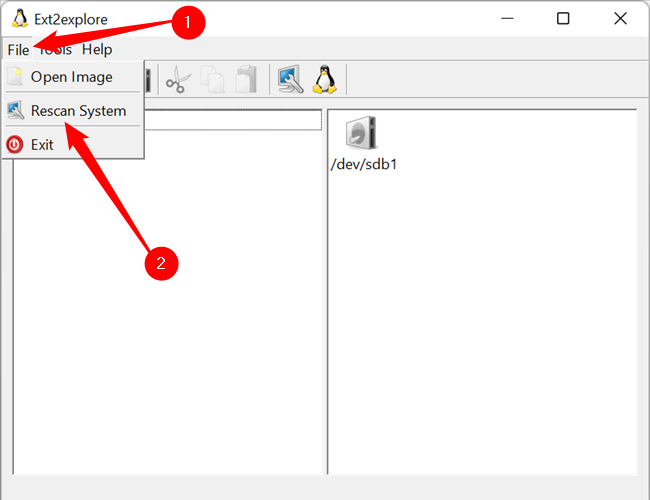
There is a good chance Ext2explore won’t detect any Ext4 partitions or drives when you first run the application. The fix is simple: click on «File» in the top-left-hand corner, then select «Rescan System» from the drop-down menu.
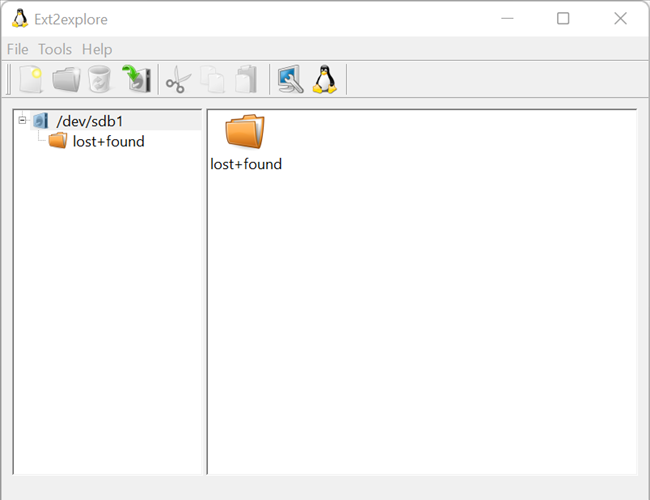
Ext2explore basically works like every other file explorer. You have a hierarchy view in the left pane and folder view on the right. You navigate around it just like you would on Windows, Linux, or macOS.
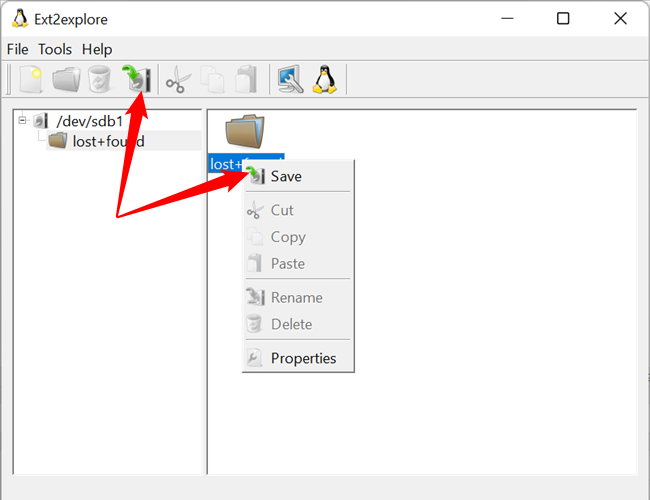
As with Linux Reader, you’ll have to save a file or directory to your Windows system before you can open it in other programs.
Linux File Systems For Windows
Linux File Systems for Windows by Paragon Software is significantly newer than the previous two options. It supports reading and writing to Ext2, Ext3, and Ext4, and supports Btrfs and XFS in read-only mode.
Linux File Systems for Windows isn’t open source or freeware — it costs $20 dollars for a license. Whether that’s worth it will depend on your needs, but we’ve tested it and it works very well.
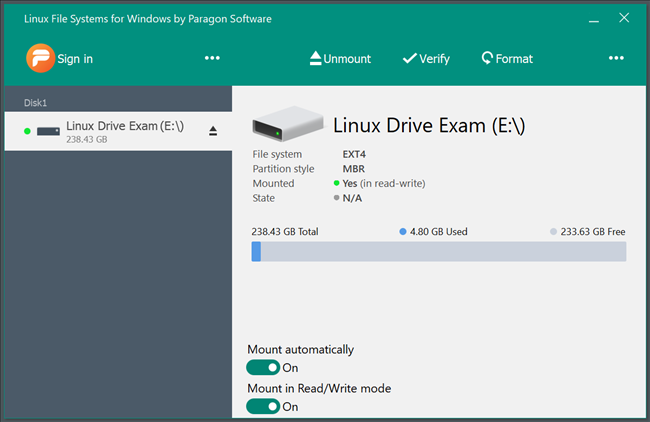
After the installation is complete, any Linux partitions attached to your system will be detected and mounted automatically. It also adds itself to the startup programs — that basically enables plug and play with any Ext2, Ext3, or Ext4 formatted external drives you might connect.
Of course, if you don’t want a a drive to mount automatically, you can always disable that functionality. You can also disable «Mount in Read/Write Mode» if you’re concerned about accidentally corrupting your data.
Linux File System for Windows also has a tool to format partitions built-in. Formatting a partition will completely wipe all data stored on it, so don’t click «Format» unless you’re sure you’re ready to do that. If you do use it, be sure to change the default format from «Ext2» to «Ext4.»
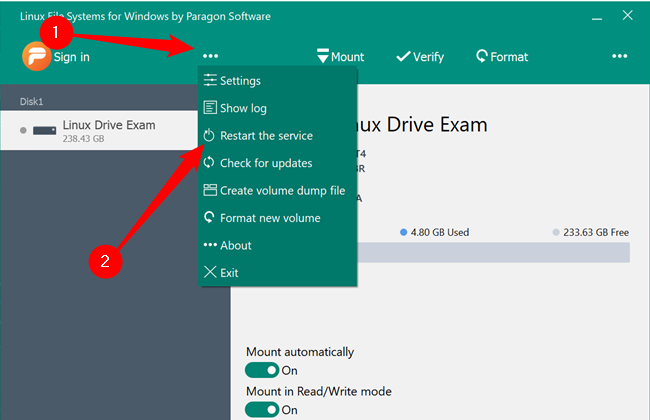
If it fails to detect your drive, click on the three dots in the middle, and then click «Restart the Service.»
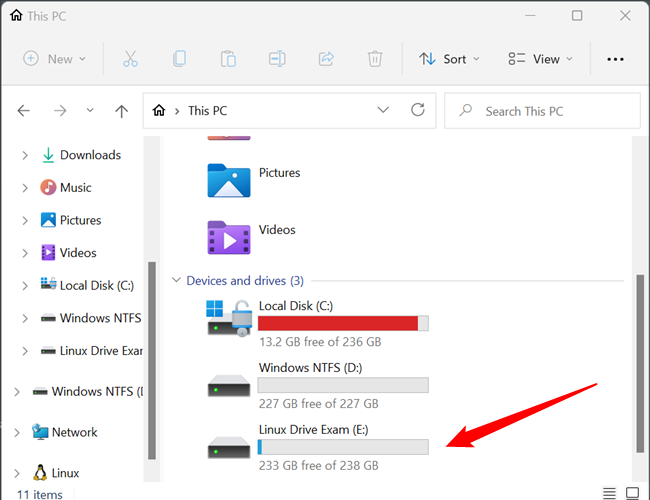
Paragon’s Linux File Systems for Windows mounts your Linux partitions in File Explorer just like any other internal or external storage device and assigns it a letter correspondingly. It isn’t a necessary feature, but it is extremely convenient.
It means that you can interact with anything on your Linux partition seamlessly, using all of the usual Windows controls and shortcuts.
Whether the $20 IS worthwhile really depends on how often you need to work with a Linux partition in Windows. If you’re just going to interact with a Linux partition from Windows once, then it probably isn’t worth spending the money. If it is something you’re going to do regularly — especially if you’ll be reading and writing to the Linux partition on a PC with Linux— then $20 is a fairly compelling value.
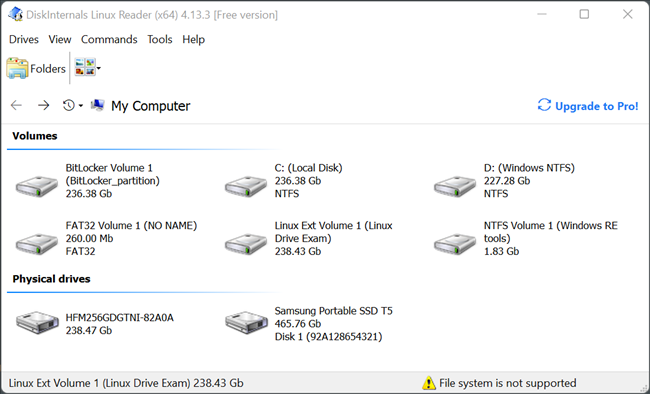
Position : Tips — How to Read and Write EXT4, EXT3 and EXT2 Drives in Windows 10/11?
This guide shows how to read and write data of Linux Ext2/Ext3/Ext4 partitions in Windows 11/10/8/7/Vista/XP. If you dual boot your computer with Windows and Linux, you’ll be able to access NTFS or FAT32 partitions under Linux, but you cannot access Linux partitions directly under Windows. If you need to read Ext4, Ext3 or Ext2 partitions under Windows 10/11 without booting into Linux, here is the tutorial that can help you.
Overview on reading Ext4/3/2 drives in Windows
«My computer is in a dual-boot environment with Windows 10 and Ubuntu. They are installed on one hard drive which is divided into two partitions C and D. Sometimes I want to grab files from Linux partition while computer has booted into Windows 10. It’s way too trouble to restart into Linux and copy files to a FAT32 partition and reboot back into Windows 10. Anyone here knows how to access Ext4 partitions from Windows 10?»
If your computer is dual-booting with Windows and Linux, you must have trouble in accessing files and folder stored in Linux partitions while Windows is running. The default file system type used on Windows and Linux are different, Windows users NTFS, exFAT, or FAT32, while Linux employs Ext2, Ext3, or Ext4 file systems. Besides, Linux has support for NTFS and FAT32 file system, which enables users to access files on Windows partitions. However, on the other hand Windows does not have inbuilt support for Linux partitions.
Therefore, you may come across such a situation that if you are using Windows and Linux together on a computer. You may need to use some files you downloaded in Linux, and you are logged into Windows OS already. Since you cannot access Linux partition directly, you’ll have to restart computer and boot to Linux, copy these files to a NTFS or FAT32 partition and then reboot computer to Windows. Wouldn’t it be better if you can access Linux partitions from Windows?
Nowadays, many users would like to dual boot Linux and Windows on one PC, and they often need to transfer data between two systems. Since Windows does not provide built-in tools to mount Linux partitions, we need to use third-party software to read & write data in Ext4/3/2 partitions. This article will introduce an effective tool to solve the problem. Keep reading the guide, you’ll be able to know how to mount and access files in Linux partitions under Windows 10/11.
Windows & Linux file systems
Some readers may wonder what a file system is. A file system is the tool for operating system to control, store, retrieve and organize files on a storage device. Why are there so many file system types? Different operating systems use and support specific types of file systems, for they target different users. For instance, Windows NT targets enterprise users and uses NTFS file system which enhanced security greatly; Windows 9X targets ordinary users and uses FAT file system which has less security but more performance.
As we all know that Windows and Linux uses different file systems: Windows uses NTFS, exFAT, and FAT32 file system, whereas Linux uses Ext2, Ext3 and Ext4. Thus, users cannot copy a file from Linux to Windows directly. It is quite complicated for an OS to add the support of a particular file system, especially adding support for proprietary file system. For example, the structure of data on disk, encryption algorithm and so on of NTFS file system are not known to the public, and it is very challenging to fully support NTFS in Linux.
Windows does not have native support for Linux file system like Ext2, Ext3 and Ext4. However, some tools have been created to solve this issue. Such software supports Linux file system and allows users to access Linux partitions under Windows. The follow section will introduce a Windows partition manager that can mount and access Linux partition from Windows.
Ext4/3/2 reader for Windows
If you have Windows and Linux on the same PC and want to access data of an EXT4 partition under Windows 10/11, then you need to use third-party software to read & write data in EXt4 partitions. Here we recommend DiskGenius Professional Edition to solve the problem. DiskGenius Professional Edition (formerly known as PartitionGuru) is advanced Windows partition manager and data recovery software. It can handle partitions formatted as NTFS, FAT32, FAT12, FAT16, exFAT, ReFS, Ext2, Ext3 and Ext4 file system from Windows.
Download DiskGenius
With this tool you can do following operations:
- Full access (write & read) to Ext2 / Ext3 / Ext4 partitions under Windows
- Create Ext2 / Ext3 / Ext4 partitions under Windows 11/10/8/7
- Format a drive to Ext4/3/2 in Windows 11/10/8/7
- Resize, shrink, extend, or split Ext2 / Ext3 / Ext4 partitions without deleting data
- Partition recovery — recover lost or deleted Ext4/3/2 partitions in Windows
- File recovery – recover deleted or lost files from Ext4/3/2 partitions in Windows
- Clone or back up Ext2 / Ext3 / Ext4 partitions
- Edit hex data of Ext2 / Ext3 / Ext4 partitions
- Check and repair disk bad sectors
Guide 1. How to mount Ext4/Ext3/Ext2 partitions in Windows 10/11?
Mounting Ext4 partitions in Windows is the first step before we can read or write data in the volume. Now we can use DiskGenius to open the Ext4 partition.
Step 1. Connect the disk that contains Ext4 partitions to your computer and boot your PC into Windows 10.
Step 2. Download and install DiskGenius Professional Edition on your PC and then launch it.
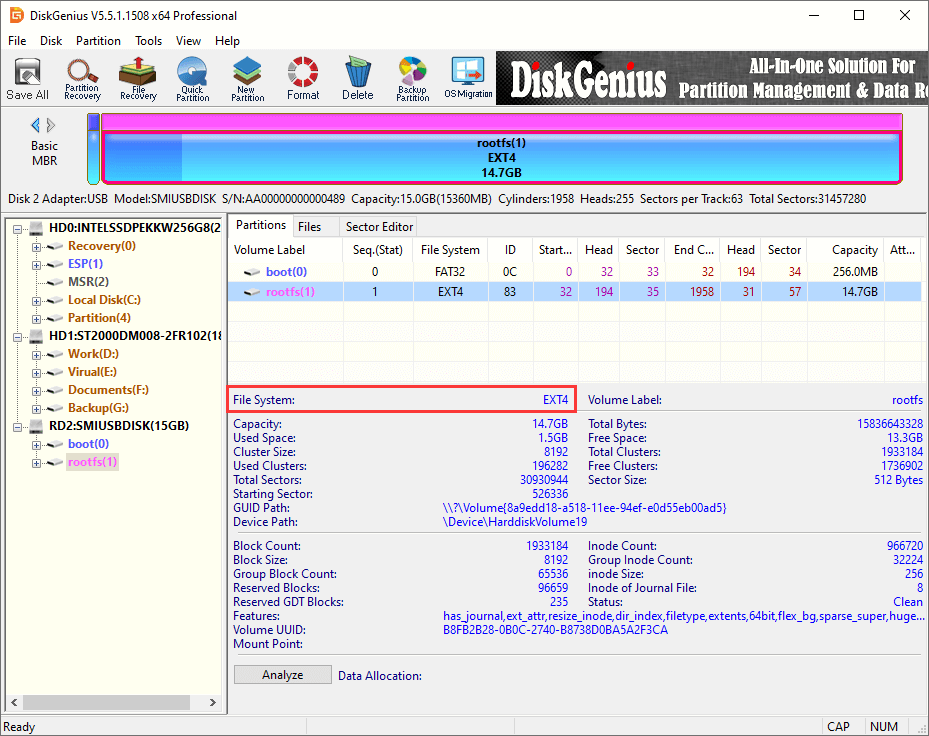
Step 3. Once DiskGenius is launched, you can view all disks and partitions attached to this computer. Select the Ext4 partition and you can browse files and folders in it.
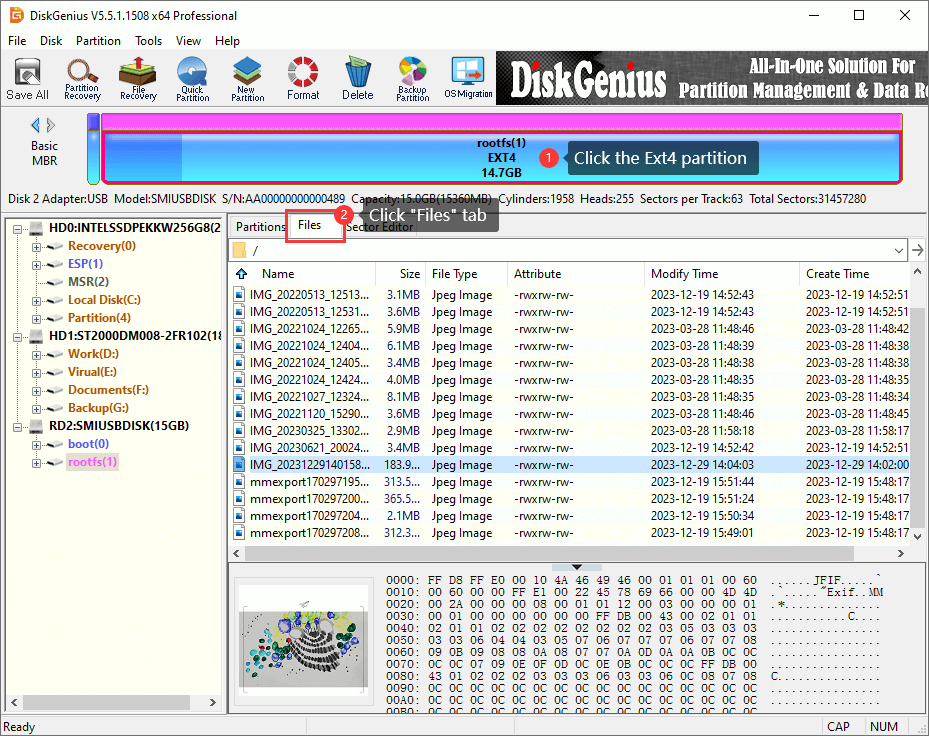
Step 4. Select the Ext4 partition and click Files tab, and you can see data in the root directory. Then you can double click a folder to open it and view files in it.
Guide 2. How to read files of Ext4 partitions in Windows 10/11?
Once the Ext4 partition is recognized by DiskGenius, you can read & write files in the partition.
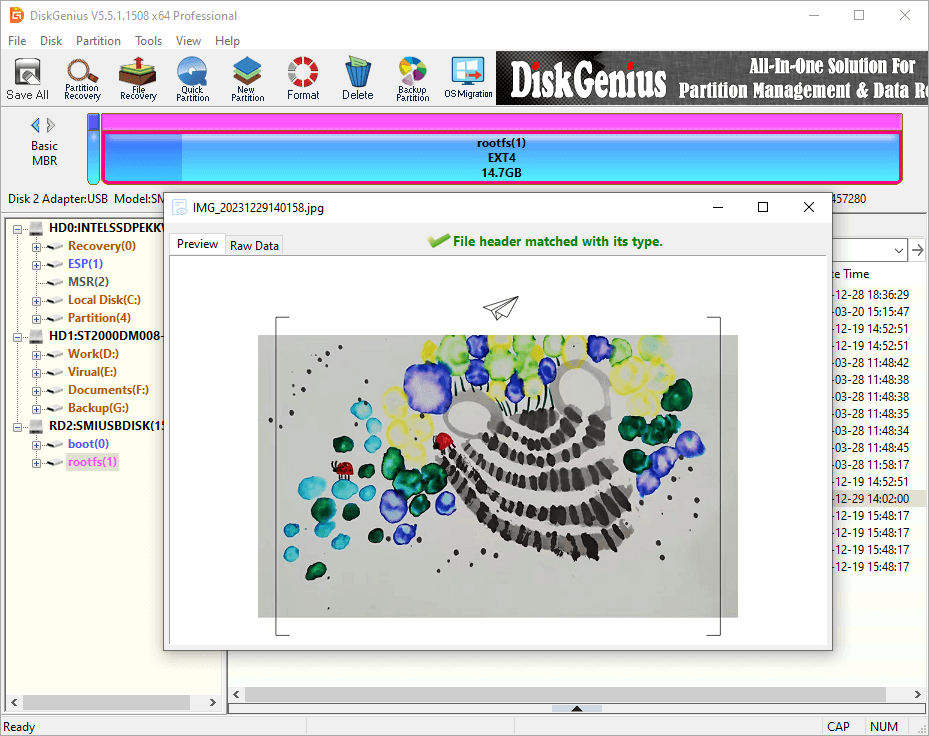
File paths and directories are listed in the left pane like Windows File Explorer, and you can click path and view files on the right pane. Click a file on the right pane, and you can see the thumbnail preview, as follows.
You can double-click the file to open it and view file content in its original size. This tool supports to preview photos, audio, video, Microsoft Office documents, PDF files, and text files.
Guide 3. How to write data into Ext4 partitions in Windows 10/11?
With DiskGenius Professional Edition, you can create new folders in the Ext4 partition, write files to this Ext4 partition, rename files and folder, delete files, export files of the Ext4 partition to another drive, etc. Here are some examples:
Example 1: Write files to Ext4 partitions
Step 1. Open the folder where you want to add data and right-click empty space on the right pane to choose «Copy Files To Current Partition«.
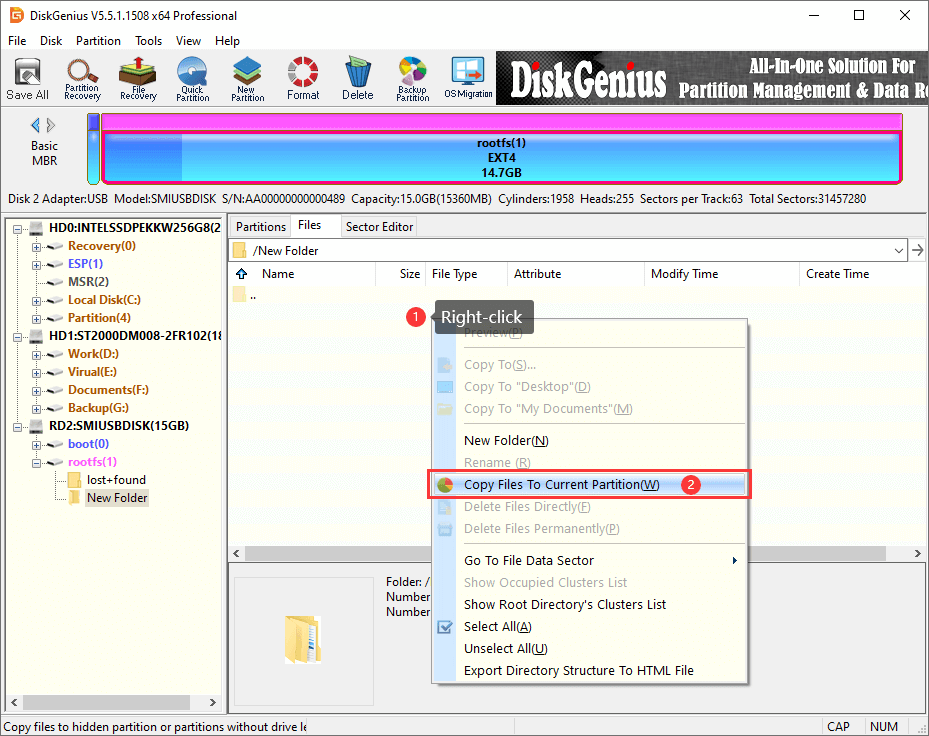
Step 2. Select files from other partitions or hard drives on your computer and Open. Wait for a while, and files will be write into this Ext4 partition.
Tip: This software also allows users to export files from the Ext4 partition to another partition on this computer: Select files you want to output -> right-click files and select «Copy To» -> select target location — > begin outputting files.
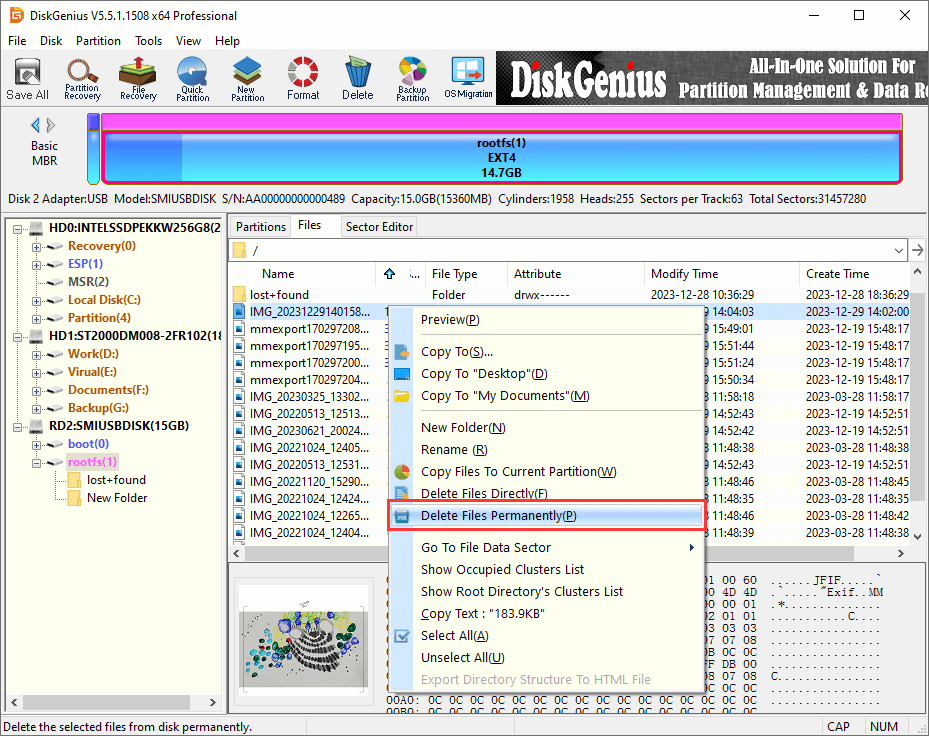
Example 2: Permanently delete files from Ext4 partitions
This feature is able to delete files permanently so that they cannot be recovered by any means, as the software overwrites the disk space while deleting files. If you just want to delete files, you can use Delete Files Directly
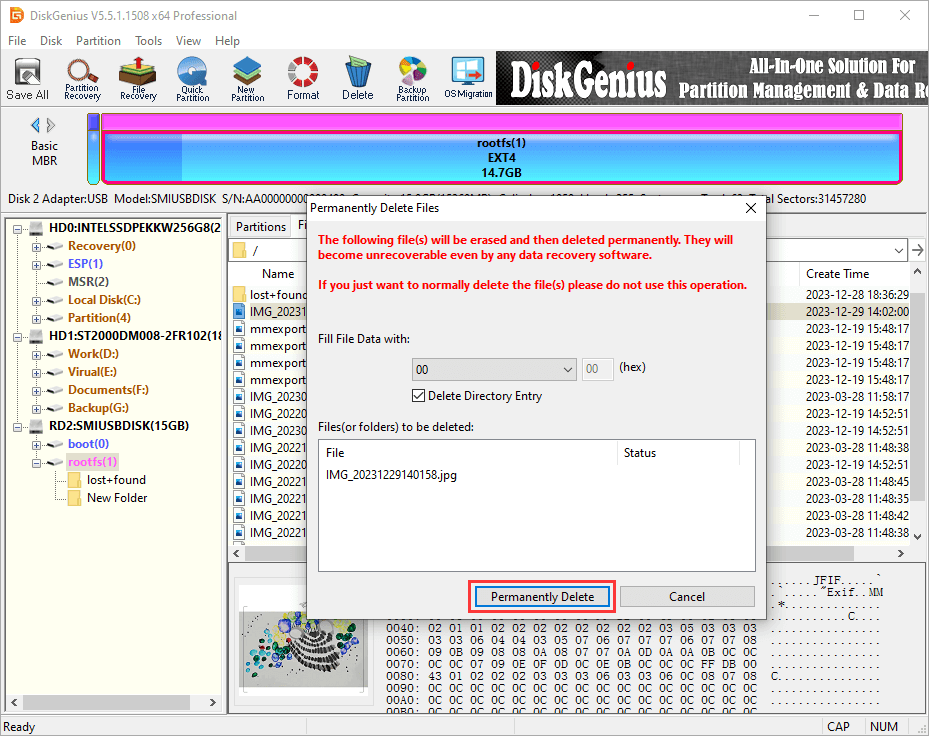
Step 1. Select and right-click files you want to delete and select «Delete Files Permanently» option from context menu.
Step 2. Click «Permanently Delete» button on the popup window. Then the selected file will be deleted permanently.
Example 3: Rename files or folders in Ext4 partitions
In addition to creating new folders, you can also rename files or folders in the software as follows:
Step 1. Right-click on a file or folder you want to change name and select «Rename«.

Step 2. Put in the desired name and click «OK» button.
Guide 4. How to resize Ext4 partitions without losing data in Windows 10/11?
The feature of resizing Ext4 partition without losing data is available for the DiskGenius Free Edition, and you can free download the free edition to resize, extend, or split an Ext4, Ext3 or Ext2 partition without deleting existing data in Windows 11/10/8/7.
Step 1. After launch DiskGenius, you can easily locate the Ext4 partition. Right-click it and choose «Resize Partition».
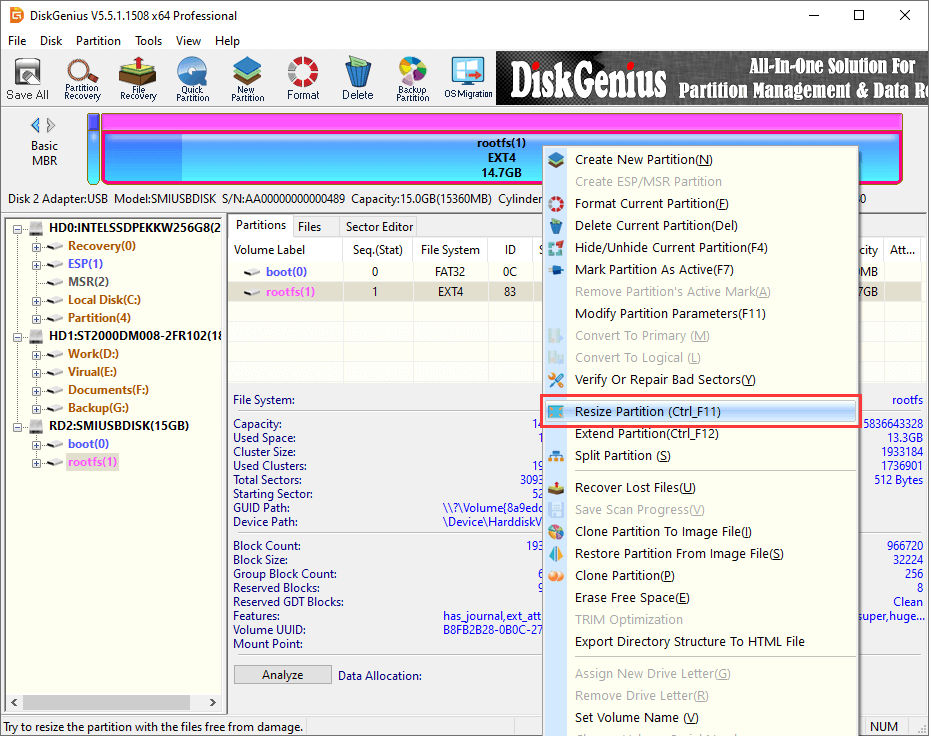
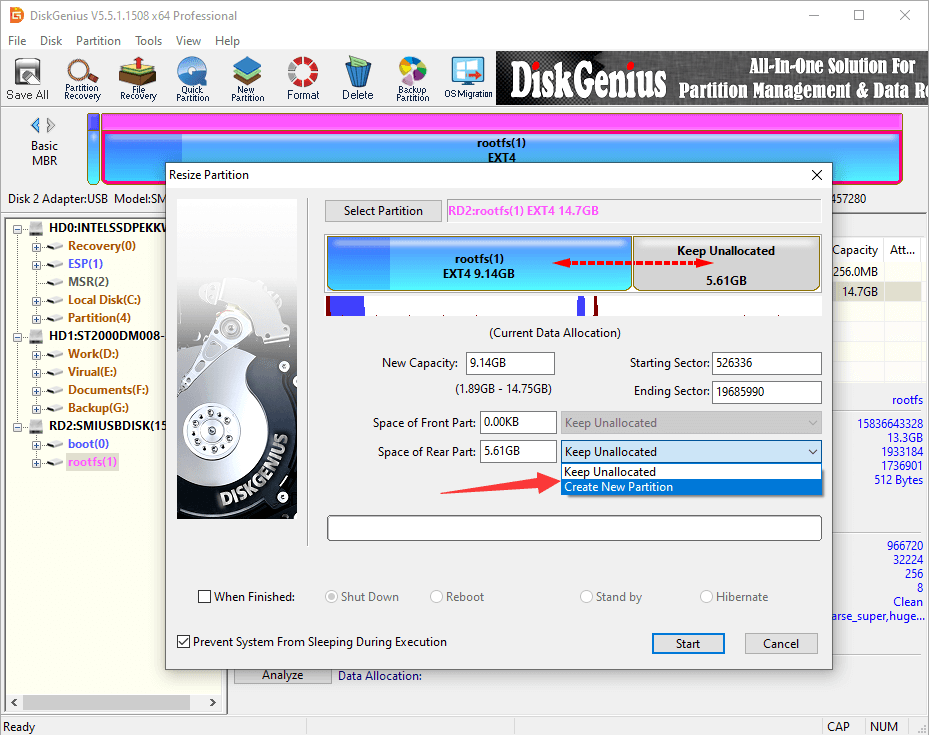
Step 2. Adjust partition size based on your needs. You can change partition size either by manually inputting the size or by dragging the partition boundaries.
The free disk space gained from the partition can be left as unallocated or created as a new partition.
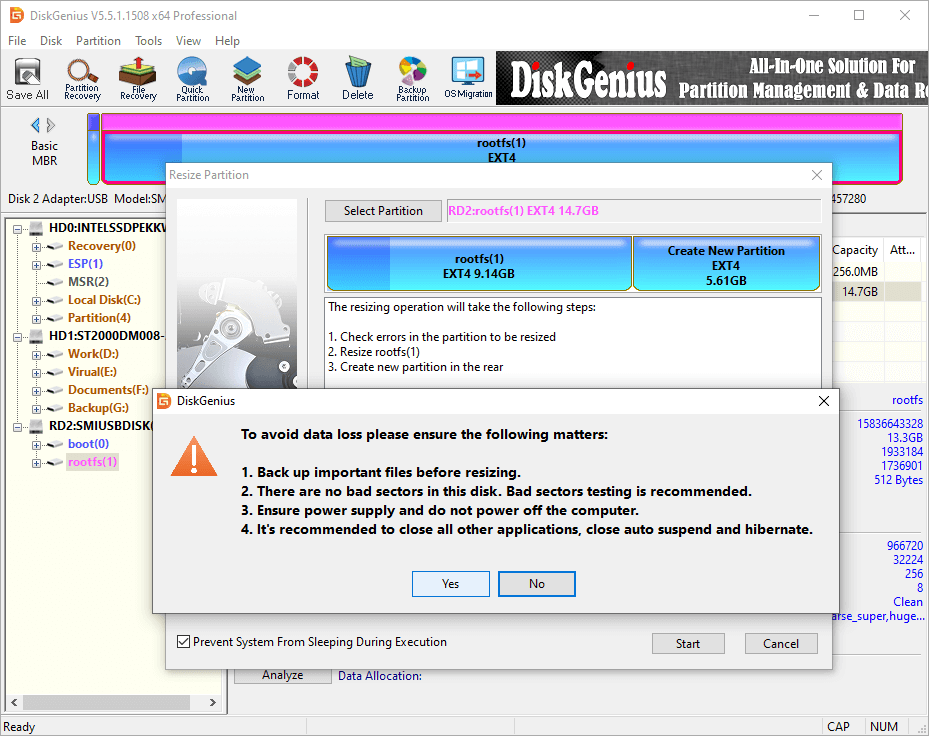
Step 3. Carefully read the notes. Click «Yes» to confirm and continue.
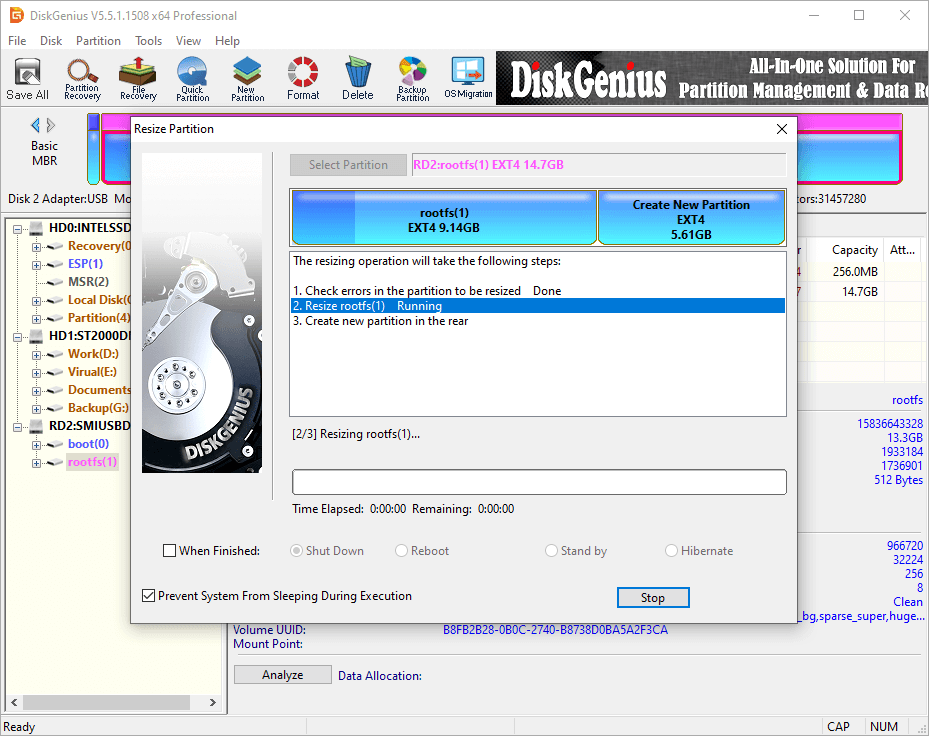
Step 4. DiskGenius is resizng the partition. The process might take some time depending on the size of the partition and the amount of data stored on it. Please be patient.
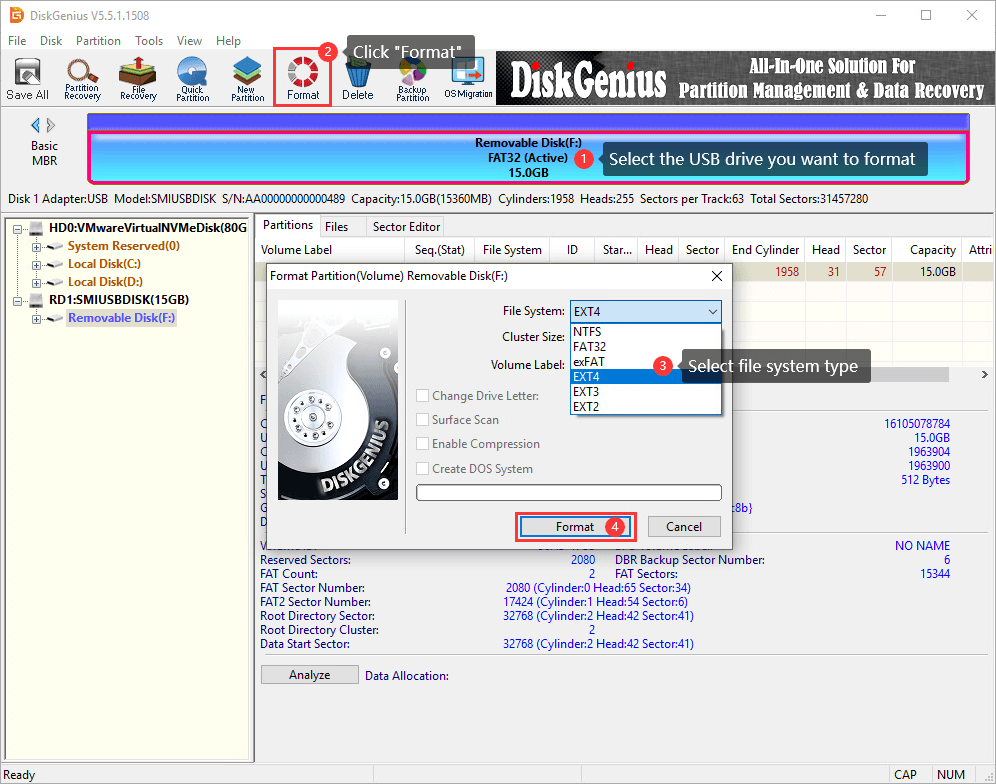
Guide 5. How to format a drive to Ext4/3/2 in Windows 10/11?
DiskGenius Free Edition support creating or formatting Linux-specific file systems like ext4, ext3, or ext2 within Window. The following steps shows how to format a partition to Ext4 using DiskGenius Free Edition in Windows 10.
Step 1. After launching DiskGenius Free Edition, you can select the partition to be formatted, click «Format» button. Then you can choose Ext4 as the file system and click «Format» button.
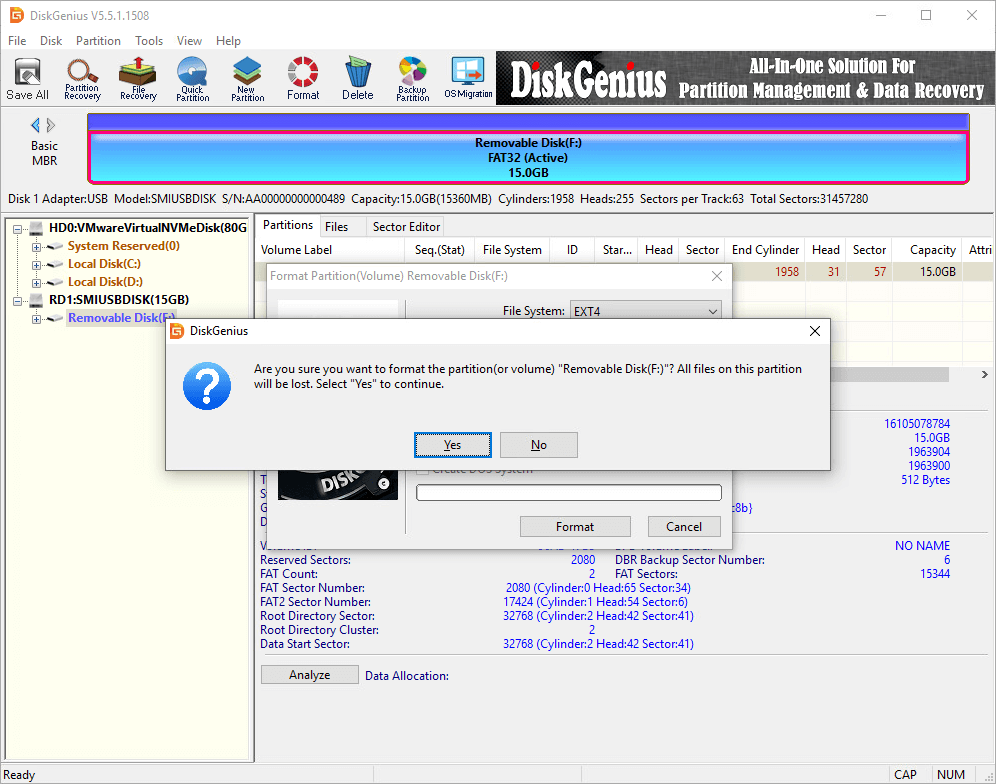
Step 2. A warning message pops up, saying all data on the drive will be erased by the formatting. If you don’t have any important data on the drive, click «Yes» to continue. Then DiskGenius starts to format the drive.
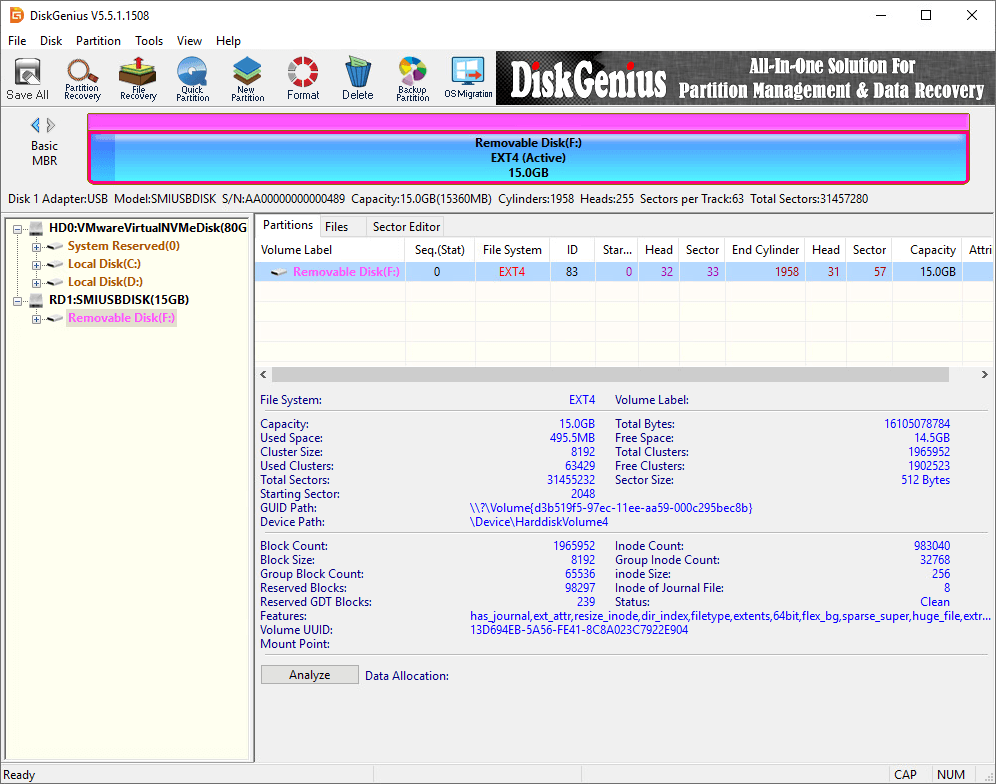
The drive is formatted as Ext4 successfully.
Here’s the video guide on how to format a partition to Ext4 file system in Windows 10:
Conclusion
DiskGenius is a handy and versatile Linux reader for Windows users. By using the software, you can easily read or write your Ext4, Ext3, and Ext2 partitions from Windows 11/10/8/7. Moreover, it also supports to manage Ext4/3/2 partitions to help you get the best use of disk space. If you are one of the dual-boot users, DiskGenius Professional Edition will be your best assistance.