
Updated on Apr 28, 2025
Quick Navigation on Checking Disk Speed Windows 10:
| 🎯Goal: | Check disk speed in Windows 10, analyze internal hard drive read and write speed |
| 👔Who Need It: | All levels of Windows users |
| 🧰Tools: | Windows 10, hard drive |
| 🛠Applicable Methods: |
1. CMD — Free & Preinstalled 2. Disk Health Check Software 🏆- Efficient and Professional |
If you care about keeping your data safe, you need to know how to monitor the health of your SSD. This article tells you on how to check disk speed windows 10 cmd. This post demands your attention if you seek detailed instructions on this topic. Let’s get going now.
- ⏲Duration: 3-5 minutes or longer
- 🚩Applied for: advanced Windows users
- 💽Supported Devices: HDDs, SSDs, and external hard drives, etc.
For Windows users, CMD stands for Command Prompt, a command line interface for running programs. WinSAT, which stands for «Windows System Assessment Tool,» is a command line utility included with Windows that performs benchmarks on different aspects of the operating system and its components. It debuted in Windows Vista and has been standard fare, including Windows 10.
Guide to Check Disk Speed via CMD Windows 10
Learn how to use CMD to examine your SSD’s condition here. The specific procedures are as follows:
Step 1. Open the Run window by pressing the Windows key + R, typing cmd, and hitting Enter.
Step 2. Followed by pressing «Enter» after typing «wmic» into the Command Prompt window
Step 3. Enter «winsat disk -drive c«, and press Enter again.
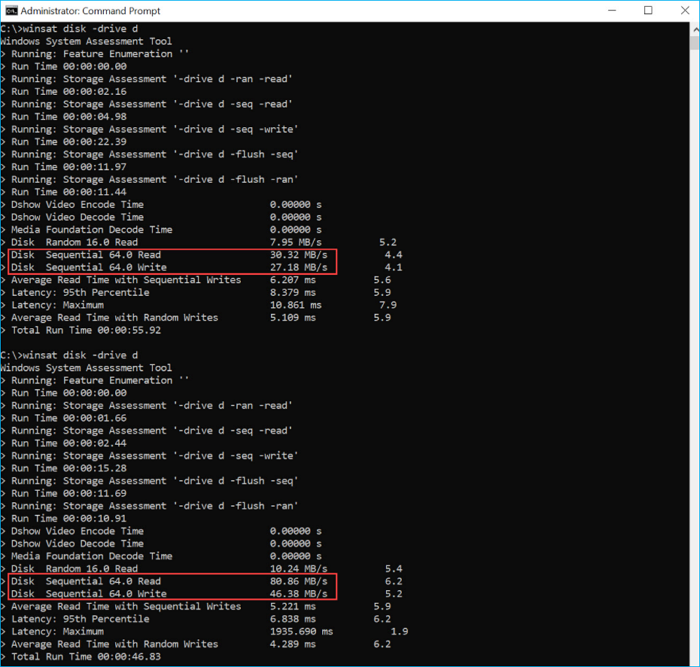
Step 4. The Command Prompt will list the drives and their current speed:
- Disk Sequential 64.0 Read meants its reading speed
- Disk Sequential 64.0 Wirte means its writing speed
CMD is also helpful in detecting other types of disk speed. This method also applise to help you:
While CMD may check the disc, it doesn’t display all the features connected to an SSD’s health state. Using CMD requires computer knowledge, so if you want to check SSD health condition quickly and thoroughly, EaseUS Partition Master is an excellent option.
Pros and Cons of Using CMD to Check Disk Speed in Windows 10
In this section, let’s discuss pros and cons of checking disk speed in Windows 10 using CMD:
| Pros✅ | Cons❎ |
|---|---|
|
|
According to the Pros and Cons, it’s clear that CMD measuring solution contains some drawbacks that cannot fulfill most hard drive owners needs in some specific suitations. For an all-in-one, free, and professional disk speed test tool, we suggest you find a CMD alternative software for help. To test and increase your drive’s speed, EaseUS Partition Master stands out to help you accomplish the tast.
CMD Alternative Software to Check Disk Speed in Windows 10
- 📝Software Define: perfect CMD alternative software in checking disk speed.
- 💽Supported Devices: HDDs, SSDs, USB flash drives, SD cards, and hybrid-HDDSSDs, etc.
- 🖥Compatible Systems: Windows 10/11, older Windows 8/7/XP/Vista, an Sever systems.
- 👩💻Best For: All Windows beginners, geeks, hard drive manufacturers, and gaming lovers.
EaseUS Partition Master as an alternative to the CHKDSK command, it is a reliable tool for assessing the state of a hard drive and SSD, etc. It works smoothly with Windows 11, 10, 8.1, 8, 7, XP, and Vista. Its DiskMark feature is a free tool that allows users to quickly and easily detect and check disc speed with only a few mouse clicks.
Thanks to this handy tool, you can now check the speed status of your SSD with a few clicks.
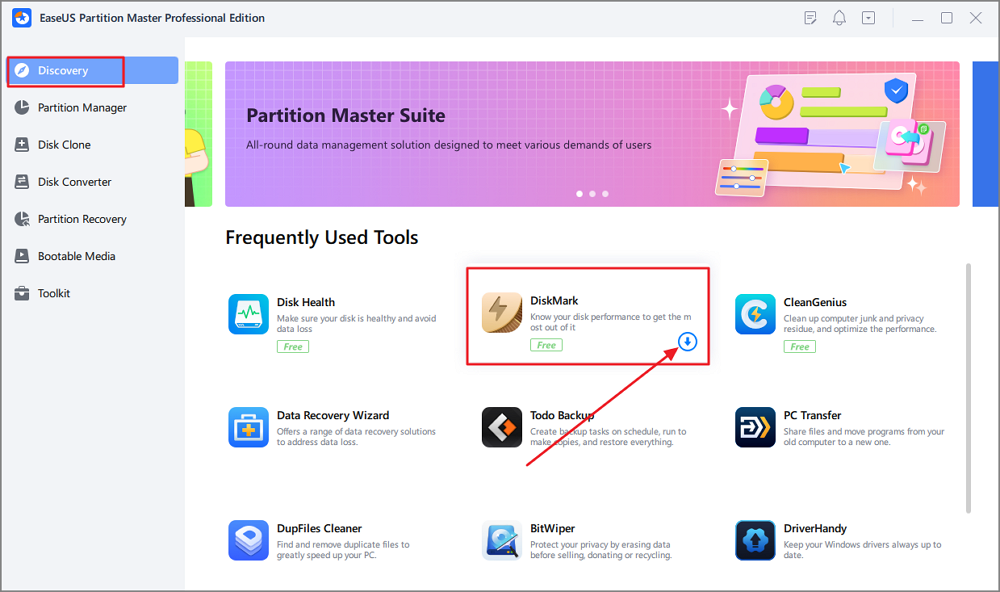
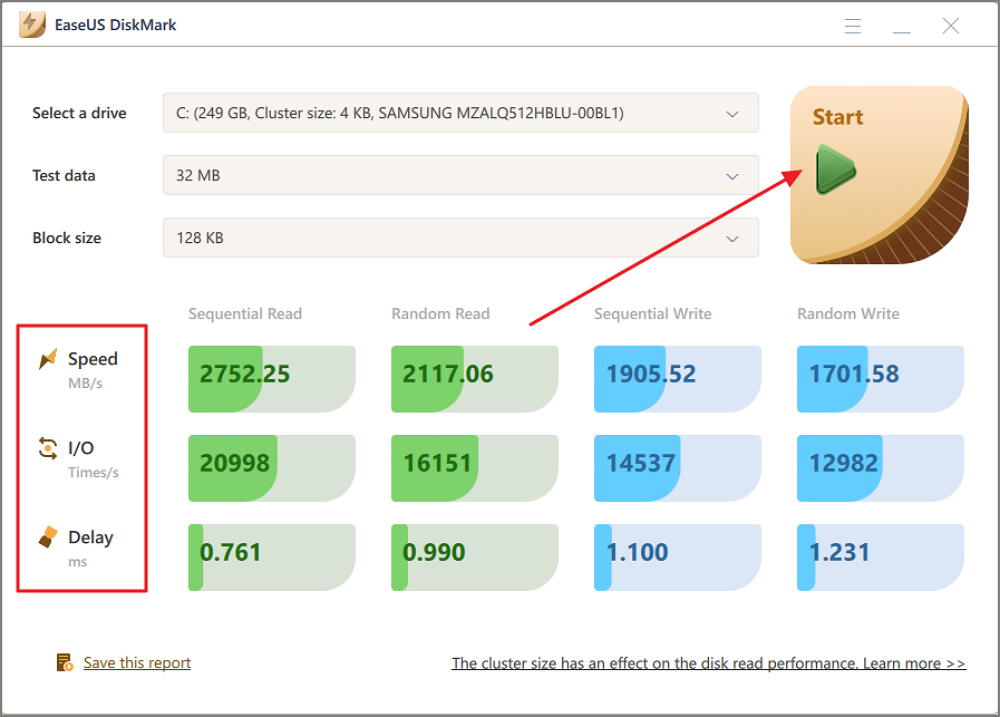
Step 1. Launch EaseUS Partition Master. And click the download button to activate the «DiskMark» feature under the «Discovery» section.
Step 2. Click on the drop-down box to choose the target drive, test data, and block size.
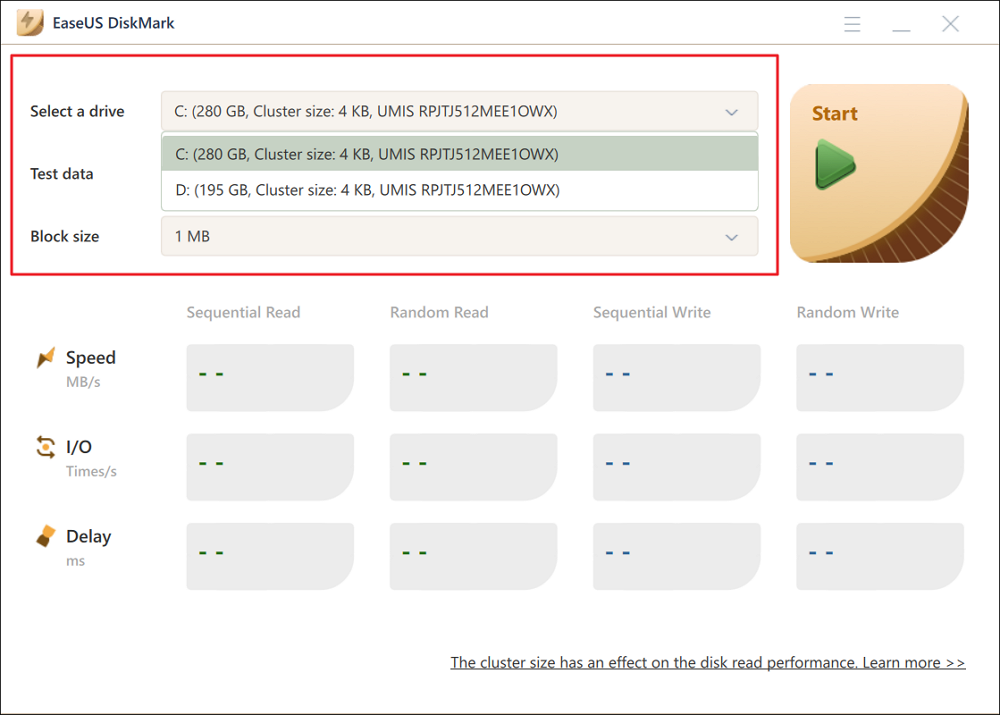
Step 3. Once everything is configured, click «Start» to begin the disk test. Then, you can see the Sequential or Random read/write speed, I/O, and Delay data.
Video Tutorial in Check SSD Speed
When you find your hard drive speed is slower than its average speed, stay calm. Here you can follow this tutorial guide for help:
Why Choose EaseUS Partition Master Over CMD
So why should you select EaseUS Partition Master over CMD in Windows 10? Here is a comparison table and it exlains you the reasons:
| Comparison | EaseUS Partition Master | CMD |
|---|---|---|
| Check Disk Read/Write Speed | ✔ | ✔ |
| Display Disk Speed Test Report | ✔ | ✔ |
| Free to Use | ✔ | ✔ |
| Optimize Disk Speed | ✔ | ✖ |
| Who to Use It | Professionals, Geeks & Beginners | Professionals |
Aside checking disk speed, EaseUS Partition Master also provides Disk Health feature to monitor your HDD and SSD status, temperature, number of powered-on hours, and total host writes and reads can all be seen on your PC.
Moreover, it includes some excellent features that you may also like for better managing partitions and optimizing disk peformance, such as:
- Improve SSD performance by 4k alignment.
- Check and fix hard drive or SSD file system errors.
- Erase all data to reset HDD or SSD.
- Combined partitions.
- Migrate OS from HDD to SSD.
- Allocate hard drive space
As you can see, EaseUS Partition Manager offers various HDD and SSD management options. So, get the trial version and try it out.
When Do I Need to Check Disk Speed in Windows 10?
The hard drive’s read and write speeds will impact your Windows computer’s performance. You are doing periodic speed tests to monitor your discs.
Finding out if a computer’s hard drive is failing is crucial. Broken or corrupted sectors on a hard disc can cause performance and operating system boot issues. To do a disc performance test in Windows 10 under any of the following conditions:
- The computer is slow to transfer files.
- The computer becomes slow to boot up or shut down.
- C drive full or low disk space.
- Windows 10 warns of high RAM CPU usage issue
- The computer gets slow or stuck while playing games.
To determine the disc speed in Windows 10, follow these instructions of accessing the command prompt (CMD) or its altenrative software above on this page for help.
Conclusion
This article is all about check disk speed windows 10 cmd. On Windows 10, it is crucial to check the status of your SSD regularly to ensure the integrity of your data, privacy, and games.
Although EaseUS Partition Master can assess the health of an SSD, we recommend EaseUS Command Prompt instead due to its more user-friendly interface and extra solid functions.
FAQs About Checking Disk Speed in Windows 10 Using CMD
Read these answers to avoid confusions.
1. How do I run SSD speed test in Windows 10 using CMD?
Monitoring the disc regularly provides vital information for keeping the device secure. Aside from the primary query, there are other inquiries concerning the CMD-based SSD health check in Windows 10. Have faith that they will be of assistance.
On Windows 10, how can I access the command prompt to run the SSD speed test?
- Launch the command line interface (as an Administrator, please!)
- Fill in the blanks: The WinSAT disc was in Drive C. (where c is the drive letter that you want to check)
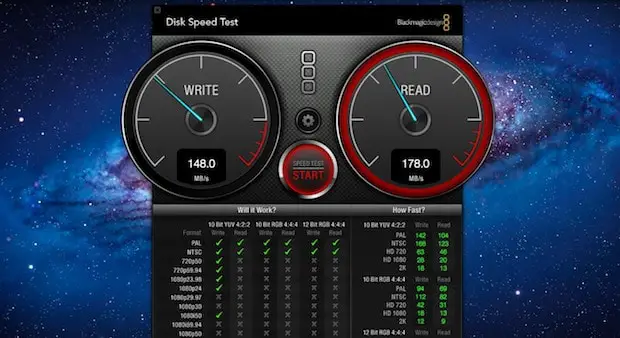
2. Can I run Blackmagic Disk Speed Test in Windows 10?
Yes, sure. BlackMagic Disk Speed Test is a free and open-source application that can check the integrity of hard drives. Supported operating systems include Windows 11/10/8.1/8/7/Vista. But it’s not easy for Windows users to find its genuine version online and you may turn to a reliable BlackMagic Disk Speed Test alternative for Windows software for help.
3. How can I check my hard drive health in CMD?
Like previously, enter «cmd» into the search bar; but, this time, instead of hitting enter, right-click on «Command Prompt» and choose «Run as Administrator.» Put «wmic» and hit Enter. Then put «wmic diskdrive get status» into the new Command Prompt window, and press enter to run it.
Все способы:
- Проверяем скорость работы HDD
- Способ 1: Сторонние программы
- Оптимальные значения тестов скорости
- Способ 2: Командная строка/PowerShell
- Вопросы и ответы: 5
Как и многие другие комплектующие, жесткие диски тоже имеют разную скорость, и этот параметр уникален для каждой модели. При желании пользователь может узнать этот показатель, протестировав один или несколько винчестеров, установленных в его ПК или ноутбук.
Читайте также: SSD или HDD: выбор лучшего накопителя для ноутбука
Проверяем скорость работы HDD
Несмотря на то, что в целом HDD — самые медленные устройства записи и чтения информации из всех существующих ныне решений, среди них все равно присутствует распределение на быстрые и не очень. Самым понятным показателем, определяющим быстроту работы жесткого диска, является скорость вращения шпинделя. Основных вариантов тут 4:
- 5400 об/мин;
- 7200 об/мин;
- 10000 об/мин;
- 15000 об/мин.
От этого показателя зависит, какая пропускная способность будет у диска, или проще говоря, с какой скоростью (Мбит/с) будут вестись последовательные запись/чтение. Для домашнего пользователя актуальными будут лишь первые 2 варианта: 5400 RPM используется в старых сборках ПК и на ноутбуках ввиду того, что они меньше шумят и обладают повышенной энергоэффективностью. У 7200 RPM оба этих свойства повышены, но вместе с тем увеличена и скорость работы, за счет чего их устанавливают в большинство современных сборок.
Важно заметить, что на скорость влияют и другие параметры, например, поколение SATA, IOPS, объем кэша, время произвольного доступа и др. Именно из этих и других показателей складывается общая скорость взаимодействия HDD с компьютером.
Читайте также: Как ускорить работу жесткого диска
Способ 1: Сторонние программы
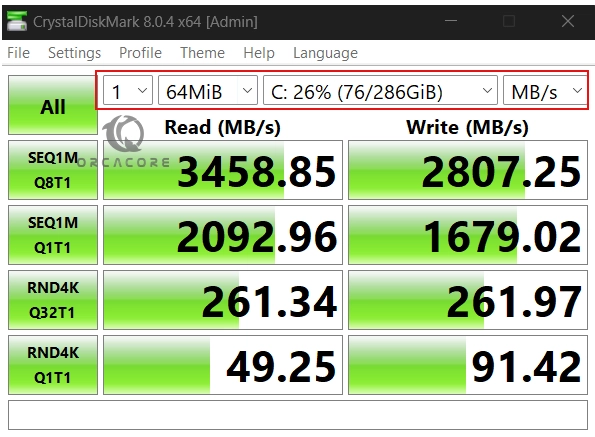
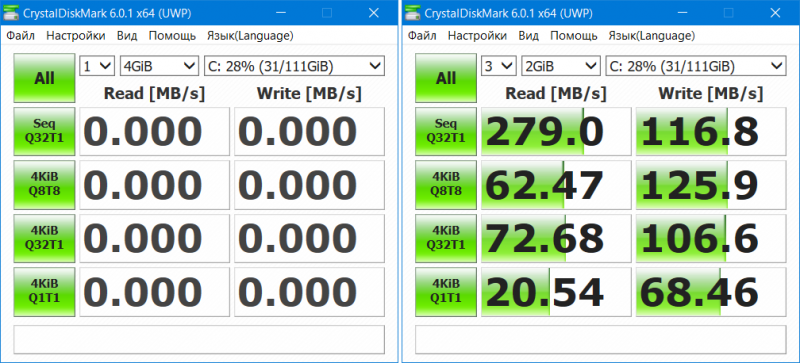
CrystalDiskMark считается одной из лучших программ, поскольку позволяет в пару кликов провести тестирование и получить интересующую пользователя статистику. Мы рассмотрим все 4 варианта тестов, которые в ней имеются. Тест сейчас и в другом способе будем проводить на не очень производительном HDD для ноутбука — Western Digital Blue Mobile 5400 RPM, подключенному по SATA 3.
Скачать CrystalDiskMark с официального сайта
- Загрузите и установите утилиту обычным способом. Параллельно с этим закройте все программы, которые могут нагружать HDD (игры, торренты и др.).
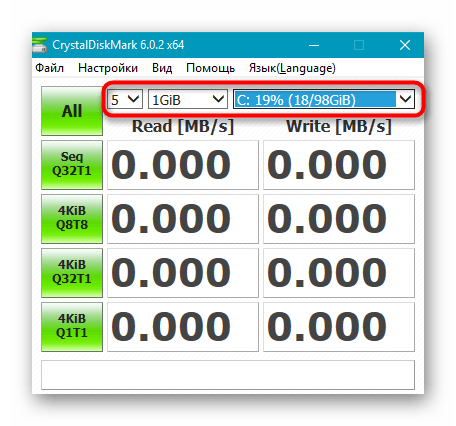
- Запустите CrystalDiskMark. Первым делом можете произвести некоторые настройки касательно тестируемого объекта:
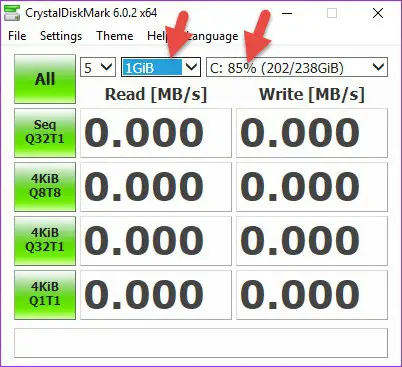
Поле Описание 5 Количество циклов чтения и записи файла, используемого для проверки. По умолчанию установлено рекомендуемое значение, поскольку это повышает точность окончательного результата. При желании и сокращении времени ожидания можете снизить число до 3 1GiB Размер файла, который будет использоваться для записи и дальнейшего чтения. Регулируйте его размер в соответствии с наличием свободного места на накопителе. Кроме того, чем больше выбран размер, тем продолжительнее будет происходить замер скоростей C: 19% (18/98GiB) Как уже понятно, выбор жесткого диска или его раздела, а также количество занятого места от его общего объема в процентах и цифрах - Нажмите по зеленой кнопке с тем тестом, который вас интересует, либо запустите их все, выбрав «All». В заголовке окна будет отображен статус активного теста. Сначала будет проведено 4 теста чтения («Read»), потом записи («Write»).
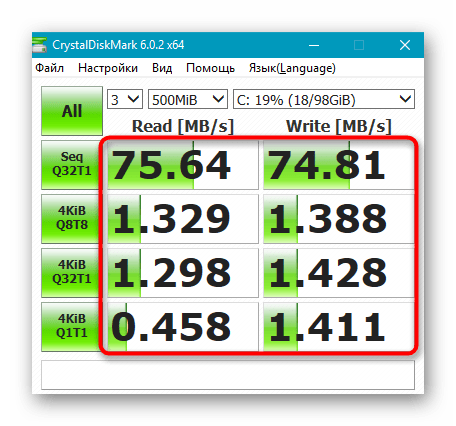
- Когда процесс будет завершен, останется разобраться в значениях каждого теста:
Тесты Описание All Запуск всех тестов по порядку Seq Q32T1 Многоочередные и многопоточные последовательные запись и чтение с размером блоков 128 КБ 4KiB Q8T8 Случайные запись/чтение блоков 4 КБ с очередью 8 и 8 потоками 4KiB Q32T1 Запись/чтение случайные, блоки по 4 КБ, очередь — 32 4KiB Q1T1 Случайные запись/чтение в режиме одна очередь и один поток. Блоки используются размером 4 КБ

В CrystalDiskMark 6 был убран тест «Seq» из-за его неактуальности, другие поменяли свое название и расположение в таблице. Неизменным остался лишь первый — «Seq Q32T1». Поэтому если эта программа уже была у вас установлена, обновите ее версию до последней.
Что касается потоков — это значение отвечает за количество одновременных запросов на диск. Чем выше значение, тем большее количество данных диск обрабатывает за одну единицу времени. Потоком называется количество одновременных процессов. Многопоточность повышает нагрузку на HDD, однако информация при этом распределяется быстрее.
В заключение стоит отметить, что есть ряд пользователей, считающих обязательным подключение HDD через SATA 3, имеющий пропускную способность 6 ГБ/с (против SATA 2 с 3 ГБ/с). На деле же скорости жестких дисков для домашнего использования практически не могут перешагнуть рубеж SATA 2, из-за чего нет смысла менять этот стандарт. Прирост в скорости будет заметен лишь после переключения с SATA (1,5 ГБ/с) на SATA 2, но первый вариант этого интерфейса касается совсем старых ПК-сборок. Зато для SSD интерфейс SATA 3 будет ключевым фактором, позволяющим работать в полную силу. SATA 2 же будет ограничивать накопитель и он не сможет раскрыть весь свой потенциал.
Оптимальные значения тестов скорости
Отдельно бы хотелось рассказать об определении нормальных показателей скорости работы жесткого диска. Как вы могли заметить, тестов довольно много, каждый из них проводит анализ чтения и записи с различной глубиной и потоками. Обратить внимание следует на такие моменты:
- Скорость чтения от 150 МБ/c и запись от 130 МБ/c при тесте «Seq Q32T1» считается оптимальной. Колебания в несколько мегабайт не играют особой роли, поскольку такой тест предназначен для работы с файлами объемом от 500 МБ и выше.
- У всех тестов с аргументом «4KiB» показатели практически идентичны. Средним значением принято считать чтение 1 МБ/с; скорость записи – 1.1 МБ/c.
Важнейшими показателями являются результаты «4KiB Q32T1» и «4KiB Q1T1». Обращать на них особое внимание следует тем пользователям, кто проводит тестирование диска с установленной на него операционной системой, поскольку практически каждый системный файл весит не более 8 КБ.
Способ 2: Командная строка/PowerShell
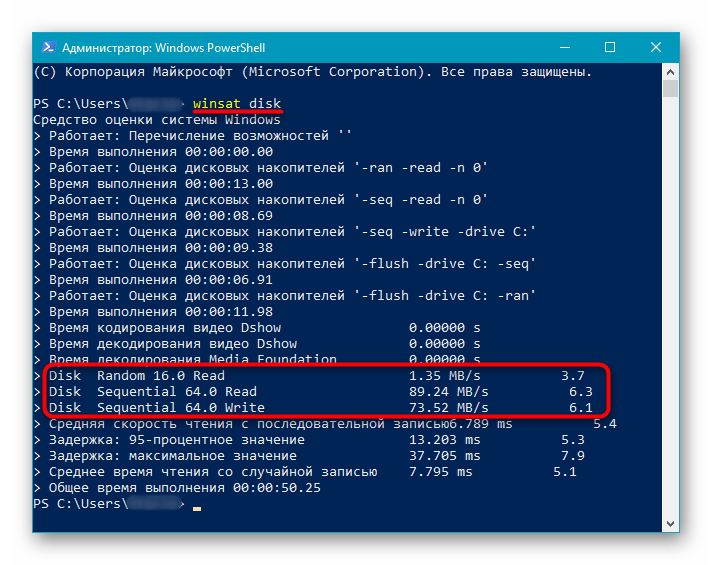
В Windows есть встроенная утилита, позволяющая проверять скорость работы накопителя. Показатели там, конечно, ограниченные, но все же могут пригодиться некоторым пользователям. Запуск тестирования происходит через «Командную строку» или «PowerShell».
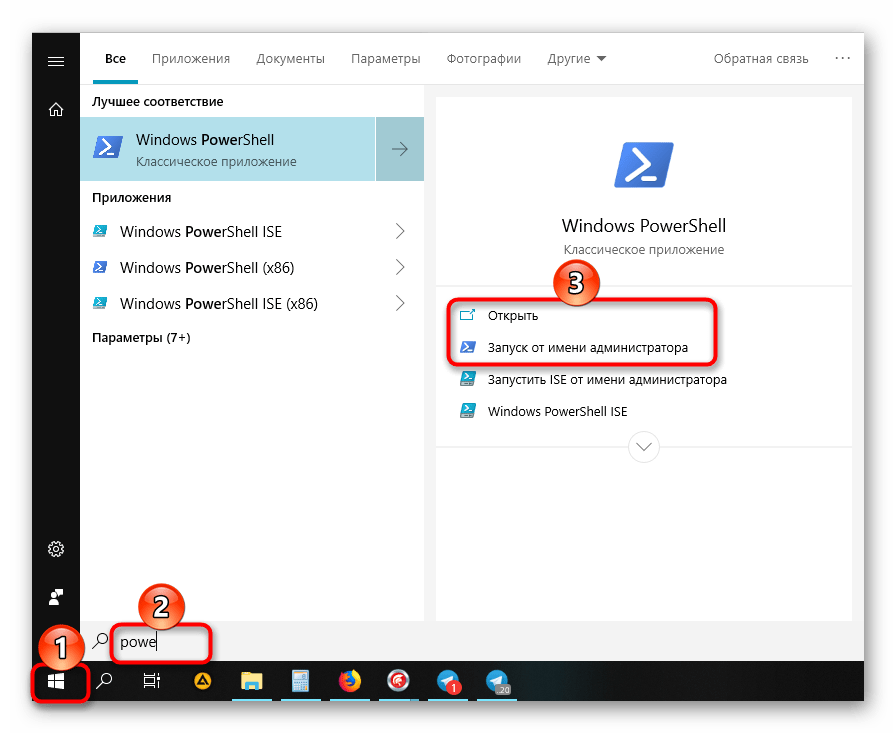
- Откройте «Пуск» и начните набирать там «cmd» либо «powershell», после чего запустите программу. Права администратора при этом необязательны.
- Впишите команду
winsat diskи нажмите Enter. Если вам нужно проверить не системный диск, воспользуйтесь одним из следующих атрибутов:-n N(где N — номер физического диска. По умолчанию проверяется диск «0»);
-drive X(где X — буква диска. По умолчанию проверяется диск «C»).Атрибуты нельзя использовать вместе! Другие параметры этой команды вы найдете в информационном документе от Microsoft по этой ссылке. К сожалению, доступна версия только на английском языке.
- Как только закончится проверка, найдите в ней три строчки:
Строка Описание Disk Random 16.0 Read Случайная скорость чтения 256 блоков по 16 КБ каждый Disk Sequential 64.0 Read Последовательная скорость чтения 256 блоков по 64 КБ каждый Disk Sequential 64.0 Write Последовательная скорость записи 256 блоков по 64 КБ каждый - Значения каждого из этих показателей вы найдете, как уже понятно, во втором столбце, а в третьем расположен индекс производительности. Именно он берется за основу, когда пользователь запускает средство оценки производительности Windows.
Сравнивать эти тесты с предыдущем способом будет не совсем корректно, поскольку тип тестирования не совпадает.
Читайте также: Как узнать индекс производительности компьютера в Windows 10
Теперь вы знаете, как проверить скорость работы HDD разными способами. Это поможет сверить показатели со средними значениями и понять, является ли жесткий диск слабым звеном в конфигурации вашего ПК или ноутбука.
Читайте также:
Как ускорить работу жесткого диска
Тестируем скорость SSD
Наша группа в TelegramПолезные советы и помощь
This guide intends to teach you 2 Ways To Test Hard Disk Speed in Windows 10 and Windows 11. If you want to run a Hard Disk Drive Speed Test, you can follow this guide provided by the Orcacore team to test your speed by using PowerShell commands and the Disk Crystal Mark app.
Table of Contents
To complete this guide, you must log in to your Windows Client and follow the steps below. You can simply test your Hard disk speed by using the following methods:
- Using PowerShell Commands
- Using Disk Crystal Mark
Method 1 – Run a Hard Disk Speed Test on Windows with PowerShell
In this way, you must open your Windows PowerShell as an administrator. To do this, you can check this guide on Run PowerShell as Administrator on Windows.
Once you open your Windows PowerShell, you can use the winsat command to test your hard disk speed.
To get the read speed of the hard disk, you can run the following command in your Windows PowerShell:
winsat disk -ran -read -drive location-of-hard-driveFor example:
winsat disk -ran -read -drive cExample Output:
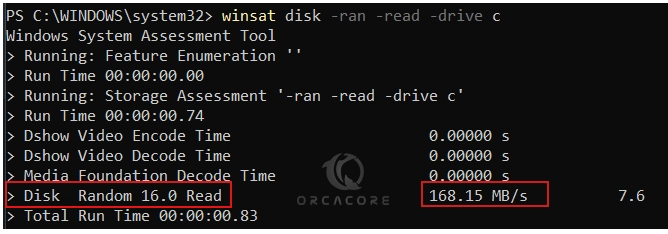
As you can see the reading speed of drive c in this example is shown on Disk Random Read speed.
If you want to get the write speed of the hard disk, you can simply use the following command:
winsat disk -ran -write -drive location-of-hard-driveFor example:
winsat disk -ran -write -drive c
Example Output:
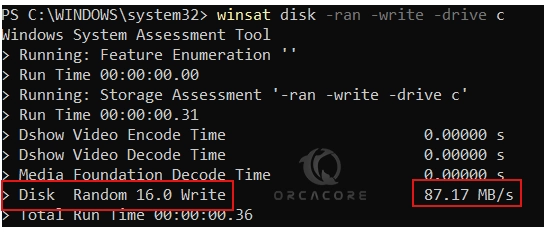
From the output, you can see your Disk Random Write speed.
With this option, you can easily measure your Hard Disk Read and Write speed from the Windows PowerShell.
Method 2 – Measure Windows Hard Disk Speed with Crystal Disk Mark
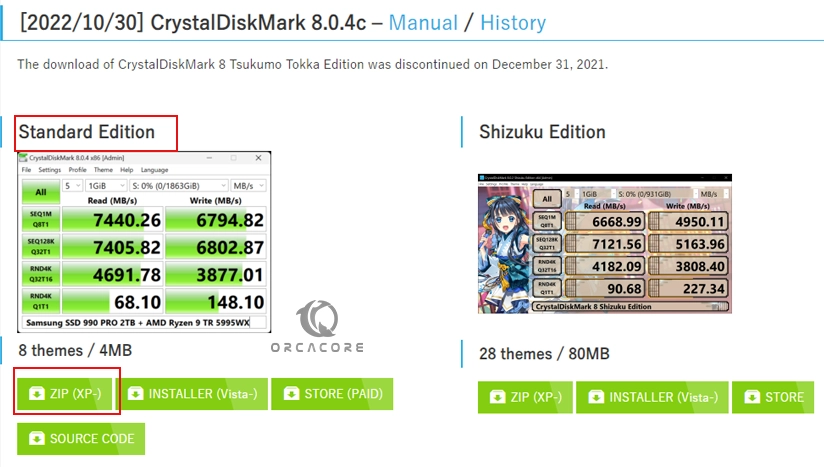
Alternatively, you can use an app to measure your hard disk speed in Windows. Crystal Disk Mark is an open-source disk drive benchmark tool for Windows. You can simply download the Crystal Disk Mark Standard edition from the official site and start using it. To do this, visit the official site and get the standard edition Zip file.
When your download is completed, extract your downloaded file to your desired folder.
You will see the DiskMark32 and DiskMark64 bits. Here we run the DiskMark64 bit.
Once you run the DiskMark, you will see the following screen:
From there, you can choose your disk drive, and your speed test per MB/s or GB/s or IOPs. For better performance, you can set your Test size to 1GB. Also, you can set your test count to your desired one. This will simply, measure your Hard Disk speed depending on your settings.
Conclusion
At this point, you have learned 2 Ways To Test Hard Disk Speed in Windows. One of them is to use PowerShell Commands to measure your Hard Disk read and write speed, another one is to use Crystal Disk Mark benchmark tool for Windows.
Hope you enjoy using it. Also, you may interested in the following articles:
Disable Quick Access in Windows
Install Docker Desktop on Windows
I prioritize SSDs for personal computers such as laptops and desktops. I believe that they truly boost the performance of a computer, creating an immense difference from the traditional mechanical hard disk. Even with the same processor and RAM size, changing the hard disk from normal HDD to SSD on the same computer will greatly help.
It is possible to tell the difference between an HDD and an SSD while using the computer, but how do you measure the speed improvement when you switch your computer to an SSD? Here are the ways to check SSD speed in Windows 11/10 and 8.1/7.
When it comes to checking the performance of SSD or NVMe, we need to check the disk’s data writing and reading speed. How fast can it write and read a specific data size under certain conditions? Many tools with extra parameters and configurations are available to check the SSD speed, but for everyday home or business users, the CrystelDisk tool is the best option.
Checking the speed of your SSD (Solid State Drive) is important for several reasons. The main reason is to ensure your laptop/desktop SSD is performing at its optimal level because it can become slow due to various factors such as fragmentation, a high number of files, or installation of lots of programs and temp data without proper maintenance.
Also, checking the SSD speed can help you compare the other SSD devices in the market if you are a techy person. If the model you are using does not give the recommended output, then you can optimize or upgrade other hardware (such as cables and ports) to get the optimal SSD speed.
Ways to Check the SSD/NVMe Speed in Windows 10/11
- Use the Built-in utility – It can do the basic testing of the SSD or any hard disk. But, we will not have any extra options/settings.
- Use the third-party tools – A few dedicated disk speed test tools can do the job well with several options/inputs.
Check the SSD Speed in Command Prompt or PowerShell
We can use the Windows built-in system check tool to identify the disk read and write speed.
You must have administrative access on the PC to perform the below task.
Open the command prompt or PowerShell with the ‘Run as Administrator’ option and type the below command.
winsat disk
This will check the system’s main disk (mostly the C drive).
My main disk is SSD, so I got the below speed results.

If you have more than one disk, you need to enter the below command to find the other SSD speed.
For example, I have another drive/partition called D from a regular hard disk.
winsat disk -drive d
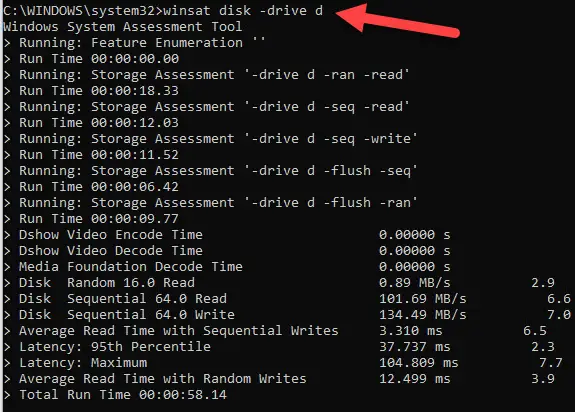
As expected, the normal hard disk’s read/write speed is way less than the SSD.
Using Third-party Tools to Check SSD Speed on Windows 11/10/8.1
Several popular disk benchmarking tools are available online, but my favorite is CrystalDiskMark. It is a lightweight free tool. It also provides detailed information on the performance of different file sizes and queue depths.
If you want to compare the speed between your old and new SSD disk, you should do the first test on the same computer with the old hard disk, then do the following test on the new SSD disk with the same parameters/settings.
1) Download the CrystalDisk Mark standard from the official site. Somehow I like the standard version, which is simple and easy to use.

2) Launch the program after the installation.
You do not need to change much here except the partition you want to test. Mostly it will be the C drive with the OS and programs files. Leave the default 1GB data size to check the read/write speed. If you want to give more stress to the disk, increase the data size, which will take longer.
3. After all tests are over, you can see the results. To get a better result for comparison, I suggest closing all programs/files and not doing any activities on the computer while the test is running.
4. Here is the result of the SSD drive.
That is how simple it was to check the SSD speed in Windows 11/10 with the simple GUI tool.
Additional Third-party SSD Speed Benchmarking Software
AS SSD Benchmark:
This is another free and widely used tool that tests the sequential and random read/write speeds of your SSD. It also provides information on the access time and CPU usage during the test, which can help assess CPU/motherboard compatibility with the SSD.
Anvil’s Storage Utilities:
This comprehensive benchmarking software provides detailed information on the performance of your SSD, including sequential and random read/write speeds and IOPS (input/output operations per second).
PCMark 10:
It is a popular benchmarking software that provides a detailed performance test for your laptop/desktop computer, including SSDs. As it provides many other details about the PC, you may need to wait a bit longer to see the SSD speed test result.
Samsung Magician:
This is software specifically designed for Samsung SSDs, but it can also work with other brands. In addition to testing the speed of the hard disk, it can also provide details about temperature and firmware updates.
Compared to others, I find CrystalDiskMark one of the best and simple SSD benchmark tools to easily use on any laptop and desktop computer. Even in the server production environment, I used this tool to benchmark the SSD speed vs. HDD vs. NVMe once the physical or virtual servers are migrated to SSD storage. If you replaced your desktop or laptop computer hard disk from HDD to SSD, this tool could clearly show how much the data access speed improved (or dropped) after the changeover.
Checking the speed of your SSD is essential in maintaining optimal performance and ensuring that your computer runs at its best. The article discussed two methods for checking SSD speed: using Windows’ built-in tool using third-party benchmarking software.
Среди обычных пользователей, не относящих себя к сегменту энтузиастов-сборщиков или просто интересующихся ПК-техникой юзеров, бытует мнение, что скорость компьютера в первую очередь зависит от частоты процессора и объема оперативной памяти. Отчасти это правда, но многие часто недооценивают другой очень важный компонент современного компьютера – диск для пользовательских данных и операционной системы. От того, насколько быстро работает система хранения файлов вашего ПК, сильно зависит скорость работы компьютера в целом. Именно поэтому пользователям, которые хотят прокачать производительность компьютера, первым делом советуют купить SSD, поскольку работает он гораздо быстрее обычных жестких дисков.
Существует много поводов проверить скорость работы диска. От банального любопытства до диагностики просадки производительности или сравнения заявленных производителем скоростей с настоящими. Проверка скорости диска в Windows 10 также поможет вам понять, стоит ли заменить диск на другой для увеличения производительности.
К сожалению, в Windows 10 нет встроенных механизмов для измерения скорости диска, а поэтому будем пользоваться сторонними приложениями для выполнения этой задачи.
CrystalDisk Mark — проверка скорости жесткого диска
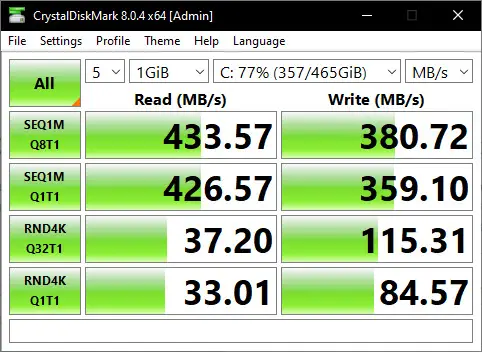
Одна из самых популярных утилит для проверки скорости работы диска в Windows 10. Простая, бесплатная, удобная, а также русифицирована. Кроме того, ее можно скачать из магазина Microsoft Store, что еще больше упростит задачу пользователю.
Для справки: версия из магазина ничем не отличается от версии на официальном сайте. Все дело в удобстве установки.
- Перейдите в магазин Microsoft Store по ссылке и скачайте приложение. Если вы не можете его загрузить из магазина или же вы проводите диагностику компьютера на Windows 8 или старше, воспользуйтесь файлом на официальном сайте CrystalDisk Mark.
- Запустите установленное приложение, после чего появится небольшое окно.
- Слева от кнопки All выберите количество кругов теста. Можно оставить 3, этого будет достаточно для определения средней скорости диска.
- Далее идет выпадающее меню размера файла. Он будет использоваться для проверки скорости. Используйте файл в пределах 1-4 Гб. Не стоит использовать низкие значения, иначе вы будете просто тестировать кэш диска, а не его эффективную скорость. И да, учитывайте также свободное место на диске. Если на нем свободно лишь 2 Гб, а вы выберите размер файла 4 Гб, тест не получится провести.
- В последнем выпадающем списке выберите диск для тестирования.
- Для полной проверки диска нажмите кнопку All. Запустится тест. Учтите, что время проведения теста будет во многом зависеть от размера выбранного файла, количества прохождений и состояния вашего диска. Если у вас быстрый SSD, тест пройдет быстро, но, если ваш старый «жесткий» на 120 Гб и 5400 RPM уже на ладан дышит, может понадобится немного больше времени.

- Когда тест будет завершен, на экране отобразятся результаты. В первую очередь вас должен интересовать пункт сиквентальной или последовательной записи. Он отмечен как “SEQ”. Пункт Read обозначает скорость чтения, а пункт Write – скорость записи. Под скоростью диска зачастую подразумевают именно последовательную запись, но система работает с диском разными способами. Остальные результаты показывают скорость записи при размере блока 4 Кб и случайных секторов, а также с разным количеством очередей и потоков.
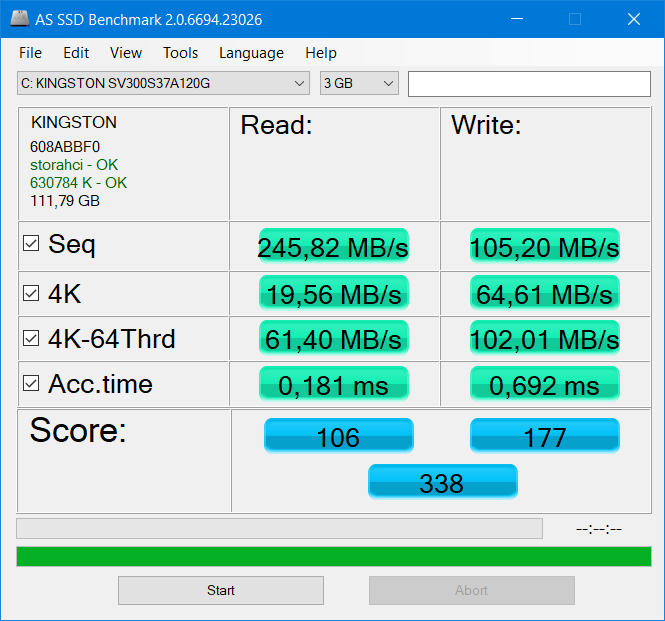
Тест скорости диска в AS SSD Benchmark
- Другая программа, являющаяся по своей сути аналогичной CrystalDisk Mark. AS SSD Benchmark работает в «портативном» режиме и может использоваться для проверки любых накопителей, будь то внутренние или внешние SSD / HDD или даже флешки.
- Скачайте приложение на официальном вебсайте (ссылка на загрузку расположена в самом низу страницы) и запустите exe-файл.
- В левом верхнем углу окна выберите диск для проверки, а также объем файла. Нажмите Start и дождитесь завершения процедуры.

Вполне возможно, что вы увидите показатели ниже заявленных производителем вашего диска (в первую очередь это касается SSD). В таком случае советуем проверить интерфейс подключения SSD к компьютеру. Чтобы «раскрыть потенциал» обычного 2.5” диска, используйте SATA3-подключение. Оно обеспечивает скорость до 600 Мб/сек. Диски SATA3 могут подключаться к SATA и SATA2-интерфейсу, но в таком случае их максимальная скорость будет не выше 150 и 300 Мб/сек. Самые высокие значения будут демонстрировать диски в RAID-конфигурации или с интерфейсом PCIe. Если при проверке жесткого диска вы заметили очень низкие показатели скорости, быть может, на диске есть некоторое количество «битых секторов». В таком случае рекомендуем вам проверить диск на битые сектора. Это поможет вам решить, стоит ли менять систему хранения вашего ПК или же существующие накопители еще могут поработать кое-какое время.
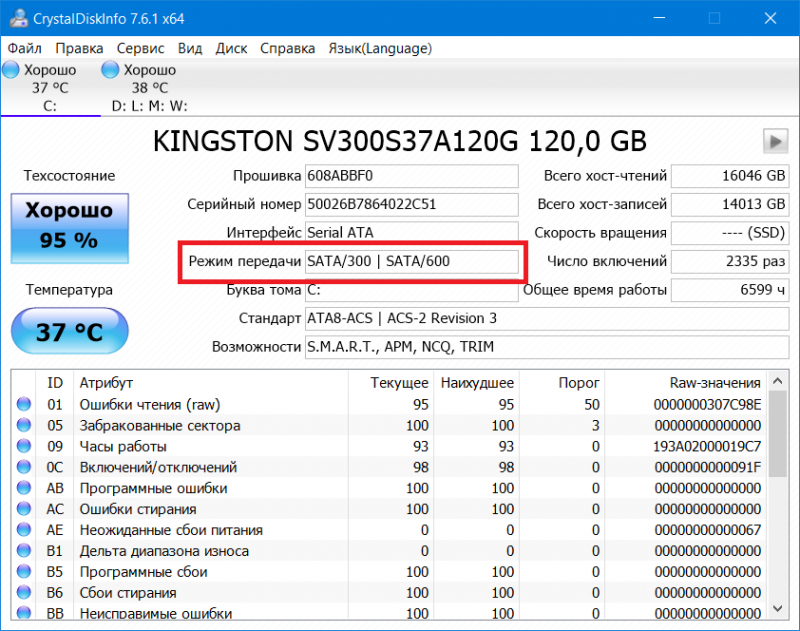
Проверить тип интерфейса можно на материнской плате компьютера или в стороннем софте. Разработчик CrystalDisk Mark создал утилиту, которая понадобится вам для проверки типа SATA. Она не только покажет подключенный интерфейс, но и другую важную информацию, вроде состояния здоровья диска, его температуру, «пробег» и так далее.
- Скачайте приложение из официального сайта (можно скачать как установщик, так и портативную версию) и распакуйте в любую папку. Запустите приложение и выберите диск в верхней части интерфейса.
- Найдите пункт Режим передачи. Первая часть – используемый интерфейс, вторая часть – интерфейс диска. На скриншоте указано SATA/300 | SATA/600. Это значит, что в порт SATA2 подключен SATA3-диск (у меня еще старая материнка с SATA2-портами).

В Интернете существует большое количество других приложений для тестирования скорости ваших дисков. В этой статье мы сосредоточили внимание лишь на двух, так как считаем их возможности достаточными для обычного пользователя. В паре с CrystalDisk Info они обеспечивает потребителя всеми необходимыми инструментами для диагностики скорости и состояния здоровья накопителя.
Если после чтения этой статьи и проверки скорости диска вы задумались об обновлении накопителя или покупке SSD, советуем вам почитать отдельную статью, которая объяснит вам, как выбрать SSD-диск для компьютера.