
Windows 10 allows the user to share his or her locally connected printers and stored files with other users over the network. Shared files can be accessible for reading and writing to others. Shared printers can be used for printing on the remote computer. Let’s see how to view all network shares available on a computer in your network.
It is easy to share a folder over a network in Windows 10 using the built-in file sharing feature. No third-party apps required. The procedure is covered in detail in the following article:
How to Share File or Folder in Windows 10
There are several ways to see network shares available on computers running on your network. Let’s review them.
To view network shares in Windows 10, do the following.
- Press the Win + R keys on the keyboard.
- Type fsmgmt.msc into the Run box.
- This will open the Shared Folders MMC snap-in.
- On the left, click on Shares.

- You will see the list of shares, sessions and files open over a network, including administrative shares (C$, IPC$, etc).
View Network Shares in File Explorer
- Open File Explorer.
- On the left, click on the Network item.

- There, you will see the list of network computers available on your network. Tip: See Network Computers are Not Visible in Windows 10 Version 1803.
- Double-click on the computer icon to see its shared folders, files and printers.

View Network Shares Using The Command Prompt
- Open a new command prompt.
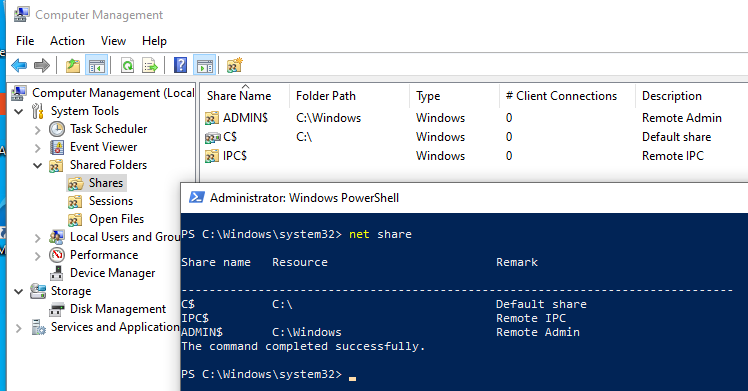
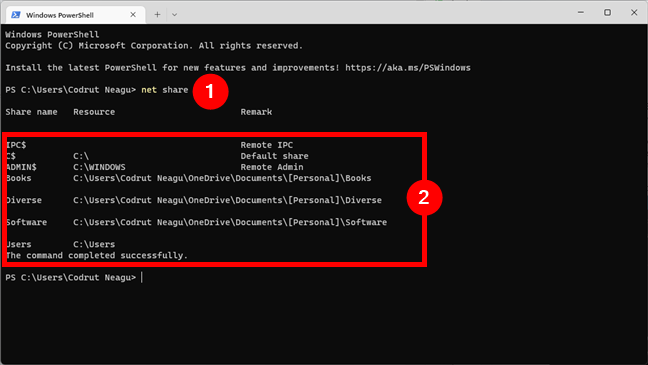
- To view all shares of the current PC, type the following command:
net share. Its output is as follows.
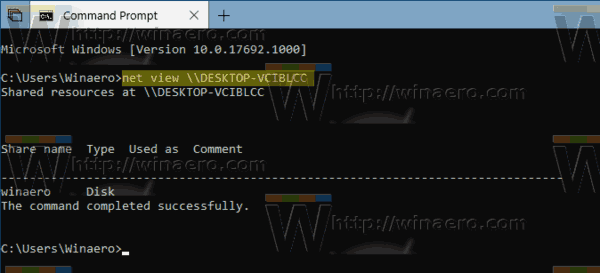
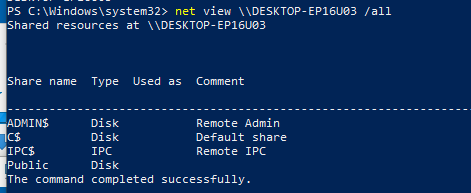
- To view all shares of a remote computer, type the command
net view \\computername /all. Substitute the computername portion with the actual computer name running on your network.
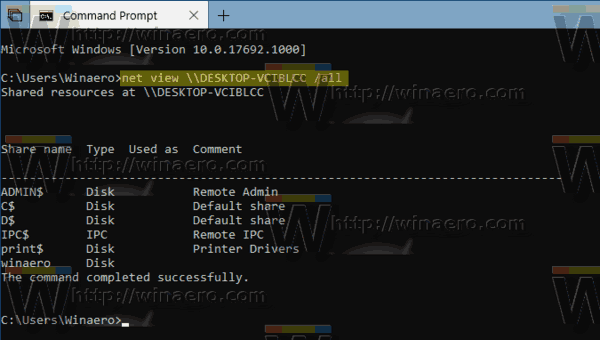
The output of the commands above includes administrative shares. It is possible to exclude them from the net view command output. Just remove the /all argument and you are done. You will see only the user shares.
Related articles:
- Enable SMB1 Sharing Protocol in Windows 10
- How to Share File or Folder in Windows 10
- Change File Sharing Encryption Level in Windows 10
- Disable or Enable File and Printer Sharing in Windows 10
- Disable Password Protected Sharing in Windows 10
Support us
Winaero greatly relies on your support. You can help the site keep bringing you interesting and useful content and software by using these options:
If you like this article, please share it using the buttons below. It won’t take a lot from you, but it will help us grow. Thanks for your support!
Административные общие папки (шары, ресурсы) в Windows используются для удаленного доступа и управление компьютером. Windows по-умолчанию создает следующие административные шары:
-
Admin$
— Remote Admin (это каталог
%SystemRoot%
) – используется для удаленного администрирования компьютера; -
IPC$
— Remote IPC — используется для коммуникации программ named pipes) -
C$
— Default Share. Расшаренный системный диск. Если на компьютере есть другие диски с назначенными буквами, они также автоматически публикуются в виде административных общих ресурсов (
D$
,
E$
и т.д.); -
Print$
— публикуется, если вы открыли общий доступ к принтеру (используется, чтобы открыть доступ к каталогу с драйверами принтеров
C:\Windows\system32\spool\drivers
); -
FAX$
— используется для общего доступа к факс-серверу.
Содержание:
- Использование административных шар в Windows
- Как удалить общие административные шары в Windows?
- Включить административные общие папки в Windows
- Разрешить удаленный доступ к административным папкам Windows
Использование административных шар в Windows
Список административных папок на компьютере можно вывести в консоли управления компьютером
compmgmt.msc
( System Tools -> Shared Folders -> Shares, Общие папки -> Общие ресурсы), выполнив команду
net share
.
Имена общих административных шар заканчиваются знаком $. Служба LanmanServer скрывает общие папки с символом $ в сетевом окружении. Если в проводнике открыть список доступных сетевых папок на компьютере (
\\computername
), административные шары не будут показаны.
Можно получить список доступных административных шар на удаленном компьютере с помощью команды:
net view \\computername /all
В большинстве сторонних файловых менеджеров для Windows доступна опция, позволяющая автоматически показывать доступные административные ресурсы на удаленных компьютерах.
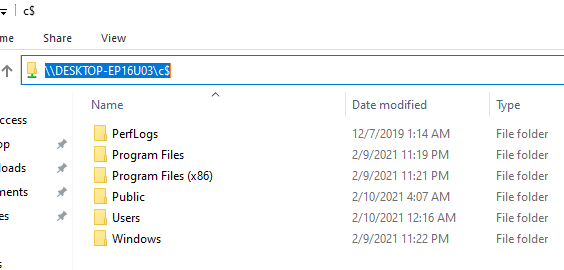
Чтобы открыть содержимое административной шары из File Explorer, нужно указать ее полное имя. Нажмите Win+R, и выполните команду
\\computername\c$
.
Данная команда откроет содержимое локального диска C и позволит вам получить полноценный доступ к файловой системе системного диска удаленного компьютера.
Получить доступ к административным шарам могут только члены локальной группы администраторов компьютера (и группы Backup Operators) при условии, что у вас включен SMB протокол, общий доступ (Turn on file and printer sharing) и доступ по 445 порту TCP не блокируется Windows Defender Firewall.
Как удалить общие административные шары в Windows?
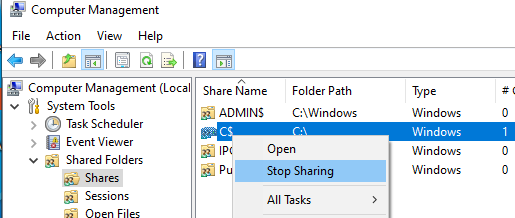
Административные общие папки Windows удобны для удаленного администрирования компьютера, но несут дополнительные риски безопасности. Вы можете полностью запретить Windows создавать эти скрытые папки. Это не нарушит работу компьютера Windows, использующегося в качестве клиента, но ограничит его удаленное администрирование.
Чтобы отключить общую административную папку, выберите опцию Stop sharing в консоли Computer Management (или выполните команду
net share IPC$ /delete
). Это удалит общую административную папку, но по после перезагрузки компьютера Windows пересоздаст ее автоматически.
Чтобы запретить Windows публиковать административные шары, нужно открыть редактор реестра regedit.exe, перейти в ветку реестра HKLM\System\CurrentControlSet\Services\LanmanServer\Parameters и добавить Dword параметр с именем AutoShareWks (для десктопных версий Windows) или AutoShareServer (для Windows Server) и значением 0.
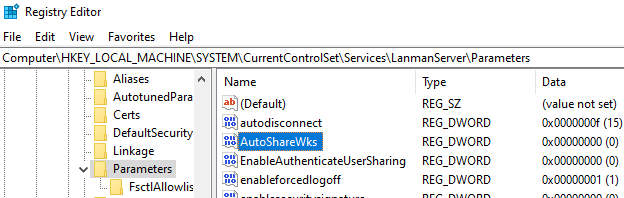
Можно создать это параметр реестра вручную, из командной строки reg add:
reg add HKLM\SYSTEM\CurrentControlSet\Services\lanmanserver\parameters /f /v AutoShareWks /t REG_DWORD /d 0
или через PowerShell:
New-ItemProperty -Name AutoShareWks -Path HKLM:\SYSTEM\CurrentControlSet\Services\LanmanServer\Parameters -Type DWORD -Value 0
Теперь после перезагрузки административные шары не будут создаваться. При этом перестанут работать утилиты удаленного управления компьютером, в том числе psexec.
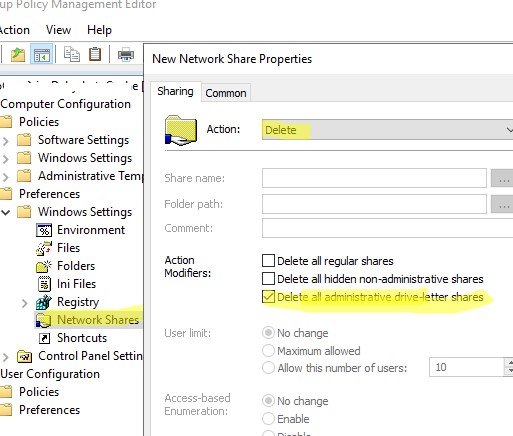
В доменной сети вы можете запретить публиковать локальные диски компьютеров в качестве административных шар с помощью групповых политик:
- Создайте новую GPO в консоли GPMC. Перейдите в раздел Computer Configuration -> Preferences -> Windows Settings -> Network Shares;
- Выберите Action: Delete и включите опцию Delete all administrative drive-letter shares.

Включить административные общие папки в Windows
Если вы хотите включить административные сетевые папки, нужно изменить значение параметра на 1 или удалить его.
Set-ItemProperty -Name AutoShareWks -Path HKLM:\SYSTEM\CurrentControlSet\Services\LanmanServer\Parameters -Value 1

Административные шары публикуются службой LanmanServer. Если эта служба остановлена, удаленные пользователи не смогут получить доступ к общим ресурсам на этом компьютере.
Get-Service LanmanServer
Чтобы Windows пересоздала административные шары, достаточно перезапустить службу Server командой:
Get-service LanmanServer | restart-service

Выполните команду PowerShell Get-SmbShare и проверьте, что административные шары стали доступны.
Разрешить удаленный доступ к административным папкам Windows
На компьютерах, добавленных в домен AD, удаленный доступ к административным шарам разрешен пользователям, состоящим в локальной группе администраторов.
Однако Windows по-умолчанию блокирует удаленный доступ к административным шарам на компьютерах в рабочей группе (Workgroup). При попытке открыть в проводнике список файлов на таком компьютере с помощью команды\
\win10_pc\C$
появляется запрос пароля. После ввода учетных данных локального пользователя из группы локальных администраторов появляется ошибка доступа (Access is denied). Удаленный доступ к административным шарам возможен только под встроенным администратором Windows.
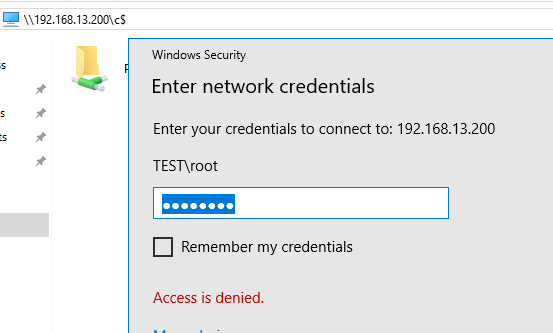
Удаленный доступ к административным шарам в этом случае блокируется компонентом Remote UAC (контроль учетных записей для удаленных подключений). Remote UAC фильтрует токены доступа локальных записей и аккаунтов Microsoft, блокируя удаленный административный доступ к папкам. При доступе под доменным аккаунтом такое ограничение не применяется.
Отключить Remote UAC можно путем создания в системном реестре параметра LocalAccountTokenFilterPolicy
Совет. Эта операция несколько снижает уровень безопасности Windows.
- Откройте редактор реестра (regedit.exe);
- Перейдите в ветку реестра HKEY_LOCAL_MACHINE\SOFTWARE\Microsoft\Windows\CurrentVersion\Policies\System ;
- Создайте новый параметр типа DWORD (32-bit) с именем LocalAccountTokenFilterPolicy;
- Установите значение параметра LocalAccountTokenFilterPolicy равным 1;

- Для применения изменений потребуется перезагрузить компьютер
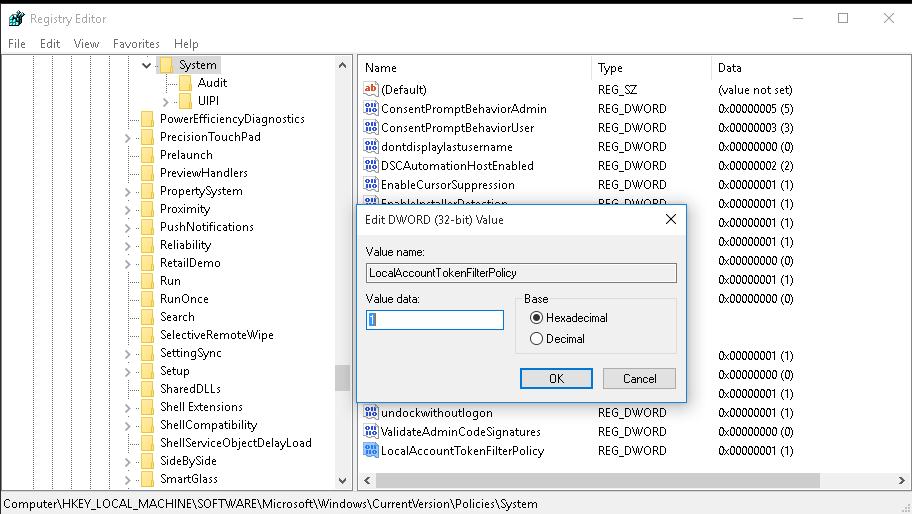
Примечание. Создать параметр LocalAccountTokenFilterPolicy можно командой
reg add "HKLM\SOFTWARE\Microsoft\Windows\CurrentVersion\Policies\System" /v "LocalAccountTokenFilterPolicy" /t REG_DWORD /d 1 /f
После перезагрузки попробуйте удаленно открыть административный каталог C$ на компьютере Windows. Авторизуйтесь под учетною записью, входящей в группу локальных администраторов.
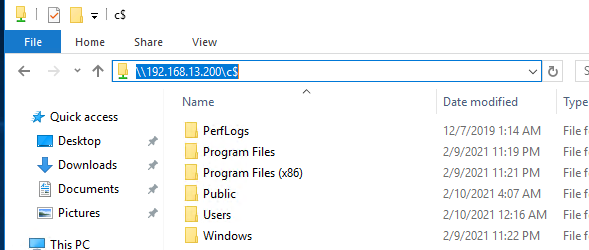
Должно открыться окно проводника с содержимым диска.
Расшаренные папки (или папки с общим доступом) – это удобный инструмент для обмена файлами внутри локальной сети. Такие общие ресурсы используются как на предприятиях, так и в домашних сетях. Например, вы можете открыть общий доступ к папке на настольном компьютере и получить к ней доступ со своего ноутбука или мультимедийной приставки.
Но, при активном использовании расшаренных папок бывает сложно вспомнить, к чему был открыт общий доступ и где это находятся на компьютере. В данной небольшой статье мы рассмотрим именно этот вопрос и расскажем, как быстро найти все расшаренные папки на компьютере с Windows 10 или Windows 7.
Содержание
Просмотр расшаренных папок в окне «Мой компьютер»
Если вы хотите узнать, какие папки расшарены на вашем компьютере, то вы можете просто получить доступ к своему собственному компьютеру по сети, использовав имя компьютера «localhost» или IP-адрес «127.0.0.1».
Для этого откройте окно «Мой компьютер» и введите в адресную строку одну из следующих команд:
\\localhost

\\127.0.0.1
На скриншоте внизу показано, куда нужно вводить команду.

После ввода данного адреса нажмите на клавишу Enter и перед вами появится список всех папок с общим доступом на этом компьютере. В нашем случае это папки FOTO, INFO и Users.

Прямо отсюда можно отключить общий доступ для любой из папок. Для этого нужно кликнуть правой кнопкой мышки по папке, открыть «Свойства», перейти на вкладку «Доступ» и нажать на кнопку «Расширенная настройка». В результате появится небольшое окно с настройками общего доступа.

Просмотр расшаренных папок в командной строке
Кроме этого, вы можете посмотреть список общих папок на локальном компьютере с помощью командной строки.

Для этого нужно запустить командную строку и выполнить одну из следующих команд:
net share

net view \\localhost

net view \\127.0.0.1
Просмотр расшареных папок через «Управление компьютером»
Также вы можете найти все расшаренные папки через инструмент «Управление компьютером». Для этого нужно нажать комбинацию клавиш Win-R и ввести команду «compmgmt.msc» либо ввести фразу «Управление компьютером» в поиск в меню «Пуск».

В окне «Управление компьютером» нужно открыть раздел «Служебные программы – Общие папки – Общие ресурсы». Здесь будет отображаться список всех папок, к которым открыт общий доступ на вашем компьютере.

Обратите внимание, общие папки со знаком доллара ($) в конце являются скрытыми и по умолчанию не отображаются при просмотре общих ресурсов. Эти папки были открыты операционной системой по умолчанию и доступ к ним есть только у локального администратора. Эти общие скрытые ресурсы не рекомендуется отключать, так как это может вызвать проблемы при работе с локальной сетью.
Посмотрите также:
- Как расшарить папку в Windows 7
- Схема обжима витой пары
- Как узнать какая сетевая карта стоит на компьютере
- Как узнать MAC адрес компьютера на Windows 10
- Как подключить сетевой диск в Windows 10
Автор
Александр Степушин
Создатель сайта comp-security.net, автор более 2000 статей о ремонте компьютеров, работе с программами, настройке операционных систем.
Остались вопросы?
Задайте вопрос в комментариях под статьей или на странице
«Задать вопрос»
и вы обязательно получите ответ.
Are you looking for an answer to the question: “Where can I see all the folders shared on my Windows computer or device?”. We thought it was a really good question, and we decided to answer it. There are three different alternatives to view your Windows shared folders: one using File Explorer, one using Computer Management, and one using the command line (Terminal, Command Prompt, or PowerShell). Furthermore, all of the following methods work both in Windows 11 and Windows 10. So, if you want to learn how to find the shared folders on your Windows computer, how to find their path, or how to access a shared folder, read on:
NOTE: As all the methods to list shared folders work the same way and everything looks similar in Windows 11 and Windows 10, I used screenshots mainly from Windows 11.
1. How to see your shared folders using File Explorer
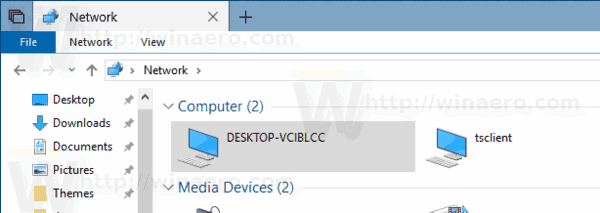
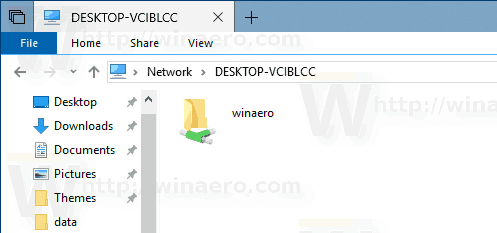
The simplest method to view and access your shared folders in Windows is offered by File Explorer. Regardless of whether you’re using Windows 10 or Windows 11, open File Explorer, expand the Network section from its left navigation pane, and click or tap on the name of your Windows PC. This shows you the list of folders shared on the network. Here’s what it looks like in Windows 11:
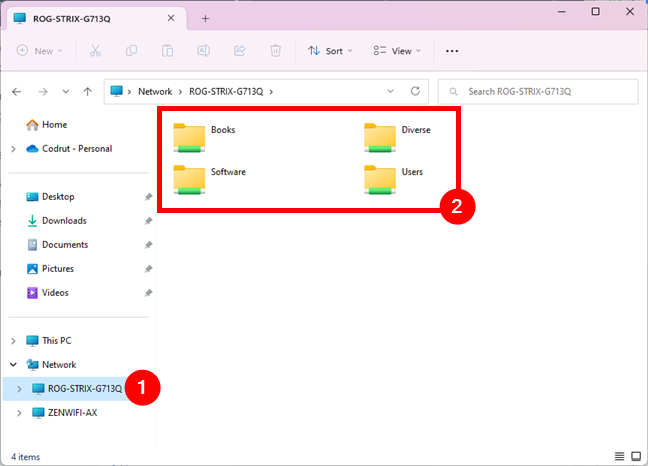
The list of folders shared with the network in Windows 11
If you’re using Windows 10, this is what you should see when accessing your shared folders in File Explorer:
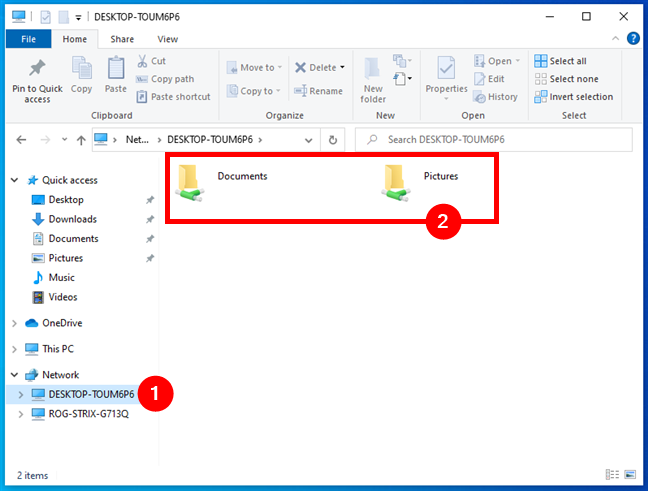
The list of folders shared with the network in Windows 10
TIP: To access any of your shared folders, you only need to double-click or double-tap on its name. Just like you would open a regular folder on your PC or any folder shared on another computer or device in your network.
Unfortunately, the problem with this view is that it doesn’t show hidden shares or give too much information about how each folder is shared. However, you can right-click or press and hold on any folder and then click/tap Properties or hit Alt + Enter on your keyboard.
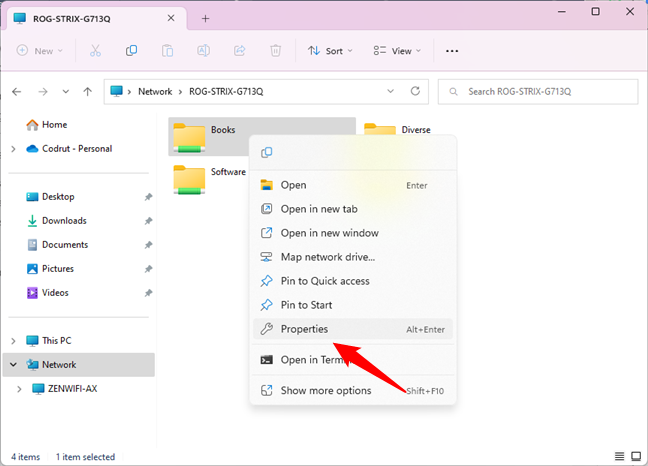
The Properties option from the contextual menu of a shared folder
This opens the Properties window of the selected shared folder. You can use it to access more information about how the folder is shared, the security settings it has, and so on.
Sharing settings and permissions for a folder
Although this method works, it’s not exactly an elegant way to see or manage your shared folders. There are better alternatives, as you’ll find out in the next chapters of this tutorial. Also, for unknown reasons, sometimes Windows doesn’t display your PC in the Network section.
2. How to view your Windows shared folders using Computer Management
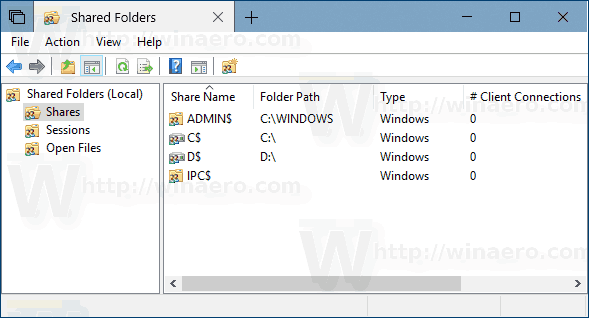
In my opinion, Computer Management is the best Windows tool for getting the complete list of shared folders on your PC. Open Computer Management and, on its left side panel, navigate to System Tools > Shared Folders > Shares. Then, in its central panel, Computer Management lists all the shared folders on your Windows computer or device.
You can see both the folders you shared and the default Windows shares (such as C$, which is the main partition on your PC), as well as the default remote administrative shares created by Windows (like ADMIN$).
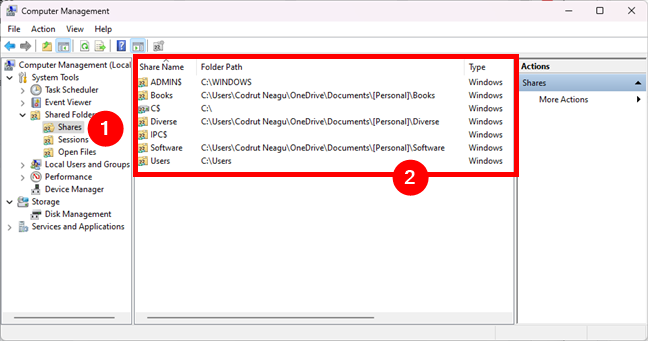
The shared folders can be seen in the Shares section of the Computer Management
For each shared folder or partition, Computer Management shows the official share name (as seen by others on the network, if not hidden), the exact folder path, the type of share, the number of connections made from the network to that folder, and a short description (if available).
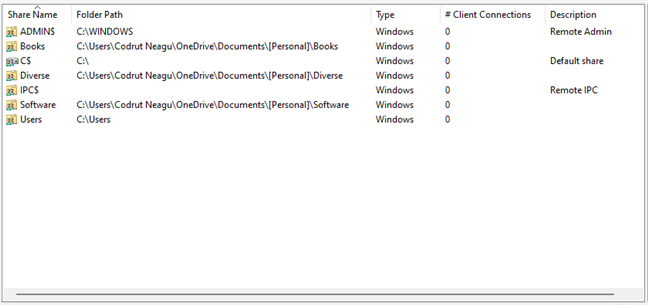
Shared folders are listed with their share name, folder path, type, etc.
TIP: If you want to access a shared folder, you can do that quickly by right-clicking (or pressing and holding) on its name and then selecting Open in the contextual menu.
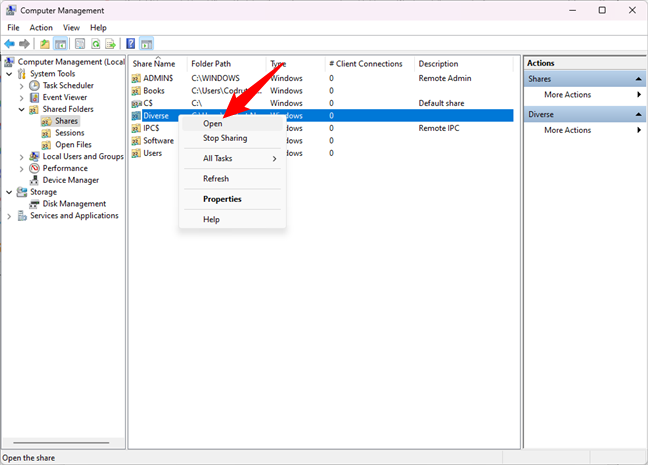
How to access a shared folder from Windows’ Computer Management
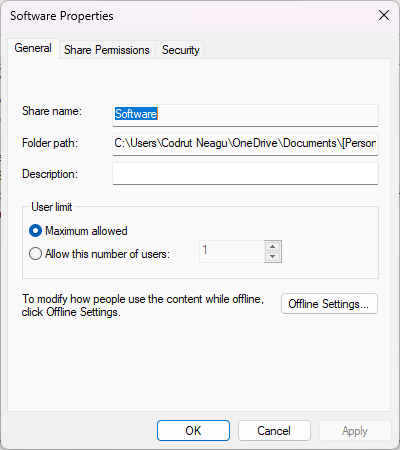
Double-clicking or double-tapping on a shared folder opens its Properties window. There, you can manage the different sharing parameters, such as the share name, description, and the maximum number of users allowed to simultaneously access that shared folder.
The Properties of a shared folder
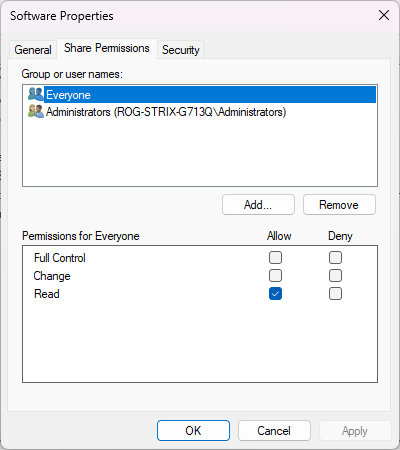
If you go to the Share Permissions tab from the Properties window, you can view and set which users and user groups have access to the shared folder and the type of access each of them has.
The Share Permissions of a Windows shared folder
Going back to the Computer Management window, if you click or tap Sessions on the left navigation pane, you can see the list of users who are currently connected to your network shares. For each user, you get to see the device where the connection is made, how many files are currently open by the user, the time since the connection was initiated, and so on.

Sessions lists the users currently accessing your shared folders
Select Open Files in the same navigation pane on the left, and Computer Management shows you all the files and folders accessed by the users who are connected to your network shares.
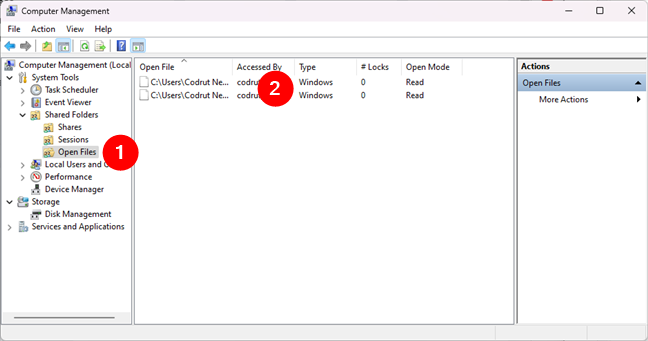
Open Files lists the shared files currently opened by users
All this is really useful information, isn’t it?
3. How to list your shared folders in the command line (with Terminal, Command Prompt, or PowerShell)
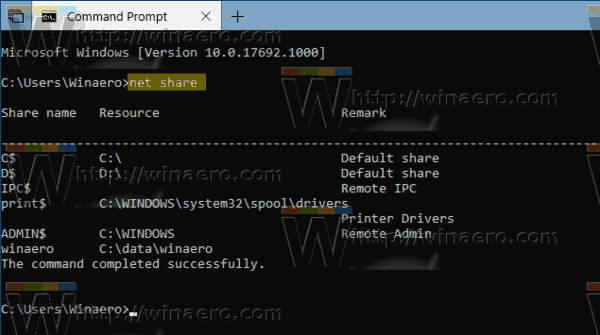
You can also get the complete list of the folders you share with the network from the command line. It doesn’t matter which tool you use, it can be Terminal, Command Prompt, or PowerShell. Just open the command-line environment you prefer and run this command to list your shared folders:
net share
Press Enter on your keyboard and the list of Windows shared folders is instantly generated and displayed.
The net share command displays the list of shared folders
Furthermore, if you want to find the path of a shared folder, it’s easy because the net share command also outputs this information in the Resource column.

The net share command tells you the path of each shared folder
Neat, right?
TIP: To access a shared folder on your computer, you can use the simple cd command followed by that shared folder’s path, which you can find in the list under Resource. For other useful commands, check this article: CMD: 11 basic commands you should know (cd, dir, mkdir, etc.).
How do you make Windows show your shared folders?
As always with Windows operating systems, there is more than one way of doing something. Try the methods we’ve shown in this guide, and then tell us which one works best for you. Or, if you know other easy ways to show and access shared folders in Windows, don’t hesitate to let us know in the comments below, and we’ll update this guide as soon as possible.

On Windows 10, you can easily share folders with other users in the network to share files and offer network storage. However, keeping track of all the shares can become difficult if you share multiple folders from different locations.
Luckily, Windows 10 includes multiple ways to view a list of all the folders shared on your device, including using File Explorer and Computer Management.
This guide will tech you two ways to view all the folders your computer is currently sharing in the network on Windows 10.
- View shared folders from File Explorer
- View shared folders from Computer Management
View shared folders from File Explorer
To view all the network shared folders in File Explorer, use these steps:
-
Open File Explorer on Windows 10.
-
Click on Network.
-
Under the “Computer” section, double-click your device name.
-
See all the folders currently shared on the network.


Once you complete the steps, you can see the folders currently accessible from the network. However, you may need to confirm the user credentials to access the network contents.
View shared folders from Computer Management
To view all the network shared folders through Computer Management, use these steps:
-
Open Start.
-
Search for Computer Management and click the top result to open the app.
-
Expand the Shared Folders branch from the left pane.
-
Click the Shares item.
-
See all the folders currently shared on the network.


In Computer Management, you will see a shared folder list, plus other shared items, such as C$, IPC$, and ADMIN$. These are administrative (hidden) shares that Windows 10 enables by default and are not visible unless someone uses the specific path and proper credentials.
Although these methods can help review the folders currently shared on the network, note that if you share a folder inside your profile folder, it will appear as the “Users” folder being shared in the network. Typically, you don’t want to share folders from within your profile folders (Desktop, Downloads, Pictures, etc.). Instead, you should create a share from the secondary drive or the root of the “C:\” drive.
Mauro Huculak is a
Windows How-To Expert and founder of
Pureinfotech
(est. 2010). With over 21 years as a technology writer and IT Specialist,
Mauro specializes in Windows, software, and cross-platform systems such as Linux, Android, and macOS.
Certifications:
Microsoft Certified Solutions Associate (MCSA),
Cisco Certified Network Professional (CCNP),
VMware Certified Professional (VCP),
and
CompTIA A+ and Network+.
Mauro is a recognized Microsoft MVP and has also been a long-time contributor to Windows Central.
You can follow him on
YouTube,
Threads,
BlueSky,
X (Twitter),
LinkedIn and
About.me.
Email him at [email protected].