
Checking open TCP/IP ports on your Windows computer is crucial for managing network security and ensuring smooth connectivity. Certain apps and processes in Windows may face issues due to closed or misconfigured ports, often caused by firewalls or private IP addresses. This guide will walk you through step-by-step methods to check whether a TCP port is open or closed using built-in tools and third-party utilities.
Why You Should Check TCP/IP Ports?
Here are some common scenarios where checking ports is necessary:
- Troubleshooting connectivity issues for applications or services.
- Configuring firewalls to ensure necessary connections are allowed.
- Detecting suspicious activity that might indicate a security breach.
Methods to Check Open TCP/IP Ports
There are several ways to check open TCP/IP ports in Windows. Here are a few options:
Method 1. Using Telnet Client
Step 1: Check whether the telnet client feature is ON or not. In order to check, open the Turn Windows feature on or off settings from the search bar. OR press the ‘window’ key and type ‘windows’ features. Then press on “Turn Windows features on or off”.
-660.png)
Windows Features Option
A new prompt will be opened. Search for “Telnet Client” and check the box in front of ‘telnet Client’.

Windows Features
Step 2: Open the command prompt. Press the ‘windows’ key and type ‘cmd’. Press “Command Prompt”.
-660.png)
Command Prompt Option
Step 3: On the command prompt, type the command “telnet + IP address or hostname + port number” and check the status of the provided TCP port.
-660.png)
Telnet Command
Step 4: If only the blinking cursor is visible, then the port is open.
-660.png)
Port is Open
Step 5: If you get the message “connection failed” then the port is closed.
-660.png)
Port is close
Method 2: Using built-in netstat command-line utility:
Step 1: Open the command prompt.
Step 2: Run the following command:
netstat -an

Method 3. Using TcpView
Another option is to use the TcpView utility from Microsoft’s Sysinternals suite of tools. This utility provides a more user-friendly interface for viewing active TCP/IP connections, along with additional information such as the process ID and process name for each connection. Steps to be followed:
Step 1: Download the TcpView utility from the Microsoft Sysinternals website. You can find the download link on the TcpView page of the Sysinternals website.
-660.png)
Download Page
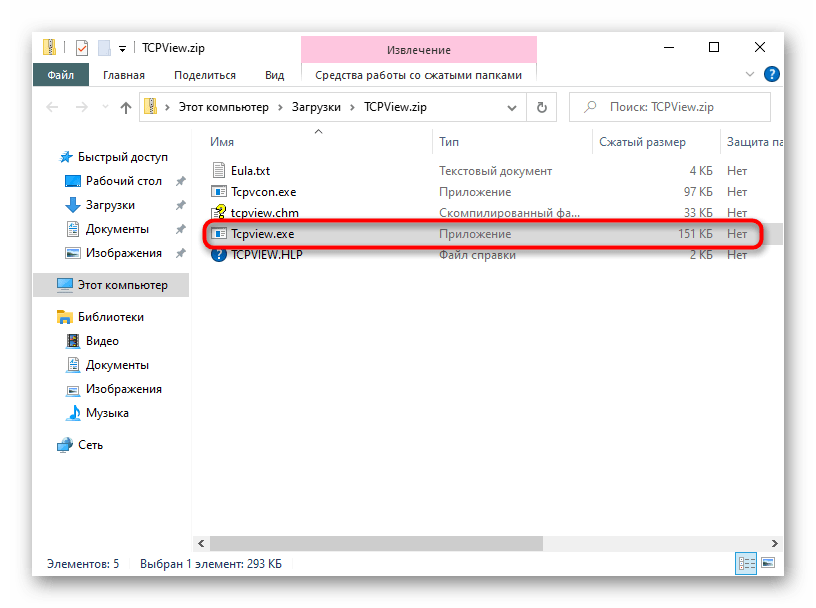
Step 2: Extract the downloaded file and run the TcpView.exe file to launch the TcpView utility. This will open the TcpView window, which shows a list of all active TCP/IP connections on your machine.

Extracted FIles
Step 3: Open the tcpview.exe (application).
By default, TcpView will display the following columns in the list of connections:
Protocol: Shows the protocol being used for the connection (TCP or UDP)
Local Address: Shows the local address and port being used for the connection
Remote Address: Shows the remote address and port being connected to
State: Shows the current state of the connection (e.g. Established, Listen, etc.)
You can use the “Local Address” and “Remote Address” columns to see which ports are being used by which applications. For example, if you see a connection with a local address of “127.0.0.1:80”, this means that the local application is using port 80 for outgoing connections.
Method 4. Using Windows PowerShell
You can also use Windows PowerShell to check open TCP/IP ports. To do this, use the Get-NetTCPConnection cmdlet, which allows you to view a list of active TCP/IP connections and the local and remote addresses and ports being used. For example, you can run the following command to view a list of all active TCP/IP connections:
Get-NetTCPConnection |
Select-Object LocalAddress,
LocalPort, RemoteAddress, RemotePort

Get-NetTCPConnection cmdlet
Method 5. Using Nmap
To install Nmap in the Windows command line, follow these steps:
Step 1: Download the latest version of Nmap from the Nmap website. You can find the download link on the Nmap download page:
https://nmap.org/download.html
Step 2: Extract the downloaded file to a location on your computer. This will create a new folder containing the Nmap files.
Step 3: Open a command prompt and navigate to the directory where you extracted the Nmap files. For example, if you extracted the files to the C:\nmap directory, you would run the following command:
cd C:\nmap
Step 4: Once you are in the Nmap directory, you can install Nmap by running the nmap.exe file. To do this, run the following command:
nmap.exe -V
This will display the version number of Nmap, indicating that it has been installed successfully.
Step 5: To use nmap to scan for open TCP/IP ports, run the “nmap -sT” command, followed by the IP address or hostname of the machine you want to scan.
nmap -sT localhost

This will scan the specified host or IP address and display the results. You can also use the -h option to view a list of available options and arguments for the nmap command. Overall, installing Nmap in the Windows command line is a straightforward process. You can download the latest version of Nmap from the Nmap website, extract the files, and then run the nmap.exe file to install it. Once it is installed, you can use the nmap command to scan hosts and IP addresses and view the results.
Common Issues That Close Ports
- Applications not functioning as expected.
- Misconfigured firewall rules blocking connections.
- IP addresses improperly set as private.
Troubleshooting Common Issues
Here are some common issues that may occur during opening TCP/IP Ports in Windows:
- Telnet Not Listed in Features: Ensure your system version supports Telnet or enable it via PowerShell.
- Firewall Blocking Ports: Temporarily disable the firewall to test port connectivity.
- Command Not Recognized: Verify tool installation and environment variables.
Conclusion
Checking open TCP/IP ports on your Windows computer is an important step for maintaining your system’s security and efficiency. By regularly monitoring these ports, you can identify any unwanted or suspicious connections that might put your computer at risk. Windows provides several simple tools, like Command Prompt and PowerShell, which make it easy to see which ports are open and what applications are using them. Taking the time to check your open ports helps ensure that your computer runs smoothly and stays protected from potential threats. Staying proactive about monitoring your network connections is a key part of keeping your digital environment safe and reliable.
Как посмотреть список открытых портов в Windows
Статья обновлена: 10 сентября 2021
ID: 101
Чтобы посмотреть список открытых портов:
- Откройте командную строку. Инструкция в статье.
- Выполните команду:
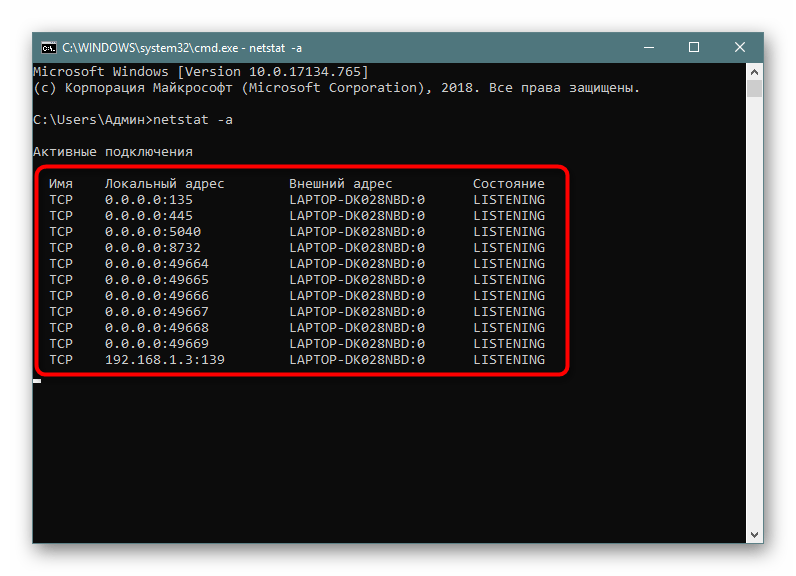
netstat -a
- Нажмите Enter на клавиатуре.

Вы получите список открытых портов в Windows.
Спасибо за ваш отзыв, вы помогаете нам становиться лучше!
Спасибо за ваш отзыв, вы помогаете нам становиться лучше!
Все способы:
- Вариант 1: Брандмауэр
- Вариант 2: Консольные утилиты
- Способ 1: «Командная строка»
- Способ 2: «Windows PowerShell»
- Вариант 3: Онлайн-сервисы
- Вариант 4: Сторонние приложения
- Способ 1: TCPView
- Способ 2: PortQry
- Вариант 5: Веб-интерфейс маршрутизатора
- Вопросы и ответы: 0
Важно! Большая часть описанных в этой статье способов просмотра открытых портов являются универсальными для всех операционных систем семейства Windows, оставшиеся подойдут только для определенных версий. Об этом будет указанно непосредственно в тексте. Несмотря на это, все скриншоты, приведенные в статье, сделаны в Windows 10, но отличия в них заключаются исключительно в графическом оформлении интерфейса.
Вариант 1: Брандмауэр
Все открытые в системе порты фиксируются в брандмауэре, соответственно, их можно посмотреть там. Для этого выполните следующее:
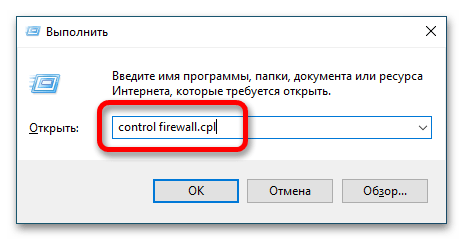
- Откройте главное окно брандмауэра. Сделать это можно разными способами, универсальный подразумевает использование ввода специальной команды в утилите «Выполнить». Для этого сначала вызовите ее сочетанием клавиш Win + R, а затем впишите в поле «Открыть» команду
control firewall.cplи нажмите Enter.
Читайте также: Настройка брандмауэра в Windows 11 / 10 / 7
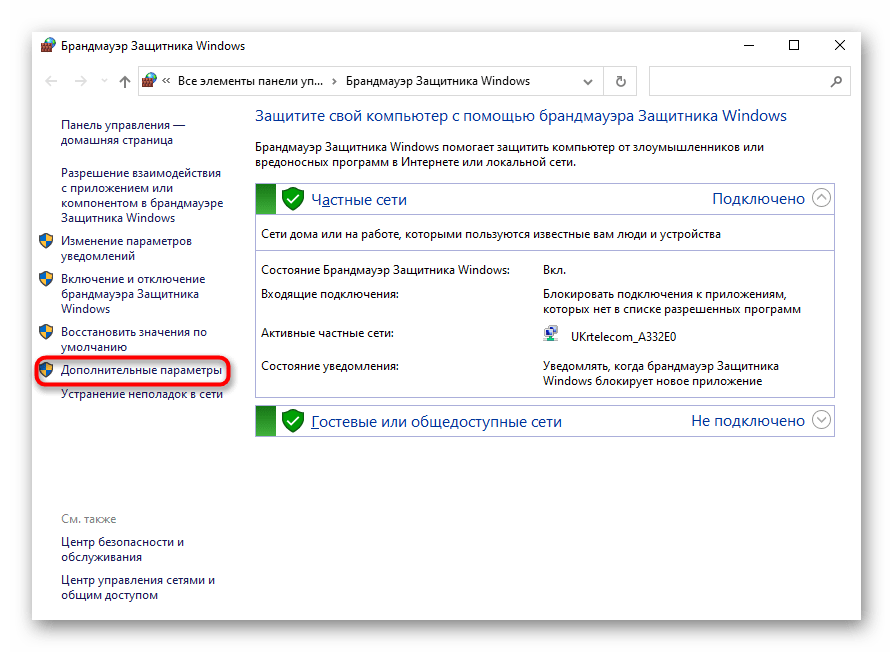
- В открывшемся окне щелкните по пункту «Дополнительные параметры», расположенному на боковой панели слева.
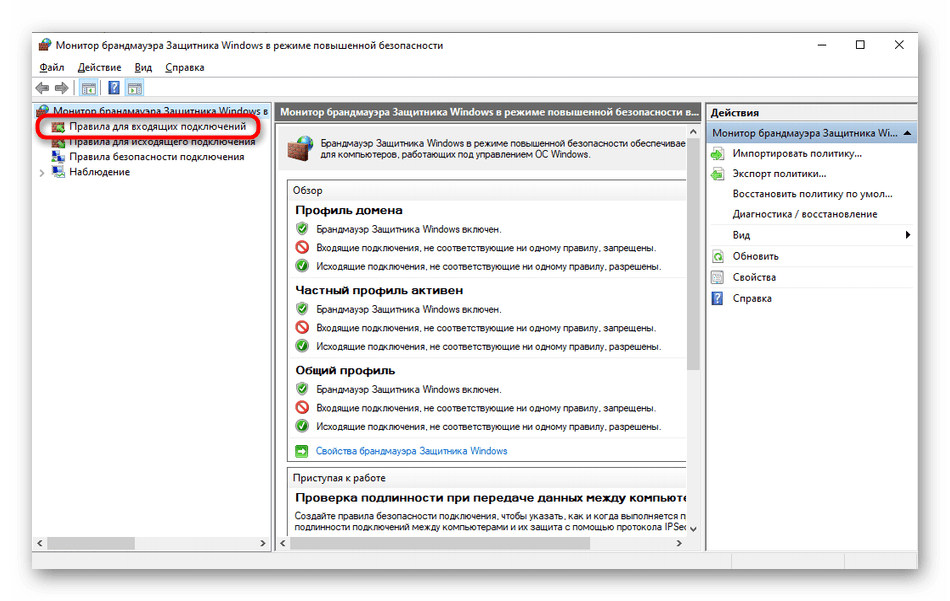
- В новом меню на навигационной панели слева нажмите по пункту «Правила для входящих подключений».
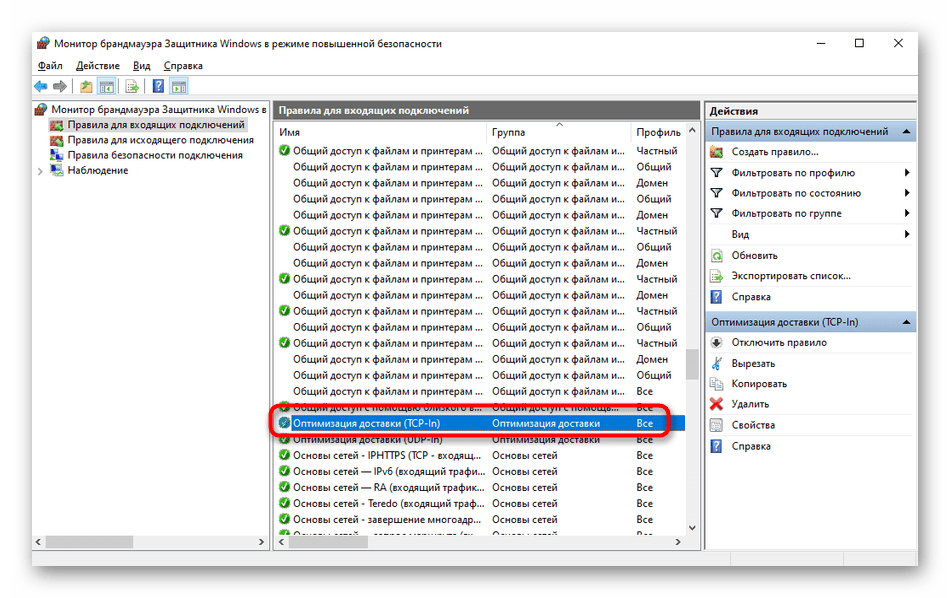
- Найдите в списке интересующее вас разрешающее подключение (пункт, отмеченный зеленной галочкой) и откройте его «Свойства». Для этого щелкните дважды кнопкой мыши по названию.
- В появившемся окне проследуйте на вкладку «Протоколы и порты» и найдите поле «Локальный порт» — именно там и указаны искомые данные.
- Таким же образом проверьте оставшиеся подключения, чтобы узнать все открытые порты.
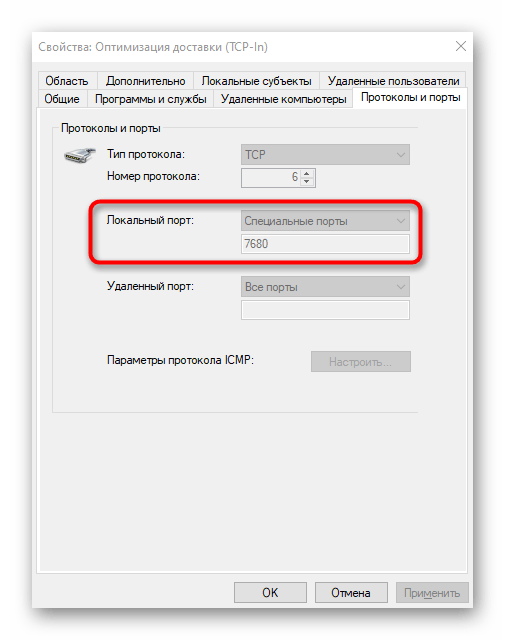
Обратите внимание! Этот способ не предоставляет сразу весь список открытых портов, их потребуется проверять каждый раз отдельно, что не очень удобно. Но таким образом вы сможете узнать дополнительную информацию выбранного подключения в окне его «Свойств».
Вариант 2: Консольные утилиты
Посмотреть сразу все открытые порты в операционной системе можно путем ввода специальной команды в консольных утилитах. Притом они будут различаться в «Командной строке» и «Windows PowerShell».
Способ 1: «Командная строка»
В «Командной строке» можно вывести перечень всех открытых портов с помощью команды netstat. Она также имеет дополнительные параметры, которые позволяют гибко настроить вывод данных. Этой утилите у нас на сайте посвящена отдельная статья, в которой подробно рассмотрено ее использование. Воспользуйтесь ссылкой ниже, чтобы ознакомиться с изложенной там инструкцией.
Подробнее: Использование команды netstat для просмотра открытых портов
Способ 2: «Windows PowerShell»
Аналогичные сведения можно посмотреть в «Windows PowerShell», для этого потребуется воспользоваться командой Get-NetTCPConnection.
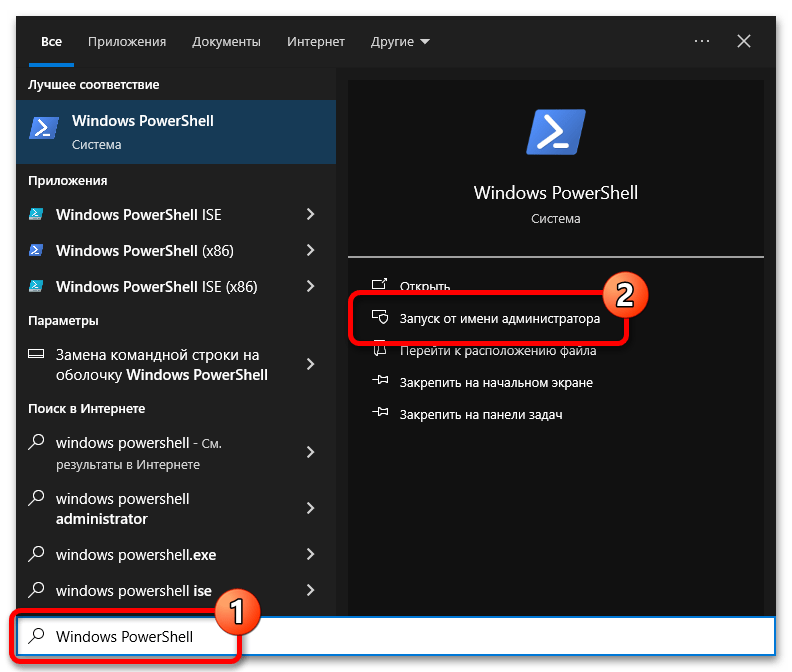
- Сначала нужно запустить саму консоль от имени администратора. Во всех операционных системах это можно сделать через поиск. Вызовите его сочетанием клавиш Win + S и в появившееся поле введите запрос «Windows Powershell», а затем в результатах кликните правой кнопкой мыши по искомому приложению и воспользуйтесь пунктом «Запуск от имени администратора». При необходимости после этого подтвердите запуск, нажав по кнопке «Да» в появившемся диалоговом окне контроля учетных записей.
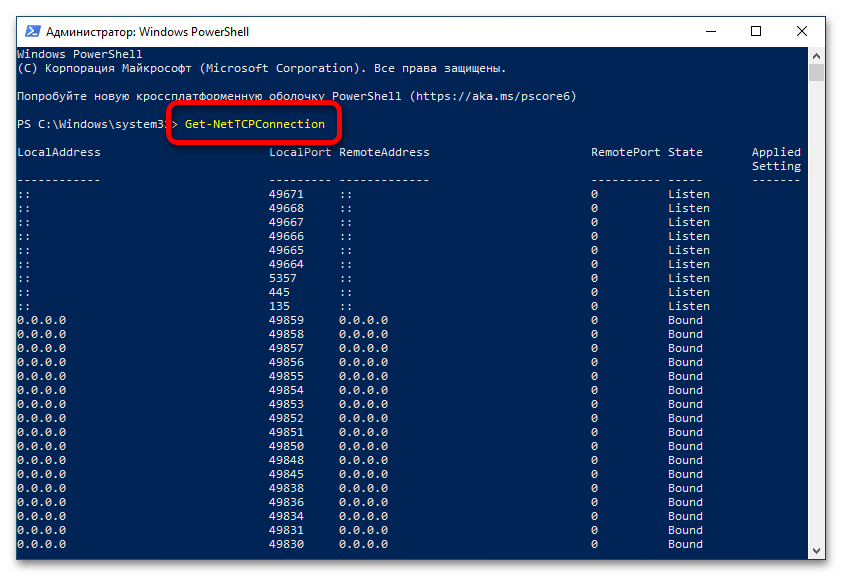
- Теперь можете ввести в окно консоли команду
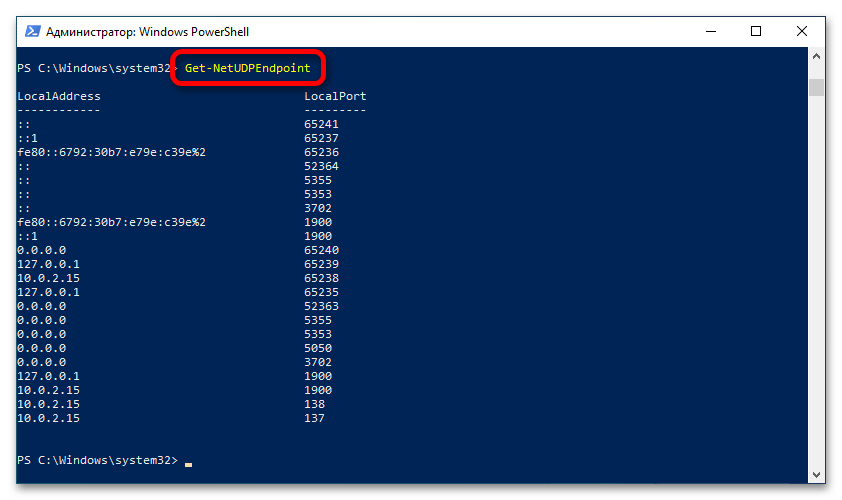
Get-NetTCPConnectionи нажать Enter. По итогу на экране появится перечень всех портов TCP в системе, включая закрытые. - Чтобы отобразить список только открытых, необходимо воспользоваться параметром
-Stateсо значениемListen. Итоговая команда будет выглядеть следующим образом:Get-NetTcpConnection -State Listen - Если вы хотите просмотреть информацию о конечной точке UDP, тогда команда будет другой:
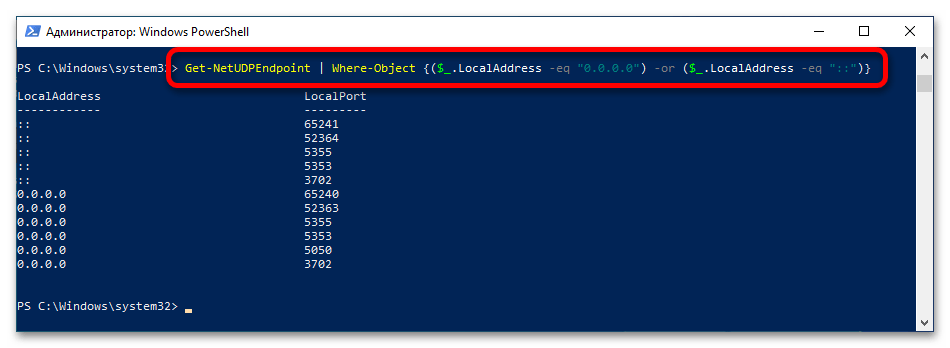
Get-NetUDPEndpoint. Запущенная без опций, она вернет список только локальных портов. - Если необходимо просмотреть сетевые интерфейсы, тогда к команде потребуется добавить дополнительный параметр. В итоге она будет выглядеть следующим образом:
Get-NetUDPEndpoint | Where-Object {($_.LocalAddress -eq "0.0.0.0") -or ($_.LocalAddress -eq "::")}Вы увидите только открытые удаленные порты UDP, локальные в перечне будут отсутствовать.

Вариант 3: Онлайн-сервисы
В интернете есть специальные сервисы, которые позволяют вывести информацию о всех открытых на компьютере портах. Это удобный способ, который не подразумевает использования штатных средств операционной системы и ввода специальных консольных команд. В сети есть множество решений для выполнения поставленной задачи, о трех из них детально рассказывается в отдельной статье на нашем сайте.
Подробнее: Онлайн-сервисы для проверки портов компьютера
Вариант 4: Сторонние приложения
Компания Microsoft для просмотра информации о состоянии портов выпустила два отдельных приложения. Они различаются набором дополнительных функций, но одинаково хорошо подходят для выполнения поставленной задачи.
Способ 1: TCPView
TCPView — это приложение с графическим интерфейсом, которое предоставляет сведения о процессах, запущенных в операционной системе. Также в нем отображается их принадлежность к определенному порту и протоколу передачи данных. Чтобы воспользоваться всеми функциями программы, потребуется изначально скачать ее на компьютер. Для этого перейдите на официальный сайт разработчика, воспользовавшись кнопкой ниже.
Скачать TCPView с официального сайта
Теперь выполните описанные далее действия, чтобы получить данные об открытых портах компьютера:
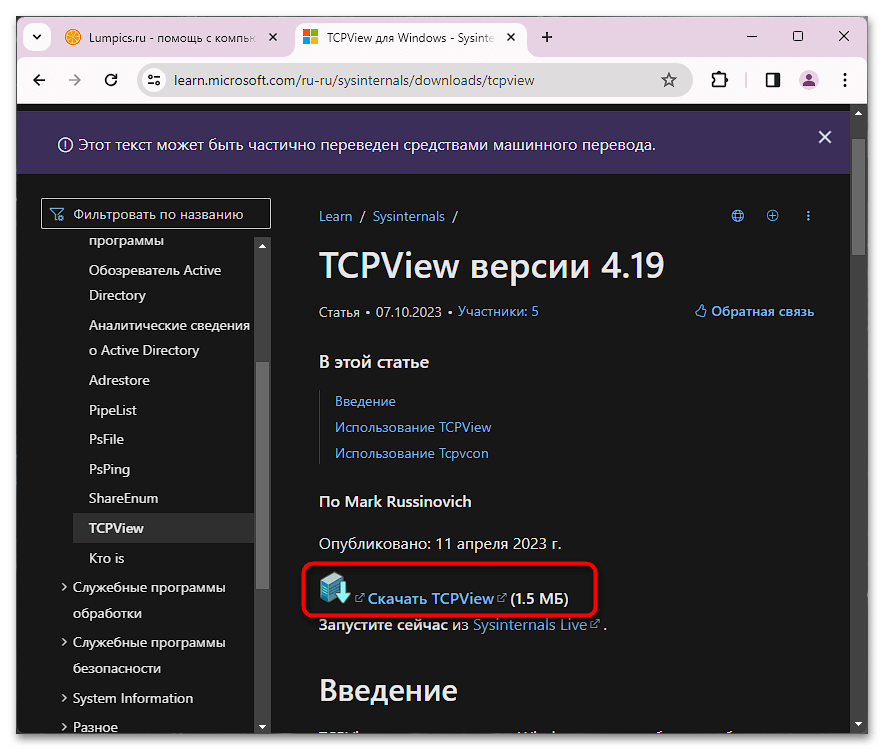
- Находясь на странице загрузки приложения, кликните по строке «Download TCPView». Точное ее расположение показано на изображении ниже.
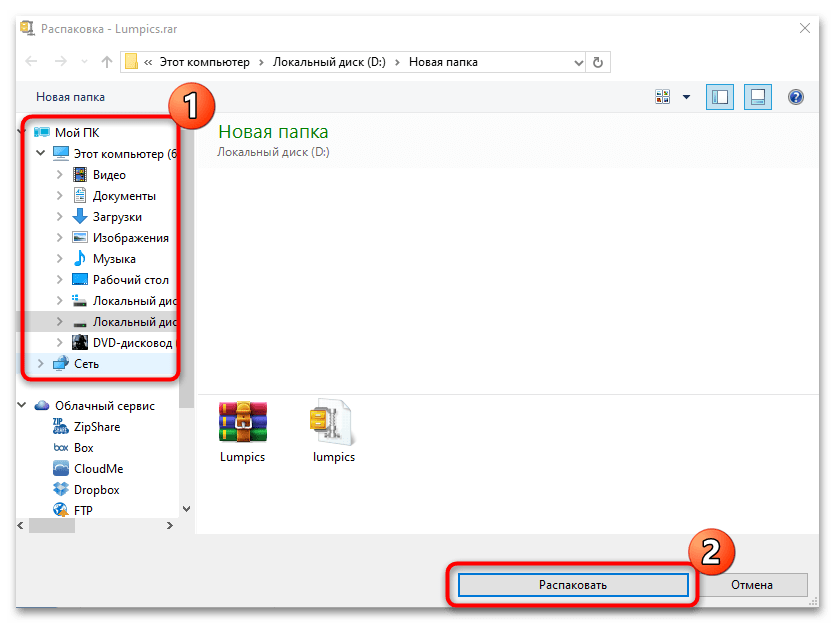
- После завершения загрузки перейдите в папку, в которую вы сохранили файл, и извлеките их из архива. Сделать это можно как встроенными средствами операционной системы, так и с помощью стороннего программного обеспечения. Об этом подробнее рассказывается в другой статье на нашем сайте.
Подробнее: Методы извлечения из архива папки с файлами
- Затем перейдите в извлеченную директорию и запустите исполняемый файл приложения «Tcpview.exe». Устанавливать его не потребуется, так как программа является портативной.
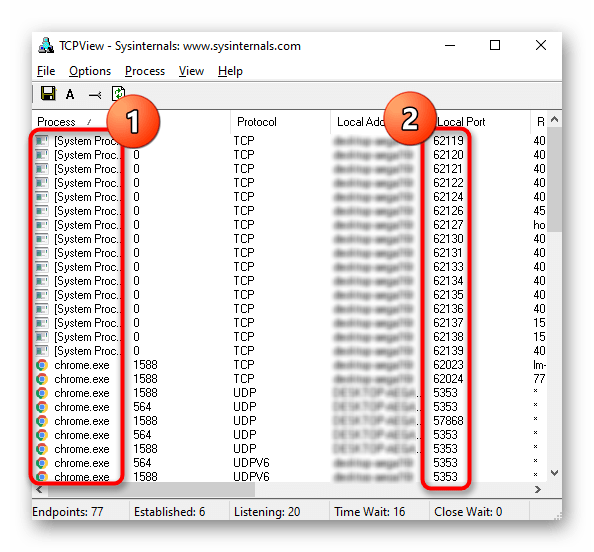
- В открывшемся окне будут отображаться все запущенные процессы, их название находится в столбце «Process», а используемые ими порты указаны в столбце «Local Port». Соответственно, все они являются в настоящее время открытыми.
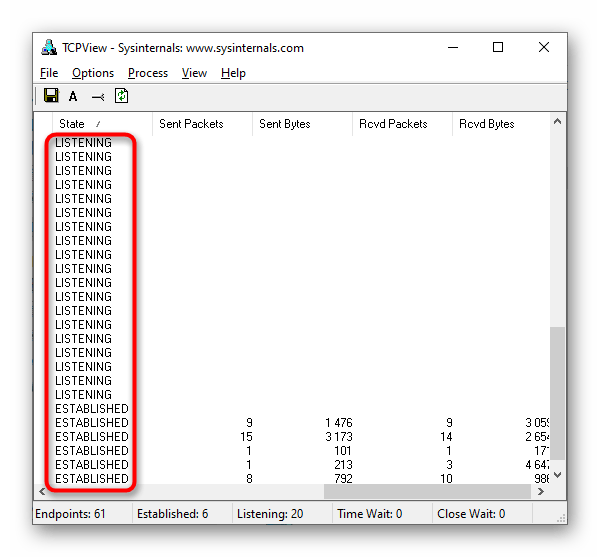
- Дополнительно можете пролистать страницу программы вправо до столбца «State» — именно там отображается состояние каждого порта. Он может прослушиваться, находиться в ожидании или вовсе не использоваться. Но, несмотря на это, каждый находящийся в списке порт является открытым.
Способ 2: PortQry
PortQry — это тоже приложение от компании Microsoft для просмотра открытых портов, только она не имеет графического интерфейса, поэтому пользоваться ей возможно только через «Командную строку».
Скачать PortQry с официального сайта
Эта программа не является портативной, в отличие от разобранной ранее в статье, поэтому ее потребуется инсталлировать, предварительно скачав на компьютер. А потом можно будет запустить утилиту в консоли и проверить открытые порты.
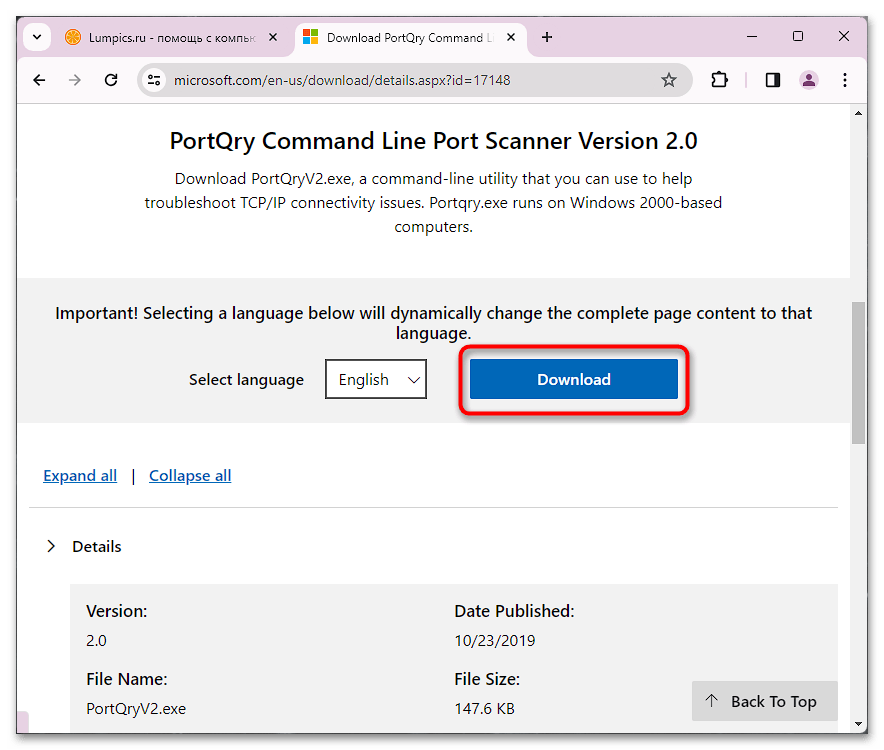
- Перейдя на страницу загрузки приложения, нажмите по кнопке «Download», чтобы начать скачивание инсталляционного файла.
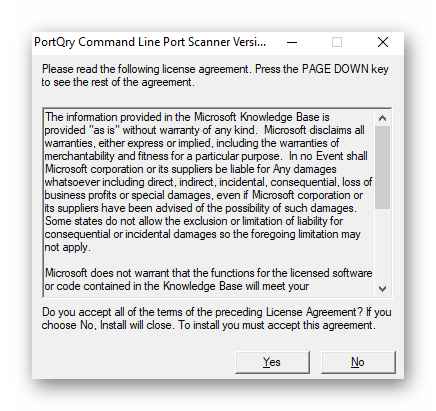
- После того как загрузка завершится, перейдите в директорию со скачанным файлом и запустите его двойным кликом по названию. Затем в появившемся окне примите условия лицензионного соглашения и продолжайте следовать инструкциям инсталлятора.

Важно! Оставьте путь установки программы по умолчанию, чтобы при выполнении последующих действий, описанных в этой инструкции, не появлялось ошибок.
- Закройте окно инсталлятора и запустите «Командую строку» от имени администратора, например через поиск по системе. Вызовите соответствующий интерфейс комбинацией клавиш Win + S, введите запрос и в результатах щелкните по пункту «Запуск от имени администратора».

Читайте также: Как запустить «Командную строку» от имени администратора в Windows 11 / 10
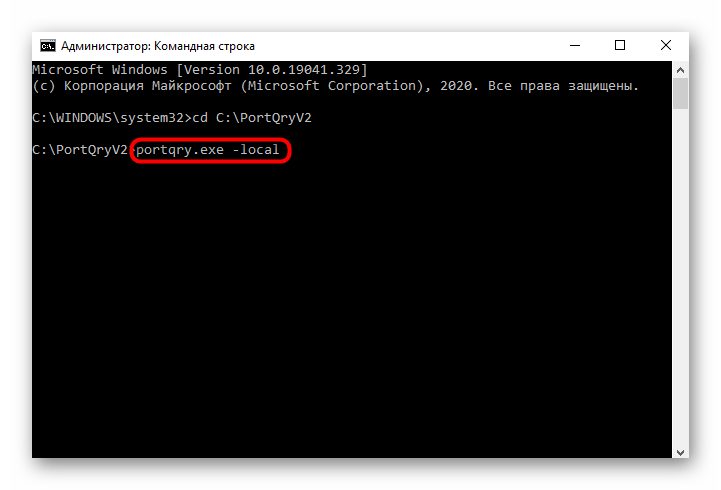
- Проследуйте в директорию, в которую было установлено приложение. По умолчанию это
C:\PortQryV2. Чтобы туда перейти, следует ввести и выполнить следующую команду:cd C:\PortQryV2 - Запустите приложение с параметром
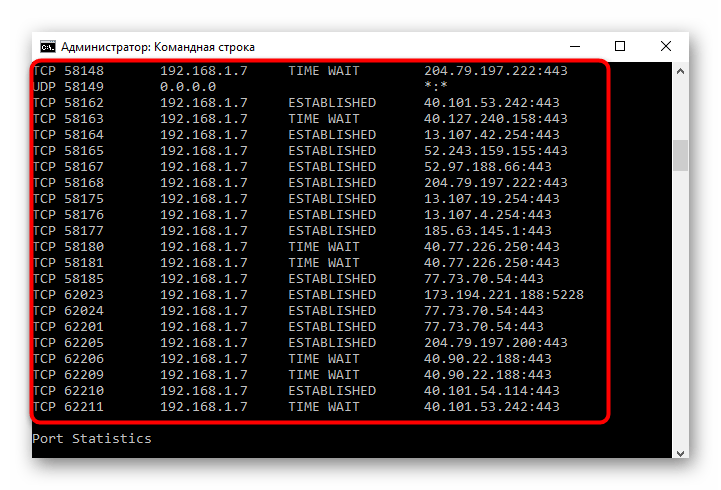
-local, чтобы вывести на экран список всех открытых портов в операционной системе.portqry.exe -local
Теперь, спускаясь по консоли вниз, вы будете видеть тип подключения, номер порта, его адрес (внешний и внутренний) и статус.


Вариант 5: Веб-интерфейс маршрутизатора
Оставшийся способ просмотра открытых портов на компьютере подразумевает вход в админ-панель роутера. Для этого необходимо знать логин и пароль, а по умолчанию они соответствуют тем, что указаны на корпусе устройства. Развернуто о том, как войти в меню маршрутизатора, рассказывается в другой статье на нашем сайте. При необходимости воспользуйтесь ссылкой ниже, чтобы ознакомиться с изложенной там информацией.
Подробнее: Как войти в веб-интерфейс роутера
Важно! В админ-панели маршрутизатора можно посмотреть только те порты, которые были заданы по умолчанию или созданы вручную пользователем. Так что посмотреть абсолютно все порты этим способом не получится. Также следует учитывать, что все дальнейшие действия будут выполняться на примере админ-панели роутера TP-Link, но в других моделях устройств все будет похожим.
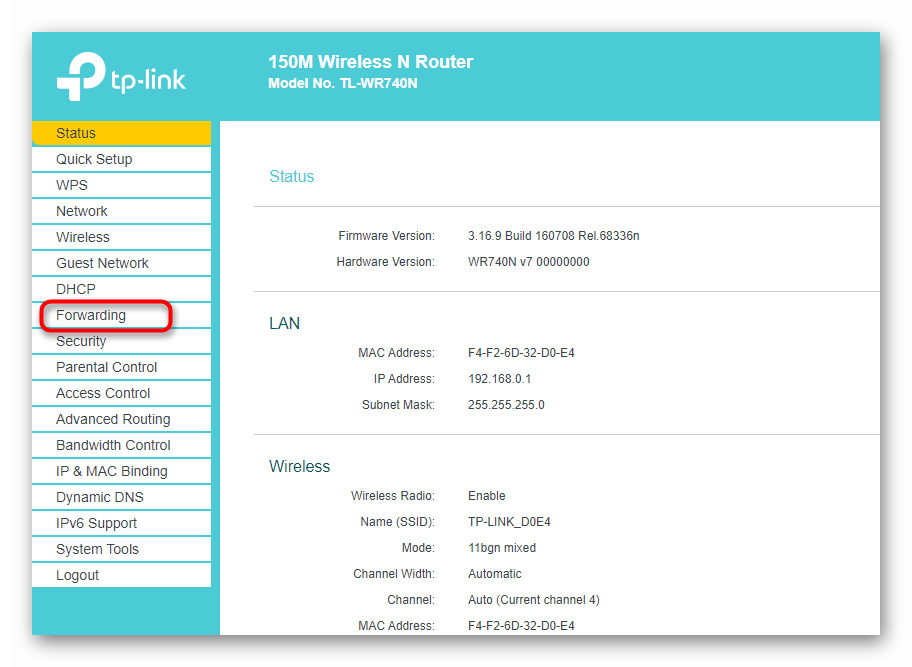
- Перейдите в меню роутера, после чего проследуйте в раздел «Forwarding», воспользовавшись навигационной панелью в левой части интерфейса.
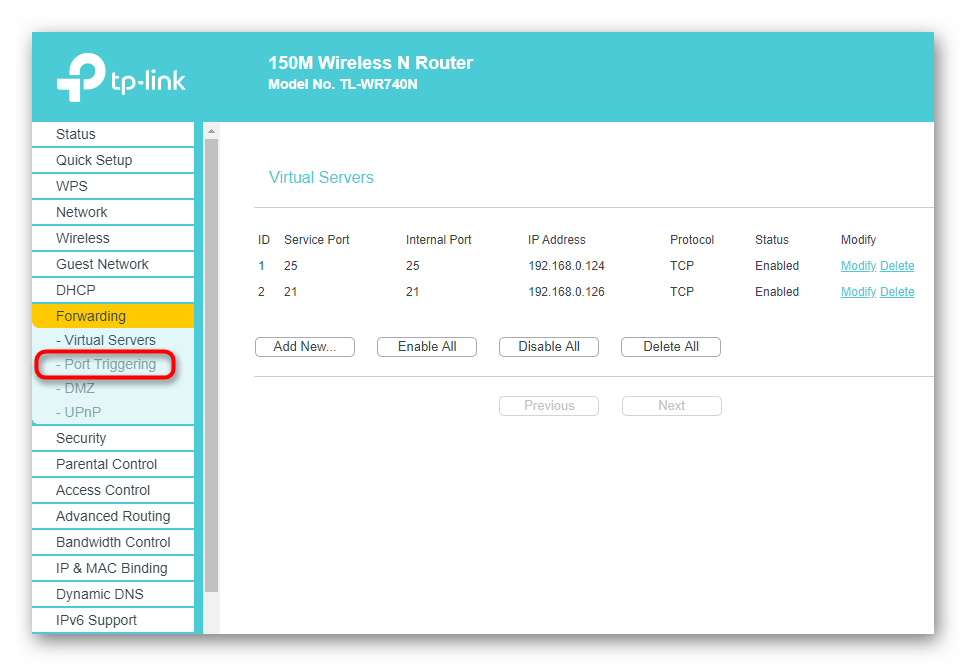
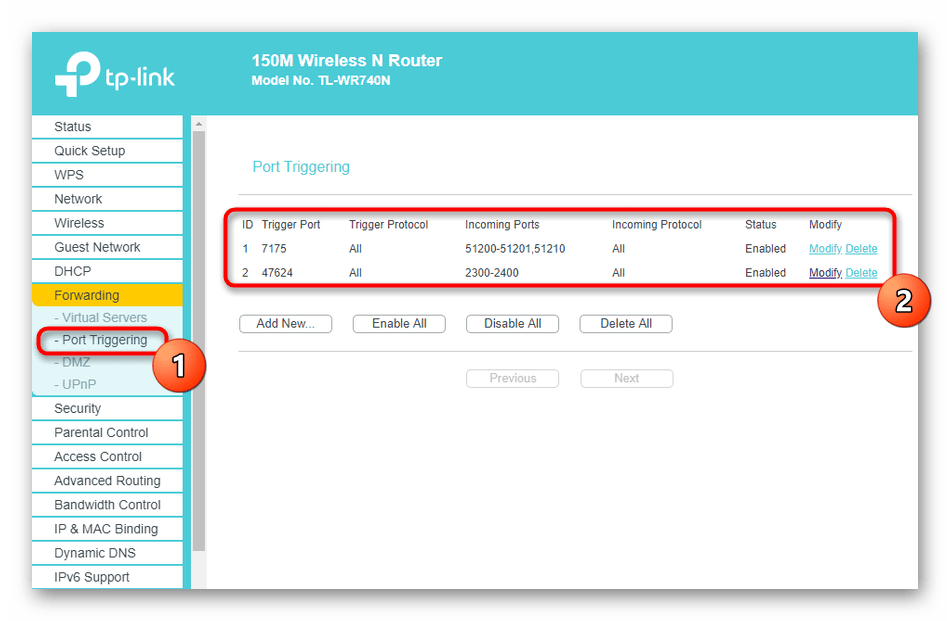
- В развернувшемся списке подразделов кликните по пункту «Port Triggering», чтобы перейти к списку открытых портов.
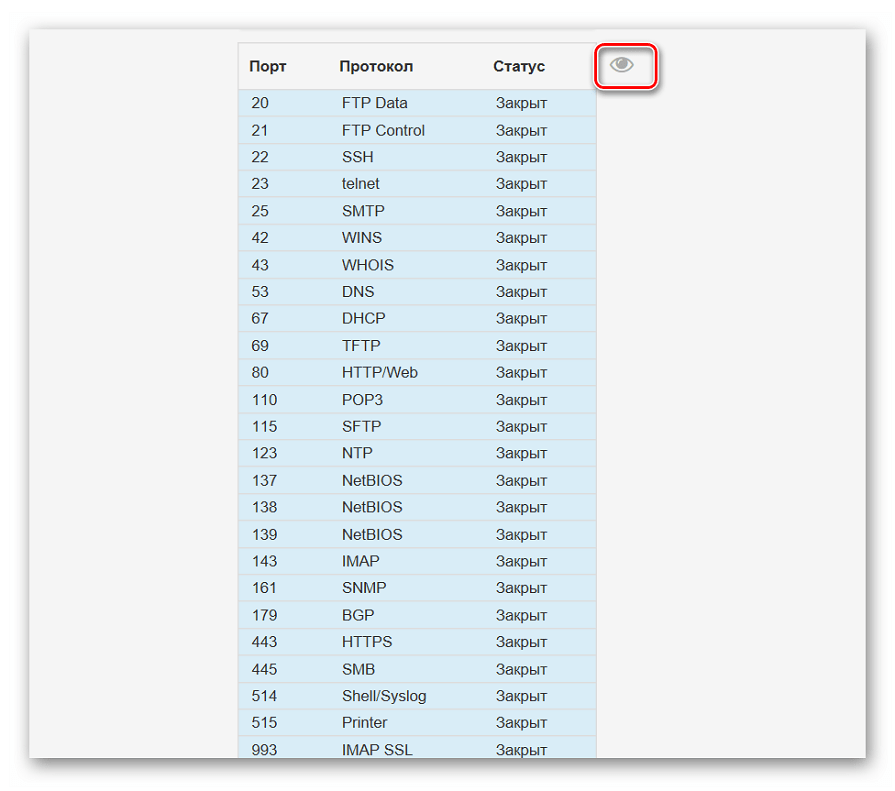
- В целевом меню размещен список всех портов маршрутизатора. В нем номер находится в столбце «Trigger Port», а в «Status» вы можете посмотреть его статус. Значение «Enabled» означает, что порт открыт, а «Disabled» — закрыт. Также вы можете менять этот статус вручную, нажав по соответствующей кнопке.
Наша группа в TelegramПолезные советы и помощь
In this tutorial, we will learn how to run the netstat command to check open ports in Windows Operating System. We will also look at command options and how to use the findstr command (similar to grep) to filter the netstat output.
To check open ports, open a command prompt (or PowerShell) as administrator and run the netstat command as follows:
netstat -aonThe command displays lots of information. What you should pay attention to are Local Addresses that are in the LISTENING state.
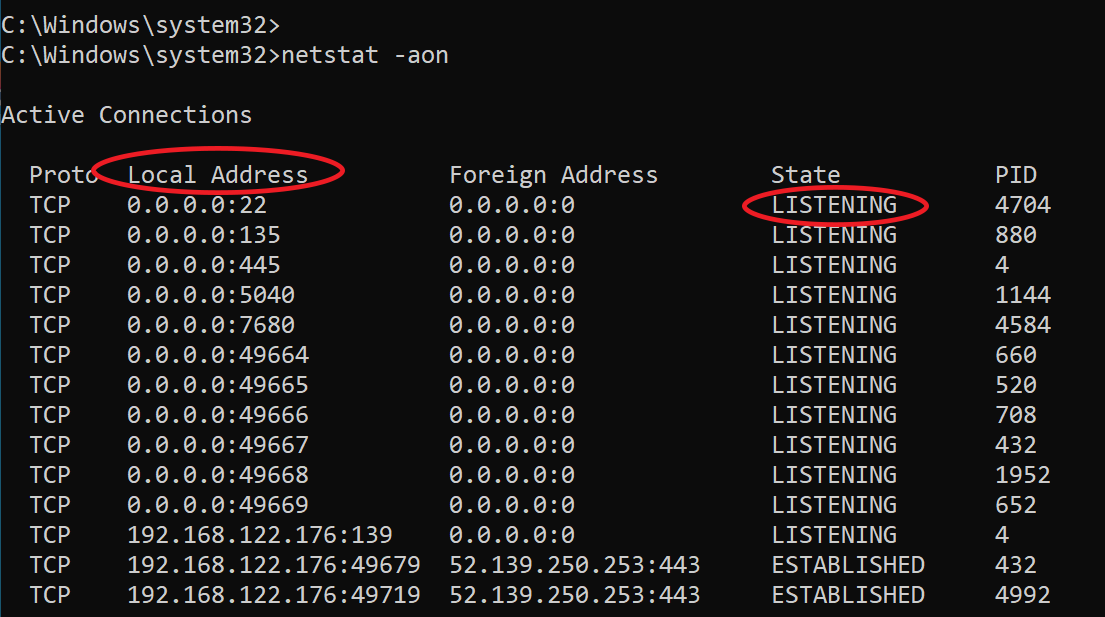
As you can see in the previous screenshot, In my Windows 10 computer, port 22 (SSH) is open.
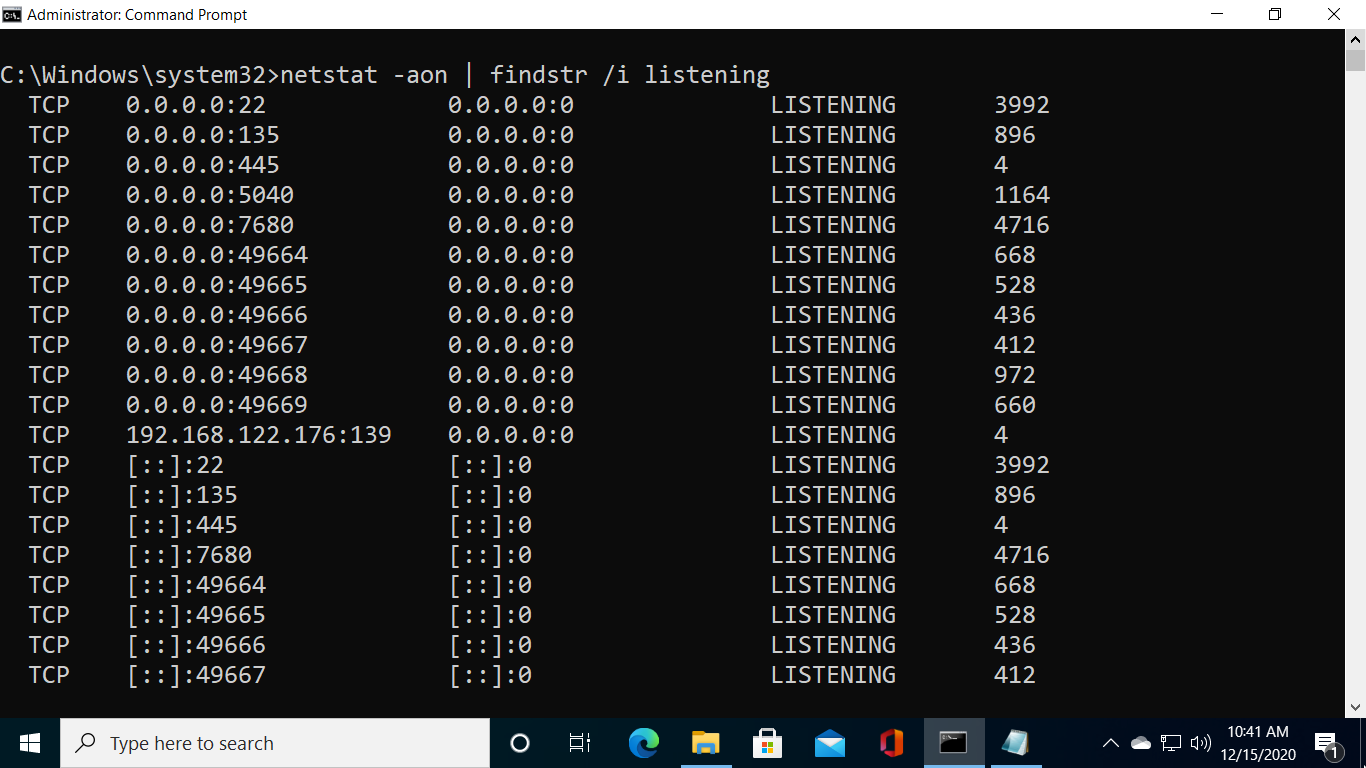
Administrators can run the following command to show opened ports only without all other details:
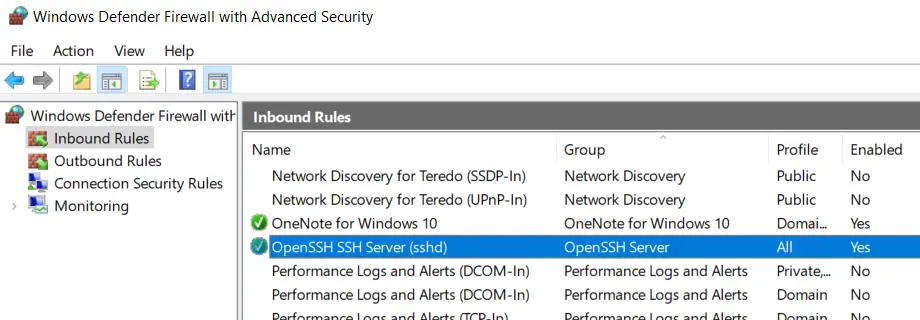
netstat -aon | findstr /i listeningOne important point is that the Windows Firewall may block a port even if it is in the listening state. In the Windows Defender Firewall with Advanced Security, there has to be a corresponding inbound firewall rule to match the listening port (Anything with a green checkmark is an open rule).
The Foreign Address column of the output shows the IP address and port of the computer/server at the remote end of the connection.
To check that the port is open from a remote computer, an administrator can run the telnet command from a remote computer against the IP address of the Windows computer.
For example, to check if port 22 is open, I will run the telnet command from a remote computer as follows:
telnet IP_ADDRESS 22Replace IP_ADDRESS with the actual IP Address of the Windows computer.

Filtering netstat using findstr
Administrators can use the findstr CMD command (which is similar to grep) to filter netstat command data based on string patterns.
For example, run the following command to check TCP connections in TIME_WAIT State.
netstat -a | findstr /i TIME_WAITThe /I option is for the case insensitive matching.

Command Options
Windows netstat command, without any command-line arguments, displays active TCP connections.
It also includes some useful command options to show network connections and ports in various forms, such as show connections and opened ports based on the protocol, find the process id of a connection/port, view network statics, and find the application that utilizes connections and ports.
| -a | displays all network connections and ports on which Windows is listening (include both IPv4 or IPv6 addresses). |
| -b | The output shows you which applications are using each active connection and ports (need administrative privileges). |
| -e | Displays network statistics, such as the Errors, the number of bytes, and packets sent and received. |
| -n | Displays addresses and ports in numerical format. |
| -f | When used, the output will contain Fully Qualified Domain Names (FQDNs) of IP addresses, if available. |
| -o | Displays an additional column that contains the Process ID (PID). |
| -p | Display data for a specific protocol (e.g., -p TCP). The Protocol can be one of the following: TCP, UDP, TCPv6, or UDPv6. If combined with the -s option, Protocol can be TCP, UDP, ICMP, IP, TCPv6, UDPv6, ICMPv6, or IPv6. |
| -r | Check Windows routing table. |
| -s | Displays detailed network statistics for each protocol (IPv4, IPv6, ICMPv4, ICMPv6, TCP, and UDP). |
| interval | Sets Time interval (in seconds) to automatically update the output. See examples to learn more. |
Examples: Using the netstat command
List all Active TCP connections:
netstatCheck open ports:
netstat -aon | findstr /i listeningOnly want to see information about TCP protocol:
netstat -a -p tcpShow network statistics:
netstat -sReal-time network monitoring — In the following example, we set a 5 second time interval to check active network connections in real-time. The number 5 causes the command to repeat every five seconds (Press CTRL+C to quit).
netstat -n 5If you need more information about the Windows netstat command, type netstat \? in the command prompt.
A Port basically serves as an interface between your computer and the internet or other computers in the network. Every communication over the web is exchanged using these ports, so they are an essential part of the entire internet communication model.
Every IP address has a total of 65,535 ports, and it’s either a UDP port or a TCP port. An open port in a computer refers to a port that is configured to accept the connections, and a port that rejects connections is obviously a closed port.
While open ports are necessary for internet communication, they can be dangerous if the service listening on the port has bad security rules and is misconfigured. Such open ports are vulnerable to attacks.
In this post today, we will learn how to check which ports are being used in your machine, how to test if a Firewall is blocking a Port, and also learn how to check which process or service is using the open port.

Open Command Prompt, type the following, and hit Enter to view the Ports used along with the Process Identifiers (PIDs):
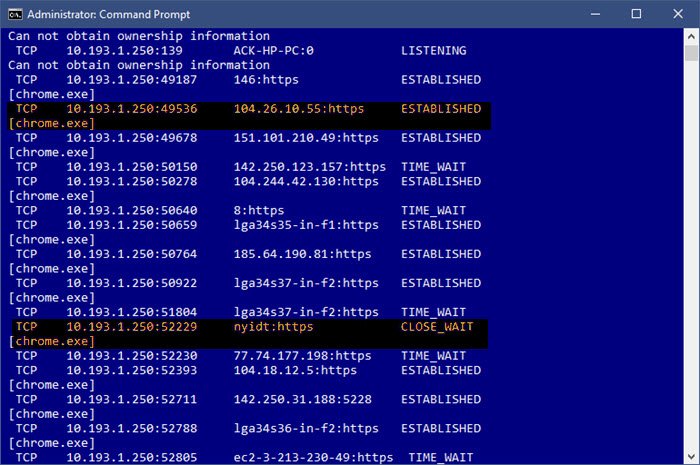
netstat -ano
This will display the ports on your PC. It will display the details in 5 columns-
- Protocols,
- Local Address,
- Foreign Address,
- State, and
- PID (Process Identifier).
The port numbers here are displayed under the Local Adress column, for example, if the Local Adress is 0.0.0.0:5040, 5040 here is the port number.
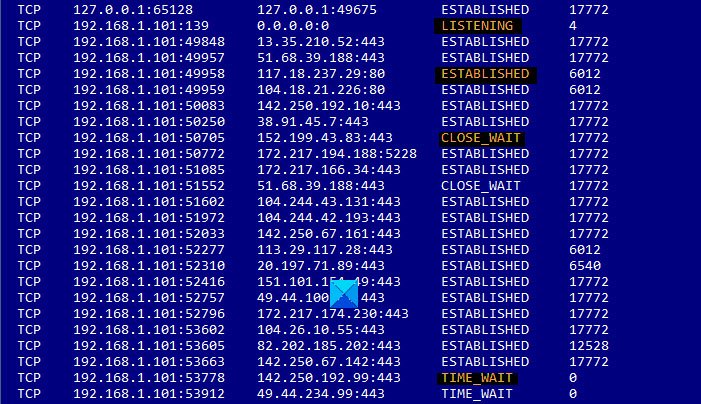
Under the State tab, you can check whether a port is open or not.
- LISTENING means that it just waits and it is ready to send an answer whenever a client program requests it. The connection becomes open when a client connects to that port and a conversation begins.
- ESTABLISHED means that the connection has been established.
- TIME_WAIT means it’s waiting for a reply or connection. this often happens when a port is activated and the connection has not yet. been established
- CLOSE_WAIT means that the other side of the connection has closed the connection.
This is how you check what all ports are open in your Windows 10.
You can also view the Ports used along with the Process Names by running this command:
netstat -ab
Read: How to use Port Query Tool (PortQry.exe).
Check which process or service is using the open port
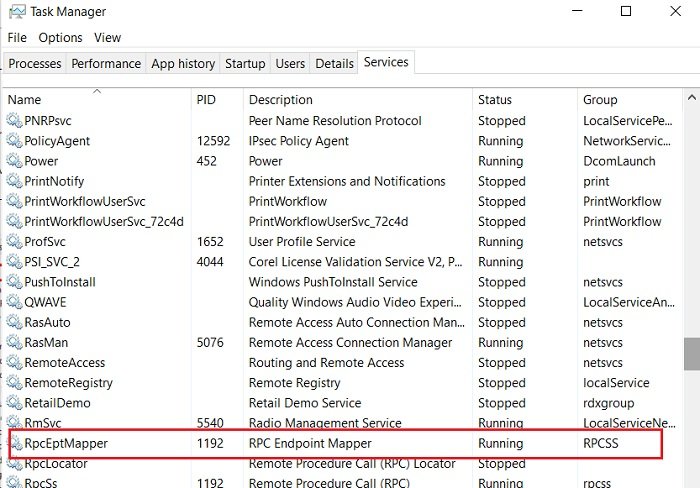
Now when we know what all ports are open in our system, we can also check which service is using which open port. To check that, go to the PID (Process ID) tab.
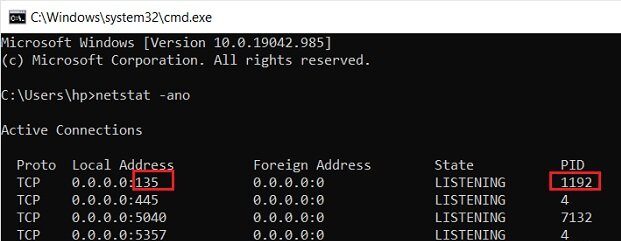
Let’s take the example of our first open port in the list, port 135, and its PID is 1192.
Now open the Task Manager by hitting Ctrl+Alt+Delete. Go to the Services tab and check for PID 1192.
Under the Description tab, you will see which app/program uses that port. End that particular task if you want to close that connection.
Alternatively, you can also find this using this command:
takslist|findstr "1192"
This will display the program using the selected port.

If you are looking for an easy way, you can also use some third-party software to check what all ports are open in your Windows 10. There is quite a few such freeware available on the web which tell what all websites your computer is connecting to and what all ports are open in your PC. One of such freeware is CurrPorts.
Read: How to Block or Open a Port in Windows Firewall.
How to test if Firewall is blocking a Port
CurrPorts is a simple and portable freeware to check open ports that comes in a zip file and takes no time to download on your PC. Since it is portable software, you do not need to install it. Simply download it, extract all the files and run it. Make sure you download the correct version as per your machine’s configuration.
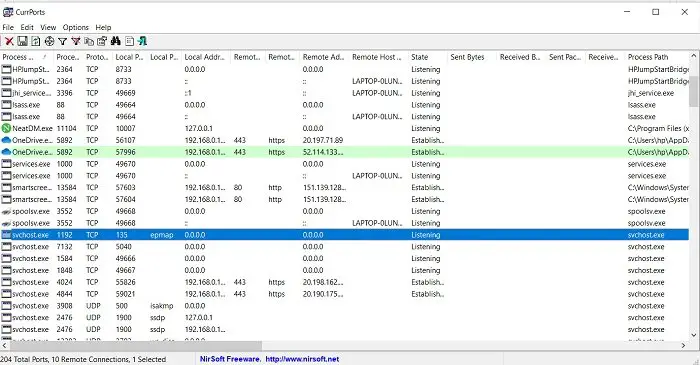
CurrPorts is a network monitoring software that displays the entire list of all open ports of your PC. Apart from the port number and its State, the freeware also shows detailed information about the processes using the open ports, the complete path of the process, file description, product name, file version, date and time it was created, and much more.
Once you download CurrPorts and run it, the main overview has it all. It displays the entire thing in one single window. You can check all the currently opened TCP and UDP ports and the program using that particular port in a single window. Check the screenshot below. You can select one or more processes at a time, check their ports and kill them if they seem to be unwanted. It also allows you to save the port information to an HTML/XML/Text file.

Furthermore, CurrPorts also lets you kill the process from the same window. Simply select the processes you want to kill, right-click and select ‘Kill processes of selected ports’ from the dropdown menu.
Another benefit of using CurrPorts is that it marks the suspicious TCP/UDP ports owned by the unidentified applications. So you can directly kill them and save your PC from a possible attack.
Certainly, using this freeware is an easier option as compared to the Command Prompt option mentioned above. You can download the software from the official website Nirsoft.net. Please note that there is a separate download link for x64 versions of Windows. This utility works fine with almost every version of Windows. It is a standalone executable utility so it doesn’t require any installation.
Read: Closed Port vs Stealth Port.