
Все способы:
- Определение серийного номера ноутбука
- Способ 1: Просмотр надписи на наклейке
- Способ 2: Поиск информации в BIOS
- Способ 3: Использование фирменных программ
- Способ 4: Использование консольных команд Windows
- Вопросы и ответы: 15
Серийный номер ноутбука иногда требуется для получения поддержки со стороны производителя или определения его технических характеристик. Каждое устройство имеет уникальный номер, состоящий из разного количества символов, что определяет производитель. Такой код указывает принадлежность ноутбука к определенной серии устройств с похожими характеристиками.
Определение серийного номера ноутбука
Обычно в комплекте с каждым ноутбуком идет инструкция к нему, где и указан серийный номер. Кроме этого он написан и на упаковке. Однако такие вещи быстро теряются или выбрасываются пользователями, поэтому далее мы рассмотрим несколько других простых способов определения уникального кода устройства.
Способ 1: Просмотр надписи на наклейке
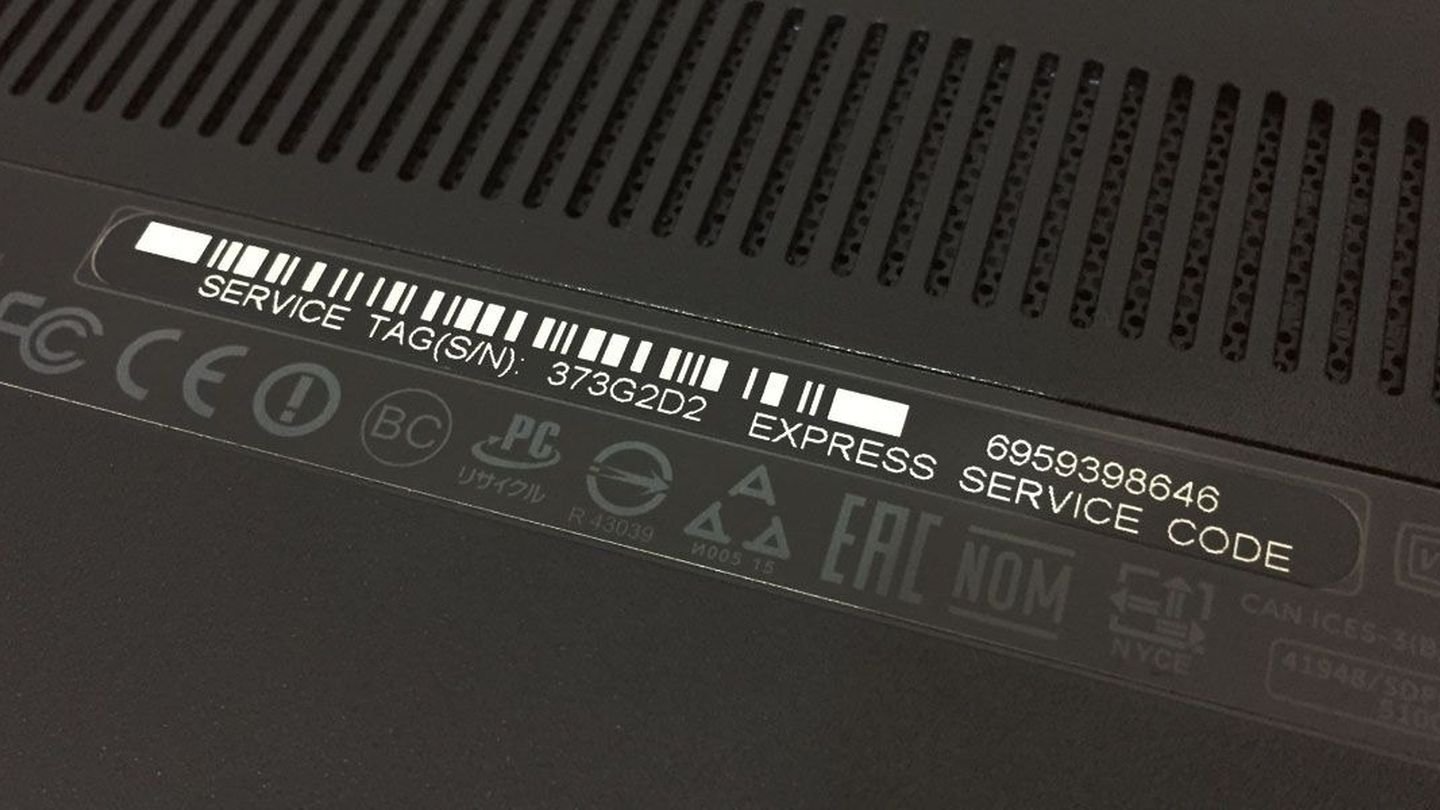
На каждом ноутбуке сзади или под батареей находится наклейка, где указана основная информация о производителе, модели, а также там находится и серийный номер. Вам достаточно только перевернуть устройство, чтобы задняя крыша оказалась вверху, и найти там соответствующую наклейку.
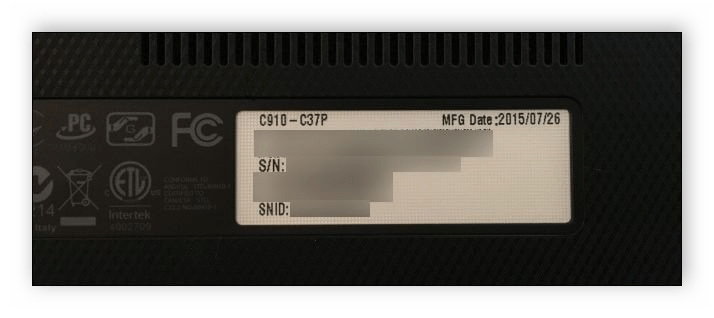
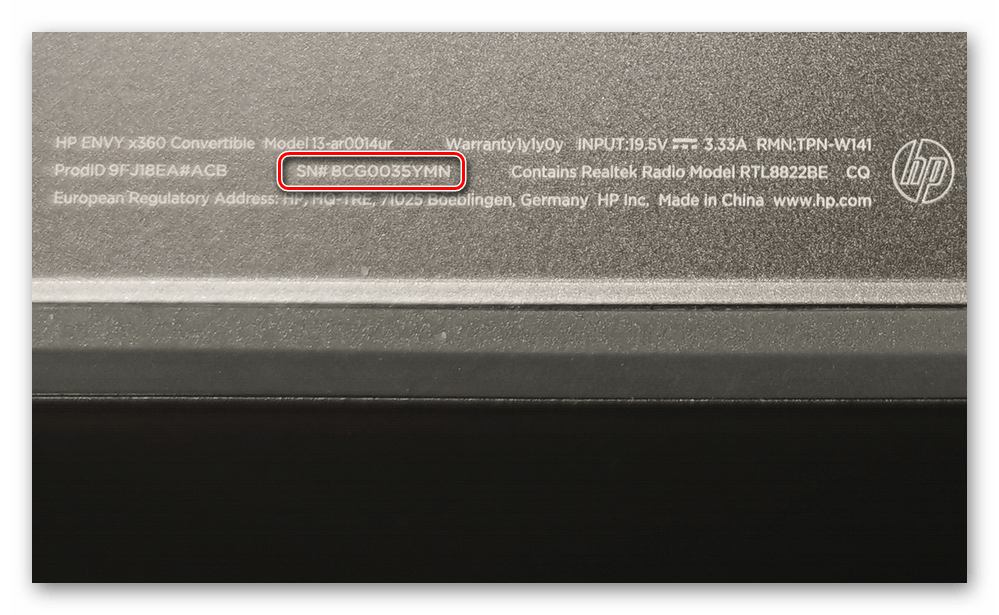
Когда наклейка нет, поищите нанесенную на корпус надпись. Например, на фото ниже вся необходимая информация находится в нижней части корпуса.
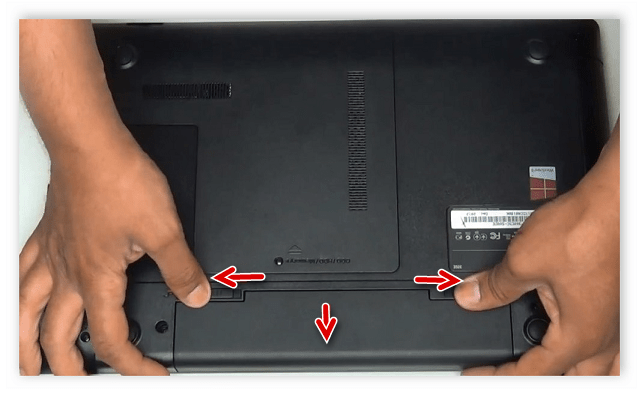
Если ноутбук старый, вместо такой надписи и наклейки искомые данные находятся под батареей. Вам потребуется выполнить следующие действия:
- Полностью выключите устройство и отсоедините его от сети.
- Переверните его задней крышкой вверх, разведите защелки и вытащите батарею.
- Теперь обратите внимание — на корпусе находятся различные надписи. Найдите там строку «Serial Number» или «Серийный номер». Те цифры, что идут после данной надписи, и есть уникальный код ноутбука.
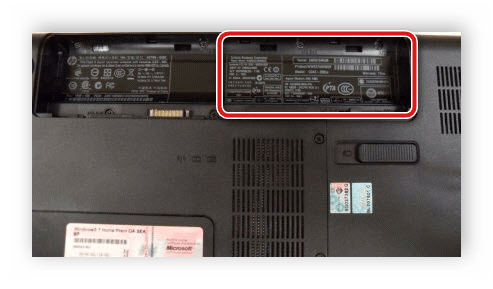
Запомните его или запишите где-то, чтобы каждый раз не снимать батарею, а далее останется только собрать устройство. Конечно, такой способ определения серийного номера самый простой, однако со временем наклейки стираются и некоторые цифры или вовсе все надписи не видно. Если такое произошло, то следует использовать другой метод.
Способ 2: Поиск информации в BIOS
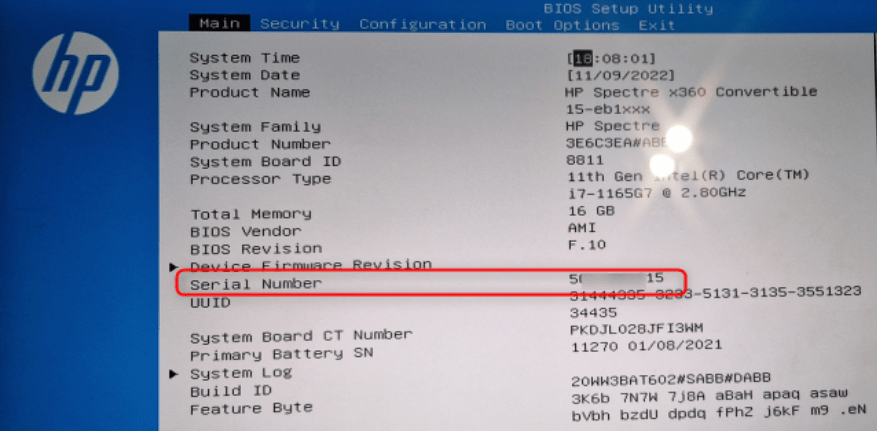
Как известно, в BIOS находится основная информация о компьютере, а запустить его можно даже без установленной операционной системы. Метод определения уникального кода ноутбука через BIOS будет полезен тем пользователям, у которых возникли определенные неполадки, не позволяющие полностью запустить ОС. Давайте подробнее рассмотрим его:
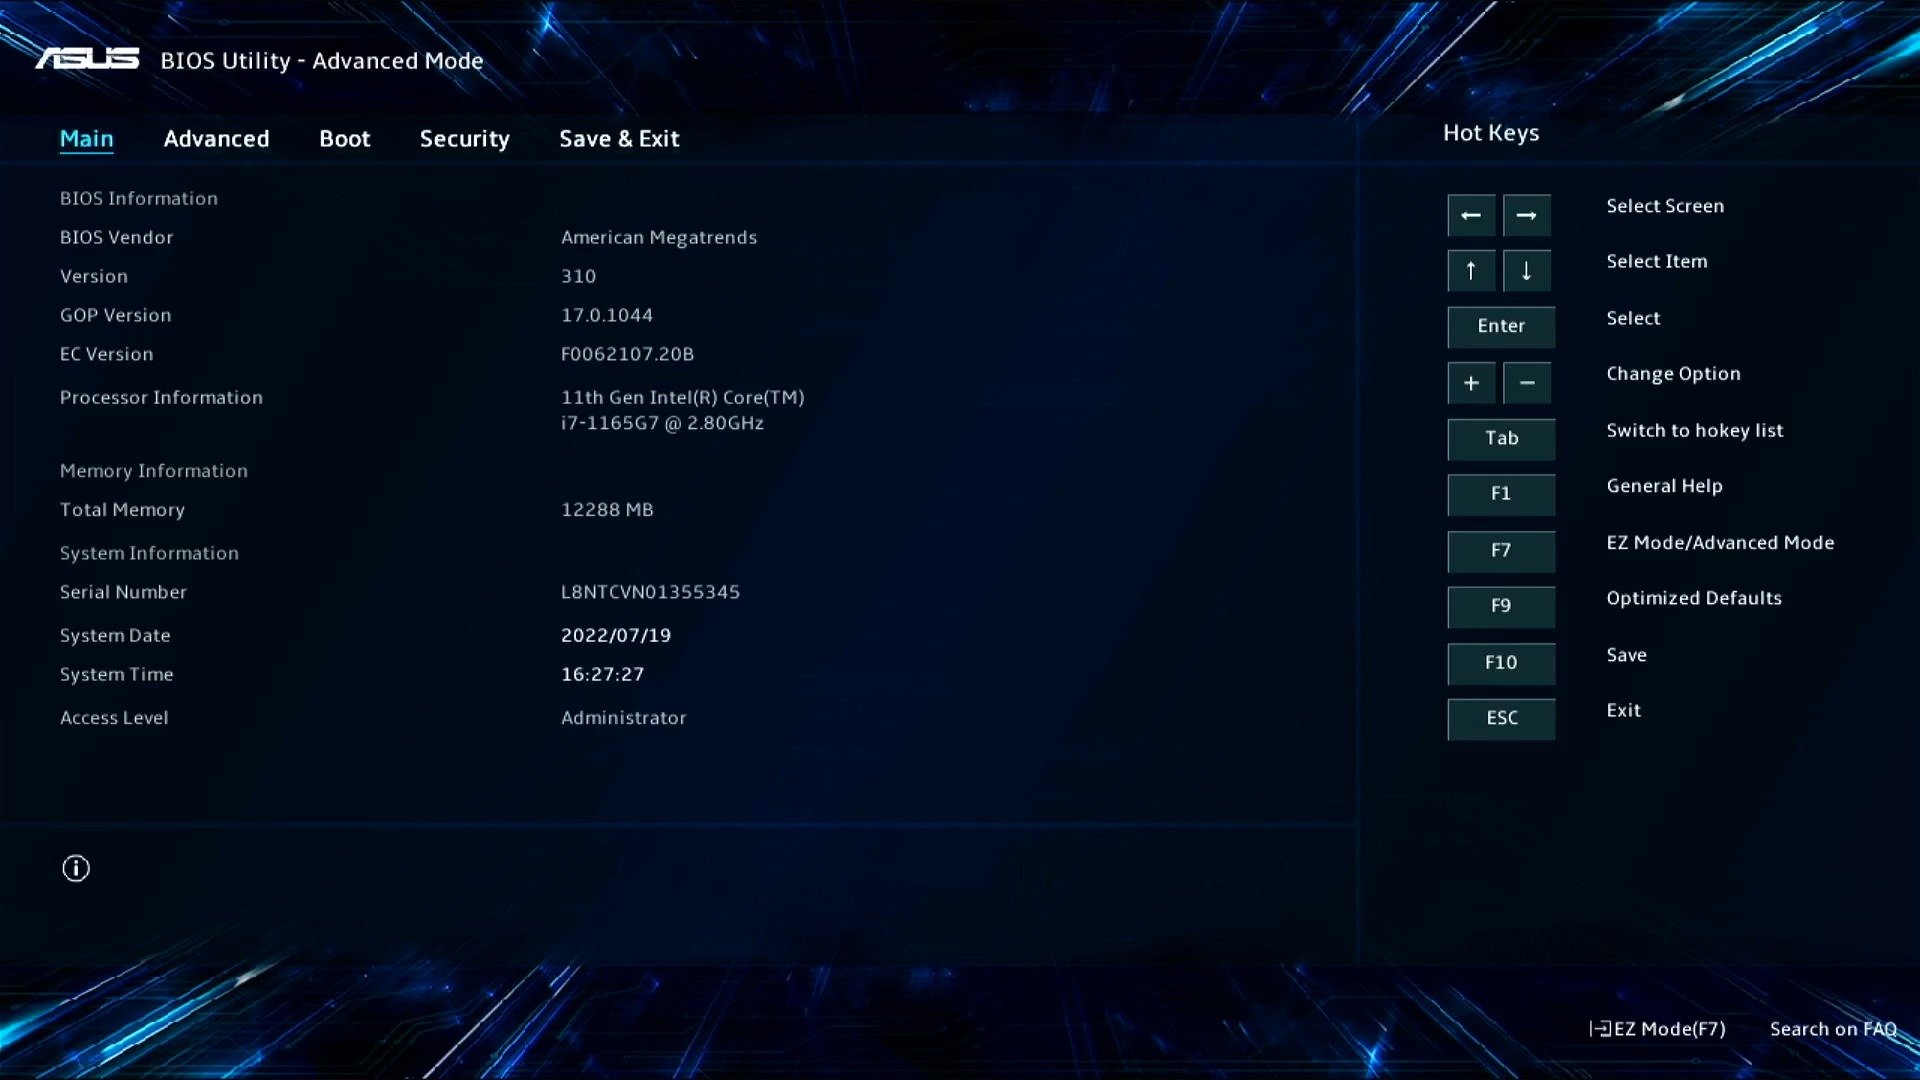
- Включите устройство и перейдите в БИОС нажатием на соответствующую клавишу на клавиатуре.
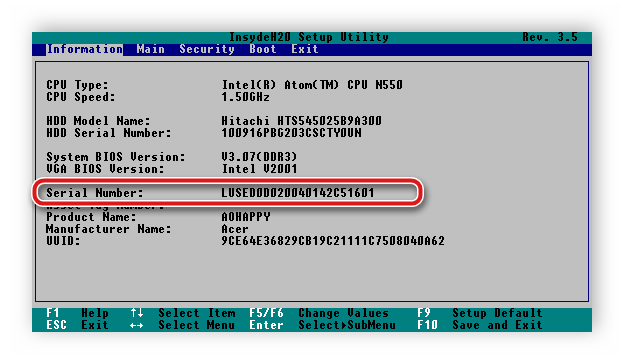
- Вам не понадобится даже переключаться по вкладкам, обычно серийный номер указан в разделе «Main» или «Information».
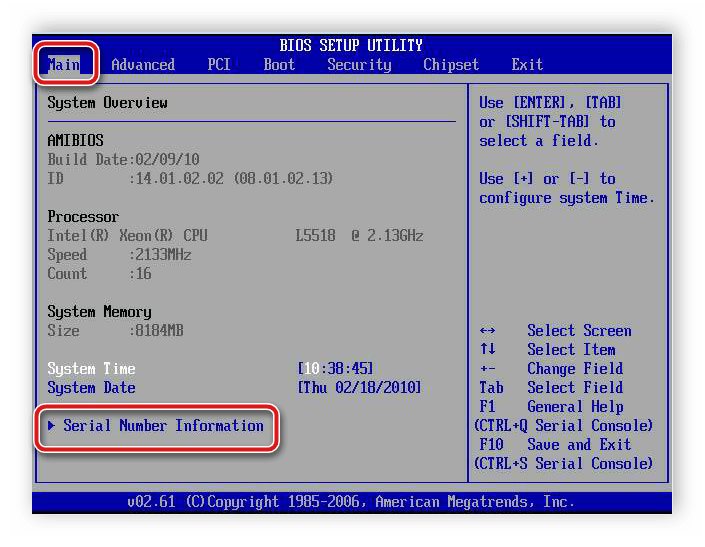
- Существует несколько версий BIOS от разных производителей, все они имеют одинаковое предназначение, однако их интерфейсы отличаются. Поэтому в некоторых версиях БИОСа вам потребуется перейти во вкладку «Main» и выбрать строку «Serial Number Information».
Подробнее: Как попасть в BIOS на компьютере
Читайте также: Почему не работает BIOS
Способ 3: Использование фирменных программ
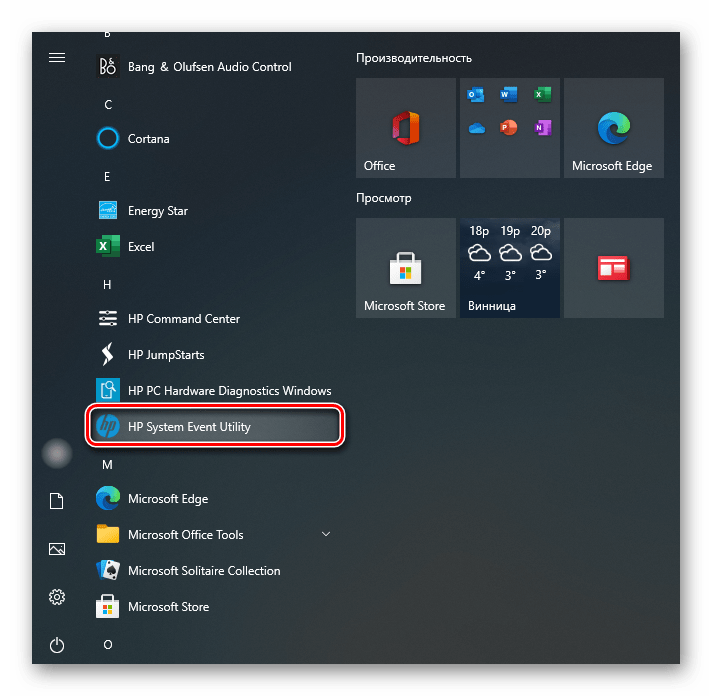
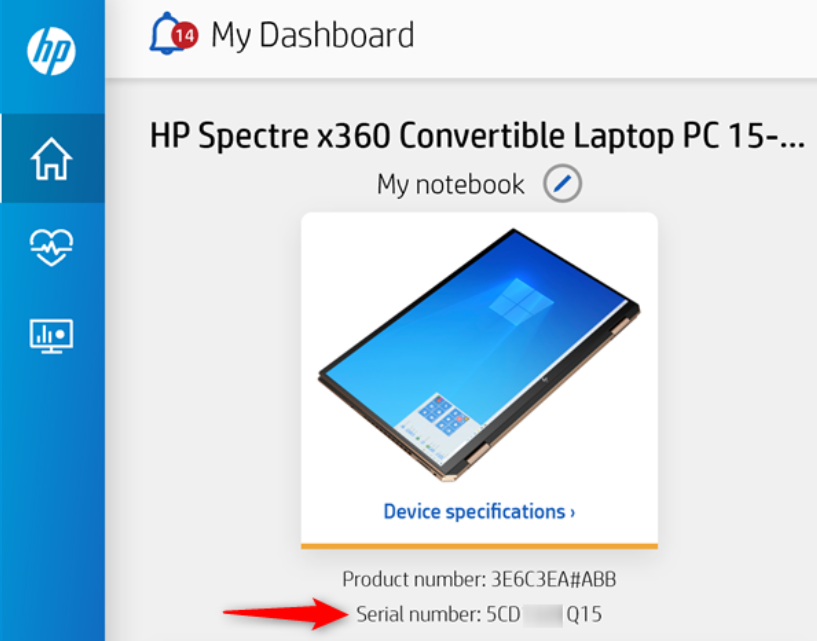
Практически у всех ноутбуков есть фирменное программное обеспечение, чаще всего предустановленное. Таких программ, как правило, несколько, и все они отвечают за выполнение разных действий. Вам понадобится найти то приложение, которое отображает именно информацию о ноутбуке. Например, у лэптопов HP эта программа называется HP System Event Utility (та же информация доступна и через HP Support Assistant), у других брендов название должно быть примерно похожим. Найти ее можно через «Пуск» — весь предустановленный софт всегда отображается там, если вы его, конечно, не удаляли. В такой ситуации проще всего воспользоваться любым другим способом нашей статьи.
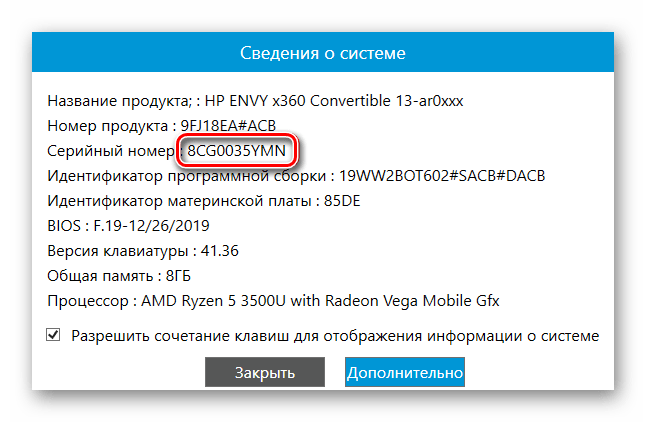
Как видно на скриншоте ниже, одна из строк демонстрирует серийный номер устройства.
Способ 4: Использование консольных команд Windows
Во всех версиях операционной системы Windows старше 7 присутствует встроенная WMIC-утилита, позволяющая быстро определить серийный номер устройства через командную строку. Данный способ очень прост, а пользователю необходимо будет выполнить всего два действия:
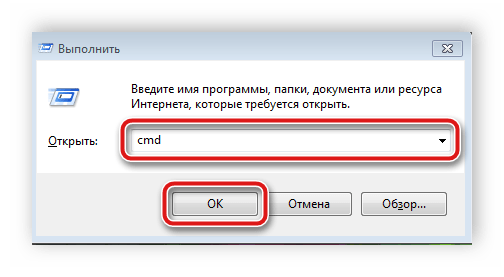
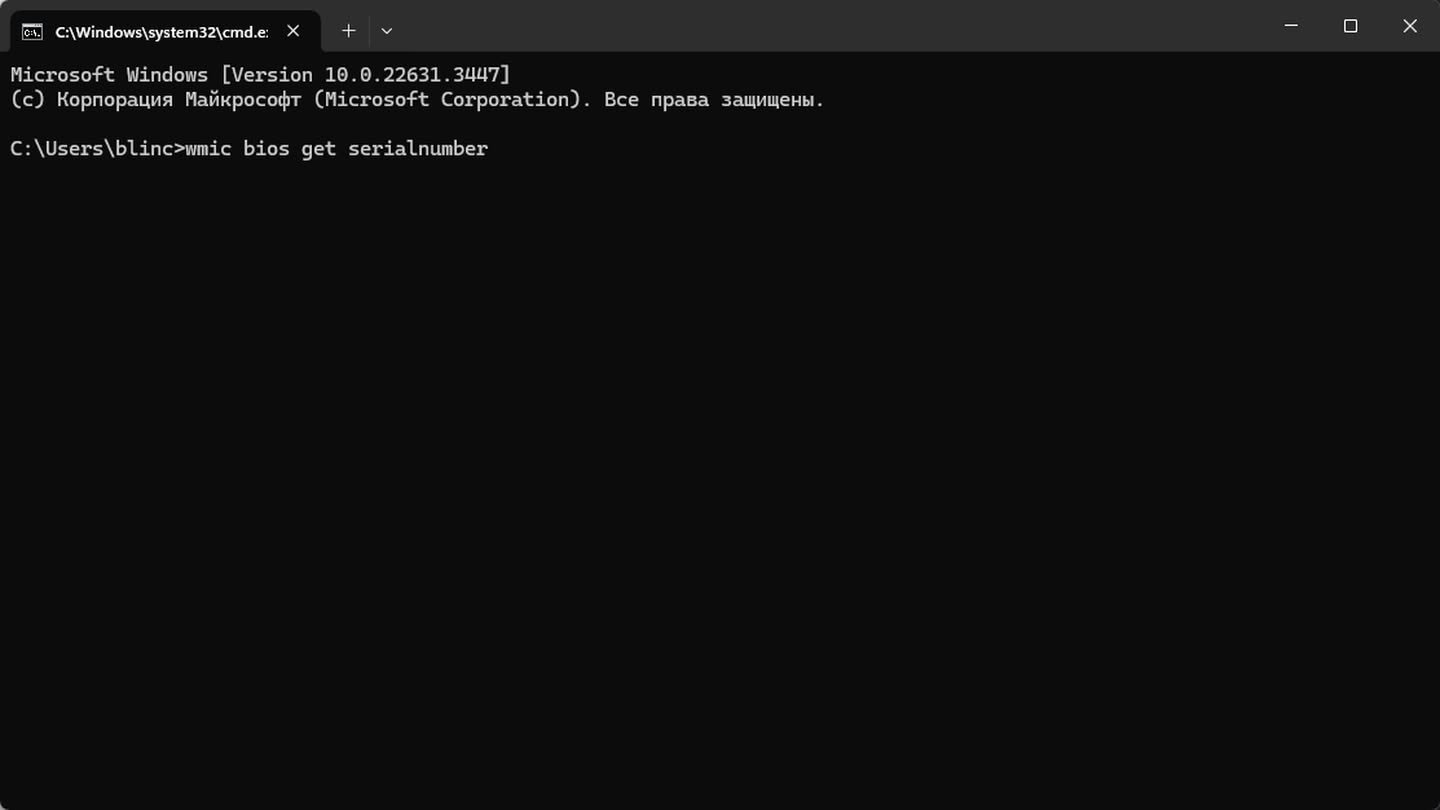
- Зажмите сочетание клавиш Win + R, чтобы запустить «Выполнить». В строку введите
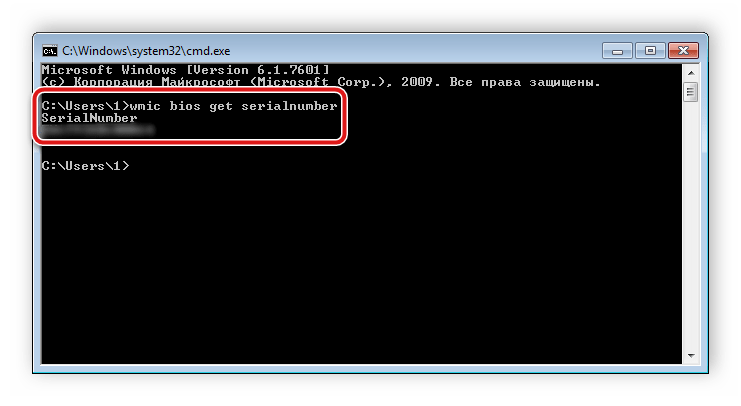
cmdи нажмите «ОК». - Откроется командная строка, куда потребуется вписать следующее:
wmic bios get serialnumber - Для выполнения команды нажмите Enter, и через несколько секунд в окне отобразится уникальный номер вашего устройства. Прямо отсюда его можно скопировать в буфер обмена.
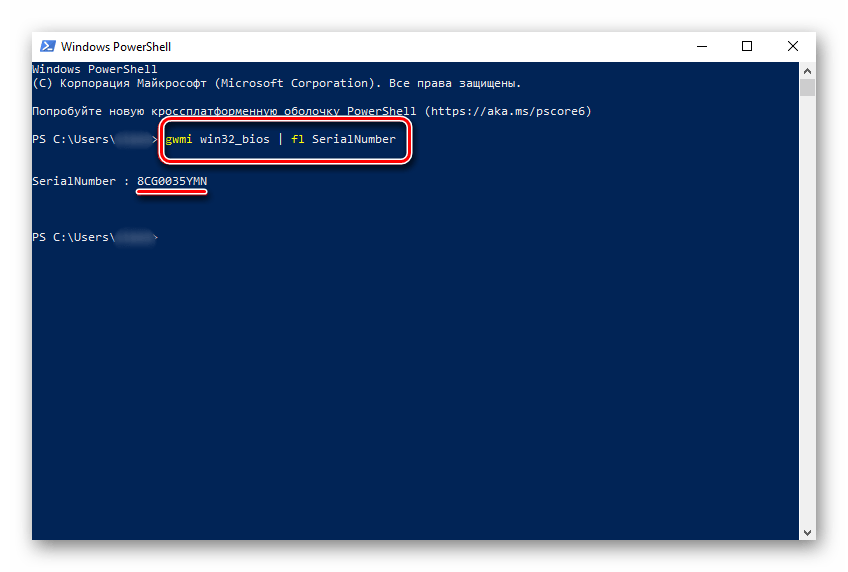
Если же вам более удобно пользоваться утилитой PowerShell, откройте ее, а затем введите одну из представленных далее команд.
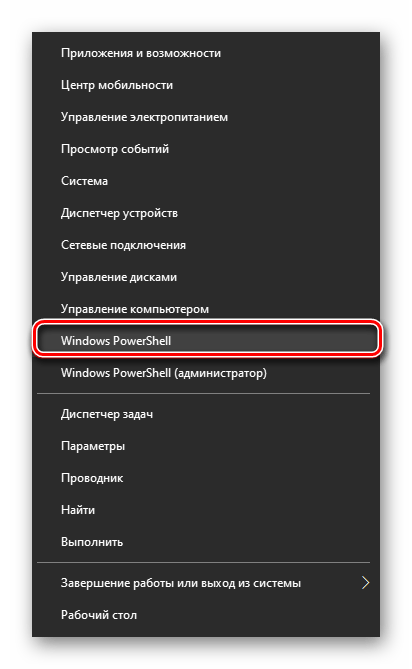
Поскольку PowerShell по умолчанию встроена в альтернативный «Пуск», открывающийся кликом правой кнопкой мыши, у всех последних версий Windows 10 (в старых сборках используется «Командная строка»), некоторым юзерам удобнее запускать именно эту оболочку консоли.
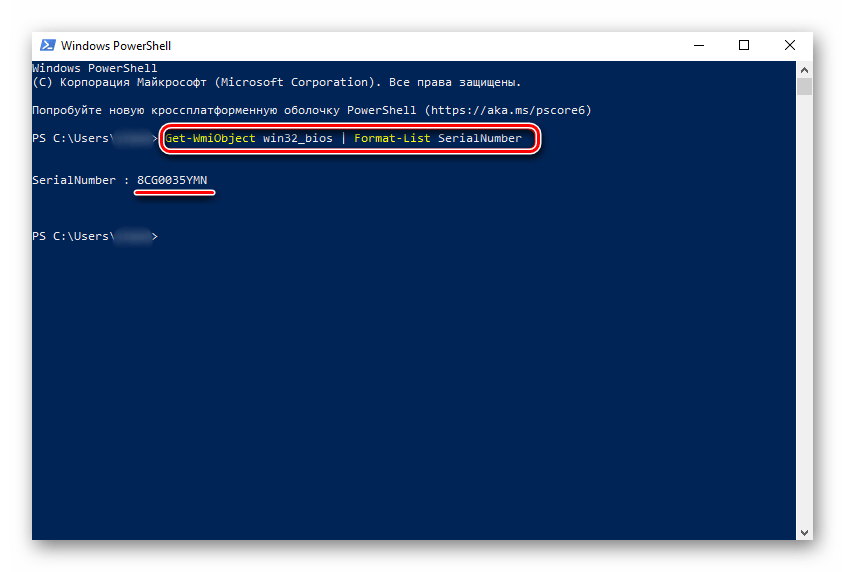
Она поддерживает две команды, которые выводят серийный номер ноутбука. Первая — Get-WmiObject win32_bios | Format-List SerialNumber. Скопируйте и вставьте ее, а затем нажмите Enter.
Если у вас по каким-то причинам предыдущая команда не работает, можете воспользоваться ее аналогом — gwmi win32_bios | fl SerialNumber. Результат, как видите, тот же.
Как видите, серийный номер ноутбука определяется всего в несколько действий простыми способами и не требует от пользователя дополнительных знаний или навыков. Все, что от вас нужно, – выбрать подходящий метод и следовать инструкции.
Наша группа в TelegramПолезные советы и помощь
Applies ToWindows Vista Enterprise Windows Vista Business Windows Vista Ultimate Windows Server 2008 Datacenter Windows Server 2008 Datacenter without Hyper-V Windows Server 2008 Enterprise Windows Server 2008 Enterprise without Hyper-V Windows Server 2008 for Itanium-Based Systems Windows Server 2008 Standard Windows Server 2008 Standard without Hyper-V Windows Server 2008 Web Edition
Author:
Yuval Sinay MVP
COMMUNITY SOLUTIONS CONTENT DISCLAIMER
MICROSOFT CORPORATION AND/OR ITS RESPECTIVE SUPPLIERS MAKE NO REPRESENTATIONS ABOUT THE SUITABILITY, RELIABILITY, OR ACCURACY OF THE INFORMATION AND RELATED GRAPHICS CONTAINED HEREIN. ALL SUCH INFORMATION AND RELATED GRAPHICS ARE PROVIDED «AS IS» WITHOUT WARRANTY OF ANY KIND. MICROSOFT AND/OR ITS RESPECTIVE SUPPLIERS HEREBY DISCLAIM ALL WARRANTIES AND CONDITIONS WITH REGARD TO THIS INFORMATION AND RELATED GRAPHICS, INCLUDING ALL IMPLIED WARRANTIES AND CONDITIONS OF MERCHANTABILITY, FITNESS FOR A PARTICULAR PURPOSE, WORKMANLIKE EFFORT, TITLE AND NON-INFRINGEMENT. YOU SPECIFICALLY AGREE THAT IN NO EVENT SHALL MICROSOFT AND/OR ITS SUPPLIERS BE LIABLE FOR ANY DIRECT, INDIRECT, PUNITIVE, INCIDENTAL, SPECIAL, CONSEQUENTIAL DAMAGES OR ANY DAMAGES WHATSOEVER INCLUDING, WITHOUT LIMITATION, DAMAGES FOR LOSS OF USE, DATA OR PROFITS, ARISING OUT OF OR IN ANY WAY CONNECTED WITH THE USE OF OR INABILITY TO USE THE INFORMATION AND RELATED GRAPHICS CONTAINED HEREIN, WHETHER BASED ON CONTRACT, TORT, NEGLIGENCE, STRICT LIABILITY OR OTHERWISE, EVEN IF MICROSOFT OR ANY OF ITS SUPPLIERS HAS BEEN ADVISED OF THE POSSIBILITY OF DAMAGES.
SUMMARY
The following article will help you to find the computer serial number
Tips
Please use one the method bellow to retrieve the computer serial number:
1. Using the buid in «wmic» command:
«wmic bios get serialnumber«
Tip: You can use the command «wmic csproduct get name» to retrieve the local computer model.
2. Using a vbs script:
On Error Resume Next Dim strComputerstrComputer = InputBox(«Enter the name of the computer:») Set objWMIService = GetObject(«winmgmts:» & «{impersonationLevel=impersonate}!\\» & strComputer & «\root\cimv2») Set colSMBIOS = objWMIService.ExecQuery («Select * from Win32_SystemEnclosure») For Each objSMBIOS in colSMBIOSMsgBox strComputer & «: » & objSMBIOS.SerialNumberNext
Need more help?
Want more options?
Explore subscription benefits, browse training courses, learn how to secure your device, and more.
77
77 people found this article helpful
Use these simple methods to get the serial number in seconds
The Download
- Enter this into Command Prompt: wmic bios get serialnumber. The serial number shows up instantly.
- Another way to find the serial number is to look on the underside of the laptop.
- Other methods include checking the purchase receipt or warranty details.
This article explains how to find the serial number of a Windows 10 or Windows 11 laptop and why you might need to.
How to Get the Laptop Serial Number in Command Prompt
One of the simplest ways to find your serial number is by entering a command into the Command Prompt. This will display the serial number in a fraction of a second, and it’s easy to copy it if you need to.
-
Open Command Prompt. One easy way to do this is to search for cmd from the taskbar.
-
Type this into Command Prompt, and then press Enter:
wmic bios get serialnumber -
Your serial number should be displayed. Highlight it and then right-click if you need to copy it.
Physically Find the Serial Number
If your laptop won’t boot up or you don’t feel comfortable using the command line, turn your laptop over and look for S/N or Serial Number followed by a string of letters and numbers on the label. You might also find it on the box your laptop came in.
Other Places to Look
If you registered your laptop with the manufacturer, your serial number should be included in the registration documentation, warranty service receipt, or email confirmation. You might also find it on the purchase receipt.
What Is a Laptop Serial Number?
The serial number is a unique string of numbers and letters assigned to your laptop. No two laptops have the same serial number.
Why You Might Need Your Laptop Serial Number
As mentioned previously, a laptop’s serial number is useful for warranty claims and insurance issues. It also helps technical support identify when your laptop was manufactured and explain what specific hardware it’s running.
So, it’s useful in many situations—for example, when:
- You must prove your laptop’s authenticity to a buyer.
- The manufacturer’s technical or customer support person must identify the specific model, specifications, and/or warranty details.
- The laptop has been stolen, and an insurance claim has been submitted.
- A technician must specify compatible parts for upgrades or repairs.
FAQ
-
First, check the underside or back edges of the laptop. Next, if you have a laptop with a removable battery, look inside the battery compartment. Finally, for a detachable laptop, remove the tablet from the dock to reveal the serial number.
-
Although you can use Windows commands to find the serial number, you can also find it on the Service Tag of a Dell laptop. The Service Tag is located on the bottom panel.
-
The serial number can be found as a printed sticker or laser etching on the bottom case of a Toshiba laptop.
-
On a Lenovo laptop, the serial number is on the bottom of the system. Alternatively, you can go to the Lenovo Support website, select Detect Product, and install Lenovo Service Bridge. After installation, Lenovo Service Bridge will open a product page with your laptop’s information, including the serial number.
Thanks for letting us know!
Get the Latest Tech News Delivered Every Day
Subscribe
Существует несколько способов узнать серийный номер ноутбука. Рассмотрим каждый из них подробнее.
Способ №1: Командная строка
Вы можете использовать команду WMIC в командной строке Windows для получения серийного номера вашего ноутбука. Вот как это сделать:
- Нажмите сочетание клавиш Win + R;
- В появившемся окне введите cmd и нажмите Enter;
- В командной строке введите следующую команду и нажмите Enter: «wmic bios get serialnumber» без кавычек.
Эта команда покажет серийный номер BIOS, который обычно является серийным номером вашего ноутбука.
Примечание: Не забудьте запустить командную строку с правами администратора, если команда не работает. Это можно сделать, щелкнув правой кнопкой мыши на значке командной строки и выбрав «Запустить от имени администратора».
Также обратите внимание, что функция WMIC присутствует только в Windows 7, 8, 10 и 11.
Способ №2: PowerShell

Вы можете использовать программу PowerShell (в локализованной версии Windows называется «Терминал»), чтобы узнать серийный номер ноутбука. Для этого:
- Нажмите сочетание клавиш Win + X, затем выберите Терминал или Терминал (Администратор);
- В PowerShell введите следующую команду и нажмите Enter: «Get-WmiObject -Class Win32_BIOS | Select-Object SerialNumber» без кавычек.
Как и в предыдущем случае, вам покажут серийный номер BIOS, который является серийным номером ноутбука.
Способ №3: BIOS/UEFI
Для просмотра серийного номера ноутбука в BIOS/UEFI, следуйте этим шагам:
- Перезагрузите ваш ноутбук;
- Когда появится начальный экран (обычно с логотипом производителя), нажмите клавишу для входа в BIOS/UEFI. Чаще всего это клавиша F2, F10, F12 или Delete. Конкретная клавиша может отличаться в зависимости от производителя вашего ноутбука;
- После входа в BIOS/UEFI, ищите информацию о системе. Серийный номер обычно находится в разделе System Information или Main;
- Запишите серийный номер.
Будьте осторожны: Не меняйте другие настройки в BIOS/UEFI, если вы не уверены в своих действиях. Неправильные настройки могут привести к проблемам с загрузкой вашего ноутбука.
Способ №4: Проверить наклейки на ноутбуке
Серийный номер ноутбука обычно указывается на наклейке, которая находится на дне ноутбука или в отсеке для батареи. Вот как вы можете его найти:
- Выключите ноутбук и отключите его от источника питания;
- Переверните ноутбук и посмотрите на его дно. Найдите наклейку с информацией о продукте. На ней обычно указаны модель ноутбука, его серийный номер (S/N или SN) и другие данные;
- Если вы не видите наклейку на дне ноутбука, проверьте отсек для батареи. Некоторые производители помещают наклейку с информацией о продукте внутрь отсека для батареи;
- Запишите серийный номер.
Способ №5: О системе

В Windows 11 вы можете использовать раздел «О системе», чтобы посмотреть серийный номер ноутбука или ПК (если это заводская сборка).
- Нажмите «Пуск», выберите «Параметры»;
- В появившемся окне слева выберите «Система»;
- Найдите раздел «Характеристики Windows» и посмотрите серийный номер ноутбука.
Используйте способы выше, чтобы узнать серийный номер вашего ноутбука.
Заглавное фото: trustedreviews.com
Last Updated :
23 Apr, 2024
Knowing how to find computer serial number can be useful to you in a variety of ways. Most commonly, the serial number will be required if you want to computer serial number check and report an issue with your device to the PC manufacturer or just want to keep track of WMIC BIOS to get the serial numbers of your inventory in case you are in charge of a large number of devices.

In this article, we will discuss some methods that will help you find your Windows PC’s serial number. Moving ahead, let’s see the best method to find the serial number of your PC in simple steps:
Methods to Find Computer Serial Number
- Method 1: Find PC Serial Number Using the cmd or Powershell
- Method 2: Find PC Serial Number using BIOS
- Method 3: Find the PC Serial Number using Manufacturer Support App
- Significance of PC Serial Number
- How Find Your Windows PC Serial Number — FAQs
What is a PC Serial Number?
- A PC serial number is a unique identification code assigned to a personal computer (PC) by its manufacturer.
- It helps identify and track individual computers for warranty, support, and inventory purposes.
- You can find the serial number on a label or sticker on the PC, or in its system information settings.
But sometimes the serial number sticker is damaged or missing. in that case, you can try the following methods to find your windows PC’s Serial Number.
Different Methods to Find Your Computer’s Serial Number
Computer’s serial number can be found using following Methods, use the methods as instructed to get PC serial number.
Method 1: Find PC Serial Number Using the cmd or Powershell
This method involves using the Command Prompt or PowerShell on your Windows PC to locate your computer’s serial number.
Step 1: Go to the search bar and type PowerShell. The Windows PowerShell app will pop up. Click on it to open.

Step 2: A PowerShell window will pop up. Type the following command in it:
wmic bios get serialnumber
Step 3: After typing the command, Hit Enter.
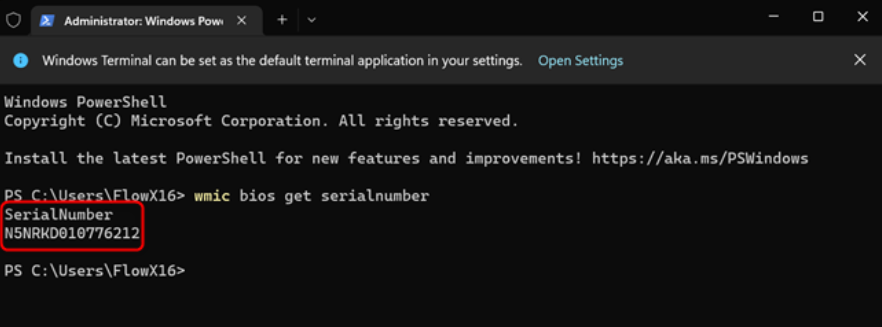
As you can see above, the serial number of your device will be displayed on the screen. If the above doesn’t work well for you, you can go ahead with second method i.e. using BIOS
Method 2: Find PC Serial Number using BIOS
In this method, you need to enter the BIOS Mode and check the serial number. Follow the steps below:
Step 1: Hold down Shift and hit Restart.

Step 2: After restarting your computer, you will see the following screen with some boot options. So, Navigate to Troubleshoot > Advanced Options. You will see an option named UEFI Firmware Settings. Click on it to proceed.
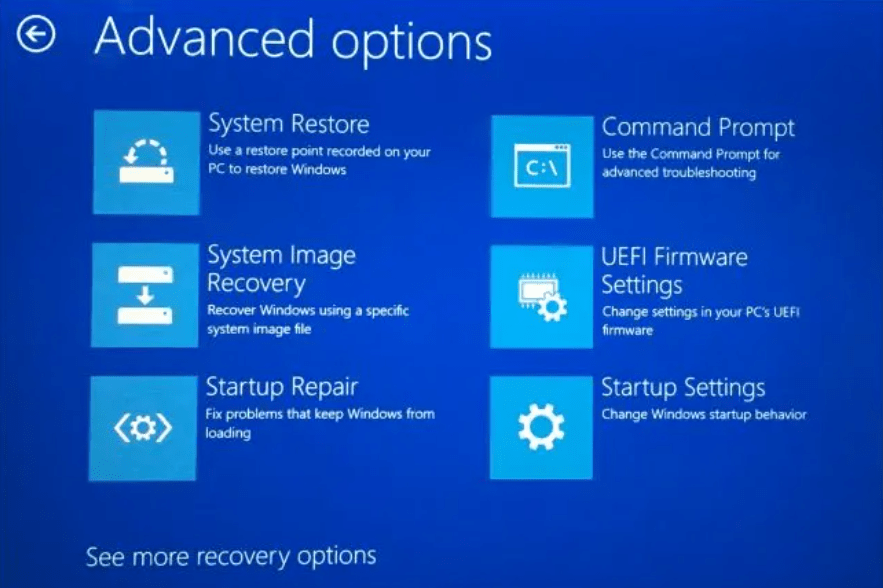
Step 3: The below screen will appear. In the window, find the Serial Number property. The value of that property is the serial number of your device.
Method 3: Find the PC Serial Number using Manufacturer Support App
Prebuilt PCs usually offer a manufacturer-installed support app. For example, every HP device comes with the HP support assistant app, which provides information about the device you are using, drivers, BIOS updates, and many other things. If you want to find your serial number follow the following steps.
Step 1: Search for Support Assistant app in your PC, open it, and navigate to the Home tab.
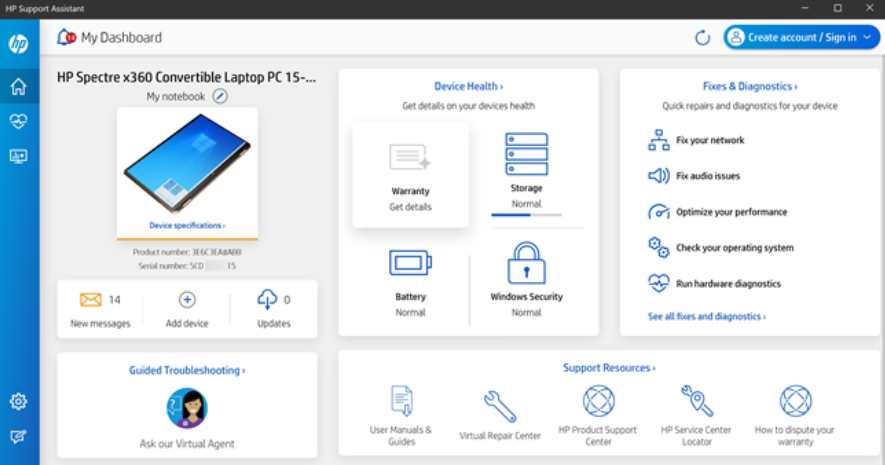
Step 2: At the top-left side of your screen, you will notice the serial number of your device.
Significance of PC Serial Number
- Warranty and Support: A PC serial number helps manufacturers identify your computer for warranty claims and technical support.
- Product Tracking: It allows companies to monitor and manage their products’ inventory and distribution.
- Anti-Theft: Serial numbers can aid in tracking stolen PCs, making recovery more likely.
- Software Activation: Some software may require a unique serial number for activation.
- Hardware Identification: It assists in pinpointing specific hardware configurations for troubleshooting or upgrades.
Conclusion
In conclusion, knowing your computer’s serial number is crucial for warranty claims, technical support, and theft identification. In this article, we’ve explored simple methods to locate it, whether you’re on a Windows PC or a Mac. You can find it using the cmd or Powershell, BIOS, and Manufacturer Support App. By following these steps, you can quickly access this vital information and ensure your device is properly registered and protected. So, next time you need your computer’s serial number, you’ll know just where to find it, making troubleshooting and maintenance a breeze.
Also Read
- Interesting Facts about WINDOWS
- Tricks in Windows 10
- How To Troubleshoot and Fix Windows 10 Blue Screen Errors?