
Updated on Apr 28, 2025
| Workable Solutions | Step-by-step Troubleshooting |
|---|---|
| Disk Partition CMD | Step 1: You can use the two methods mentioned above to open the command prompt or Run window…Full steps |
| EaseUS Partition Master |
1. Disk migration and cloning…Full steps 2. Partition Recovery…Full steps |
«Unable to select a drive, as it is showing 0 MB while installing Windows 10, I tried to check-in cmd, but I don’t know its instructions. Can I get the cmd guide or other software?»
Are you confused about how to use disk partition cmd? Don’t worry. We know what you want to know. In the following, this page lists many practical tips about cmd. And we recommend a third party software — EaseUS Partition Master Professional that can replace the cmd function.
Overview of disk partition cmd
Cmd, the abbreviation for command, is a Microsoft Windows command that opens the Windows command line window.
Notes: Windows 95 & 98 users can only enter the command line by entering command; other Windows users can enter command or cmd to use.
How to open Windows cmd
Method 1: You can input cmd in the Start Menu search bar to open the Windows Command Prompt.
Method 2: You can press Win+R to open the Run box, type cmd, and press Enter.
What is Diskpart
After open cmd, you need to type ‘diskpart’ for disk partitioning. Diskpart is a command-line utility in Windows 10, which enables you to operate disk partition by using Diskpart command prompt, including create, merge, extend, shrink, format, delete, wipe disk partition, and other features.
Next, we will provide more information about how to use disk partition cmd in Windows 11/10. If you like this page, don’t hesitate to click the buttons below to share it with more people!
Steps to create a partition in Windows 11/10 using command prompt.
Warning: Do not use the Diskpart until a full backup.
Step 1: You can use the two methods mentioned above to open the command prompt or Run window.
Step 2: Enter Diskpart
Steps about essential partition functions are as follows:
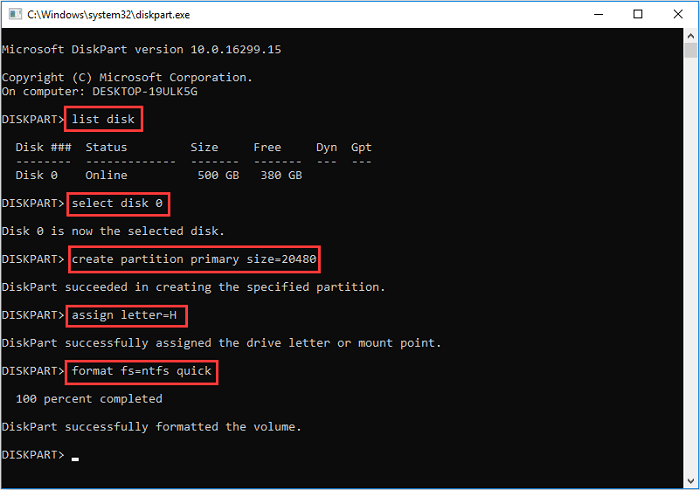
- Create a partition using Diskpart
1. At the Diskpart prompt, type: List Disk
2. Input: Select Disk * (* represents the disk number)
3. Type: Create partition primary size=*(* means the partition size.)
4. Input: Assign letter=* (* represents Choose a drive letter not already being used.)
5. Type: Exit (Exit is the Esc on the top left of the keyboard.)
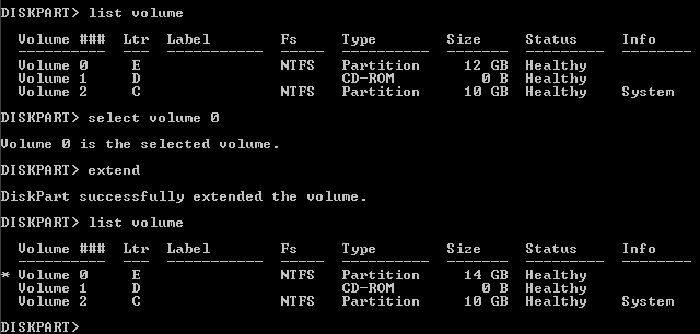
- Extending a partition using Diskpart
Note: If you try it or any other method, make sure you have a full backup.
1. Verify that contiguous free space is available on the same drive and that free space is next to the partition you intend on extending, with no partitions in between.
2. Type: Select Disk * (Selects the disk.)
3. Type: Select Volume *(Selects the volume.)
4. Type: Extend Size=*
5. Type: Exit
- Deleting a partition using Diskpart
Note: You cannot delete an active system or boot partition or a partition with a dynamic page file.
1. Input: Diskpart.exe
2. Select disk *
3. Select Partition *
4. Delete partition
5. Exit
- Wiping a disk using Diskpart
This operation deletes all data on the disk.
1. Type: Select disk *
2. Type: Clean all(The CLEAN ALL command removes all partition and volume information from the hard drive being focused on.)
3. Exit
The diskpart also has other features, such as assign drive letters, shrink partition, mark partition as active, convert MBR/GPT. If you want to learn these parts, FAQ, at the end of the article, will bring you the right answer.
After reading the above guide, I believe you have a specific understanding of how to use cmd via Diskpart in Windows 11/10. Cmd is a powerful tool, but it is not suitable for a beginner. Misoperations can easily cause partition problems. There is a better software — EaseUS Partition Master.
How to manage partitions with EaseUS Partition Master
EaseUS Partition Master is an all-in-one partition manager, which helps you create, resize, clone, move, merge, and format partitions. The following video tutorial shows you how to create, deleted, shrink, and resize a partition with this powerful disk management program.
Favored by millions of users. It contains all features Diskpart has and many other superior functions like the two demonstrated below.
1. Disk migration and cloning
Nowadays, for better performance of computer disk, you may want to migrate the operating system and clone disk to the target one. It saves the user’s time to download programs. It only takes a few steps to get remarkable results. For example, there is a guide about transfer Windows 10 to another drive.
Steps to migrate OS to HDD/SSD:
- Run EaseUS Partition Master, and select «Clone» from the left menu.
- Check «Migrate OS» and click «Next».
- Select the SSD or HDD as the destination disk and click «Next».
- Check Warning: the data and partitions on the target disk will be deleted. Make sure that you’ve backed up important data in advance. If not, do it now.
- Then click «Yes».
- Preview the layout of your target disk. Then click «Start» to start migrating your OS to a new disk.
- After this, click «Reboot Now» or «Done» to determine if you want to reboot the computer from the new disk immediately.
«Reboot Now» means to keep the changes instantly, while «Done» means you need to restart the computer later manually.

Note: The operation of migrating OS to SSD or HDD will delete and remove existing partitions and data on your target disk when there is not enough unallocated space on the target disk. If you saved important data there, back up them to an external hard drive in advance.
2. Partition Recovery
Partition Recovery is a practical feature targeting your lost partitions.
It is worth trying to scan your selected disk. The spending time of a deep scan may in line with your disk volume.
You can check the related article about «recover unallocated space in Windows 10» to get further learning.
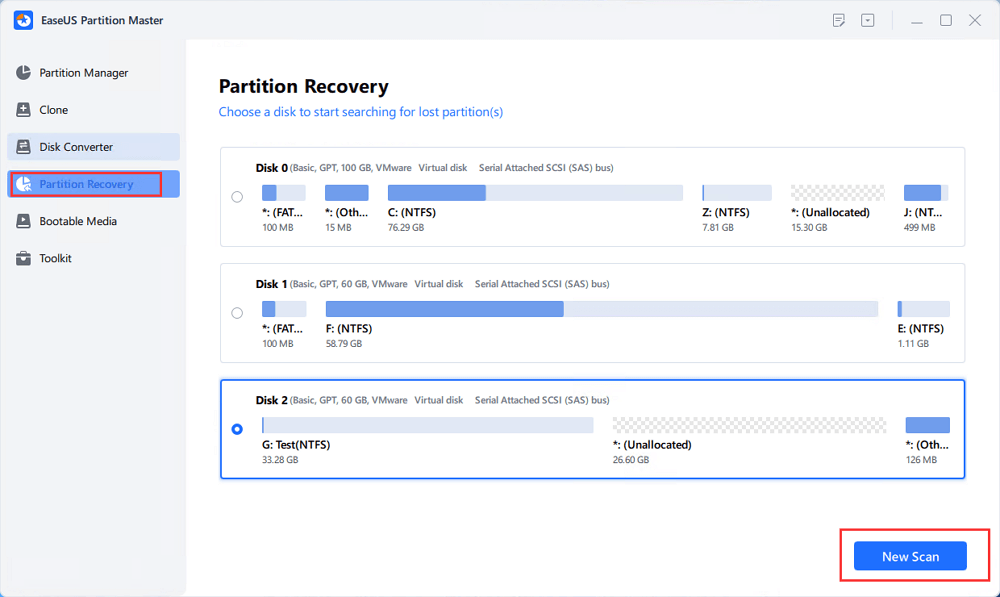
Step 1. Open EaseUS Partition Master and click «Partition Recovery». Select the target disk with your lost partition and click «New Scan».
Step 2. Wait patiently to let the software execute «Quick Scan» and «Full Scan» operation. It will mark your deleted partition as «lost» as the Status section. Select the lost partition, and click «Recover».
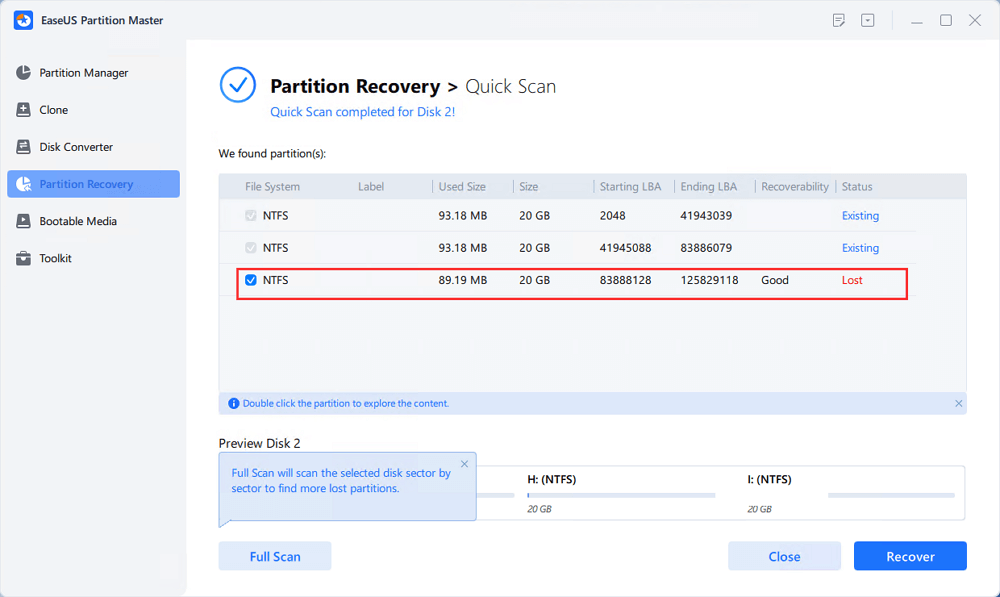
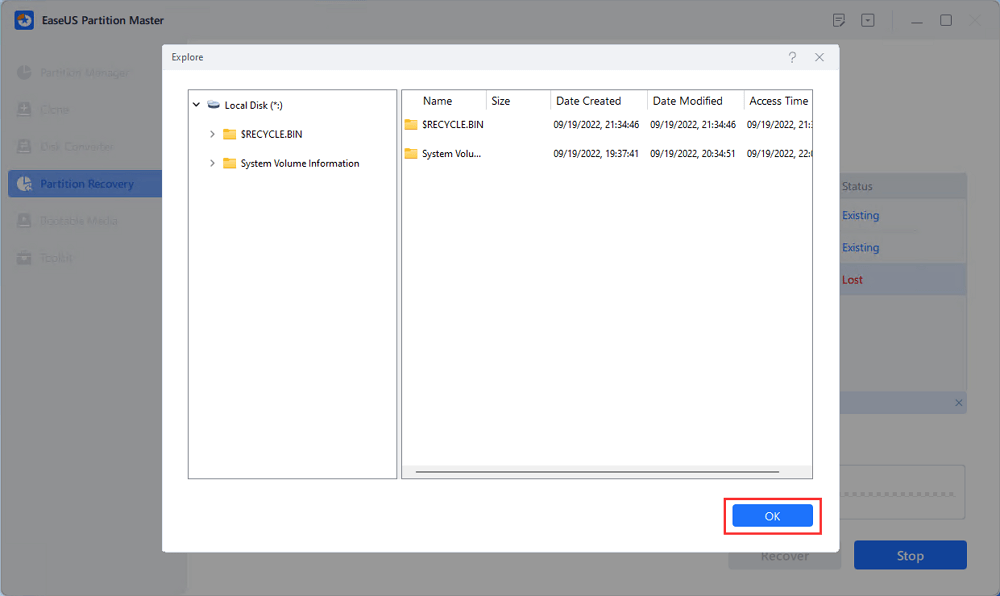
You can also double click on the partition you’re looking for to preview its content and click «OK» to confirm.
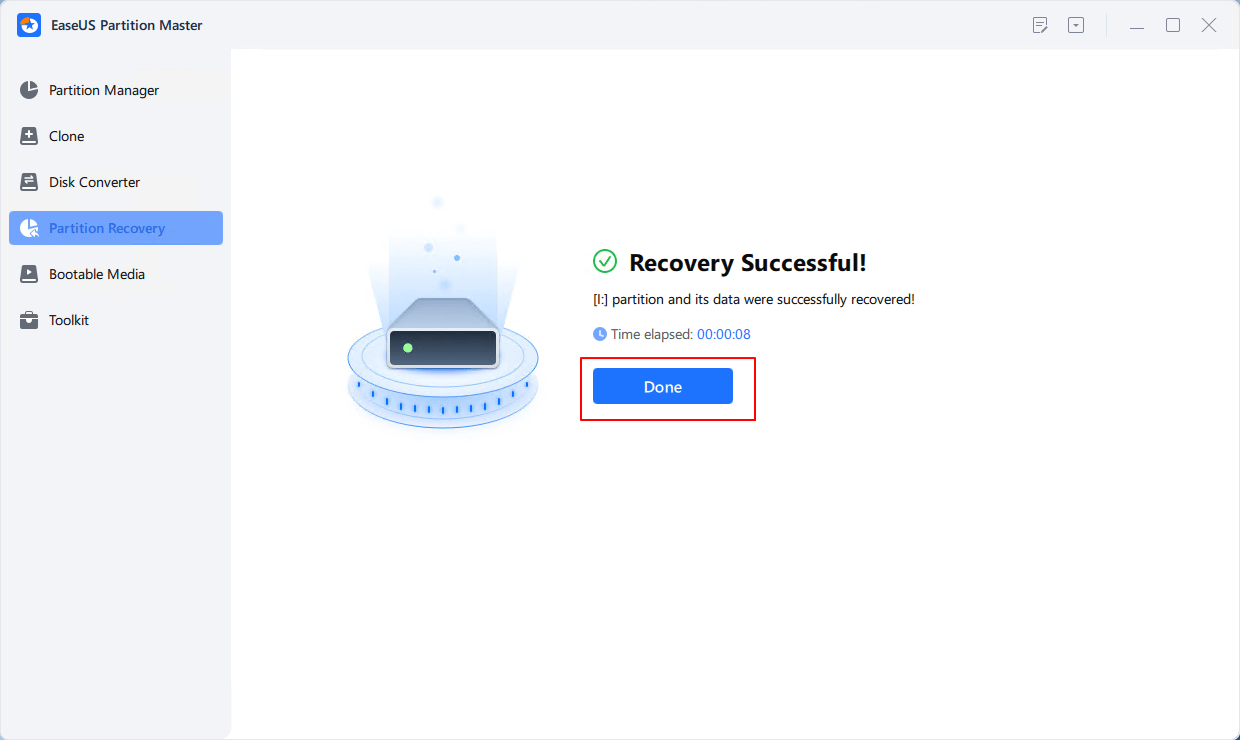
Step 3. Wait patiently and click «Done» when the partition recovery process completes.
FAQ
1. How do I use diskpart command in Windows 11/10?
-Boot into Windows 10
-Press the Windows key and C to open the charm bar.
-Type cmd
-Click Command Prompt
-When Command Prompt opens, type diskpart
-Press Enter
2. How to assign drive letter via Diskpart?
—Type «assign letter=F» (F can be replaced with another letter that has not been used yet).
—And then, you will receive a message that says: DiskPart successfully assigned the drive letter or mount point.
3. How to shrink partition via Diskpart
Type shrink directly will automatically shrink the partition by Windows, and you can also type shrink desired=*** to define your partition size.
(Such as: Type «shrink desired=10240». And then, you will receive a message that says: DiskPart successfully shrunk the volume by 10GB.)
Note: You can reduce the size of a volume only if it is formatted using the NTFS file system.
4. How to mark a partition as active via Diskpart?
—Type active.
—And then, you will receive a message that says: DiskPart marked the current separation as active.
5. How to clean Disk/convert a disk to GPT/ convert a disk to MBR?
-Type: list disk.
-Type: select disk 1.
-Type: clean.
-Type: convert gpt or convert mbr.
Встроенная утилита Diskpart — эффективное средство для исправления логических ошибок и восстановления жестких дисков, флешек и других запоминающих устройств.

Содержание
- Начало работы с Diskpart
- Как создать разделы и отформатировать стертый диск?
- Как удалить защищенный, активный и системный разделы жесткого диска?
- Удаление через командную строку в работающей ОС
- Удаление любых разделов
- Что делать если пропали важные данные?
Некорректная работа накопителей, неправильное отображение размера в проводнике, невозможность форматирования и другие неполадки – все эти проблемы значительно затрудняют использование флешек и жестких дисков, поэтому при обнаружении вышеуказанных неполадок следует сразу прибегнуть к их устранению.
Важно! Перед началом работы, следует позаботиться о сохранности информации на проблемном накопителе, поскольку для исправления проблемных дисков потребуется полное стирание, а также удаление таблицы разделов, что непременно приведет к удалению всей информации.
Начало работы с Diskpart
Для начала следует подключить проблемную флешку к компьютеру или точно определить необходимый накопитель. Это нужно для того, чтобы случайно не стереть нормально работающий диск с важной информацией. В нашем случае проблемным диском будет выступать флешка объемом 14.4 гигабайт.

После этого следует запустить командную строку или Windows PowerShell с правами администратора. Это можно сделать, нажав правой кнопкой мыши по «Пуск» и выбрав соответствующий пункт (командная строка(администратор) или Windows PowerShell(администратор)).
В открывшемся окне командной строки следует ввести команду «Diskpart» и нажать Enter (кнопка Enter подтверждает команды, поэтому её следует нажимать после каждой новой команды) для начала работы с утилитой.

Теперь необходимо точно определить проблемный диск в утилите. Для этого нужно ввести команду «list disk», отображающую весь список подключенных носителей.

Как видно из скриншота, утилита определила два диска: Диск 0 размером 111 гигабайт и диск 1 размером 14 гигабайт. Поскольку системный диск с большим размером работает нормально, а проблемы имеются именно с USB-флешкой объемом 14 гигабайт, запоминаем что в Diskpart она носит название «Диск 1».
Важно! В данном пункте следует точно определить необходимый диск, чтобы не удалить всю информацию с системного накопителя.
Выбираем проблемный накопитель командой «select disk 1» (если у пользователя установлены дополнительные диски, после команды select disk следует ввести число, соответствующее проблемному носителю).
Следующий шаг является финальным, поэтому рекомендуем еще раз перепроверить правильность выбранного диска. После выполнения команды все данные будут стерты. Для выполнения стирания выбранного диска, вводим команду «Clean» и подтверждаем Enter.
После стирания диска, Diskpart выдаст сообщение «Очистка диска выполнена успешно». После этого можно закрыть окно «Windows PowerShell».
Стоит отметить, что для нормальной работы стертого диска, на нем необходимо создать разделы и провести форматирование.
Как создать разделы и отформатировать стертый диск?
Стертый диск нуждается в создании на нем разделов и форматировании в нужной файловой системе. Для этого необходимо выполнить следующее:
Открываем меню «Управление дисками», нажав ПКМ по кнопке «Пуск» и выбрав соответствующий пункт.
В открывшемся окне находим стертый диск. Как правило, он не имеет буквы или вовсе не отображается в меню, но его можно обнаружить как нераспределенную область в нижней части окна. Нажимаем ПКМ по блоку область не распределена и выбираем первый пункт «Создать простой том».

В открывшихся окнах следует выбрать букву, а также файловую систему и размер диска. По умолчанию система сама выбирает максимальный размер, букву, а также файловую систему NTFS, поэтому в данном пункте можно просто нажимать «Далее».

Как удалить защищенный, активный и системный разделы жесткого диска?
Для удаления разделов жесткого диска можно воспользоваться функционалом встроенной утилиты «Управление дисками», где для удаления следует просто нажать по необходимому разделу правой кнопкой мыши и выбрать пункт «Удалить том…».
В некоторых случаях это может не сработать, поскольку:
- Логический диск имеет поврежденную файловую систему (можно исправить проверкой Chkdsk).
- На нем присутствуют сбойные сектора и бед блоки (решить проблему можно при помощи проверки бесплатной программой Victoria).
- Логический диск защищен от удаления (от удаления защищены системные разделы, скрытые и служебные разделы и т.д.).
Тем не менее существует несколько способов позволяющих удалить абсолютно любой раздел.
Удаление через командную строку в работающей ОС
Для удаления ненужных защищенных разделов в работающей Windows можно воспользоваться командой строкой и встроенной утилитой Diskpart. Данный способ позволит удалить все проблемные разделы, кроме системных и служебных.
Для этого:
Шаг 1. Открываем командную строку от имени администратора и вводим поочередно команды: diskpart, list disk, select disk 0 (в нашем случае раздел расположен на диске 0), list part (команда открывает список разделов на диске).
Шаг 2. Выбираем необходимый раздел командой select partition 4, после этого вводим команду delete partition для удаления раздела.
Шаг 3. Финальным этапом станет создание нового раздела и его форматирование. Вводим поочередно: create partition primary, format fs=ntfs quick, assign letter Z (команда присваивает букву созданному разделу) и exit.
После выполнения данных действий, раннее заблокированный раздел будет готов к использованию, удалению и другим манипуляциям в меню «Управление дисками».
Удаление любых разделов
Чтобы провести удаление системных, зарезервированных и скрытых разделов, пользователю понадобиться загрузочная флешка или установочный диск. Загружаемся с них и в меню выбора языка нажимаем сочетание клавиш Shift+F10 для открытия командной строки.

В командной строке, аналогично с предыдущим способом, вводим команды: diskpart, list disk, select disk 0, lis part, select partition 2 (или любой другой раздел, который невозможно удалить) и удаляем его командой del par override.
Стоит отметить, что команда del par override удаляет абсолютно любой раздел, независимо от его атрибутов.
Важно! Удаление некоторых разделов диска может повлиять на его работу, поэтому мы настоятельно не рекомендуем прибегать к удалению защищенных разделов.
Что делать если пропали важные данные?
Зачастую при манипуляциях с накопителем через командную строку пользователи случайно форматируют не тот накопитель или совершают действия, из-за которых теряются ценные данные.
Кроме того, нередки случаи, когда производится очистка и форматирование диска и при этом не все важные данные сохранены в безопасном месте.
Так или иначе все эти действия ведут к потере важной информации, что в свою очередь может грозить даже финансовыми потерями, так как с каждым годом стоимость данных становится все выше.
Если любая из этих ситуаций случилась с вами, и вы потеряли важны файлы – не спешите отчаиваться.
Лучше сразу же воспользуйтесь программой RS Partition Recovery – профессиональным инструментом для восстановления утерянных данных.
Программа очень удобна в использовании, что заметно выделяет ее среди конкурентов, и позволяет восстановить утерянный файл практически в несколько кликов мышки.
Но самое главное – это то, что RS Partition Recovery поддерживает ВСЕ современные файловые системы. Благодаря этому не имеют значения тип устройства (компьютер, сервер, смартфон) или тип файловой системы – вы все равно сможете восстановить важную информацию.

Плюс еще одной очень полезной функцией RS Partition Recovery является режим глубокого сканирования накопителя. Благодаря ему вы сможете восстановить даже файлы, утерянные несколько месяцев тому назад.
Часто задаваемые вопросы
Diskpart это системная утилита Windows, которая предназначена для работы с дисками, подключенными непосредственно к компьютеру. Программа не имеет графического интерфейса и все манипуляции производятся при помощи командной строки или Windows PowerShell.
Чтобы удалить любой раздел с диска загрузитесь с загрузочного диска/флэшки и запустите командную строку. Затем по очереди выполните несколько команд (нажимая после каждой «Enter»): «diskpart», «list disk», «select disk 0», «list part», «select partition 2» (где «2» — это номер удаляемого раздела), «del par override». Больше деталей вы можете найти на нашем сайте.
RS Partition Recovery создана как раз для таких случаев и позволяет восстанавливать данные, которые были утеряны вследствие случайного форматирования раздела или диска, случайного удаления, повреждения файловой структуры диска и во многих других случаях.
Обычно такие разделы созданы специально. К примеру, Windows 10 создает дополнительный скрытый раздел размером 100 Мб, в котором хранится Recovery меню и другие дополнительные данные. Удаление таких разделов может нарушить работоспособность всей операционной системы.
Запустите командную строку и выполните несколько простых команд, нажимая после каждой «Enter»: «diskpart», «list disk», «select disk 0» (где «0» — это номер нужного диска), «select partition 1» («1» — это номер форматируемого раздела), «format fs=ntfs quick» Больше информации вы найдете на нашем сайте.
Sometimes the disk on your Windows 10 system may not work correctly, or the Windows fails to start because of the hard disk error. To rectify such disk errors, Windows 10 comes with an excellent tool known as DiskPart.
The DiskPart is a powerful command tool that lets you manage the Windows disks and partitions using Command Prompt or Windows PowerShell. This command interpreter allows you to delete, create, and modify partitions on any drives your PC can detect, even the external hard drives and USB storage. It is quite useful when any Pendrive or hard disks get corrupted because of logical errors and stopped working. Using DiskPart commands, you can wipe out the data and start clean.
To fix various Windows 10/11 problems, we recommend Outbyte PC Repair:
This software will repair common computer errors, protect you from file loss, malware damage, hardware failure, and optimise your computer for peak performance. In three simple steps, you can resolve PC issues and remove virus damage:
- Download Outbyte PC Repair Software
- Click Start Scan to detect Windows 10/11 issues that may be causing PC issues.
- Click Repair All to fix issues with your computer’s security and performance.
This month, Outbyte has been downloaded by 23,167 readers.
DiskPart is not a new concept. It has been the part of the Windows even before Windows 10. It is the best alternative when other disk utility such as Disk Management Tool fails to work.
In this guide, we would learn to use the common DiskPart commands to fix ‘Drive not Working’ and other disk errors.
How to open DiskPart on Windows 10?
Launching the DiskPart is not a big task. You just require to open the command terminals, either the Command Prompt or Windows PowerShell with the administrative rights.
In this guide, we would use the Command Prompt to run the DiskPart commands. The same commands can be directly used in Windows PowerShell without any changes.
-
Search Command Prompt in the Windows search bar and launch it with admin rights.

-
In the command window, type diskpart and hit enter. The DISKPART tool would be open and ready to use.

-
If you want to glance on the full list of available commands of DiskPart type help in the command window and press the enter key.

-
After using it, type Exit and hit the enter key to exit the tool.


Common DiskPart Commands
We would now explore the common DiskPart Command Prompt commands that you will mostly require.
| Command | Description |
| ACTIVE | Mark the selected partition as active. |
| ADD | Add a mirror to a simple volume. |
| ASSIGN | Assign a drive letter or mount point to the selected volume. |
| ATTRIBUTES | Manipulate volume or disk attributes. |
| ATTACH | Attaches a virtual disk file. |
| AUTOMOUNT | Enable and disable automatic mounting of basic volumes. |
| BREAK | Break a mirror set. |
| CLEAN | Clear the configuration information, or all information, off the disk. |
| COMPACT | Attempts to reduce the physical size of the file. |
| CONVERT | Convert between different disk formats. |
| CREATE | Create a volume, partition, or virtual disk. (No virtual disk management in Windows XP.) |
| DELETE | Delete an object. |
| DETAIL | Provide details about an object. |
| DETACH | Detaches a virtual disk file. |
| EXIT | Exit DiskPart. |
| EXTEND | Extend a volume. |
| EXPAND | Expands the maximum size available on a virtual disk |
| FILESYSTEMS | Display current and supported file systems on the volume. |
| FORMAT | Format the volume or partition. |
| GPT | Assign attributes to the selected GPT partition. |
| HELP | Display a list of commands. |
| IMPORT | Import a disk group. |
| INACTIVE | Mark the selected partition as inactive. |
| LIST | Display a list of objects. |
| MERGE | Merges a child disk with its parents. |
| ONLINE | Online an object that is currently marked as offline. |
| OFFLINE | Offline an object that is currently marked as online. |
| RECOVER | Refreshes the state of all disks in the selected pack. Attempts recovery on disks in the invalid pack, and resynchronizes mirrored volumes and RAID5 volumes that have stale plex or parity data |
| REM | Does nothing. This is used to comment scripts. |
| REMOVE | Remove a drive letter or mount point assignment. |
| REPAIR | Repair a RAID-5 volume with a failed member. |
| RESCAN | Rescan the computer looking for disks and volumes. |
| RETAIN | Place a retained partition under a simple volume. |
| SAN | Display or set the SAN policy for the currently booted OS. |
| SELECT | Shift the focus to an object. |
| SETID | Change the partition type. |
| SHRINK | Reduce the size of the selected volume. |
| UNIQUEID | Displays or sets the GUID partition table (GPT) identifier or master boot record (MBR) signature of a disk. |
Listing Existing Hard Drives, Volumes & Partitions using DiskPart
Before applying any destructive commands, you can first check the current internal and external hard disks and USB storage layout.
To check the available disks:
- Open the DiskPart and after “DISKPART>” prompt type list disk and hit enter. This command will list all the available and detectable storage disks, including internal and external drives and USB storage.

- To apply the DiskPart commands on the disks, you need to remember the disk number. For example, the windows disk is “Disk 0.“

To display the list of detected Volumes:
- Launch DiskPart and next to “DISKPART>” prompt type list volume.

- All volumes would be listed.

Check the list of partitions:
- To check the partition list, you must first select the hard disk with the list disk command.
- After the disk list is displayed, type select disk followed by the disk number.

- Once the disk is selected, type list partition, and hit the enter key, the selected disk’s partition list will be displayed. You can further modify the partitions using the partition number.


How to Delete Hard Drive, Volume, and Partition using DiskPart ?
If you want to delete the Volume or Partition of your system’s hard disk using Diskpart, follow these steps:
- First, select the hard drive using the select disk command, followed by the disk number.
- Now open the partition list of the chosen disk using list partition command.
- Chose the partition using select partition # command, replace # with the required partition number.
- Once the partition is selected, you can delete it using the delete partition command. The partition will be deleted.

- Similarly, you can delete the disk volume. Type list volume, check your chosen volume number, then type select volume #, replacing # with your volume number.

- Type delete volume, to delete the chosen volume.


How to Completely Wipe Out the Hard Disk using DiskPart?
If you face a problem in formatting the system hard disk, external hard drive, or the USB Pendrive, then using DiskPart, you can easily wipe them out. Obviously, you won’t be able to clean the disk on which your OS is installed.
- Similar to previous steps, on the DISKPART prompt window, type list disk.
- By typing select disk # command where # is your disk number, choose the disk that you want to format completely.
- After selecting the disk, type clean command to format it completely. Remember that it would not warn you, so make sure that you have selected the correct disk.

- After the cleanup, DiskPart would display the success message, and the disk would be ready for creating the new partitions.

How to Create and Format New Hard Drive Partitions using DiskPart?
Using the steps from the last section, you might have cleaned your hard disk. Now its time to create the new partitions and format them with Windows-friendly file systems like NTFS or FAT32.

- Open the disk list using the list disk command and select the disk using the select disk # command, where # is the disk number.
- After selecting the disk type the create partition primary command to create a partition using the entire space on that drive.
- If you want to create multiple partitions, you can assign how much space a partition could take. For that type, create partition primary size=X, where X is the size that you wish to set to the partition.
- To ensure that the new partition is listed, type list partition command.
- Use active command to activate the partition. It is required to use the partition as a bootable drive.
- To format the partition with the NTFS file system, use format FS=NTFS label=Data quick command. You can replace Data with any label you want.
- After it gets format, the DiskPart would automatically assign the letter to the partition. If it doesn’t, you can manually set it. For that type, assign letter=g, where you can replace g with any drive letter that you want.

Conclusion
These are the top used DiskPart commands that you can use to fix your hard drive problems and clean the USB drives and hard disks.
There are more commands, too, if you want to know about them, type help after launching DISKPART in the command window.
1. How to open DiskPart in Windows 10?
You can open DiskPart utility through Command Prompt or Windows PowerShell in Windows 10. After launching any of the command terminals, type diskpart to launch DiskPart.
2. How to fix hard drive problems with DiskPart?
DiskPart utility is specifically available for solving the disk issues on Windows 10. After launching the diskpart, type the help command to know about all the commands supported by diskpart. This post guides you on how to use the most common DiskPart commands.
Peter is an Electrical Engineer whose primary interest is tinkering with his computer. He is passionate about Windows 10 Platform and enjoys writing tips and tutorials about it.
Last Updated :
30 Nov, 2021
DiskPart is a powerful tool for disk management under Windows OS. Diskpart Command is used to manage the computer hard drive, partitions, and volumes. This Command is not only limited to Windows 10 but also available in Windows 8.1,8,7 or even in Windows 2000. The Diskpart is used from creating or deleting partitions to wiping the drive clean or fixing errors on drives.
Diskpart looks similar to the Disk Management tool, but the only difference is that diskpart is a command prompt utility which makes it more powerful and provides more functionality than the Disk Management tool.
Let us see how Diskpart can help you to manage your drives, partitions, and volumes.
Note: You should always run your computer in Administrator mode while you are making use of DiskPart.
Syntax:
diskpart <parameter>
Parameters:
You can run the following commands from the Diskpart command interpreter:
ACTIVE      - Mark the selected partition as active.
ADD         - Add a mirror to a simple volume.
ASSIGN      - Assign a drive letter or mount point to the selected volume.
ATTRIBUTES  - Manipulate volume or disk attributes.
ATTACH      - Attaches a virtual disk file.
AUTOMOUNT   - Enable and disable automatic mounting of basic volumes.
BREAK       - Break a mirror set.
CLEAN       - Clear the configuration information, or all information, off the
             disk.
COMPACT     - Attempts to reduce the physical size of the file.
CONVERT     - Convert between different disk formats.
CREATE      - Create a volume, partition or virtual disk.
DELETE      - Delete an object.
DETAIL      - Provide details about an object.
DETACH      - Detaches a virtual disk file.
EXIT        - Exit DiskPart.
EXTEND      - Extend a volume.
EXPAND      - Expands the maximum size available on a virtual disk.
FILESYSTEMS - Display current and supported file systems on the volume.
FORMAT      - Format the volume or partition.
GPT         - Assign attributes to the selected GPT partition.
HELP        - Display a list of commands.
IMPORT      - Import a disk group.
INACTIVE    - Mark the selected partition as inactive.
LIST        - Display a list of objects.
MERGE       - Merges a child disk with its parents.
ONLINE      - Online an object that is currently marked as offline.
OFFLINE     - Offline an object that is currently marked as online.
RECOVER     - Refreshes the state of all disks in the selected pack.
             Attempts recovery on disks in the invalid pack, and
             resynchronizes mirrored volumes and RAID5 volumes
             that have stale plex or parity data.
REM         - Does nothing. This is used to comment scripts.
REMOVE      - Remove a drive letter or mount point assignment.
REPAIR      - Repair a RAID-5 volume with a failed member.
RESCAN      - Rescan the computer looking for disks and volumes.
RETAIN      - Place a retained partition under a simple volume.
SAN         - Display or set the SAN policy for the currently booted OS.
SELECT      - Shift the focus to an object.
SETID       - Change the partition type.
SHRINK      - Reduce the size of the selected volume.
UNIQUEID    - Displays or sets the GUID partition table (GPT) identifier or
             master boot record (MBR) signature of a disk.
Open and List Drives or Partitions or Volumes:
It is important to list the drives, partitions, or volumes before we go ahead and implement DiskPart commands on them. Follow the below-mentioned steps to list the drives:
- Type diskpart, after pressing Windows+R Keys and clicking on ok.

- In the DiskPart command Window, type list disk and hit Enter

- This will list all the available drives with a number specified to them starting from 0.
- If you want to see all the volumes then type list volume and hit Enter.

- This will list all the available volumes with a number specified to it starting from 0.
The above article, explains the use cases and parameters of the diskpart command on Windows.
-
Home
-
Partition Manager
- CMD List Drives: How to List Drives in Command Prompt? [Answered]
By Ariel | Follow |
Last Updated
Sometimes you may to need list all drives on your systems. How to list drives in CMD/PowerShell? This post of MiniTool provides a full guide on PowerShell/CMD list drives and a professional tool to manage your drives.
When formatting a drive or copying files from a drive to another drive, you may need to use the CMD or Windows PowerShell tool to list drives. However, many people don’t know how to list drives in Command Prompt or PowerShell, like a user from the superuser forum:
Is there a way to list the available drives from cmd.exe? (Other than manually typing c: d: …) and seeing which ones return errors.https://superuser.com/questions/139899/see-available-drives-from-windows-cli
How to List Drives in CMD
Command Prompt, also known as CMD, is the command-line interpreter in Windows operating system. You can input certain commands in the Command Prompt window to take corresponding actions. If you want to list drives of your systems, you can use the WMIC (Windows Management Instrumentation for Management) or Diskpart command.
List Drives CMD via WMIC:
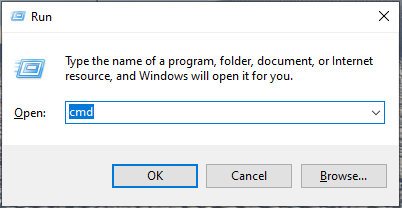
Step 1. Press Win + R keys to open the Run dialog box, and then type cmd in it and press Ctrl + Shift + Enter keys together to open the elevated Command Prompt window.
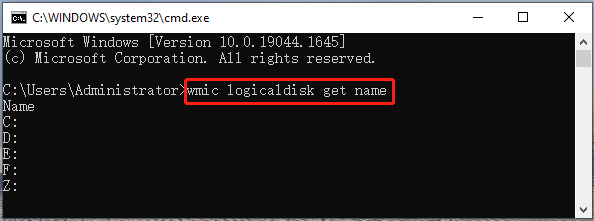
Step 2. To let CMD list drives, type one of the following commands and hit Enter.
- wmic logicaldisk get name
- wmic logicaldisk get caption
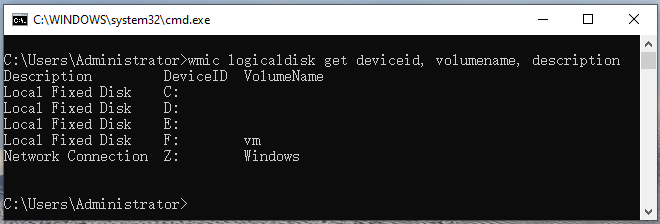
Step 3. If you want to display the Device ID and volume name, type the following command and hit Enter. Also, you can run the fsutil fsinfo drives command to list drives on your computer
wmic logicaldisk get deviceid, volumename, description
List Drives CMD via Diskpart:
DiskPart is a disk partition management tool that uses command lines to perform operations. It can be used to list drives CMD as well. Here’s how to use it.
Step 1. Open the Command Prompt window again as we explained above.
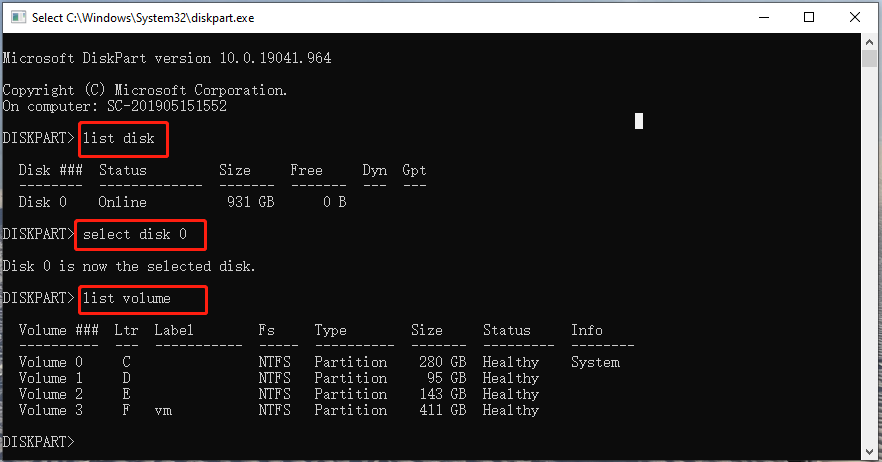
Step 2. Type the following commands in order and hit Enter after each one. Then you will see a list of drives on the disk, including partition/volume number, label, letter, file system, size, and status.
- diskpart
- list disk
- select disk *
- list volume/list partition
How to List Drives in PowerShell
PowerShell is a command-line tool like CMD. Here you can let PowerShell list drives as well. To do so, follow the steps below:
Step 1. Open the Run dialog box, and then type powershell in it and hit Enter.
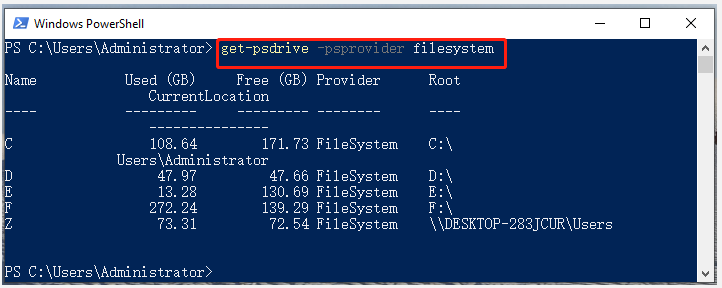
Step 2. In the Windows PowerShell window, type the following command and hit Enter.
get-psdrive -psprovider filesystem
How to let PowerShell/CMD list drive letters? Now, I believe that you already have known the answer.
Better Choice Than PowerShell/CMD List Drives
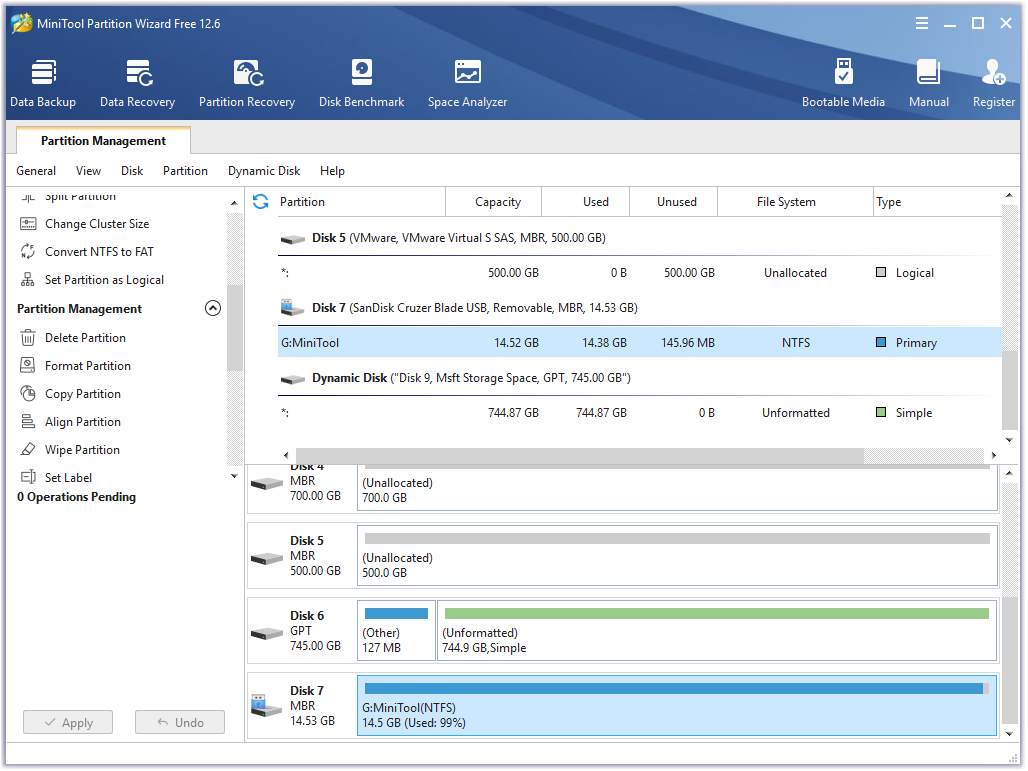
Although both of the two Windows tools can help you list drives, you may encounter some limitations to further managing drives/disks with them. For example, you can’t format a drive larger than 32GB to FAT32 using CMD. If you want to manage your hard disk or partitions more effectively, it’s highly recommended that you use a professional tool like MiniTool Partition Wizard.
MiniTool Partition Wizard DemoClick to Download100%Clean & Safe
It is a popular partition manager trusted by millions of users around the world. With this tool, you can not only obtain the drive information easily but do many other powerful tasks, including create/extend/move/format/wipe partition, convert NTFS to FAT32 without data loss, convert MBR to GPT, migrate OS, rebuild MBR, recover data, etc.
About The Author
Position: Columnist
Ariel has been working as a highly professional computer-relevant technology editor at MiniTool for many years. She has a strong passion for researching all knowledge related to the computer’s disk, partition, and Windows OS. Up till now, she has finished thousands of articles covering a broad range of topics and helped lots of users fix various problems. She focuses on the fields of disk management, OS backup, and PDF editing and provides her readers with insightful and informative content.