
Все способы:
- Способ 1: Информация на сайте производителя
- Способ 2: Раздел «О системе»
- Способ 3: «Сведения о системе»
- Способ 4: «Средство диагностики DirectX»
- Способ 5: Сторонние программы
- Вопросы и ответы: 0
Способ 1: Информация на сайте производителя
Вы можете получить детальную техническую спецификацию вашего компьютера на сайте производителя, если купили устройство в собранном состоянии, а не занимались покупкой комплектующих и дальнейшей сборкой самостоятельно. Обычно вам достаточно будет знать полное название модели вашего компьютера, которое должно быть указано на его коробке. Затем вы переходите на сайт, где осуществляли покупку, находите свою модель по названию или через журнал заказов, и на отдельной странице получаете развернутую информацию о том, какими характеристиками обладает выбранное устройство.
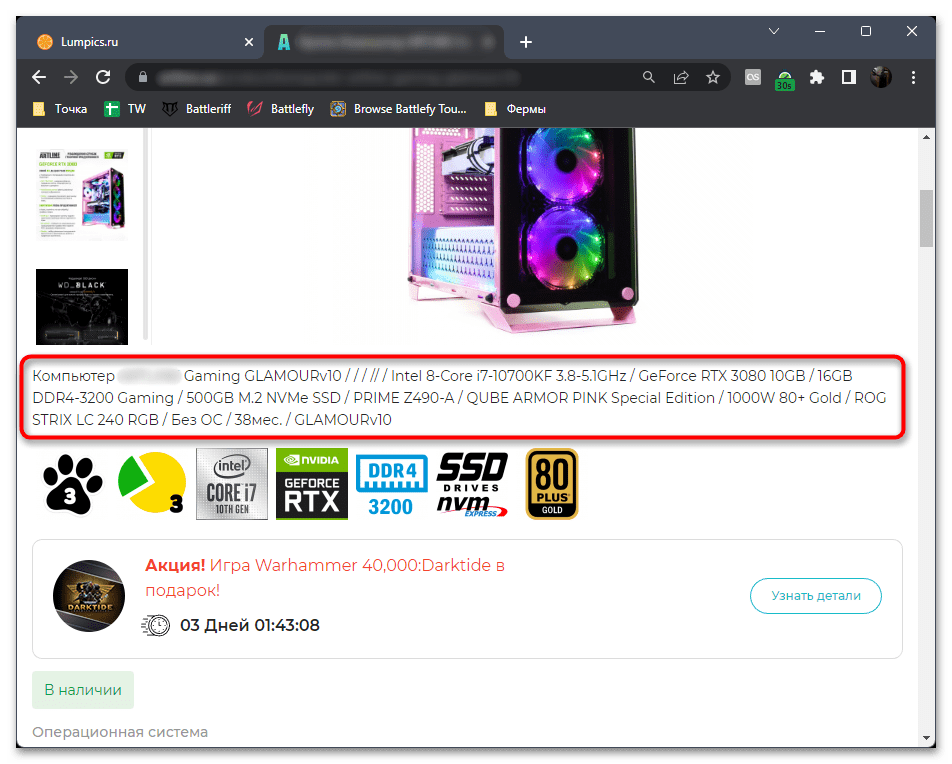
Примерно это же касается и ноутбуков, но работает метод определения характеристик во всех случаях, поскольку никто не занимается ручной сборкой ноутбуков, да и это не представляется возможным. Так вот, вам понадобится узнать точную модель вашего ноутбука со всеми кодовыми числами и буквами, присутствующими в названии. Обычно эта информация указана на коробке или на наклейке, находящейся на задней крышке ноутбука. Откройте официальный сайт компании-производителя или введите запрос в поисковике, после чего выберите раздел с технической спецификацией и ознакомьтесь с выдачей, чтобы узнать характеристики своего лэптопа.
Подробнее: Как узнать название своего ноутбука
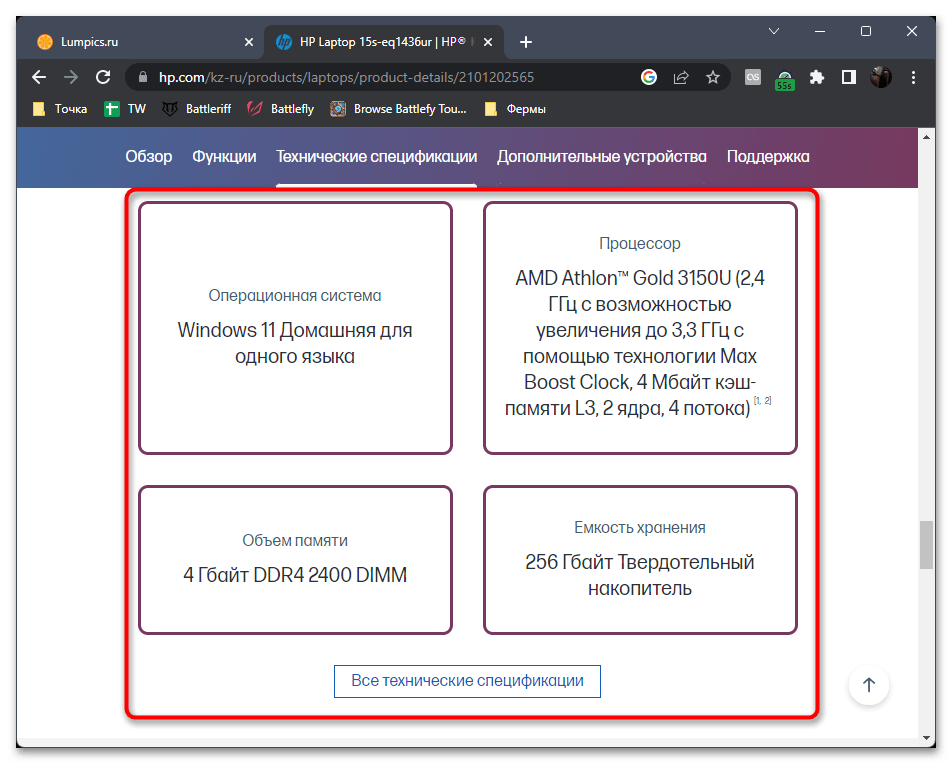
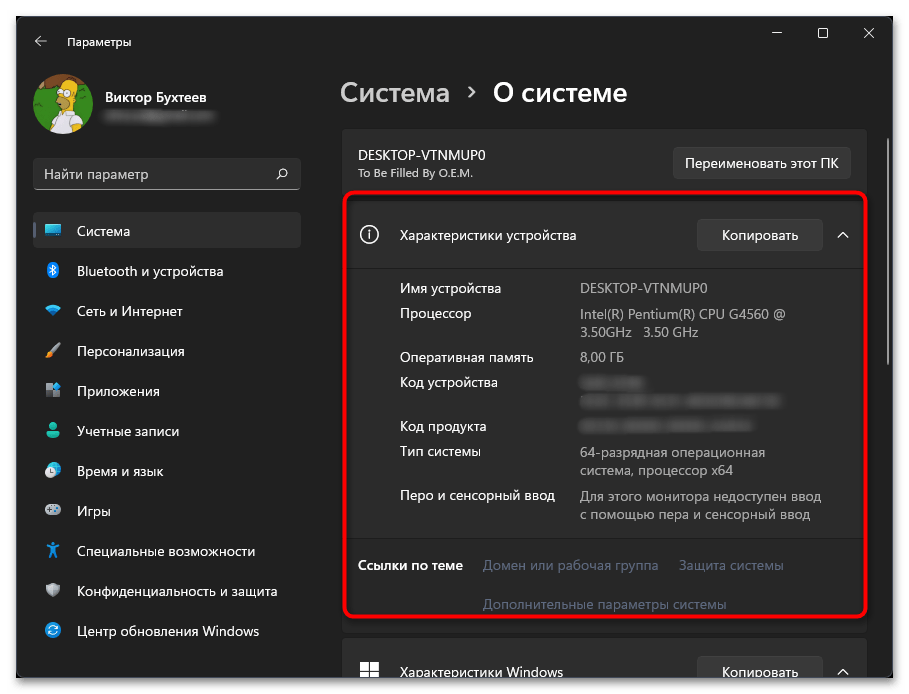
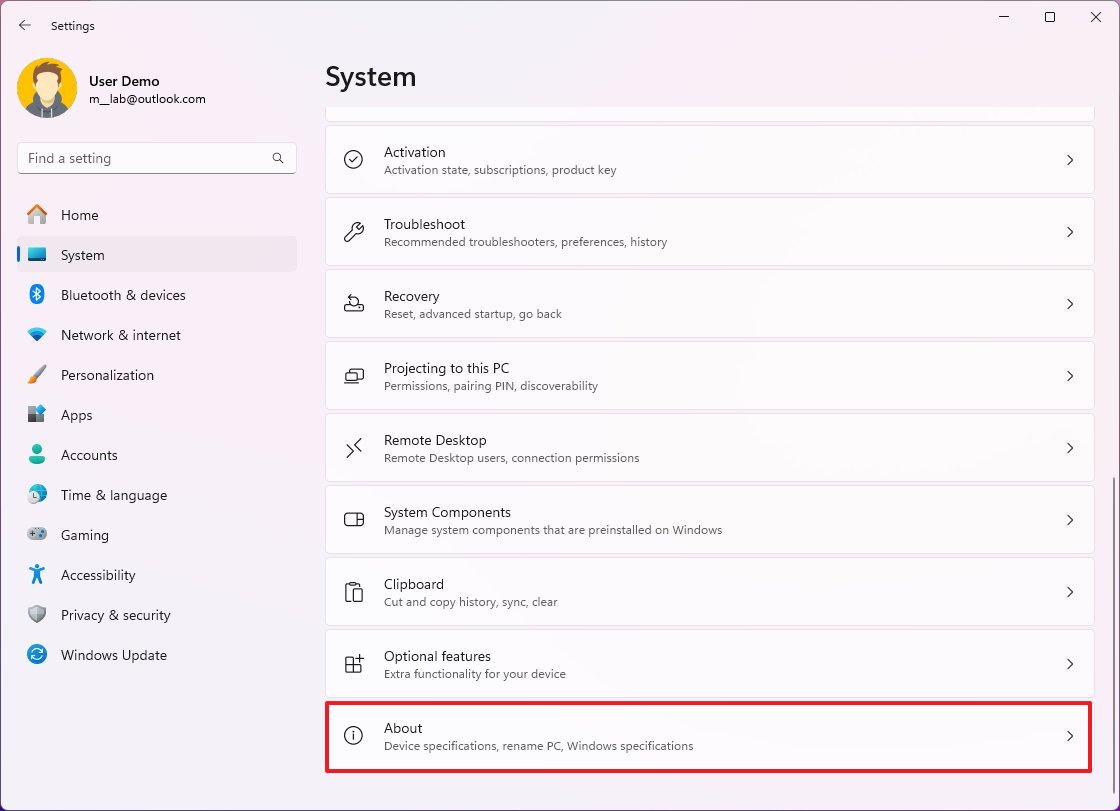
Способ 2: Раздел «О системе»
Поверхностные сведения о характеристиках вашего компьютера можно получить через системный раздел в Windows 11, где отображается текущая ОС, полное описание установленного процессора и объем оперативной памяти. Выполните следующие действия:
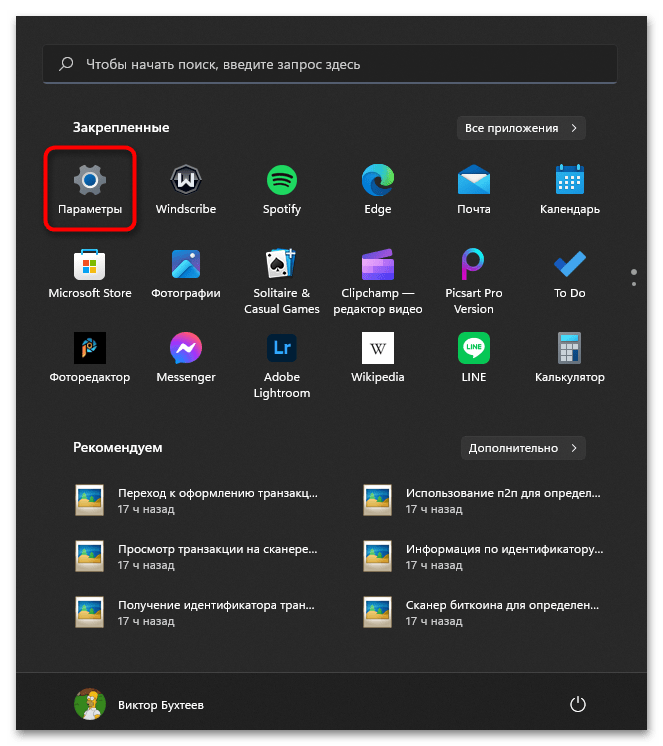
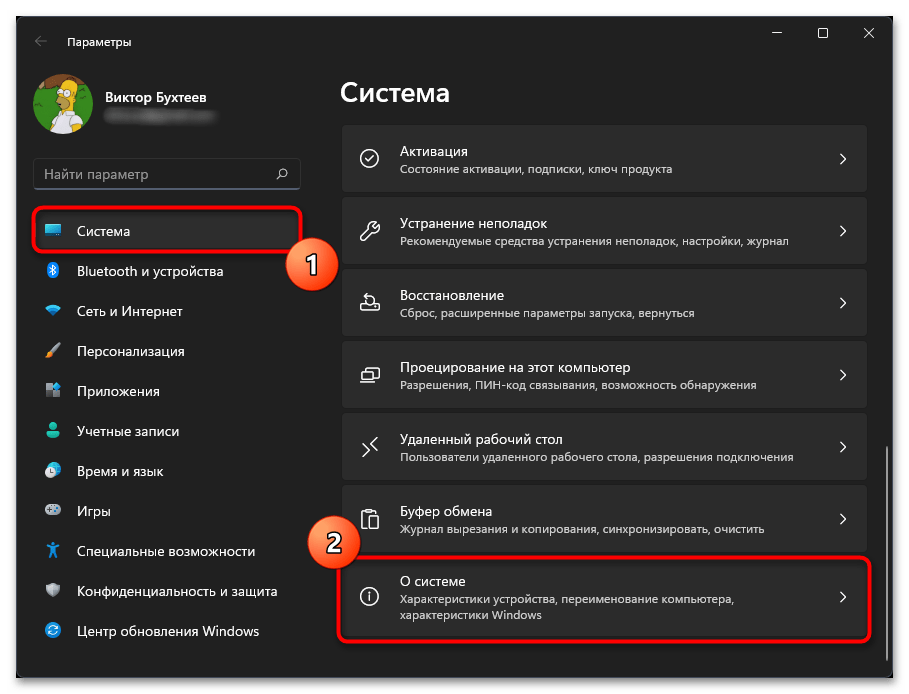
- Откройте меню «Пуск» и нажмите по значку с шестеренкой, чтобы перейти в «Параметры».
- Выберите раздел «Система», прокрутите список вниз и щелкните по плитке «О системе».
- Вы увидите блок с названием «Характеристики устройства», в котором и сможете получить эту самую поверхностную информацию. Если нужно, используйте кнопку «Копировать», чтобы передать эти сведения другим пользователям.
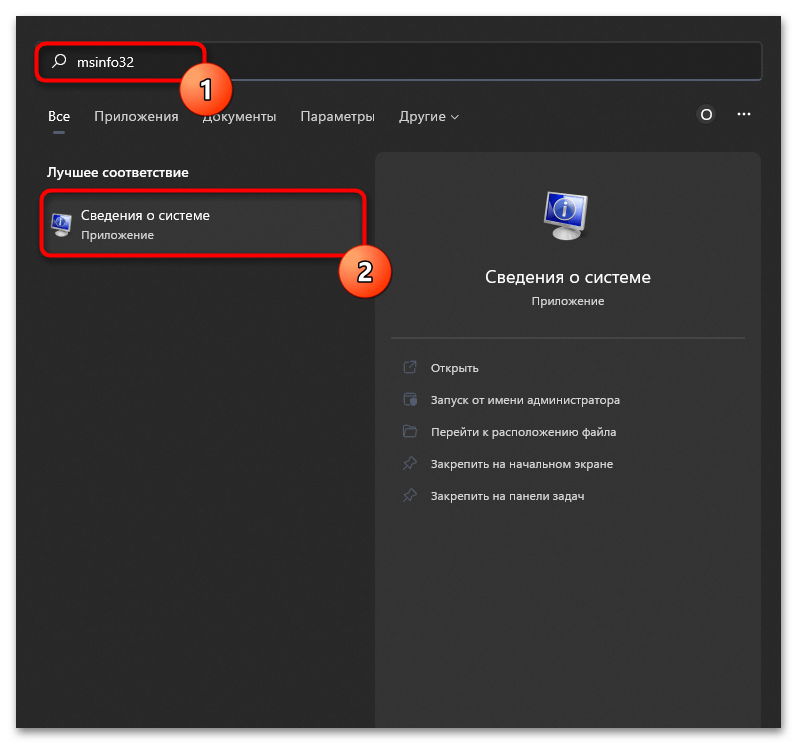
Способ 3: «Сведения о системе»
msinfo32 — команда, запускающая одно из системных приложений, специально предназначенное для просмотра информации с характеристиками вашего компьютера. Это приложение подойдет большинству пользователь и сможет удовлетворить практически все потребности в определении спецификации ПК или лэптопа.
- Вы можете открыть поиск в меню «Пуск», ввести команду
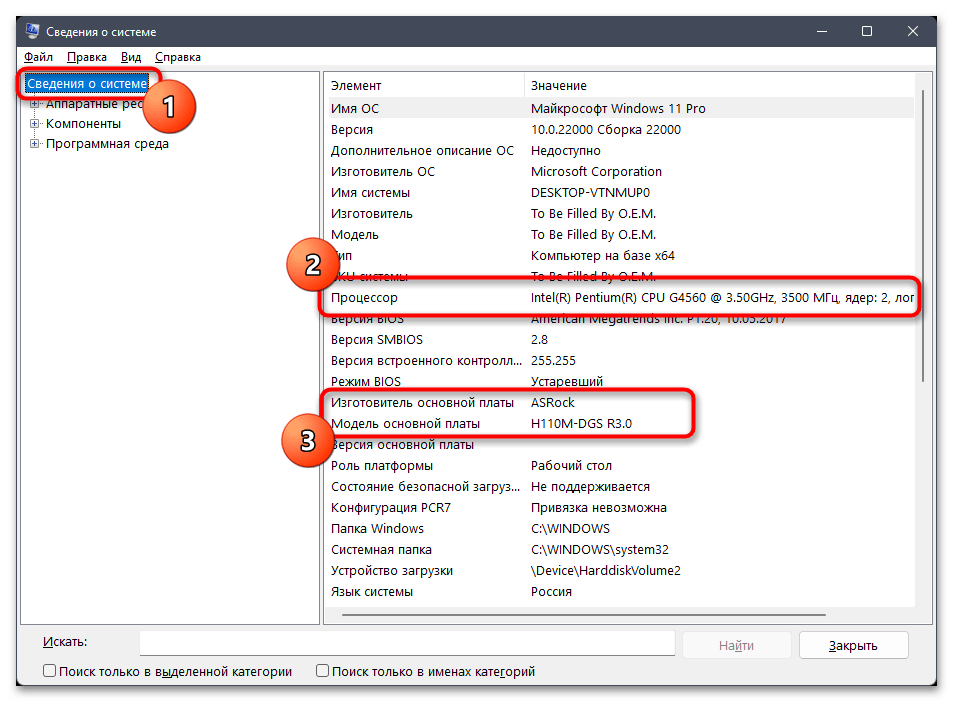
msinfo32и нажать левой кнопкой мыши по появившемуся соответствию с названием «Сведения о системе». - Выберите первый список с названием «Сведения о системе», выделив его нажатием ЛКМ. Справа в перечне элементов вы увидите название вашего процессора, модель материнской платы вместе с ее ревизией и изготовителем.
- Прокрутите перечень элементов немного вниз, чтобы узнать общий объем установленной оперативной памяти.
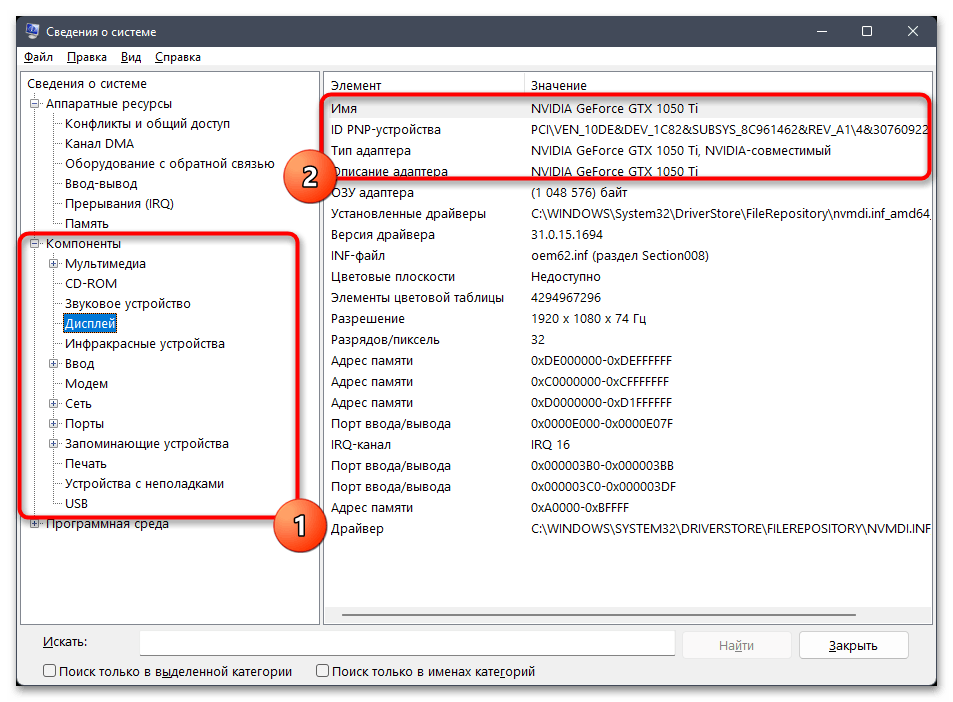
- Если вас интересует информация о другом железе и периферии, откройте «Компоненты» и выберите одну из веток, чтобы узнать видеокарту, звуковую карту, посмотреть на сетевые устройства, подключенную мышь и клавиатуру.

Способ 4: «Средство диагностики DirectX»
В качестве следующего системного метода получения данных о характеристиках компьютера рассмотрим еще одну команду, которая отвечает за вызов немного другого окна, но предоставляющего такие же основные сведения. Вы можете использовать его как альтернативу предыдущим вариантам, если они по каким-то причинам конкретно вам не подходят.
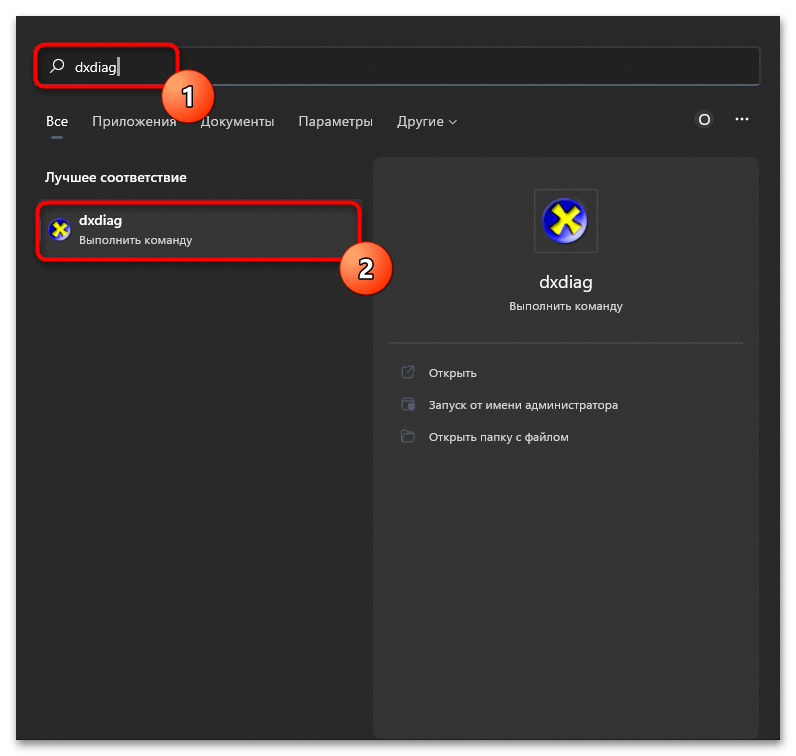
- Точно так же, как и в предыдущем методе, перейдите к поиску в «Пуске», введите
dxdiagи щелкните ЛКМ по появившемуся соответствию для выполнения команды. - Обратите внимание на блок с названием «Сведения о системе». В нем показана практически та же информация, которая есть и в «Параметрах», включая размер выделенного файла подкачки.
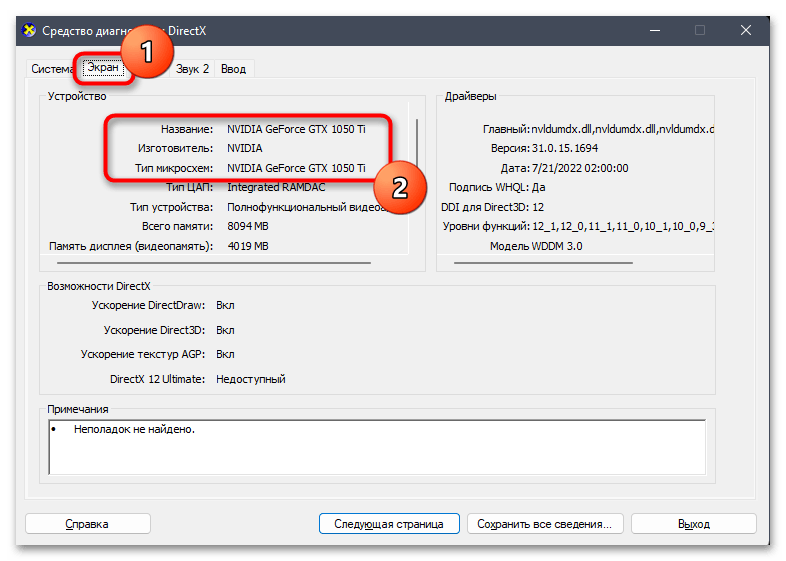
- Дополнительно в «Средстве диагностики DirectX» можно получить информацию об установленной в компьютере видеокарте. Для этого перейдите на вкладку «Экран» и в блоке «Устройство» посмотрите на первые три строки, чтобы узнать все необходимое.

Способ 5: Сторонние программы
Наиболее подходящим вариантом определения характеристик компьютера является использование сторонних программ. Да, понадобится скачивать дополнительное приложение, однако в этом случае вы получаете самую развернутую информацию, которую вряд ли найдете при помощи встроенных средств операционной системы. Единственной достойной альтернативой будет ручной просмотр спецификации на сайте устройства, но и такую информацию не всегда удается найти.
Скачать Speccy
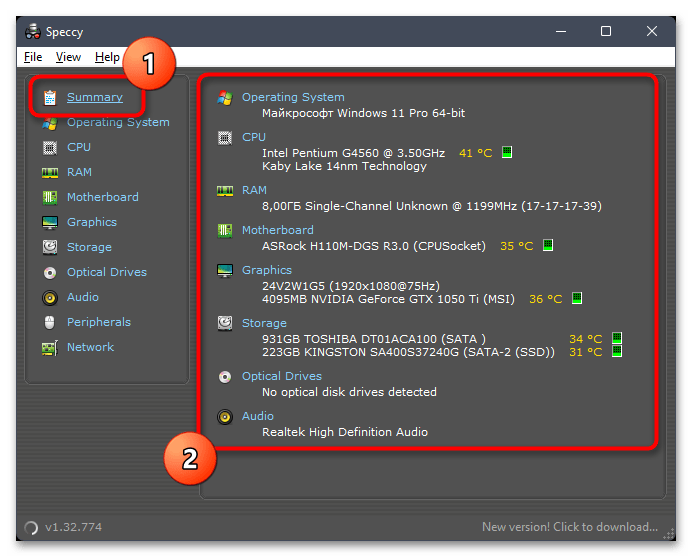
- Разберем этот метод на примере бесплатной программы с названием Speccy. Вы можете перейти по ссылке выше и установить ее в Виндовс 11. После запуска откройте раздел «Summary» для получения базовых сведений о характеристиках компьютера. Вы узнаете название ОС, модель процессора, количество оперативной памяти, модель материнской платы, видеокарты, жесткого диска и встроенной звуковой карты.
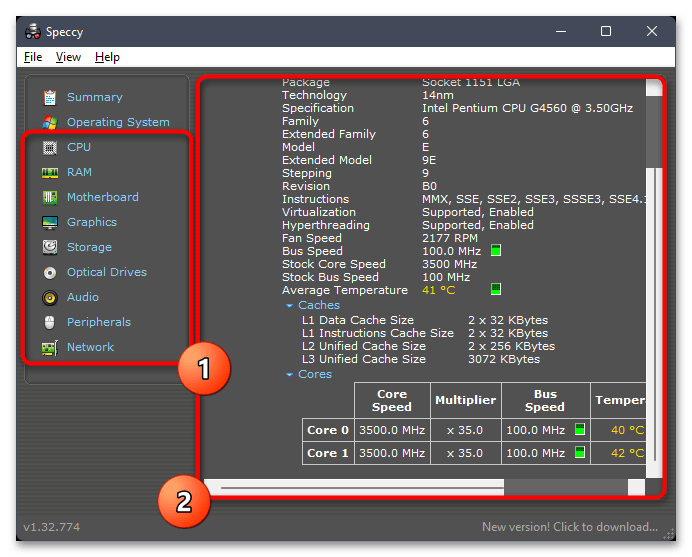
- Вместе с этим предлагается просмотреть и разделы, посвященные конкретным комплектующим. Это уже относится к определению железа, а не общих характеристик, поэтому детально останавливаться на данном этапе не будем.
- Если желаете больше узнать об операционной системе: получить серийный номер, узнать, активирован ли антивирус, средство обновлений или какие версии компонентов установлены, перейдите к разделу «Operating System» и ознакомьтесь со списком.

Speccy — далеко не единственная программа в данной теме. Есть и другие, как продвинутые, так и более простые решения. Обзор на самые популярные вы найдете по следующей ссылке и сможете выбрать другой софт для себя, если тот, который был описан в качестве примера, вам не подходит.
Подробнее: Программы для определения железа компьютера
Наша группа в TelegramПолезные советы и помощь
Applies ToWindows 11 Windows 10
Поддержка Windows 10 прекратится в октябре 2025 г.
После 14 октября 2025 г. корпорация Майкрософт больше не будет предоставлять бесплатные обновления программного обеспечения из Центра обновления Windows, техническую помощь и исправления безопасности для Windows 10. Ваш компьютер по-прежнему будет работать, но мы рекомендуем перейти на Windows 11.
Подробнее
В этой статье описывается получение основных сведений об устройстве с Windows.
Разверните каждый раздел, чтобы узнать больше:
Чтобы найти имя устройства, можно использовать один из следующих методов:
-
В приложении «Настройки» на устройстве с Windows, выберите Сведения осистеме >
-
Щелкните правой кнопкой мыши пуск и выберите Параметры.
-
Используйте следующую ссылку:
Около
Имя устройства отображается в верхней части страницы.
Чтобы найти версию и выпуск Windows, можно использовать один из следующих методов:
-
В приложении «Настройки» на устройстве с Windows, выберите Сведения осистеме >
-
Щелкните правой кнопкой мыши пуск и выберите Параметры.
-
Используйте следующую ссылку:
Около
В разделе Характеристики Windows можно увидеть версию и выпуск ОС Windows, установленной на устройстве.
Чтобы найти версию и выпуск Windows, можно использовать один из следующих методов:
-
В приложении «Настройки» на устройстве с Windows, выберите Сведения осистеме >
-
Щелкните правой кнопкой мыши пуск и выберите Параметры.
-
Используйте следующую ссылку:
Около
В разделе Спецификации устройств проверка сведения о вашем устройстве, в том числе:
-
Тип процессора
-
Установленный объем ОЗУ
-
Если устройство работает под управлением 32-разрядной или 64-разрядной версии Windows
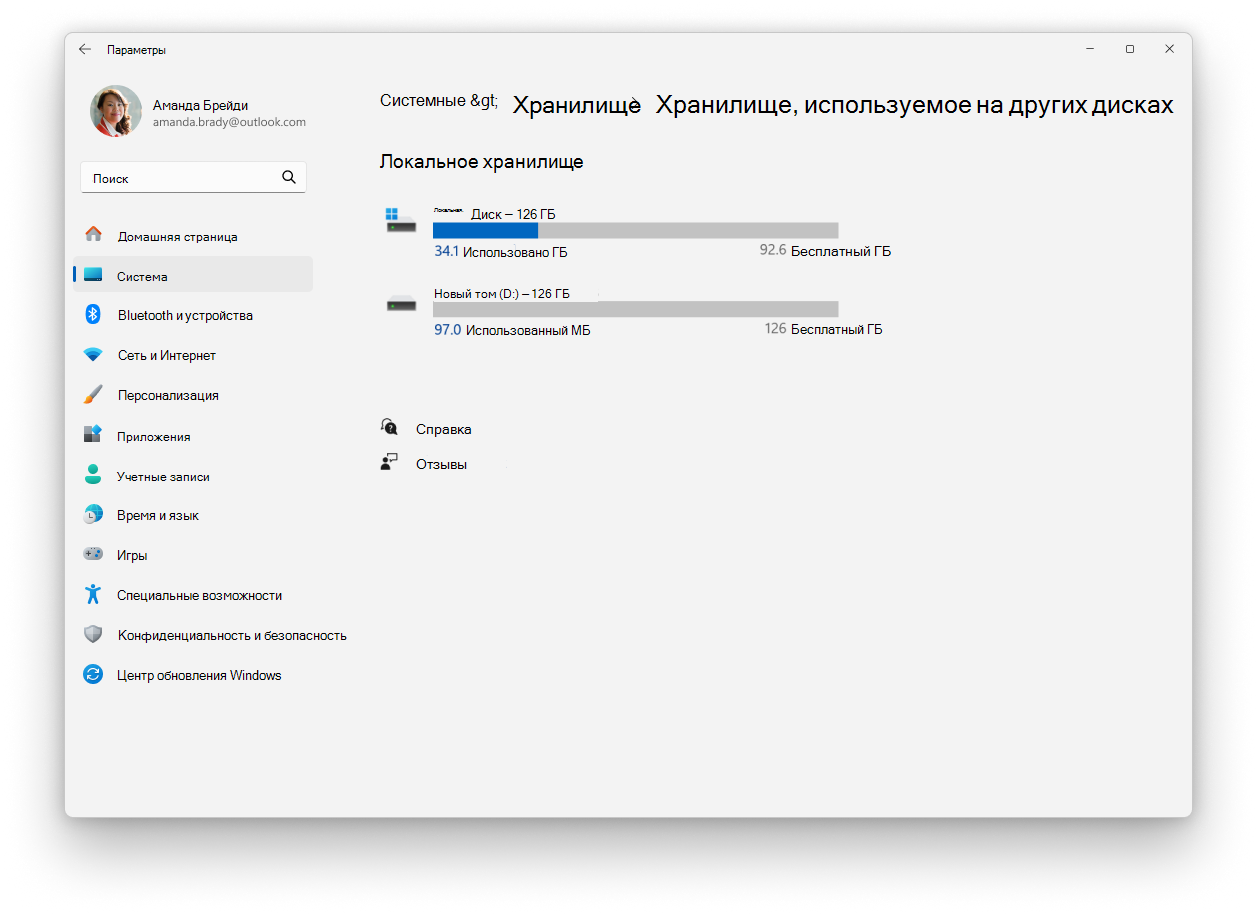
Чтобы узнать, сколько места на диске у вас есть, можно использовать один из следующих методов:
-
В приложении «Настройки» на устройстве с Windows, выберите System > Storage
-
Используйте следующую ссылку:
Хранение
Совет: Если у вас несколько дисков, выберите Дополнительные параметры хранилища > Хранилище, используемое на других дисках , чтобы просмотреть доступное хранилище на всех дисках одновременно.
Если вам нужны более подробные сведения, см. статью Средства настройки системы в Windows.
Нужна дополнительная помощь?
Нужны дополнительные параметры?
Изучите преимущества подписки, просмотрите учебные курсы, узнайте, как защитить свое устройство и т. д.
One feature that’s important to be able to locate is the specs of your Windows 11 PC, as being able to see what components you have can help to figure out if you need to upgrade a particular component.
There are a few easy ways to see your PC specs in Windows 11, so here we’ll show you how so that you’ll be prepared for next time you need to look up some information about your computer.
Jon Martindale / DigitalTrends
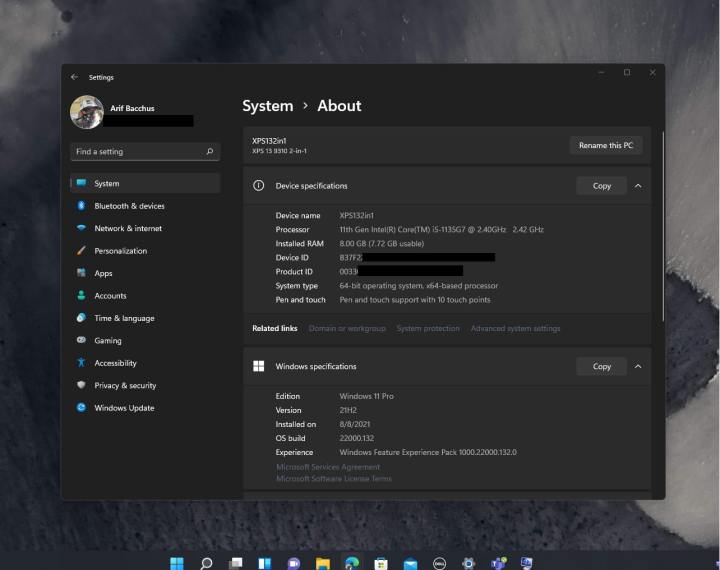
Using About PC
For a straightforward way to look at your basic PC specs, check out the About PC screen.
Step 1: Open the Windows Settings screen by pressing Windows key + I.
Step 2: Select System from the left-hand menu.
Step 3: Scroll down the list, and select About This PC from the bottom.
Step 4: Here you’ll find all the important information on your CPU model, your memory quantity and speed, Windows version (a specific release, or whether you’re using Windows 11 Home or Windows 11 Pro), and more.
It won’t tell you much more, though. For that, you’ll need to use one of the other methods below.

Jon Martindale / DigitalTrends
Using System Information
One of the easiest ways to see your computer specifications in Windows 11 is via the System Information App.
Step 1: Use the Windows search bar to look for MSInfo.
Step 2: That will bring up a list that should show a link to the System Information App. Select it.
You’ll be able to see the build of Windows 11 you’re running, the System model, the Processor, BIOS version, RAM, virtual memory, and more.
Step 3: In the screen that pops up you’ll have information on your CPU, memory, motherboard, and more. You can find more detailed information on USB ports, your network, sound device, display(s) and more, by selecting the menus on the left-hand side.
Jon Martindale / DigitalTrends
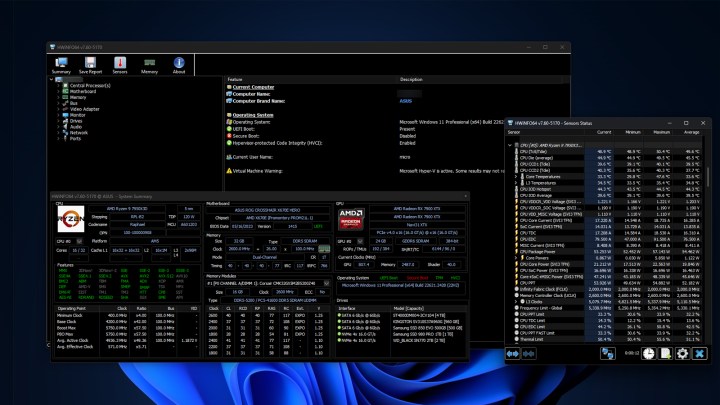
Using HWInfo
If you want to look at live information on your system, like its power usage, clock speeds, or temperatures, you need a third-party application. I really like HWInfo.
Step 1: Download HWInfo from the official website and install it like you would any other application.
Step 2: Launch the app, and if you want to just see live information, select Sensors only. Otherwise you can leave both boxes unticked and get the full system summary, and the live sensor window.
Step 3: To see live information, select Sensors from the top menu. The window that appears will have a lot of information about your PC’s live stats, like its clock speeds for each core, your graphics card power draw, and more. It’s extremely in-depth, so can be a little overwhelming, but rest assured if you wanted to know something about your PC, it’s there.
The main HWInfo window will tell you in-depth information about every component in your PC. Just select it to learn more.
Where is computer configuration in Windows 11?
While you’re looking for details about your specs, you might also want to look for the system configuration utility. This can be handy for changing your computer’s boot settings, for example, or seeing what services are running. The easiest way to access the system configuration utility is by going to the Start menu, and then selecting Run. Then type in MSCONFIG and press enter.
This opens up the utility, and from here you can perform any operations that you need to, such as switching over to diagnostic startup mode (useful if your computer is having serious issues) and seeing what programs are set to begin automatically on startup (useful to block any programs you don’t want running, or to automatically start programs that you do want to run whenever your computer is booted up).
Now you know your PC’s specs, do you want to learn more about tracking its temperatures? Here’s our guide on managing your processor temperatures.
(Image credit: Mauro Huculak)
If you have a laptop or desktop computer, determining the technical specifications of the hardware and software can be helpful. For example, it can confirm if the device meets the requirements to upgrade to a new version of Windows 11 or a specific application. If the computer becomes sluggish, the specifications can help determine whether a component needs an upgrade or if you have to upgrade to a new computer. Or, if the device stops working, this information can help troubleshoot the problem.
Regardless of the case, Windows 11 provides multiple methods to check your computer information (CPU, RAM, motherboard, video card, model and serial number, drivers, and Windows update and version) using Settings, System Information, PowerShell, and Command Prompt. (The available information may be slightly different depending on the utility.)
In this how-to guide, I will explain how to check your laptop or desktop computer’s complete hardware and software specifications.
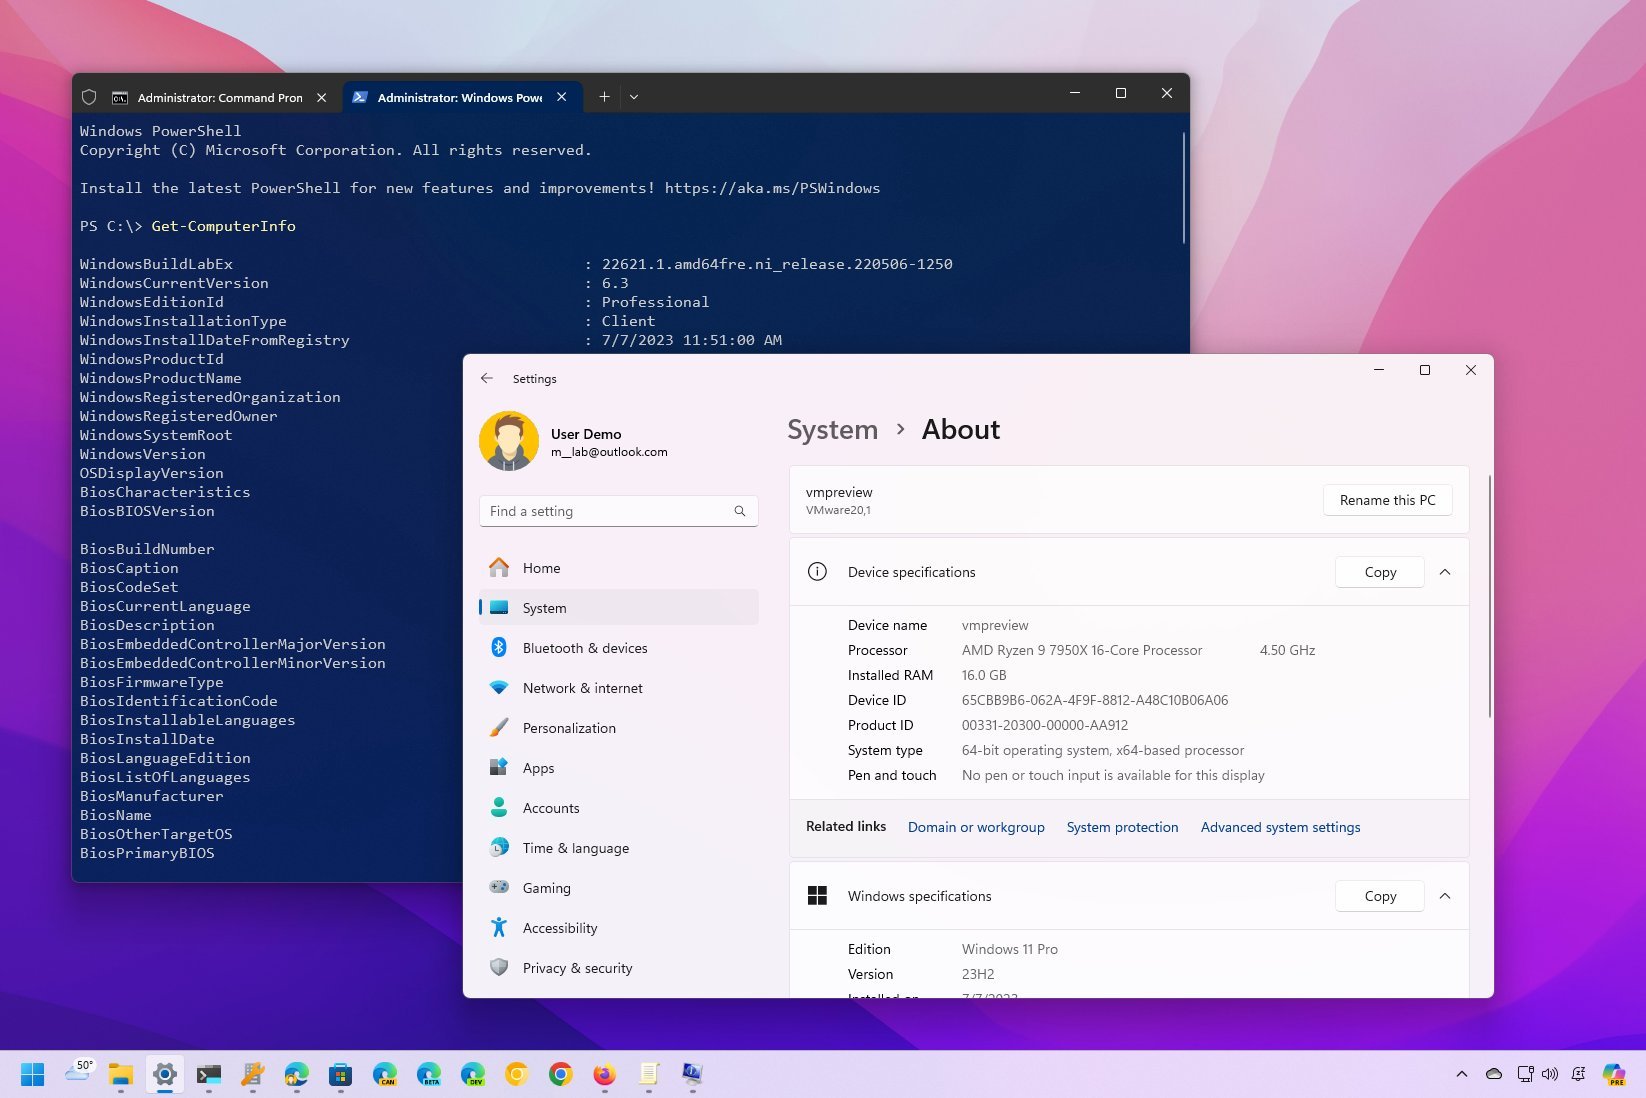
How to find device specs from Settings on Windows 11
If you are interested in the basic system specifications (such as processor, memory, and Windows installation details), use the «About» settings page.
To check the device’s basic hardware specs with the Settings app, use these steps:
- Open Settings.
- Click on System.
- Click the About page on the right side.
- Check the processor, system memory (RAM), architecture (32-bit or 64-bit), and pen and touch support under the «Device specifications» section.

- (Optional) Click the Copy button to copy and share the details and save them for future reference or inventory.
- Check the software specifications under the «Windows specifications» section:
- Edition — Shows whether this is a Windows 11 Pro or Home installation.
- Version — Reveals the Windows release currently on the computer, and the version changes every year after a feature update.
- Installed on — States the date when the last feature update was installed.
- OS build — Indicates the build number of the release. The first five numbers represent the version, and anything after the period represents the latest quality update.
- Experience — Reveals the service feature pack version installed on the device.
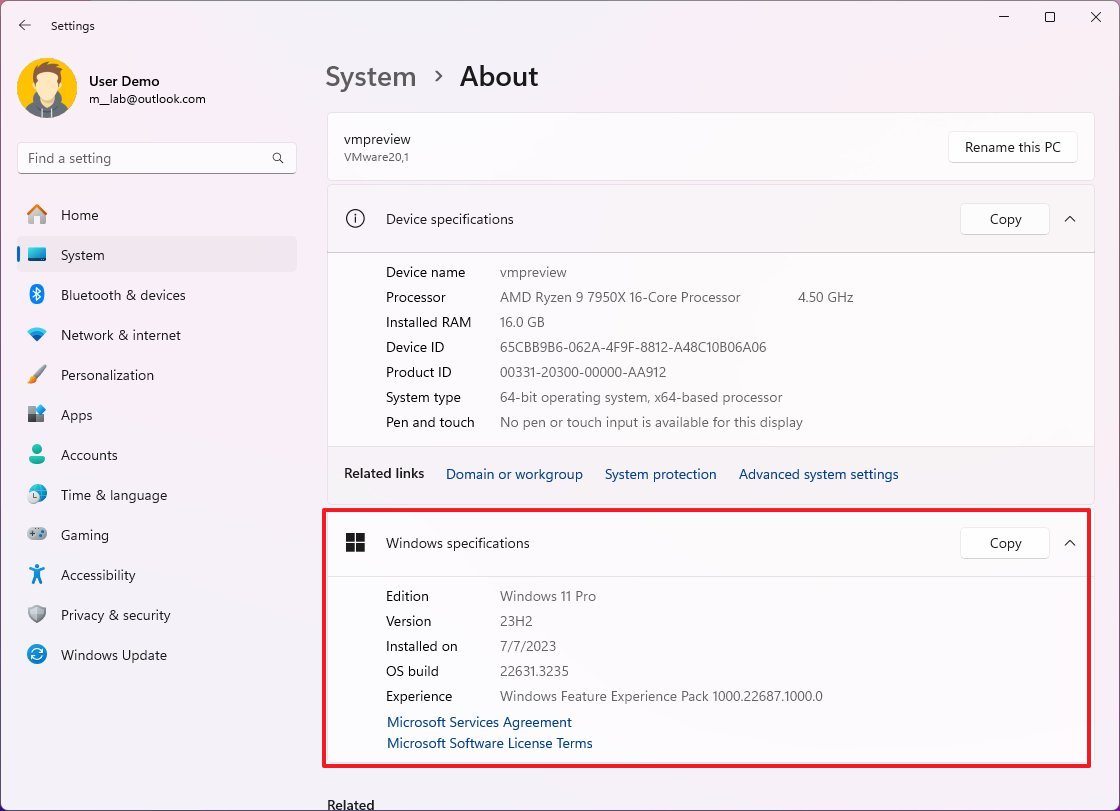
- (Optional) Click the Copy button to copy and share the details and save them for future reference or inventory.
Once you complete the steps, you will know the basic technical specifications for the computer.
How to find device specs using System Information on Windows 11
The System Information app can give you a complete overview of the computer’s technical specifications on Windows 11.
All the latest news, reviews, and guides for Windows and Xbox diehards.
To view all the hardware specs of the laptop or desktop computer, use these steps:
- Open Start.
- Search for msinfo32 and click the top result to open the System Information app.
- Select on System Summary.
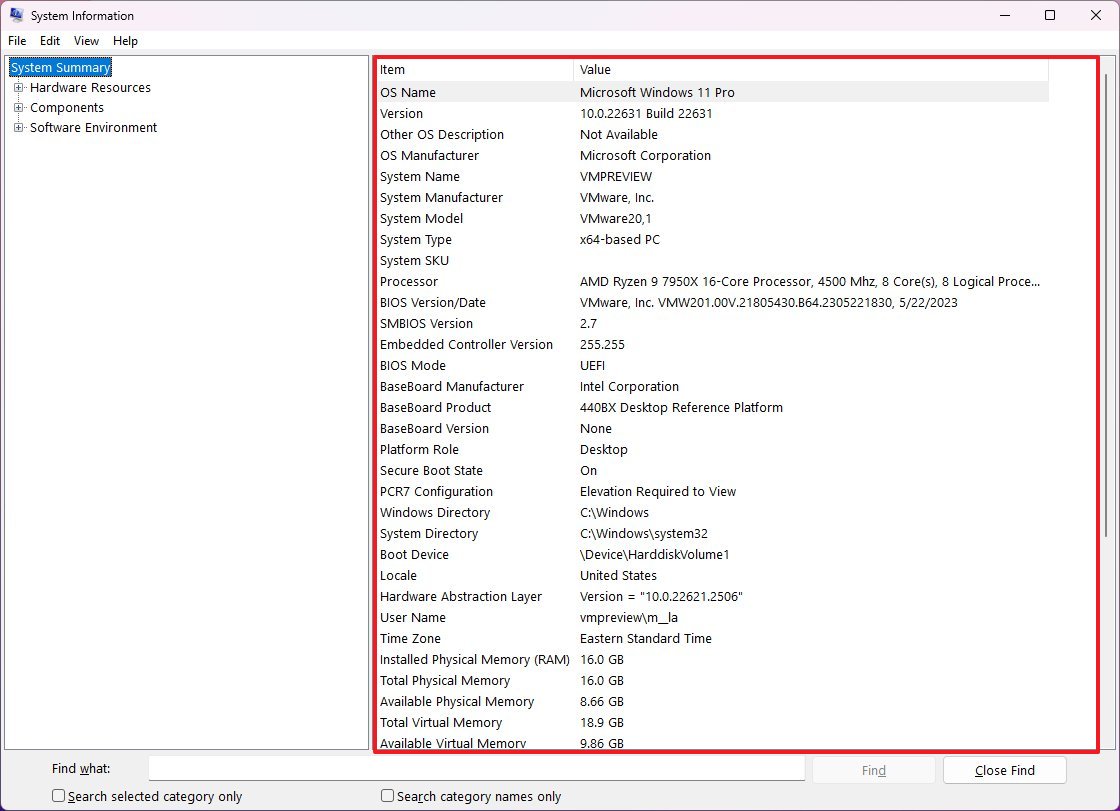
- Confirm the device specifications, including system model and type, processor brand and model, UEFI firmware version and other details, total memory capacity, motherboard brand and model, and virtualization feature support.
- (Optional) Expand the Components branch.
- Click on Display to view the graphics card information.
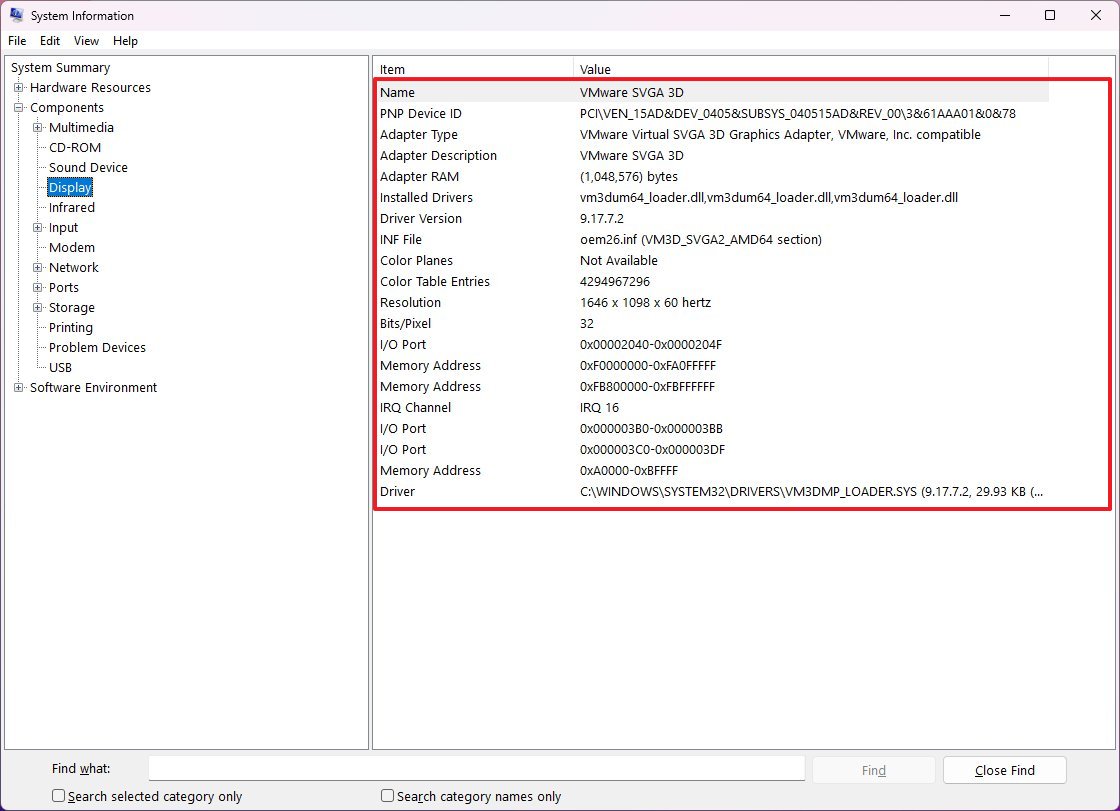
After you complete the steps, you will have a detailed overview of the device.
Create hardware specs report
You can also use the app to create a computer hardware and software specifications report.
To create a report with the system specifications on Windows 11, use these steps:
- Open Start.
- Search for msinfo32 and click the top result to open the System Information app.
- Select the tech specs to export by selecting the category on the left navigation pane.
- Quick tip: Selecting «System Summary» will export everything. However, if you only need to export the graphics card details, select the «Display» item.
- Click on the File menu.
- Click the Export option.
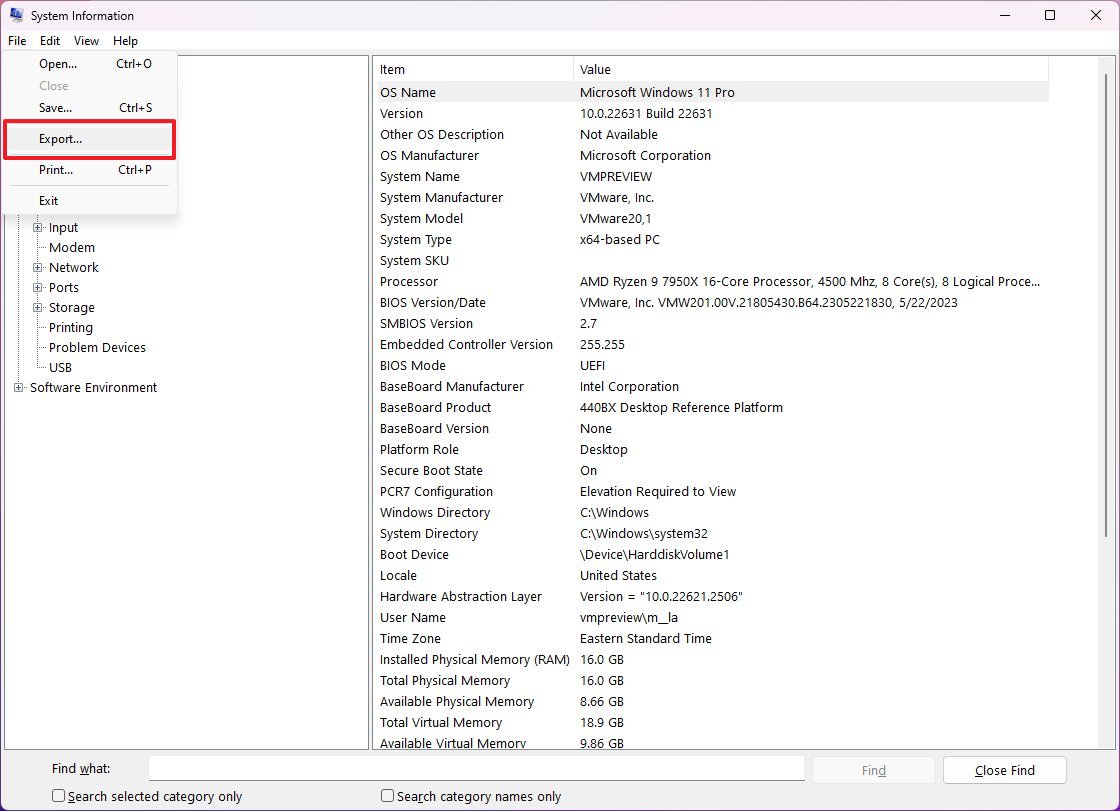
- Select the folder to export the report.
- Confirm a descriptive name for the report — for example, «Office PC Specs.»
- Click the Save button.
After you complete the steps, the specifications will export into a text file, which you can then open with any text editor.
How to find device specs from PowerShell on Windows 11
You can use PowerShell to determine the technical specifications of a laptop or desktop computer on Windows 11.
To check the computer tech specs through PowerShell, use these steps:
- Open Start.
- Search for PowerShell, right-click the top result, and select the Run as administrator option.
- Type the following command to determine the hardware specs and press Enter: Get-ComputerInfo
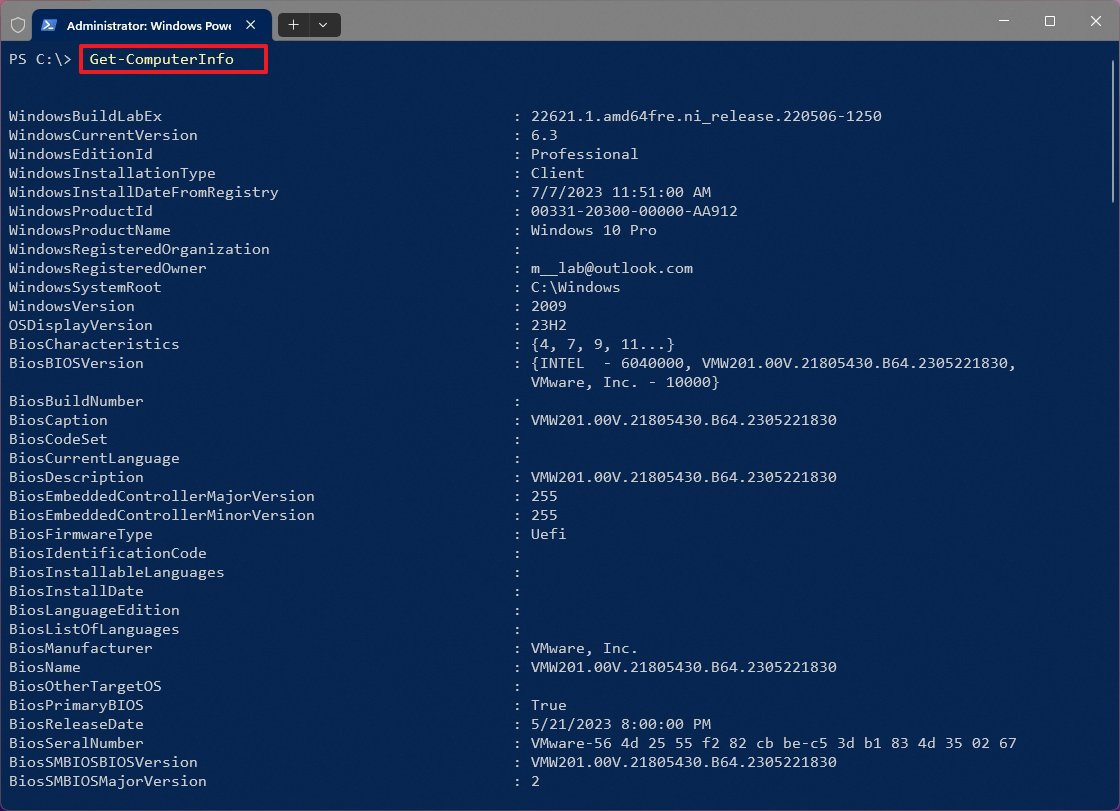
- (Optional) Type the following command to view only the details of a specific component and press Enter: Get-ComputerInfo -Property «PROPERTY-NAME»
In the command, change PROPERTIES-NAME for the details to review. This example shows the firmware information: Get-ComputerInfo -Property «bios*»
- Quick note: The asterisk
*in the command is a wildcard to match every property that starts with the «BIOS» keyword.
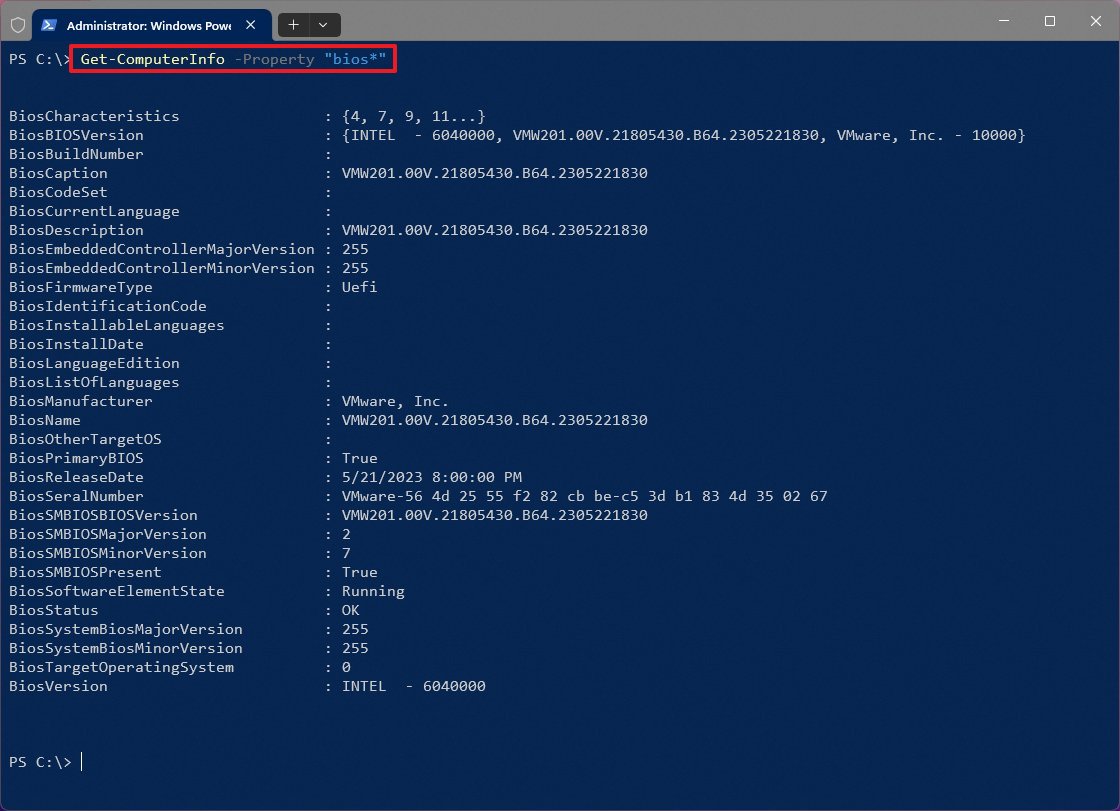
Once you complete the steps, PowerShell will display a complete list of the hardware information from Windows 11 or the specific property you specified in the command.
How to find device specs from Command Prompt on Windows 11
Also, it’s possible to use Command Prompt to generate a viewing of the technical specifications with the System Information tool.
To determine the computer specifications from Command Prompt on Windows 11, use these steps:
- Open Start.
- Search for Command Prompt, right-click the top result, and select the Run as administrator option.
- Type the following command to find the computer technical specifications and press Enter: systeminfo
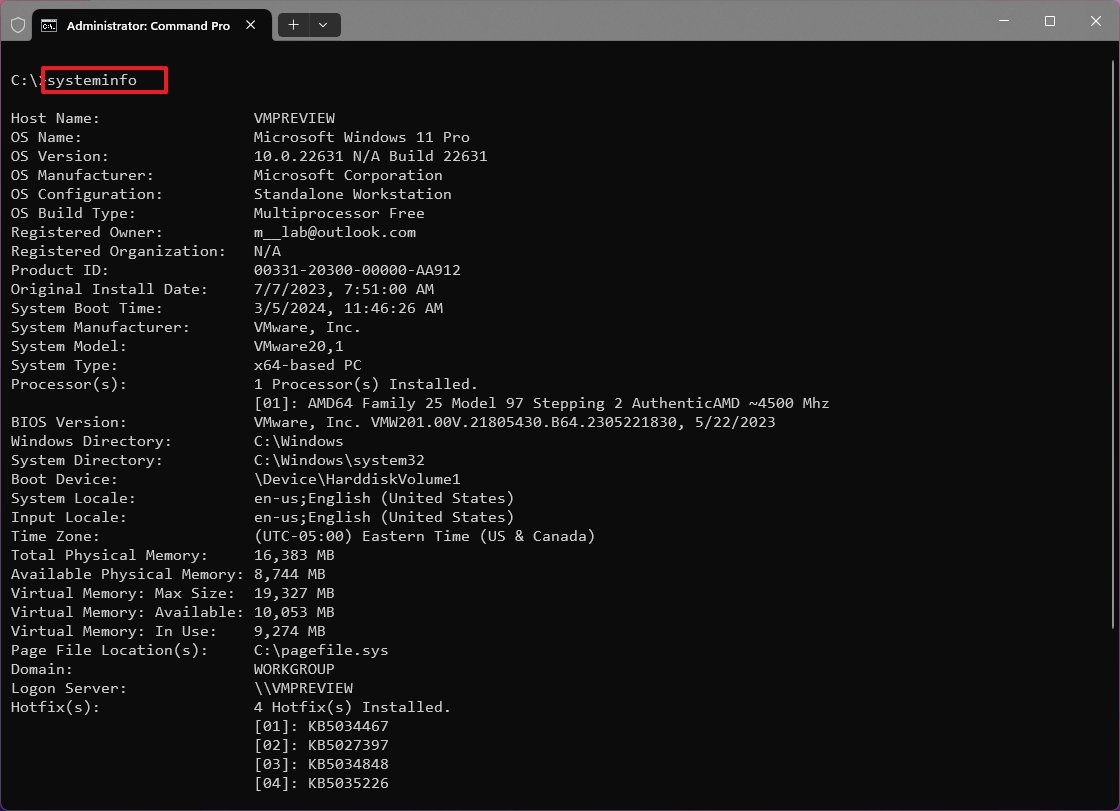
- Quick tip: Use the «systeminfo /?» command to list the available options of the tool.
- (Optional) Type the following command to view only the details of a specific component and press Enter: systeminfo | findstr /C:»ITEM-NAME»
In the command, change ITEM-NAME for the details to review as shown in the «Item» column of the System Information app. This example shows the total amount of memory: systeminfo | findstr /C:»Total Physical Memory»

Once you complete the steps, the hardware and software specifications will be shown in the output.
On Command Prompt and PowerShell, you can use these instructions to export the command console output to a text file.
More resources
For more helpful articles, coverage, and answers to common questions about Windows 10 and Windows 11, visit the following resources:
- Windows 11 on Windows Central — All you need to know
- Windows 10 on Windows Central — All you need to know
Mauro Huculak has been a Windows How-To Expert contributor for WindowsCentral.com for nearly a decade and has over 15 years of experience writing comprehensive guides. He also has an IT background and has achieved different professional certifications from Microsoft, Cisco, VMware, and CompTIA. He has been recognized as a Microsoft MVP for many years.