Все способы:
- Вариант 1: «Диспетчер задач»
- Вариант 2: Раздел «О системе»
- Вариант 3: Утилита msinfo32
- Вариант 4: «PowerShell»
- Вариант 5: Сторонние программы
- Вариант 6: BIOS
- Вопросы и ответы: 1
Вариант 1: «Диспетчер задач»
Через «Диспетчер задач» в Windows 11 пользователь может не только получить информацию об установленном количестве оперативной памяти, но и узнать, насколько она загружена, как используется файл подкачки, ознакомиться с графиком нагрузки и посмотреть на активные процессы. Этот метод мы считаем приоритетным и самым доступным, поэтому давайте ознакомимся с ним более детально.
- Для начала понадобится перейти в «Диспетчер задач». Для этого щелкните правой кнопкой мыши по кнопке «Пуск» и из контекстного меню выберите соответствующий пункт.
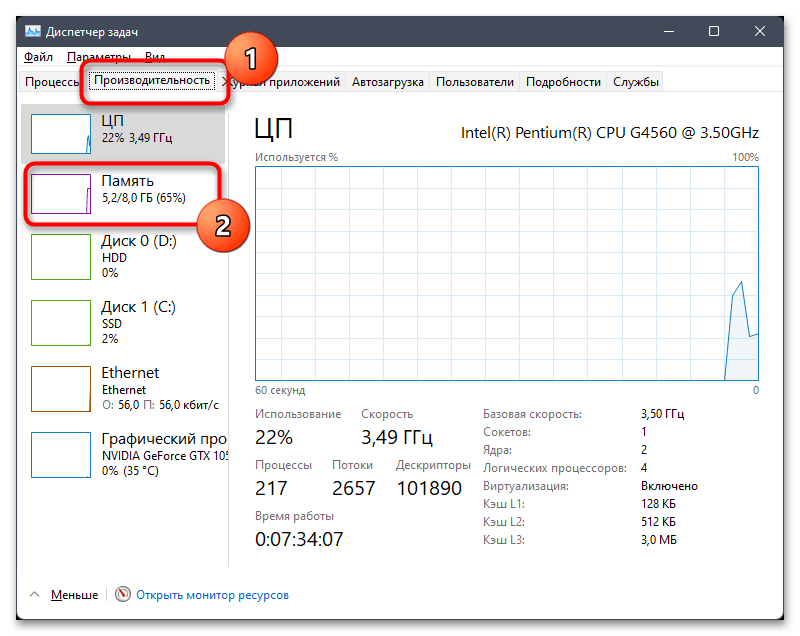
- Перейдите на вкладку «Производительность» и среди мониторов выберите «Память». Кстати, прямо под названием монитора уже видно, сколько памяти из доступной используется.
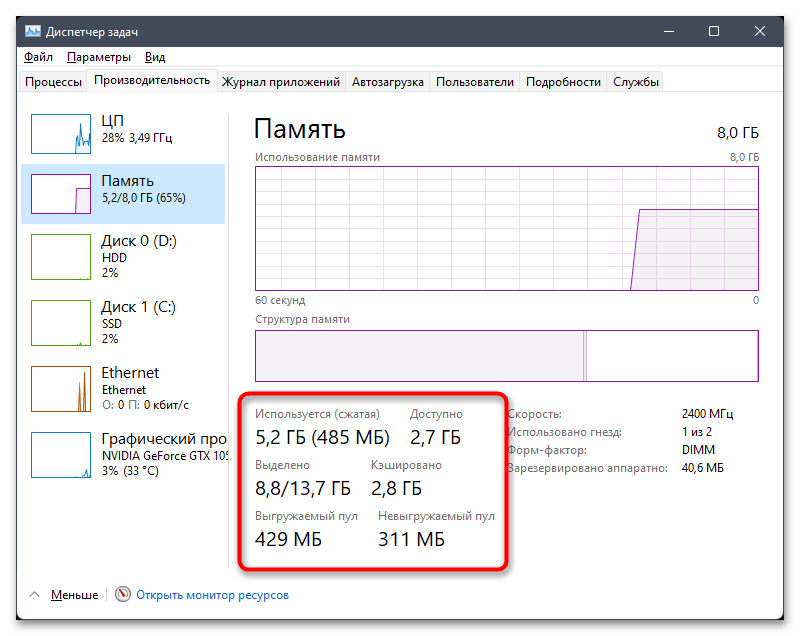
- Однако вы можете получить более детальные сведения, учитывая количество выделенной памяти, сжатой, кешированной и доступной. Здесь же отображается невыгружаемый пул, большой объем которого иногда становится причиной зависаний в работе ОС.
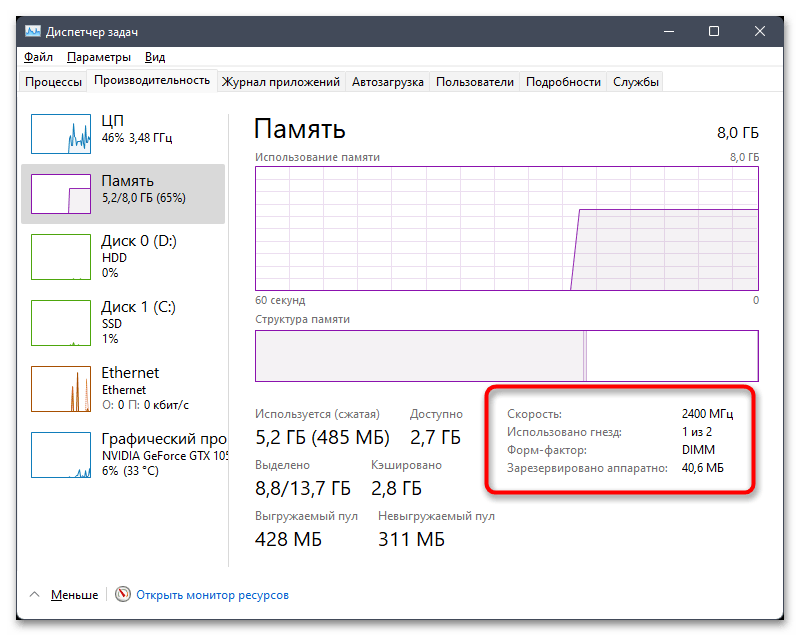
- Справа вы видите номинальную скорость вашей оперативной памяти, количество занятых слотов, форм-фактор ОЗУ и объем аппаратно зарезервированной RAM.
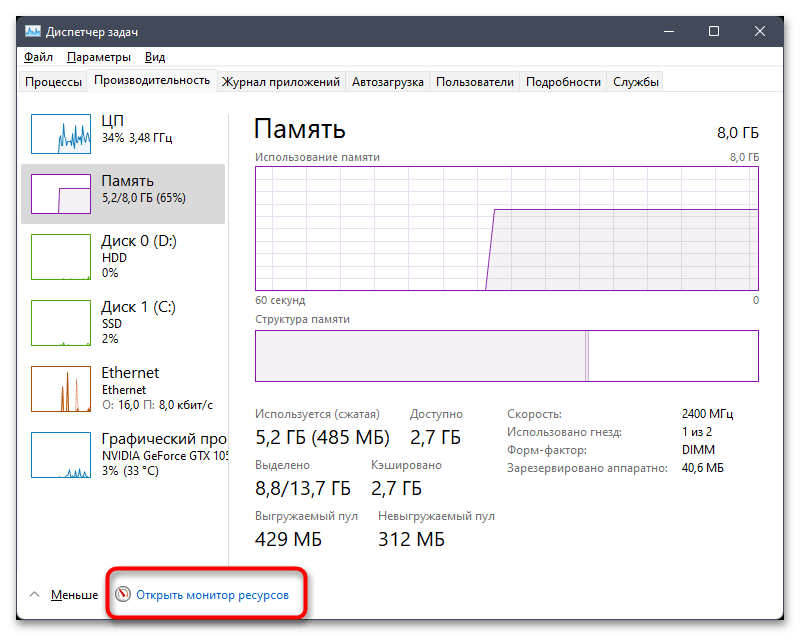
- Если хотите получить более детальные сведения об использовании оперативной памяти в Виндовс 11, щелкните по ссылке «Открыть монитор ресурсов» внизу.
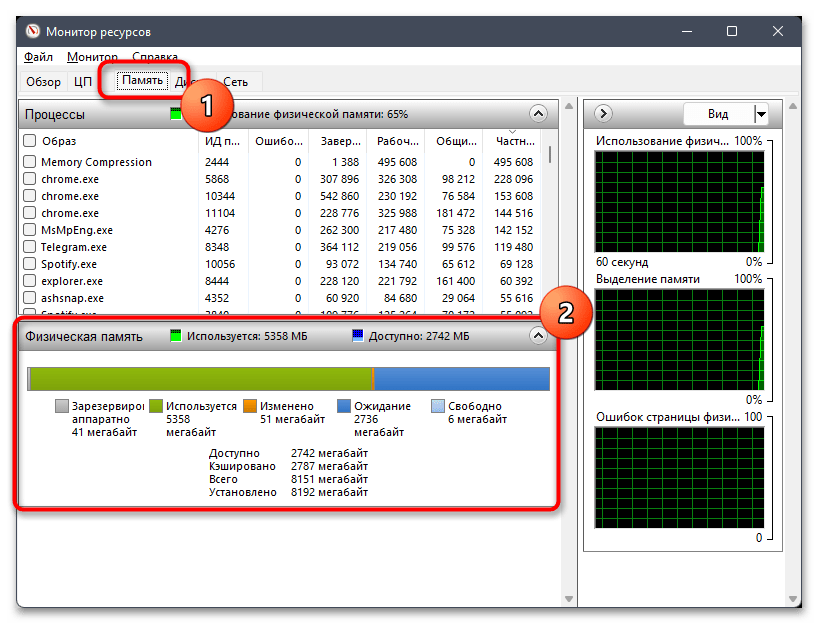
- Далее перейдите на вкладку «Память» и ознакомьтесь с линией, где наглядно при помощи цветов показано, сколько используется памяти, сколько свободно и сколько находится в ожидании.
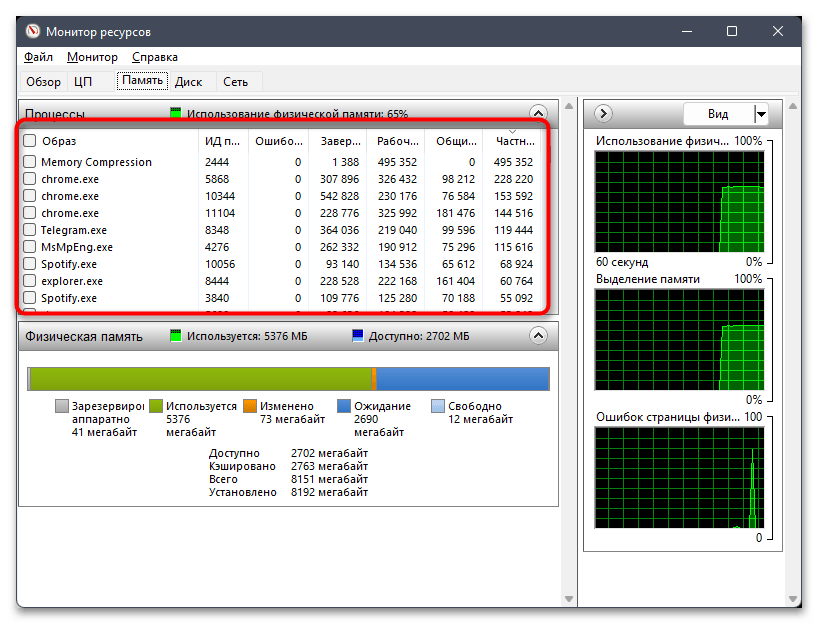
- Есть и список процессов, которые можно сортировать как по алфавиту, так и по количеству используемой ОЗУ.
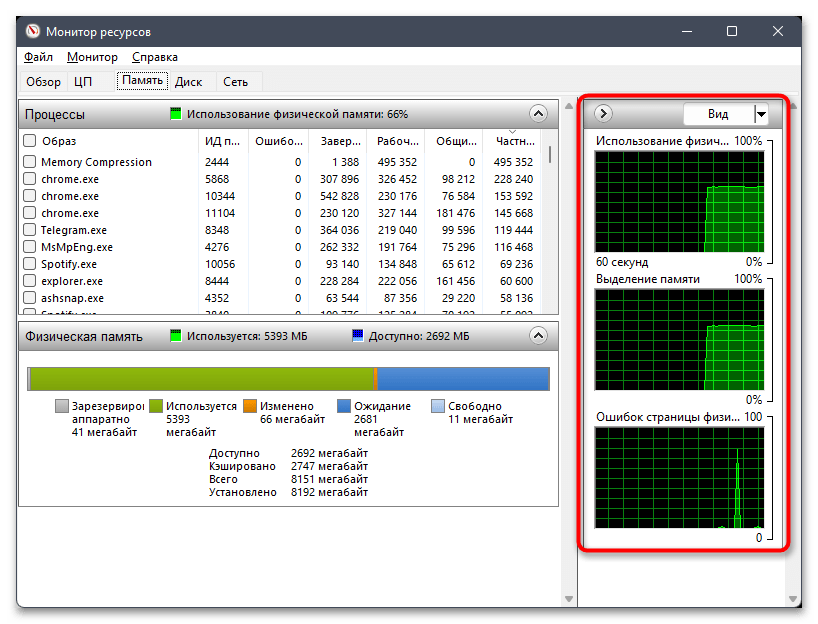
- Если вас интересуют графики использования в режиме реального времени, обратите внимание на три разных справа. Этих сведений вполне достаточно для того, чтобы получить полную картину об ОЗУ в Windows 11.
Вариант 2: Раздел «О системе»
Следующий метод более простой и отображает только один параметр оперативной памяти — ее объем. Подойдет тем пользователям, кого только эта характеристика и интересует. Вы можете использовать следующую инструкцию, чтобы понять, как обратиться к требуемому меню и получить нужные сведения.
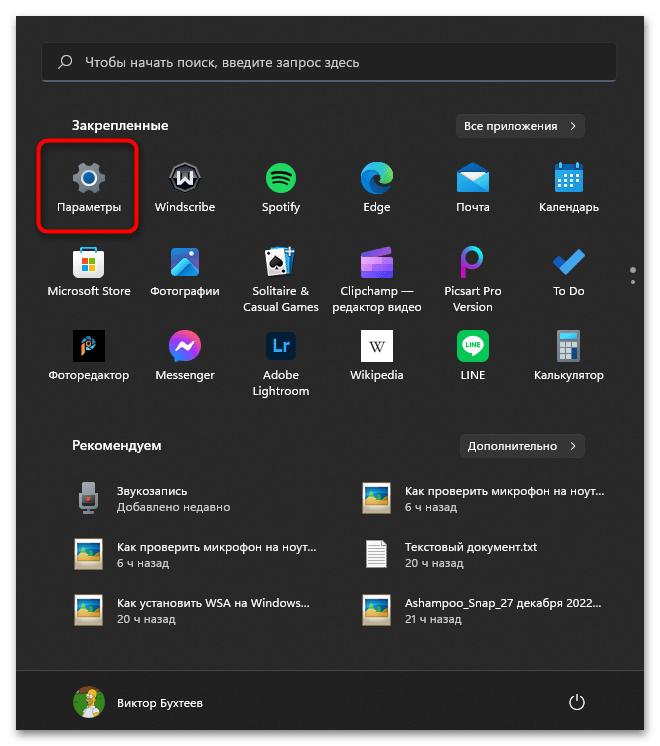
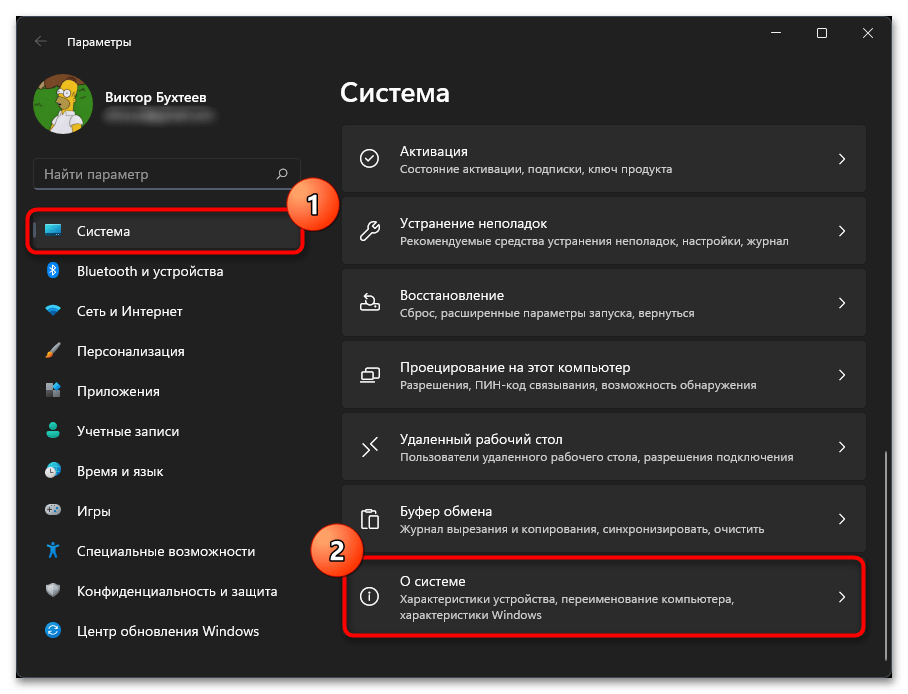
- Откройте меню «Пуск» и нажмите по закрепленному значку с изображением шестеренки, чтобы перейти в «Параметры».
- На панели слева выберите раздел «Система», прокрутите колесико мыши в самый низ и щелкните по пункту «О системе».
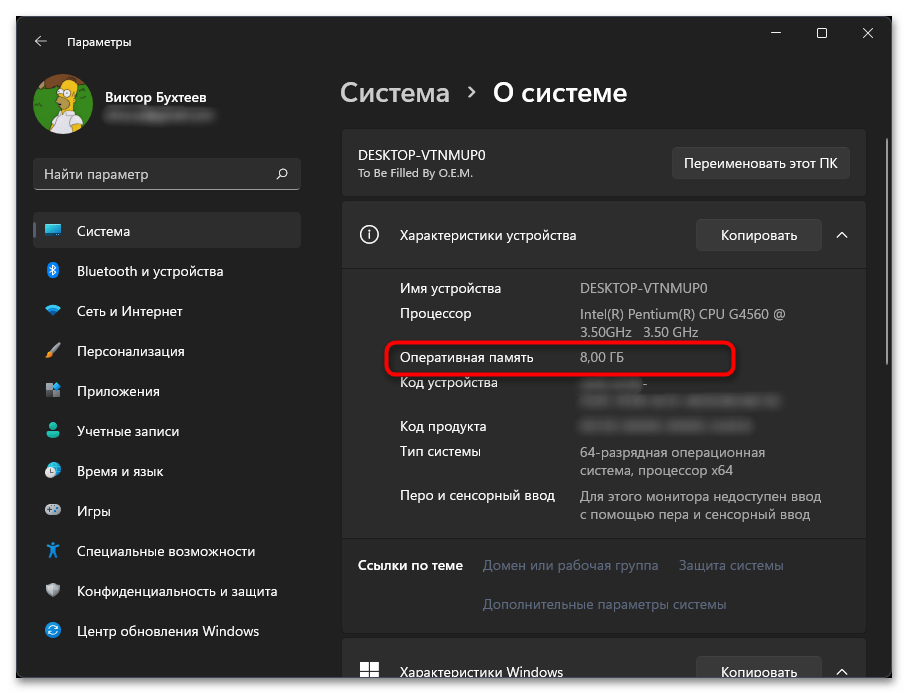
- Теперь остается только найти строку «Оперативная память», чтобы понять, какой номинальный объем ОЗУ установлен в используемом компьютере.
Вариант 3: Утилита msinfo32
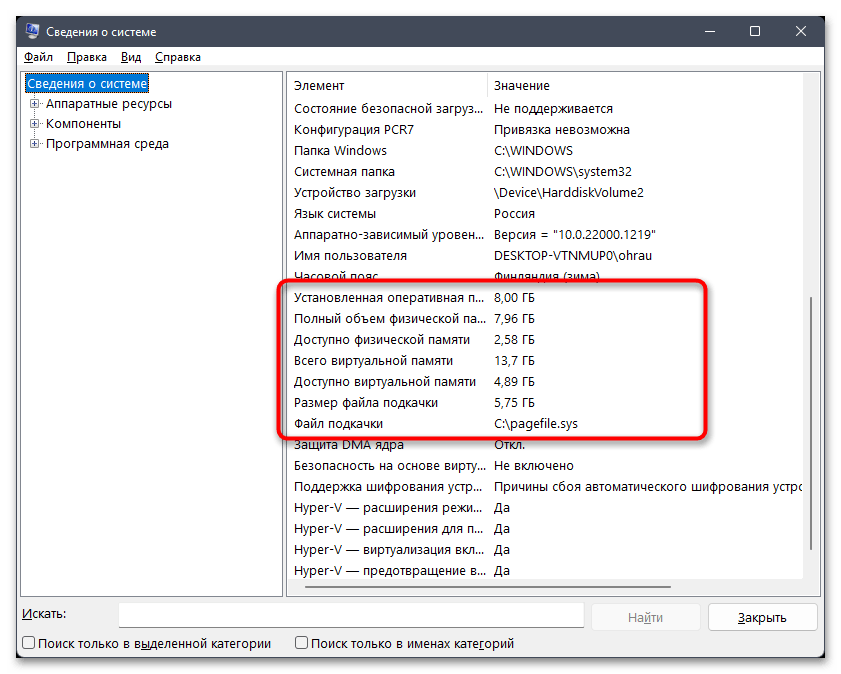
Далее предлагаем воспользоваться еще одним стандартным средством Windows 11, при помощи которого можно запросто получить необходимые сведения о характеристиках компьютера, включая данные об оперативной памяти. Строк с информацией будет несколько, поэтому вы даже сможете узнать, сколько установлено виртуальной памяти и какое количество физической доступно в текущий момент.
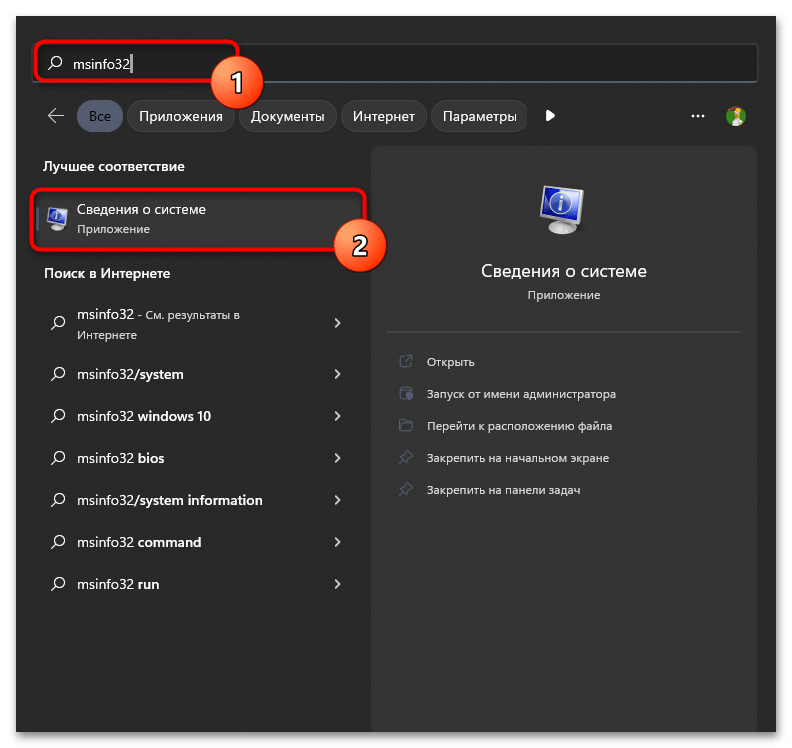
- Проще всего запустить утилиту через меню «Пуск», для этого в поле ввода укажите
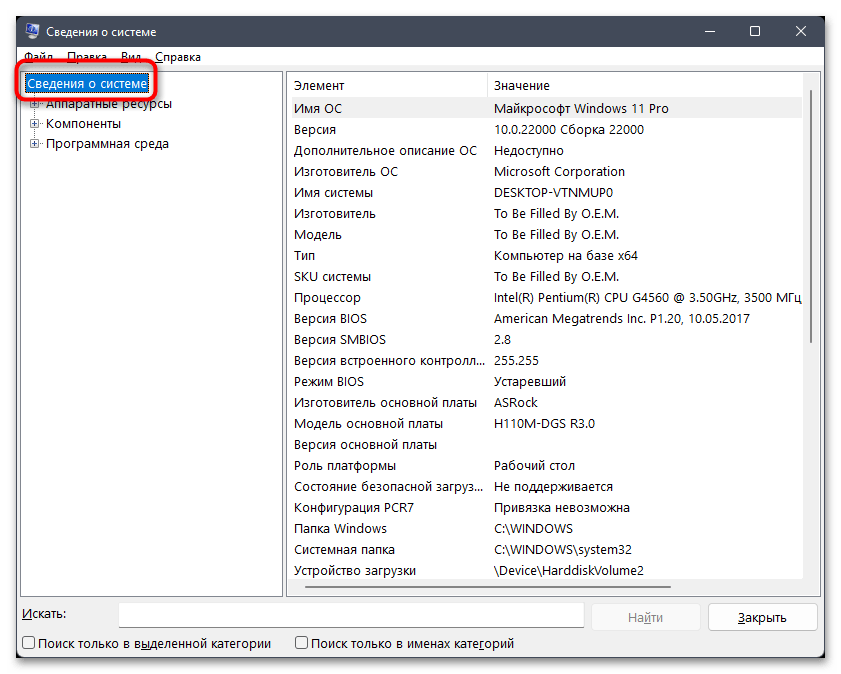
msinfo32и нажмите левой кнопкой мыши по появившемуся соответствию. - В новом окне выберите раздел «Сведения о системе», выделив строку нажатием ЛКМ.
- Прокрутите список с характеристиками немного вниз, чтобы получить информацию об оперативной памяти. Как вы уже поняли, так вы узнаете установленный и доступный объемы ОЗУ, а также количество виртуальной памяти с расположением файла подкачки.
Вариант 4: «PowerShell»
С помощью команды для «PowerShell» можно узнать не только установленный объем оперативной памяти в Windows 11, но и получить информацию об установленной скорости, что тоже бывает актуально. Используемая далее утилита выведет сведения отдельно о каждой плашке, если такие установлены в разных разъемах на материнской плате.
- Щелкните правой кнопкой мыши по «Пуску» и из появившегося контекстного меню выберите пункт «Терминал Windows (Администратор)».
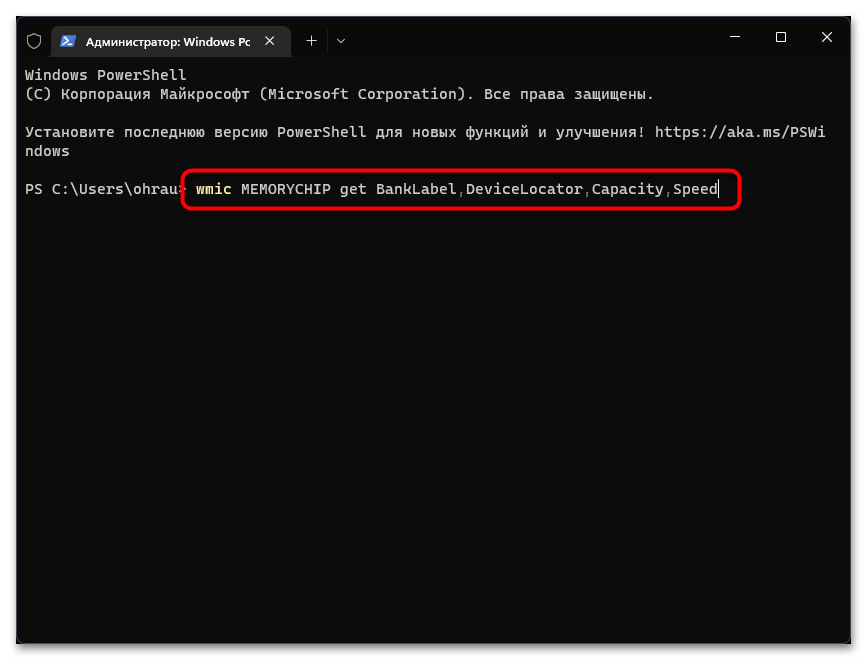
- В появившемся окне «PowerShell» введите команду
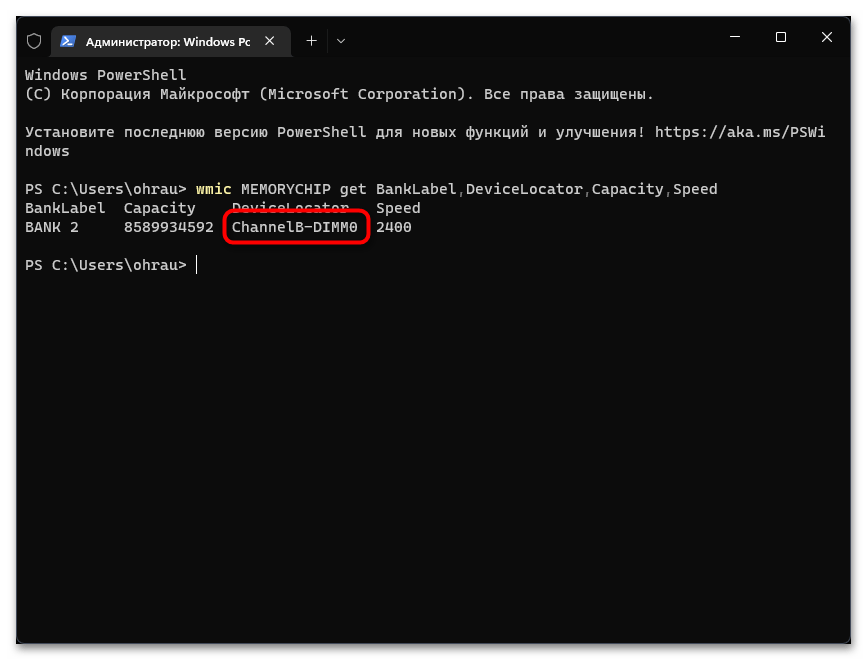
wmic MEMORYCHIP get BankLabel,DeviceLocator,Capacity,Speedи нажмите Enter для ее применения. - Первое значение показывает общий объем планки ОЗУ в байтах, поэтому понадобится немного времени на перевод значения в ГБ.
- Далее идет номер слота и информация о канале, что нужно в редких случаях.
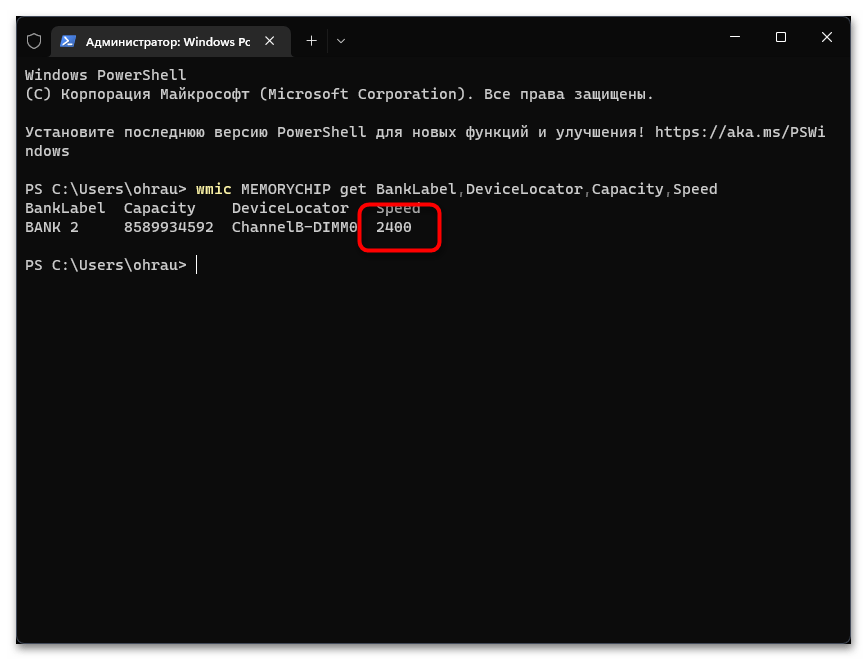
- Показатель «Speed» отображает номинальную скорость оперативной памяти, но это не значит, что именно с такой она сейчас работает в операционной системе.

Вариант 5: Сторонние программы
При помощи сторонних программ в Windows 11 можно получить комплексный набор информации о комплектующих и их характеристиках. В рамках данной статьи не будем разбирать всю функциональность подобного рода софта, а только рассмотрим, как осуществляется получение сведений об оперативной памяти на примере бесплатного решения под названием Speccy.
Скачать Speccy
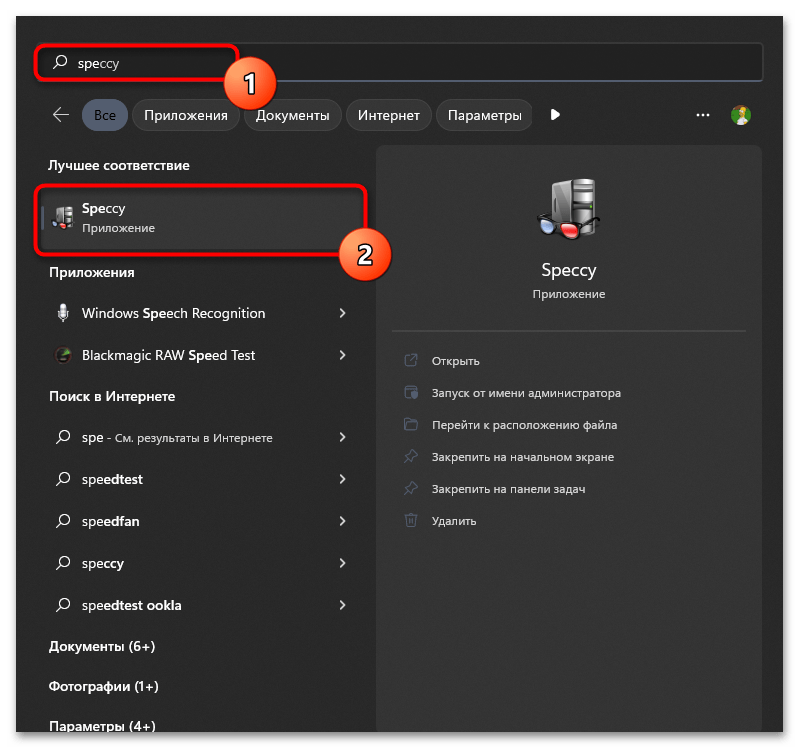
- Вы можете выбрать данную программу или скачать любую другую на свое усмотрение. После установки запустите приложение через значок на рабочем столе или исполняемый файл при поиске через «Пуск».
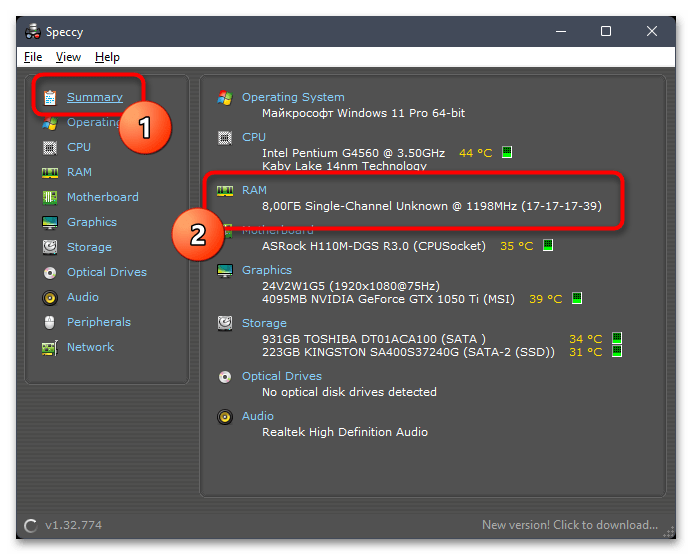
- В Speccy вы можете выбрать первый раздел с названием «Summary», чтобы получить информацию о том, какой объем оперативной памяти установлен в компьютере, работает ли многоканальность и на какой частоте.
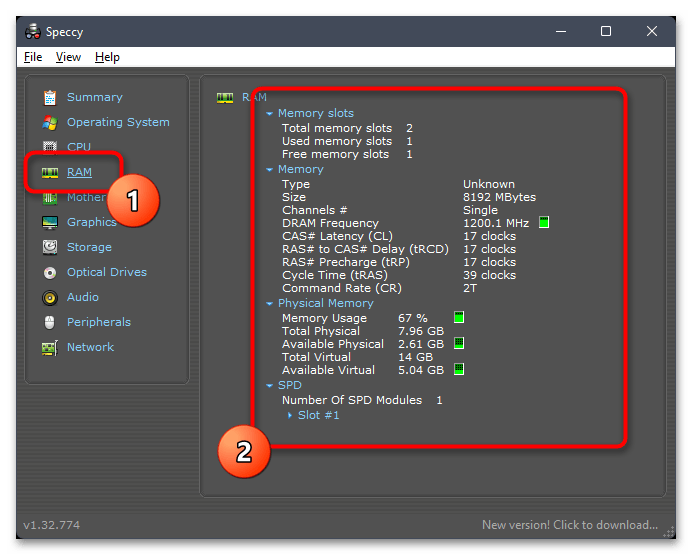
- Если интересуют дополнительные сведения, перейдите в «RAM» и начните ознакомление со всей представленной информацией.
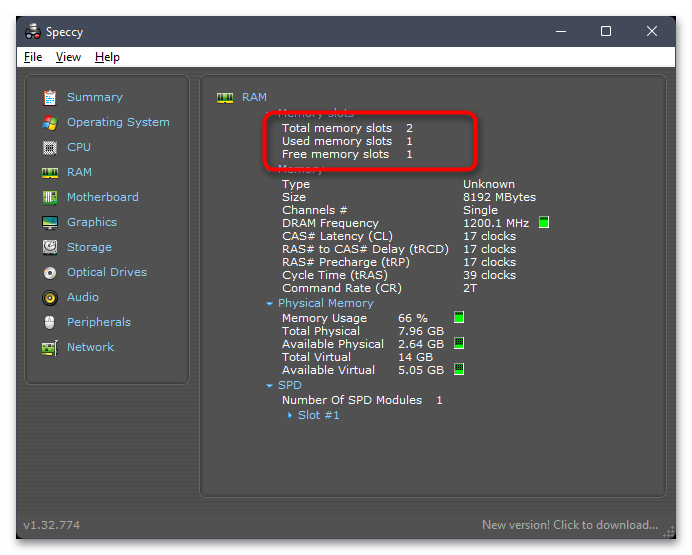
- Здесь же можно увидеть, сколько всего слотов под оперативную память доступно в вашей материнской плате и сколько занято.
Существуют и другие как платные, так и бесплатные программы, позволяющие юзеру получить сразу всю информацию о характеристиках компьютера. Мы рекомендуем ознакомиться с обзором по следующей ссылке, если вы еще не решили, какой софт использовать в данной ситуации.
Подробнее: Программы для определения железа компьютера
Вариант 6: BIOS
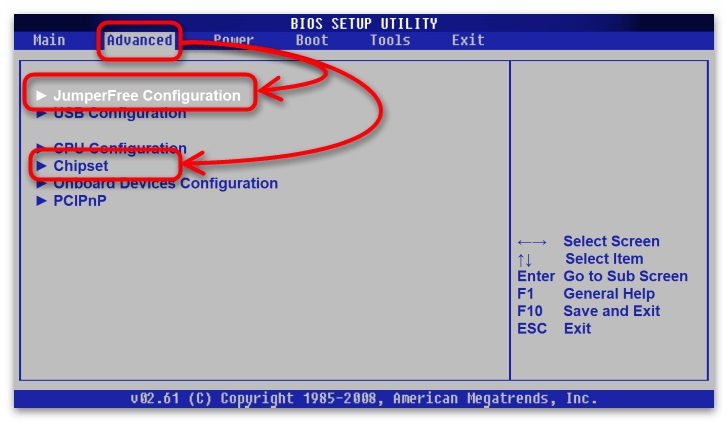
В завершение затронем метод, который непосредственно не связан с Windows 11, поскольку его можно использовать даже без входа в операционную систему. Вам понадобится при загрузке перейти в BIOS и выбрать соответствующий раздел, в котором и показана информация о RAM. Способ перехода к такому разделу и отображающаяся в нем информация зависит исключительно от версии БИОС или UEFI.
Подробнее: Как посмотреть оперативную память в BIOS
Наша группа в TelegramПолезные советы и помощь
If you have a Windows 11 laptop or desktop computer, understanding the system memory — or RAM (Random Access Memory) — specifications could be helpful to troubleshoot problems with technical support or confirm the changes after tweaking the settings in the Unified Extensible Firmware Interface (UEFI).
Also, if the device is ready for an upgrade, understanding the RAM details can come in handy to determine the brand, speed, size, and other information you may need to get the correct modules to improve system performance.
Whatever the reason, you can use Command Prompt on Windows 11 to quickly find out all the information without using Task Manager or third-party tools.
This guide will walk you through the steps to determine the specifications for the memory installed on your computer.
How to check RAM specs with Command Prompt on Windows 11
You can use Command Prompt to find out many details about the system memory installed on the computer, including manufacturer, part and serial number, capacity information, speed, type, form factor, and more.
Although you can use commands to query many different details about the system memory, some information may not be available depending on the hardware.
Check manufacturer
All the latest news, reviews, and guides for Windows and Xbox diehards.
To find out the memory manufacturer, use these steps:
- Open Start.
- Search for Command Prompt, right-click the top result, and select the Run as administrator option.
- Type the following command to determine the memory manufacturer name and press Enter: wmic memorychip get devicelocator, manufacturer
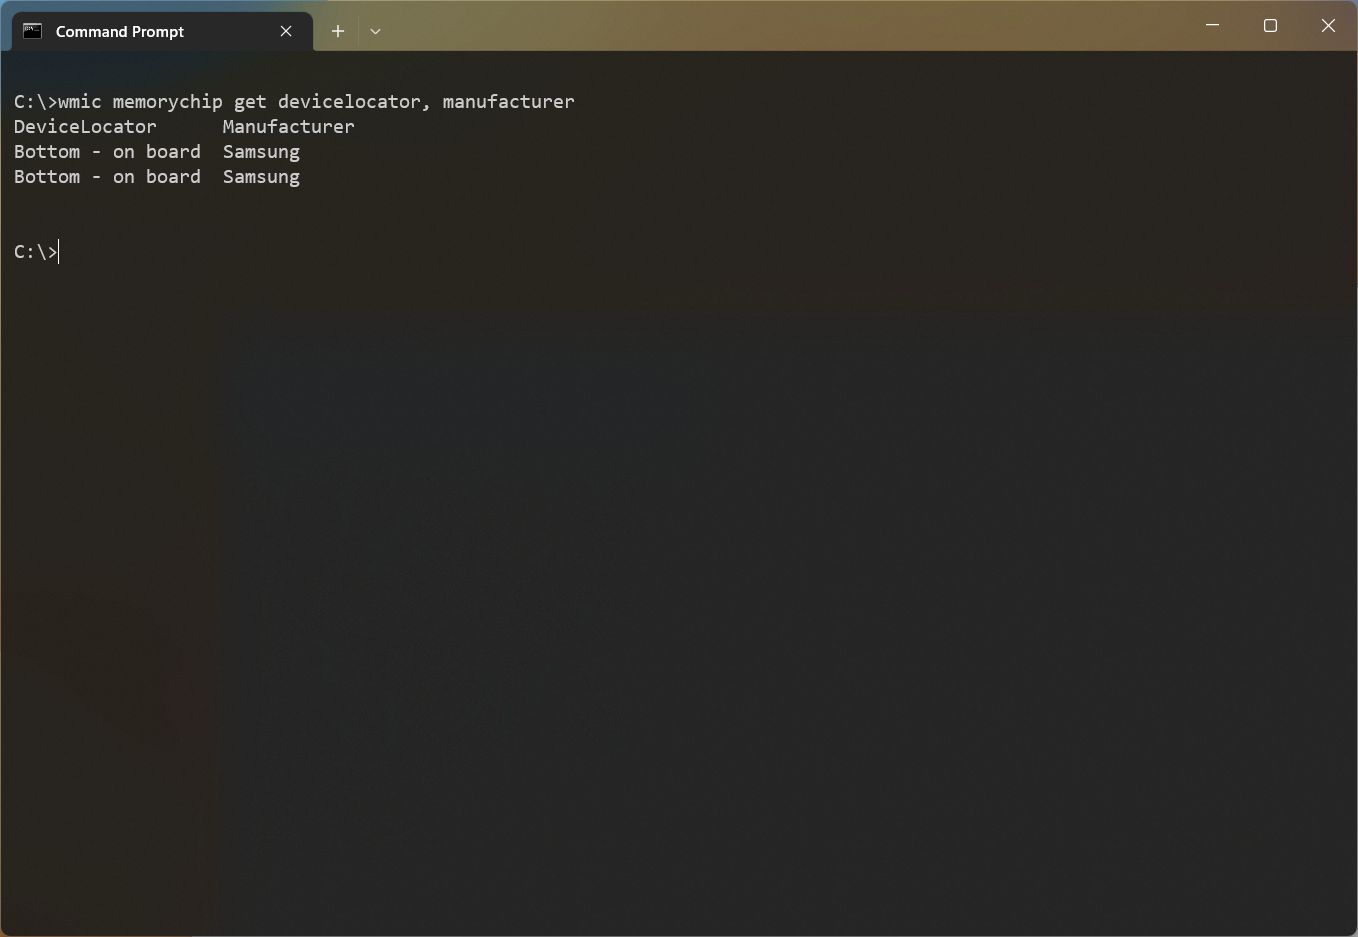
- Confirm the memory manufacturer name under the «Manufacturer» column.
Check part number
To determine the part number for each of the memory modules, use these steps:
- Open Start.
- Search for Command Prompt, right-click the top result, and select the Run as administrator option.
- Type the following command to determine the memory part number and press Enter: wmic memorychip get devicelocator, partnumber
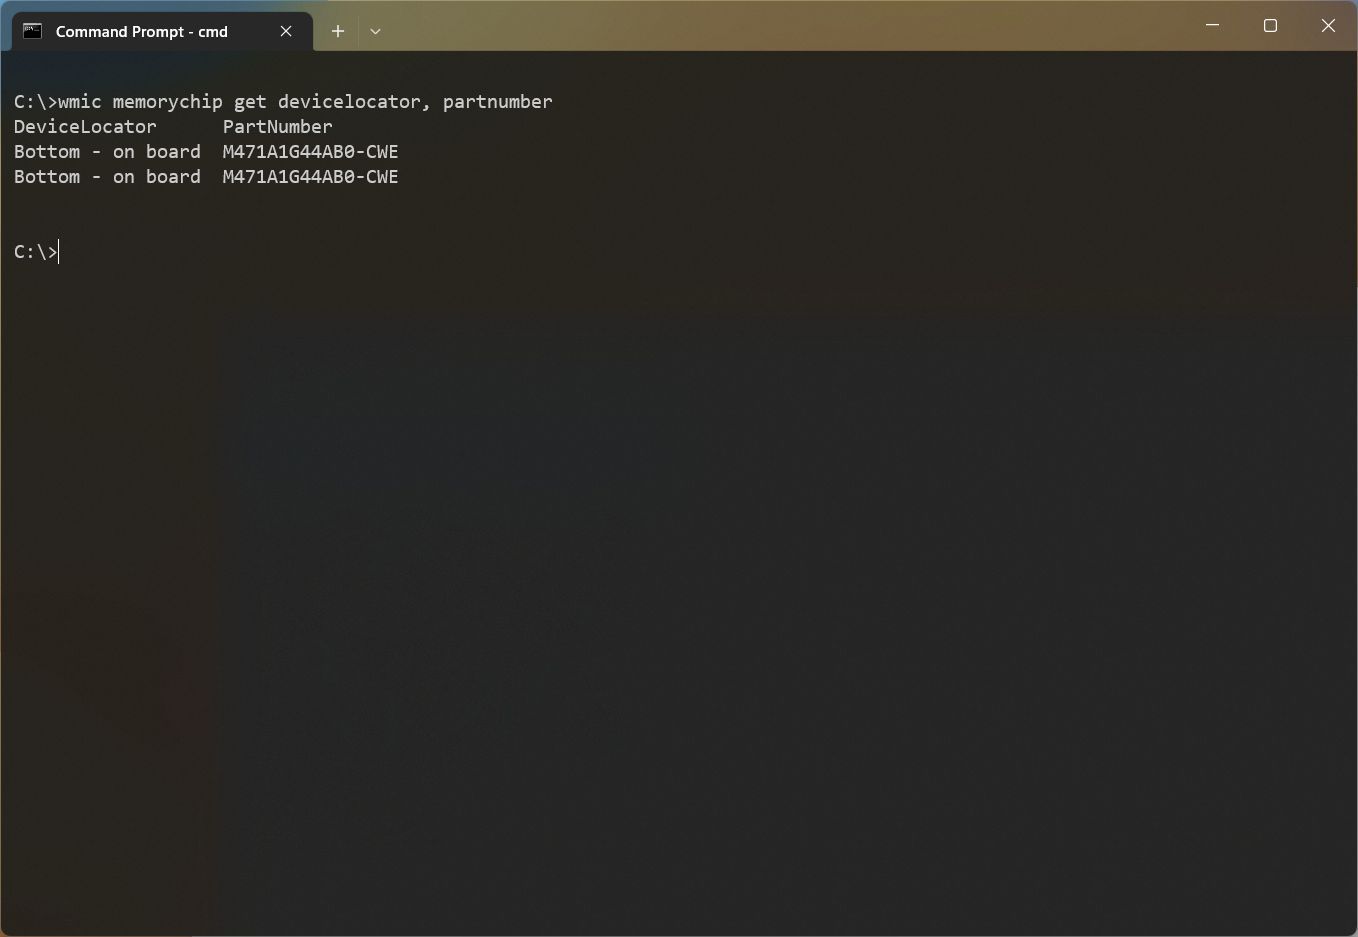
- Confirm the product number under the «PartNumber» column.
Check serial number
To check the memory serial number, use these steps:
- Open Start.
- Search for Command Prompt, right-click the top result, and select the Run as administrator option.
- Type the following command to get the RAM stick’s serial number and press Enter: wmic memorychip get devicelocator, serialnumber
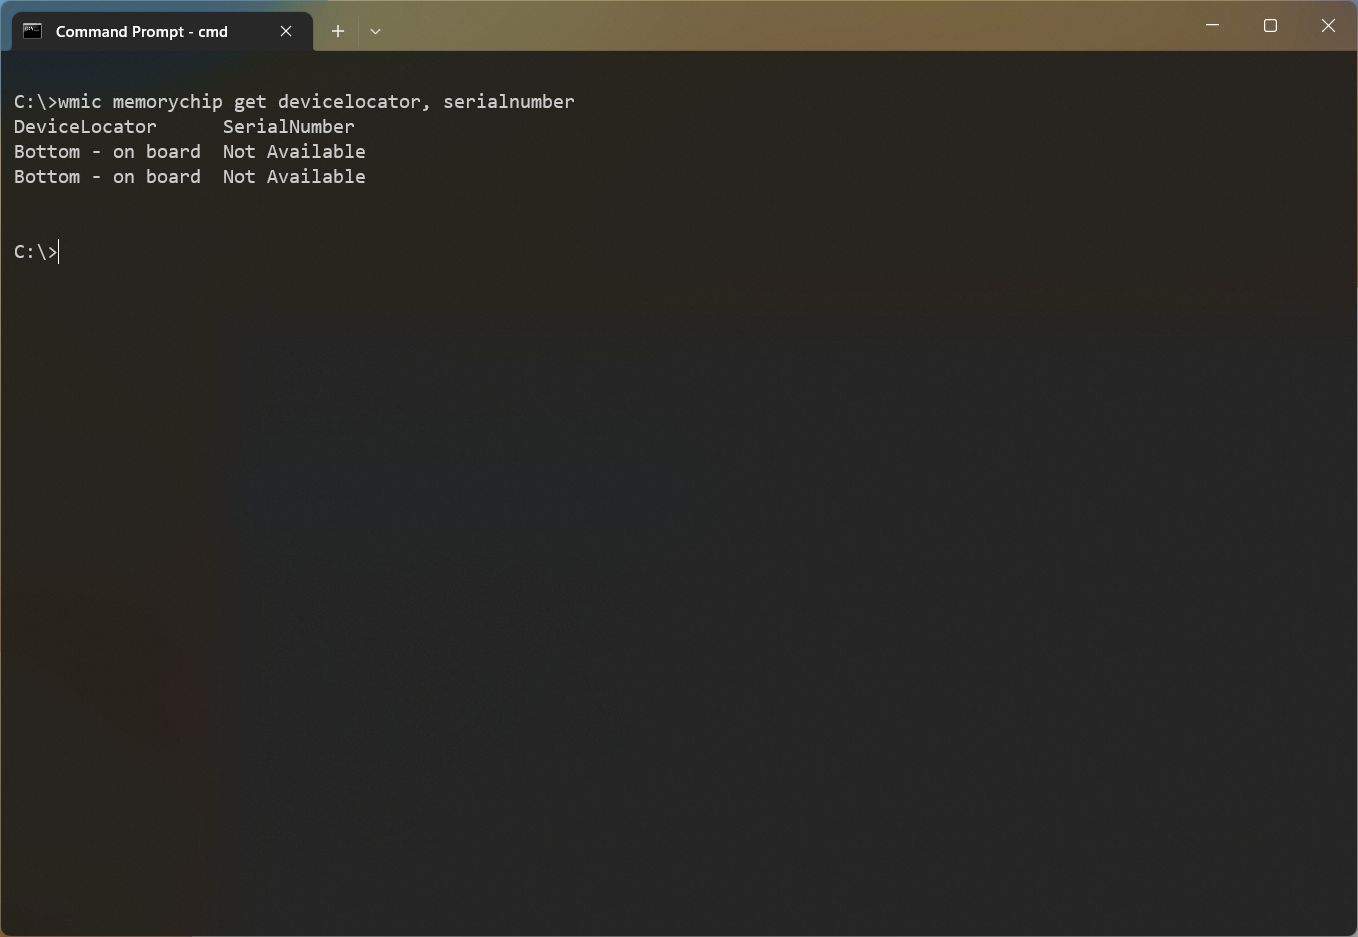
- Confirm the product serial number under the «SerialNumber» column.
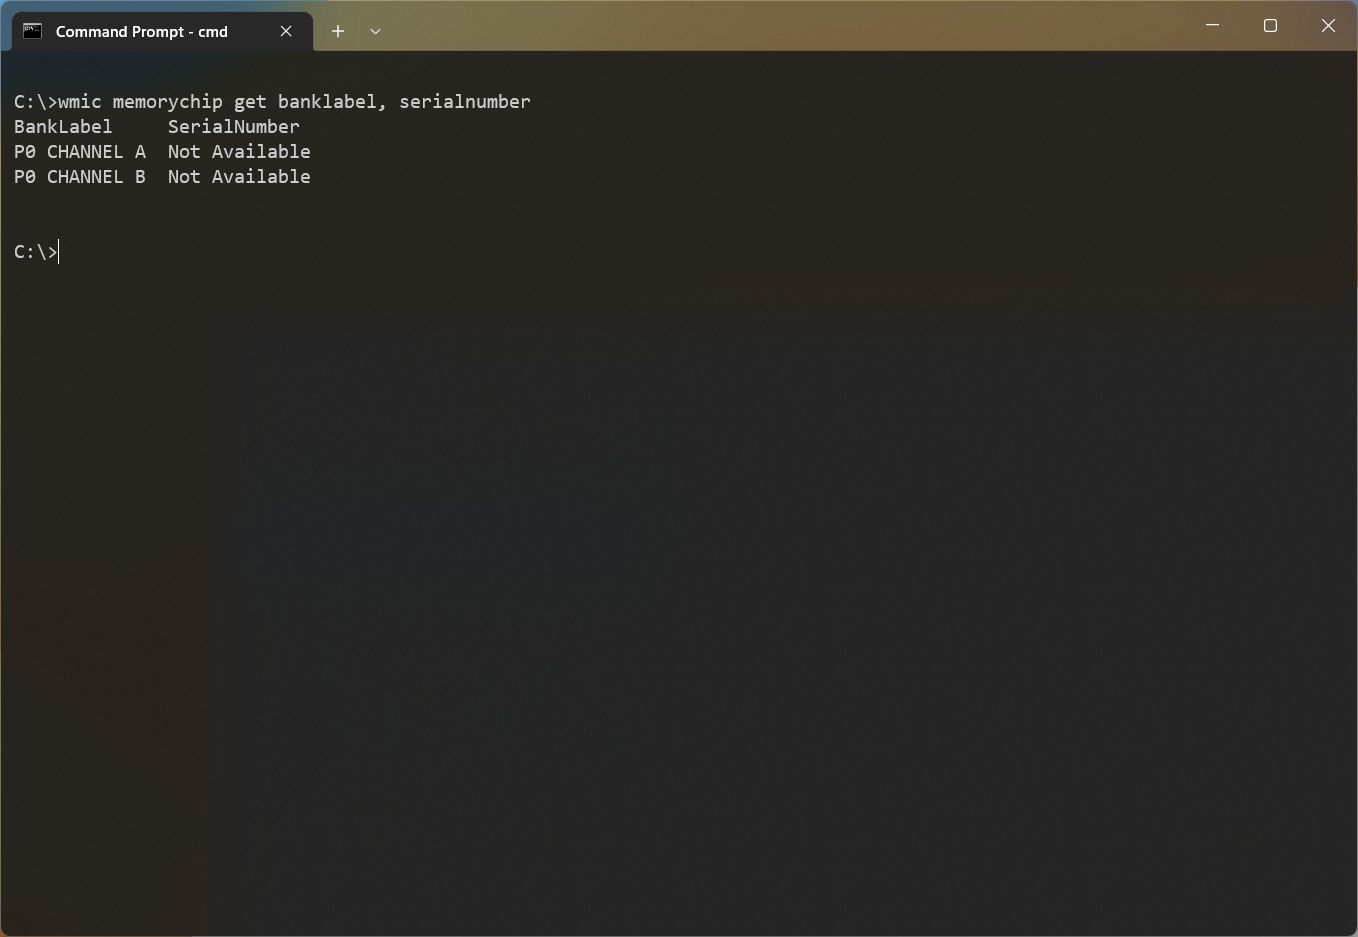
- (Optional) Type the following command to find out the physical location of the stick on the motherboard and press Enter: wmic memorychip get banklabel, serialnumber
Check capacity
On Windows 11, you can also use different commands to determine the total system capacity or capacity per module.
Determine capacity per module
To find out the amount of memory available in each stick, use these steps:
- Open Start.
- Search for Command Prompt, right-click the top result, and select the Run as administrator option.
- Type the following command to determine each module capacity and press Enter: wmic memorychip get devicelocator, capacity
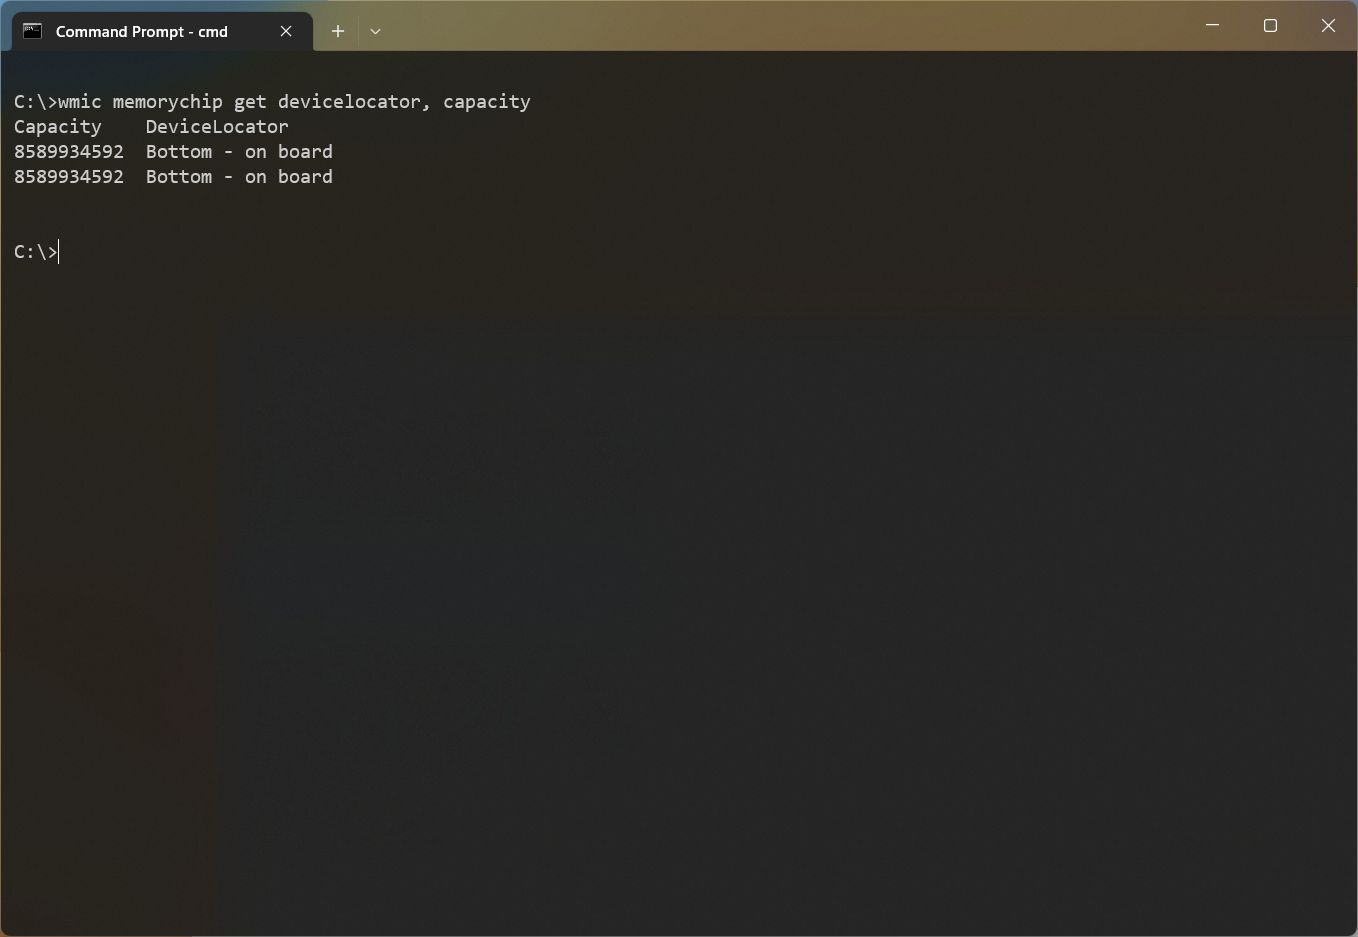
- Confirm the amount of RAM per module under the «Capacity» column.
Since the capacity is returned in bytes, you have to divide the number by 1,073,741,824 (1 gigabyte in bytes) to convert the information into gigabytes.
Determine capacity total
To determine the total amount of RAM installed on Windows 11, use these steps:
- Open Start.
- Search for Command Prompt, right-click the top result, and select the Run as administrator option.
- Type the following command to determine the total amount of RAM installed on the computer and press Enter: wmic computersystem get totalphysicalmemory
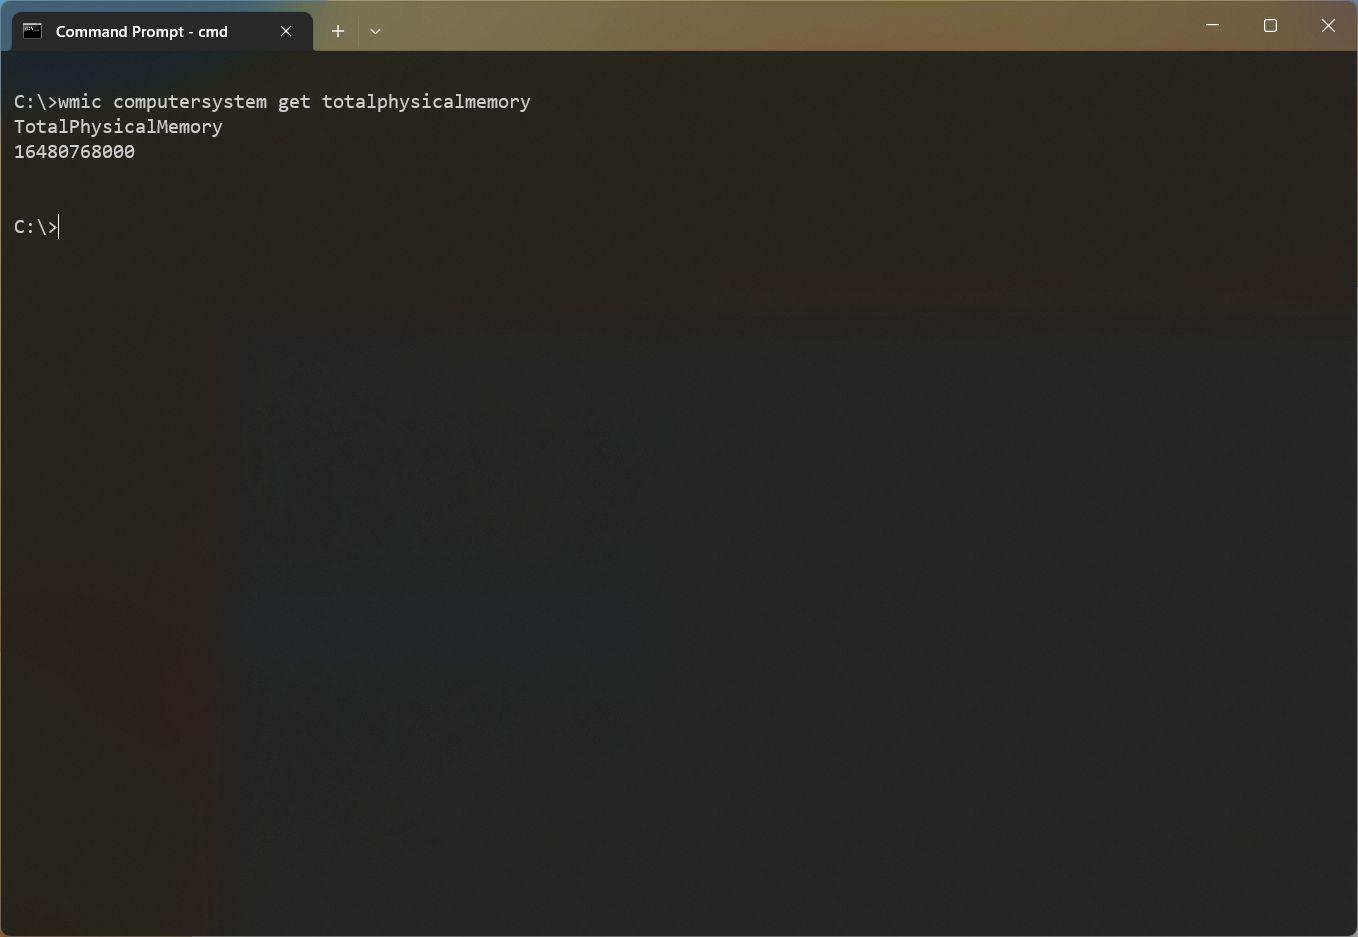
- Confirm the amount of RAM per module under the «Capacity» column.
To convert the information to gigabytes, you must divide the number by 1,073,741,824 (1 gigabyte in bytes).
Check speed
To find out the speed of the memory modules, use these steps:
- Open Start.
- Search for Command Prompt, right-click the top result, and select the Run as administrator option.
- Type the following command to check the memory speed and press Enter: wmic memorychip get devicelocator, speed
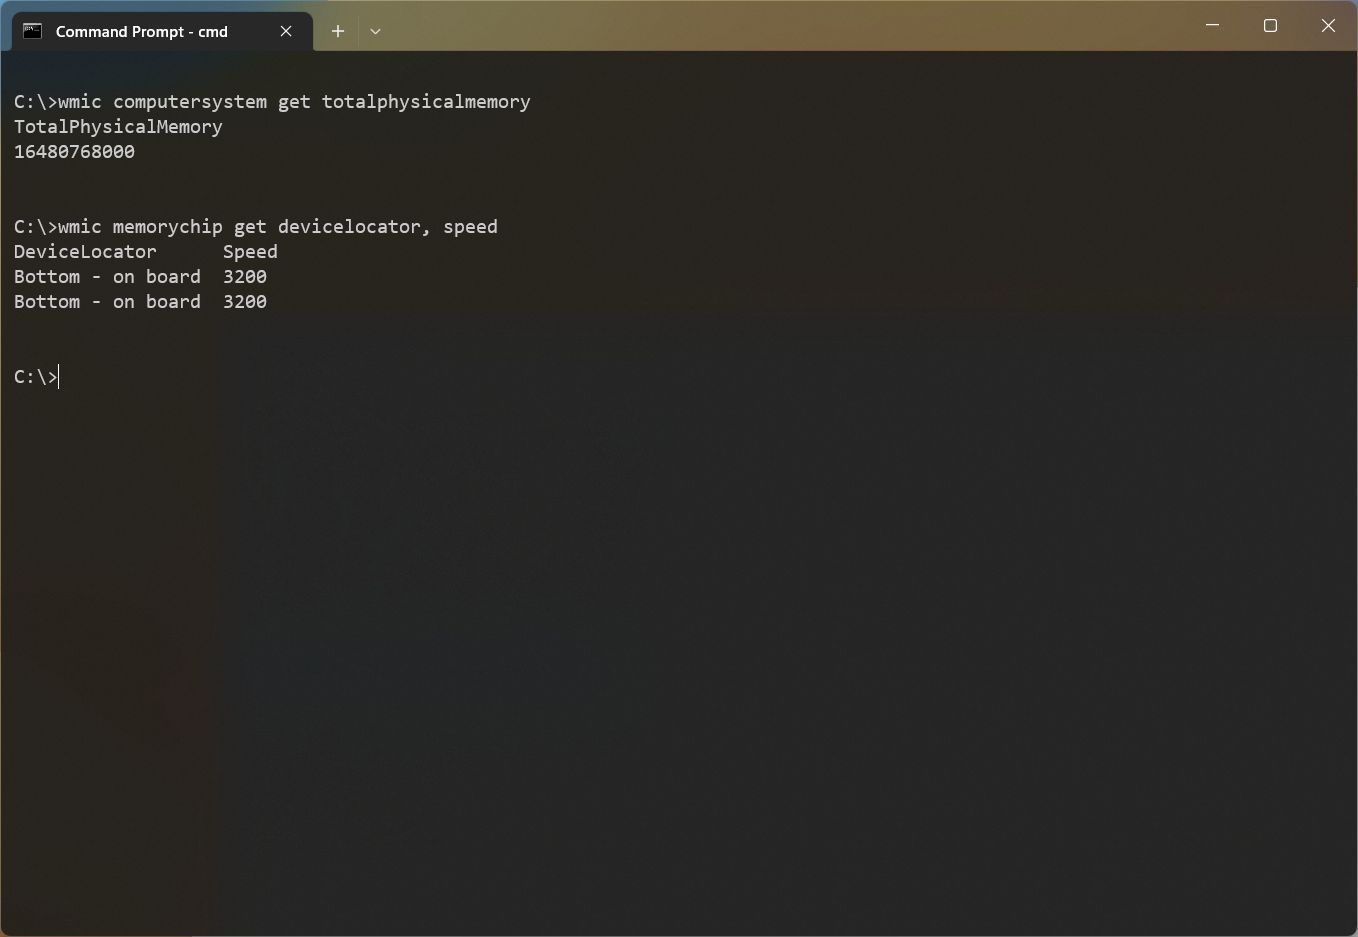
- Confirm each of the memory module’s speed under the «Speed» column.
Check type
To determine memory type (such as DRAM, DDR4, RDRAM, etc.), use these steps:
- Open Start.
- Search for Command Prompt, right-click the top result, and select the Run as administrator option.
- Type the following command to check the memory type and press Enter: wmic memorychip get devicelocator, memorytype
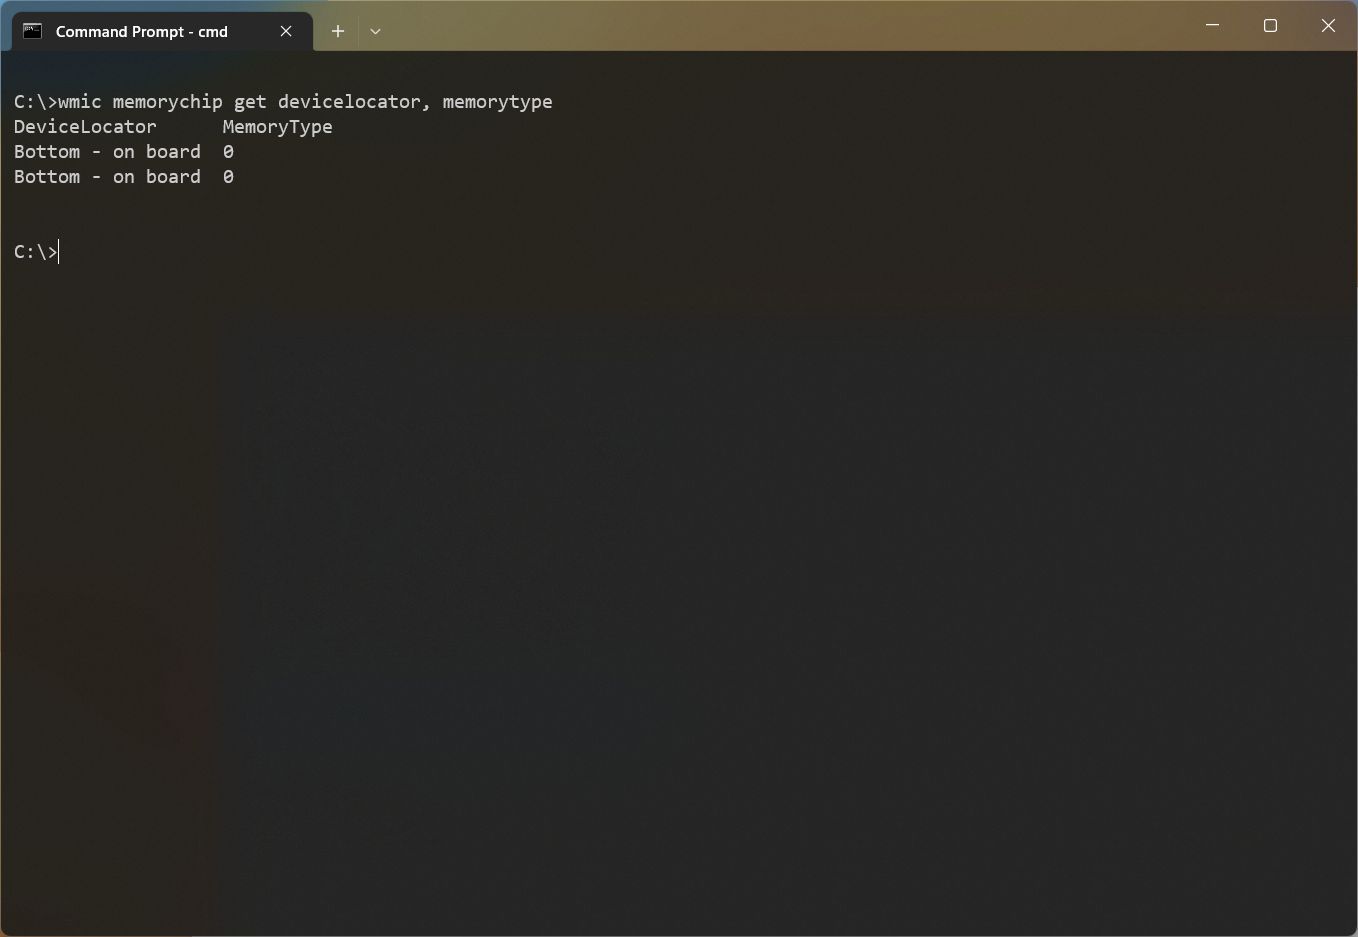
- Confirm memory type under the «MemoryType» column.
Supported memory types
Here’s the list of the memory types that the command can detect:
- 0: Unknown.
- 1: Other.
- 2: DRAM.
- 3: Synchronous DRAM.
- 4: Cache DRAM.
- 5: EDO.
- 6: EDRAM.
- 7: VRAM.
- 8: SRAM.
- 9: RAM.
- 10: ROM.
- 11: Flash.
- 12: EEPROM.
- 13: FEPROM.
- 14: EPROM.
- 15: CDRAM.
- 16: 3DRAM.
- 17: SDRAM.
- 18: SGRAM.
- 19: RDRAM.
- 20: DDR.
- 21: DDR2.
- 22: DDR2 FB-DIMM.
- 24: DDR3.
- 25: FBD2.
- 26: DRR4.
Check form factor
To determine the memory sticks form factor (such as DIMM, SODIMM, etc.) on Windows 11, use these steps:
- Open Start.
- Search for Command Prompt, right-click the top result, and select the Run as administrator option.
- Type the following command to check the memory form factor and press Enter: wmic memorychip get devicelocator, formfactor
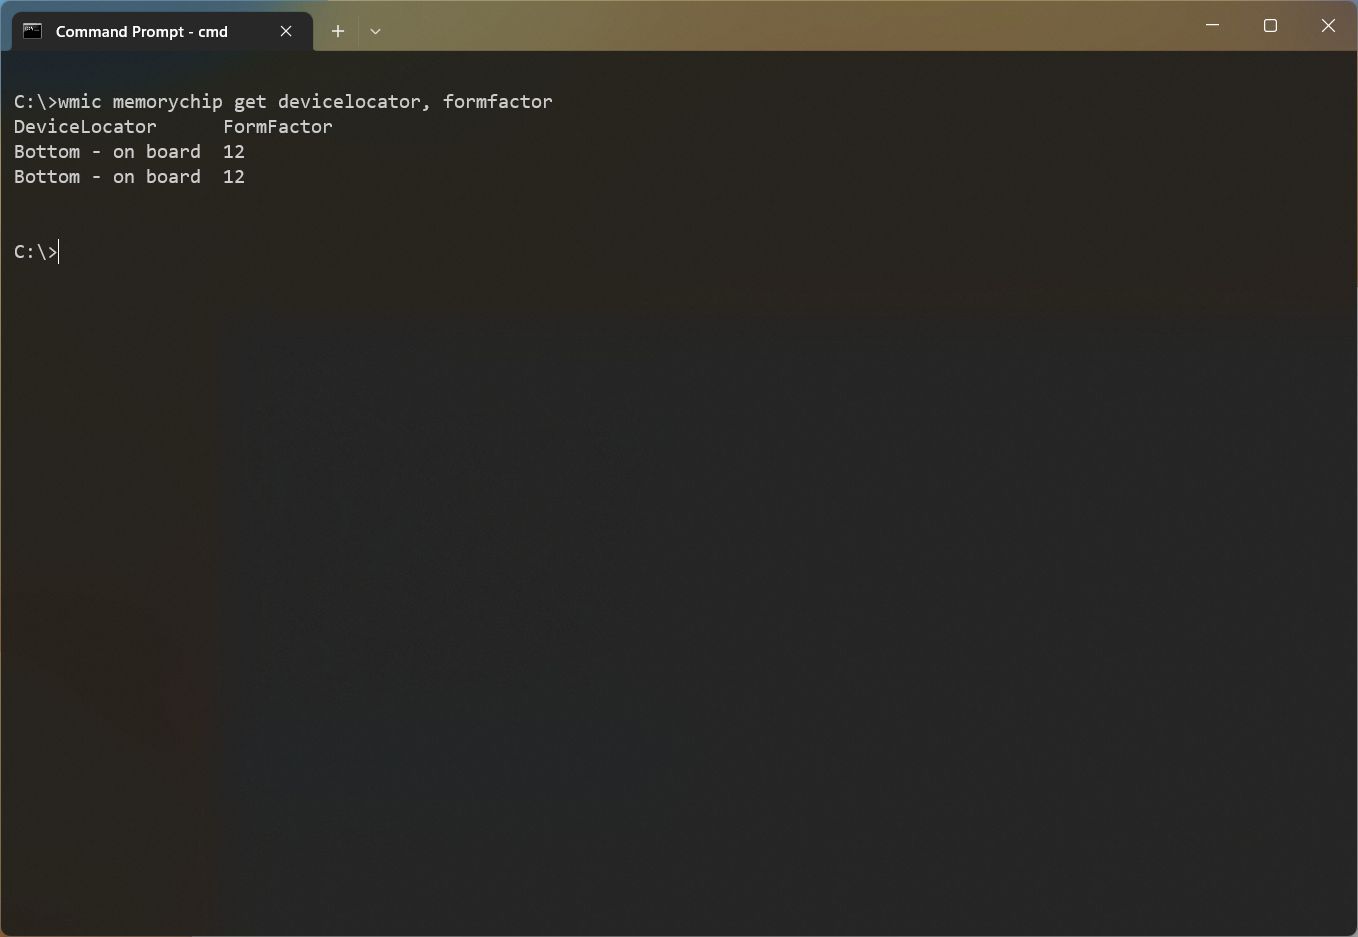
- Confirm the memory form factor under the «FormFactor» column.
If the output is 8, the computer uses DIMM modules (usually available on desktops). Otherwise, if the command output the number 12, the device uses SODIMM modules (commonly used on laptops).
Supported form factor
Here’s a list of the form factors that the command can detect:
- 0: Unknown.
- 1: Other.
- 2: SIP.
- 3: DIP.
- 4: ZIP.
- 5: SOJ
- 6: Proprietary.
- 7: SIMM.
- 8: DIMM.
- 9: TSOP.
- 10: PGA.
- 11: RIMM.
- 12: SODIMM.
- 13: SRIMM.
- 14: SMD.
- 15: SSMP.
- 16: QFP.
- 17: TQFP.
- 18: SOIC.
- 19: LCC.
- 20: PLCC.
- 21: BGA.
- 22: FPBGA.
- 23: LGA.
- 24: FB-DIMM.
Check full specs
You can use the previous command to find specific information about the memory modules individually. However, you can also query all the memory specs with a single command on Windows 11.
To view all the memory details, then use these steps:
- Open Start.
- Type Command Prompt, right-click the top result, and select the Run as administrator option.
- Type the following command to view all the memory details and press Enter: wmic memorychip list full
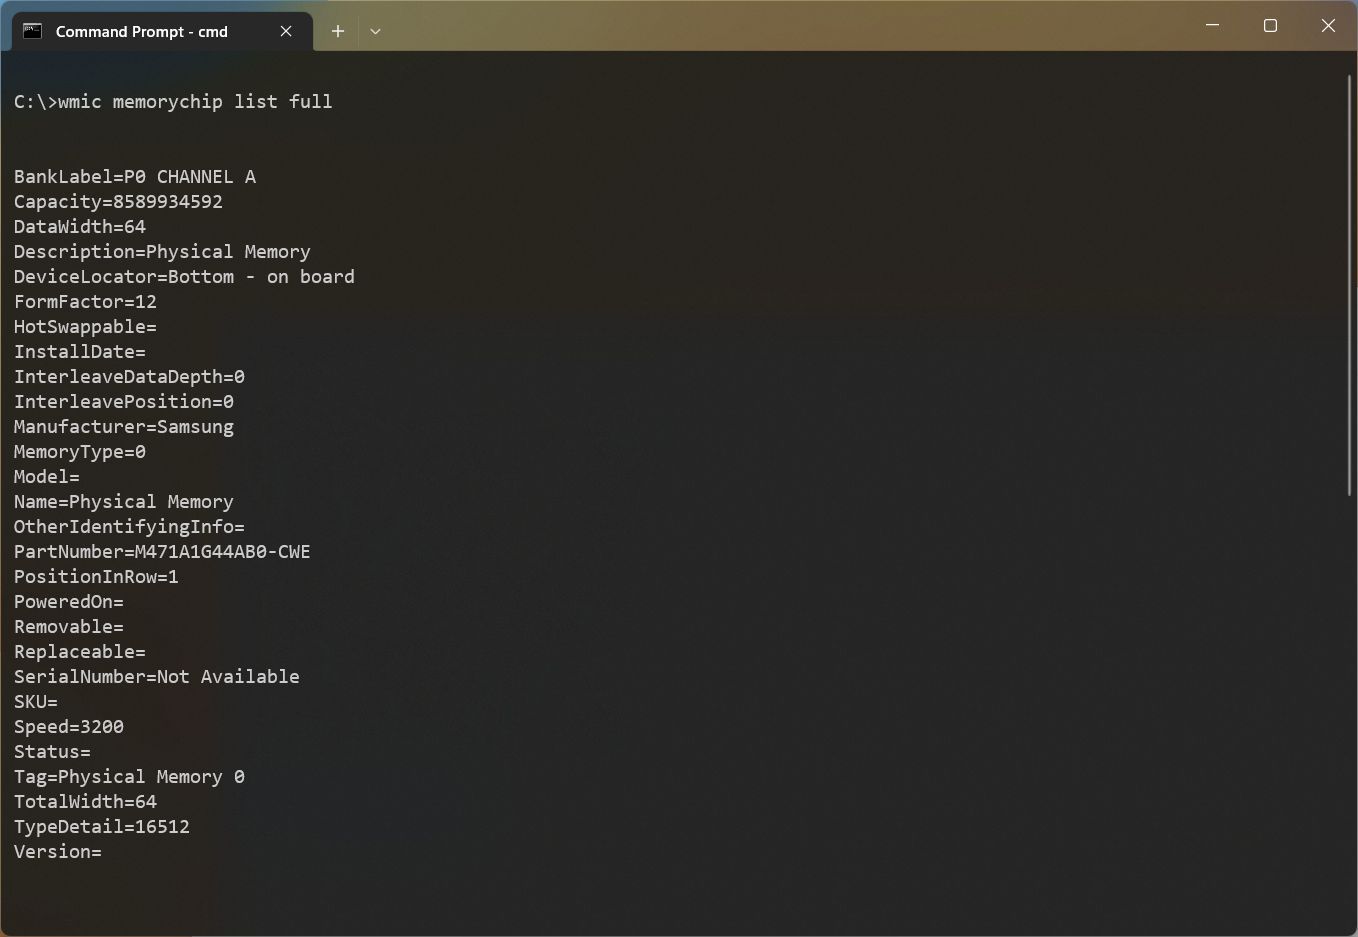
- Confirm the specs for each module installed on the device.
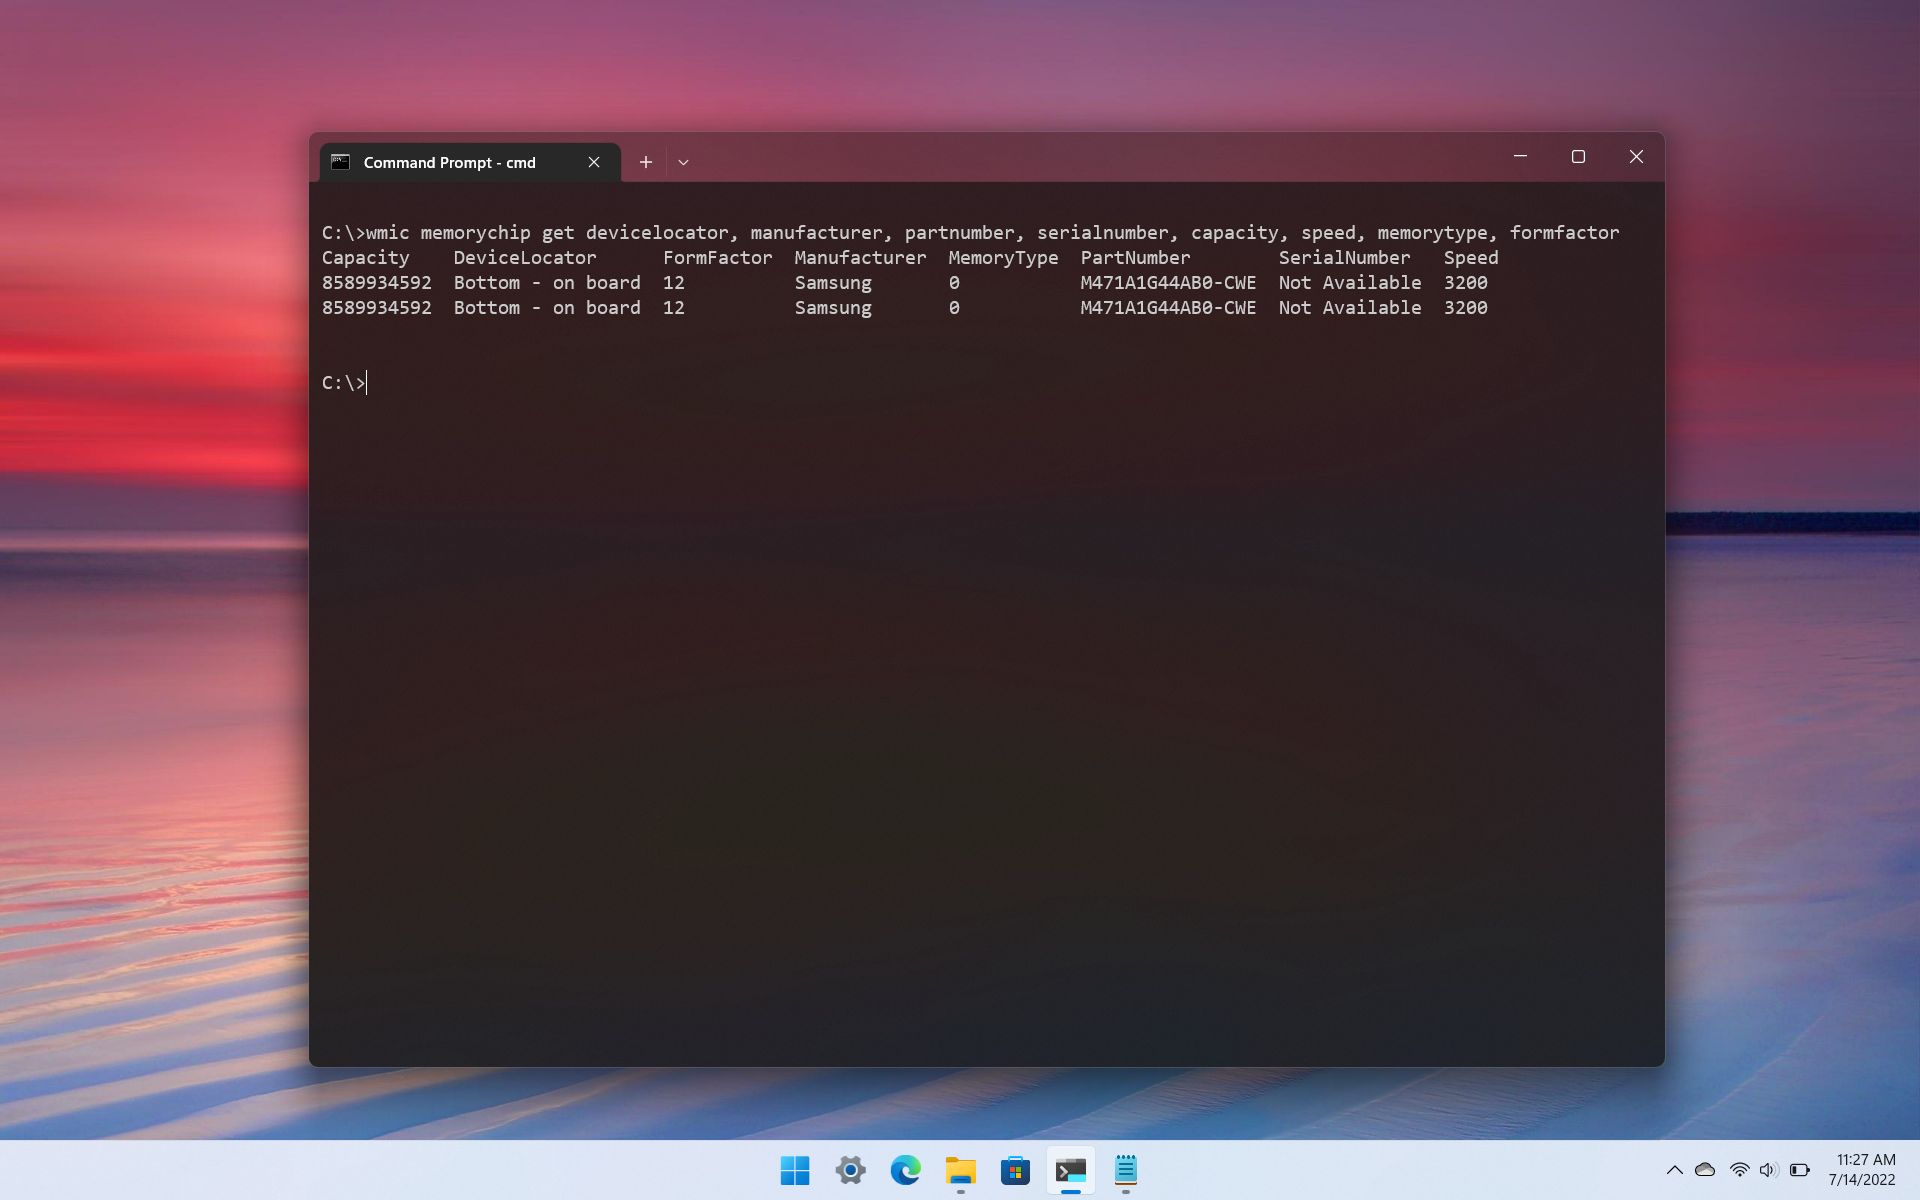
- (Optional) Type the following command to view only the specific details and press Enter: wmic memorychip get devicelocator, manufacturer, partnumber, serialnumber, capacity, speed, memorytype, formfactor
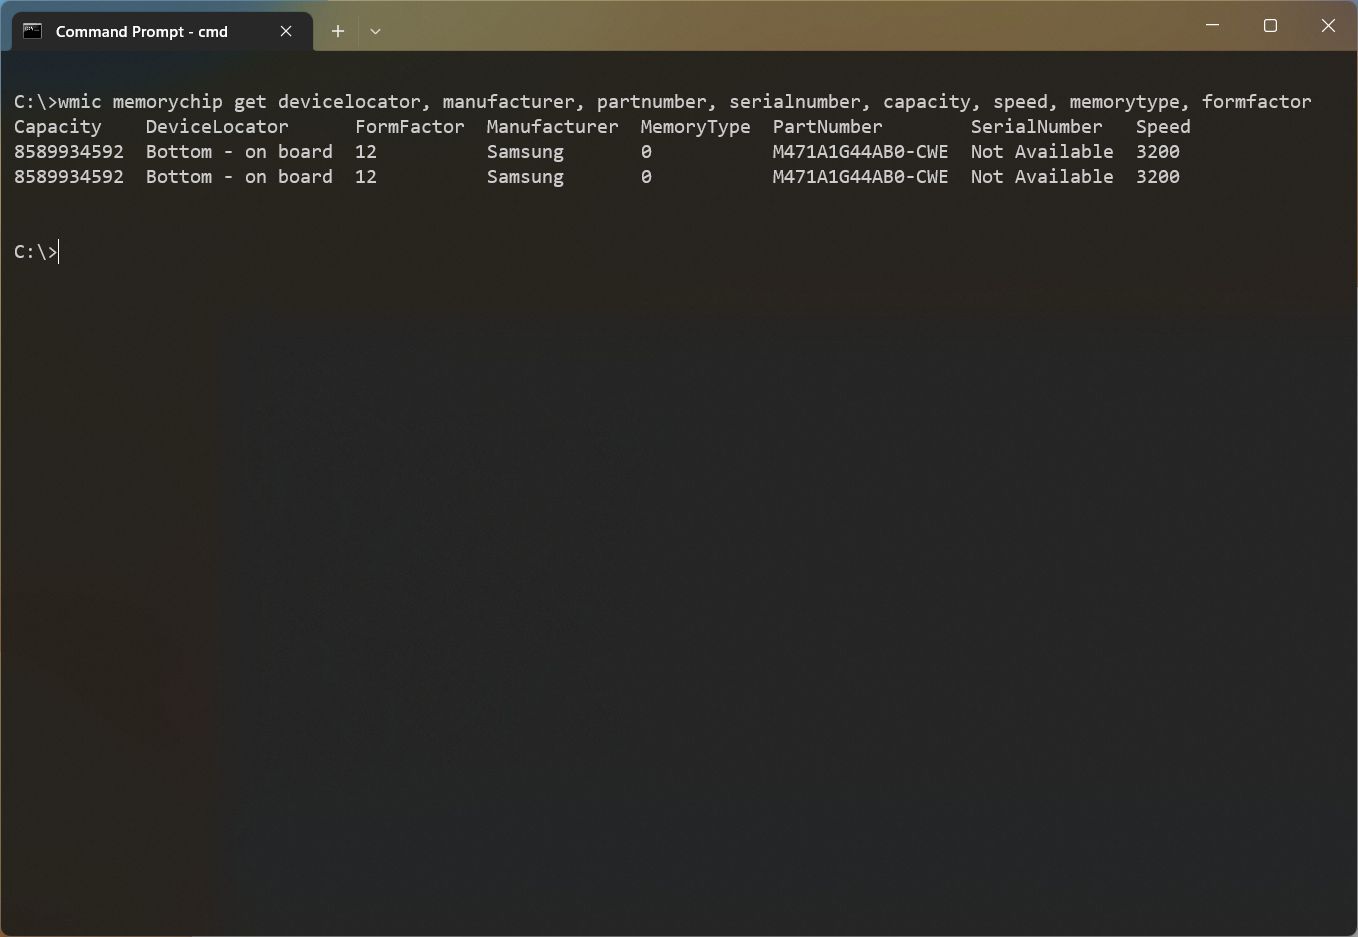
- Confirm the memory details.
Once you complete the steps, you will have a full overview of the memory specifications.
More resources
For more helpful articles, coverage, and answers to common questions about Windows 10 and Windows 11, visit the following resources:
- Windows 11 on Windows Central — All you need to know
- Windows 10 on Windows Central — All you need to know
Mauro Huculak has been a Windows How-To Expert contributor for WindowsCentral.com for nearly a decade and has over 15 years of experience writing comprehensive guides. He also has an IT background and has achieved different professional certifications from Microsoft, Cisco, VMware, and CompTIA. He has been recognized as a Microsoft MVP for many years.
Last Updated :
10 Jul, 2024
Knowing your RAM speed is essential for understanding your computer’s performance capabilities. If you’re using Windows 11, there are several methods to check your RAM speed, whether you’re troubleshooting performance issues, planning an upgrade, or simply curious about your system’s specifications. In this guide, we will provide step-by-step instructions on how to check your RAM speed on Windows 11 using built-in tools and third-party applications.
Methods to check your RAM Speed on Windows 11
The speed of RAM can be easily identified in Windows 11. To enhance the CPU retrieval of new information and smooth operation of the applications. For optimal operation of your Windows 11 machine, be sure the RAM’s clock speed is up to par. Moving further, let’s understand different methods to find RAM speed on Windows 11.
Method 1: How To Find RAM Speed From Task Manager
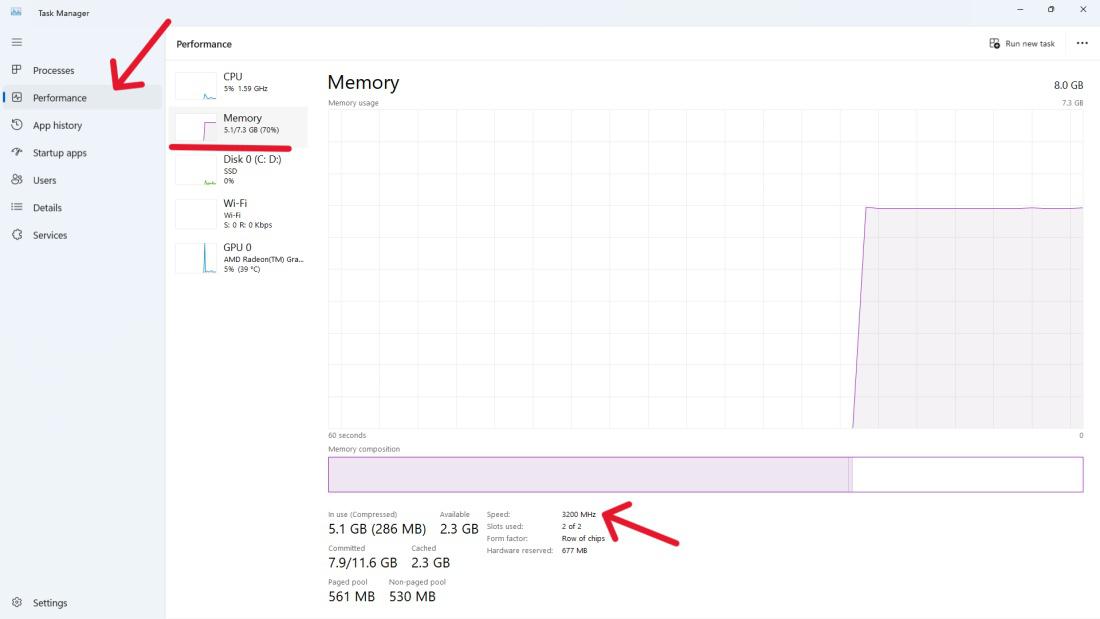
Step 1: To open the task manager, right-click on the taskbar and choose “Task Manager” or press Ctrl + Shift + Esc.

Step 2: In the Task Manager, navigate to the «Performance» tab.
Step 3: Click on «Memory» in the right sidebar.
Step 4: Under the «Memory» section, you will find information about your RAM, including the speed.
Method 2: Check RAM Speed Using Command Prompt
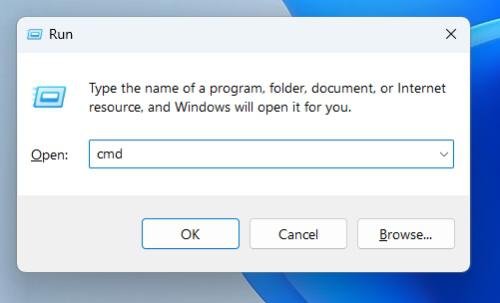
Step 1: Simultaneously press the Win + R keys to open the Run dialog box.
Step 2: Enter «CMD» in the Run box and press Enter.
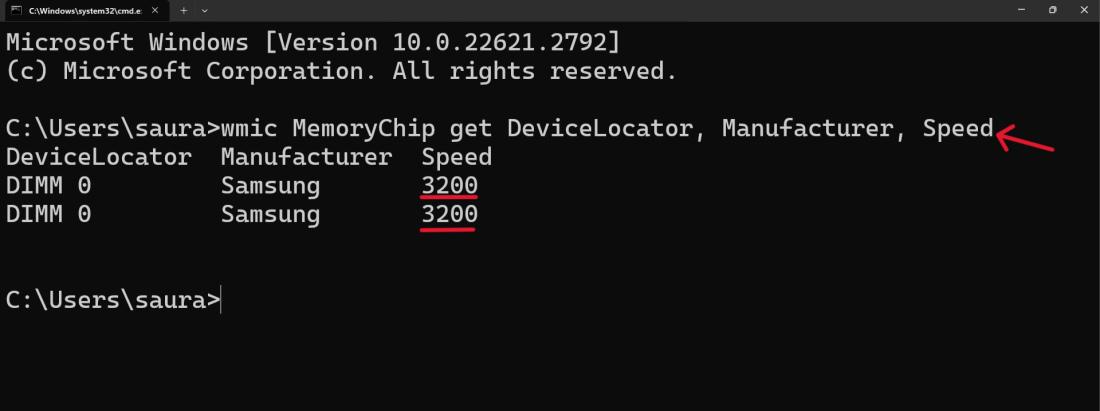
Step 3: Type this following command
wmic MemoryChip get DeviceLocator, Manufacturer, Speed
Step 4: Close the Command prompt
Method 3: Find RAM Speed Using Windows PowerShell
Step 1: Go to start menu, type “PowerShell” then right click on “Windows Powershell” choose “Run as administrator.”
Step 2: Type the following command and press Enter:
Get-CimInstance -ClassName Win32_PhysicalMemory | Format-Table Devicelocator, Manufacturer, Speed
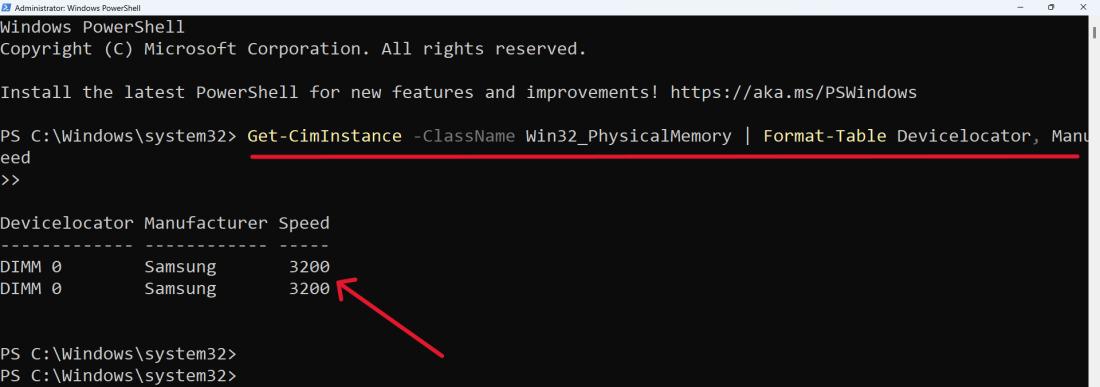
Step 3: Close the PowerShell
How to Check RAM Information on Windows 11?
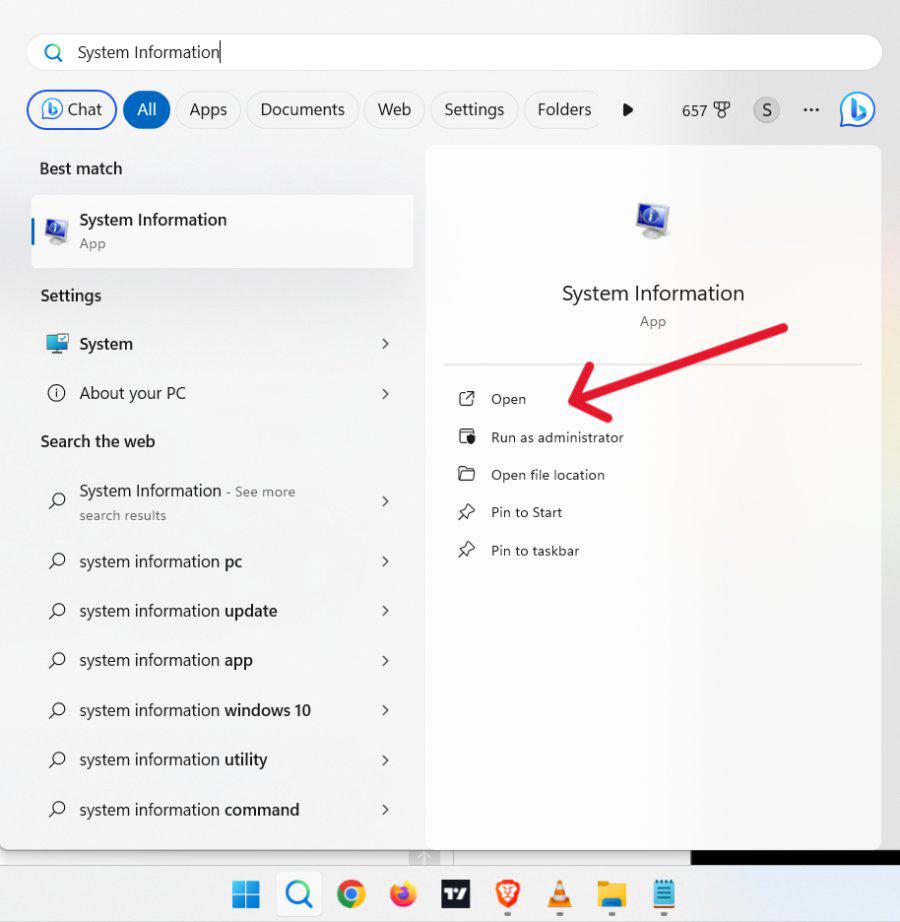
Step 1: Click on start menu, type “System Information” and open the displayed results.
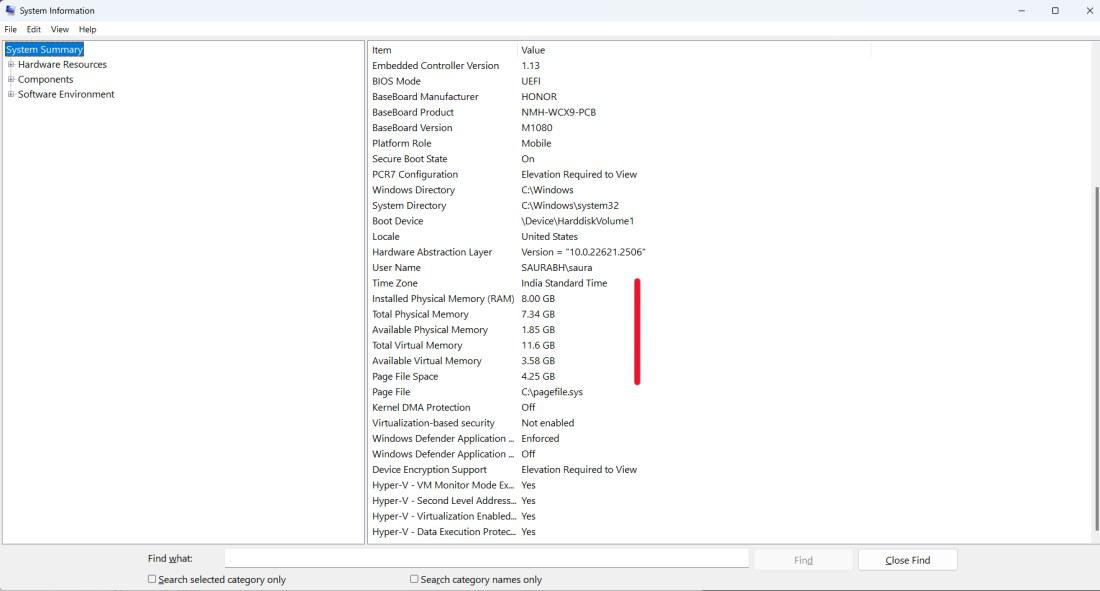
Step 2: You can get detailed information about your installed RAM on right sidebar
Conclusion
Checking your RAM speed on Windows 11 is a straightforward process that can provide valuable insights into your system’s performance. By following the steps outlined in this guide, you can easily determine your RAM speed and make informed decisions about potential upgrades or optimizations. Regularly monitoring your system’s specifications ensures you maintain optimal performance and stay aware of your hardware capabilities.
-
Home
-
News
- How to Check RAM on Windows 11/10 (Size, Speed, Type, etc.)
By Vera | Follow |
Last Updated
Do you want to know the details of the RAM on your computer? It is very easy to check RAM on Windows 11/10. Today in this post, MiniTool Solution will show you how to check RAM speed, size, type, and other information in multiple ways.
RAM, random-access memory, is a form of computer memory installed on the motherboard of a computer. It is used to store temporary information from Windows and other applications. When turning off the computer, any data in RAM is lost.
In some cases, you need to know the information of your RAM installed on your computer. For example, you need to know how much the RAM size is when installing or upgrading the Windows operating system, or installing a high graphics game; when your system slows down and you perform a diagnosis, knowing the RAM used by a particular application is important; if you want to upgrade RAM, it is also important to check Windows RAM.
How can you check RAM on Windows 11 if you have upgraded to this new operating system? In the following part, let’s see some methods.
How to Check RAM in Windows 11/10
Check RAM Windows 10/11 via Settings
Step 1: Click the Start icon and choose Settings to open this app.
Step 2: Choose System from the sidebar, scroll down to find About, and click it.
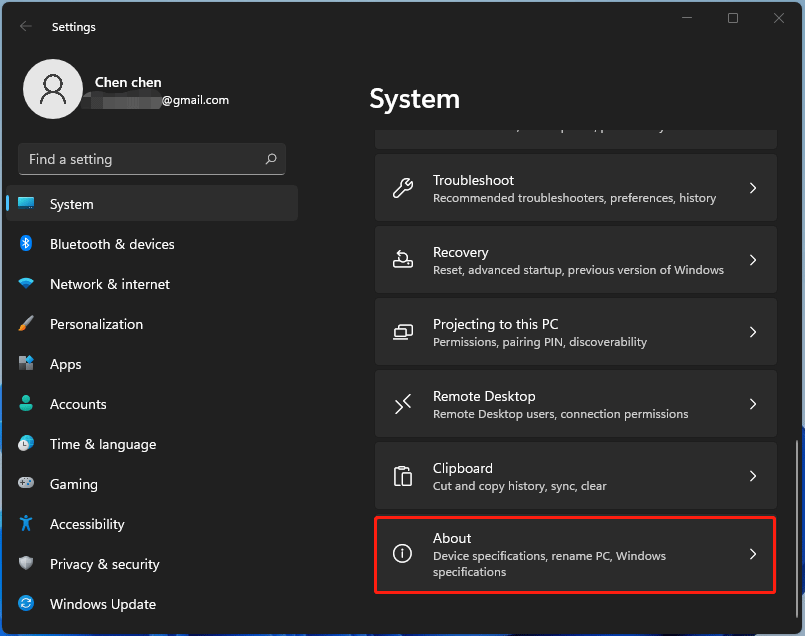
Step 3: You can find the RAM information – RAM size under the Device specifications section.
Check Windows 11 RAM via System Information
Step 1: Press Win + R to open the Run dialog, type msinfo32, and click OK.
Step 2: In the System Information window, go to the right section and you can find some details of RAM: Installed Physical Memory (RAM), Total Physical Memory, Available Physical Memory, Total Virtual Memory, and Available Virtual Memory.
Check RAM via Task Manager
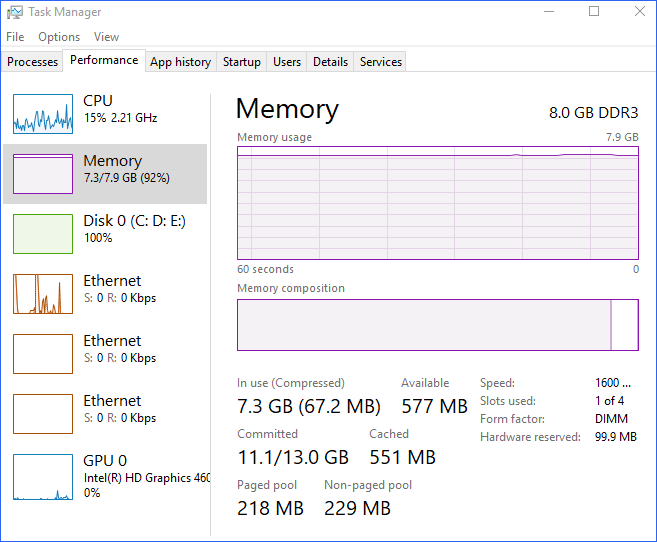
You may ask: how to check RAM speed in Windows 10/11? To know the real-time statistic of RAM usage by your system including RAM speed, you can open Task Manager.
Step 1: Run Task Manager in Windows 11 or 10.
Step 2: go to the Performance tab and click Memory from the sidebar.
Step 3: On the upper right section of the screen, you can see the total RAM size and the RAM type. In the lower right part of the window, you know the used RAM size, available RAM size, RAM speed, memory model form factor, and more.
Check Windows 11 RAM via Command Prompt
To know more information about your RAM on the Windows 11/10 computer, you can resort to Command Prompt.
- Just follow one of these ways to open CMD – How to Open Command Prompt (CMD) in Windows 11? (7 Ways) and then start the check task.
- Type wmic memorychip get/format:list and press Enter to check all the specifications of RAM.
Some useful commands:
- Check the total physical memory installed on your computer – systeminfo | findstr /C:”Total Physical Memory”
- Check memory speed – wmic memorychip get devicelocator, speed
- Check memory type – wmic memorychip get devicelocator, memorytype
A numerical value will return after typing the memory type command and the meaning of the value is: 21 – DDR2, 22 – DDR2 FB-DIMM, 24 – DDR3, etc. We only list some common values and you can search for the meaning online based on the value you get.
Final Words
How to check RAM on Windows 11/10? After reading this post, you can find some useful methods to easily check your RAM speed, type, size, and more. Just choose one based on your actual situation.
About The Author
Position: Columnist
Vera is an editor of the MiniTool Team since 2016 who has more than 7 years’ writing experiences in the field of technical articles. Her articles mainly focus on disk & partition management, PC data recovery, video conversion, as well as PC backup & restore, helping users to solve some errors and issues when using their computers. In her spare times, she likes shopping, playing games and reading some articles.
Quick Tips
- It’s crucial to know your RAM type when considering an upgrade.
- You can find your RAM type by visiting your system manufacturer’s website.
- Alternatively, you can check the RAM type using Task Manager, Command Prompt, PowerShell, or a third-party application.
Method 1: Check the PC or Laptop Model From the Manufacturer’s Site
If you use a pre-built rig from a PC maker or have a laptop, the first course of action is to check the manufacturer’s website for product details. The product specifications page will list the RAM size, type, and other details.
However, if your PC (desktop or laptop) is slightly old and you don’t have its model number, use the System Information app to check the model number of your PC. Here’s how:
Step 1: Open the Start menu > type Sysinfo in the search box > press Enter.

Step 2: Click on the System Model entry on the right and press the Control + C keyboard shortcut to copy the entry.
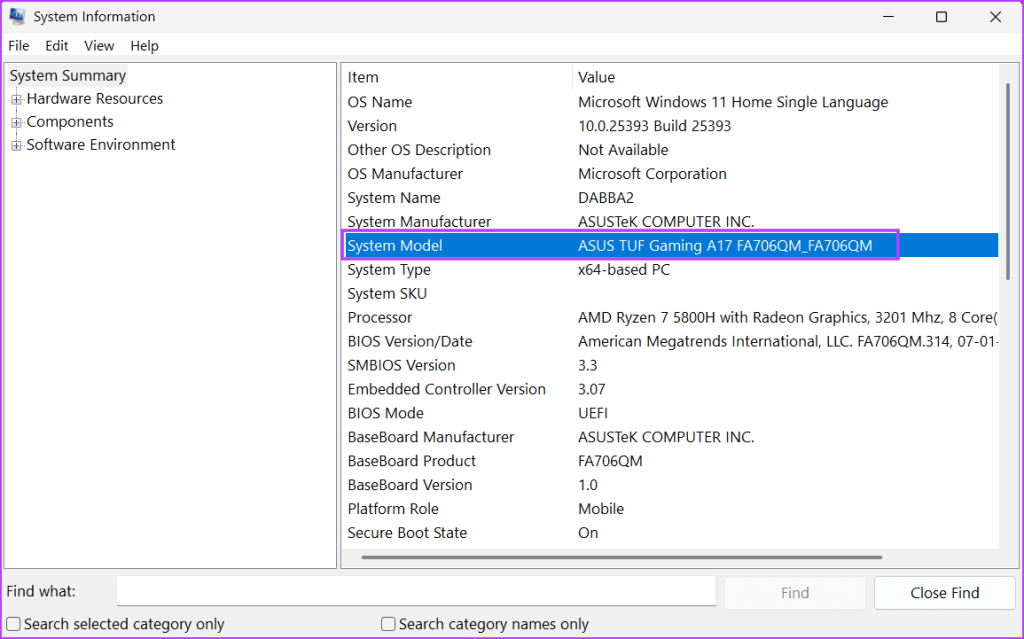
Step 3: Open a browser, go to the address bar, and paste the copied System Model entry. Press Enter to search for it.
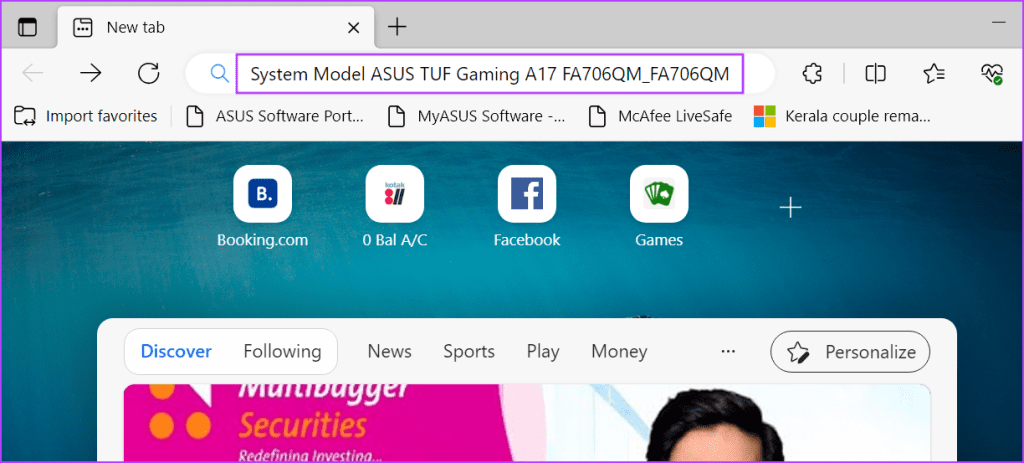
Step 4: Click on the relevant search result and look for the product’s technical specs page to find the RAM type.

Method 2: Using Task Manager
If you cannot find the system model name and number, use Task Manager to check the RAM type of a Windows 10 or 11 PC. However, this method can only display the RAM details of DDR3 or older memory. If you have DDR4 RAM installed, it won’t show the RAM type. Here’s how to do it:
Step 1: Press the Control + Shift + Esc keyboard shortcut simultaneously to open the Task Manager.
Step 2: Switch to the Performance tab.
Step 3: Click on the Memory option.
Step 4: At the top right, there’s a mention of memory with RAM size. If your RAM is DDR4, you will only see the size under that column.
However, if your RAM is DDR3, you will also see the RAM type.

Method 3: Using Command Prompt
If you want to find out what kind of RAM your PC has, you can use the Command Prompt. It will display the number instead of stating DDR3 or DDR4. Here’s how to do it:
Step 1: Open the Start menu, type cmd in the search box, and press Enter to open Command Prompt in the Terminal app.

Step 2: Now, type the following command in Terminal and press Enter to execute it:
wmic memorychip get SMBIOSMemoryType
Step 3: The command will output numbers. In our case, it is 26, which denotes that our PC has a DDR4 RAM installed. If you see the number 24, you have DDR3 RAM.
Method 4: Using PowerShell
Like the Command Prompt method, you can also know if the RAM is DDR3, DDR4, or any other version by using the Get-CimInstance cmdlet in PowerShell. But this method will also display a number instead of a simple text like DDR3 or DDR4 as the output. Repeat the following steps:
Step 1: Launch the Start menu > type PowerShell in the search box > press Enter.

Step 2: Type the following command in the terminal and press Enter to execute it:
Get-CimInstance -ClassName Win32_PhysicalMemory | Format-Table SMBIOSMemoryType
Step 3: The command will output a number. In our case, it shows 26 because we have DDR4 memory. You might see another number if you have DDR3 or older memory.
Method 5: Using a Third-Party App
If you don’t want to spend time searching for your RAM type or find the Command Prompt or PowerShell route complicated, use a third-party app instead. It will present all the information related to each component (CPU, RAM, GPU, and more) in an easy-to-understand manner.
You can use Speccy or CPU-Z to check the RAM type in a PC on Windows 11 or older OS with minimal effort. Here’s how to do it using Speccy:
Step 1: Download Speccy. Then, press the Windows + E keyboard shortcut to open the File Explorer.
Step 2: Navigate to the Downloads folder and double-click to run the setup file.
Step 3: Follow the on-screen instructions to install Speccy on your PC.
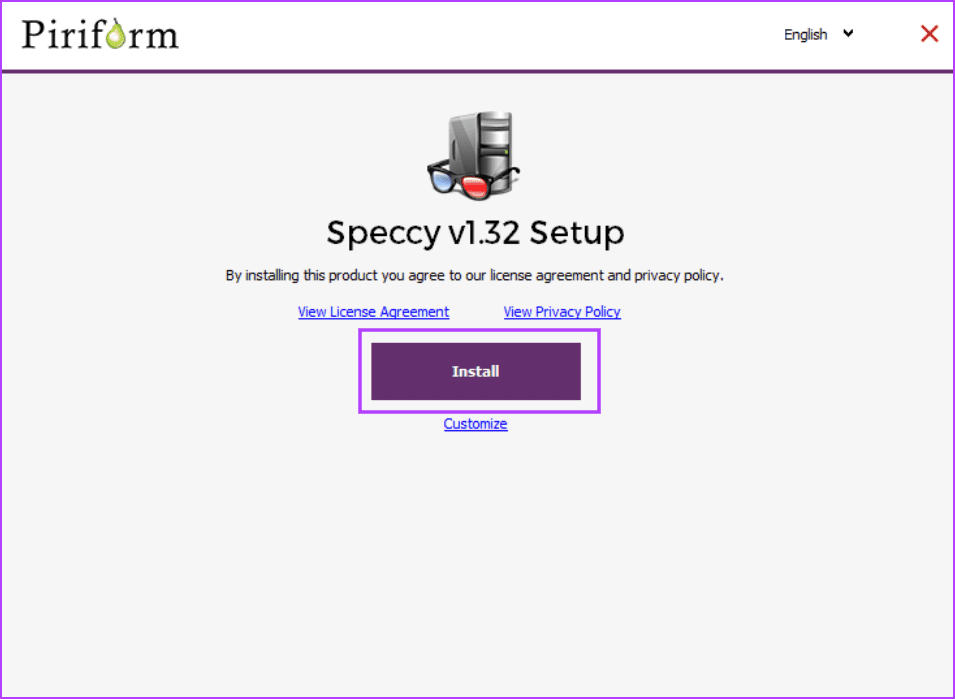
Step 4: Click on the Run Speccy button.

Step 5: Wait for the app to analyze all the hardware components in your PC. Then, click on RAM in the left-side menu.
Step 6: It will display all the RAM details, including its type, size, frequency, and usage.

Also Read: How to increase Virtual Memory on Windows 11
Was this helpful?
Thanks for your feedback!
The article above may contain affiliate links which help support Guiding Tech. The content remains unbiased and authentic and will never affect our editorial integrity.
