
Все способы:
- Способ 1: Поиск
- Способ 2: Дополнительное меню кнопки «Пуск»
- Способ 3: «Инструменты Windows»
- Способ 4: Универсальная команда
- Вариант 1: Поиск
- Вариант 2: «Выполнить»
- Вариант 3: Консоль
- Вариант 4: «Диспетчер задач»
- Способ 5: Исполняемый файл
- Дополнительно: Создание ярлыка для быстрого запуска
- Вопросы и ответы: 0
Обратите внимание! Журнал ошибок в прямом смысле этого слова отсутствует в Windows 11 и предыдущих версиях, однако есть более универсальное средство «Просмотр событий», в котором, как можно понять из названия, отображаются не только ошибки в работе операционной системы, но и все критически важные события. Далее будет рассказано именно о том, как запустить данный компонент.
Способ 1: Поиск
Зачастую наиболее удобным и быстрым в своей реализации методом запуска любого системного компонента является использование функции поиска, представленной отдельным элементом на панели задач (ПЗ).
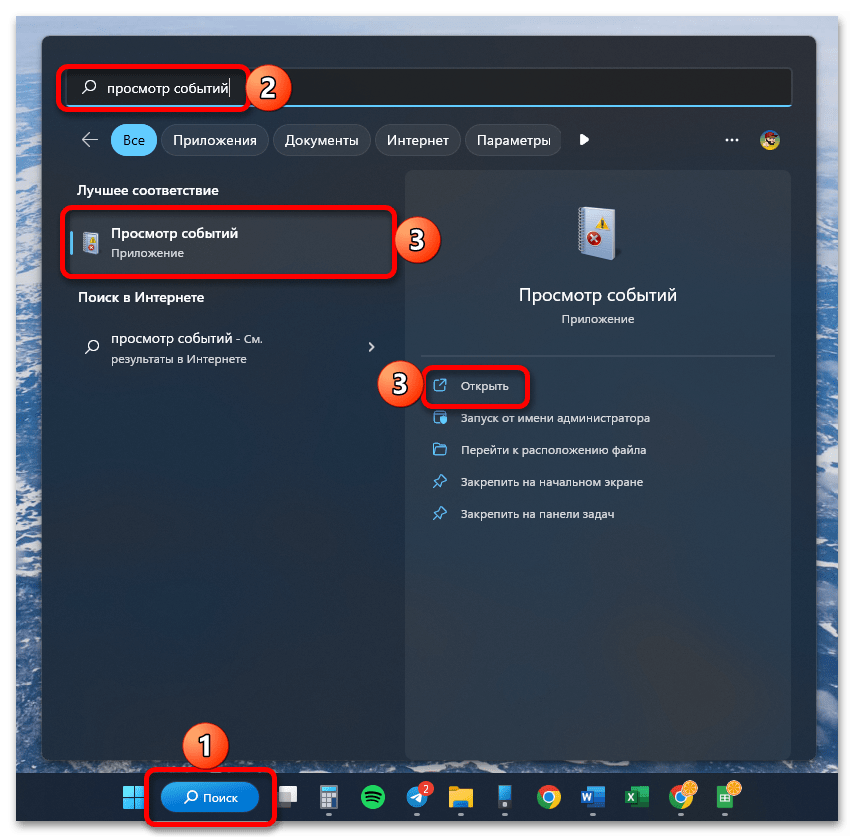
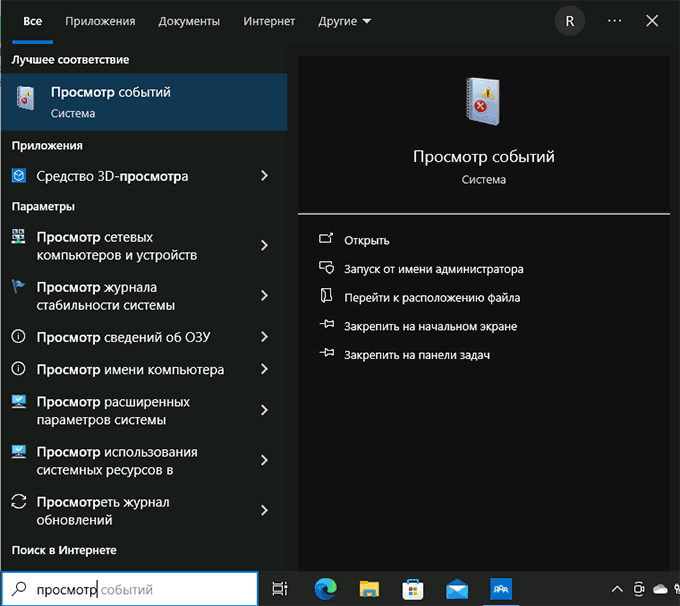
С помощью обозначенной кнопки или комбинации клавиш «Win+S» разверните окно поиска и начните вводить в него запрос «Просмотр событий». Как только искомая оснастка появится в списке «Лучшее соответствие», откройте ее нажатием по ярлыку или расположенной справа надписи-ссылке.
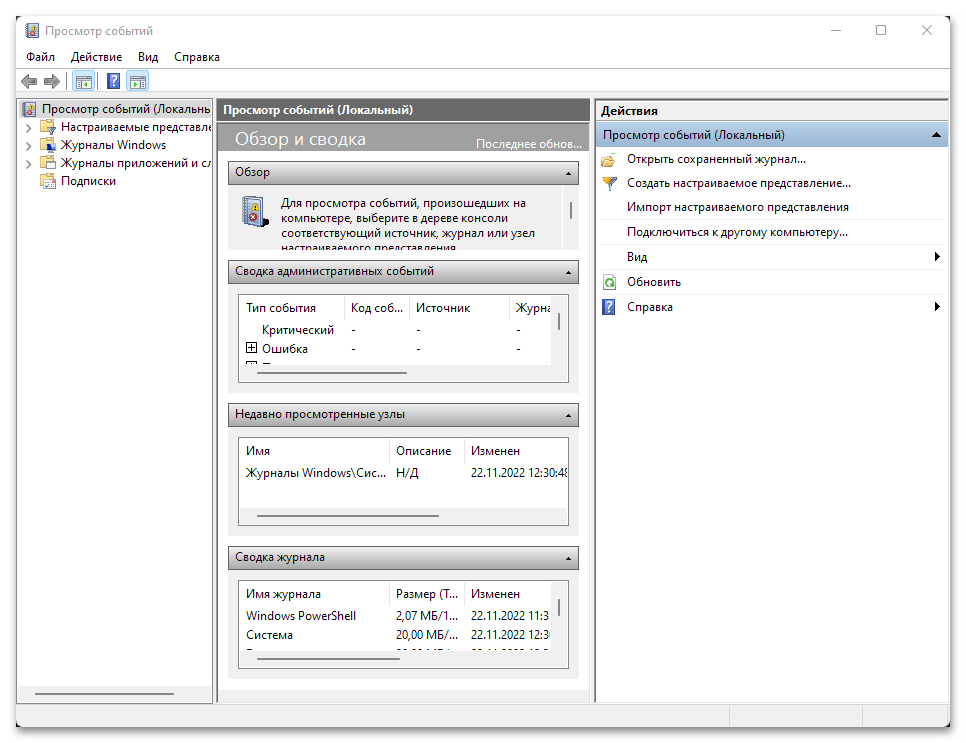
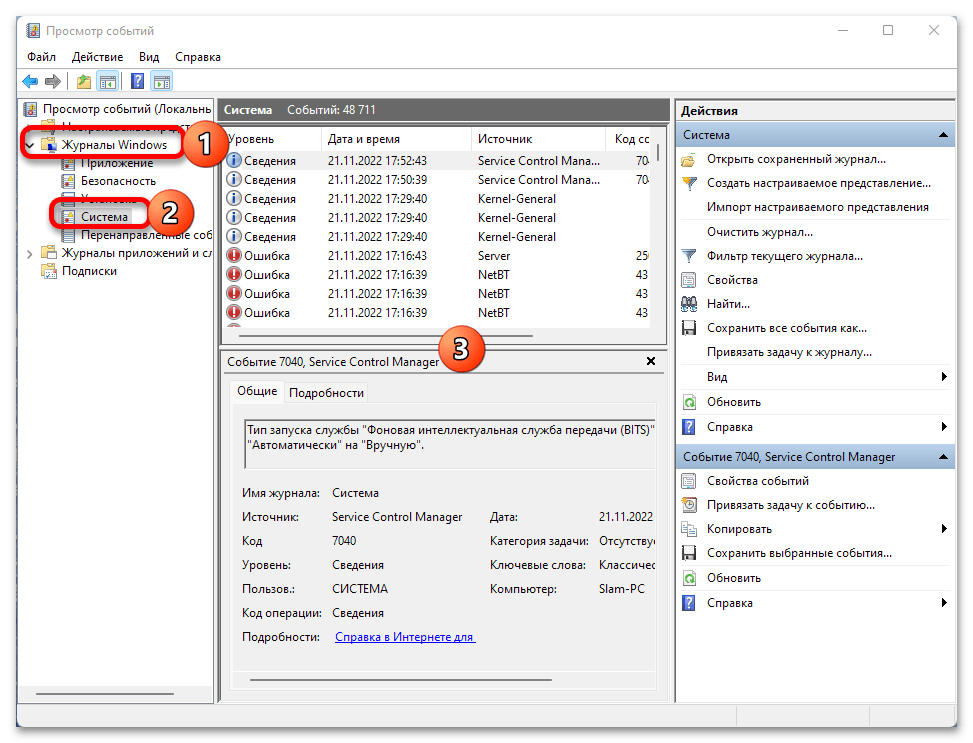
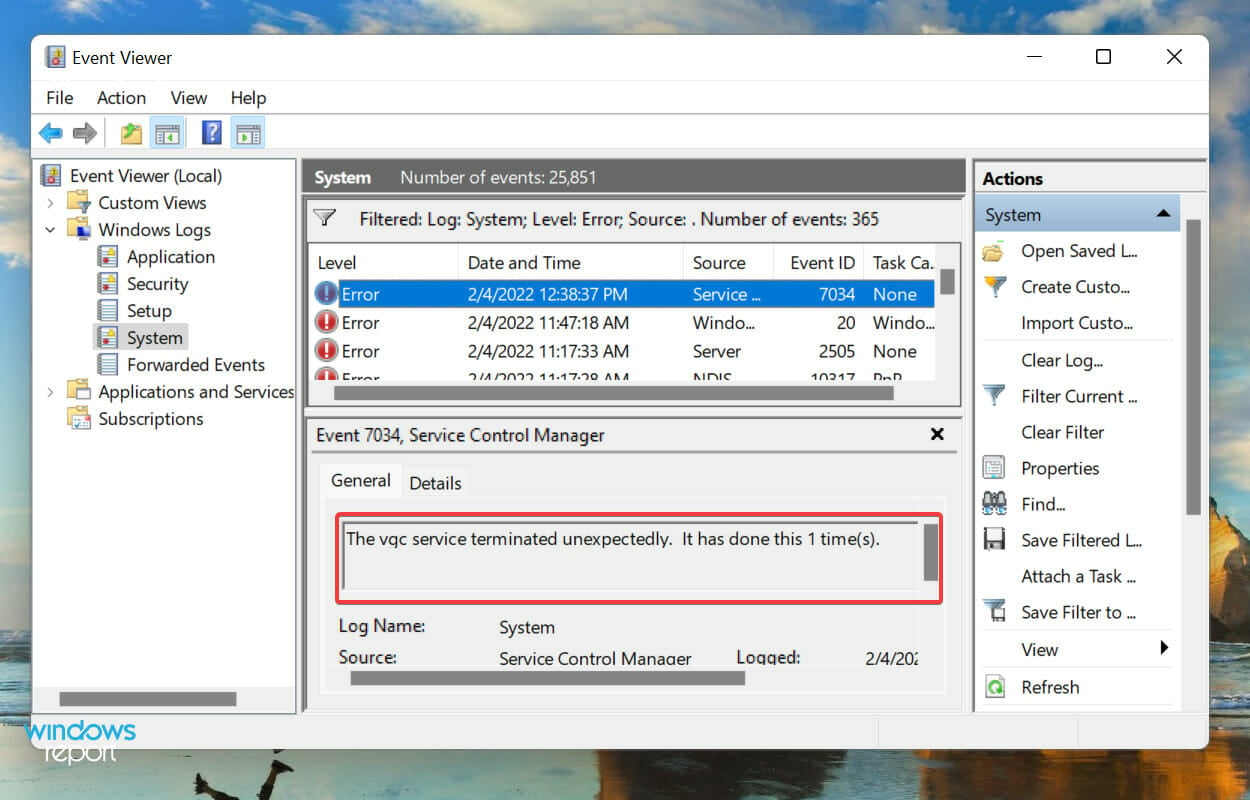
По умолчанию рассматриваемый компонент ОС открывается в представлении «Просмотр событий (Локальный)». Если же вы хотите увидеть непосредственный перечень ошибок, разверните каталог «Журналы Windows», а затем входящую в него директорию «Система» — необходимые сведения будут представлены в блоке, расположенном в центральной верхней части окна.
Способ 2: Дополнительное меню кнопки «Пуск»
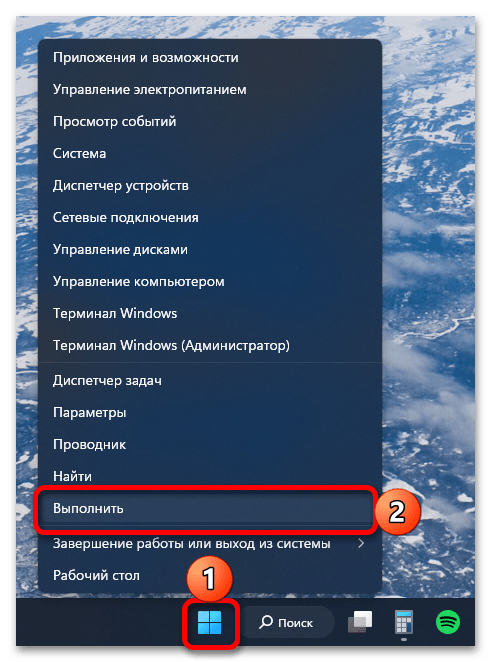
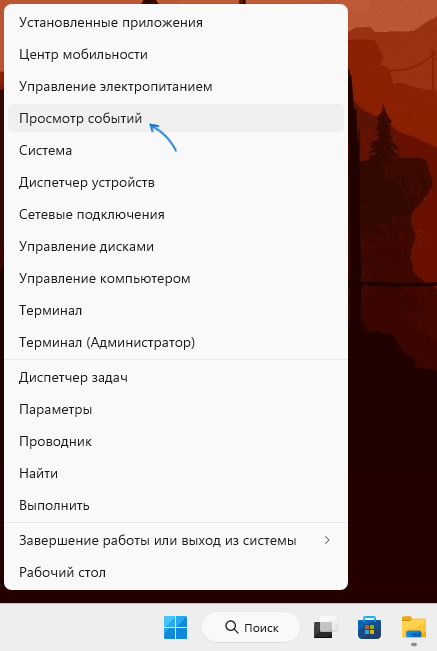
У главного меню операционной системы есть подменю, вызываемое нажатием по элементу «Пуск» правой кнопкой мышки (ПКМ) или сочетанием «Win+X».
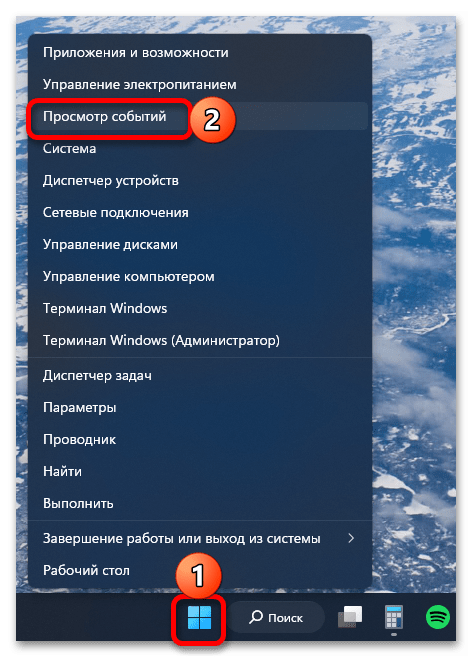
В списке опций, который появляется при выполнении указанного действия, доступен пункт для быстрого запуска средства «Просмотр событий».
Способ 3: «Инструменты Windows»
Ряд важных для Windows 11 компонентов, включая интересующий нас, представлен в разделе «Инструменты Windows» — по сути, это то же, что и средства «Администрирования», доступные в десятой версии операционной системы от Microsoft.
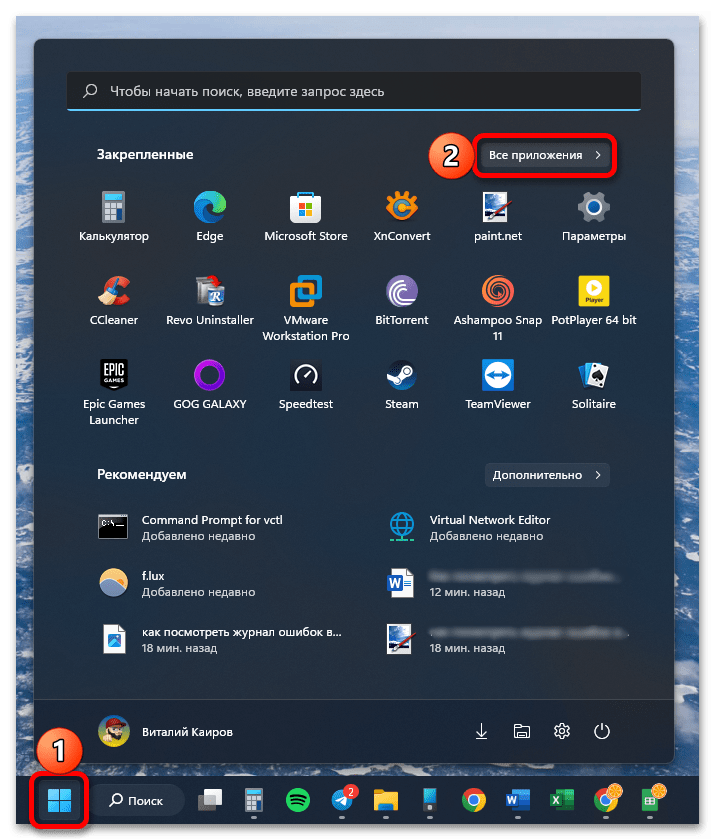
- Разверните меню «Пуск», а затем кликните по надписи «Все приложения».
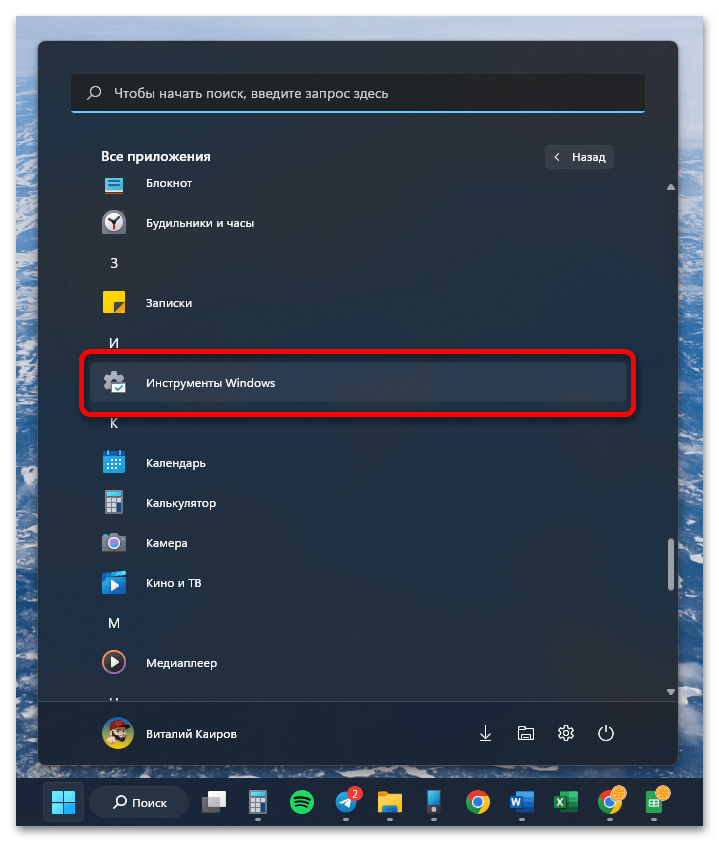
- Пролистайте перечень представленных в главном меню элементов вниз, найдите в нем «Инструменты Windows» и откройте.
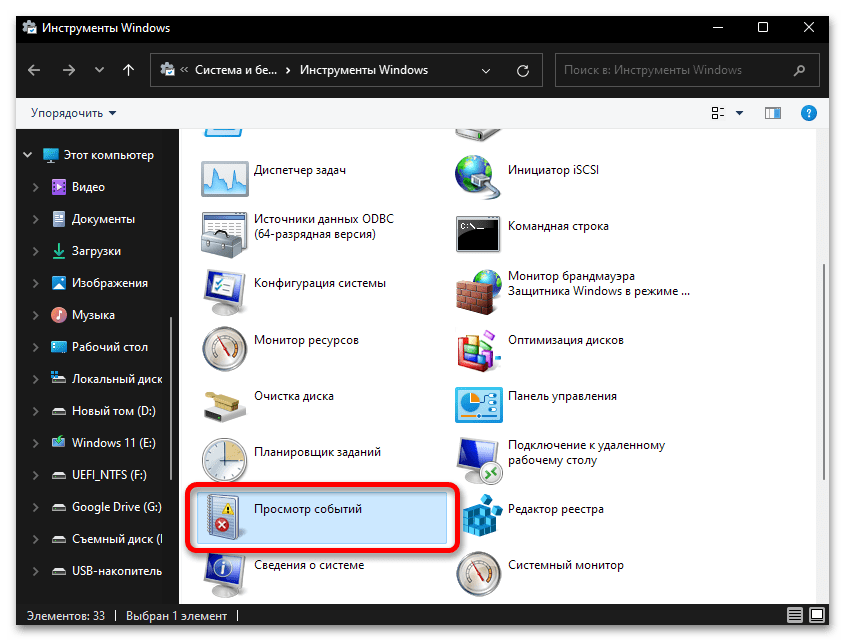
- Найдите и запустите «Просмотр событий».
У данного метода решения нашей задачи существует еще один вариант реализации:
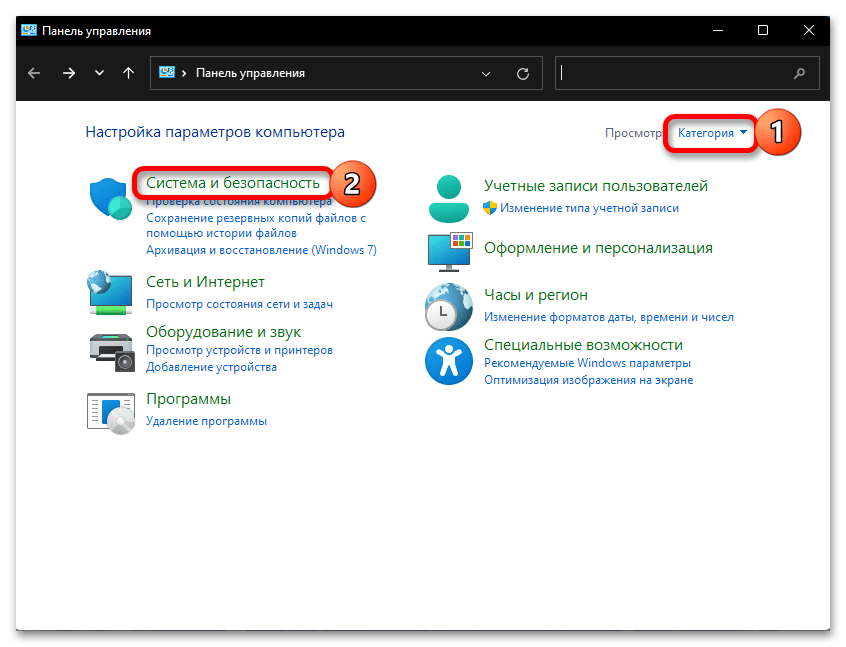
- Вызовите «Панель управления». Проще всего это сделать через поиск.
- Переключитесь в режим просмотра «Категория» и откройте раздел «Система и безопасность».
- Далее вы можете либо сразу кликнуть по ссылке «Просмотр журналов событий», чтобы перейти к интересующему нас в рамках настоящей статьи компоненту ОС,

либо открыть «Инструменты Windows» и найти «Просмотр событий» там, как это уже было показано выше.


Способ 4: Универсальная команда
Многие интегрированные в Виндовс 11 компоненты можно вызывать с помощью специальных запросов, которые, в свою очередь, одинаково эффективно выполняются сразу в нескольких системных оснастках. Команда, с помощью которой осуществляется запуск «Просмотра событий», выглядит следующим образом:
eventvwr.msc
Далее расскажем, где и как ее можно использовать.
Вариант 1: Поиск
Вместо полного названия искомой оснастки, указанного нами в качестве запроса в самой первой части настоящей статьи, вполне можно задействовать представленную выше команду.

Вариант 2: «Выполнить»
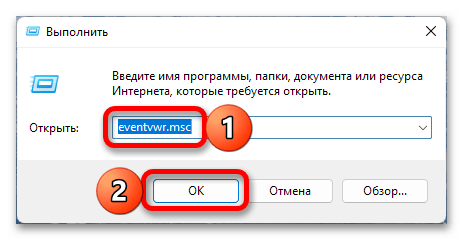
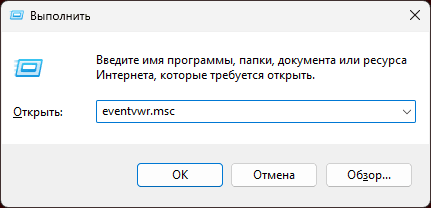
Используя клавиатурное сочетание «Win+R» или контекстное меню «Пуска», откройте окно «Выполнить».
Введите самостоятельно или скопируйте и вставьте запрос для запуска «Просмотра событий», после чего нажмите «ОК» или «Enter».
Вариант 3: Консоль
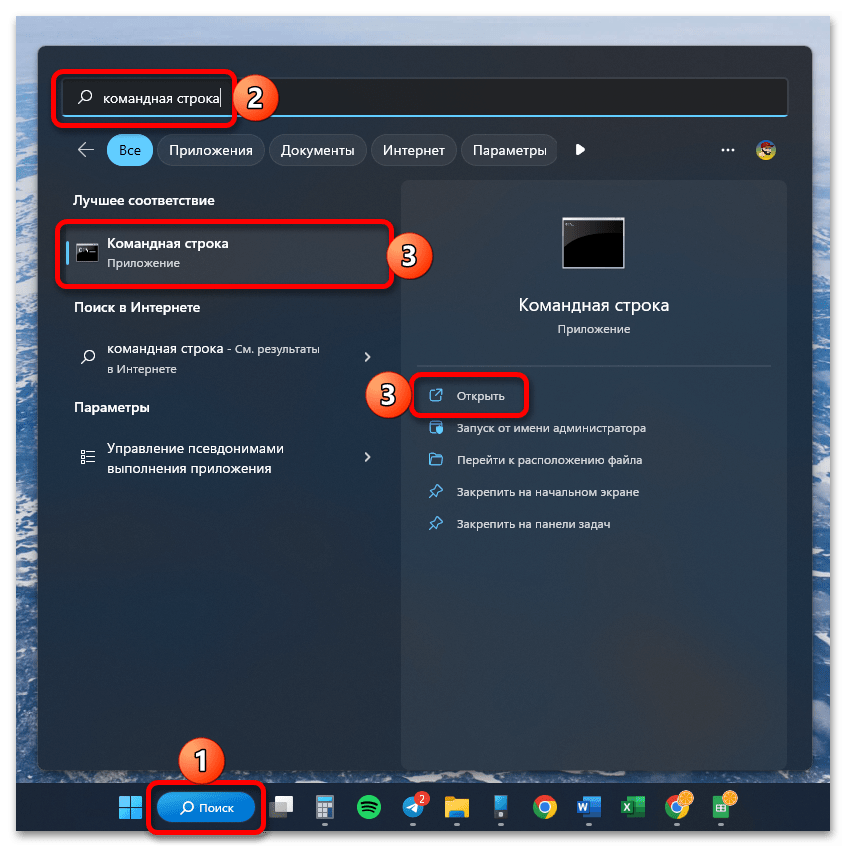
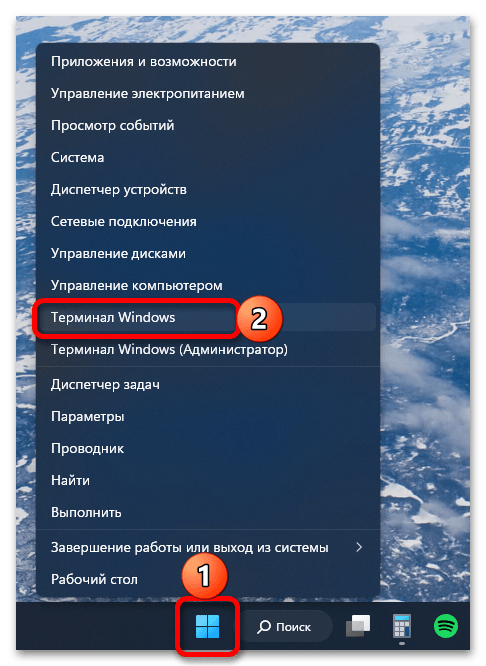
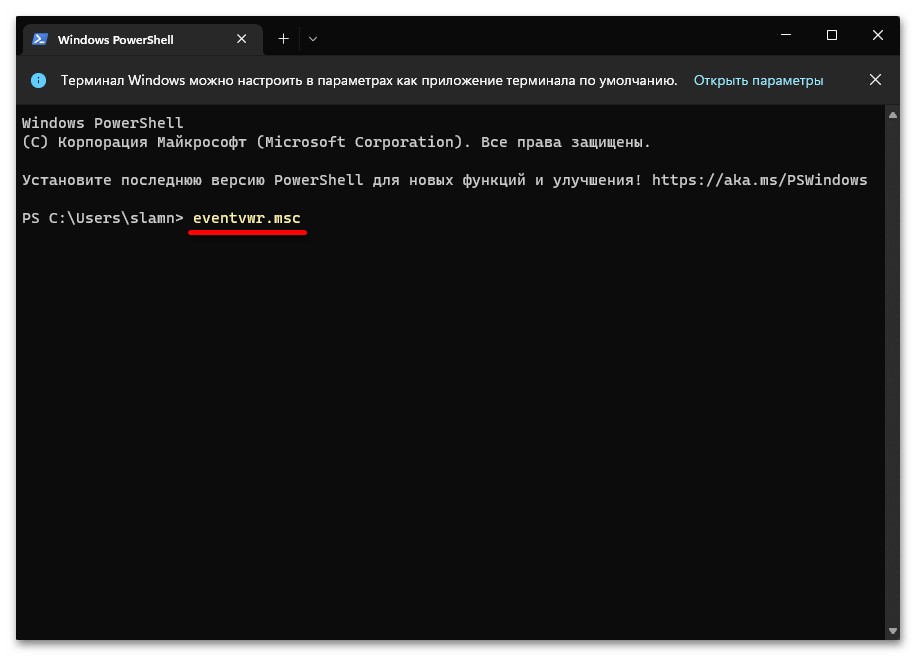
Аналогичным образом работает и консоль, причем любой из доступных в ОС Windows 11 ее вариантов, будь то «Командная строка», «PowerShell» или «Терминал».
- Откройте желаемый вариант консоли, задействовав для этого поиск или любой другой удобный способ.

Читайте также: Как открыть «Командную строку» от имени администратора в Виндовс 11
В качестве примера далее нами будет использоваться «Терминал», запущенный через контекстное меню элемента «Пуск».

Читайте также: Как открыть «Терминал» в Windows 11
- Введите вручную или скопируйте и вставьте с помощью ПКМ указанную во вступительной части данного способа команду, после чего нажмите «Enter» для ее выполнения.
Вариант 4: «Диспетчер задач»
Несмотря на то что данный компонент операционной системы чаще всего используется именно для снятия задач, с его помощью также можно и запускать их.
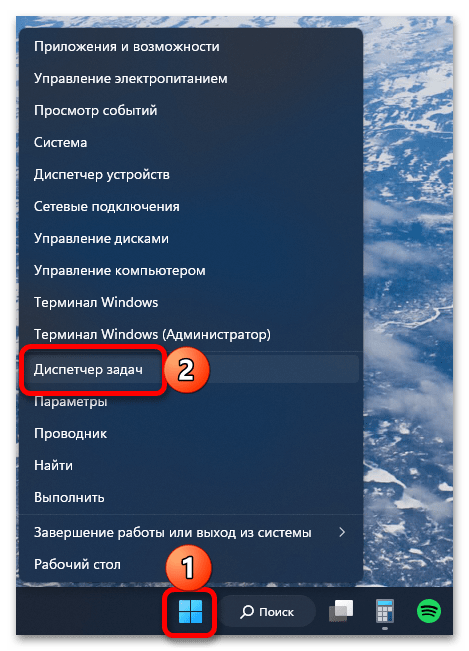
- Вызовите «Диспетчер задач», задействовав для этого клавиши «Ctrl+Shift+Esc», поиск, контекстное меню «Пуска» или любой другой доступный способ.

Читайте также: Как открыть «Диспетчер задач» в Виндовс 11
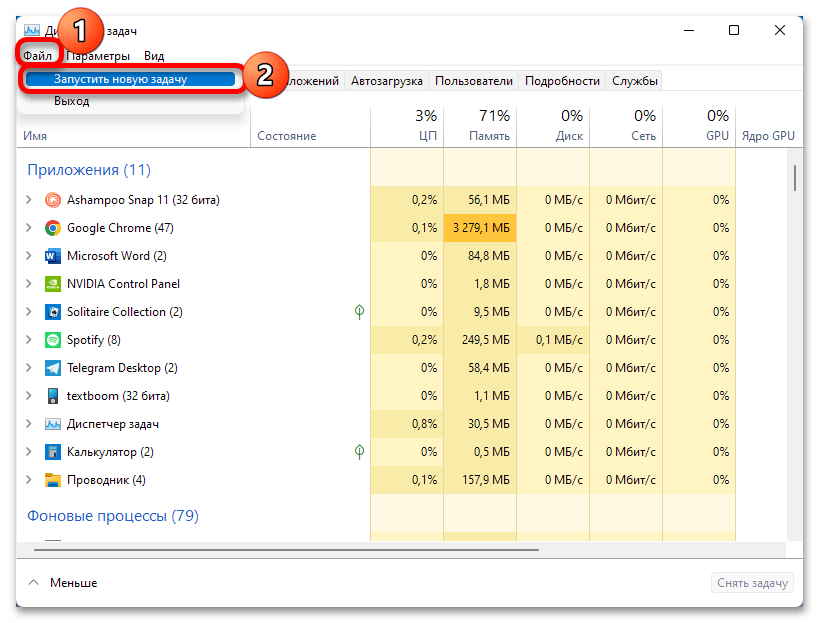
- Разверните меню «Файл» и выберите в нем пункт «Запустить новую задачу».
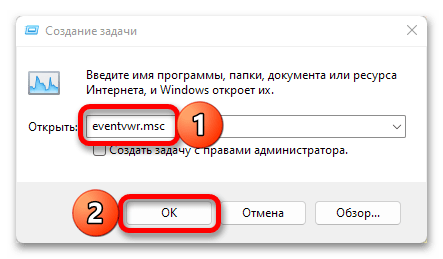
- Вставьте в появившееся окно уже знакомую по предыдущим вариантам команду и нажмите «ОК» или «Enter».
Способ 5: Исполняемый файл
Все встроенные в Windows 11 и предыдущие версии ОС от Microsoft компоненты имеют свои исполняемые файлы, которые также можно использовать для запуска. В случае с «Просмотром событий» доступно два варианта.
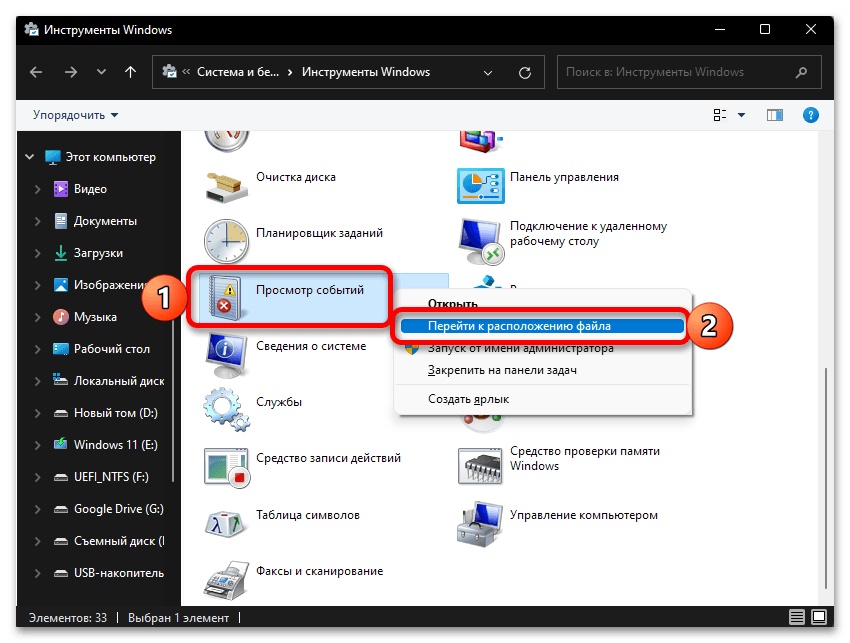
Повторите первые два шага из инструкции «Способ 3» настоящей статьи, то есть откройте «Инструменты Windows». Далее кликните по искомому компоненту правой кнопкой мышки и выберите в контекстном меню пункт «Перейти к расположению файла».
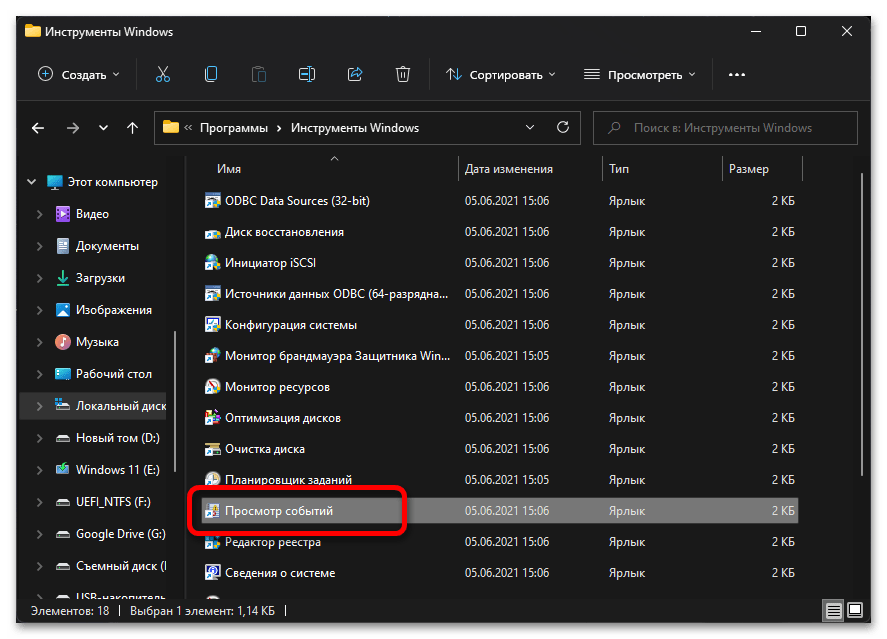
Запустите средство «Просмотр событий».
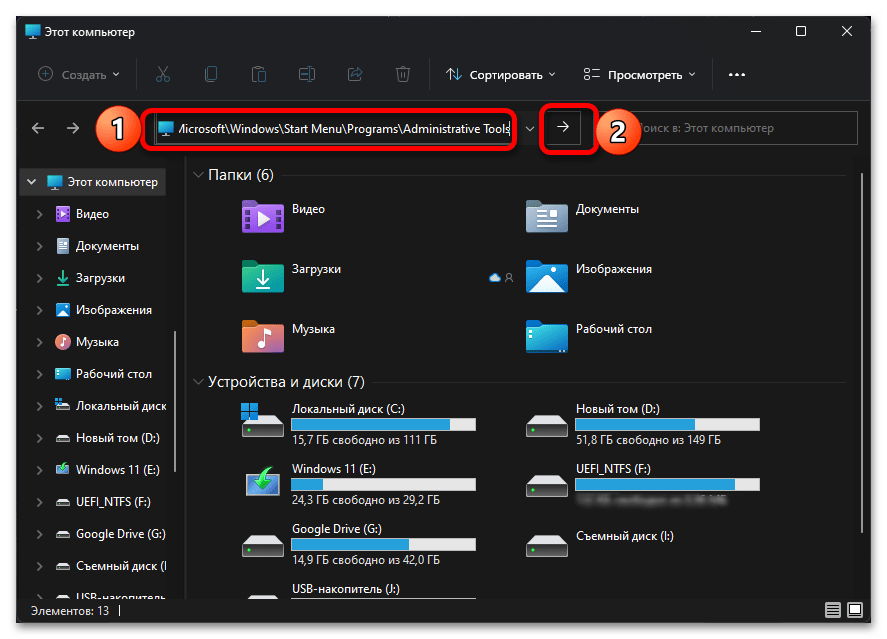
Вы также можете самостоятельно перейти в указанное расположение, скопировав представленный ниже путь, вставив его в адресную строку «Проводника» (используйте для запуска закрепленный на панели задач ярлык или клавиши «Win+E») и нажав «Enter» или указывающую справа стрелку.
C:\ProgramData\Microsoft\Windows\Start Menu\Programs\Administrative Tools
Адрес выше ведет к ярлыку, закрепленному в стартовом меню и «Панели управления», основной же исполняемый файл находится в другой системной папке:
C:\Windows\System32
Откройте ее, пролистайте список доступных файлов и папок вниз и найдите объект с названием «eventvwr.msc» (расширение может не отображаться) и типом «Приложение».
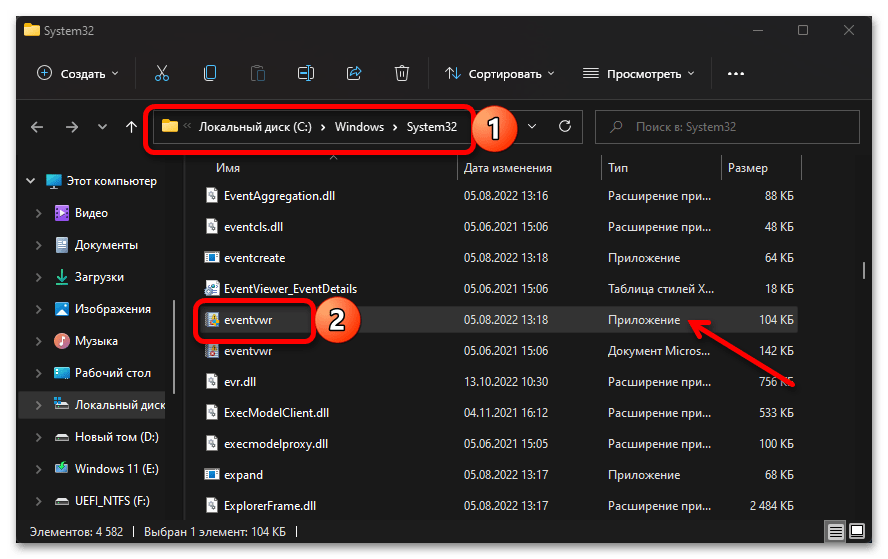
Это и есть ярлык «Просмотра событий», который также можно использовать для его запуска.
Читайте также: Как открыть «Проводник» в Виндовс 11
Дополнительно: Создание ярлыка для быстрого запуска
Если вам довольно часто приходится запускать рассматриваемую системную оснастку, логичным будет обеспечить вариант наиболее быстрого и удобного способа решения данной задачи. С такой целью можно создать ярлык на рабочем столе и/или закрепить компонент на панели задач.
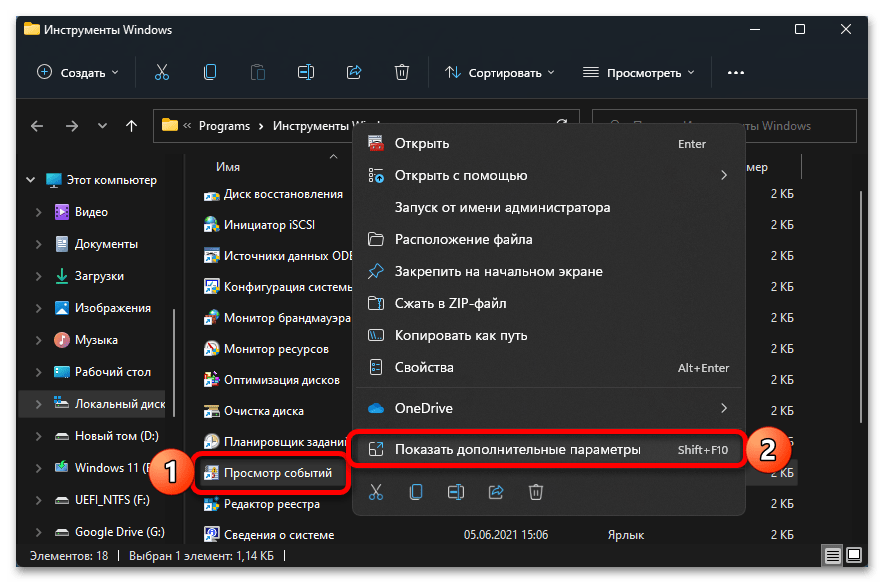
- Воспользовавшись рекомендациями из предыдущей части статьи, перейдите к исполняемому файлу «Просмотра событий» (можно открыть любое из двух указанных расположений). Нажмите по нему правой кнопкой мышки и выберите «Показать дополнительные параметры».
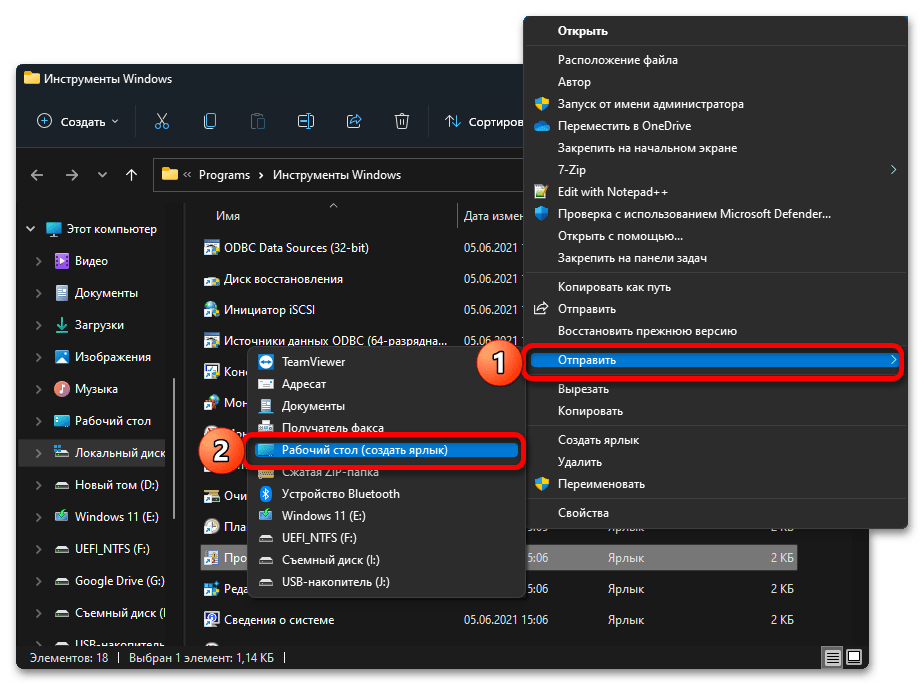
- Далее в появившемся классическом контекстном меню последовательно воспользуйтесь пунктами «Отправить» — «Рабочий стол (создать ярлык)».
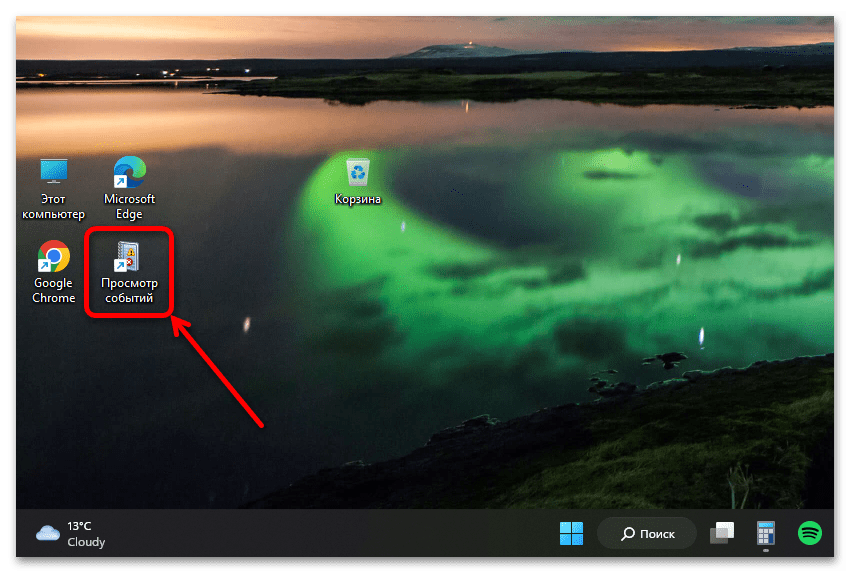
- Соответствующий ярлык появится на рабочем столе операционной системы.
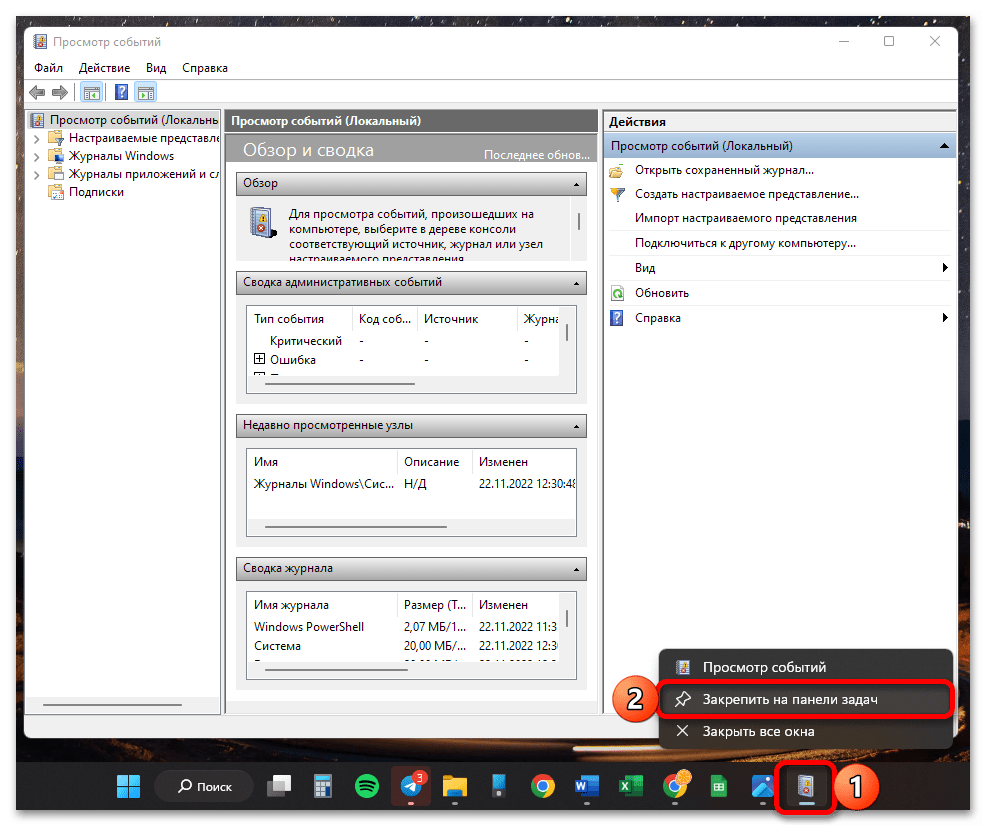
Если же вы хотите закрепить «Просмотр событий» на панели задач, откройте его любым из предложенных в статье способов, затем кликните ПКМ по значку и выберите соответствующий пункт контекстного меню.
Наша группа в TelegramПолезные советы и помощь
Whenever you encounter an error in Windows, it certainly is a cause for concern. But, we often do not bother discovering what caused it or don’t know how to.
Error logs, as the name suggests, are the log files that store all the information as to why the error happened, the program or process that led to it, along the exact date and time of it.
How do I view error logs in Windows 11?
Here are a few ways to see error logs in Windows 11:
-
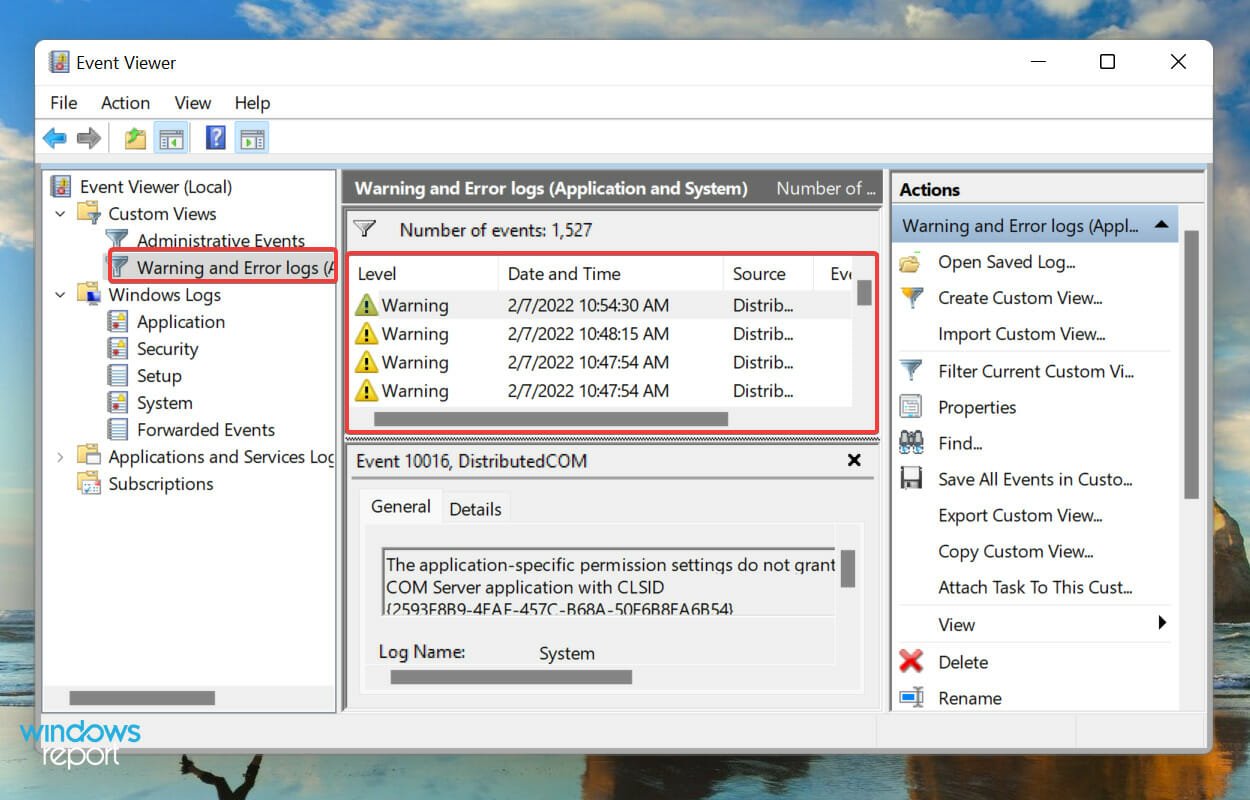
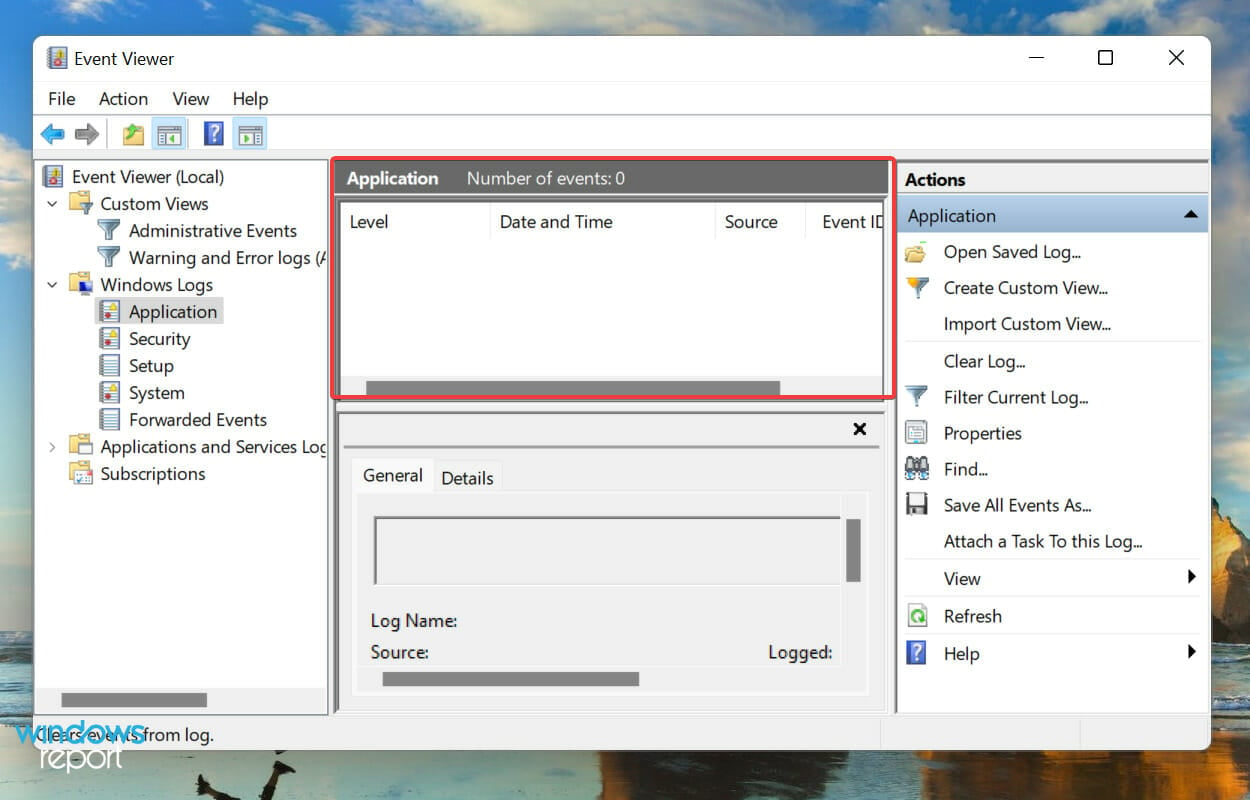
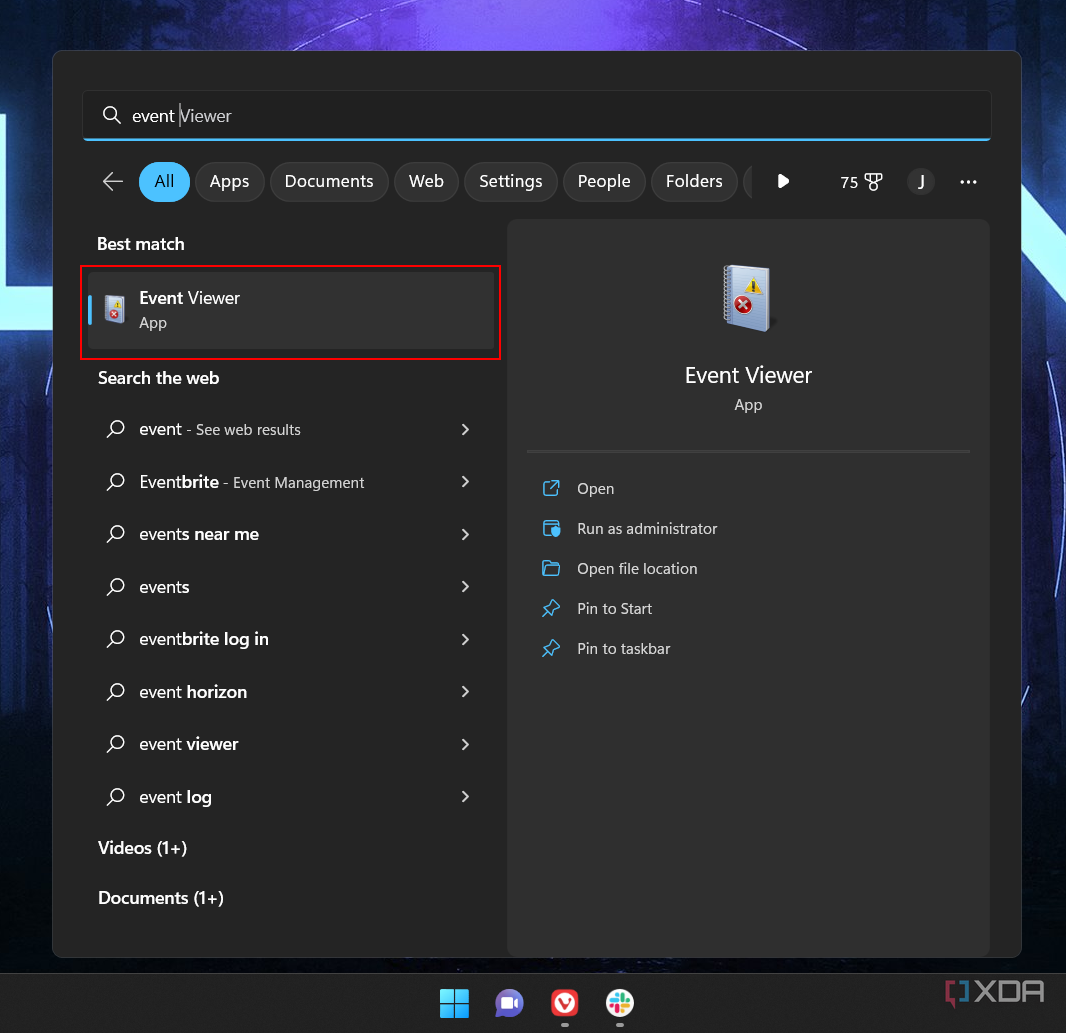
1. Press Windows + S to launch the Search menu, enter Event Viewer in the text field at the top, and click on the relevant search result.

-
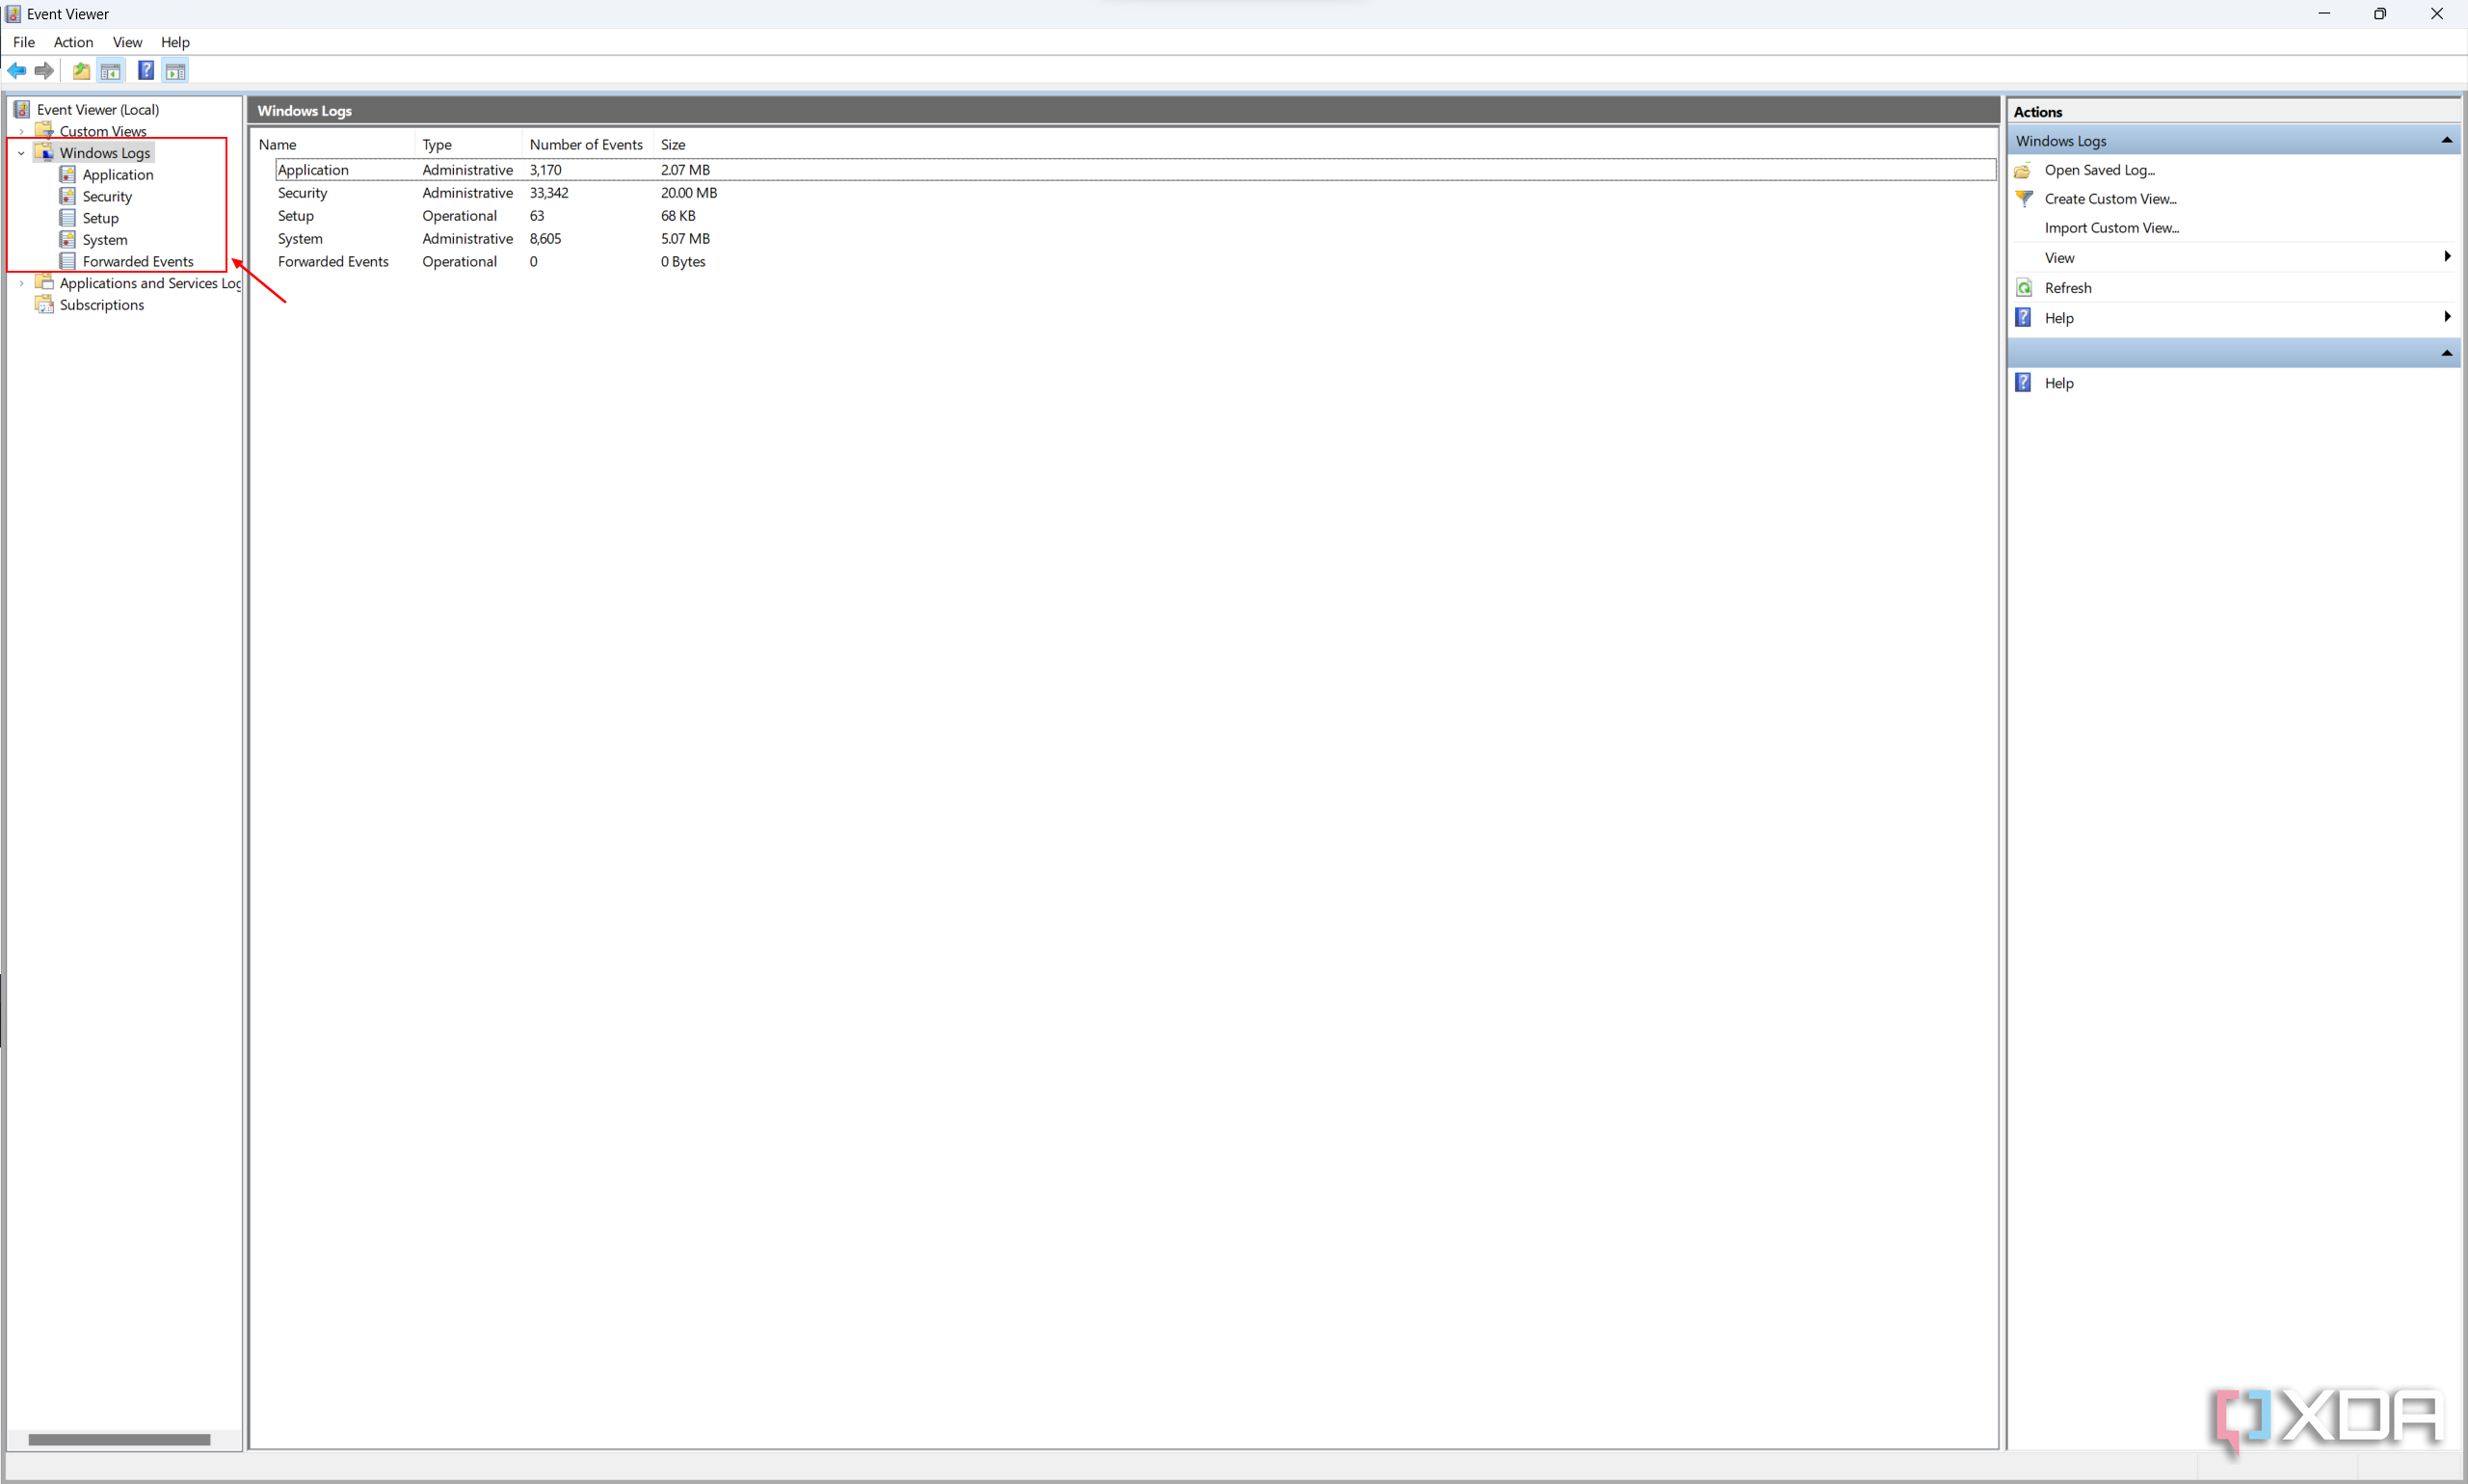
2. Double-click on Windows Logs in the navigation pane on the left.
-
3. You will now find the five different categories. Select any of these, and all the error logs under it will be listed on the right.
-
4. Now, click on any of the error logs to view all the relevant information about them.
It’s pretty simple and quick to access the error logs on your Windows 11 OS, but in case you didn’t used before, the steps below will surely help you find them.


You now know how to check the Windows 11 error logs, but just knowing that won’t suffice.
There’s still a lot out there to understand before you can actually make some sense out of these logs, and use them to your advantage.
How to understand Windows 11 error logs?
When you view a Windows 11 crash log, the general details and the Event ID is critical in identifying and eliminating the error. Apart from that, there’s an Event Log Online Help link at the bottom, which may provide some valuable insights.
For instance, here’s a Windows 11 error log when the relevant driver for a device failed to load.
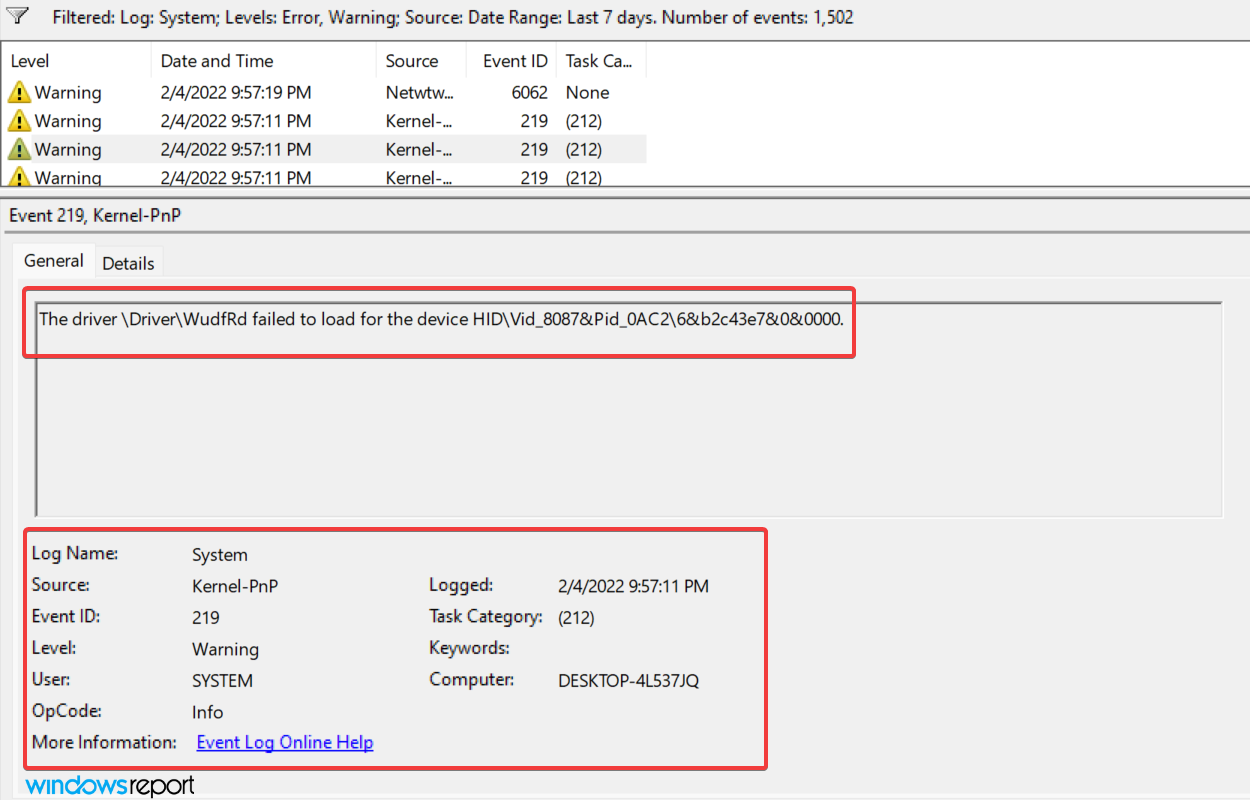
The 219 Event ID helped find out a lot of information along with the relevant fixes for the problem.
We just did a Google search for this Event ID and there were a plethora of results. But this requires a proper understanding of Windows 11 error logs.
But, it’s important to mention here that not all error logs will be as descriptive. Some might have things that you wouldn’t be able to comprehend or use jargon excessively. No matter the case, a simple Google search would suffice.
And if Event Viewer is not working in Windows 10 and 11, rest assured that our detailed guide will help you.
What are the different types of error logs?
When you go through the Windows 11 error logs, there are three important categories, referred to as Event Level, under which these are placed.
And, the categories define the severity of the event for which the log is created. The three categories are as follows:
- Information: These are created when an operation goes through successfully. For instance, when a driver is loaded or an application is launched without encountering any issues.
- Warning: These are created when the OS finds an issue with the system. These issues do not pose an imminent risk, but could be problematic in the future. For instance, if you are running low on disk space, a log will be created.
- Error: These indicate a major problem, though most of the time, Windows takes care of these as well. For example, an error log will be created if a driver or service does not load. But, these are the most critical ones of all.
If you are identifying problems with the PC, ignore the Information logs, go through the Warning logs, but pay special attention to the ones categorized as Error, since these are most likely to record the problem you are looking for.
When you open the Event Viewer in Windows 11, it will list out all three. The view will remain the same if you have not changed the Windows 11 Error Reporting logs location in the in the Group Policy.
However, identifying all logs for one of these levels will take up a lot of your time. This is where filtering error logs come to your aid. Check the next section to find out how you can do that.
How can I filter error logs?
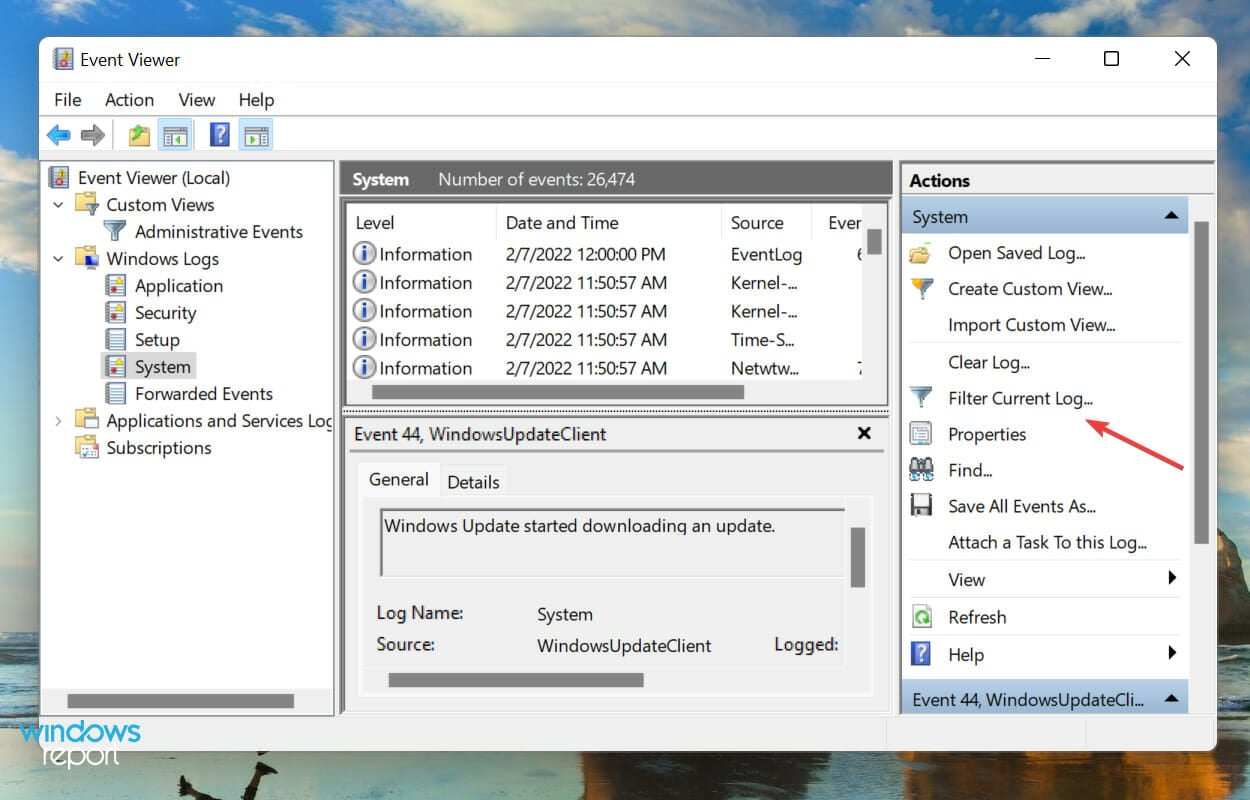
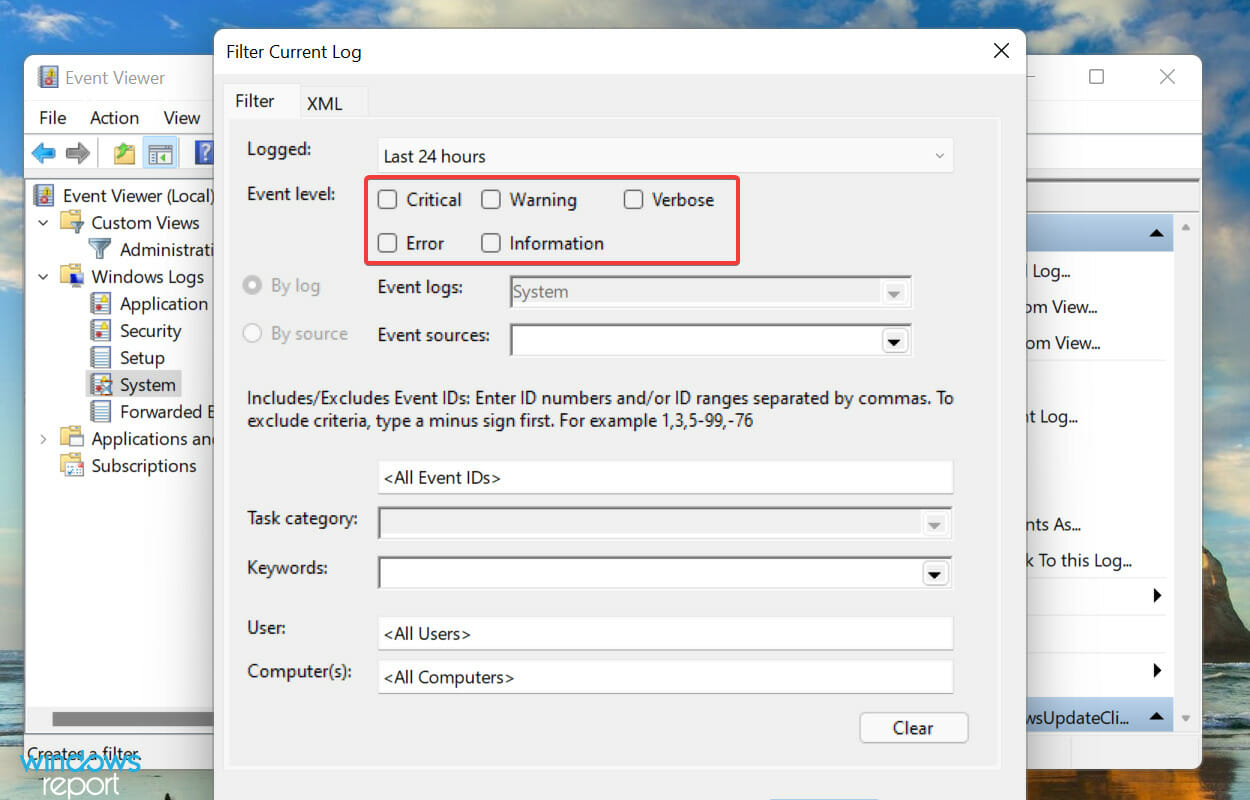
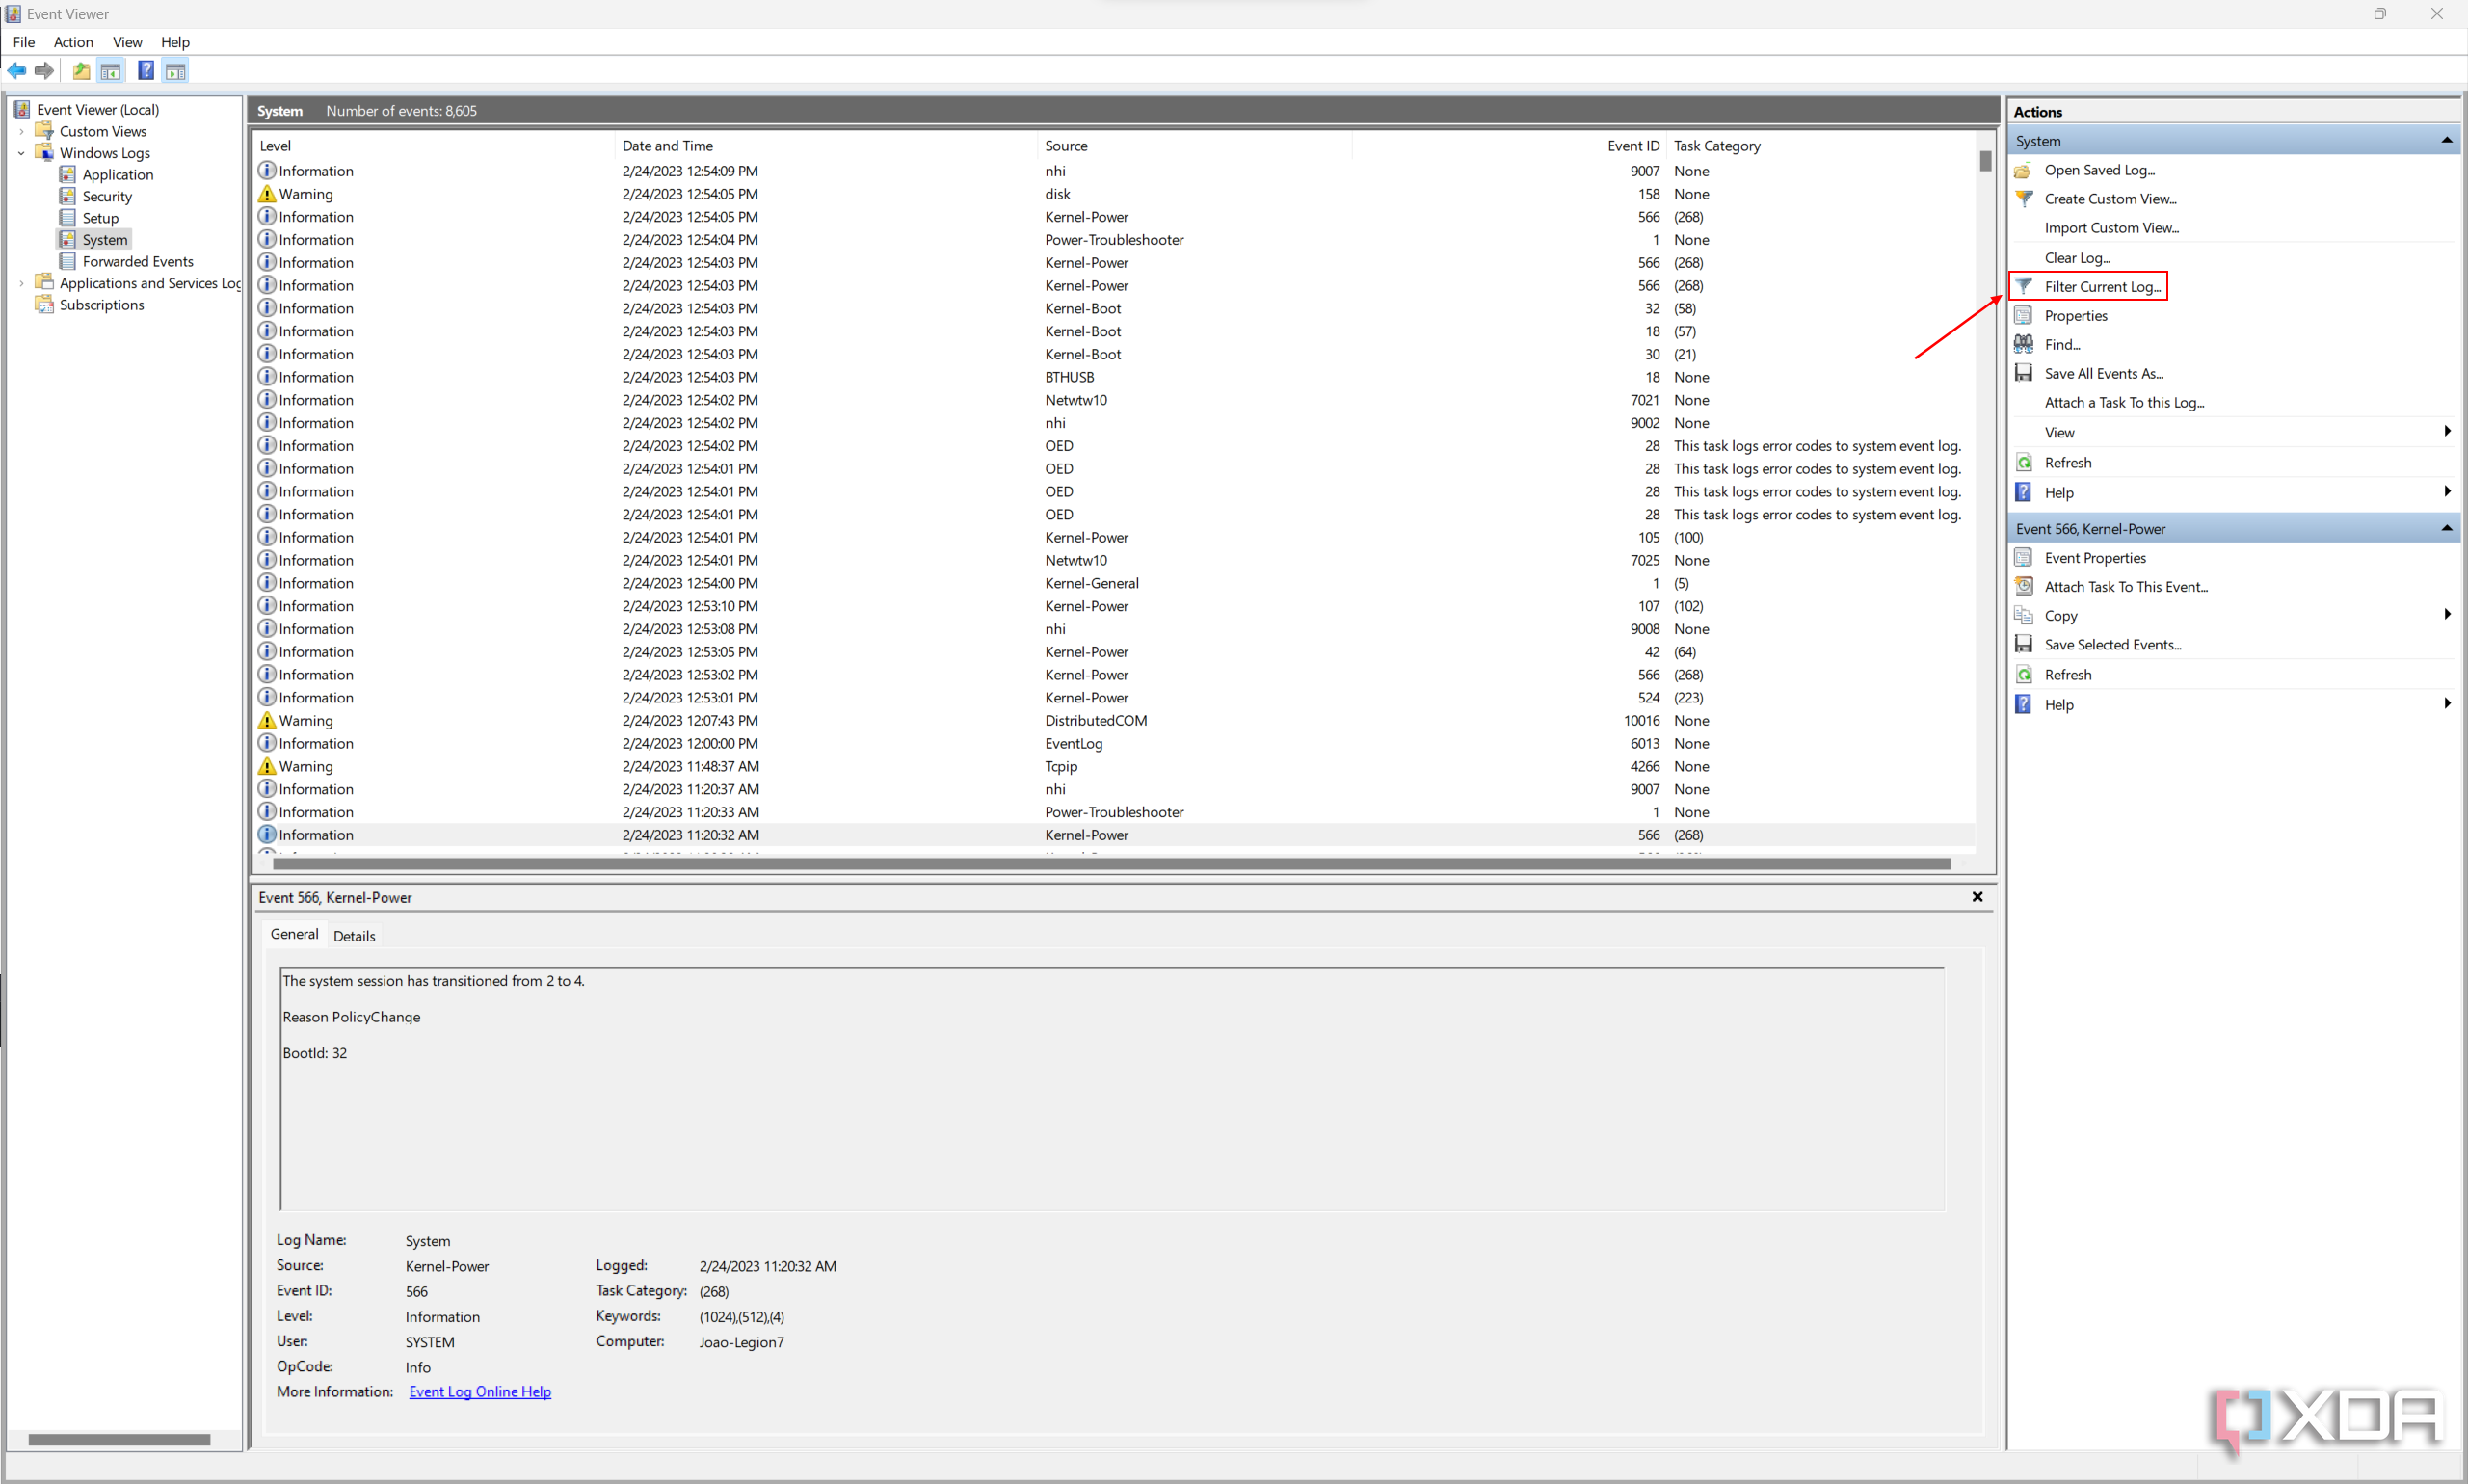
- Open the Event Viewer, navigate to the particular category of logs from the left, and then click on Filter Current Log on the right.
- Next, click on the Logged dropdown menu to select the duration for which you want to check the logs.
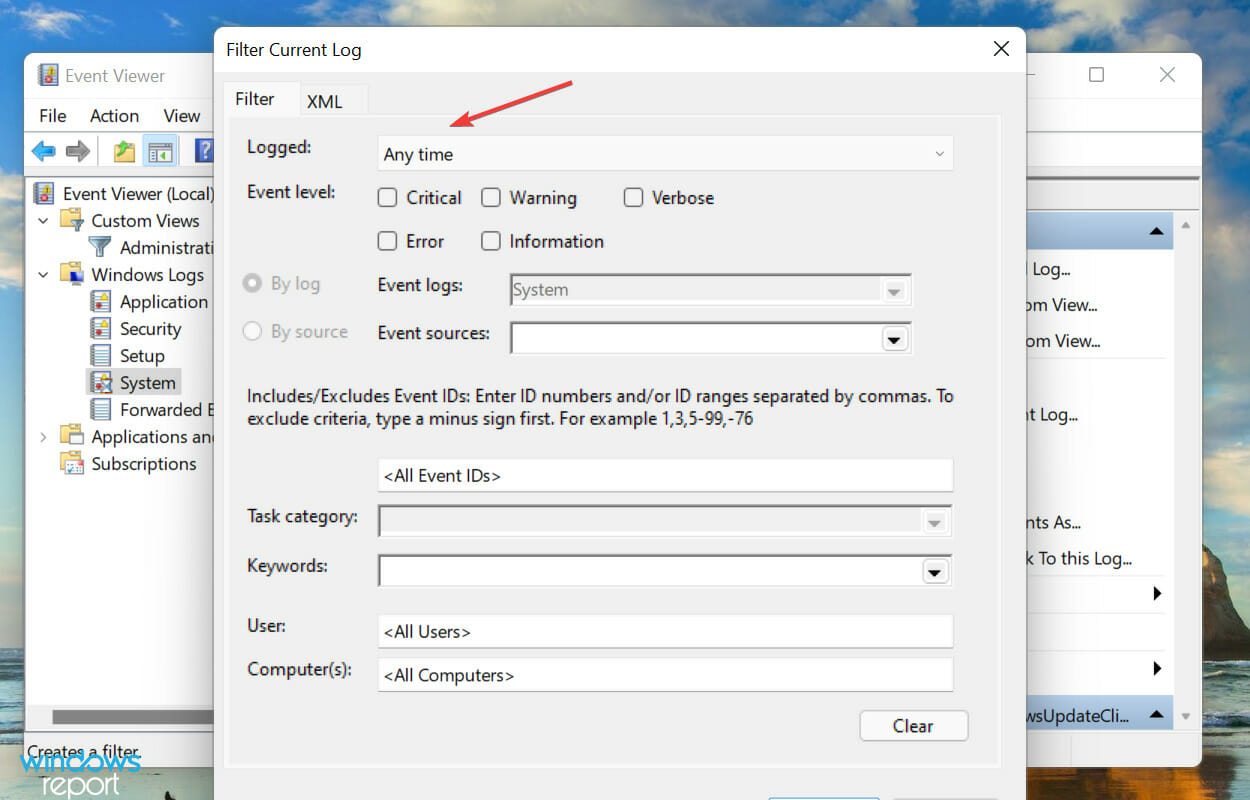
- Now, select a time duration from the list of options. You can also choose the last option to create a custom range.
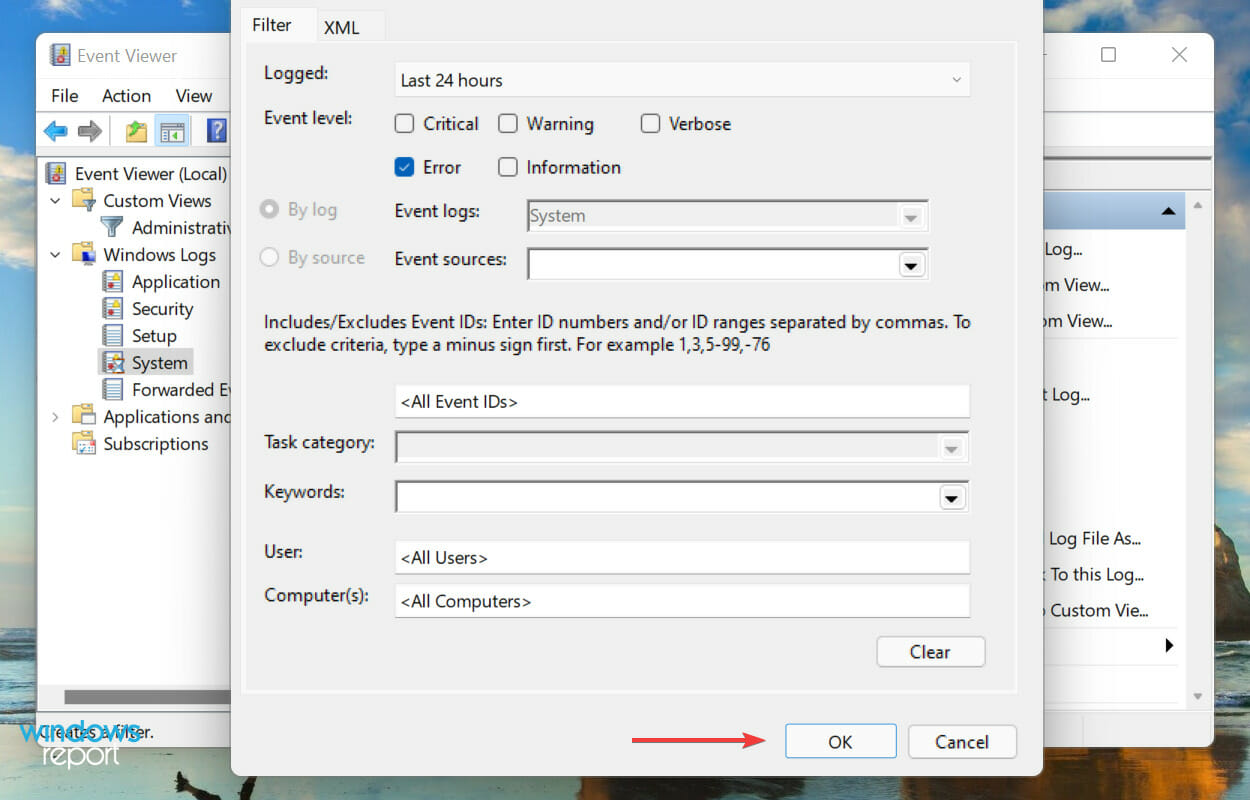
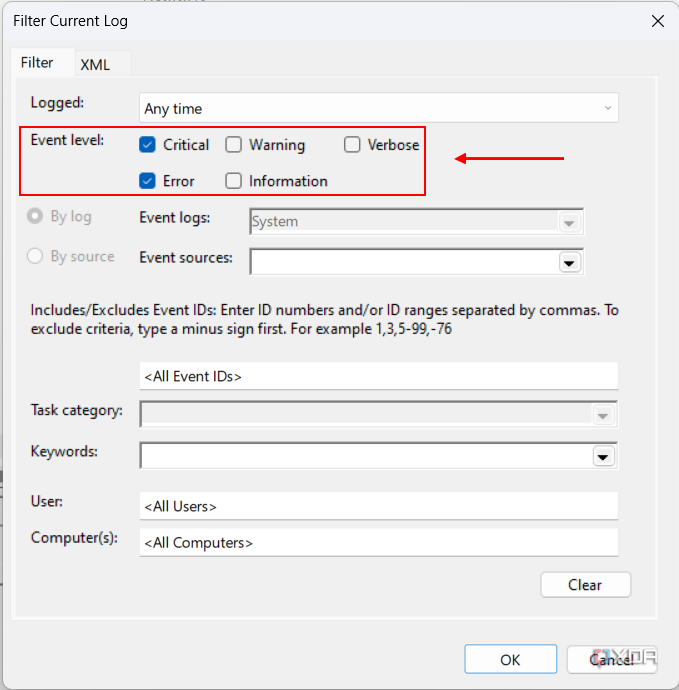
- Once done, tick the checkboxes for the Event Levels that you want to filter.
- Finally, click on OK at the bottom to filter the error logs.
- All the errors logs that fall under the choosen filters will now be listed.
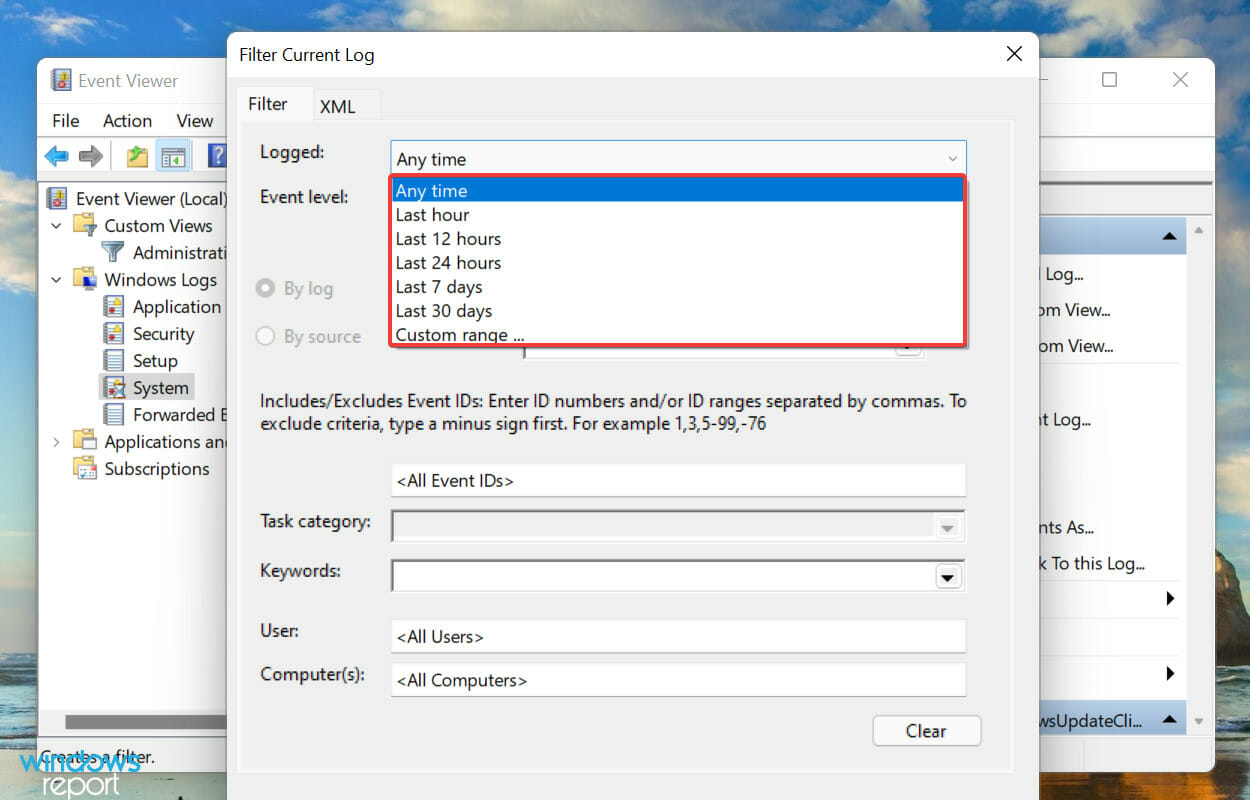
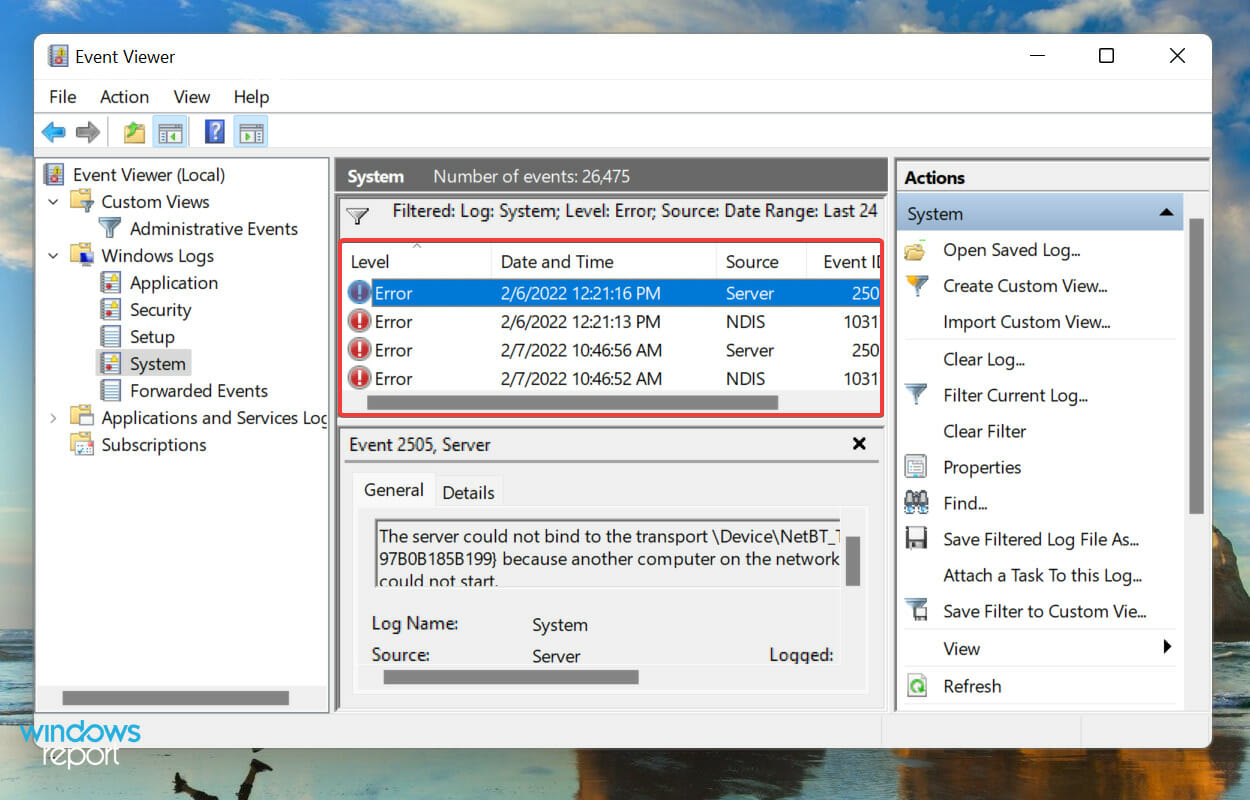
We selected the duration as 24 hours, and level as Error, and filtered the logs. Event Viewer then listed the four Windows 11 error logs that were created during that time.
- Recent Windows 11 update lets you disable profanity filter in voice typing
- Microsoft wants Windows 10 users to upgrade to Windows 11 or Copilot + PCs
- Windows 11 KB5055627 update makes File Explorer more fluid
- A few keyboard settings are moving from Control Panel to Settings app in Windows 11
How to create a custom view to check a particular category and level of logs in Windows 11?
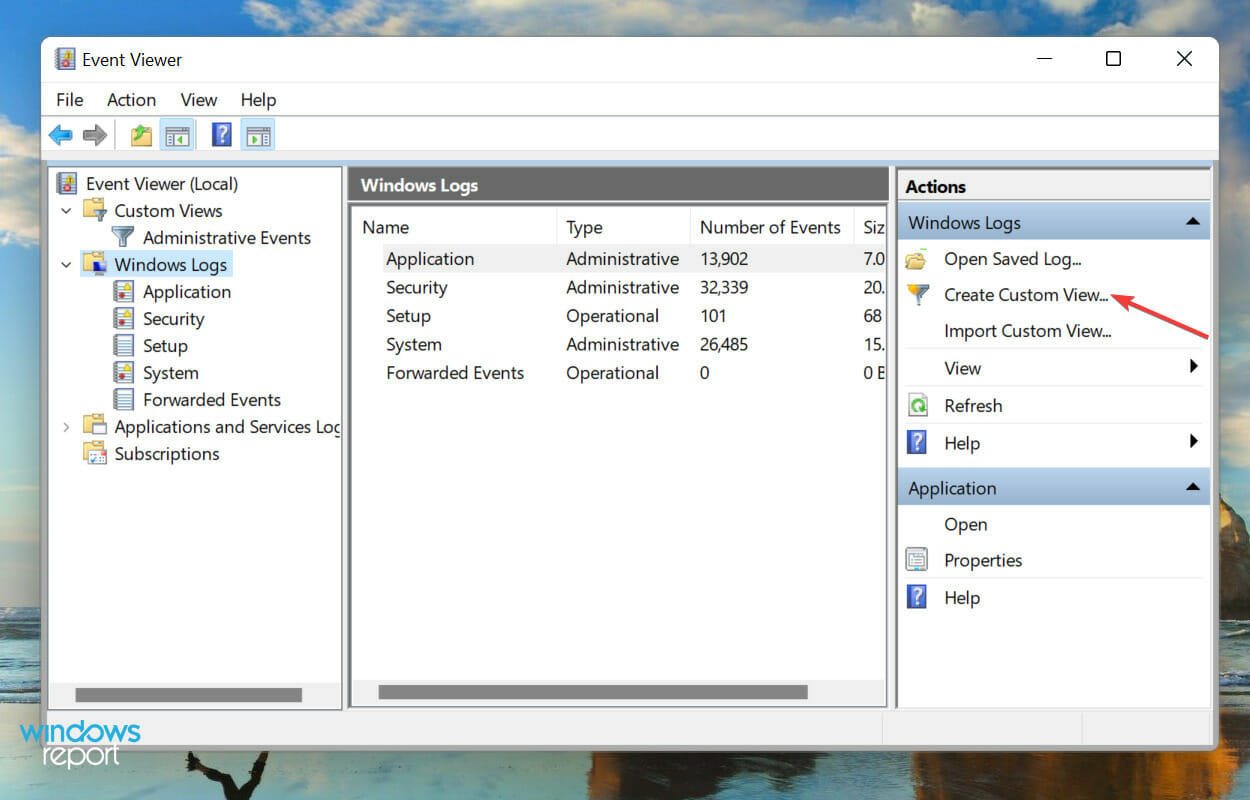
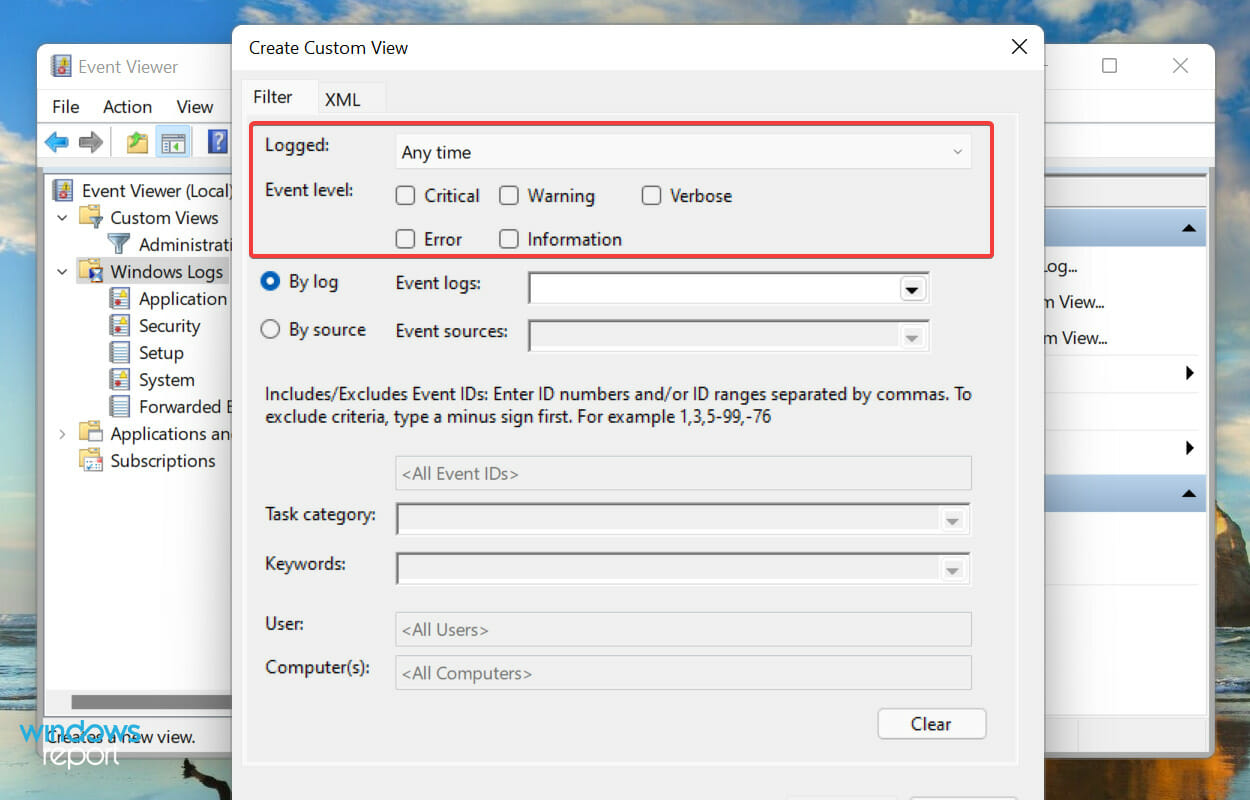
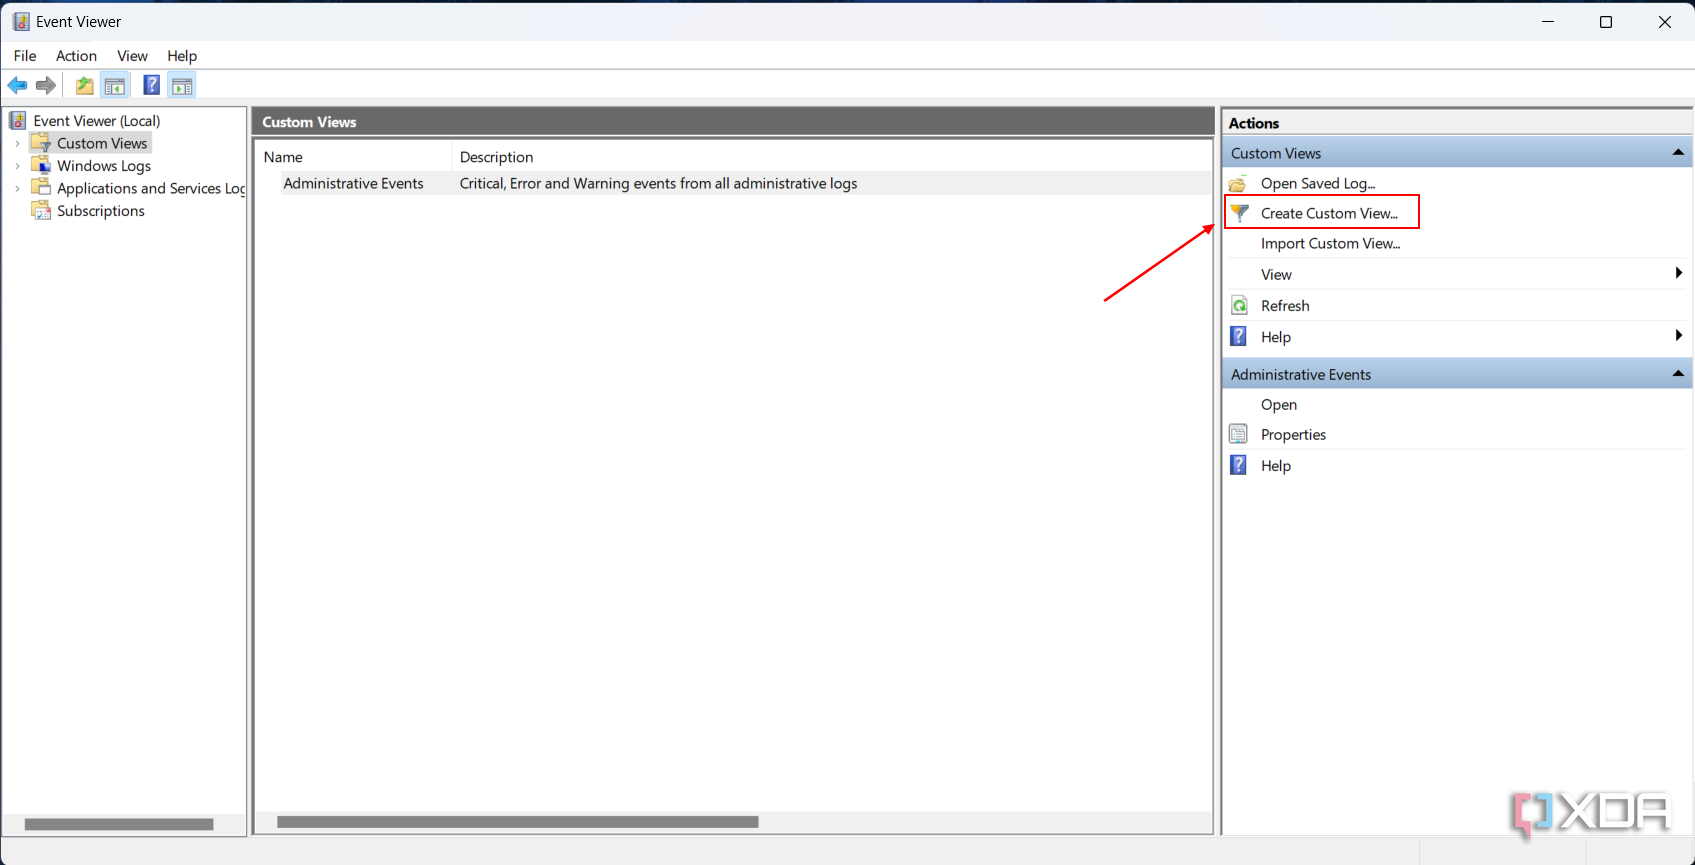
- Open the Event Viewer and click on Create Custom View on the right.
- Next, select the duration and Event Level, as you did earlier when creating a filter.
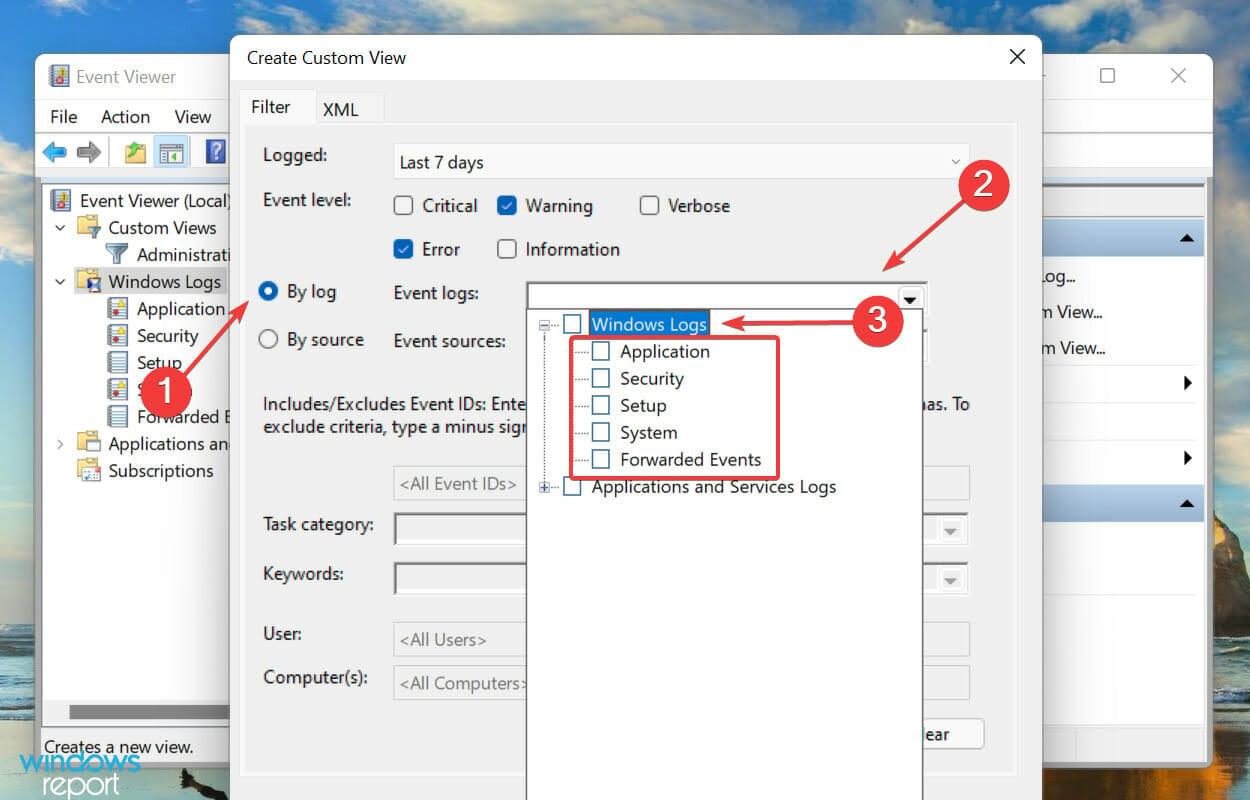
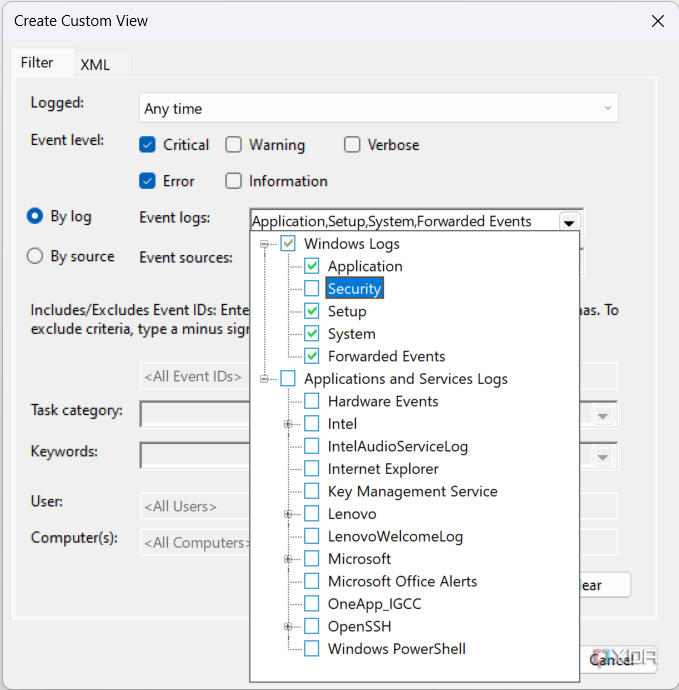
- With the By logs option selected, click on the Event logs dropdown menu, double-click on the Windows Logs entry to expand and view the various categories, and tick the checkboxes for the desired ones.
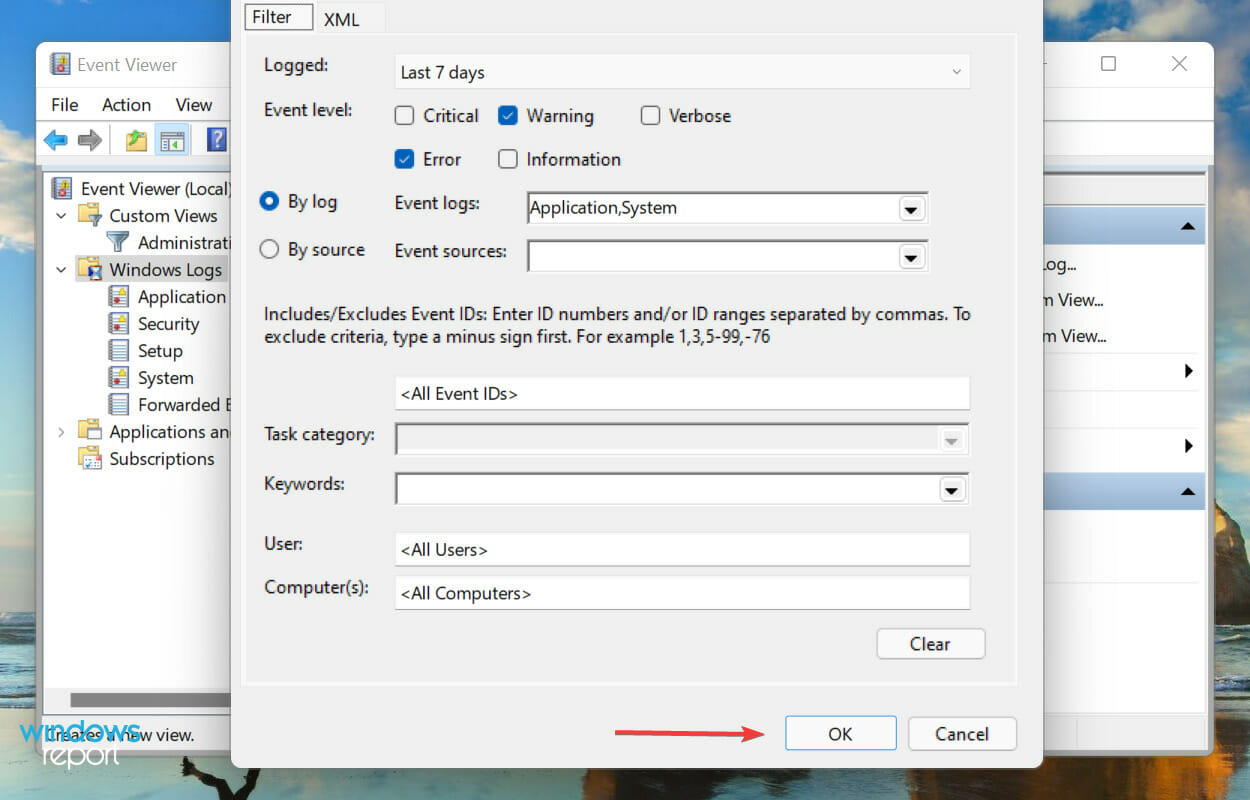
- Now, click on OK at the bottom to set filters for the new custom view.
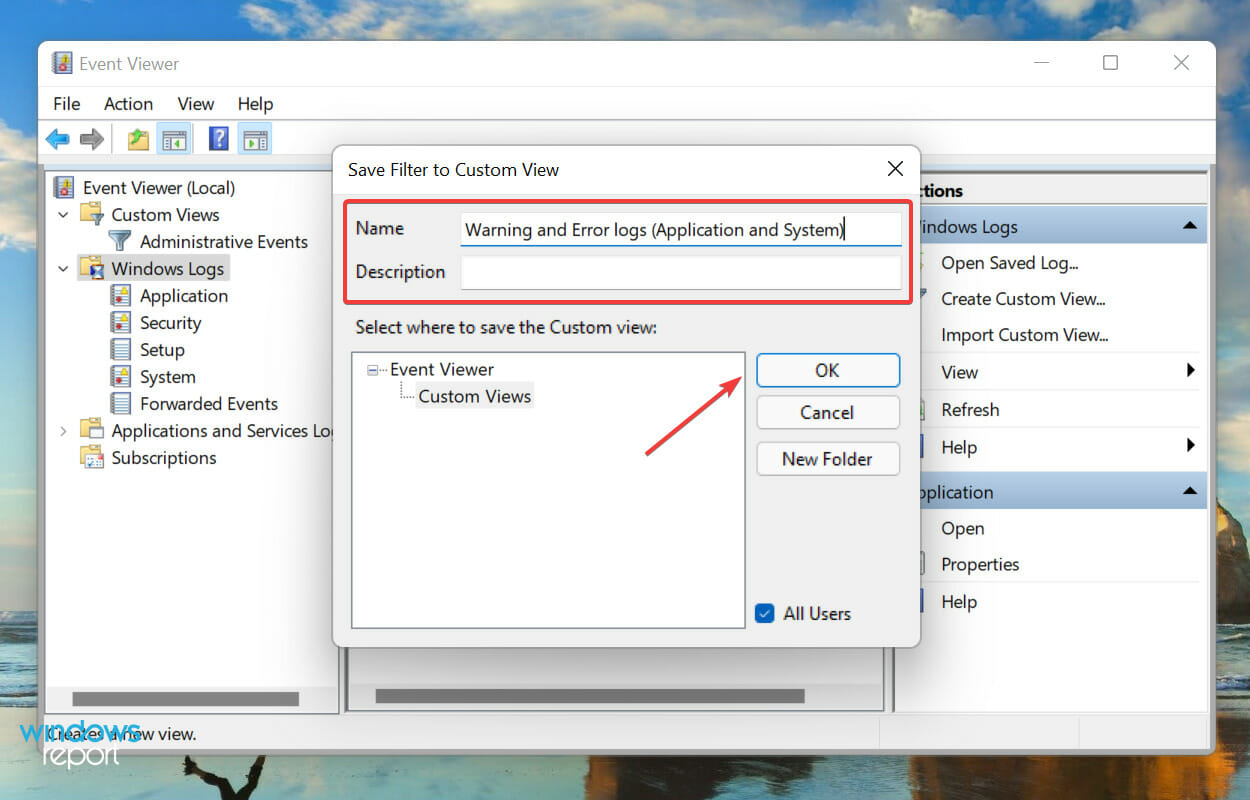
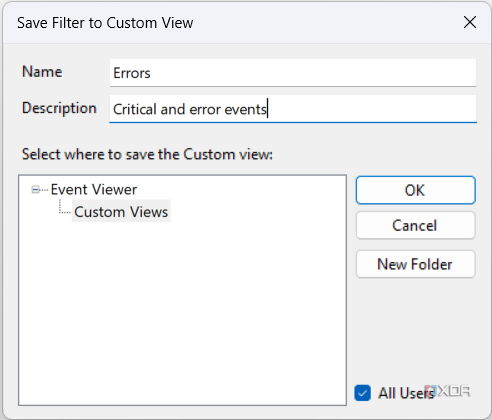
- Enter a Name and Description for the custom view and click on OK.
- The new custom view will now be listed on the left, and all logs falling under it on the right.
How can I clear error logs in Windows 11?
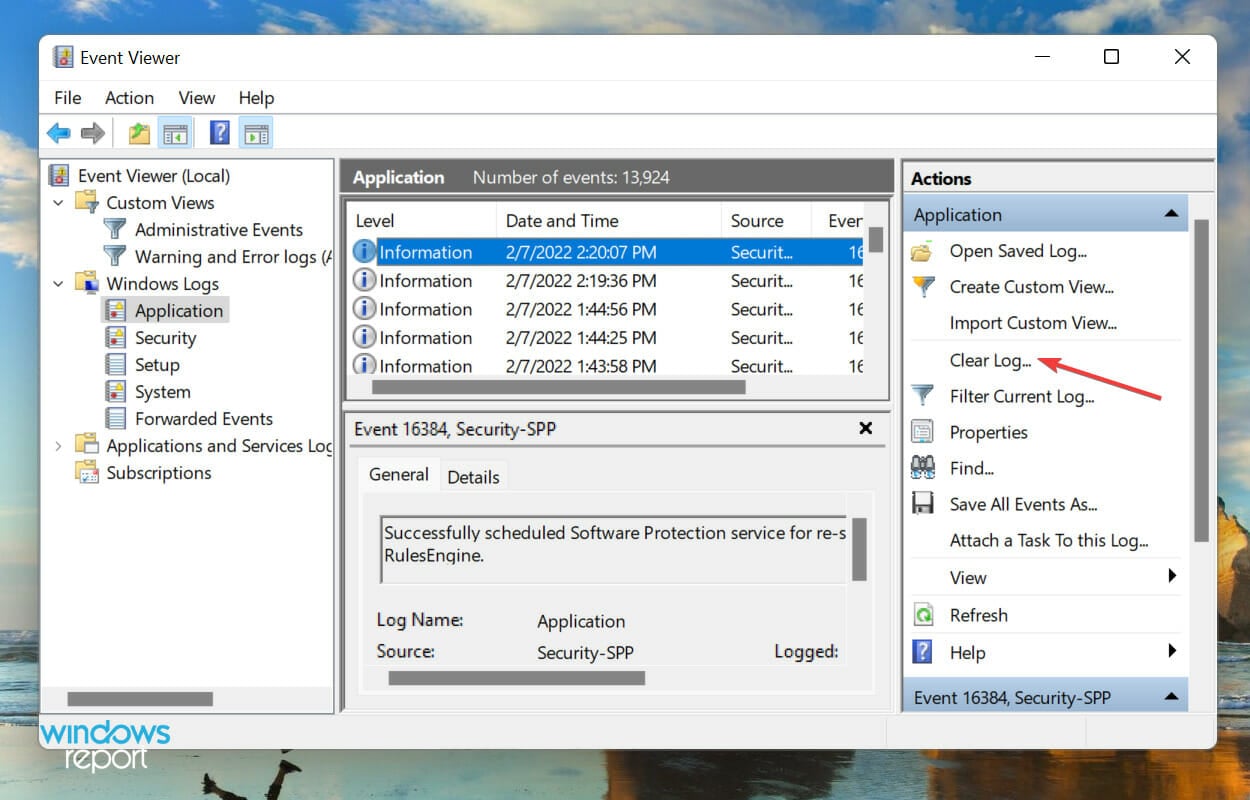
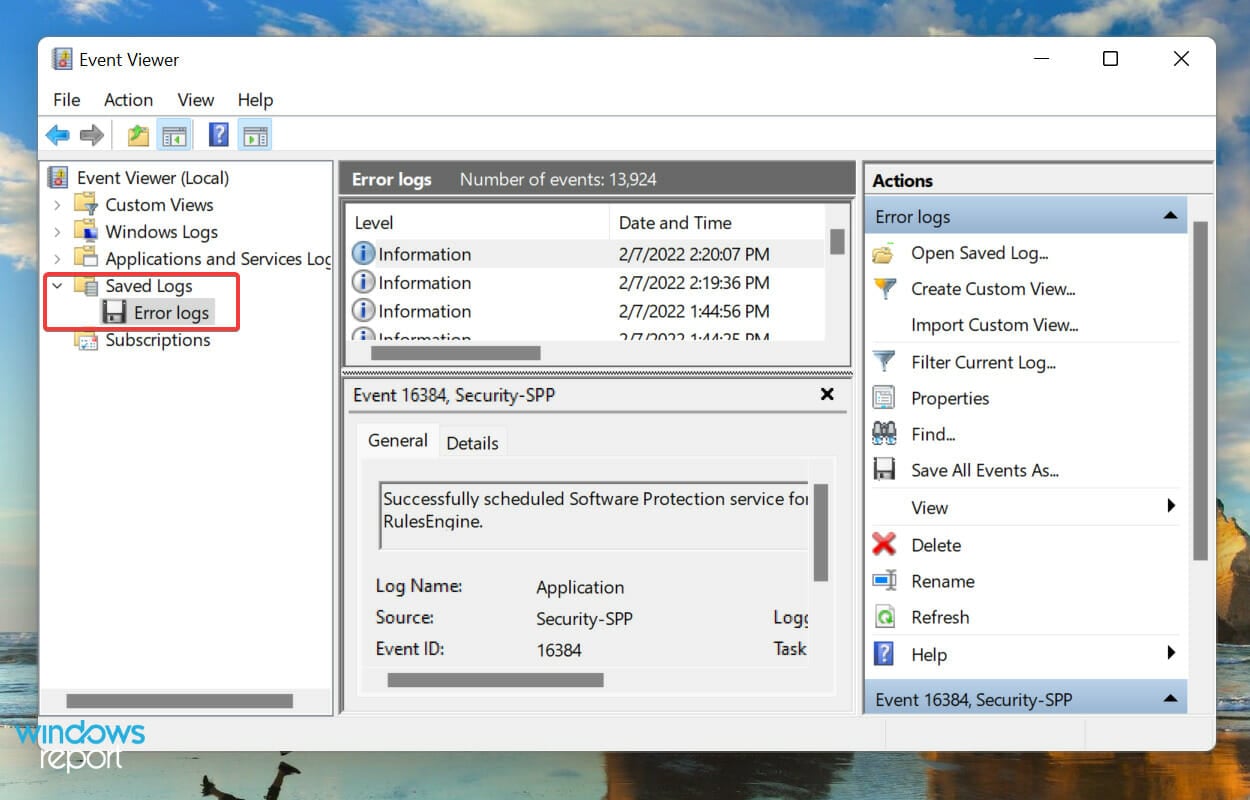
- Launch the Event Viewer, navigate to the relevant category, and click on Clear Log from the list of options on the right.
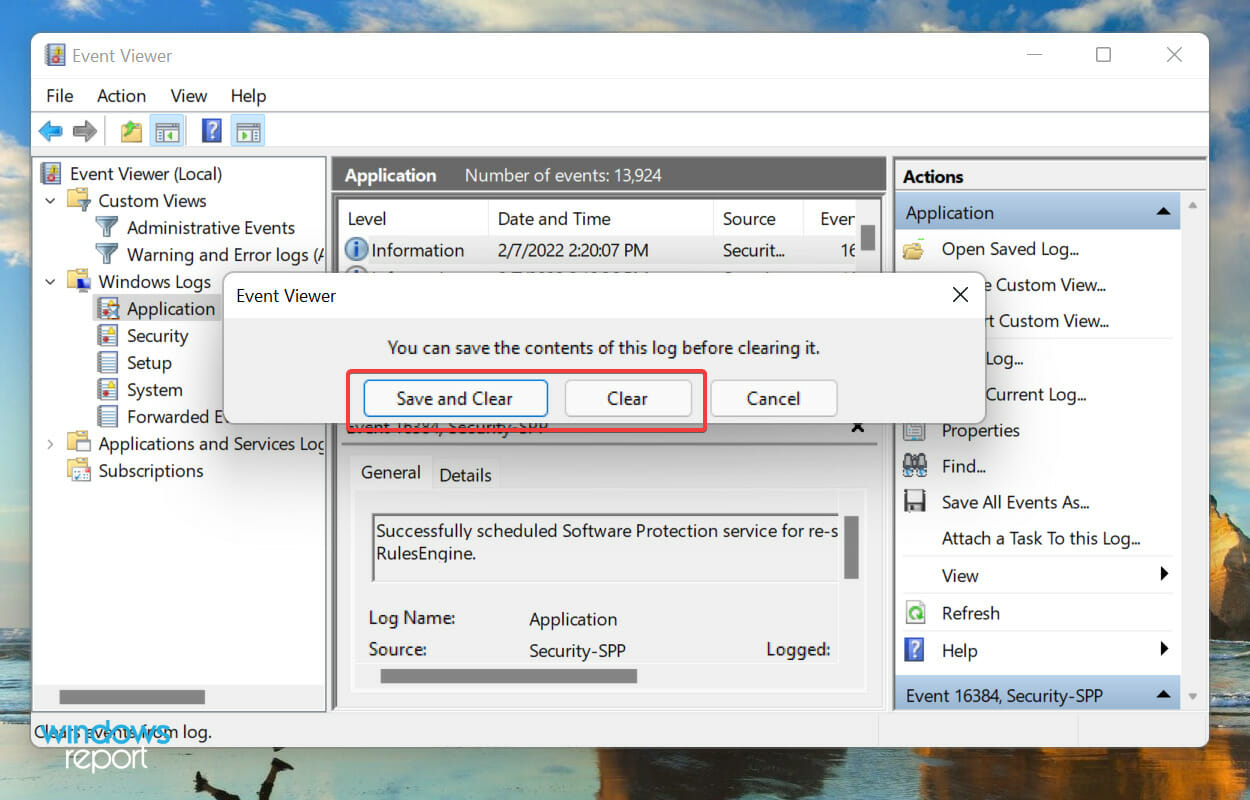
- You now have two options, either Save and Clear the error logs or directly Clear them. Choose the desired option.
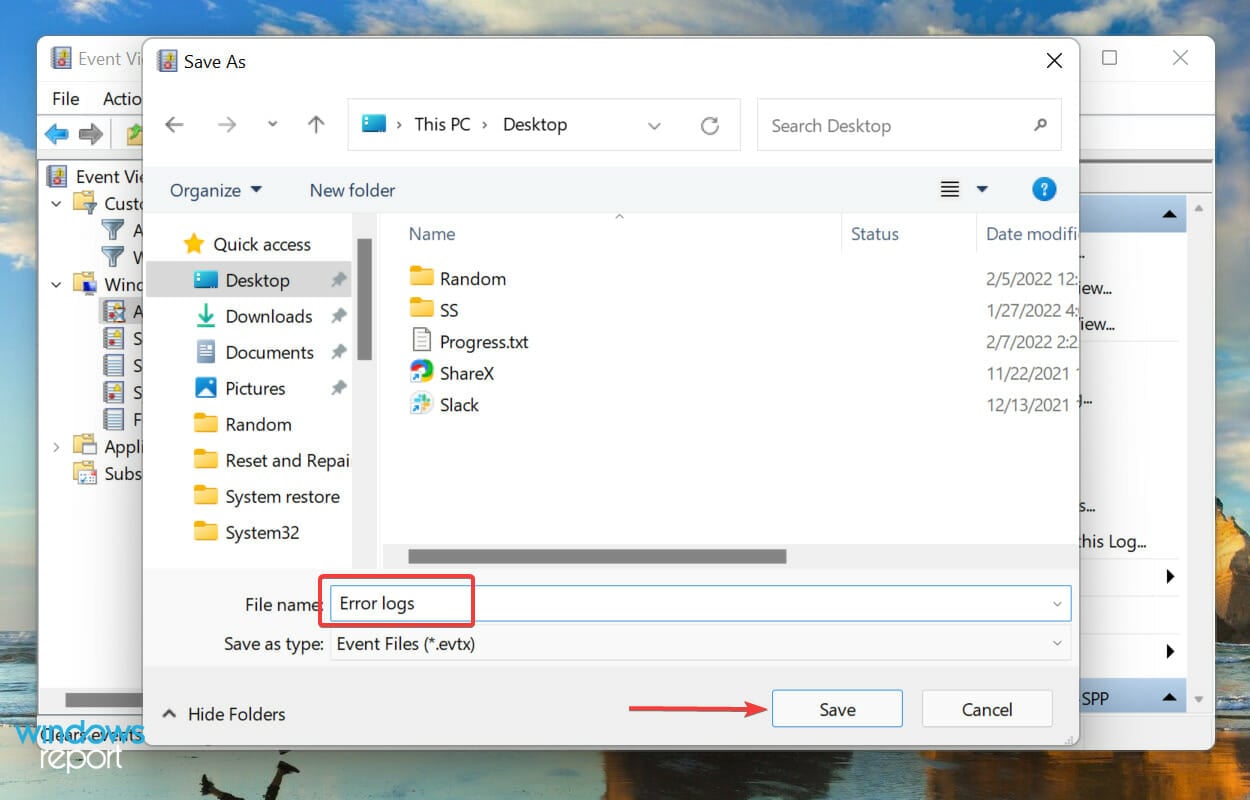
- If you selected Save and clear, choose the location for the file, add a name for it and click on Save.
- Once saved, they error logs will be cleared right away and there will be none listed under that particular category.
- In case you saved the error logs before deleting them, these can be found under Saved Logs in the navigation pane on the left.
The OS creates thousands of logs for each type of event, be it the successful launch of a driver and service or the most fatal errors. Like any other file, these too consume space on your hard disk, no matter how small it is.
So, if you are running out of space, or just want a more organized Event Viewer, clearing the Windows 11 error logs may help.
Checking the error logs can help you understand the BSoD errors like 139, and point you in the right direction to fix it.
How do I create my own log file in Windows 11?
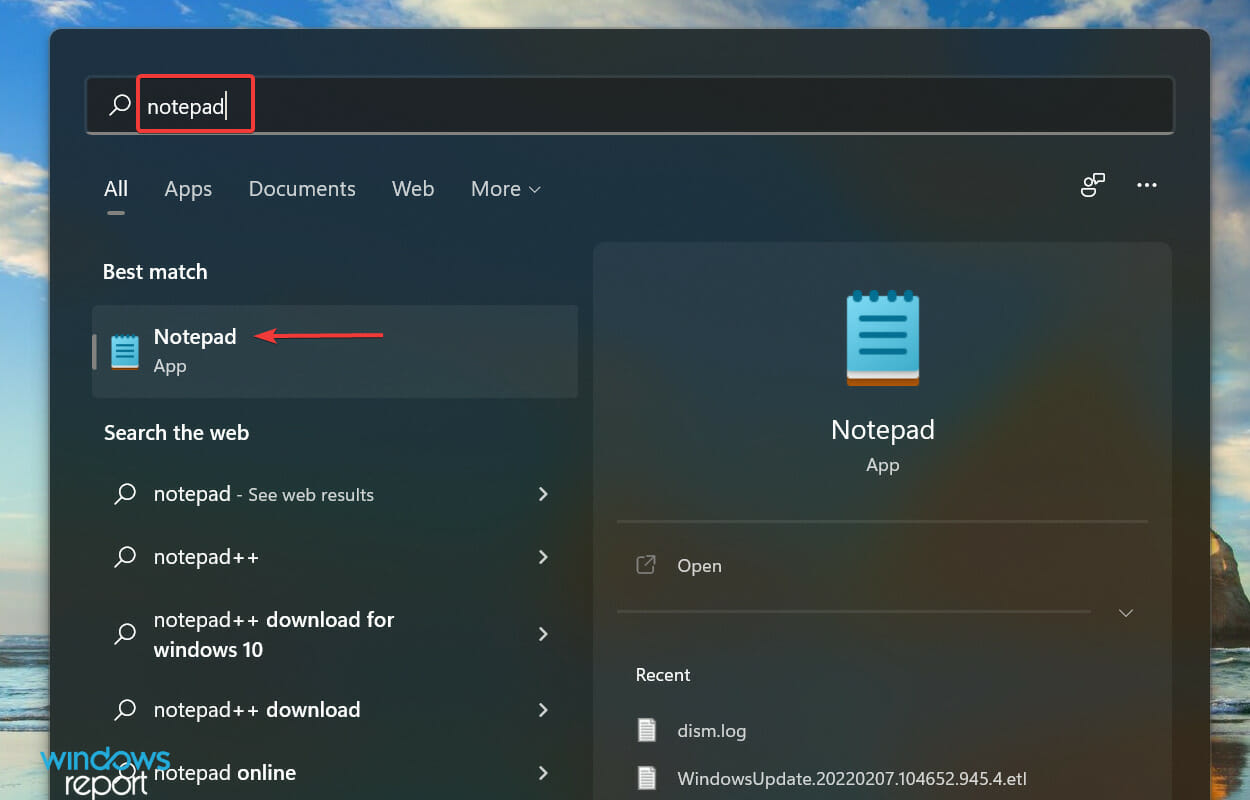
- Press Windows + S to launch the Search menu, enter Notepad in the text field at the top, and click on the relevant search result that appears.
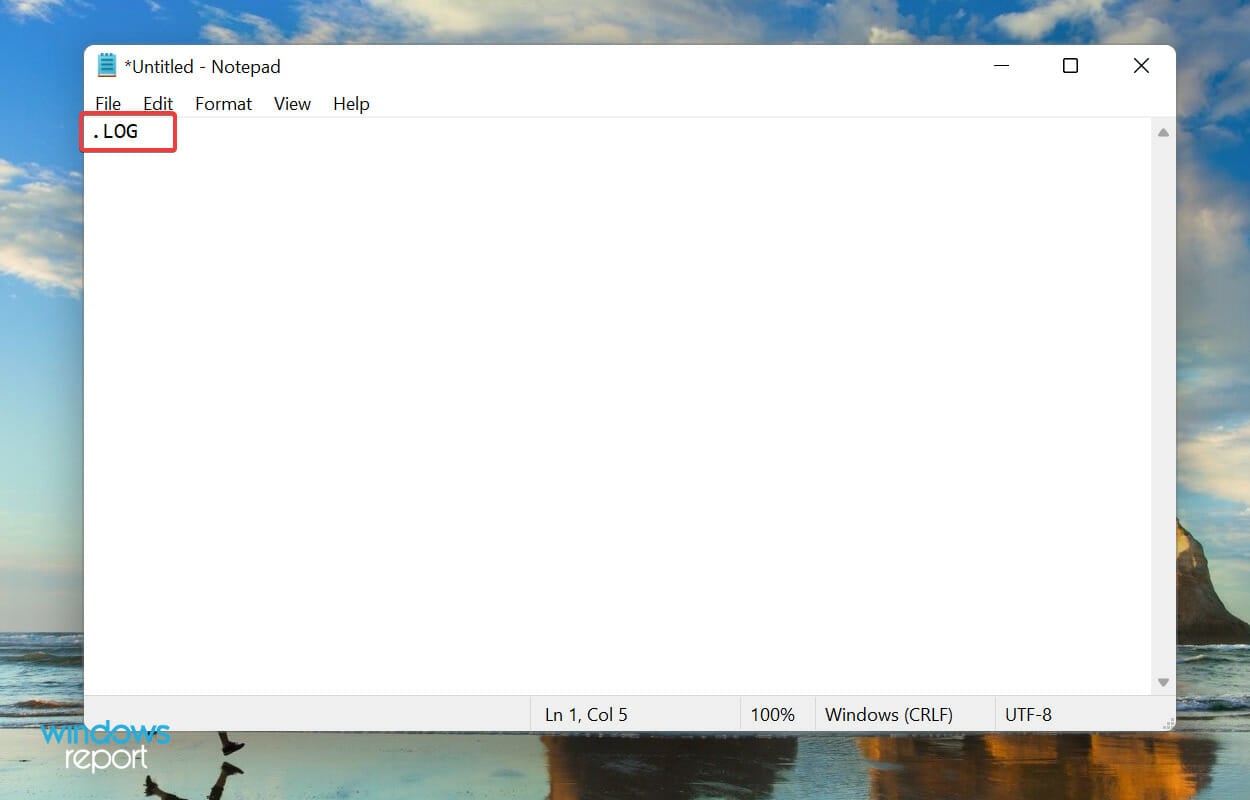
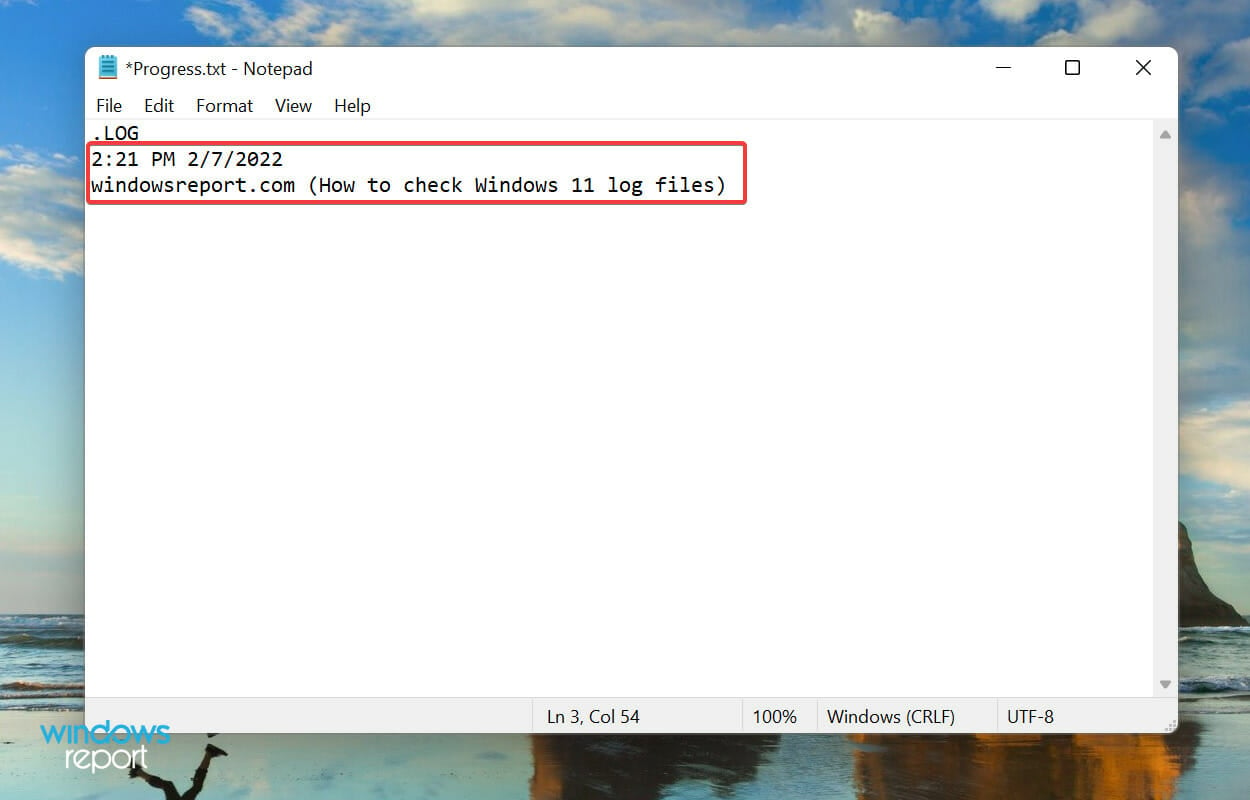
- Enter .LOG in the very first line of the Notepad.
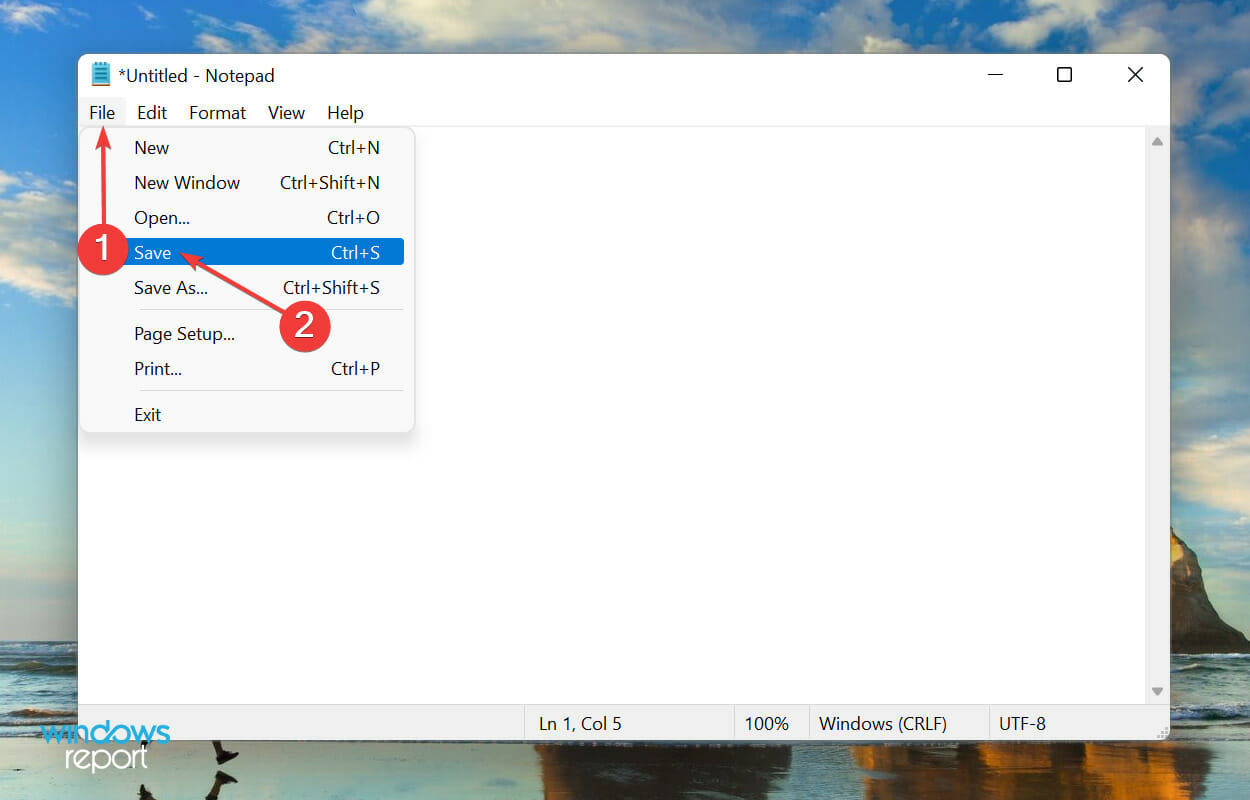
- Click on the File menu, and select Save from the list of options.
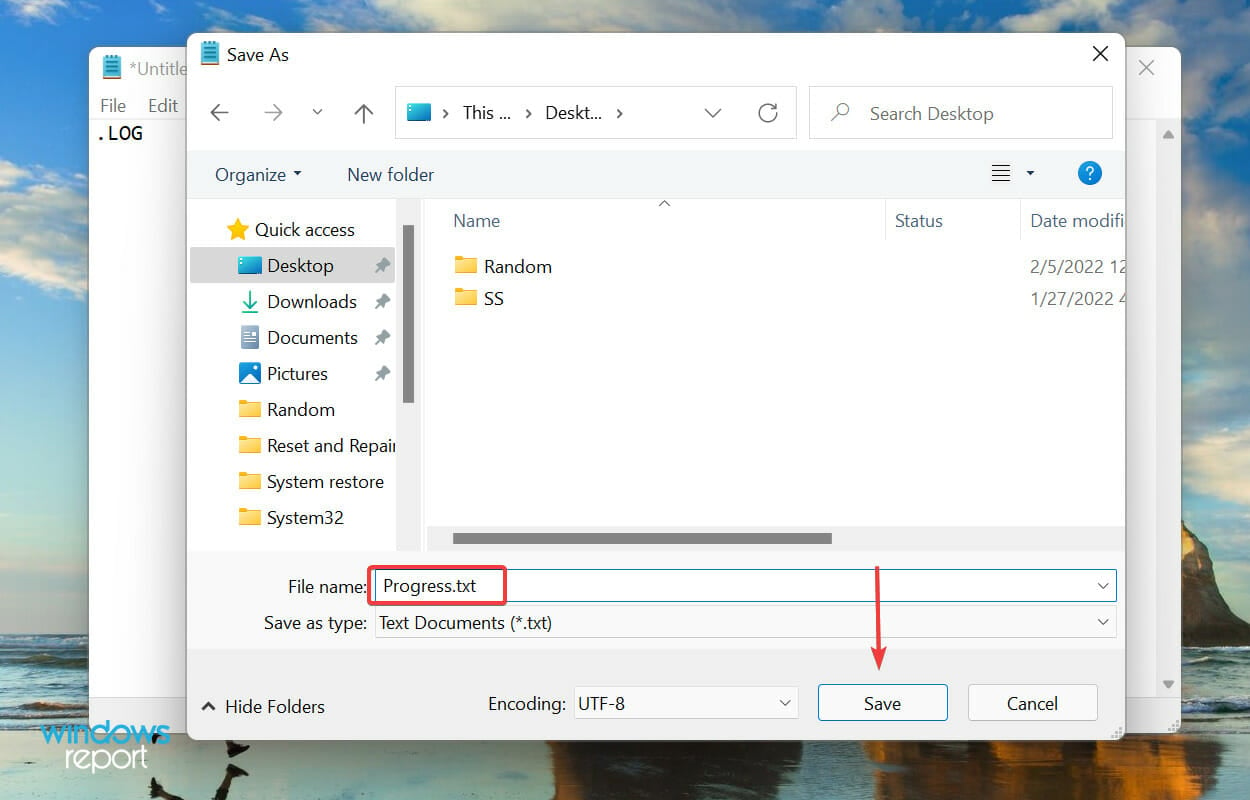
- Next, choose the location and name for the file, and click on Save at the bottom. Now, close the Notepad.
- Once the log file is created, the current date and time will be mentioned everytime you open it, and you can enter whatever you want to and hit Ctrl + S to save it.
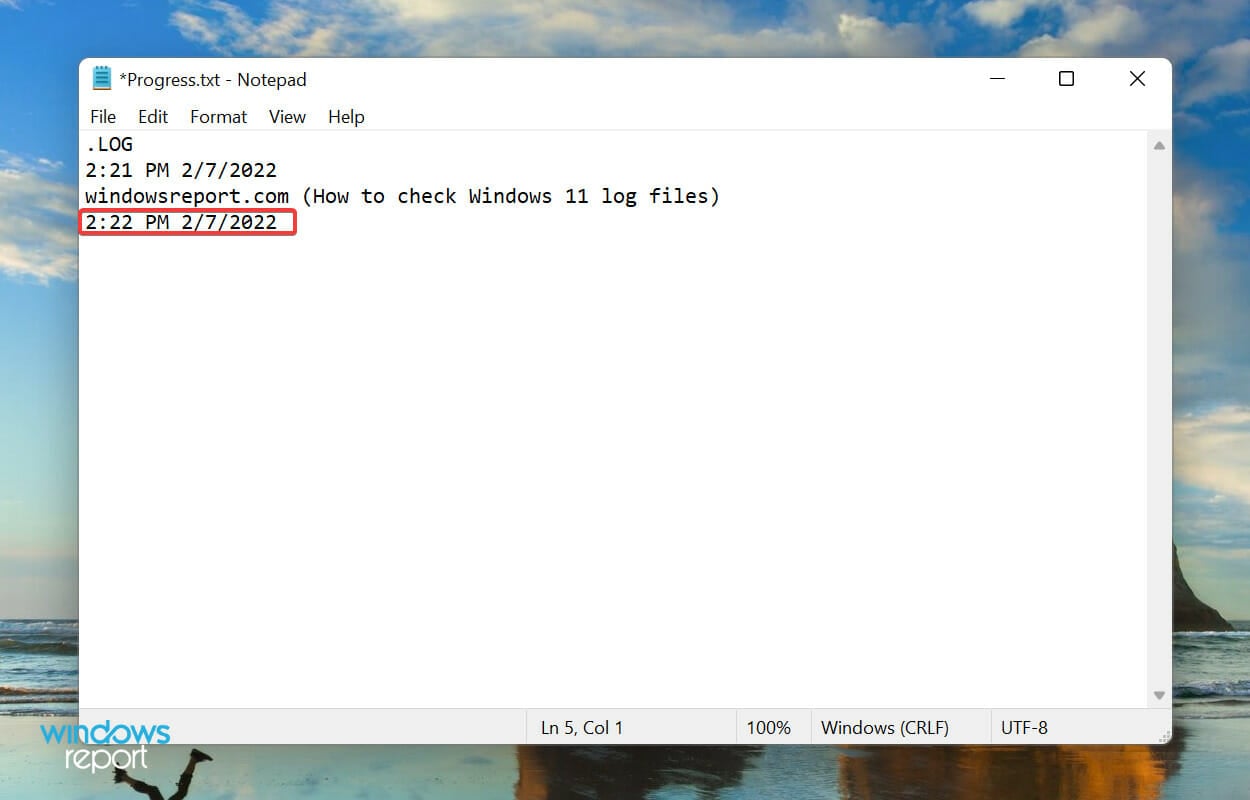
- Now, when you open the same log file the next time, the previously added entry will be listed under that date and time, and the current date and time will again be mentioned below the last entry.
A log file is used to record data. Windows uses it for errors, warnings, and information, while you can use it for other purposes.
Creating a log file is simple, and so is maintaining it. Say you want to record the progress for a book you are reading, just create a log file and enter the number of pages you read each day, or as you may please.
Why do I need to check Windows 11 error logs?
Checking error logs on Windows 11 allows you to find the underlying cause of an issue such as a BSOD (Blue Screen of Death).
That’s all you need to know about Windows 11 system logs. From now on, identifying the underlying cause of errors should no longer be a problem.
Also, if you feel that Event Viewer does not meet all your requirements, check the best apps to view errors logs in Windows 11.
Do not hesitate to comment if you have any questions or would like us to add a related topic.
Kazim Ali Alvi
Windows Hardware Expert
Kazim has always been fond of technology, be it scrolling through the settings on his iPhone, Android device, or Windows PC. He’s specialized in hardware devices, always ready to remove a screw or two to find out the real cause of a problem.
Long-time Windows user, Kazim is ready to provide a solution for your every software & hardware error on Windows 11, Windows 10 and any previous iteration. He’s also one of our experts in Networking & Security.
Для различных событий и ошибок системы и приложений Windows ведёт журналы событий, которые можно просмотреть и получить дополнительную информацию, которая может быть полезной при решении проблем с компьютером.
В этой инструкции для начинающих — способы открыть просмотр событий Windows 11/10 и дополнительная информация на тему, которая может пригодиться. На близкую тему: Как отключить журнал событий в Windows.
Контекстное меню кнопки Пуск и поиск
Самый быстрый способ перейти к просмотру журналов событий в Windows 11 и 10 — нажать правой кнопкой мыши по кнопке «Пуск» или нажать клавиши Win+X на клавиатуре и выбрать пункт «Просмотр событий» в открывшемся меню.
Ещё один простой и в большинстве случаев работающий способ открыть какой-либо системный инструмент, расположение которого вам неизвестно — использовать поиск в панели задач.
Начните вводить «Просмотр событий» в поиске, после чего запустите найденный результат:
Почему не «Журнал событий» или «Журнал ошибок», которые пользователи обычно ищут? Причина в том, что сами журналы — это файлы на диске в папках
C:\Windows\System32\winevt\Logs
C:\Windows\System32\LogFiles
Пользователи, задавая вопрос о том, где журнал событий в Windows, обычно имеют в виду именно системный инструмент «Просмотр событий» для удобного просмотра соответствующих журналов.
Команда «Выполнить»
Самый быстрый и часто используемый метод запуска просмотра журналов событий Windows — использование команды «Выполнить»:
- Нажмите клавиши Win+R на клавиатуре, либо нажмите правой кнопкой мыши по кнопке «Пуск» и выберите пункт «Выполнить».
- Введите eventvwr.msc (или просто eventvwr) и нажмите Enter.

- Откроется «Просмотр событий».
Эту же команду можно использовать для создания ярлыка или для открытия журнала событий в командной строке. Возможно, вам пригодится информация о других полезных командах «Выполнить».
Обычно описанных выше вариантов бывает достаточно для открытия просмотра журналов событий и ошибок в Windows, но есть и другие подходы:
Помимо просмотра журнала событий, в Windows присутствует ещё один полезный инструмент — Монитор стабильности системы, позволяющий наглядно получить информацию о работе вашей системы по дням на основании данных из журнала событий.
Quick Links
-
The Windows Event Viewer interface
-
Searching for specific events in Event Viewer
-
Creating a custom view in Event Viewer
-
How to back up event logs
There’s a very high chance you’ve run into an error on your PC at some point. You’ve probably seen the infamous «blue screen of death» once or twice or some other problem. While it may not be known to most people, Windows 11 has a tool that lets you learn more about these errors, called the Event Viewer.
The Event Viewer has been around for many Windows versions, and it mostly works like it did in the past. It logs all kinds of events related to your Windows PC, not just errors. The primary reason you’d want to use it is to find information about problems you’re running into.
That said, using the Event Viewer can feel convoluted if you’re relatively new to it, so we’re here to help with that. While we won’t be diving into specific errors, this article will give you an overview on how to use Event Viewer to find errors and other events on your Windows 11 PC.
The Windows Event Viewer interface
The easiest way to open the Event Viewer on Windows 11 is to search for it on the Start menu. Simply open Start and type Event Viewer into the search bar. It should be the first result.
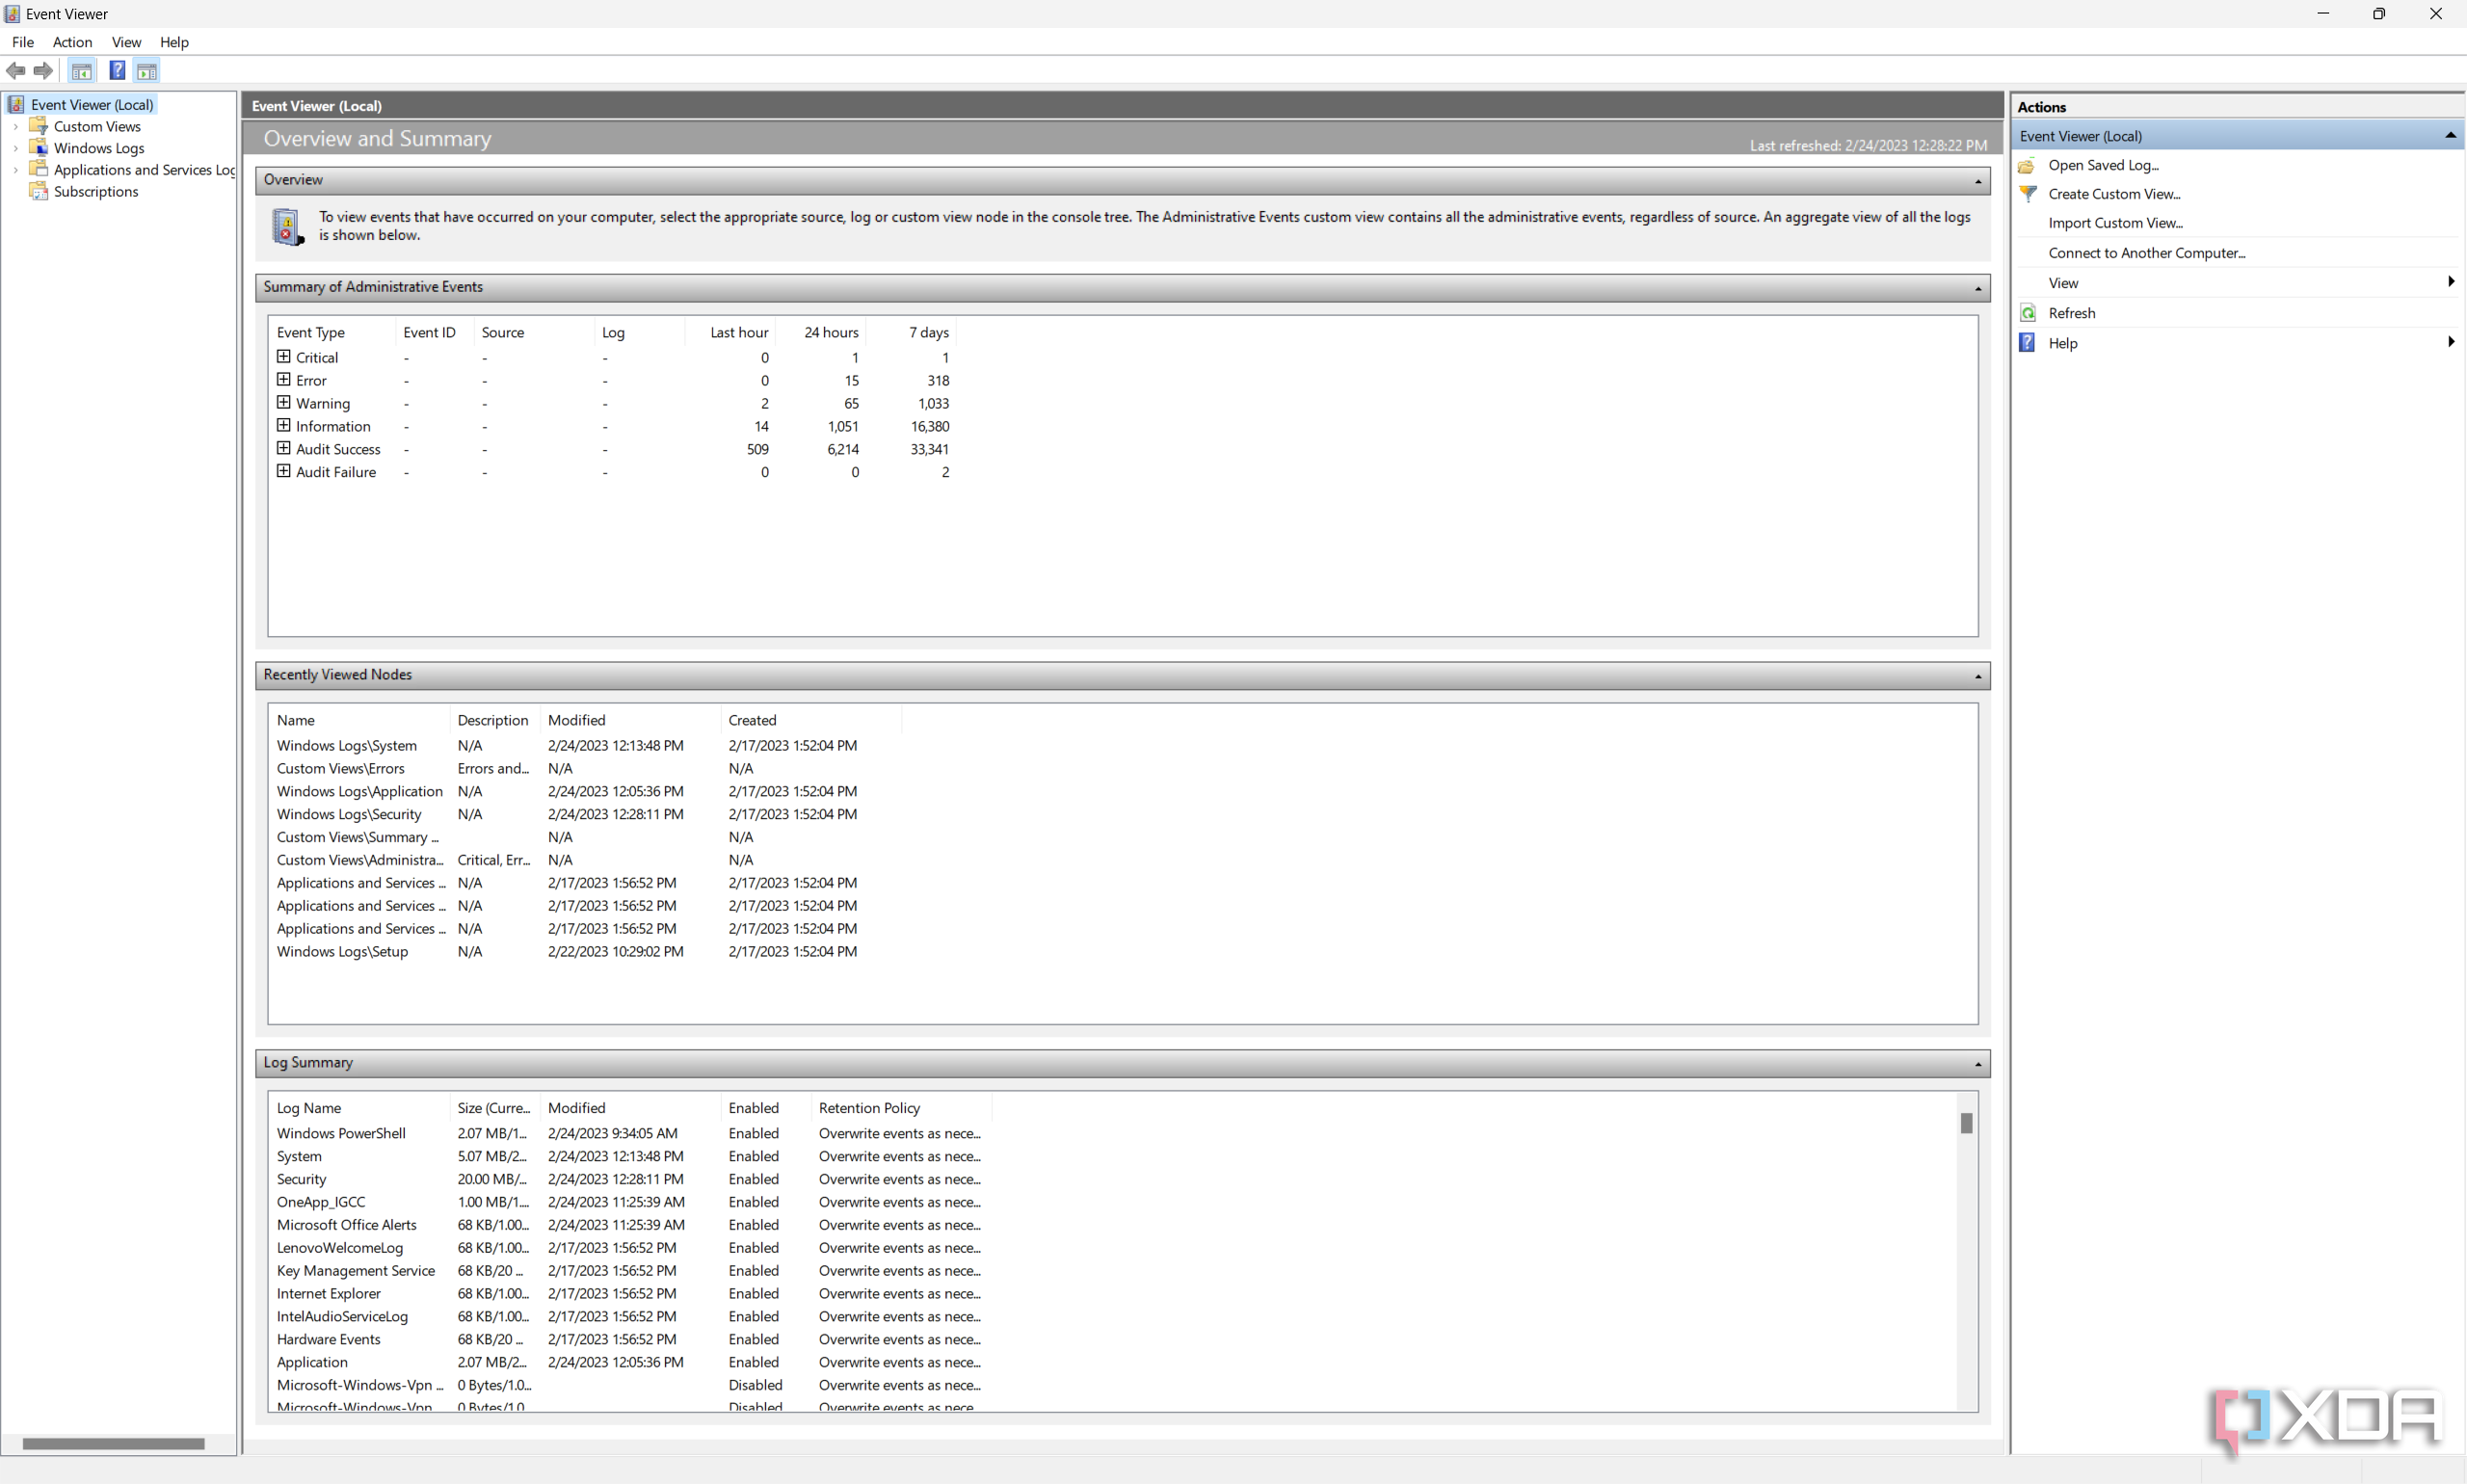
When you first launch the Event Viewer, you’ll see a summary of recent events on your PC. It includes all the events logged in the past week but also breaks down the events over the last 24 hours and the last hour, making it easier to have an idea of when a problem might have occurred. You’ll also see a navigation tree on the left side of the window, along with the Actions pane on the right side.
As you can see above, there are four general types of events that Event Viewer tracks: Critical, Error, Warning, and Information. Information events are the most common because they appear whenever things work as intended. Warning events also aren’t particularly interesting since they don’t necessarily relate to any major problems.
Error events are more interesting, as they might suggest a more serious problem, but they can also crop up when everything functions normally. You shouldn’t take these numbers as a guarantee that something is persistently wrong. It could be something as simple as a service failing to start up on the first try but then starting anyway later. Critical events are errors that cause the computer to crash, and those are probably the ones you’ll be looking for most often. If you keep running into a blue screen of death, it’s because of an error that falls in this category.
While this summary is helpful, your focus will probably be on the Windows Logs folder on the navigation pane on the left. If you expand it, you’ll see five different logs, and the most likely ones to be important to you are the System and Application logs, which are related to Windows 11 itself and installed apps. The Security log keeps track of all kinds of security events, including login attempts, while the Setup log includes events related to updates.
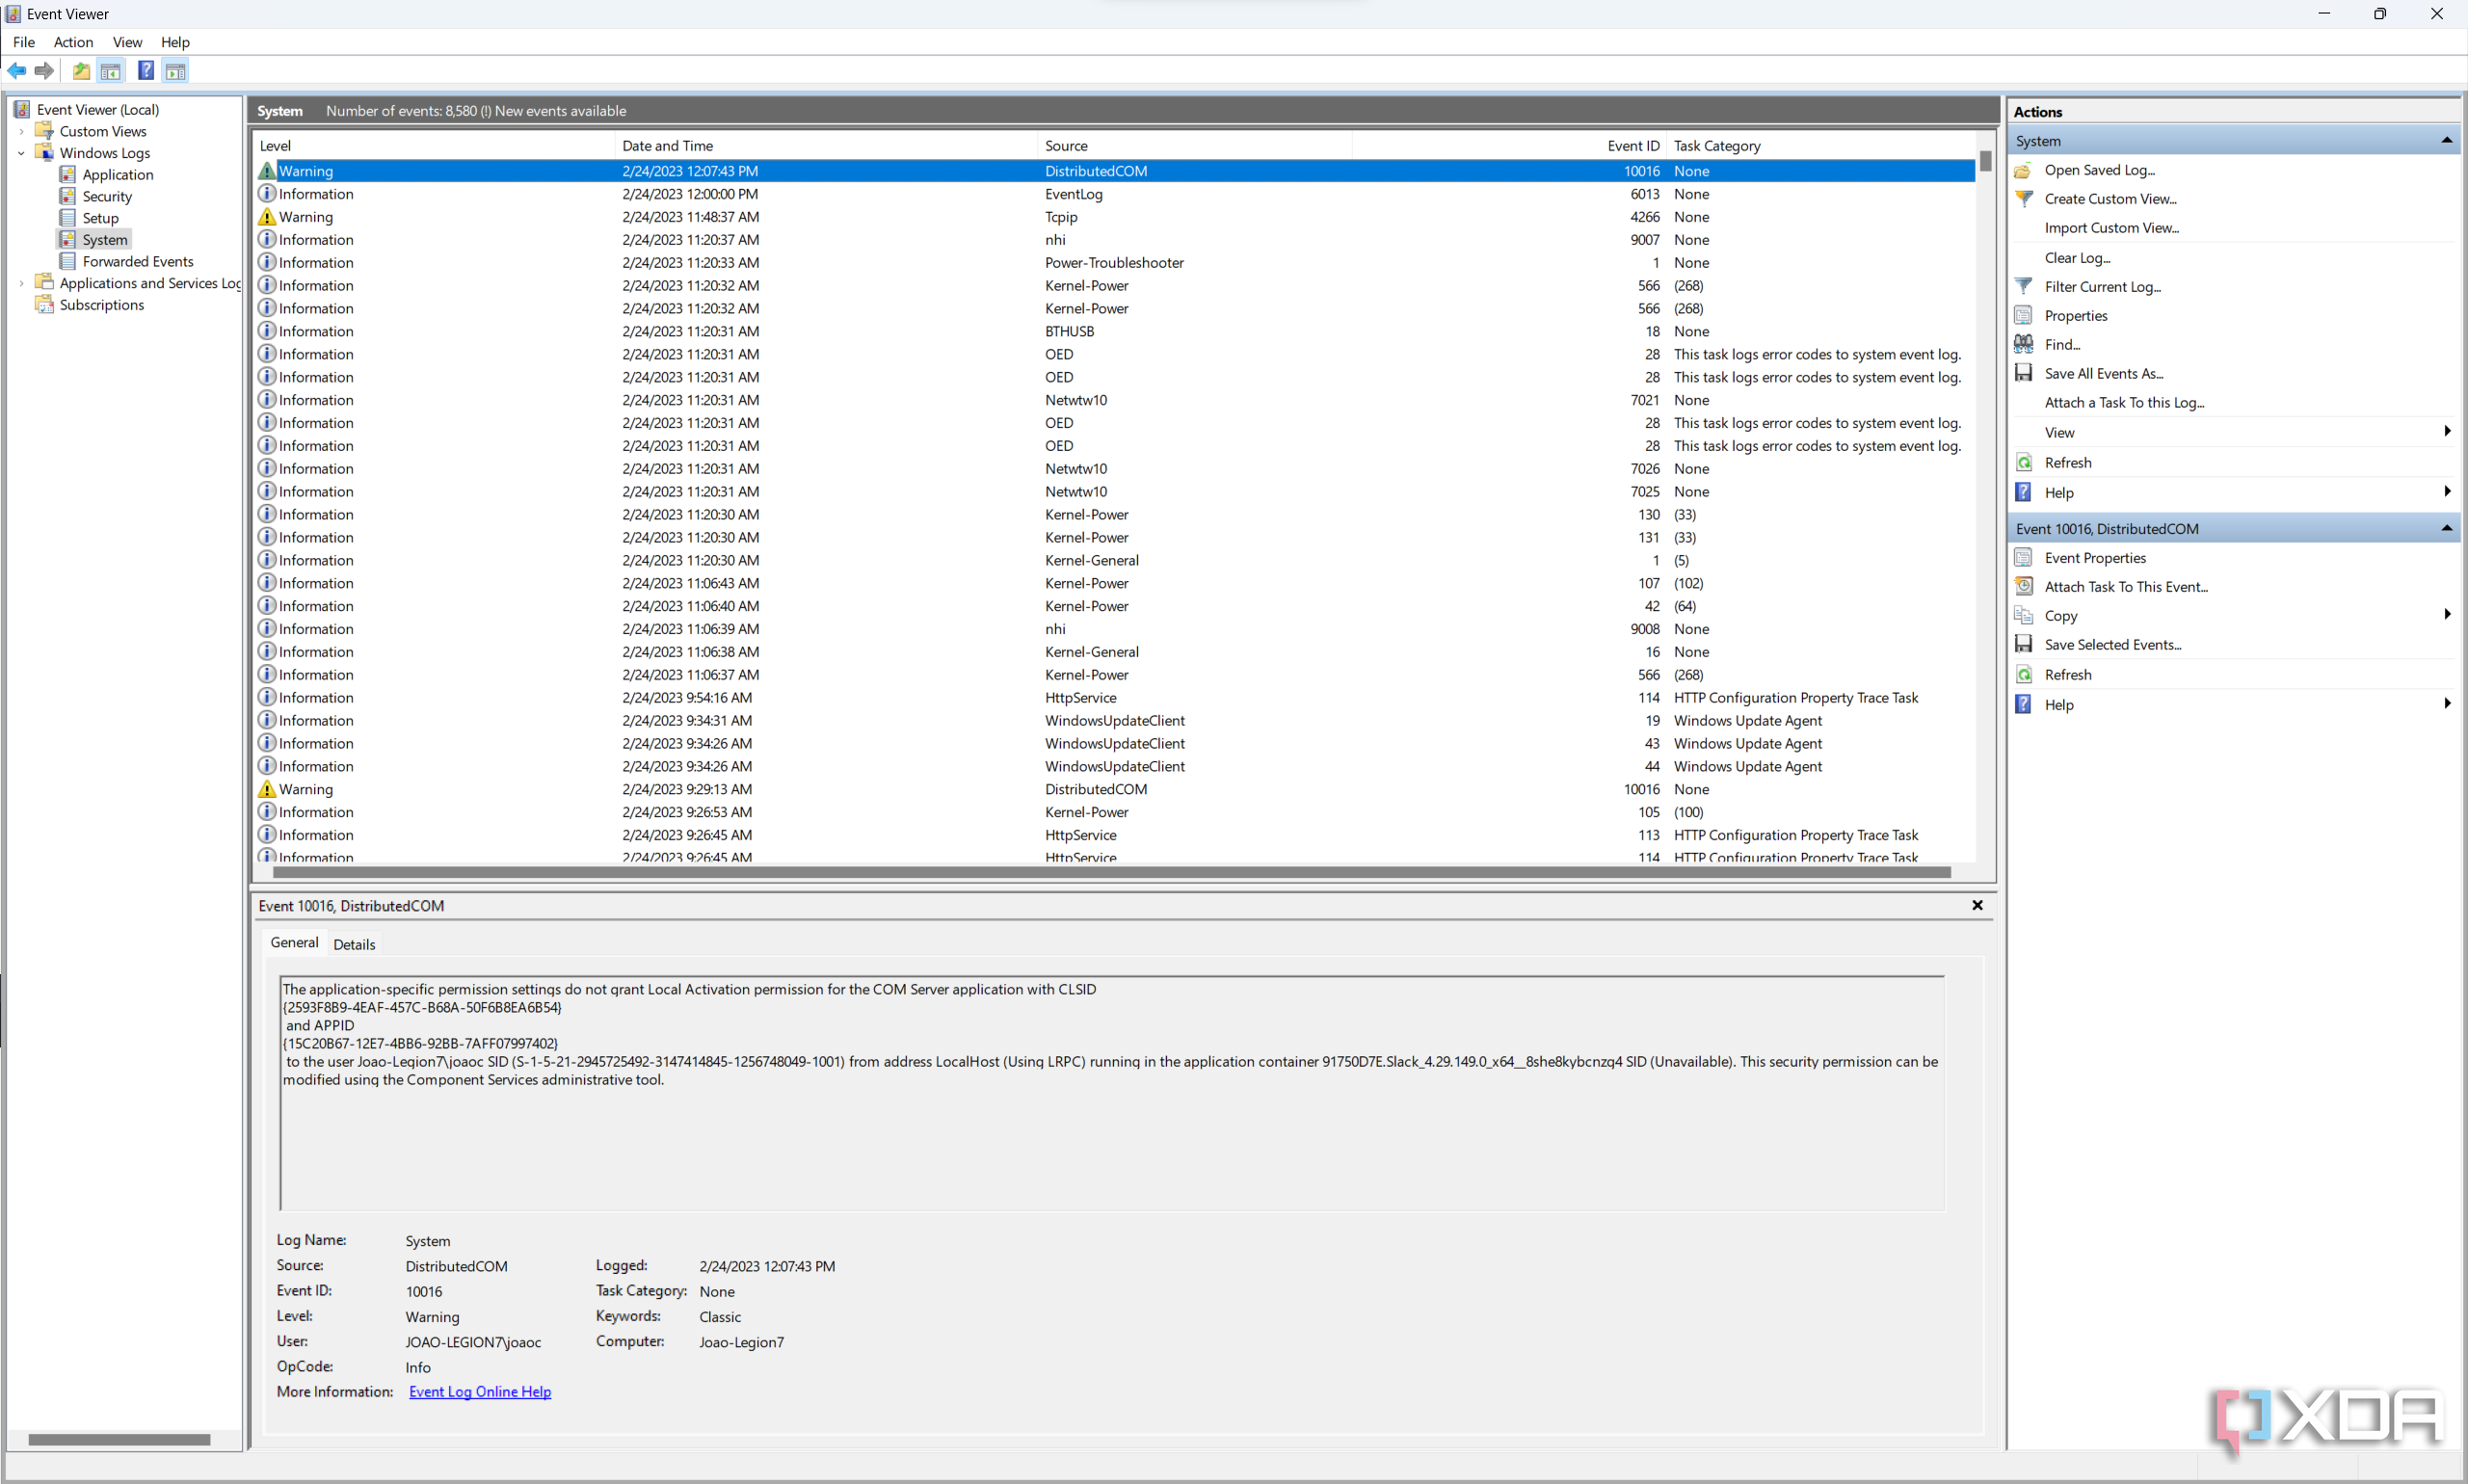
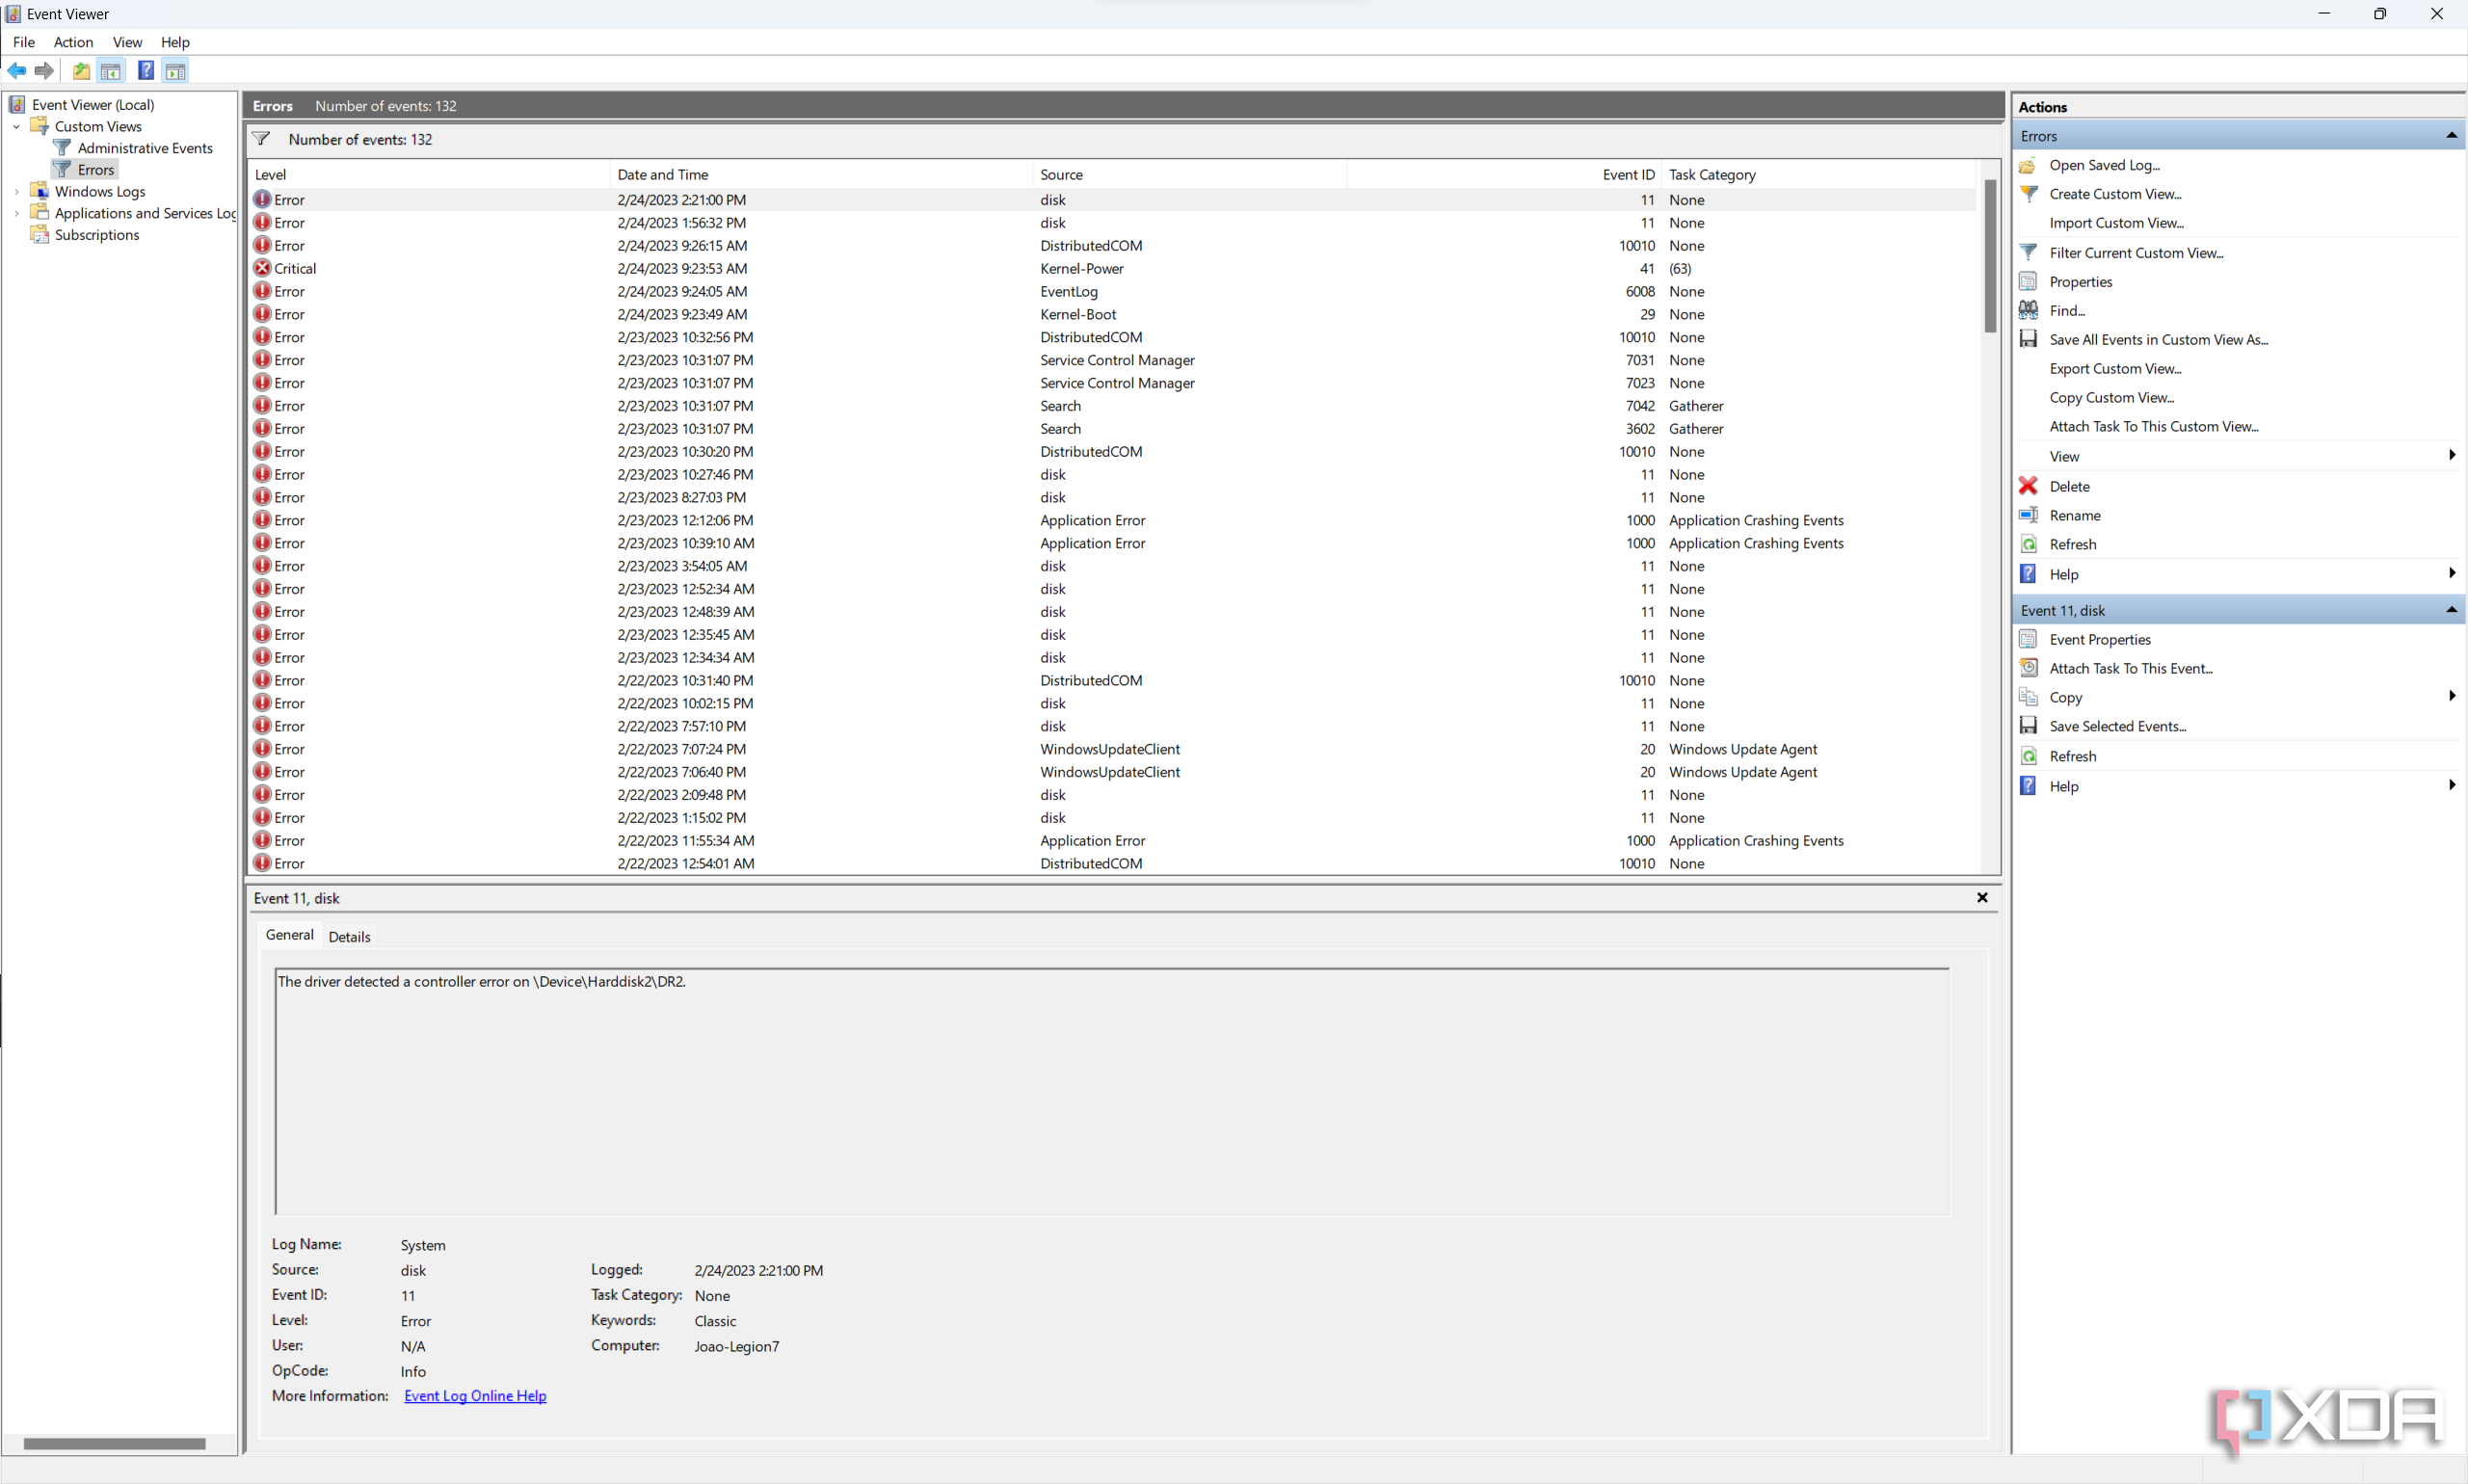
You can click any of these logs to view all the events in the log, and most of them will likely have the Information type. If you find an error or warning you want to learn more about, you can click it, and the related information will appear at the bottom of the window. You can also double-click the event to see that information in a separate window.
The event properties pane/window includes a description of the error, which should include enough information for you to know what’s wrong and how to fix it, if necessary. You may also want to look at the Event ID, which you can use to help you find more information about the problem online. In some cases, the description itself includes an error code, which is good if you want to search for it online.
Searching for specific events in Event Viewer
If you want to find a specific event in your log, assuming you already have an idea of what to look for, the Event Viewer can help you do that, too. Two primary search tools can help, one being more basic and the other giving you more advanced options.
Find (basic search)
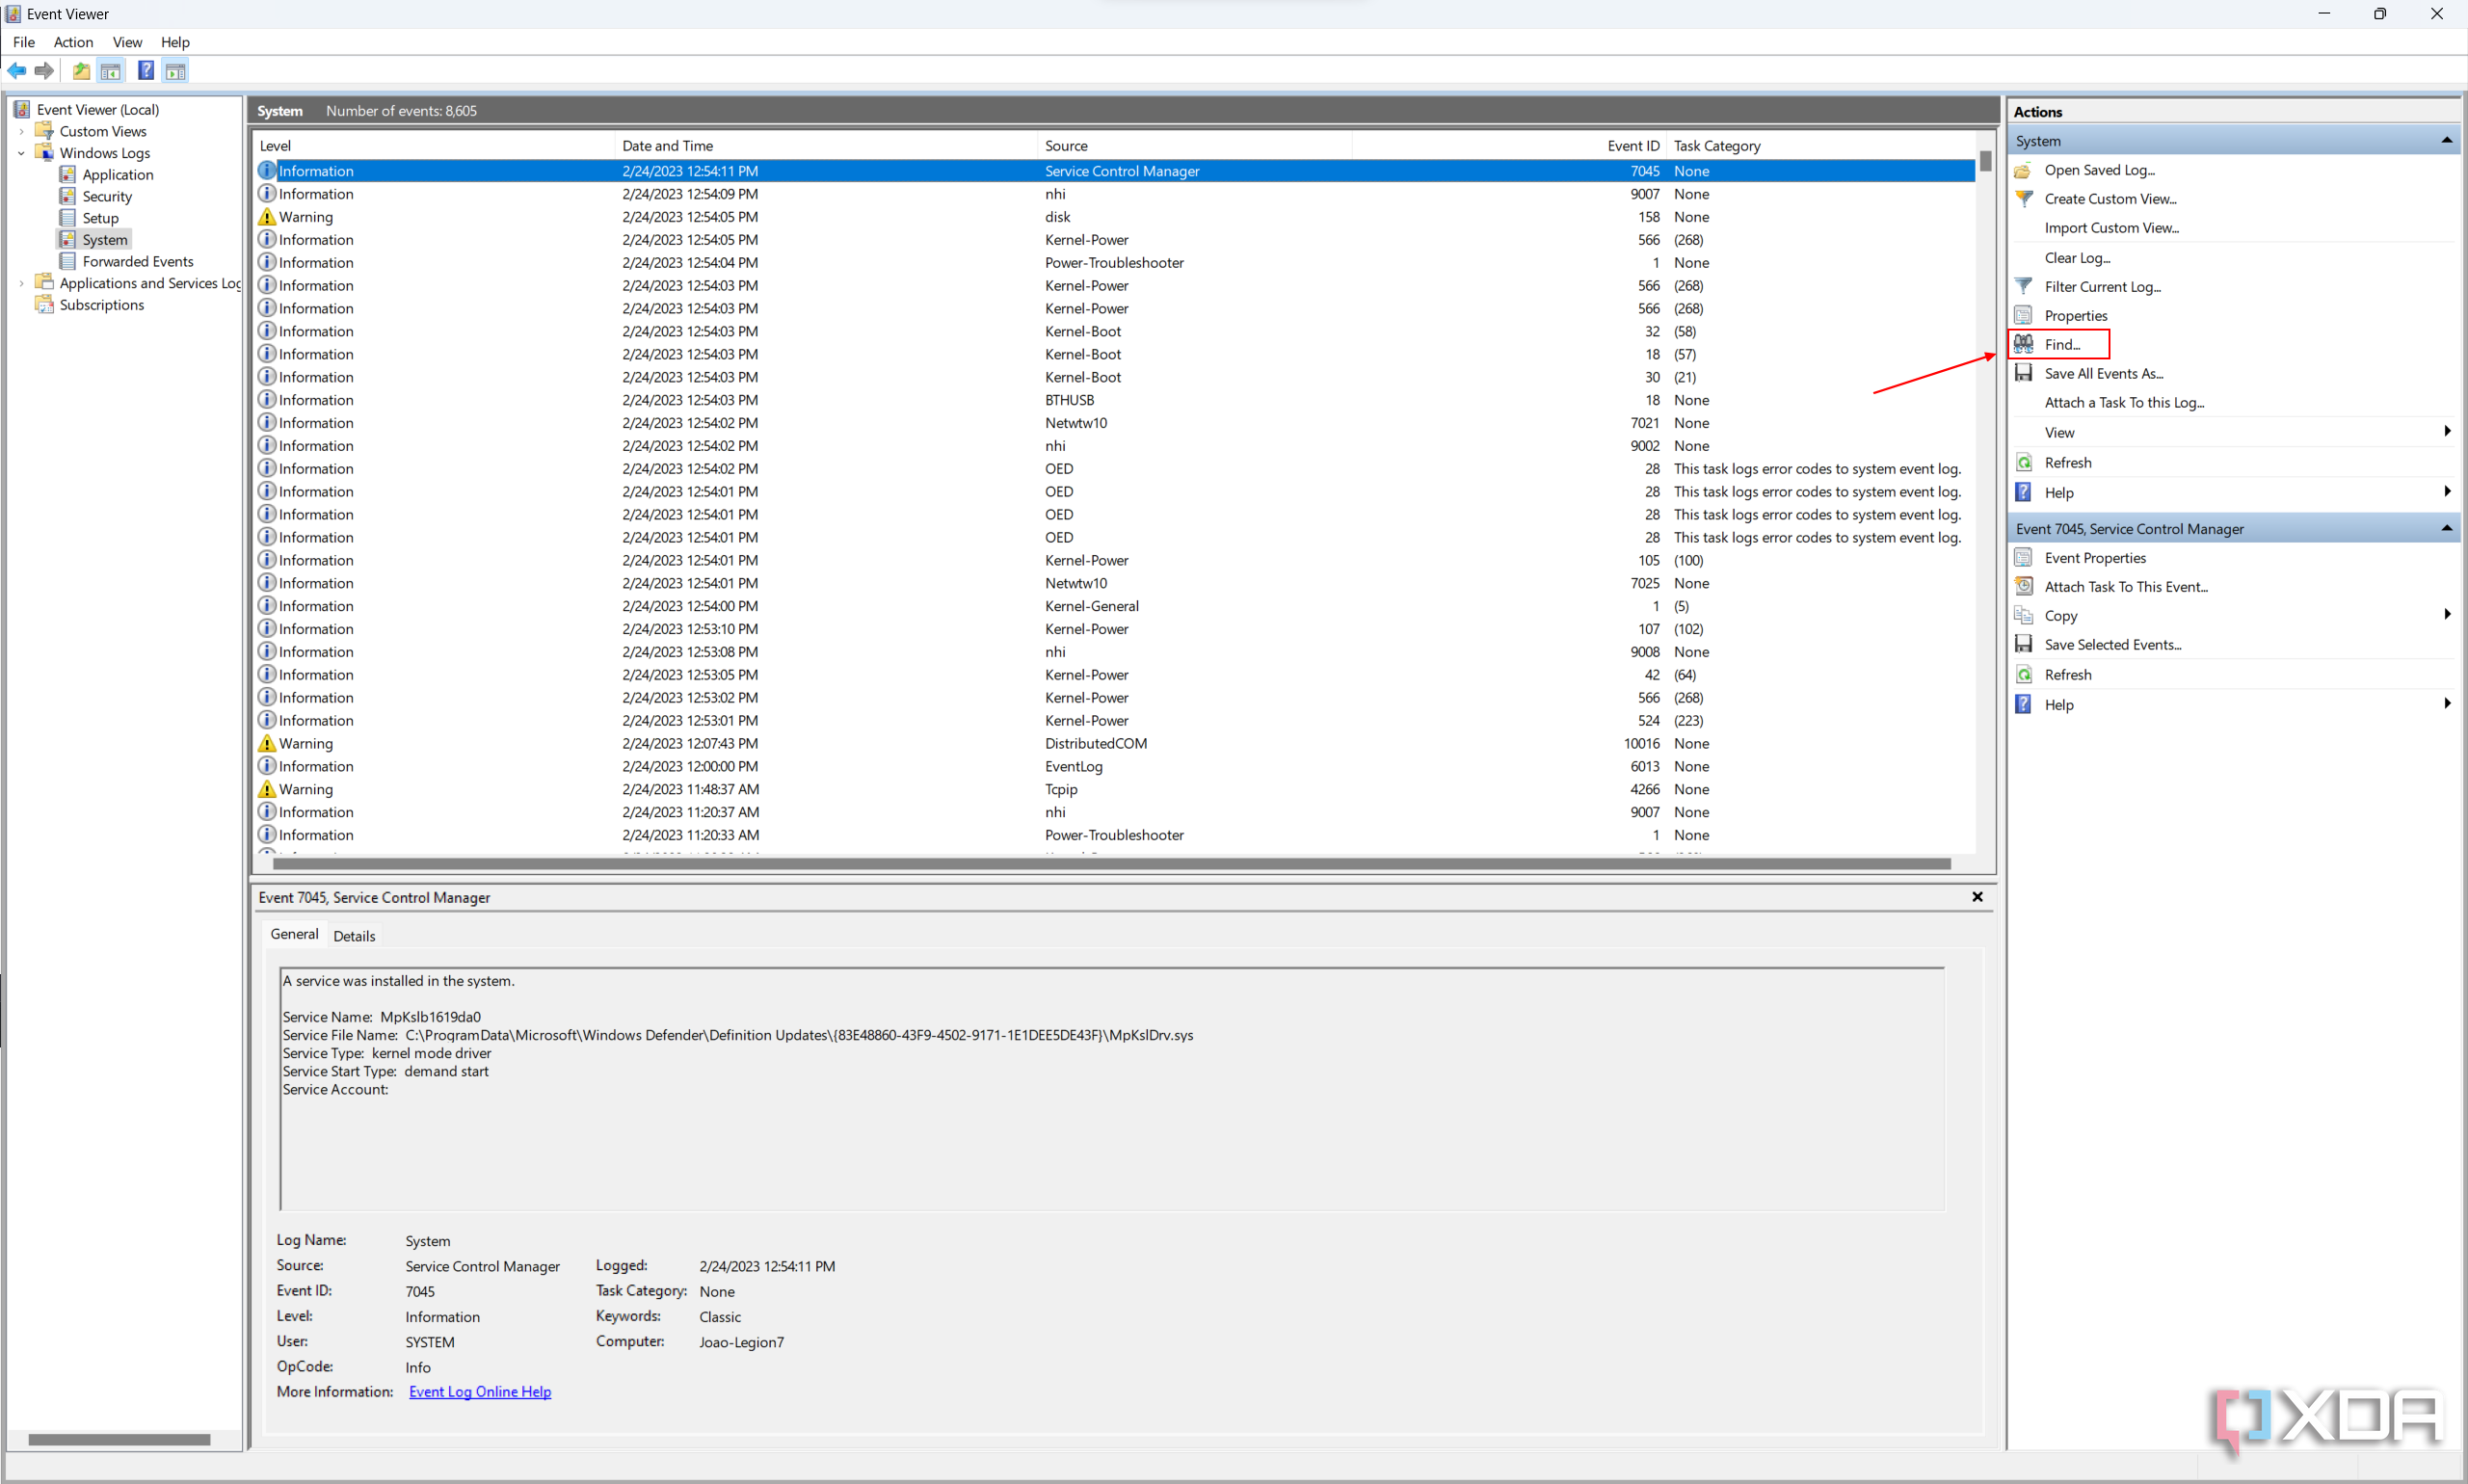
The more basic tool is called Find, and you can use it to find an event by searching for a term in any of the fields related to it. You can search for a service that created the event, a task category, or an event ID. Here’s how to do it:
- Open Event Viewer.
-
Expand the Windows Logs folder (you can also use custom views, which we’ll get to later).

- Select the log you want to search in, such as System.
-
Click Find in the Actions pane on the right side of the window.
-
Alternatively, right-click the log and choose Find in the context menu
-
Alternatively, right-click the log and choose Find in the context menu
-
Enter the keyword, event ID, or another search term into the text field and click Find Next.

- Event Viewer will highlight events that match the keyword, and you can cycle through them one at a time.
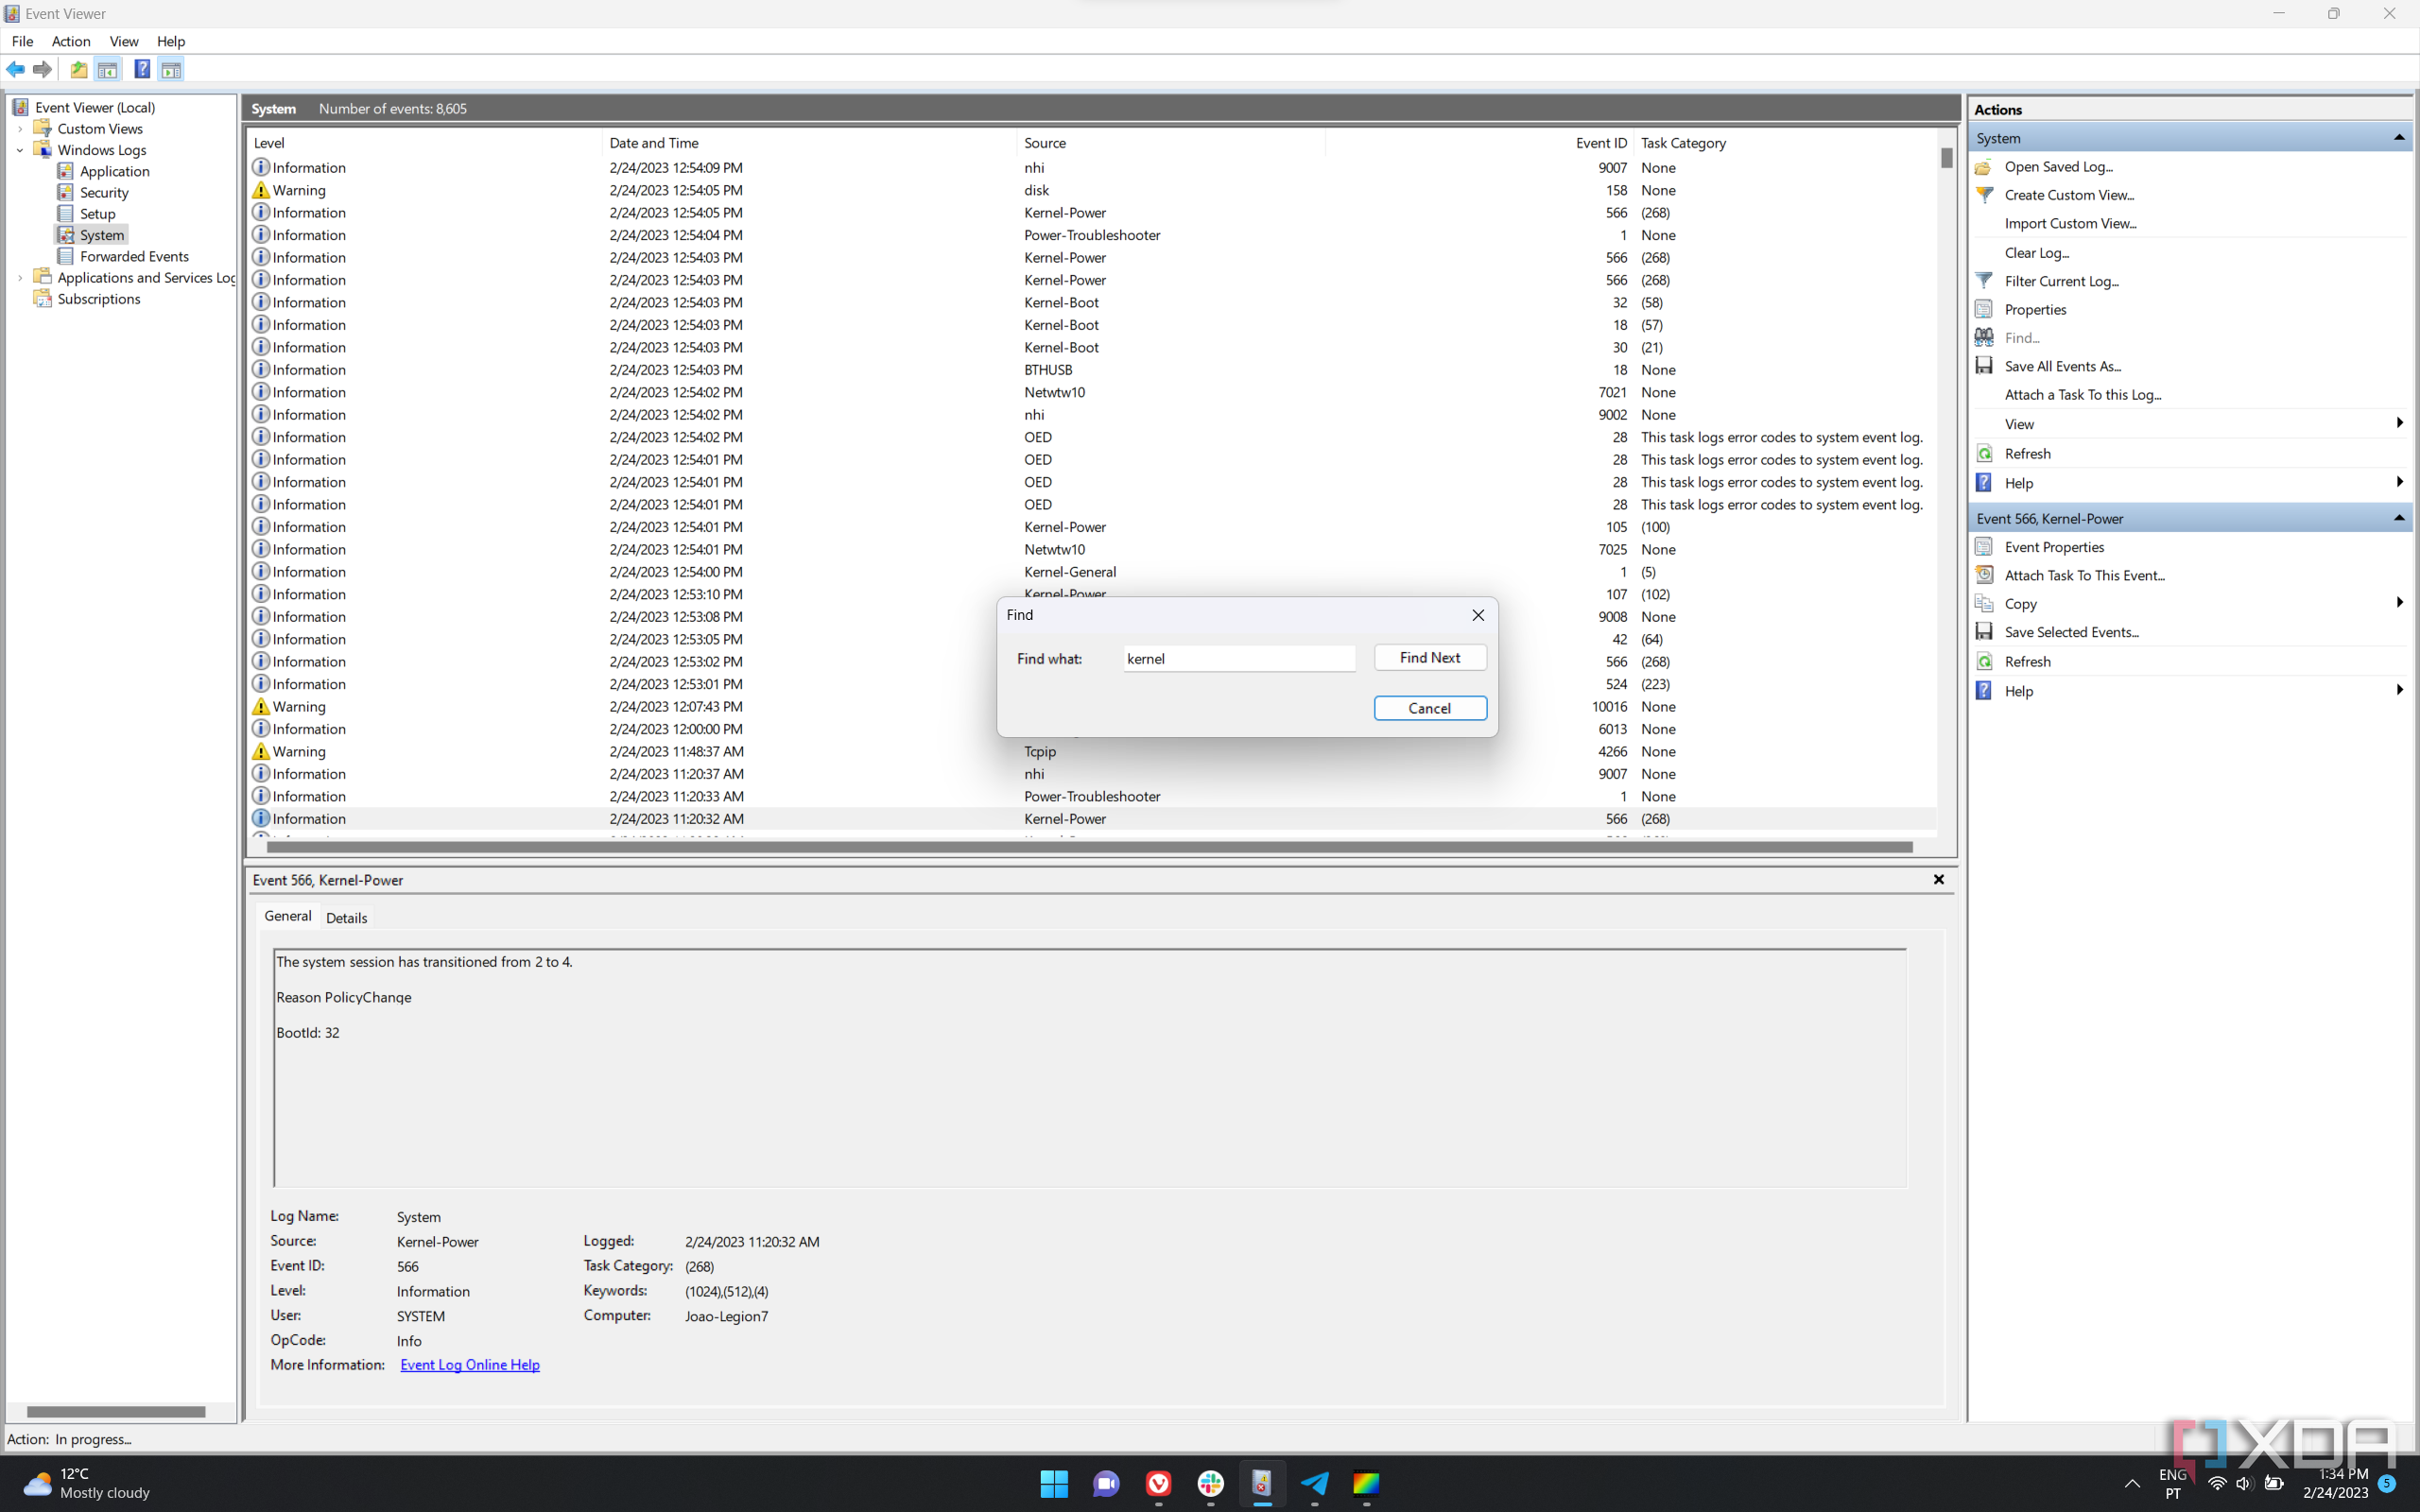
This more basic search can help you find a specific event, but it is somewhat limited since you can only see one result at a time, and other unrelated events are still visible. That’s where the advanced search tools come in.
Filter logs (advanced search)
If you want to find all events that match a specific set of criteria, your best bet is to use the log filtering options in Event Viewer. This feature provides more ways to find the events you’re looking for. Here’s how to do it:
- Open Event Viewer and navigate to the log you want to search (as explained in steps 1-3 above).
-
In the Actions pane, click Filter Current Log.
-
Here, you can filter events based on multiple criteria. First, you’ll need to choose the event levels you want to see, such as Critical, Error, Warning, or Information event types.

- The Logged field at the top allows you to choose when the event occurred, so if you know a particular error happened recently, you can filter it for the last hour, for example.
-
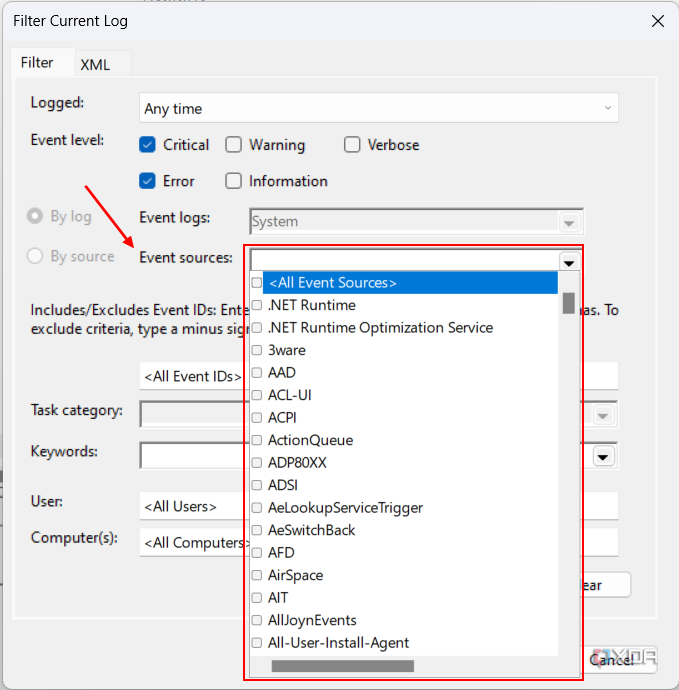
The Event source filter (optional) lets you choose a service or app that created the event you’re looking for.
- You can also enter an Event ID if you know more specifically what kind of event you’re looking for.
- Finally, the Keywords field provides a list of common keywords you might be looking for.
- After applying your filters, click OK.
- You can now sort through all the errors that match your criteria and see more details about them.
This should make it much easier to find specific errors in Windows 11, considering there are thousands of events that aren’t always relevant.
Creating a custom view in Event Viewer
If the default logs provided by Event Viewer are too cluttered or unrefined for your usage, you can also create custom views. This is especially useful for regular users frequently looking for specific events that may now be well organized in the default logs. Custom views work similarly to filters, except they’re permanently available. Here’s how to create a custom view:
- Open Event Viewer.
- On the left-side pane, click Custom views.
-
Select Create custom view from the Actions pane on the right side of the window.

- The Logged field works as we explained above so that you can filter events by date. You can also choose the same event levels as before.
-
Here, you can choose if you want to filter results by log or by source.
- By log lets you choose one or multiple logs where the events originate, such as System and Applications.
-
By source lets you choose a service or app that created the events you want to filter for.
- Once you’ve selected the field above, the rest of the fields work similarly to normal filters. You can choose an Event ID, a Task Category, and Keywords, if you know what events you want to see in your custom view.
- Click OK
-
Choose a name and description for your custom view. You can also choose where to store the custom view on your navigation tree, which is useful if you have a lot of custom views.

- Click OK.
-
You’ll now see your custom view in the Custom Views folder (or whatever folder you chose to create for it). Simply select it from the left-side pane to view the events in your custom view.
How to back up event logs
If you don’t know how to investigate a specific error or need more help, you can save event logs into a file that you can share with someone else who can look at the events from your computer. Here’s how:
- Open Event Viewer.
- Navigate to the log or custom view you want to export.
-
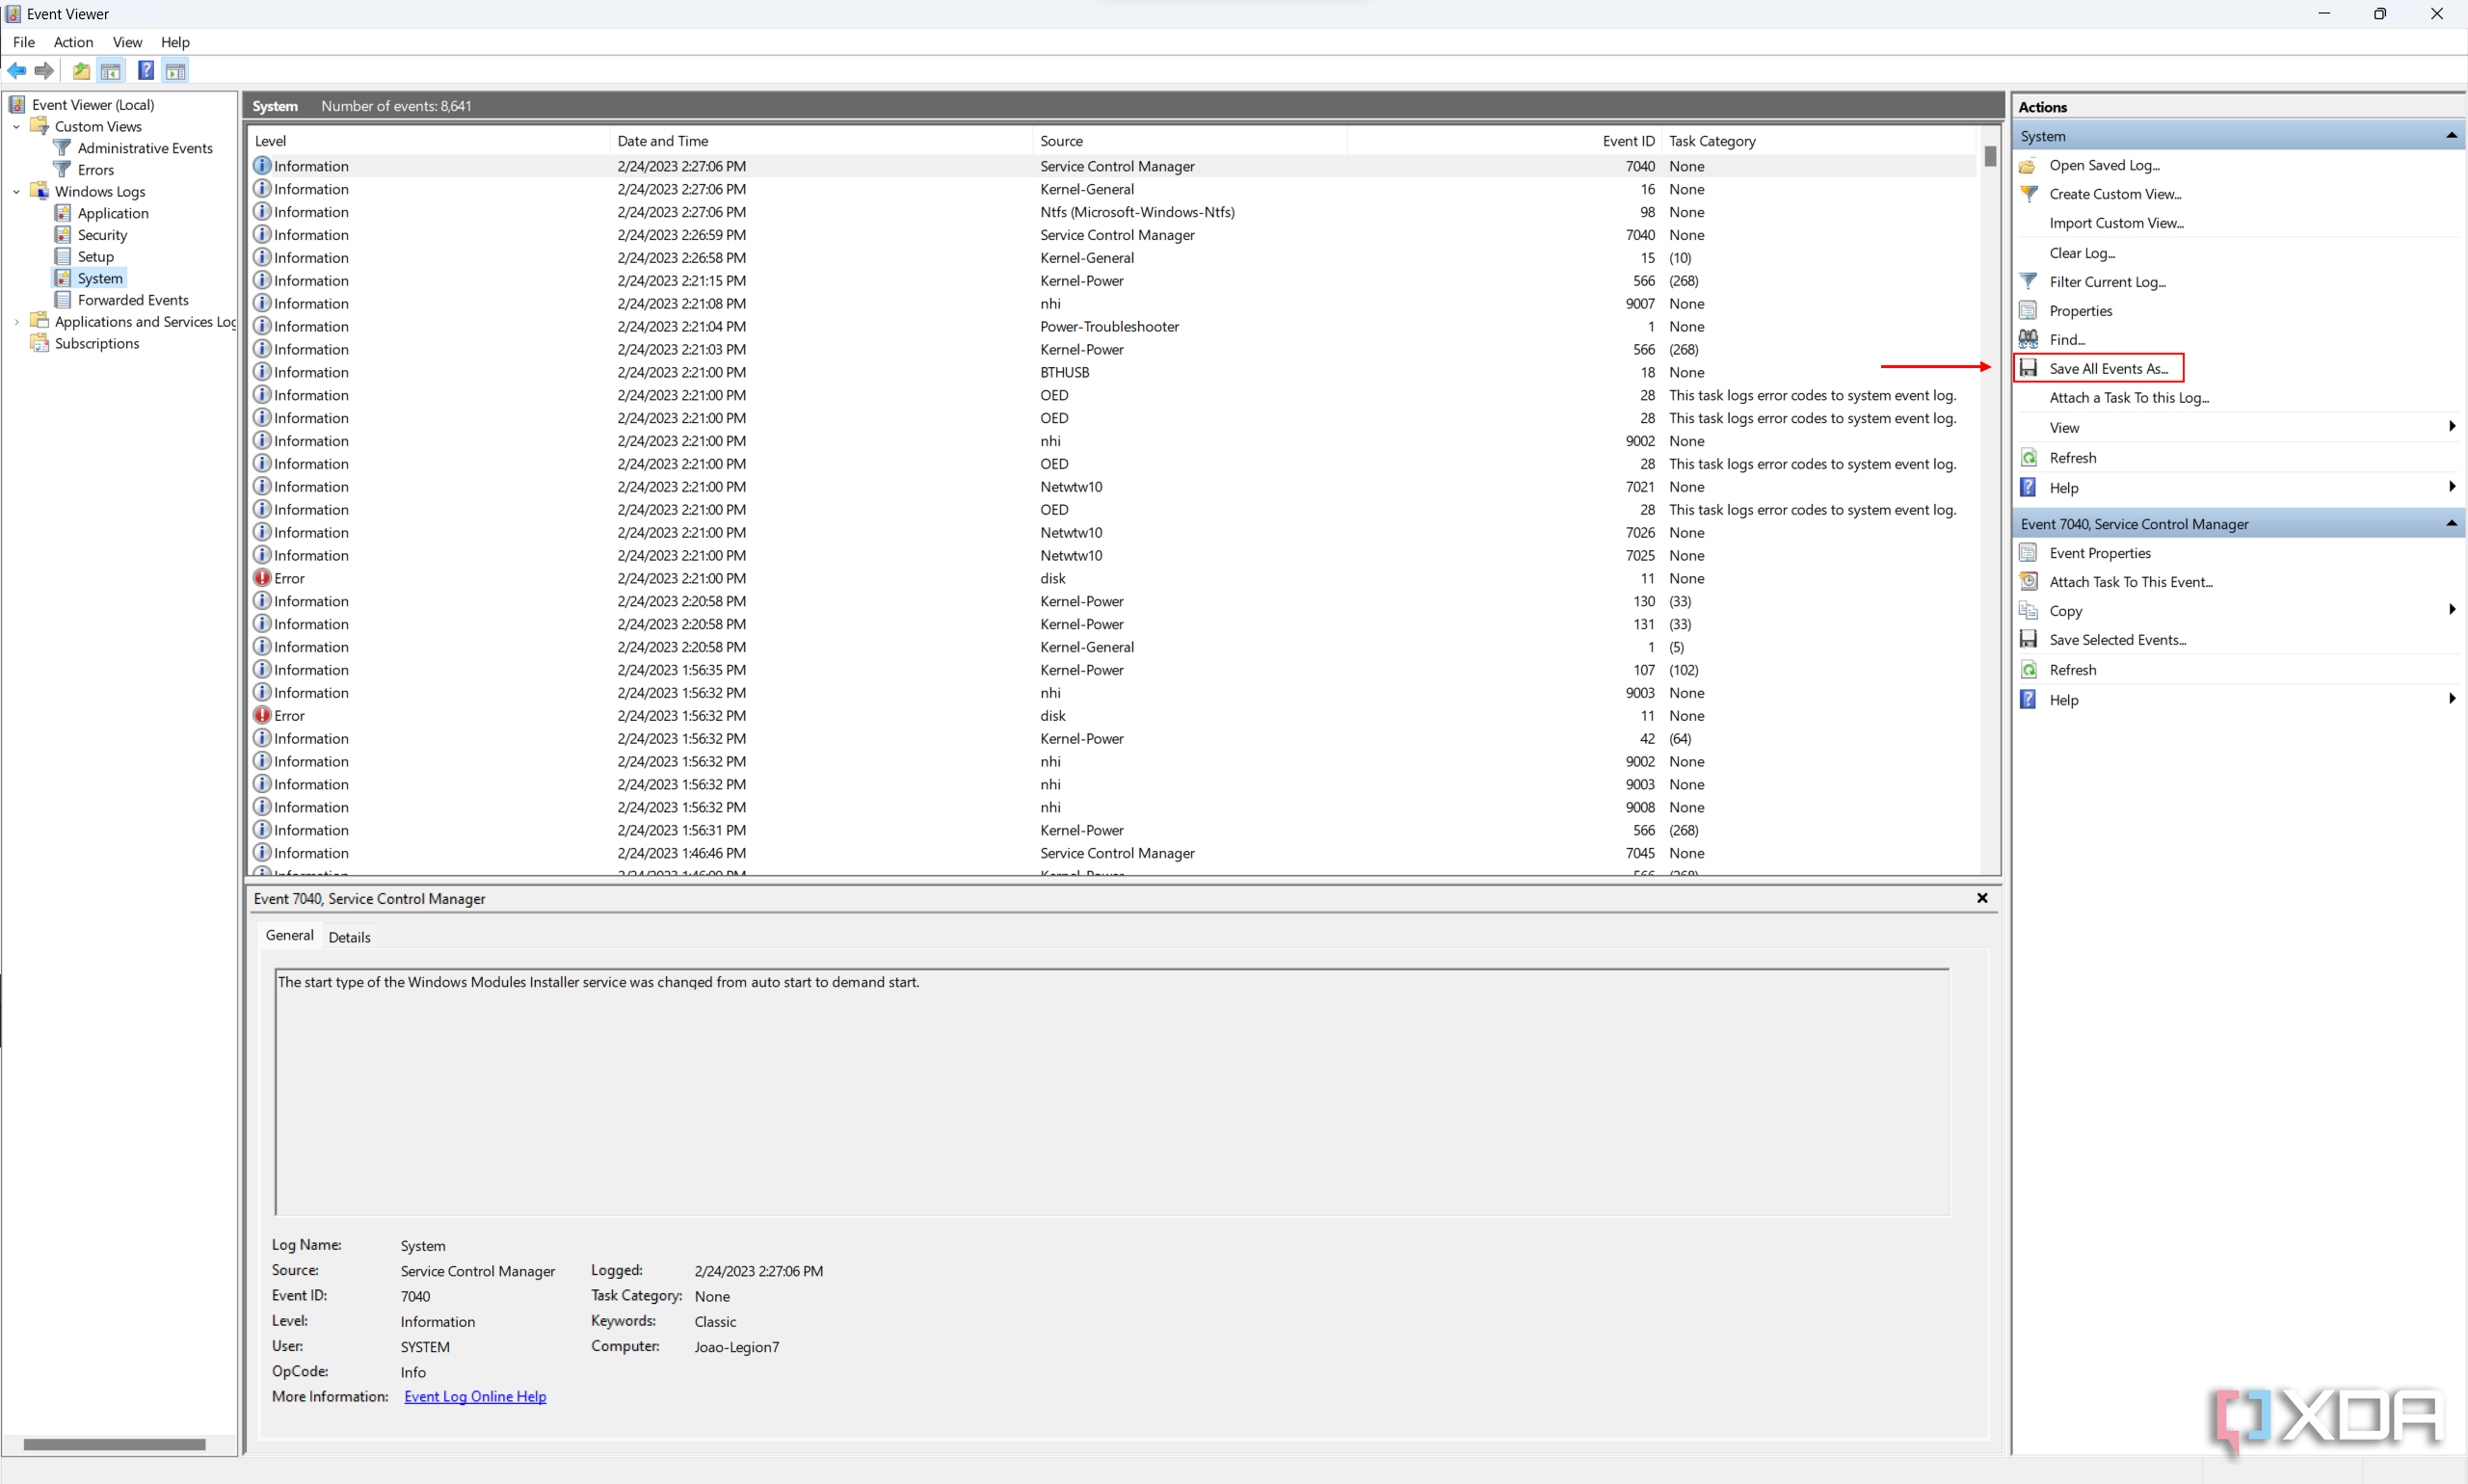
In the Actions pane on the right, choose Save All Events As… (for logs) or Save All Events in Custom View As…
- Alternatively, you can select specific events manually and then choose Save Selected Events.
- Choose a name and location for the file and click Save.
- You can then send this file to someone you trust, so they can check what might be happening with your computer.
How to clear event logs
There should be no reason to clear your event logs most of the time, but if you need to save some space on your drive, you can delete all the events in a log. We wouldn’t necessarily recommend this, but if you want to do it, here’s how:
- Open the Event Viewer.
- Expand the Windows Logs option on the left-side panel.
-
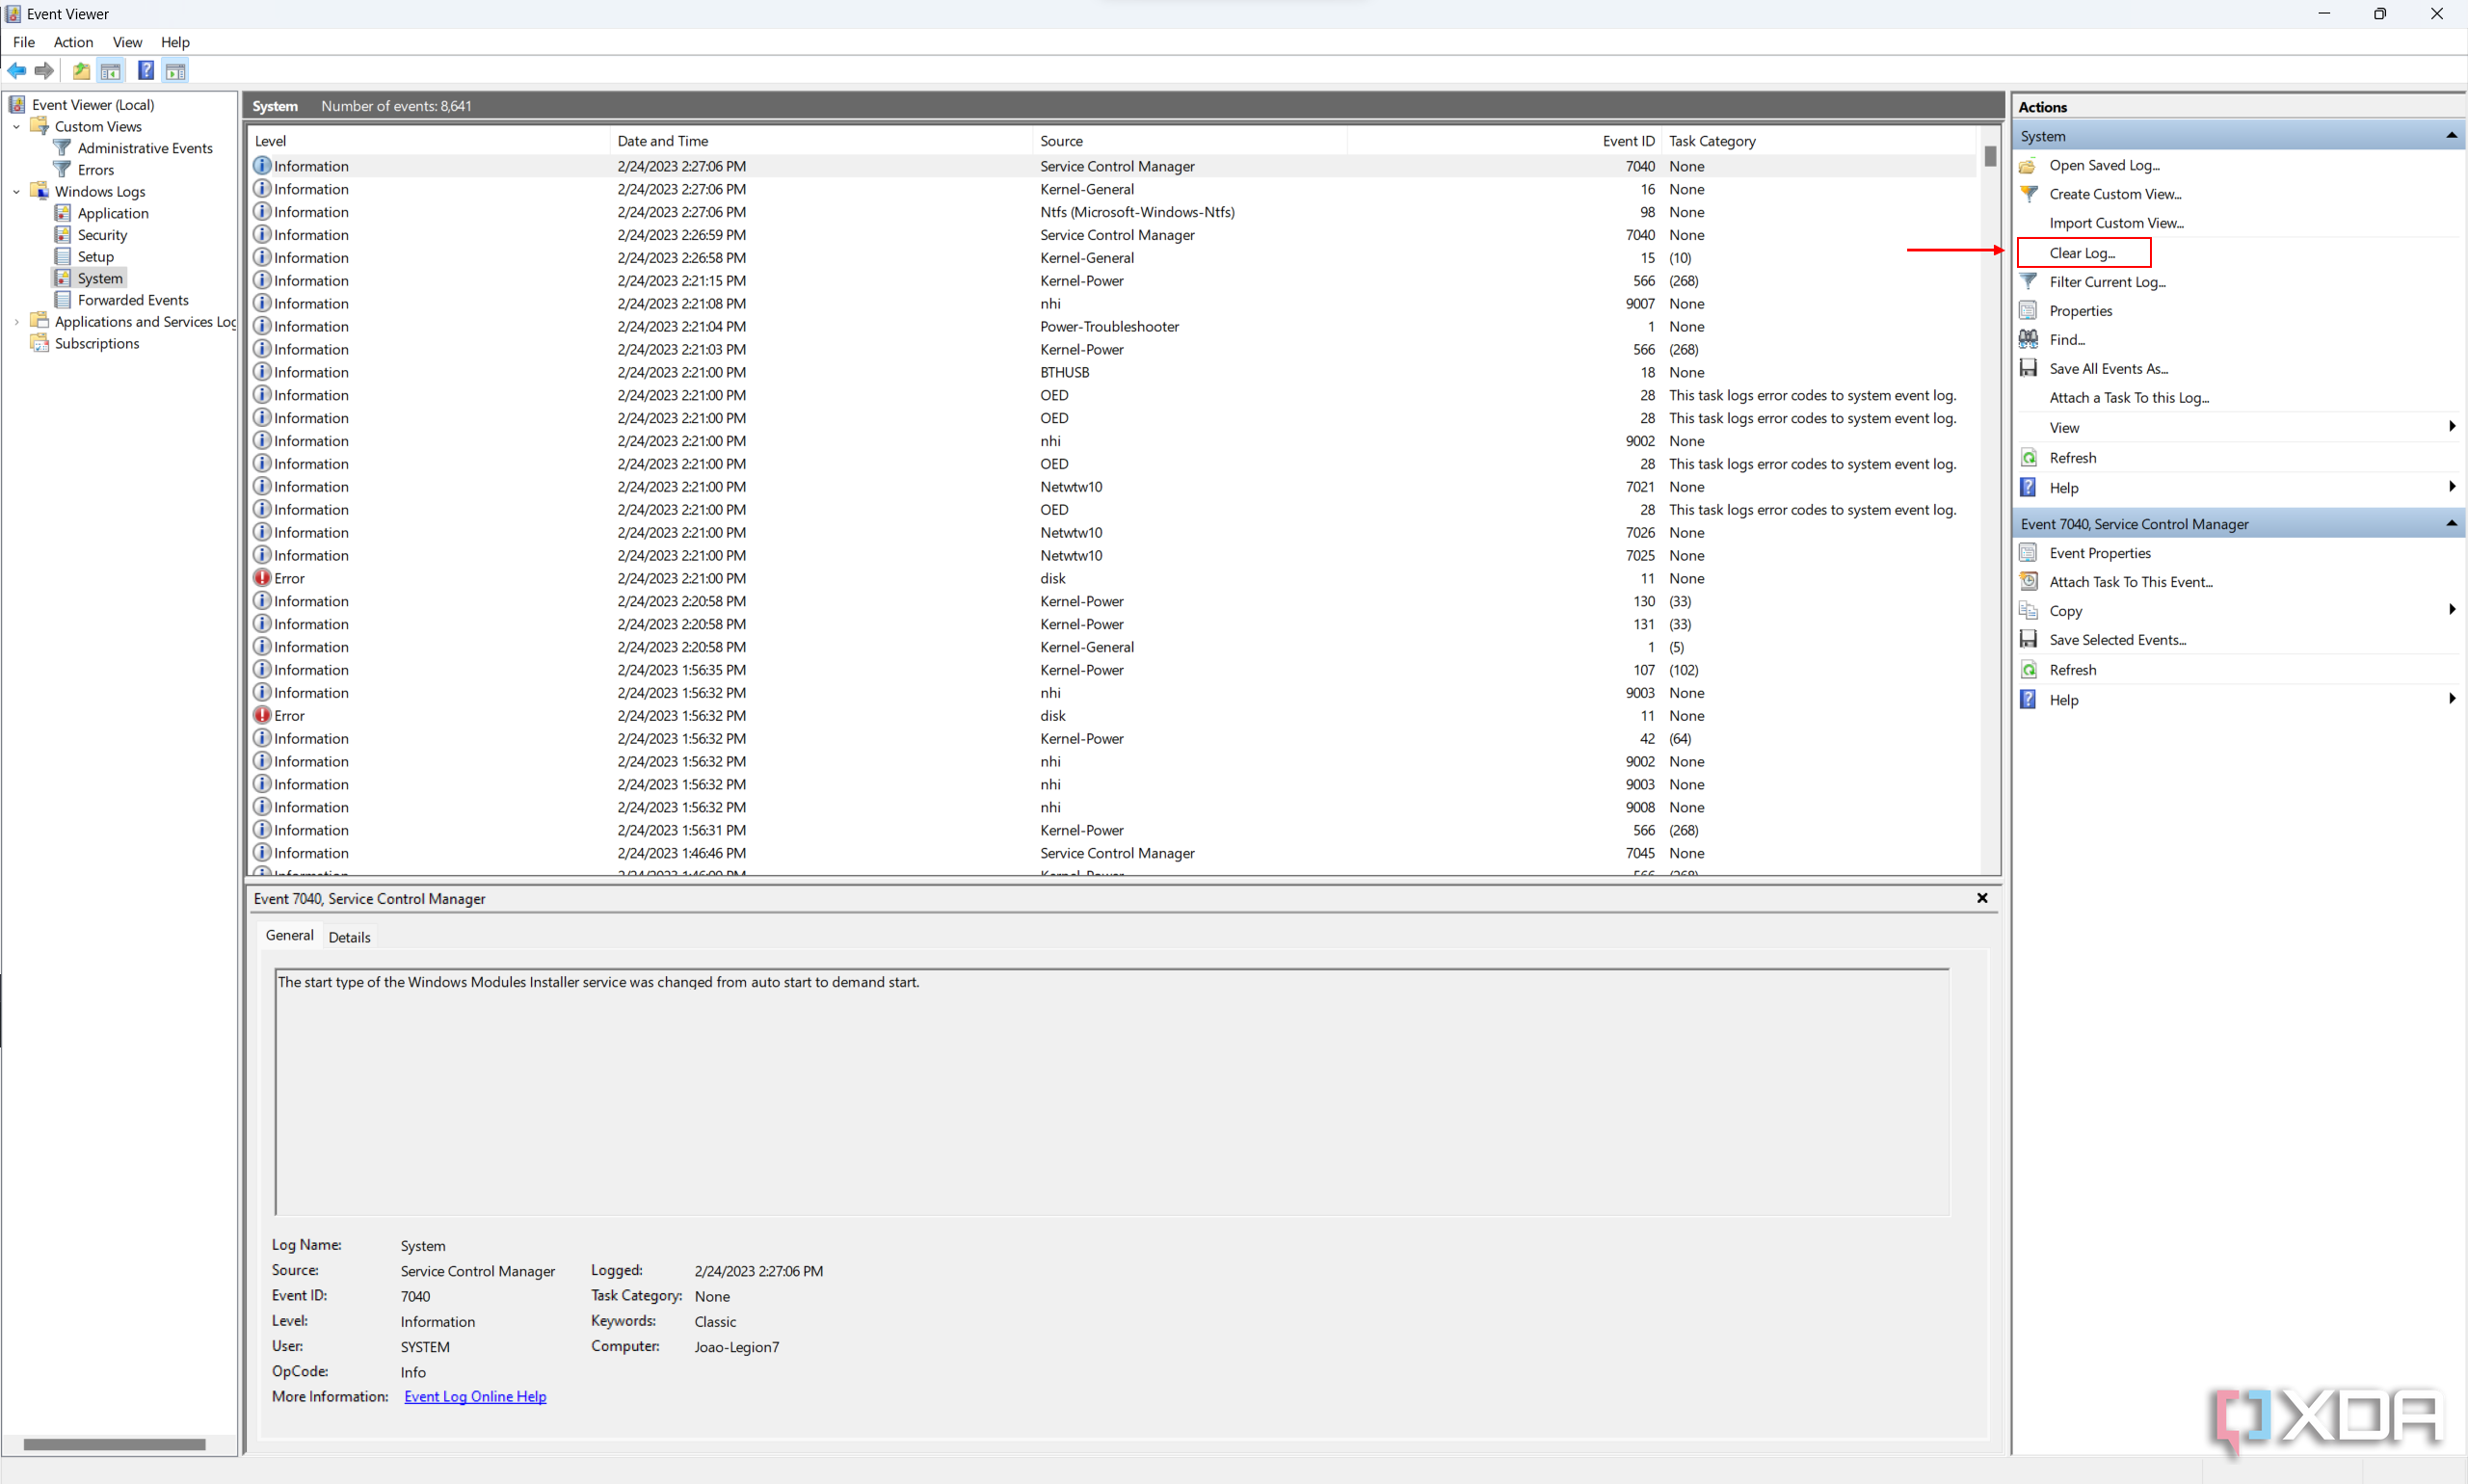
Open the log you want to clear (such as System) and choose Clear Log in the Actions pane.
- Choose Clear to delete all the events in the log, or Save and Clear if you’d like to back up the events to a separate file before deleting them.
And that’s about all you need to know about using the Event Viewer in Windows 11. As you can tell, there’s a lot to it, and it can be very useful to figure out what’s happening with your normally great PC or laptop. If you’d like to learn about other Windows 11 features, check out how to use BitLocker or how to customize Windows 11 if you’d like to tweak your experience.
Quick Links
-
Use Event Viewer to View BSOD Logs
-
Use Reliability Monitor to Access BSOD Logs
-
Make Windows 11 Display Error Details on the BSOD
Summary
To view Windows 11’s BSOD logs:
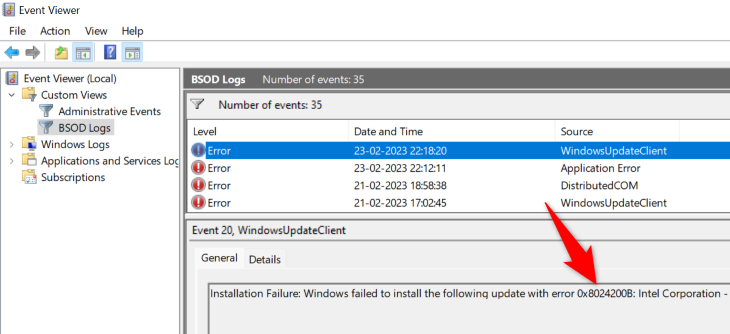
- Open Event Viewer.
- Click Action > Create Custom View.
- Change the «Logged» timeframe to one that includes when you saw the error.
- Check the «Error» box.
- Change Event Logs to «Windows Logs» and click OK.
- Enter a name for your view and select OK.
- Click each logged error to view its details.
Got a BSOD (Blue Screen of Death)? Checking Windows 11’s error logs could reveal what caused it. You can use either Event Viewer or Reliability Monitor, and you can also force the BSOD screen itself to display the error information in the future. Here’s how to do that.
Why Look at BSOD Logs?
The main reason to find BSOD logs is to get to the root of the problem. You may have encountered a BSOD error, like the infamous Kmode exception not handled error, but you don’t know exactly what caused it and how it happened.
With BSOD logs, you get to see the program that caused the problem as well as other useful and related information to help you deal with the issue.
Once you’ve found your error log, you can analyze it, find the cause of the problem, and fix the underlying issue to prevent further BSOD errors.
Use Event Viewer to View BSOD Logs
A quick and easy way to access your BSOD logs is to use your PC’s built-in Event Viewer tool. This tool lets you create a custom report that contains the errors and logs from your specified timeframe. The process for this method involves more steps (at least the first time you do it) than using Reliability Monitor, but the data it gives you is more comprehensive.
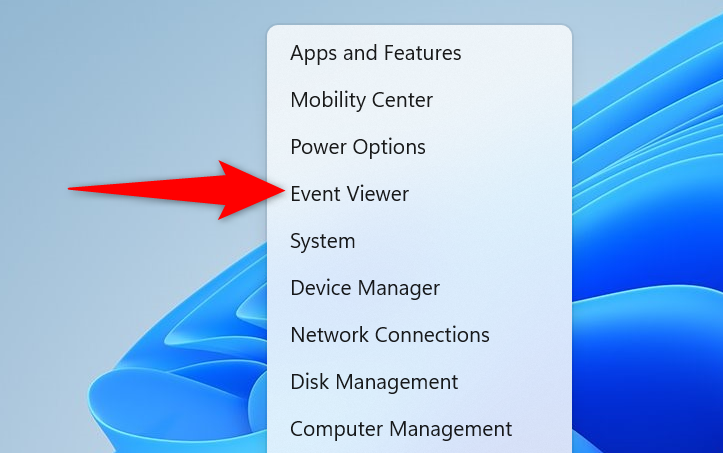
To do that, first, open Event Viewer by right-clicking your «Start» menu icon and choosing «Event Viewer.»
In Event Viewer, from the menu bar, select Action > Create Custom View.
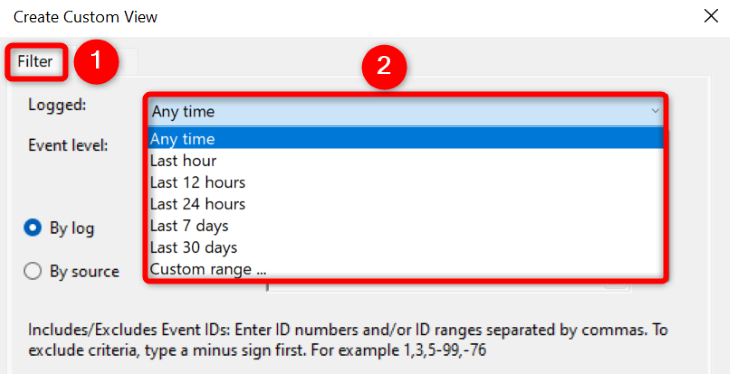
You’ll land on a «Create Custom View» page. Here, at the top, select the «Filter» tab. Then, click the «Logged» menu and choose the timeframe for which you want to see the logs. Make sure to select the timeframe when your BSOD error occurred.
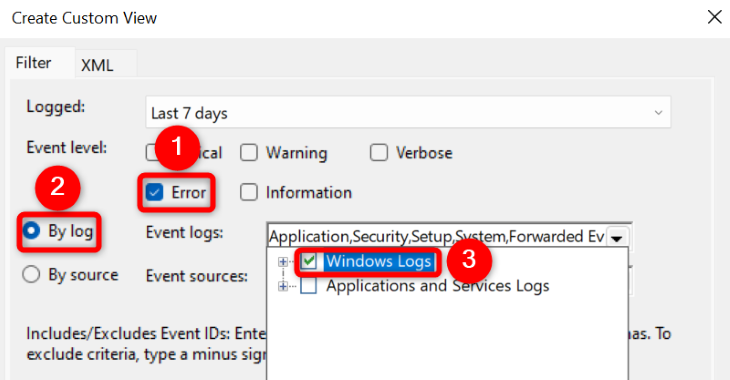
Next, in the «Event Level» section, choose «Error.» Turn on the «By Logs» option, click the «Event Logs» drop-down menu, and choose «Windows Logs.»
Then, confirm your selection by choosing «OK.»
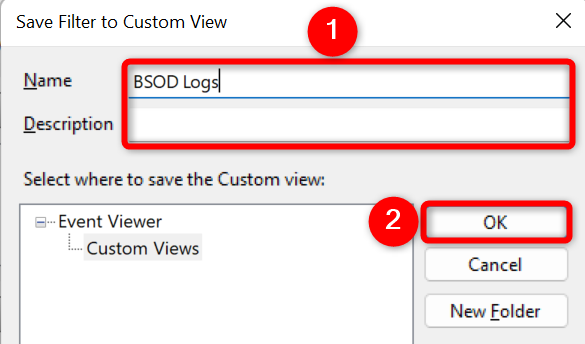
You’ll now save the custom view so that it’s easier to find these logs in the future. To do that, click the «Name» field and enter a name for your view. Enter a descriptive name (like BSOD Logs) so you can quickly find it again. Then, click «OK.»
Your custom view is now ready to use. On your current screen, you’ll see all the errors that occurred in your specified timeframe on your PC. To get more details about an error, select it on the list. Then, beneath the error, you’ll see more information about it.
In the future, to access this custom log view, open Event Viewer, choose «Custom Views» on the left, and select the name of your custom view.

With the information available in these logs, you can take the appropriate steps and rectify your PC problems. Good luck!
Use Reliability Monitor to Access BSOD Logs
Another way to access error message logs in Windows 11 is to use Reliability Monitor. This tool monitors your PC’s usage over a period of time, allowing you to quickly get to any errors that have occurred on your machine. It may not give you quite as much data as Event Viewer does, but accessing Reliability Monitor is faster and it gives you a visual chart representing your PC’s overall stability.
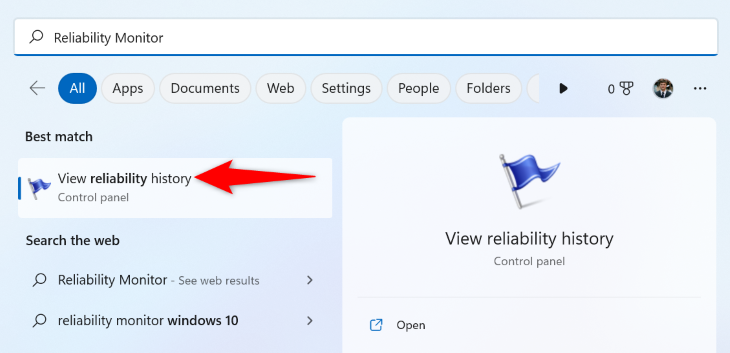
To access the tool, open the «Start» menu, search for «Reliability Monitor», and click «View Reliability History» in the search results.
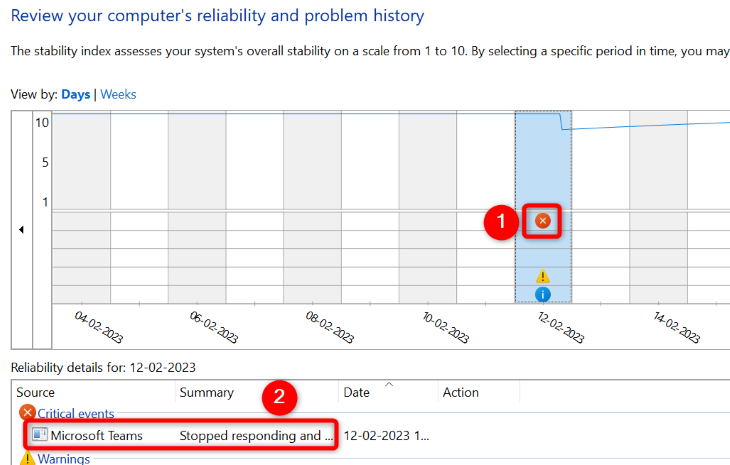
On the screen that opens, you’ll see a graph showing your system’s status. Here, an error message is indicated with a red «X.» Click this icon for your error, and then in the pane at the bottom, double-click the error.
The screen that opens displays more information about your selected error. Here, the «Description» section will give you details about your issue.
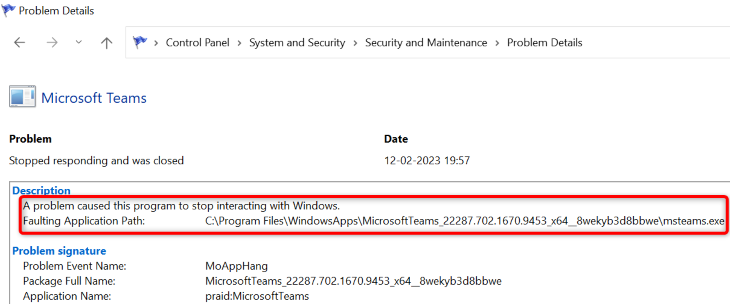
You now have some information about your BSOD error, and you can apply the possible fixes to resolve your problem.
Make Windows 11 Display Error Details on the BSOD
By default, Windows 11’s blue screen of death doesn’t display any information that can help you deal with the issue. It only shows a sad smiley and nothing much of value.
Luckily, you can change that and make the BSOD display more useful information. This information can help you find out the cause of the problem so you can fix it and get rid of BSOD.
To get Windows 11 to show more details on the BSOD, add an entry to your PC’s registry. Start this process by opening the Run dialog box using Windows+R, typing the following in the box, and pressing Enter (or selecting «OK.»)
regedit
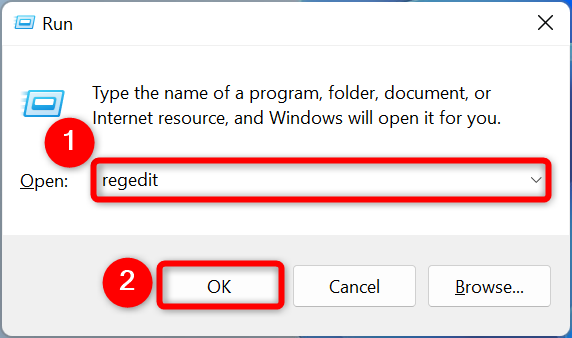
In the «User Account Control» prompt, select «Yes.»
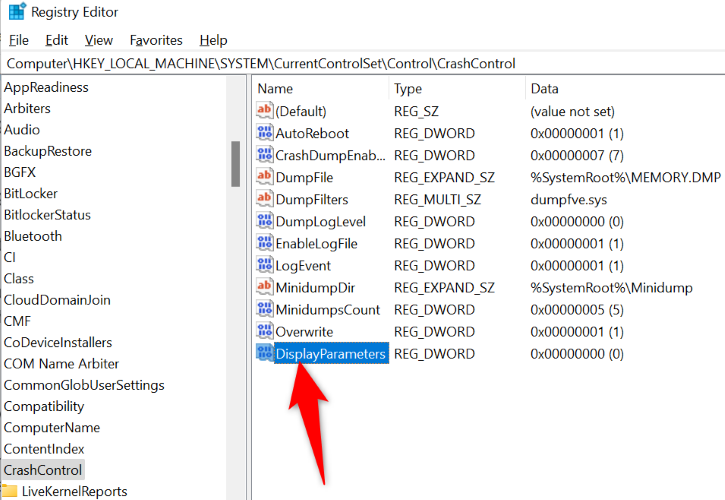
You’ll see a Registry Editor window. Here, navigate to the following path. Then, on the right pane, right-click anywhere blank and choose New > DWORD (32-bit) Value.
Computer\HKEY_LOCAL_MACHINE\SYSTEM\CurrentControlSet\Control\CrashControl
Enter DisplayParameters as the entry name and press the Enter key. Then, double-click this entry.
A small box will open. Here, click the «Value Data» field and enter 1 . Then, select «OK.»
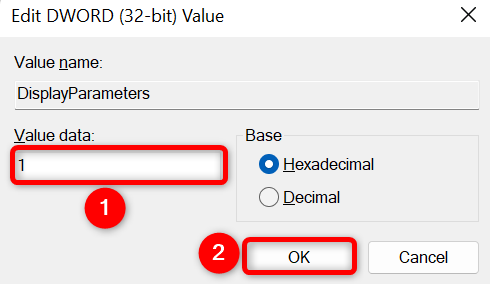
You’ve successfully added the required entry to your registry. Now, reboot your PC to bring your changes into effect. From now on, when a BSOD error occurs, you’ll see the error details right on the BSOD itself.
And that’s how you access more details about your BSOD error on Windows 11. We hope these logs help you fix your PC problems.