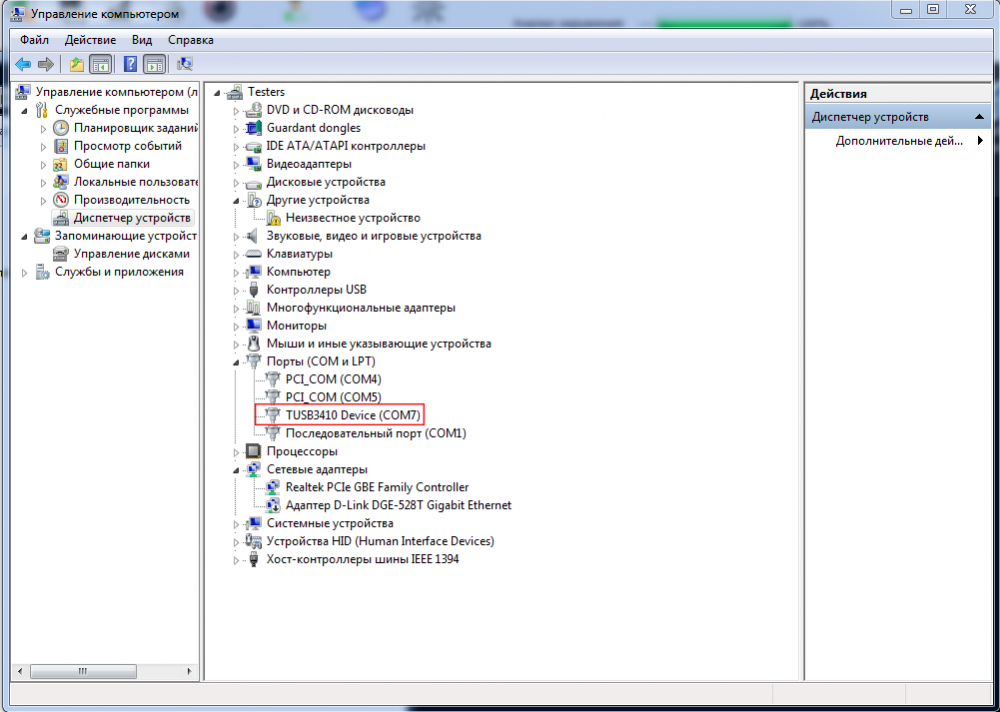
Способ 1: «Диспетчер устройств»
Для просмотра оборудования на компьютерах с Windows традиционно используется оснастка «Диспетчер устройств», однако в случае с COM-портами все нет так просто. Сегодня этот интерфейс считается устаревшим, поэтому в списке оборудования «Диспетчера устройств» он может не отображаться даже при включении опции «Показать скрытые устройства».
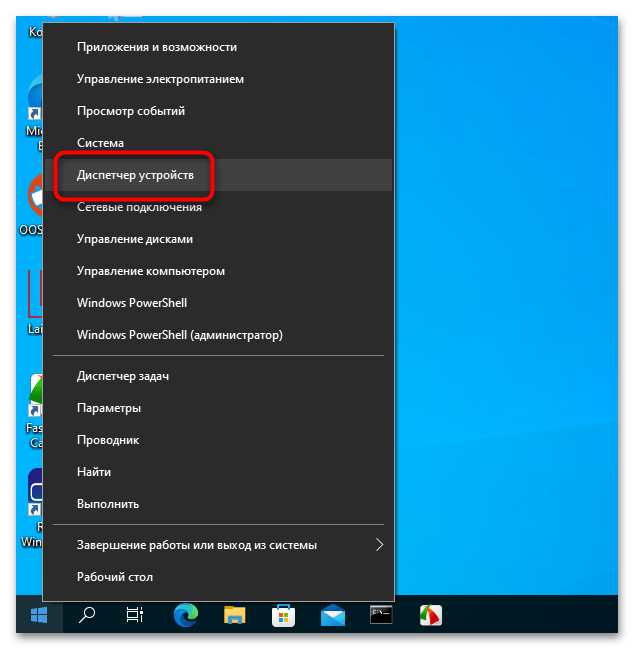
- Откройте «Диспетчер устройств» из контекстного меню кнопки «Пуск».
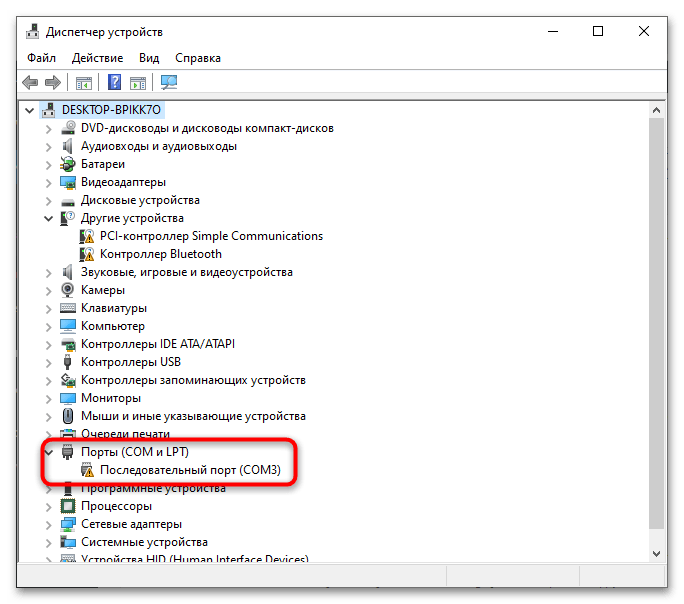
- Посмотрите, имеется ли списке оснастки раздел «Порты (COM и LPT)». Если да, раскройте его – оно будет содержать список имеющихся на компьютере портов с интерфейсами COM и LPT. Если указанный раздел отсутствует, проследуйте дальнейшим указаниям.
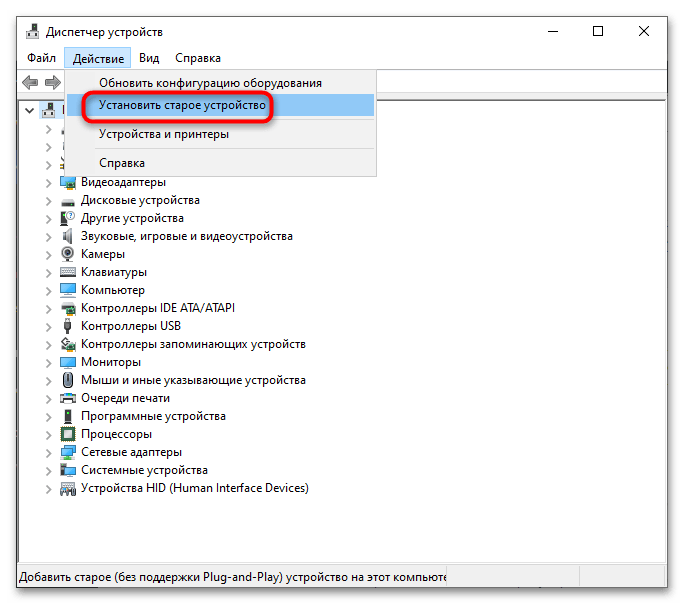
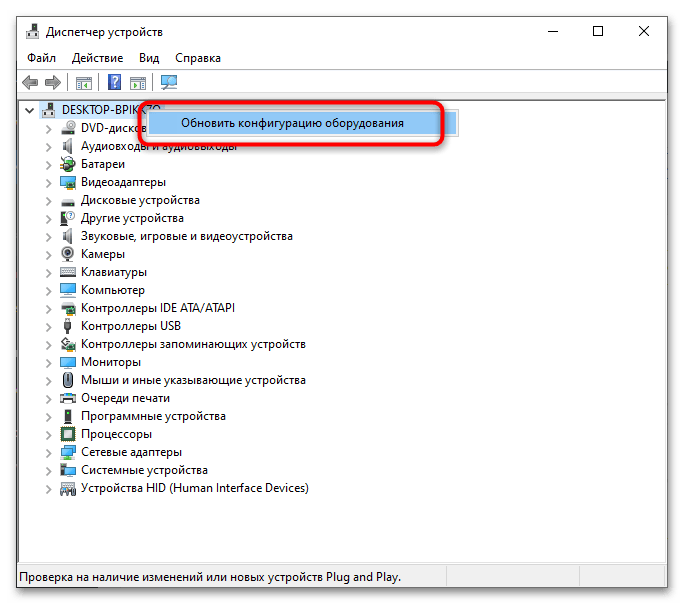
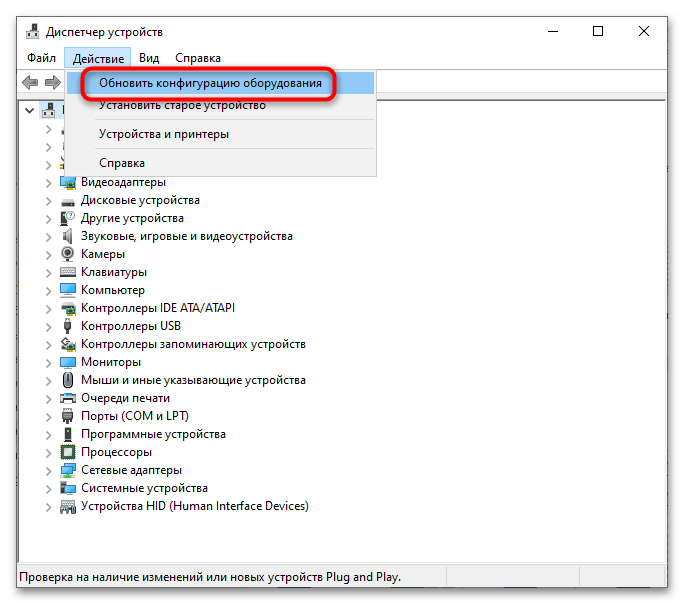
- В меню «Действие» открытого «Диспетчера устройств» выберите опцию «Установить старое устройство».

В случае отсутствия опции правой кнопкой мыши кликните тут же в окне оснастки по названию компьютера и выберите «Обновить конфигурацию оборудования». Теперь опция «Установить старое устройство» должна стать доступной. Кликните по ней.
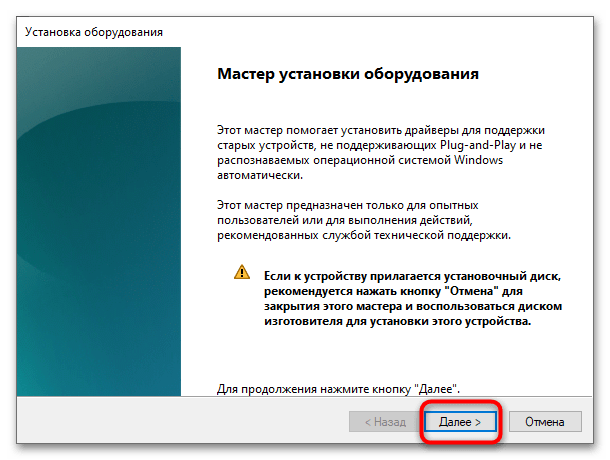
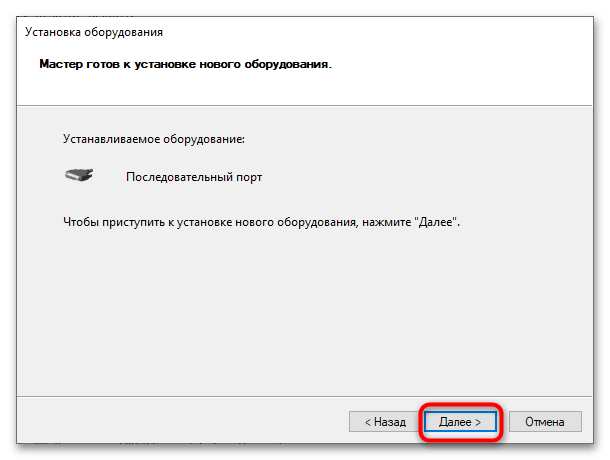
- В открывшемся окне мастера оборудования нажмите «Далее».
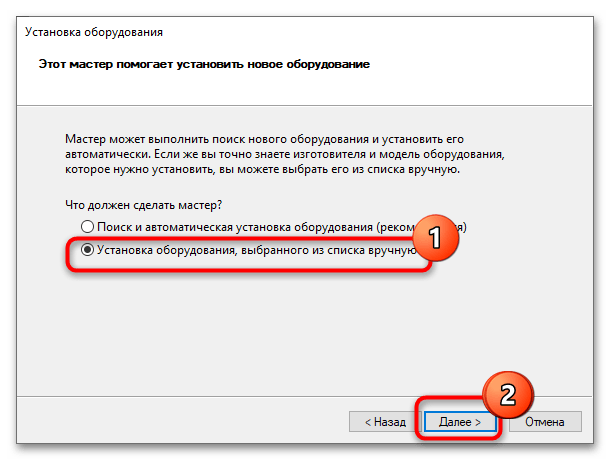
- В следующем окне выберите вариант «Установка оборудования, выбранного вручную» и нажмите «Далее».
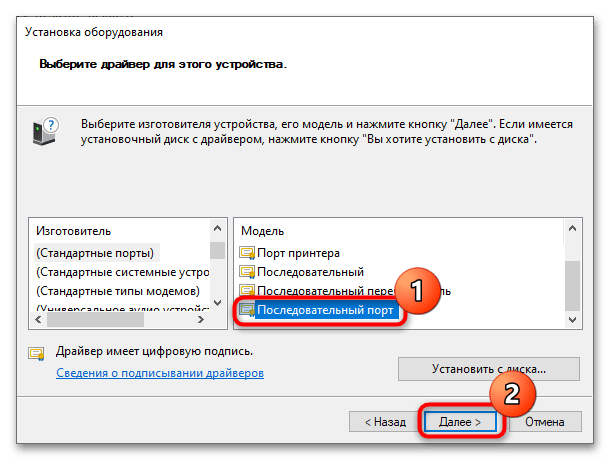
- В следующем окне в правой части выберите «Стандартные порты», а в левой – «Последовательный порт». Нажмите «Далее».

- Еще раз нажмите «Далее».
- По завершении этих действий в «Диспетчере устройств» должен появиться раздел «Порты (COM и LPT)». Если он не появится сразу, перезапустите оснастку или обновите конфигурацию оборудования, воспользовавшись одноименной опцией в меню «Действие».
Способ 2: «Редактор реестра»
Информация о доступных физических и виртуальных COM-портах хранится в системном реестре, откуда ее можно извлечь средствами самой операционной системы.
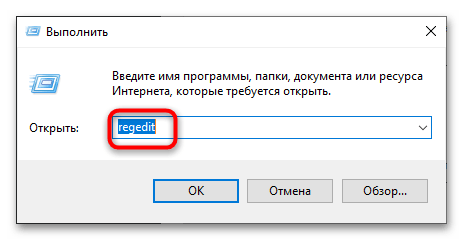
- Откройте «Редактор реестра» командой
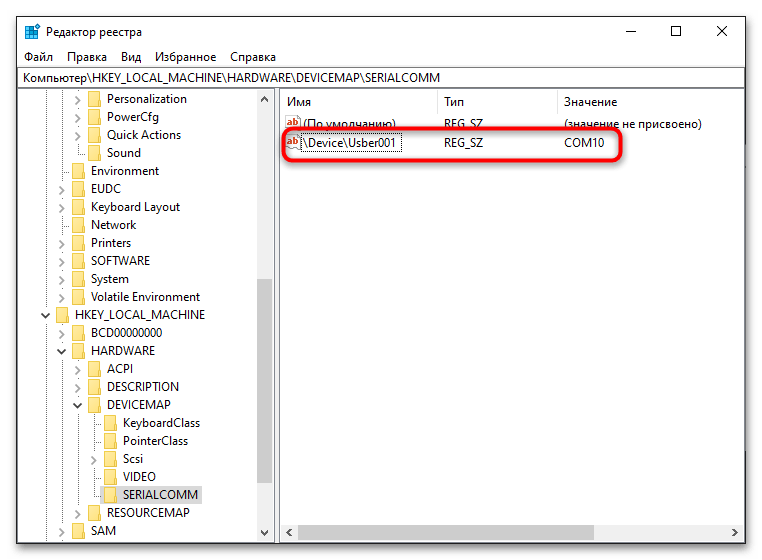
regedit, выполненной в вызванной нажатием клавиш Win + R диалоговом окошке быстрого запуска приложений. - Перейдите в раздел реестра
HKEY_LOCAL_MACHINE\HARDWARE\DEVICEMAP\SERIALCOMMи изучите содержимое правой колонки. Доступные COM-порты будут указаны в виде строковых параметров со значениями «COM1», «COM2», «COM3» и так далее.
Следует отметить, что использование COM-портов в современных версиях Windows не столь актуально, как раньше. Они могут понадобится только для подключения специального оборудования, например старых моделей промышленных контроллеров. Маловероятно, что обычному пользователю когда-либо придется иметь дело с подобной аппаратурой.
Наша группа в TelegramПолезные советы и помощь
Для правильного подключения оборудования, необходимо определить номер COM порта.
Проверка проводится при условии, что сервер полностью развернут, и работает заведомо правильно.
Windows
Для определения номера COM порта на ОС Windows необходимо:
- Убедиться в том, что многожильный кабель подключен к COM-порту
- Перейти в «Диспетчер устройств», расположенный в: Панель управления\Оборудование и звук\Диспетчер устройств (необходимы права администратора)
- Раскрыть дерево «Порты (COM и LPT)»
- Отсоединить многожильный кабель
- Запомнить изменения в дереве устройств «Порты (COM и LPT)»
- Присоединить многожильный кабель обратно к COM-порту
- Найти новый порт в дереве устройств «Порты (COM и LPT)»
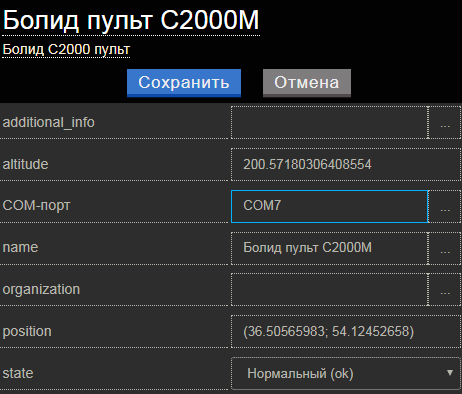
8. После того, как номер COM-порта определен его необходимо указать в схеме SCADA, для устройства, подключенного многожильным кабелем.
Linux
Для определения номера COM порта на ОС Linux необходимо:
- Обладать правами Root либо пользователь должен входить в группу dialout
- Убедиться в том, что многожильный кабель подключен к COM-порту
- Проверить наличие COM портов в системе, введя в командную строку следующую команду:
ls -l /dev/ttyS* /dev/ttyUSB*
4. После выполнения команды отобразится список всех доступных COM-портов
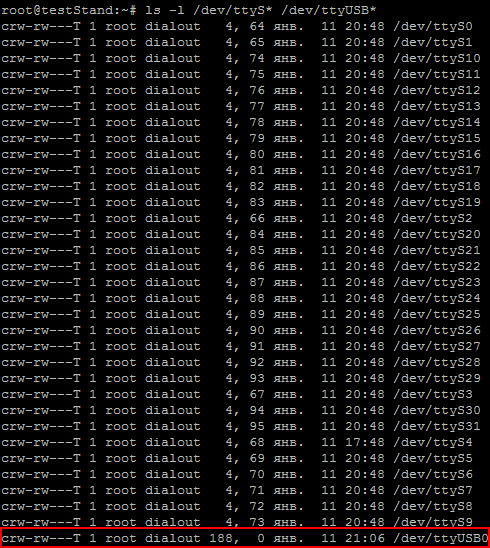
dev/ttyS0 — первый COM порт
/dev/ttyS1 — второй COM порт
/dev/ttyUSB0 — специальный кабель-переходник из USB в COM (Gembird UAS111)
5. Установить программу minicom. Для этого вводим следующую команду:
apt-get install minicom
6. Найти многожильный кабель в оплётке длиной 4-6 см.
7. Соединить 2 и 3 выводы COM порта перемычкой из кусочка многожильного провода. Оплётка будет удерживать провод на контактах, а металлические жилы внутри будут проводниками.
8. Настроить программу minicom. Для этого вводим следующую команду:
minicom -s
9. Выбрать «Настройка последовательного порта»

10. Нажимая А поочередно выбираем порты (если используется кабель-переходник из USB в COM то выбрать /dev/ttyUSB0)
11. Отключить аппаратное управление потоком, нажав «F»
12. Выйти из настроек нажав «Enter»
13. Сохранить настройки по умолчанию «Сохранить настройки как dfl»
14. Выйти из minicom
15. Запустить minicom выполнив команду:
minicom
16. Нажать на любую клавишу на клавиатуре
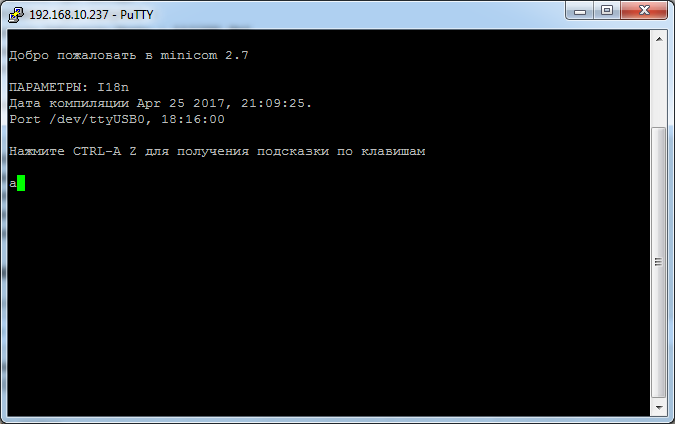
В случае, если символы не вводятся с клавиатуры, необходимо вернуться к пункту 10, и выбрать другой COM-порт
Если вводимые символы отображаются — значит COM-порт определен верно
17. После того, как номер COM-порта определен его необходимо указать в схеме SCADA, для устройства, подключенного многожильным кабелем.
When it comes to navigating the world of technology, understanding how to find COM ports on Windows 10 can be a valuable skill. These communication ports play a crucial role in connecting peripheral devices to your computer, allowing for data transfer and device control. But how exactly can you locate these ports on your Windows 10 system?
Windows 10 provides an intuitive method for finding COM ports, ensuring that users can easily access and utilize these essential connections. By accessing the Device Manager, you can view a comprehensive list of all the COM ports available on your system. This not only allows you to identify the COM ports, but also provides information about the devices connected to them. Having this knowledge empowers you to troubleshoot connection issues and optimize the performance of your peripheral devices.
If you’re looking to find COM ports on Windows 10, follow these steps:
- Open the Device Manager by pressing the Windows key + X and selecting «Device Manager» from the menu.
- In the Device Manager window, click on the «Ports (COM & LPT)» category to expand it.
- You’ll find a list of COM ports on your computer. Note that each port is labeled with a number (e.g., COM1, COM2).
- To get more information about a specific port, right-click on it and select «Properties.»
- In the Properties window, you can view details such as the port’s status, driver information, and settings.

Introduction to Finding COM Ports on Windows 10
Communication ports, commonly known as COM ports, play a crucial role in connecting external devices to your Windows 10 computer. These ports facilitate the transfer of data between your PC and peripherals like printers, scanners, and serial devices. For experts working with hardware and troubleshooting, it’s essential to know how to find COM ports on Windows 10. In this article, we will explore different methods and tools to uncover and manage these ports effectively.
Method 1: Device Manager
The Device Manager utility in Windows 10 offers a convenient way to access and manage COM ports on your system. Here’s how:
- Right-click on the Start button and select «Device Manager» from the menu.
- In the Device Manager window, locate and click on the «Ports (COM & LPT)» category.
- Expand the category to view all the available COM ports on your system.
- Each COM port is listed with its corresponding number.
Using Device Manager to Troubleshoot COM Port Issues
If you are experiencing problems with a specific COM port or device, Device Manager can come in handy for troubleshooting:
- Right-click on the problematic COM port and select «Properties» from the context menu.
- In the Properties window, navigate to the «Port Settings» tab and click on the «Advanced» button.
- Here, you can adjust various settings like the baud rate, flow control, and latency.
Method 2: PowerShell Command
PowerShell is a powerful command-line tool that allows you to perform advanced system operations on Windows 10. You can also use the following PowerShell command to find the COM ports on your system:
Get-WmiObject Win32_SerialPortThis command fetches information about the serial ports on your computer, including the COM port number, name, and description. To use this method:
- Open PowerShell by searching for it in the Start menu.
- Type the command
Get-WmiObject Win32_SerialPortand press Enter. - The PowerShell window will display a list of all the COM ports with their details.
Filtering the COM Port List in PowerShell
If you want to filter the COM port list based on specific properties, you can modify the PowerShell command with additional parameters. For example:
Get-WmiObject Win32_SerialPort | Where-Object {$_.Name -like "*COM3*"}This command will filter the list and display only the COM ports that contain «COM3» in their name. You can replace «COM3» with any other COM port number to suit your requirements.
Method 3: SerialPort Utility
If you prefer a graphical user interface (GUI) instead of command-line tools, you can use a third-party software called SerialPort Utility to find and manage COM ports on Windows 10. Here’s how:
- Download and install the SerialPort Utility software from a reputable source.
- Launch the application.
- The interface will display a list of available COM ports along with their status and details.
Managing COM Ports with SerialPort Utility
In addition to providing basic information about COM ports, SerialPort Utility offers various features to manage and test these ports:
- Toggle the status of a COM port to enable or disable it.
- Monitor the incoming and outgoing data on a COM port.
- Perform loopback tests to check the functionality of a COM port.
Exploring Additional Dimensions of Finding COM Ports on Windows 10
Aside from the methods mentioned above, there are other interesting aspects to consider when dealing with COM ports on Windows 10. Let’s explore a few more:
Using Device Management Software
Device management software can provide a comprehensive view of all the connected devices and their corresponding COM ports on your Windows 10 system. These software tools offer advanced features for monitoring, configuring, and troubleshooting devices efficiently. Some popular options include:
| Software | Features |
| Serial Port Monitor | Real-time monitoring, diagnostics, and analysis of COM ports. |
| Advanced Serial Port Monitor | Monitoring, analyzing, and logging data from COM ports. |
| Serial Port Tool | Data transmission, logging, and debugging for COM ports. |
Benefits of Device Management Software
Using dedicated device management software can provide several advantages over manual methods:
- Real-time monitoring of COM ports and connected devices.
- Enhanced diagnostics and troubleshooting capabilities.
- Advanced data analysis and logging features.
- Automation options to streamline device management tasks.
Virtual COM Ports
Virtual COM ports, also known as software COM ports, are a useful concept that allows software applications to communicate with virtual devices as if they were physical COM ports. These virtual ports can be created using specialized software tools like:
| Software | Features |
| Virtual Serial Port Driver | Creation and management of virtual COM ports. |
| Virtual Serial Port Emulator | Creation and emulation of virtual COM ports. |
| Eltima Virtual Serial Port | Creation and testing of virtual COM ports. |
Applications of Virtual COM Ports
Virtual COM ports offer various applications in scenarios where physical connections are not feasible or practical:
- Testing and development of software applications that require COM port communication.
- Simulating and emulating hardware devices for virtual testing.
- Creating virtual connections between remote devices over networks.
These software tools enable seamless communication between software applications and virtual devices, eliminating the need for physical hardware.
Hardware Serial Port Expansion Cards
In certain cases, the number of COM ports available on your Windows 10 computer may be inadequate for your specific requirements. In such situations, you can consider using hardware serial port expansion cards. These cards can be added to your PC to provide additional physical COM ports for connecting peripherals and devices.
Serial port expansion cards are available in various configurations, offering multiple COM ports on a single card. They can be connected to an available PCI or PCIe slot on your motherboard. Once installed, you can access and manage these additional COM ports using the methods mentioned earlier.
Choosing a Serial Port Expansion Card
When selecting a serial port expansion card, consider the following factors:
- Compatibility with your computer’s motherboard and operating system.
- The number of additional COM ports required.
- Support for advanced features like flow control and high-speed data transmission.
- Reliability and reputation of the manufacturer.
Conclusion
Understanding how to find COM ports on Windows 10 is essential for hardware experts and troubleshooters. Whether you choose to utilize the built-in Device Manager, use PowerShell commands, or leverage third-party tools like SerialPort Utility, there are various methods at your disposal. Additionally, exploring concepts like device management software, virtual COM ports, and serial port expansion cards offers a deeper understanding of the subject and expands your capabilities. By mastering the art of finding and managing COM ports, you can effectively connect and control external devices, ensuring smooth operation and optimal performance.

Finding Com Ports on Windows 10
When working with devices connected to your computer through a serial connection, you may need to find the COM ports they are using on your Windows 10 system. Here are two methods to help you locate the COM ports:
Using Device Manager
- Press the Windows key + X on your keyboard to open the Power User menu.
- From the menu, select Device Manager. The Device Manager window will open.
- In the Device Manager, expand the category labeled Ports (COM & LPT) to view the list of COM ports on your computer.
Using PowerShell
- Press the Windows key + X on your keyboard to open the Power User menu.
- From the menu, select Windows PowerShell (Admin). The PowerShell window will open.
- Type the following command: Get-WmiObject -query «SELECT * FROM Win32_PnPEntity WHERE Description LIKE ‘%(COM%'» and press Enter.
- The PowerShell window will display a list of all the COM ports on your computer.
By following these methods, you can easily locate the COM ports on your Windows 10 system, allowing you to manage and troubleshoot devices connected through serial connections.
Key Takeaways: How to Find Com Ports on Windows 10
- Com ports on Windows 10 can be found in the Device Manager.
- To access the Device Manager, right-click the Start button and select «Device Manager.»
- In the Device Manager, expand the «Ports (COM & LPT)» category.
- The Com ports will be listed as «COM» followed by a number.
- To check the properties of a Com port, right-click on it and select «Properties.»
Frequently Asked Questions
Here are some commonly asked questions about finding COM ports on Windows 10.
1. How do I check for available COM ports on Windows 10?
To check for available COM ports on Windows 10, follow these steps:
1. Open the Device Manager by pressing the Windows + X keys and selecting «Device Manager» from the menu.
2. In the Device Manager window, expand the «Ports (COM & LPT)» section.
3. The available COM ports on your computer will be listed under the «Ports (COM & LPT)» section.
4. Note down the COM port numbers for future reference.
By following these steps, you can easily check for available COM ports on Windows 10.
2. How can I find the COM port number of a specific device on Windows 10?
To find the COM port number of a specific device on Windows 10, you can use the Device Manager. Here’s how:
1. Connect the device for which you want to find the COM port number to your computer.
2. Open the Device Manager by pressing the Windows + X keys and selecting «Device Manager» from the menu.
3. In the Device Manager window, locate the device you want to find the COM port number for under the relevant category (e.g., «Ports (COM & LPT)»).
4. Right-click on the device and select «Properties» from the context menu.
5. In the device’s Properties window, go to the «Port Settings» tab.
6. The COM port number for the device will be displayed under the «Port» section.
By following these steps, you can easily find the COM port number of a specific device on Windows 10.
3. What should I do if I can’t find any COM ports on Windows 10?
If you can’t find any COM ports on Windows 10, try the following solutions:
1. Check if the device is properly connected to your computer. Ensure that the device is securely plugged into the appropriate port.
2. Restart your computer and check again. Sometimes, a simple restart can resolve connectivity issues and refresh the COM port list.
3. Update the device drivers. Outdated or incompatible drivers can cause issues with COM ports. Visit the manufacturer’s website and download the latest drivers for your device.
4. Check if the device is being recognized by your computer. Open the Device Manager and look for any unknown devices or devices with exclamation marks. If you find any, try uninstalling and reinstalling the drivers for those devices.
If none of these solutions work, it’s recommended to consult with a technical expert or contact the device manufacturer for further assistance.
4. Can I create virtual COM ports on Windows 10?
Yes, you can create virtual COM ports on Windows 10 using specialized software. Virtual COM ports allow your computer to communicate with virtual devices or software that require a COM port connection.
There are several software solutions available that enable you to create virtual COM ports. One popular option is the «Virtual Serial Port Driver» software, which allows you to create pairs of virtual COM ports that are linked together.
Before you create virtual COM ports, make sure you understand the purpose and requirements of the software or device you intend to connect to. Consult the software or device manufacturer’s documentation for specific instructions on creating and using virtual COM ports.
5. Are COM ports still used in modern computing?
Yes, COM ports are still used in modern computing, albeit less frequently than before. While technologies
So there you have it! Finding COM ports on Windows 10 is a simple process that can be done in just a few steps. By following the instructions in this article, you can easily locate and identify the COM ports on your Windows 10 computer.
Remember, COM ports are essential for connecting serial devices to your computer, so it’s important to know how to find them. Whether you need to troubleshoot a connection issue or simply want to check which COM ports are in use, the steps outlined in this article will help you accomplish that. Now you can easily navigate the world of COM ports on Windows 10 with confidence!
Check COM Ports in the Device Manager
The Device Manager is the easiest way to see the list of your available ports. Generally, if you want to inspect your PC’s components, it’s the first place to look. There are multiple ways to open the Device Manager to see Windows 10 COM ports:
• Press Win+X, and select it from the newly opened menu.

• Press Win+R to open the Run prompt, and type in devmgmt.msc.

• Simply type “Device” into the search bar, and find it in the search results.

If you have problems with COM ports not showing in Device Manager, this could be caused by a different version of Windows that hides them by default, a technical issue with your motherboard, or a lack of drivers for a USB-to-serial adapter.
How to Find COM Ports on Windows 10
- Open the Device Manager.

- Optionally, enable “View” → “Show Hidden Devices”.
- Locate “Ports (COM and LPT)”.

You can now right-click any individual port to view their Windows 10 COM port settings, and possibly disable them or update their drivers.
List COM Ports — Windows 10 Command Line Solution
If you’d want to know how to view COM ports in Windows 10 through the Command Prompt, it’s easy, but first you need to launch CMD. This is done by entering “cmd” in the Run prompt, which is opened with Win+R.
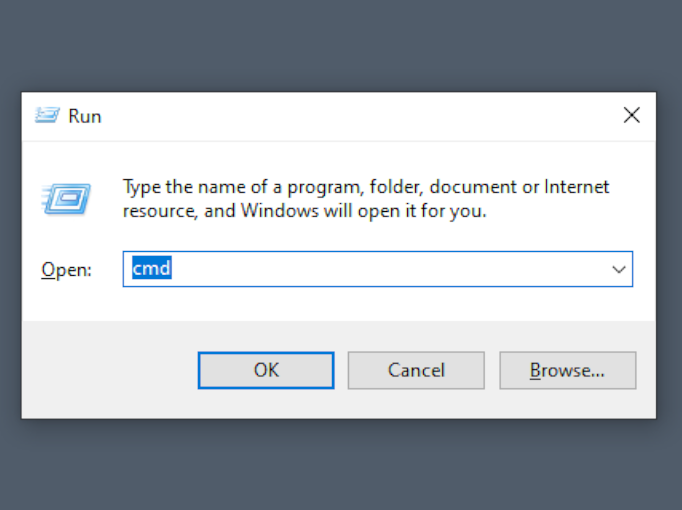
Once the terminal is opened, type mode and confirm by pressing Enter. You will get data on the available ports and their settings.

Some details on how to check COM port in Windows 11 are different, since the addition of the Windows Terminal.
What Port Am I Using?
COM ports are simple — unlike USB, the devices won’t identify themselves. Thus, the only way to see if anything is connected to a Windows 10 COM port is to receive a message from the connected device. This can be done with PowerShell. Before trying this approach, you’ll need to find the correct settings to be used when communicating with the device, including the baud rate, parity bits, etc.
How to Find what COM Port a Device is On
- Open PowerShell by pressing Win+X and selecting “Windows PowerShell (Admin)”.

- Add the port as an object:
$port = New-Object System.IO.Ports.SerialPort [port name],[baud rate],[parity],[data bits],[stop bits] - Open the port with the
$port.Open()command.

- You can now read a single line from the port or send a message to it by running
$port.WriteLine()or$port.ReadLine().

ReadLine will keep running until it receives one line of data. If you want to read from the port continuously, this is best done with a serial terminal application.
Когда вы подключаете к компьютеру новое COM или некоторые USB устройства (например, USB модем, мобильный телефон, Bluetooth адаптер, конвертеров последовательных портов в USB и т.п.), Windows определяет его через механизм Plug-n-Play и назначит ему номер COM порта в диапазоне от 1 до 255 (COM1, COM2, COM3 и т.д.). При повторном подключении этого же устройств, ему назначается номер COM порта (Communication Port, или Serial port), зарезервированный за ним ранее. Новым устройствам выдается первый незанятый номер COM порта. Не редкость, когда внешние устройства при подключении создают сразу несколько COM портов (в моем случае после подключения адаптера Bluetooth, в системе появилось сразу 10
!!!!
новых COM портов).
Ряд приложений (как правило, довольно древних), способны адресовать только двухзначные номера COM портов, и отказываются работать с COM100 и выше. Или видят только COM1-COM9 устройства. Что делать, если подключенное устройство получило высокий номер COM порта? Можно ли сбросить нумерацию для зарезервированных COM портов и удалить назначенные порты?
Содержание:
- Изменить номер COM порта устройства в Windows
- Определяем процесс, который использует COM в Windows
- Сброс назначенных COM портов Windows через реестр
Изменить номер COM порта устройства в Windows
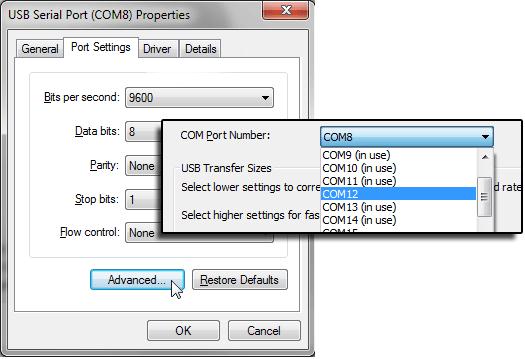
В Windows можно вручную изменить номер COM порта, назначенный устройству. Предположим требуемый COM порт уже занят, и мы хотим его попробовать его освободить. Для этого:
- Откройте диспетчер устройств (Device Manager) командой devmgmt.msc;
- В меню выберите View->Show Hidden Devices;
- Затем разверните Ports (COM & LPT) и найдите в списке устройство;
- Перейдите на вкладку Port Settings и нажмите кнопку Advanced;
- Текущий номер COM порта, назначенный устройству указан в поле COM Port Number;
- Чтобы изменить его, раскройте выпадающий список и выберите номер COMпорта, который хотите задать.


Но чаще всего изменить номер COM порт на другой не получится, так как все «низкие» COM порт уже используются (in use);
- В этом случае нужно попробовать удалить резервацию COM порта за другим устройством. В ветке Ports (COM & LPT) найдите которому назначен нужный вам номер COM порта (бледная иконка означает, что данный COM порт назначен, но в сейчас это устройство не подключено);
- Щелкните по нему ПКМ и выберите Uninstall;
- Теперь вы можете назначить освобожденный COM порт другому устройству. Еще раз откройте свойства вашего устройство, перейдите на вкладку Port Settings -> Advanced. Задайте свободный номер COM порта для вашего устройства.

Однако такой способ позволяет освободить занятый COM порт не во всех случаях.
Вы можете вывести полный список занятых COM портов в Windows с помощью PowerShell:
Get-WMIObject Win32_SerialPort | Select-Object Name,DeviceID,Description
Можно определить номер COM порта для определённого устройства по его имени, например:
Get-WMIObject Win32_SerialPort | Where-Object { $_.Name -like "*Arduino*"}|select name, deviceid
Или
Get-WMIObject Win32_SerialPort | Where-Object { $_.Name -like "*GPS*"}|select name, deviceid
Определяем процесс, который использует COM в Windows
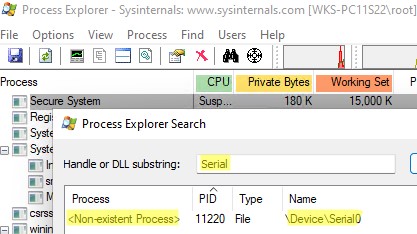
Вы не сможете освободить COM порт устройства, которое используется Windows или запущенной программой, процессом. Сначала вам нужно завершить процесс/программу, которая использует сейчас COM порт. Чтобы определить имя процесса, который использует COM порт понадобится утилита Process Explorer (https://docs.microsoft.com/en-gb/sysinternals/downloads/process-explorer).
Сначала нужно вывести имя службы, которая использует COM порт. Выполните команду PowerShell:
get-pnpdevice -class Ports -ea 0| Select Name, PNPDeviceID, Status, Service

Имя службы данного COM порта указано в столбце Service. Например, для COM2 это Serial. Теперь нужно запустить Process Explorer с правами администратора и выбрать в меню Find -> Find Handle or DLL. В строке Hangde or DLL substring введите значение Service, полученное ранее. В нашем примере это
Serial
.
Process Explorer должен показать процесс, который использует сейчас ваш COM порт. Чтобы освободить COM порт, завершите процесс или программу.
Сброс назначенных COM портов Windows через реестр
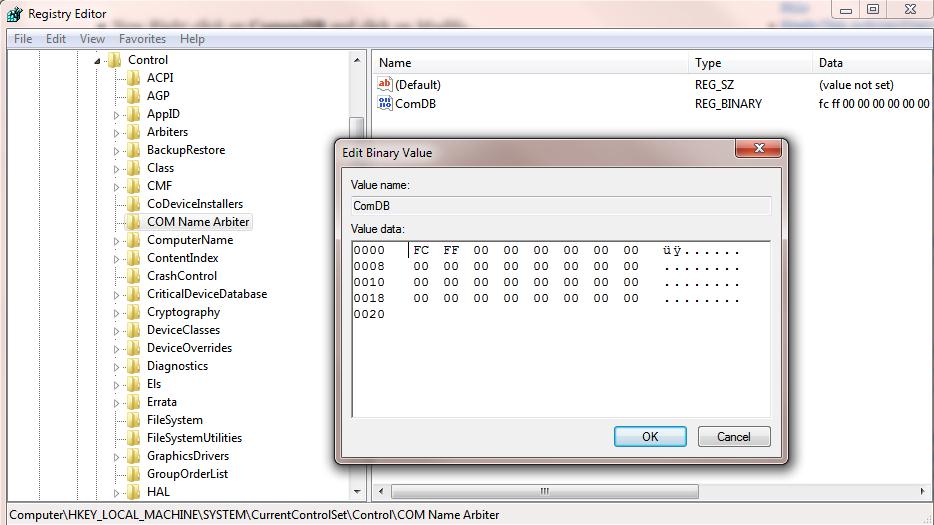
Информация об используемых COM портах хранится в ключе реестра CommDB в разделе HKEY_LOCAL_MACHINE\SYSTEM\CurrentControlSet\Control\COM Name Arbiter
- Откройте редактор реестра (regedit.exe) и перейдите в указанную ветку.
Важно! Настоятельно рекомендуем предварительно создать резервную копию данной ветки реестра (File -> Export). В том случае, если что-то пойдет не так, вы сможете вернуться к первоначальной конфигурации COM портов.

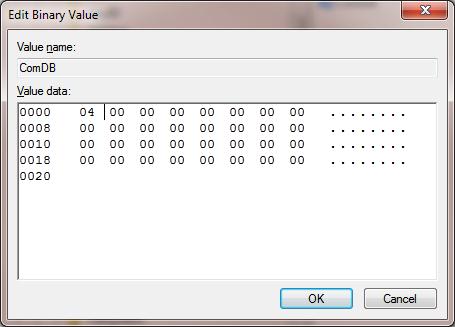
- Значение параметра ComDB в двоичном формате определяет список COM портов, зарезервированных в системе. Каждый бит определяет состояние соответствующего порта (от 1 до 255). К примеру, если нам нужно оставить резервацию только для COM3, hex значение ComDB будет равно 04 (0000 0100);

Важно! Будьте предельно внимательными, ни в коем случае не добавьте в этот параметр дополнительные байт, иначе система может начать падать в BSOD.
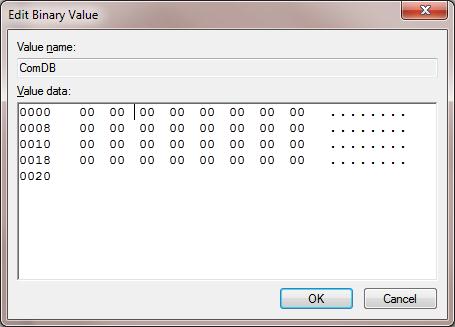
- Если нужно полностью сбросить все привязки COM, измените значение ключа ComDB на 0.
Примечание. В разделе HKEY_LOCAL_MACHINE\HARDWARE\DEVICEMAP\SERIALCOMM можно увидеть полный список COM портов, доступных в Windows.В разделе HKEY_LOCAL_MACHINE\HARDWARE\DEVICEMAP\SERIALCOMM можно увидеться список COM портов, подключенных к системе.

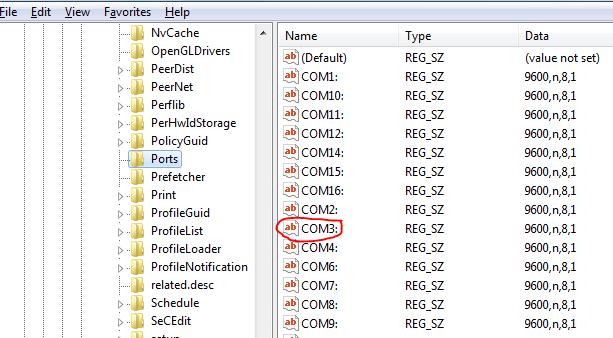
- В ветке HKEY_LOCAL_MACHINE\SOFTWARE\Microsoft\Windows NT\CurrentVersion\Ports содержится список назначенных COM портов. Все ненужные порты можно удалить (в нашем примере мы оставим только COM3 и удалим остальные);

- Отключите все оборудование и перезагрузите Windows;
- После перезагрузки включите оборудование в нужном порядке (переустановите конверторы USB-to-serial и т.д.). Все обнаруженные COM-порты автоматически определяться системой и им будут последовательно выделены номера COM портов.

Также вы можете использовать следующие две бесплатные утилиты для очистки занятых (In Use) COM портов:
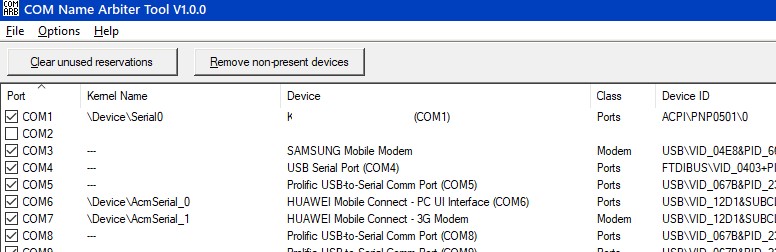
- COM Name Arbiter Tool – утилита для освобождения занятых COM портов. Запустите утилиту с правами администратора, выберите COM порты, которые вы хотите освободить и нажмите Clear unused Reservations и Remove non-present devices;

- Device Cleanup Tool – утилита используется для поиска в реестре информации о ранее подключенных устройств (в ветке HKEY_LOCAL_MACHINE\SYSTEM\CurrentControlSet\Enum) и удаления неиспользуемых устройств и очистки резерваций COM портов.