
Некоторые начинающие пользователи задают вопрос: как определить, оснащен ли компьютер обычным жестким диском HDD или же твердотельным накопителем SSD, не вскрывая компьютер. Сделать это сравнительно просто, но для начинающих пользователей методы могут быть неочевидными.
В этой инструкции подробно о способах узнать какой диск: SSD или HDD установлен на вашем ПК или ноутбуке. Рассматриваются методы для Windows 10 и Windows 11, но большинство из них будут работоспособны и в предыдущих версиях системы.
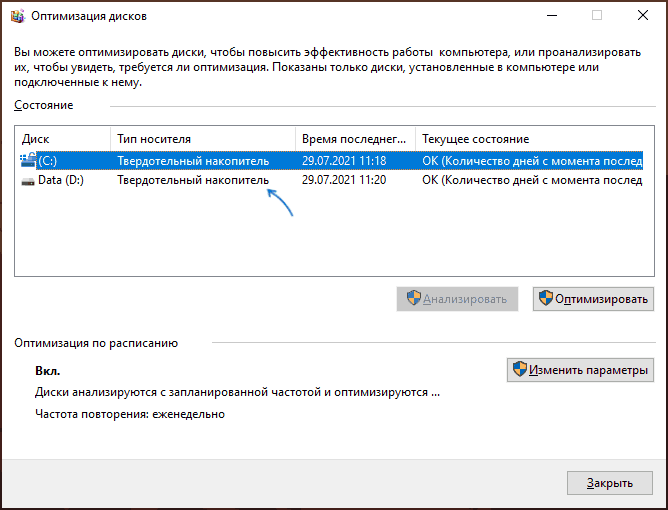
Окно «Оптимизация дисков»
Первый из способов посмотреть, жесткий диск или твердотельный накопитель установлен на вашем компьютере — полагаться на то, как сама Windows определила тип диска и посмотреть «выводы» системы в окне оптимизации дисков. Плюсы подхода — он простой и быстрый. Минусы: иногда SSD может быть ошибочно определен как жесткий диск. Для просмотра типа дисков достаточно использовать следующие шаги:
- В проводнике откройте свойства диска: нажмите правой кнопкой мыши по диску и выберите соответствующий пункт контекстного меню.
- Перейдите на вкладку «Сервис» и нажмите кнопку «Оптимизировать». Еще один способ быстро попасть в нужное расположение — нажать сочетание клавиш Win+R, после чего ввести dfrgui и нажать Enter.
- В окне оптимизации накопителей вы увидите список дисков, а также столбец «Тип носителя». Если в нём мы видим «Твердотельный накопитель» — это SSD.

При определении типа диска в указанном расположении система опирается на проводимый автоматически тест производительности системы и, если он не проводился или по какой-то причине скорость накопителя оказалась низкой, то тип может быть определён неверно.
В случае, если оценка производительности не производилась, вы можете запустить её вручную: в командной строке, запущенной от имени администратора введите команду
winsat formal -restart clean
и нажмите Enter. Дождитесь завершения выполнения оценки производительности, перезагрузите компьютер и проверьте, обновилась ли информация о типе установленных накопителей.
Определение типа диска по модели
Следующий способ — использование имени устройства и поиска в Интернете. Почти абсолютно надёжный, при условии, что ваш диск достаточно не является слишком уникальным. Это можно сделать и с помощью диспетчера устройство, но я рекомендую окно «Сведения о системе», поскольку оно позволяет копировать нужные данные:
- Откройте сведения о системе, для этого нажмите клавиши Win+R на клавиатуре, введите msinfo32 и нажмите Enter.
- Перейдите в раздел «Компоненты» — «Запоминающие устройства» — «Диски» (второй из двух повторяющихся пунктов).
- Выберите строку «Модель» и нажмите клавиши Ctrl+C для копирования модели.
- В поиске в интернете введите модель диска (само слово «Модель», которое также скопируется, удалите из запроса) и с большой вероятностью результаты поиска позволят вам определить, SSD или HDD установлен на вашем ПК или ноутбуке.


В выдаче поискового сервиса вы сможете найти информацию о конкретном накопителе, его типе и характеристиках.
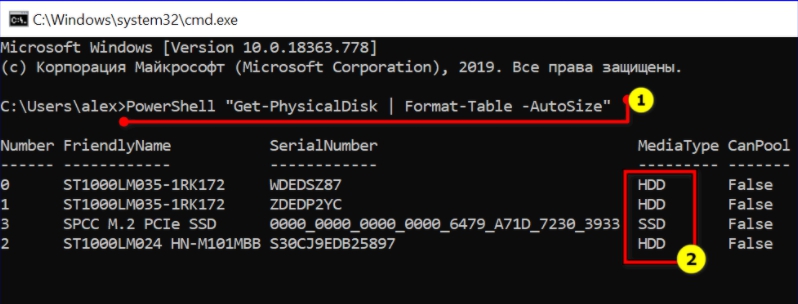
Команда PowerShell
Существует возможность определения типа диска с помощью PowerShell, но недостатки метода те же, что и в первом случае. Достаточно запустить Windows PowerShell и ввести команду:
Get-PhysicalDisk

Если в столбце MediaType будет указано SSD — это именно он и есть.
Сторонние программы
Многие программы, предназначенные для просмотра аппаратных характеристик компьютера (даже самые простые наподобие Speccy), а также утилиты для проверки дисков, такие как CrystalDiskInfo отображают, помимо прочего, и тип диска, а также его точную модель.

Про CrystalDiskInfo (именно её я рекомендую для рассматриваемой задачи) вы можете прочесть в обзоре Программы для SSD.
Надеюсь, предложенных способов будет достаточно для ваших задач. Если же остаются вопросы или необходимость уточнения информации, вы можете использовать комментарии ниже, я постараюсь помочь.
Как узнать, какой диск, SSD или HDD, установлен на компьютере? Обычно пользователей вопрос комплектующих не интересует — но только до того момента, пока все работает как нужно и не выходит из строя. Но бывает так, что пропадают данные или же на дисках не хватает места. Вот тогда и возникают сложности.
Расскажем, как узнавать информацию о жестком диске на компьютере или ноутбуке, как находить подходящую model of hard disk drive.
Определяем вид накопителя
Итак, как узнать, какой у меня диск? Какие для этого существуют способы? Прежде всего, нужно разобраться, о каком именно накопителе идет речь. Например, HDD устанавливаются в компьютерах цеховой сборки, и их сложно перепутать с чем-либо еще.
А вот SSD работают без механики, чем и хороши. Они недорогие и бесшумные. Еще бывают внешние жесткие диски — те, что подключаются к компьютеру через определенный разъем. Теперь вы знаете, как определить, HDD или SSD: достаточно уточнить тип техники.
Что же нужно сделать, чтобы определить название жесткого диска? Рассказываем самые распространенные способы.
Вытащите жесткий диск
Как узнать, какой диск? Можно просто посмотреть модель жесткого диска на компьютере определять название жесткого диска, открыв крышку ПК. Обычно производители указывают на корпусах все необходимые названия и характеристики.
Сложности могут возникнуть, если у вас ноутбук — в некоторых моделях может понадобиться разобрать весь корпус, прежде чем вы доберетесь до винчестера.
Воспользуйтесь возможностями Windows
Если у вас установлена операционная система Виндовс, то можно воспользоваться “встроенными функциями”.
Для этого нужно зайти в меню “Мой компьютер”:
- просто щелкните по ярлыку правой кнопкой мыши;
- перейдите в пункт “Управление”;
- найдите “Запоминающие устройства” и перейдите в “Управление дисками”;
- откройте во вкладке “Диспетчер устройств”, и в “Дисковых устройствах” будет указана модель вашего накопителя.
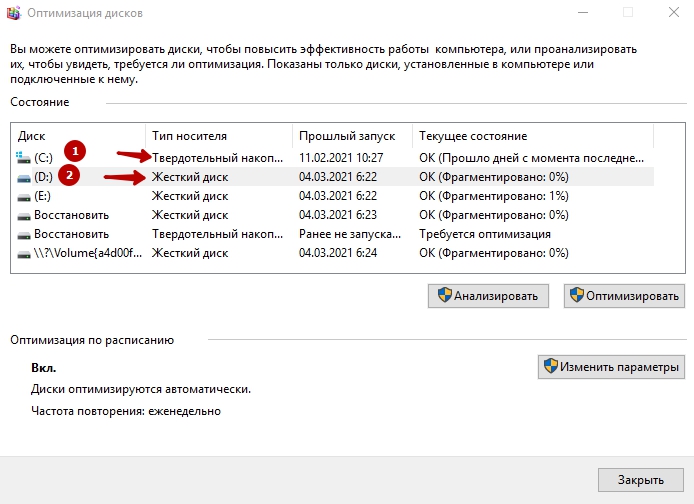
Используйте встроенную программу оптимизации дисков
Это служебная программа, которая запускается через “Пуск”. Потом вам нужно будет перейти в «Средства администрирования Windows». Там выберите пункт «Оптимизация дисков». Затем понадобится посмотреть информацию в колонке «Тип носителя». Если там будет указано “Твердотельный”, значит, речь идет о SSD, а «Жесткий диск» обозначает HDD.
Используйте командную строку
Чтобы ее вызвать, достаточно нажать Win+R. Откроется окно, где нужно ввести команду CMD. После этого нажмите “ОК” Снова откроется окно, где вы должны написать PowerShell «Get-PhysicalDisk | Format-Table -AutoSize» и нажать Enter. Приложение покажет вам, какие диски есть в компьютере и укажет на их характеристики.
Воспользуйтесь специализированной программой
Вам подойдет любая утилита, предназначенная для диагностики и проверки жесткого диска. К примеру, можно использовать программу EVERSET: если вы перейдете во вкладку “Хранение данных”, то сможете отследить каждую из характеристик вашего жесткого диска.
А вот общий объем здесь будет указан на 7% меньше от того, что заявлено производителем. Это не значит, что с вашим диском что-то не так: на самом деле такая разница между заявленной и реальной стоимостью — это стандарт.
Если вы планируете приобрести новый жесткий диск, обращайтесь за помощью в выборе в нашу лабораторию в Москве. При необходимости поможем определить, какая модель винчестера уже установлена в вашей технике. Можно сделать выбор, ориентируясь на стоимость, емкость или оптимальное сочетание этих параметров.
Every part of your computer works together to bring you better performance and efficiency. However, there may be times when one of your hardware needs replacement or repair. Making sure that your computer parts are within warranty can save you money.
A Hard Disk Drive (HDD) or a Solid State Drive (SSD) stores and protects all the information in your computer. You can register your hard disk drive if it’s under warranty, so anything happening to it will not give you a headache by spending too much. What you need to know is the model and the serial number of your hard disk drive to register it for warranty claims.

Now, you may ask how you can retrieve the model number and the serial number of your hard disk drive device. There are two ways to find it on Windows 10 PC. One way is to use the Windows Command Prompt tool. The other method is to go through the Device Manager folder. Let’s dive in.
How to Find your Hard Disk Drive & SSD Model Number or Get the Serial Number on a Windows 10 Computer
Your hard disk drive comes with a unique model number, which identifies what type of hard drive it is and its specifications. Warranties benefit from the model number to know what specs to replace or how to repair your HDD or SSD based on its specific directions.
The serial number is a unique set of numbers that applies to your hard disk drive. Check out the steps below on how you can look up or obtain the model or the serial number of your hard disk drive on a PC.
Method #1 – Look for your HDD or SSD Model and Serial Number Information through the Command Prompt

- First, click the Start button.
- Navigate to the Command Prompt.
- Enter the following command: wmic diskdrive get model,serialnumber
- Now, you will see the model and the serial number information of your hard disk drive.
Method #2 – Check the Hard Disk Drive or SSD Model and Serial Number using the Device Manager

- Click the Start button.
- Go to the Control Panel.
- Select Hardware and Sound.
- Click Device Manager.
- Look for Disk Drives and click to open it.
- Look for your hard disk drive and right-click to select Properties.
- Now, go to the Details tab to check the HDD or SSD model and serial number information.
That’s it! You have two options that you can try when you want to find and take note of your hard disk drive model and serial numbers for repairs or replacements.
Which of the two methods above is easier for you to do? And, what is your reason for getting your HDD or SSD’s model or serial number? We are curious to know, so drop your answer in the comment section below.
Windows Dispatch is a website supported by its readers & community. Some pages may contain affiliate links which may allow us to earn a little money when you buy through them.
Eddie Mendoza Jr
Eddie has a degree in Information Technology with a natural inclination towards troubleshooting devices. With more than 10 years of blogging experience in different niches, he has found it most satisfying when writing easy-to-follow guides and simplified articles related to computers, smart TVs, mobile devices and Internet-based services.
If you’re looking for a way to check or view the serial number of your hard disk or SSD on your computer or laptop, perhaps for inventory management purposes, this guide will help. While it’s easy to view the serial number of a hard disk or SSD that’s not fitted to your PC by simply looking at the sticker, it’s not as straightforward if you’ve purchased a branded PC or notebook. Unscrewing your computer to find the serial number on the sticker of the hard disk is not recommended, as it may void your warranty. However, there’s a way to find out the serial number of your PC without having to unscrew the device.
So what exactly is a serial number? Manufacturers use serial numbers to identify devices for warranty and replacement purposes. In this guide, we’ll show you how to find the serial number of your hard disk or SSD on your computer or laptop without voiding your warranty.
In this post, we will guide you with at least four ways through which you can find out the serial number of your hard disk or SSD fitted on your computer or notebook. These are the following:-
- Check the hard disk sticker label to find out the serial number.
- Find out the HDD (Hard Disk Drives) or SSD (Solid State Drives) serial number using Command Prompt.
- Get the Hard Disk Drives or Solid State Drives’ serial numbers using PowerShell.
- Check out the hard disk serial number using Third-Party Software.
How to check the hard disk sticker label to find out the serial number?
If you have purchased the hard disk separately, you can see the serial number on the hard disk case, or even it will be written on the hard disk sticker. On the sticker or case of the hard disk, look for a serial number listed after the word “Serial No,” “S/N,” or “SN.”
In some of the hard drives, you will find a QR code printed on the label. Just scan the QR code, and you can find the unique serial number associated with your drive. Further, you can use the serial number to see the warranty status from its manufacturer’s website.

How to find out the Hard Disk Drive (HDD) or Solid State Drive (SSD) serial number using Command Prompt on Windows 11/10?
This is the best way to find out the SSD or hard drive serial number using Command Prompt. Perform the following steps:-
Step 1. Open an elevated Command Prompt.
To open the Command Prompt with an administrative privilege, click the Start button on Windows 11/10 and type “command.”

In the available search results, right-click on the “Command Prompt” and choose the “Run as administrator” option.
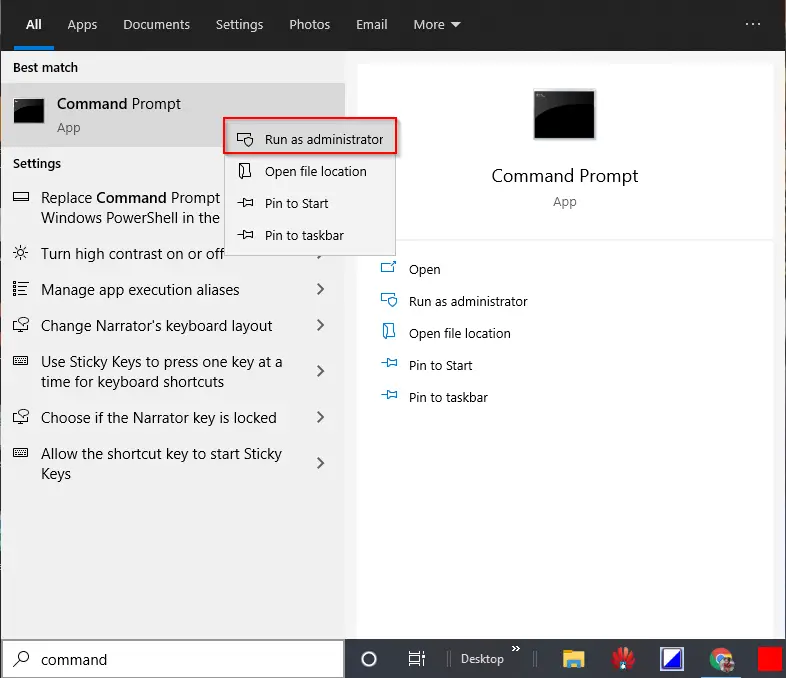
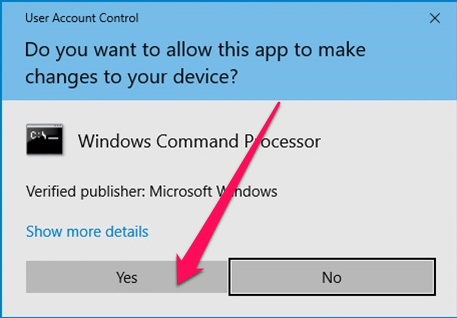
If the “User Account Control” window requests permission to continue, click Yes.
Step 2. In the administrative Command Prompt window, type the following and press Enter from the keyboard:-
wmic diskdrive get model,name,serialnumber

or,

wmic diskdrive get serialnumber
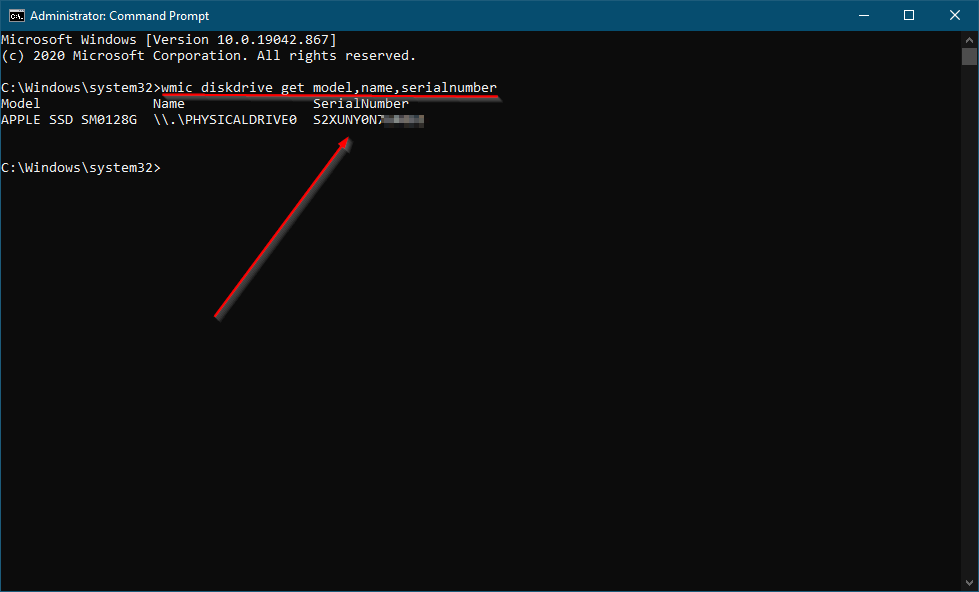
Step 3. Once you execute the above command, it will show the Model Number of the HDD/SSD and the Serial Number.
If more than one hard disk drive is fitted on your computer or laptop, you will have more than one entry after executing the command.
How to Obtain the HDD (Hard Disk Drive) or SSD (Solid State Drives) serial number using PowerShell?
This is another method to find the HDD (Hard Disk Drive) or SSD (Solid State Drives) serial number using PowerShell. To get the serial number, do the following steps:-
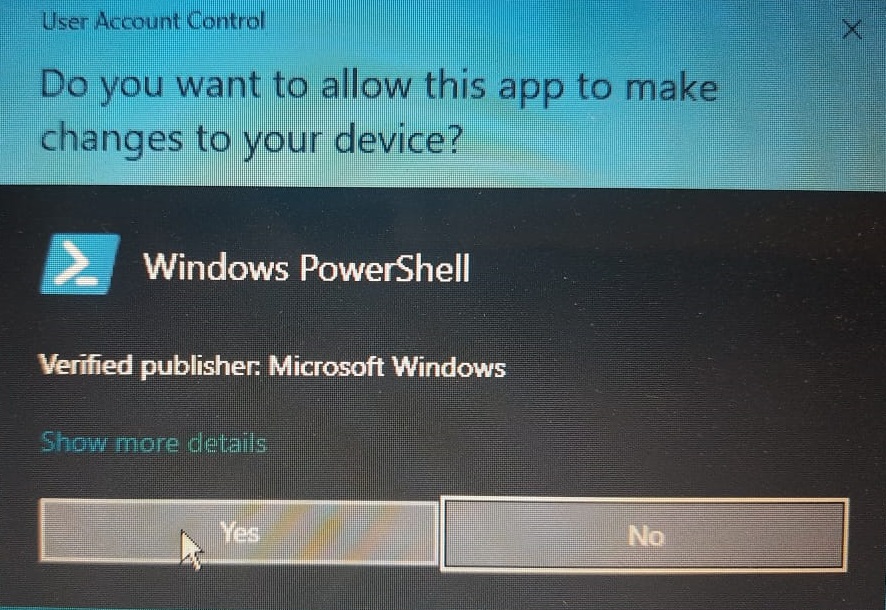
Step 1. Click on the Start button/menu of Windows 11/10 and type PowerShell.

Step 2. On the top search result, right-click on the Windows PowerShell entry and select “Run as administrator.”
Step 3. If User Account Control (UAC) prompts, click the Yes button to continue.
Step 4. On the Windows PowerShell, copy and paste the following command and then press Enter from the keyboard to execute it:-
Get-PhysicalDisk | Select-Object FriendlyName,SerialNumber

or,

Get-PhysicalDisk | Select-Object MediaType, SerialNumber
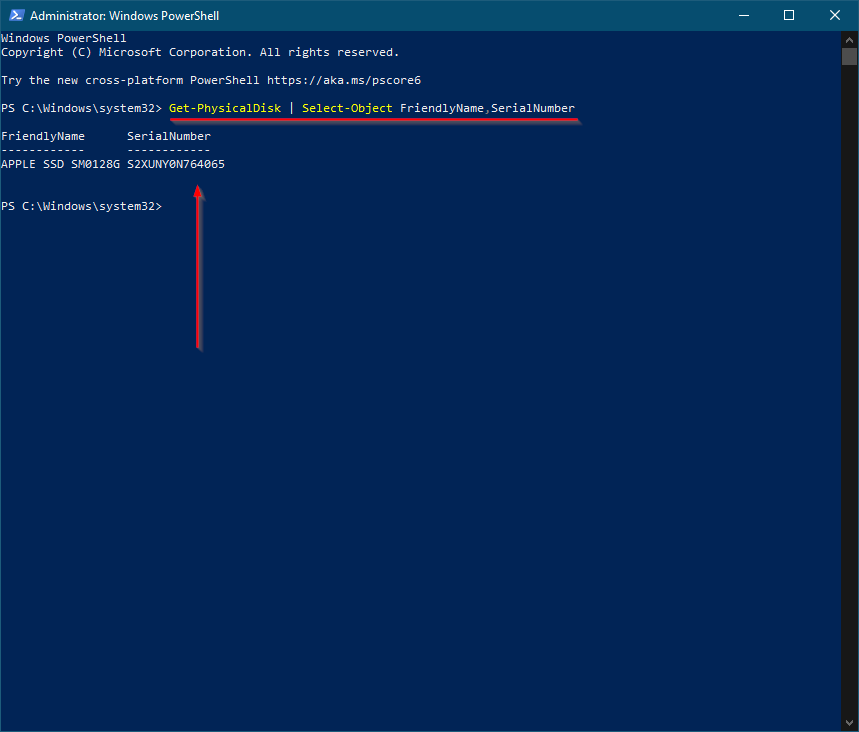
Once you complete the above steps, you will see the Model Number (Friendly Name) and Serial Number of the HDD or SSD. If your PC is fitted with more than one HDD or SSD, you will have more than one entry in the PowerShell output.
The above-mentioned command also works with NVMe storage devices.
How to check out the Hard Disk Drives (HDD) or Solid State Drives (SSD) serial number using a Third-Party Tool?
This may be your preferred method if you want to check the serial number of the HDD or SSD using a third-party tool. Seagate, the hard disk manufacturer, has created a straightforward tool called Seagate Drive Detect, which lets you check the serial number and the model number of all Seagate, Samsung, Maxtor, and Apple brands drives connected to your computer or laptop.
Step 1. To check the serial number of the HDD or SSD, download the portable freeware tool Seagate Drive Detect from this link.
Step 2. Double-click on the downloaded executable file DriveDetect to launch it.
Step 3. Once you run this utility, it will show the serial number and the model number of the attached HDD or SSD to your PC.
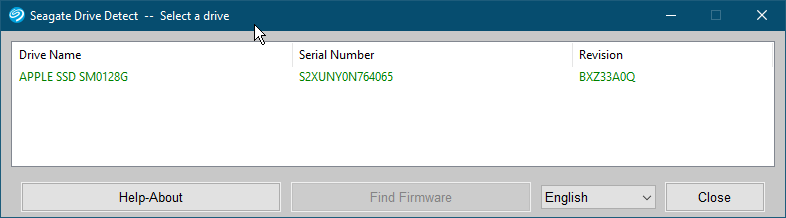
The Drive Detect utility also helps you to find out the firmware of your HDD or SSD. Just select the hard disk entry and click on “Find Firmware.” It will open the manufacturer’s webpage, where you can download the firmware of your HDD or SSD.
Conclusion
In conclusion, finding the serial number of a hard disk or SSD on your computer or laptop can be a daunting task, especially if you’ve purchased a branded PC or notebook. However, there are several ways to obtain the serial number without voiding your warranty, such as checking the sticker label, using Command Prompt, PowerShell, or third-party software like Seagate Drive Detect. By following the steps outlined in this guide, you can easily find the serial number of your hard disk or SSD and use it for warranty and replacement purposes. Remember to exercise caution and avoid unscrewing your device, which may void your warranty.