Как посмотреть настройки биос из windows

Вы можете использовать PowerShell для просмотра или изменения настроек BIOS/UEFI на компьютере Windows. В этой статье мы рассмотрим, как получить или изменить настройки BIOS компьютера через Windows PowerShell на обычном компьютере и на брендовых устройствах популярных производителей (HP, Lenovo, Dell, Toshiba).

Содержание:

  • Получаем информацию из BIOS/UEFI с помощью PowerShell
  • Получить и изменить настройки BIOS с помощью модуля Get-BIOS
  • Управление BIOS из PowerShell на компьютерах Lenovo
  • Доступ к настройкам BIOS из PowerShell на компьютерах Hewlett-Packard
  • Настройка BIOS на устройствах DELL из PowerShell

Получаем информацию из BIOS/UEFI с помощью PowerShell

Базовая информация о BIOS (UEFI) компьютера доступна в WMI классе Win32_BIOS. Вы можете вывести всю доступную информацию о BIOS с помощью командлета Get-WmiObject.

Get-WmiObject -Class Win32_BIOS

Get-WmiObject Win32_BIOS вывести версию BIOS

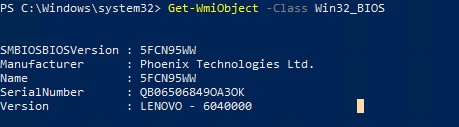
По умолчанию команда возвращает информацию о версии BIOS (SMBIOSBIOSVersion + Manufacturer), серийный номер и модель компьютера (SerialNumber, Version).

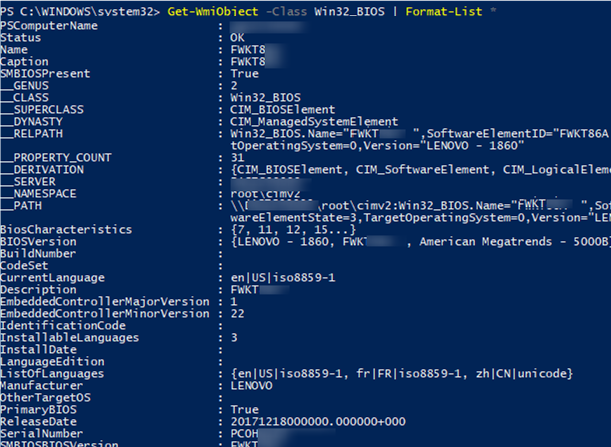
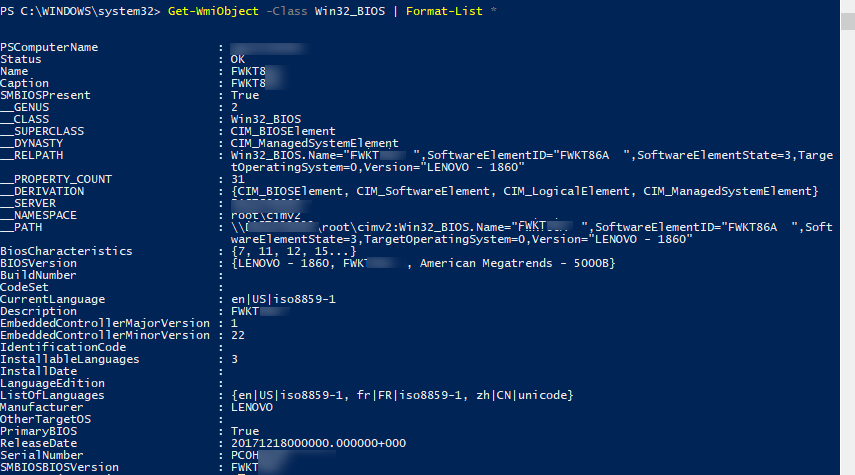
Полный список параметров BIOS, который доступен в WMI классе Win32_BIOS можно вывести командой:

Get-WmiObject -Class Win32_BIOS | Format-List *

Get-WmiObject -Class Win32_BIOS

Можно вывести только интересующие вас настройки BIOS. Например, версию BIOS, серийный номер компьютера, производителя и дату выпуска:

Get-WmiObject -Class Win32_BIOS | Select SMBIOSBIOSVersion, Manufacturer, SerialNumber, ReleaseDate

Можно получить информацию BIOS удаленного компьютера:

Get-WmiObject -Class Win32_BIOS -ComputerName MSK-WKS2210

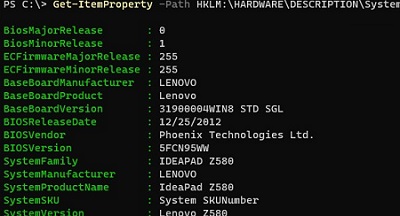
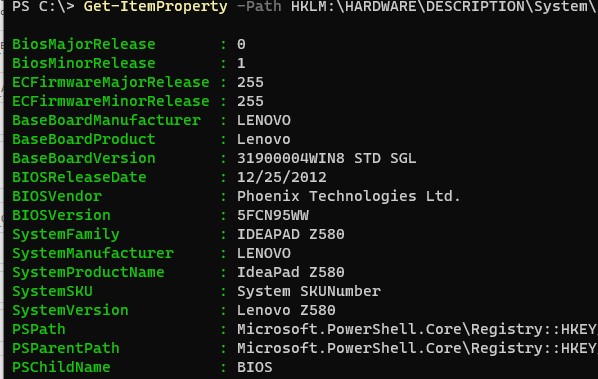
Информация о BIOS компьютера хранится в реестре Windows. Вы можете получить нужную информацию BIOS напрямую из реестра с помощью PowerShell:

Get-ItemProperty -Path HKLM:\HARDWARE\DESCRIPTION\System\BIOS

nayti-parametry bios/uefi хранятся в реестре

Класс Win32_BIOS является универсальным и может быть использован для получения базовой информации о BIOS на любом устройстве Windows.

Однако, некоторые производители оборудования предоставляют специальные WMI классы для обращения к BIOS из Windows (необходимо, чтобы на компьютере были установлены родные драйвера от производителя).

Получить и изменить настройки BIOS с помощью модуля Get-BIOS

Для получения настроек BIOS/UEFI брендовые компьютеров Dell, HP, Lenovo, Toshiba можно использовать отдельный модуль из PSGallery, который называется Get-BIOS.

Установите модуль из онлайн галереии PowerShell (также вы можете установить PowerShell модуль офлайн):

Install-Module GetBIOS

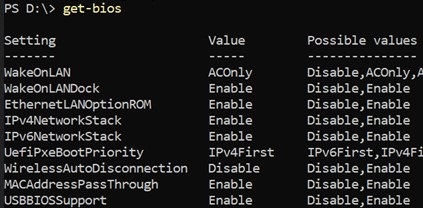
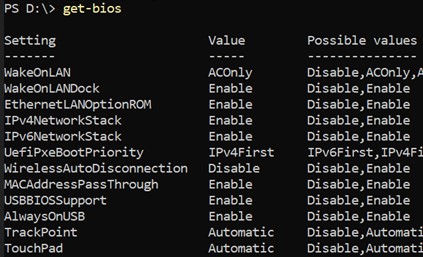
Чтобы вывести настройки BIOS вашего компьютера, выполните команду:

Get-BIOS

get-bios вывести настройки BIOS с помощью PowerShell

На компьютерах Dell можно вывести описание настроек BIOS с помощью параметра:

Get-BIOS -ShowDescription

Также от этого же разработчика есть модуль, который позволяет изменить настройки BIOS на устройствах Dell/Lenovo/HP.

Install-Module SetBIOS

Для изменения настроек BIOS вашего устройства, нужно сформировать CSV файл в формате {Setting, Value}.

Чтобы применить CSV файл с натсройками BIOS, выполните команду:

Set-BIOS -Path "YourPath.csv"

Если BIOS защищен паролем, добавьте в параметр -Password.

Управление BIOS из PowerShell на компьютерах Lenovo

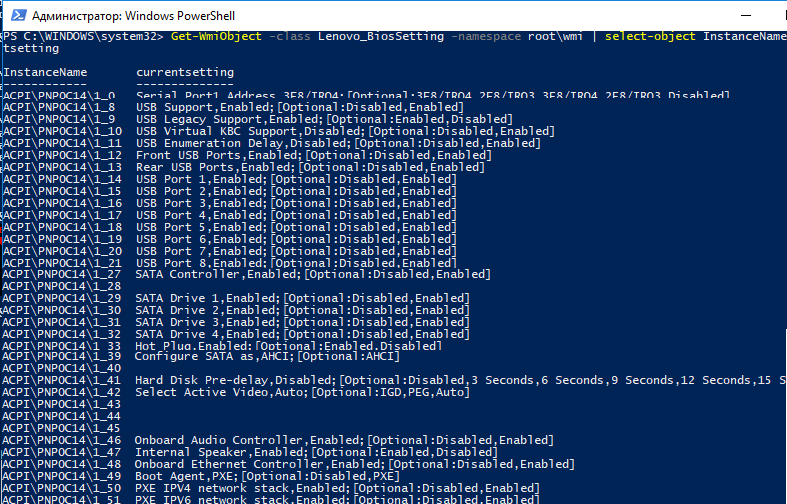
На компьютерах Lenovo текущие настройки BIOS хранятся в оттельном WMI классе. Вы можете вывести список параметров BIOS и их текущие значения так:

Get-WmiObject -class Lenovo_BiosSetting -namespace root\wmi | select-object InstanceName, currentsetting

Получить настройки BIOS на компьютере Lenovo из Powershell

Проверим, что на компьютере Lenovo установлен пароль для входа в BIOS:

(gwmi -Class Lenovo_BiosPasswordSettings -Namespace root\wmi).PasswordState

Если команда вернула 0, значит пароль для входа в BIOS не установлен.

проверить наличие пароля BIOS Lenovo_BiosPasswordSettings - data-lazy-src=

Изменить пароль BIOS на устройстве:

(gwmi -Class Lenovo_SetBiosPassword -Namespace root\wmi).SetBiosPassword("pap,oldPassword,newPassword,ascii,us")

Вы можете изменить некоторые параметры BIOS на компьютерах Lenovo. Например, включим на компьютере WOL:

$getLenovoBIOS = gwmi -class Lenovo_SetBiosSetting -namespace root\wmi
$getLenovoBIOS.SetBiosSetting("WakeOnLAN,Enable")
$SaveLenovoBIOS = (gwmi -class Lenovo_SaveBiosSettings -namespace root\wmi)
$SaveLenovoBIOS.SaveBiosSettings()

Сбросить настройки BIOS устройства Lenovo на заводские:

$DefaultSettings = Get-WmiObject -Namespace root\wmi -Class Lenovo_LoadDefaultSettings
$DefaultSettings.LoadDefaultSettings("CurrentBIOSPassword,ascii,us")

Доступ к настройкам BIOS из PowerShell на компьютерах Hewlett-Packard

На компьютерах/ноутбуках от HP можно использовать следующую команду для получения параметров BIOS, их значений и доступных опций:

Get-WmiObject -Namespace root/hp/instrumentedBIOS -Class hp_biosEnumeration | select Name, value, possiblevalues –AutoSize

Вы можете изменить некоторые настройки BIOS на компьютерах HP из PowerShell. Например, отключить загрузку компьютера с USB устройств.

$getHPBios = gwmi -class hp_biossettinginterface -Namespace "root\hp\instrumentedbios"
$getHPBios.SetBIOSSetting('USB Storage Boot','Disable')

Если для изменения настроек BIOS требуется указать пароль, вы можете использовать следующий скрипт:

$HPBIOSPassword = "<utf-16/>"+"P@$$w0rd"
$getHPBios = gwmi -class hp_biossettinginterface -Namespace "root\hp\instrumentedbios"
$getHPBios.SetBIOSSetting(‘Network (PXE) Boot','Disable',$HPBIOSPassword)

Если последняя команда вернула “Return 0”, значит она отработала успешно. Можно сделать простейший обработчик:

$ChangeBIOS_State = $bios.setbiossetting(Network (PXE) Boot', 'Disable' , $HPBIOSPassword)
$ChangeBIOS_State_Code = $ChangeBIOS_State.return
If(($ChangeBIOS_State_Code) -eq 0)
{
write-host "OK"
}
Else
{
write-host "Error - (Return code $ChangeBIOS_State_Code)" -Foreground Red
}

Если вы хотите включить в BIOS LAN/WLAN Switching на ноутбуке HP для автоматического отключения от Wi-FI при наличии Ethernet подключения, выполните команду:

$getHPBios.SetBIOSSetting('LAN/WLAN Switching','Enable')

Кроме того, вы можете установить на устройство Hewlet Packard расширение HP Client Management Script Library, CMSL (https://www.hp.com/us-en/solutions/client-management-solutions/download.html). В состав CMSL входят несколько PowerShell модулей, который позволяют получить или изменить настройки BIOS/UEFU, обновить прошивку и т.д.

Экспорт настроек BIOS в текстовый файл:

Get-HPBIOSSettingsList | Out-File -FilePath ‘C:\ProgramData\HP\CMSL\Logs\CurrentBIOSSettings.txt’

Включить WLAN Auto Switch:

Set-HPBIOSSettingValue -Name "LAN/WLAN Auto Switching" -Value Enable -Password BiosPass000rd

Настройка BIOS на устройствах DELL из PowerShell

На компьютерах DELL для просмотра и управления параметрами BIOS вы можете использовать WMI класс DCIM-BIOSService или более новый класс root\dellomci (доступен после установки пакета OMCI — Open Manage Client Instrumentation).

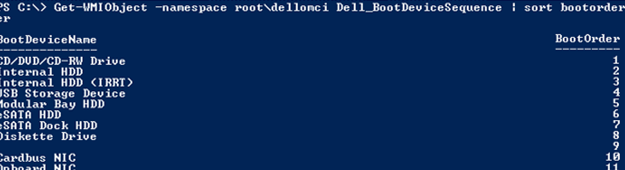
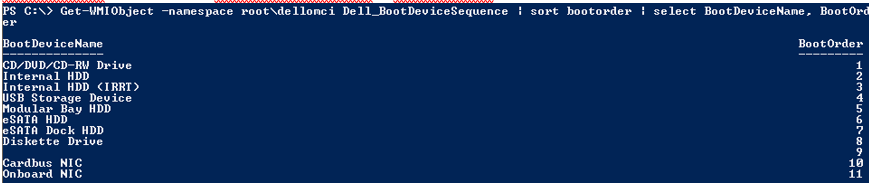
Чтобы вывести порядок использования загрузочных устройств в BIOS на компьютерах Dell, выполните:

Get-WmiObject -NameSpace root\dellomci Dell_BootDeviceSequence | sort bootorder | select BootDeviceName, BootOrder

класс dellomci для получения параметров bios на компьютерах DELL

Например, вы можете включить Wake on LAN в BIOS следующим образом:

(Get-WmiObject DCIM-BIOSService -namespace rootdcimsysman).SetBIOSAttributes($null,$null,"Wake-On-LAN","4")

Кроме того, для компьютеров Dell можно использовать официальный PowerShell модуль DellBIOSProvider, который устанавливается при установке драйверов либо вы можете установить его вручную командой:

Install-Module -Name DellBIOSProvider -Force

С помощью этого модуля вы можете получить порядок загрузки на компьютере Dell:

Get-Item DellSmbios:\BootSequence\Bootsequence

Проверить, задан ли пароль BIOS:

Get-Item -Path DellSmbios:\Security\IsAdminPasswordSet

Изменить пароль BIOS на устройстве Dell:

Set-Item -Path Dellsmbios\Security\AdminPassword –Value 0ldDellP@ss –Password Newde11P@ss

Мы рассмотрели, как получить и изменить настройки BIOS на устройствах Windows с помощью PowerShell. Это позволит вам стандартизировать настройки BIOS/UEFI на всех компьютерах в вашей сети (с помощью SCCM, Intune, MDT, и т.д.

Every computer has a BIOS that starts the computer. We can configure different hardware settings in BIOS. To access BIOS, press the F2, F12 or DEL keys depending upon the manufacturer of the computer.

By definition, Basic Input/ Output System (BIOS) is a set of computer instructions within the firmware that controls the inputs and the outputs of the computer. It can be referred to as a series of algorithms for the hardware of the computer to function accordingly, that is controlled by the software. The microprocessor within the computer also performs its functions with the aid of the BIOS.

Some information in BIOS is valuable and is needed by the user from time to time. This includes computer serial no., asset tag, BIOS version, etc.

The problem is that the user has to restart the computer to access BIOS. It can’t be accessed directly from Windows.

There is a way by which we can extract some useful information from the computer BIOS. Let’s discuss:

Access BIOS information from Within Windows 10 using PowerShell

Go to the Start Menu and search for PowerShell. Right-Click Windows PowerShell and select Run as Administrator.

Run the following command in PowerShell to view all current BIOS settings:

Get-WmiObject -Class Win32_BIOS | Format-List *
image 11

Some other useful information can also be obtained from PowerShell by using various commands.

If you wish to get computer Serial Number or Asset Tag, enter the following command:

Get-wmiobject Win32_systemenclosure

View BIOS information from Within Windows 10 using Command Prompt

To only get the Serial Number, use the following command:

wmic bios get serialnumber

If you wish to obtain the BIOS version, enter the following command:

wmic bios get smbiosbiosversion

A number of individualized information can be obtained from the BIOS. A list is automatically generated by the following command that suggests what commands you may enter to get the relevant information:

wmic bios get /? 
image 17

In the image shown above, it can be seen that the command has displayed a list of words that can replace the “/?” in the command wmic bios get /?. For example, if you wish to obtain the status of the machine, simply put in the following command:

wmic bios get status 

Moreover, another useful information that can be obtained is the memory (RAM) of the computer. This can be acquired from within the Windows PowerShell with the following command:

wmic memorychip get capacity

The displayed information will be of individual memory cards and the number will be displayed in bytes, as in the example below:

image 18

I hope this will be useful if you want to get information from BIOS while running Windows 10 and don’t want to restart the computer.

Is this information helpful for you? What type of information do you normally require from BIOS?

 
You should not be confused with UEFI, actually, it is the short form for the Unified Extensible Firmware Interface. and just after booting Windows 10 PC, you see the text written Press Del to Enter Setup which guides to open UEFI. But due to fast Startup, it is just uninterruptible. So you need to discover another way to go to UEFI BIOS in Windows 10. So we are writing the Windows 10 tips here to show you How to Access UEFI (BIOS) Settings on Windows 10. The tips are working for Windows 8 and 8.1 too.

In the coming passages, you will read How to Access UEFI (BIOS) Settings on Windows 10. Certain approaches are valid and functional for the sake of the former editions as 8 moreover 8.1 too.

You may like to Read:

How to Create Windows To Go Startup Options Shortcut Manually

How to Access UEFI (BIOS) Settings on Windows 10

Usually, you can access it as it was in Windows 8/8.1 it has a little bit different. Let us see how:

  • On Windows 10, tap on Start symbol at the taskbar.
  • Check for Settings and click the same option to navigate it on your screen.
  • On the home page, take the option Update & Security.
  • Under Update and Security, choose a Recovery option. Then you will see the Advance Startup on the right partition of the screen. And click on Restart now button.

Note: When you click Restart now tab your PC will start to boot and it may take few minutes to again restart.

  • During rebooting it will bring you to Advance Startup Screen, there hit the Troubleshoot option.
  • Under troubleshoot, tap on Advanced Options at the bottom part.
  • The screen shows 5 choices. Go along with Startup Settings.
  • On the next screen. you see a group of 7 options. Restart without doing anything. Restarting your system will bring these options allocated with function keys.
  • Your display showcases 9 different options here and for each, one function key from F1 to F9 is assigned. To choose any one of these you need to press the concerned function key. F10 brings more options and Enter takes you to OS.
  • When you press F10 anymore you get Launch Recovery Environment.

Now, you need to know that UEFI interface which was present in earlier versions has gone. But you get Launch Recovery Environment.

You can use PowerShell to view or change BIOS/UEFI settings on a Windows computer. In this article, we will look at how to use Windows PowerShell to get or change computer BIOS settings on regular computers and on popular brand devices  (HP, Lenovo, Dell, and Toshiba).

Contents:

  • Check BIOS/UEFI Version with PowerShell
  • How to Get or Change BIOS Settings with the Get-BIOS Module
  • List BIOS Settings on Lenovo Device with PowerShell
  • PowerShell: List and Change BIOS Settings on HP Computers
  • Configure DELL BIOS Settings with PowerShell

Check BIOS/UEFI Version with PowerShell

The WMI class Win32_BIOS provides basic information about the computer’s BIOS (UEFI). You can use the Get-WmiObject cmdlet to get BIOS information from WMI (Windows Management Instrumentation).

Get-WmiObject -Class Win32_BIOS

By default, the command returns information about the BIOS version (SMBIOSBIOSVersion), manufacturer, serial number, and computer model.

To view the full list of BIOS parameters that are available in the Win32_BIOS WMI class, use the command:

Get-WmiObject -Class Win32_BIOS | Format-List *

Get-WmiObject Win32_BIOS

You can view only the BIOS settings you are interested in. For example, BIOS version, computer serial number, manufacturer, and release date:

Get-WmiObject -Class Win32_BIOS | Select SMBIOSBIOSVersion, Manufacturer, SerialNumber, ReleaseDate

You can also get BIOS information from a remote computer:

Get-WmiObject -Class Win32_BIOS -ComputerName MUN-WKS41

Computer BIOS information is stored in the Windows registry. You can get BIOS information directly from the registry using PowerShell:

Get-ItemProperty -Path HKLM:\HARDWARE\DESCRIPTION\System\BIOS

get bios version from registry

The Win32_BIOS is a generic class that can be used to get basic BIOS information on any Windows device. However, some hardware vendors provide special WMI classes to access the BIOS directly from the Windows OS (you will need to install the manufacturer’s native drivers.).

How to Get or Change BIOS Settings with the Get-BIOS Module

You can use a separate module of PSGallery called Get-BIOS to get BIOS/UEFI settings for Dell, HP, Lenovo, and Toshiba computers.

Install the module from the PowerShell online gallery (PowerShell modules can be installed offline):

Install-Module GetBIOS

To view your computer’s BIOS settings, run the command:

Get-BIOS

list bios (uefi) settings with powershell

With some versions of the BIOS, you can display not only the current value of the BIOS parameter but also its description and the possible values:

Get-BIOS -ShowDescription

There is also a module from the same developer that allows you to change the BIOS settings on Dell, Lenovo, and HP machines.

Install-Module SetBIOS

You need to create a CSV file in the following format to change your device’s BIOS settings: {Setting, Value}.

In order to apply a CSV file containing the BIOS settings, run the following command

Set-BIOS -Path "YourBIOSSettingsFile.csv"

If the BIOS is password protected, add -Password to the option.

List BIOS Settings on Lenovo Device with PowerShell

Current BIOS settings are stored in a separate WMI class on Lenovo computers. You can list the available BIOS options and their values on the Lenovo device:

Get-WmiObject -class Lenovo_BiosSetting -namespace root\wmi | select-object InstanceName, currentsetting

list all Lenovo_BiosSetting using powershell

Let’s check if the BIOS password is set on your Lenovo computer:

(gwmi -Class Lenovo_BiosPasswordSettings -Namespace root\wmi).PasswordState

If the command returned 0, then the BIOS security password is not set.

powershell Lenovo_BiosPasswordSettings

Change BIOS admin password on your Lenovo device:

(gwmi -Class Lenovo_SetBiosPassword -Namespace root\wmi).SetBiosPassword("pap,oldPassword,newPassword,ascii,us")

You can change some BIOS parameters on Lenovo computers. For example, let’s enable WOL (Wake-On-LAN):

$getLenovoBIOS = gwmi -class Lenovo_SetBiosSetting -namespace root\wmi
$getLenovoBIOS.SetBiosSetting("WakeOnLAN,Enable")
$SaveLenovoBIOS = (gwmi -class Lenovo_SaveBiosSettings -namespace root\wmi)
$SaveLenovoBIOS.SaveBiosSettings()

Reset your Lenovo device’s BIOS settings to factory defaults:

$DefaultSettings = Get-WmiObject -Namespace root\wmi -Class Lenovo_LoadDefaultSettings
$DefaultSettings.LoadDefaultSettings("CurrentBIOSPassword,ascii,us")

PowerShell: List and Change BIOS Settings on HP Computers

You can list the available BIOS options, their values, and available options on Hewlett Packard computers/laptops using the following command:

Get-WmiObject -Namespace root/hp/instrumentedBIOS -Class hp_biosEnumeration | select Name, value, possiblevalues –AutoSize

On HP computers, you can use PowerShell to change some BIOS settings. For example, you can disable the ability to boot your computer from a USB storage device.

$getHPBios = gwmi -class hp_biossettinginterface -Namespace "root\hp\instrumentedbios"
$getHPBios.SetBIOSSetting('USB Storage Boot','Disable')

If a password is required to change BIOS settings on an HP device, you can use this script:

$HPBIOSPassword = "<utf-16/>"+"Passw0rd!1"
$getHPBios = gwmi -class hp_biossettinginterface -Namespace "root\hp\instrumentedbios"
$getHPBios.SetBIOSSetting(‘Network (PXE) Boot','Disable',$HPBIOSPassword)

If the last command has returned “0”, it was successfully executed. You can use a simple PowerShell handler:

$ChangeBIOS_State = $bios.setbiossetting(Network (PXE) Boot', 'Disable' , $HPBIOSPassword)
$ChangeBIOS_State_Code = $ChangeBIOS_State.return
If(($ChangeBIOS_State_Code) -eq 0)
{
write-host "OK"
}
Else
{
write-host "Error - (Return code $ChangeBIOS_State_Code)" -Foreground Red
}

If you want to enable the LAN/WLAN Switching in BIOS on an HP laptop to automatically disconnect from Wi-Fi when an Ethernet connection is available, run this command:

$getHPBios.SetBIOSSetting('LAN/WLAN Switching','Enable')

You can also install the HP Client Management Script Library (CMSL) extension on your Hewlett-Packard device (https://www.hp.com/us-en/solutions/client-management-solutions/download.html). CMSL includes several PowerShell modules that allow you to get or change BIOS/UEFU settings, update firmware, etc.

Export the current BIOS settings to a text file:

Get-HPBIOSSettingsList | Out-File -FilePath ‘C:\ProgramData\HP\CMSL\Logs\CurrentBIOSSettings.txt’

Enable the WLAN Auto Switching option in the HP BIOS settings:

Set-HPBIOSSettingValue -Name "LAN/WLAN Auto Switching" -Value Enable -Password BiosPass000rd

Configure DELL BIOS Settings with PowerShell

You can view and manage BIOS settings on DELL computers using the DCIM-BIOSService WMI class or the modern root\dellomci class (available after installing OMCI, Open Manage Client Instrumentation).

To view the boot device order in BIOS on Dell computers, run the following command:

Get-WmiObject -NameSpace root\dellomci Dell_BootDeviceSequence | sort bootorder | select BootDeviceName, BootOrder

dellomci class to view and change bios setting on dell computers with powershell

For example, you can enable Wake on LAN in the BIOS like this:

(Get-WmiObject DCIM-BIOSService -namespace rootdcimsysman).SetBIOSAttributes($null,$null,"Wake-On-LAN","4")

In addition, for Dell computers, you can use the official DellBIOSProvider PowerShell module, which is installed as part of the driver installation process, or you can manually install it with the command:

Install-Module -Name DellBIOSProvider -Force

For example, you can use this module to get the boot order on your Dell computer:

Get-Item DellSmbios:\BootSequence\Bootsequence

Check that the BIOS password is set:

Get-Item -Path DellSmbios:\Security\IsAdminPasswordSet

Change BIOS security password on a Dell device:

Set-Item -Path Dellsmbios\Security\AdminPassword –Value BadDellPa$$ –Password G00dDe11P@ss

We had a look at how to use PowerShell to get and change BIOS settings on Windows devices.  This allows you to unify the BIOS/UEFI settings on all your computers (using SCCM, Intune, MDT, etc.).

Понравилась статья? Поделить с друзьями:
0 0 голоса
Рейтинг статьи
Подписаться
Уведомить о
guest

0 комментариев
Старые
Новые Популярные
Межтекстовые Отзывы
Посмотреть все комментарии
  • Trello приложение для windows
  • Именно в этом году вышла операционная система windows 95 напишите ответ
  • Как запустить недетские сказки на windows 10
  • Не удалось вычислить индекс производительности windows для этой системы как исправить
  • Как подключиться к windows server по ssh