
-
Home
-
Partition Magic
- How to View Windows 10 Crash Logs and Error Logs
By Irene |
Last Updated
When you computer crashes, a crash log will be generated, which can help you analyze the causes of the crash. But, do you know how to view Windows 10 crash logs and error logs? If you don’t know, don’t worry. This article from MiniTool will show you how to view Windows 10 crash log with two methods.
Method 1. View Windows 10 Crash Logs with Event Viewer
To view Windows 10 crash logs, you can make use of the built-in tool Event Viewer, which keeps a log of application and system messages, errors, warnings, etc. You can follow the steps below to check Windows crash logs Windows 10 with Event Viewer.
Step 1. Type Event Viewer in the Windows 10 Cortana search box. Then right click the best match Event Viewer and choose Run as Administrator.
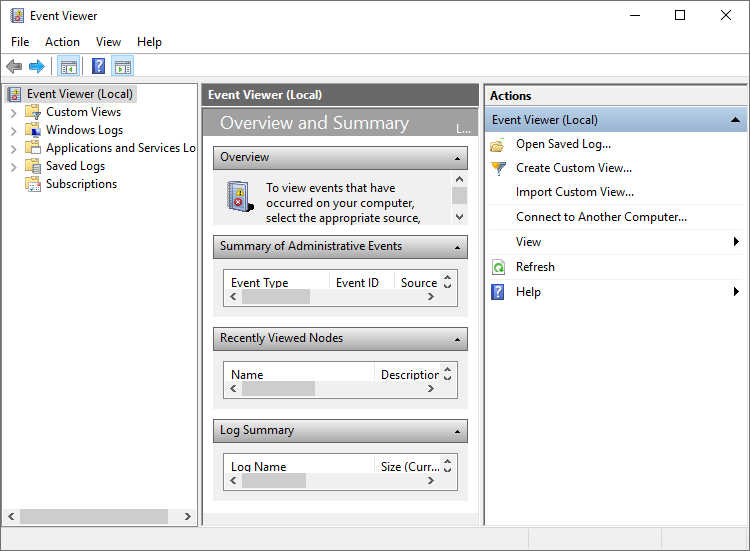
Step 2. Here is the main interface of Event Viewer. On the left side of the window, you can view all the Logs according to the category. To view Windows 10 crash logs such as the logs of blue screen error, just click on Windows Logs.
Step 3. Then choose System under Windows Logs.
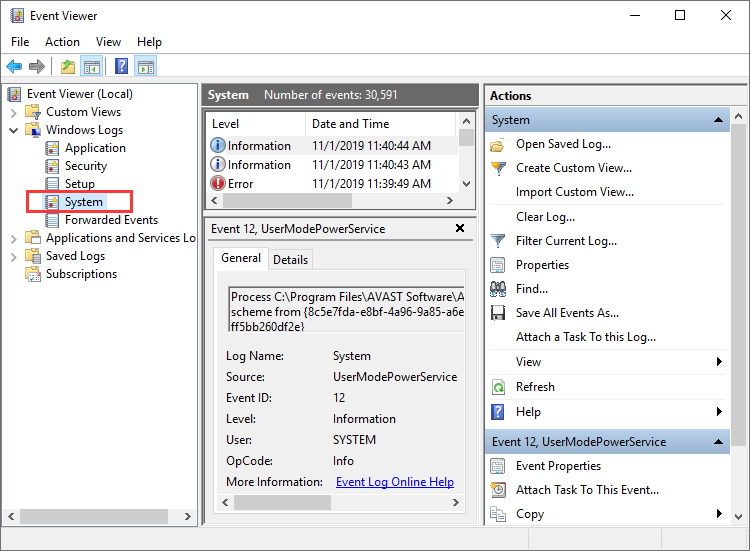
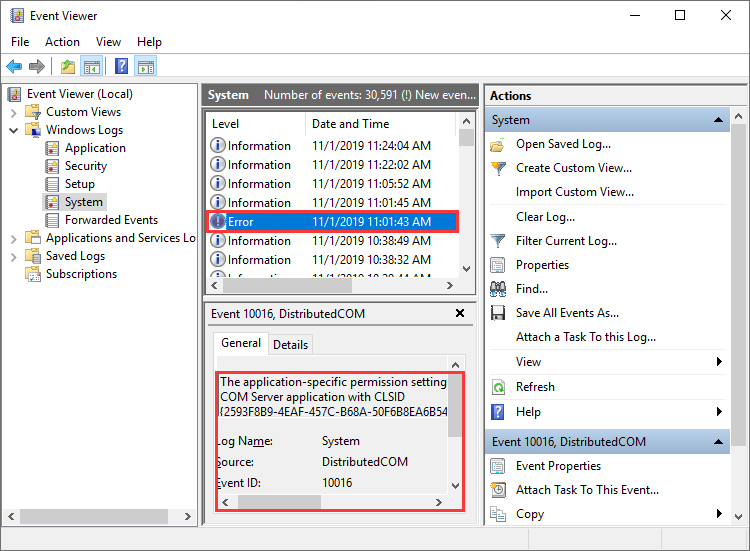
Step 4. Find and click Error on the event list. Then you can view the detailed crash log information shown up in the bottom of the window.
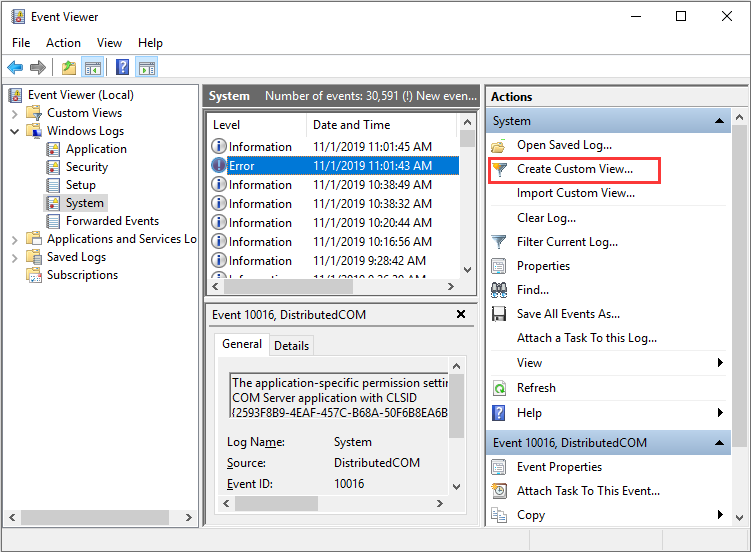
You can also create a custom view so you can view the crash logs more quickly. Here are steps on how to create a custom view.
Step 1. Click on Create a Custom View on the right window. As you click on Create Custom View, a new window will pop up.
Step 2. Choose a time period you want to view. Then check the boxes next Critical, Warning and Error in the Event levels section.
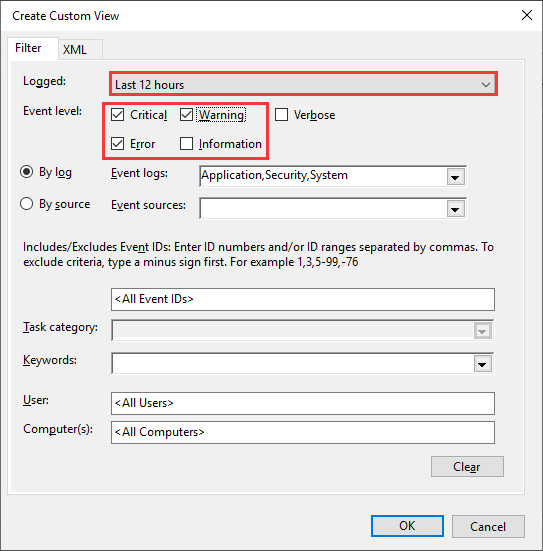
Step 3. Select the By log option. Then click the drop-down menu next to Event logs, and then select Application, Security and System.
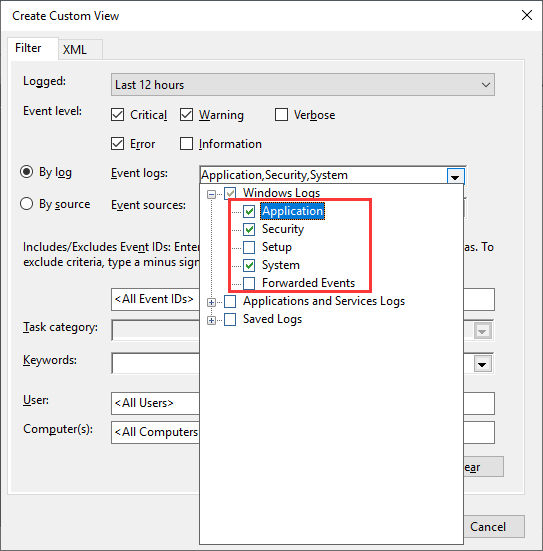
Step 4. Then click OK to save the settings.
Step 5. Name this custom view and then click OK to start to view the Windows 10 crash log.
Step 6. Then you can view all the Windows 10 crash logs during the tome period you select.

Windows Reliability Monitor also enables you to view recent system and application crashes. Here’s how to check Windows 10 crash logs with Reliability Monitor.
Method 2. View Windows 10 Crash Log with Reliability Monitor
Step 1. Type reliability in the Windows 10 Cortana search box. Then click the best match View reliability history.
Step 2. From the main interface, you can see that the Reliability Monitor window is arranged by dates. If Windows crashes or freezes, you will see a red circle with an “X” representing the failure, as shown below.
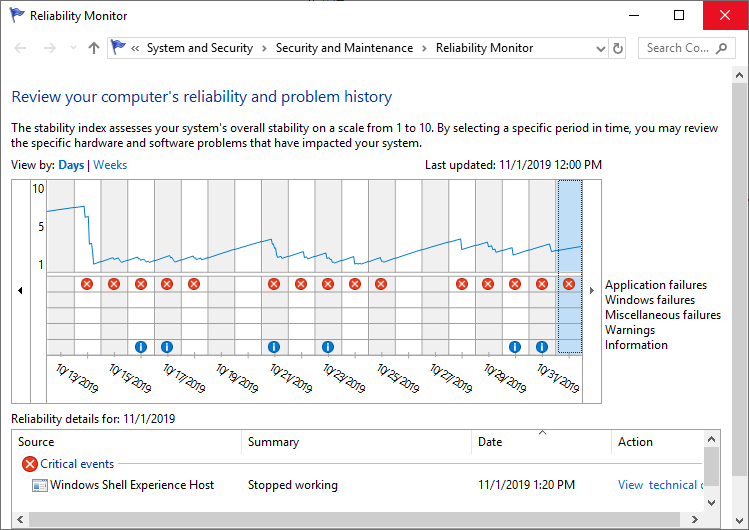
Step 3. If you want to view a certain day’s crash log, just click that day’s column and more detailed information will be displayed at the bottom. You can also double click one of the listed events to open a new window with more information.
Tips:
Discover and eliminate deceptive antivirus with MiniTool System Booster, your safeguard against digital threats.
MiniTool System Booster TrialClick to Download100%Clean & Safe
Conclusion
Event viewer and Reliability Monitor are all good for you to check Windows 10 crash logs. Choose a tool you like and you can get all the Windows crash log information.
About The Author
Position: Columnist
Irene joined MiniTool in 2018 and has since become a professional in the areas of disk management and Windows tricks. Irene’s expertise allows her to assist clients with managing their hard drives, optimizing their Windows operating system, and troubleshooting any technical issues that arise.
Has your computer with Windows 10 operating system just crashed suddenly and you are right now searching for a way to view crash logs in Windows 10 then you have come to the right place. This is where we can guide you on how you can check crash logs in Windows 10.

Table of Contents
Windows crash may be because of a lot of reasons like overheating of the system or some fault in the driver installed. This is where the crash logs option comes in use for you can see what has caused the crash and other info like the name of the log and the EventID.
What Causes Windows 10 to Crash?
The users that face this kind of crash the first time may think that the reason behind this might be confusing and it will not be worth it to know. But the point to focus on here is the fault might not be with the components of Windows 10 and there must be an external reason that you can check in Windows crash report.
- Issue in RAM: There is a high possibility that your computer RAM is not working at the optimum level and that is what causes your PC trouble in retrieving data from memory whensoever you are trying to do so.
- Overheated System: With low RAM size or any other compatibility issue in the motherboard you may face an overheating of the system that is causing your PC to crash or freeze.
- Incompatible Driver: It is a common habit to install new drivers for our system when our pre-installed drivers get outdated and start to make any function of the PC lag. But these drivers may in all possibility contain some viruses or bugs that can potentially harm and cause our system to crash.
- Issue with Hard Drive: Hard drives contain most of the data in your PC and any fault can create a situation that most probably will lead to a crash where a Windows 10 blue screen log is.
Microsoft’s investigation identifies the following as the primary reasons why Windows crashes:
- 70% of accidents are the result of rogue driver code.
- 10% of the total is accounted for by hardware issues.
- 15% of the cases include unknown causes.
- 5% of the issues are the result of Microsoft code.
You can check our guide to Fix Windows 10 Crashing Randomly.
Here, we have listed the ways to check crash logs in Windows 10.
Method 1: Through Event Viewer
Event viewer is an inbuilt app to view crash logs in Windows 10. You may view the event logs on your computer using the Event Viewer component of the Windows operating system. Application and system messages, such as informative messages, errors, warnings, etc., are logged by Event Viewer. You may identify the specific reasons why your computer crashes using Event Viewer and it is one of the easiest ways to get Windows crash reports.
1. Go to the Windows Cortana Search box and type Event Viewer. Click on Open.

2. Click on Windows log. This is where you will get all logs including Windows 10 blue screen log.

3. Then, choose System from the drop-down menu.

4. On the event list, click Error. Then you can view all the information about Windows crash reports.

Also Read: How to Clear All Event Logs in Event Viewer in Windows 10
Method 2: Through Reliability Monitor
There is another tool to get reliable information and view crash logs in Windows 10. It is called a Reliability Monitor and as the name suggests, it is a great choice to depend on in case your Windows 10 PC crashes. Below are the steps that will help you guide on how to use this to check crash logs in Windows 10.
1. Again, go to Windows 10 Cortana search box and type Reliability Monitor, and click on Open.

2. You will see on the interface Reliability Monitor is generating the report Please wait.

3. You will see Stability Index.

It assesses your overall system stability on a scale from 1 to 10. You can select any week or any day to review specific hardware or software problems that troubled your system. The horizontal line in blue will show you the score.
Note: stability index does not take into account warning and informational events when it calculates the stability score from 1 to 10.
The report records 3 failures which are application failure, Windows failure, and miscellaneous failure. Moreover, it records informational events and warnings. The table below shows how these failures, informational events, and warnings.
| Icon | Information it shows |
| Blue info icon | Informational events |
| Red cross icon | 3 failures |
| Yellow exclamation icon | Warning |
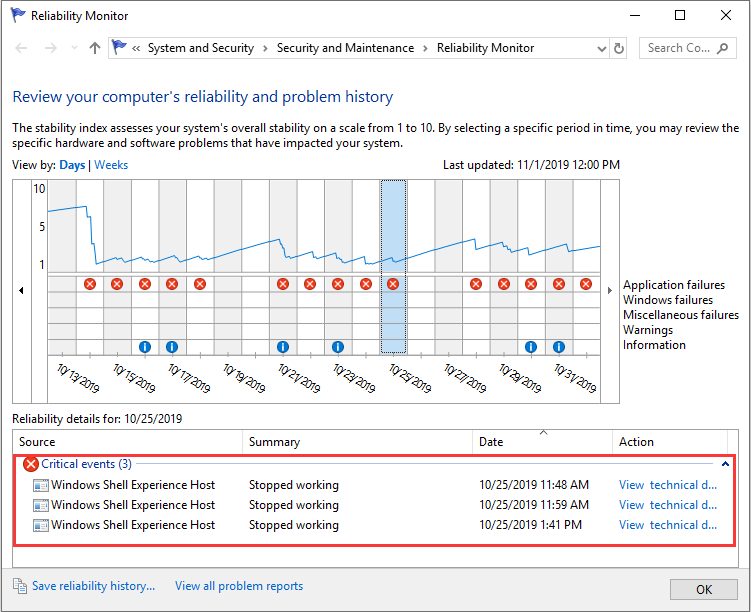
4. Then out of all these crash dates if you want any information about a particular date what you got to do is just, click on that date’s column. This will open a new window displaying all the information.

5. Click on View all problem reports.

Now, you will see all crash log details.

Also Read: Fix The Procedure Entry Point Error on Windows
Method 3: Through Windows PowerShell
Third and the final method to check cash logs in Windows 10 is using the Power Shell tool. Power Shell is a great application that is used in automating the management system with the use of a scripting language. Read below to understand how you can use this application to view crash logs in Windows 10.
1. Go to the Windows 10 Cortana search box and type PowerShell. Click on Open after finding the top search result.

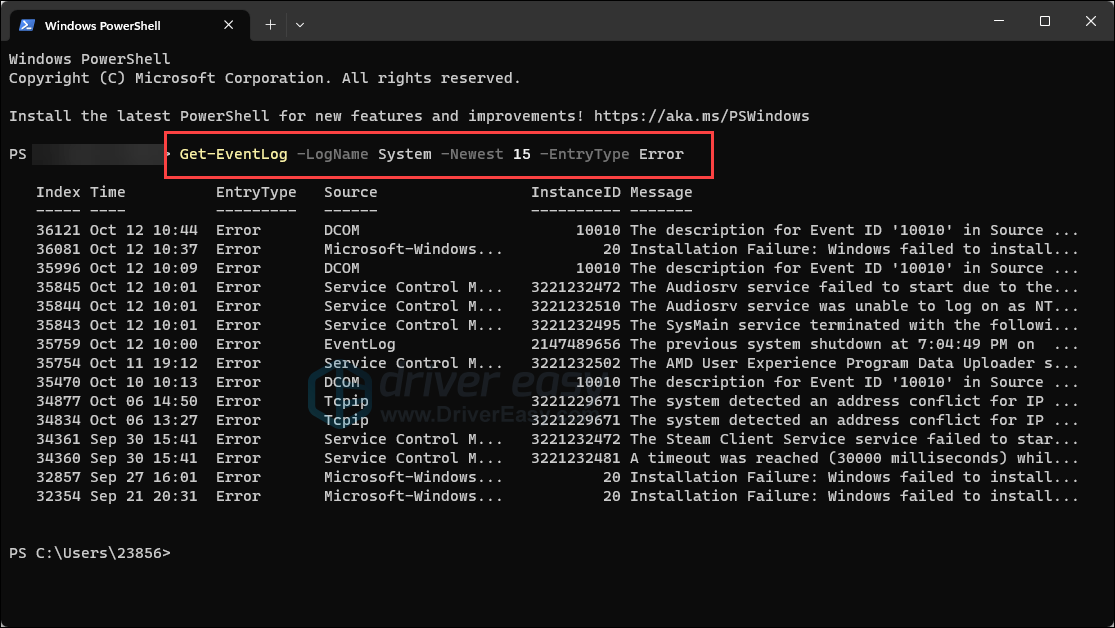
2. Type the following command into the command box. The crash logs will be retrieved together with their Index, Time, EntryType, Source, InstanceID, and Description using this command.
Get-EventLog -Log system | where {$_.entryType -match "Error"}

3. Get the most recent crash logs up to the specified number by using the Newest argument. Run the following command to collect the 20 most recent crash logs:
Get-EventLog -LogName System -Newest 20 -EntryType Error

Frequently Asked Questions (FAQs)
Q1. Where do I find information about my computer crashing?
Ans. You can use Event viewer which is an in-built app in Windows 10, you can also use reliability monitor which is a user-friendly application and you can also use PowerShell application which is an open-source CLI tool.
Q2. What are the most frequent crashes in Windows 10?
Ans. The three most frequent crashes in Windows OS are fault at the application level, the software hangs unexpected restart and shutdown. There are other reasons also but these are common reasons as per Microsoft investigation.
Q3. Where can I find crash log in Windows 11?
Ans. You can use Event Viewer to see the crash logs in Windows 11. In the event viewer app, move to the Windows log. Then search error and tap on the error. Detailed information will be shown for the error.
Q4. Why does my PC keep crashing and freezing?
Ans. There are a number of reasons for crashes and freezing. Some common reasons are overheating, issues with memory, faulty hardware and software, malicious files, corrupted system registry files, and too little available memory.
Recommended:
- Fix Windows Does Not Have Enough Information to Verify This Certificate Solutions
- Why is my Computer Making Funny Noises?
- Fix Hard Disk Problems in Windows 10
- Fix Event 1000 Application Error in Windows 10
The Windows PCs are designed in a way that they can store all the crash log information in your crash log so you can at any time view crash log information in Windows 10. We hope that these methods might have helped you to view crash logs in Windows 10.
Все способы:
- «Журнал ошибок» в Виндовс 10
- Включение логирования
- Запуск «Просмотра событий»
- Анализ журнала ошибок
- Вопросы и ответы: 5
Во время работы операционной системы, как и любого другого программного обеспечения, периодически возникают ошибки. Очень важно уметь анализировать и исправлять подобные проблемы, дабы в будущем они не появлялись снова. В ОС Windows 10 для этого был внедрен специальный «Журнал ошибок». Именно о нем мы и поговорим в рамках данной статьи.
«Журнал ошибок» в Виндовс 10
Упомянутый ранее журнал является лишь небольшой частью системной утилиты «Просмотр событий», которая по умолчанию присутствует в каждой версии Windows 10. Далее мы разберем три важных аспекта, которые касаются «Журнала ошибок» — включение логирования, запуск средства «Просмотр событий» и анализ системных сообщений.
Включение логирования
Для того чтобы система могла записывать все события в журнал, необходимо включить его. Для этого выполните следующие действия:
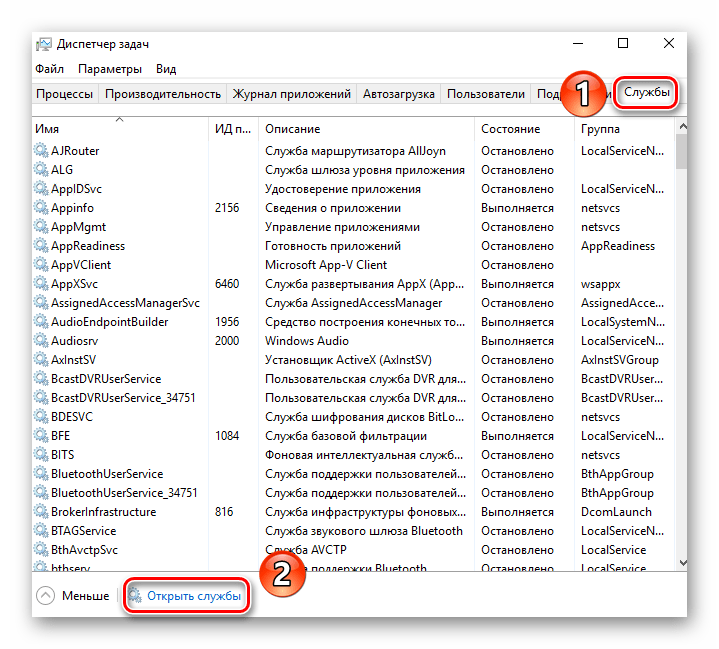
- Нажмите в любом пустом месте «Панели задач» правой кнопкой мышки. Из контекстного меню выберите пункт «Диспетчер задач».
- В открывшемся окне перейдите во вкладку «Службы», а затем на самой странице в самом низу нажмите кнопку «Открыть службы».
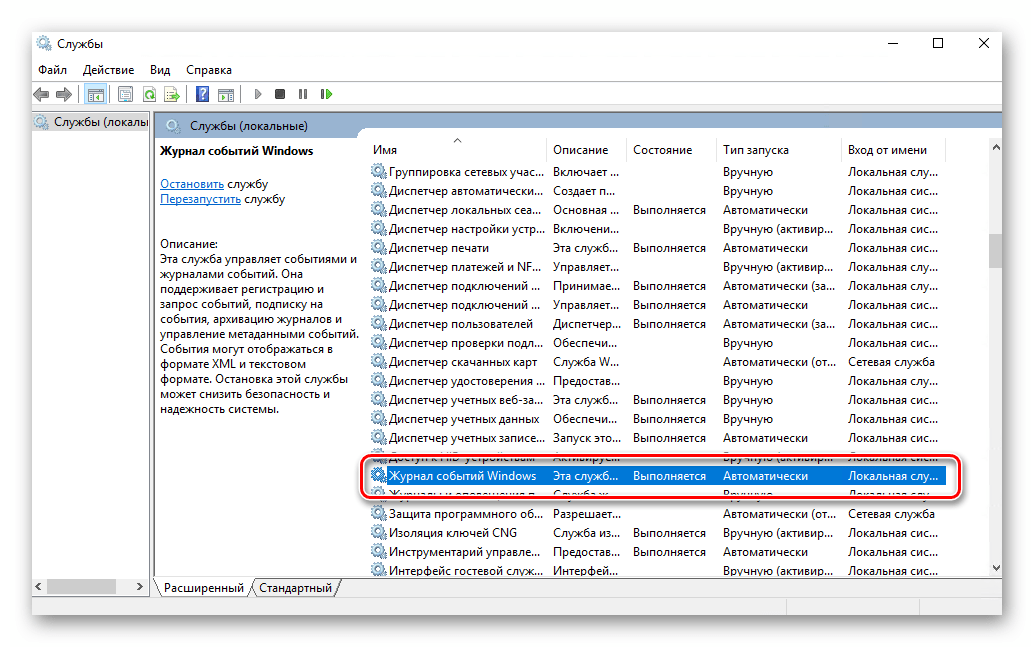
- Далее в перечне служб нужно найти «Журнал событий Windows». Убедитесь, что она запущена и работает в автоматическом режиме. Об этом должны свидетельствовать надписи в графах «Состояние» и «Тип запуска».
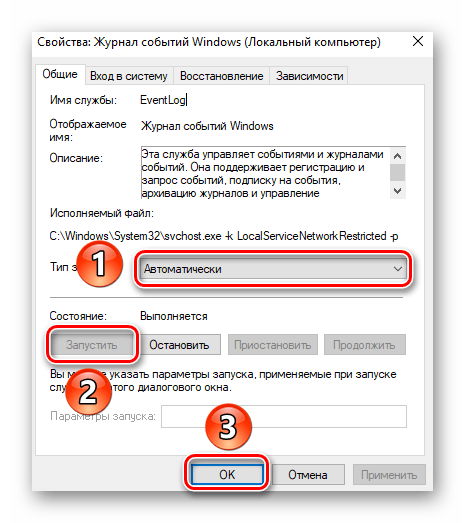
- Если значение указанных строк отличается от тех, что вы видите на скриншоте выше, откройте окно редактора службы. Для этого кликните два раза левой кнопкой мыши на ее названии. Затем переключите «Тип запуска» в режим «Автоматически», и активируйте саму службу путем нажатия кнопки «Запустить». Для подтверждения нажмите «OK».

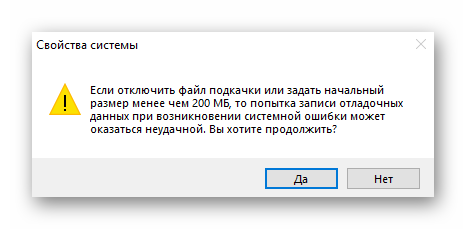
После этого остается проверить, активирован ли на компьютере файл подкачки. Дело в том, что при его выключении система попросту не сможет вести учет всех событий. Поэтому очень важно установить значение виртуальной памяти хотя бы 200 Мб. Об этом напоминает сама Windows 10 в сообщении, которое возникает при полной деактивации файла подкачки.
О том, как задействовать виртуальную память и изменить ее размер, мы уже писали ранее в отдельной статье. Ознакомьтесь с ней при необходимости.
Подробнее: Включение файла подкачки на компьютере с Windows 10
С включением логирования разобрались. Теперь двигаемся дальше.
Запуск «Просмотра событий»
Как мы уже упоминали ранее, «Журнал ошибок» входит в состав стандартной оснастки «Просмотр событий». Запустить ее очень просто. Делается это следующим образом:
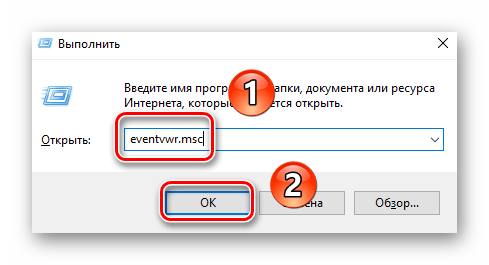
- Нажмите на клавиатуре одновременно клавишу «Windows» и «R».
- В строку открывшегося окна введите
eventvwr.mscи нажмите «Enter» либо же кнопку «OK» ниже.
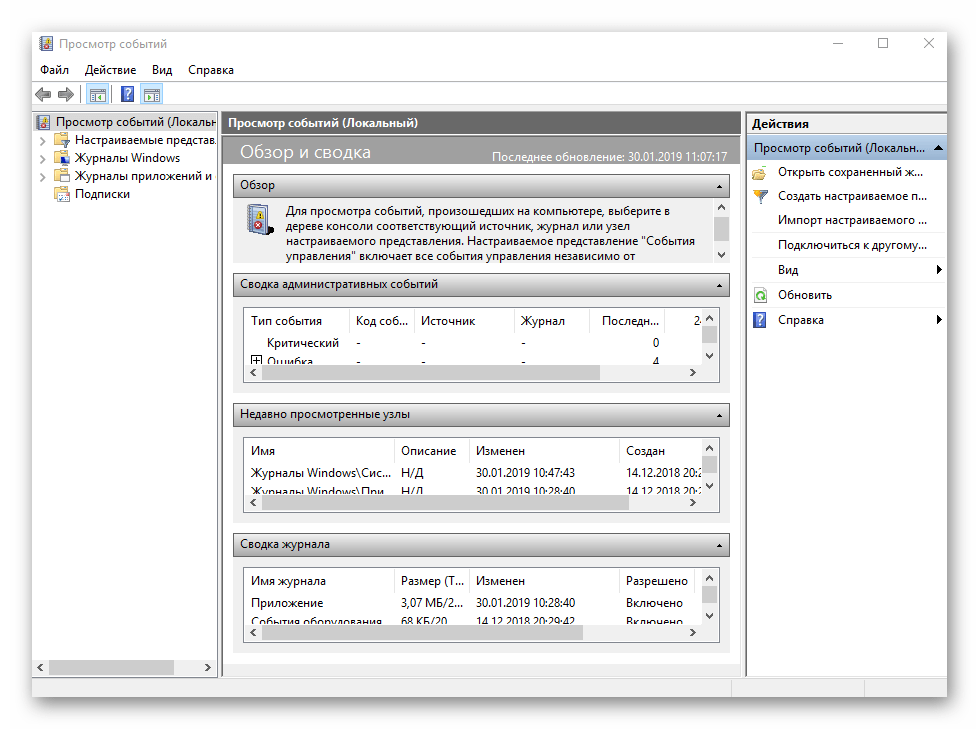
В результате на экране появится главное окно упомянутой утилиты. Обратите внимание, что существуют и другие методы, которые позволяют запустить «Просмотр событий». О них мы в деталях рассказывали ранее в отдельной статье.
Подробнее: Просмотр журнала событий в ОС Windows 10
Анализ журнала ошибок
После того как «Просмотр событий» будет запущен, вы увидите на экране следующее окно.
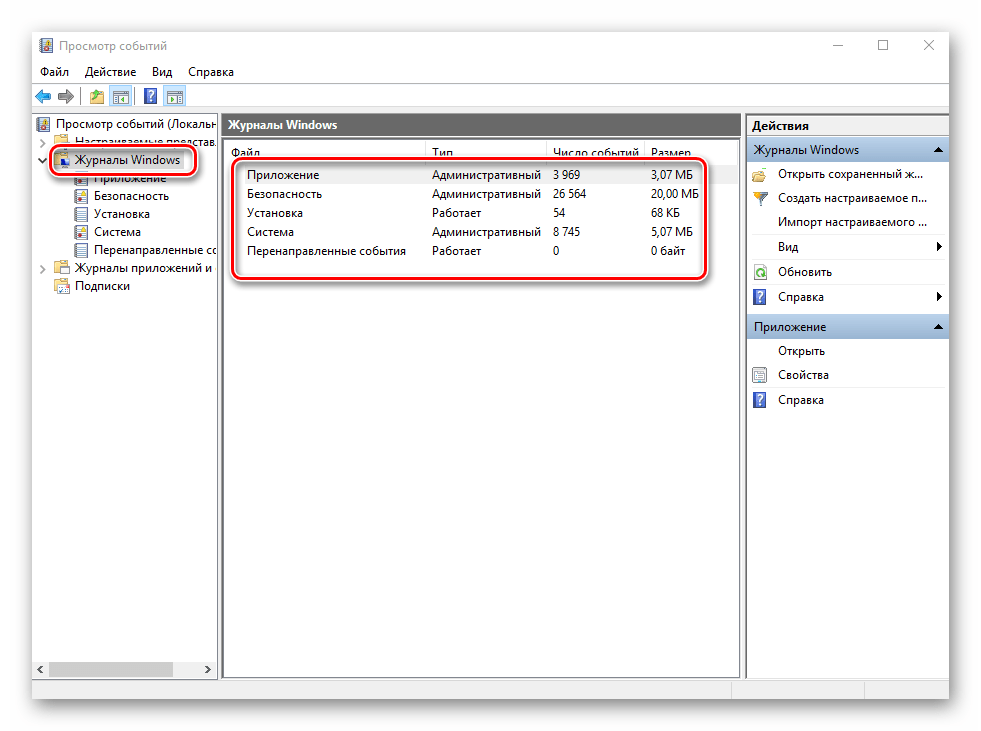
В левой его части находится древовидная система с разделами. Нас интересует вкладка «Журналы Windows». Нажмите на ее названии один раз ЛКМ. В результате вы увидите список вложенных подразделов и общую статистику в центральной части окна.
Для дальнейшего анализа необходимо зайти в подраздел «Система». В нем находится большой список событий, которые ранее происходили на компьютере. Всего можно выделить четыре типа событий: критическое, ошибка, предупреждение и сведения. Мы вкратце расскажем вам о каждом из них. Обратите внимание, что описать все возможные ошибки мы не можем просто физически. Их много и все они зависят от различных факторов. Поэтому если у вас не получится что-то решить самостоятельно, можете описать проблему в комментариях.
Критическое событие
Данное событие помечено в журнале красным кругом с крестиком внутри и соответствующей припиской. Кликнув по названию такой ошибки из списка, немного ниже вы сможете увидеть общие сведения происшествия.
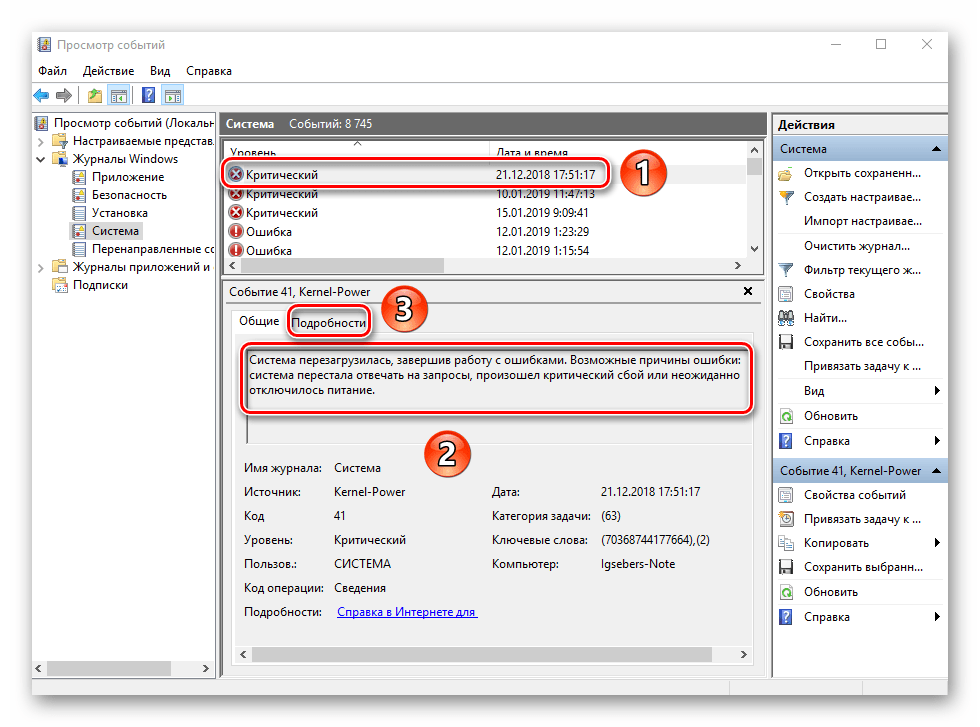
Зачастую представленной информации достаточно для того, чтобы найти решение проблемы. В данном примере система сообщает о том, что компьютер был резко выключен. Для того чтобы ошибка не появлялась вновь, достаточно просто корректно выключать ПК.
Подробнее: Выключение системы Windows 10
Для более продвинутого пользователя есть специальная вкладка «Подробности», где все событие представлены с кодами ошибок и последовательно расписаны.
Ошибка
Этот тип событий второй по важности. Каждая ошибка помечена в журнале красным кругом с восклицательным знаком. Как и в случае с критическим событием, достаточно нажать ЛКМ по названию ошибки для просмотра подробностей.
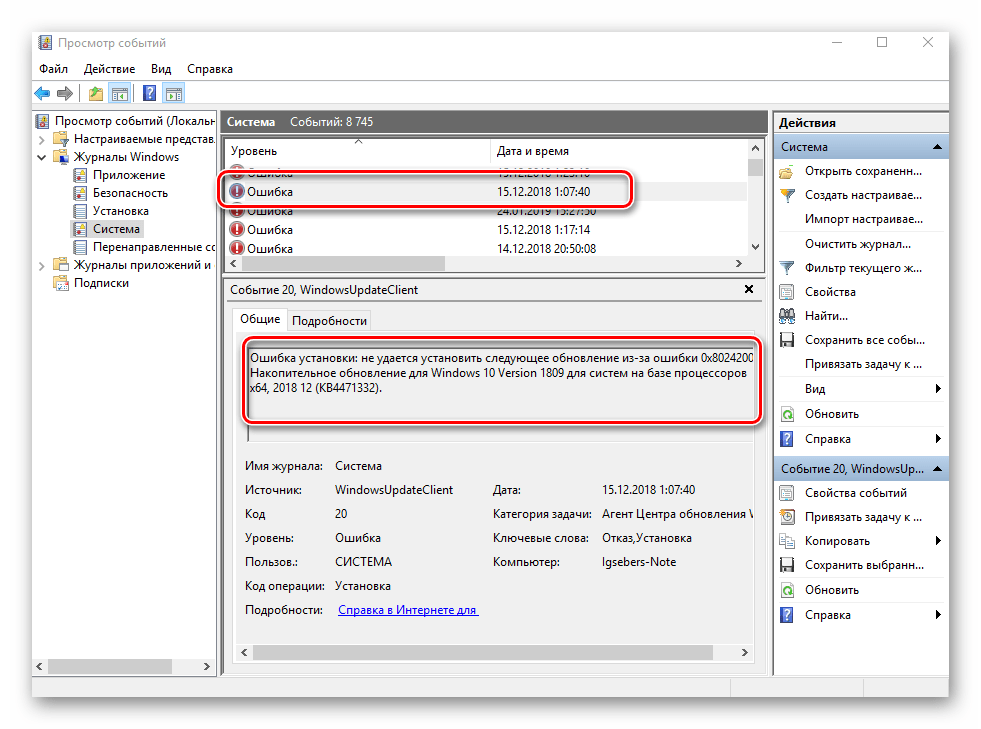
Если из сообщения в поле «Общие» вы ничего не поняли, можно попробовать найти информацию об ошибке в сети. Для этого используйте название источника и код события. Они указаны в соответствующих графах напротив названия самой ошибки. Для решения проблемы в нашем случае необходимо попросту повторно инсталлировать обновление с нужным номером.
Подробнее: Устанавливаем обновления для Windows 10 вручную
Предупреждение
Сообщения данного типа возникают в тех ситуациях, когда проблема не носит серьезный характер. В большинстве случаев их можно игнорировать, но если событие повторяется раз за разом, стоит уделить ему внимание.
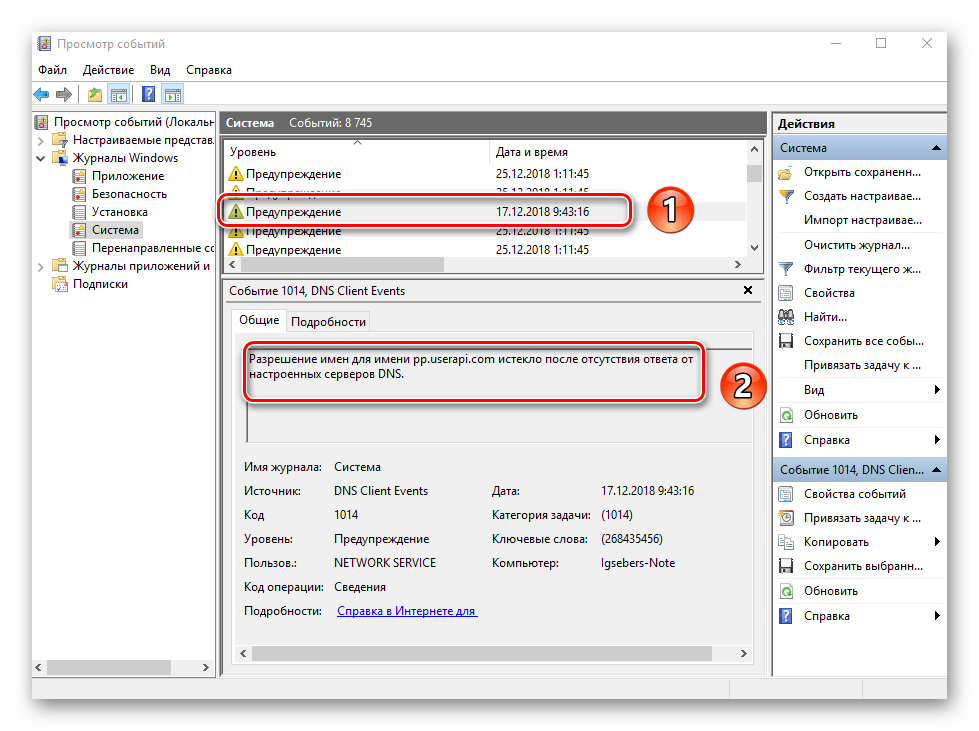
Чаще всего причиной появления предупреждения служит DNS-сервер, вернее, неудачная попытка какой-либо программы подключиться к нему. В таких ситуациях софт или утилита попросту обращается к запасному адресу.
Сведения
Этот тип событий самый безобидный и создан лишь для того, чтобы вы могли быть в курсе всего происходящего. Как понятно из его названия, в сообщение содержатся сводные данные о всех инсталлированных обновлениях и программах, созданных точках восстановления и т.д.
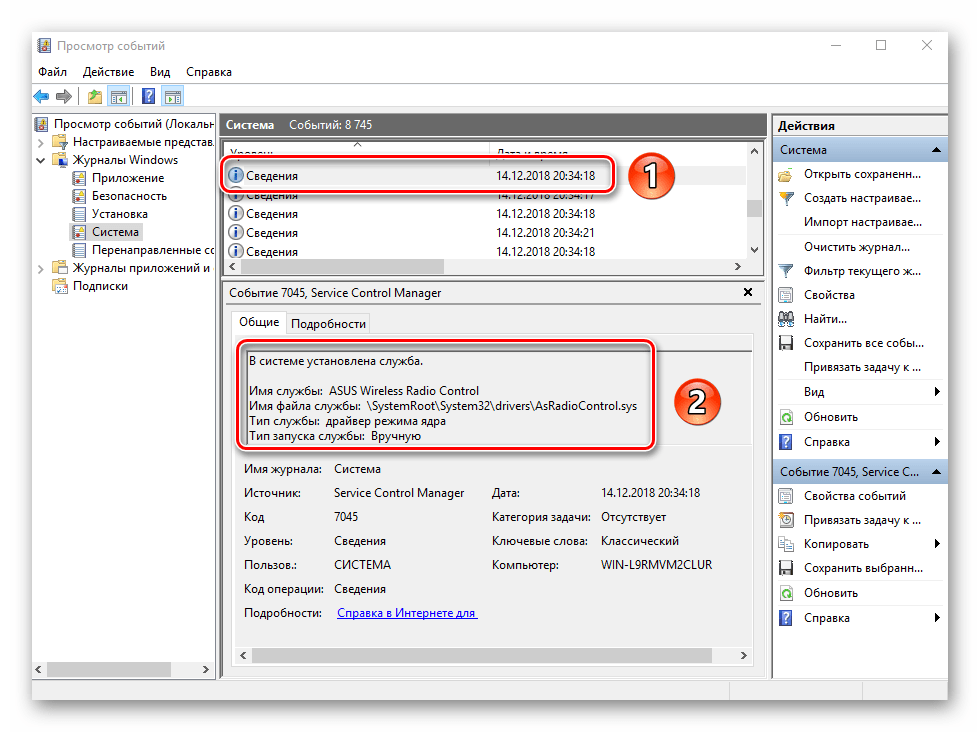
Подобная информация будет очень кстати для тех пользователей, которые не хотят устанавливать сторонний софт для просмотра последних действий Windows 10.
Как видите, процесс активации, запуска и анализа журнала ошибок очень прост и не требует от вас глубоких познаний ПК. Помните, что таким образом можно узнать информацию не только о системе, но и о других ее компонентах. Для этого достаточно в утилите «Просмотр событий» выбрать другой раздел.
Наша группа в TelegramПолезные советы и помощь
If your computer crashes or freezes a lot, or it turns itself off all of a sudden, or your games won’t launch out of nowhere, and you have no idea what’s going on, don’t worry, there are usually crash logs and reports saved in your computer that can help you identify the culprit, or at least get closer to the root cause. Here in this post, we’ll introduce 4 kinds of crash logs on Windows and how you can use them to identify the culprit to your computer software problems.
4 Kinds of Crash Logs on Windows
The following are 4 types of crash logs that you can find on Windows. You can check them all if necessary, and cross-check the information in these 4 tools to dig out the culprit, and eventually, solve the computer performance and reliability issues by yourself.
- View Crash Logs with PowerShell
- View Crash Logs with Event Viewer
- View Crash Logs with Reliability Monitor
- View Crash Logs with Minidump Files
1. View Crash Logs with PowerShell
To view Windows crash logs with PowerShell, here’s what you can do:
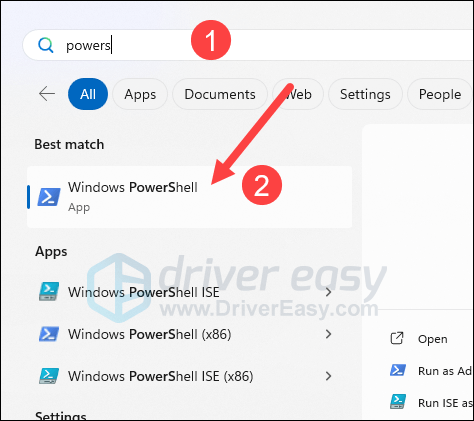
- On your keyboard, press the Windows key and type PowerShell, then select Windows PowerShell.

- Copy and paste this command
Get-EventLog -LogName System -Newest 15 -EntryType Errorto the PowerShell window and hit Enter.
- The latest 15 error entries will be listed for you to see. If you want to see more latest entries, just change the number 15 to whatever number you desire.
Note that this command only displays very basic information about the computer system issues, so if this is not detailed enough for you, please move on.
2. View Crash Logs with Event Viewer
Event Viewer keeps a detailed and chronological record of system, security, and application notifications, so it’s a good tool to narrow down any system problems and failures. To use Event Viewer:
2.1 Check Windows System Logs in Event Viewer
- On your keyboard, press the Windows key and the R key at the same time. Type eventvwr and hit Enter.

- Click Windows Logs, then System, and scroll down on the right panel to click the red exclamation entry you see, and you’ll find detailed information about this error underneath.


Most of the entries you see in Event Viewer are tagged with:
- Information (a white i mark),
- Warning (a yellow exclamation mark),
- Error (a red exclamation mark), or
- Critical (a red cross)
We suggest that you focus on the entries with a red cross only, i.e. the critical events, since Event Viewer can be a bit too sensitive when it comes to crash logs: most of the time, Warning and Error entries (yellow and red exclamations) merely mean something unexpected happened or didn’t happen. While the Information entries are just there to record events in Windows, purely informational.
So you can also choose to view the crash logs with only the Critical entries shown in the way follows.
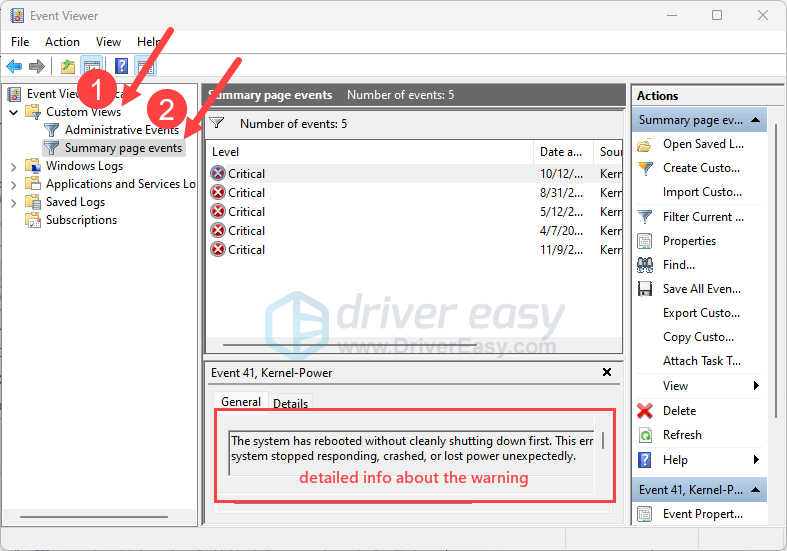
2.2 Check Critical events only in Event Viewer
- On your keyboard, press the Windows key and the R key at the same time. Type eventvwr and hit Enter.
- On the left panel, click Custom Views, then Summary page events, then you should see only the critical errors listed, with the detailed information listed underneath.

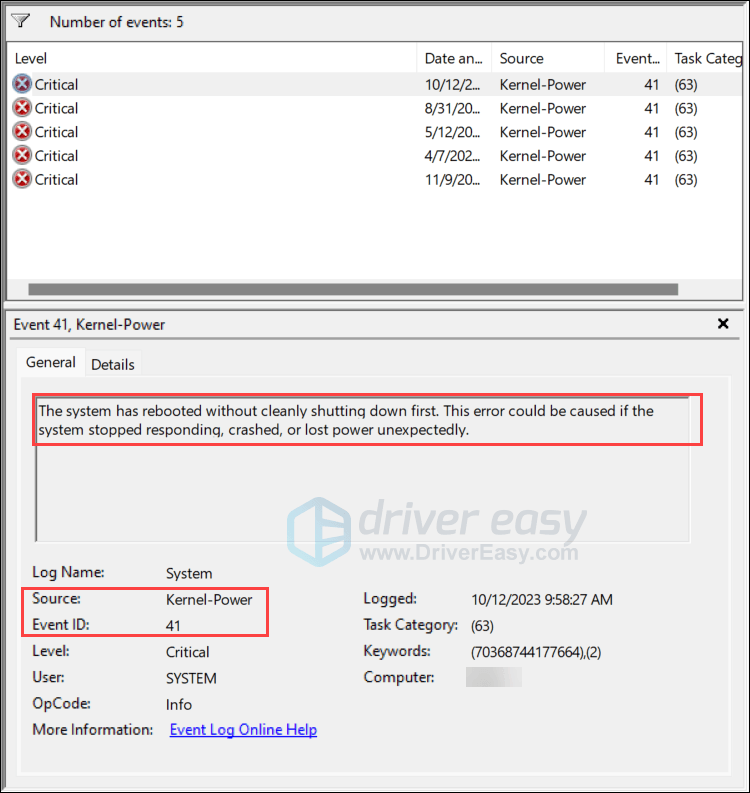
2.3 How to use the information in Event Viewer
In the detailed information section, you can refer to the information mentioned in the General section, which may be helpful sometimes. You can also check the Source and Event ID fields. For instance, mine is showing “Kernel-Power 41”, and if I do a Google search with this keyword combination, I’ll get a lot of results, with many of them mentioning power-related problems. Then I’ll know what to look at to fix this computer problem.
If there’s not much useful information that can be seen on your Event Viewer, you can move on to use the next tool.
3. View Crash Logs with Reliability Monitor
Reliability Monitor shows your Windows 10 system stability history at a glance. It also tracks critical events, warnings, and informational events on your computer. To use Reliability Monitor:
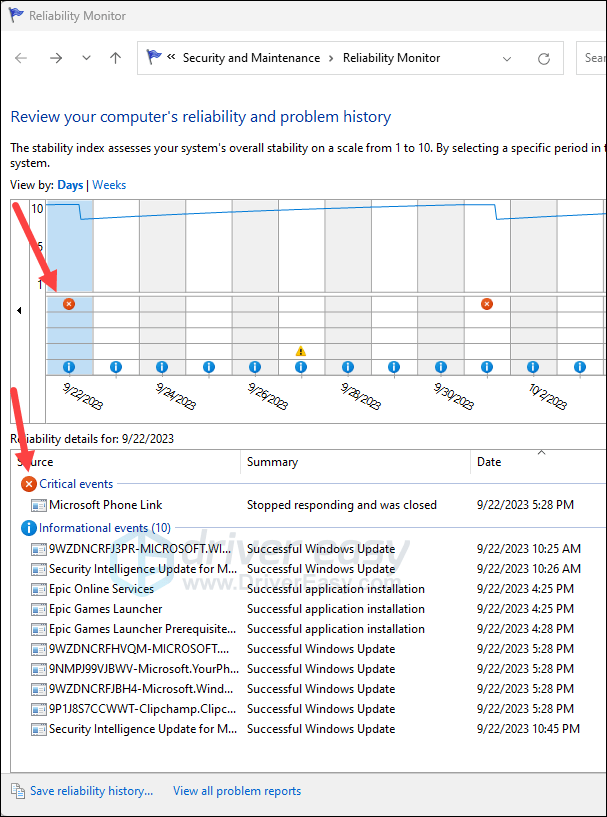
- On your keyboard, press the Windows key and the R key at the same time. Type perfmon /rel and hit Enter.
- Then you should see a window like this. Click the section where there’s a red cross (meaning critical events), and you should see the detailed information about this event.

- Double-clicking each event to see more detailed information in a new window.

3.1 How to use Reliability Monitor
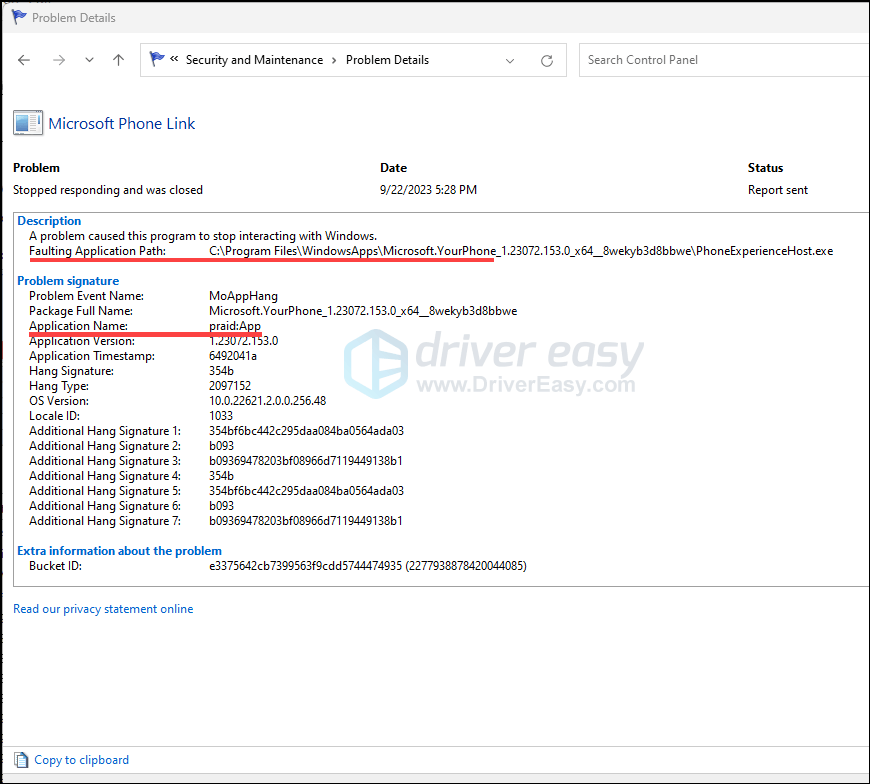
If you see a faulting application name and a faulting module path in the detailed information window, you can do a Google search with their combination and find the results that you need.
For instance, I see a LinkCollector.exe as the faulting application and KERNELBASE.dll as the faulting module. To “translate” the crash log, it’s saying KERNELBASE.DLL has trouble launching LinkCollector, the bookmark manager.
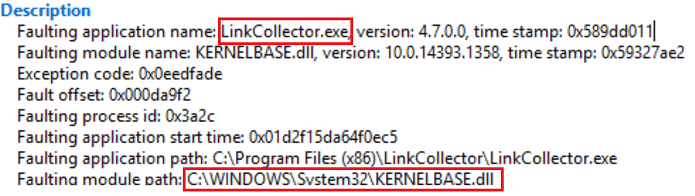
Then I did a Google search on LinkCollector and KERNELBASE.dll individually, and almost all results told me that the latter is a legitimate Windows file that can’t be removed from my computer. I then looked at the bookmark manager, and it turned out that this software is rather old, and probably has a problem keeping up with Windows 11 or Windows 10. For older software to work smoothly on newer operating systems, running it in compatibility mode should be the go-to option. So the problem was fixed.
4. View Crash Logs with Minidump Files
Minidump files are very useful if you’re experiencing blue screen of death errors. When a fatal system error or system crash occurs, a minidump file will be saved on your computer. With the information stored in these minidump files, it’s much easier and faster to locate the culprit to your blue screen of death errors.
The minidump files are usually saved in C:\Windows\Minidump, but if you don’t see it there, please make sure that you have the minidump file feature enabled.
4.1 To enable the Minidump File
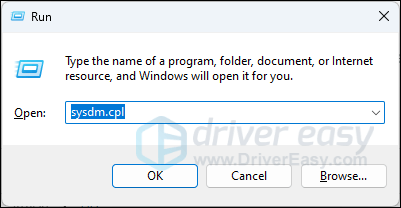
- On your keyboard, press the Windows key and the R key at the same time. Type sysdm.cpl and hit Enter.
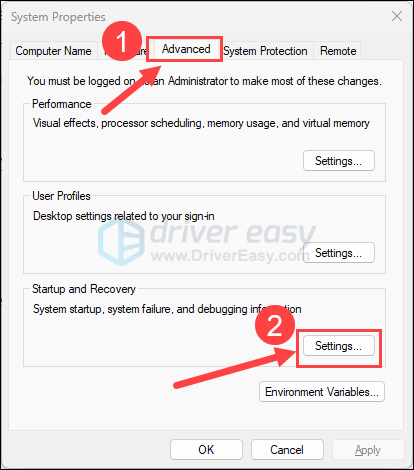
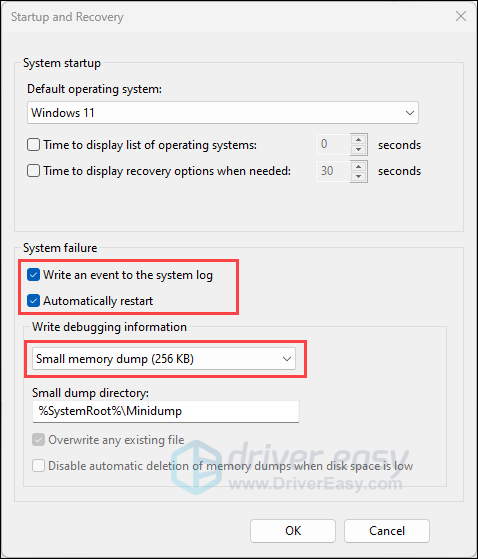
- Click Advanced, then click the Settings button under Startup and Recovery.

- Make sure the boxes for Write an event to the system log and Automatically restart are checked, and the Write debugging information has Small memory dump (256 KB) selected.

- Click OK to save the changes.
4.2 How to use Minidump Files to Fix Blue Screen of Death Errors
- Firstly, you need to download and install WinDbg from here: https://apps.microsoft.com/detail/9PGJGD53TN86?hl=en-us&gl=US
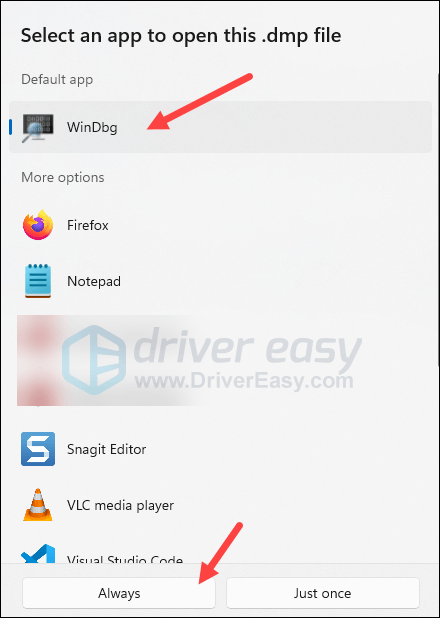
- Go to C:\Windows\Minidump (where your minidump files are saved), then right-click one of the minidump files and select Open with…

- Select WinDbg, and select Always, so WinDbg will be the default app to open all the rest of your minidump files.

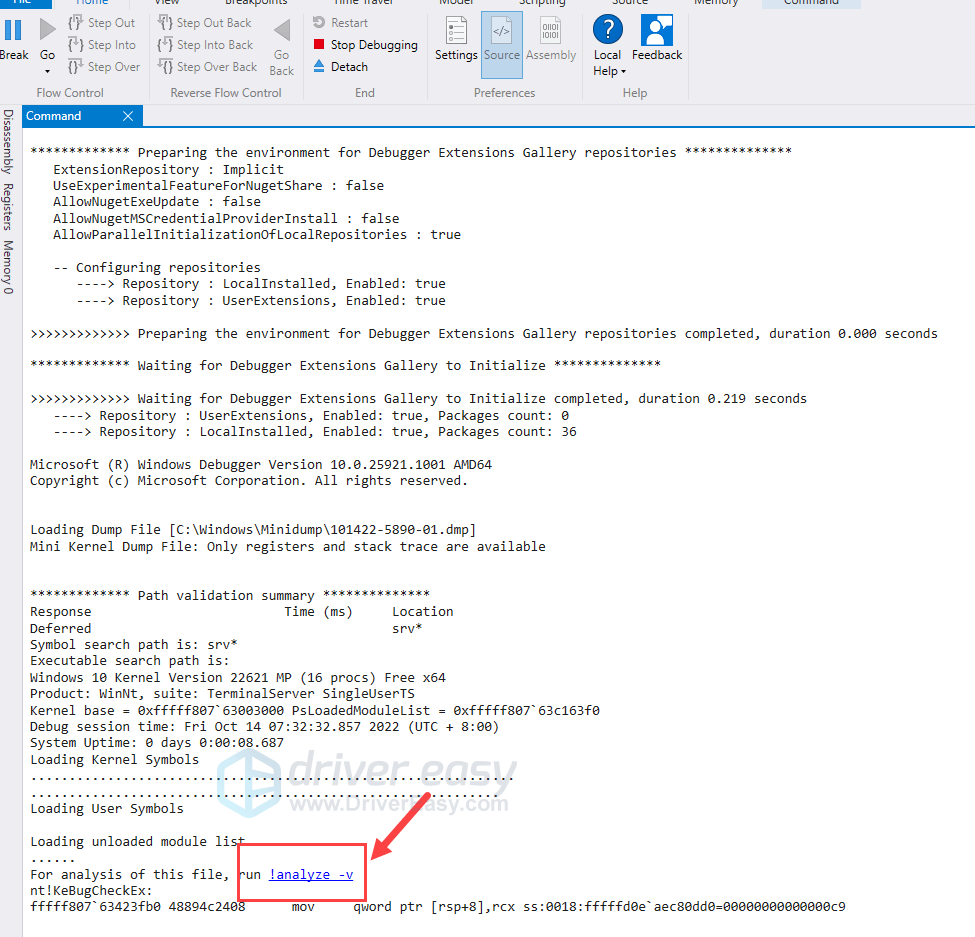
- Then the minidump file will open.
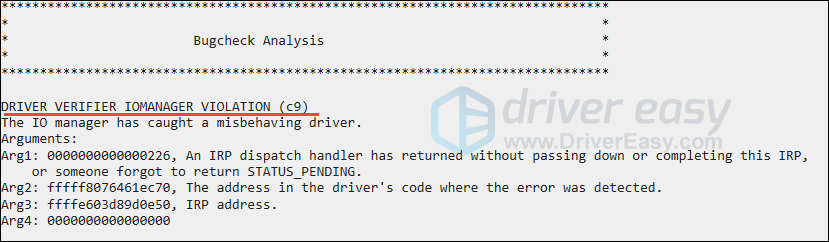
- When it finishes loading, you’ll see a window like this. Click the !analyze -v section to continue.

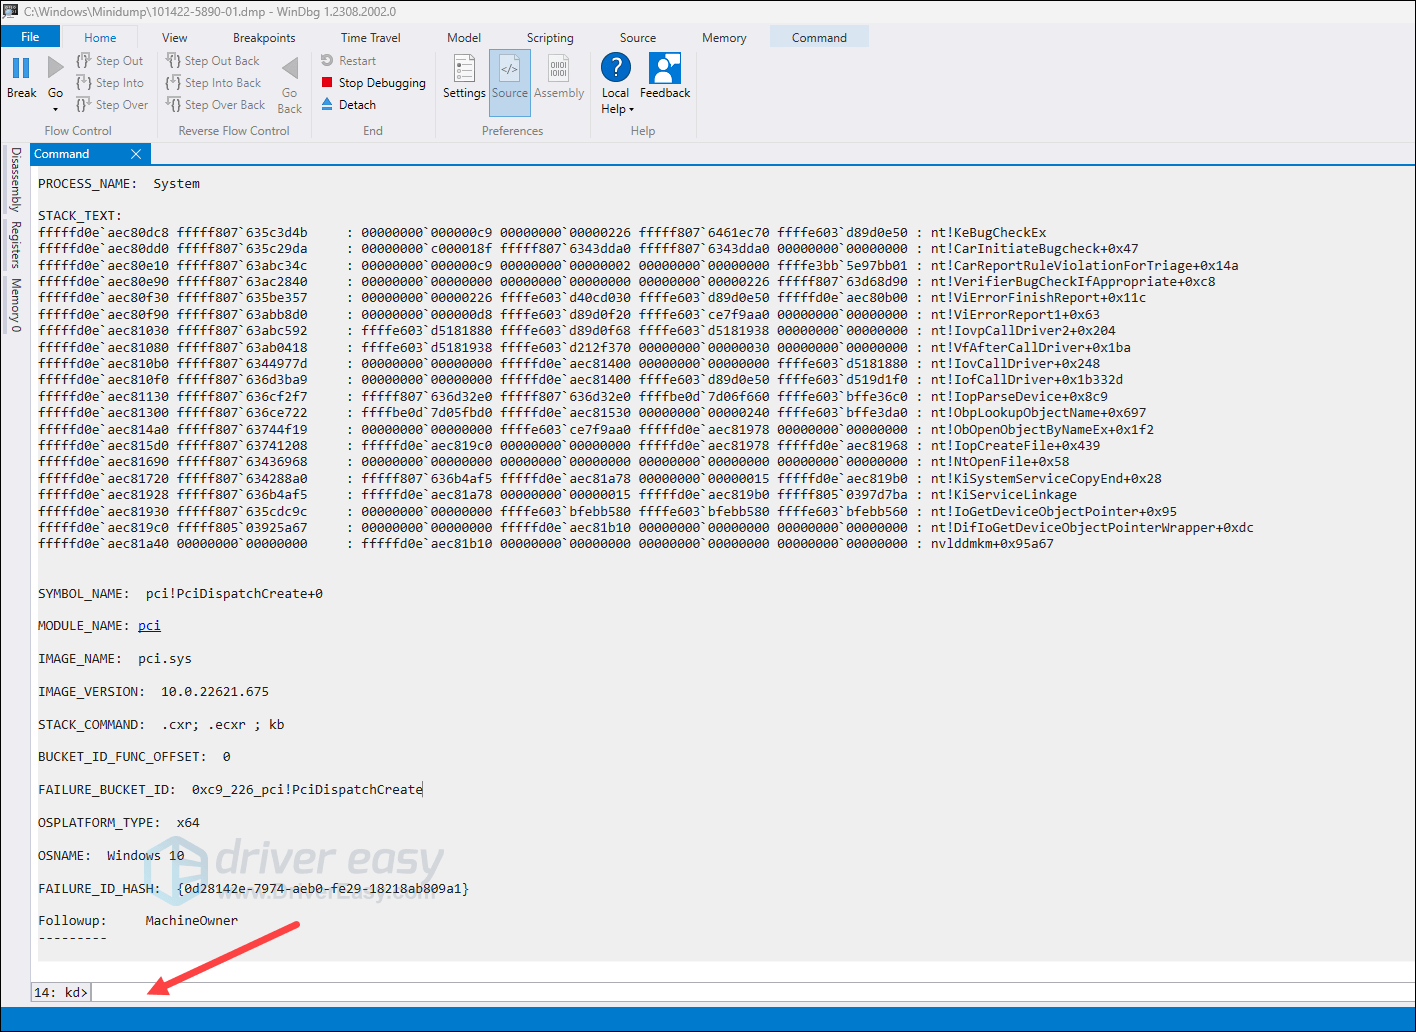
- When you see a window like this, and with no *BUSY* wording in the kd> field, the debugging is done.

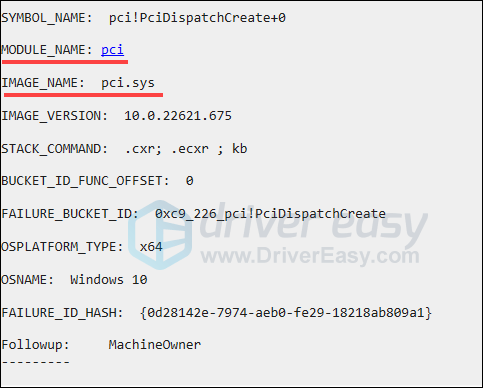
- Keep an eye on the MODULE_NAME and the IMAGE_NAME entries, as these are closely related to the faulting services or programs that cause the blue screen problems.

- On your keyboard, press the Ctrl key and the Home key at the same time to go to the top of the WinDbg window, and you’ll see more information there. Copy the first line of the crash log and run a Google search, and you’ll find more helpful results online.

- Or you can search the crash log you see here in our knowledgebase: https://www.drivereasy.com/kbc/blue-screen-error/ and see if there are targeted results.
- Another helpful source is Microsoft’s Bug Check Code Reference, but it’s a bit challenging if you’re not very experienced with computer crashes and fixes.

2
2 people found this helpful
Viewing crash logs on Windows 10 can help you figure out why your computer isn’t acting right. To access these detailed logs, you’ll need to navigate to the Event Viewer, which is a built-in tool in Windows 10. Once there, you can explore different logs and pinpoint the crash-related information. You’ll need to know which logs to look for and how to filter them for the specific crash events.
Viewing Crash Logs on Windows 10
The following steps will guide you through the process of accessing and analyzing crash logs using the Event Viewer in Windows 10. This will help you identify and understand any issues causing system crashes.
Step 1: Open Event Viewer
To open Event Viewer, press the Windows key and type “Event Viewer” to search for the tool, then press Enter to open it.
Event Viewer is a built-in Windows tool that provides detailed information about significant system events, including crashes. It’s like a detective’s notebook, where you can find clues about what went wrong.
Step 2: Navigate to Windows Logs
In the Event Viewer window, look for the “Windows Logs” folder on the left pane and click on it to expand the options.
Windows Logs contain several categories, such as Application, Security, Setup, and System. Each category holds different types of events. For crash-related information, the System log is usually the most relevant.
Step 3: Select the System Log
Click on “System” under Windows Logs to view events related to system processes.
The System log is where you’ll find events related to the core functions of your operating system. It’s the go-to place for investigating system crashes and disruptions.
Step 4: Filter the Events
In the Actions pane on the right, click “Filter Current Log” to narrow down the events to those related to crashes.
Filtering helps you pinpoint specific events, so you don’t have to sift through hundreds or thousands of logs. You can filter by level, such as Critical, Error, or Warning, to focus on the most severe issues.
Step 5: Analyze the Events
Look for events marked as “Error” or “Critical,” and double-click on any suspicious entries for more details.
Once you open an event, you’ll see detailed information, including error codes and descriptions. This data can give you insights into the cause of the crash and help you troubleshoot the problem.
After following these steps, you will have identified and accessed the crash logs on your Windows 10 system. You can now use the information gathered to troubleshoot and resolve the issues causing your system to crash.
Tips for Viewing Crash Logs on Windows 10
- Keep the Event Viewer open after a crash occurs to quickly access the logs.
- Use keywords in the Event ID field to search for specific error types.
- Regularly clear old logs to keep Event Viewer clutter-free and more efficient.
- Familiarize yourself with common error codes to speed up the troubleshooting process.
- Save and export relevant logs for further analysis or when seeking technical support.
Frequently Asked Questions
What is the Event Viewer?
The Event Viewer is a Windows tool that shows detailed information about significant system events, including system crashes and errors.
Why should I check crash logs?
Checking crash logs can help you identify the root cause of system issues, allowing you to fix problems and prevent future crashes.
Can I delete crash logs?
Yes, you can clear old crash logs to free up space and keep your system organized. However, make sure to review them before deleting.
How often should I check crash logs?
It’s wise to check crash logs after any unexpected shutdowns or crashes to understand what happened and prevent recurrence.
What should I do if I find a critical error?
Investigate the error details, seek online resources for solutions, and consider contacting technical support if needed.
Summary
- Open Event Viewer.
- Navigate to Windows Logs.
- Select the System Log.
- Filter the Events.
- Analyze the Events.
Conclusion
Understanding how to view crash logs on Windows 10 is an essential skill for anyone who uses a computer regularly. By accessing these logs, you’re essentially becoming a tech detective, investigating the causes of your system’s hiccups. It may seem daunting at first, but with practice, you’ll find it becomes second nature. These logs hold the key to understanding why your system might be acting up, and they can provide the crucial first step in solving the issue.
For further reading, consider exploring Microsoft’s official documentation on Event Viewer or seeking out community forums that discuss common Windows issues and their solutions. Once you’re comfortable with reading and interpreting these logs, you’ll be better equipped to handle and even prevent crashes in the future. Remember, every computer issue has a solution, and the crash logs are a vital tool in finding it.
Matt Jacobs has been working as an IT consultant for small businesses since receiving his Master’s degree in 2003. While he still does some consulting work, his primary focus now is on creating technology support content for SupportYourTech.com.
His work can be found on many websites and focuses on topics such as Microsoft Office, Apple devices, Android devices, Photoshop, and more.