
The Task Manager has been around since the release of Windows NT and Windows 2000. It is a useful tool for many. Apart from killing off “Not Responding” tasks, it can also be used to view resource consumption, hardware performance, manager startup apps, user and process details, services, and view app history and statistics.
Today, we are going to talk about the “App History” tab inside the Task Manager and how it can be used to view the history of all processes that are running and had run in the past, and gain some insight into its resource utilization, such as CPU time, network bandwidth consumption, etc.
Table of Contents
What is App History in Task Manager

The “App History” tab inside the Task manager shows you the resource utilization statistics of the different applications that had run on your computer in the past. It shows the accumulative CPU time and other network bandwidth consumption over time.
By default, the App History tab shows details for only the Microsoft Store applications, and other applications and programs are not included in the list. However, you can change this and view the history for all processes that had run on your computer. Note that the statistics for each app/process are only displayed since the last time the counter was reset.
The methods to view the history of all processes and reset the counter are discussed below in this post.
How to See History of All Processes in Task Manager
Using the steps below, you should be able to view the history of all processes that are currently running and have run in the past, on your Windows computer.
Note: Microsoft has recently updated the UI of the Task Manager with Windows 11 22H2. If you are on this OS version, then use the given method below to view the history of all processes. If you are using an older version of Windows 11 or are on Windows 10, then skip to the next section down below.
View History of All Processes on Windows 11 22H2
-
Open the Task Manager by pressing the CTRL + Shift + Esc shortcut keys and then open its settings by clicking on the gear icon in the bottom-left corner.

Open Task Manager settings -
Here, under Other options, check the box next to “Show history for all processes.”
Enable show history for all processes -
Now switch to the App History tab and you should now see all of the processes and their respective details.
App History tab in new Task Manager You should now be able to see the usage history of all the apps and processes.
-
(Optional) Here, right-click on any column’s header and select or unselect which information you wish to view about the processes from the context menu.
Select details to view or hide You can also arrange the processes by a specific column in a descending or ascending manner by clicking on the respective header.


As you can see in the image above, the App History tab now includes the history of all the processes and apps, as opposed to the default Microsoft Store apps only.
You can also uncheck the same option in the Task Manager settings to disable show details for all processes in the Task Manager.
View History of All Processes on Windows 11/10
Use the guide below to view the usage history of all the processes in the Task Manager if you are using Windows 11 21H2, or Windows 10.
-
Open the Task Manager by pressing the CTRL + Shift + Esc shortcut keys and then switch to the App History tab.

Switch to the App History tab -
Now click Options from the top menu and then click “Show history for all processes.”
Enable show history for all processes


You should now be able to see all of the processes in the App History tab along with their past statistical data.

If you wish to view only the history of the Microsoft Store apps again, simply click on Show history for all processes inside the Options menu to disable it.
Open App & Process Details
Regardless of which Windows version you are using, you can open an app directly from the App History tab and view the details of the individual processes.
Note that you can only open the Microsoft apps and view the details of the processes from the App History tab.
To open an app, right-click on the app and then click Switch To.

If you wish to view the details of a process, right-click it and then click Properties from the context menu.

This opens the Properties window where you can find all sorts of information about the process, including the file responsible for the process, its copyright holder, etc.

If you still need more information, then you can also perform a quick online search by clicking Search online from the context menu.

Windows then uses the default search engine and opens the results for the process name in the default web browser.
Reset Usage History
As we mentioned earlier, the App History tab only contains the information till the time it was last reset. You can see the last reset date near the top of the Task manager window.

You can also reset the entire data by clicking Delete usage history.

This will reset all the statistical data and begin recording the app and process usage history from that time onwards.
Closing Words
The Task Manager can do much more than what we have discussed today. It has integrated performance monitoring tools for the different hardware components, and you can also manage the Windows services too.
As far as the App History tab is concerned, it is all the tab is capable of at the moment. We found that the information per app/process is currently very limited. For example, we cannot see the disk or RAM utilization for each item, when was the last time it was run, etc.
We certainly hope that Microsoft will eventually add these features for us to be able to get more insight into our system usage habits.
Applies ToPrivacy Windows 11 Windows 10 Microsoft account dashboard
Activity history helps keep track of the things you do on your device, such as the apps and services you use, the files you open, and the websites you browse. Your activity history is stored locally on your device.
You can manage activity history settings to choose what to store.
Features that use activity history
The following Windows features use your activity history. Refer back to this page after Windows releases and updates to learn about any new services and features that use your activity history:
-
Timeline. See a timeline of activities and choose whether to resume those activities from your device. For example, let’s say that you are editing a Word document on your device, but you aren’t able to finish before you have to stop working for the day. If you turn on the Store my activity history on this device setting on the Activity history settings page, you will see that Word activity in your timeline the following day—and for the next several days—and from there, you can resume working on it.
-
Microsoft Edge. When you use Microsoft Edge Legacy, your browsing history will be included in your activity history. Activity history will not be saved when browsing with InPrivate windows.
Your Microsoft account settings don’t allow you to send your activity history to Microsoft, but your activity history will be stored on your device to help keep track of the things you do.
Activity history for multiple accounts
For multiple accounts, activity history is collected and stored locally for each local account, Microsoft account, or work or school account that you have associated with your device in Settings > Accounts > Email & accounts. You can also see these accounts in Windows 10 under Settings > Privacy > Activity history and in Windows 11 under Settings > Privacy & security > Activity history, where you can filter out activities from specific accounts from showing in your timeline. Hiding an account does not delete the data on the device.
Manage activity history settings
Activity history is customizable—at any time, you can choose to stop saving activity history.
Stop saving activity history locally on your device
-
Select Start , then select Settings > Privacy & security > Activity history.
-
Switch the Store my activity history on this device setting to Off.
Open Activity history settings
Note: The option to send activity history to Microsoft has been deprecated from Windows 11 23H2 and 22H2, January 23, 2024-KB5034204 update. Previous Windows 11 versions before this update would still have the option available on their activity history page, and if enabled, activity history data will still be sent to Microsoft. You can either turn this option off or update to the latest Windows version to get the most recent updates.
You can clear and delete the activity history stored on your device.
Clear your activity history
-
Select Start , then select Settings > Privacy & security > Activity history.
-
Next to Clear activity history for this account, select Clear history.
Note: If you have previous activity history stored in the cloud before Windows 11 23H2 and 22H2, January 23, 2024-KB5034204 update, you can use the Clear activity history button to delete previously stored data in the cloud. Otherwise, your activity history will be automatically deleted within 30 days from when your data was last synced to the cloud.
Need more help?
Want more options?
Explore subscription benefits, browse training courses, learn how to secure your device, and more.
Download Article
Download Article
- On Windows 10
- On Windows 11
- On a Mac
- Video
- Expert Interview
- Tips
|
|
|
|
|
When you’re working with multiple apps on your computer, it’s easy to lose track of which windows you have open. Fortunately, Windows 11, Windows 10, and macOS all have easy keyboard shortcuts and utilities that make multitasking a breeze. This wikiHow article will teach you how to quickly show all of your open windows and apps on your PC or Mac.
-

The Task View icon is on your taskbar by default, and it looks like three rectangular windows with a slider on the right side. This displays all open windows on a single screen and is the most straightforward way to see all open windows.[1]
- If you don’t see the Task View button on the taskbar, right-click the taskbar and select Show Task View Button. You can also open Task View by pressing Windows key + Tab.
- If you’ve created virtual desktops on which you’re running different apps, click each virtual desktop in the bar at the top of Task View to view the open windows on that desktop.
-
Another way to see all open windows on the same screen is to align them using options on the taskbar. Right-click the taskbar, and then choose any of these options to display all open windows:
- Select Cascade windows to show open windows cascaded, with each window’s title bar visible.
- Select Show windows stacked to display all open windows in one or more vertical stacks. The number of stacks depends on how many windows are open.
- Select Show windows side by side is similar to the stacked feature but displays them horizontally rather than vertically.
Advertisement
-
Release the Tab key while continuing to hold down Alt to display all open windows. This shortcut is great for quickly switching between open apps using keyboard keys instead of your mouse, but it’s also a quick way to see which windows are open.[2]
- To switch to another window, use the Tab key (while continuing to hold down Alt) to navigate through the open apps. When you get to the one you want to bring into view, release both keys.
-
[3]
Task Manager displays all apps and background processes that are running on your PC. You can open it quickly by pressing Control + Shift + Esc at the same time, or by right-clicking the taskbar and selecting Task Manager.[4]
- When Task Manager opens, you’ll see a brief list of open apps. Click More details to view more information, including a list of processes running in the background.
- The apps in the «Apps» area of the Processes tab are the ones that have windows open or minimized.


Advertisement
-
The Task View icon looks like two overlapping squares—one white and one gray—and you’ll find it on the taskbar at the bottom of the screen. This displays all windows on a single screen and is the simplest way to see all open windows. You can also open Task View by pressing Windows key + Tab.[5]
- If you don’t see the Task View icon on the taskbar, right-click the Taskbar, select Taskbar settings, and then click the switch next to «Task View» to turn it on.
- If you’re using virtual desktops to run different sets of apps, you’ll see each desktop at the bottom of Task View. Click a desktop to view the windows open on that desktop.[6]
-
When you open an app on Windows 11, its icon stays visible on the taskbar. Apps that have open windows have white underlines on the taskbar. Hover your mouse cursor over any of the icons with a white underline to see thumbnails of its open window(s). You can then click one of the thumbnails to bring that window into view.
- Hovering your cursor over the Task View icon to see all open desktops. You can then click one of the open desktops to switch to that desktop.
-
Release the Tab key while continuing to hold down Alt to display all open windows. This shortcut is great for quickly switching between open apps using keyboard keys instead of your mouse, but it’s also a quick way to see which windows are open.
- To switch to another window, use the Tab key (while continuing to hold down Alt) to navigate through the open apps. When you get to the one you want to bring into view, release both keys.
-
Task Manager displays all apps and background processes that are running on your PC. You can open it quickly by pressing Control + Shift + Esc at the same time, or by right-clicking the taskbar and selecting Task Manager.[7]
- When Task Manager opens, you’ll see a brief list of open apps. Click More details to view more information, including a list of processes running in the background.
- The apps in the «Apps» area of the Processes tab are the ones that have windows open or minimized.


Advertisement
-
This is the easiest way to see which apps are open on your Mac.[8]
If you created Spaces for running different apps, you’ll see each Space at the top of Mission Control. Click a Space to view the windows that are open on that space. To open Mission Control, do any of the following:- On an Apple keyboard, press the Mission Control key (F3) in the top row of keys. It has an icon of a rectangle containing three smaller rectangles.
- If you’re using a MacBook, swipe up on the trackpad with three fingers.
- If your MacBook has a Touch Bar, tap the icon with three rectangles.
- If you have a Magic Mouse, double-tap its surface with two fingers.
- Press Control + Up Arrow on the keyboard at the same time.
- Double-click the Mission Control app in your Applications folder.
-
This shortcut is great for quickly displaying all open apps. When you press this combination, release the Tab key while continuing to hold down the Command key to keep the open apps in view.[9]
- To switch to one of the open windows: While continuing to hold down Command, use the left and right arrow keys to select the app you want to use, and then release the Command key to bring it into view.
-
The Force Quit exists to help you quickly close apps, but you can also use it to quickly see which windows are open on your Mac—even those that are minimized.[10]
To open this menu, press Command + Option + Esc at the same time.[11]
- You can close an app on this window by selecting it and clicking Force Quit.
-
Activity Monitor not only shows you which apps are open, but also tells you how much memory, energy, and CPU power each app is using.[12]
To open Activity Monitor, go to your Applications folder in Finder, double-click the Utilities folder, and then double-click Activity Monitor.- Activity Monitor also displays information about processes running in the background, not just apps that have windows open on your desktop.
- Click through the tabs at the top of Activity Monitor to learn about the resources each open app or process consumes.


Advertisement
Ask a Question
200 characters left
Include your email address to get a message when this question is answered.
Submit
Advertisement
Video
-
Want to reduce the number of open windows for a single app on your Mac? With any of the app’s windows open, click the Window menu and select Merge All Windows. To move a combined tab back to its own window, select the tab, click the Window menu, and then choose Move Tab to New Window.
-
You can manage the behavior of Alt + Tab on Windows 11 in Settings > Systems > Multitasking> Alt Tab.
-
If you’re using a Mac app that has multiple open windows and you want to close them all at once, press Command + Option + W.
Thanks for submitting a tip for review!
Advertisement
About This Article
Article SummaryX
1. Press Windows key + Tab on a PC to display open windows in Task View.
2. Press F3 or the Mission Control key to display open Mac apps in Mission Control.
Did this summary help you?
Thanks to all authors for creating a page that has been read 304,419 times.
Is this article up to date?
В этой статье мы рассмотрим, как с помощью политик аудита Windows можно узнать какие программы запускались на компьютере. Довольно часто от администратора требуют предоставить информацию о том, какие приложения запускает пользователь, когда он запускал приложение в последний раз и т.д. Эту информацию можно собрать из журнала событий Windows и преобразовать в удобный отчет с помощью PowerShell.
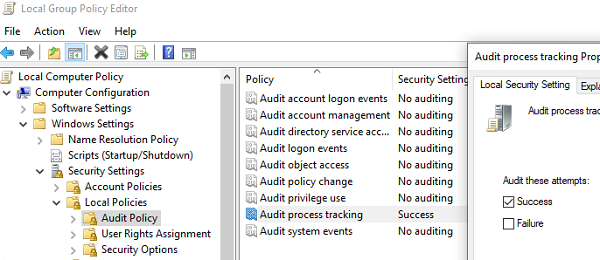
Сначала нужно включить политику аудита запуска/остановки процессов в Windows.
- Откройте редактор локальной групповой политики gpedit.msc ;
Если вы хотите включить политику аудита процессов на компьютерах в домене Active Directory, нужно использовать редактор доменных GPO –
gpmc.msc
. - Перейдите в раздел GPO Computer Configuration -> Windows Settings -> Security Settings -> Local Policies -> Audit Policy;
- Включите политику Audit process tracking и тип событий Success;

- Сохраните изменения и обновите локальные политики на клиенте командой:
gpupdate /force
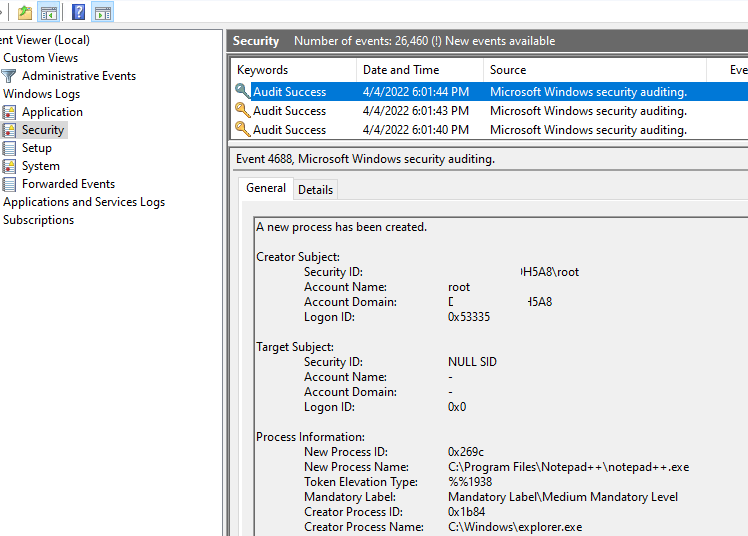
Откройте Event Viewer (
eventvwr.msc
) и разверните раздел Windows Logs -> Security. Теперь при запуске любой программы (процесса) в этом журнале событий появляется событие Process Creation с EventID 4688.
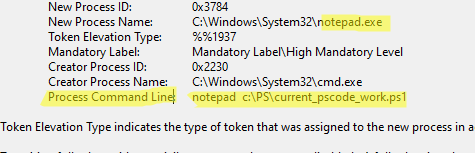
A new process has been created.
В информации о событии указан пользователь, запустивший программу (
Creator Subject
), имя исполняемого файла процесса (
New Process Name
) и родительский процесс, из которого было запущено приложение (
Creator Process Name
).
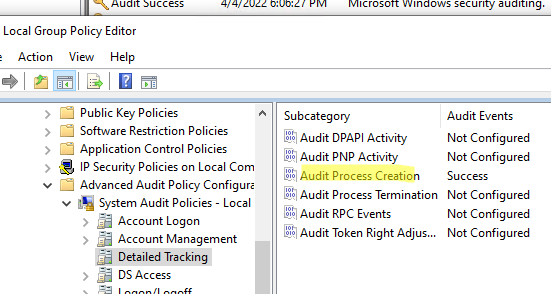
Обратите внимание, что при включении рассмотренной выше политики Audit process tracking в журнал Security начинают сохранятся все события, связанные с процессами. Если вы хотите уменьшить число событий в Event Viewer и сохранять только информацию о событиях запуска, можно отключить данную политику и включить только расширенную политику аудита Audit Process Creation (Windows Settings -> Security Settings -> Advanced Audit Policy Configurations -> System Audit Policy -> Detailed Tracking).
Чтобы в события аудита записывалась информация о параметрах запуска процессов (аргументы, с которыми запускаются программы), включите также параметр GPO Include command line in process creation events в Computer Configuration -> Administrative Templates -> System -> Audit Process Creation.
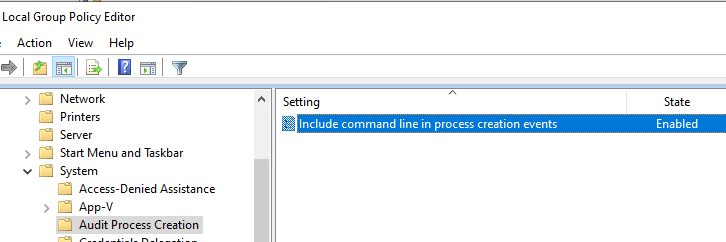
После включения этой политики в аргументе Process Command Line видно, с каким аргументом запускался тот или иной процесс.
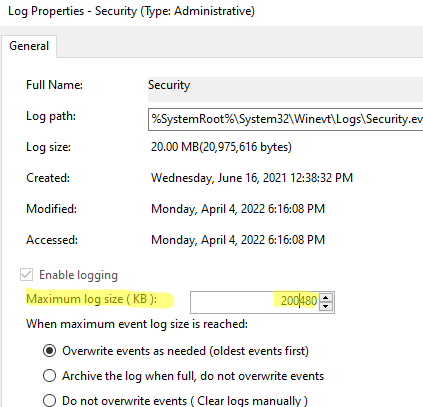
Не забудьте увеличить размер журнала Security со стандартных 20 Мб. Это позволит хранить история запуска приложения за более длительный период. Для этого откройте свойства журнала Security и увеличьте значение параметра Maximum log size.
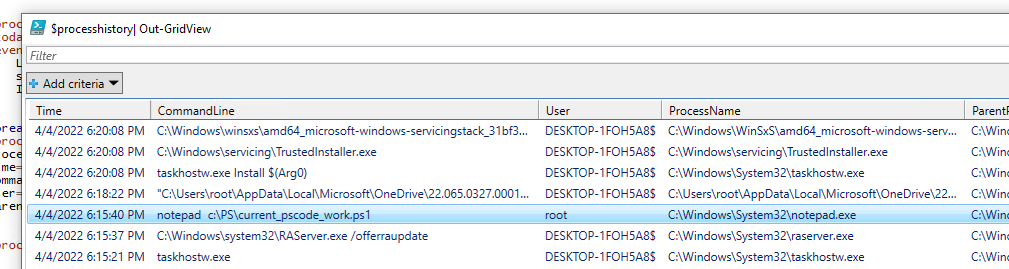
Для анализа программ, запущенных пользователем можно использовать фильтры Event Viewer. Но это не очень удобно. Ниже я покажу несколько PowerShell скриптов который позволят вам получить удобные списки событий с историей запуска приложений пользователями. Для получения событий из журнала Event Viewer мы будем использовать команду Get-WinEvent:
$processhistory = @()
$today = get-date -DisplayHint date -UFormat %Y-%m-%d
$events=Get-WinEvent -FilterHashtable @{
LogName = 'Security'
starttime="$today"
ID = 4688
}
foreach ($event in $events){
$proc = New-Object PSObject -Property @{
ProcessName=$event.Properties[5].Value
Time=$event.TimeCreated
 CommandLine=$event.Properties[8].Value
User=$event.Properties[1].Value
ParentProcess=$event.Properties[13].Value
}
$processhistory += $proc
}
$processhistory| Out-GridView
Данный PowerShell скрипт выберет все события запуска программ за сегодняшний день и выведет список процессов, времени запуска и пользователях в графическую таблицу Out-GridView.
Полученный массив объектов можно использовать для выполнения различных запросов.
Например,
- Найти всех пользователей, которые запускали определённое приложение:
$proc_name=”notepad++.exe”
$processhistory | where-object {$_.ProcessName –like “*$proc_name*”}|out-gridview
- Вывести список программ, которые запускал сегодня определенный пользователь:
$username="aivanov"
$processhistory | where-object {$_.User –like “*$username*”}|out-gridview

Такие скрипты часто используем для анализа запуска программ пользователей на серверах RDS фермы.
Также история запуска программ в Windows ведется в файле %SystemRoot%\AppCompat\Programs\Amcache.hve. Файл заблокирован Windows и прочитать его можно только, загрузившись с LiveCD или загрузочного/установочного диска. В файле есть метки запуска, установки/удаления программы, контрольные суммы исполняемого файла (SHA1). Для преобразования этого бинарного файла в текстовый формат нужно использовать сторонние утилиты (например, regripper).
Ниже мы разберем основные методы просмотра последних событий на компьютере, а также расскажем про следы, которые оставляет после себя каждый пользователь Windows.

Содержание
- История браузера
- Просмотр измененных файлов
- Поиск удаленных данных в корзине
- Просмотр папки «Загрузки»
- Просмотр последних установленных программ
- Поиск последних запущенных программ
- Дополнительные методы выявления последних действий
- Что делать если в ходе несанкционированного доступа были удалены важные данные?
Операционная система Windows и многие программы, работающие в ней, оставляют после себя множество следов, при помощи которых можно определить, что происходило с компьютером во время отсутствия пользователя. Данное руководство поможет выявить куда заходили, что смотрели, какие программы запускались и какие файлы изменялись при несанкционированном доступе к Вашей системе.
Просмотр последних действий является комплексной мерой, требующей поочередной проверки отдельных элементов системы и программного обеспечения, где могли остаться следы после доступа к ПК третьих лиц.
История браузера
Первым делом следует проверить историю Вашего интернет-обозревателя, где всегда сохраняются адреса сайтов, на которые был совершен переход с браузера.
История браузера должна проверяться первым делом, поскольку с его помощью можно получить данные для входа в социальные сети, банковские аккаунты, учетные записи онлайн-сервисов цифровой дистрибуции (к примеру, Steam, Origin, Epic Games Store и т.д.) и другие сервисы, откуда злоумышленники могут получить данные платежных карт и другую материальную выгоду.
Чтобы просмотреть историю браузера Google Chrome, достаточно открыть интернет-обозреватель и нажать комбинацию клавиш Ctrl+H, либо ввести в поисковую строку путь «chrome://history/» или нажать по иконке трех точек в правом верхнем углу и в открывшемся меню выбрать пункт «История».
В открывшемся окне можно просмотреть дату, время и посещенные ресурсы, по которым можно определить, что искали третьи лица при несанкционированном доступе к ПК.

Если Вы обнаружили, что история браузера была очищена, хотя Вы этого не делали, это означает, что во время несанкционированного доступа кто-то пытался скрыть следы работы за компьютером.
В таком случае следует воспользоваться нашим руководством «Как восстановить историю браузера после очистки», где можно узнать про восстановление и просмотр истории во всех популярных браузерах.
Помимо истории, браузер Google сохраняет многие действия, совершенные в сети с компьютера, в специальном разделе «Мои действия», где можно более детально просмотреть вводившиеся поисковые запросы, просмотренные видеоролики на YouTube и другую информацию.
Для перехода в меню «Мои действия», достаточно скопировать и вставить в адресную строку ссылку https://myaccount.google.com/activitycontrols, после чего выбрать требуемый пункт (к примеру, выберем пункт «История приложений и веб-поиска», но также здесь можно просмотреть историю местоположений, история просмотров и поисков YouTube, данные с синхронизированных устройств и т.д.) и нажать по кнопке «Управление историей».

В открывшемся окне можно детально ознакомиться со всеми действиями, просмотрами и введенными поисковыми запросами, которые были совершены в ближайшее время.
Просмотр измененных файлов
Ознакомившись с историей в браузере следует приступить к выявлению действий, которые были совершены непосредственно с компьютером и личной информацией.
Чтобы просмотреть файлы, документы и другие данные, подвергнувшиеся изменению при несанкционированном доступе следует воспользоваться функцией просмотра именных файлов.
Чтобы сделать это необходимо:
Шаг 1. Нажимаем правой кнопкой мыши по «Пуск» и в открывшемся меню выбираем пункт «Выполнить». В строке открывшегося окна вводим команду «recent» и подтверждаем действие «Ок».

Шаг 2. В открывшемся окне можно обнаружить последние файлы, фотографии, документы и другие данные с которыми выполнялись какие-либо действия, а также точную дату их изменения.
Стоит отметить, что «подкованные» злоумышленники могут удалить все данные из этой папки, но это станет явным следом деятельности третьих лиц с системой и информацией.
Поиск удаленных данных в корзине
Если во время несанкционированного доступа к Вашему компьютеру были удалены какие-либо данные, они могли попасть в корзину, где можно посмотреть время удаления, а также быстро восстановить удаленные файлы.
При стандартных настройках интерфейса Windows, корзина всегда располагается на рабочем столе.

Если есть подозрения, что файлы были удалены при несанкционированном доступе, а корзина была очищена, рекомендуем срочно ознакомиться с темой «Как восстановить файлы после удаления в «Корзину» и ее очистки», поскольку если не восстановить данные сразу, в скором времени они могут быть уничтожены из-за перезаписи!
Просмотр папки «Загрузки»
Помимо корзины, обязательно следует посетить папку «Загрузки», поскольку в ней могут содержаться последние данные, скачанные на компьютер из интернета.
Это могут быть и вредоносные программы, и специальные утилиты для слежки, а также другое вредоносное и опасное ПО, способное навредить системе и конфиденциальности пользователя. Проще всего перейти в папку из каталога «Мой компьютер» или «Этот компьютер» в Windows 10.
В открывшемся окне следует внимательно проверить скачанные установочные данные и другие подозрительные файлы. В случае обнаружения таких, следует немедленно их удалить, поскольку запуск исполняемых файлов может привести к заражению.
Просмотр последних установленных программ
Во время несанкционированного доступа к Вашему компьютеру, в систему могли быть установлены сторонние программы, майнеры, рекламные приложения и другое нежелательное ПО, поэтому следует проверить список последних установленных программ.
Чтобы сделать это, следует:
Шаг 1. Нажимаем левой кнопкой мыши по иконке «Поиск» (изображение лупы возле кнопки «Пуск») и вводим в строку фразу «Панель управления», после чего переходим в непосредственно сам пункт «Панель управления».

Шаг 2. Находясь в панели управления, включаем режим отображения «Категория» и нажимаем по пункту «Удаление программы».
Шаг 3. В открывшемся списке нажимаем по графе «Установлено», чтобы выровнять перечень программ по дате установки, после чего внимательно просматриваем все недавно установленные программы на наличие подозрительных.
При обнаружении неизвестных утилит, лучшим решением будет их удаление. Это можно сделать при двойном нажатии левой кнопкой мыши в списке. Важно! В данном окне могут отображаться системные программы и утилиты, поэтому следует знать, что нужно удалить, а что лучше оставить.
Поиск последних запущенных программ
Система Windows также позволяет узнать в какое время и какие программы были запущенны, что поможет лучше понять, что происходило во время несанкционированного доступа.
Чтобы воспользоваться поиском последних запущенных программ необходимо:
Шаг 1. Переходим в каталог «Этот компьютер» и в правом верхнем углу вводим в поиск «.exe» — ключ, который позволит найти все исполняемые файлы на компьютере.
Шаг 2. Нажимаем правой кнопкой мыши по любому из колонок списка и в открывшемся меню выбираем «Сортировка», после чего «Подробнее».

Шаг 3. В открывшемся меню ставим галочку напротив пункта «Дата доступа», что позволит выровнять список по последним запущенным исполнительным файлам программ.
Дополнительные методы выявления последних действий
Помимо вышеописанных способов, опытные пользователи смогут воспользоваться просмотром журналов Windows, которые позволяют найти, когда были запущены различные приложения или, когда выполнялся вход и выход из системы.
Стоит отметить, что журнал событий является средством, предназначенным для системных администраторов, поэтому пользователи, не знающие коды конкретных событий, не смогут найти нужную информацию в журналах.
Помимо вышеописанных способов, можно на постоянной основе пользоваться специальными программами для слежения за компьютером (к примеру: NeoSpy, Snitch, Actual Spy и другие). В данном случае, утилиты будут показывать все действия, произведенные с компьютером в удобном меню и в понятной для любого пользователя форме.
Что делать если в ходе несанкционированного доступа были удалены важные данные?
Если Вы обнаружили, что кто-то намеренно удалил важные данные, фотографии, документы или любую другую информацию с компьютера, рекомендуем немедленно воспользоваться специальной утилитой для восстановления информации RS Partition Recovery.
С её помощью можно быстро вернуть данные, которые были удалены комбинацией клавиш Shift+Delete, отформатированы с носителя, удалены вирусным ПО, или уничтожены в ходе изменения логической структуры носителя.
RS Partition Recovery обладает крайне низкими системными требованиями, что позволяет использовать программу даже на ноутбуках и офисных машинах. Помимо этого, утилита для восстановления данных имеет интуитивно-понятный интерфейс, в котором сможет разобраться абсолютно любой пользователь.
Чтобы вернуть утерянные файлы, достаточно провести быстрое или полное сканирование накопителя. Это поможет выявить недавно удаленные файлы или все данные, возможные для восстановления. Чтобы ознакомиться с другими возможностями и преимуществами работы с RS Partition Recovery, рекомендуем посетить официальную страницу программы.
Часто задаваемые вопросы
Чтобы просмотреть историю браузера Google Chrome, достаточно его открыть и нажать комбинацию клавиш Ctrl+H, либо ввести в поисковую строку путь «chrome://history/» или нажать по иконке трех точек в правом верхнем углу и в открывшемся меню выбрать пункт «История».
Да. Могут. Дело в том, что «Корзина» для хранения удаленных файлов использует пространство жесткого диска, а не какой-то изолированный участок памяти. Соответственно, файлы, находящиеся в «Корзине», могут взаимодействовать с другими компонентами операционной системы без особых проблем. Поэтому настоятельно рекомендуется использовать антивирус.
Воспользуйтесь программой RS Partition Recovery. Она позволяет вернуть утерянный файл практически в несколько кликов мышки.
Чтобы проверить какие приложения запускались последними откройте окно «Этот Компьютер» и справа вверху в поле поиска введите .exe Перед вами откроются все исполняемые файлы приложений. Затем отсортируйте результаты по дате доступа. Более подробно вы можете прочесть на нашем сайте
Чтобы проверить какие приложения были установлены последними откройте «Панель Управления», затем раздел «Установка и удаление программ». Перед вами откроется список всех установленных приложений. Отсортируйте их по дате, начиная от самой новой. Таким образом вы сможете узнать, какие программы были установлены последними. Более детально вы можете прочесть на нашем сайте.