
В этой статье мы рассмотрим, как с помощью политик аудита Windows можно узнать какие программы запускались на компьютере. Довольно часто от администратора требуют предоставить информацию о том, какие приложения запускает пользователь, когда он запускал приложение в последний раз и т.д. Эту информацию можно собрать из журнала событий Windows и преобразовать в удобный отчет с помощью PowerShell.
Сначала нужно включить политику аудита запуска/остановки процессов в Windows.
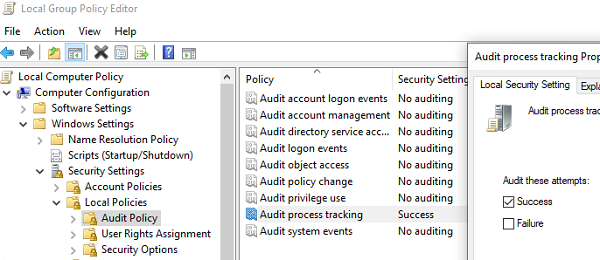
- Откройте редактор локальной групповой политики gpedit.msc ;
Если вы хотите включить политику аудита процессов на компьютерах в домене Active Directory, нужно использовать редактор доменных GPO –
gpmc.msc
. - Перейдите в раздел GPO Computer Configuration -> Windows Settings -> Security Settings -> Local Policies -> Audit Policy;
- Включите политику Audit process tracking и тип событий Success;

- Сохраните изменения и обновите локальные политики на клиенте командой:
gpupdate /force
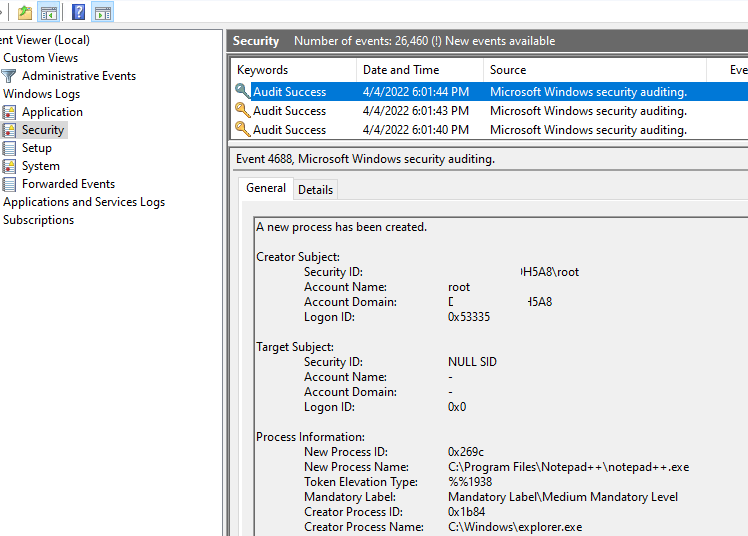
Откройте Event Viewer (
eventvwr.msc
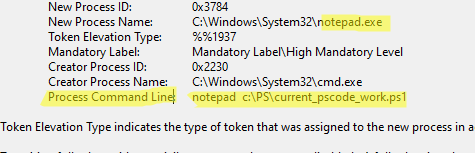
) и разверните раздел Windows Logs -> Security. Теперь при запуске любой программы (процесса) в этом журнале событий появляется событие Process Creation с EventID 4688.
A new process has been created.
В информации о событии указан пользователь, запустивший программу (
Creator Subject
), имя исполняемого файла процесса (
New Process Name
) и родительский процесс, из которого было запущено приложение (
Creator Process Name
).
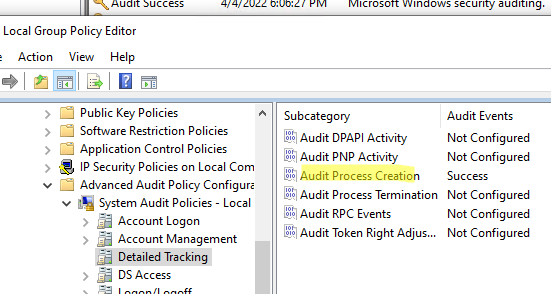
Обратите внимание, что при включении рассмотренной выше политики Audit process tracking в журнал Security начинают сохранятся все события, связанные с процессами. Если вы хотите уменьшить число событий в Event Viewer и сохранять только информацию о событиях запуска, можно отключить данную политику и включить только расширенную политику аудита Audit Process Creation (Windows Settings -> Security Settings -> Advanced Audit Policy Configurations -> System Audit Policy -> Detailed Tracking).
Чтобы в события аудита записывалась информация о параметрах запуска процессов (аргументы, с которыми запускаются программы), включите также параметр GPO Include command line in process creation events в Computer Configuration -> Administrative Templates -> System -> Audit Process Creation.
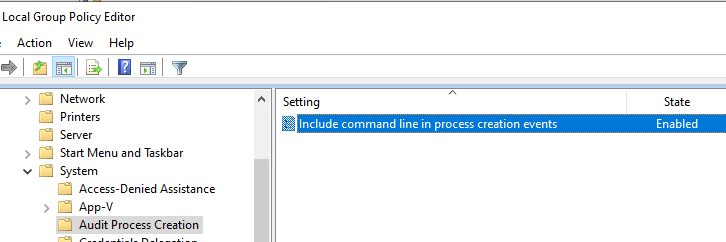
После включения этой политики в аргументе Process Command Line видно, с каким аргументом запускался тот или иной процесс.
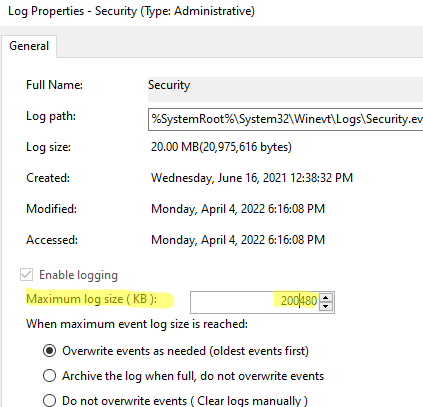
Не забудьте увеличить размер журнала Security со стандартных 20 Мб. Это позволит хранить история запуска приложения за более длительный период. Для этого откройте свойства журнала Security и увеличьте значение параметра Maximum log size.
Для анализа программ, запущенных пользователем можно использовать фильтры Event Viewer. Но это не очень удобно. Ниже я покажу несколько PowerShell скриптов который позволят вам получить удобные списки событий с историей запуска приложений пользователями. Для получения событий из журнала Event Viewer мы будем использовать команду Get-WinEvent:
$processhistory = @()
$today = get-date -DisplayHint date -UFormat %Y-%m-%d
$events=Get-WinEvent -FilterHashtable @{
LogName = 'Security'
starttime="$today"
ID = 4688
}
foreach ($event in $events){
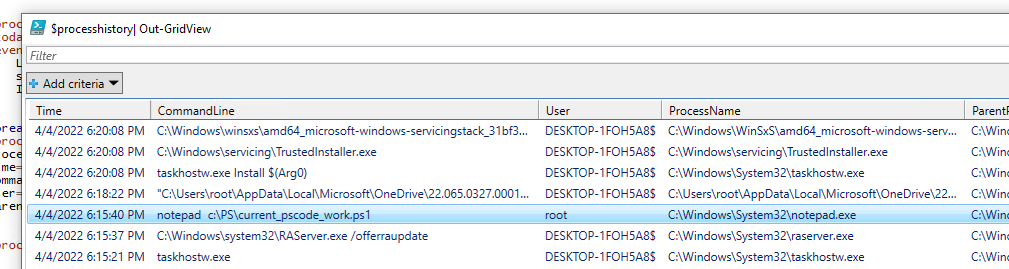
$proc = New-Object PSObject -Property @{
ProcessName=$event.Properties[5].Value
Time=$event.TimeCreated
 CommandLine=$event.Properties[8].Value
User=$event.Properties[1].Value
ParentProcess=$event.Properties[13].Value
}
$processhistory += $proc
}
$processhistory| Out-GridView
Данный PowerShell скрипт выберет все события запуска программ за сегодняшний день и выведет список процессов, времени запуска и пользователях в графическую таблицу Out-GridView.
Полученный массив объектов можно использовать для выполнения различных запросов.
Например,
- Найти всех пользователей, которые запускали определённое приложение:
$proc_name=”notepad++.exe”
$processhistory | where-object {$_.ProcessName –like “*$proc_name*”}|out-gridview
- Вывести список программ, которые запускал сегодня определенный пользователь:
$username="aivanov"
$processhistory | where-object {$_.User –like “*$username*”}|out-gridview

Такие скрипты часто используем для анализа запуска программ пользователей на серверах RDS фермы.
Также история запуска программ в Windows ведется в файле %SystemRoot%\AppCompat\Programs\Amcache.hve. Файл заблокирован Windows и прочитать его можно только, загрузившись с LiveCD или загрузочного/установочного диска. В файле есть метки запуска, установки/удаления программы, контрольные суммы исполняемого файла (SHA1). Для преобразования этого бинарного файла в текстовый формат нужно использовать сторонние утилиты (например, regripper).
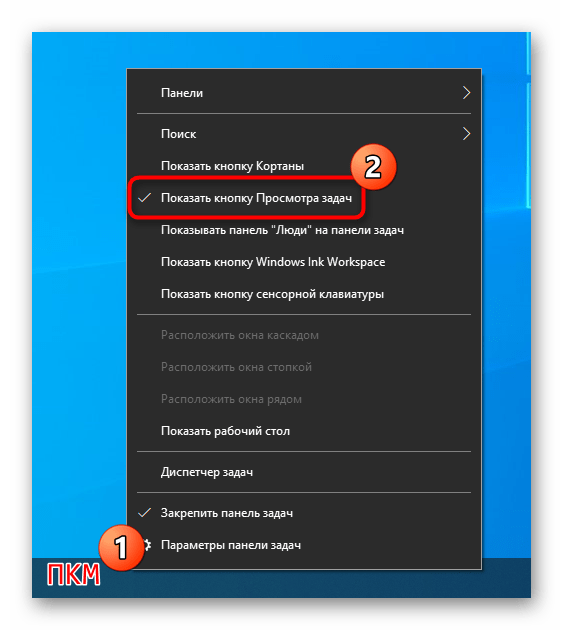
Способ 1: Кнопка «Просмотр задач»
В операционной системе Windows 10 реализована специальная кнопка на панели задач, нажатие на которую отображает все окна активных приложений. Но, помимо них, здесь отображаются еще и открытые папки.
Здесь же можно управлять рабочими столами: создавать новые, перемещаться между ними, удалять.
Читайте также:
Создаем и используем несколько виртуальных рабочих столов на Windows 10
Способы смены рабочего стола в Windows 10
Удаляем рабочий стол в Windows 10
Если кнопки «Просмотр задач» нет, то, возможно, она отключена. Кликните по нижней панели правой кнопкой мыши и отметьте пункт «Показать кнопку Просмотра задач».
Способ 2: «Диспетчер задач»
Чтобы посмотреть работающие программы в Windows 10, можно использовать штатное средство «Диспетчер задач». Он позволяет управлять процессами, следить за загруженностью ПК, а также предоставляет другие возможности.
- Кликните правой кнопкой мыши по нижней панели и выберите в меню запуск «Диспетчера задач». Можете использовать любой другой способ
Подробнее: Методы запуска «Диспетчера задач» в Windows 10
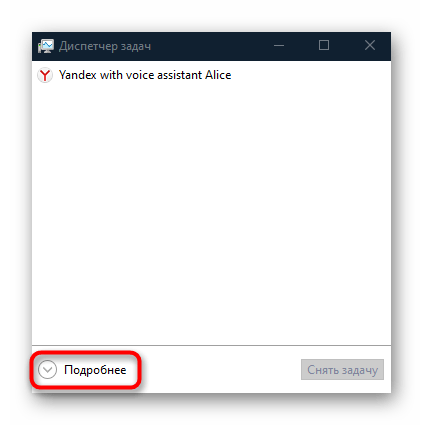
- Если менеджер запущен в свернутом виде, нажмите на кнопку «Подробнее», чтобы развернуть окно.
- На вкладке «Процессы» доступны все задачи, которые в данный момент работают, в том числе и в фоновом режиме. Все работающие программы отображаются в списке «Приложения».

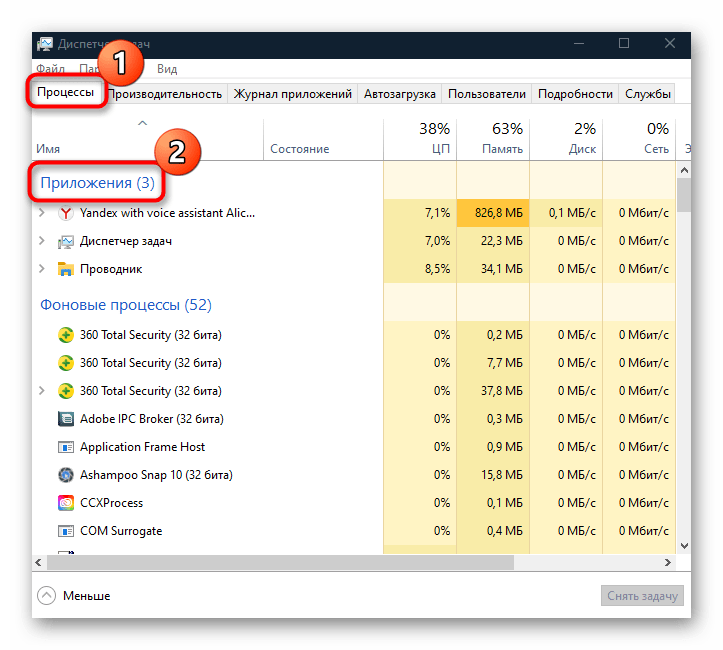
Некоторые приложения содержат несколько подпроцессов, представляющие собой совокупность работающих программных компонентов.
Функции «Диспетчера задач» предусматривают возможность прямо из его интерфейса принудительно завершать работу приложений.
В качестве альтернативы можно воспользоваться аналогичными программами, которые так же, как и штатный менеджер, отображают подробную информацию о работающих программах, процессах и службах. Только в отличие от «Диспетчера задач», в большинстве из них не реализована сортировка процессов и программ.
Подробнее: Альтернативы «Диспетчера задач» для Windows 10
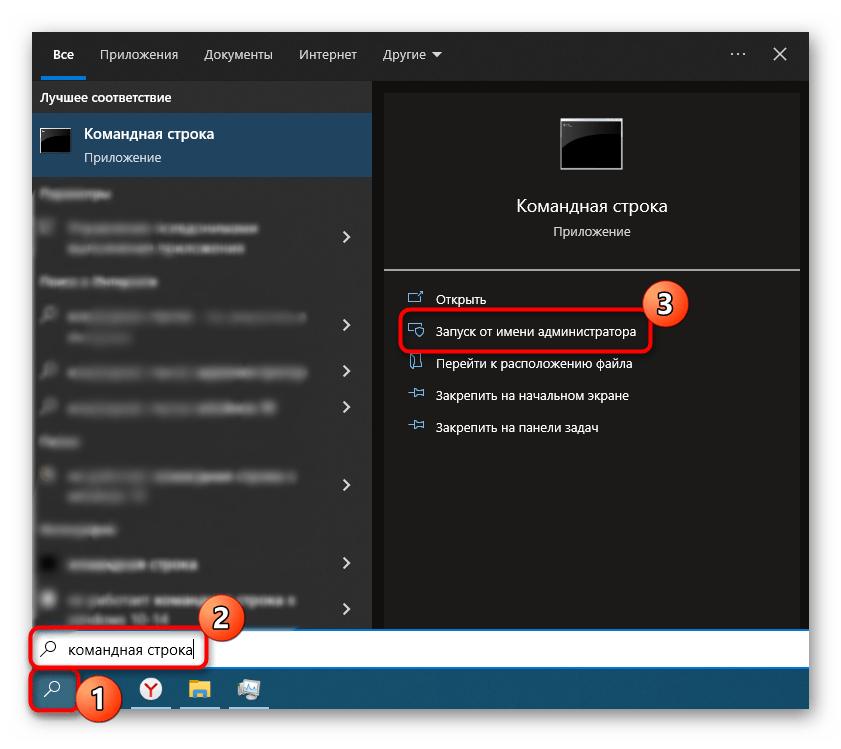
Способ 3: «Командная строка»
Через «Командную строку» можно посмотреть список запущенных процессов. Нюанс в том, что отображаются все задачи, в том числе и фоновые, а также различные службы, из которых сложно отыскать приложения. Но вы можете попробовать использовать команду:
- Запустите «Командную строку» от имени администратора, отыскав консоль через строку поиска.
- В окне введите
tasklistи нажмите на клавишу «Enter».
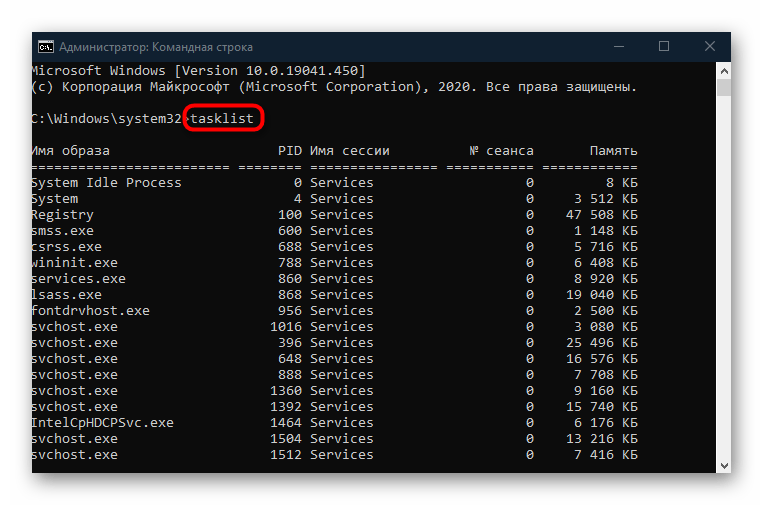
Как уже говорилось, таким способом вы увидите все процессы, что не всегда удобно. Но кроме названий есть возможность ознакомиться с дополнительными сведениями, например идентификатором или потребляемым объемом оперативной памяти.
Читайте также: Запуск «Командной строки» от имени администратора в Windows 10
Наша группа в TelegramПолезные советы и помощь
The Task Manager has been around since the release of Windows NT and Windows 2000. It is a useful tool for many. Apart from killing off “Not Responding” tasks, it can also be used to view resource consumption, hardware performance, manager startup apps, user and process details, services, and view app history and statistics.
Today, we are going to talk about the “App History” tab inside the Task Manager and how it can be used to view the history of all processes that are running and had run in the past, and gain some insight into its resource utilization, such as CPU time, network bandwidth consumption, etc.
Table of Contents
What is App History in Task Manager

The “App History” tab inside the Task manager shows you the resource utilization statistics of the different applications that had run on your computer in the past. It shows the accumulative CPU time and other network bandwidth consumption over time.
By default, the App History tab shows details for only the Microsoft Store applications, and other applications and programs are not included in the list. However, you can change this and view the history for all processes that had run on your computer. Note that the statistics for each app/process are only displayed since the last time the counter was reset.
The methods to view the history of all processes and reset the counter are discussed below in this post.
How to See History of All Processes in Task Manager
Using the steps below, you should be able to view the history of all processes that are currently running and have run in the past, on your Windows computer.
Note: Microsoft has recently updated the UI of the Task Manager with Windows 11 22H2. If you are on this OS version, then use the given method below to view the history of all processes. If you are using an older version of Windows 11 or are on Windows 10, then skip to the next section down below.
View History of All Processes on Windows 11 22H2
-
Open the Task Manager by pressing the CTRL + Shift + Esc shortcut keys and then open its settings by clicking on the gear icon in the bottom-left corner.

Open Task Manager settings -
Here, under Other options, check the box next to “Show history for all processes.”
Enable show history for all processes -
Now switch to the App History tab and you should now see all of the processes and their respective details.
App History tab in new Task Manager You should now be able to see the usage history of all the apps and processes.
-
(Optional) Here, right-click on any column’s header and select or unselect which information you wish to view about the processes from the context menu.
Select details to view or hide You can also arrange the processes by a specific column in a descending or ascending manner by clicking on the respective header.


As you can see in the image above, the App History tab now includes the history of all the processes and apps, as opposed to the default Microsoft Store apps only.
You can also uncheck the same option in the Task Manager settings to disable show details for all processes in the Task Manager.
View History of All Processes on Windows 11/10
Use the guide below to view the usage history of all the processes in the Task Manager if you are using Windows 11 21H2, or Windows 10.
-
Open the Task Manager by pressing the CTRL + Shift + Esc shortcut keys and then switch to the App History tab.

Switch to the App History tab -
Now click Options from the top menu and then click “Show history for all processes.”
Enable show history for all processes


You should now be able to see all of the processes in the App History tab along with their past statistical data.

If you wish to view only the history of the Microsoft Store apps again, simply click on Show history for all processes inside the Options menu to disable it.
Open App & Process Details
Regardless of which Windows version you are using, you can open an app directly from the App History tab and view the details of the individual processes.
Note that you can only open the Microsoft apps and view the details of the processes from the App History tab.
To open an app, right-click on the app and then click Switch To.

If you wish to view the details of a process, right-click it and then click Properties from the context menu.

This opens the Properties window where you can find all sorts of information about the process, including the file responsible for the process, its copyright holder, etc.

If you still need more information, then you can also perform a quick online search by clicking Search online from the context menu.

Windows then uses the default search engine and opens the results for the process name in the default web browser.
Reset Usage History
As we mentioned earlier, the App History tab only contains the information till the time it was last reset. You can see the last reset date near the top of the Task manager window.

You can also reset the entire data by clicking Delete usage history.

This will reset all the statistical data and begin recording the app and process usage history from that time onwards.
Closing Words
The Task Manager can do much more than what we have discussed today. It has integrated performance monitoring tools for the different hardware components, and you can also manage the Windows services too.
As far as the App History tab is concerned, it is all the tab is capable of at the moment. We found that the information per app/process is currently very limited. For example, we cannot see the disk or RAM utilization for each item, when was the last time it was run, etc.
We certainly hope that Microsoft will eventually add these features for us to be able to get more insight into our system usage habits.
Applies ToPrivacy Windows 11 Windows 10 Microsoft account dashboard
Activity history helps keep track of the things you do on your device, such as the apps and services you use, the files you open, and the websites you browse. Your activity history is stored locally on your device.
You can manage activity history settings to choose what to store.
Features that use activity history
The following Windows features use your activity history. Refer back to this page after Windows releases and updates to learn about any new services and features that use your activity history:
-
Timeline. See a timeline of activities and choose whether to resume those activities from your device. For example, let’s say that you are editing a Word document on your device, but you aren’t able to finish before you have to stop working for the day. If you turn on the Store my activity history on this device setting on the Activity history settings page, you will see that Word activity in your timeline the following day—and for the next several days—and from there, you can resume working on it.
-
Microsoft Edge. When you use Microsoft Edge Legacy, your browsing history will be included in your activity history. Activity history will not be saved when browsing with InPrivate windows.
Your Microsoft account settings don’t allow you to send your activity history to Microsoft, but your activity history will be stored on your device to help keep track of the things you do.
Activity history for multiple accounts
For multiple accounts, activity history is collected and stored locally for each local account, Microsoft account, or work or school account that you have associated with your device in Settings > Accounts > Email & accounts. You can also see these accounts in Windows 10 under Settings > Privacy > Activity history and in Windows 11 under Settings > Privacy & security > Activity history, where you can filter out activities from specific accounts from showing in your timeline. Hiding an account does not delete the data on the device.
Manage activity history settings
Activity history is customizable—at any time, you can choose to stop saving activity history.
Stop saving activity history locally on your device
-
Select Start , then select Settings > Privacy & security > Activity history.
-
Switch the Store my activity history on this device setting to Off.
Open Activity history settings
Note: The option to send activity history to Microsoft has been deprecated from Windows 11 23H2 and 22H2, January 23, 2024-KB5034204 update. Previous Windows 11 versions before this update would still have the option available on their activity history page, and if enabled, activity history data will still be sent to Microsoft. You can either turn this option off or update to the latest Windows version to get the most recent updates.
You can clear and delete the activity history stored on your device.
Clear your activity history
-
Select Start , then select Settings > Privacy & security > Activity history.
-
Next to Clear activity history for this account, select Clear history.
Note: If you have previous activity history stored in the cloud before Windows 11 23H2 and 22H2, January 23, 2024-KB5034204 update, you can use the Clear activity history button to delete previously stored data in the cloud. Otherwise, your activity history will be automatically deleted within 30 days from when your data was last synced to the cloud.
Need more help?
Want more options?
Explore subscription benefits, browse training courses, learn how to secure your device, and more.