
Last Updated :
25 Apr, 2025
Have you ever needed to check what documents you’ve printed from your Windows computer? Maybe you’re trying to find a file you printed a while back, or you want to see if someone else has been using your printer. Windows can keep track of your printed document history, but it’s not something you can see right away—you need to turn it on first. Once it’s set up, checking your print history is easy and super helpful for staying organized or solving printer problems.
In this blog, we’ll explain how to view your printed document history on Windows in simple steps. We’ll show you how to switch on the history feature and where to find it, whether you’re using Windows 10 or 11.
Where is the History of Printed Documents Saved?
The history of printed documents is stored in different locations based on the method you are using to track the prints. For example, Windows logs printing activities in the Event Viewer, while detailed print logs can be found in the Print Management tool. Third-party software might store print logs in its database.
- Windows Event Viewer: Logs are stored in the Windows Event Viewer under
Windows Logs > Application. - Print Management: Logs can be accessed within the Print Management tool under
Print Servers > [Your PC] > Printer Queues. - Third-Party Software: Logs are saved in the software’s database or in a file that can be exported for review.
The location depends on whether you’re using native Windows tools or third-party applications, and how you’ve set up logging or monitoring features.
Needs to View Printer History on Windows
- Track Important Prints: You might need to find a document you printed, like a receipt, ticket, or form, to confirm it was done or to reprint it if lost.
- Monitor Printer Use: If you share a printer, checking the history helps you see who’s been printing and what, keeping tabs on usage.
- Troubleshoot Problems: If a print job failed or didn’t come out right, the history can show you what went wrong or if it even went through.
- Organize Work: For projects or jobs, knowing what you’ve printed helps you stay on top of tasks and avoid duplicates.
- Verify Actions: You may need proof of printing something, like for work or school, and the history gives you that record.
How to View Printer History on Windows 10 and 11
Note: The methods for viewing the printer history are the same for both Windows 10 and Windows 11. You can follow the steps below for either version.
In both Windows 10 and 11, you can view the printed document history by using built-in tools like Event Viewer or Print Management. These methods allow you to check which documents were printed, when they were printed, and by which printer.
Method 1: Using the Event Viewer
The Event Viewer is a built-in Windows tool that logs various system events, including printing activities. By filtering the right logs, you can view the printed document history.
Step 1: Open Event Viewer
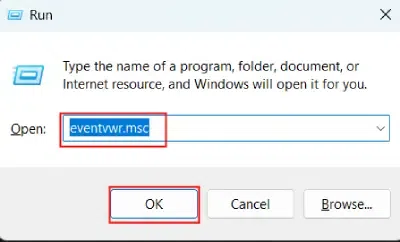
- Press
Win + Rto open the Run dialog box. - Type
eventvwr.mscand press Enter.
Step 2: Navigate to Applications and Services Logs
- Applications and Services Logs > Microsoft > Windows.
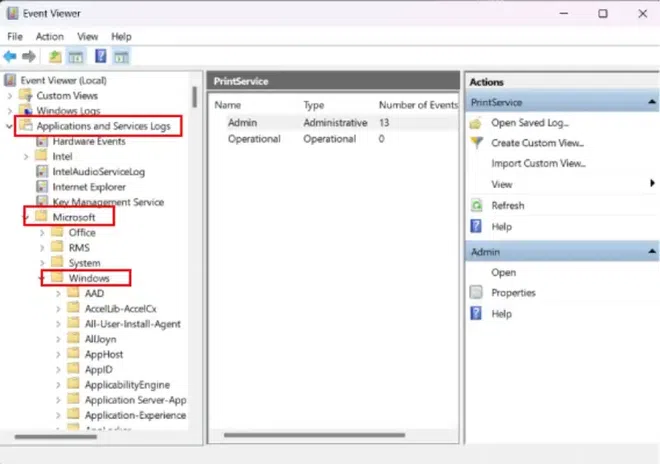
Step 3: PrintService
- Now locate the PrintService folder within the Windows folder.
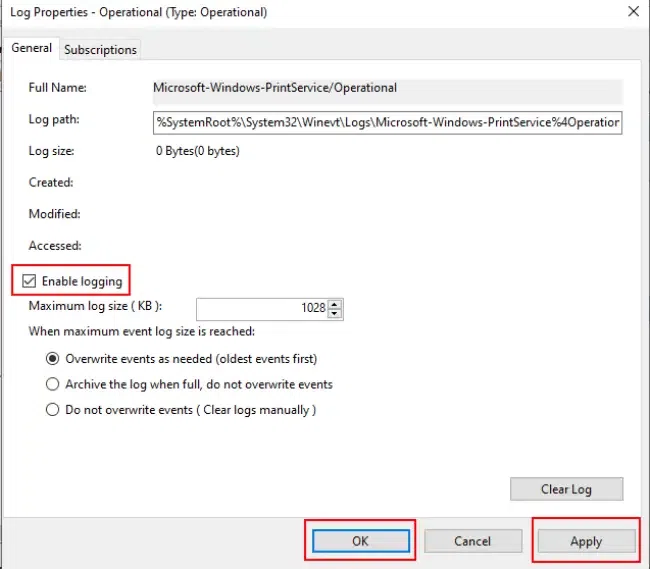
Step 4: Go to Operational > Properties
- Right-Click on Operational then click on properties > Tick on Enable logging.
- Click on Apply then hit OK.
Step 5: Examine Document Details
- Click on any event to see detailed information about the printed document, including the document name and time.
Method 2: Using Print Management
Print Management is another tool available in both Windows 10 and 11, allowing you to view detailed print logs, including the document name, status, and user information.
Step 1: Open Print Management
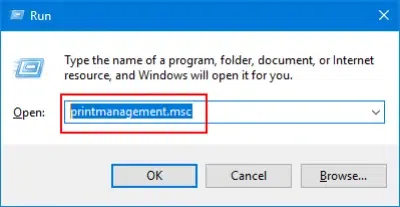
- Press
Win + Rto open the Run dialog box. - Type
printmanagement.mscand press Enter.
Step 2: Navigate to Print Server
- In the Print Management window, expand
Print Servers. - Go to Test(Local), then go to Printers.
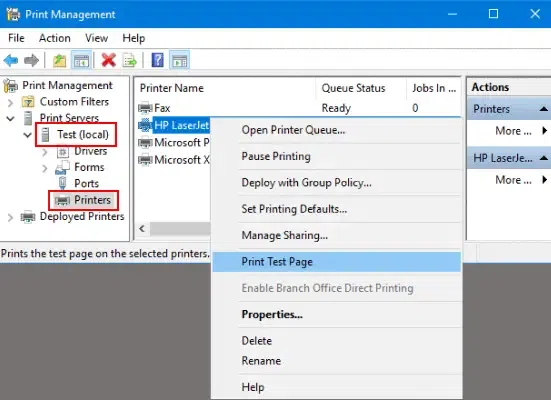
Step 3: Select Printer and View History
- Click on the printer for which you want to view history.
- You will see a log of recent print jobs with information like the job status, time, and user.
If you want more advanced features or easier access to print logs, third-party tools can provide enhanced printing logs and tracking capabilities.
Step 1: Download a Third-Party Tool
- Tools like
PaperCutorPrint Inspectorcan track print jobs in more detail. - Download and install one of these tools based on your preference.
Step 2: Configure the Tool and View the Logs
- Follow the tool’s setup instructions to integrate with your printer and track print history.
- After setting it up, open the third-party tool and navigate to the log section to view detailed printing history.
Troubleshooting Tips
Sometimes, you may encounter issues when trying to view your printer history. Here are some common problems and their solutions:
- Print History Not Showing Up: Make sure that the print logging feature is enabled on your printer. In Event Viewer or Print Management, ensure that you’ve applied the correct filters for print-related events.
- Logs are Not Detailed Enough: Some printers may not log detailed information. Consider using third-party tools for enhanced logging features.
- Unable to Open Event Viewer or Print Management: Check if your user account has administrative privileges. If not, try logging in as an administrator.
- Logs Show Incorrect Information: This could happen if the printer’s configuration is incorrect. Double-check printer settings or reset the printer queue.
Also Read:
- Windows 11 vs. Windows 10
Conclusion
Viewing printer history in Windows can be an essential way to monitor printing activities, troubleshoot issues, or maintain documentation. Both Windows 10 and 11 provide several built-in methods such as Event Viewer and Print Management, as well as third-party tools for more comprehensive logging. Make sure to explore the methods above and choose the one that best suits your needs.
There may be a number of reasons why you may want to check the log of the printed documents for your PC.
You may want to review which files you should have in hard copy or you may simply be interested in how much volume you print in a period of time.
Unfortunately, checking the history of a printer is not as straightforward as one might think — or as it probably should be.
If you are wondering “how do I check my print history in Windows 10?”, you’ve come to the right place — we will address your concern right down below.
How to View the Log of Printed Documents in Windows 10?
By default, your printed document history is deleted after each file has been printed.
Thankfully, it does not have to be this way and you can change this option in the settings.
This way, your printing log won’t be automatically wiped after each printing process.
You will need to change this setting for every printer that has been installed on your computer.
In order to change the settings for your printers, you will need to access your print queue.
Here’s how to do that:
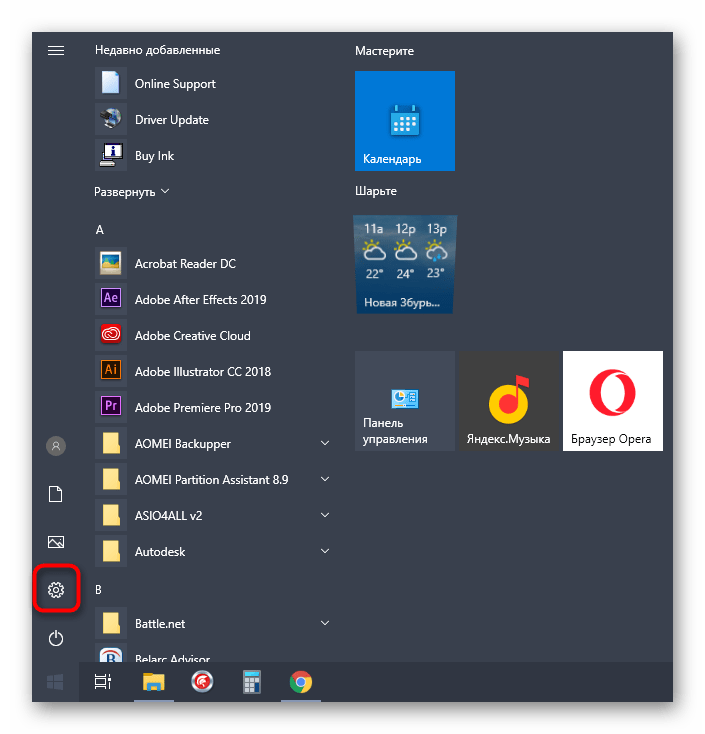
- Right-click the Windows Start menu button.
- Go to Settings.
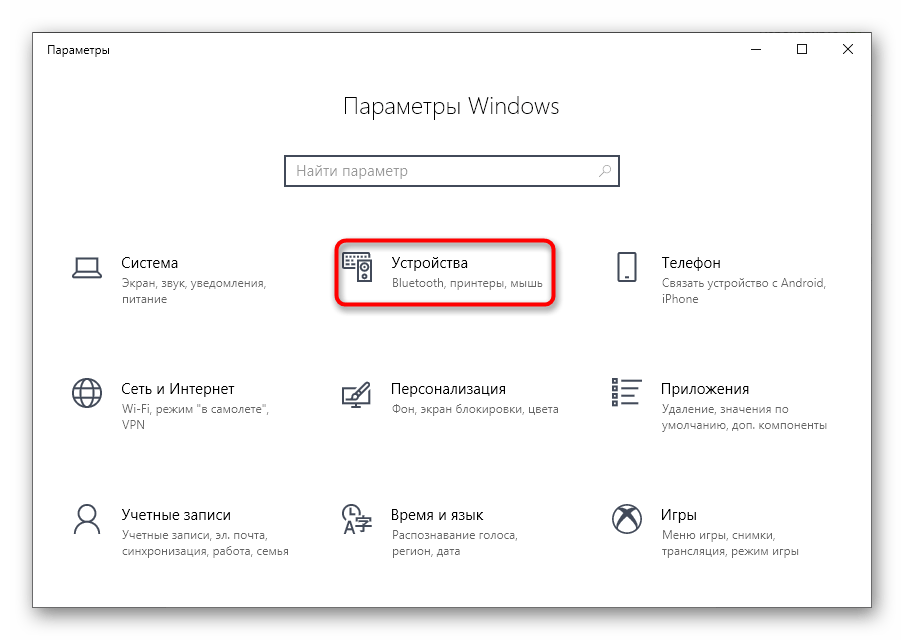
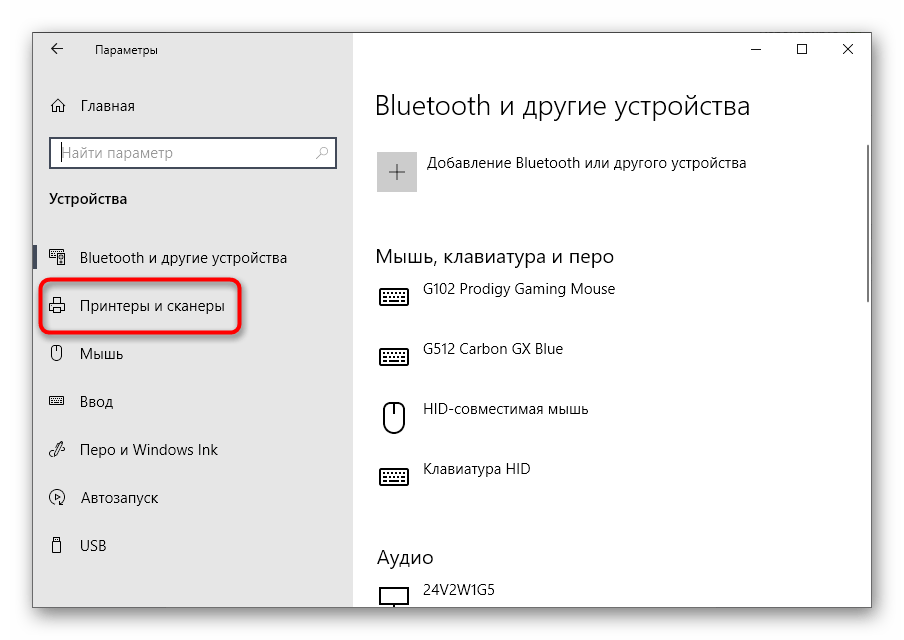
- From here, navigate to Devices > Printers & Scanners.
- From the list of available printers and scanners, find the needed device
- Click it and then click Open Queue.
- In the new window, you will see your printer queue with the list of current and queued printed items.
- You will not be able to see the documents that had been printed earlier as logging was not enabled at that time.
Now, you will need to activate the printer history feature. Here’s what to do:
- In the print queue window for your selected printer, navigate to Printer > Properties.
(Alternatively, you can select your printer, go to the settings menu, and under Printers & Scanners, click Manage).
- Under Printer Properties, click Advanced.
- Select the Keep Printed Documents option.
- Click OK to save the changes you have made.
- Now that you have enabled your printed document history, your documents will no longer disappear from your print queue after they have been printed.
Also Read: How Do I Align Printer Cartridges in Windows 10?
How to Enable Long-Term Print History?
The print queue you have just enabled will provide a short-term overview of the documents that you have previously printed.
However, if you want to be able to see a long-term list of the documents you have printed, you will need to take a few extra steps and use the Windows Event Viewer. Here’s how to proceed:
- Right-click your Windows Start menu button.
- Locate the Event Viewer option and click it.
- The Event Viewer will let you see a list of previously printed files but there is another thing you will need to do to make it happen: you will need to set Windows to start logging your long-term printer history first.
In order to enable the print history feature in Event Viewer, you will need to do the following:
- On the Windows Event Viewer page, go to the Event Viewer (Local) menu on the left.
- Here, navigate to Applications and Services Logs > Microsoft > Windows.
- You will find a range of Windows services.
- Scroll all the way down to the PrintService category.
- Now, right-click the Operational log and then press the Properties button.
- Click the Enable Logging option.
- You will then be asked to set a maximum size for the log: the larger the size you set it, the longer Windows will record your printed document history.
- Click OK to save the changes you have made.
From now on, Windows will automatically log the printing history for all the printers that are connected to your PC and you will be able to access that information within Event Viewer.
Also Read: Why Is My Printer Offline? Quick Fixes to Get It Back Online
Where is the History of Printed Documents Saved?
Once you have completed the steps described above and have enabled your printer history, your system will keep a log of the documents you have printed. However, how do you access this information?
You will be able to see the log of your printed files in the Event Viewer:
- Locate and open the PrintService category and then go to the Operational log.
- Here, you will be able to see all Windows printer events including initial printer spooling, completed and failed prints.
- If you go to the Task Category, you will see the section called Printing a Document. This is where you will see a list of documents that have been successfully printed. Here, you will also find a list of files that have failed to print.
If you think that this is not clear enough, you can group your print logs by category. Here’s how to do that:
- Right-click the Task Category heading.
- Press the Group Events by This Column button.
- Your items will now be organized by category and you will probably find it easier to locate the needed logs.
There you have it. You have now successfully enabled the option for viewing your printing logs.
Now, anytime you need to check what files you have printed on your PC, simply follow the steps described above and you will get the needed info.
Alternatively, if you don’t want to change settings on your computer, you can also use third-party programs to view your printing history.
Also Read: How to Rename a Printer in Windows 10?
Conclusion
In order to ensure that all the elements in your system are working properly, consider installing professional speed-enhancing software like Auslogics BoostSpeed.
Download Auslogics BoostSpeed
Your one-stop PC maintenance and optimization tool, this program will clean, speed up, repair and tweak your system to ensure maximum speed and efficiency.
The program will run a complete scan of your computer, locate speed-reducing issues (unneeded system and user temporary files, leftover Windows Update files, temporary Sun Java files, unneeded Microsoft Office cache and more) and safely get rid of them.
This way, you will be freeing gigabytes of space on your PC without wasting time on deleting all of these files manually.
Moreover, Auslogics BoostSpeed will tweak non-optimal system settings and speed up standard processes and operations.
Do you often check the print logs on your computer? Share in the comments below.
Все способы:
- Способ 1: Встроенная функция сохранения документов
- Способ 2: Окно «Очередь печати»
- Способ 3: Окно событий принтера
- Способ 4: Приложение «Просмотр событий»
- Способ 5: O&K Print Watch
- Вопросы и ответы: 3
Способ 1: Встроенная функция сохранения документов
Практически каждый принтер обладает стандартным набором настраиваемых параметров, которые устанавливаются на компьютер вместе с драйвером. К ним относится и функция сохранения документов после печати, позволяющая вести историю. Однако для этого опцию сначала потребуется активировать, что происходит так:
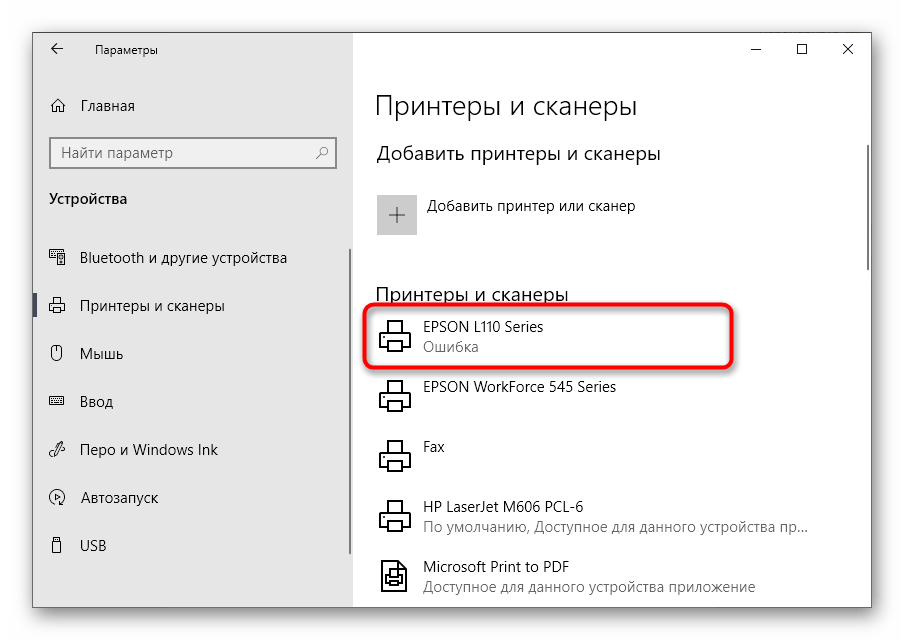
- Откройте меню «Пуск» и вызовите «Параметры».
- Выберите раздел «Устройства».
- Через панель слева перейдите к категории «Принтеры и сканеры».
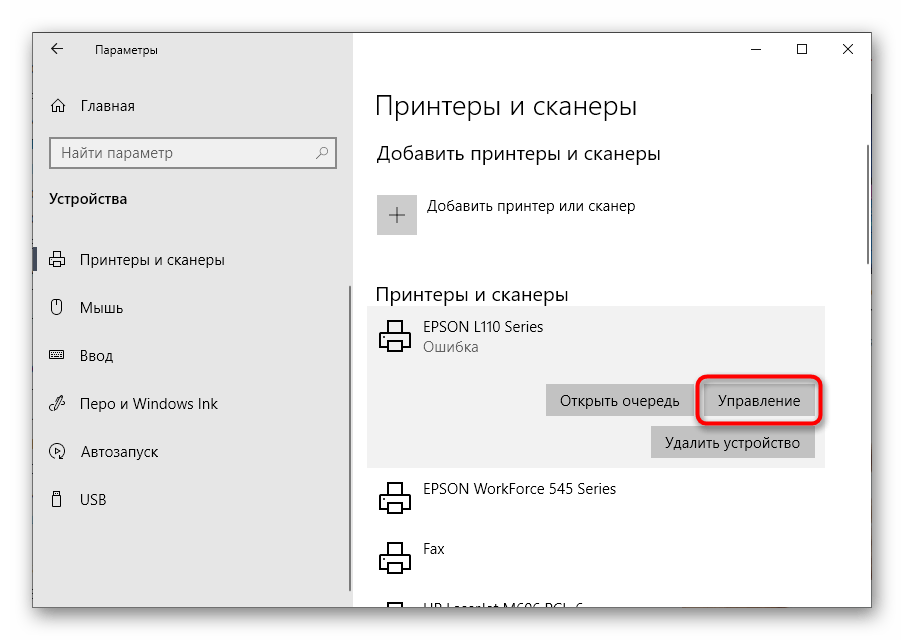
- В списке отыщите требуемый для настройки принтер и нажмите по нему левой кнопкой мыши.
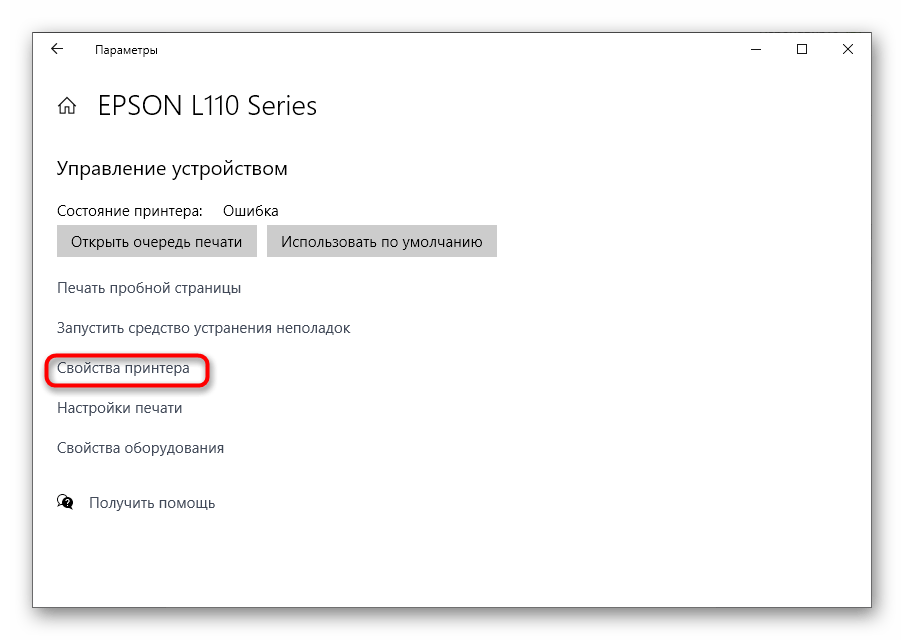
- Появится несколько кнопок, позволяющих взаимодействовать с оборудованием. Сейчас вам интересна только «Управление».
- В появившемся меню отыщите кликабельную надпись «Свойства принтера» и нажмите по ней для перехода в соответствующее меню.
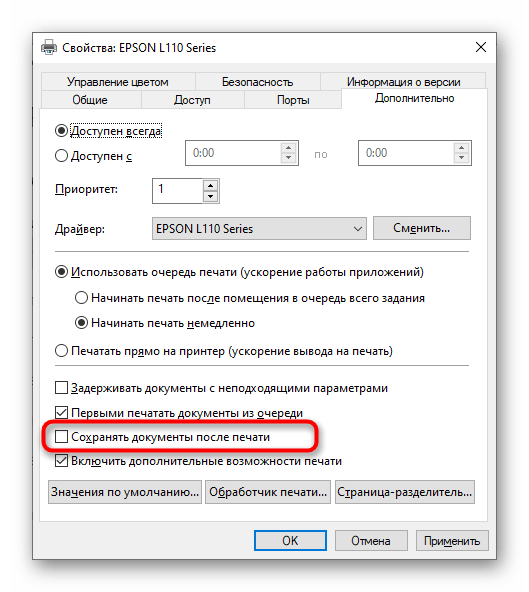
- Находясь на вкладке «Дополнительно», поставьте галочку возле пункта «Сохранять документы после печати».

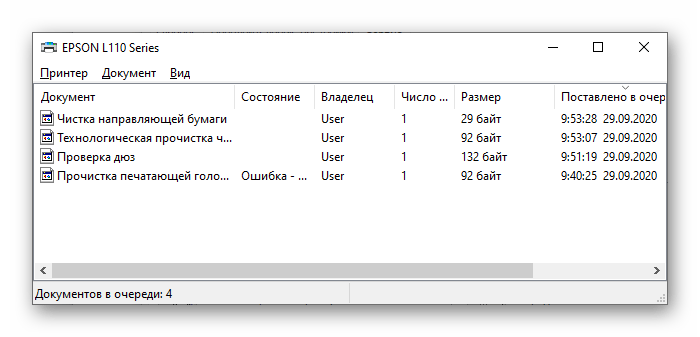
Остается только отправить в печать любой документ, чтобы проверить, как работает этот инструмент сохранения истории. Папка с файлом должна отобразиться автоматически, а если этого не произошло, найдите его по названию или загляните в стандартную директорию «Документы» для понимания того, куда этот инструмент в дальнейшем будет сохранять все файлы.
Способ 2: Окно «Очередь печати»
Для некоторых принтеров настройка «Сохранять документы после печати» действует иным образом, просто оставляя записи в «Очереди печати». Иногда история сохраняется самостоятельно, например, когда устройством одновременно управляют с нескольких компьютеров. Впрочем, ничего не помешает открыть окно и посмотреть, записывается ли она.
- В том же меню управления печатающим оборудованием выберите пункт «Настройки печати».
- Откройте вкладку «Сервис», где располагается необходимая функция.
- Среди списка всех доступных инструментов отыщите «Очередь на печать» и сделайте клик левой кнопкой мыши по этому блоку.
- Просмотрите те документы, которые сейчас находятся в очереди или уже были распечатаны, следя за их состоянием в специально отведенном для этого столбце.


Способ 3: Окно событий принтера
По умолчанию операционная система запоминает все события, связанные с определенными девайсами, к которым относятся и принтеры. Это позволяет просмотреть, в какое время и какой документ был отправлен в печать. Первый вариант, подразумевающий взаимодействие с этим меню, реализовывается так:
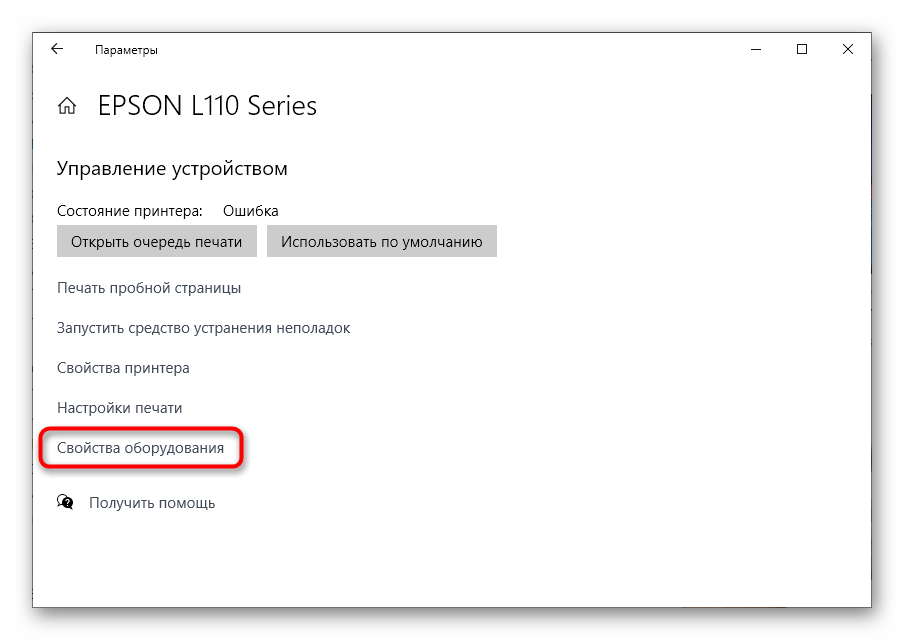
- Через «Параметры» найдите принтер и перейдите к окну управления им.
- Там выберите пункт «Свойства оборудования».
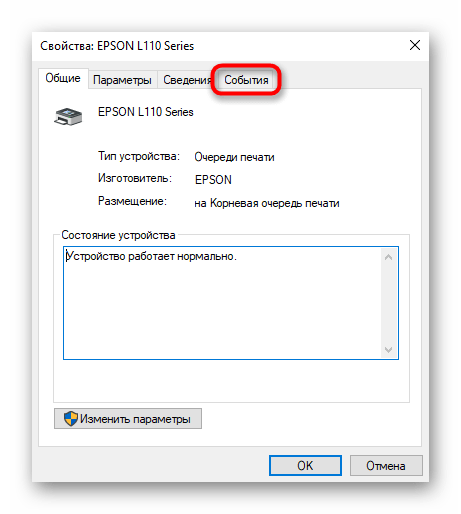
- В новом появившемся окне откройте вкладку «События».
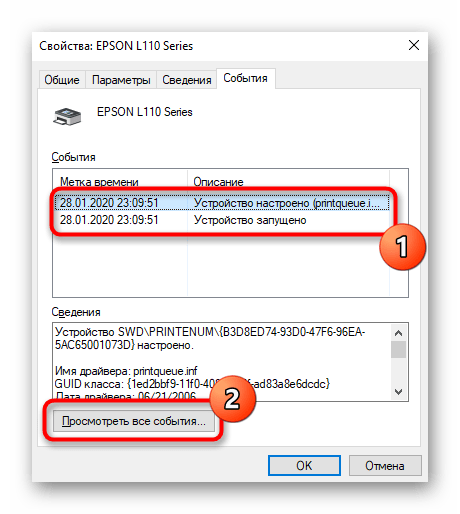
- В блоке с событиями вы можете найти сохраненные действия и посмотреть подробные сведения, чтобы узнать, какой документ был запущен в печать. Если конкретного события здесь найдено не было, нажмите по кнопке «Просмотреть все события».
- Откроется раздел «Диспетчер устройств» актуального принтера, где ознакомьтесь со всеми последними событиями и найдите интересующие.
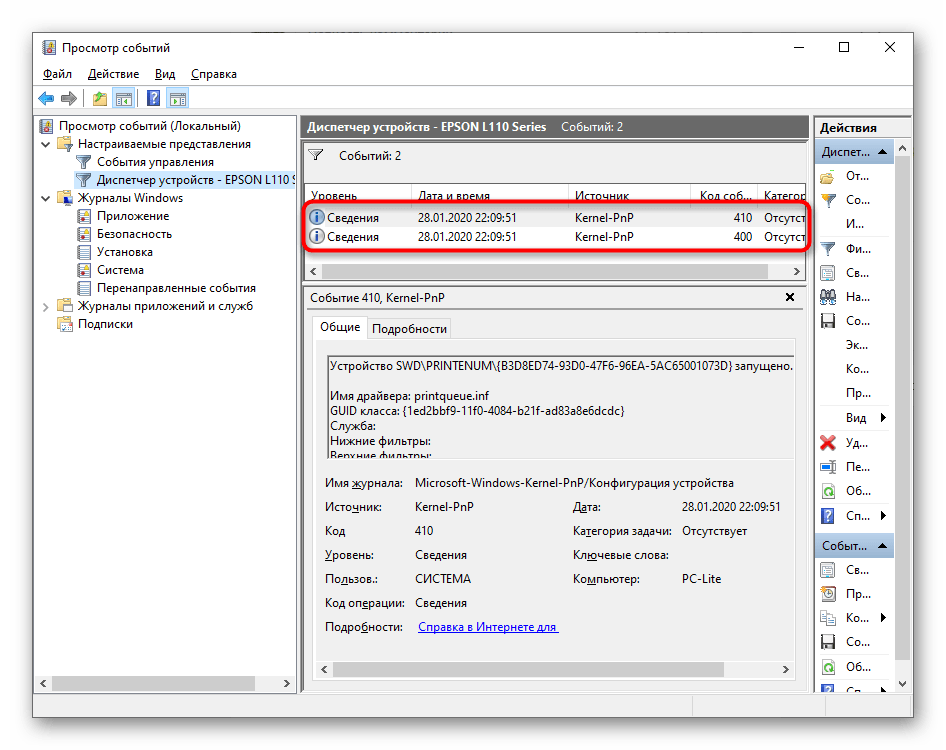
Если «Диспетчер устройств» не создал отдельный блок с событиями для этого оборудования, значит, подойдет следующий метод их просмотра, который связан с системным журналом.
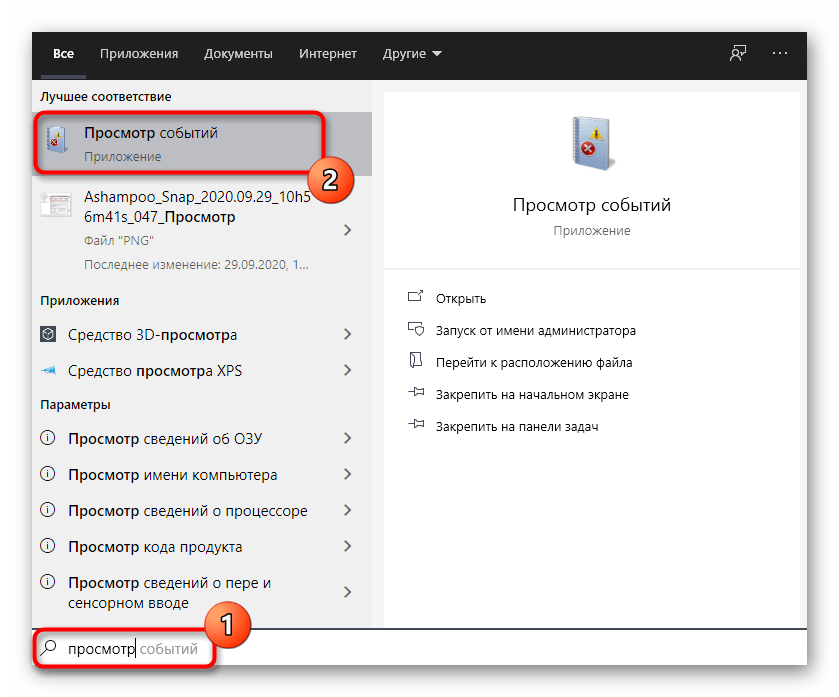
Способ 4: Приложение «Просмотр событий»
Приложение «Просмотр событий» позволяет отследить все действия, выполняемые в операционной системе, в том числе и найти перечень документов, которые были отправлены в печать за последнее время.
- Для этого отыщите само приложение, например, воспользовавшись поиском по меню «Пуск», а затем запустите его.
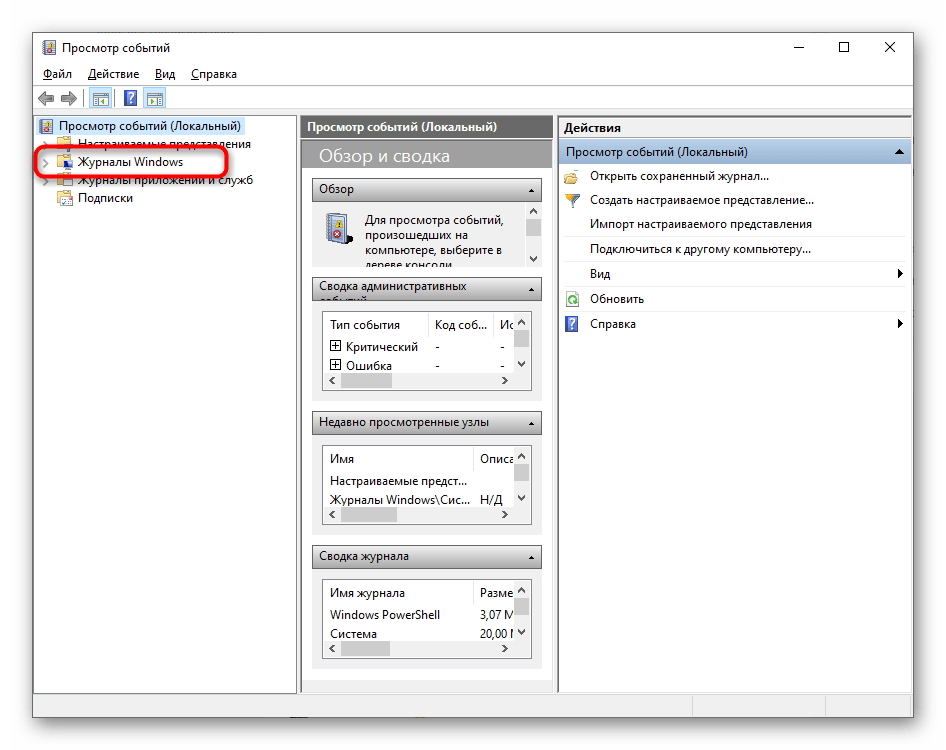
- Разверните блок «Журналы Windows».
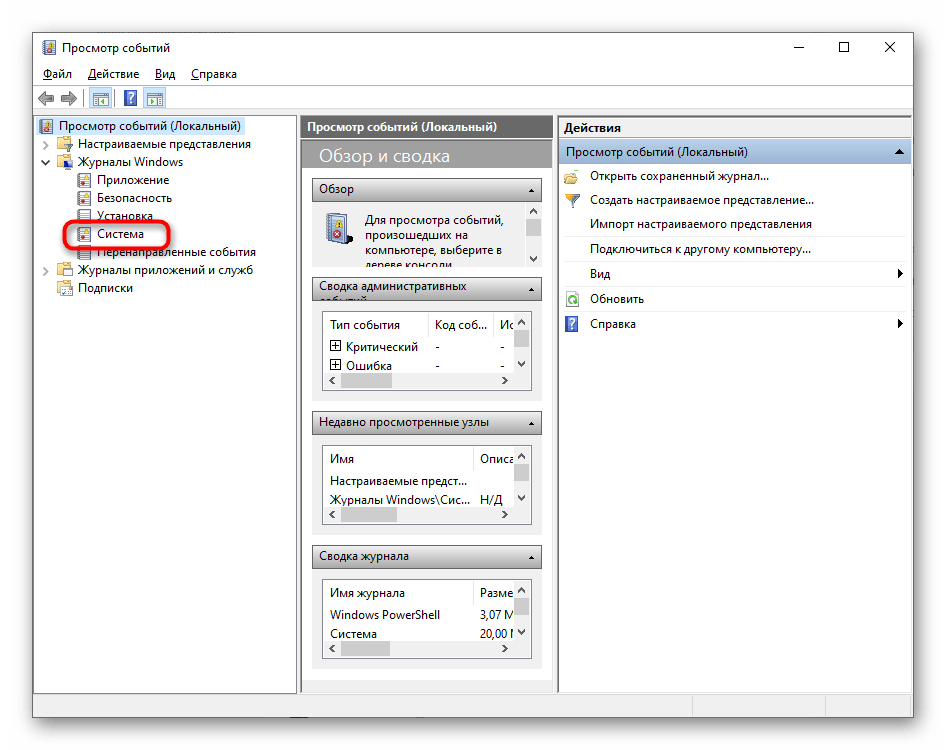
- Откройте раздел под названием «Система».
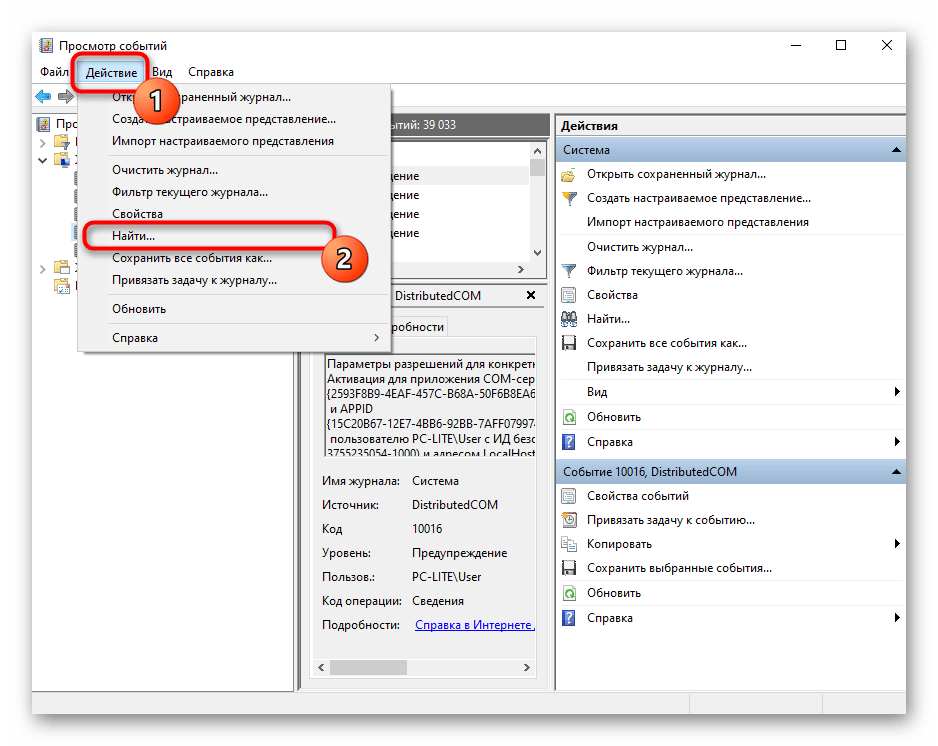
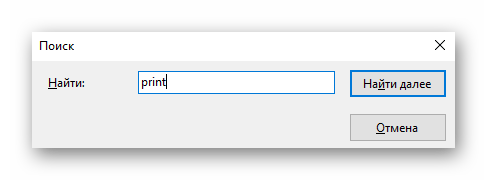
- После этого проще всего воспользоваться меню «Действие» и выбрать там инструмент «Найти».
- Введите ключевую фразу
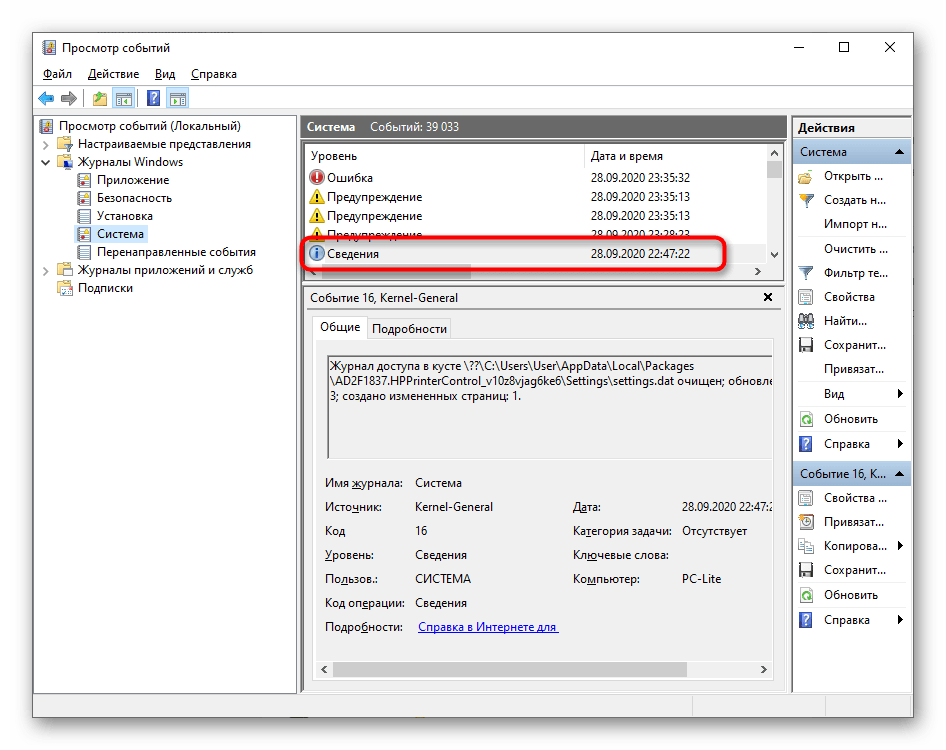
printдля поиска и начинайте просматривать все события, связанные с ней. - После того, как найдете сведения о печати, ознакомьтесь с ними, чтобы определить дату отправки в печать и адрес самого файла.
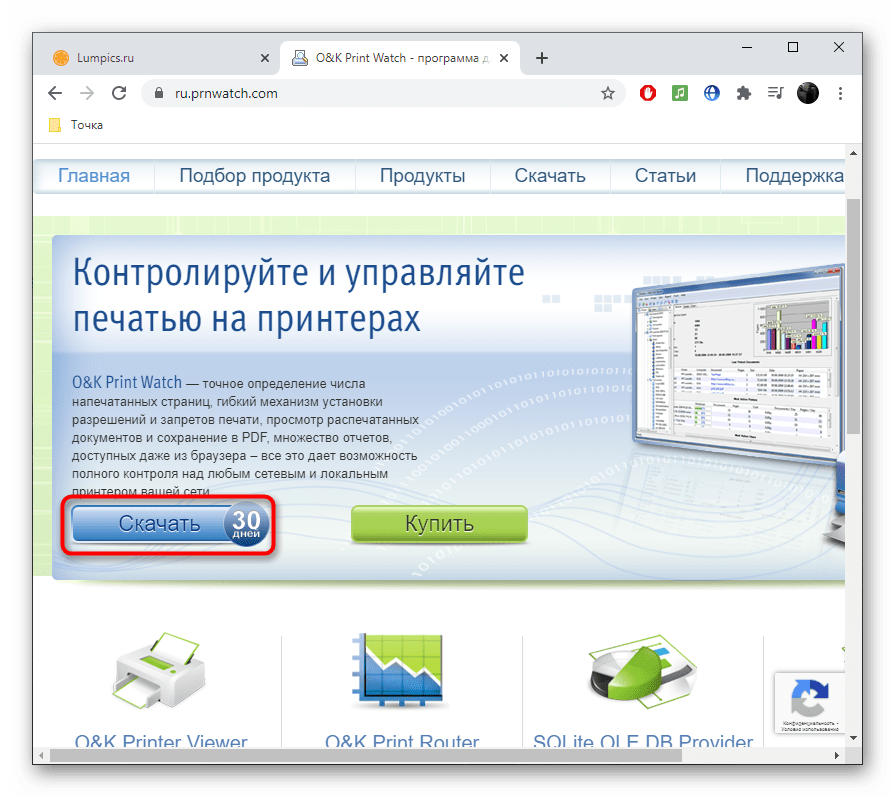
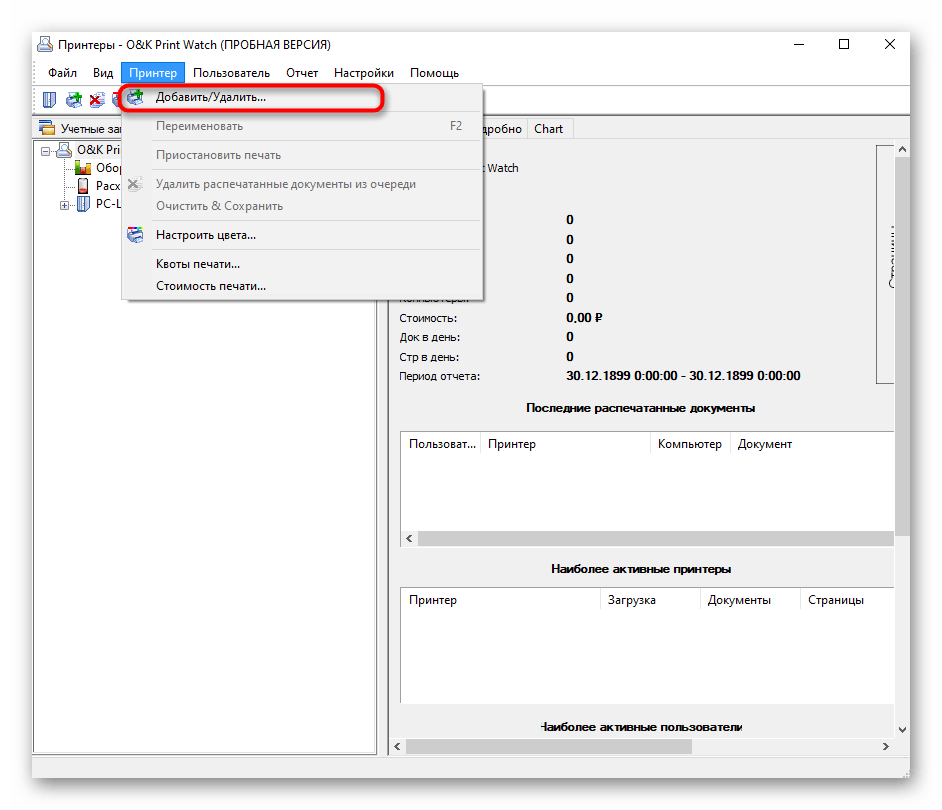
Способ 5: O&K Print Watch
Если вас не устраивают стандартные способы получения истории печати или они не предоставляют необходимый уровень информации, обратите внимание на продукт от сторонних разработчиков под названием O&K Print Watch. Он позволяет контролировать печать на всех принтерах, подключенных к компьютеру, и сохраняет историю.
Скачать O&K Print Watch
- Откройте ссылку выше и скачайте программу с официального сайта.
- Запустите полученный исполняемый файл и следуйте инструкциям для выполнения стандартной инсталляции.
- Запустите софт и сразу же добавьте принтер, если этого не было выполнено автоматически.
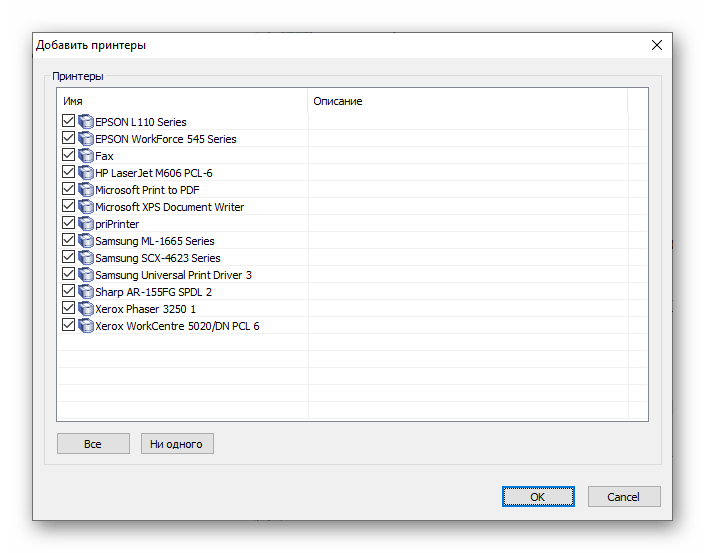
- Отметьте галочками все необходимые устройства, за которыми хотите следить.
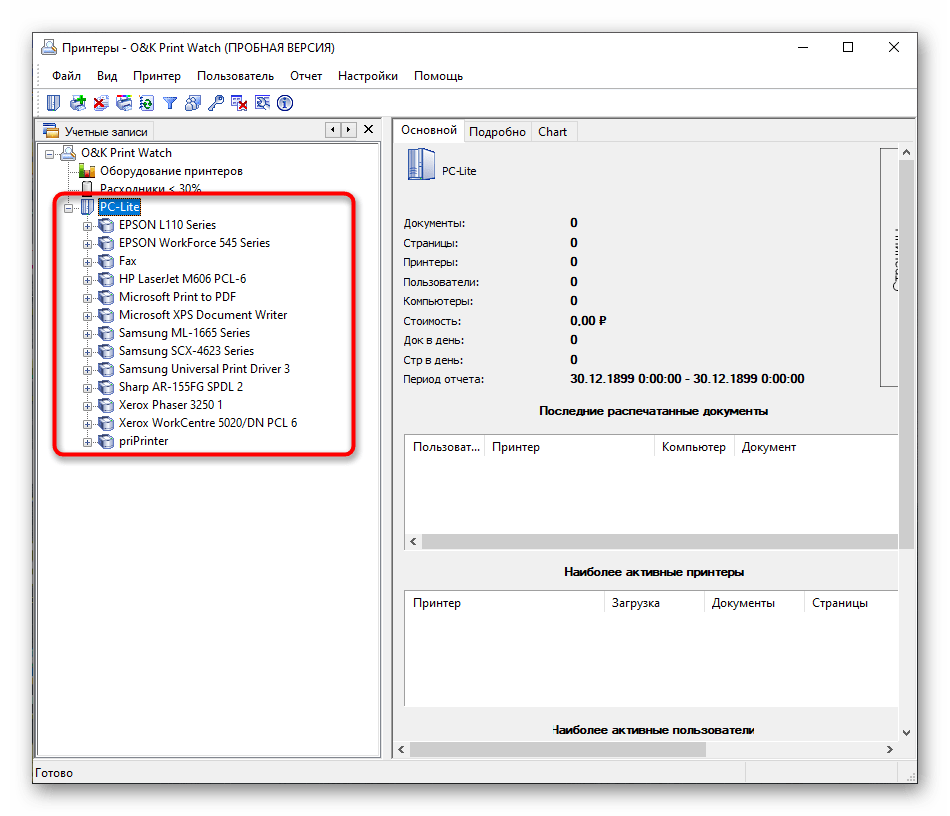
- Разверните каталог своего пользователя и кликните по названию принтера, чтобы просмотреть сведения о нем.
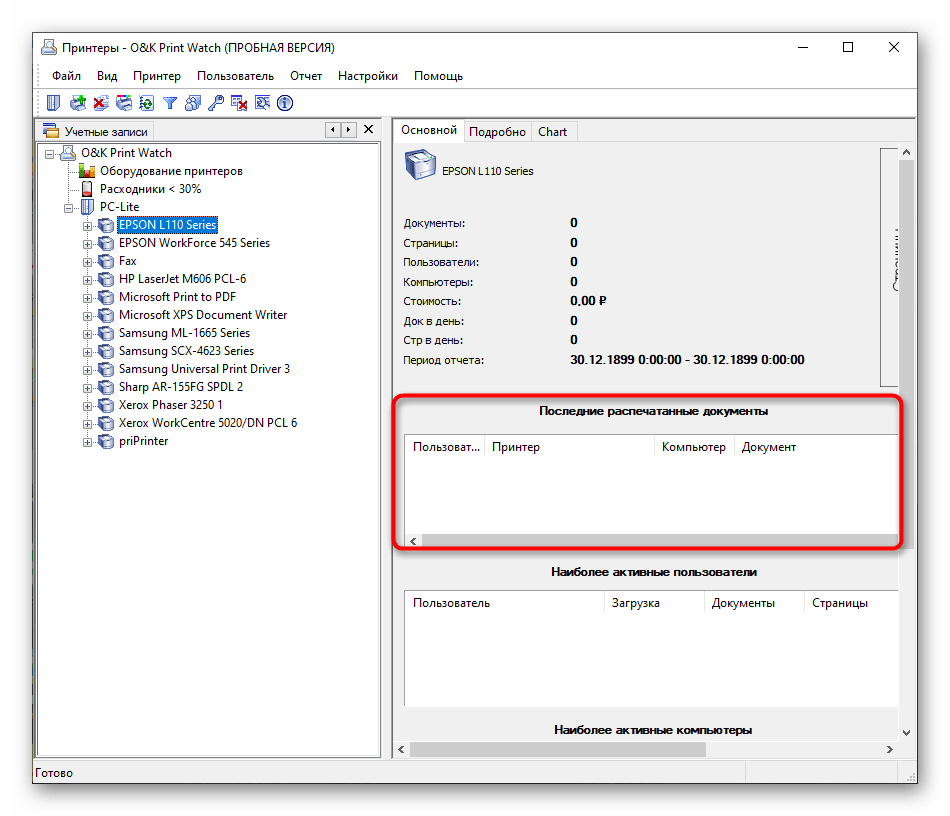
- Просмотрите содержимое таблицы «Последние распечатанные документы».

В O&K Print Watch присутствуют и другие продвинутые опции, предназначенные для активных пользователей принтеров. Узнайте о них на официальном сайте или в пробной версии софта, а затем решите, хотите ли вы приобретать его для постоянного использования.
Наша группа в TelegramПолезные советы и помощь
В Windows есть штатная возможность аатоматически вести журнал печати, историю распечатанных документов.
Маленькая неприятность в том, что по умолчанию она отключена.
Соответственно, сначала нужно однократно включить ведение журнала печати, а далее уже можно просматривать историю.
В современных версиях Windows 10, 8, Windows Server 2012, 2016 включить историю печати можно следующим образом:
- Запустить Панель управления. Например, через командную строку командой control или через меню.
- Зайти в раздел «Администрирование» и выбрать пункт «Просмотр событий».
- Перейти в раздел «Журналы приложений и службы».
- Последовательно перейти по веткам Microsoft — Windows — PrintService и нажать правой кнопкой на пункте «Работает».
- Нажать на надпись Включить журнал».

Готово.
Посмотреть журнал печати теперь можно там же, выбирая левой кнопкой мыши пункт «Работает».
Журнал включается один раз и в него записываются события печати по всем подключенным принтерам.