
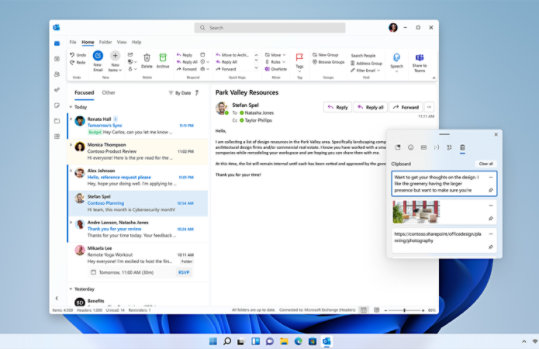
Access clipboard history
Save time and effort with shortcuts. Press Windows logo key + V to save recent copied or cut items on the cloud-based clipboard so you can paste them in other apps or sync across devices.
To start using clipboard history, press Windows logo key + V.
Sync your clipboard items to your PC
Copy images and text from one PC to another with a cloud-based clipboard. To sync clipboard items to your PC, you’ll need to make sure the sync feature is on.
- Select Start > Settings > System > Clipboard.
- Set the Sync across devices toggle to On.
- Select Automatically sync text that I copy. The sync feature is tied to your Microsoft account, or your work account, so remember to use the same login information on all your devices.
Frequently asked questions
-
Make sure you’ve turned on clipboard history. To turn your clipboard on for the first time, select Windows logo key + V and select Turn on.
Clipboard history gets cleared each time you restart your PC, except for the items you’ve pinned.
-
You can quickly clear everything—except pinned items—on your device and the cloud.
- Select Start > Settings > System > Clipboard.
- In the Clear clipboard data area, select Clear.
You can also clear your device clipboard history by selecting Windows logo key + V and then selecting the Clear all option at the top.
-
You can clear any specific item on your clipboard.
- Select Windows logo key + V.
- Next to the item in question, select See more (…) and then select Delete.
-
Your clipboard history is limited to 25 copied entries. Older items—unless they’re pinned—are removed automatically to make room for new clipboard items.
Related features

Keyboard shortcuts in Windows
Save time by navigating Windows using keyboard shortcuts. Explore a full list of taskbar, command prompt, and general Windows shortcuts.
Keyboard shortcuts in apps
Discover keyboard shortcuts in apps like Microsoft Edge, Maps, Photos, Groove, Calculator, Paint, Game bar, Movies & TV, and Voice Recorder.
Windows keyboard shortcuts for accessibility
Accessibility shortcuts can help you use your PC with a keyboard or assistive device.
Всё, что нужно знать о полезной функции для более продуктивной работы.
Что такое журнал буфера обмена
Стандартный буфер, который все привыкли использовать через контекстное меню «Скопировать» и «Вставить» или через сочетания Ctrl + C, Ctrl + V, имеет лишь одну «ячейку памяти». Чего бывает очень мало. Начиная с Windows 10 Microsoft внедрила журнал буфера обмена, который умеет запоминать до 25 элементов. Копировать и вставлять при этом можно текст, ссылки, изображения и другой контент.
Как включить журнал буфера обмена Windows 10 и Windows 11
По умолчанию функция неактивна. Её можно активировать следующим образом.

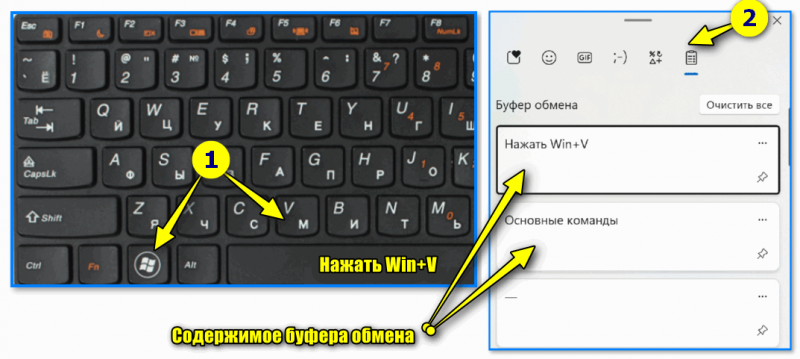
Удерживая клавишу Win (с символом «окошка»), нажмите V на клавиатуре. Вы увидите предложение включить журнал буфера обмена с помощью соответствующей кнопки.

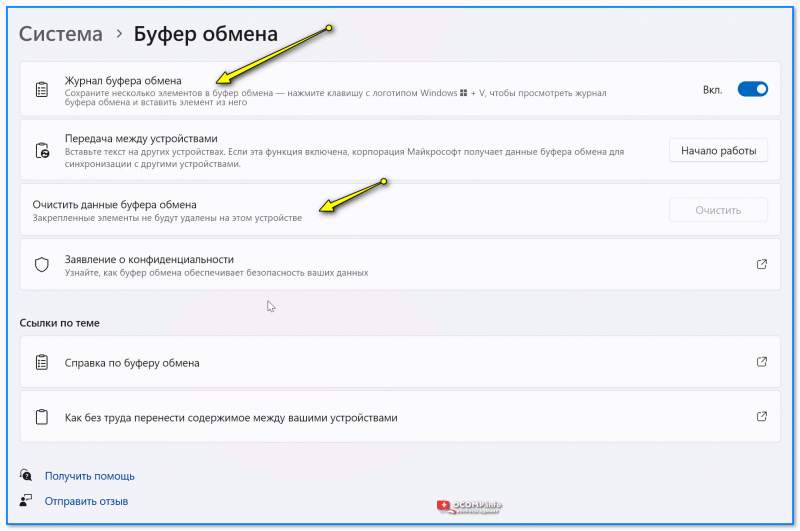
Если при нажатии Win + V ничего не происходит, то активировать функцию можно в настройках. Для этого сделайте правый клик по меню «Пуск» и выберите «Параметры». Далее в разделе «Система» → «Буфер обмена» включите тумблер как на скриншоте выше.
Как просмотреть буферы обмена Windows 10 и Windows 11
После включения система начнёт хранить всё, что вы копируете или вырезаете, в буфере обмена.

Для просмотра журнала нажмите Win + V. На экране отобразится плавающее окошко со списком сохранённых элементов, которое можно переместить в удобное место. Запомнить сочетание легко — как обычная вставка, только вместо Ctrl используется клавиша Win.
Как вставить куда-то скопированный элемент

Для вставки элемента в документ или, например, в строку поиска достаточно кликнуть по нужному тексту, ссылке или изображению в списке, после чего буфер автоматически закроется. Помимо этого можно использовать стрелки клавиатуры для навигации и Enter для вставки.
Как закрепить нужный элемент
Если вам часто приходится вставлять одинаковые данные вроде реквизитов, ссылок или номеров телефонов, можно закрепить их в буфере, чтобы они всегда были под рукой.

Для этого просто кликните по значку иголки напротив нужного элемента.
Как очистить журнал буфера обмена
Как упоминалось выше, в памяти буфера всего 25 ячеек. При их заполнении во время записи новых элементов самые старые стираются.

Каждую из них можно удалить по отдельности, кликнув на троеточие в списке и выбрав значок корзины. Для освобождения места во всём буфере используется кнопка «Очистить всё».
При этом буфер автоматически очищается после перезагрузки и выключения компьютера. Из памяти исчезают все элементы, кроме закреплённых.
Last Updated :
04 Oct, 2024
The Windows clipboard history feature allows you to save and manage multiple copied items for easy access later. If you’re looking to enable clipboard history in Windows, this guide will walk you through the steps to turn it on and use clipboard history effectively. Whether you need to copy and paste multiple items or manage your clipboard data, the Windows clipboard feature is a powerful tool for boosting productivity.
Table of Content
- How to Enable Clipboard History in Windows 10
- Method 1: Windows Shortcut to Open The Clipboard History
- Method 2: Switch on Clipboard history
- How to Enable and Use Clipboard History in Windows – FAQ’s
How to Enable Clipboard History in Windows 10
Turning on the clipboard history is very simple. You can do it via two methods.
Method 1: Windows Shortcut to Open The Clipboard History
Press Windows + V on your keyboard and one pop-up will appear which tells you that it can’t show history and asks you to turn on clipboard history. If you press the Turn On button, it will now start to save your copied data.
Click on the Turn On button and turn history on.
Method 2: Switch on Clipboard history
1. Go to the search box present at the left corner of your screen and search for “Clipboard Setting“.
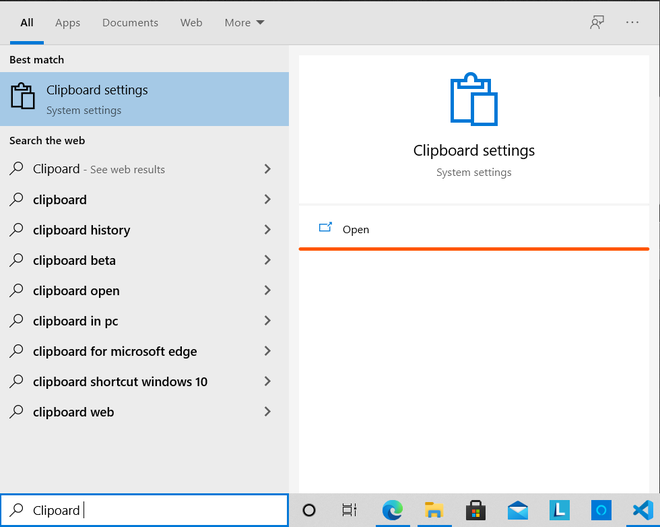
Open clipboard settings by searching in the search box
2. In the clipboard settings, find the Clipboard history option and turn that toggle ON.
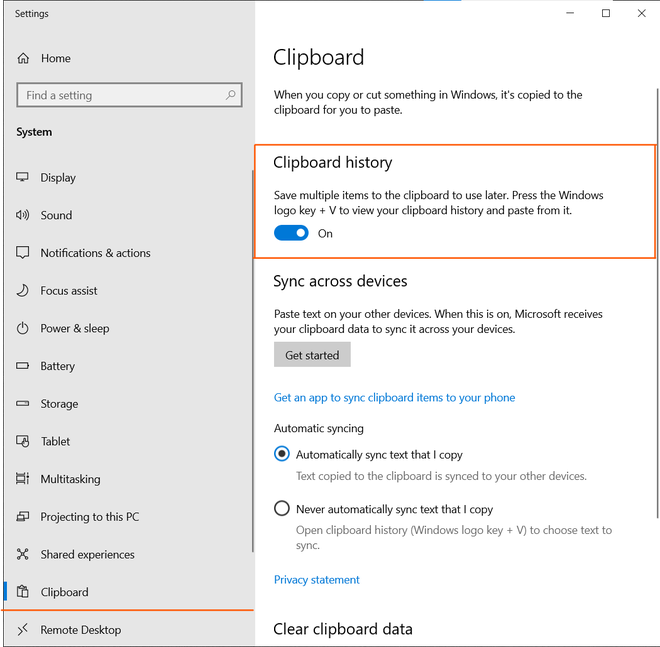
Turn ON the clipboard history toggle from settings.
That’s all to enable the clipboard history. Now, whenever you press Windows + V, you will see a small window that shows the most recent items copied by you, which may be images, text, or urls. You need to click on any item in the Clipboard history list to paste it wherever you want.
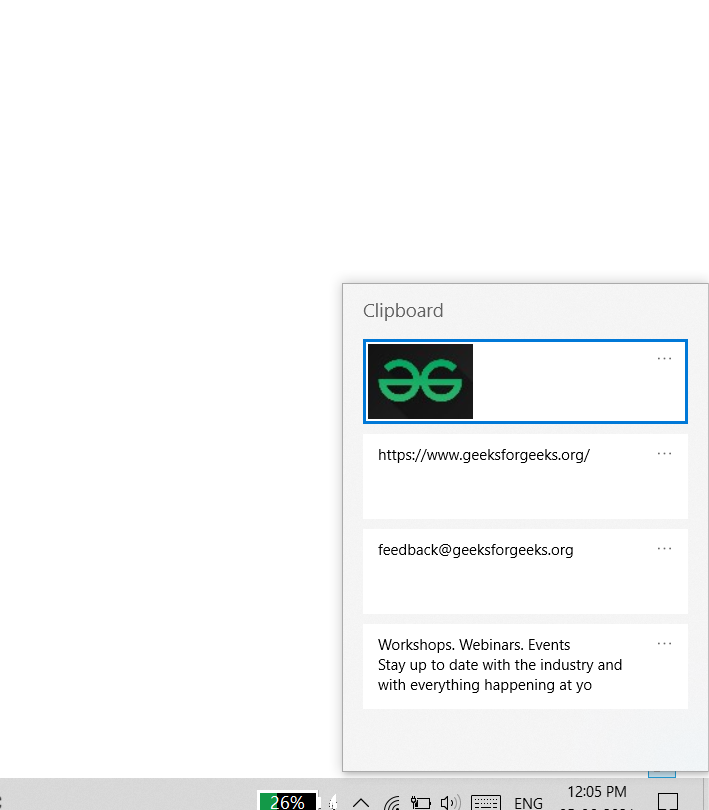
Clipboard history window
Keep in mind that clipboard history vanishes after you restart your computer. Hence, if you want to save a particular item permanently on your clipboard, you need to pin it by clicking on three dots in the top-right corner.
You’ll get three options in the top-right corner:
- Delete: Permanently remove an item from your clipboard history.
- Pin: Keep an item even if you clear all the history or restart your PC.
- Clear all: Delete all items from your clipboard history except pinned items.
Three options in the clipboard history
So this is how you can view and paste items that were copied previously. Clipboard history is a very useful feature for you if you need to paste multiple items at a time. You can copy multiple things at the same time and then paste them one by one using the Windows + V keyboard shortcut.
Conclusion
By learning how to enable clipboard history in Windows, you’ll be able to access and manage your copy-and-paste history more efficiently. This feature is perfect for handling multiple items at once, saving you time and effort when working with text, images, and files. Make sure to explore all the options available in the Windows clipboard settings to fully take advantage of this helpful tool.
Содержание статьи:
- Работа с буфером обмена в Windows
- Как посмотреть что в нем
- Как очистить его историю
- Настройки журнала буфера обмена в Windows
- Вопросы и ответы: 1
Всем здравия!
В современных ОС Windows 10/11 появилась одна интересная фишка, которую многие почему-то не используют. Речь, конечно, о журнале буфера обмена…
Что это и зачем нужно?
Вот представьте: при работе нередко приходится что-то копировать (тексты, картинки), вставлять, затем снова копировать и т.д. по кругу… Порой, приходится десятки раз открыть источник, чтобы поочередно из него скопировать нужные фразы, символы и т.д., часто одно и тоже по неск. раз. Неудобно?!
Вот для оптимизации этого процесса и появился журнал буфера обмена — он позволяет очень быстро просмотреть весь список того, что вы когда-то копировали при работе — и, если что нужно, сразу же вставить это в новый документ/файл. На мой взгляд, штука весьма полезная. 👌
Теперь, собственно, о том, как с ней работать…
Примечание: кстати, у меня на блоге есть заметка на аналогичную тему для Android устройств…
*
Работа с буфером обмена в Windows
Как посмотреть что в нем
Ну для начала (на всякий случай) было бы неплохо, если бы вы выделили какое-нибудь слово (фразу) и скопировали ее (сочетание Ctrl+C).
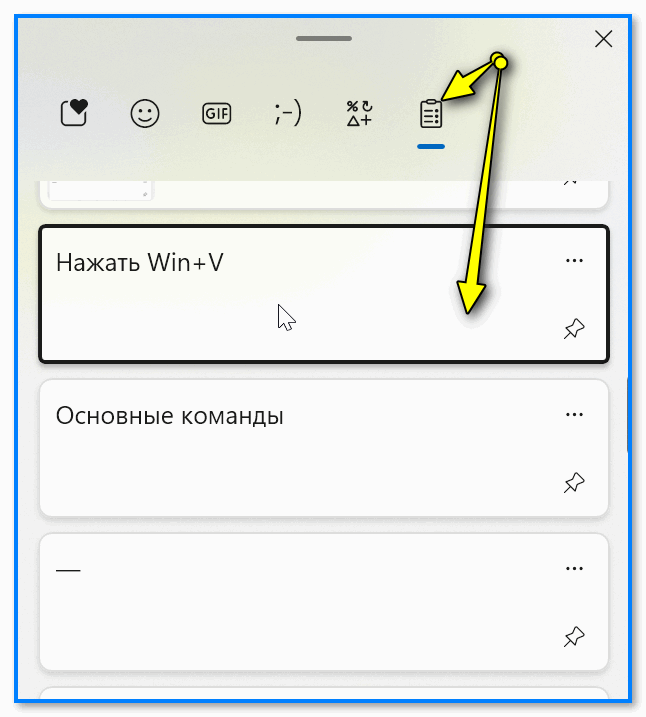
Затем следует нажать сочетание клавиш «WIN»+»V» (можно также попробовать «Win»+».», на ноутбуках возможно Fn+Win+V) — далее перед вами появится спец. окно, в котором есть вкладка с буфером обмена. В этой вкладке можно просмотреть всё, что вы копировали ранее при работе (в этом сеансе).
См. мой пример ниже. 👇
Примечание: журнал буфера обмена появился в Windows 10 в версии 1803 (в 2018г.). В некоторых версиях Windows может быть отключен (включается простым нажатием одноименной кнопки в истории буфера обмена).
Как открыть журнал буфера обмена и посмотреть его содержимое
В моем примере в буфере содержится неск. скопированных слов из этой заметки (я их вставлял туда-сюда, пока оформлял пояснения… 🙂). На скриншоте ниже приведен пример. 👇
Кстати, чтобы вставить что-нибудь из буфера обмена — сделайте следующее:
- поставьте курсор мышки в нужное место;
- нажмите Win+V (чтобы появилось заветное окно 👇);
- и нажмите левой кнопкой мыши по нужной строке из списка. Вроде всё просто?! 👌
Вставка из буфера обмена
*
Как очистить его историю
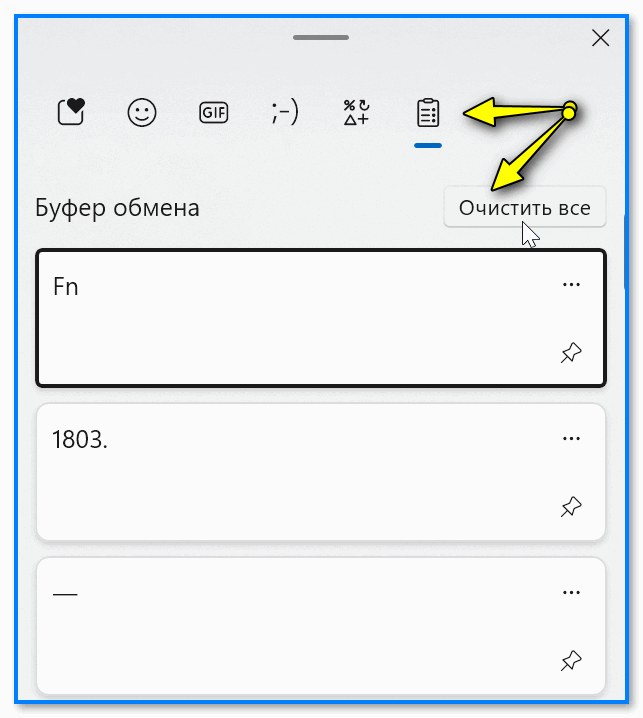
Вариант 1:
- нажать Win+V, чтобы появилось окно управления буфером обмена;
- нажать кнопку «Очистить все». 👇
Вариант 2: зайти в параметры Windows и отключить ведение журнала буфера обмена. Об этом чуть ниже.
Кнопка очистить всё, что если в буфере
Если очистка выполнена успешно — вы увидите надпись «Здесь ничего нет». В моем примере ниже показано, как это выглядит. 👇

Здесь ничего нет
*
Настройки журнала буфера обмена в Windows
Изменить некоторые настройки буфера обмена можно во вкладке параметров Windows — в разделе «Система».
📌 В помощь!
Как открыть параметры в Windows 11/10 — [см. инструкцию]
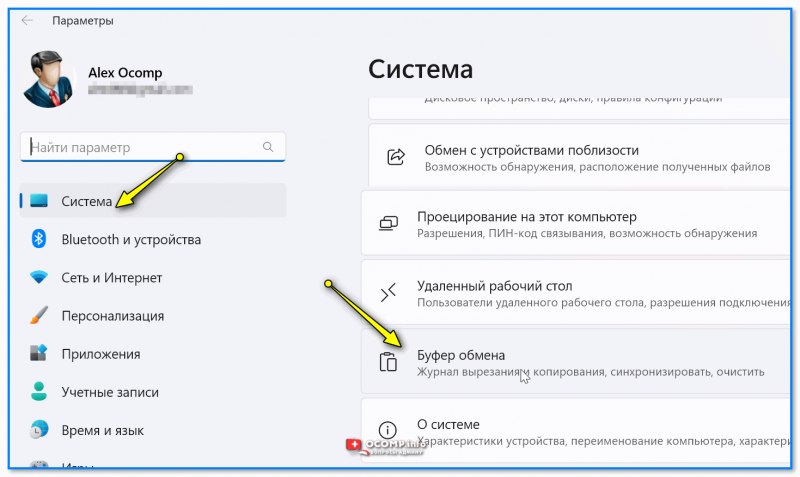
Система — буфер обмена
В соответствующей вкладке можно очистить журнал буфера обмена или вовсе откл. его работу, есть возможность настроить передачу данных между различными устройствами.
Кстати, тут же есть ссылки на справку и подсказке по работе с ним (правда, почему-то в некоторых версиях Windows они открываются на нагл. языке… И хорошо, если браузер сделает перевод… 🙂)
Журнал буфера обмена включен!
*
PS
Кстати, в MS Word есть свой буфер обмена. Чтобы его посмотреть — нажмите по маленькой стрелочке во вкладке «Главная», см. мой пример ниже. 👇
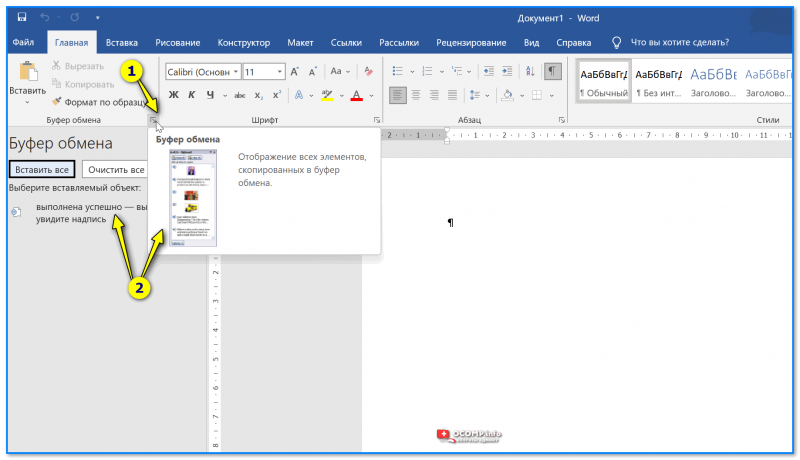
Буфер обмена в Word
*
Дополнения по теме можно оставить в комментариях ниже.
Успехов!
👋
Windows 10 clipboard history is a feature that allows users to see a list of items that they have copied over time. Users can also select a specific item to be pasted from the clipboard history list.
The clipboard history is a set of all data that you copied to the clipboard. This includes texts in various formats (plain text, rtf, html), images, file lists, etc.
In Windows 10, the clipboard history is disabled by default. But the new clipboard has many advantages if used properly. Here are some of the benefits you will get using the Windows 10 clipboard:
- You can copy multiple items and paste them anywhere you want.
- You can pin the item you use frequently. In this way, the item is kept in clipboard memory and can be used without copying the item again.
- You can synchronize the clipboard across multiple devices wherever you login with your Microsoft ID.
If you want to take your clipboard experience to the next level, you must make use of Windows 10 clipboard management.
Let’s begin by enabling the clipboard history feature in Windows 10.
See also: Windows 10 Power Toys
Table of Contents
How to enable or disable Windows 10 clipboard history?
There are four ways to enable/disable clipboard history.
1. Enable or disable Clipboard history using Windows Settings
- Open Windows Settings by pressing Windows key + i
- Go to System –> Clipboard.
- Under Clipboard history, switch the toggle button to ON.


To verify that the clipboard history is enabled, press Windows key + V. This will bring up the list of items you copied in Windows clipboard memory.
Please note that clipboard memory is temporary. It will be erased when you restart the computer. The clipboard history is not maintained upon restart.
You can also disable clipboard history at any time. Just do the following:
- Go to Windows Settings –> System –> Clipboard
- Under Clipboard history, toggle the button to OFF.
2. Enable Clipboard history using Keyboard shortcut
If you want to quickly enable clipboard history, follow these steps:
- Simply press the Windows key + V.
- It will open the clipboard history prompt.
- Click on Turn on.
- Now the clipboard history is turned on, and anything you have copied can be viewed on the clipboard.


3- Enable or disable clipboard history using Windows Registry
If you are an advanced user, you can easily enable clipboard history using the Registry. Here are the steps:
- Open Registry Editor (Run –> regedit)
- Go to the following key:
HKEY_CURRENT_USER\Software\Microsoft\Clipboard - In the right-hand pane, right-click –> New –> DWORD Value. Name it EnableClipboardHistory.
- The following values will enable or disable the clipboard history:
- 1 = Enable clipboard history
- 2 = Disable clipboard history
Please note that you will need to restart the computer for the changes to take effect.
4- Enable or disable clipboard history using Group Policy
If you are a sysadmin or want to enable or disable clipboards for multiple users, the best way is to use the Group Policy settings.
- Open Group Policy Editor (Run –> gpedit.msc)
- Go to Computer Configuration –> Administrative Templates –> System –> OS Policies.
- From the right hand pane, double-click Allow clipboard history.
- Select Enable to enable clipboard history
- Select Disable to disable clipboard history


Please note that this will disable or enable clipboard history for all users in the system.
How to sync clipboard history?
You can sync your clipboard history across various devices.
Follow these steps to enable clipboard history sync:
- Go to Windows Settings –> System –> Clipboard
- Under Sync across devices, click on the Get Started button.
- Follow the instructions to enable synchronization options.


Please note that the sync option requires that you use Microsoft ID instead of your local account to sync all data across devices. All devices that have the same Microsoft ID signed in will share the same clipboard history.
How to clear clipboard history?
You can easily clear clipboard history. There are several ways to do it. However, I am providing a method using Windows Settings:
- Go to Windows Settings –> System –> Clipboard
- In the right-hand pane, under Clear clipboard data, press the Clear button.
This will delete your entire clipboard history.
How do I clear specific items from the clipboard?
- Open the clipboard history list using Windows key + V.
- Click on the three dots in the section of the data you wish to remove.
- Select Delete
- Now this particular thing will be removed from your clipboard history.
Conclusion
Clipboard can be a handy tool, especially when you wish to copy multiple things into a space or into different spaces.
Synchronization feature allows you to use the same copied data to use across different devices so you can paste data on different devices too.
How do you use the clipboard on your Windows 10 computer? Do you use it for copying multiple items or just a single item?