
When dealing with hardware issues or needing specific drivers for a Windows device, it is often important to know the Hardware ID of your Windows Device. The Hardware ID is a unique identifier assigned to each piece of hardware by its manufacturer. By knowing this ID, you can search for the appropriate drivers or troubleshoot problems efficiently. Follow the steps below to learn how to find the Hardware ID for a Windows Device.
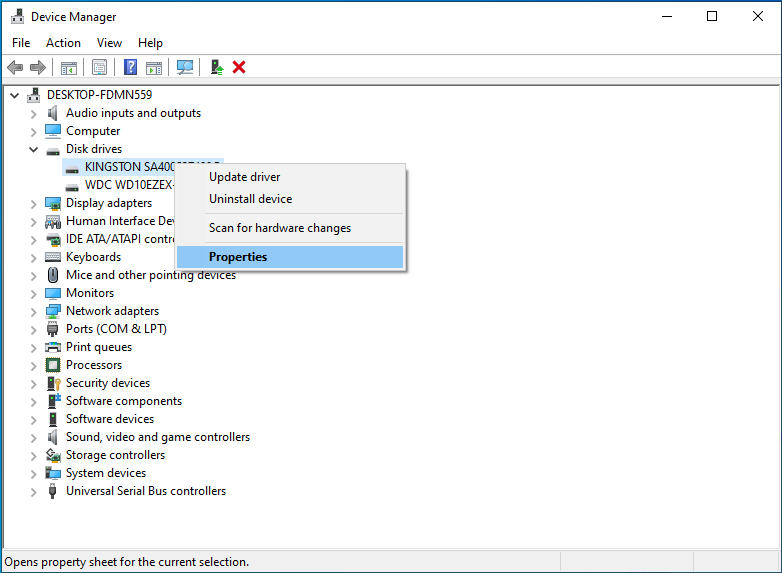
- Open up Device Manager. There are a couple of ways to do this. The easiest way is to click the Start button in the bottom left corner of your screen> Type “Device Manager” into the search bar> Click on “Device Manager” from the search results.
- In the Device Manager window, click the arrow next to the category that corresponds to the hardware for which you want to find the Hardware ID.
- Right-click on the specific hardware component you are interested in.
- From the context menu, select “Properties.”
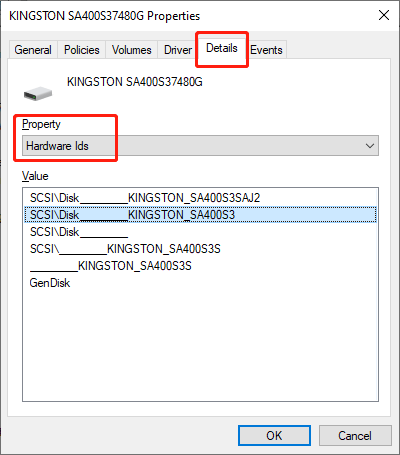
- In the Properties window, click on the “Details” tab> Find the “Property” drop-down menu> Click “Hardware Ids.”
- In the “Value” box, you’ll be able to see the Hardware IDs.
How to Reset Network Settings in Windows 10
Have you ever wondered what your computer’s hardware ID (HWID) is? Or how to check the HWID on your device? Knowing how to find your hardware ID can be useful whether you need it for troubleshooting or software licensing. In this article, we’ll explore different methods to check the HWID on your device.
What is my HWID?
A hardware ID (HWID, or Windows device ID, is a unique identifier assigned to the hardware components of a Windows computer. You can think of the HWID as a digital “fingerprint” for your computer, helping distinguish it from other devices.
While the term “hardware ID (HWID)” is exclusive to Windows, other types of devices have similar concepts. For example, Apple computers include serial numbers that contain information about when and where they were manufactured.
What is the HWID used for?
A HWID helps software developers and system administrators identify your device to ensure software applications are functioning properly. It’s used by software, drivers, and operating systems for purposes such as system authentication, software licensing, and hardware tracking.
For example, HWIDs are often used during software installation and activation to ensure that the program is deployed on the correct device. They help prevent unauthorized copying of software applications to multiple systems.
HWIDs are also useful during the troubleshooting process. Knowing the HWID helps IT technicians identify specific hardware components within a device, providing more targeted assistance.
What does a HWID look like?
The HWID of a Windows computer is generated based on the specific characteristics of the device’s hardware components. This includes its CPU, hard drive, motherboard, network adapter, and more. In addition, each hardware component has its own unique HWID.
A hardware ID is usually a combination of alphanumeric characters. It may include letters, numbers, and sometimes special symbols. The length and format of the HWID can vary depending on the device and the specific hardware component being identified. It’s important to note that the HWID generally does not contain personally identifiable information (PII) about the user, so keeping it protected (as you would with your password) is less of a concern.
How do I check my hardware ID?
Knowing how to find a device’s hardware ID can be useful for multiple reasons — like when your users come to you to ask “What is my HWID?” or when you’re performing an IT asset inventory. Let’s explore various methods to check your HWID on your device.
Using Device Manager
One of the easiest ways to check your hardware ID is by using the Device Manager. Here’s how you can do it:
- Press the Windows key + X on your keyboard and select “Device Manager” from the menu that appears.
- In the Device Manager window, expand the category for the hardware component you want to check. For example, if you want to check the HWID of your network adapter, expand the “Network Adapters” category.
- Right-click on the specific hardware device and select “Properties” from the context menu.
- In the Properties window, navigate to the “Details” tab.
- From the “Property” drop-down menu, select “Hardware Ids.”
- The hardware ID for the selected device will be displayed in the “Value” field.
Using Command Prompt
Another method to check your hardware ID is by using the Command Prompt. Follow the steps below:
- Open the Command Prompt by pressing the Windows key + R, typing “cmd,” and hitting the Enter key.
- In the Command Prompt window, type the following command and press Enter: “wmic bios get serialnumber”
- The hardware ID, also known as the Serial Number, will be displayed on the screen.
Using PowerShell
Like the Command Prompt, PowerShell is another powerful command-line tool that can be used to check your hardware ID. Here’s how to check HWID in PowerShell:
- Open PowerShell by pressing the Windows key + X and selecting “Windows PowerShell” from the menu.
- In the PowerShell window, type the following command and press Enter: “Get-WmiObject Win32_BaseBoard | Select-Object -ExpandProperty SerialNumber”
- The hardware ID, also known as the Serial Number, will be displayed on the screen.
Using Windows Device Console (DevCon)
If you prefer a command-line tool specifically designed for managing hardware devices, you can use the Windows Device Console (DevCon.exe). Follow these steps to check HWID with DevCon:
- Download the DevCon utility from the official Microsoft website and extract it to a folder on your computer.
- Open the Command Prompt by pressing the Windows key + R, typing “cmd,” and hitting Enter.
- In the Command Prompt window, use the “cd” command to navigate to the folder where you extracted the DevCon utility.
- Once you are in the DevCon folder, type the following command and press Enter: “devcon hwids *”
- The hardware IDs for all the devices on your computer will be displayed on the screen.
Additional methods
Apart from the methods mentioned above, there are other ways to check your hardware ID. For example, some third-party software applications and system information tools provide this information to users. You may also be able to check your HWID in the computer’s BIOS (Basic Input/Output System) on startup, or via the Windows Registry Editor.
Factors to consider when deciding how to check HWID
The good news is that there are multiple ways for Windows users to check their hardware ID. When deciding which method to use for how to find hardware ID, there are a few factors you should consider:
- Ease of use: Some methods to check HWID, such as using the Device Manager, are more user-friendly than others; however, none of them are too challenging. Consider your technical expertise and choose a method that you are comfortable with.
- Specific hardware component: Depending on the hardware component you need to check, certain methods may be more suitable. For example, if you want to check the HWID of your graphics card, using software applications may provide more detailed information.
- Operating system: Different methods may be available or work differently depending on your Windows operating system version. Ensure that the method you choose is compatible with your version of Windows.
Finding manual hardware ID checks tedious? Streamline with NinjaOne. Automate and manage all your IT assets effortlessly.
Try NinjaOne for free.
Make it easy with endpoint management software
Checking hardware IDs isn’t difficult, but the process can quickly get out of hand if you need to do it for many different endpoint machines within an IT environment.
If you are running an asset inventory and find the process of checking hardware IDs manually cumbersome, consider using endpoint management software such as NinjaOne. Tools like NinjaOne automate the process of discovering, managing, and monitoring your IT assets.
NinjaOne can do everything from software deployment and patch management to monitoring and alerting, helping you stay on top of all your devices. Check out a live tour, or start your free trial of the NinjaOne platform.
Sometimes you encounter hardware malfunction with an installed device, but you don’t know who made that device or its other hardware details. In such a situation, the hardware ID of the device can help you in finding these details. There can be many more benefits of knowing the hardware ID of the devices installed on your computer. Therefore, in this guide we will describe how to check hardware ID of a device in Windows 10/11, even if the device isn’t working.

What is Hardware ID?
Every device vendor provides an identification string for a hardware, which Windows uses for matching that hardware device with an INF file. This identification string is called a Hardware ID (hwid). The hardware ID of a device can help you in finding the manufacturer and model of any device on your computer. This ID can also be used for finding the right driver for that device.
Where is the Hardware ID located?
You will commonly find that a hardware device is associated with multiple hardware IDs. This can confuse a lot of users as they don’t know which ID is the best one. When you see such a list of hardware IDs, keep in mind that these IDs are listed in order of their decreasing suitability. This means that the hardware ID which is on the top of that list is the most suitable identification for that piece of hardware.
Follow the steps given below to learn how you can check the hardware ID of any computer peripheral in Windows 10. You can use this method to find the hardware ID of non-working devices as well.
Step 1: Right click ‘Start’ button and select ‘Device Manager’.
Step 2: In the Device Manager, you will see the list of all the devices identified by your computer. Non-identified devices can be found under ‘other devices‘.
Step 3: Click the ‘Arrow‘ to expand the category list of devices for which you want to check the hardware ID. Then, right click on your preferred device and select ‘Properties‘.
Step 4: In Properties window, go to ‘Details‘ tab.
Step 5: In Property drop down list, choose ‘Hardware Ids‘.
Step 6: Now you can see complete list of hardware IDs associated with your chosen hardware device. The ID which is on the top is the one which is best suited to be used for this device.
That’s it
Now you know how to check hardware ID of a device in Windows 10. The process for checking hardware ID is almost same in other Windows OS as well. Please remember that the top most ID is the most specific ID for that hardware device, and as you go down the IDs become more generic.
Hardware ID is a unique identifier for your devices that your system uses to match it to its driver. You can use this value to check for a specific device on the internet or official websites if you need to update its driver or troubleshoot any issues with its software.
A hardware ID usually follows the format <BUS>\<VENDOR ID>&<Device ID>&<Additional IDs>. For instance, the ID for Generic USB Hub may show USB\VID_05E3&PID_0608&REV_6090. However, the identity for root devices and the computer doesn’t follow this format.
In this article, we provide the most convenient ways to look up this information on your Windows PC.
How to Look up for Hardware ID on Your PC
You can use the Device Manager or built-in command line tools to look up the hardware Id for individual devices on your PC. But, if you want more options, you can use the Windows Device Console.
Using Device Manager
The Device Manager is the built-in Windows tool that helps you check and control all the devices on your PC. You can also use it to look up the hardware IDs of such devices.
- Open Run by pressing Win + R.
- Type
devmgmt.mscand press Enter to launch the Device Manager. - Expand the device category for the device you want to look up.
- Right-click on the device and select Properties.

- Go to the Details tab.
- Click on the drop-down box under Property and set it to Hardware Ids.


The Hardware ID will show up under Value.
Also, keep in mind that a device may have more than one ID. However, the top ID is the most specific one.
Using Windows Command Line
You can also use the Command line interfaces such as Command Prompt or Windows PowerShell to look up the hardware ID of your devices.
Command Prompt
Command Prompt is the traditional command line on the Windows system. You can use the DISM utility to check your devices and get their hardware ID.
- Open Run.
- Type
cmdand press Ctrl + Shift + Enter to open the Elevated Command Prompt. - Enter the following command to list out your devices:
Dism /Online /Get-Drivers /all /Format:Table
- Check the class name to get a general idea of your driver. It will list all the possible drivers, so you can add | findstr “search string” on the command to only list the necessary ones.
For example,Dism /Online /Get-Drivers /all /Format:Table | findstr “usb” - The command only lists the Original and Published names, not the general names. Note down or copy the Published Name.
- Then, enter the command
Dism /Online /Get-DriverInfo /Driver:<Published Name>. - This command lists the information on all the devices within the category, not just those active on your PC. So, you need to search carefully for your device by checking the Description column.
- After determining the device, look at its Hardware ID value.


Windows PowerShell
Windows PowerShell is a powerful Command Line tool that you can use to control all your system activities. You also have various options for customizing the commands, so it’s an effective way to get the necessary information.
- Open Run.
- Type
powershelland press Ctrl + Shift + Enter to open the Elevated PowerShell. - Enter the following command to list your devices:
Get-PnpDevice -PresentOnly | Sort-Object -Property “Class” | Format-Table -AutoSize
- Then, search for your device using the Class and FriendlyName columns and copy or note down its InstanceId.
- Then, enter the following command while replacing the Instance ID with the value you copied or noted:
Get-PnpDeviceProperty -InstanceId "Instance Id" | Format-Table -AutoSize - Here, search for DEVPKEY_Device_HardwareIds and check its Data to get this information.


Using Windows Device Console
It is easy to check the Hardware ID of a device using the Device Manager or the built-in Command line. However, you can only look up this information for one or a few devices at a time. If you want to look up the ID for all your devices or the devices within a specific category, you need to use the Windows Device Console (Devcon).
Microsoft does not provide this utility in the default Windows OS but includes it in its Windows Driver Kit. So you need to install this package before you can use the Device Console.
- Download and install Windows Drivers Kit from Microsoft’s platform. You only need to download the WDK and not the SDK or Visual Studio.
- Then, you need to set the location of the console on the system path so that you can access it from anywhere on the Command line. To do so,
- Now, open Run.
- Type
cmdand press Enter to open the Command Prompt. - Enter the commands below to look up the hardware ID according to the corresponding scenario:
devcon hwids *: List out all devices with their hardware Ids
devcon hwids =<class>: List out the hardware IDs for all devices in a particular class. You can look for the available classes using the commanddevcon listclassdevcon hwids * > “D:\HardwareId.txt”: Create aHardwareId.txtfile inD:\which lists all devices with their hardware IDs. You can use any location you want or create a text file that displays the output of the other command.

If you want to know more about using Devcon to check and manage your devices, we recommend you visit its documentation on Microsoft.
-
Home
-
News
- How to Find Hardware ID to Search for Device Drivers?
By Stella | Follow |
Last Updated
In this post, we will introduce what a HWID is and how to find hardware ID to help you get the best match driver package for hardware driver update. Here is also a data restore tool from MiniTool Software to help you recover lost and deleted files on Windows in different situations.
What Is a HWID?
The full name of HWID is hardware ID.
A hardware ID on Windows 10/11 is a vendor-defined identification string that Windows uses to match a device to a driver package. A hardware ID can identify what a device is to some level of specificity and is indicating that any driver package that declares it can work with a device that has that ID can work with this device for some degree of functionality.
In most cases, a device has more than one hardware ID associated with it. Typically, a list of hardware IDs is sorted from most to least suitable for a device.
How to Find Hardware ID?
Many users don’t know where the hardware ID is and how to check hwid. Is there any available hardware ID checker?
You can check the hardware ID in Device Manager and it is easy to do this.
Step 1: Right-click Start (the Windows icon in the taskbar) and select Device Manager to open it.
Step 2: Find your target device and right-click it, then select Properties.
Step 3: Switch to the Details tab.
Step 4: Expand the options under Property, then select Hardware Ids.
Usually, you can see multiple hardware IDs for a device. This is not strange. The top one is the most specific identifier, the following identifiers are more generic. A hardware ID is used to select a matched device driver to fix your computer issues.
How to Find a Device Driver Using a Hardware ID?
A hardware ID is not for a simple look. The hardware ID is available for devices in which drivers were already installed, for unknown devices and not recognized devices.
To get the latest version of a device driver, you can use the hardware ID to search for drivers in Microsoft Update Catalog or using a search engine.
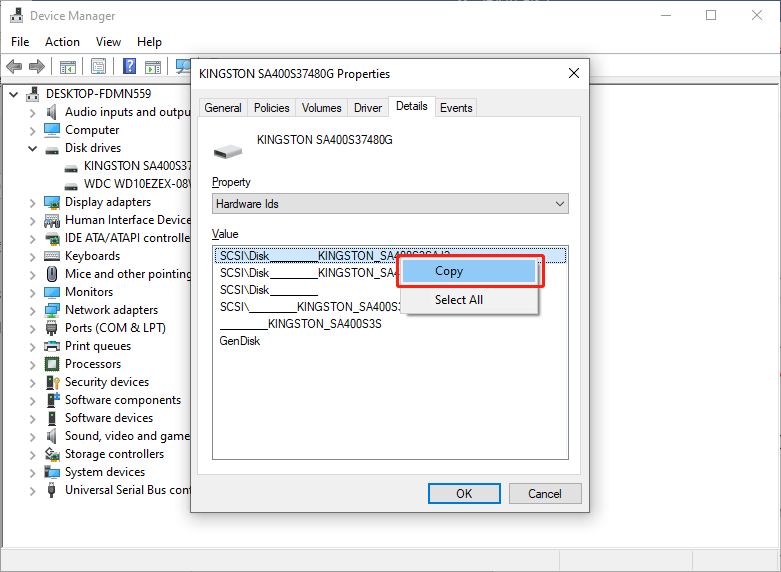
You can right-click the hardware ID and select Copy to copy it. Then, you can search for this ID in Microsoft Update Catalog. If you cannot find a driver using this way, you can paste the hardware ID to your web browser and search for the driver from the manufacture’s website. Then you can download it for further use.
In this part, we want to introduce the best free data recovery software for you. It is MiniTool Power Data Recovery.
MiniTool Power Data Recovery FreeClick to Download100%Clean & Safe
This data recovery software is specially designed to recover data from internal hard drives and external hard drives, SSDs, USB flash drives, and other kinds of data storage devices.
This utility can work in different situations:
- If you permanently delete files from your drive, you can use this software to get them back.
- If you format a drive without backing up the data on it, you can use this tool to rescue your files.
- If your drive become RAW or inaccessible for some reason, you can firstly use this program to recover your files and then format the drive to normal.
- This software can also help you recover data from an unbootable computer to safely keep your files.
You can first try the free edition of this software and see if it can find your files. You can also recover up to 1 GB of files for free.
MiniTool Power Data Recovery FreeClick to Download100%Clean & Safe
If you decide to use this software to recover more files, you can use a full edition.
Bottom Line
Here is how to find a hardware id and use it to search for your needed device driver. It is just a simple work. In addition, you can just try MiniTool Power Data Recovery to help you recover your files in different situations. Should you have any issues when using MiniTool software, you can contact us via [email protected].
About The Author
Position: Columnist
Stella has been working in MiniTool Software as an English Editor for more than 8 years. Her articles mainly cover the fields of data recovery including storage media data recovery, phone data recovery, and photo recovery, videos download, partition management, and video & audio format conversions.