
Как часто вам хочется просто просидеть целый день за компьютером? Вот чтобы аж глаза высохли и спина осталась в позе креветки? Нам — очень часто. Все дело в том, что Интернет и игры — слишком веселое место, от которого трудно оторваться. И если с играми все понятно и тот же Steam показывает, сколько времени вы провели в них за день и в общем, то с простой работой ПК уследить не так просто.
В статье рассмотрим несколько вариантов того, как посмотреть экранное время на ПК, и ознакомимся с парой приложений для контроля активности.
Microsoft Family Safety
В первую очередь, можно воспользоваться функцией Microsoft Family Safety. Это одна из фирменных программ, которые вы можете скачать из магазина приложений Microsoft. Правда, работает она в основном на разных устройствах.
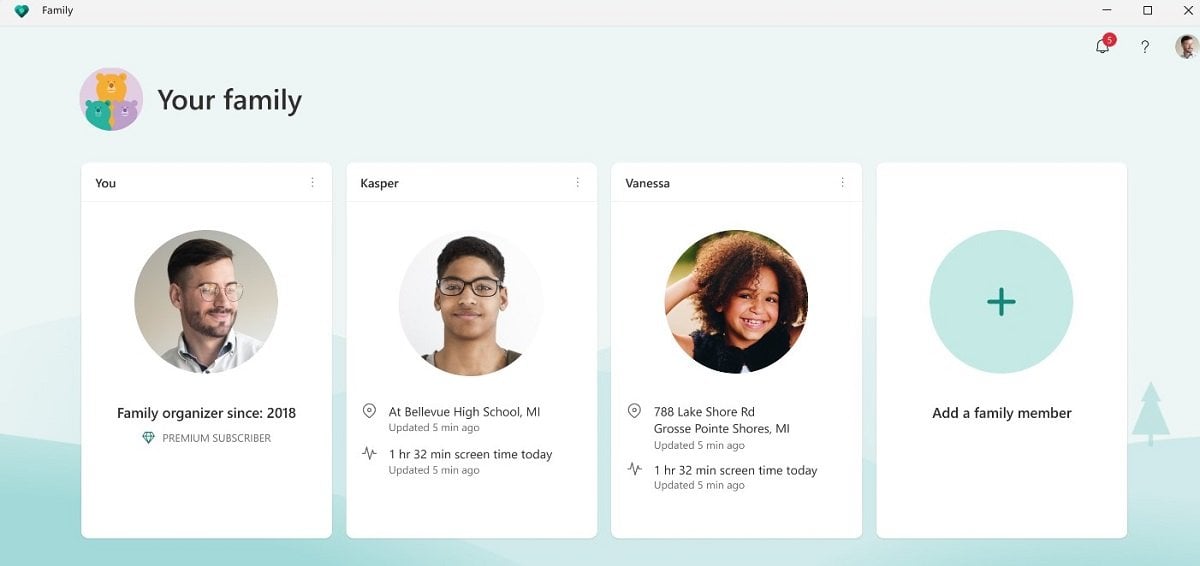
Источник: Microsoft Store / Интерфейс программы Microsoft Family Safety
Вы можете подключить несколько устройств к одной семейной группе, после чего организатор сможет просматривать действия других участников. Например, время активности экрана, запущенные приложения и время их работы, историю поиска в Microsoft Egde. Также вы можете ограничивать периоды активности для разных устройств. Например, выставить время с 18:00 до 21:00 на ноутбуке ребенка.
Кстати, программа также позволяет отслеживать приставки Xbox и смартфоны на базе Android, так что только ПК и ноутбуками ее функционал не ограничен.
Windows 11
В новейшей версии ОС Windows добавили специальную утилиту, которая позволит следить за активностью вашего ПК. В первую очередь она полезна для ноутбуков, но и на стационарных компьютерах может неплохо работать. Например, покажет, сколько раз за неделю вы включали и отключали ПК, и сколько часов проводили у монитора.
Чтобы воспользоваться функцией, следуйте простой инструкции:
- Зайдите в «Пуск»
- Откройте «Настройки» (или используйте комбинацию Win + I для быстрого запуска);
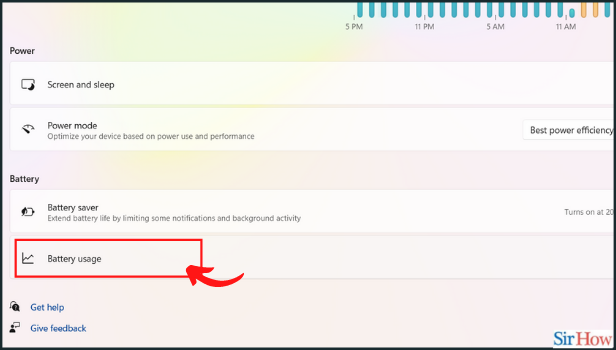
- Кликните на пункт «Питание и батареи»;
- Найдите раздел Режим питания.
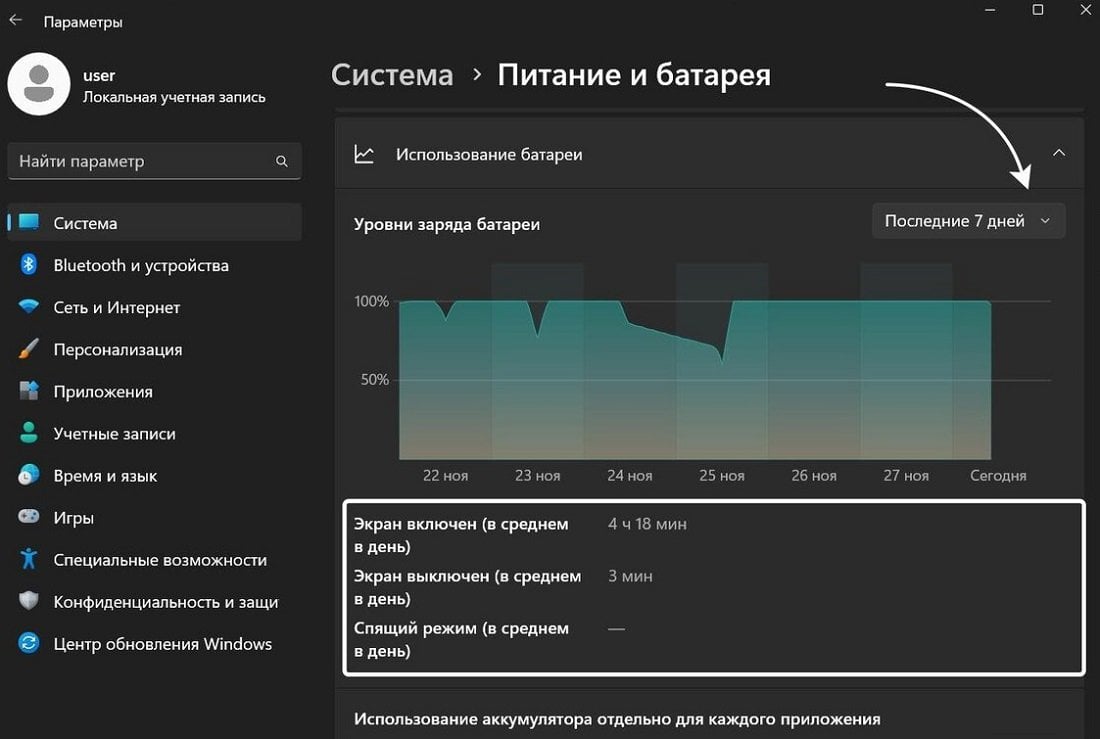
Источник: Дзен / Экранное время в Windows 11
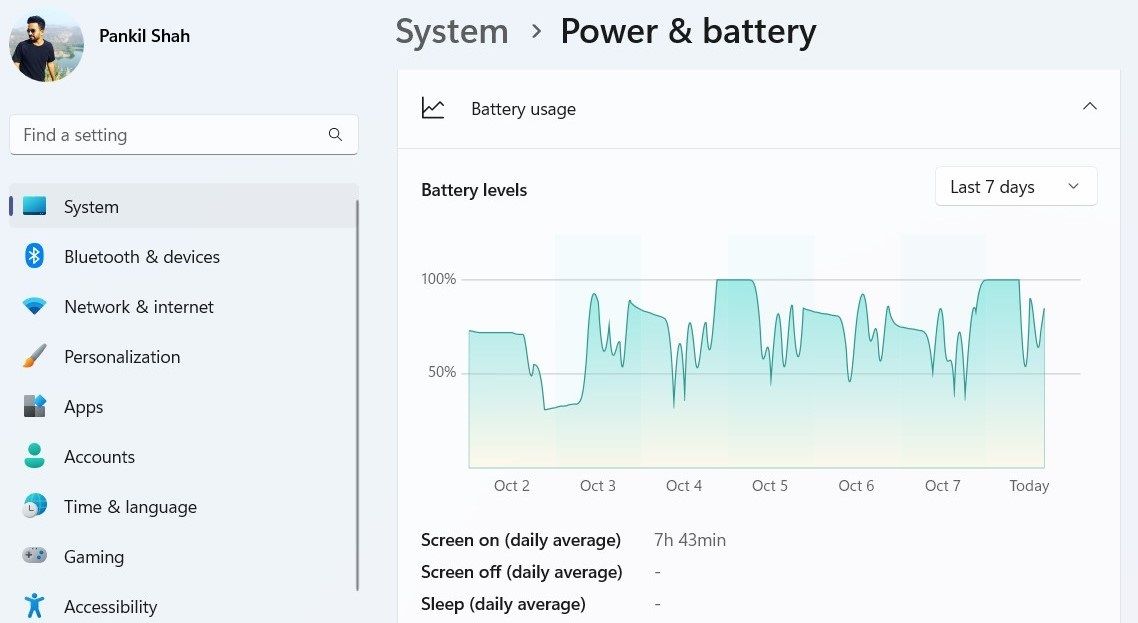
С ноутбука вы можете в нем посмотреть, насколько быстро расходуется заряд вашего устройства, и оптимизировать это. А также увидите время активности экрана. С ПК вы можете посмотреть такие параметры как время включения и выключения экрана, время сна и обзор за последнюю неделю.
RescueTime
Третий вариант — установите приложение RescueTime. Кстати, это также можно сделать и на телефоне. Из минусов только то, что придется заплатить за использование: $6.5 в месяц, но есть пробный период на 14 дней.
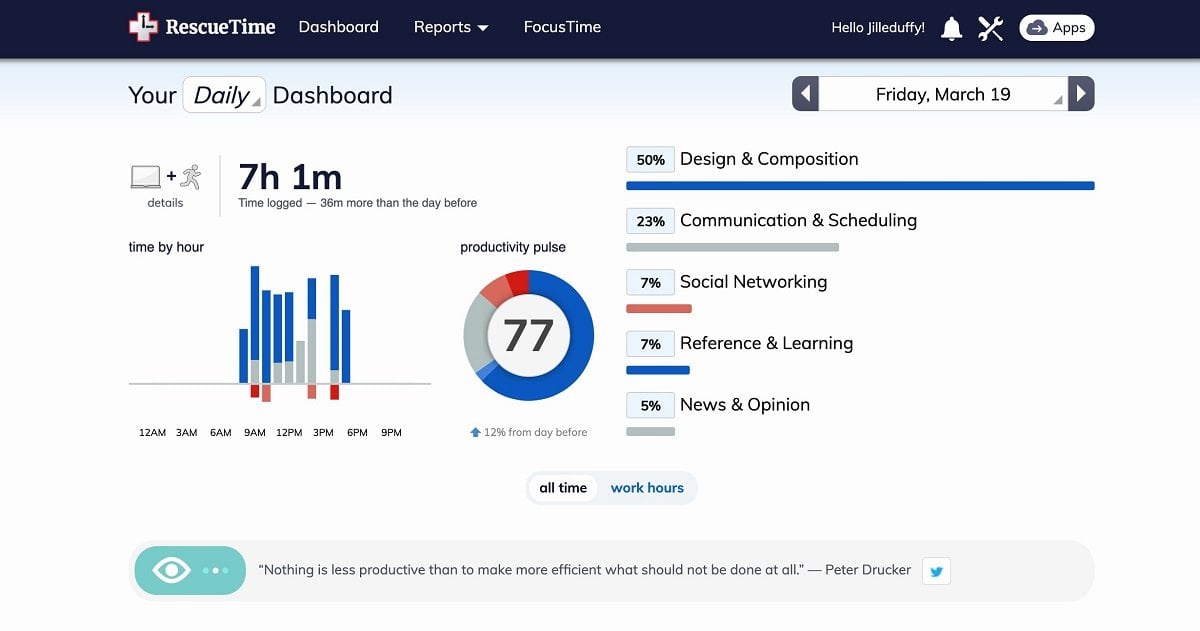
Источник: PCMag / Интерфейс программы RescueTime
Сервис направлен на анализ вашей работы и отслеживания времени активности в разных областях. Например, приложение может сообщать вам о том, что вы слишком долго работаете и пора сделать перерыв, или поставить таймер для работы. С его помощью также можно отследить сколько времени вы провели за ПК в целом, или только за работой. В общем, это большой анализ вашей эффективности.
Диспетчер задач
Ну и последний вариант — просто воспользуйтесь диспетчером задач. Этот способ работает в Windows 10 и 11 версий. И тут все куда проще, чем в других пунктах.
Запустите диспетчер задач любым удобным для вас способом и зайдите во вкладку «Производительность». Там нас интересует пункт «ЦП». Кликните на него и вы увидите строку «Время работы», где будет показано, сколько работает ваше устройство.
Важно! Иногда ноутбуки не выключаются полностью, а уходят в спящий режим после выключения, поэтому может показываться больше времени, чем на самом деле. Например, если верить скриншоту, то автор не выключал ноутбук больше 6 дней…
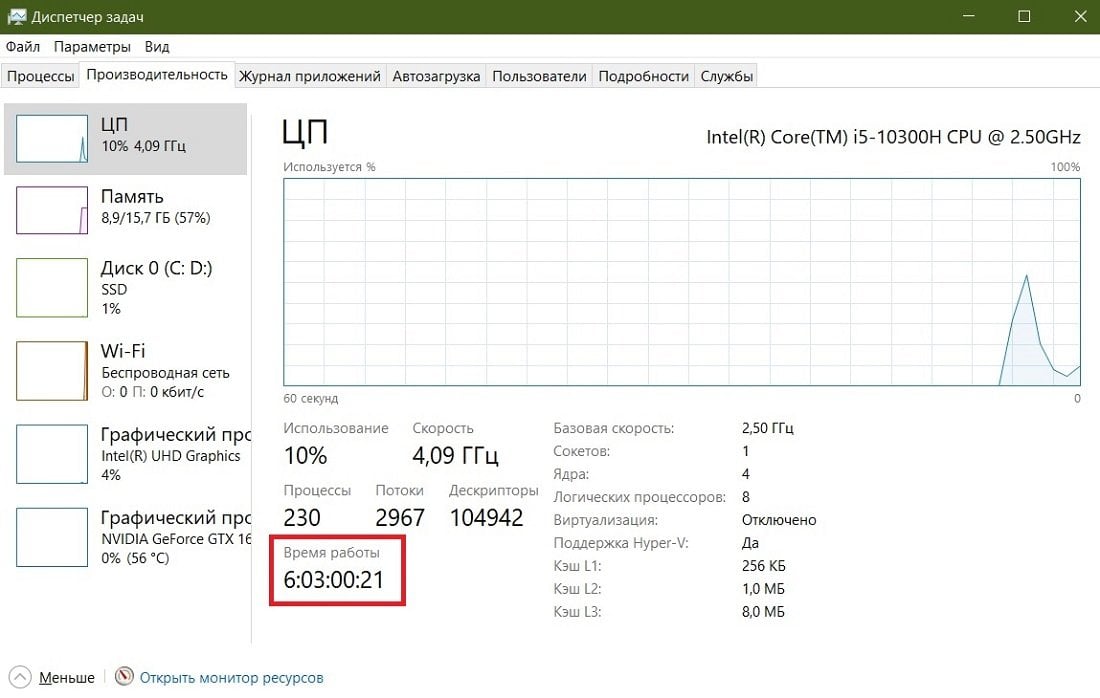
Источник: скриншот CQ.ru
Мы разобрали самые популярные способы того, как можно посмотреть экранное время с помощью встроенных функций системы или с помощью сторонних программ. Пользуйтесь нашей инструкцией и не забывайте читать другие статьи.
Заглавное фото: helpdeskgeek.com
Spending too much time on your screen can be damaging to your health. If you have red eyes, an aching back, and spend too much time on your computer, it may be time to get it under control and monitor your screen activity on a daily basis.
Windows 11 natively lets you view the “Screen On” time and gives information on the last 24 hours as well as the last 7 days. This is the time that tells you the duration when the screen has been left on. Of course, the information may not be accurate since you may have left the screen on while you are away from your computer. However, you still get a pretty good idea.
As for Windows 10, there is no native method to check the screen time you spend on the PC. However, you can either use the third-party applications given in this post below or use a stopwatch to measure how long you have spent staring at the screen.
Let us now show you how to check the time you have spent on the screen.
Table of Contents
Check the Screen Time on Windows 11
Check the Total Screen On Time in Windows 11
As we mentioned before, the native method to check the “Screen On” time in Windows Check the Screen Time on Windows 11 may not be entirely accurate. However, it can still be used to get an estimate of the total time you have spent looking at a screen.
Use these steps to see your screen time on a Windows 11 computer:
-
Go to the following:
Settings app >> System >> Power & battery
-
Scroll down and click “Battery usage” under the Battery section to expand it.

Expand battery statistics -
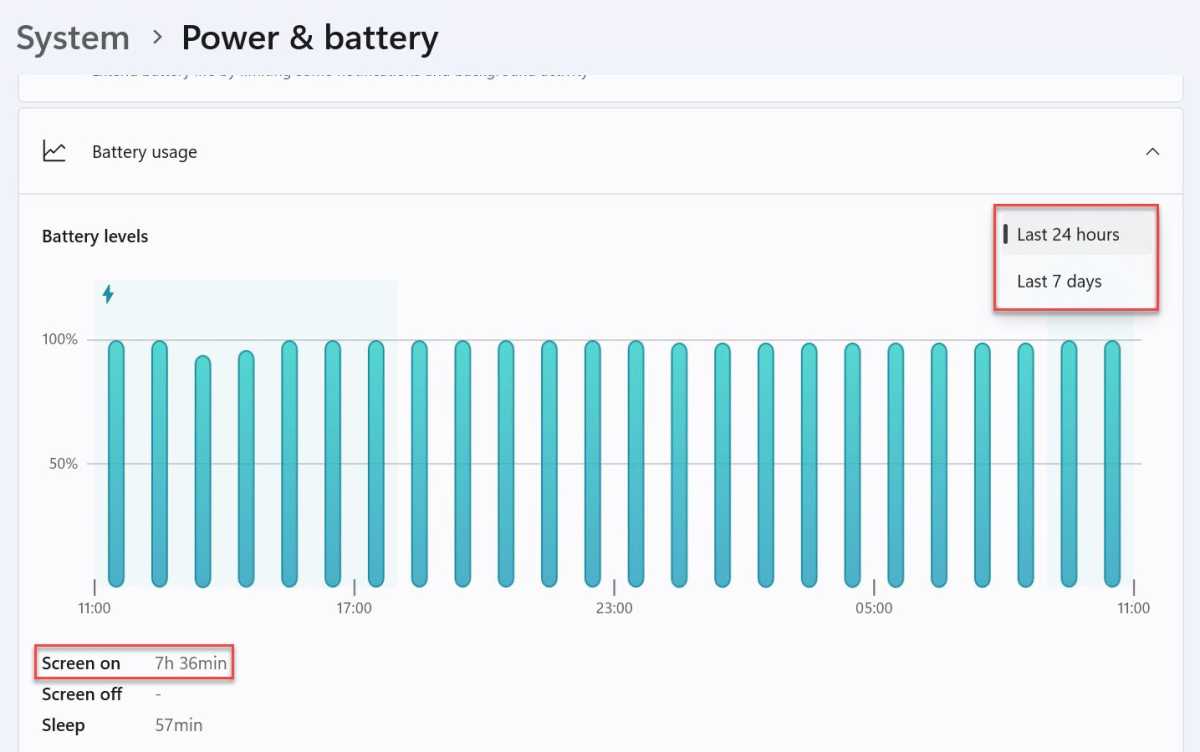
Select the period to view the “Screen On” time.
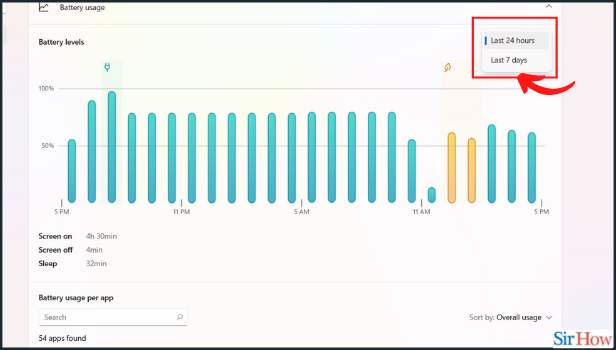
You can choose from “Last 24 hours” (default setting) or “Last 7 days.”
Select the time period to view the battery statistics for -
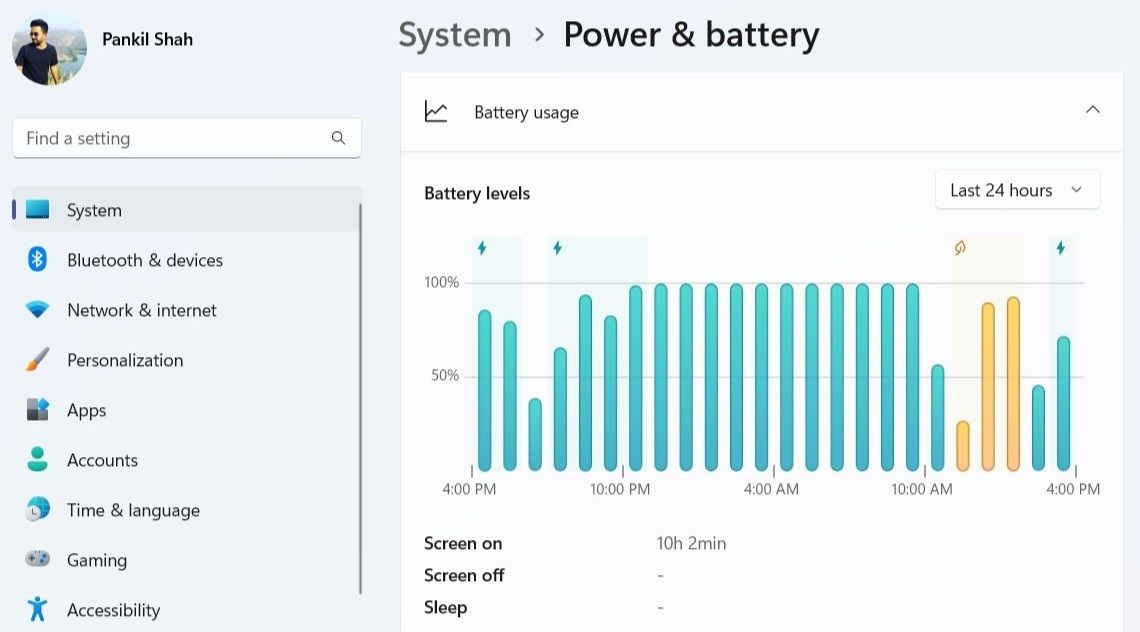
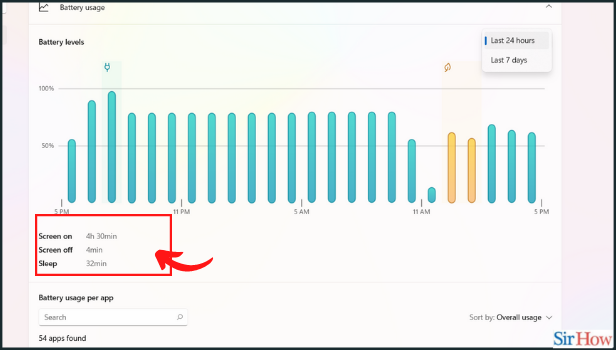
The “Screen On” time will be displayed at the bottom of the bar graph, as in the image below.
Check “Screen On” time from Windows 11 Settings app


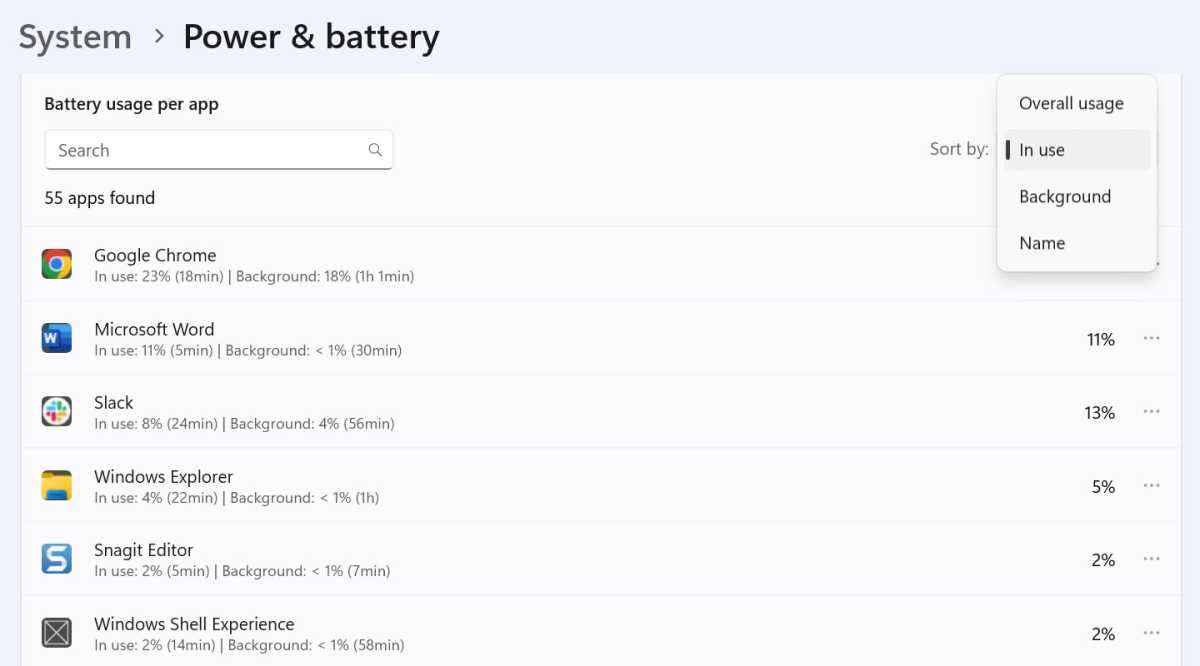
Check Screen Time Per App in Windows 11
You can also view the time you have spent on each app in Windows 11 if you want to find a detailed analysis of our total screen time. Here is how:
Note: This information may not be accurate as it only shows the details for the apps that consumed power from the battery, and not while the laptop was plugged in. Therefore, viewing per-app screen time is not recommended using this method.
-
Go to the following:
Settings app >> System >> Power & battery
-
Scroll down and click “Battery usage” under the Battery section to expand it.
Expand battery statistics -
In the “Battery usage per app” section, click on the drop-down menu in front of Sort by and select “In use.”
This will show you the time you have spent on the apps that are currently running.
Sort by apps in use Now, all of the apps will be arranged according to how much battery life they used during the last 24-hour or 7-day period selected above.
-
You will now see the screen time you have spent on the individual applications inside the brackets under the app’s name.
Check your screen time spent on each app


If you want precise and accurate information to check your time spent on individual applications, we suggest you use the third-party apps discussed below.
Check the Screen Time on Windows 11, 10 using Third-Party Apps
The applications discussed in this section can be used on both Windows 10 and 11.
Digital Wellbeing
Digital Wellbeing is an app by Google designed for Android. Microsoft is yet to make an app for its Windows operating system, but a modified version of the app is currently available (and safe) to use on Windows PC.
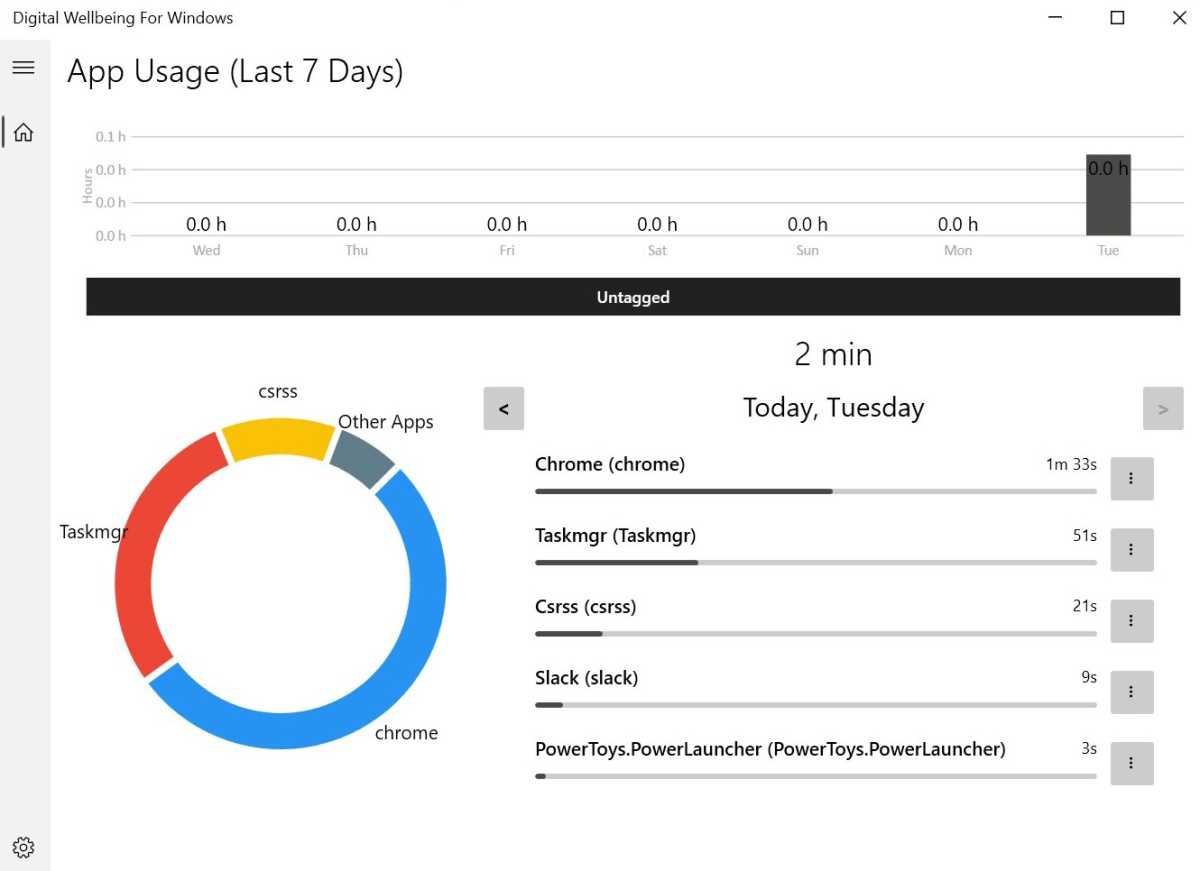
The Digital Wellbeing application collects and displays the time you have spent on the different applications in the last 7 days. You can also set a time limit for each app and the app will intimate you when you have crossed that limit.
Here are the steps to download, install, and use Digital Wellbeing on your Windows PC:
-
Open the Digital Wellbeing for Windows download page and click “Free Download.”

Download Digital Wellbeing for Windows -
Click “Download: External Mirror”
Use external mirror download Your download should then start automatically.
-
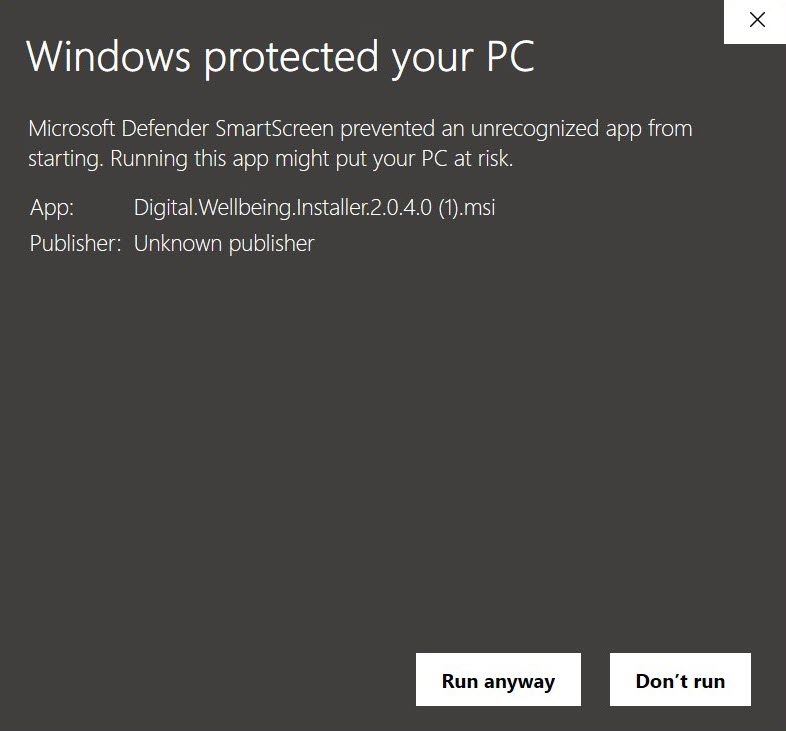
Run the downloaded setup file and proceed with the on-screen instructions of the installation wizard.
If prompted with a “Windows protected your PC” message, click “Run anyway” and proceed with the installation. We have verified that the app is safe to use and won’t harm your PC or your data.
-
When installed, restart the computer.
-
After the reboot, run the Digital Wellbeing application.
Allow the app some time to collect the data.
-
You should now be able to see the time spent on different applications.

Check screen time using Digital Wellbeing


If the app does not open, you can access it from the System Tray in the taskbar.
Other Apps to Check Screen Time on Windows
Previously, you could also use the app “RescueTime” for free to check and limit the time spent on your screen. The app still works, but it is no longer free and a viable option anymore. If you are willing to pay each month, RescueTime is a good option to check your screen time.
Here is a list of other applications that you can also use for the same purpose:
- TimeCamp
- Toggl
- DeskTime
- Tick (for macOS)
Check the Screen Time on Mac
On a macOS, you can conveniently check your screen time using these steps:
-
Go to the following:
System Preferences >> Screen Time
-
Here, you will see the total screen time as well as the time spent using different apps.

Check screen time on macOS

Closing Words
Monitoring your activity on the computer can help you sort out your life. Too much screen all the time can affect your mental and physical health. Thanks to various apps and tools, you can now check the time you spend on different apps and ensure that none of it is wasted and that you give yourself the proper break needed to relax.
Windows 11 is a very capable operating system, but its built-in tools for managing screen time are lacking.
Within Settings, you’ll only find a simple measure of total screen time and how much each app has depleted battery life. Further controls are available via Microsoft’s Family Safety app, but screen time can only be accessed if you set up a separate child account and device.
By contrast, Android and iOS let you set app limits and provide lots of data about your own device by default. Becoming aware of where your time is being spend is a useful step towards reducing screen time – something many of us are trying to do.
However, alongside the limited built-in tools, there is a third-party app available for Windows 11 which offers some additional functionality. It doesn’t quite compare to what you’ll find on a smartphone, but it’s a significant improvement.
In this article, we’ll run through the three main ways you can check and manage screen time on Windows 11.
As its name suggests, ‘Screen on’ serves as a measure of the total time your device’s display has been switched on. It’s not a completely accurate measure of how long you’re staring at it for – you may leave the screen on while away from your desk or sofa – but it serves as a useful guide.
To access it on Windows 11:
- Head to Settings > System > Power & battery
- Scroll down to the ‘Battery’ sub-heading and click ‘Battery usage’ to expand that section
- The graph is useful for battery life info, but below it you’ll find a figure for ‘Screen on’. This is set to the last 24 hours by default, but you can choose the last 7 days if you prefer
Anyron Copeman / Foundry
How to check Windows 11 screen time per app
Microsoft only provides data for battery usage per app, rather than screen time. That won’t be of any use if your device is plugged in, but the timings are generally accurate if you’ve been running on battery power.
To view it:
- Head to Settings > System > Power & battery > Battery usage once again
- From the drop-down box next to ‘Sort by:’, choose ‘In use’
- Each app will now be sorted by the amount of battery power consumed in the time specified above – either 24 hours or 7 days. See the ‘in use’ time in brackets for a guide to screen time
Anyron Copeman / Foundry
But while many Windows 11 devices can last a full working day, most people will plug them in at some point. That makes the data much less reliable, but a third-party app makes things easier.
How to check Windows 11 screen time using a third-party app
Microsoft is yet to make a dedicated version of Android’s Digital Wellbeing app, but developer Alexandra Sava has.
Despite being limited to data from the last seven days, it offers Android-style graphs and pie charts for exploring where your time is spent. You can also set individual app limits, tag apps as one of six categories or choose to include any from the data.
Here’s how to get it:
- To get it, simply head to the Digital Wellbeing for Windows page on the Softpedia website and click ‘Download Now’
- From the pop-up that appears, click ‘DOWNLOAD: External mirror’. The file will start downloading within a few seconds
- Once complete, click the downloaded file to begin installation. If you see a message saying ‘Windows protected your PC’, click ‘More info’, then ‘Run anyway’
Anyron Copeman / Foundry
- Once installed, the app will open automatically to the home screen you see below. It sometimes takes a while to update with the latest data, but should be generally accurate
Anyron Copeman / Foundry
In order to collect screen time data, Digital Wellbeing for Windows stays running in the background. It means that when you try to open it, you’ll see a message saying ‘Application is already running. Check your notification tray’.
When that happens, click the up icon on the taskbar, then right-click the Digital Wellbeing for Windows icon and choose ‘Open’. For easier access, you can drag it out of this folder and on to the taskbar.
Anyron Copeman / Foundry
Related articles
- How to manage notifications in Windows 11
- How to make Windows 11 more energy efficient
- 12 hidden Windows 11 features that are actually worth using
Anyron is Mobile Editor at Tech Advisor, where he’s been a mainstay of the editorial team since 2019. In his current role, Anyron is responsible for all smartphone, tablet and mobile network coverage on the site. A BA Journalism graduate, he has experience with a wide range of consumer tech products and services, including smartphones, tablets, foldables, wearables and more.
Do you feel like you’re spending way too much time on your computer? Well, then you might want to keep an eye on your daily screen time on Windows.
It is vital to track your day if you want to make the most of it. If you’re concerned about how much time you spend on your computer, you can check your screen time in the Windows 11 Settings app. Let’s see how.
How to Check Your Screen Time on Windows Using the Settings App
The Power & Battery section of the Windows 11 settings app provides a detailed breakdown of your computer’s battery usage pattern. It also displays information regarding your PC’s screen on time, screen off time, and total sleep time.
To check your screen time on Windows 11, use the steps below.
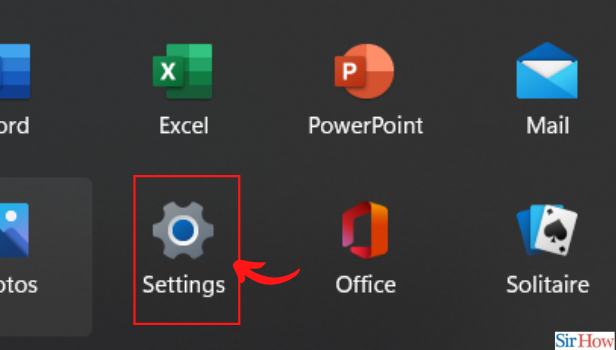
- Open the Start menu and click the gear-shaped icon to launch the Settings app.
- In the System tab, select Power & battery from the right side.
- Under the Battery section, click on Battery usage to expand it.
-
You can find your screen time for the last 24 hours directly below the chart. You’ll also see the screen off and sleep time.

-
You can use the drop-down menu next to Battery levels to select 7 days and view your daily average screen time for the past week.

-
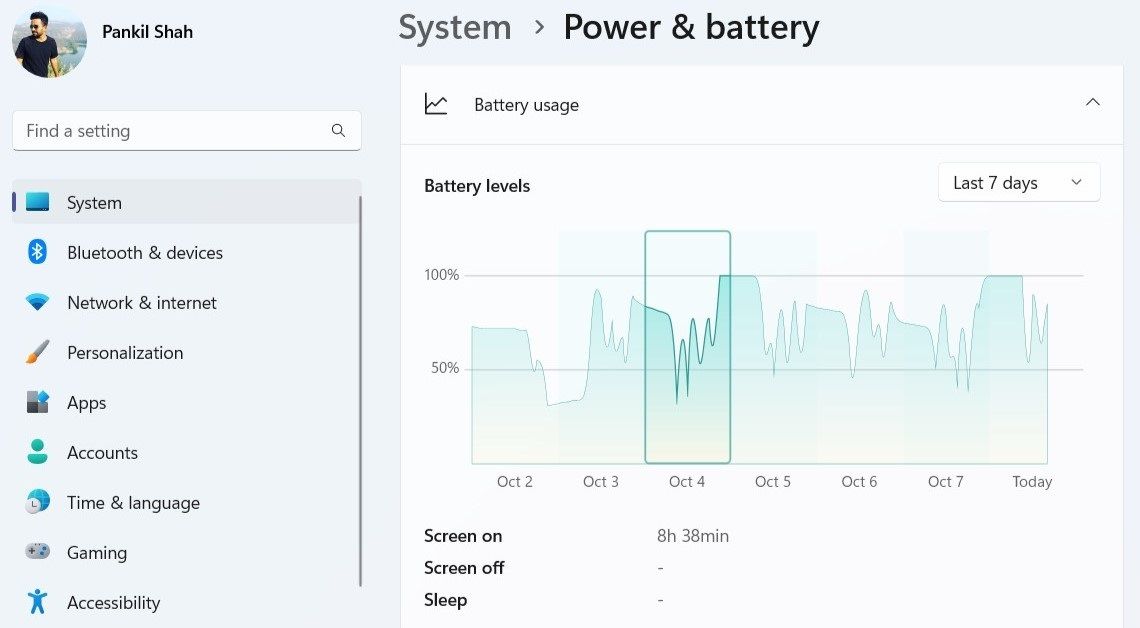
You can view your screen time for a specific date in the past week by clicking on that date.

Unfortunately, the Settings app does not show how much time you spend on each app, so you’ll need to use time-tracking software for that.
Checking Your Screen Time in Windows 11
It’s easy to lose track of time when you’re sitting in front of a computer. You might be surprised to learn how much screen time you clock in daily. Knowing your screen time should help you take the necessary steps to limit your screen usage.
Using Pc blindly can affect your eye vision plus affect your physical health too. On-Screen matters a lot to keep the record to avoid excess use of PC. One must always track the screen time and make effort to lessen it day by day. Or you can simply schedule your time to spend on the Pc screen. Let’s look into this article’s steps to check the screen on time in windows 11.
Check Screen on Time in Windows 11 (Tutorial)
Check Screen On Time In Windows 11 With 7 Easy Steps
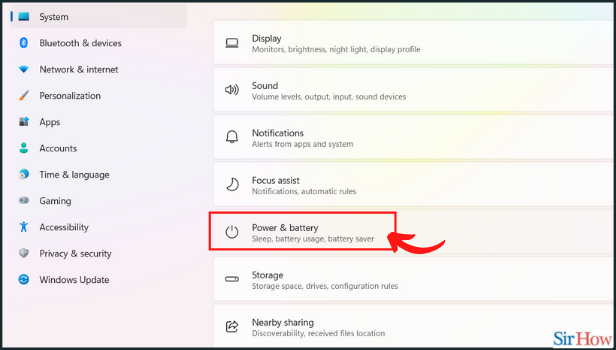
Step-1 Click on the ‘Windows’ icon: Firstly, you need to confirm an account on windows 11. Be it a guest account on windows 11, both will work.
- Now from your desktop screen, go to the taskbar.
- Then click on the windows icon.
- Next, open its page on your screen.

Step-2 Choose the ‘Settings’ option: Now from the various app options under Windows 11. Click on the Settings app and open it. You can either use the shortcut ‘Win+I‘ to open the settings.
Step-3 Go to the System section: Under settings, you will view multiple sections. You have to go to the system section from the left sidebar. Then it will open another list of options on the right panel.

Step-4 Go to the ‘Power & battery’: Next, go to the Power & battery section to get access to settings. Then click on the option and open it.
Step-5 Expand the ‘Battery usage’ section: Now under the Battery section, click on the option of ‘Battery usage’ to expand on your screen.
Step-6 View Screen Information: Now a chart appears on your screen which displays your PC’s battery usage over the past 24 hours.
- You can view specific hour battery usage by clicking on each bar of the chart.
- Furthermore, below the chart, you can view screen on time, screen off time, and the total sleep time.
- Here you can see the screen on time: 4h 30min.
Step-7 Switch to the ‘Last 7 days’ option: Also, if you want your last 7 days’ battery sugars, then from the dropdown menu on the right side. Click on the option last 7 days. Then you can view your battery usage for the last 7 days.
Can You Check Battery Usage Of Per Apps On Windows 11?
Yes, you can track the battery usage of each app on windows 11. To do so follow the above steps. Under the battery usage option, you will find a battery of apps. Then check each battery usage.
Can You View 2 Weeks Of On Screen Time Battery Usage On Windows 11?
No, you cannot view 2 weeks of battery usage onscreen time on windows 11. Furthermore, there are two options to check the onscreen time in windows 11: One is 24 hours and the other is 7 days.
Do You Have Calculator App On Windows 11?
Yes, you can use the calculator app on windows 11. In addition, you can keep a calculator on top of windows 11 for easy access. This makes your calculations pretty smooth without hustling from one page to other.