
how to check mouse dpi windows 10
Ever wondered just how sensitive your mouse is? Well, knowing your mouse’s DPI (dots per inch) can make all the difference in your user experience, especially if you’re into gaming or graphic design. In Windows 10, it’s actually pretty straightforward to check your mouse DPI. You don’t even need any fancy software! You can do it with just a few steps. Ready to get started?
In the following steps, I’ll show you how to check your mouse DPI in Windows 10. You’ll be able to find out the sensitivity settings and make any adjustments if needed.
Step 1: Open Settings
Head to the Start Menu and click on the «Settings» icon.
You can also press “Windows key + I” on your keyboard to open Settings directly. This is where you’ll find most of the customization options for your Windows 10 system.
Step 2: Go to Devices
In the Settings window, select «Devices.»
This section contains all the settings for things like Bluetooth, printers, and, you guessed it, your mouse.
Step 3: Select Mouse
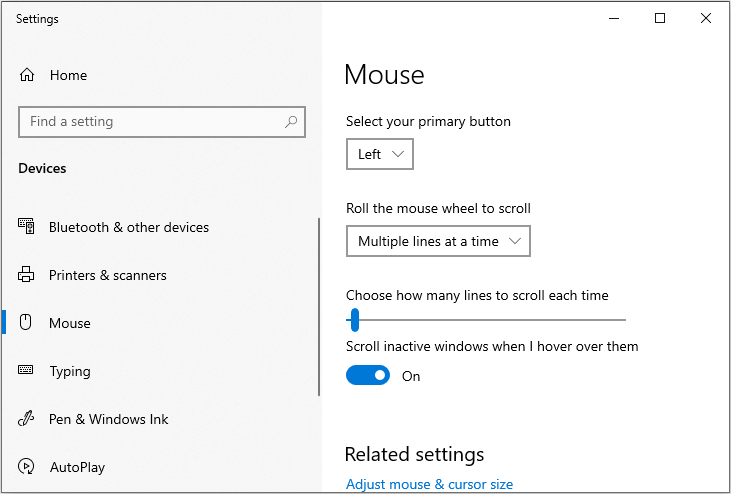
Click on «Mouse» on the left side of the Devices menu.
Here, you’ll see options to adjust various mouse settings like scrolling, primary button selection, and more.
Step 4: Additional Mouse Options
Scroll down and click on «Additional mouse options.»
This will open a new window where you can access more detailed settings for your mouse, including pointer speed and hardware properties.
Step 5: Pointer Options Tab
In the Mouse Properties window, go to the «Pointer Options» tab.
This tab lets you change settings like pointer speed and enhance pointer precision. While it doesn’t directly show DPI, it affects how your mouse sensitivity feels.
Step 6: Use DPI Checker or Software
For an exact DPI number, you may need to use a DPI checker tool or the software that came with your mouse.
Some brands provide their own software that allows you to see and adjust the DPI settings. If not, you can use online DPI calculator tools to find out the precise DPI.
After completing these steps, you will have a clearer understanding of your mouse’s DPI settings and how they affect your daily tasks or gaming performance.
Tips for Checking Mouse DPI in Windows 10
- Know Your Mouse Model: Some mice have built-in DPI buttons or come with software that lets you check and adjust DPI easily.
- Use Online Tools: There are various online tools and websites where you can measure your mouse DPI.
- DPI Buttons: If your mouse has DPI buttons, press them to cycle through the presets. These are usually located on the mouse itself.
- Mouse Software: Check if the mouse manufacturer provides software. This software typically provides DPI settings and allows you to fine-tune sensitivity.
- Manual Calculation: You can manually calculate DPI by moving your mouse a set distance and measuring the cursor movement on-screen.
Frequently Asked Questions
What is mouse DPI?
Mouse DPI stands for «dots per inch» and is a measurement of how sensitive a mouse is.
Why is DPI important?
Higher DPI means higher sensitivity, which can be crucial for activities like gaming or graphic design where precision matters.
Can I change my mouse DPI?
Yes, many mice come with DPI buttons or software that lets you change the DPI settings.
How do I find out my mouse’s default DPI?
You can usually find this information in the mouse’s manual or product specifications on the manufacturer’s website.
Do all mice have adjustable DPI?
No, not all mice have adjustable DPI. Basic models might have fixed DPI settings.
Summary of Steps
- Open Settings
- Go to Devices
- Select Mouse
- Additional Mouse Options
- Pointer Options Tab
- Use DPI Checker or Software
Conclusion
In a nutshell, checking your mouse DPI in Windows 10 is pretty straightforward, especially if you follow the steps laid out above. Whether you’re a gamer looking for that competitive edge or just someone who wants a more comfortable computing experience, knowing your mouse DPI can be incredibly useful. You might find that tweaking it to the right level will significantly improve your efficiency and accuracy.
Feel free to explore different settings and tools until you find the perfect sensitivity for your needs. And remember, understanding your mouse DPI is just one part of optimizing your overall computer setup. Happy clicking!
Matt Jacobs has been working as an IT consultant for small businesses since receiving his Master’s degree in 2003. While he still does some consulting work, his primary focus now is on creating technology support content for SupportYourTech.com.
His work can be found on many websites and focuses on topics such as Microsoft Office, Apple devices, Android devices, Photoshop, and more.
-
Home
-
News
- 2 Methods to Check Your Computer’s Mouse DPI on Windows 10
By Daisy | Follow |
Last Updated
Mice usually have DPI (dots per inch) specifications printed on their labels. DPI is one of the standards used to measure and market mice out to the public. This post from MiniTool will show you how to check mouse DPI.
What Is the Difference Between DPI and CPI?
CPI stands for count per inch, and it is related to the number of virtual pixels that the mouse sensor can obtain through the on-board sensor. Many people confuse DPI and CPI, but they are essentially the same thing. It’s just a matter of preference. Some manufacturers may choose to use a DPI measurement mouse, while some manufacturers may use CPI.
How to Check DPI/CPI?
Windows operating system doesn’t have a specific application or setting to allow you to see the exact number of the DPI or CPI of the mouse. This indicator is usually specified in the documentation or specifications of the mouse model. Then, I will introduce how to check mouse DPI on Windows 10.
Method 1: Check Specification
Finding the mouse’s specifications and looking at the dimensions recorded by the manufacturer itself is the most accurate way to check the CPI / DPI of a mouse. Here is how to do that:
Step 1: Navigate to the manufacturer’s website and find the model number of the mouse.
Step 2: After opening the product page, you need to find the section where all the information is stored.
Then you have done the mouse DPI test successfully.
Method 2: Measure DPI/CPI
If you can’t find the specifications of the mouse model online, you can try to measure the DPI / CPI manually. This method will not be accurate, so you have to take the average. In addition, you need to disable specific settings of CPI / DPI for mouse manipulation in the Windows operating system so that we can get accurate readings. Here is how to do that:
Step 1: You will need to prepare a ruler, a white paper, and a marker.
Step 2: Search for mouse settings in the Search box, then open the application.
Step 3: Now click Additional mouse options under the Related settings section.
Step 4: Now navigate to the Pointer Options tab and uncheck the Enhance pointer precision option. Then click Apply and OK.
Step 5: Now take out a paper and measure around 2-3 inches and mark it correctly. Then navigate to the DPI Analyzer website and hover there.
Step 6: Now place the mouse at the starting point and bring it to the starting point on the paper.
Step 7: Now in a straight line, bring the mouse from the starting point to the ending point. After you are finished, note the DPI as shown by the site.
Step 8: Now you need to repeat the process for 5 or 6 times and record the readings. After you are done, take their average.
Here is all the information on how to check mouse DPI on Windows 10.
Final Words
To sum up, this post has demonstrated the difference between DPI and CPI and how to check mouse DPI Windows 10. I hope that this post is helpful to you.
About The Author
Position: Columnist
Having been an editor at MiniTool since graduating college as an English major, Daisy specializes in writing about data backups, disk cloning, and file syncing as well as general computer knowledge and issues. In her free time, Daisy enjoys running and going with friends to the amusement park.
Readers help support Windows Report. We may get a commission if you buy through our links.
Read our disclosure page to find out how can you help Windows Report sustain the editorial team. Read more
DPI or Dots Per Inch is the most important characteristic of a mouse. If your mouse has a higher DPI then it will be more fast and responsive, and if the DPI is low, then your mouse will lag.
In this guide, we will share with you a guide on how to check mouse DPI in Windows 10. We have listed different ways to check out your mouse DPI. Let us get right into it.
What is mouse DPI?
DPI or Dots Per Inch refers to how your mouse measures physical distance. It is the speed at which your mouse travels from one point to another on your screen.
If your mouse has a low DPI and you move it one inch on your screen, then your mouse will travel less distance. However, if the mouse has a higher DPI and you move it an inch, then the mouse with a higher DPI will travel more distance, even though the sensor size is the same.
So, DPI measures how smoothly or how far your mouse can travel the distance on your screen.
Is a high DPI always preferable?
This is a highly debatable question. While some may think high DPI will help them have a smooth experience when using a mouse and could be better for gaming and editing-related tasks.
However, several gaming companies have said that a high DPI mouse is an irrelevant specification to talk about. Often high DPI mouse could fly across your screens resulting in not so better gaming or editing experience.
So, you should choose a mouse with a DPI that is suitable for your needs. If you are a gamer, then you should check which is the appropriate DPI mouse for that game or the type of games you play. This applies to other professions as well.
How can I check the mouse DPI in Windows 10?
1. Visit the official website

The best way to know or check the mouse DPI in Windows 10 or any OS for that matter is to visit the official website of your mouse.
There you will see the exact DPI of your mouse along with other details, you might need. The DPI is usually written in the spec sheet of the device. So, you may want to scroll through the specifications sheet.
You will find different ways of mentioning DPI. Some manufacturers mention the exact DPI or the highest DPI the mouse supports. While some, such as Logitech, would only specify a range the mouse supports.
- More mouse control settings were migrated to Settings from Control Panel
- Microsoft Office Lens: A Powerful Tool for Capturing and Organizing Information
- Swap Left/Right Speaker in Realtek Audio Console [How to]
2. Use an online tool
- Visit the DPI analyzer website.
- Make sure any pointer acceleration option is disabled in your mouse driver software.
- Draw inch or centimeter lines on a blank paper that will serve as your mousepad.
- Measure the rough distance that you need your mouse to move from the left to the right side of the screen and enter the distance inside the Target distance box. Leave the Configured DPI box blank.

- Click the red crosshair and move your mouse from the left side to the right moving the mouse to the distance specified in the Target distance box. Do not move your mouse fast, you have to be accurate.

- A figure will appear in the Actual DPI box, which will be the approximate DPI of your mouse.


The above steps will not let you know the actual DPI of your mouse. However, it will at least let you know the approximate DPI of your mouse.
3. Use Microsoft Paint
- Press the Win key to open the Start menu.
- Type Mouse and open the Mouse Settings.

- Click on Additional mouse settings.

- Click on the Pointer options tab.

- Uncheck the Enhance pointer precision box and click OK.
- Launch the Paint program on your PC.
- Make sure the zoom level is set to 100%.

- Click on the Pencil tool in Paint.

- Move the mouse to the leftmost side of the working area, where it reads 0 pixels. For example, you will see something like 0, 200px.
- Place a ruler below your mouse and move the mouse by left-clicking to draw a line until you reach the one-inch mark.
- Note down the pixel movement (i.e., check the number in place of 0 in the above example 0, 200px) and note it down.
- Repeat step number 10 multiple times.
- Take out the average of the px number, that will be your approximate DPI.


This way you can at least know the approximate DPI of your mouse. Although this is not a precision method and you don’t get to know the actual DPI, something is better than nothing, in case you urgently require it.
That is it from us in this guide. If you are experiencing erratic mouse movements in Windows 10, then you should read our guide which lists the best solutions to resolve the problem.
We also have a guide that explains in detail how you can resolve the mouse flickering issue in Windows 10 computers.
Feel free to let us know in the comments below, which one of the above methods you used to know the DPI of your mouse in Windows 10.
Sagar Naresh
Sagar is a web developer and technology journalist. Currently associated with WindowsReport and SamMobile. When not writing, he is either at the gym sweating it out or playing country music on his guitar.
He is an avid traveler and has been to 15 countries, going to more places soon. TRAVEL and WORK is his mantra for a peaceful life.
Mouse DPI, or dots per inch, is a measurement used to determine the sensitivity of a mouse.
This is important for gamers or other users that need precise mouse movements to achieve the highest accuracy when playing games or performing work.
If a mouse is not working properly, it may be due to issues with hardware, drivers, software, or connectivity.
A Mouse Test is a tool designed to analyze mouse-related problems, test various aspects of mouse performance, and provide detailed reports on mouse behavior.
A higher DPI means the mouse is more sensitive and requires less movement for the same cursor speed on the screen.
On the other hand, a lower DPI means the mouse is less sensitive and requires more movement for the same cursor speed on the screen.
Checking a mouse’s DPI is fairly simple, and can be done in just a few ways on Windows 10.
To check mouse DPI, users can use the Mouse Properties window or the Settings app.
What Are The Steps To Check The DPI Of A Mouse In Windows?
If you don’t have the manufacturer software installed or if it doesn’t display the DPI settings, you can still check your mouse DPI using the Windows settings in Windows 10/11. Here are the steps to follow:
- Open the Windows settings by pressing the Windows key + I.
- Click on “Devices.”
- Click on “Mouse” in the left pane.
- Scroll down to the “Related settings” section and click on “Additional mouse options.”
- Click on the “Pointer Options” tab.
- Under the “Motion” section, you’ll see a slider labeled “Pointer speed.” Make a note of the current position of the slider.
- Move your mouse a known distance, such as one inch, and measure how far the mouse pointer moves on the screen.
Other Ways To Check Mouse DPI
1. Check DPI Via Mouse Driver Software
Mouse sensitivity is directly related to DPI or dots per inch. The DPI of the mouse determines its sensitivity and the amount of movement and control required.
It enhances the performance in games where more precise control is required. On the other hand, lower DPI settings can reduce mouse sensitivity, making it easier to make larger movements with the same amount of effort.
2. Using MS Paint
To test your mouse’s sensitivity in Microsoft Paint, open the program, then press and hold the left mouse button while dragging the cursor across the screen.
If your mouse is highly sensitive, you will find that the cursor moves across the screen very quickly.
If your mouse is less sensitive, you will find that it takes more effort to move the cursor across the screen.
From this test, you can adjust your mouse’s sensitivity by increasing or decreasing the DPI using the slider in the Control Panel.
3. DPI Analyzer Tool
The DPI Analyzer tool is a great way to measure your mouse sensitivity. This tool measures the accuracy of your mouse movements and is useful for determining the best settings.
To use this tool, you will need to install it on your computer. Once it is installed, launch the application and follow the on-screen instructions to measure your mouse movements.
Measure The Mouse DPI Manually

If you want to measure your mouse sensitivity manually, you can do so by using a wrist ruler. Place the ruler on the mousepad, then move the mouse cursor up and down the ruler.
As you move, check the distance the cursor has moved in relation to the ruler. By measuring the distance, you can calculate the DPI of your mouse.
Ultimately, your mouse sensitivity is a personal preference and depends on how you will use it.
If you are a gamer, you may need a higher sensitivity to make quick movements in-game.
On the other hand, if you are an artist or graphic designer, you may need a lower sensitivity to be able to make precise and detailed movements.
Experiment with different sensitivities to find out which one works best for you.
Mouse Sensitivity (DPI) Settings
Adjusting your mouse sensitivity, or DPI can be done in the settings menu of your mouse. Most gaming mice will have some built-in presets, as well as the ability to adjust the sensitivity manually.
On most modern mice you can also adjust the polling rate, or how often the mouse communicates with the computer.
This can be adjusted to reduce lag in gaming and increase accuracy in precision tasks.
The correct settings depend on the task at hand and the user’s individual preferences. Higher sensitivity is often favored by gamers as it allows for quick movements and reactions.
While lower sensitivity is often favored by artists and graphic designers as it allows for more precise and detailed movements.
Ultimately, there is no one “right” setting and it is up to the user to experiment with different settings to find out which one works best for them.
How To Adjust The DPI Settings Of My Mouse For Gaming?

To adjust the sensitivity of your mouse for gaming, you must first access the settings menu. This can usually be done by pressing the button on the mouse or through the mouse software.
Once you’re in the settings, you can select one of the preset sensitivities or adjust the settings manually.
It’s important to experiment with different sensitivity levels to find what’s right for you.
You may want to start with a lower-sensitivity setting and move up until you find the one that is most comfortable for you.
Remember, the higher the DPI, the more sensitive your mouse will be. This can be beneficial in certain cases, such as Fast-Paced Shooters, but it may have a negative effect on your more precise aiming.
It’s important to find a balance between speed and accuracy, and this goes for all aspects of gaming, not just the mouse settings.
FAQs
Can You Check My Mouse DPI Using Third-Party Software?
The answer is yes. There are a few different pieces of free software available that allow users to check their mouse DPI.
It is important to note that these programs can give a relatively accurate reading, but may not match the exact DPI setting of the mouse.
This is because some mice are designed to have their DPI settings changed on the fly, without any software required.
Can You Find The DPI Of My Mouse On The Manufacturer’s Website?
Yes, you can typically find the DPI of your mouse on the manufacturer’s website. However, it is important to note that the exact setting may vary depending on the specific model and make of the mouse.
Additionally, some mice may have the ability to adjust their DPI settings without the need for any Third-Party software, so it is best to consult with the manufacturer’s website or customer support if you are unsure.
Lastly, if you are looking to purchase a new mouse, it is a good idea to look at the features and specifications available so that you can make an informed decision.
How Is Mouse Sensitivity Related To DPI?
Mouse sensitivity is related to DPI in that the higher the DPI, the more sensitive the mouse will be.
This means that the mouse cursor will move farther with less movement of the mouse itself.
Therefore, if you have a mouse with a high DPI, you will need to make smaller movements to achieve the same movement on the screen.
On the other hand, if you have a mouse with a low DPI, you will need to make larger movements for the cursor to move the same distance on the screen.
Final Words
Knowing your mouse’s DPI is important if you want to adjust the sensitivity of your mouse to match your needs.
You can check your mouse DPI using the manufacturer’s software or by using the Windows settings.
By following the steps outlined in this blog post, you’ll be able to find out your mouse DPI and make any necessary adjustments.

A pixels indicator, often known as DPI, is seen in computer mice. It uses to test the sensitivity of your mouse and to alter the speed of your mouse cursor by adjusting how many pixels per second it moves.
Understanding your DPI is essential while playing video games or utilizing software that requires precision cursor placement. It also makes using widescreen monitors and many displays a lot easier.
In this article, you will find how to check mouse DPI.
What is the DPI (dots per inch) of the mouse?
DPI is an abbreviation for dots per inch. It’s a measurement that shows how many pixels your mouse can move in a single inch. If your mouse has a DPI of 1600, for example, moving it one inch (2.54 cm) will proceed to the cursor 1600 pixels on your screen.
The higher your mouse’s DPI, the more sensitive it is. Modern gaming mice, for example, have DPIs of up to 20000. Although this may appear to be a disturbance, many people who use big or many monitors appreciate the ability to move the cursor more quickly.
While most people are concerned about DPI, it is crucial for video game players. Many people speculate about the ideal DPI level to shoot precisely in First Person Shooter (FPS) games.
You may alter your mouse DPI in various methods, then check your current DPI to remember which level works best.
How to change the DPI of your mouse in Windows 10?
Many individuals wish to change their DPI level to increase or decrease sensitivity. You’ll feel more at ease and be able to operate your smartphone more efficiently. With optimum sensitivity, you can get more done and enjoy your gaming experience even more.
Here are some options for changing your DPI.
Method 1: In the Settings app, adjust the mouse sensitivity.
This strategy works well with a mouse that doesn’t have a specific DPI button. Fortunately, the Windows 10 developers didn’t forget about folks who use older computer mice, and they provided an easy way to modify mouse sensitivity for everyone.
You may easily modify your DPI using the Settings program.
1. To open the Start menu, click the Windows symbol in the bottom-left corner of your screen, then select “Settings.” You may also use the Windows + I keyboard shortcut.
2. Select “Devices” from the drop-down menu.
3. Using the left-side panel, navigate to the “Mouse” tab.
4. At the bottom of the page or in the right-hand panel, click the “Additional mouse options” link.
5. Using the Mouse Properties window’s header menu, select the “Pointer Options” tab.
6. With the slider under ‘Motion,’ you can change the pace of your mouse. Moving the slider head to the left slows down your mouse while moving it to the proper speeds it up.
7. We recommend disabling the “Enhance pointer precision” setting because it has the potential to mess up your DPI.
8. Then press the OK button. The difference in mouse speed should be seen right away.
Method 2: Change the DPI setting on your mouse.
The majority of gaming mouse have a dedicated button for altering your DPI on the fly. You may change your DPI in any program by switching between presets, which may or may not be configurable depending on your mouse.
Typically, the DPI button is found beneath the scrolling wheel. It’s modest compared to the other buttons, and it may even have the word “DPI” printed on it.

You may cycle between the default DPI settings by pressing the button once, and they steadily become higher and higher. Instead of cycling, some mice may have two buttons to increase or decrease the DPI.
Are you unsure which button controls your DPI? We recommend looking for your mouse’s original box, which should have graphic labeling for each button. You can search the manufacturer’s website for your model on the internet.
How to check the DPI of your mouse
There is no unique Windows 10 program for testing your DPI that comes with the OS at the time of writing. It is a problem since many individuals would like to understand their mouse DPI clearly and straightforwardly.
Here are the three methods that we can recommend for you to check the DPI of your mouse.
Method 1: Examine the product’s specifications.
Many brands use this method. Most large manufacturers have a website to list their items, replete with details and photographs. It intends to pique clients’ curiosity, but it can also benefit people who have already purchased the goods.
1. Go to the manufacturer’s website to learn more. We went to the official Razer website in our circumstance.
2. To find your mouse model, utilize the built-in search engine.
3. Look for the web page’s technical details and double-check the DPI count.

If you can’t locate your mouse on the manufacturer’s website, we recommend contacting customer service. Many companies provide customer service by e-mail or phone.
Method 2: Construct a drawing with Microsoft Paint.
It may appear to be a ridiculous method of determining your DPI, yet it works almost exactly. Because MS Paint allows you to view your cursor’s pixel, you can do a small experiment to choose your DPI.
1. You can find MS Paint by searching for it in your taskbar or your list of programs. You can find MS Paint
2. Increase the zoom level to 100%.
3. Place your cursor to the far left of the screen and select any brush tool. The first value in the bottom-left corner should be 0.
4. Move your mouse about 2-3 inches while holding the left mouse button. Look at the initial number in the bottom-left corner without moving your mouse and write it down.
5. Rerun this process as many times as needed, then average the results. It is your DPI setting.

Method 3: Make sure you have the proper mouse drivers installed.
The manufacturer provides the driver software for most branded computer mice. Even if the hardware contains extra buttons and functions, it allows you to modify how it behaves.
You may be able to check your DPI after installing the appropriate mouse driver. We’ll utilize a branded Trust GXT 177 Rivan RGB Gaming Mouse for this example.
1. Go to the manufacturer’s website to learn more.
2. To find your product, use a search engine.
3. Look for an area where you can download the driver software, then select your operating system from the drop-down menu.
4. Launch the app after installing the driver. You should be able to find a section dedicated to DPI settings, which will allow you to see your mouse’s DPI.

To Wrap Up
On the Devices page, click on “Mouse.” Click on “Additional mouse options” under “Related settings.” In the “Mouse Properties” pop-up, click on “Pointer Options.” Adjust DPI using the slider under “Select a pointer speed.”
We hope that this post proved helpful in determining your mouse DPI. Keep in mind that DPI is adaptable; you don’t have to stay in a single sitting; instead, assign different alternatives to different activities. Visit Fastsoftwares for more helpful articles.