
Все способы:
- Вариант 1: Встроенные средства
- Способ 1: Свойства компьютера
- Способ 2: «Диспетчер задач»
- Способ 3: «Командная строка»
- Способ 4: Оснастка «Сведения о системе»
- Вариант 2: Специализированный софт
- Способ 1: CPU-Z
- Способ 2: AIDA64
- Способ 3: RAMExpert
- Способ 4: Piriform Speccy
- Способ 5: HWiNFO64
- Вопросы и ответы: 1
Вариант 1: Встроенные средства
Большинство встроенных средств операционной системы позволяет посмотреть лишь некоторые характеристики оперативной памяти, в частности объем и в некоторых случаях частоту. Но если вас интересует только эта информация, воспользуйтесь следующими способами.
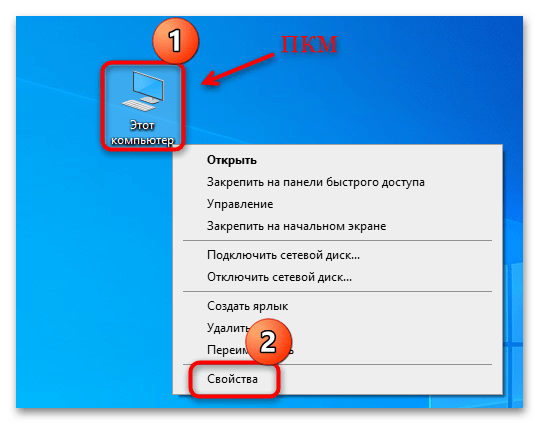
Способ 1: Свойства компьютера
Самый простой метод посмотреть параметры оперативной памяти, а точнее ее объем, заключается в запуске свойств компьютера. Достаточно кликнуть правой кнопкой мыши по значку «Этот компьютер» на рабочем столе, затем выбрать из появившегося меню пункт «Свойства».
Читайте также: Добавление ярлыка «Мой компьютер» на Рабочий стол в Windows 10
Откроется окно штатных «Параметров» с разделом «О системе». В центральной части отображаются некоторые сведения о программных и аппаратных компонентах системы, в том числе и об оперативной памяти.
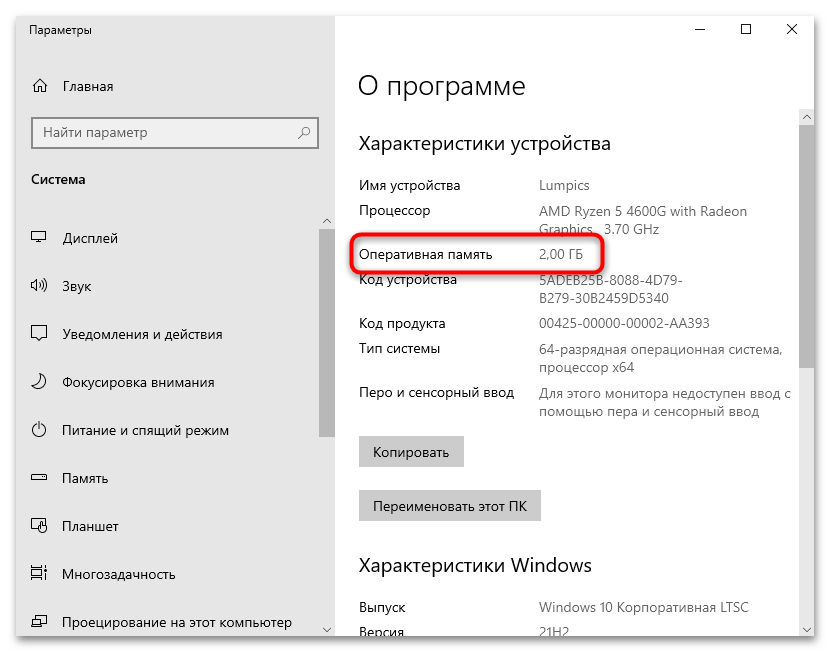
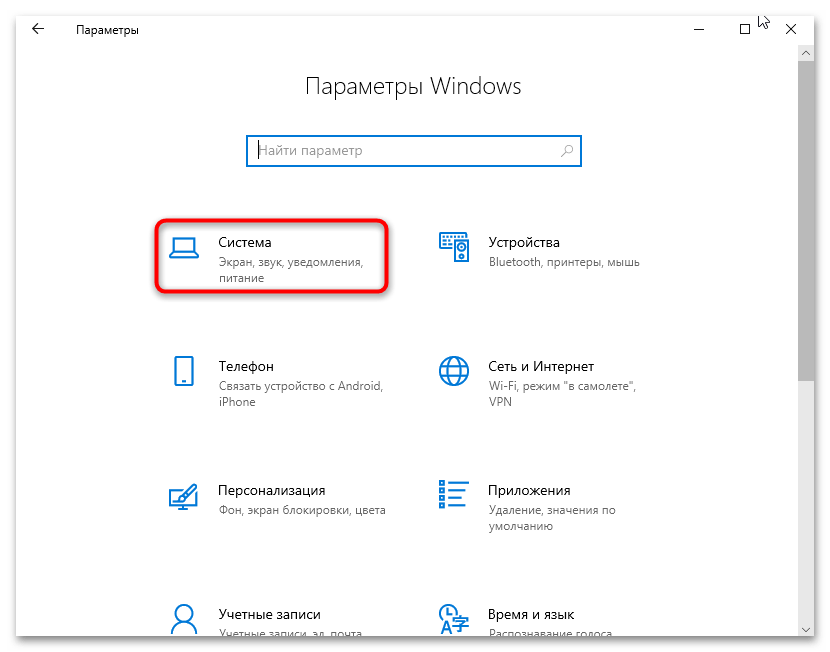
Попасть в это можно и другими способами, например запустив «Параметры» через «Пуск», затем выбрав раздел «Система» и через панель навигации слева переключившись в «О системе».
Способ 2: «Диспетчер задач»
В обновленном «Диспетчере задач», предустановленном в Виндовс, также можно узнать объем ОЗУ. Кроме того, здесь есть сведения о текущем состоянии оперативной памяти, включая показатели используемого или кешированного объема:
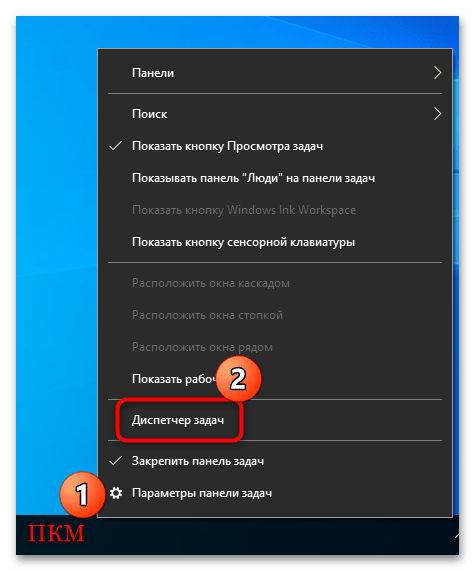
- Кликните по панели задач правой кнопкой мыши и выберите запуск «Диспетчера задач».

К слову, открыть его можно и другими способами, о чем мы писали в отдельном материале на сайте.
Читайте также Методы запуска «Диспетчера задач» в Windows 10
- Если окно «Диспетчера задач» уменьшено, нажмите на кнопку «Подробнее».
- После перейдите на вкладку «Производительность», затем на панели слева нажмите по разделу «Память». В центральной части окна отобразится информация о загрузке компонента, а ниже будут его параметры.

К сожалению, больше данных об оперативной памяти здесь нет, как и в большинстве встроенных в систему средств, поэтому, если вам нужно узнать более детальные сведения, то сразу переходите к Варианту 2.
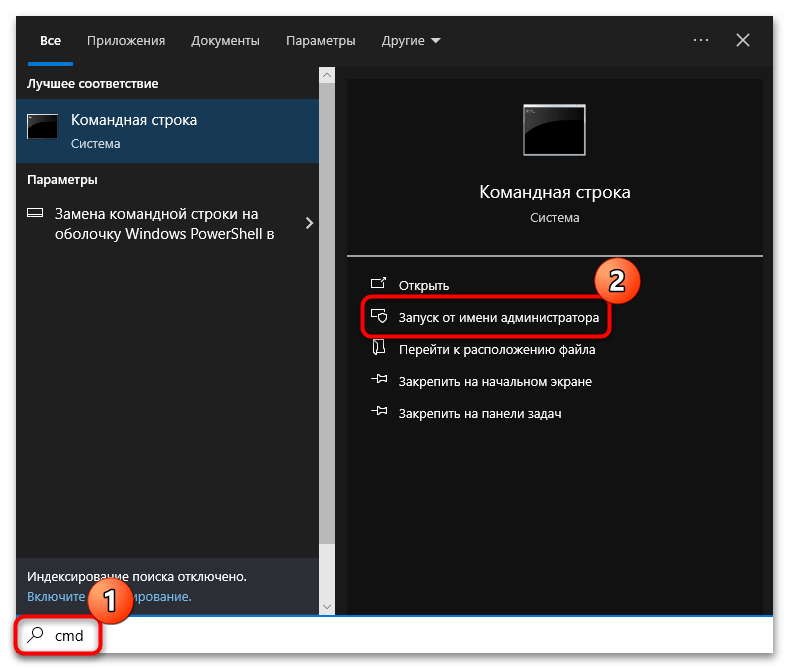
Способ 3: «Командная строка»
Узнать некоторые параметры ОЗУ можно и с помощью консоли. Для этого достаточно выполнить простую команду:
- Запустите «Командную строку» с расширенными правами: воспользуйтесь строкой системного поиска, введя соответствующий запрос (или
cmd), затем выберите пункт «Запуск от имени администратора».
Читайте также: Запуск «Командной строки» от имени администратора в Windows 10
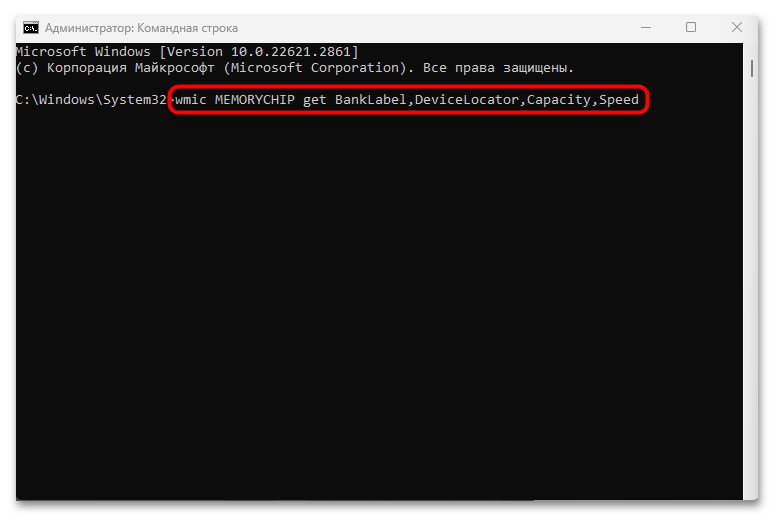
- Далее введите следующую команду —
wmic MEMORYCHIP get BankLabel,DeviceLocator,Capacity,Speed, где каждый запрос вызывает отображение того или иного параметра («BankLabel» — тип разъема, «DeviceLocator» — номер слота на материнской плате, «Capacity» — объем памяти и «Speed» — скорость обработки информации). После ввода команды нажмите на клавишу «Enter». - Ниже отобразятся все необходимые данные – ознакомьтесь с ними в столбцах.

Способ 4: Оснастка «Сведения о системе»
Есть еще один способ ознакомиться с параметрами оперативной памяти – использовать оснастку «Сведения о системе», представляющую собой окно с некоторыми данными о программных и аппаратных компонентах ОС и устройства. Здесь, как и в предыдущих методах, вы найдете не все показатели, но основные особенности узнать сможете.
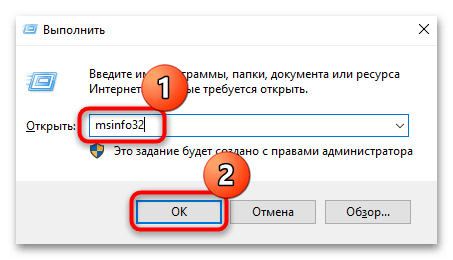
- Вызовите утилиту «Выполнить» («Win + R») и выполните команду
msinfo32, нажав на кнопку «ОК». - На панели слева, оставаясь в разделе «Сведения о системе», отыщите в центральной части окна параметры ОЗУ. Всего доступно несколько строчек, в том числе объем оперативной и виртуальной памяти, сведения о файле подкачки и другие данные.

Вариант 2: Специализированный софт
Если системные способы для просмотра параметров оперативной памяти не подходят, то можете воспользоваться специализированными средствами от сторонних разработчиков, о которых мы поговорим ниже.
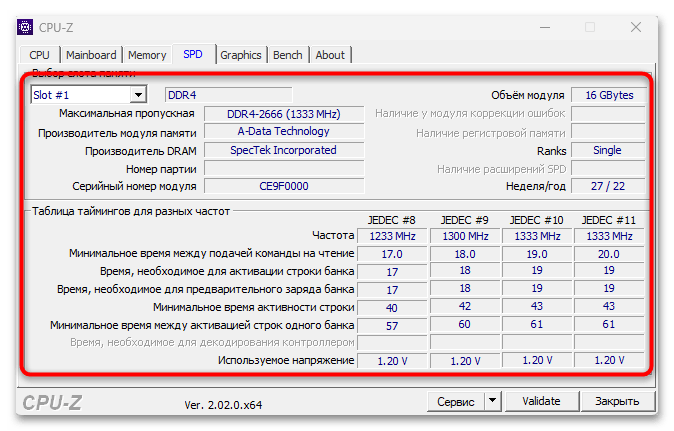
Способ 1: CPU-Z
Одно из самых эффективных, но при этом бесплатных решений – это утилита CPU-Z, представляющая информацию о различных компонентах системы, в том числе оперативной памяти.
Скачать CPU-Z
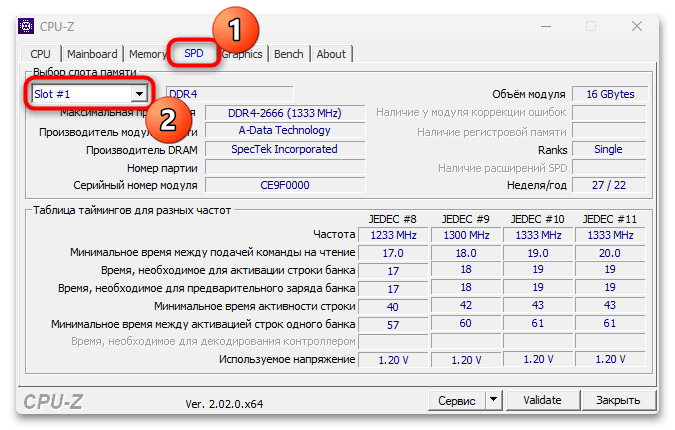
- Перейдите по ссылке выше и скачайте инсталляционный файл утилиты. Чтобы узнать информацию об установленной оперативной памяти, перейдите на вкладку «SPD», затем из выпадающего меню «Slot» выберите тот разъем ОЗУ, сведения о котором требуется посмотреть.
- Правее в соответствующих полях появится подробная статистика о компоненте. Помимо объема, типа и частоты обновления, здесь также доступна инфа о производителе устройства и другие параметры.
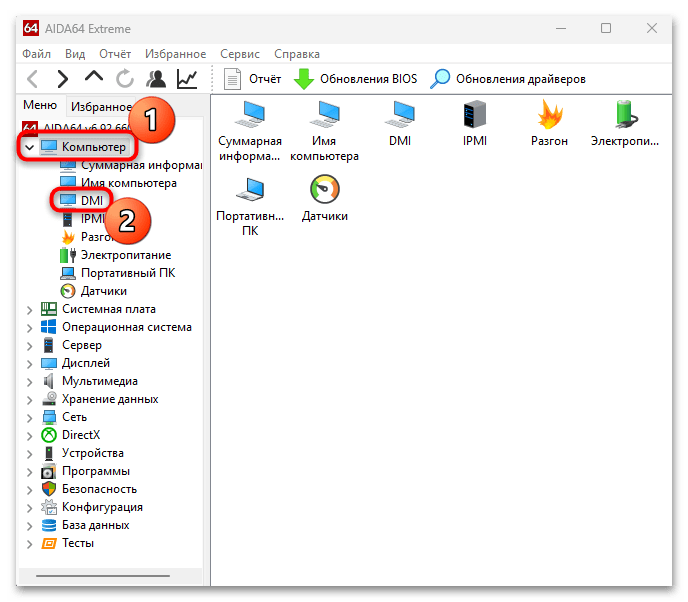
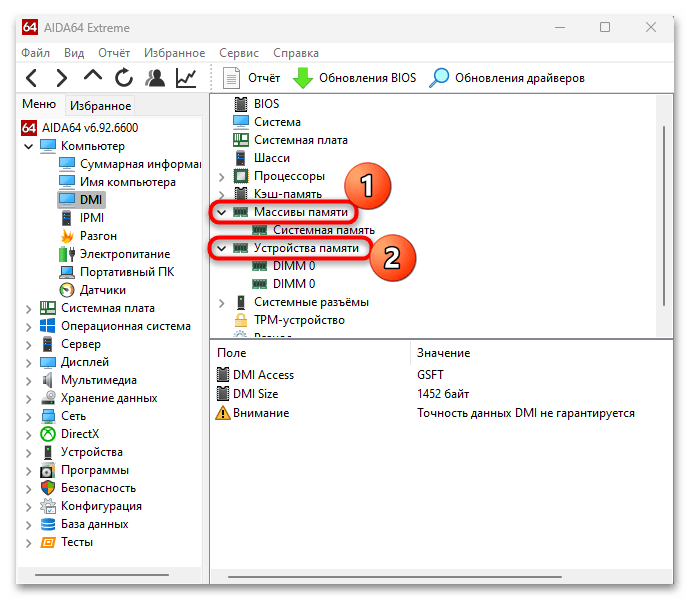
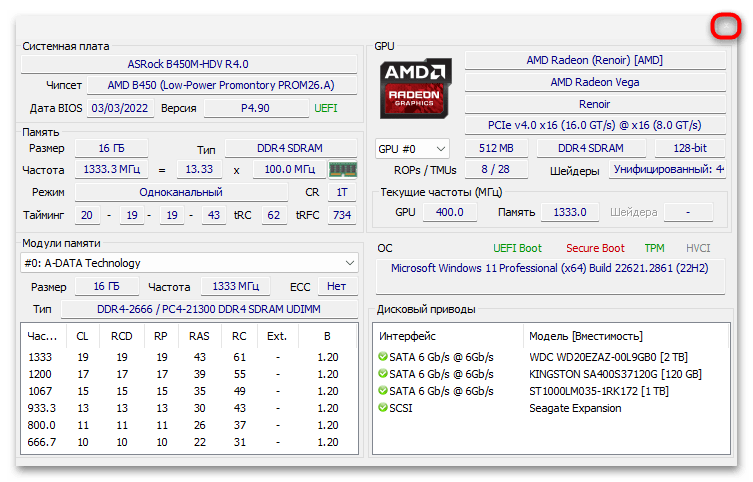
Способ 2: AIDA64
С помощью программы AIDA64 можно детально узнать информацию о различных компонентах компьютера, поскольку это решение более серьезное, чем предыдущий вариант. Есть как бесплатная, так и платная версия, предоставляющая максимально полные данные об оперативной памяти.
Скачать AIDA64
- Скачайте и инсталлируйте программное обеспечение, после чего запустите его и дождитесь, пока оно соберет все сведения о системе. Далее разверните на панели слева меню «Компьютер» и выберите из списка пункт «DMI».
- В основной части окна раскройте «Массивы памяти» и «Устройства памяти».
- Поочередно выбирайте устройства в развернутых списках – в нижней части окна вы увидите детальную инфу о каждом из них.

Следует отметить, что через AIDA64 можно узнать и другие данные, а также провести некоторые тесты производительности. О том, как правильно пользоваться софтом, ранее писал наш автор более детально.
Подробнее: Использование программы AIDA64
Способ 3: RAMExpert
Утилита RAMExpert – простой и интуитивно понятный инструмент, распространяющийся бесплатно и не требующий установки на компьютер. Никаких других сведений, кроме информации об оперативной памяти, здесь не предусматривается, но зато определенные параметры можно сохранить в текстовом формате или перенести в таблицу MS Excel. К сожалению, разработчик уже не поддерживает свой продукт, поэтому скачивать его придется с проверенных, но сторонних источников.
После загрузки достаточно запустить исполняемый файл, после чего отобразится окно с информацией о каждом устройстве: номинальный объем, тип, модель и др.

Способ 4: Piriform Speccy
Разберем еще одно простое приложение — Piriform Speccy, отличающееся минималистичным и понятным интерфейсом. Софт доступен для бесплатного использования, поэтому достаточно скачать EXE-файл, нажав на кнопку ниже, затем запустить его.
Скачать Piriform Speccy
В открывшемся окне перейдите на вкладку «RAM», расположенную на левой панели, после чего в центральной части окна отобразятся значения параметров, касающихся установленной оперативной памяти.

Способ 5: HWiNFO64
Еще одна утилита для аппаратного анализа компьютера — HWiNFO64. С ее помощью можно получить максимально подробные данные о материнской плате, видеоадаптере, модулях оперативной памяти, дисковых накопителях, батарее и других компонентах. Также полученный отчет можно сохранить, а процессы и производительность того же ЦП есть возможность протестировать с помощью встроенных инструментов.
Скачать HWiNFO64 с официального сайта
- Скачайте и инсталлируйте утилиту на компьютер. После первого запуска отобразится окно с детальной информацией о процессах и загруженности, но его можно закрыть.
- Для просмотра сведений об оперативной памяти на панели слева выберите пункт «Память», затем в раскрывшемся списке нажмите на интересующее устройство, если у вас несколько планок ОЗУ. В основной части окна вы увидите максимально полные сведения о выбранном модуле, в том числе объем, частоту и др.
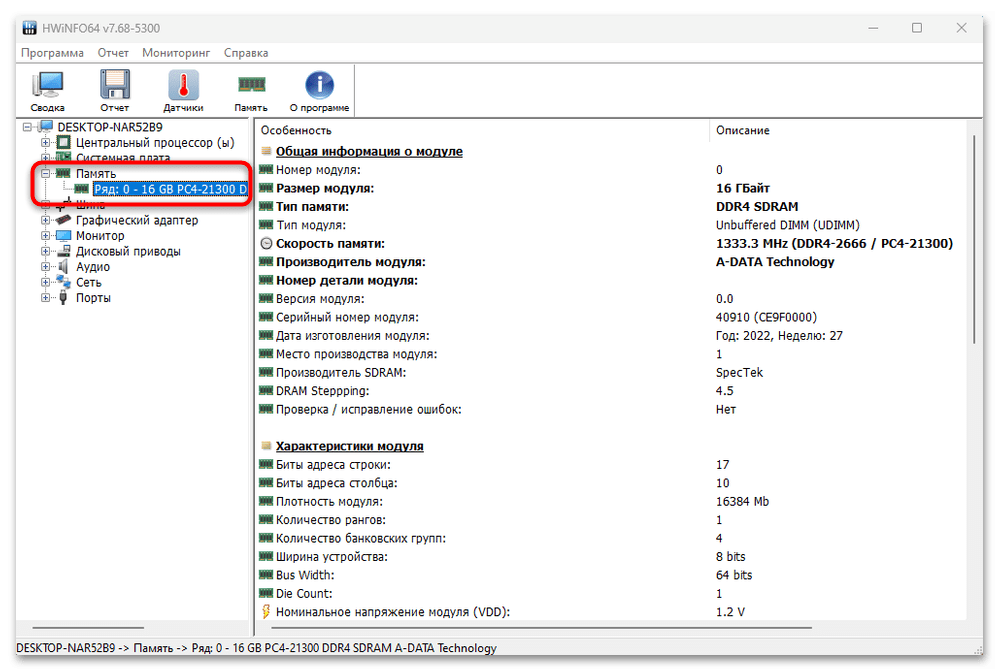
Доступно несколько версий программного обеспечения HWiNFO64, включая бесплатную и портативную (не требующую инсталляции на ПК). Но, в отличие от платного продукта, некоторые возможности у таких версий ограничены.
Наша группа в TelegramПолезные советы и помощь
Reading time7 min
Views23K
Read this article to find out how to find specifications for the system memory installed on your computer, including information about its manufacturer, part number, serial number, effective speed, capacity, form factor, type etc.

Introduction
There are many scenarios when the ability of Windows 10 to supply specifications data on installed computer hardware may come in handy. Getting to know the detailed information on system memory (also known as random-access memory, or RAM) can sometimes be very useful in helping you to take the correct decision if any problems arise. For example, if a computer works slowly because it has to run memory-intensive applications or games, then adding more system memory may give it a considerable boost. Knowing certain peculiarities and required standards of the system memory can help you decide on the correct capacity, speed and brand of RAM to buy a piece of compatible hardware for an upgrade.
If you are having issues with system memory, knowing the information on its manufacturer, part number and serial number will help you to contact the tech support and solve the problem. At least, you will be able to find a memory module of the same type which, as you already know, is fully compatible with your PC. Besides, when you are configuring memory settings in the basic input / output system (BIOS) or in the unified extensible firmware interface (UEFI), a chance to have a look at memory information can help you to understand if a particular configuration was applied correctly.
Whatever might be your reasons, Windows 10 can provide you with all the information you may need; what is more, it saves you the trouble of having to open the computer case or install third-party tools, which may trigger a conflict of interest or cause compatibility issues.

In this tutorial, we will try to show you how to find specifications for the system memory installed on your computer, including information about its manufacturer, part number, serial number, effective speed, capacity, form factor, type etc.
A brief note: Despite the fact that Windows 10 lets users see detailed information on the system memory in their devices, some data may be unavailable due to peculiarities of specific hardware.
How to get detailed information on system memory with the command prompt console

If you suspect that Task Manager displays inaccurate or wrong information on your RAM specifications, or if you need to learn more detailed data such as serial number, part number, manufacturer etc on every memory module, Windows 10 is here to help you find all that information by using a certain set of system commands.
To start searching and find specific data on memory modules installed on your desktop PC or laptop, you need to use the functions of the command prompt with administrator rights in Windows 10. There are a few ways to open the Command Prompt application, the rich functionality of which we are going to explore today.
Click the Search button, shaped as a magnifying glass and located on the Taskbar next to the Start button, and open the search panel. There, type command prompt or cmd. The Best match section will show you the app you are looking for. Right-click on it and select Run as administrator from the context menu.

Identify the manufacturer
Here is what you do to identify the manufacturer company (brand or trademark) that produced the RAM modules installed on your PC.
Open the Command Prompt with administrator rights using the way you prefer.
To find out the manufacturer’s name, type the following command and press the Enter key (make sure there are no quotation marks):
wmic memorychip get devicelocator, manufacturer

Read the RAM module manufacturer name under the column Manufacturer.
Identify the part number
To find data on the part number that the manufacturer assigned to a specific RAM module, here’s a simple sequence of steps to take.
Use any method you prefer to open the command prompt console with extended rights.
In the window that appear, type the command to run (without quotation marks) and press the Enter key.
wmic memorychip get devicelocator, partnumber

Under the column PartNumber you will see the product identifier you are looking for.
Note: If the speed of data processing and overall performance of your computer is decreasing, upgrading your RAM modules might be one of the best way to solve the issue. Using modern memory sticks, you can add high-quality components to your machine, with a pleasant bonus of higher bandwidth and advanced settings at an affordable price.
Check the serial number of your memory module
Take these steps to find out the serial numbers for every memory stick currently installed in your computer:
Open Command Prompt with administrator rights using any way you prefer.
In the corresponding line, type the command for identification of RAM serial number (make sure there are no quotation marks) and hit the Enter key to begin.
wmic memorychip get devicelocator, serialnumber

Hint: In the command for identification of the serial number, you can replace the part devicelocator by banklabel to see the serial number of the physical label of the bank where the memory is installed on the motherboard.

The result will be displayed in the Command Prompt window under the column SerialNumber.
Identify RAM capacity
In Windows 10 you can use a variable set of commands to find out total capacity for every RAM module, and for the entire system memory.
Discover capacity of each RAM module
To learn capacity of each memory stick in your configuration, take a few steps.
Open Command Prompt with administrator rights, using any method you prefer.
In the program’s window, type the following command for displaying the memory capacity, and then press the Enter key to run it (make sure the command doesn’t contain any quotation marks).
wmic memorychip get devicelocator, capacity

The total capacity of RAM installed on your computer will be shown under the column Capacity.
Note: The memory module capacity is represented in bytes, so to understand the figure properly you need to convert it into gigabytes (divide the value shown in the Command Prompt window by 1073741824, which is how many bytes are there in one gigabyte).
Displaying total amount of RAM
In addition, you can quickly learn the total size of system memory on your computer by taking another sequence of simple steps.
Open Command Prompt with administrator rights.
When the corresponding window opens, type the following command to see the total system memory size installed on your computer with Windows 10, and press the Enter key to run the command (remove any quotation marks).
systeminfo | find “Total Physical Memory”

Note: If the total memory size is not displayed, try a similar command:
systeminfo | findstr /C:”Total Physical Memory”
With every command, make sure there are no quotation marks.
The total size of physical system memory (in megabytes) available on this computer will be shown in the corresponding line.
Check RAM speed
To find out the speed that the memory modules are operating at, here are the steps to use:
Open the Command Prompt console with administrator rights in any way you prefer.
Type the command to determine the RAM speed and press Enter on your keyboard (make sure there are no quotation marks):
wmic memorychip get devicelocator, speed

In the corresponding Speed column, the program will display the speed of your memory modules (in MHz).
Check RAM type
To check the system memory type (generation) in Windows 10, take these steps:
Open Command Prompt with administrator rights, using any method you prefer.
In the corresponding line, type the following command to determine the memory type and press Enter on your keyboard (make sure there are no quotation marks):
wmic memorychip get devicelocator, memorytype

The MemoryType column will contain a digit from zero to twenty-five that denotes a certain memory type. For example, if you see 24 in the column, it means this computer is using DDR3memory modules.
Also, you may see zeroes in the MemoryType column: it means the Windows system tool wmic.exe cannot identify the memory generation properly (it may happen if you’re using DDR4 modules), as such values are not provided in the specifications.
The comprehensive list of supported memory types
Below, find the comprehensive list of file types that can be identified by this command:
- 0: Unknown.
- 1: Other.
- 2: DRAM.
- 3: Synchronous DRAM
- 4: Cache DRAM.
- 5: EDO.
- 6: EDRAM.
- 7: VRAM.
- 8: SRAM.
- 9: RAM.
- 10: ROM.
- 11: Flash.
- 12: EEPROM.
- 13: FEPROM.
- 14: EPROM.
- 15: CDRAM.
- 16: 3DRAM.
- 17: SDRAM.
- 18: SGRAM.
- 19: RDRAM.
- 20: DDR.
- 21: DDR2.
- 22: DDR2 FB-DIMM.
- 24: DDR3.
- 25: FBD2.
Check RAM form factor
The word “form factor” (standard size) suggests certain standard dimensions of a memory module which also includes additional characteristics such as the module shape. By form factor, there are twenty-five types of system memory. However, the two most widespread categories are DIMM and SODIMM.
To find out if your RAM sticks are DIMM or SODIMM, follow these steps:
Use your preferred method to open Command Prompt with administrator rights.
In the window Administrator: Command Prompt, type the following command to identify the memory form factor and press the Enter key (make sure there are no quotation marks):
wmic memorychip get devicelocator, formfactor

If the result in the FormFactor column is 8, then your computer is using DIMM modules (the default option for desktop computers). Otherwise, if the command displays the number 12, then your computer is using SODIMM modules (the typical choice for laptops).

The comprehensive list of supported memory form factors
Here is the list of form factors that this command can identify:
- 0: Unknown.
- 1: Other.
- 2: SIP.
- 3: DIP.
- 4: ZIP.
- 5: SOJ
- 6: Proprietary.
- 7: SIMM.
- 8: DIMM.
- 9: TSOP.
- 10: PGA.
- 11: RIMM.
- 12: SODIMM.
- 13: SRIMM.
- 14: SMD.
- 15: SSMP.
- 16: QFP.
- 17: TQFP.
- 18: SOIC.
- 19: LCC.
- 20: PLCC.
- 21: BGA.
- 22: FPBGA.
- 23: LGA.
- 24: FB-DIMM.
Displaying all RAM details
The commands described above allow you to identify the most important data about memory modules. However, if you want to find all the information, here’s what you do:
Open Command Prompt with administrator rights in any way you prefer.
In the corresponding line, type the following command to display all memory details and press Enter to run it (don’t forget to remove any quotation marks):
wmic memorychip list full

View all the available information for each RAM module installed on your computer.
(Optional) if the list of data is too big and you don’t actually need all that stuff, type the following command to view only the necessary things and press Enter (everything should be typed into one line; remember to remove the quotation marks):
wmic memorychip get devicelocator, manufacturer, partnumber, serialnumber, capacity, speed, memorytype, formfactor

Now you can view the memory information you prefer.
Conclusion
Using the steps described in this article, you’ll get an impressive amount of data on the RAM modules installed on your computer. These hints will come in handy when troubleshooting PC issues, tweaking configuration (e.g. when overclocking), or when you’re planning to upgrade your system memory to improve overall computer performance.
See the full article with all additional video tutorials
If you need to find out what type of RAM you have – DDR3, DDR4 or DDR5, here’s a few methods on how to check the DDR type of RAM in Windows 11 or Windows 10.
Check RAM Type DDR5, DDR4 or DDR3 via Task Manager
In Windows 10 or 11, without a third-party software, there is no column that would directly tell you if you have a DDR3, DDR4 or DDR5 RAM. To find out what DDR type your RAM sticks are, you need to first figure out the speed of the RAM you have.
Here’s how to check the RAM speed via Task Manager in Windows 11/10.
- Press CTRL + SHIFT + ESC to open Task Manager. Alternatively, you can right-click on your taskbar and select Task Manager to open it.
- Click on the Performance tab.
- Click on Memory from the left pane.
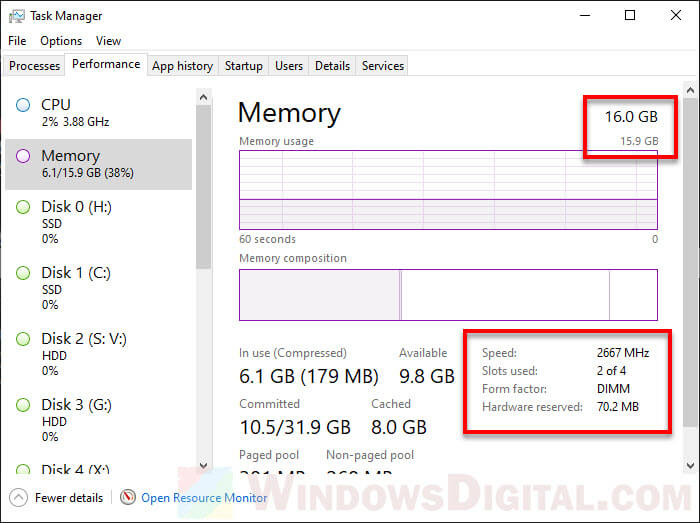
From there, you can learn the speed, size and various other information about your RAM. Since each generation of RAM has its own specific range of speed, the RAM speed can tell you what DDR type the RAM is.
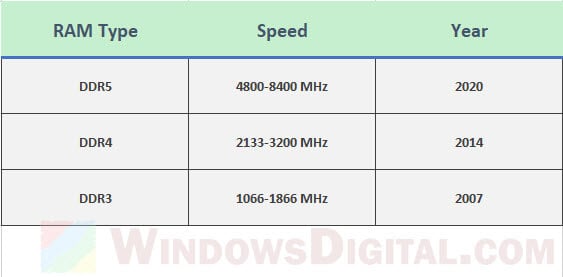
- If the RAM speed is between 4800 MHz up to 8400 MHz, it’s a DDR5 RAM.
- If the RAM speed is between 2133 MHz up to 3200 MHz, it’s a DDR4 RAM.
- If the RAM speed is between 1066 MHz up to 1866 MHz, it’s a DDR3 RAM.
- RAM speed lower than 800 MHz would mean that you have an ancient DDR2 RAM, which is no longer supported in most modern motherboard.
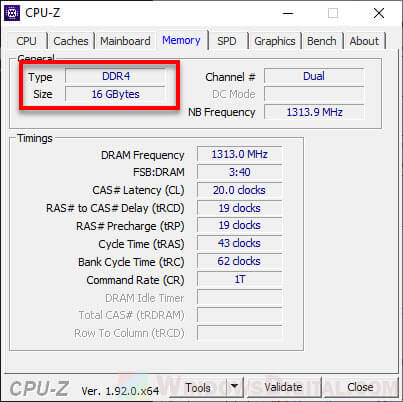
In the screenshot example above, you can see that I have 2 sticks of RAM with speed of 2667 MHz. Because a DDR4 RAM would have speed between 2133-3200 MHz, it indicates that my RAM sticks are DDR4 RAM.
Check RAM Type in Windows 11/10 via CMD
Another quicker method to check the RAM speed (so that you can tell what type of DDR RAM you have) is by executing a simple command in Command Prompt.
On the Windows 10/11 search bar or start menu, type “cmd” or “command prompt”. Click on “Command Prompt” from the search result to open it.
In the command prompt window, type the following command and press the Enter key.
wmic MEMORYCHIP get Manufacturer, Speed
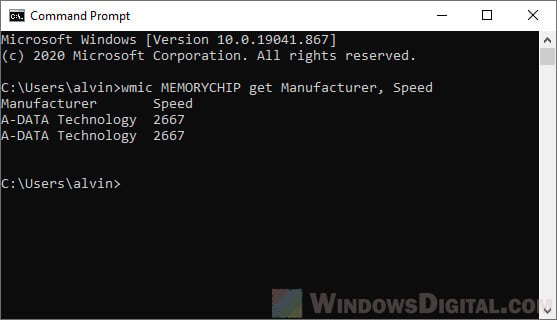
This particular command will tell you the manufacturer and the speed of the RAM installed on your PC. Once you know the RAM speed, you can determine the type of the RAM by referring to the table below.
Check DDR Type of RAM using CPU-Z
To better identify the RAM type, speed and various other information about your RAM, we recommend using a popular software called CPU-Z. CPU-Z is a freeware that is able to show you information about your processor, RAM and motherboard.
You can download CPU-Z from the link below, preferably the zip version so that you don’t have to install it.
https://www.cpuid.com/softwares/cpu-z.html
.Once downloaded, open the app and click on the “Memory” tab. From there, you can see all the information about the RAM installed on the computer. The RAM type will be shown under General.
How to identify RAM type physically when it’s not installed
Look at the specification on the label of the RAM. The RAM type should usually be shown on the label. Otherwise, refer to the labelled RAM speed to determine if it’s a DDR3, DDR4 or DDR5 RAM stick.
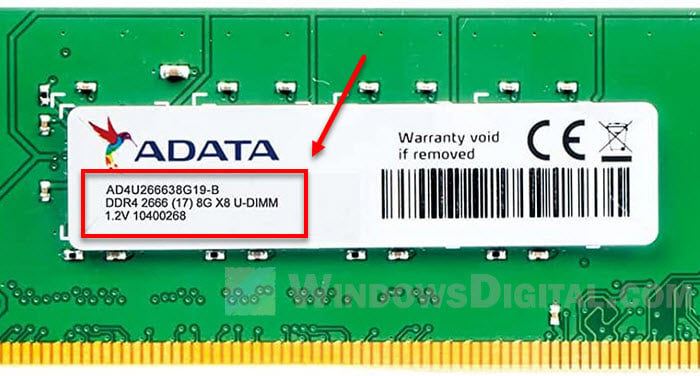
If the label on the RAM stick shows only the model of the RAM, the speed of RAM is usually listed as part of the model. For example, AD4U266638G19-B has a RAM speed of 2666 MHz.
Количество и тип оперативной памяти во многом определяет производительность компьютера. Если она достаточно старая, с низкой частотой, то ее лучше заменить. Но для этого нужно точно знать, какая оперативная память стоит в компьютере.
Что такое
Для чего
Способы
Ничего не помогает
Как обновить
Важно
Что такое
Для чего
Способы
Ничего не помогает
Как обновить
Важно
Без знания типа ОЗУ можно приобрести не те компоненты, которые не будут работать на вашей конфигурации. Для того чтобы узнать, какая оперативная память стоит в компьютере, есть сразу несколько способов.
Что такое оперативная память на компьютере
Оперативная память (ОЗУ, RAM) — это оперативное запоминающее устройство, предназначенное для кратковременного хранения информации. Другими словами, в ОЗУ хранятся данные работающей программы, а также операционной системы. Это нужно для нормального функционирования программного обеспечения.
Во время запуска игры или работы какой-либо программы компьютер выполняет промежуточные вычисления для обработки ваших действий. Это те данные, которые нужны в конкретный момент времени, но не постоянно. Для их хранения и предназначена оперативная память, от ее объема напрямую зависит, сколько кода компьютер может обрабатывать одновременно. Скорость работы ОЗУ во много раз превышает скорость даже самого дорогого SSD-накопителя.
Если вам нужно собрать ПК, то вы сможете найти всю необходимую информацию здесь.
Для чего важно знать, какая оперативная память установлена
Очень важно знать, какая оперативная память установлена в компьютере, так как разные типы несовместимы друг с другом. Вот почему важно точно определить тип установленной ОЗУ в процессоре и узнать, чем разные типы могут отличаться:
- Форм-фактор (SO-DIMM, DIMM). От форм-фактора напрямую зависит размер модуля памяти. DIMM используется в классических ПК, а SO-DIMM обладает гораздо меньшими размерами и разработан специально для использования в ноутбуках.
- Тип модуля ОЗУ (DDR4, DDR5). Сейчас актуальными стандартами считаются DDR4 и DDR5. Они не взаимозаменяемые, и если ваш ПК работает с памятью DDR4, то установить в него DDR5 без замены материнской платы никак не получится.
- Тактовая частота. Чем она выше, тем быстрее будет модуль оперативной памяти. У материнской платы есть ограничения по поддерживаемым частотам ОЗУ. К тому же, если купить два модуля с разными частотами, они могут конфликтовать между собой.
- Тайминг. Тайминги определяют время, которое проходит при обмене данными с процессором. Оно измеряется в тактах. Чем меньше тактов, тем быстрее оперативная память.
Способы узнать, какая оперативная память стоит на компьютере
Существует сразу несколько способов узнать, какая именно оперативная память установлена в конкретном компьютере. Причем способы совершенно разные: от простого визуального осмотра до использования сторонних программ, которые предназначены для предоставления информации о компьютере.
1. Визуальный осмотр модуля памяти
Этот способ годится для классических ПК и ноутбуков, в которых чипы оперативной памяти не распаяны на материнской плате, а расположены в отдельном съемном модуле. Нужно вскрыть крышку системного блока, найти слоты под модуль оперативной памяти, отщелкнуть фиксаторы по бокам модуля и извлечь его.

На каждом модуле имеется наклейка с информацией об объеме конкретного модуля оперативной памяти, рабочей частоте, типе и таймингах. Также можно посмотреть, какие микросхемы используются: если Hynix, то вам повезло, а если вы видите чипы от Samsung, то с такой оперативной памятью нужно быть осторожнее и ни в коем случае не пытаться ее разгонять.
2. Информация в Windows
В ОС Windows есть встроенный инструмент, который позволяет получить информацию об оперативной памяти. Но сведения скудны, и не факт, что вам их хватит. Тем не менее этот вариант считается одним из самых простых. Он актуален для любой версии Windows. Вот что нужно сделать:
-
Нажмите на клавиатуре сочетание Win+R для вызова инструмента «Выполнить», введите в строку «msinfo32» и нажмите «ОК».

-
В появившемся окне щелкните «Сведения о системе» и в окне справа будет информация об объеме физической и виртуальной памяти.

Как видите, сведения, полученные при помощи этого инструмента, крайне скудны. Поэтому продвинутые пользователи предпочитают использовать другие способы, которые дают возможность получить более подробную информацию.
3. Командная строка
Еще один инструмент в ОС Windows — командная строка. При правильном использовании консоль может дать необходимую информацию. Но важно запускать ее с правами администратора — только тогда старания увенчаются успехом. Также можно использовать Windows PowerShell. А алгоритм действий следующий:
-
Щелкните правой кнопкой мыши по кнопке «Пуск» и в выпадающем меню выберите «Windows PowerShell (администратор)».

-
В консоли введите «systeminfo» и нажмите «Enter».
»")
-
Информация об оперативной памяти будет доступна в соответствующих строках.
» с информацией об оперативной памяти")
Этот инструмент одинаково работает как в Windows 10, так и в Windows 11 с той лишь разницей, что в последних сборках Windows 11 может использоваться «Терминал Windows», а не PowerShell. Однако этот инструмент не сильно информативнее предыдущего. Поэтому если вам нужна максимально подробная информация, лучше воспользоваться программами от сторонних разработчиков. Они, как правило, более информативны.
4. Диспетчер задач
Еще один встроенный инструмент, позволяющий получить информацию об основных компонентах компьютера — диспетчер задач Windows. Там содержатся сведения об оперативной памяти ПК. Для того чтобы их увидеть, нужно сделать следующее:
-
Кликните правой кнопкой мыши по кнопке «Пуск», в выпадающем списке выберите «Диспетчер задач».

-
В самом диспетчере перейдите на вкладку «Производительность» и щелкните по пункту «Память».

-
Информация об оперативной памяти будет отображаться под окном с графиком.

Информации немного, но зато здесь можно посмотреть, как система использует оперативную память и на что вообще она расходуется. Это даст возможность оптимизировать потребление памяти вручную.
5. CPU-Z
Программа CPU-Z в основном предназначена для показа подробной информации об установленном в ПК процессоре. Также здесь можно найти немало сведений об оперативной памяти устройства. CPU-Z совершенно бесплатна, ее можно скачать с сайта разработчика.
-
Запустите программу и перейдите на вкладку «Memory».

-
В первом блоке будет отображаться общая информация, а во втором — тайминги ОЗУ.

Здесь информации уже намного больше. Впрочем, количество информации зависит от железа компьютера. Если в нем установлена какая-то редкая оперативная память, программа может отобразить только общую информацию.
6. AIDA64
Если вам нужна максимально подробная информация, то лучше воспользоваться программой AIDA64. Ранее она называлась Everest и была крайне популярна среди пользователей ПК. Программа платная, но для разового просмотра сведений об ОЗУ хватит и триальной версии. Скачать ее можно с официального сайта разработчика.
-
Запустите программу, перейдите в раздел «Системная плата», затем щелкните пункт «Память».

-
Вся информация об оперативной памяти отобразится в правой части окна программы.

AIDA64 также позволяет мониторить температуры основных компонентов компьютера, выполнять тестирование (в том числе стресс-тест) для проверки стабильности системы и даже формировать отчет, в котором отображаются все особенности железа ПК.
Что делать, если ничего из указанных способов не помогает
Иногда бывает, что ни один из вышеописанных способов не помогает. Чаще всего такое случается с материнскими платами и памятью, купленными на китайской площадке AliExpress. В этом случае рекомендуется обратиться к помощи специалиста, поскольку самостоятельно узнать, какая именно оперативная память установлена в компьютере, не представляется возможным.
Как обновить или заменить оперативную память
Если вы хотите обновить или заменить оперативную память, то нужно это делать грамотно. Вот рекомендации, которые позволят выбрать именно то, что нужно для вашей системы:
- Обращайте внимание на тип памяти. Разные стандарты не являются взаимозаменяемыми, и если ваша материнская плата поддерживает только DDR3, установить в нее DDR4 никак не выйдет.
- Обращайте внимание на частоты. Сначала посмотрите на рабочие частоты того модуля памяти, который у вас уже есть. Нужно выбирать новый модуль с теми же частотами. Так будут решены проблемы с совместимостью и модули заработают в двухканальном режиме, что существенно увеличит производительность компьютера.
- Оцените размер модуля. Если у вас установлен большой и мощный процессорный кулер, он может перекрывать слоты оперативной памяти и поэтому классические модули на эти места установить не получится. В этом случае необходимо искать низкопрофильные планки оперативной памяти: они намного уже обычных и создавались как раз для таких ситуаций.
- Наличие радиатора — плюс. Если вы покупаете высокопроизводительную оперативную память и планируете ее разгонять, то важно, чтобы модули были оснащены радиаторами охлаждения. Они позволят эффективно отводить тепло, выделяемое чипами ОЗУ. Но здесь надо учесть, что массивные радиаторы могут не поместиться под процессорным кулером.
Если вы не уверены в своих силах и думаете, что не сможете заменить оперативную память самостоятельно, лучше обратиться в сервисный центр к специалистам. Они смогут решить вашу проблему быстро и качественно. О ремонте электроники в России вы можете прочесть здесь.
Что нужно запомнить ПК пользователю
Обобщим всю полученную информацию и расскажем о том, что важно запомнить об оперативной памяти.
- Оперативная память — важный компонент любого компьютера или ноутбука.
- Чем больше объем оперативной памяти, тем быстрее будут выполняться некоторые задачи в системе.
- Частота оперативной памяти сильно влияет на ее производительность.
- При добавлении оперативной памяти в систему нужно учитывать не только тип ОЗУ, но и рабочие частоты.
- Не все модули памяти могут располагаться вблизи от процессорного кулера.
- При замене оперативной памяти нужно учитывать стандарты DDR, поскольку они не взаимозаменяемы.
Sometimes it becomes essential to know How to Check Ram Type in Windows 10 or 11 before you change or add a new memory stick or buy a new system. There are 24 RAM specifications like DDR, DDR2, SDRAM, EDRAM you might need to find out at this moment. Several built-in utilities help you to find out this info such as task manager, Command Prompt, PowerShell.
You will get here a few methods using these including 3rd party tools so that you could find out the memory type easily on your system.
How to Check Ram Type in Windows 11 or 10
Random Access Memory in short RAM is utilized by CPU as temporary memory storage to make the performance faster. RAM type determines the quality of memory chip and DDR, RDRAM, and SDRAM are supposed to be better.
Below methods will be thoroughly helpful to know How to Check Ram Type in Windows 11 or 10.
Find using Task Manager
When you want to check Ram Type in Windows 10 or 11, the task manager is the easiest and effective native utility. We have already written an article in some different contexts – How to Analyze Resources Performance in Task Manager Windows 10. You will get your requisite information from here in only a few clicks on your system.
- Right-click on Start on the Taskbar and select Task Manager from the list.
- The tool opens with Processes tab by default, so select Performance (just next).
- Once the Task Manager comes, click on Memory from the left pane.
- You will observe RAM type and size from the upper section which clearly reveals at the top.
- If you want extra information such as numbers of slots, committed memory, cached memory then go down just below the graphical view.
How to Check Ram Type in Windows 11 or 10 through Command Prompt (Admin)
Another way to check the ram type is possible through running a simple command in Command Prompt. This will output your RAM type in numeral form so we are giving a table deciphering the meaning of each number.
Step-1: Type cmd in the search.
Step-2: At once a UAC pop up will appear, choose Yes.
Step-3: Once “Command Prompt” appears at the top, put a right click on it and choose “Run as Administrator”.
Step-4: Type the below command here and Hit the Enter button:
wmic MemoryChip get MemoryType
or
wmic MemoryChip get BankLabel, Capacity, MemoryType, TypeDetail, Speed
Description will not appear after the command runs instead you see number representation. Match the number with the following list to ascertain your RAM type.
| RAM type in Number | Type of Physical Memory |
| 0 | Unknown |
| 1 | Other |
| 2 | DRAM |
| 3 | Synchronous DRAM |
| 4 | Cache DRAM |
| 5 | EDO |
| 6 | EDRAM |
| 7 | VRAM |
| 8 | SRAM |
| 9 | RAM |
| 10 | ROM |
| 11 | Flash |
| 12 | EEPROM |
| 13 | FEPROM |
| 14 | EPROM |
| 15 | CDRAM |
| 16 | 3DRAM |
| 17 | SDRAM |
| 18 | SGRAM |
| 19 | RDRAM |
| 20 | DDR |
| 21 | DDR2 |
| 22 | DDR2 FB=DIMM |
| 24 | DDR3 |
| 25 | FBD2 |
How to Check Ram Type in Windows 11 or 11 or 10 via PowerShell
Fortunately, a few PowerShell commands tell you the whole story of the Ram Type, size, number, slots manufacturer, serial number, speed and a lot more. And it needs the lesser effort rather than the command prompt because you can open it simply from Power user menu. So we suggest using PowerShell when you are going to Check Ram Type in Windows 10.
- Press Windows logo and X keys altogether and let the Power menu appear. Select Windows PowerShell (Admin) from the list.
- Select “Yes” on the “User account control” pop up covering the system screen.
- Soon you will experience Administrator: Windows PowerShell on your computer. Copy the following piece of command, paste there and then press Enter:
Get-WmiObject Win32_PhysicalMemory
- One more command also works pretty effectively, so copy (without quotes) it from underneath, paste, and hit Enter as an alternative:
"Get-WmiObject Win32_PhysicalMemory | select BankLabel,DeviceLocator,Capacity,SMBIOSMemoryType,Manufacturer,PartNumber,SerialNumber,TotalWidth,Speed"
If you need to detect only the size of RAM there are two additional methods further.
Check Ram Size in Windows 10 using Settings
The Settings application has About section that includes the info about the Installed RAM. See the method –
- Hold down the Windows logo key and I letter on your keyboard at the same time.
- Once the Windows Settings appears, select System.
- Go to the left pane on the next screen, scroll down and make a click on About. Move to the opposite side and Locate Installed RAM to find the magnitude of the memory.
- If you want to see the same information on the Control panel then click on System info.
- Alternatively, You can get access the same location following this path – Control panel => System.
Find RAM Size using System Information
System information tool reveals a report of your PC configuration that includes RAM, Hardware resources, “components”, software environment. So far as the question of memory, you can find its volume installed on your computer.
- Perform a Click in the search bar located at the taskbar just before the Task view icon, type
msinfo32and then hit Enter.
- Once the System information window comes up, find Installed Physical Memory (RAM) and its volume.
This was all about How to Check Ram Type in Windows 11 or 10 using the built-in tools,
Using 3rd Party tools
Few third party tools play outstanding roles to check Ram type in Windows 11 or 10 when you are going to memory upgrade on your system. We are here sorting the foolproof applications taking into account that you could gain the info without a hitch.
CPU-Z
CPU-Z is the most popular freeware and provides all the information about hardware in your computer. You get Ram type, channel #, size, NB frequency, cycle time, and lots more on a simple interface. The powerful hardware detection tool is based on kernel-mode software driver and collects the information in real time. Qusere engine of this app is very prompt so you don’t need to wait anymore. So you can use this utility without hesitation to check the memory type on your Windows system.
1. Download CPU Z from here and install following the onscreen instructions.
2. Launch the tool and go to Memory tab to see all the specifications.
RAMMon
This is a simple working Windows-based application that allows seeing the details of Ram modules. RAMMon uses system information dll SDK to retrieve data of memory installed on your device. You will find the RAM type such as DDR, DDR2, DDR4, XMP, EPP, write recovery time, maximum capacity, bandwidth speed comic locker speed and everything you need. Hinging on RAM type, and other distinct SPD data can be reclaimed as well, for example, the module thickness, width, and other. RAMMon is absolutely free for personal use and has a very small size.
- Navigate to RAMMon official website and download the utility https://www.passmark.com/ftp/rammon.exe.
- Open the tool and perceive all the data you wanted.
SIW
SIW is one more tool that lets you check ram type with a lot of additional information on Windows. If you need to find out Memory type, manufacturer name, total and used volume, number of slots, serial number then this is an ideal application. An extra feature is you can create XML report of the info provided by SIW. The software comes as trial version for 30 days, so grab it at current time without paying any cost.
1. Take SIW from https://www.gtopala.com/thank-you/siwviewer.php, download and install on your system. Double click on the Setup icon and allow to expand on the system screen.
2. Select Memory tab from the left pane and find the RAM Type in the Properties column.
ScanMyPC
ScanMyPC is one of the easy-going tools that displays RAM Type on the browser window. The app reads details set on your computer by the manufacturer with the model and throws out on its website. When you run ScanMyPC it automatically sends there and asks you to click on View results. You comprehend the description of System Manufacturer, System Series / Model, Motherboard, Total Installed Memory, Memory Type, Modules Installed, Operating System. If you need to get more about your RAM click on Show Advanced Details.
Closing words
When you have performed finding out with the help of How to Check Ram Type in Windows 11 or 10 like DDR, DDR2, SDRAM etc, choosing best one is easy. Now check the capacity that will fulfill your need and upgrade or purchase your memory chip to have a good computing experience. We hope the methods will help you to enjoy Windows 10 PC.