
Here is how to check if your Processor is 32-bit, 64-bit, or ARM in Windows 10 (CPU architecture).
The CPU, Central Processing Unit, or simply Processor is the main electronic circuitry in a computer responsible for carrying out instructions of a computer software, including the OS and installed apps. It also manages the other components in your computer by performing the basic arithmetic, logic, controlling, and input/output (I/O) operations specified by the instructions in the program. The architecture of the CPU defines which OS you will be able to run on your computer and which apps you will be able to use.
Modern consumer devices include processors of the following CPU architectures: 32-bit (x86), 64-bit (x64), or ARM. If your CPU is a 32-bit processor, you will only be able to install a 32-bit version, e.g. a 32-bit Windows 10 release, a 32-bit Linux distro, etc. A 64-bit CPU is able to handle both 32-bit and 64-bit operating systems. In this case, it is recommended you to install a 64-bit OS in order to use all available hardware resources. Check out the following CPU requirements for Windows 10.
This post will show you how to find the CPU architecture and check if it is 32-bit, 64-bit, or ARM on Windows 10. There are two methods you can use.
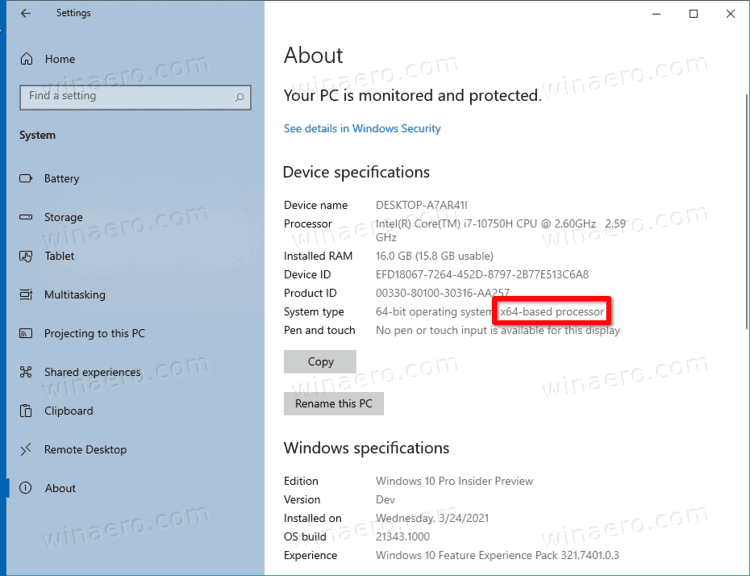
- Open the Settings app.
- Navigate to System > About.
- On the right, check out the System type value.

- It shows either a x86-based processor (32-bit), x64-based processor (64-bit), or ARM-based processor depending on the hardware you have.
You are done.
That’s quite easy and simple. However, there is an alternative method you can use. You can find find the CPU architecture in the command prompt. That can be used in various automation scenarios.
Find CPU architecture type in command prompt
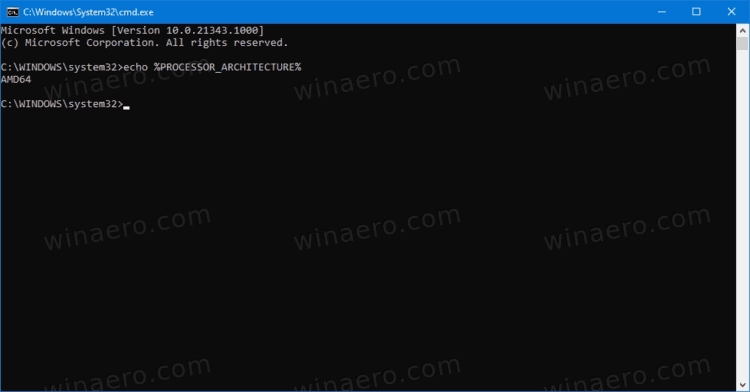
- Open a new command prompt.
- Type
echo %PROCESSOR_ARCHITECTURE%and hit the Enter key. - The output includes one of the following values: x86 for a 32-bit CPU, AMD64 for a 64-bit CPU, or ARM64.

- You can close the command prompt if you want.
It is worth mentioning that while there are plenty of 32-bit only devices in use, they no longer being produced and superseded by x64 processors. Also, Microsoft still releases Windows 10 32-bit, but that’s not for long.
That’t it.
Support us
Winaero greatly relies on your support. You can help the site keep bringing you interesting and useful content and software by using these options:
If you like this article, please share it using the buttons below. It won’t take a lot from you, but it will help us grow. Thanks for your support!
Whether you want to go computer shopping or try fixing a computer problem, it may help you think better if you know the detailed computer specs. This article will show you all the ways to view computer specs on Windows 10.
You’ll learn:
- How to view basic computer specs through System Properties.
- How to view the entire computer specs through System Information.
- How to view certain detailed computer specs through Command Prompt.
- Bonus tip: How to keep your computer in tip-top shape
How to view basic computer specs through System Properties
Firstly, You may want to view some basic computer specs such as the Windows edition and system type of your computer. You can quickly access the information through Windows System — On your keyboard, press the Windows logokey and Pause/Break key at the same time to open the System window. You’ll see something like this:

How to view the entire computer specs through System Information
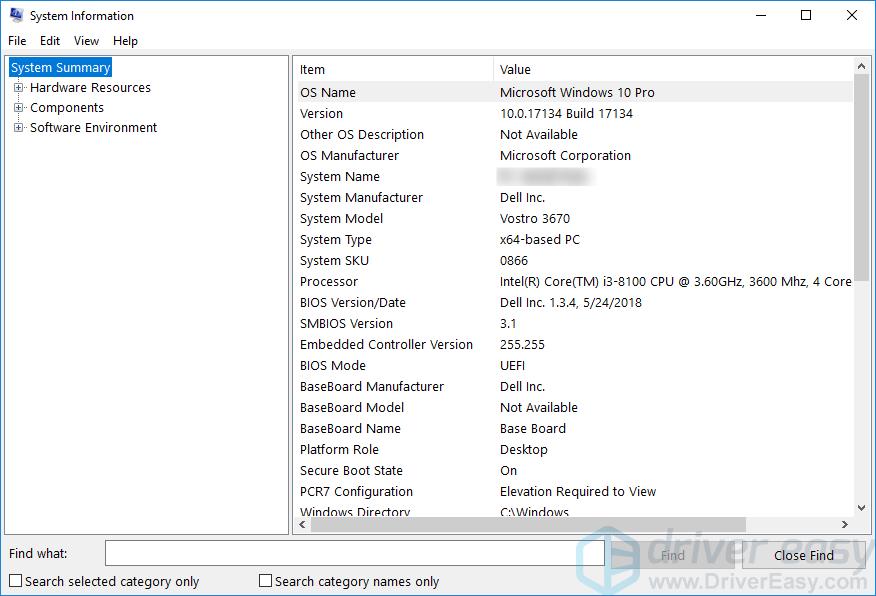
If you want to view the entire computer specs, you can do so through System Information:
- Press the Windows logo key and I key at the same time to invoke the Run box.
- Type msinfo32, and press Enter.
The System Information window will then appear:

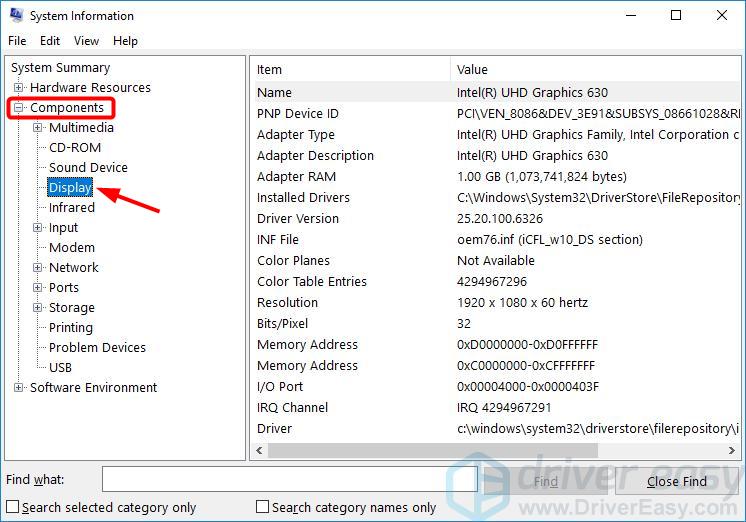
Note: If you don’t see the graphics card information under the System Summary category, you can expand Components, then click Display.
How to view certain detailed computer specs through Command Prompt
You can also use Command Prompt to view certain system information, including memory, BIOS version, network adapter, etc.
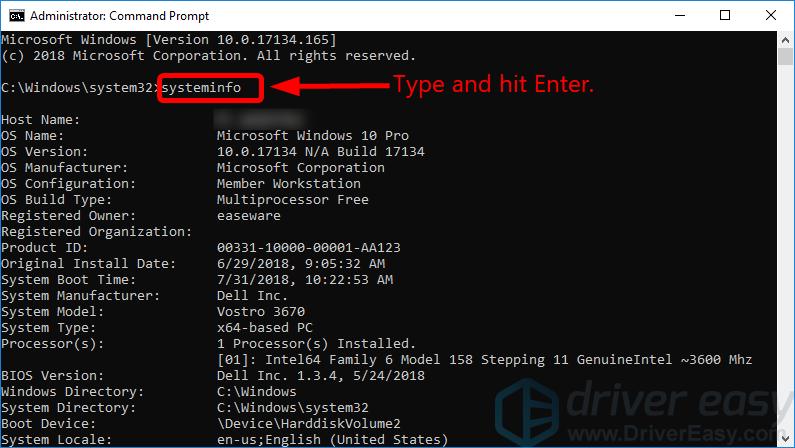
- Right-click the Start button in the lower left corner of your screen, then select Command Prompt(Admin).
- At Command Prompt, type systeminfo and press Enter. You can then see a list of information.

Bonus tip: How to keep your computer in tip-top shape
If you want to keep your computer in tip-top shape, you should keep all your device drivers up to date.
There are two ways to update your drivers: manually and automatically.
Update your drivers manually — you can update your driver manually by going to the hardware manufacturer’s website and searching for the latest driver. But if you take this approach, be sure to choose the driver that’s compatible with the exact model number of your hardware, and your version of Windows.
Or
Update your drivers automatically — If you don’t have the time, patience or computer skills to update all your drivers manually, you can do it automatically with Driver Easy. You don’t need to know exactly what system your computer is running, you don’t need to risk downloading and installing the wrong driver, and you don’t need to worry about making a mistake when installing. Driver Easy handles it all.
- Download and install Driver Easy.
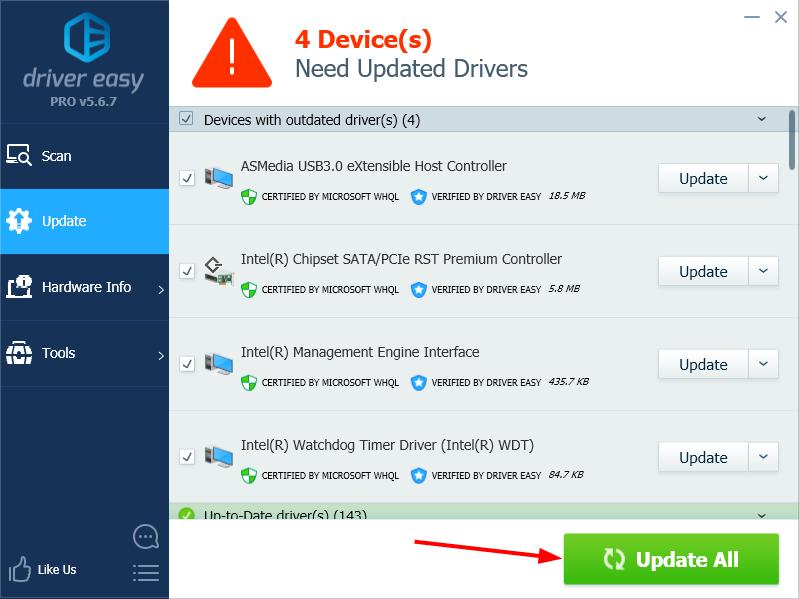
- Run Driver Easy and click Scan Now. Driver Easy will then scan your computer and detect any problem drivers.

- Click Update next to any flagged devices to automatically download the correct version of their drivers, then you can install them manually. Or click Update All to automatically download and install them all automatically. (This requires the Pro version – you’ll be prompted to upgrade when you click Update All. You get full support and a 30-day money back guarantee.)
If you need assistance, please contact Driver Easy’s support team at support@drivereasy.com.

There are two main categories of architecture, 32 bit and 64 bit, this depends on Processor. Processors are manufactured under these Categories. If you are using a 32-bit Processor then you have to install a 32-bit operation system, for a 64-bit Processor you can use either 32 or 64-bit operating system. The 32-bit Processor was already gone extinct so we will focus on only, 64-bit Processor. So, what 64-bit processor will do, the 64-Bit processor handles more calculations per second compared to a 32-bit processor.
And also, there is one big advantage of a 64-bit processor. A 64-bit processor supports more RAM (Random Access Memory) Memory, 32-bit only supports 4GB of RAM. And 64-bit CPUs support 8TB of RAM memory. Nowadays most Operating systems and Software support only 64 bit CPUs. So it is very mandated to know about your OS architecture and CPU architecture. This article will guide you to Check your Computer Processor Architecture Using CMD in Windows 10. Using this command, you will get your computer processor architecture is 32-bit, 64-bit or ARM.
You can check your computer processor architecture in two different methods in Windows 10. Also, there are many third-party tools available to check system hardware details. But if you are working in corporate, then you are restricted to install third-party applications on your laptop or system.
Using Windows Settings:
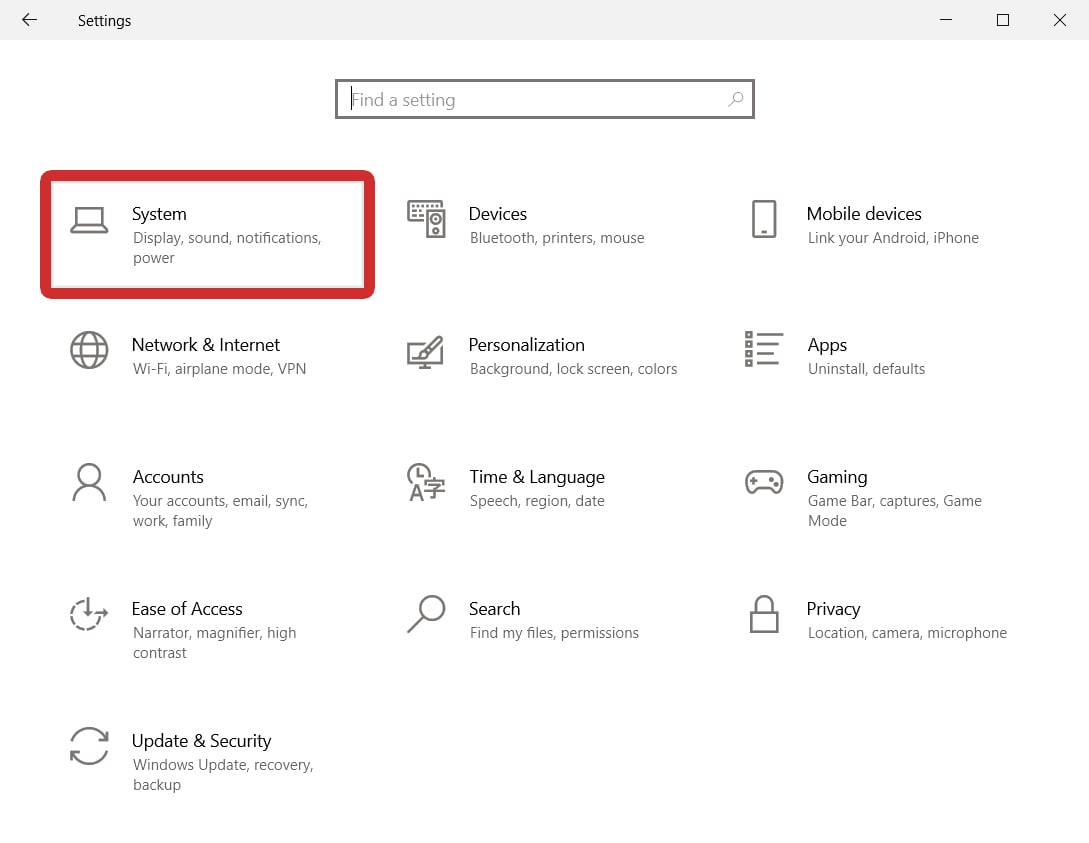
Open Windows settings by pressing Windows + I and click on the System icon.
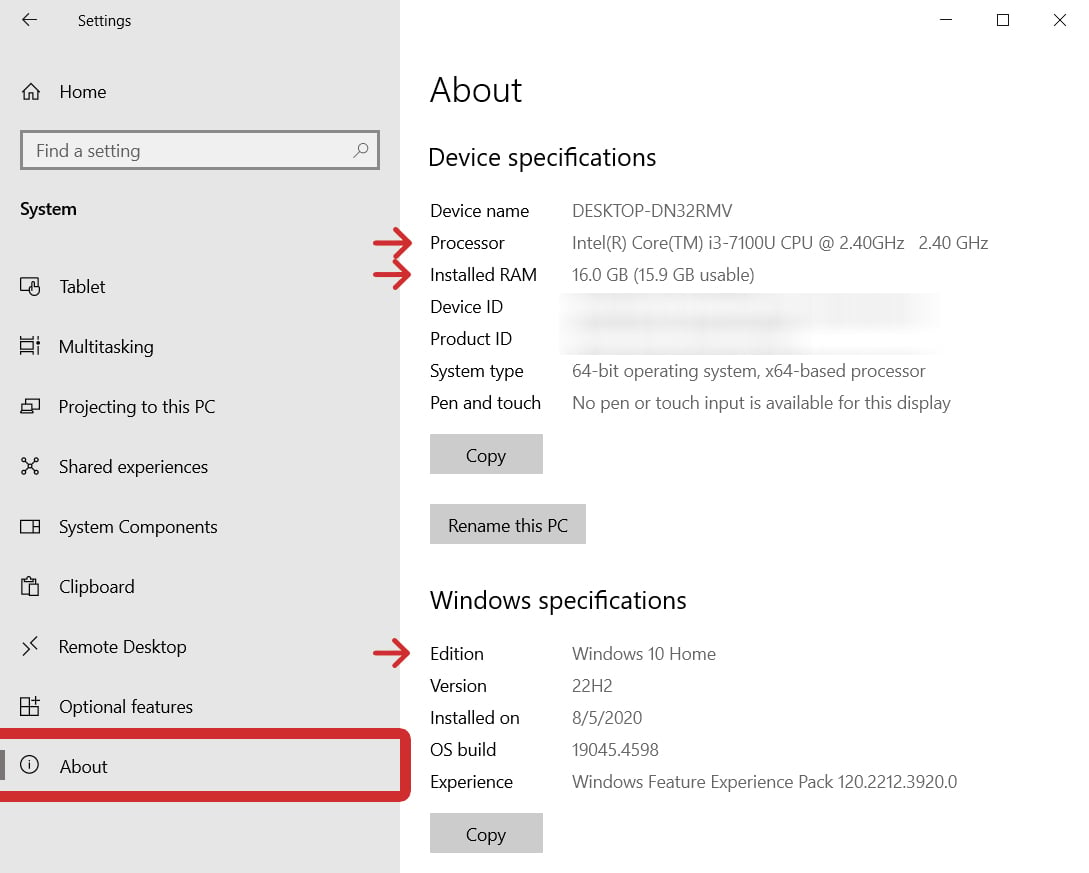
Under System settings, from the left-hand side scroll down to the bottom and click on About.
From the right-hand side under Device Specifications, you can see the System type.

System type will show the OS architecture and the Processor Architecture.
Check your Computer Processor Architecture Using CMD:
Open Command Prompt in elevated mode, and type the following command and hit enter.
echo %PROCESSOR_ARCHITECTURE%

This command will display the Processor architecture.
Post Views: 3,766
With the numerous companies that manufacture Windows computers and components, it can be difficult to find out what kind of CPU you have, how much RAM you have, and more. Checking your computer’s specifications also makes it easier to upgrade your hardware and understand the system requirements for new programs you want to install. Here are several ways to check your CPU, GPU, RAM, hard drives, internet adapters, and other specs on your Windows 10 PC.
Read More: How to check your specs on a Windows 11 PC
How to Quickly Check Your Specs in Windows 10
To check your general specs on a Windows 10 PC, press the Windows + I keys on your keyboard to open a settings window. Then go to System, scroll down the left sidebar, and select About. From here, you can check your CPU, RAM, and which version of Windows 10 you are running.
- Press the Windows + I keys on your keyboard. When you press these keys at the same time, a settings window will open. Alternatively, you can open settings by left-clicking the Windows logo at the bottom of your screen, typing “settings,” and selecting Open.
- Then, select System.

- Next, click About. You can find this by scrolling down to the bottom of the left sidebar.
- Finally, check your specs on the right side of the window. Here you can find details about your CPU, RAM, the version of Windows you are running, and more.
If you need more information about your specs, there’s an easy way to find out how your hardware is performing in real-time. This is especially important information if you are wondering whether you need to upgrade any hardware.
How to Check Real-Time Specs in Windows 10
To check your specs on a Windows 10 PC, press the Windows + X keys on your keyboard and select Task Manager from the pop-up menu. Then select the Performance tab to check your CPU, Memory, Disk, Ethernet, Wi-Fi, and GPU usage in real-time.
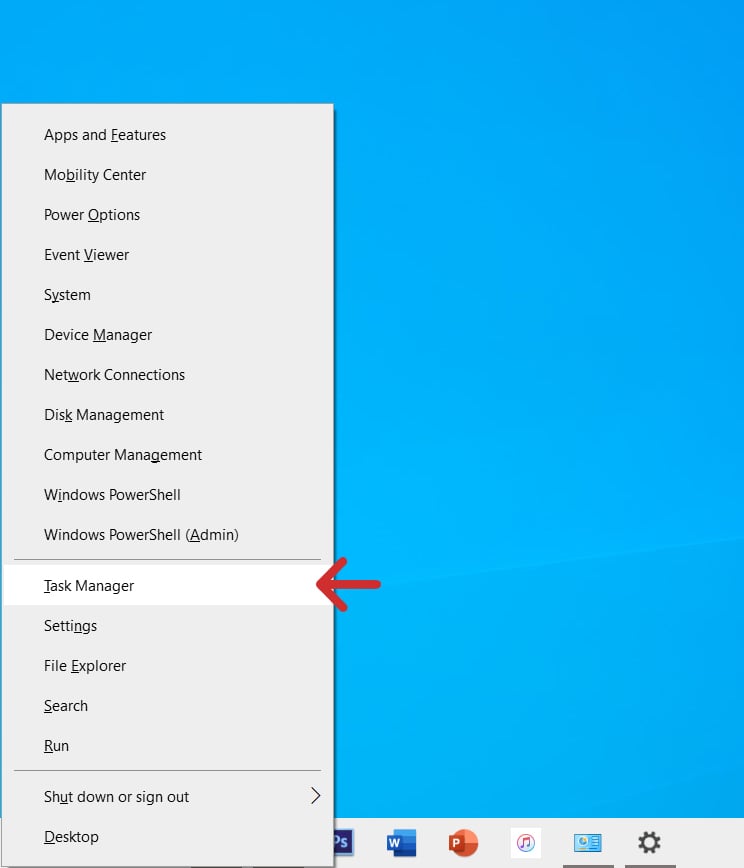
- Press the Windows + X keys on your keyboard. This will open a ‘Quick Link’ menu in the bottom-left corner of your screen.
- Then, select Task Manager. You can also press the “T” key on your keyboard when the Quick Link menu is open.
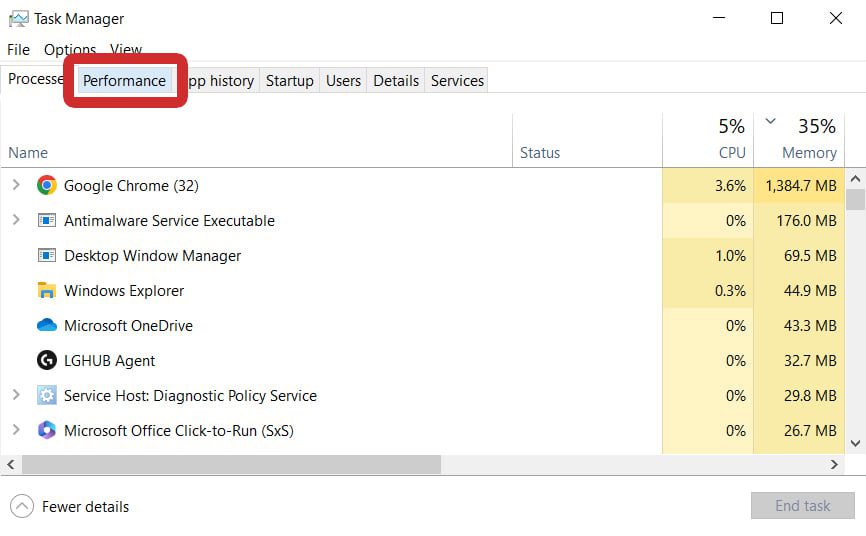
- Next, select the Performance tab. You will see this at the top of the window next to Processes.
- Then, choose CPU, Memory, Disk, Ethernet/Wi-Fi, or GPU. You will see these options in the left sidebar of the Task Manager window.
- Finally, check your general specs in the top-right corner of the window and your real-time specs below.
How to Check Your CPU Specs in Windows 10
To check your CPU specs, press the Windows + X keys on your keyboard and go to Task Manager > Performance > CPU. Then you will see your processor’s name in the top-right corner. Below that, check your CPU base speed, how many cores it has, and more.
Read More: What is a CPU?
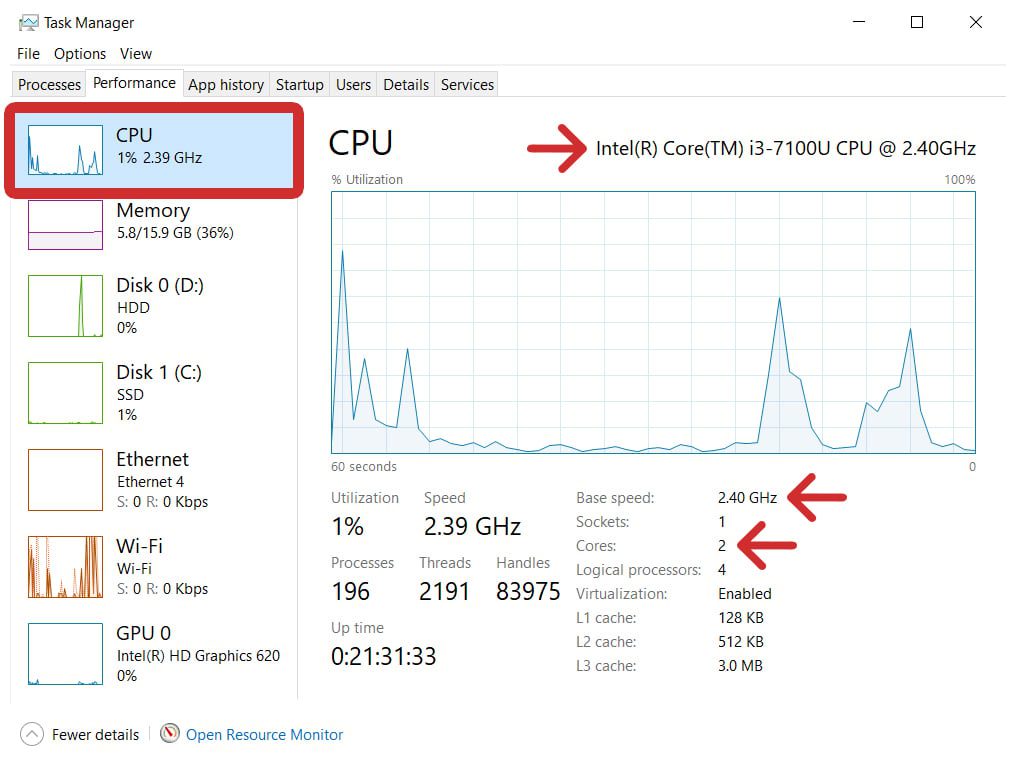
Note: If you’re looking for more detailed information for your CPU and other hardware specs, scroll to the sections below on using System Information, Device Manager, and Windows PowerShell.
How to Check Your RAM Specs in Real-Time
To check your RAM specs, press the Windows + X keys on your keyboard and go to Task Manager > Performance > Memory. Then, you will see your total RAM capacity in the top-right corner. Below that, you can check how much RAM is ‘In Use’ and how much is ‘Available.’
Read More: How much RAM do you really need?
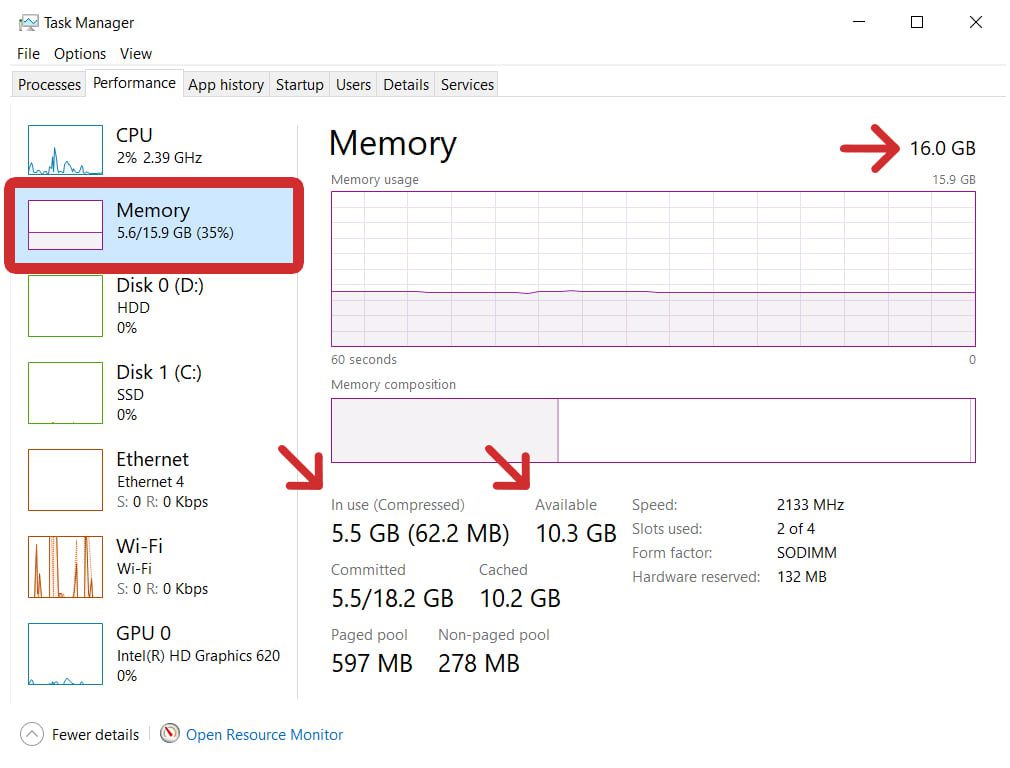
In the bottom-right corner of this window, you’ll also find other important information about your RAM, including its speed, how many memory slots your computer has available, and more.
How to Check Your Hard Drive Specs in Real-Time
To check your hard drive specs, press the Windows + X keys and go to Task Manager > Performance > Disk. In the top-right corner, you will see the name of your hard drive. In the bottom-right corner, you can check your drive’s total storage capacity and the type of drive it is.
Read More: What’s the difference between SSD and HDD?
Note: If you have more than one drive, your main drive will usually be labeled as “(C:).” This is typically where your Windows 10 operating system will be installed, as well as most of your apps. Other disks can include external hard drives, USB sticks, or secondary internal drives.
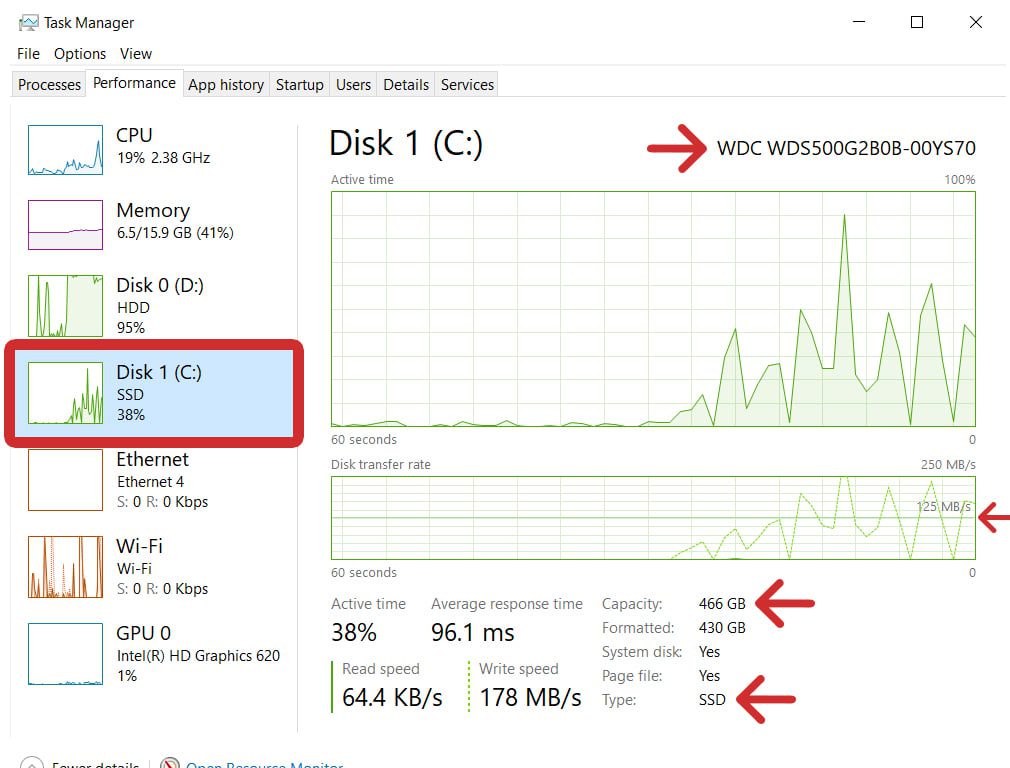
You’ll see real-time information about your hard drives while files are being transferred. Then, you will be able to see its Read/Write speed at the bottom of the window. While these speeds fluctuate, you can use the line in the second graph to see the drive’s average transfer rate.
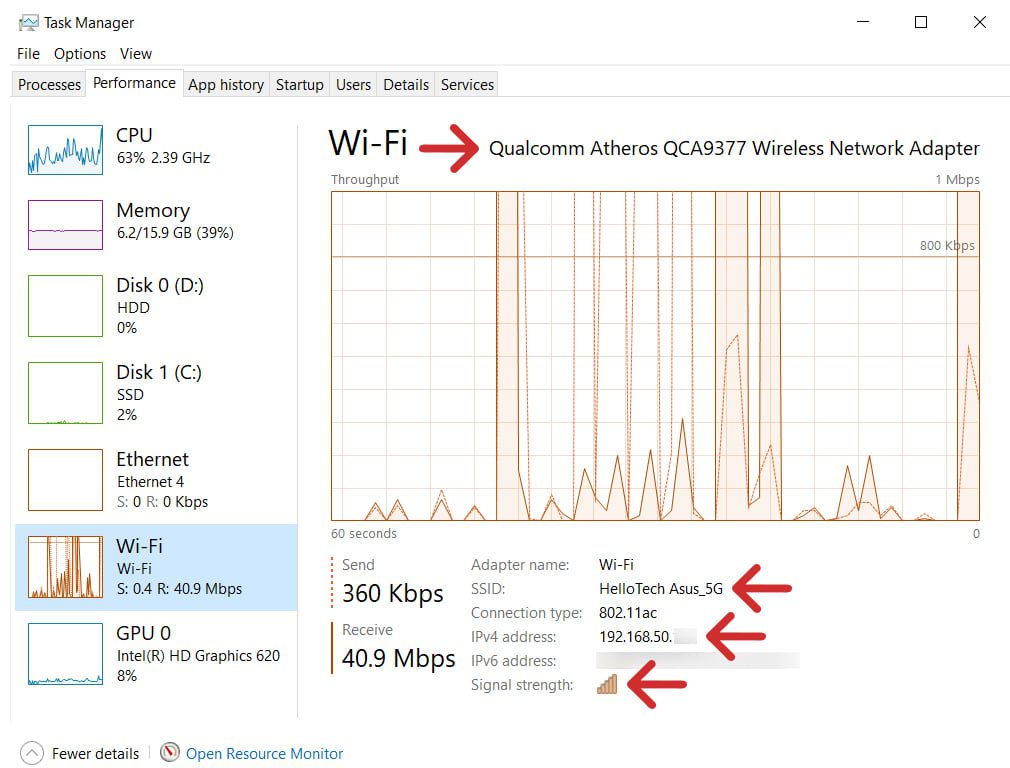
How to Check Your Internet Specs in Real-Time
To check your internet specs, press the Windows + X keys and go to Task Manager > Performance > Wi-Fi or Ethernet. Then you will see your adapter’s name in the top-right corner and your network name (SSID), router IP address, and signal strength below.
Read More: How to test your WiFi speed at home
How to Check Your GPU Specs in Real-Time
To check your GPU specs, press the Windows + X keys on your keyboard and go to Task Manager > Performance > GPU. Then you will see the name of your GPU in the top-right corner, as well as information about the utilization and temperature of your GPU below.
Read More: How to set up dual monitors on a Windows 10 PC

How to Check Your Specs with System Information
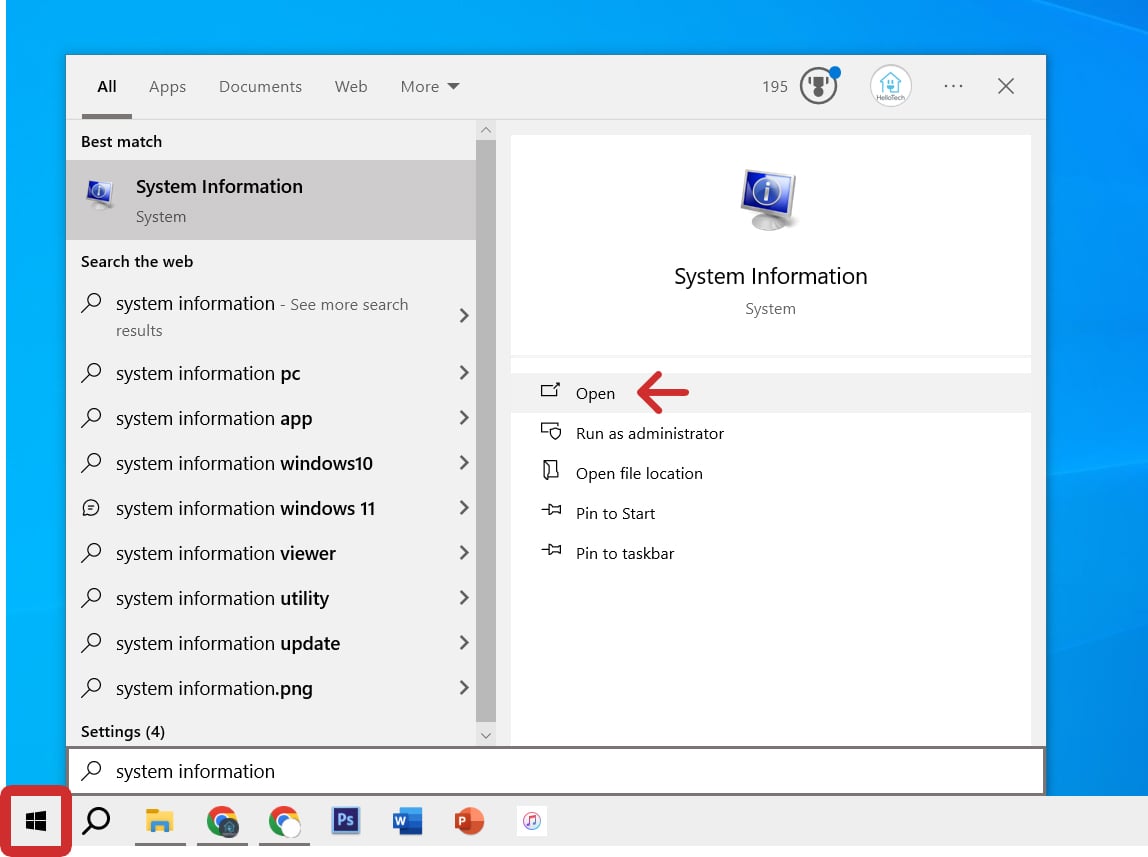
To check detailed specs for any device on your Windows 10 PC, left-click the Windows logo at the bottom of your screen, type “system information” and click Open. Then use the menu in the left sidebar and the search bar at the bottom of the window to search for specs.
- Click the Windows logo at the bottom of your screen. This is the logo with 4 squares, usually located in the bottom-left corner of the screen. Alternatively, you can press the Windows + R keys on your keyboard, type “msinfo32” into the Run box, and hit Enter on your keyboard.
- Then, type “System Information.”
- Next, click Open. You can also press the Enter key on your keyboard.
- Finally, use the menu in the left sidebar and the search bar at the bottom of the window to check for any specs.
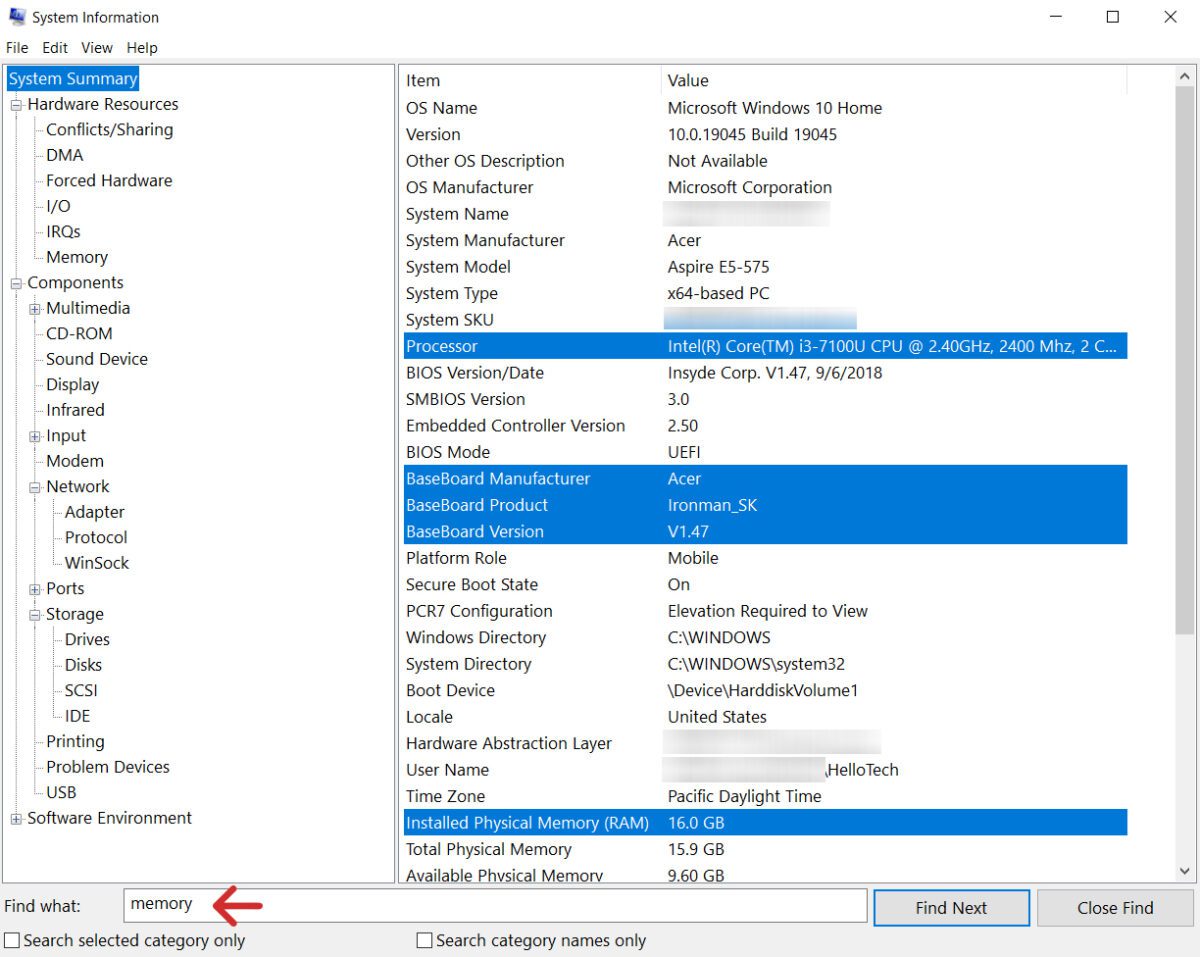
If you want to find information for certain devices, here are some common paths:
- CPU: Under System Summary next to Processor
- GPU: UnderSystem Summary > Components > Display
- Motherboard: Under System Summary next to BaseBoard Manufacturer/Product/Version
- RAM: Under System Summary next to Installed/Total/Available Physical Memory
- Hard Drives: Under System Summary > Components > Storage > Drives
How to Check Your Specs Using Device Manager
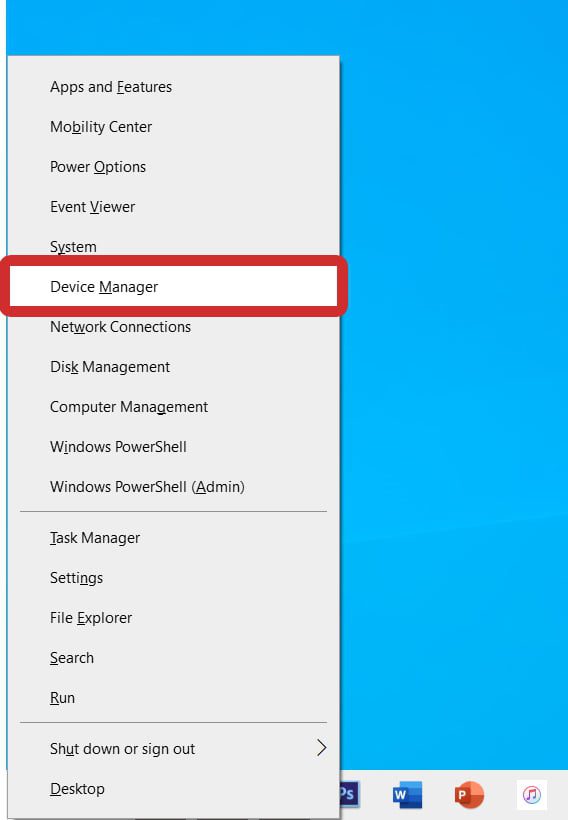
To check the specs for any device on your Windows 10 PC, press the Windows + X keys on your keyboard and select Device Manager. Then click the arrow icon next to a hardware category, right-click a device, and select Properties to check its name, status, and more.
- Press the Windows + X keys on your keyboard.
- Then, select Device Manager.
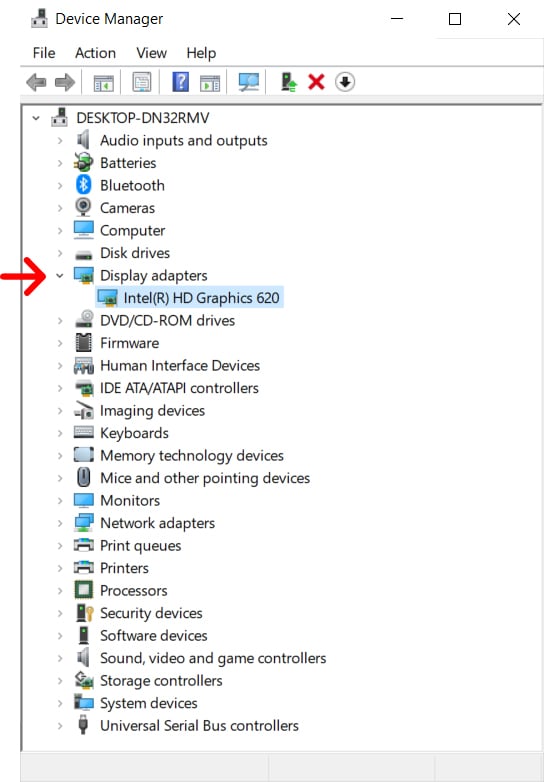
- Next, click the arrow next to the hardware you want to check. For example, the entry below Display adapters shows what GPU you have. You can also find your CPU under Processors, your RAM under Memory technology devices, and your hard drives under Disk drives.
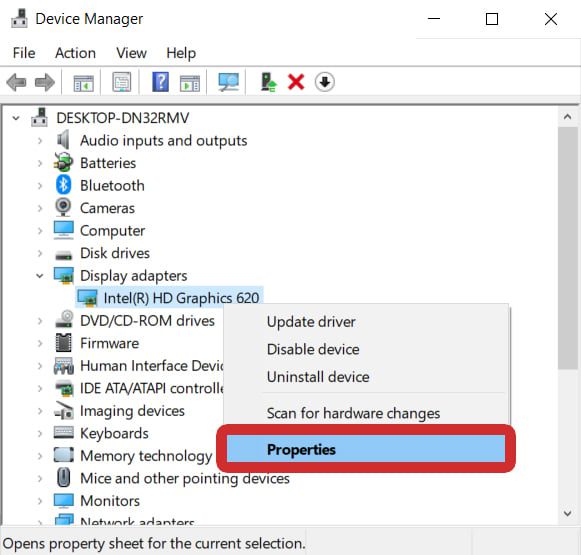
- Then, right-click the device and select Properties. If your device isn’t working properly, you can try selecting Update driver from this menu.
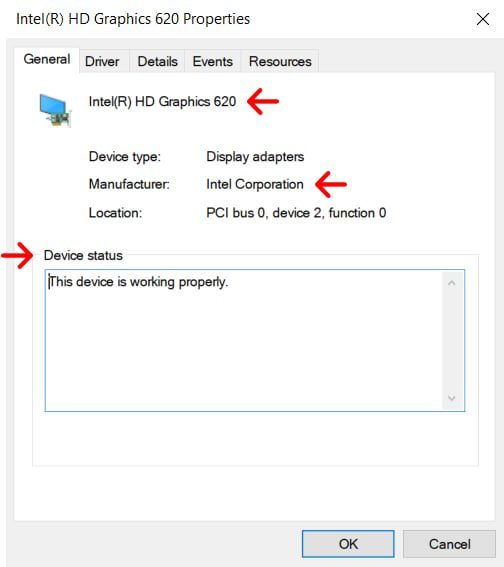
- Finally, check the specs in the General tab. From here, you can see your device name at the top, the type, manufacturer, and location below, and the Device status at the bottom.
If you still can’t find the specs you’re looking for, you can use the Windows Management Instrumentation command (wmic) to get specific information about your hardware devices, including serial numbers, power requirements, and more.
How to Check Your Specs with Windows PowerShell
To check the most detailed specs on a Windows 10 PC, press the Windows + R keys on your keyboard, type “PowerShell” into the Run box, and click OK. Then enter this text into the window “wmic CPU get /format:list” or replace “CPU” with MEMORYCHIP, DISKDRIVE, or GPU.
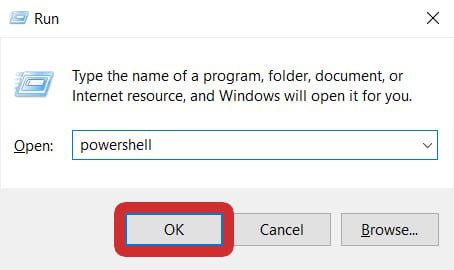
- Press the Windows + R keys on your keyboard. When you press these keys at the same time, a Windows Run box will open.
- Then, type “powershell” into the Run box and click OK. You can also press the Enter key on your keyboard.
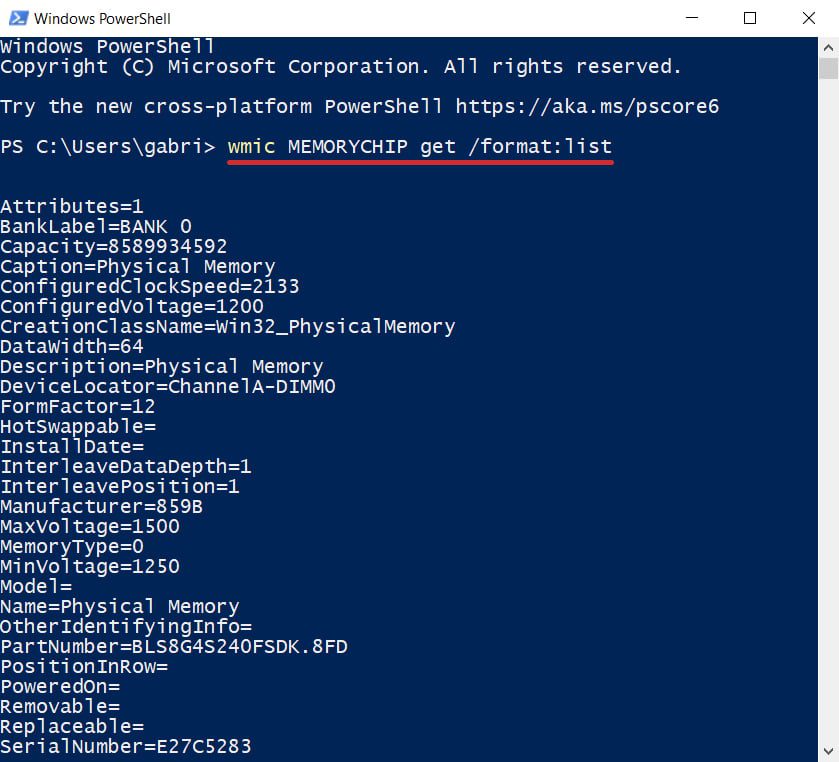
- Finally, type “wmic CPU get /format:list” into the PowerShell window and hit Enter. You can also copy and paste it into the window instead.
Here are some other helpful PowerShell commands you can use to check the specs on your Windows 10 computer:
- Basic Info: systeminfo
- Whole Computer: Get-ComputerInfo
- CPU: Get-ComputerInfo -ClassName Win32_Processor
- RAM: wmic MEMORYCHIP get /format:list
- GPU: wmic GPU get /format:list
- Hard Drives: wmic DISKDRIVE get /format:list
- Motherboard: wmic BASEBOARD get /format:list
- Battery: powercfg /batteryreport