

Понадобилось мне как-то проверить, работает ли UDP порт на компьютере. На получателе настраиваю прослушивание UDP порта с помощью PktMon:
PktMon — ловим UDP трафик в Windows 10
Слушаю, слушаю. Нет трафика. Нужно самому послать UDP пакет, а под рукой нет никаких подручных средств. На помощь приходит Powershell.
Send-UdpDatagram.ps1
function Send-UdpDatagram
{
      Param ([string] $EndPoint,
      [int] $Port,
      [string] $Message)

      $IP = [System.Net.Dns]::GetHostAddresses($EndPoint)
      $Address = [System.Net.IPAddress]::Parse($IP)
      $EndPoints = New-Object System.Net.IPEndPoint($Address, $Port)
      $Socket = New-Object System.Net.Sockets.UDPClient
      $EncodedText = [Text.Encoding]::ASCII.GetBytes($Message)
      $SendMessage = $Socket.Send($EncodedText, $EncodedText.Length, $EndPoints)
      $Socket.Close()
}
Usage.ps1
Send-UdpDatagram -EndPoint "127.0.0.1" -Port 53 -Message "Hello world"Скрипт писал не сам, но проверил. Работает.
Примечание
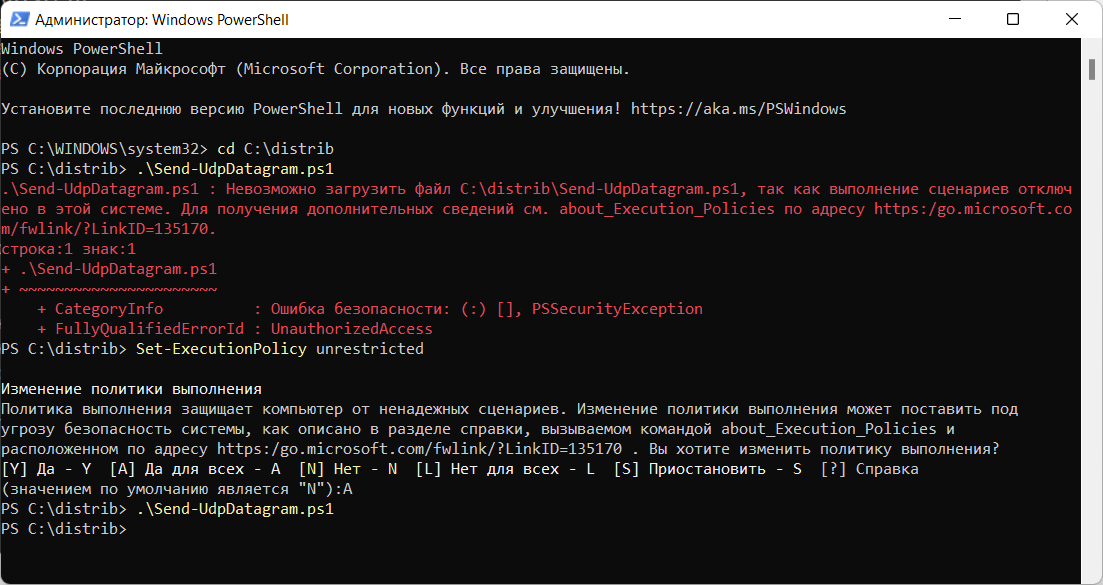
Пришлось ещё разрешить выполнение PowerShell скриптов.
Powershell — невозможно загрузить файл ps1, так как выполнение сценариев отключено в этой системе
-
Funbit
Member
- Публикаций:
-
0
- Регистрация:
- 13 апр 2003
- Сообщения:
- 92
- Адрес:
- Russia
Можно ли как-нибудь послать udp сообщение (на указанный адрес и порт) стандартными средствами Windows XP/2000, т.е. используя только то, что поставляется вместе с ОС (без всяких portqry и т.п.) ? (никакого программирования, просто предположите, что кроме свежеустановленной ОС у вас ничего нет)
-
ganes
New Member
- Публикаций:
-
0
- Регистрация:
- 7 дек 2004
- Сообщения:
- 62
- Адрес:
- Ukraine
Никак! Развечто какойнибудь клиент типа ftp.exe и-то
собственный удп пакет он тебе незгенерит если даже
он и мог-бы их посылать…
П.С Надь хоть Doo.Mать-Вашу чо спрашивать, пошли-бь
занялись чам нябуДь!
-
Funbit
Member
- Публикаций:
-
0
- Регистрация:
- 13 апр 2003
- Сообщения:
- 92
- Адрес:
- Russia
ganes
лучше бы сам пошел и занялся чем-нибудь, чем умничать тут
-
ZENiTH
New Member
- Публикаций:
-
0
- Регистрация:
- 13 май 2003
- Сообщения:
- 16
легко:
слушаешь 69 ingress udp port
nc -L -u -p 69
посылаешь udp egress udp packet
tftp.exe 192.168.0.2 GET file.bin
получаешь приблизительно такой пакет
☺file.bin netascii
-
ZENiTH
New Member
- Публикаций:
-
0
- Регистрация:
- 13 май 2003
- Сообщения:
- 16
если хочешь произвольный порт измени его в этом файле
C:\windows\system32\drivers\etc\SERVICES
-
Flasher
Member
- Публикаций:
-
0
- Регистрация:
- 31 янв 2004
- Сообщения:
- 640
а у ftp и tftp — протоколы одинаковые ?
т.е. при get запросе сначало отправляется ip,port потом RETR filename.exe ?
Кажись не в тему, но имеет отношение к tftp
-
ash
New Member
- Публикаций:
-
0
- Регистрация:
- 9 ноя 2004
- Сообщения:
- 52
- Адрес:
- Latvia
Нет, не одинаковые.
hxxp://www.google.com/search?q=site:www.faqs.org+tftp
hxxp://www.google.com/search?q=site:www.faqs.org+ftp
-
Funbit
Member
- Публикаций:
-
0
- Регистрация:
- 13 апр 2003
- Сообщения:
- 92
- Адрес:
- Russia
ZENiTH
nc -L -u -p 69
что есть nc ?
-
ZENiTH
New Member
- Публикаций:
-
0
- Регистрация:
- 13 май 2003
- Сообщения:
- 16
nc это порт юниксовой утилитки, полное название netcat, здесь она используется просто для проверки что соединение было
-L слушать
-u слушать по udp
-p порт
могу залить если нужна (с исходниками)
-
Funbit
Member
- Публикаций:
-
0
- Регистрация:
- 13 апр 2003
- Сообщения:
- 92
- Адрес:
- Russia
ZENiTH
что-то я не понял, на чистом winXP откуда всё это ? =\
-
ZENiTH
New Member
- Публикаций:
-
0
- Регистрация:
- 13 май 2003
- Сообщения:
- 16
nc просто показывает что факт входящего соединения был, вместо неё может быть любой ip и порт, а исходящее соединение делается с помощью встроенной утилиты XP tftp.exe как и было в исходных условиях задачи
-
Funbit
Member
- Публикаций:
-
0
- Регистрация:
- 13 апр 2003
- Сообщения:
- 92
- Адрес:
- Russia
да, спасибо, работает,
только жаль, что сообщение с нулевого байта начинается
-
Funbit
Member
- Публикаций:
-
0
- Регистрация:
- 13 апр 2003
- Сообщения:
- 92
- Адрес:
- Russia
да, спасибо, работает,
только жаль, что сообщение с нулевого байта начинается
Introduction

Read this in other languages: English, Español, Deutsch, Français.
Packet Sender is an open source utility to allow sending and receiving TCP, UDP, and SSL (encrypted TCP) packets as well as HTTP/HTTPS requests and panel generation. The mainline branch officially supports Windows, Mac, and Desktop Linux (with Qt). Other places may recompile and redistribute Packet Sender. Packet Sender is free and licensed GPL v2 or later. It can be used for both commercial and personal use. If you find the app useful, please consider donating/sponsoring so development may continue.
Table Of Contents
-
Sponsors
- Visit IWL.com
- Visit NagleCode.com
- Visit Eletiope.com
-
GUI
-
Intense Traffic Generator (GUI)
-
Network
-
Downloads
-
iOS Mobile App
-
Support
-
IPv4 Subnet Calculator
-
Wake-On-LAN / Magic Packet
-
Packet Sender Cloud
-
Portable Mode
-
Macros and Smart Responses
-
Persistent TCP and SSL
-
HTTP/HTTPS Requests
-
Panel Generator
-
Command Line Interface
-
Intense Traffic Generator (CLI)
-
Building Packet Sender
Sponsors
Packet Sender would like to thank the following sponsors.
IWL is a California company creating computer networking products.
NagleCode is a software publisher and development studio.
Eletiope installs lighting, audiovisuals and immersive rooms for exhibitions and museums, and for corporate showrooms.
Would you like your name/logo listed here?
Support
- Twitter/X: @NagleCode
- Forums are at: GitHub Discussions.
- Email: Packet Sender Contact
- Connect with me on LinkedIn
NOTE: Try (temporarily) disabling your firewall if having problems in Windows.
Downloads
Desktop Download
Official releases of Packet Sender can be downloaded at PacketSender.com. Some places redistribute Packet Sender.
iOS Mobile App
The Packet Sender for iOS is fully native, contain bare minimum permissions, and collects no data. This is software that respsects you. Thank you for supporting this effort.
The iOS version is located on the Apple App Store
GUI
Packet Sender is identical for all the desktop versions. The only difference is its theme to match the operating system.

- A packet has a name, destination address (domain names are default resolved just before sending), port, and data associated with it.
- In the table, there is a list of saved packets. You can double-click to directly edit fields in this table.
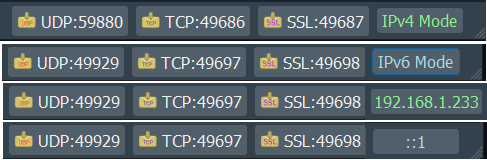
- In the bottom right, there are UDP, TCP, and SSL server status and port(s). Clicking on these will activate or deactivate the protocol. Packet Sender supports binding to any number of ports.
- There is also a IP toggle button. Clicking this changes it to IPv4 (default), IPv6, or custom IP
General Notes
- A resend value of «0» means it is a single-shot packet.
- During packet resending, there will be a button to cancel all resends.
- Please check your firewall. Windows aggressively blocks TCP-based servers. Packet Sender will still work if the firewall blocks it, but it can’t receive unsolicited TCP-based packets.
- An optional response can be sent. The same response is used for TCP, UDP, and SSL.
- For IPv6 sending, you will also need the scope ID.
- Packet Sender supports mixed ASCII and HEX notation:
- Double-click either field to bring up the multi-line editor
- \XX gets translated to XX in hex
- \n, \r, \t will get translated to 0A, 0D, and 09
- HEX numbers are space delimited
- The HEX field will attempt to interpret other common delimiters (such as commas, colons (Wireshark), semicolons, » 0x», etc) and auto-correct. It is very fault-tolerent.
- A single stream of HEX is also supported. If the number of bytes is odd, Packet Sender will assume the front byte needs a zero and then auto-correct.
- Example ASCII: hello world\r
- Example HEX: 68 65 6c 6c 6f 20 77 6f 72 6c 64 0d
- You may save a packet directly from the traffic log. You will be prompted for a name, and the source address and port will be switched for your convenience.
- You may also load a file directly in to the HEX field. The HEX field supports sending up to 10,922 bytes. The theoretical limit for sending via the command line is 200 MB.
Hotkeys/Keyboard Shortcuts
The fields at the top can be navigated using CTRL+1, CTRL+2, etc, up to CTRL+8 (send button). On Mac, the shortcut key is Command.
The hotkeys and fields are:
- CTRL + 1 = Name
- CTRL + 2 = ASCII
- CTRL + 3 = HEX
- CTRL + 4 = Address
- CTRL + 5 = Port
- CTRL + 6 = Resend Delay
- CTRL + 7 = Protocol Selection
- CTRL + 8 = Send (executes)
Some notes:
- The fields are linked to the corresponding hotkey regardless of protocol selection.
- When you navigate to the TCP/UDP/SSL option, you may use up/down or t/u/s/h characters to make a selection.
- If you are going to automate with hotkeys (using tools such at AutoHotKey), you may want to turn off «Restore previous session».
Network Features
Basic Settings
By default, Packet Sender launches with UDP, TCP, and SSL servers enabled on random ports (shown as buttons on the bottom right). You may bind to any number of ports (if the OS allows it), using comma-separated port numbers. For example, 0, 1000, 2000 will bind to «random» and ports 1000, 2000.
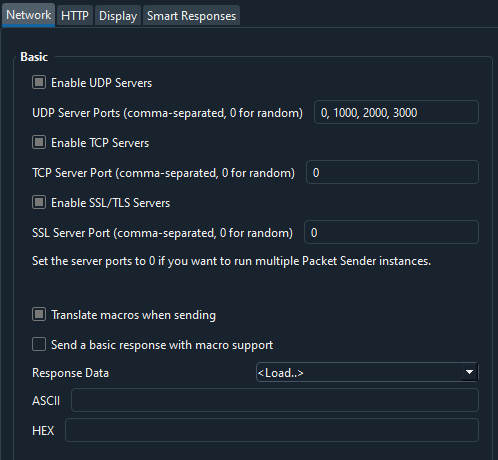
The UDP button now shows 3 ports bound. 1 of them is random.

The other setting is to respond to all requests with a reply. You may also have this request be a macro. There is a field to type the reply (or load a saved packet).
Additional UDP/TCP/SSL Settings
By default, Packet Sender binds to any IPv4 address. In this area of the settings, you may have it bind to any IPv6 instead, or to a specific IP address.
Binding to a specific address is very helpful when there are multiple NICs and you want to force communication (like broadcast packets) out a specific one.
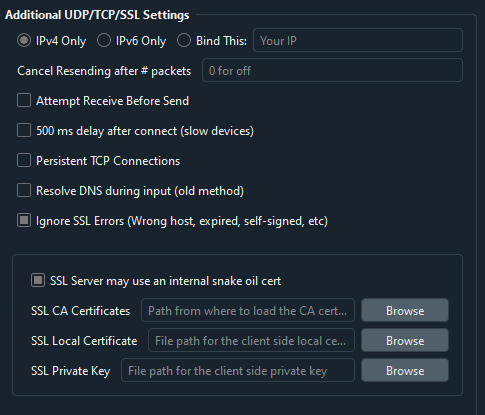
Some protocols expect the server to send data before the client sends (such as many telnet services). This workflow can be enabled with the «Receive Before Send».
If you have a slow device (such an embedded server with a weak processor), you may wish to enable «500 ms delay after connect». This will allow the slow server time to launch its handler.
IPv4, IPv6, Custom IP
Packet Sender’s built-in servers are configured to support either IPv4 or IPv6 but not both at the same time. For clients, Packet Sender GUI and CLI will seamlessly switch between the two modes upon sending (scope ID may be needed for IPv6). Click the IPv4 / IPv6 toggle on the bottom right to switch between the two.
Inside the settings, you may also force Packet Sender’s servers to bind to a custom IP address. This can be very useful for systems with multiple NICs or complicated IP setups. Packet Sender will trigger an error if told to bind to an address that does not exist.
IPv4 Subnet Calculator
Packet Sender has a built-in subnet calculator. It is under the Tools menu.
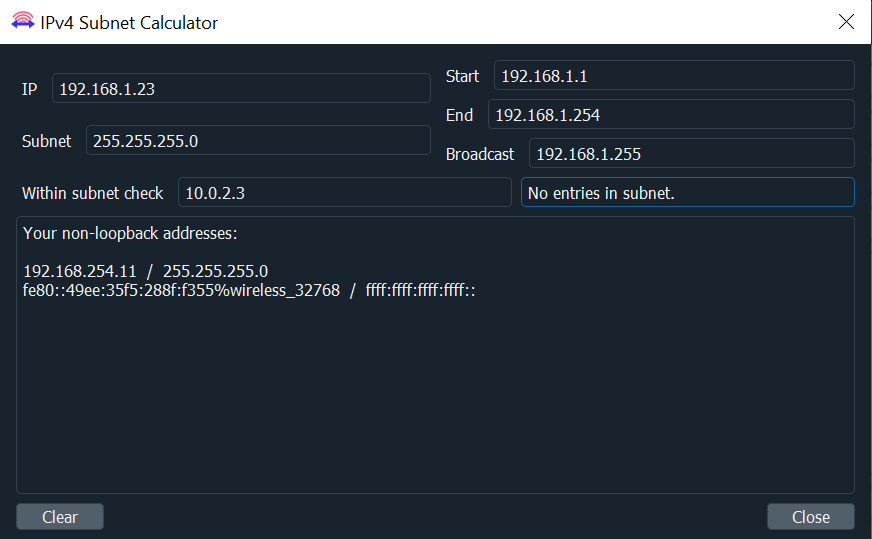
- The log window (bottom section) will display non-loopback IPv4 and IPv6 addresses found on your computer.
- On the left side, input the IPv4 address in the IP field.
- On the left side, input the subnet in either X.X.X. or /XX notation
- The results of the calculation are on the right.
- The field below is a quick check to see if an IPv4 is within one of your subnets.
Wake-On-LAN / Magic Packet
Wake-On-LAN (or WOL) is a protocol that tells computers to wake up from sleep. It is triggered by a broadcast packet with special data based on the target’s MAC address. For more information, take a look at Wikipedia.
Packet Sender has a built-in WOL generator. It is under the Tools menu.
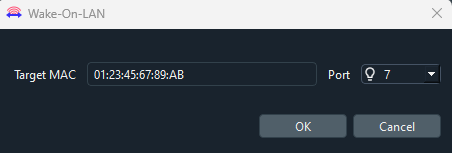
Fill out the options, and the main GUI will be filled with the correct data for the WOL format.

There are also CLI options to help generate and send WOL packets
packetsender --wol f8:23:66:30:e5:30
Sending broadcast Wake-On-LAN to target: F8:23:66:30:E5:30 on port 7
UDP (60360)://255.255.255.255:7 ff ff ff ff ff ff f8 23 66 30 e5 30 f8 23 66 30 e5 30 f8 23 66 30 e5 30 f8 23 66 30 e5 30 f8 23 66 30 e5 30 f8 23 66 30 e5 30 f8 23 66 30 e5 30 f8 23 66 30 e5 30 f8 23 66 30 e5 30 f8 23 66 30 e5 30 f8 23 66 30 e5 30 f8 23 66 30 e5 30 f8 23 66 30 e5 30 f8 23 66 30 e5 30 f8 23 66 30 e5 30 f8 23 66 30 e5 30
SSL Client and Server
Packet Sender supports establishing encrypted connections over SSL.
This is supported in the GUI and on the command line.
Packet Sender bundles OpenSSL for use in Windows. On Mac and Linux, Packet Sender will use the native SSL libraries.
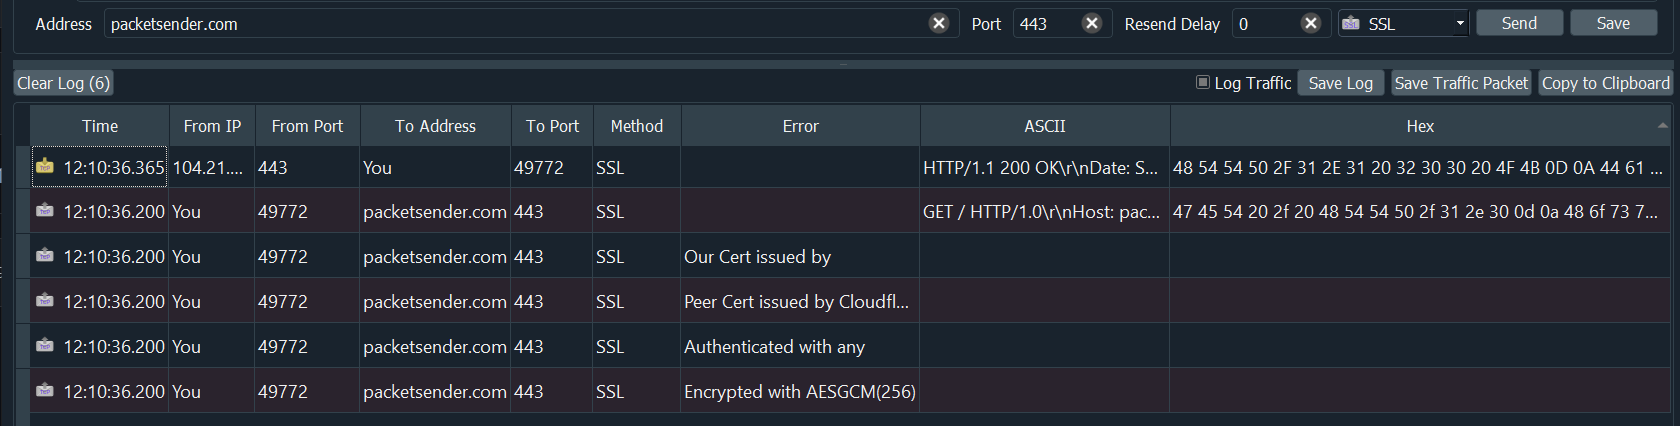
SSL Notes:
- The certificate negotiation is handled immediately during connection.
- By default, Packet Sender ignores all SSL errors (expired cert, wrong host name, self-signed, etc).
- Packet Sender outputs the cert negotiation progress in to the traffic log.
- Packet Sender outputs the encryption algorithm used in the traffic log (such as AES 128).
Packet Sender bundles an internal «Snake Oil» certificate for use as a server for Windows. The certificate and key is in the same place as packet and settings.
Note: Overriding the cert locations in Settings also overrides the snake-oil certificate.
If there is an SSL error, Packet Sender will output it to the traffic log. If the setting is to continue anyway (default), it will continue to negotiate encryption. Otherwise, the connection ends with failure to connect.
Multicast (Experimental)
Packet Sender’s multicast support is triggered by attempting to send to a IPv4 multicast address or from the mulitcast submenu. The feature is currently experimental and has these known problems.
- Packet Sender abandons IPv6 support when joining multicast.
- And stays abandoned until you revisit settings or attempt to send to IPv6
- On wifi, it sometimes takes 20 seconds for multicast join to actually take effect.
- Packet Sender has no logic to rejoin a mulitcast group if the switch reboots or some other common error.
There is no IPv6 multicast support, though it is on the roadmap. Sponsors wanting IPv6 multicast support are welcome to contact me.
UDP Traffic Generator (Experimental)
For when the normal send system is not enough, you can hammer a target IP with packets to see if your device can handle it. This can be found in the GUI toolbar at Tools -> Intense Traffic Generator
Please note that this feature is experimental and the metrics displayed have not been fully tested. For a more accurate test, you may want to look at the CLI version of this tool.

Packet Sender Features
Packet Sender Cloud
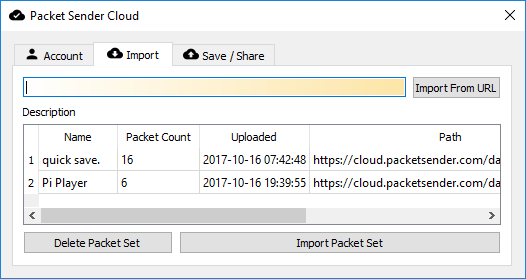
Packet sets can be quickly saved/retrieved/shared using the free Packet Sender Cloud service. The cloud may also be used to publicly display and distribute your packets (via an URL) for collaboration, tutorials, end users, etc. Packet Sender may import public packet sets with public URL.
There are various reasons to do this:
- Keeping all your packets ready so you can quickly retrieve them when installing a fresh Packet Sender
- Quickly swapping between packet sets when working on different projects.
- Sharing a login (it is allowed) for collaborative packet set generation
- Having a public page of your packet sets so others can quickly find and import
If you are publishing a network API, maintaining a public cloud page is significantly easier than painfully detailing (IP, port, type, etc) the packets to your users. Plus, updating that page is easy.
More information about it can be found at
https://cloud.packetsender.com/help
Portable Mode
Packet Sender has a «portable» mode. At launch, it will look for portablemode.txt and populate any missing settings files in that run-time directory. These files are packets.ini, ps_settings.ini, ps.key, and ps.pem.
You may also have some files portable and the other in their standard location by removing portablemode.txt.
DDLs that can be removed in Console-only portable Mode
If you do not require the GUI, you may remove these DDLs
- Qt6Svg.dll
- Qt6Widgets.dll
- Qt6Gui.dll
- opengl32sw.dll
- D3Dcompiler_47.dll
- iconengines directory
- imageformats directory
- styles directory
Note that DLLs with + characters in their names that can cause problems with Windows command-line copy if you do not surround them with " .
DDLs that can be removed if you do not need secure connections
If you do not require SSL, you may remove these DDLs
- libcrypto-1_1-x64.dll
- libssl-1_1-x64.dll
The run-time directory Windows users is the same place as the .exe.
For MAC users, this run-time directory is at PacketSender.app/Contents/MacOS.
If INI files are found, it will use them instead of %APPDATA% or Library/Application Support.
Smart Responses
Packet Sender supports up to 5 smart responses.
To enable this feature, go to File -> Settings at the GUI toolbar. Go to the Smart Responses tab and enable the Send a Smart Response checkbox.
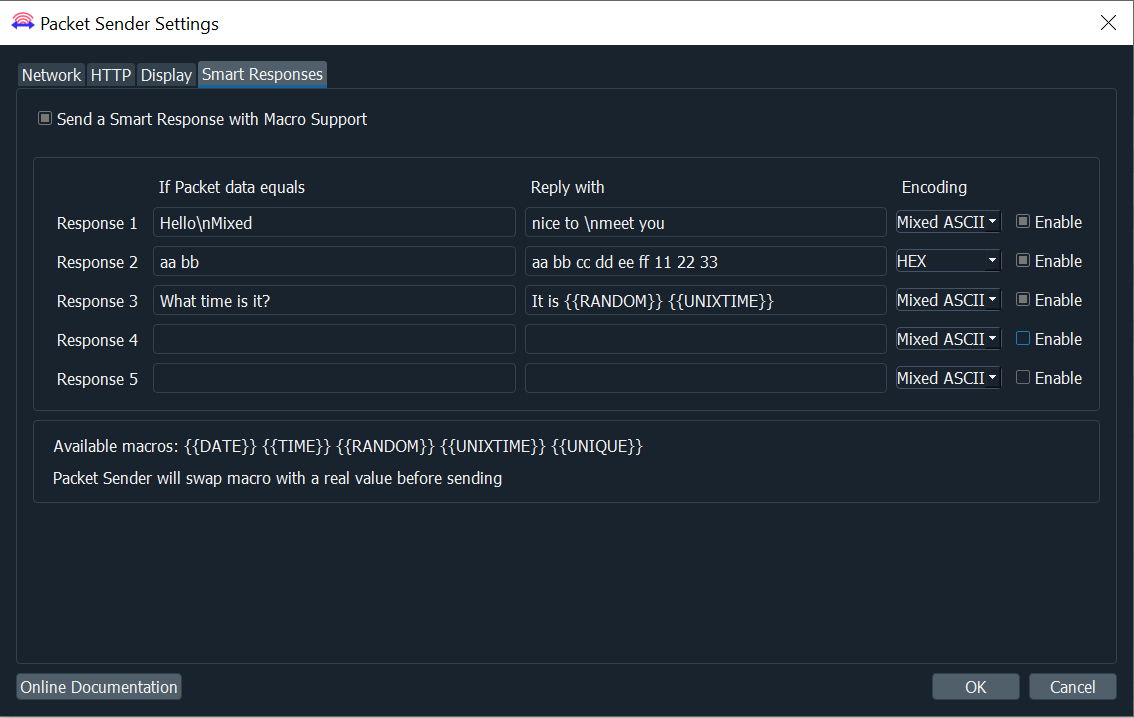
- Packet Sender will compare the packet within the encoding you choose.
- Packet Sender translates the encoding before sending out the reply.
- The available encodings are:
- Mixed ASCII — The standard Packet Sender way of encoding ASCII along with non-printable characters
- HEX — Packet Sender’s normal HEX encoding
Macros
Packet Sender supports these macros when sending responses:
- {{DATE}} — Sends the current date in «yyy-mm-dd» format.
- {{TIME}} — Sends the current time in «hh:mm:ss ap» format.
- {{UNIXTIME}} — Sends the current epoch time stamp.
- {{COUNTER}} — Sends an incrementing counter for each packet that uses it. Starts at 1 at launch.
- {{RANDOM}} — Sends a random number ranging from either 0 to 32767 or 2147483647, depending on 32-bit or 64-bit (default installer for Windows is 32-bit. Mac is 64-bit).
- {{UNIQUE}} — Sends a random string. Uses an internal UUID to generate it.
Packet Sender will swap the macro with real values before sending.
Persistent TCP and SSL
Packet Sender supports persistent TCP and SSL connections via a separate GUI window. It is enabled by a checkbox on the main window or through the Settings window.
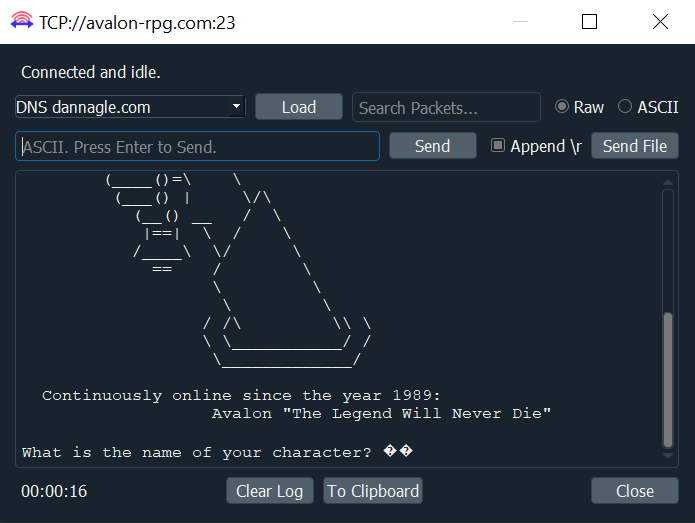
Notes on Persistent TCP and SSL:
- Any number of persistent connections can be created.
- Previously saved packets can be loaded in the drop-down.
- There is a «Raw» view and «ASCII» view. The ASCII view is useful to troubleshoot data that is not printed by the raw view.
- Traffic is also saved in the main window traffic log.
- A file may be uploaded to the persistent connection. You may wish to turn off logging if you use this.
- The timer in the bottom left starts as soon as a valid data packet is sent/received. It stops when the connection is closed.
- You may optionally append a carriage return when you quick-send by hitting the return key. This is useful for command-prompt menus over TCP / SSL connections. Packet Sender remembers previous state of \r checkbox.
- Incoming persistent connections to the server will launch the separate GUI window.
- During resend, the persistent connection packet is carried over to the new GUI window. Clicking «Resending(1)» will cancel it.
Persistent connections are not supported via the command line.
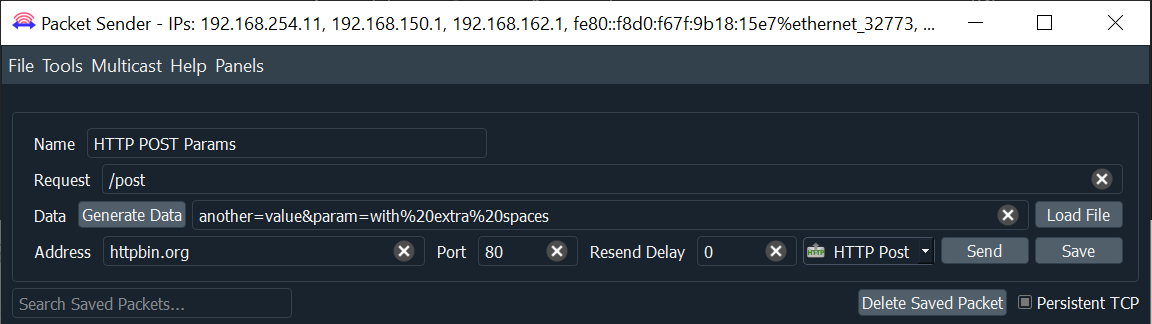
HTTP/HTTPS POST & GET
Packet Sender supports sending POST/GET requests via HTTP and HTTPS.
Protocol dropdown includes the following options: HTTP GET, HTTP POST, HTTPS GET, HTTPS POST. When selecting HTTP(S), input fields will udpate to: Name, Request, Address, Data (when POST is selected), Generate Data button (when POST is selected), Load FIle (when POST is selected).
Sending HTTP/HTTPS GET/POST Requests
- Select HTTP(S) GET or POST from the protocol dropdown
- In Address field input the domain or IP
- In Request field add the URL path, if needed
- In Port field, the default for HTTP is 80 and HTTPS is 443
- Check Persistent TCP to see the server data more clearly (HTTP headers are removed automatically).
You may also paste a complete URL in the Request field and Packet Sender will parse and auto-populate the other fields.
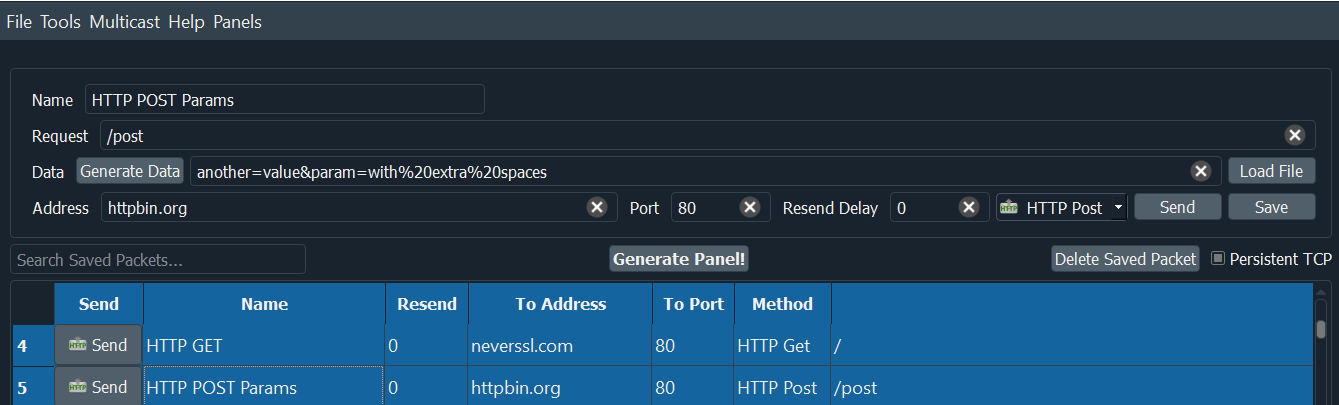
For POST Requests:
- You can manually add in the data into the Data field.
- Format would go: key=value
- For multiple paramaters: key=value&key=value&key=value
- Or you can click on the Generate Data button
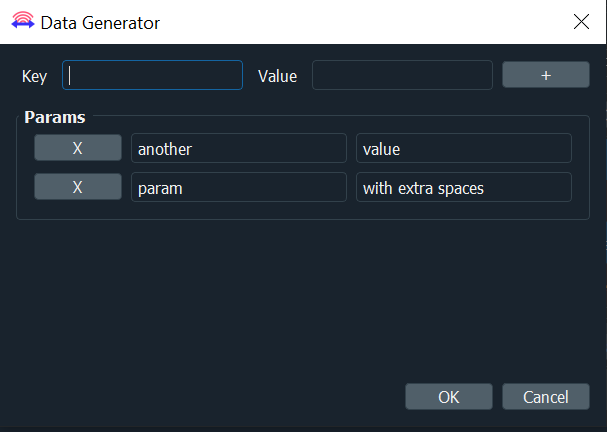
- To add data, input the Key and Value parameters. Click the + button.
- Can add multiple parameters with the + button.
- Remove parameters by clicking the X button next to the parameter
- Once parameters are added, click Ok and data will be generated in the Data field.
To add Authentication credentials:
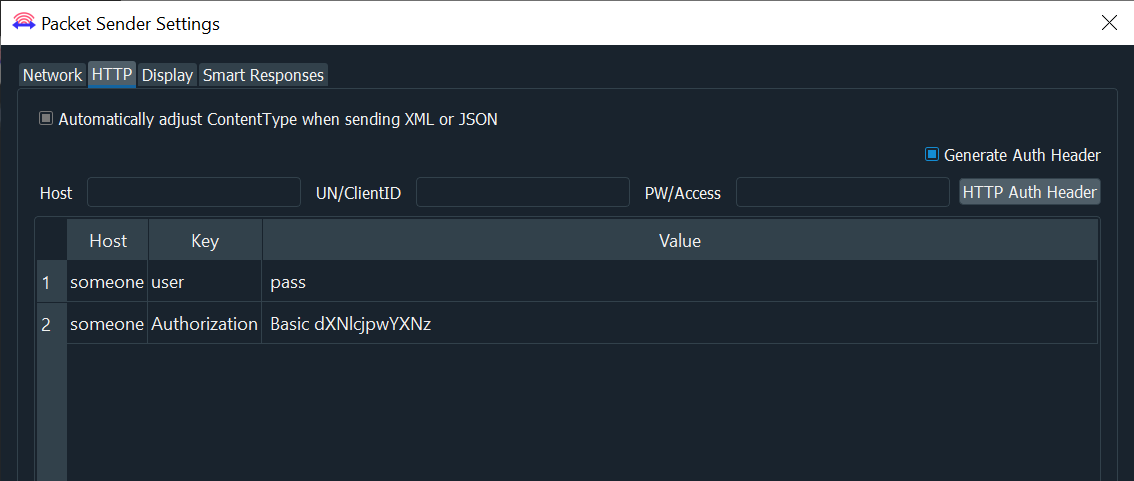
- Go to File -> Settings -> HTTP
- Check Generate Auth Header
- Input the Host, UN/Client ID, and PW/Access
- Click on HTTP Auth Header to generate the authentication header
Panel Generator
Packet Sender supports generating control panels. Panels consist of buttons with scripts (packets) assigned to them. Clicking the button will execute the packet(s) referenced on that button.
Loading a Panel
Panels can be created one of two ways:
- Clicking Panels on the toolbar and selecting either Load Starter Panel or Empty Panel Project
- Load Starter Panel will load the Panel assigned as starter. If no panel is set as the starter, an empty panel project will open.
- Highlighting 2 or more saved packets and clicking on the Generate Panel button (Generate Panel button only appears when multiple packets are selected)
Packet Sender supports launching in panel-only mode with the starter panel using the command line option --starterpanel
Scripting a Panel
To begin scripting the buttons on your panel, you will need to open a panel and go to the Editing screen. Once a panel project is opened, check the button in the bottom right corner. If this button says «Viewing», you are on the Viewing screen. Click the button to move the panel to the Editing screen.
Once at the Editing screen, buttons and scripts can be added to the panel.
Button Scripting
Button scripts will contain the name of the packet to be sent.
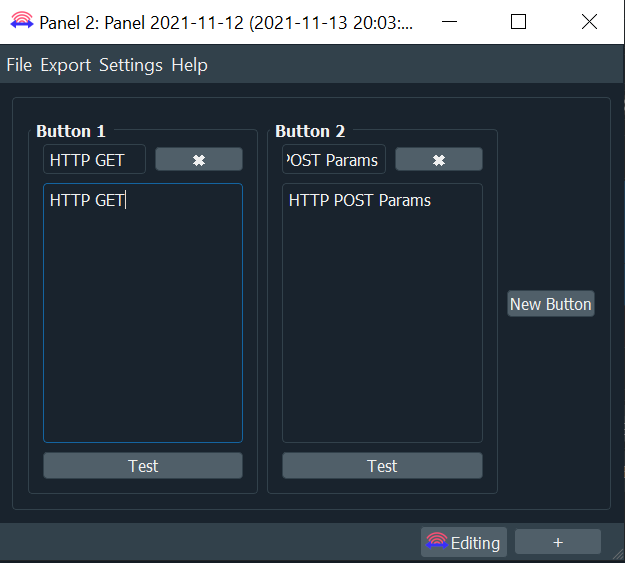
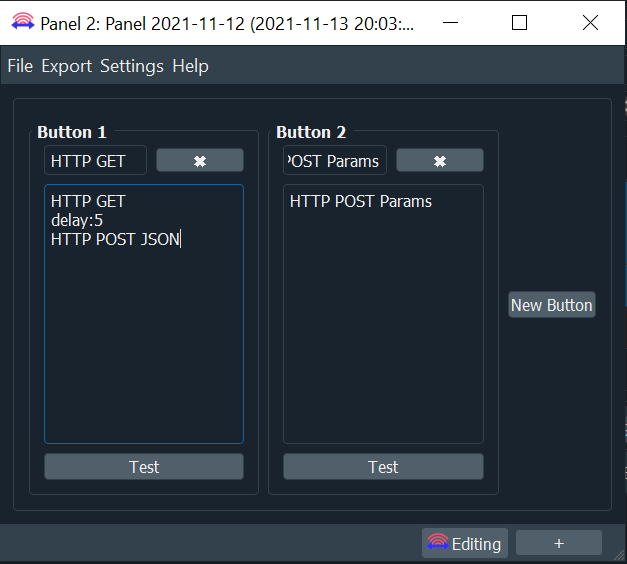
Multiple packets can be set to a button by adding each name on a new line.
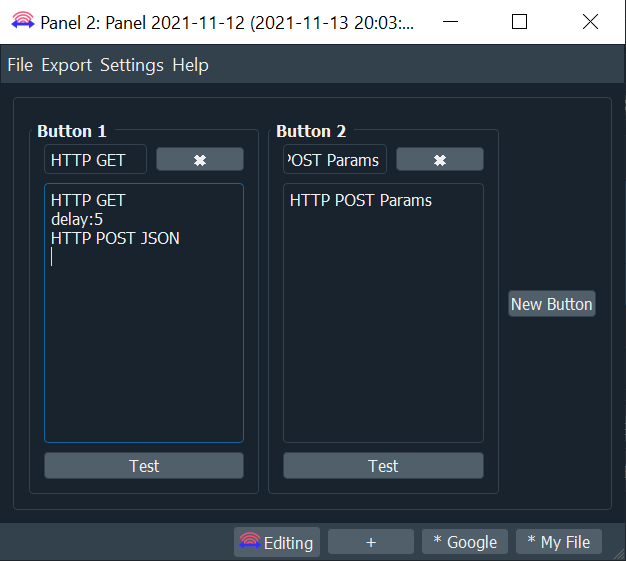
Panel Generator supports adding a delay between multiple packets by adding «delay:# of seconds» in between packets.
Panel Generator supports adding a script to load a new panel by adding «panel:panel id #«. Once all previous scripts on the button are executed, the Panel will transition to the next panel.
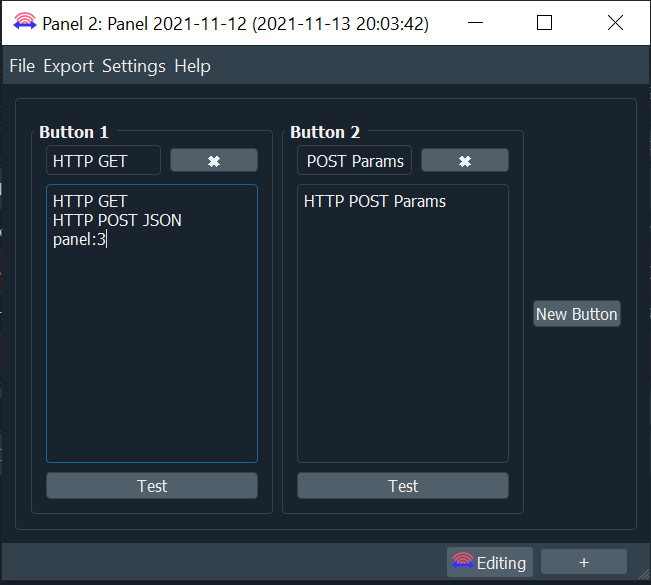
Adding Files/URLs
Panel Generator supports adding buttons that link to locally-stored files or URLs.
File/URL buttons can be added while in the Editing screen by clicking the + in the bottom right corner.
- For files: Go to the file on the PC, right click on the file and select Copy. Paste this into the URL or File textbox in Packet Sender
- For URLs: Copy the URL into the URL or File textbox in Packet Sender
- URLs must begin with http:// or https://
Once the file or URL is copied, you will be prompted to input a name for the button. Buttons will populate at the bottom of the panel.
While on the Editing screen, clicking these buttons will allow you to edit the file/URL link and the name of the button. You can also delete the button by clicking the X on the popup.
When on the Viewing screen, clicking these buttons will launch the URL in the default browser or open the file (with the default program for the file type).
Panel Editing/Saving
While in the Editing screen of a Panel, there will be a toolbar with menus File, Export, Settings, Help. You can save, export, import, load panel projects, and edit the current panel project from this toolbar.
From Settings, you can do the following:
- Set Panel Name — select this to rename the current panel project
- Set Panel ID — select this to change the ID associated with the current panel project
Note: Setting an ID in use will replace that panel - Starter Panel — select this to set the current panel project as the starter panel.
- Delete Panel — This will bring up a menu of current panel projects. Select a panel project to delete it. Note: Buttons and scripts will be retained on the Editing screen until the Panel is closed
DTLS
For now, DTLS is only supported in the GUI with Windows. Other operating systems may enable DTLS by compiling from source using Qt6.
Overview
This repository contains a DTLS (Datagram Transport Layer Security) protocol feature. This feature have added a graphical interface to configure and manage DTLS connections, including server verification and session persistence options.
Features
Main Window

- Cipher Suites: Dropdown to select the desired cipher suite for DTLS communication.
- Server Common Name: Field to input the server’s common name for client-side verification.
- Persistent Session: Option to save the session key after the first handshake by enabling the persistent checkbox.
- Optional Server Verification: An option for enabling two-sided verification during the handshake.
- DTLS Server Port: Button to define the DTLS server port for the connection.
Additional Images:

- A detailed view of the cipher suite selection dropdown.

- Persistent connection window while DTLS.

- On click button for DTLS server Enabling or disabling.
Settings Window
Network Tab

- Send Simple Acknowledge: Checkbox to enable the sending of a simple acknowledgment.
- Enable DTLS Server: Option to enable the DTLS server and select a port.
- Certificates and Keys: Certificates and keys can be loaded similarly to SSL configuration.
Smart Responses Tab

- Smart Responses: Smart responses feature works over the DTLS protocol.
Wireshark Integration
Sniffing by Wireshark:
Regular Connection

- Example of a regular DTLS connection captured sniffed by Wireshark.
Persistent Connection

- Example of a persistent DTLS connection sniffed by Wireshark.
Command Line
Packet Sender can be used from the command line on your computer.
For Windows, use the extension .com (packetsender.com) to use the command line interface. Optionally, you can also use packetsender without an extension. Using the extension .exe will launch the GUI.
For Linux, the command line system in Packet Sender follows the same pattern as other Linux utilities. It has a long name (such as —version) and a short name (such as -v). These options can be arranged in any order and Packet Sender will parse them correctly. The last 3 options are positional and must appear last. They are IP, port, and data. These last options are optional if using a stored packet.
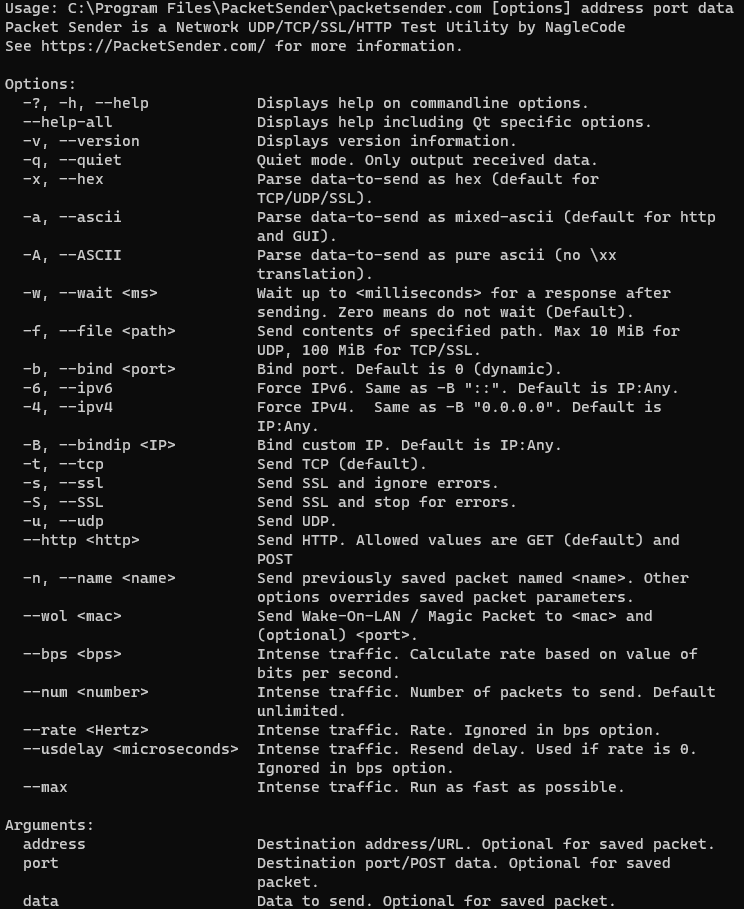
packetsender --help
Usage: C:\Program Files\PacketSender\packetsender.com [options] address port data
Packet Sender is a Network UDP/TCP/SSL/HTTP Test Utility by NagleCode
See https://PacketSender.com/ for more information.

Options:
  -h, --help                Displays help on commandline options.
  --help-all                Displays help including Qt specific options.
  -v, --version             Displays version information.
  -q, --quiet               Quiet mode. Only output received data.
  -x, --hex                 Parse data-to-send as hex (default for
                            TCP/UDP/SSL).
  -a, --ascii               Parse data-to-send as mixed-ascii (default for http
                            and GUI).
  -A, --ASCII               Parse data-to-send as pure ascii (no \xx
                            translation).
  -l, --listen              Listen instead of send. Use bind options to specify
                            port/IP. Otherwise, dynamic/All.
  -r, --response <ascii>    Server mode response data in mixed-ascii. Macro
                            supported.
  -w, --wait <ms>           Wait up to <milliseconds> for a response after
                            sending. Zero means do not wait (Default).
  -f, --file <path>         Send contents of specified path. Max 10 MiB for
                            UDP, 100 MiB for TCP/SSL.
  -b, --bind <port>         Bind port. Default is 0 (dynamic).
  -6, --ipv6                Force IPv6. Same as -B "::". Default is IP:Any.
  -4, --ipv4                Force IPv4.  Same as -B "0.0.0.0". Default is
                            IP:Any.
  -B, --bindip <IP>         Bind custom IP. Default is IP:Any.
  -t, --tcp                 Send TCP (default).
  -s, --ssl                 Send SSL and ignore errors.
  -S, --SSL                 Send SSL and stop for errors.
  -u, --udp                 Send UDP.
  --http <http>             Send HTTP. Allowed values are GET (default) and
                            POST
  -n, --name <name>         Send previously saved packet named <name>. Other
                            options overrides saved packet parameters.
  --wol <mac>               Send Wake-On-LAN / Magic Packet to <mac> and
                            (optional) <port>.
  --bps <bps>               Intense traffic. Calculate rate based on value of
                            bits per second.
  --num <number>            Intense traffic. Number of packets to send. Default
                            unlimited.
  --rate <Hertz>            Intense traffic. Rate. Ignored in bps option.
  --usdelay <microseconds>  Intense traffic. Resend delay. Used if rate is 0.
                            Ignored in bps option.
  --max                     Intense traffic. Run as fast as possible.

Arguments:
  address                   Destination address/URL. Optional for saved packet.
  port                      Destination port/POST data. Optional for saved
                            packet.
  data                      Data to send. Optional for saved packet.
Example CLI
The CLI follows the same format between Windows, Linux, and MAC.
The format is: packetsender [options] address port data
packetsender -taw 500 mirrors.xmission.com 21 "USER anonymous\r\nPASS [email protected]\r\n"
TCP (65505)://mirrors.xmission.com:21 55 53 45 52 20 61 6e 6f 6e 79 6d 6f 75 73 0d 0a 50 41 53 53 20 63 68 72 6f 6d 65 40 65 78 61 6d 70 6c 65 2e 63 6f 6d 0d 0a
Response Time:5:51:37.042 pm
Response HEX:32 32 30 2D 57 65 6C 63 6F 6D 65 20...
Response ASCII:220-Welcome to XMission Internet...
Example CLI to listen for packets (Server Mode)
Use the existing bind options to configure the server.
- -b for port
- -B for iP
- -t/-u/-s for TCP, UDP, or SSL
- -r to send an response (macro supported ASCII)
Binding to dynamic port using TCP
packetsender -l
TCP Server started on 0.0.0.0:52567
Use ctrl+c to exit server.

From: 127.0.0.1, Port:52568
Response Time:2024-06-04 19:01:53.198
Response HEX:48 65 6C 6C 6F
Response ASCII:Hello

From: 127.0.0.1, Port:52569
Response Time:2024-06-04 19:02:24.063
Response HEX:57 6F 72 6C 64
Response ASCII:World
Binding to port 8080 using UDP
packetsender -l -u -b 8080
UDP Server started on 0.0.0.0:8080
Use ctrl+c to exit server.

From: ::ffff:127.0.0.1, Port:49500
Response Time:2024-06-04 19:04:28.890
Response HEX:48 65 6C 6C 6F 20 55 44 50 20 50 61 63 6B 65 74
Response ASCII:Hello UDP Packet
Binding to port 8080 using UDP with current time response
packetsender -l -u -b 8080 -r "{{TIME}}"
Loading response packet.
UDP Server started on 0.0.0.0:8080
Use ctrl+c to exit.

From: ::ffff:127.0.0.1, Port:59594
Response Time:2024-06-05 20:48:18.180
Response HEX:68 65 6C 6C 6F 20 70 61 63 6B 65 74 20 73 65 6E 64 65 72
Response ASCII:hello packet sender

From: You (Response), Port:59594
Response Time:2024-06-05 20:48:18.182
Response HEX:30 38 3a 34 38 3a 31 38 20 70 6d
Response ASCII:08:48:18 pm
Binding to IP 192.168.86.26, port 54321 using SSL
packetsender -l -s -B 192.168.86.26 -b 54321
Binding to custom IP 192.168.86.26
Listening for SSL packets in server mode.
SSL Server started on 192.168.86.26:54321
Use ctrl+c to exit server.

From: 192.168.86.26, Port:52588
Response Time:2024-06-04 19:11:30.726
Error/Info:Encrypted with AESGCM(256)

From: 192.168.86.26, Port:52588
Response Time:2024-06-04 19:11:30.726
Error/Info:Authenticated with RSA

From: 192.168.86.26, Port:52588
Response Time:2024-06-04 19:11:30.726
Error/Info:Peer cert issued by

From: 192.168.86.26, Port:52588
Response Time:2024-06-04 19:11:30.726
Error/Info:Our Cert issued by SnakeOil

From: 192.168.86.26, Port:52588
Response Time:2024-06-04 19:11:30.747
Response HEX:43 6F 6F 6C 20 53 53 4C
Response ASCII:Cool SSL
Examples binding to port and custom IP, IPv4, or IPv6
Packet Sender command line can bind to custom ports to force IPv4/6 modes or multiple NIC using the -B option.
packetsender -taw 3000 fe80::c07b:d517:e339:5a08 5005 "Hello\r"
packetsender -taw 3000 192.168.0.201 5005 "Hello\r"
packetsender -B 192.168.0.200 -taw 3000 192.168.0.201 5005 "Hello\r"
packetsender -B fe80::a437:399a:3091:266a%ethernet_32769 -taw 3000 fe80::c07b:d517:e339:5a08 5005 "Hello\r"
packetsender -B fe80::a437:399a:3091:266a -taw 3000 fe80::c07b:d517:e339:5a08 5005 "Hello\r"
Example CLI using SSL and ignoring errors
The command line has the option to ignore or abandon on SSL errors. The default is to ignore.
- Use -s option to send SSL and ignore errors.
- Use -S option to send SSL and stop for errors
packetsender -saw 500 expired.packetsender.com 443 "GET / HTTP/1.0\r\n\r\n"
SSL Error: The certificate has expired
SSL (54202)://expired.packetsender.com:443 47 45 54 20 2f 20 48 54 54 50 2f 31 2e 30 0d 0a 0d 0a
Cipher: Encrypted with AES(128)

Response Time:3:24:55.695 pm
Response HEX:48 54 54 50 2f 31 2e 31 20 34 32 31 20 0d 0a 53 65 72 76 65 72 3a 20 6e 67 69 6e 78 2f 31 2e 31 30 2e 30 20 28 55 62 75 6e 74 75 29 0d
Response ASCII:HTTP/1.1 421 \r\nServer: nginx/1.10.0 (Ubuntu)\r
Example CLI using HTTP
Note this uses the built-in default packets.
packetsender --name "HTTPS POST Params"
packetsender --http GET "https://httpbin.org/get"
packetsender --http POST "https://httpbin.org/post" "{}"
Example using CLI Intense Traffic Generator
The command intense traffic generator works much the same way as the GUI version but it is a bit more accurate, with more control options, (and more intensity!).
See below for examples how to use it. Note that these calculations are «Best Effort». It does OK, but processor spikes or various network hiccups can throw it off. The threading is not real-time, and is not super-smart with its attempts to compensate.
- Resend «My Awesome Packet» at a rate of 20 Hz
- Resend «My Awesome Packet» at a bps of 2000 baud
- Resend «My Awesome Packet» as fast as possible
- Resend «My Awesome Packet» with 2000000 microsecond delay between each packet
Note: For Windows, use the «.com» build, so each example would be packetsender.com
packetsender --rate 20 --name "My Awesome Packet"
packetsender --bps 2000 --name "My Awesome Packet"
packetsender --rate 0 --name "My Awesome Packet"
packetsender --usdelay 2000000 --name "My Awesome Packet"
Building Packet Sender
The only dependency is Qt SDK
Building Packet Sender for Windows/MAC
- Download the Qt installer from https://www.qt.io/download-open-source/
- Let it install MingGW if you don’t have a compiler.
- Open the project PacketSender.pro
- Build!
The Windows and Mac versions were built using Qt 5.12. Packet Sender does support Qt 6, however it does not
support cmake.
Building Packet Sender for Linux
Here is the sequence of commands for Ubuntu 16.04. Please adapt to your Linux platform. Packet Sender requires no additional libraries beyond the stock Qt SDK. I have been told there are build issues with stock Fedora. If a Fedora wizard has insight, please let me know, and I’ll add your instructions.
If you are feeling adventurous, feel free to build from the master branch. It contains the latest stable build. The development branch should probably be avoided.
sudo apt-get update
sudo apt-get install qt5-default build-essential
wget https://github.com/dannagle/PacketSender/archive/(Version).tar.gz
tar -xzvf (Version).tar.gz
cd PacketSender-(Version)/src
qmake PacketSender.pro
make
To run use:
./PacketSender
If it doesn’t run, you may need to set it executable
chmod a+x PacketSender
Enhancements/Requests
Missing a feature? You can hire me to add it to Packet Sender.
Legal / Compliance
License is GPL v2 or Later. Contact me if you require a different license.
Some distributions of Packet Sender may use OpenSSL.
The most current VPAT may be found in this repo.
Copyright
Packet Sender was written by Dan Nagle and is published by © NagleCode, LLC — @NagleCode — PacketSender.com
Introduction

Read this in other languages: English, Español, Deutsch, Français.
Packet Sender is an open source utility to allow sending and receiving TCP, UDP, and SSL (encrypted TCP) packets as well as HTTP/HTTPS requests and panel generation. The mainline branch officially supports Windows, Mac, and Desktop Linux (with Qt). Other places may recompile and redistribute Packet Sender. Packet Sender is free and licensed GPL v2 or later. It can be used for both commercial and personal use. If you find the app useful, please consider donating/sponsoring so development may continue.
Table Of Contents
- Sponsors
- Visit IWL.com
- Visit NagleCode.com
- Visit Eletiope.com
- Visit John Huntington
- GUI
- Intense Traffic Generator (GUI)
- Network
- Downloads
- iOS Mobile App
- Support
- IPv4 Subnet Calculator
- Wake-On-LAN / Magic Packet
- Packet Sender Cloud
- Portable Mode
- Macros and Smart Responses
- Persistent TCP and SSL
- HTTP/HTTPS Requests
- Panel Generator
- Command Line Interface
- Intense Traffic Generator (CLI)
- Building Packet Sender
Sponsors
Packet Sender would like to thank the following sponsors.
IWL is a California company creating computer networking products.
NagleCode is a software publisher and development studio.
Eletiope installs lighting, audiovisuals and immersive rooms for exhibitions and museums, and for corporate showrooms.
John Huntington
Author, consultant, educator, sound engineer, award-winning photographer, and storm chaser.
Would you like your name/logo listed here?
Support
- Twitter/X: @NagleCode
- Forums are at: GitHub Discussions.
- Email: Packet Sender Contact
- Connect with me on LinkedIn
NOTE: Try (temporarily) disabling your firewall if having problems in Windows.
Downloads
Desktop Download
Official releases of Packet Sender can be downloaded at PacketSender.com. Some places redistribute Packet Sender.
iOS Mobile App
The Packet Sender for iOS is fully native, contain bare minimum permissions, and collects no data. This is software that respsects you. Thank you for supporting this effort.
The iOS version is located on the Apple App Store

GUI
Packet Sender is identical for all the desktop versions. The only difference is its theme to match the operating system.

- A packet has a name, destination address (domain names are default resolved just before sending), port, and data associated with it.
- In the table, there is a list of saved packets. You can double-click to directly edit fields in this table.
- In the bottom right, there are UDP, TCP, and SSL server status and port(s). Clicking on these will activate or deactivate the protocol. Packet Sender supports binding to any number of ports.
- There is also a IP toggle button. Clicking this changes it to IPv4 (default), IPv6, or custom IP
General Notes
- A resend value of «0» means it is a single-shot packet.
- During packet resending, there will be a button to cancel all resends.
- Please check your firewall. Windows aggressively blocks TCP-based servers. Packet Sender will still work if the firewall blocks it, but it can’t receive unsolicited TCP-based packets.
- An optional response can be sent. The same response is used for TCP, UDP, and SSL.
- For IPv6 sending, you will also need the scope ID.
- Packet Sender supports mixed ASCII and HEX notation:
- Double-click either field to bring up the multi-line editor
- \XX gets translated to XX in hex
- \n, \r, \t will get translated to 0A, 0D, and 09
- HEX numbers are space delimited
- The HEX field will attempt to interpret other common delimiters (such as commas, colons (Wireshark), semicolons, » 0x», etc) and auto-correct. It is very fault-tolerent.
- A single stream of HEX is also supported. If the number of bytes is odd, Packet Sender will assume the front byte needs a zero and then auto-correct.
- Example ASCII: hello world\r
- Example HEX: 68 65 6c 6c 6f 20 77 6f 72 6c 64 0d
- You may save a packet directly from the traffic log. You will be prompted for a name, and the source address and port will be switched for your convenience.
- You may also load a file directly in to the HEX field. The HEX field supports sending up to 10,922 bytes. The theoretical limit for sending via the command line is 200 MB.
Hotkeys/Keyboard Shortcuts
The fields at the top can be navigated using CTRL+1, CTRL+2, etc, up to CTRL+8 (send button). On Mac, the shortcut key is Command.
The hotkeys and fields are:
- CTRL + 1 = Name
- CTRL + 2 = ASCII
- CTRL + 3 = HEX
- CTRL + 4 = Address
- CTRL + 5 = Port
- CTRL + 6 = Resend Delay
- CTRL + 7 = Protocol Selection
- CTRL + 8 = Send (executes)
Some notes:
- The fields are linked to the corresponding hotkey regardless of protocol selection.
- When you navigate to the TCP/UDP/SSL option, you may use up/down or t/u/s/h characters to make a selection.
- If you are going to automate with hotkeys (using tools such at AutoHotKey), you may want to turn off «Restore previous session».
Network Features
Basic Settings
By default, Packet Sender launches with UDP, TCP, and SSL servers enabled on random ports (shown as buttons on the bottom right). You may bind to any number of ports (if the OS allows it), using comma-separated port numbers. For example, 0, 1000, 2000 will bind to «random» and ports 1000, 2000.

The UDP button now shows 3 ports bound. 1 of them is random.

The other setting is to respond to all requests with a reply. You may also have this request be a macro. There is a field to type the reply (or load a saved packet).
Additional UDP/TCP/SSL Settings
By default, Packet Sender binds to any IPv4 address. In this area of the settings, you may have it bind to any IPv6 instead, or to a specific IP address.
Binding to a specific address is very helpful when there are multiple NICs and you want to force communication (like broadcast packets) out a specific one.

Some protocols expect the server to send data before the client sends (such as many telnet services). This workflow can be enabled with the «Receive Before Send».
If you have a slow device (such an embedded server with a weak processor), you may wish to enable «500 ms delay after connect». This will allow the slow server time to launch its handler.
IPv4, IPv6, Custom IP
Packet Sender’s built-in servers are configured to support either IPv4 or IPv6 but not both at the same time. For clients, Packet Sender GUI and CLI will seamlessly switch between the two modes upon sending (scope ID may be needed for IPv6). Click the IPv4 / IPv6 toggle on the bottom right to switch between the two.
Inside the settings, you may also force Packet Sender’s servers to bind to a custom IP address. This can be very useful for systems with multiple NICs or complicated IP setups. Packet Sender will trigger an error if told to bind to an address that does not exist.

IPv4 Subnet Calculator
Packet Sender has a built-in subnet calculator. It is under the Tools menu.

- The log window (bottom section) will display non-loopback IPv4 and IPv6 addresses found on your computer.
- On the left side, input the IPv4 address in the IP field.
- On the left side, input the subnet in either X.X.X. or /XX notation
- The results of the calculation are on the right.
- The field below is a quick check to see if an IPv4 is within one of your subnets.
Wake-On-LAN / Magic Packet
Wake-On-LAN (or WOL) is a protocol that tells computers to wake up from sleep. It is triggered by a broadcast packet with special data based on the target’s MAC address. For more information, take a look at Wikipedia.
Packet Sender has a built-in WOL generator. It is under the Tools menu.

Fill out the options, and the main GUI will be filled with the correct data for the WOL format.

There are also CLI options to help generate and send WOL packets
packetsender --wol f8:23:66:30:e5:30
Sending broadcast Wake-On-LAN to target: F8:23:66:30:E5:30 on port 7
UDP (60360)://255.255.255.255:7 ff ff ff ff ff ff f8 23 66 30 e5 30 f8 23 66 30 e5 30 f8 23 66 30 e5 30 f8 23 66 30 e5 30 f8 23 66 30 e5 30 f8 23 66 30 e5 30 f8 23 66 30 e5 30 f8 23 66 30 e5 30 f8 23 66 30 e5 30 f8 23 66 30 e5 30 f8 23 66 30 e5 30 f8 23 66 30 e5 30 f8 23 66 30 e5 30 f8 23 66 30 e5 30 f8 23 66 30 e5 30 f8 23 66 30 e5 30
SSL Client and Server
Packet Sender supports establishing encrypted connections over SSL.
This is supported in the GUI and on the command line.
Packet Sender bundles OpenSSL for use in Windows. On Mac and Linux, Packet Sender will use the native SSL libraries.

SSL Notes:
- The certificate negotiation is handled immediately during connection.
- By default, Packet Sender ignores all SSL errors (expired cert, wrong host name, self-signed, etc).
- Packet Sender outputs the cert negotiation progress in to the traffic log.
- Packet Sender outputs the encryption algorithm used in the traffic log (such as AES 128).
Packet Sender bundles an internal «Snake Oil» certificate for use as a server for Windows. The certificate and key is in the same place as packet and settings.
Note: Overriding the cert locations in Settings also overrides the snake-oil certificate.
If there is an SSL error, Packet Sender will output it to the traffic log. If the setting is to continue anyway (default), it will continue to negotiate encryption. Otherwise, the connection ends with failure to connect.
Multicast (Experimental)
Packet Sender’s multicast support is triggered by attempting to send to a IPv4 multicast address or from the mulitcast submenu. The feature is currently experimental and has these known problems.
- Packet Sender abandons IPv6 support when joining multicast.
- And stays abandoned until you revisit settings or attempt to send to IPv6
- On wifi, it sometimes takes 20 seconds for multicast join to actually take effect.
- Packet Sender has no logic to rejoin a mulitcast group if the switch reboots or some other common error.
There is no IPv6 multicast support, though it is on the roadmap. Sponsors wanting IPv6 multicast support are welcome to contact me.
UDP Traffic Generator (Experimental)
For when the normal send system is not enough, you can hammer a target IP with packets to see if your device can handle it. This can be found in the GUI toolbar at Tools -> Intense Traffic Generator
Please note that this feature is experimental and the metrics displayed have not been fully tested. For a more accurate test, you may want to look at the CLI version of this tool.

Packet Sender Features
Packet Sender Cloud
Packet sets can be quickly saved/retrieved/shared using the free Packet Sender Cloud service. The cloud may also be used to publicly display and distribute your packets (via an URL) for collaboration, tutorials, end users, etc. Packet Sender may import public packet sets with public URL.
There are various reasons to do this:
- Keeping all your packets ready so you can quickly retrieve them when installing a fresh Packet Sender
- Quickly swapping between packet sets when working on different projects.
- Sharing a login (it is allowed) for collaborative packet set generation
- Having a public page of your packet sets so others can quickly find and import

If you are publishing a network API, maintaining a public cloud page is significantly easier than painfully detailing (IP, port, type, etc) the packets to your users. Plus, updating that page is easy.
More information about it can be found at
https://cloud.packetsender.com/help
Portable Mode
Packet Sender has a «portable» mode. At launch, it will look for portablemode.txt and populate any missing settings files in that run-time directory. These files are packets.ini, ps_settings.ini, ps.key, and ps.pem.
You may also have some files portable and the other in their standard location by removing portablemode.txt.
DDLs that can be removed in Console-only portable Mode
If you do not require the GUI, you may remove these DDLs
- Qt6Svg.dll
- Qt6Widgets.dll
- Qt6Gui.dll
- opengl32sw.dll
- D3Dcompiler_47.dll
- iconengines directory
- imageformats directory
- styles directory
Note that DLLs with + characters in their names that can cause problems with Windows command-line copy if you do not surround them with " .
DDLs that can be removed if you do not need secure connections
If you do not require SSL, you may remove these DDLs
- libcrypto-1_1-x64.dll
- libssl-1_1-x64.dll
The run-time directory Windows users is the same place as the .exe.
For MAC users, this run-time directory is at PacketSender.app/Contents/MacOS.
If INI files are found, it will use them instead of %APPDATA% or Library/Application Support.
Smart Responses
Packet Sender supports up to 5 smart responses.
To enable this feature, go to File -> Settings at the GUI toolbar. Go to the Smart Responses tab and enable the Send a Smart Response checkbox.

- Packet Sender will compare the packet within the encoding you choose.
- Packet Sender translates the encoding before sending out the reply.
- The available encodings are:
- Mixed ASCII — The standard Packet Sender way of encoding ASCII along with non-printable characters
- HEX — Packet Sender’s normal HEX encoding
Macros
Packet Sender supports these macros when sending responses:
- {{DATE}} — Sends the current date in «yyy-mm-dd» format.
- {{TIME}} — Sends the current time in «hh:mm:ss ap» format.
- {{UNIXTIME}} — Sends the current epoch time stamp.
- {{COUNTER}} — Sends an incrementing counter for each packet that uses it. Starts at 1 at launch.
- {{RANDOM}} — Sends a random number ranging from either 0 to 32767 or 2147483647, depending on 32-bit or 64-bit (default installer for Windows is 32-bit. Mac is 64-bit).
- {{UNIQUE}} — Sends a random string. Uses an internal UUID to generate it.
Packet Sender will swap the macro with real values before sending.
Persistent TCP and SSL
Packet Sender supports persistent TCP and SSL connections via a separate GUI window. It is enabled by a checkbox on the main window or through the Settings window.

Notes on Persistent TCP and SSL:
- Any number of persistent connections can be created.
- Previously saved packets can be loaded in the drop-down.
- There is a «Raw» view and «ASCII» view. The ASCII view is useful to troubleshoot data that is not printed by the raw view.
- Traffic is also saved in the main window traffic log.
- A file may be uploaded to the persistent connection. You may wish to turn off logging if you use this.
- The timer in the bottom left starts as soon as a valid data packet is sent/received. It stops when the connection is closed.
- You may optionally append a carriage return when you quick-send by hitting the return key. This is useful for command-prompt menus over TCP / SSL connections. Packet Sender remembers previous state of \r checkbox.
- Incoming persistent connections to the server will launch the separate GUI window.
- During resend, the persistent connection packet is carried over to the new GUI window. Clicking «Resending(1)» will cancel it.
Persistent connections are not supported via the command line.
HTTP/HTTPS POST & GET
Packet Sender supports sending POST/GET requests via HTTP and HTTPS.
Protocol dropdown includes the following options: HTTP GET, HTTP POST, HTTPS GET, HTTPS POST. When selecting HTTP(S), input fields will udpate to: Name, Request, Address, Data (when POST is selected), Generate Data button (when POST is selected), Load FIle (when POST is selected).
Sending HTTP/HTTPS GET/POST Requests

- Select HTTP(S) GET or POST from the protocol dropdown
- In Address field input the domain or IP
- In Request field add the URL path, if needed
- In Port field, the default for HTTP is 80 and HTTPS is 443
- Check Persistent TCP to see the server data more clearly (HTTP headers are removed automatically).
You may also paste a complete URL in the Request field and Packet Sender will parse and auto-populate the other fields.
For POST Requests:
- You can manually add in the data into the Data field.
- Format would go: key=value
- For multiple paramaters: key=value&key=value&key=value
- Or you can click on the Generate Data button

- To add data, input the Key and Value parameters. Click the + button.
- Can add multiple parameters with the + button.
- Remove parameters by clicking the X button next to the parameter
- Once parameters are added, click Ok and data will be generated in the Data field.
To add Authentication credentials:

- Go to File -> Settings -> HTTP
- Check Generate Auth Header
- Input the Host, UN/Client ID, and PW/Access
- Click on HTTP Auth Header to generate the authentication header
Panel Generator
Packet Sender supports generating control panels. Panels consist of buttons with scripts (packets) assigned to them. Clicking the button will execute the packet(s) referenced on that button.

Loading a Panel
Panels can be created one of two ways:
- Clicking Panels on the toolbar and selecting either Load Starter Panel or Empty Panel Project
- Load Starter Panel will load the Panel assigned as starter. If no panel is set as the starter, an empty panel project will open.
- Highlighting 2 or more saved packets and clicking on the Generate Panel button (Generate Panel button only appears when multiple packets are selected)
Packet Sender supports launching in panel-only mode with the starter panel using the command line option --starterpanel

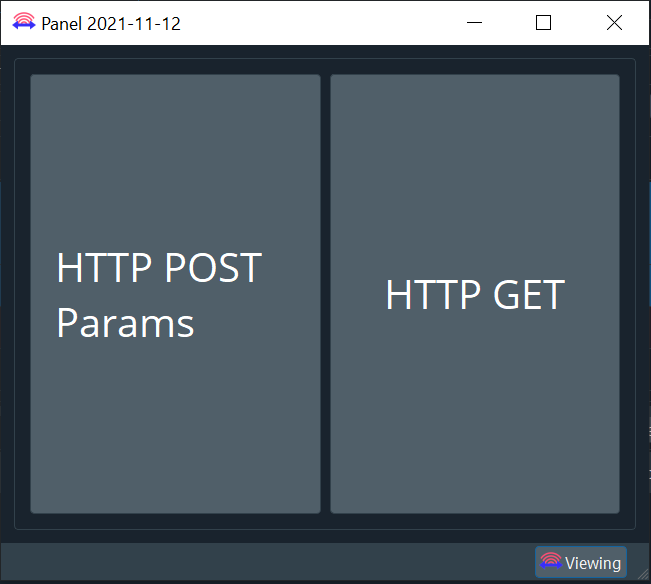
Scripting a Panel
To begin scripting the buttons on your panel, you will need to open a panel and go to the Editing screen. Once a panel project is opened, check the button in the bottom right corner. If this button says «Viewing», you are on the Viewing screen. Click the button to move the panel to the Editing screen.
Once at the Editing screen, buttons and scripts can be added to the panel.
Button Scripting
Button scripts will contain the name of the packet to be sent.

Multiple packets can be set to a button by adding each name on a new line.

Panel Generator supports adding a delay between multiple packets by adding «delay:# of seconds» in between packets.

Panel Generator supports adding a script to load a new panel by adding «panel:panel id #«. Once all previous scripts on the button are executed, the Panel will transition to the next panel.

Adding Files/URLs
Panel Generator supports adding buttons that link to locally-stored files or URLs.
File/URL buttons can be added while in the Editing screen by clicking the + in the bottom right corner.
- For files: Go to the file on the PC, right click on the file and select Copy. Paste this into the URL or File textbox in Packet Sender
- For URLs: Copy the URL into the URL or File textbox in Packet Sender
- URLs must begin with http:// or https://
Once the file or URL is copied, you will be prompted to input a name for the button. Buttons will populate at the bottom of the panel.
While on the Editing screen, clicking these buttons will allow you to edit the file/URL link and the name of the button. You can also delete the button by clicking the X on the popup.
When on the Viewing screen, clicking these buttons will launch the URL in the default browser or open the file (with the default program for the file type).
Panel Editing/Saving
While in the Editing screen of a Panel, there will be a toolbar with menus File, Export, Settings, Help. You can save, export, import, load panel projects, and edit the current panel project from this toolbar.
From Settings, you can do the following:
- Set Panel Name — select this to rename the current panel project
- Set Panel ID — select this to change the ID associated with the current panel project
Note: Setting an ID in use will replace that panel - Starter Panel — select this to set the current panel project as the starter panel.
- Delete Panel — This will bring up a menu of current panel projects. Select a panel project to delete it. Note: Buttons and scripts will be retained on the Editing screen until the Panel is closed
DTLS
For now, DTLS is only supported in the GUI with Windows. Other operating systems may enable DTLS by compiling from source using Qt6.
Overview
This repository contains a DTLS (Datagram Transport Layer Security) protocol feature. This feature have added a graphical interface to configure and manage DTLS connections, including server verification and session persistence options.
Features
Main Window

- Cipher Suites: Dropdown to select the desired cipher suite for DTLS communication.
- Server Common Name: Field to input the server’s common name for client-side verification.
- Persistent Session: Option to save the session key after the first handshake by enabling the persistent checkbox.
- Optional Server Verification: An option for enabling two-sided verification during the handshake.
- DTLS Server Port: Button to define the DTLS server port for the connection.
Additional Images:

- A detailed view of the cipher suite selection dropdown.

- Persistent connection window while DTLS.

- On click button for DTLS server Enabling or disabling.
Settings Window
Network Tab

- Send Simple Acknowledge: Checkbox to enable the sending of a simple acknowledgment.
- Enable DTLS Server: Option to enable the DTLS server and select a port.
- Certificates and Keys: Certificates and keys can be loaded similarly to SSL configuration.
Smart Responses Tab

- Smart Responses: Smart responses feature works over the DTLS protocol.
Wireshark Integration
Sniffing by Wireshark:
Regular Connection

- Example of a regular DTLS connection captured sniffed by Wireshark.
Persistent Connection

- Example of a persistent DTLS connection sniffed by Wireshark.
Command Line
Packet Sender can be used from the command line on your computer.
For Windows, use the extension .com (packetsender.com) to use the command line interface. Optionally, you can also use packetsender without an extension. Using the extension .exe will launch the GUI.

For Linux, the command line system in Packet Sender follows the same pattern as other Linux utilities. It has a long name (such as —version) and a short name (such as -v). These options can be arranged in any order and Packet Sender will parse them correctly. The last 3 options are positional and must appear last. They are IP, port, and data. These last options are optional if using a stored packet.
packetsender --help
Usage: C:\Program Files\PacketSender\packetsender.com [options] address port data
Packet Sender is a Network UDP/TCP/SSL/HTTP Test Utility by NagleCode
See https://PacketSender.com/ for more information.

Options:
  -h, --help                Displays help on commandline options.
  --help-all                Displays help including Qt specific options.
  -v, --version             Displays version information.
  -q, --quiet               Quiet mode. Only output received data.
  -x, --hex                 Parse data-to-send as hex (default for
                            TCP/UDP/SSL).
  -a, --ascii               Parse data-to-send as mixed-ascii (default for http
                            and GUI).
  -A, --ASCII               Parse data-to-send as pure ascii (no \xx
                            translation).
  -l, --listen              Listen instead of send. Use bind options to specify
                            port/IP. Otherwise, dynamic/All.
  -r, --response <ascii>    Server mode response data in mixed-ascii. Macro
                            supported.
  -w, --wait <ms>           Wait up to <milliseconds> for a response after
                            sending. Zero means do not wait (Default).
  -f, --file <path>         Send contents of specified path. Max 10 MiB for
                            UDP, 100 MiB for TCP/SSL.
  -b, --bind <port>         Bind port. Default is 0 (dynamic).
  -6, --ipv6                Force IPv6. Same as -B "::". Default is IP:Any.
  -4, --ipv4                Force IPv4.  Same as -B "0.0.0.0". Default is
                            IP:Any.
  -B, --bindip <IP>         Bind custom IP. Default is IP:Any.
  -t, --tcp                 Send TCP (default).
  -s, --ssl                 Send SSL and ignore errors.
  -S, --SSL                 Send SSL and stop for errors.
  -u, --udp                 Send UDP.
  --http <http>             Send HTTP. Allowed values are GET (default) and
                            POST
  -n, --name <name>         Send previously saved packet named <name>. Other
                            options overrides saved packet parameters.
  --wol <mac>               Send Wake-On-LAN / Magic Packet to <mac> and
                            (optional) <port>.
  --bps <bps>               Intense traffic. Calculate rate based on value of
                            bits per second.
  --num <number>            Intense traffic. Number of packets to send. Default
                            unlimited.
  --rate <Hertz>            Intense traffic. Rate. Ignored in bps option.
  --usdelay <microseconds>  Intense traffic. Resend delay. Used if rate is 0.
                            Ignored in bps option.
  --max                     Intense traffic. Run as fast as possible.

Arguments:
  address                   Destination address/URL. Optional for saved packet.
  port                      Destination port/POST data. Optional for saved
                            packet.
  data                      Data to send. Optional for saved packet.
Example CLI
The CLI follows the same format between Windows, Linux, and MAC.
The format is: packetsender [options] address port data
packetsender -taw 500 mirrors.xmission.com 21 "USER anonymous\r\nPASS chrome@example.com\r\n"
TCP (65505)://mirrors.xmission.com:21 55 53 45 52 20 61 6e 6f 6e 79 6d 6f 75 73 0d 0a 50 41 53 53 20 63 68 72 6f 6d 65 40 65 78 61 6d 70 6c 65 2e 63 6f 6d 0d 0a
Response Time:5:51:37.042 pm
Response HEX:32 32 30 2D 57 65 6C 63 6F 6D 65 20...
Response ASCII:220-Welcome to XMission Internet...
Example CLI to listen for packets (Server Mode)
Use the existing bind options to configure the server.
- -b for port
- -B for iP
- -t/-u/-s for TCP, UDP, or SSL
- -r to send an response (macro supported ASCII)
Binding to dynamic port using TCP
packetsender -l
TCP Server started on 0.0.0.0:52567
Use ctrl+c to exit server.

From: 127.0.0.1, Port:52568
Response Time:2024-06-04 19:01:53.198
Response HEX:48 65 6C 6C 6F
Response ASCII:Hello

From: 127.0.0.1, Port:52569
Response Time:2024-06-04 19:02:24.063
Response HEX:57 6F 72 6C 64
Response ASCII:World
Binding to port 8080 using UDP
packetsender -l -u -b 8080
UDP Server started on 0.0.0.0:8080
Use ctrl+c to exit server.

From: ::ffff:127.0.0.1, Port:49500
Response Time:2024-06-04 19:04:28.890
Response HEX:48 65 6C 6C 6F 20 55 44 50 20 50 61 63 6B 65 74
Response ASCII:Hello UDP Packet
Binding to port 8080 using UDP with current time response
packetsender -l -u -b 8080 -r "{{TIME}}"
Loading response packet.
UDP Server started on 0.0.0.0:8080
Use ctrl+c to exit.

From: ::ffff:127.0.0.1, Port:59594
Response Time:2024-06-05 20:48:18.180
Response HEX:68 65 6C 6C 6F 20 70 61 63 6B 65 74 20 73 65 6E 64 65 72
Response ASCII:hello packet sender

From: You (Response), Port:59594
Response Time:2024-06-05 20:48:18.182
Response HEX:30 38 3a 34 38 3a 31 38 20 70 6d
Response ASCII:08:48:18 pm
Binding to IP 192.168.86.26, port 54321 using SSL
packetsender -l -s -B 192.168.86.26 -b 54321
Binding to custom IP 192.168.86.26
Listening for SSL packets in server mode.
SSL Server started on 192.168.86.26:54321
Use ctrl+c to exit server.

From: 192.168.86.26, Port:52588
Response Time:2024-06-04 19:11:30.726
Error/Info:Encrypted with AESGCM(256)

From: 192.168.86.26, Port:52588
Response Time:2024-06-04 19:11:30.726
Error/Info:Authenticated with RSA

From: 192.168.86.26, Port:52588
Response Time:2024-06-04 19:11:30.726
Error/Info:Peer cert issued by

From: 192.168.86.26, Port:52588
Response Time:2024-06-04 19:11:30.726
Error/Info:Our Cert issued by SnakeOil

From: 192.168.86.26, Port:52588
Response Time:2024-06-04 19:11:30.747
Response HEX:43 6F 6F 6C 20 53 53 4C
Response ASCII:Cool SSL
Examples binding to port and custom IP, IPv4, or IPv6
Packet Sender command line can bind to custom ports to force IPv4/6 modes or multiple NIC using the -B option.
packetsender -taw 3000 fe80::c07b:d517:e339:5a08 5005 "Hello\r"
packetsender -taw 3000 192.168.0.201 5005 "Hello\r"
packetsender -B 192.168.0.200 -taw 3000 192.168.0.201 5005 "Hello\r"
packetsender -B fe80::a437:399a:3091:266a%ethernet_32769 -taw 3000 fe80::c07b:d517:e339:5a08 5005 "Hello\r"
packetsender -B fe80::a437:399a:3091:266a -taw 3000 fe80::c07b:d517:e339:5a08 5005 "Hello\r"
Example CLI using SSL and ignoring errors
The command line has the option to ignore or abandon on SSL errors. The default is to ignore.
- Use -s option to send SSL and ignore errors.
- Use -S option to send SSL and stop for errors
packetsender -saw 500 expired.packetsender.com 443 "GET / HTTP/1.0\r\n\r\n"
SSL Error: The certificate has expired
SSL (54202)://expired.packetsender.com:443 47 45 54 20 2f 20 48 54 54 50 2f 31 2e 30 0d 0a 0d 0a
Cipher: Encrypted with AES(128)

Response Time:3:24:55.695 pm
Response HEX:48 54 54 50 2f 31 2e 31 20 34 32 31 20 0d 0a 53 65 72 76 65 72 3a 20 6e 67 69 6e 78 2f 31 2e 31 30 2e 30 20 28 55 62 75 6e 74 75 29 0d
Response ASCII:HTTP/1.1 421 \r\nServer: nginx/1.10.0 (Ubuntu)\r
Example CLI using HTTP
Note this uses the built-in default packets.
packetsender --name "HTTPS POST Params"
packetsender --http GET "https://httpbin.org/get"
packetsender --http POST "https://httpbin.org/post" "{}"
Example using CLI Intense Traffic Generator
The command intense traffic generator works much the same way as the GUI version but it is a bit more accurate, with more control options, (and more intensity!).
See below for examples how to use it. Note that these calculations are «Best Effort». It does OK, but processor spikes or various network hiccups can throw it off. The threading is not real-time, and is not super-smart with its attempts to compensate.
- Resend «My Awesome Packet» at a rate of 20 Hz
- Resend «My Awesome Packet» at a bps of 2000 baud
- Resend «My Awesome Packet» as fast as possible
- Resend «My Awesome Packet» with 2000000 microsecond delay between each packet
Note: For Windows, use the «.com» build, so each example would be packetsender.com
packetsender --rate 20 --name "My Awesome Packet"
packetsender --bps 2000 --name "My Awesome Packet"
packetsender --rate 0 --name "My Awesome Packet"
packetsender --usdelay 2000000 --name "My Awesome Packet"
Building Packet Sender
The only dependency is Qt SDK
Building Packet Sender for Windows/MAC
- Download the Qt installer from https://www.qt.io/download-open-source/
- Let it install MingGW if you don’t have a compiler.
- Open the project PacketSender.pro
- Build!
The Windows and Mac versions were built using Qt 5.12. Packet Sender does support Qt 6, however it does not
support cmake.
Building Packet Sender for Linux
Here is the sequence of commands for Ubuntu 16.04. Please adapt to your Linux platform. Packet Sender requires no additional libraries beyond the stock Qt SDK. I have been told there are build issues with stock Fedora. If a Fedora wizard has insight, please let me know, and I’ll add your instructions.
If you are feeling adventurous, feel free to build from the master branch. It contains the latest stable build. The development branch should probably be avoided.
sudo apt-get update
sudo apt-get install qt5-default build-essential
wget https://github.com/dannagle/PacketSender/archive/(Version).tar.gz
tar -xzvf (Version).tar.gz
cd PacketSender-(Version)/src
qmake PacketSender.pro
make
To run use:
If it doesn’t run, you may need to set it executable
Enhancements/Requests
Missing a feature? You can hire me to add it to Packet Sender.
Legal / Compliance
License is GPL v2 or Later. Contact me if you require a different license.
Some distributions of Packet Sender may use OpenSSL.
The most current VPAT may be found in this repo.
Copyright
Packet Sender was written by Dan Nagle and is published by © NagleCode, LLC — @NagleCode — PacketSender.com
An article describing how to create custom UDP packets and then send them through the Internet using WinPCap.
- Download source code- 35.1 KB

Introduction
In this article, I will explain how to create UDP packets and then send them to a remote server through the Internet using WinPCap for Windows. The code has been tested to work with Windows XP SP2 and Vista SP1 on Linksys routers, and on Toshiba modems connected directly to the Internet. Please note that the code here is very minimalistic, and can be greatly expanded depending on your needs. The reason I use WinPCap in this article is that it solves the issue of Winsock for Windows (XP SP2 and above) not allowing raw UDP packets to be sent (in Linux, you can just use regular sockets). With WinPcap, it is possible to specify your own source IP and source hardware addresses in packets.
Background
You should know the basics of how computers communicate through the Internet; this includes knowing what packets, sockets, UDP, IP addresses, and MAC addresses are. Additionally, you might want to review the packet headers before reading over this material. The headers involved are Ethernet II, IP, and UDP. Also, know how memcpy() works; it’s used a lot. Lastly, you must know how to install headers and libraries for use with your compiler.
Before we begin
Getting WinPCap
The WinPCap 4.02 libraries I use here can be downloaded here. Once the libraries are set up, you need to add «HAVE_REMOTE» to your preprocessor. In Visual Studio 2008, this can be done in the C++ Options of your project. Make sure you do this because I spent a good time wondering why my WinPCAp project would not compile despite me checking for errors many times. Also, if you want to run WinPCap applications, you will have to install the WinPcap binaries.

Windows SDK
Some functions and structures used in this article are from Winsock2 and the Iphlp API. These are included in the Windows SDK, and can be downloaded for free here (1.33 GB; good luck dial-up users).
How a UDP packet works
Headers
First part of the packet — Ethernet II header
A packet to be sent through the Internet usually starts with an Ethernet II header. This header consists of three main parts: the destination hardware address, the source hardware address, and the type. The most important thing here is the destination hardware address because it determines the first place the packet is sent after being created. In this article, I set the destination hardware address to that of my «Default Gateway». A default gateway is a modem/router/computer that connects a network to the Internet or another network. If you use this code in a network with more than one LAN, you will have to determine what default gateway address to use with GetIpNetTable and your own addresses. The «type» part of the Ethernet II header specifies what kind of packet is being used. In this case, «0x0800» is used to specify IPv4.

(An image showing the individual bytes we will have to fill in later. The packet was made using the example application and captured using Wireshark.)
Second part of the packet — IP header
The IP header stores the IP addresses of the source and the destination as well as other important data. Information about the IP header can be found here. We will have to fill all of this in after we fill in the Ethernet code.
Third part of the packet — UDP header
UDP is used by many applications, and so there has to be a way for an application to know which information is meant for it. Where an IP and MAC address are used to determine what computer the information is meant for, ports are used by UDP to determine what application the information is meant for. Information about UDP headers can be found here.
Checksums
The IP and UDP headers require a checksum to be calculated. This is probably the most annoying part of crafting UDP packets, but is fortunately pretty straightforward. In the IP header, the «Checksum is the 16-bit one’s complement of the one’s complement of the header».
In the UDP header, the Checksum is the 16-bit one’s complement of the one’s complement of the pseduoheader (described later).
Using the code
Choosing the correct device
The first thing we must code is a way to determine what device is to be used to send the packets. Most home computers today have a «loop-back interface» that is used to access the computer itself with «localhost». This device cannot be used for sending packets to remote servers, and so you must make sure to use another one. In the sample project, I use the «ShowDeviceList()» function in the «NetworkStuff.h» file to show a list of network devices installed on the computer, using WinPCap.
void ShowDeviceList(void)
{
    // Error buffer for Pcap functions, not optional!
    char Error[PCAP_ERRBUF_SIZE];
    pcap_if_t* Devices;pcap_findalldevs_ex(PCAP_SRC_IF_STRING,NULL,
                                           &Devices,Error);
    int i = 1;
    for(pcap_if_t* CurrentDevice = Devices;CurrentDevice != NULL;
        CurrentDevice = CurrentDevice->next)
    {
        cout<<i << ". "<<  CurrentDevice->description << endl;
        i++;
    }
}
The function first creates an error buffer for use by the pcap_findalldevs_Ex function. Remember that this buffer is not optional, and will result in a program crash if set to null. The pcap_findalldevs_ex function sets a «pcap_if_t» pointer at the beginning of a linked list of network devices. A loop is then executed to show the description of each device. (If you do not have an understanding of linked lists, I suggest you read this.)
Next, the user enters the number of his selection, and the program loops that number of times and sets the global «CurrentDevice» to the appropriate pcap_if_t* device.
cout << "Enter the number of your device (example: 2)" << endl;
ShowDeviceList();
int chosen;
cin >> chosen;

int i = 1;char Error[PCAP_ERRBUF_SIZE];
pcap_findalldevs_ex(PCAP_SRC_IF_STRING,NULL,&ChosenDevice,Error);

//Set CurrentDevice to the beginning of the list and loop until
//the correct device is found or until there are no more devices
for(pcap_if_t* CurrentDevice = ChosenDevice;
    CurrentDevice != NULL;
    CurrentDevice = CurrentDevice->next)
{
    if(i == chosen)
    {
        ChosenDevice = CurrentDevice;
        break;
    }
    i++;
}
ChosenDevice should now be set to the device chosen by the user.
Getting the required device information
Now, we must find the required information about the chosen device. This is the MAC address of the device’s default gateway, and in the case that the user wants to use real information, it is also the device’s MAC and IP addresses. In the sample application, I created a structure called «DeviceInfo» to store this information, and the function «GetAdapterInfo()» to fill it in. The GetAdapterInfo() function uses the IP Helper API by Microsoft to greatly simplify getting device information. (Previously, I believe you had to use Windows Drivers to read NIC data.)
DeviceInfo GetAdapterInfo(pcap_if_t* Device)
{
    DeviceInfo DevInfo;
    ZeroMemory(&DevInfo,sizeof(DevInfo));

    IP_ADAPTER_INFO* AdapterInfo = new IP_ADAPTER_INFO [48];
    ULONG AIS = sizeof(IP_ADAPTER_INFO) * 48;
    GetAdaptersInfo(AdapterInfo,&AIS); // Allocate 48 Devices.
    for(IP_ADAPTER_INFO* Current = AdapterInfo;Current != NULL;
        Current = Current->Next)
    {
        if(strstr(Device->name,Current->AdapterName)!=0)

        {
            DevInfo.DefaultGateway = inet_addr(Current->GatewayList.IpAddress.String);
                  //The default gateway is the device that connects lan to internet
            DevInfo.IP = inet_addr(Current->IpAddressList.IpAddress.String);
               //inet_addr converts an IP address string to a 4 byte integer.
            memcpy((void*)DevInfo.PhysicalAddress,(void*)(Current->Address),6);
            ULONG MACSize = 6;
            if(SendARP(DevInfo.DefaultGateway,NULL,
                      (void*)DevInfo.GatewayPhysicalAddress,&MACSize)
                !=NO_ERROR){cout << "SendARP Failed. No default gateway\n"; }
                //SendARP gets the MAC address of the default gateway we got earlier
            // If this is false, the device was probably invalid
            DevInfo.Exists = true;
            return DevInfo;
        }
    }
    DevInfo.Exists = false;
    return DevInfo;
}
We are now able to get the information of the pcap_if_t* device chosen earlier into a DeviceInfo structure for use in packets. Note that if you choose a loop-back interface, the DeviceInfo.Exists member will be set to false for error checking. (GetAdaptersInfo() does not get loopback interfaces, and so the if() condition will never be satisfied.)
Input
Next, we can get input for use in the RawPacket class. It is easier if all the input is in a char buffer and is then converted to a data type supported by the class.
DeviceInfo di;
di = GetAdapterInfo(ChosenDevice);
if(di.Exists == false)
{
    cout << "Invalid Selection (Try another device)\n";
    return 0;
}

cout << "You chose: " << ChosenDevice->name << endl;

char SourceIP[16];
char SourcePort[6];
char SourceMAC[19];

char DestinationIP[16];
char DestinationPort[6];

char DataString[2048];

cout << "Enter source IP (or -1 for real)\n";
cin >> SourceIP;
cout << "Enter source port (0-65535)\n";
cin >> SourcePort;
cout << "Enter source MAC (or -1 for real) \n";
cin >> SourceMAC;
cout << "Enter destination IP\n";
cin >> DestinationIP;
cout << "Enter destination port(0-65535)\n";
cin >> DestinationPort;
cout << "Enter data string\n";
cin >> DataString;
The way you handle input is, of course, dependent on your needs. Just remember that if you want to have an option to use real device data (real MAC or IP), it is stored in the DeviceInfo structure for ease of access.
The RawPacket class and how it works
The following code is executed in the sample application if neither the source MAC or the source IP were -1:
// (Yes I know having one huge function isnt very cool, but this is just a sample)

RawPacket RP;

RP.CreatePacket(MACStringToBytes(SourceMAC),
        di.GatewayPhysicalAddress,
        inet_addr(SourceIP),
        inet_addr(DestinationIP),
        atoi(SourcePort),
        atoi(DestinationPort),
        (UCHAR*)DataString,
        strlen(DataString));

    RP.SendPacket(ChosenDevice);
The usage of RawPacket.CreatePacket and RawPacket.SendPacket should be pretty straightforward. Just know that the inet_addr() function converts a string containing a decimal dot IP address to a 4 byte integer, and atoi converts a string representation of a number to an integer. DataString is the data carried at the end of the packet that is separate from the headers. The last argument is the length of DataString in bytes. MACStringToBytes converts a MAC address in the format of (xx:xx:xx:xx:xx:xx) (each xx represents a 2 digit hexadecimal number) to a 6 byte array. Its definition follows:
unsigned char* MACStringToBytes(LPSTR String)
{
    char* Tmp = new char[strlen(String)];
    memcpy((void*)Tmp,(void*)String,strlen(String));
    //The 6 byte array
    unsigned char* Returned = new unsigned char[6];
    for(int i = 0;i<6;i++)
    {
        sscanf(Tmp,"%2X",&Returned[i]); // Read data as hexadecimal
        memmove((void*)(Tmp),(void*)(Tmp+3),19-i*3);//Unsafe I think...
    }
    return Returned;
}
Inside the class
Now, here is the first function we call from RawPacket. This function basically creates a buffer big enough to hold the data plus the headers of the packet, and then appends the data to the buffer. Note that most of the hard coded values here can be changed depending on your needs. Also, you should know what the «Length» in each header means. In the IP header, it means the length of the IP header itself plus the length of the UDP header plus the length of the data at the end. In the UDP header, it means the length of the UDP header plus the length of the end data. Usually, IP headers are 20 bytes, and UDP headers are 8 bytes. Remember to put shorts and ints into network byte order using htons() or htonl() before copying them to the packet.
void RawPacket::CreatePacket
                     (unsigned char* SourceMAC,
                      unsigned char* DestinationMAC,
                      unsigned int   SourceIP,
                      unsigned int   DestIP,
                      unsigned short SourcePort,
                      unsigned short DestinationPort,
                      unsigned char* UserData,
                      unsigned int   UserDataLen)
{
    RawPacket::UserDataLen = UserDataLen;
    // DataLength + 42 Bytes of Headers
    FinalPacket = new unsigned char [UserDataLen + 42];
    //Len for IPHeader (UDPLen + IPLen + DataLen)
    USHORT TotalLen = UserDataLen + 20 + 8;

    //Beginning of Ethernet II Header
    memcpy((void*)FinalPacket,(void*)DestinationMAC,6);//DestMAC
    memcpy((void*)(FinalPacket+6),(void*)SourceMAC,6); //SrcMAC
    USHORT TmpType = 8;                                   // Type: IPv4
    memcpy((void*)(FinalPacket+12),(void*)&TmpType,2);
    // Beginning of IP Header
    memcpy((void*)(FinalPacket+14),(void*)"\x45",1);
    // First 4 bits = Version (4)
    // Last 4 bits = HeaderLen (20)

    //Differntiated services field. Usually 0
    memcpy((void*)(FinalPacket+15),(void*)"\x00",1);
    TmpType = htons(TotalLen);
    memcpy((void*)(FinalPacket+16),(void*)&TmpType,2);
    TmpType = htons(0x1337);
    memcpy((void*)(FinalPacket+18),(void*)&TmpType,2);
    // ID Number. Usually not needed
    // Set to 0x1337 here

    // Flags. Used more by TCP.
    memcpy((void*)(FinalPacket+20),(void*)"\x00",1);
    // Fragment Offset. NOt much use in udp
    memcpy((void*)(FinalPacket+21),(void*)"\x00",1);
    // Time To Live. I see 128 alot
    memcpy((void*)(FinalPacket+22),(void*)"\x80",1);
    // Protocol. UDP is 0x11;TCP is 6;ICMP is 1 etc
    memcpy((void*)(FinalPacket+23),(void*)"\x11",1);
    memcpy((void*)(FinalPacket+24),(void*)"\x00\x00",2);
    //checksum, should be zero before
    // checksum calculation

    //inet_addr does htonl() for us
    memcpy((void*)(FinalPacket+26),(void*)&SourceIP,4);
    // if inet_addr not used, use htonl()
    memcpy((void*)(FinalPacket+30),(void*)&DestIP,4);
    //Beginning of UDP Header
    TmpType = htons(SourcePort);
    memcpy((void*)(FinalPacket+34),(void*)&TmpType,2);
    TmpType = htons(DestinationPort);
    memcpy((void*)(FinalPacket+36),(void*)&TmpType,2);
    USHORT UDPTotalLen = htons(UserDataLen + 8); // UDP Len + DataLen
    // Note missing 2 bytes for checksum
    memcpy((void*)(FinalPacket+38),(void*)&UDPTotalLen,2);
    /Finally append our own data
    memcpy((void*)(FinalPacket+42),(void*)UserData,UserDataLen);

    unsigned short UDPChecksum = CalculateUDPChecksum(UserData,
        UserDataLen,SourceIP,DestIP,htons(SourcePort),
        htons(DestinationPort),0x11);
    memcpy((void*)(FinalPacket+40),(void*)&UDPChecksum,2);
    // The UDP Checksum

    unsigned short IPChecksum = htons(CalculateIPChecksum();
    memcpy((void*)(FinalPacket+24),(void*)&IPChecksum,2);

    return;
}
Checksums
Now, for the checksum functions. These are CalculateUDPChecksum and CalculateIPChecksum. I will go over the latter first.
unsigned short RawPacket::CalculateIPChecksum(void)
{
    unsigned short CheckSum = 0;
    for(int i = 14;i<34;i+=2)
    {
        unsigned short Tmp = BytesTo16(FinalPacket[i],FinalPacket[i+1]);
        unsigned short Difference = 65535 - CheckSum;
        CheckSum += Tmp;
        if(Tmp > Difference){CheckSum += 1;}
    }
    CheckSum = ~CheckSum;
    return htons(CheckSum);
}
The cool thing about calculating the IP checksum is that we don’t need items that are spread across the packet. The IP checksum is based only on the 20 bytes of the entire IP header. Since the IP header in our packet starts at the 15th byte, we set i to 14 (arrays start at zero) and stop at 14+20 (34). The checksum for the IP header is based on the 16 bit complement of the 16 bit one’s complement sum. This means that we must join every two bytes into one, then add it to the checksum, and if the addition causes the checksum total to go over 65535 (the maximum an unsigned short can hold), we add one to the checksum. In the function, BytesTo16() joins the two bytes and puts the result in Tmp, and then Difference holds the highest number Tmp can be without causing CheckSum to go over 65535. At the end of every loop, a check is made to see if Tmp is higher than Difference, and one is added accordingly. At the very end of the function, the ~ operator is used to get the One’s Complement of CheckSum. (The one’s complement of the one’s complement sum).
Here is the BytesTo16 function used to join two chars into a short:
unsigned short BytesTo16(unsigned char X,unsigned char Y)
{
     unsigned short Tmp = X;
     Tmp = Tmp << 8;
     Tmp = Tmp | Y;
     return Tmp;
}
The UDP checksum function is very similar to the IP checksum one, except that first a «pseduoheader» must be constructed. The pseudoheader is made up of the source IP, the destination IP, the source port, the destination port, the length (the length should be in the pseudoheader twice), the protocol, and the actual data. Note that if the length of the pseudoheader is an odd number, a zero should be added at the end for check sum purposes. Make sure that all things are in the network byte order because otherwise there will be problems.
unsigned short RawPacket::CalculateUDPChecksum(unsigned char* UserData,
                                               int UserDataLen,
                                               unsigned int SourceIP,
                                               unsigned int DestIP,
                                               unsigned short SourcePort,
                                               unsigned short DestinationPort,
                                               unsigned char Protocol)
{
    unsigned short CheckSum = 0;
    unsigned short PseudoLength = UserDataLen + 8 + 9; //Length of PseudoHeader =
                                                        //Data Length + 8 bytes UDP header
                                                        //+ Two 4 byte IP's + 1 byte protocol

    PseudoLength += PseudoLength % 2; //If bytes are not an even number, add an extra.

    unsigned short Length = UserDataLen + 8; // This is just UDP + Data length.
                                             //needed for actual data in udp header

    unsigned char* PseudoHeader = new unsigned char [PseudoLength];
    for(int i = 0;i < PseudoLength;i++){PseudoHeader[i] = 0x00;}//Init

    PseudoHeader[0] = Protocol; // Protocol

    memcpy((void*)(PseudoHeader+1),(void*)(FinalPacket+26),8); // Source and Dest IP

    Length = htons(Length); // Length is not network byte order yet
    memcpy((void*)(PseudoHeader+9),(void*)&Length,2); //Included twice
    memcpy((void*)(PseudoHeader+11),(void*)&Length,2);

    memcpy((void*)(PseudoHeader+13),(void*)(FinalPacket+34),2);//Source Port
    memcpy((void*)(PseudoHeader+15),(void*)(FinalPacket+36),2); // Dest Port

    memcpy((void*)(PseudoHeader+17),(void*)UserData,UserDataLen);


    for(int i = 0;i < PseudoLength;i+=2)
    {
        unsigned short Tmp = BytesTo16(PseudoHeader[i],PseudoHeader[i+1]);
        unsigned short Difference = 65535 - CheckSum;
        CheckSum += Tmp;
        if(Tmp > Difference){CheckSum += 1;}
    }
    CheckSum = ~CheckSum; //One's complement
    return CheckSum;
}
Woot, that’s about it. Just use these functions to place the UDP or IP checksum where they belong. Also, I am not yet sure why I need to do htons() on the IP checksum but not the UDP checksum.
Sending the information
The next function to look at is RawPacket.SendPacket(pcap_if_t* Device). This is where WinPCap sends the packets. Fortunately for us, this function is very simple.
void RawPacket::SendPacket(pcap_if_t* Device)
{
    char Error[256];
    pcap_t* t;
    t = pcap_open(Device->name,65535,PCAP_OPENFLAG_DATATX_UDP,1,NULL,Error);
    pcap_sendpacket(t,FinalPacket,UserDataLen + 42);
    pcap_close(t);
}
pcap_sendpacket sends packets, but first, we must get a pcap_t* for its first parameter. Since we already have the ChosenDevice variable, we can just pass its device->name to pcap_open so that pcap_t* t contains a handle to the device we want. pcap_open is described here. pcap_sendpacket just takes a pcap_t* variable, the data to send in an unsigned char buffer, and the length of the data. The length here is the length of the data plus 42 bytes of headers.
Improving the code
This class could use variables (instead of taking them all in one function), accessor functions, and perhaps some sort of division between headers.
Points of interest
I thought it was interesting that some ISPs don’t allow packets with spoofed source IPs or MAC addresses to be sent. I tried this myself, and could only send using my real IP and MAC (using spoofed values made the packets visible to me on Wireshark, but not at the target server), but my friend in Mexico was able to successfully send packets with both of these items being spoofed. (I was the server, and was able to see his packets coming from «11.33.33.77»). Just remember that if you are only using this in a local network, you should be able to use any IP or MAC address that exists in your LAN (192.168.1.0 — 192.168.1.100, for example). Another problem I had was knowing what the destination MAC was. At first, I thought it was the hardware address of the device at the destination IP. Then, I learned that it is actually just the hardware address of the next device to which the data should be sent. (For me, the default gateway.)
History
No changes yet.