
Хэш или контрольная сумма файла — короткое уникальное значение, вычисляемое из содержимого файла и обычно использующееся для проверки целостности и соответствия (совпадения) файлов при загрузке, особенно если речь идет о больших файлах (образы системы и подобные), которые могут быть скачены с ошибками или есть подозрения о том, что файл был подменен вредоносным ПО.
На сайтах загрузок часто бывает представлена контрольная сумма, вычисленная по алгоритмам MD5, SHA256 и другим, позволяющая сверить загруженный файл с файлом, выложенным разработчиком. Для вычисления контрольных сумм файлов можно использовать сторонние программы, но есть способ сделать это и стандартными средствами Windows 10, 8 и Windows 7 (требуется версия PowerShell 4.0 и выше) — с помощью PowerShell или командной строки, что и будет продемонстрировано в инструкции.
Получение контрольной суммы файла средствами Windows
Для начала потребуется запустить Windows PowerShell: проще всего использовать поиск в панели задач Windows 10 или меню Пуск Windows 7 для этого.
Команда, позволяющая вычислить хэш для файла в PowerShell — Get-FileHash, а чтобы использовать ее для вычисления контрольной суммы достаточно ввести ее со следующими параметрами (в примере вычисляется хэш для образа ISO Windows 10 из папки VM на диске C):
Get-FileHash C:\VM\Win10_1607_Russian_x64.iso| Format-List

При использовании команды в таком виде, хэш вычисляется по алгоритму SHA256, но поддерживаются и другие варианты, задать которые можно с помощью параметра -Algorithm, например, для вычисления контрольной суммы MD5 команда будет выглядеть как в примере ниже
Get-FileHash C:\VM\Win10_1607_Russian_x64.iso -Algorithm MD5 | Format-List

При этом поддерживаются следующие значение для алгоритмов вычисления контрольной суммы в Windows PowerShell
- SHA256 (по умолчанию)
- MD5
- SHA1
- SHA384
- SHA512
- MACTripleDES
- RIPEMD160
Подробное описание синтаксиса команды Get-FileHash доступно также на официальном сайте https://technet.microsoft.com/en-us/library/dn520872(v=wps.650).aspx
Получение хэша файла в командной строке с помощью CertUtil

В Windows присутствует встроенная утилита CertUtil для работы с сертификатами, которая, помимо прочего, умеет высчитывать контрольную сумму файлов по алгоритмам:
- MD2, MD4, MD5
- SHA1, SHA256, SHA384, SHA512
Для использования утилиты достаточно запустить командную строку Windows 10, 8 или Windows 7 и ввести команду в формате:
certutil -hashfile путь_к_файлу алгоритм
Пример получения хэша MD5 для файла показан на скриншоте ниже.

Дополнительно: на случай, если вам требуются сторонние программы для вычисления хэшей файлов в Windows, можно обратить внимание на SlavaSoft HashCalc.
Если же требуется вычислить контрольную сумму в Windows XP или в Windows 7 без PowerShell 4 (и возможности его установить), вы можете использовать утилиту командной строки Microsoft File Checksum Integrity Verifier, доступную для загрузки на официальном сайте https://www.microsoft.com/en-us/download/details.aspx?id=11533 (формат команды для использования утилиты: fciv.exe путь_к_файлу — результат будет MD5. Также можно вычислить хэш SHA1: fciv.exe -sha1 путь_к_файлу)
When it comes to working in the digital world, the question of files’ authenticity is of great importance. A checksum is data computed from data contained in the given file which can be used to check if the given file was modified or not. This article will help you how to find the checksum of a file and whether it is correct or not using Get-FileHash in Powershell in Windows.
What is Hash?
Hash is an alphanumeric string created by processing bytes of the file by some algorithm. This hash value is of significantly lower magnitude than the size of the actual file and is listed right alongside the file that you are downloading; allowing you to take your downloaded file, run your hash value against it, and check if the two hashes match.
The use of these hashmap values is different algorithms and utilities that are used that come with the programming languages. Every algorithm will provide another hash; however, the utility used for creating the hash will provide the same hash value when you select another algorithm.
What is a Checksum?
A checksum is a value created from the data within a file. This has the role of pointing at the file like a fingerprint. When a file is downloaded one can hash it and compare it to the checksum of the file given by the source to check if the file was modified.
Why Verify Checksums?
- Integrity Verification: Checks that the file has not been changed by anyone, especially before using or updating.
- Security: Prevents malicious modifications.
- Error Detection: Detects corrupted files if it is used during the downloading or transferring of files.
Using Get-FileHash in PowerShell
PowerShell is a scripting language and command-line interface to the operating system for administration. Get-FileHash is a cmdlet that calculates the hash value for a file using a named hash algorithm.
Step 1: Open PowerShell
Press Windows + X and select Windows PowerShell (or Windows PowerShell (Admin) if you need administrative privileges).
Step 2: Navigate to the File Directory
Use the cd (Change Directory) command to navigate to the directory where your file is located. For example, if your file is in C:\Users\YourName\Downloads, you would enter:
cd C:\Users\YourName\Downloads
Step 3: Calculate the File’s Checksum
To calculate the checksum of the file the Get-FileHash cmdlet needs to be run and the file path needs to be supplied. Indeed, by default, the hash of the image is calculated using the SHA-256 algorithm, but you can set what kind of hash to generate, for instance, MD5 or SHA-1.
For SHA-256:
Get-FileHash yourfile.ext
For MD5:
Get-FileHash yourfile.ext -Algorithm MD5
For SHA-1:
Get-FileHash yourfile.ext -Algorithm SHA1
Replace yourfile.ext with the actual name and extension of your file.
Example:
If you have a file named example.txt in the current directory:
Get-FileHash example.txt
The output will look something like this:
Algorithm       Hash                                                                   Path
---------       ----                                                                   ----
SHA256          D2D2D2D2D2D2D2D2D2D2D2D2D2D2D2D2D2D2D2D2D2D2D2D2D2D2D2D2D2D2D2D2      C:\Users\YourName\Downloads\example.txt

Step 4: Compare the Checksum
Compare the computed checksum with one that is given by the source. If they match, congratulations, your file is still safe. Otherwise, the file could be accidentally corrupted or modified in some way and the original lost.
(Get-FileHash C:\Users\YourName\Downloads\example.txt -A SHA256).hash -eq "YourHashCode"

The Output results as True, Its matched.
Detailed Explanation
1. Opening PowerShell:
- PowerShell is a specific shell in the network that is higher in terms of scripting capability than the Command Prompt.
- The users may employ the Windows + X command to open the PowerShell among the choices in the menu.
2. Navigating to the File Directory:
- The processor abbreviation for it is a shorthand of cd: ‘change directory,’ and it is used to get to different directories when working on the Windows command line.
- Make sure you are in the right directory where the target file is found to ease the command.
3. Calculating the File’s Checksum:
- Get-FileHash happens to be a PowerShell cmdlet which computes the hash value of a given file.
- Primarily, it has the SHA-256 algorithm integrated into it but you can use others by simply entering -Algorithm.
4. Comparing the Checksum:
- This should be cross-checked with the value for checksum expected from the source of the file.
- Values in parallel with those of the originals assure the file’s accurate condition, and different data point to the problem.
Common Hash Algorithms
- MD5 (Message Digest Algorithm 5): Generates a 128-bit hash value. Faster, but does not protect against collisions as effectively.
- SHA-1 (Secure Hash Algorithm 1): Creates a 160-bit result key or hash value. Safer than MD5 but currently not resistant to some kinds of attacks.
- SHA-256 (Secure Hash Algorithm 256): SHA-2 family member that creates the 256-bit hash value. It is highly secure and very commonly used in today’s world.
Here are a few items to be aware of:
- The more the file size is the more time is likely to consuming when calculating the hash. For example, I have observed that as large as 500GB images can sometimes may take couple of hours.
- The hash is given with respect to the content of the file and is not dependent on the date/time stamps, etc.
- For example, if you create a file called “HelloWorld. txt” and put “Hello World” in it, the hash is:For example, if you create a file called “HelloWorld. txt” and put “Hello World” in it, the hash is:
- A591A6D40BF420404A011733CFB7B190D62C65BF0BCDA32B57B277D9AD9F146E
- If you change the name of the file to a “GoodbyeWorld. txt”, the hash does not change.
- If you change the text inside the file to “Goodbye World” and save it, the hash is now:If you change the text inside the file to “Goodbye World” and save it, the hash is now:
- C96724127AF2D6F56BBC3898632B101167242F02519A99E5AB3F1CAB9FF995E7
- However, if I replace the content back to ‘Hello World’ the hash is equal to the previous hash value.
As mentioned above you can write some text in a file and use such a file as the location of a variable in Go, and in the same time get the same hash value. Hashes are calculated on the content to check their authenticity. You can try for instance, modifying the text from “Hello World” to “Hello world”(lowercase w on “world) Here, you will note that the hash that is generated is different.
LARGE FILES
In addition to simple checks when comparing the content, adjusted for the fact that downloaded files can be larger, a hash is useful when there are large copies.
For instance, just the other day I was working on a file transfer of a relatively big size where there was a rude interruption from the network. The transfer auto-resumed, but due to this network interruption I could not be certain there was no data corruption. I reverted the hash on both the source and the destination to check if there were any problems with the file; as a result, I saved an hour of downloading a file that did not need to be downloaded again.
VALIDATE AGAINST TAMPERING
Another use of this could be to perhaps guarantee that files were not altered. Of course, you can have good security measures in place, but there is always a way that someone can reach files that they should not.
If you want to be sure files were not touched at all, you can record the result of computation against all the files into a text file and put that into another location/into immutable media. And then any time you need to do validation, you can run another compute against those files and invariably, all is well. This will nicely suit the paranoid person within your organization to the extreme.
Conclusion
Checksum is an effective and very basic way of confirming that the content you are receiving or the physical storage media is indeed secure and has not been tampered with. By conducting this in PowerShell, the task is easy and quick because the Get-FileHash cmdlet can accomplish this. Thus, using the tips described in this article, you can effectively check the reliability of the files in Windows.
NOTE: Ensure that you always compare the checksum provided by the file source to detect any potential tampering or corruption. This practice is crucial for maintaining the security and reliability of your digital files.
Ensuring the integrity and authenticity of files is paramount, especially when downloading software, sharing documents, or maintaining system backups. This is where MD5 checksums come into play, serving as a crucial tool for users and administrators alike. Originally designed as a cryptographic hash function, the MD5 algorithm produces a unique 128-bit hash value for any given piece of data. Although its use in secure cryptographic contexts has been superseded due to vulnerabilities, MD5 checksums remain widely used for verifying data integrity.
In this article, we will delve into the world of MD5 checksums on the Windows platform. From generating checksums for your files to verifying them against known values, we’ll cover the essential steps and tools you need to ensure your data remains intact and trustworthy. Whether you’re a casual user looking to verify your downloads or a professional managing critical data, understanding how to use MD5 checksums is an invaluable skill in today’s digital landscape.
Understanding MD5 Checksums
At the heart of data integrity and verification lies the MD5 checksum, a technology that, despite its age, continues to play a vital role in ensuring the authenticity of digital data. To fully appreciate its value, it’s essential to understand what MD5 checksums are and how they function within the realm of data security.
What is an MD5 Checksum?
An MD5 checksum is a unique 128-bit (16-byte) hash value generated by running the MD5 hashing algorithm on a piece of data, be it a file, a string of text, or any digital content. This hash function takes input data of any size and produces a fixed-size hash value. Due to its design, even the smallest change in the input data will result in a significantly different hash value, making MD5 checksums extremely sensitive to alterations in the data.
How MD5 Checksums Work
The process of generating an MD5 checksum is straightforward: the MD5 algorithm processes the input data in blocks, each of a fixed size, and produces a unique hash value. If two different files were to produce the same MD5 hash (an occurrence known as a collision), it would undermine the algorithm’s reliability. However, for non-malicious purposes, such as verifying data integrity, the chances of accidental collisions are astronomically low.
The Role of MD5 Checksums in Data Integrity
MD5 checksums serve as a digital fingerprint for files. When you download a file, the source can provide an MD5 checksum that you can compare against the checksum of the downloaded file. If the two checksums match, it confirms that the file has not been altered from its original state. This verification process is crucial for detecting corrupted downloads or files that may have been tampered with, intentionally or accidentally.
Limitations of MD5 Checksums
While MD5 checksums are excellent for verifying data integrity, they are not without their limitations. Over the years, researchers have found vulnerabilities in the MD5 algorithm that allow for the creation of different files with the same MD5 hash, known as hash collisions. These vulnerabilities mean that MD5 is not suitable for cryptographic security purposes, such as SSL certificates or digital signatures where a higher level of security is required. For these applications, more secure hashing algorithms like SHA-256 are recommended.
Despite these limitations, MD5 checksums remain a valuable tool for their intended purpose: ensuring the integrity of files and data. Their ease of use, widespread support, and the ability to quickly detect data corruption or alteration make them an indispensable tool in the toolkit of anyone who manages digital files. Whether you’re a software developer, a system administrator, or just someone looking to ensure the authenticity of downloaded files, understanding and utilizing MD5 checksums is a critical step in safeguarding your digital information.
How to Generate & Check MD5 Checksums in Windows
Generating MD5 checksums in Windows is a straightforward process that can be accomplished using built-in tools or third-party software. This capability allows users to create a unique hash value for any file, providing a way to verify its integrity later. Here’s how you can generate MD5 checksums on Windows, using both native and external tools.
Using CertUtil – A Built-in Windows Tool
Windows comes with a command-line utility called CertUtil that can generate MD5 checksums without the need for any additional software. Here’s how to use it:
- Open Command Prompt: Press
Windows + R, typecmd, and press Enter to open the Command Prompt. - Navigate to Your File: Use the
cdcommand to navigate to the directory containing the file you want to check. For example,cd C:\Users\YourUsername\Downloads. - Generate the MD5 Checksum: Type the following command and press Enter:
CertUtil -hashfile YourFileName.ext MD5Replace YourFileName.ext with the name and extension of your file. CertUtil will process the file and display the MD5 checksum in the Command Prompt window.
Using PowerShell
Another method to generate an MD5 checksum in Windows is through PowerShell, which provides a more flexible scripting environment. Here’s how:
- Open PowerShell: You can do this by searching for PowerShell in the Start menu.
- Use the Get-FileHash Cmdlet: Type the following command and press Enter:
Get-FileHash -Path "C:\Path\To\Your\File.ext" -Algorithm MD5Make sure to replace C:\Path\To\Your\File.ext with the actual path to your file. PowerShell will display the hash value in its output.
Using Third-Party Tools
For those who prefer a graphical user interface (GUI) or need additional features not offered by CertUtil or PowerShell, numerous third-party applications are available. These tools often support multiple hashing algorithms and can handle batch processing of multiple files. Some popular options include:
- MD5 & SHA Checksum Utility: A free tool that supports various algorithms and allows you to generate, verify, and compare checksums with a user-friendly interface.
- HashMyFiles: Another free utility that can generate and compare hashes for individual files or in batch mode. It’s portable, requiring no installation, and offers extensive features for advanced users.
When selecting a third-party tool, ensure it comes from a reputable source to avoid software that might compromise your system’s security.
Best Practices
When generating MD5 checksums, consider the following best practices to ensure the process’s integrity and security:
- Verify the Tool’s Authenticity: If you’re downloading a third-party tool, ensure it’s from a reputable website or the official developer’s site to avoid malware.
- Regularly Update Software: Keep your chosen tool updated to benefit from the latest features and security improvements.
- Use for Intended Purpose: Remember, MD5 checksums are suitable for verifying data integrity, not for cryptographic security purposes. For secure encryption needs, consider stronger algorithms like SHA-256.
Generating MD5 checksums in Windows is a simple yet powerful way to ensure the integrity of your files. Whether you choose to use built-in tools like CertUtil and PowerShell or opt for a third-party application, the process adds an essential layer of security to your data management practices.
FAQs
What is an MD5 checksum?
An MD5 checksum is a 128-bit hash value generated by the MD5 hashing algorithm. It serves as a unique digital fingerprint for a file, allowing users to verify the file’s integrity by comparing checksums.
How do I generate an MD5 checksum on Windows?
You can generate an MD5 checksum on Windows using the built-in CertUtil command-line tool or PowerShell. Third-party applications also offer graphical interfaces for generating checksums.
Can MD5 checksums be used for secure encryption?
No, MD5 checksums are not suitable for secure encryption due to vulnerabilities that allow for hash collisions. They are primarily used for verifying data integrity.
How do I verify an MD5 checksum on Windows?
To verify an MD5 checksum on Windows, generate a checksum for the file in question and compare it to the original checksum. This can be done using CertUtil, PowerShell, or third-party tools.
Are there alternatives to MD5 for checksums?
Yes, there are more secure alternatives to MD5, such as SHA-256 and SHA-3, which offer stronger security against hash collisions and are recommended for cryptographic purposes.
Содержание статьи:
- Узнаем контрольную сумму
- Способ 1
- Способ 2
- Способ 3
- Способ 4
- Способ 5
- Вопросы и ответы: 0
Вводная (зачем это нужно): когда вы скачиваете из сети какую-нибудь программу, архив, образ ISO (особенно больших размеров) — есть определенная вероятность, что у вас может оказаться битый файл (или поддельный, т.е. кем-то измененный, например, вирусами).
Чтобы убедиться, что перед вами оригинальный файл (а не подделка) — нужно сравнить контрольные суммы* своего файла на диске, с контрольными суммами файла на сайте его разработчика (они их обычно всегда приводят). Если совпадут — значит все OK!
* Важный момент: контр. сумма (или хэш-сумма) представляет из себя текстовую строку с буквами и цифрами, которая уникальна для каждого файла (как подпись у человека). И если содержимое файла изменится хоть на один байт — контрольная сумма тоже изменится! Разумеется, если хэш-сумма вашего файла не совпадает с оригиналом — лучше его не открывать, и перезагрузить информацию…
*
Узнаем контрольную сумму
Способ 1
Пожалуй, наиболее быстрый и удобный способ — воспользоваться программой Total Commander (ссылка на сайт разработчика: https://www.ghisler.com/download.htm). Это аналог проводника, который сильно упрощает взаимодействие с большим кол-вом файлов.
Что делать:
- скачивание, установка, запуск у Total Commander стандартны, и поэтому я их не рассматриваю;
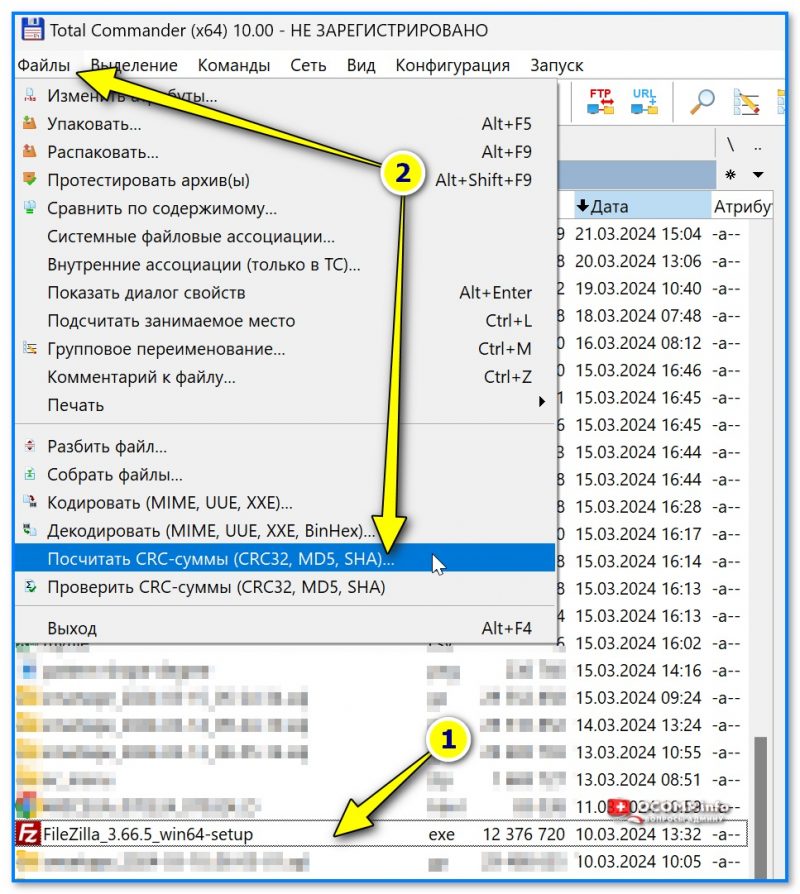
- далее в панели нужно выбрать тот файл, для которого вам требуется контрольная сумма, и перейти в меню «Файл — посчитать CRC суммы». См. скриншот ниже; 👇

Файл — посчитать CRC суммы
- затем указать тип контрольной суммы: MD5, SHA256, SHA1 и др. (обычно выбирают тот тип, который указан на сайте, с которого вы загрузили файл. Иначе как сравнивать-то? 😉);

Тип контрольной суммы
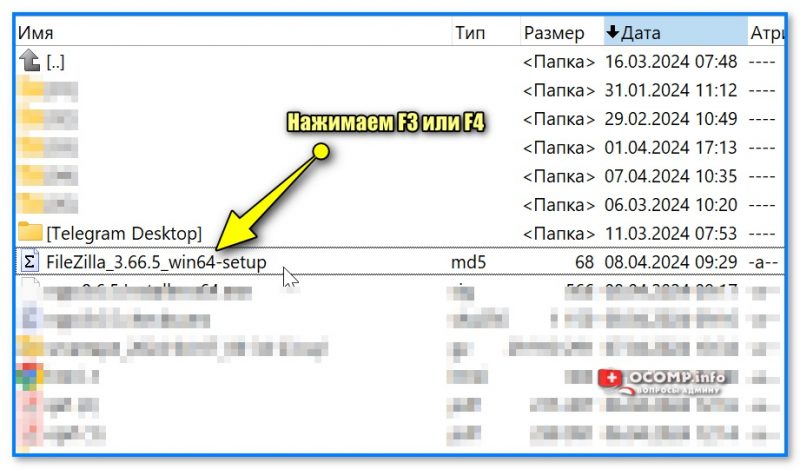
- после этого у вас в этой же папке с файлом появится новый текстовый файл (в моем случае с расширением MD5). Необходимо открыть его: для этого нужно его выбрать и нажать F3 (на ноутбуках возможно Fn+F3);

Открываем полученный текстовый файл
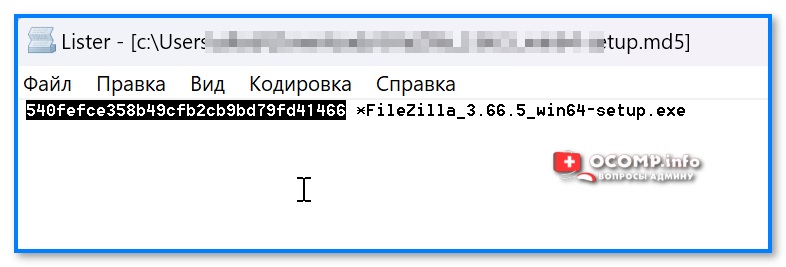
- ву-а-ля, перед вами контрольная сумма! Эту строку теперь можно скопировать и сравнить со строкой от разработчиков вашего файла: если совпадает — значит ваш файл никто не изменил… (не подделка…).

Напротив каждого файла своя контр. сумма

*
Способ 2
Если вы достаточно часто что-то качаете и загружаете (и нужно постоянно проверять хеш-суммы) — возможно, вам придется по душе дополнение для проводника HashTab V 6.0 (ссылка на сайт разработчика).
После его установки — достаточно просто открыть свойства нужного файла и перейти во вкладку «Хеш-суммы файлов». В ней будут представлены следующие типы контр. сумм: CRC32, MD5, SHA-1, SHA-256 (в настройках можно добавить и другие).
Удобно?! 👌👇👇
Свойства файла
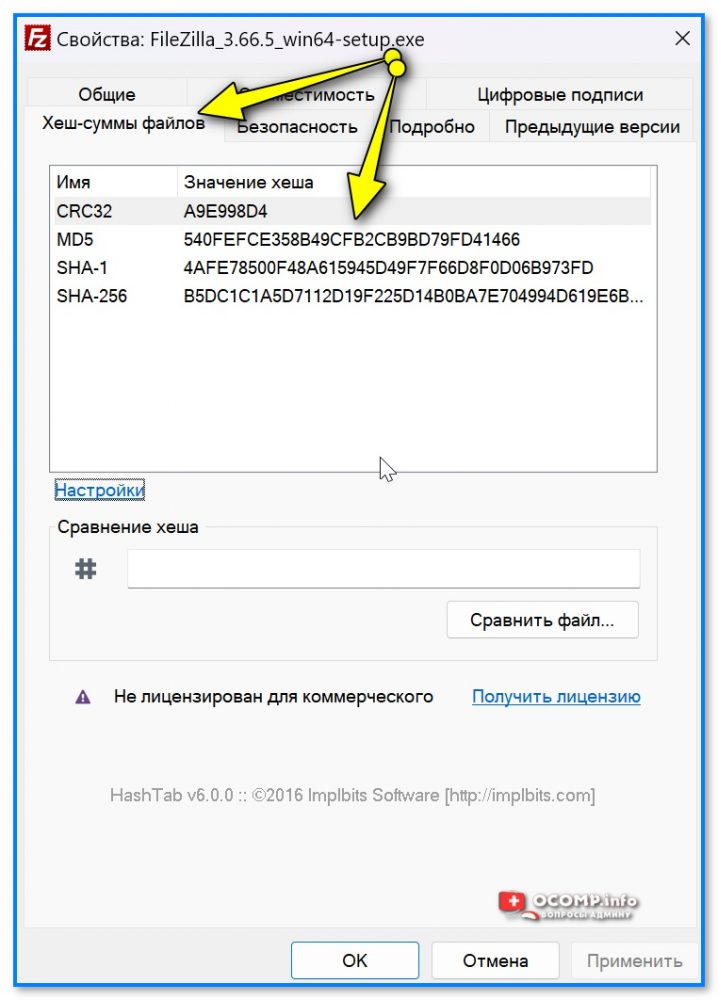
Хеш-суммы файлов
*
Способ 3
Есть еще одна достаточно удобная утилита для подсчета хеш-сумм — File Checksum Calculator (сайт разрабочтика: https://vovsoft.com/software/file-checksum-calculator/).
После запуска File Checksum Calculator — нужно-то лишь указать расположение файла: через 1-2 сек. вы получите всё необходимое (строки CRC32, MD5, SHA1, SHA256, SHA512)! См. скрин ниже. 👇
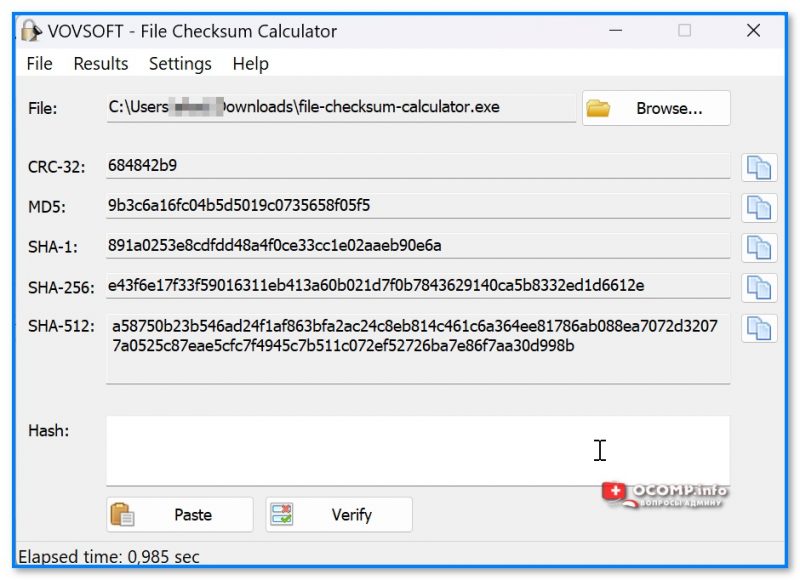
File Checksum Calculator — скрин окна приложения
*
Способ 4
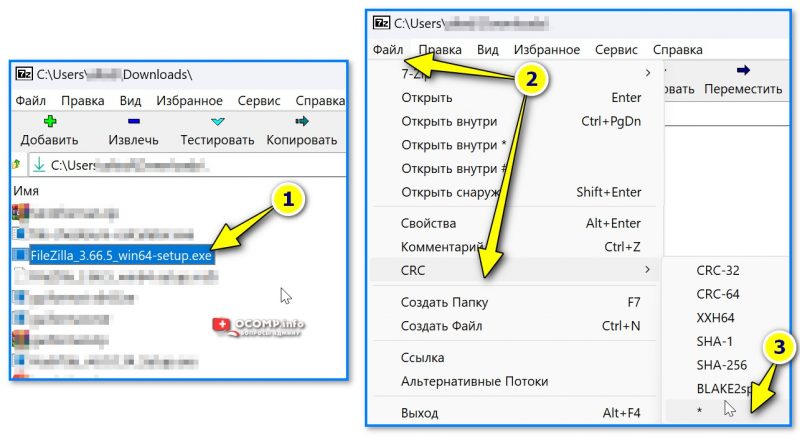
Если вы пользуетесь архиватором 7ZIP (ссылка на офиц. сайт: https://www.7-zip.org/) — то достаточно просто узнать хэш-суммы в нем:
- для этого нужно открыть сам архиватор (через ярлык в меню ПУСК, например);
- выбрать в нем файл и перейти в меню «Файл / CRC / *» (см. стрелку 3 на скрине ниже);

7ZIP — файл — CRC
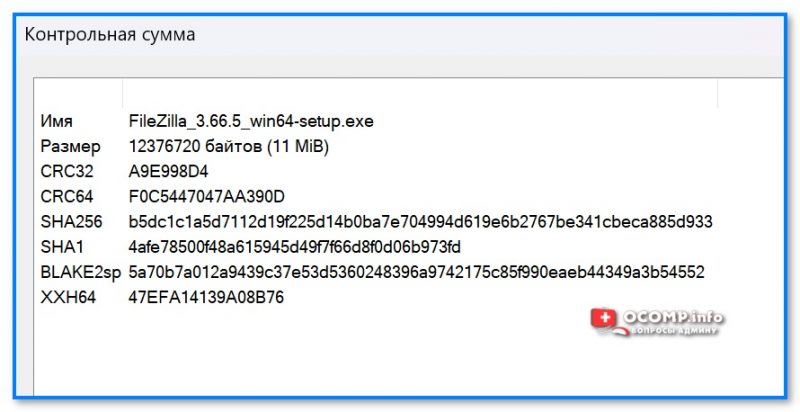
- архиватор тут же представит неск. типов контрольных сумм (CRC32, 64, SHA256, SHA1 и др.). Задача выполнена?!

7zip — контрольные суммы
*
Способ 5
Можно также воспользоваться встроенной в Windows утилитой CertUtil (для этого понадобиться 📌запустить командную строку, ввести в нее нижеприведенную команду и нажать Enter).
certutil -hashfile C:\Users\alex\Downloads\FileZilla_3.66.5_win64-setup.exe MD5
Обращаю внимание на то, что:
- вместо моего пути к программе (C:\Users\alex\Downloads\FileZilla_3.66.5_win64-setup.exe) — вам нужно указать свой путь!
- вместо MD5 — можно указать другой тип контр. суммы (SHA1 или SHA256, например).
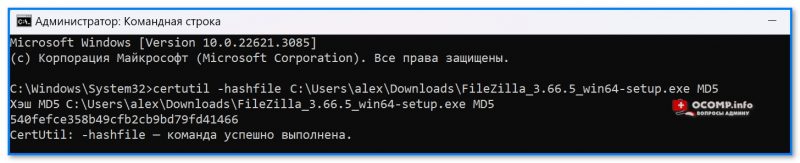
Командная строка — хэш-сумма // в качестве примера
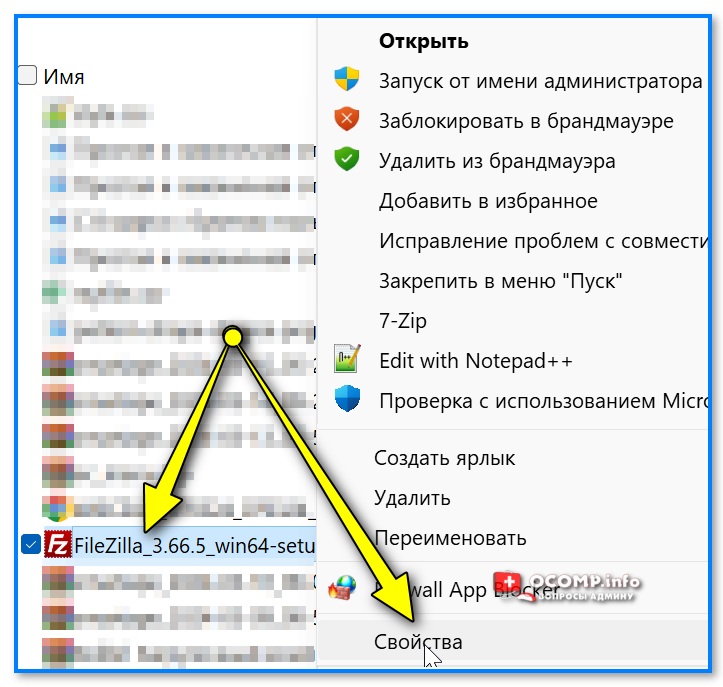
✏️ Кстати!
Чтобы узнать имя и расположение своего файла — нажмите по нему правой кнопкой мыши и откройте его свойства: во вкладке «Общие» эти сведения указаны (см. скрин ниже). 👇
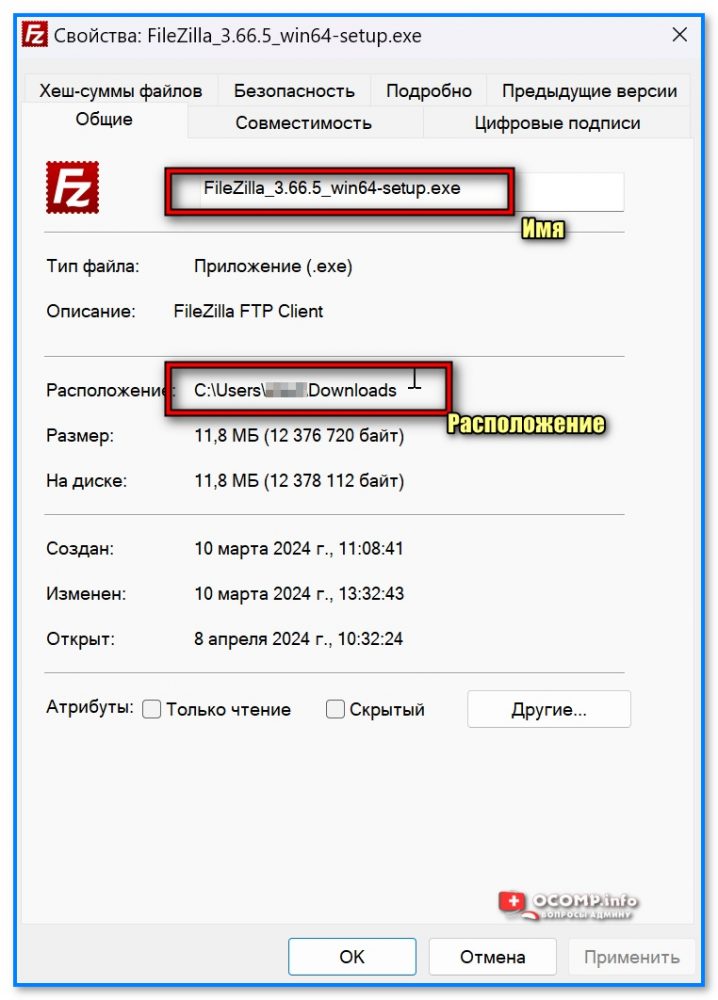
Свойства файла — имя и расположение
*
Иные (более простые) способы — приветствуются в комментариях ниже.
Всего доброго!
👋
Getting Started with MD5 Checksum
An MD5 checksum is a unique string of letters and numbers that serves as a digital fingerprint for a file. You can use it to verify a file’s integrity and authenticity by comparing its checksum value with the original. Learning how to Check MD5 Checksum on Windows is easy and can ensure your downloaded files are complete and uncorrupted.
This comprehensive guide will take you through everything you need to know about MD5 hashes and how to Check MD5 Checksum on Windows using various methods.
What is an MD5 Checksum and Why Use It?
An MD5 checksum, also known as an MD5 hash value or just MD5 hash, is a 128-bit alphanumeric string calculated from a file’s binary content. The MD5 algorithm processes the file’s data and generates a distinct checksum value that can act like a fingerprint for that file.
Key Facts about MD5 Checksums
The main use case for MD5 hashes is to check the integrity and authenticity of downloaded files. By comparing a file’s generated MD5 against the original value provided, you can ensure:
For example, software developers post MD5 hashes so users can verify the installer downloads are complete and official. People distributing Linux ISO images often include the MD5 hash to check whether the ISO file contents are original or unmodified.
Other uses of MD5 include verifying cached files, detecting duplicate data, and providing a checksum in data transmission protocols.
How to Generate an MD5 Checksum Value in Windows
To check a file’s MD5 hash, you first need to calculate the checksum value on your end to compare it with the original.
Here are some easy ways to generate MD5 hashes in Windows:
Using Microsoft File Checksum Integrity Verifier
Microsoft provides the small utility tool File Checksum Integrity Verifier (FCIV) to generate and validate checksums for files.
To use it:
From File Explorer’s Properties
You can view a file’s MD5 hash in the Properties window:
Generate MD5 Hash Using PowerShell
To generate the MD5 hash in PowerShell:
Generate MD5 Using Command Prompt
In Command Prompt, use the certUtil -hashfile command:
Create MD5 Hash Using Third-Party Tools
Many free tools like QuickHash and, WinMD5 can easily generate MD5 hashes for files.
Follow their instructions to select a file and produce the MD5 checksum value.
Step-by-Step Guide for Comparing the Generated MD5 Hash
Once you have the MD5 checksum from your downloaded file, you can verify it matches the original value provided by the file source.
Here are the steps:
Matching MD5 hashes gives you confidence in the integrity and authenticity of your downloaded files. This verification is useful for installing software, checking disk images, examining sensitive data, and other situations where file accuracy matters.
Why MD5 Hashes May Not Match
If the generated MD5 and original value do not match, there are a few common reasons:
If you are certain, you have the right original hash, a mismatch almost always indicates a corrupted or tampered file. Delete it and re-download it to generate a new MD5.
MD5 Checksum Use Cases and Examples
Here are some common situations where using MD5 hashes to check file integrity is very useful:
MD5 Hashing Limitations and Alternatives
While still very useful, MD5 hashes have some limitations:
Due to these flaws, security-conscious users may want to consider stronger modern hashing algorithms:
How to Check MD5 Hash on Windows: Step-by-Step Walkthrough
Here is a step-by-step walkthrough to clearly demonstrate verifying an MD5 checksum on Windows:
Final Thoughts
Verifying MD5 checksums on Windows is a straightforward process that ensures your downloaded files are intact and uncorrupted. By comparing the MD5 hash values, you can confirm that the file contents match the original. This simple checksum verification gives you peace of mind that your downloaded file has not been tampered with or corrupted during transfer.
While MD5 has some limitations in terms of collision resistance, it remains a quick and easy way to check file integrity on Windows. Following the simple steps outlined, even beginners can learn to generate and compare MD5 checksums.
FAQs about MD5 Hashes in Windows
Here are some frequently asked questions about using MD5 checksums on Windows systems:
What is the best software tool for generating MD5 hashes on Windows?
Microsoft’s FCIV utility and PowerShell are good built-in tools. Third-party options like QuickHash GUI also provide user-friendly MD5 generation.
Can I generate an MD5 checksum for a folder or drive?
No, MD5 hashes are calculated from a file’s complete binary contents. They cannot be created for folders, partitions, or disks.
Does turning off a virus scanner improve MD5 generation performance?
Yes, antivirus software can slow down MD5 generation. Excluding the file or pausing your antivirus may speed up checksum calculation.
How do I verify a large download with MD5 without recalculating the entire hash?
Use a utility like HashCheck Shell Extension, which can incrementally update the MD5 value as part of a large file download.
Can MD5 hash detect if files are infected with malware or viruses?
No, MD5 only verifies if a file’s binary contents match the original. To scan for malware, use dedicated antivirus software.
What hash algorithm does Windows use for NTFS file integrity checking?
NTFS uses CRC-32 hashes, not MD5, for its internal file integrity checks on system files.