
Настройка MTU (Maximum Transmission Unit) знакома большинству пользователей, которые когда-либо настраивали Wi-Fi роутеры, но доступна и в Windows для Ethernet и других подключений. MTU — это максимальный размера блока данных одного пакета в байтах (без учета размера заголовка), стандартный размер — 1500 байт.
При необходимости размер MTU в Windows 11, 10 и других версий можно изменить. В этой инструкции — о том, как это сделать, а также узнать текущий размер MTU.
Способы изменения размера MTU в Windows 11 и Windows 10
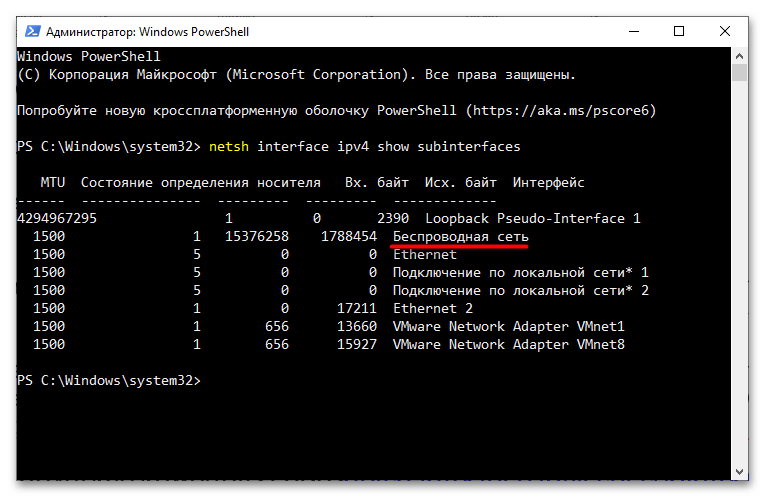
Прежде чем приступить, вы можете определить текущий размер MTU для сетевых интерфейсов, для этого достаточно запустить командную строку или Терминал от имени администратора, после чего использовать следующую команду:
netsh interface ipv4 show subinterfaces

Размеры MTU будут указаны в первом столбце в результатах выполнения команды. Если вам требуется изменить размер пакета, вы можете использовать один из следующих способов.
Включение Jumbo frame
Первая возможность — включить Jumbo Frame (Jumbo-кадр), позволяющий передавать данные в размере, превышающем стандартные 1500 байт. Для этого используйте следующие шаги:
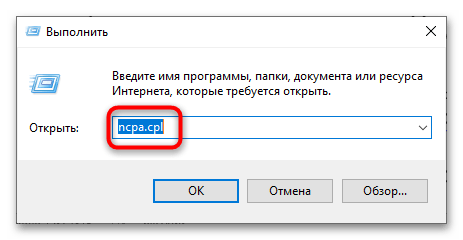
- Нажмите клавиши Win+R, введите ncpa.cpl и нажмите Enter.
- В списке подключений нажмите правой кнопкой мыши по подключению, для которого нужно включить Jumbo frame и выберите пункт «Свойства».
- Нажмите кнопку «Настроить» для настройки сетевого адаптера.
- На вкладке «Дополнительно» найдите пункт «Jumbo packet» и измените его значение, затем примените настройки.


При включении Jumbo frame соединение может быть кратковременно разорвано, но обычно затем работает исправно. Учитывайте, что настройка Jumbo packet может быть доступна не для всех сетевых карт, также её наличие может зависеть от используемых драйверов.
Изменение MTU в командной строке
Вторая возможность — использование командной строки для изменения размера MTU:
- Запустите командную строку от имени администратора и введите следующую команду, чтобы посмотреть список имен интерфейсов:
netsh interface ipv4 show subinterfaces
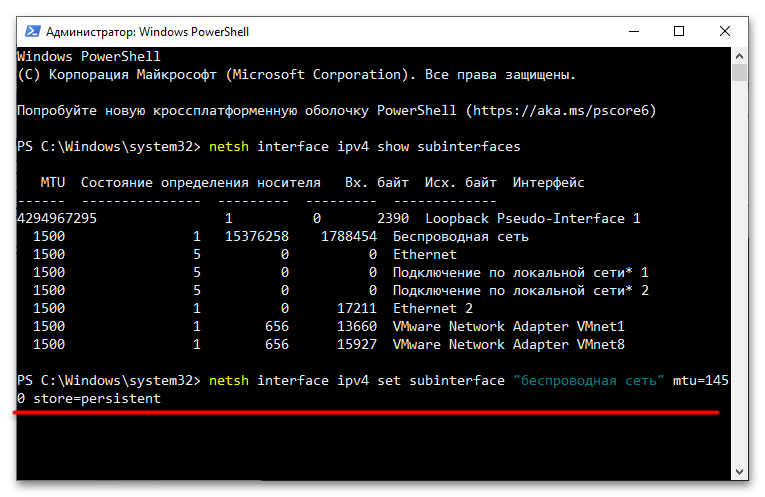
- В следующей команде измените ИМЯ_ИНТЕРФЕЙСА и значение MTU для изменения MTU для соответствующего подключения:
netsh interface ipv4 set subinterface ИМЯ_ИНТЕРФЕЙСА mtu=РАЗМЕР store=persistent

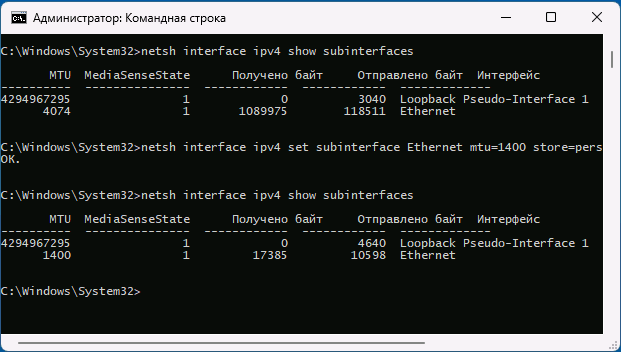
После успешного выполнения команды, размер MTU будет изменен.
Определить оптимальный размер пакета (значение MTU) для текущего Интернет-подключения можно в командной строке с помощью команды, ping адреса_сайта -f -l РАЗМЕР, например:
ping google.com -f -l 1500

Задачей будет поиск такого значения MTU, которое не приводит к сообщениям о необходимости фрагментации пакета.
Все способы:
- Определение текущего размера MTU
- Определение оптимального MTU
- Способ 1: Настройка «Jumbo Frame»
- Способ 2: Консоль
- Способ 3: Сторонние приложения
- Способ 4: «Редактор реестра»
- Вопросы и ответы: 0
Определение текущего размера MTU
Перед настройкой параметра Maximum Transmission Unit может понадобиться определение его текущего значения. Обычно оно составляет 1500 байт, но нельзя исключать, что оно будет отличаться.
- Запустите от имени администратора «PowerShell» из контекстного меню кнопки «Пуск».
- Выполните команду
netsh interface ipv4 show subinterfaces. Размеры MTU будут указаны в первом одноименном столбце отдельно для каждого подключения – как физического, так и виртуального.
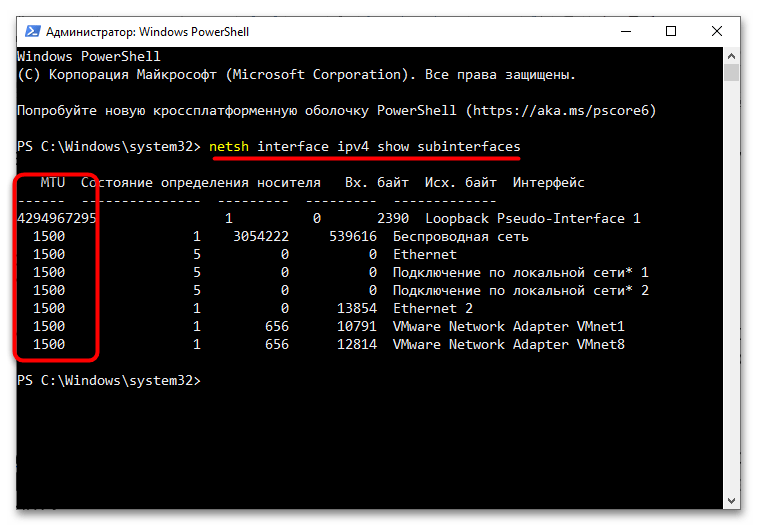
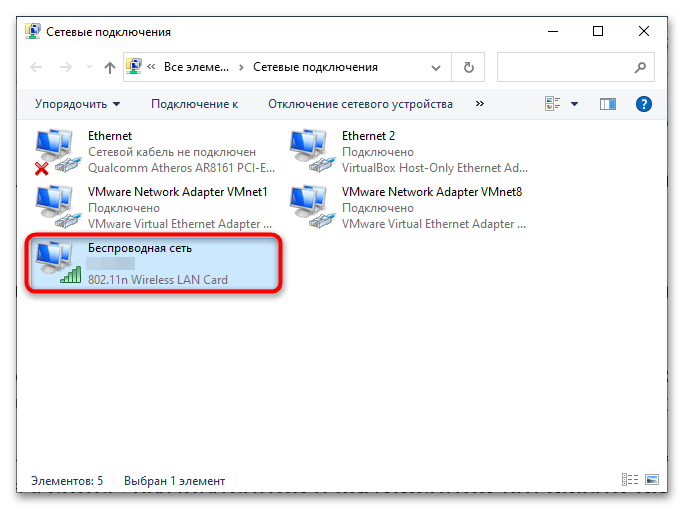
Если на компьютере используется проводное подключение, скорее всего, оно будет называться «Ethernet», если беспроводное – «Wireless», «Wi-Fi» или «Беспроводная сеть».
Определение оптимального MTU
Оптимальным значением MTU является то, при котором пакеты интернет-трафика не фрагментируются. Заданное в Windows 10 значение MTU в 1500 байт не всегда соответствует оптимальному, поэтому определение наиболее подходящего значения MTU не будет излишним.
- Откройте от имени администратора консоль «PowerShell» и выполните команду
ping google.com -f -l 1500. - В случае возвращения командой сообщение «Требуется фрагментация пакета, но установлен ограничивающий флаг» уменьшите значение 1500 на 10-50 единиц и повторите команду.
- Уменьшайте передаваемое в команде пинга значение постепенно, пока сообщение не исчезнет.

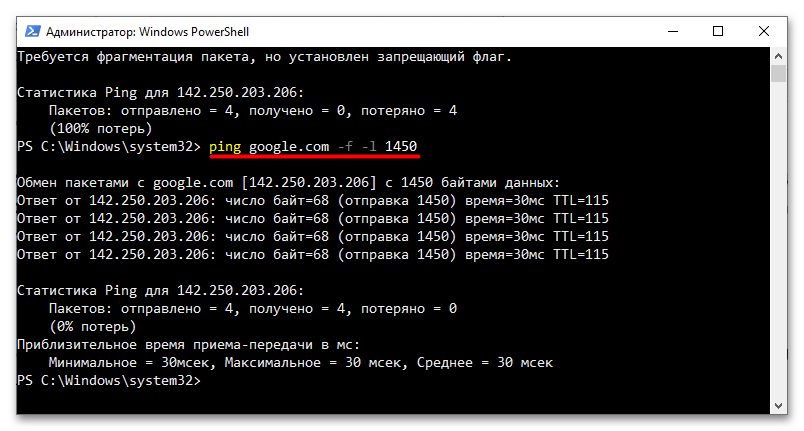
Точно так же можно определить верхнюю границу оптимального значения MTU. Поскольку при выполнении указанной команды не учитывается размер заголовков IP и запросов протокола ICMP, к тестируемому значению желательно добавить 28 байт – так полученный результат будет более точным.
Способ 1: Настройка «Jumbo Frame»
Этот способ предполагает использование графического интерфейса Windows, однако указанная настройка поддерживается не всеми сетевыми адаптерами.
- Откройте «Сетевые подключения», выполнив в вызванном нажатием клавиш Win + R диалоговом окошке быстрого запуска приложений команду
ncpa.cpl. - Кликните правой кнопкой мыши по используемому сетевому адаптеру и выберите из контекстного меню опцию «Свойства».
- В окне «Свойств» адаптера нажмите кнопку «Настроить».
- Переключитесь на вкладку «Дополнительно» и найдите в поле «Свойство» пункт «Jumbo Packet». Выберите из выпадающего списка «Значение» подходящее значение и сохраните настройки.


В момент изменения настроек соединение может разорваться на несколько секунд.
Способ 2: Консоль
Более гибким способом изменения MTU в Windows 10 является использование консоли.
- Определите название сетевого интерфейса, для которого хотите изменить значение MTU. Посмотреть его можно в окне «Сетевые подключения».

Также можно вывести список подключений командой
netsh interface ipv4 show subinterfaces, выполненной в запущенной от имени администратора «PowerShell» или «Командной строке». - Выполните команду
netsh interface ipv4 set subinterface NAME mtu=SIZE store=persistent, заменив NAME названием нужного сетевого интерфейса, а SIZE – новым размером MTU в байтах.
Убедитесь, что интернет-соединение работает нормально.
Способ 3: Сторонние приложения
Изменять значение параметра Maximum Transmission Unit могут некоторые сторонние программы для настройки и оптимизации сетевых подключений, например TCP Optimizer.
Скачать TCP Optimizer с официального сайта
- Скачайте приложение с сайта разработчика и запустите от имени администратора. Программа портативная, установки не требует.
- Включив режим «Custom», измените значение в поле «MTU» и нажмите кнопку «Apply changes».
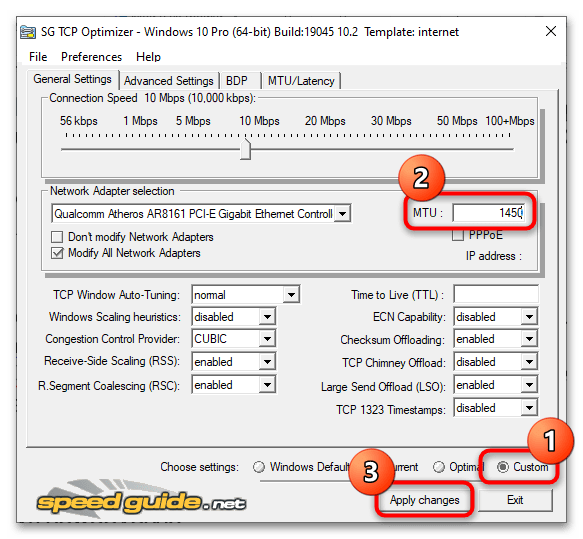
Изменения должны вступить в силу немедленно.
Способ 4: «Редактор реестра»
Вполне рабочий, но не самый удобный способ настройки MTU, поскольку он предполагает ручную правку ключа системного реестра.
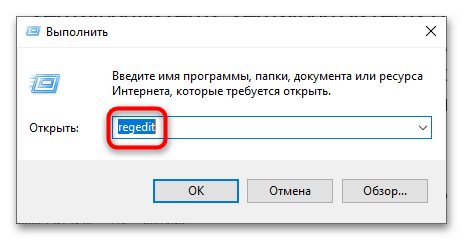
- Откройте «Редактор реестра», выполнив в диалоговом окошке быстрого запуска «Выполнить» (Win + R) команду
regedit. - Разверните ключ
HKEY_LOCAL_MACHINE\SYSTEM\CurrentControlSet\Control\Class\{4D36E972-E325-11CE-BFC1-08002bE10318}. Ключ содержит несколько вложенных подразделов с названиями «0000», «0001», «0002» и так далее – внимательно просмотрите их содержимое и выберите тот, где в качестве значения параметра «DriverDesc» будет указано название сетевого адаптера, для которого изменяется MTU. Название можно посмотреть в окошке «Свойств» подключения («Подключение через:»), смотрите шаг 2 в Способе 1. В этом же подразделе будет располагаться параметр «NetCfgInstanceId» – запомните или запишите его значение. - Затем разверните ключ
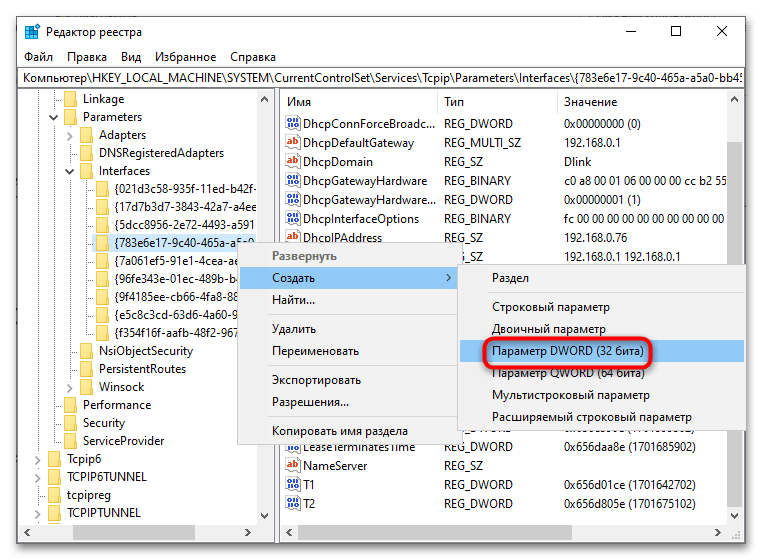
HKEY_LOCAL_MACHINE\SYSTEM\CurrentControlSet\Services\Tcpip\Parameters\Interfacesи найдите в нем подраздел, имеющий то же название, что и значение параметра «NetCfgInstanceId». Перейдите в него, отыщите тут параметр MTU и установите для него нужное значение в десятичной системе счисления.

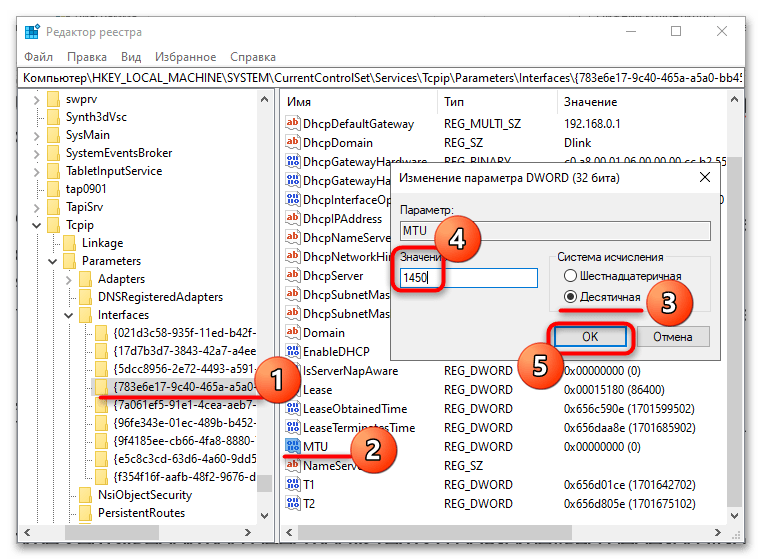
Если параметр MTU отсутствует, его нужно будет создать вручную. Для этого кликните правой кнопкой мыши по подразделу или его пустой области и выберите из контекстного меню «Создать» → «Параметр DWORD».
Сохраните настройки, закройте «Редактор реестра» и обязательно перезагрузите компьютер.
Наша группа в TelegramПолезные советы и помощь
Changing the Maximum Transmission Unit (MTU) on your Windows 10 computer can help improve network performance, especially if you’re experiencing connectivity issues. It’s a quick and straightforward process that involves using the Command Prompt to adjust the network settings.
Changing the MTU on Windows 10 can optimize how data packets are transmitted over the network, potentially reducing latency and fragmentation. Follow these steps to adjust your MTU settings.
Step 1: Open Command Prompt as Administrator
Begin by opening the Command Prompt with administrative privileges.
Right-click the Start menu and select «Command Prompt (Admin)» or «Windows PowerShell (Admin).»
Step 2: Find the Network Interface
You need to identify the network interface you wish to change.
Type netsh interface ipv4 show subinterfaces and press Enter. This command will display a list of network interfaces and their current MTU settings.
Step 3: Set the New MTU Value
Now, set the MTU value to your desired number.
Type netsh interface ipv4 set subinterface "Local Area Connection" mtu=XXXX store=persistent and press Enter. Replace «Local Area Connection» with the name of your network interface and «XXXX» with the MTU value you want to set.
Step 4: Confirm the Change
Double-check to make sure the change was successful.
Type netsh interface ipv4 show subinterfaces again and press Enter. Verify that the MTU value has been updated.
Step 5: Restart Your Computer
Finally, restart your computer to ensure the settings take effect.
After a reboot, your new MTU settings should be active. This step helps to solidify the changes made to your network configuration.
Once you have completed these steps, your network interface will operate with the new MTU value, which can lead to improved network performance and fewer connectivity issues.
Tips for Changing MTU on Windows 10
- Test different MTU values to find the optimal setting for your network.
- Always use the Command Prompt as an administrator to ensure you have the necessary permissions.
- Note down your original MTU settings before making any changes, so you can revert back if needed.
- If you experience issues after changing the MTU, try lowering the value incrementally.
- Use online tools or ping tests to determine the correct MTU value for your specific network.
Frequently Asked Questions
What is MTU?
MTU stands for Maximum Transmission Unit, and it determines the largest size of a data packet that can be sent over a network.
Why change the MTU?
Changing the MTU can help optimize network performance, reduce packet fragmentation, and resolve connectivity issues.
What is a typical MTU value?
The standard MTU value for Ethernet networks is usually 1500 bytes, but it can vary depending on the network.
How do I find the right MTU value?
You can use ping tests with the «don’t fragment» flag to discover the optimal MTU value for your network.
Can changing the MTU harm my computer?
Generally, no. However, setting an incorrect MTU value might cause connectivity issues. Always note down original settings before making changes.
Summary
- Open Command Prompt as Administrator.
- Find the Network Interface.
- Set the New MTU Value.
- Confirm the Change.
- Restart Your Computer.
Conclusion
By following these steps, you can change the MTU on Windows 10 and potentially improve your network performance. Whether you’re dealing with slow internet speeds, frequent disconnections, or other network-related issues, adjusting the MTU can make a notable difference. Always remember to note down your original settings, so you can easily revert back if needed.
Understanding your network settings is key to maintaining an efficient and fast internet experience. If you’re interested in learning more about network optimization, there are numerous resources available online to deepen your knowledge.
In the meantime, go ahead and give it a try. Sometimes a small tweak like adjusting the MTU can have a big impact on your day-to-day internet usage.
Matt Jacobs has been working as an IT consultant for small businesses since receiving his Master’s degree in 2003. While he still does some consulting work, his primary focus now is on creating technology support content for SupportYourTech.com.
His work can be found on many websites and focuses on topics such as Microsoft Office, Apple devices, Android devices, Photoshop, and more.
how to change mtu on windows 10
Changing the MTU (Maximum Transmission Unit) on Windows 10 involves a few straightforward steps that help optimize your network connection. MTU determines the maximum size of data packets sent over a network. To make this change, you’ll use Command Prompt with Administrator privileges to adjust the settings. Follow along for a step-by-step guide to fine-tuning your MTU for a better online experience.
Step by Step Tutorial for Changing MTU on Windows 10
In this section, you’ll learn how to change the MTU on your Windows 10 machine. Adjusting the MTU can help improve network performance, especially if you’re experiencing lag or connectivity issues.
Step 1: Open Command Prompt as Administrator
To begin, you’ll need to open the Command Prompt with elevated privileges.
Right-click on the Start button and select «Command Prompt (Admin)» or «Windows PowerShell (Admin)». This ensures you have the necessary permissions to modify network settings.
Step 2: Identify Current Network Adapter
Next, you need to identify the network adapter you want to change the MTU for.
Type netsh interface ipv4 show subinterfaces and press Enter. This command will display a list of all network adapters and their current MTU settings.
Step 3: Choose the Network Adapter
Find the name of the network adapter you want to change.
Look for the adapter that corresponds to your active network connection. Note down its name exactly as it appears.
Step 4: Change the MTU Setting
Now, you can modify the MTU setting for your selected adapter.
Type netsh interface ipv4 set subinterface "YOUR_ADAPTER_NAME" mtu=NEW_MTU_VALUE store=persistent, replacing «YOUR_ADAPTER_NAME» with the name of your adapter and «NEW_MTU_VALUE» with the desired MTU value. Press Enter to execute.
Step 5: Verify the Change
Finally, confirm the MTU value has been changed successfully.
Run the netsh interface ipv4 show subinterfaces command again. Check if the MTU value for your selected adapter has been updated.
After completing these steps, your network connection should be optimized according to the new MTU value. This can result in a smoother and more reliable online experience.
Tips for Changing MTU on Windows 10
- Experiment with different MTU values to find the optimal setting for your specific network.
- Common MTU values to try are 1500, 1492, and 1480.
- If you experience issues after changing the MTU, you can revert to the default value.
- Use online MTU optimization tools to determine the best MTU for your network.
- Remember to test your internet speed and connectivity after making changes.
Frequently Asked Questions
What is MTU?
MTU stands for Maximum Transmission Unit, which is the largest size of a packet that can be sent over a network.
Why would I need to change the MTU?
Changing the MTU can help improve network performance and reduce fragmentation, especially if you’re experiencing slow or unreliable connections.
How do I know what MTU value to use?
You can use online MTU optimization tools or perform a ping test with different MTU values to determine the best setting for your network.
Can changing the MTU cause any issues?
Yes, setting an incorrect MTU value can lead to network problems such as dropped connections or reduced speed. Always test after making changes.
How can I revert to the default MTU value?
Follow the same steps to change the MTU, but set the MTU value back to the default, which is usually 1500 for most network connections.
Summary
- Open Command Prompt as Administrator.
- Identify Current Network Adapter.
- Choose the Network Adapter.
- Change the MTU Setting.
- Verify the Change.
Conclusion
Changing the MTU on Windows 10 might seem like a daunting task, but it’s actually pretty simple once you get the hang of it. By following the steps outlined above, you can optimize your network connection for better performance. This could be the magic bullet you need to fix those annoying connectivity issues or lag during your most crucial online activities.
Remember, experimenting with different MTU values is key to finding the best setup for your specific network. And don’t worry if you don’t get it right on the first try; you can always revert to the default settings if needed.
For further reading, consider exploring more advanced network optimization techniques or consulting with your Internet Service Provider (ISP) for additional tips. Happy tweaking!
Kermit Matthews is a freelance writer based in Philadelphia, Pennsylvania with more than a decade of experience writing technology guides. He has a Bachelor’s and Master’s degree in Computer Science and has spent much of his professional career in IT management.
He specializes in writing content about iPhones, Android devices, Microsoft Office, and many other popular applications and devices.
Read his full bio here.
How to Change MTU on Windows 10 and Windows 11
12th January 2019
No Comments
Networks, Windows
admin
HOW TO CHANGE MTU IN WINDOWS 10 and WINDOWS 11
It often is observed that some websites don’t perform optimally on some Broadband Connections . When nothing else works, It can be fixed by adjusting your MTU . Please see the below steps to change MTU
Lets see HOW TO CHANGE MTU IN WINDOWS 10
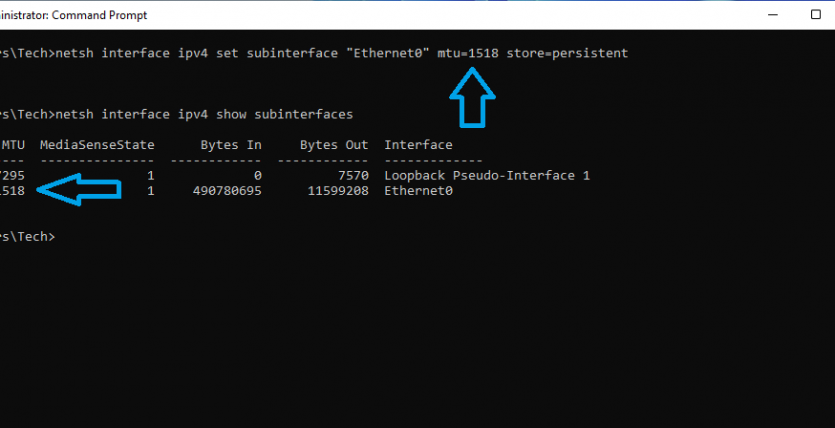
- Open a command prompt as administrator. You can do this by Hitting Windows start button, type CMD, right click on command prompt and run as administrator
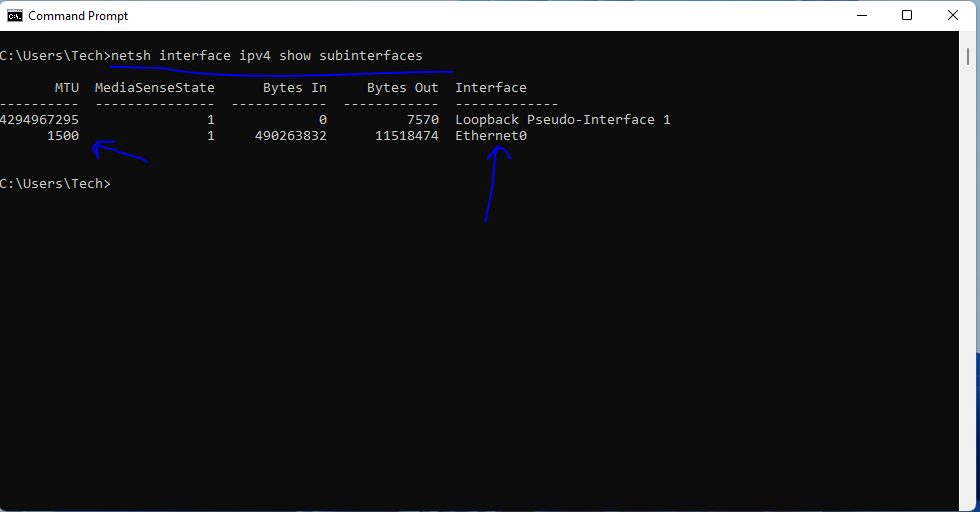
- type the command netsh interface ipv4 show subinterfaces
- The Output will show as below listing your Interfaces and MTU Size currently.
- Note Down the interface name as we will need it in next command to change the MTU size , Ethernet0 in above Example.
- In the next command substitute Ethernet0 with your interface name and new MTU size of 1518.
- netsh interface ipv4 set subinterface “Ethernet0” mtu=1518 store=persistent

That’s it, As you can see in image above, we can now see the MTU has changed.
You can either Increase or Decrease your MTU to see what works in your case.
This command works on Windows 10 and Windows 11 Both.
What is MTU
For those who are more Curious , maximum transmission unit (MTU) is a measurement representing the largest data packet that a network-connected device will accept. Lets put it like a height limit for freeway underpasses or tunnels: Vehicles that exceed the height limit cannot fit through, just as packets that exceed the MTU of a network cannot pass through that network.
However, unlike cars and trucks, data packets that exceed MTU are broken up into smaller pieces so that they can fit through. This process is called fragmentation. Fragmented packets are reassembled once they reach their destination.
MTU is measured in bytes — a “byte” is equal to 8 bits of information, meaning 8 ones and zeroes. 1,500 bytes is the maximum MTU size.
Let us know in comments if this article helped you or if you have additional questions
Tags
About The Author