
Если текущая скорость перемещения указателя мыши или, иначе — чувствительность мыши в Windows отличается от удобной для вас, её можно настроить, используя встроенные параметры системы, а для некоторых устройств — сторонние программы.
В этой пошаговой инструкции для начинающих подробно о том, как настроить чувствительность мыши в Windows 11 и Windows 10 в Параметрах и Панели управления, а также кратко о фирменных утилитах от производителей, которые также позволяют уменьшить или увеличить её.
Как изменить чувствительность мыши в Параметрах
Первый способ настройки чувствительности мыши — использования интерфейса «Параметры». В Windows 11 шаги будут следующими:
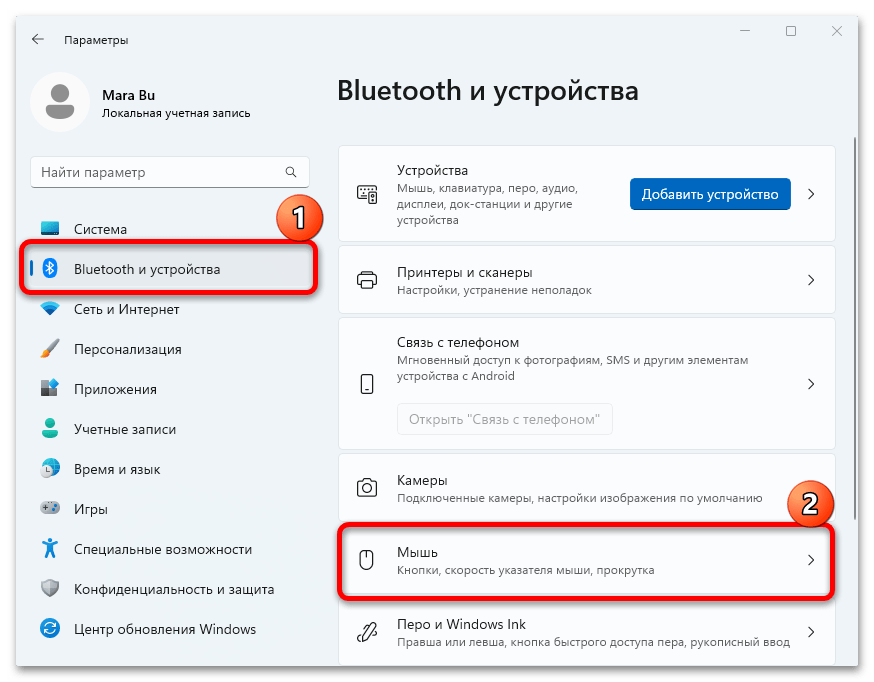
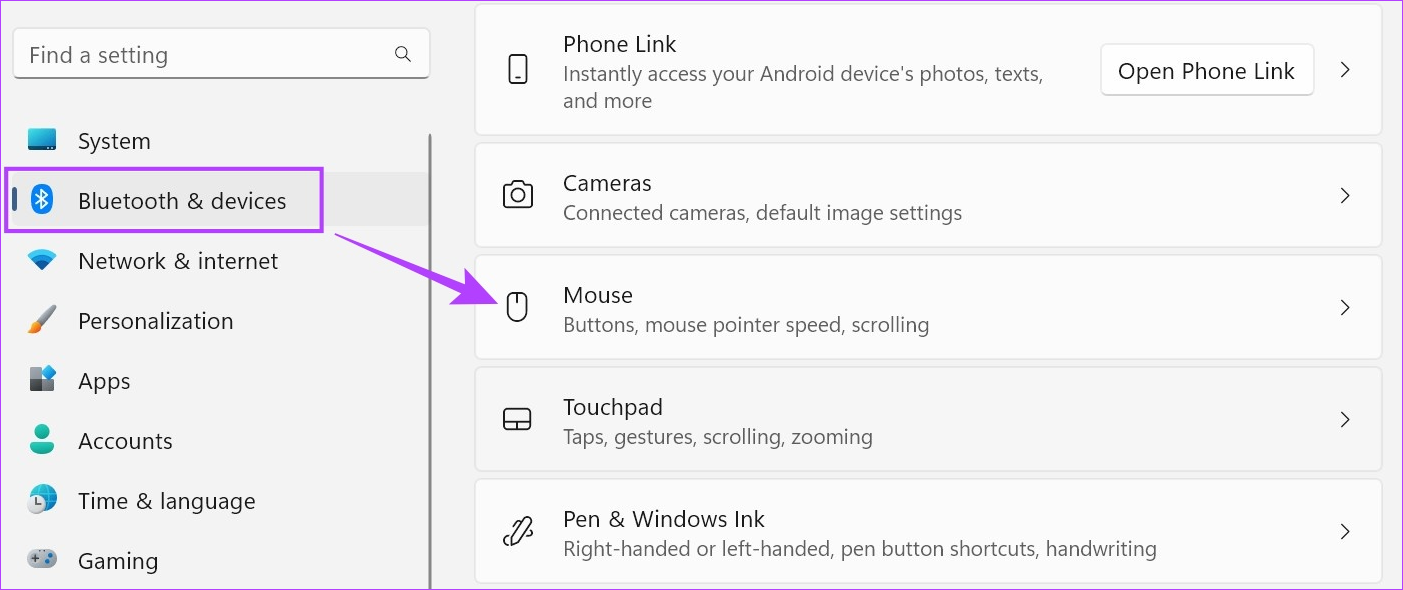
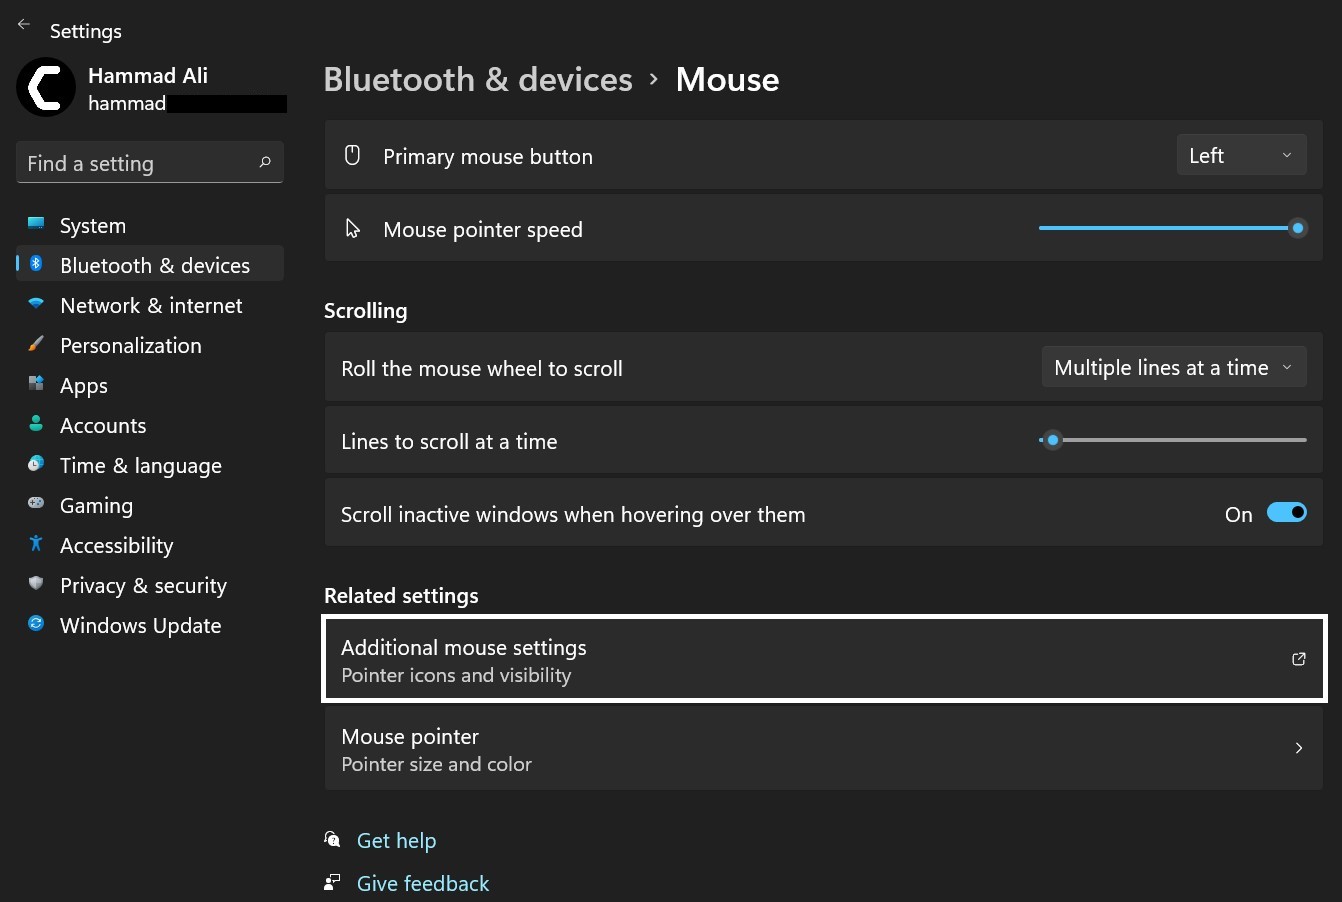
- Откройте Параметры (можно нажать клавиши Win+I), а в них — раздел «Bluetooth и устройства».
- Откройте пункт «Мышь».

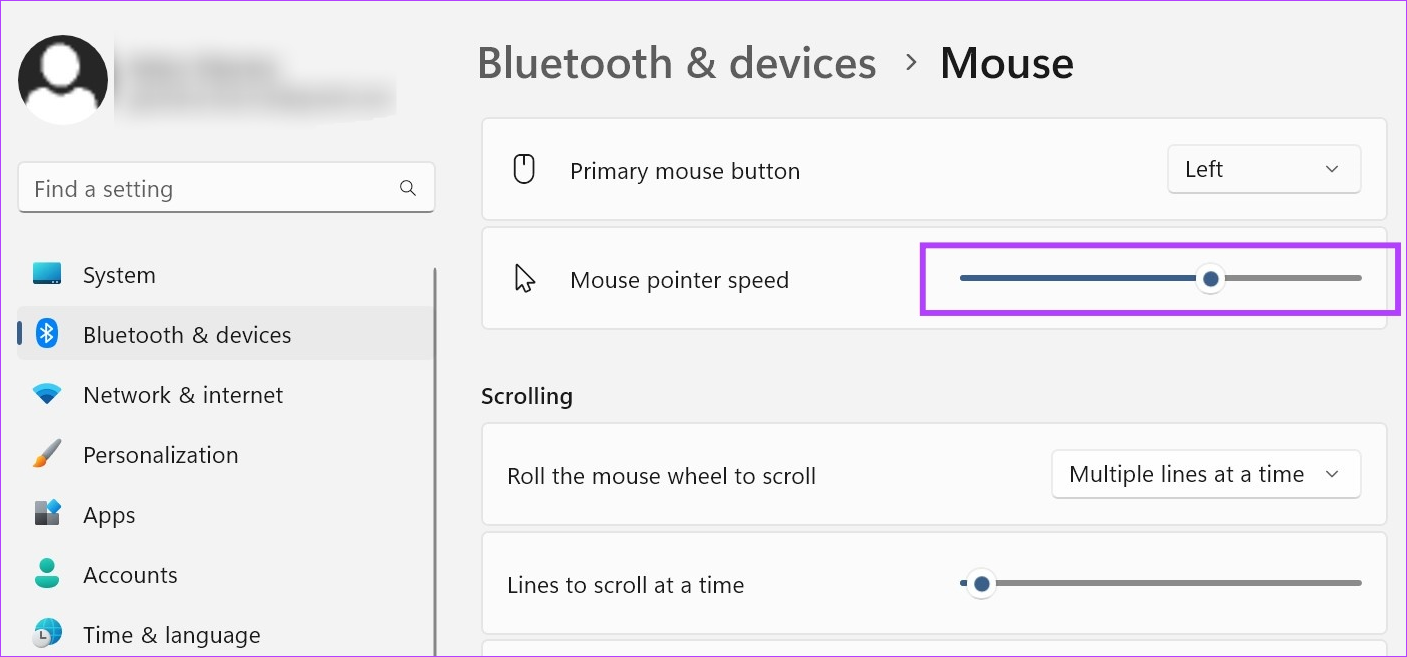
- Измените «Скорость указателя мыши», передвигая ползунок мышью. При желании ниже вы также можете изменить скорость прокрутки страниц колесиком.


В Windows 10 действия очень похожи:
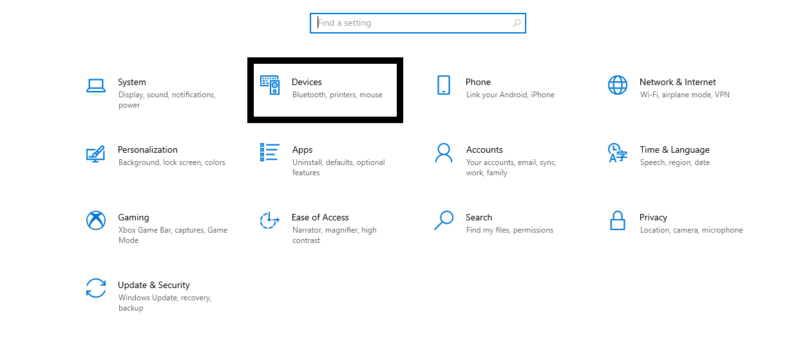
- Откройте «Параметры» и перейдите в раздел «Устройства».
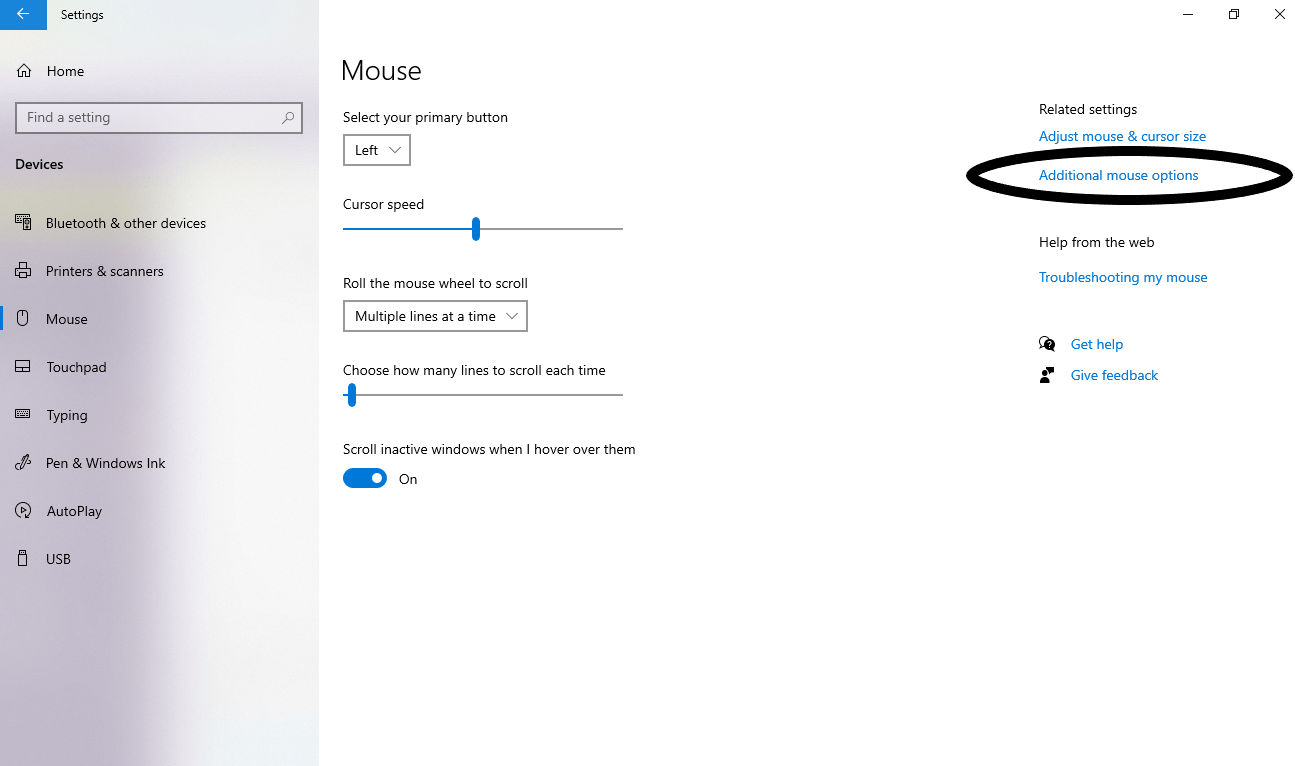
- В списке слева выберите пункт «Мышь».
- Измените значение «Скорость курсора», передвигая его вправо для увеличения скорости или влево для её уменьшения.


Настройка скорости указателя мыши в Панели управления
Второй способ — настройка чувствительности мыши в Панели управления:
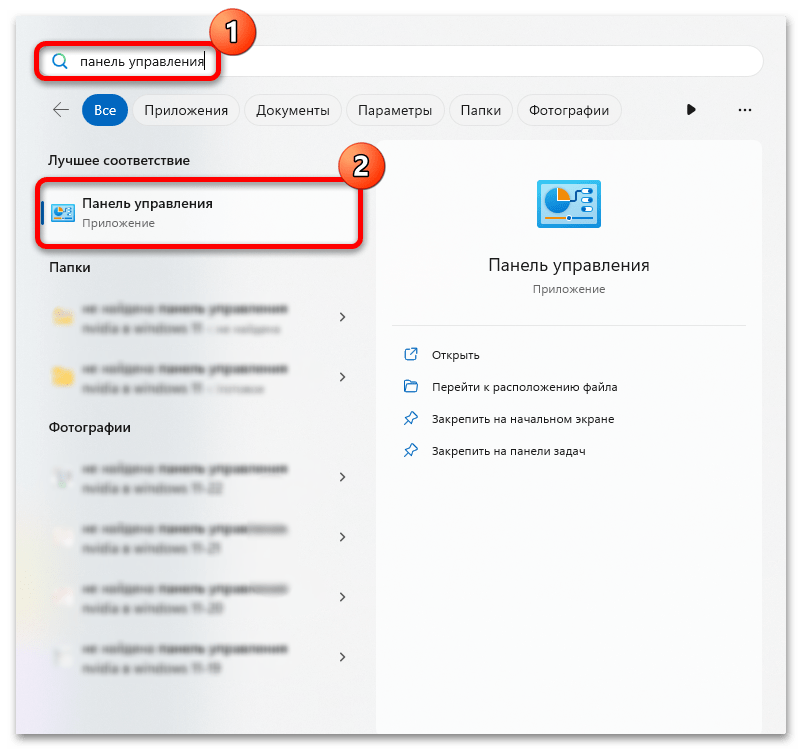
- Откройте Панель управления. Для этого можно использовать поиск на панели задач. Подробнее: Как открыть панель управления Windows 11, Как открыть панель управления Windows 10.
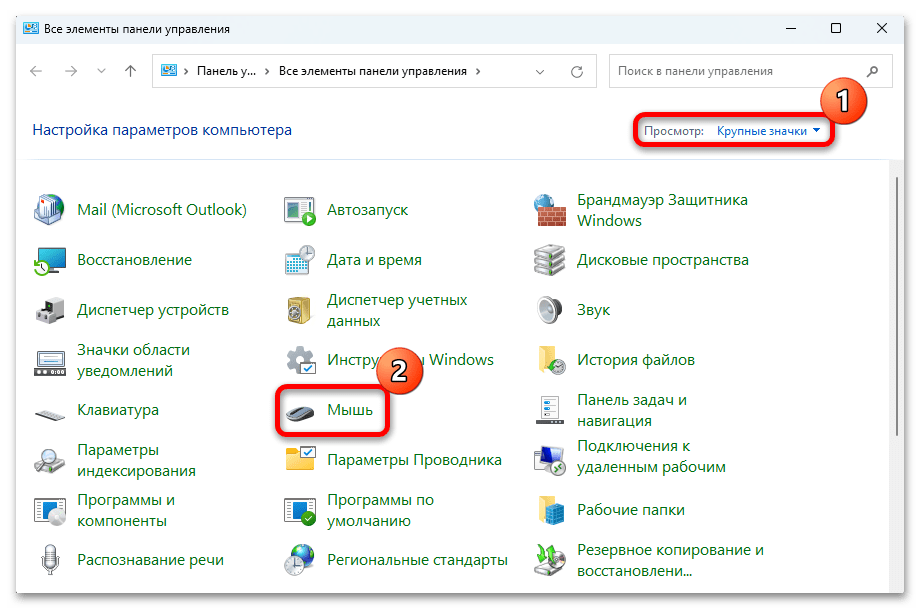
- Убедитесь, что в поле «Просмотр» панели управления установлено «Значки» и откройте пункт «Мышь».

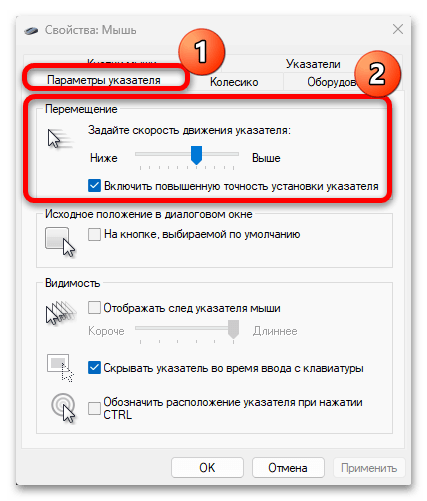
- В следующем окне перейдите на вкладку «Параметры указателя» и задайте скорость движения указателя — ниже или выше.

- Примените настройки


Выполняемые изменения применяются сразу, то есть после каждого изменения чувствительности, ещё до их применения, вы можете проверить, подходят ли они вам.
Программы с возможностью изменения чувствительности мыши
Описанные выше методы изменения чувствительности мыши — это всё, что может предложить Windows 11 и Windows 10, если говорить о встроенных средствах системы.
Однако, для многих «продвинутых» мышей, особенно игровых, производители выпускают собственные бесплатные программы для настройки, позволяющие настраивать чувствительность и другие параметры мыши, например:
- Logitech G Hub для игровых мышей Logitech, или Logitech Options для «обычных» мышек
- Razer Synapse
- SteelSeries Engine
- Corsair iCUE
- Центр управления мышью и клавиатурой для устройств Microsoft
Обычно такое ПО доступно на официальном сайте производителя вашей мыши в разделе «Поддержка», а в некоторых случаях скачивается и устанавливается Windows автоматически.
Все способы:
- Способ 1: Штатные «Параметры»
- Способ 2: «Панель управления»
- Способ 3: Кнопка DPI
- Способ 4: Сторонний софт
- Вопросы и ответы: 0
Способ 1: Штатные «Параметры»
Наиболее популярный способ у пользователей Windows 11 изменения чувствительности мыши – это возможности штатных «Параметров». Здесь располагаются все важные настройки, касающиеся указателя.
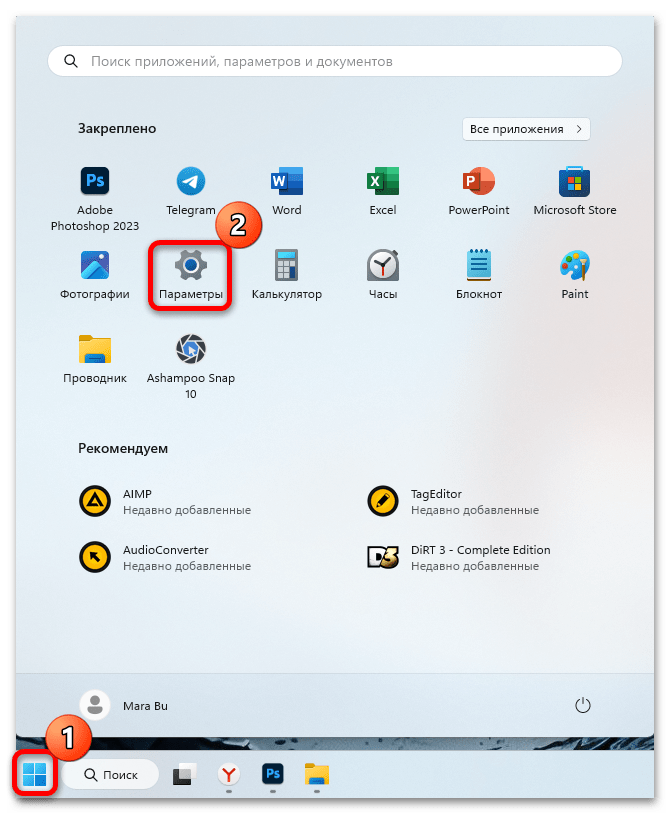
- Нажмите на кнопку «Пуск» и выберите значок в виде шестерни, чтобы запустить «Параметры».
- Переключитесь на вкладку «Bluetooth и устройства», затем выберите раздел «Мышь», располагающийся в центральной части окна.
- Далее с помощью ползунка можно выставить значение чувствительности мыши – его перетаскивание влево замедляет курсор, а вправо – увеличивает скорость. Настройки применяются мгновенно, то есть вы сразу поймете, достаточная ли чувствительность у указателя.

Еще в этом окне можно выставить значение для колесика мыши, а также здесь есть ряд дополнительных настроек, в том числе параметры прокрутки и указателя мыши (цвет, размер и другое).
Способ 2: «Панель управления»
В Windows 11 все еще есть классическая «Панель управления», которая в ранних выпусках операционной системы была основным инструментом для управления параметрами ОС и подключенного оборудования. Если по каким-то причинам способ с «Параметрами» не подходит, можете воспользоваться инструкцией ниже:
- С помощью строки системного поиска отыщите и запустите «Панель управления».
- Выберите отображение разделов как мелкие или крупные значки – это упростит переход к настройкам указывающего устройства, поскольку в окне отобразится пункт «Мышь».
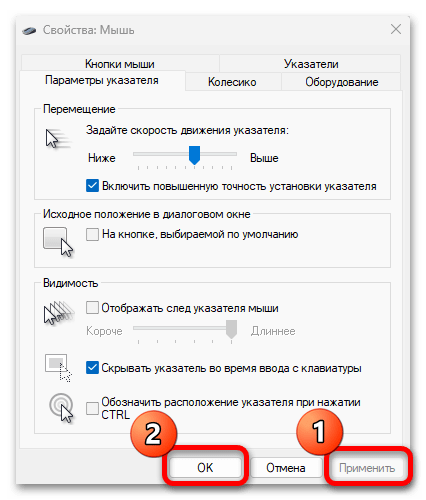
- В открывшемся окне перейдите на вкладку «Параметры указателя», затем в блоке «Перемещение» настройте чувствительность мыши с помощью ползунка. Также доступен дополнительный параметр – «Включить повышенную точность установки указателя». Он задействует специальный режим, который увеличивает точность смещения курсора, особенно при его перемещении на незначительные расстояния.
- Чтобы проверить чувствительность мыши, нажмите на кнопку «Применить». Если настройка устраивает, тогда подтвердите ее, кликнув по «ОК».
В окне со свойствами мыши также доступно большое количество настроек, которое превышает на данный момент возможности «Параметров», в частности изменение поведения кнопок мыши, указателя, колесика и оборудования в целом.
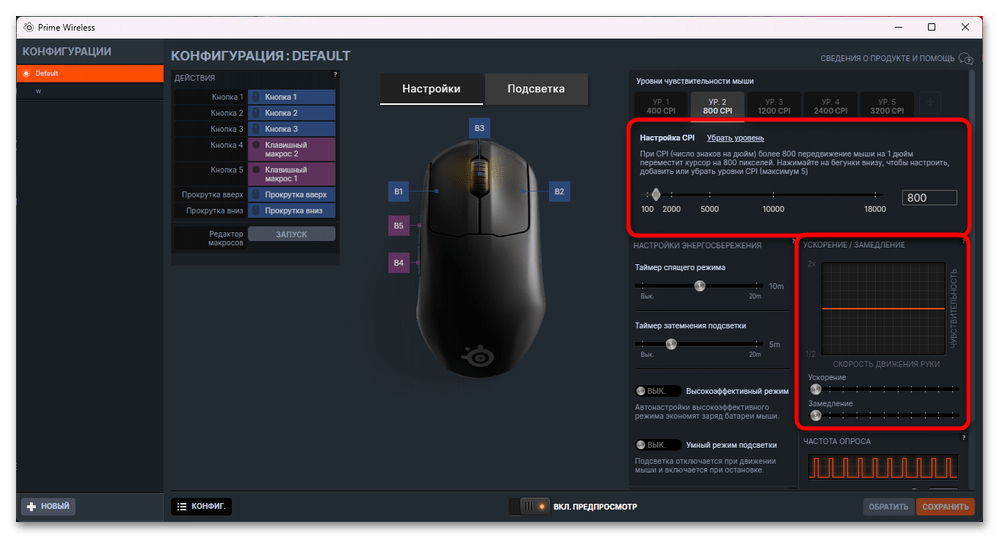
Способ 3: Кнопка DPI
Некоторые современные компьютерные мыши оснащаются специальной кнопкой – DPI. Она может располагаться на верхней части корпуса (около колесика) или сбоку. Кнопка предназначается для регулировки чувствительности устройства. Как правило, нажатие на нее увеличивает скорость курсора, а чтобы его уменьшить, придется нажимать на нее столько раз, чтобы перешагнуть максимальную чувствительность.
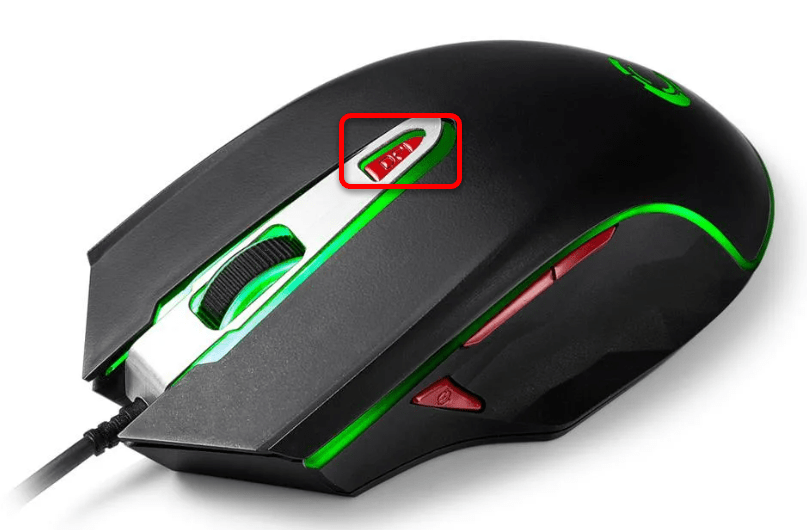
Изучите свою мышь и проверьте, есть ли дополнительные кнопки на ней. Также подробную информацию можно найти на официальном сайте производителя, указав модель устройства, или в техническом паспорте, который обычно поставляется в комплекте.
Способ 4: Сторонний софт
Для настройки мыши применяются и программы как от сторонних разработчиков, так и от производителей периферийных устройств (обычно это игровые мыши). Как правило, через такой софт назначаются клавиши, устанавливаются драйверы и настраиваются другие параметры, в том числе чувствительность.
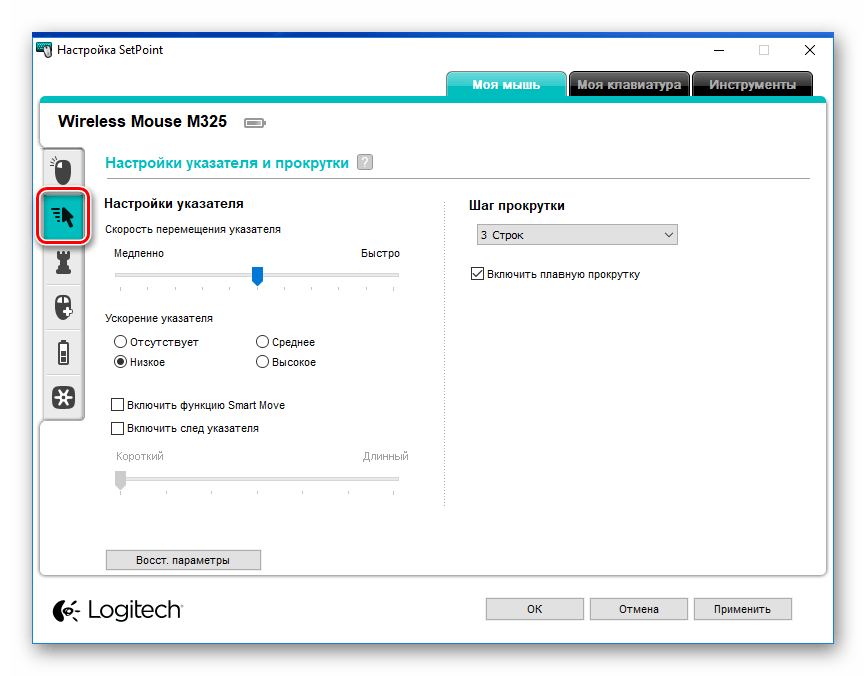
Например, у компании Logitech есть несколько фирменных утилит, с помощью которых настраивается скорость перемещения курсора и сам указатель с прокруткой. Для офисных это один софт.
Подробнее: Как настроить чувствительность мыши через Logitech SetPoint
Для игровых — другой.

Набор функций зависит от производителя. Например, в драйвере для мышек SteelSeries есть более гибкая настройка ускорения и замедления. Также у приложений для игровых девайсов есть настройка DPI, позволяющая настроить на кнопку, о которой шла речь в Способе 3, свои показатели и ускорять/замедлять ее так, как нужно вам.
Также можно воспользоваться сторонними решениями, например простой утилитой Mouse Speed Switcher, которая позволяет изменить скорость курсора, причем, если настраивать периферию на ноутбуке, изменить интересующий показатель можно только для мыши, а чувствительность тачпада останется неизменной. Кроме того, через программу можно создавать до 10 пресетов и быстро переключаться между ними в зависимости от выполняемой на компьютере работы.
Скачать Mouse Speed Switcher с официального сайта
- Нажмите на кнопку выше, чтобы перейти к скачиванию утилиты. Загрузите и инсталлируйте ее, следуя инструкциям пошагового мастера.
- Интерфейс утилиты состоит из одного основного окна. С помощью ползунка выберите значение для чувствительности («Slow» — низкая, «Fast» — высокая). Затем нажмите на «Apply» для применения, и, если все в порядке, то кнопку «ОК», чтобы сохранить настройки.

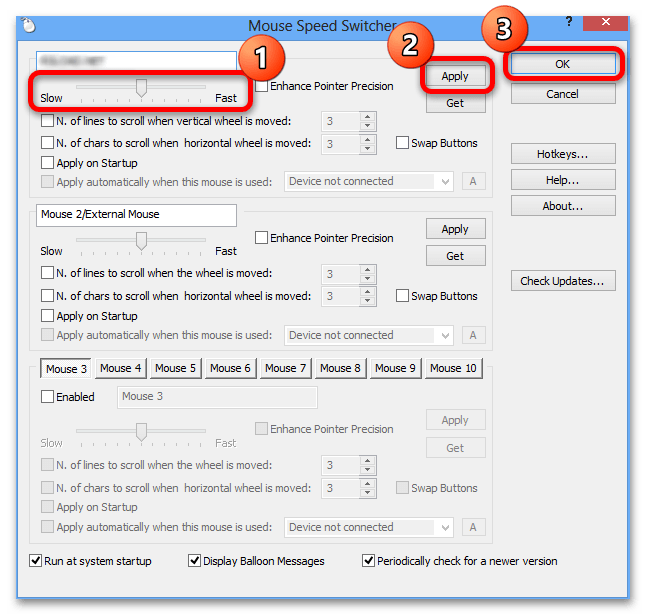
Чувствительность мыши можно задавать разную в отдельных пресетах или для различных указывающих устройств – главное указать их в соответствующих полях. Стоит отметить, что Mouse Speed Switcher платная (с триальным периодом), но при этом отличается удобством, простотой и нетребовательностью к ресурсам.
Наша группа в TelegramПолезные советы и помощь
Quick Tips
- Open Settings > Bluetooth & devices > Mouse > Mouse pointer speed bar to increase or decrease mouse sensitivity.
- Open Mouse Settings > Roll the mouse wheel to scroll drop-down > select the relevant scrolling setting.
- Go to Mouse Settings > Additional mouse settings > Pointers > Scheme drop-down > select relevant theme > Apply and OK.
Method 1: Increase or Decrease Mouse Sensitivity
Sensitivity in a mouse can be anything, from how fast it moves across the screen to how fast it reacts when double-clicking. For different users, different mouse sensitivity levels can be set according to their preferences. Here’s how to do it.
Step 1: Open Settings and click on Bluetooth & devices. Then, click on Mouse.
Step 2: Use the Mouse pointer speed bar to increase or decrease mouse sensitivity.
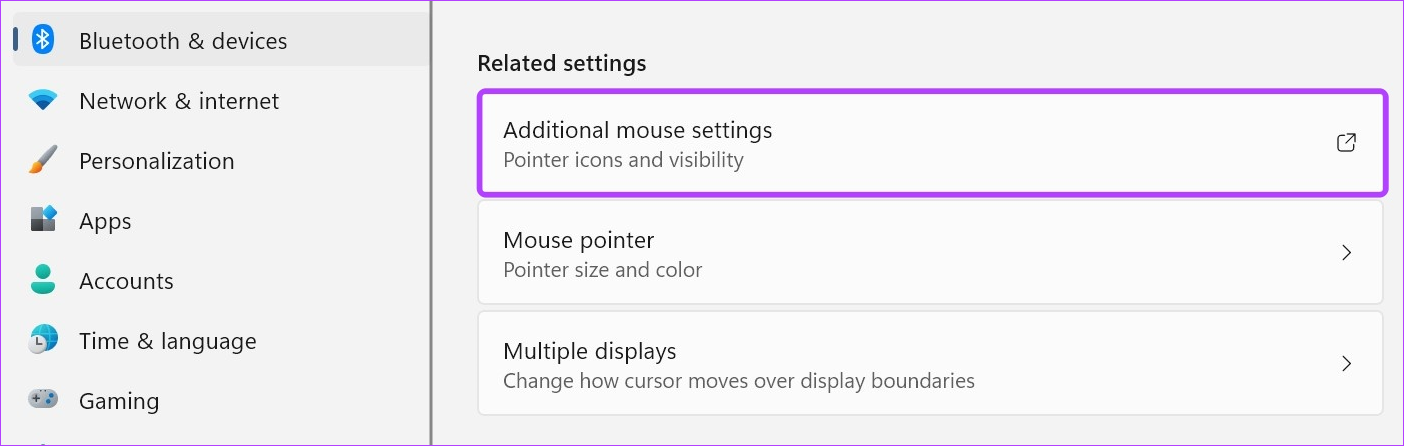
Step 3: Then, scroll down to the Related settings section and click on Additional mouse settings.
Step 4: Here, go to Double-click speed and use scale to increase or decrease the double-click speed.
Step 3: Once done, click on Apply and OK.
This will close the window and change the double-click response time for your mouse accordingly.
While scrolling up and down on a page might not seem like a major thing, it becomes an important feature when you’re scrolling through pages and would like the scroll speed to be a little fast or slow. This can also be helpful if you’re using an external mouse. Here’s how to do it.
Step 1: Open Settings → Bluetooth & devices → Mouse.
Step 2: Click on the Roll the mouse wheel to scroll drop-down and select the relevant scrolling setting.
Note: Selecting the One screen at a time option will automatically disable the Lines to scroll at a time option.
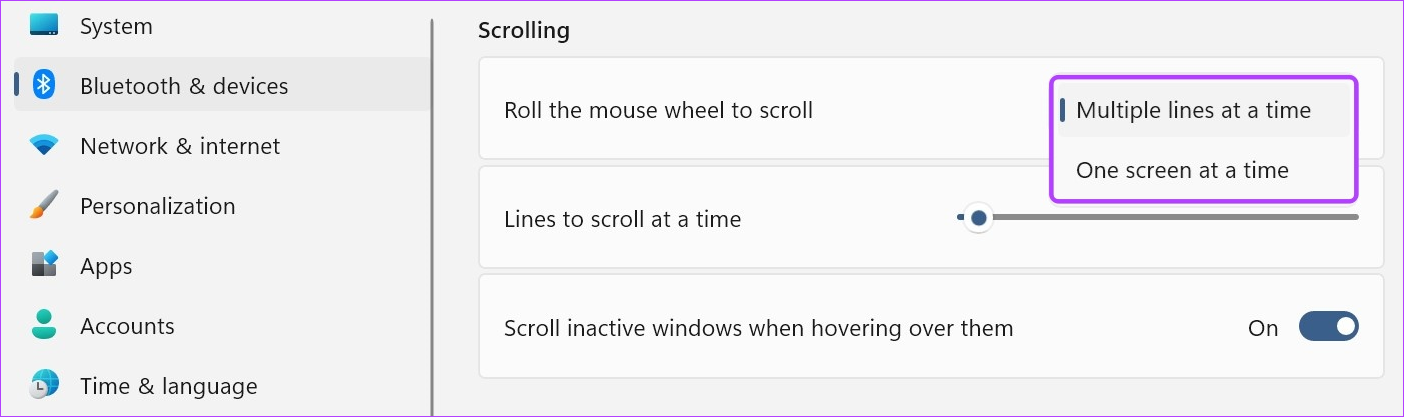
Step 3: Use the Lines to scroll at a time bar to select the relevant scrolling configuration.
Step 4: Turn on the Scroll inactive windows when hovering over them toggle.
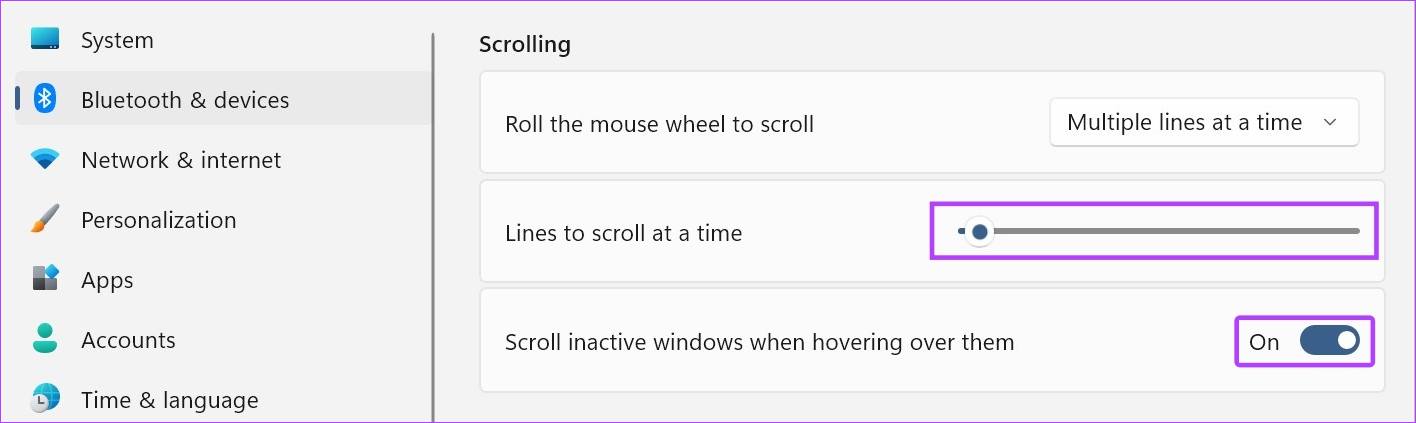
This will allow you to increase the mouse scrolling speed and to scroll through inactive windows just by hovering over them.
Method 3: Use a Different Cursor Scheme
The classic white mouse cursor with a black outline is a staple across most Windows devices. However, this can get a little monotonous after a while. So, to make your mouse’s cursor more fun, here’s how you can adjust mouse settings using pre-fed cursor schemes in Windows 11.
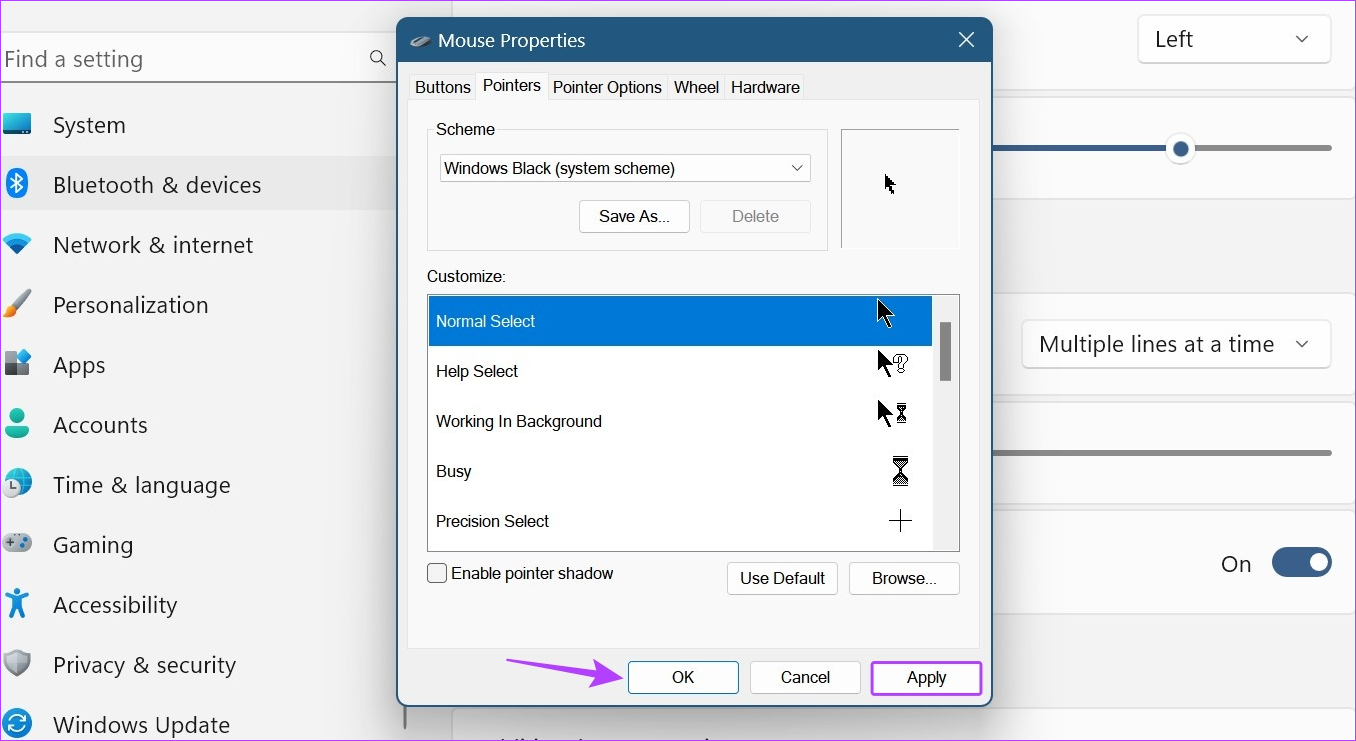
Step 1: Open Settings → Bluetooth & devices → Mouse. Click on Additional mouse settings.
Step 2: From the menu options, click on Pointers.
Step 3: Use the Scheme drop-down to select the relevant cursor scheme.

Step 4: Once done, click on Apply and OK.
Also Read: How to use mouse without borders using PowerToys on Windows
Method 4: Enable or Disable Cursor Trails
Once activated, a trail comprising your mouse’s icon will follow the icon around the screen. It is an excellent accessibility feature that can help you track where your mouse pointer is at any given time. Follow the below steps to enable mouse cursor trails on your Windows device.
Step 1: Open Settings → Bluetooth & devices → Mouse → Additional mouse settings.
Step 2: From the menu options, click on Pointer Options. Check the Display pointer trails option.
Step 3: Then, increase or decrease the pointer trail by dragging the slider to either end.

Step 4: Check the Hide pointer while typing option to hide the mouse cursor once you start typing.
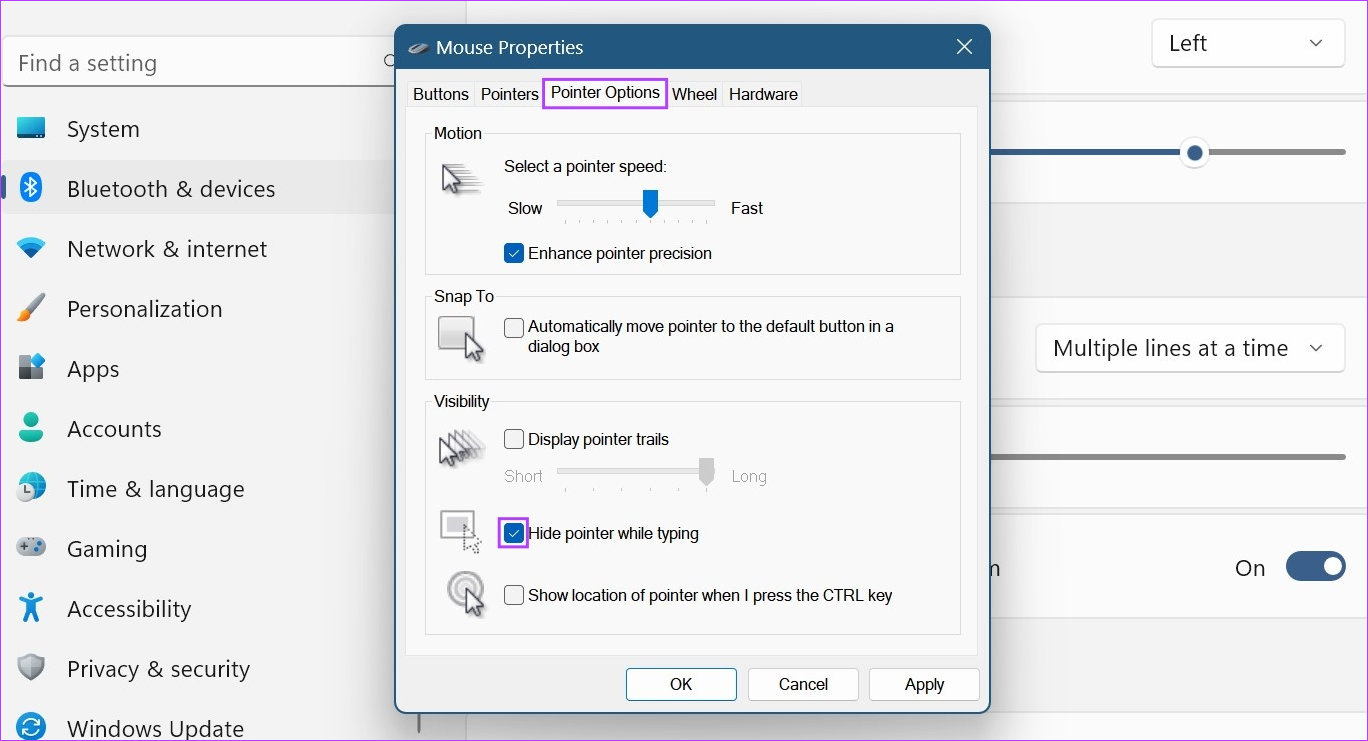
Step 5: Then, click on Apply and OK.
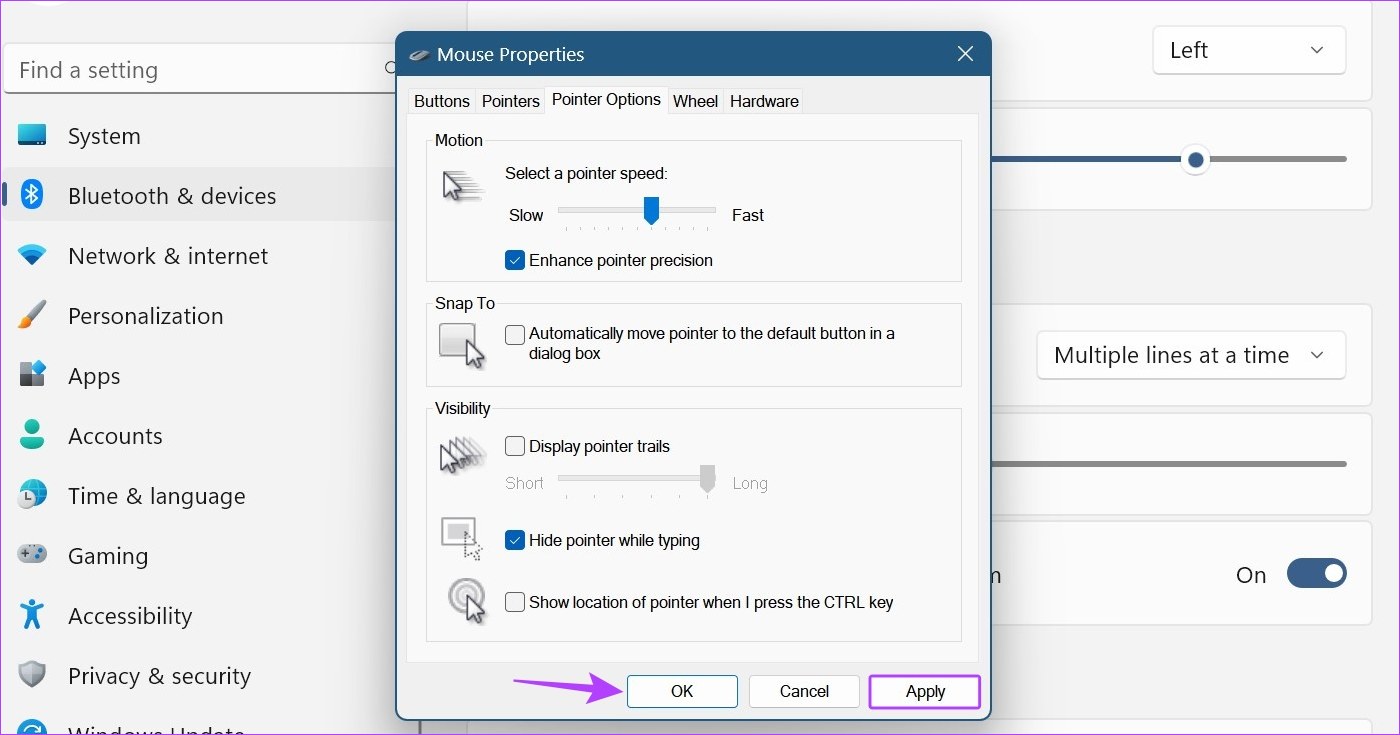
This will save the changes to your mouse cursor’s appearance and behavior accordingly. You can also uncheck the Display pointer trails option to disable pointer trails in Windows 11.
Tip: If you want to further change the appearance of your mouse cursor, you can also change the cursor size and text color on Windows 11.
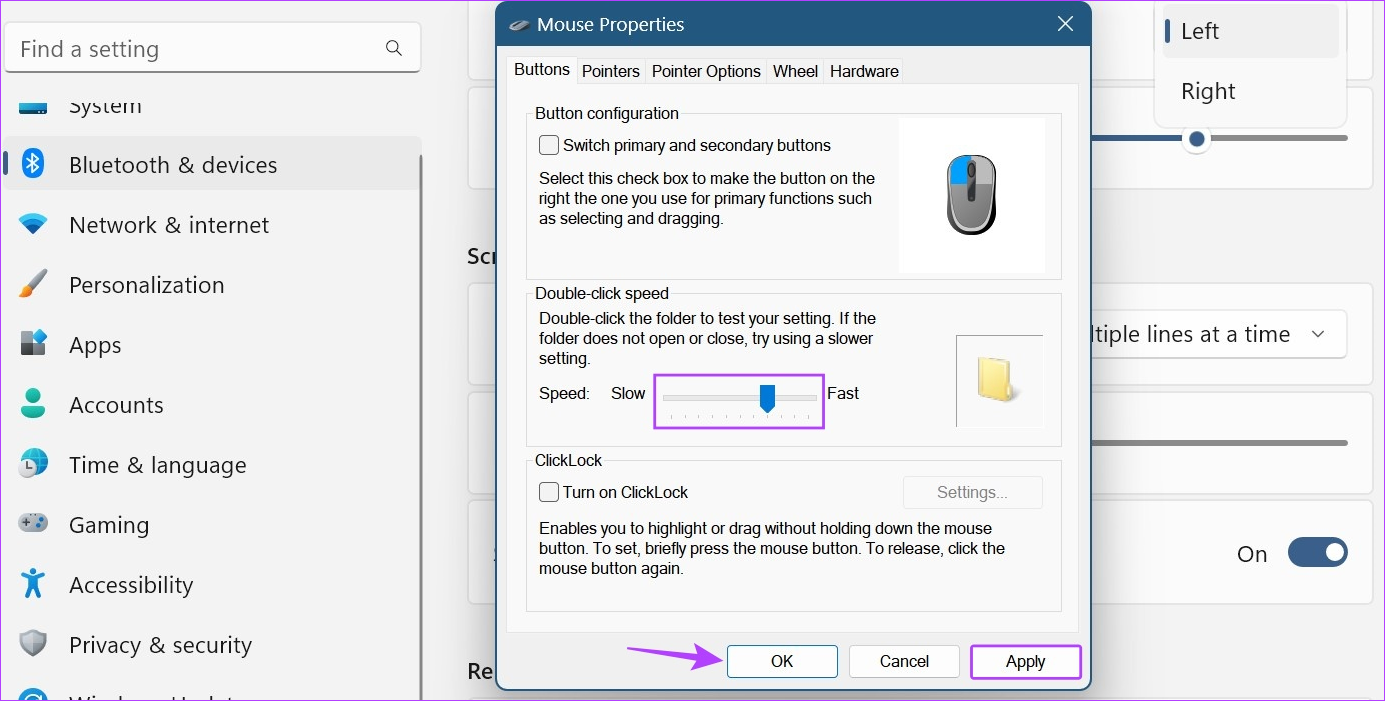
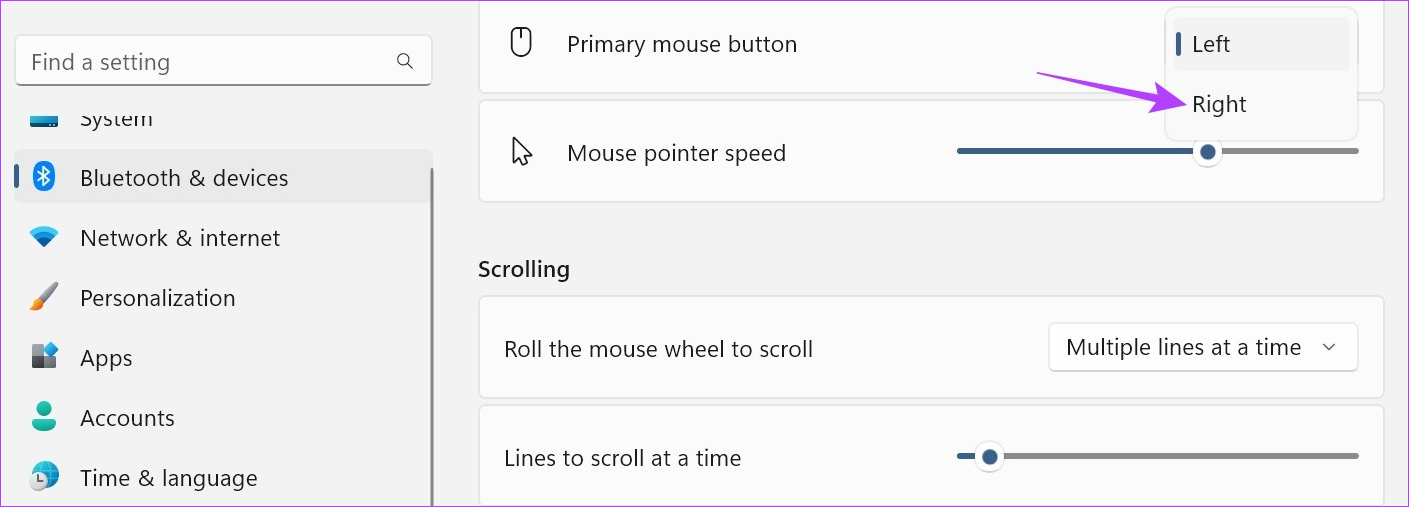
Method 5: Change the Mouse Button Configuration
Certain users who are either ambidextrous or left-handed might experience difficulty when using the mouse configuration meant for right-handed individuals. You can consider changing the layout of the primary mouse button and see if it helps in making your browsing experience better. Here’s how.
Step 1: Open Settings → Bluetooth & devices → Mouse. Click the Primary mouse button drop-down.
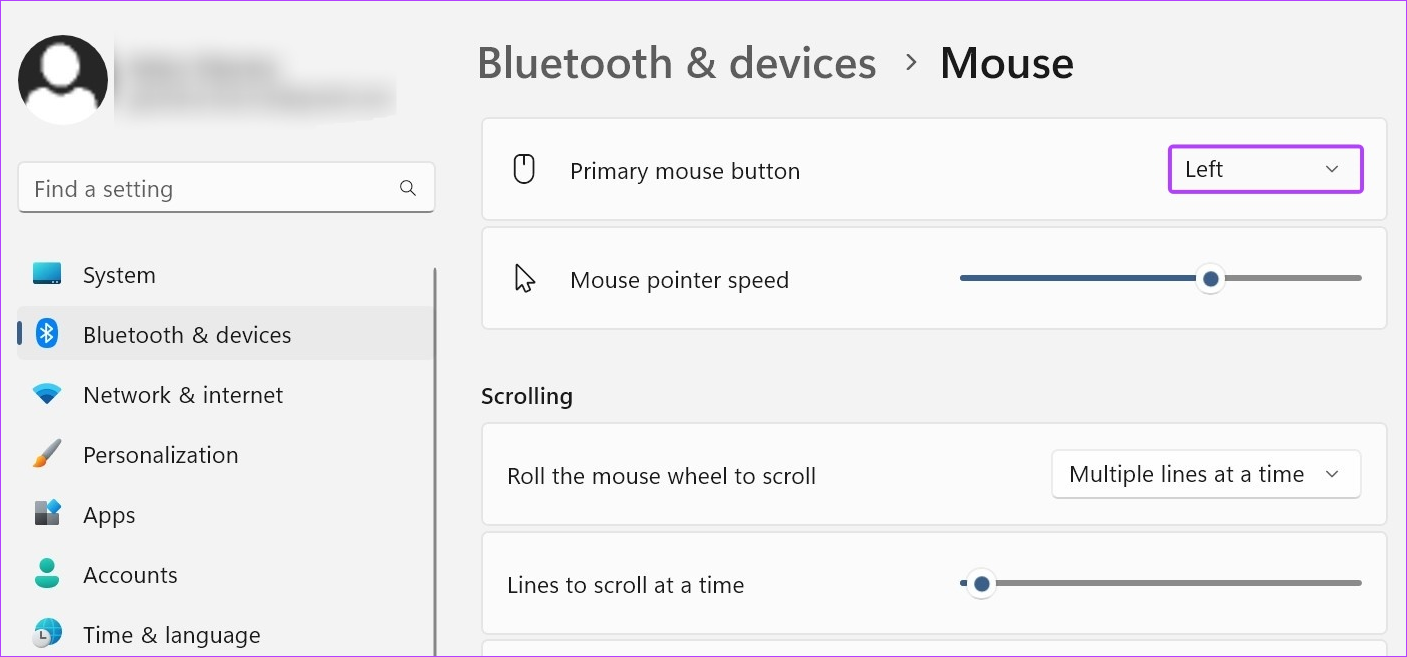
Step 2: Select the relevant side for your primary mouse button.
When mapping the mouse button to make other changes, like getting the scroll wheel to left-click or right-click, ensure an external mouse is connected. However, if you’re unable to map your mouse button using the above steps, use the Mouse Properties window for more settings options. Here’s how.
Step 3: Go down to the Related settings section and click on Additional mouse settings.
Step 4: Check the Switch primary and secondary buttons option.
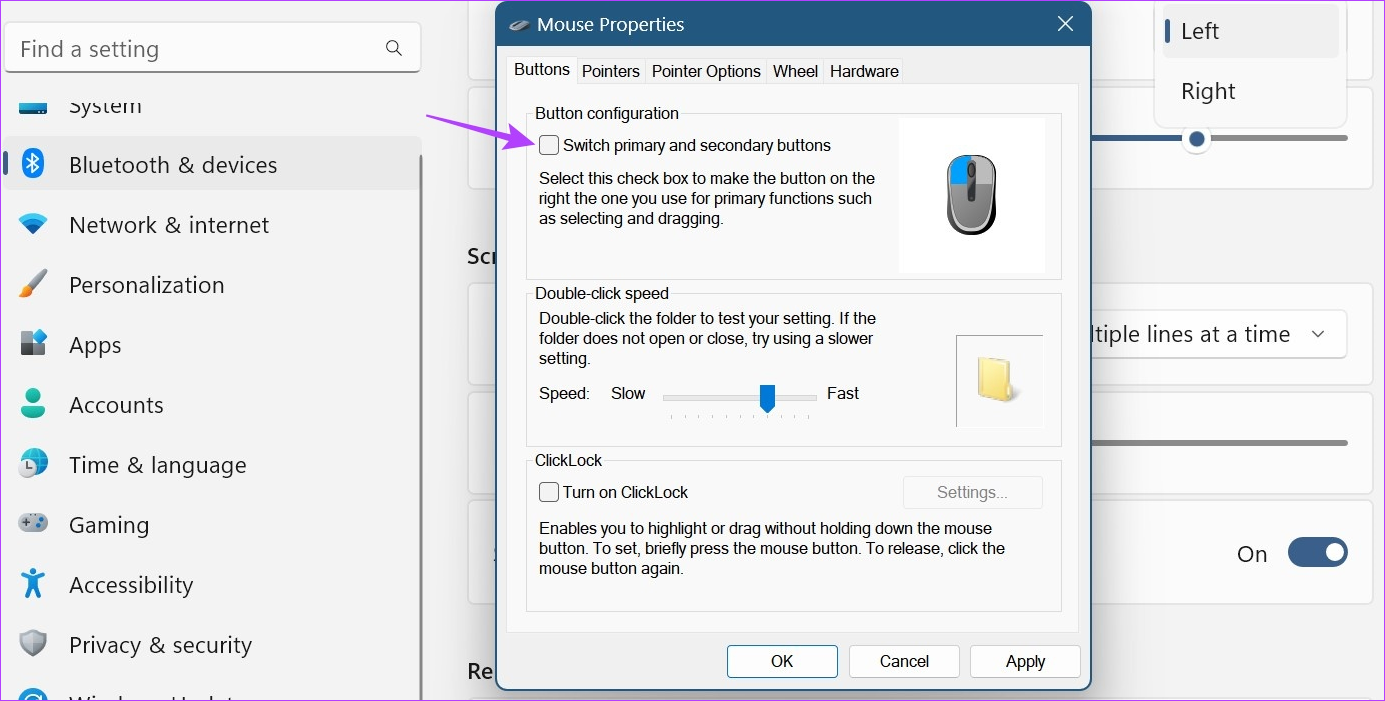
Step 5: Click on Apply and OK to save the changes.

This will switch the current primary button configuration on your mouse, allowing you to use it easily in a left-handed configuration.
FAQ
1. Can you reset the mouse settings in Windows 11?
Open Settings → Bluetooth & devices → Mouse → Additional mouse settings. From the menu, select Pointers → click on Use Default → click on Apply and OK to save the changes. This will change the mouse cursor’s settings back to default. For any other setting change, follow the above steps and make the relevant changes.
Was this helpful?
Thanks for your feedback!
The article above may contain affiliate links which help support Guiding Tech. The content remains unbiased and authentic and will never affect our editorial integrity.
Readers help support Windows Report. We may get a commission if you buy through our links.
Read our disclosure page to find out how can you help Windows Report sustain the editorial team. Read more
The latest OS is pretty impressive and it seems like users are more and more excited about its new capabilities. Convince yourself by checking the Windows 11 new features and our related update tips.
However, it comes with some predefined settings, which do not always fit people’s necessities. So, Microsoft fans are wondering what are the best ways to customize Windows 11’s mouse settings.
There are lots of ways to make your device interact better with your PC, and this article will present the best ones.
If you want to increase your level of productivity even more besides tweaking settings, you can always invest in a great mouse designed for multitasking.
Also, they are straightforward to use, so do not worry about not being prepared.
What mouse settings can I change?
1. The pointer speed
This one refers to the Windows option that scales individual counts from the mouse to on-screen cursor movement. Also known as Mouse Sensitivity, the pointer speed’s level can be changed whenever you need it.
Each Windows OS has multiple mouse sensitivity levels, so you’ll always be able to adjust them according to your needs.
2. Scrolling design
The mouse scroll wheel powers the scrolling design, and this is one of the most used features. It allows you to move from side to side for horizontal scrolling.
Along with the regular left and right buttons, each device should have such a button, and you can adjust its settings just as needed.
3. Visibility
The visibility of your mouse is how it’s shown on your screen. With Windows 11 improvements, you have a few exciting and easily adjustable options.
You can choose how to display pointer trails (short way or long way), whether or not you want to hide the pointer while typing, or whether or not you want to show the location of the pointer when pressing the CTRL-key.
How can I easily change Mouse Settings in Windows 11?
- Press simultaneously Windows + I.
- Go to Bluetooth & devices, then navigate to Mouse.

- Look at the Mouse pointer speed option, then adjust the slider according to your needs.


2. Customize Scrolling Options
- Open again the Settings menu by pressing simultaneously Windows + I.
- Click on Bluetooth & devices section, then navigate to Mouse.
- From this page, you can also choose to adjust the Scrolling settings.
- In these terms, consider the following options: Roll the mouse wheel to scroll (where you can choose from Multiple lines at a time or One screen at a time), adjust the Lines to scroll at a time slider, enabe or disable the Scroll inactive windows when hovering over them option.

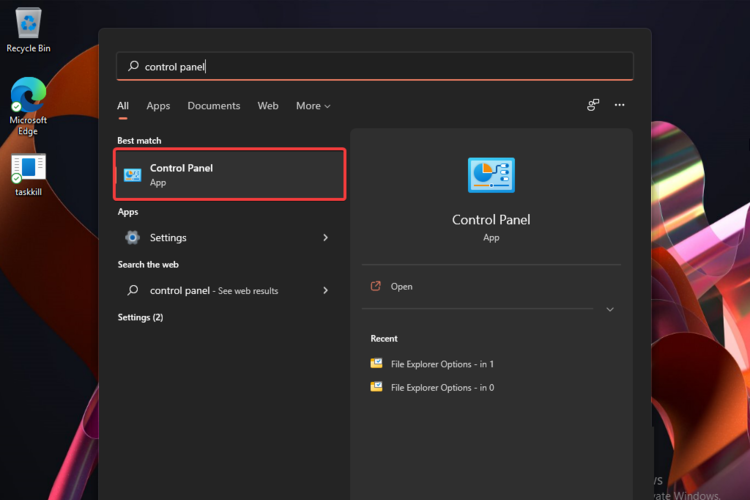
3. Adjust Pointer Options through Control Panel
- Hit the Windows key, then type Control Panel, and open it.
- Navigate to the Hardware and Sound section.
- Look at the Devices and Printers section, then click on Mouse.
- Click on the Pointer Options tab.
- Here, you can adjust certain specifications, such as Motion or Visibility.
- Click on the Apply button, then on OK.


4. Personalize Mouse Buttons with Control Panel
- Follow the first 3 steps as in the previous solution.
- In the Mouse Properties window, instead of Pointer Options tab, select the Buttons one.
- Here, you’ll find three more options: The Button configuration (which allows you to switch the primary and secondary buttons), the Double-click speed and the ClickLock.
- After you made the changes, click on Apply, then on Ok.


5. Use a third-party software
While most products support their mice with default software, some others are more generic or might come from a manufacturer that hasn’t made its own software.
If you have a device like this, you’ll need another way to change and customize your Windows 11 mouse settings. And why is that? Because Windows doesn’t have any built-in options to do it.
There are plenty of available tools that will help you to easily adjust these options. However, producers are now preparing the latest versions, so you’ll have to wait a bit more to get one of these.
Make sure you constantly keep an eye on our content to find the latest news in this regard.
- Recent Windows 11 update lets you disable profanity filter in voice typing
- Microsoft wants Windows 10 users to upgrade to Windows 11 or Copilot + PCs
- Windows 11 KB5055627 update makes File Explorer more fluid
What are the most common mouse problems?
- Too slow or fast movement cursor – This can occur due to improper settings or random bugs. It can be easily solved with the Control Panel support or updating the related drivers. If you’re not sure how to keep them up to date, we recommend using a dedicated driver updating tool.
- Mouse cursor gets freezed – Your mouse cursor could also totally stop working. This usually happens due to an extra load of PCs.
- Double-click issue – This issue refers to too quick or slow mouse double-clicking. You can quickly adjust it using the Double-click speed option (from the Control Panel) listed above.
- Uncommon behaviour of Mouse Pointer – Another common issue in mice is the malfunction of the cursor like failing to lock to the game. The main reasons that can explain this issue are unsuitable mousepad or sensor area filled with dirt.
So here you are, having an easy guide that will help to change your Windows 11 mouse settings. Rest assured that the above options are the best you can find.
In addition, to get a more unique workplace, check out how to change the mouse cursor model on Windows 11. And if you’re more into multiple displays, you can enable the ease cursor movement between displays option for a seamless transition.
Your questions and opinions are the most important, so do not forget to share them with us in the comments section below.
Radu Tyrsina
Radu Tyrsina has been a Windows fan ever since he got his first PC, a Pentium III (a monster at that time).
For most of the kids of his age, the Internet was an amazing way to play and communicate with others, but he was deeply impressed by the flow of information and how easily you can find anything on the web.
Prior to founding Windows Report, this particular curiosity about digital content enabled him to grow a number of sites that helped hundreds of millions reach faster the answer they’re looking for.
How to Change Mouse Sensitivity/DPI on Windows 11? How to adjust mouse sensitivity on Windows 11?
DPI (Dots per inch) is used to measure your mouse sensitivity and every inch your cursor moves and the number of pixels it covers.
Most users want to edit designs or create drawings and if you are a gamer then you must know How to Change Mouse Sensitivity/DPI on Windows 11.
As your work will become faster and precise as the higher the mouse sensitivity the faster the pointer speed.
This feature also makes Windows 11 is the most anticipated Windows ever; this window comes with new modern features that make Windows 11 super interesting.
Windows 11 contains lots of productivity features that will enhance the user experience and enable office workers to do work on multiple tasks on one screen at the same time, that’s super cool though!
Also
In Windows 11 you will get a fully new Microsoft store experience. Windows 11 Microsoft store you will have access to the android apps, which will enable users to use android apps on their PCs. This will improve productivity by using android tools on your PC.
In this article, you will learn a lot about How to Change Mouse Sensitivity/DPI on Windows 11/10/7 and many other features related to your mouse.
And I hope you will have questions in your mind regarding the DPI and they are also mentioned below.
Video Guide: How to Change Mouse Sensitivity/DPI on Windows 11?
DPI and they are also mentioned below.
What are the advantages of changing the DPI on Windows 11?
Some of the advantages of changing DPI on Windows 11 are:
- Your gameplay will be enhanced.
- Photo editing will be precise.
- You will be able to take a perfect shot of your enemy in the game.
- Mouse performance will be increased.
- You will have more accuracy in your work.
READ ALSO: How to Fix Wi-Fi Not Showing Up on Windows 11?
Can you Change Mouse DPI in Windows 11?
You can change mouse DPI on Windows 11 by going to the Windows 11 settings and you look for mouse settings there.
Is 4000 DPI good for gaming?
Yes, 4000 DPI is too good for gaming although the recommended DPI for gaming is 16000 as the lower the DPI the less sensitive mouse is.
READ ALSO: How to Stop Antimalware Service Executable&; from Using CPU Resources on Windows 11?
How to Change Mouse Sensitivity/DPI on Windows 11 Using the DPI button?
If you are a perfect gamer or you are too sensitive about your mouse then you must have a branded mouse like Logitech.
So, what you can do is:
- Go to your branded mouse website via Google.
- Look for the driver of your brand and install it on your PC.
- After installing it you can launch the driver and adjust DPI settings according to your needs.
- And you will be able to know How to Change Mouse Sensitivity/DPI on Windows 11 using the DPI button.
Moving on to the How to Change Mouse Sensitivity/DPI on Windows 11.
Check out Our Guide on Buying the Right Mouse for YOU
DPI is used to measure your mouse sensitivity and how fast your pointer moves.
Changing the mouse DPI/sensitivity settings on Windows 11 can help you with precision and accuracy while drawing or playing games.
It depends on what type of mouse you have for example if you have a mouse that has a DPI button on it then you can change sensitivity/DPI settings by pressing the button.
And if you don’t have that mouse then follow the steps for How to Change Mouse Sensitivity/DPI on Windows 11:
- Click on the Windows icon

- Click on the settings icon
- A new window will pop up
- Now click on Bluetooth & devices and then select the Mouse option.
- The Mouse window will open
- Select the Additional mouse settings

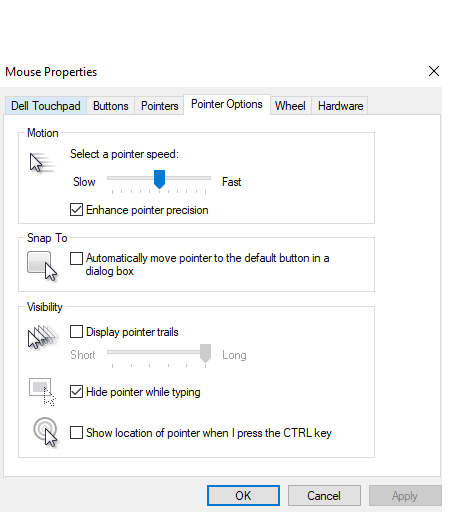
- Mouse Properties will open and now select the Pointer Options tab.
- Under the Select a pointer speed, drag the slider to the left it will decrease the DPI
- And if you will drag the slider to the right, it will increase the DPI/Sensitivity.
- Also, you can try other things such as Hide pointer while typing or turning off pointer trails.
- When you are done changing mouse sensitivity settings click Apply to save changes.
- And you will be able to know How to Change Mouse Sensitivity/DPI on Windows 11 and also how to turn down mouse sensitivity on Windows 11.
READ ALSO: How To Fix No Sound Output Problem on Windows 11?
How to Change Mouse Sensitivity/DPI on Windows 10?
If you want your slow mouse to become faster and less buggy or if you want to draw things accurately and without any mistakes?
Then,
all you need to know is How to Change Mouse Sensitivity/DPI on Windows 10.
You can adjust mouse DPI settings through your Windows 10 settings mentioned below in the steps:
- Press the Start button
- Click on the Settings icon gear
- Now a whole setting window will open
- Now select Devices

- A new window will open now select the Mouse option
- The Mouse window will open

- Select the Additional mouse options

- Mouse Properties will open and now select the Pointer Options tab.

- Under the Select a pointer speed if you drag the slider to the left it will decrease the DPI
- And if you will drag the slider to the right it will increase the DPI/Sensitivity.
- Also, you can try other things such as Hide pointer while typing or turning off pointer trails.
- When you are done changing mouse sensitivity settings click Apply to save changes.
- And you will be able to know How to Change Mouse Sensitivity/DPI on Windows 10
Using similar steps you can also turn Mouse Acceleration ON/OFF on Windows 10.
Also Read: How To Fix Slow Startup Windows 11?
Moving on to How to Change Mouse Sensitivity/DPI on Windows 7.
How to Change Mouse Sensitivity/DPI on Windows 7?
After changing mouse sensitivity settings on Windows 10, you can also adjust mouse sensitivity/DPI if you are a user of Windows 7.
You will be able to manage your cursor speed and will be able to see how fast your cursor moves with your mouse movement.
Here’s what you need to do:
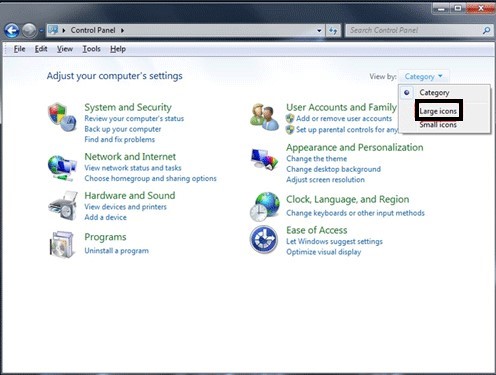
- Click the Start Menu located in the left corner.
- Click on Control Panel.
- On the right corner click on Category

- A drop-down will appear and select Large icons.
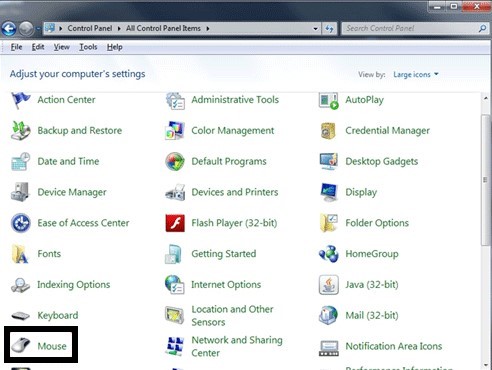
- Click on the Mouse option.

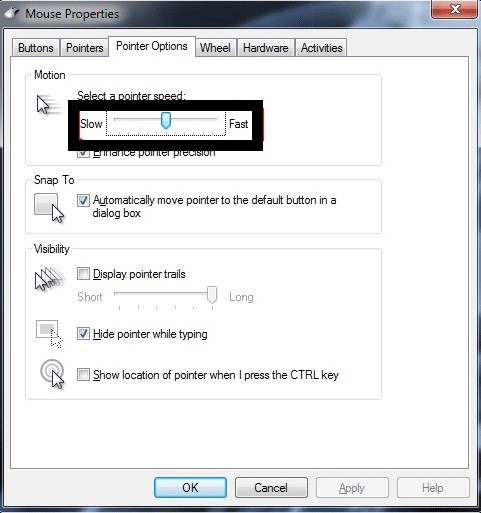
- Mouse Properties will open and now select the Pointer Options tab.
- Under the Select a pointer speed if you drag the slider to the left it will decrease the DPI
- And if you will drag the slider to the right it will increase the DPI/Sensitivity.

- Also, you can try other things such as Hide pointer while typing or turning off pointer trails.
- When you are done changing mouse sensitivity settings click Apply to save changes.
- And you will be able to know How to Change Mouse Sensitivity/DPI on Windows 7.
Conclusion
So, in the above article, we talked about How to Change Mouse Sensitivity/DPI on Windows 11 and what advantage do gamers and other people with different professions can have whether it’s an editor, designer, etc.
We hope that you get to have the full information about adjusting mouse sensitivity or How to Change Mouse Sensitivity/DPI on Windows 11
And how much DPI is required for different games and if you got any questions or you have something related to the DPI you can let us know in the comment section.
FAQ’s
-
Is a 3200 DPI mouse good?
It depends on your game if it requires a DPI of 16000 then you are not near it so as a result, it depends on your requirement.
-
What is a normal DPI on the mouse?
The normal DpI on the mouse is between 800 to 1200 and can get as higher as 16000.
-
Does anyone use 16000 DPI?
Yes, gamers around the world use 16000 DPI as it provides them perfect accuracy especially while taking headshots in a combat game.
-
Why do CS GO pro players use 400 DPI?
CS Go pro players use 400 DPI as they need to aim the target too much and for that the lower the DPI the higher the precision.
Zul is an avid gamer with a passion for RPG and racing games. He enjoys playing games like Need for Speed and Grand Theft Auto 5 and is also skilled at fixing errors and crashes to enhance the gaming experience. Zul stays up-to-date with the latest gaming news and enjoys sharing his knowledge through writing gaming guides and articles.
Follow him on Twitter