
Windows XP – это операционная система достаточно старая, да и обновление к ней больше никогда не выйдет от Microsoft. Поэтому она уже значительно поднадоела интерфейсом многим своим пользователям. Но при этом любителей этой системы хоть отбавляй, и она всё ещё остаётся актуальной для юзеров.
И тут умельцы придумали, как можно поменять те или иные визуальные элементы этой ОС. В данной статье мы рассмотрим процесс изменения экрана загрузки для Windows XP с помощью способа, который не использует дополнительных программ. Всё сводится к простому редактированию файлов системы.
Также вы можете почитать о том, как изменить экран приветствия на Winsodws 7.
Перед тем, как поменять экран загрузки для Windows XP, нужно создать картинку, которая им станет. Она должна соответствовать определённым требованиям: размеры 640 на 480 пикселей, 16-ти цветная и в формате bmp.
Добиться такого можно используя две программы: диспетчер рисунков, который поставляется с пакетом Microsoft Office и Paint, который должен быть в каждой XP. Конечно, есть способ создать нужное изображение на другом, более профессиональном редакторе, например Photoshop. Если вы знаете, как это сделать, то действуйте. Если нет, то я объясню, как это сделать из, так сказать, «подручных средств».
Итак, открываем картинку, которую хотим на boot screen, через диспетчер рисунков Microsoft Office, нажимаем «Изменить рисунки», в правой панели выбираем инструмент «Обрезка», и с помощью перетаскивания мышкой границ изображения, добиваемся необходимых размеров в строке «Новый» (640х480). И сохраняем.
Когда изображение имеет нужный размер, закрываем диспетчер рисунков и открываем наш будущий экран загрузки для Windows через Paint. Здесь нужно просто пересохранить в нужном формате. Поэтому нажимаем «Файл» — «Сохранить как…», и в строке «Тип файла» выбираем «16-цветный рисунок (*bmp, *dib)». Имя файла пишем boot. И сохраняем.
Всё. Экран загрузки готов. Теперь его нужно поместить в папку Windows.
Как поменять экран загрузки Windows XP
Чтобы поменять экран загрузки Windows XP, нажимаем правой кнопкой мышки на ярлык «Мой компьютер», и заходим в «Свойства». Выбираем вкладку «Дополнительно» и в ней нажимаем «Параметры» в разделе «Загрузка и восстановление».
Нажимаем кнопку «Правка» в открывшемся окне, и копируем следующий текст в появившийся документ:
boot loader]timeout=30 default=multi(0)disk(0)rdisk(0)partition(1)WINDOWS[operating systems]multi(0)disk(0)rdisk(0)partition(1)WINDOWS=»Microsoft Windows XP Professional RU» /noexecute=optin /fastdetect /noguiboot /bootlogo.
Всё. Сохраняем и перезагружаем компьютер. Если всё сделали верно, то Windows загрузится уже с новым boot screen.
Форум РадиоКот • Просмотр темы — Изменяем экран загрузки Windows XP
Сообщения без ответов | Активные темы
| ПРЯМО СЕЙЧАС: |
| Автор | Сообщение | ||
|---|---|---|---|
|
Заголовок сообщения: Изменяем экран загрузки Windows XP Добавлено: Вт дек 30, 2008 09:20:50 |
|||
Карма: 1 Рейтинг сообщения: 0
|
Уважаемые коты. У меня вот какой вопрос: хочу изменить экран загрузки в Windows XP про сервис пак 3. Прочитал вот эту статью http://minichden.narod.ru/articles/arti … t_logo.htm
P\S. Уважаемый Администратор если данная тема не подходит для формата данного сайта можете данное сообщение удалить. |
||
| Вернуться наверх |
Профиль www
|
||
| Реклама | |
|
|
|
|
pro_grammer |
Заголовок сообщения: Добавлено: Чт янв 01, 2009 09:04:34 |
|
Зарегистрирован: Ср ноя 26, 2008 11:45:19 Рейтинг сообщения: 0
|
Существует более простой способ.
[boot loader] Очень удобно так как не приходится править ядро (да и не каждый сумеет), плюс не зависит от текущей версии WINDOWS. Обращаю внимание на выделенное — это обязательные действия. |
| Вернуться наверх | |
| Реклама | |
|
|

|
|
Фрикер |
Заголовок сообщения: Добавлено: Чт янв 01, 2009 14:14:36 |
||
Зарегистрирован: Вт авг 05, 2008 12:45:07 Рейтинг сообщения: 0
|
Есть специальные проги. Я юзаю StyleXP. |
||
| Вернуться наверх | |||
|
Кулибин |
Заголовок сообщения: Добавлено: Пт янв 02, 2009 20:03:11 |
||
Карма: 1 Рейтинг сообщения: 0
|
pro_grammer писал(а): Существует более простой способ. Заменить картинку получилось. Ура. Только вот как ее сделать нормальной не пойму она вся размытая получается, когда ее делаешь на 16 цветов. |
||
| Вернуться наверх | |||
| Реклама | |
|
|
Открыт интернет-магазин MEAN WELL.Market – весь ассортимент MEAN WELL, выгодные цены
Открыта удобная площадка с выгодными ценами, поставляющая весь ассортимент продукции, производимой компанией MEAN WELL – от завоевавших популярность и известных на рынке изделий до новинок. MEAN WELL.Market предоставляет гарантийную и сервисную поддержку, удобный подбор продукции, оперативную доставку по России. Подробнее>> |
|
pro_grammer |
Заголовок сообщения: Добавлено: Пт янв 02, 2009 21:20:25 |
||
|
Зарегистрирован: Ср ноя 26, 2008 11:45:19 Рейтинг сообщения: 0
|
Нормальной (24 бит) она и не должна быть — а вот улучшить качество преобразования можно, главное что бы графический редактор поддерживал побольше настроек по преобразованию. Я использовал Paint Shop Pro 9
|
||
| Вернуться наверх | |||
| Реклама | |
|
|
|
| Реклама | |
|
|
LED-драйверы MOSO — надежные решения для индустриальных приложений
Продукция MOSO предназначена в основном для индустриальных приложений, использует инновационные решения на основе более 200 собственных патентов для силовой электроники и соответствует международным стандартам. LED-драйверы MOSO применяются в системах наружного освещения разных отраслей, включая промышленность, сельское хозяйство, транспорт и железную дорогу. В ряде серий реализована возможность дистанционного контроля и программирования работы по заданному сценарию. Разберем решения MOSO |
|
Фрикер |
Заголовок сообщения: Добавлено: Вт янв 20, 2009 21:11:42 |
||
Зарегистрирован: Вт авг 05, 2008 12:45:07 Рейтинг сообщения: 0
|
Я в StyleXP заменил на ту, что у мну сейчас на аватарке, побольше конечно. Получилось довольно хорошо. |
||
| Вернуться наверх | |||
|
Кулибин |
Заголовок сообщения: Добавлено: Ср янв 21, 2009 09:01:38 |
||
Карма: 1 Рейтинг сообщения: 0
|
Фрикер писал(а): Я в StyleXP заменил на ту, что у мну сейчас на аватарке, побольше конечно. С помощю программы StyleXP создать экран загрузки, это конечно хорошо но не то. Она всё делает за тебя, нет творчества, на каждый комп ее надо ставить и говорить тому кому ее установишь, что удалив эту программу и заставка исчезнет.! А я хочу чтобы люди увидив заставку поразмышляпм как это сделанно. А установить например туже StyleXP каждый может. Я вот тут всё пробуюизменить рисунок загрузки через реестр! Не Получается! Может подскажите , что я делаю не так? |
||
| Вернуться наверх | |||
Кто сейчас на форуме |
|
Сейчас этот форум просматривают: нет зарегистрированных пользователей и гости: 3 |
| Вы не можете начинать темы Вы не можете отвечать на сообщения Вы не можете редактировать свои сообщения Вы не можете удалять свои сообщения Вы не можете добавлять вложения |

Change the Picture that Appears on the XP Startup Screen
You’re not stuck with
XP’s default splash logo on the startup
screen—use any picture or logo of your choosing.
One of the nice things about XP is how
malleable it is. Don’t like the way it looks? No
problem—change it. Take my splash screen, please!
Many people, myself included, would prefer to see a more interesting
splash screen (also called the startup screen) than the default gives
you on start-up. You can change your splash screen to any of hundreds
that have been created, or make one of your own—for example,
with your picture or company logo on it.
To choose from already created splash screens, go to http://www.themexp.org and click on Boot
Screens. You’ll find over a thousand of them,
organized by categories such as Sports, TV/Movies, and so on. Being a
fan of Jack London’s The Call of the
Wild, I use a picture of huskies for my splash screen. You
can see it pictured in Figure 1-2. Nice way to
greet the new day, don’t you think?
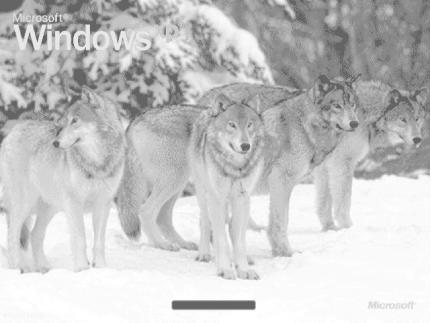
Figure 1-2. Every time I start up my PC, I can imagine myself in the wilds of Alaska
Once you’ve found the image you want to use as your
splash screen, download it. It will be downloaded as a
.zip file. I create a general folder for all my
boot screen files, called C:\Bootscreens, and
then for each bootscreen I download I create a new folder—in
this instance, C:\Bootscreens\Wild.
Warning
It’s possible that something will go wrong with your
new boot screen, so before making the change, create a
System Restore
point by choosing Control Panel → Performance and
Maintenance → System Restore and following the instructions.
If something goes wrong, you can revert to that restore point.
Unzip the contents of the .zip file into the
folder. There will be one or more files, including
ReadMe files. The boot screen itself, however,
will be named ntoskrnl.exe. If you have XP
Service Pack 1 installed, you may have to use a different file, named
ntoskrnlSP1.exe, that may also be in the
downloaded .zip file. Check the documentation of
the file you download to make sure. If you’re not
sure if you have Service Pack 1 installed, it’s easy
to find out. Right-click on My Computer, and choose Properties
→ General. Your version of the operating system will be
displayed. If you have Service Pack 1, it will say so on that screen.
The ntoskrnl.exe
file is an executable file that contains
the XP bootscreen. During the boot process, XP executes this file,
found in C:\Windows\System32, which in turn
displays the bootscreen graphic. So, to change your bootscreen,
replace your existing ntoskrnl.exe file with the
one you just downloaded. But wait: there’s more.
You might think that all you have to do is copy the new
ntoskrnl.exe over the existing one and then
restart your computer in order for the changes to take effect.
That’s not quite the case, though. You first have to
get around a feature of Windows XP that protects system files from
being overwritten.
Windows File Protection
automatically replaces certain files with the original XP version of
the file if they’ve been replaced, and
ntoskrnl.exe is one of those files. However, if
you make the change in Safe Mode, Windows File
Protection won’t kick in and you can safely copy the
file.
Tip
Windows File Protection protects many other files, not just
ntoskrnl.exe. Also included are .dll,,
.exe, .fon, .ocx, .sys.tff files,
and, depending on your system, other file types such as
.ax, .cpl, .cpx, .dll, .exe, .fon,. inf, .ocx, .rsp, .sys, and
.tff, .tlb.
Reboot your PC and press F8 immediately to get into Safe Mode. Now go
to the C:\Windows\System32 folder and find the
ntoskrnl.exe file. Copy it to another folder or
rename it as a backup so that you can revert to it when you no longer
want to use your new bootscreen, or if something goes wrong when you
install the new screen. Now copy the new
ntoskrnl.exe file into
C:\Windows\System32. (If you have to use the
ntoskrnlSP1.exe file, rename it to
ntoskrnl.exe first, and then copy it over.)
Reboot your computer again but don’t go into Safe
Mode this time. Your new splash screen will now appear every time you
start your PC. To revert to your old splash screen, repeat the steps,
copying your original ntoskrnl.exe file over
your new one.
Choose from Multiple Splash Screens on Startup
Depending on my mood, I might not want
to be greeted by huskies every morning. There are times when I want
to be greeted by the normal startup screen, and other times when I
want to see Andy Warhol’s famous painting of Marilyn
Monroe, or Al Pacino from the movie Scarface,
all available from http://www.themexp.org. So
I’ve made a startup menu that lets me choose which
graphic should be my startup screen.
To create a startup menu, first download all the screens you want to
use. Then rename the ntoskrnl.exe or
ntoskrnlSP1.exe of each so that the filename
describes the screen, for example,
ntospacino.exe,
ntosmonroe.exe, and
ntosspongebob.exe. Copy them each into
C:\Windows\System32. Don’t
touch the existing ntoskrnl.exe file there;
you’ll keep that as one of your options. Because
you’re not changing that file, you
don’t have to boot into Safe Mode to make any of
these changes.
Following the instructions in [Hack #1], create a multiboot screen
by editing your boot.ini file. In the
[operating systems] section of the
boot.ini file, create a new entry for each of
the screens from which you want to choose. Copy the existing primary
XP entry and append
/kernel=
newbootscreenfilename.exe
to the end of it, where
newbootscreenfilename.exe is the filename
of the bootscreen you want to use for that entry. Also edit the
description so that it describes the bootscreen. For example, if the
primary entry is:
multi(0)disk(0)rdisk(0)partition(1)\WINDOWS="Microsoft Windows XP Home
Edition" /fastdetect
you would create this entry for the Sponge Bob startup screen:
multi(0)disk(0)rdisk(0)partition(1)\WINDOWS="Sponge Bob Startup Screen" /
fastdetect /kernel=ntosspongebob.exe
Create as many entries as you want in the [boot loader] section. My boot.ini file
looks like this:
[operating systems]
multi(0)disk(0)rdisk(0)partition(1)\WINDOWS="Microsoft Windows XP Home
Edition" /fastdetect
multi(0)disk(0)rdisk(0)partition(1)\WINDOWS="Sponge Bob Startup Screen" /
fastdetect /kernel=ntosspongebob.exe
multi(0)disk(0)rdisk(0)partition(1)\WINDOWS="Pacino Startup Screen" /
fastdetect /kernel=ntospacino.exe
multi(0)disk(0)rdisk(0)partition(1)\WINDOWS="Marilyn Monroe Startup Screen"
/fastdetect /kernel=ntosmonroe.exe
Whenever you start up XP now, you’ll be able to
choose from your normal startup screen or any of the others
you’ve put on the menu. If you have a laptop, for
example, you might set up a menu that lets you choose a business-like
startup screen at work and a more entertaining one at home.
Build a Startup Screen from Any Graphic
So
far this hack has shown you how
to use a startup screen that someone else built. But
you’re not limited to that; you can turn any graphic
into a startup screen, using BootXP (downloadable from http://www.bootxp.net). It’s
shareware and free to try, but it costs $7.95 if you decide to keep
using it.
The program will convert graphics from many different formats to a
bootscreen graphic, use it as your bootscreen, or build a boot menu
for you so that you can choose from multiple bootscreens. That way,
you don’t have to edit the
boot.ini file yourself.
It’s a surprisingly simple program to use. Select a
graphic that you want to use as a bootscreen, and then click a button
to convert it to the 640 × 480-pixel, 16-color bitmap
startup screen standard. Preview the graphic, and if
it’s what you want, tell the program to set it as
your bootscreen. The program provides a variety of options, including
choosing a different progress bar that alerts you XP is loading,
restoring your original startup screen, or randomizing your
bootscreen so that it randomly selects one you’ve
created each time you boot. You can also use the program to download
already created startup screens from http://www.bootxp.net.
Michael asks, “Is there any way to get rid of ‘branding’ on a computer? Where computer manufacturer advertise their products when you start you computer.”
Depending on which computer manufacturer made your computer, you might have a simple splash screen displayed as the BIOS loads or you might be inundated with advertising throughout the entire boot process. These are two separate image locations requiring editing in multiple places and some confidence in your computing skills, as the BIOS option can potentially damage your system if done incorrectly.
Changing the Windows Boot Screen
I’ll start with the Windows boot screen, since that’s fairly easy and doesn’t necessarily require any direct modification of system files. There are several ways to approach changing the boot screen. One option is to eliminate it completely, opting to display a blank screen until Windows completes the boot process. To turn off the boot logo, Click Start > Run and type MSCONFIG in the run dialog box to launch the System Configuration Utility. On the BOOT.INI tab, check the box next to /NOGUIBOOT and click OK. The next time you reboot your computer, you’ll see the BIOS screen and then nothing until Windows loads completely. The downside to this option is you won’t get any feedback if your PC gets hung up somewhere in the boot process.

To maintain a more visual boot process, while also eliminating any boot branding, you might simply want to replace the boot image. The easy way to do this is to download a freeware app from WinCustomize called BootSkin. The app automatically overrides the default Windows boot screen, replacing it with one of the many options in the WinCustomize BootSkin library. With some practice you can make your own custom BootSkin as well.

Download BootSkin
If you want to get really geeky, a third option is to edit the operating system file where the boot screen information resides. You need to be careful in doing this or you can end up with a computer that won’t boot. The first part of the process is to create or find an image you want to use. If your computer simply has the all black Windows XP boot screen, with the XP logo like the one pictured below, you don’t need a very large image.
Simply create a 215×147 .bmp file with 16 colors (NOT 16-bit) in any image editor and you’ve got a working replacement. If your computer manufacturer overrides this default screen with something else, you may need to get creative to eliminate all the branding. In general, using a black background looks more consistent, but you can use any of the 16 colors in your palette.
With your new image created, you need a freeware app called Resource Hacker to make some changes.
Before proceeding, locate ntoskrnl.exe in your Windows > system32 folder. Make a copy of the file called newntoskrnl.exe or something equally easy to remember and leave the copy in the system32 folder.
Make a second copy of the ntoskrnl.exe on your desktop (this is the one you will edit).
Open ntoskrnl.exe in Resource Hacker. Expand Bitmap > 5 and highlight the 1033 folder. Right-click the 1033 icon and choose Replace Resource.

Click the Open file with new bitmap button and locate the image you created earlier. Click the Replace button. Save and exit Resource Hacker. You can optionally replace all elements of the boot screen by editing each portion of the Bitmap.

Reboot into SafeMode and copy your newly created ntoskrnl.exe file into the Windows > system32 folder.
Note: If you are using Windows 2000, you can simply replace the image in the Bitmap > 1 > 1033 location with a 640×480 16 color Bitmap to modify the Win2k boot screen in a similar fashion.
Changing the BIOS Splash Screen
To eliminate the branded splash screen associated with your BIOS, you need to obtain the firmware update for your BIOS and edit the logo file that’s part of the BIOS fileset before applying the update. Since every computer model and manufacturer uses a slightly different BIOS configuration, it’s important to get the BIOS specific to your computer from the support section of the manufacturer’s Website. In some cases, like my HP laptop, it’s become virtually impossible to replace the logo because the BIOS flash process is contained in an .exe file that runs locally in Windows rather than from a separate disk.
Assuming your PC manufacturer has you create a floppy designed to flash the PC bios, you can fairly easily make a change to the logo displayed. In following the directions to create the BIOS boot disk, simply replace the included logo.bmp file in the BIOS update package with a logo.bmp file created by you. The key here is to use a 16 color (NOT 16-bit color) 640×480 BMP file. Copy your logo.bmp file onto the disk used for your BIOS update and run the bundled logo.bat file by double-clicking it. This converts the logo.bmp to a format ready for the BIOS update.
It’s vital to keep all the files in the BIOS update named exactly as they were or your computer may not work after the update. Any changes made to BIOS update files should be done at your own risk and with extreme care.
Данный FAQ предназначен для тех, кто хочет своими руками заменить загрузочный экран WindowsXP. Все нижесказанное работает и для Windows 2000 с одним отличием — некоторые пункты не нужны, они будут перечислены в конце. За основу FAQ взята информация из двух англоязычных статей, собранная воедино, переведенная и дополненная.
Для успешной замены понадобятся:
а) непосредственно WinXP/2k
b) любой фоторедактор (зарубежные коллеги пользуют Paint Shop Pro, я пользовался PhotoImpact’ом)
c) Resource Hacker (замечательная утилитка для ковыряния в .dll и .exe файлах, не требует инсталляции) http://www.littlewhitedog.com/download-file-54.html
d) любой hex-editor (на ваш вкус, может и не понадобится!), например этот:
http://www.handshake.de/user/chmaas/delphi/download/xvi32.zip
e) немного терпения
Прежде чем начать что-либо делать! Сделайте резервную копию файла ntoskrnl.exe из папки Windows\System32, т.к. издеваться мы будем именно над этим файлом. Если вы что-то сделаете не так, и система перестанет грузиться, всегда будет возможность вернуть все «как было».
1. Делаем свою картинку.
Независимо от того делаете ли вы картинку сами или берете готовую, конечный результат нужно сохранить в разрешении 640х480, 16 цветов, .bmp. Это необходимое условие. Теперь поговорим о palette. Маздай использует свою palette и вам нужно будет ее загрузить для своей картинки. Далее я привожу хекс-значения маздайной palette для всех 16 цветов по порядку:
000000 201A15 464646 2D3ED2 536501 B23505 7E7E7E 899200 5E7FFC F76B20 8DA6FF 8EDC04 F3BC1B BCBCBC FCFCFC FFFFFF
После того, как вы поменяли palette своей картинки на эту, картинка может принять вид, который вы не совсем от нее ожидали или который вам не нравится. Можете оставить ту, которая была, но в таком случае запишите хекс-значения своей palette также, как я это сделал для маздайной (можете даже на бумажку переписать для удобства), и тогда потом вам понадобится при помощи хекс-редактора ntoskrnl.exe к вашей palette приучивать.
Это еще не все. После того как вы определились с palette, и картинка готова, замените все цвета palette на черный (000000) и сохраните картинку. Она будет выглядеть как черный прямоугольник, но на сам деле это не так. Для удобства можете сделать два .pal файла и потом их грузить в свои картинки. В общем порядок следующий: берем картинку, меняем разрешение на 640х480, меняем количество цветов на 16, грузим маздайную palette, потом грузим черную palette, потом сохраняем картинку как .bmp.
Уф, все, картинка готова.
2. Запихиваем свою картинку в ntoskrnl.exe.
Для этого открываем указанный файл прогой Resource Hacker, давим Action->Replace Bitmap. Потом выбираем картинку номер «1» в списке, потом «open file with new bitmap», указываем свою картинку и заменяем нажатием на кнопку «Replace». После этого File->Save as и сохраняем как mykrnl.exe например. Здесь все. Достаточно просто.
При желании можно заменить не только главную картинку, но еще кое-что. Привожу список по номерам.
1 — Главная картинка, она же фон.
2 — Картинка для режима гибернации.
3 — «Теперь питание компьютера можно отключить». Не совсем актуально.
4 — серая полоска, если у вас экраны приветствия не отключены, вы ее никогда не увидите.
5 — квадратик с надписью «WindowsXP»
6, 7 — хз
8 — синяя полоска, бегающая при загрузке WinXP Pro
9 — зеленая полоска, бегающая при загрузке WinXP Home
10 — квадратик с надписью «Professional»
11 — квадратик с надписью «Home Edition»
12 — надпись «Embedded». Кто-нибудь пользовался Windows Embedded?
Если после того, как вы все сделаете, при загрузке на вашей картинке наложившись сверху вылезут надписи Professional или Home Edition — замените их на черную картинку размером 1х1 пиксель, только не забудьте применить сначала маздайную, а потом черную palette.
3. Приучиваем ntoskrnl.exe к нашей palette.
Данный пункт только для тех кого не устроила маздайная palette, примененная к его картинке в п.1. Если у вас там все было пучком — смело его пропускайте.
Открываем в хекс-редакторе наш ntoskrnl.exe с уже замененной bmp’шкой и находим там эту строку:
00 00 00 00 15 1A 20 00 46 46 46 00 D2 3E 2D 00 01 65 53 00 05 35 B2 00 7E 7E 7E 00 00 92 89 00 FC 7F 5E 00 20 6B F7 00 FF A6 8D 00 04 DC 8E 00 1B BC F3 00 BC BC BC 00 FC FC FC 00 FF FF FF
Если приглядеться, это и есть та самая маздайная palette, значения цветов отделены
друг от друга значением 00, НО… (старина Билли долго думал как подальше запрятать от нас свою palette) значения поменяны местами! Смотрите 000000 — это первый цвет, дальше идут два нуля — это разделитель, дальше 151A20, но на самом деле это цвет 201A15. Все, что от вас требуется — это вписать сюда зачения вашей palette, в том же порядке, только поменяв местами первую и последнюю пары цифр и сохранить файл. То есть, если в вашей palette первый цвет D26344, то начало этой строки будет выглядеть так: 44 63 D2 00 (следущий цвет) 00 (следущий цвет) 00 и т.д. Не забывайте про нули!
4. Грузимся с новой картинкой.
Открываем блокнотом файл boot.ini, находящийся в корне диска С. У меня он выглядит так:
[boot loader]
timeout=5
default=multi(0)disk(0)rdisk(0)partition(2)\WINXP
[operating systems]
multi(0)disk(0)rdisk(0)partition(2)\WINXP=»Windows XP Home» /fastdetect
C:\=»Windows 98″
Копируем предпоследнюю строчку и вставляем ее ниже. «Windows XP Home» заменяем на то, что вам нравится, а после /fastdetect добавляем /kernel=mykrnl.exe, где mykrnl.exe — это ваш отредактированный ntoskrnl.exe, лежать он должен там же, где и оригинал — в папке System32. В результате получаем что-то типа этого:
[boot loader]
timeout=5
default=multi(0)disk(0)rdisk(0)partition(2)\WINXP
[operating systems]
multi(0)disk(0)rdisk(0)partition(2)\WINXP=»Windows XP Home» /fastdetect
multi(0)disk(0)rdisk(0)partition(2)\WINXP=»Windows XP Hacked» /fastdetect /kernel=mykrnl.exe
C:\=»Windows 98″
Сохраняем файл и перезгружаемся. Если что-то у вас не получилось и система с mykrnl.exe не грузится — всегда можно выбрать строчку с «Windows XP Home», загрузиться и продолжить изыскания.
Что касается Windows 2000, то там все проще. Вам лишь нужно сохранить картинку в разрешении 640х480, 16 цветов, .bmp, никаких palette грузить не нужно! Потом запхать ее ntoskrnl.exe, как указано в п.2 и загрузиться, как в п.4.
Все! Да здравствует творческий подход и умелые руки!
P.S. Я не знал в какой ветке разместить этот FAQ, поэтому поместил сюда. Модераторы, если посчитаете нужным, можете переместить.
[Исправлено: Moonbear : 04-03-2004 01:48]