
Если вы откроете свойства любого файла в Windows 10, 8.1 или Windows 7, среди прочей информации вы увидите три поля: Создан, Изменен и Открыт. Если по той или иной причине вам потребуется поменять их, это вполне можно сделать.
В этой инструкции подробно о том, как изменить дату создания, изменения и открытия файла с помощью простой бесплатной утилиты для этих целей, а также некоторая дополнительная информация, которая может оказаться полезной, когда речь идет о файлах фотографий, медиа и документов.
- Как поменять дату и время изменения, создания или открытия файла
- Видео инструкция
Как поменять дату и время изменения, создания или открытия файла в бесплатной программе BulkFileChanger
Наверняка многие из вас знают о небольших утилитах от NirSoft, среди них есть и программы, предназначенные для изменения указанных дат в свойствах файла. Первая версия программы называлась FileDate Changer, актуальная на сегодня, исправно работающая в Windows 10, 8.1 и Windows 7 — Bulk File Changer.
Для того, чтобы поменять дату и время создания, изменения и открытия файла в программе, достаточно выполнить следующие простые шаги:
- Запустите программу, лучше всего сделать это от имени администратора (правый клик по exe-файлу программы — «Запустить от имени администратора», иначе можем получить сообщение «Отказано в доступе» при изменении).
- Нажмите по кнопке добавления файлов в список и добавьте нужный файл или несколько файлов (дату и время можно менять сразу для группы файлов).
- В списке выделите те файлы, сведения для которых нужно изменить и нажмите по кнопке изменения даты и времени в свойствах файлов (кнопка с часами).

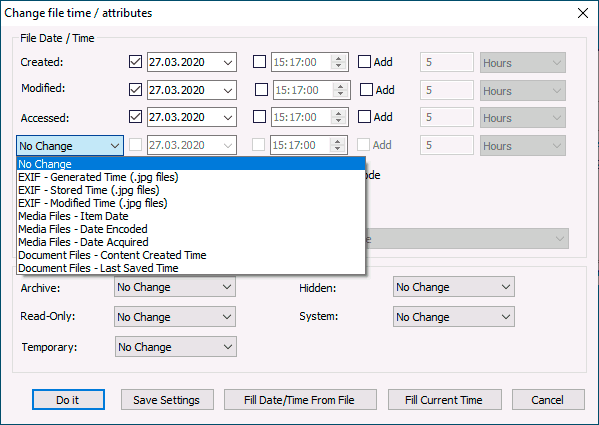
- Поменяйте значения на нужные вам в соответствующих полях. Created — дата и время создания, Modified — изменения, Accessed — открытия.

- Нажмите кнопку «Do it» для применения новых параметров.


Если всё прошло успешно, Bulk File Changer был запущен от администратора, а среди файлов нет открытых в других приложениях или заблокированных системой, выбранные вами даты будут изменены на указанные.
А теперь обещанная дополнительная информация: при изменении дат в файлах фотографий, документов и медиа следует учитывать, что некоторые данные хранятся в дополнительных мета-данных файла, увидеть вы их можете, открыв вкладку «Подробно» в его свойствах.
Если хранящиеся там данные нужно очистить, вы можете сделать это встроенными средствами Windows — просто нажмите по пункту «Удаление свойств и личной информации», а затем либо удалите ненужные свойства прямо в этом файле, либо создайте копию без этих свойств.
Вторая возможность — изменить и эти даты тоже в той же утилите Bulk File Changer. Для этого на этапе изменения дат нажмите по стрелке в пункте «No Change» и выберите, какую дату и время и для какого типа файла следует поменять.
Укажите новые сведения, примените изменения кнопкой «Do It», готово.
Скачать Bulk File Changer для изменения дат в свойствах файлов можно с официального сайта разработчика https://www.nirsoft.net/utils/bulk_file_changer.html
Изменение дат в свойствах файла — видео инструкция
Надеюсь, для кого-то инструкция оказалась полезной и позволила добиться желаемого результата.
In Windows 10 and 11, every file and folder contains certain attributes that help define their properties. In this post, we will discuss the following attributes: Date Modified, Date Created, and Date Accessed. If you need to modify these attributes, there are a few methods you can use, including the command-line approach and some third-party tools.
This information can be found in every file or folder, regardless of the type of file, which means that each document, photo, video, zipped file, and folder carries this information with them wherever they are transferred. Those who are interested in knowing this information about a particular item only need to examine its properties or metadata.
The date modified, the date created, and the date accessed are referred to as timestamps. There is a record of the last time the respective changes were made. In addition, these are used by the system to save previous versions of a file/folder by reading, if it is designed to archive or save its last version.
Table of Contents
Date Modified, Date Created, and Date Accessed
As in the example below, the 3 attributes can be seen in File Explorer. You may notice how each category displays both the date as well as the time of the event for each item.

Date Modified depicts the event when the last changes were made to the item. In the case of a text document, anything added or removed from it will automatically update the Date Modified timestamp to the current time. In the case of a folder, any changes made to the contents within the folder, such as new items added or removed, will change the Date Modified timestamp. However, if you were to modify a file within a folder, the Date Modified timestamp of the parent folder will not change.
Some may think that the Date Modified attribute is dependent upon the hard drive it is saved on, and not the metadata of the item. However, this theory is not true. You can verify this by creating a test document in one place, and then moving it to another storage device at another time. You will notice that the new copy of the item still retains its old Date Modified timestamp.
Similarly, Date Created is the date and time when an item was first created. This does not change when you make changes to an item, nor does copying it to another storage device. However, if you make a new copy of an existing file or a folder, the Date Created is automatically updated for the new copy to the current time.
Lastly, as the name suggests, the Date Accessed tells us of the last time an item was accessed. It does not necessarily have to be modified Read-only privileges will also change this timestamp to the current time.
How to Modify file and folder timestamps
Now that you understand what each timestamp indicates and how they are modified, let us move on to manually change them in case you ever need to.
All 3 timestamps can be changed to your requirements manually. To do so, there are tools present on the internet, and it can also be done through your Windows command line. Remember that modifications need to be a time of the past, and not of the future. Setting the timestamps to a future time will make the information disappear from the Explorer.
Change Date Modified, Date Created, and Date Accessed using Windows PowerShell
Windows PowerShell is a command-line tool that comes preinstalled in Windows 10 and 11. It is super-handy for superusers as it allows you not only to control your Operating System but also lets you automate tasks. Similarly, you can use the commands given below to modify the 3 timestamps to your preferences.
Change Date Modified
Launch Windows PowerShell with administrative privileges and then use the following command to change the Date Modified in the file/folder:
(Get-Item "PathToItem").LastWriteTime=("14 August 2016 13:14:00")Remember to replace PathToItem in the command above with the complete path to the file/folder that you wish to change the attribute of (including the file type). Also, change the date and time to your preference. Here is an example:
(Get-Item "D:\TestDocument.txt").LastWriteTime=("14 August 2016 13:14:00")
Run the command above and make changes to the text file in the D drive named “TestDocument.txt.” This was then verified through File Explorer. Here are the results:

Change Date Created
Likewise, you can also manipulate the Date Created attribute of a file/folder using the command below:
(Get-Item "PathToItem").CreationTime=("13 August 2015 13:18:00")As in the last example, change the PathToItem as well as the date and time of your preference in the command above. Here is an example of us changing the Date Created attribute of a folder named “Newfolder” in the D drive:

As expected, the Date Created attribute has been changed.

Change Date Accessed
To manipulate the Date Accessed attribute using PowerShell, use the command below:
(Get-Item "PathToItem").LastAccessTime=("3 August 2019 17:10:00")Always change the PathToItem as well as the date and time according to your preferences.
We shall not dwell on an example and its results, as you have already seen in the manipulation of the Date Modified and Date Created timestamps.
However, in case you notice that the Date Accessed is not changing on your system, it is very likely that the feature has been turned off. You can easily activate it by launching Command Prompt with administrative privileges, and then pasting the command given below:
sutil behavior set disablelastaccess 0
You should now be able to see an updated Date Accessed timestamp each time you open a file or a folder.
Change all 3 attributes of all items within a folder
You can also change all 3 timestamps of all the items within a folder. To do so, simply use the commands shown below, adjust them to your requirements, and voila! You are done changing the timestamps in a jiffy.
Get-ChildItem -force PathToItem * | ForEach-Object{$_.CreationTime = ("14 August 2016 13:14:00")}
Get-ChildItem -force PathToItem * | ForEach-Object{$_.LastWriteTime = ("14 August 2016 13:18:00")}
Get-ChildItem -force PathToItem * | ForEach-Object{$_.LastAccessTime = ("14 August 2016 13:22:00")}
Remember to replace PathToItem with the complete path of the folder as well as the date and time that you wish to configure.

As you can see in the image below, all contents within the folder named “Newfolder” have updated their attributes as commanded through PowerShell.

There are other similar commands you can use in Windows PowerShell to change the attributes of any file or folder. Nonetheless, all have a similar effect to that which we have discussed in this post.
Change Date Modified, Date Created, and Date Accessed using Attribute Changer
Attribute Changer is a small GUI-based utility that you can install on your system to manipulate the attributes of any file or folder using the context menu. Follow the steps below to install the tool and then learn how to use it in a few easy steps.
Open the Attribute Changer page and then click on Get Attribute Changer. The setup will then start to download. Once completed, click on it to begin the installation. The installation wizard will then open. Agree to the terms and conditions and follow through with the wizard in a few quick steps. The installation part only takes a few minutes.
Once installed, the app will not open by itself, since it is programmed to be launched through the context menu when you right-click a file or a folder.

To change a file or folder’s Date Modified, Date Created, or Date Accessed, simply right-click on it and then click Change Attributes on the context menu.
Note: You may need to click Show more options in the context menu if you are using Windows 11.
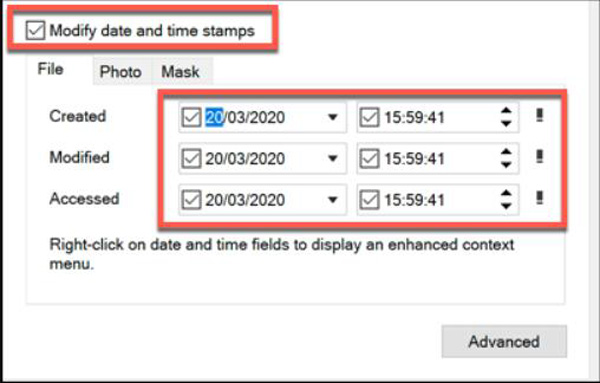
Clicking Change Attributes will open the Attribute Changer in a new window showing the details of the item that you have selected. In the File Properties tab, check the box next to “Modify date and time stamps.” The greyed-out portion below will now be active and can be modified. You can now adjust the Date Modified, Date Created and Date Accessed according to your own preferences using these options.

Once the required changes are made, click on Apply and then OK. You will now notice that the changes have been updated in File Explorer.

We would like to point out that changing the timestamps of an entire folder will not affect its contents. Therefore, you will be required to change them for each item individually.
Change Date Modified, Date Created, and Date Accessed using NirCmd
NirCmd is a third-party command-line tool by Nirsoft that allows you to perform certain advanced tasks through the Command Prompt. It can also be used to change the Date Modified, Date Created, and the Date Accessed attributes of any file on the computer.
Use the following steps to download and use NirCmd to modify these attributes for any given file:\
-
First, download the NirCmd utility for their website.
-
Extract the package by right-clicking it, and then clicking “Extract all.” Click Extract again on the extraction wizard.
-
Now, press the Windows Key + R to open the Run Command box.
-
Type in “cmd” and press CTRL + Shift + Enter to launch an elevated Command Prompt.
-
Use the “CD” command, in the following syntax, followed by the patch to the extracted folder, to change the directory to it.
Cd /d [PathToExtractedFolder]
Navigate to the extracted NirCmd folder -
Now use the following syntax to change the timestamp of your respective file by providing its complete path. Also, specify the date parameters in the format:
dd-mm-yyyy hh:mm:ssNote: You can leave the string empty by inserting only parenthesis if you want to keep a date unchanged.
nircmd.exe setfiletime [FilePath&Name] [Created Date] [Modified Date] [Accessed Date]
Change file timestamp using NirCmd


After performing the steps above, you will notice that the new timestamp has been applied to the file successfully.
To change the timestamp of all the files with a folder, use an asterisk (*) instead of the file name in the command, like in this example:
nircmd.exe setfiletime "D:\Newfolder\*.txt" "11-11-2011" "11-11-2011" "11-11-2011"Reasons to change date/timestamp
You might want to change the timestamp, the date accessed, the date created, or the date modified for a file or folder for several reasons. Here are a few reasons why one might want to:
- Changing the date parameter helps sort files accordingly. For example, you may want to sort all the files according to their “Date Modified” attribute, but one file is not where it should be. Therefore, you may need to change its date to bring it to its correct place.
- You may want to perform a version control if you are a developer. For example, if a file version is out of its correct modified date, you can correct it before rolling it out.
- Maintaining accurate records of file creation date, modified date, and accessed date is sometimes a legal requirement for some organizations. It is possible to guarantee adherence to these rules by changing these attributes.
- You may want to change the timestamp to protect your privacy and security, especially if you are planning on sharing the items with someone else and do not want them to find out its exact date of creation, or the last time it was accessed.
Closing words
Timestamps provide insight into the digital content they are associated with. Documents and folders contain these digital time signatures embedded in their metadata. Using the guide provided in this post, these can be modified for any given reason in a few minutes.
Additionally, there are other tools available online for manipulating these stamps. However, Attribute Changer has proven to be the most convenient to use.
Changing file dates and times on Windows 10 can be a useful tool in various situations. Whether you need to organize your files, keep track of versions, or modify the metadata for specific purposes, being able to manipulate the date and time of files is a valuable skill to have. In this blog post, we will explore different methods to change file date and time on Windows 10, providing step-by-step instructions and insights into each method. By the end of this article, you will have a comprehensive understanding of how to modify file dates and times on your Windows 10 system.
Video Tutorial:
Why You Need to Change File Date and Time
There are several reasons why you may want to change the date and time of files on your Windows 10 system. Here are a few scenarios where this ability can come in handy:
1. File organization: Changing the date and time of files can help you sort and arrange them in a more logical manner. For example, you may want to group files by a specific date or time range for easier navigation and retrieval.
2. Version control: If you are working on a project that involves multiple iterations or versions of files, modifying the date and time can help differentiate between different versions and track the progress more efficiently.
3. Legal and compliance requirements: Some industries or organizations have specific regulations or legal requirements that mandate keeping accurate records of file creation, modification, or access. Being able to modify file dates and times can ensure compliance with these regulations.
4. Privacy and security: Changing the date and time of files can help protect your privacy and security by obscuring sensitive information. For example, if you are sharing files with others and want to hide the exact date or time of creation, modifying the metadata can provide an additional layer of anonymity.
Method 1: Changing File Date and Time Using File Properties
Changing the file date and time using file properties is the most straightforward method available on Windows 10. This method allows you to modify the file’s creation, modification, and last access dates and times.
Here’s how you can change file date and time using file properties:
1. Right-click on the file you want to modify and select «Properties» from the context menu.
2. In the properties window, navigate to the «Details» tab.
3. Under the «Origin» section, you will find the current file dates and times. To modify them, click on the «Change» button next to the specific date or time you want to change.
4. In the «Change Date and Time» dialog box, adjust the values to your desired date and time. You can also use the arrows to modify the values incrementally.
5. Click «OK» to apply the changes.
6. Finally, click «Apply» and then «OK» in the properties window to save the modified dates and times.
Pros:
1. Easy and straightforward process to change file dates and times.
2. Provides the ability to modify creation, modification, and last access dates and times.
Cons:
1. Modifying file dates and times using file properties can be time-consuming for multiple files.
2. The changes made using this method may not be reflected in some applications that rely on specific metadata for sorting or organizing files.
Method 2: Changing File Date and Time Using Command Prompt
Another method to change file date and time on Windows 10 is by using the Command Prompt. This method allows you to modify the file’s creation, modification, and last access dates and times through a command-line interface.
Here’s how you can change file date and time using Command Prompt:
1. Open the Command Prompt by pressing the Windows key + R, typing «cmd» (without quotes), and then pressing Enter.
2. Navigate to the directory where the file is located using the «cd» command. For example, if the file is in the «Documents» folder, you can use the command «cd Documents» to navigate to that folder.
3. Once you are in the correct directory, type the following command to change the creation date and time:
copy /b filename +, , where «filename» is the name of the file you want to modify.
4. To change the modification date and time, use the following command:
copy /b filename +,,
5. To change the last access date and time, use the following command:
copy /b filename +,,
6. Replace «filename» with the actual name of the file, and make sure to remove the «,» symbols when using the commands.
7. Press Enter to execute the command. The file’s dates and times will be modified accordingly.
Pros:
1. Allows changing file dates and times through a command-line interface.
2. Can be used to modify creation, modification, and last access dates and times simultaneously.
Cons:
1. Requires familiarity with Command Prompt commands.
2. Modifying file dates and times using Command Prompt can be time-consuming for multiple files.
Method 3: Changing File Date and Time Using Third-Party Software
If you prefer a more user-friendly approach to change file dates and times on Windows 10, there are several third-party software options available. These software programs offer a graphical user interface (GUI) and additional features to efficiently modify file metadata.
Here’s an example of how you can change file date and time using a third-party software program, «File Date Corrector«:
1. Download and install the «File Date Corrector» software from a trusted source.
2. Launch the software and select the files you want to modify.
3. Choose the specific date and time attribute you wish to change (creation, modification, or last access).
4. Input the new date and time values or use the provided calendar and clock interfaces to adjust them.
5. Click on the «Modify Dates» or similar button to apply the changes.
6. The software will update the files’ metadata according to the specified modifications.
Pros:
1. User-friendly interface with additional features for managing file metadata.
2. Allows modifying file dates and times for multiple files simultaneously.
Cons:
1. Requires downloading and installing additional software.
2. Third-party software programs may have limitations or restrictions based on their individual licenses.
| Pros | Cons |
|---|---|
| 1. Offers a user-friendly interface for modifying file dates and times. | 1. Requires downloading and installing additional software. |
| 2. Allows modifying file dates and times for multiple files simultaneously. | 2. Third-party software may have limitations or restrictions based on their individual licenses. |
Method 4: Changing File Date and Time Using PowerShell
PowerShell is a powerful scripting language that can be utilized to change file dates and times on Windows 10. By leveraging PowerShell’s capabilities, you can automate the process of modifying file metadata for multiple files or perform more complex tasks.
Here’s how you can change file date and time using PowerShell:
1. Open PowerShell by pressing the Windows key + R, typing «PowerShell» (without quotes), and then pressing Enter.
2. Navigate to the directory where the file is located using the «cd» command, similar to the Command Prompt method.
3. To change the file’s creation date and time, use the following command:
(Get-Item filename).CreationTime = "yyyy-MM-dd HH:mm:ss"
Replace «filename» with the actual name of the file, and «yyyy-MM-dd HH:mm:ss» with the desired date and time in the format indicated.
4. To change the file’s modification date and time, use the following command:
(Get-Item filename).LastWriteTime = "yyyy-MM-dd HH:mm:ss"
5. To change the file’s last access date and time, use the following command:
(Get-Item filename).LastAccessTime = "yyyy-MM-dd HH:mm:ss"
6. Replace «filename» and «yyyy-MM-dd HH:mm:ss» as needed.
7. Press Enter to execute the command. The file’s dates and times will be modified accordingly.
Pros:
1. Offers more powerful scripting capabilities compared to Command Prompt.
2. Can automate the process of modifying file dates and times for multiple files.
Cons:
1. Requires familiarity with PowerShell scripting language.
2. More complexity compared to other methods, especially for beginners.
FAQs:
Q1: Can changing file dates and times negatively impact my computer?
A: No, changing file dates and times won’t negatively impact your computer itself. However, it’s important to note that modifying file dates and times can have unintended consequences, such as affecting applications that rely on specific metadata for sorting or organizing files.
Q2: Is it possible to change file dates and times to dates in the future?
A: Yes, it is possible to change file dates and times to dates in the future using some methods. However, it’s worth noting that setting dates in the future may result in unexpected behavior within certain applications or systems. It’s recommended to exercise caution and consider the implications before setting future dates.
Q3: Can file dates and times be changed back to their original values?
A: Yes, the file dates and times can be changed back to their original values using the same methods described in this article. Simply follow the steps and input the original date and time values to revert the changes.
Q4: Does changing file date and time affect file integrity or content?
A: No, changing file dates and times does not affect the integrity or content of the files. Only the metadata, such as creation, modification, and last access dates and times, are modified while leaving the file’s content intact.
Q5: Can file dates and times be modified for system files?
A: Modifying file dates and times for system files may require administrative privileges and is generally not recommended unless you have a specific reason for doing so. Any changes to system files should be done with caution, as they can potentially affect the stability and functionality of your computer.
Final Thoughts:
Changing file dates and times on Windows 10 can be a valuable skill to have, whether for organizational purposes, version control, or compliance requirements. In this blog post, we have explored four different methods to change file date and time on Windows 10. From using file properties and Command Prompt to third-party software and PowerShell, each method offers its own advantages and considerations. As always, it’s important to exercise caution and be mindful of the implications when modifying file dates and times, especially if they are critical to the functionality or organization of your files.
Использование File Date Changer для даты изменения, доступа и создания
Все мы знаем, что когда мы проверяем атрибут файла, нам показывают разные даты. Многие люди хотят изменить дату с помощью смены даты файла. Поскольку они обнаружили, что не могут напрямую изменить дату файла, независимо от даты изменения, даты доступа и даты создания. К счастью, этот пост даст вам одно средство смены даты файла и даст вам возможность заставить вашу Windows 10 стать средством смены даты файла. Вы можете выбрать наиболее подходящий для вас способ изменить эти три типа дат.
Часть 1: AnyRec для изменения даты файлов [все операционные системы]
Если вы хотите найти программу смены даты файла, AnyRec Video Converter может быть лучшим выбором для вас. Это программное обеспечение может изменить время создания, время изменения и время доступа. Более того, это также средство смены даты пакетного файла, вы можете не только изменить дату одного файла за один раз, но и время пакета файлов одновременно.
Причина, по которой вам рекомендуется это программное обеспечение, заключается не только в мощной функции изменения даты. По сравнению с другими сменщиками даты файлов, этот имеет более приятный дизайн. И что он может сделать помимо изменения даты файла. Что касается видеофайлов, вы даже можете изменить их форматы и другие метаданные с помощью этого программного обеспечения. Самое главное, что любая версия Windows и любая версия Mac могут загрузить и запустить это программное обеспечение.
AnyRec Video Converter
Измените дату пакета файлов за один раз и измените три типа дат.
Конвертируйте форматы видеофайлов в более чем 1000 различных форматов.
Отредактируйте метаданные ваших видео- и аудиофайлов, если хотите.
Имейте расширенный и совершенно новый главный экран, чем другие программы смены даты файла.
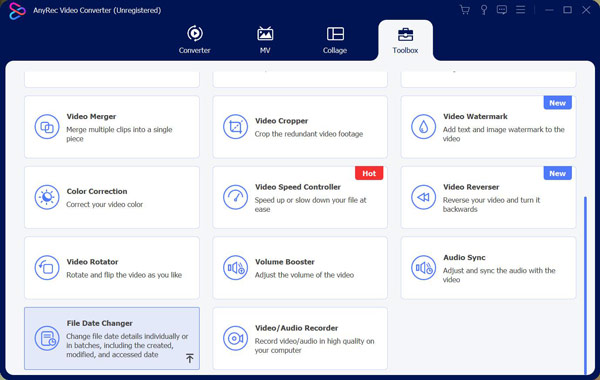
Шаг 1.При запуске программного обеспечения нажмите кнопку «Панель инструментов» в верхней части главного экрана. На этом экране вы можете увидеть кнопку «Изменение даты файла». Нажмите ее, чтобы добавить один или несколько файлов, которые вы хотите изменить.
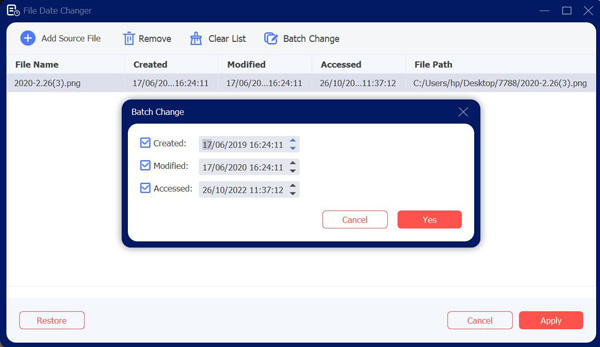
Шаг 2.После того, как вы добавите файл, вы увидите три опции рядом с именем файла. Это время создания, время изменения и время доступа. Вы можете выбрать, какое время вы хотите изменить.

Шаг 3.Если вы добавляете более одного файла и хотите изменить их дату на ту же дату. Вы можете нажать кнопку «Пакетное изменение» в верхней части экрана. Вы также можете нажать кнопку флажка, чтобы выбрать, какие даты вы хотите изменить.
Шаг 4.Когда вы закончите установку даты файла, вы можете нажать кнопку «Применить» в нижней части экрана.
Часть 2. Введите код для принудительного изменения даты Windows 10
В атрибут команда от Windows PowerShell позволяет просматривать и изменять атрибуты файлов для файлов Windows 10. Он входит в стандартную комплектацию, поэтому для его использования вам не потребуется дополнительное программное обеспечение для изменения даты файла. Но это работает только в Windows 10, и вы должны сначала получить оценку от администрации.
Это довольно сложный метод, но и весьма ограниченный. Если вам нужен более простой способ изменения атрибутов файла, используйте AnyRec Video Converter выше. Но если вы не хотите загружать какое-либо программное обеспечение, вы можете прочитать следующие шаги:
Шаг 1.Для начала откройте окно PowerShell — желательно с правами администратора. Для этого щелкните правой кнопкой мыши кнопку «Пуск» Windows и нажмите кнопку «PowerShell (Администратор)», чтобы запустить новое окно PowerShell с включенными правами администратора.

Шаг 2.Используйте команды «cd» и «ls» для перемещения папок и просмотра содержимого файлов. Как только вы окажетесь в нужной папке, вы можете перечислить все соответствующие атрибуты вашего файла, набрав «Get-ItemProperty -Path file | Format-list -Property * -Force», заменив файл своим путем к файлу.
Шаг 3.Вы можете использовать команду Set-ItemProperty для изменения атрибутов файла, например доступа только для чтения. Для этого введите «Set-ItemProperty -Path file -Name IsReadOnly -Value True», заменив файл своим именем. Полный список возможных переменных для этой команды см. в полной документации Microsoft PowerShell.

Шаг 4.Успешное изменение приведет к тому, что PowerShell не вернет ответа, но вы можете проверить, было ли оно успешным, снова введя команду «Get-ItemProperty -Path file | Format-list -Property * -Force» или просмотрев свойства файла с помощью «Проводник файлов».
Шаг 5.Затем вы можете щелкнуть файл правой кнопкой мыши и нажать кнопку «Изменить атрибуты». Там будет флажок «Изменить отметки даты и времени». Нажмите кнопку, и это позволит вам изменить созданные, измененные и доступные временные метки — измените их, используя предоставленные параметры.
Часть 3: Часто задаваемые вопросы о File Date Changer
-
Могу ли я узнать точную дату удаления файла?
Нет. Компьютеры не записывают напрямую метаданные файла при его удалении. Следовательно, как правило, невозможно указать, когда именно файл был удален. Дата последнего доступа может показать, что файл существовал в определенную дату, но ничего после этой даты.
-
Как изменить дату папки?
Щелкните правой кнопкой мыши папку, затем щелкните значок Свойства файла кнопка из Изменить атрибут. И вы можете увидеть, какие даты вы хотите изменить, внести изменения и нажать кнопку «ОК».
-
В чем разница между этими тремя видами дат?
Отметка даты последнего доступа относится практически к любому действию, которое пользователь или даже сама компьютерная система может выполнить с файлом. Дата последнего изменения файла относится к дате и времени последней записи файла. А штампы даты создания указывают, когда файл появился на конкретном носителе данных, например на жестком диске.
Заключение
Как мы видим, если вы знакомы с кодированием компьютера, вы можете заставить свою Windows 10 стать средством смены даты файла, чтобы изменить дату. Но для тех людей, которые не хотят этого неприятного действия и не используют Windows 10, AnyRec Video Converter для них это лучший выбор. И вам даже не нужно беспокоиться о том, что вы не сможете изменить дату файлов.