
In this article, we want to teach you How To Change the Time Zone on Windows Server 2019.
The term Time Zone can be used to describe several different things, but mostly it refers to the local time of a region or a country.
As you know, changing the Time Zone is important for people who use a variety of Windows services and provide that service on a network or Internet level.
In this guide, you will learn to change Time Zone with PowerShell.
Steps To Change Time Zone on Windows Server 2019 with PowerShell
To change the Time Zone with PowerShell, you need to open a PowerShell with Administrator access.
To do this, from your start menu type PowerShell and right-click on it, and select Run as an Administrator.
Check the Current Time Zone on Windows Server 2019
After you open your PowerShell on your Windows Server, run the following command to see your current Time Zone:
Get-TimeZone
In your output, you will see something similar to this:
Output
Id                         : Pacific Standard Time
DisplayName                : (UTC-08:00) Pacific Time (US & Canada)
StandardName               : Pacific Standard Time
DaylightName               : Pacific Daylight Time
BaseUtcOffset              : -08:00:00
SupportsDaylightSavingTime : True
List Available Time Zones on Windows Server 2019
Now you can use the following command to list the available Time Zones on your Windows Server:
Get-TimeZone -ListAvailable
In your output you will see:
Output
Id                         : Dateline Standard Time
DisplayName                : (UTC-12:00) International Date Line West
StandardName               : Dateline Standard Time
DaylightName               : Dateline Daylight Time
BaseUtcOffset              : -12:00:00
SupportsDaylightSavingTime : False

Id                         : UTC-11
DisplayName                : (UTC-11:00) Coordinated Universal Time-11
StandardName               : UTC-11
DaylightName               : UTC-11
BaseUtcOffset              : -11:00:00
SupportsDaylightSavingTime : False

Id                         : Aleutian Standard Time
DisplayName                : (UTC-10:00) Aleutian Islands
StandardName               : Aleutian Standard Time
DaylightName               : Aleutian Daylight Time
BaseUtcOffset              : -10:00:00
SupportsDaylightSavingTime : True
...
After viewing the list of available time zones and selecting the desired time zone, with the Set-TimeZone command you can set your Windows server time zone.
Set Time Zone
For example:
Set-TimeZone -Name “Canada Central Standard Time”
At this point, you can use the following command again to see your current Time Zone:
Get-TimeZone
In your output you will see that your Time Zone has been changed:
Output
Id                         : Canada Central Standard Time
DisplayName                : (UTC-06:00) Saskatchewan
StandardName               : Canada Central Standard Time
DaylightName               : Canada Central Daylight Time
BaseUtcOffset              : -06:00:00
SupportsDaylightSavingTime : False
Also, you can use different ways to change your Windows Time Zone like:
Change the Time Zone from the CMD, from the control panel, and from the setting.
Conclusion
At this point, you have successfully changed your Windows Server 2019 Time Zone.
Hope you enjoy it.
Maybe you will be interested in these articles:
Install and Configure Apache on Windows Server 2019.
How To Run Nginx on Windows Server 2019.
Отметим, что часовой пояс, как и дата/время, является одним из значимых параметров компьютера, влияющих на правильное функционирование Windows и различных приложений. Рекомендуется устанавливать часовой пояс в соответствии с географическим положением компьютера.
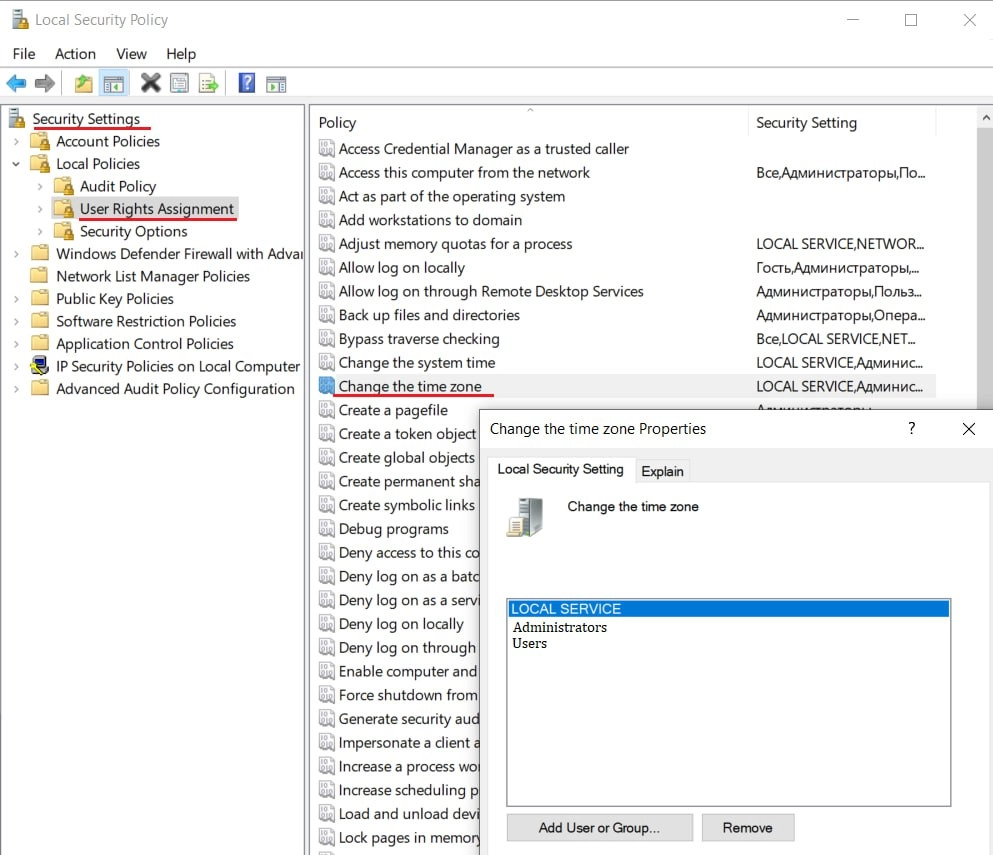
Предоставление прав на изменение часового пояса в Windows.
Чтобы ограничить права пользователей на изменение часового пояса, необходимо открыть локальную политику безопасности через командную строку с помощью команды: secpol.msc В открывшемся окне перейдите по пути: Security Settings -> Local Policy -> User Rights Assignment -> Change the time zone (Изменение часового пояса).
Чтобы ограничить права пользователей на изменение часового пояса, необходимо удалить ‘Users’ из списка учетных записей пользователей. В Windows Server изменять часовой пояс могут пользователи из групп ‘Local Service’ и ‘Administrators’.
Изменение часового пояса в Windows / Windows Server.
Изменение часового пояса в графическом интерфейсе Windows
В операционных системах Windows 10 и Windows Server 2019/2016 для настройки времени и часового пояса можно:
— перейти в раздел «Настройки» через меню «Пуск»;
— перейти в раздел «Параметры», щелкнув правой кнопкой мыши по значку часов на панели задач, где можно выбрать опцию «Настроить дату и время»;
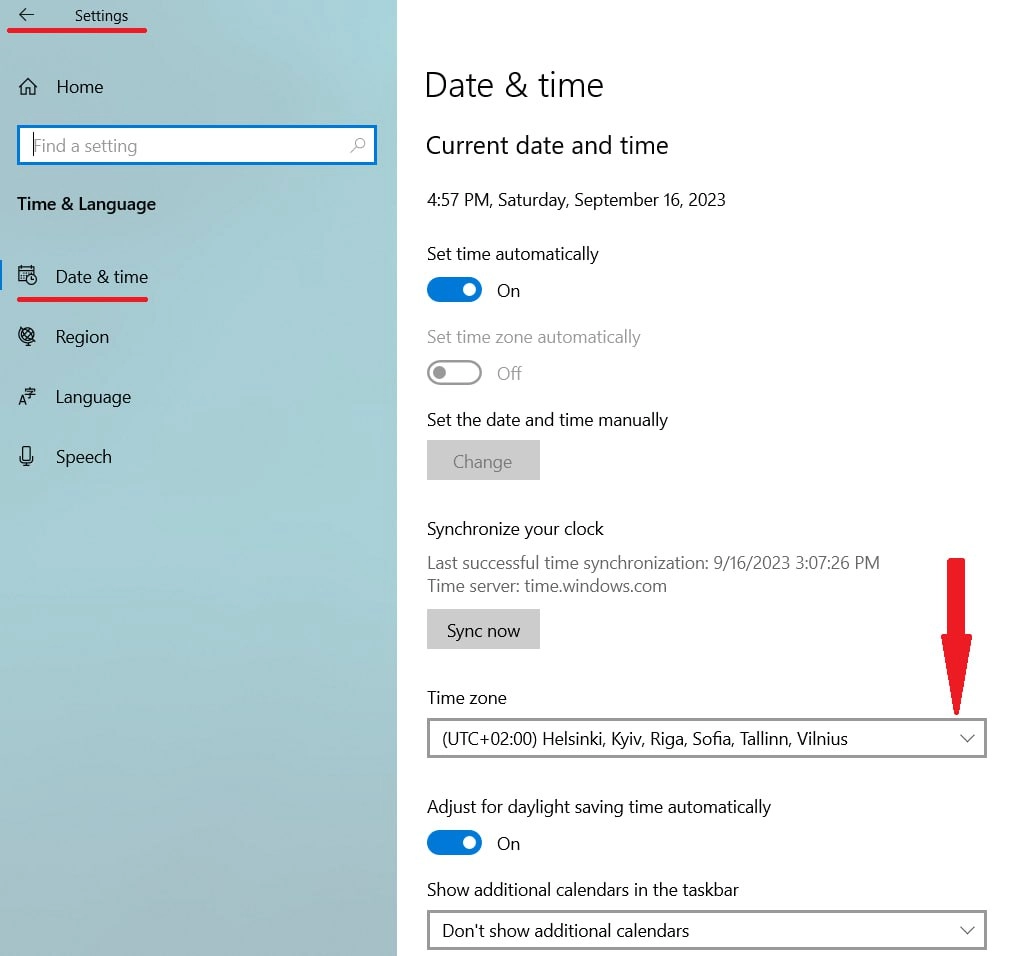
*Поумолчанию опция «Устанавливать время автоматически» будет отмечена. Вы можете отключить эту опцию и вручную выбрать нужный часовой пояс из выпадающего списка.
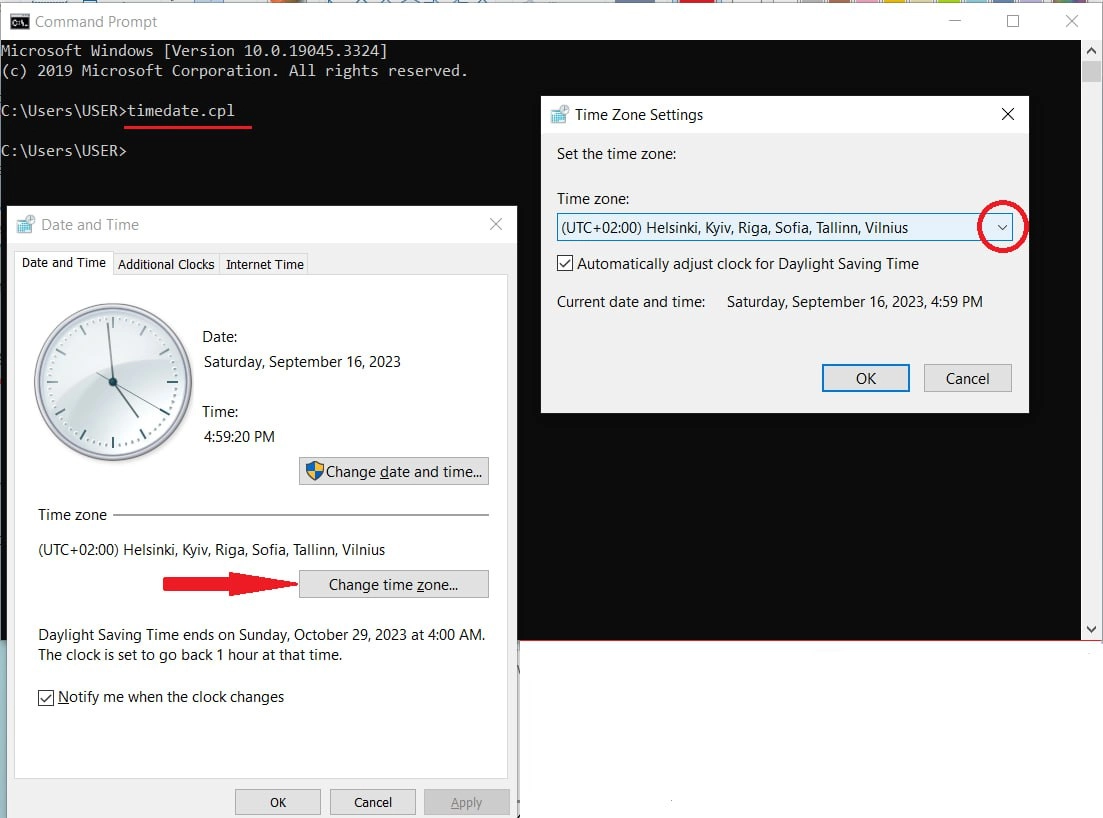
— Запустите timedate.cpl из cmd, и он откроет окно настроек времени Windows, где вы можете указать часовой пояс с помощью кнопки «Изменить часовой пояс».
Изменение часового пояса из cmd с помощью утилиты TZUtil
Откройте командную строку cmd.exe
* Отметим, что утилита tzutil.exe подходит для Windows 10/11, Windows Server 2016/2019/2022
Сначала определите текущий часовой пояс и его идентификатор (TimeZoneID). Для этого введите команду:
tzutil /g
Если вы не уверены в точном названии нужного часового пояса, выведите список всех часовых поясов с их названиями и идентификаторами с помощью следующей команды:
tzutil /l
Вы также можете найти актуальный список часовых поясов Windows у Microsoft.
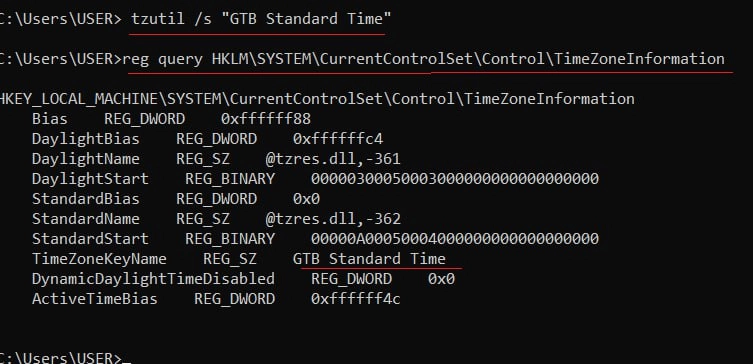
Чтобы изменить текущий часовой пояс, укажите идентификатор нового часового пояса в следующем формате:
tzutil /s "GTB Standard Time"
В реестре Windows можно проверить текущий часовой пояс:
reg query HKLM\SYSTEM\CurrentControlSet\Control\TimeZoneInformation
Чтобы отключить переход на летнее время для определенной зоны, необходимо указать идентификатор часового пояса с окончанием: _dstoff
tzutil /s "GTB Standard Time_dstoff"
Чтобы отобразить полную информацию о часовом поясе и настройках сезонных часов, введите следующую команду :
w32tm /tz

Изменение часового пояса с помощью PowerShell
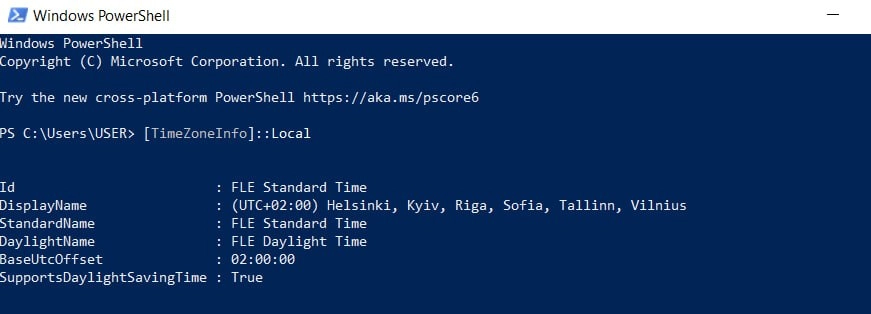
Чтобы определить текущий часовой пояс в консоли PowerShell, используйте одну из следующих команд:
[TimeZoneInfo]::Local
Get-TimeZone
Чтобы просмотреть список всех доступных часовых поясов в консоли PowerShell, вы также можете использовать одну из следующих команд:
Get-TimeZone -ListAvailable
[System.TimeZoneInfo]::GetSystemTimeZones()
Список всех часовых поясов достаточно велик, поэтому для удобства рекомендуется использовать фильтр, в котором указывается часть названия, например:
Get-TimeZone -ListAvailable | Where-Object {$_.Id -like "*FLE*"}

Чтобы изменить текущий часовой пояс из консоли PowerShell, введите команду:
Set-TimeZone -Name "FLE Standard Time"
*укажите название нужного часового пояса в кавычках.
Network Time Protocol (NTP) is a highly scalable internet protocol that determines the best time information and synchronizes accurate settings on a computer system. This guide explains how to set the time zone and configure NTP on a Windows Server.
This guide uses Windows Server 2019, but these instructions work on any machine with Server 2016 or later.
Prerequisites
Before you begin:
- Deploy a Vultr Windows Server.
- Connect to the server.
Set the Timezone
- Using the Windows Start Menu, open Server Manager.
- Locate Time zone in the local server properties section.
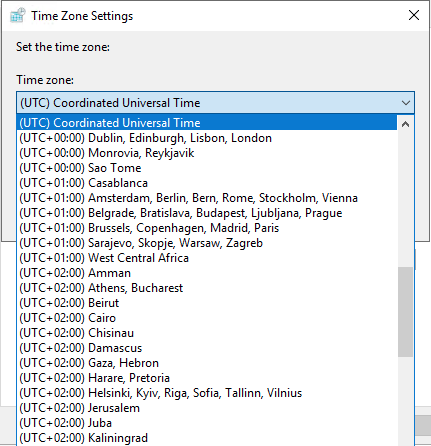
- Click the current timezone, which is UTC Coordinated Universal Timeby default.
- In the Date and Time window, click Change time zone.
- Expand the Time zone drop-down list.
- Select your preferred timezone. It’s recommended to set it to your server location.
- Click OK to save changes.
- Click Apply to load changes on the server.
- Re-open Server Manager, and verify the timezone change.
Optional: Set the Timezone using PowerShell
-
From the start menu, open Windows PowerShell, or open the run dialog (Win key + R), type
powershellin the search bar, and click OK to start PowerShell. -
Run the following command to check the server timezone.
PS > Get-Timezone -
View all available timezones.
PS> Get-Timezone -ListAvailableTo find your target timezone, use the following command to filter by name.
PS> Get-Timezone -ListAvailable | Where-Object {$_.displayname -like "*US*"}> The command above displays all names containing the characters
US. You can use a different string such as London. -
Change your timezone.
PS> Set-Timezone -Name "Central Standard Time"You can also change the timezone by ID.
PS> Set-Timezone -Id "Central Standard Time"
Configure NTP
In addition to setting the timezone, you can also configure Windows to use NTP to synchronize the time.
-
Open the Run dialog window by pressing the Windows key (WIN) + R on your keyboard.
-
In the search bar, enter
regeditand click OK to open Registry Editor. -
Expand the registry navigation tree:
HKEY_LOCAL_MACHINE -> SYSTEM -> CurrentControlSet -> Services
-
Expand W32Time.
-
Click Config.
-
Select AnnounceFlags
-
Enter
5in the Value data field. -
Click OK to save changes.
-
In the left pane, click Parameters.
Optional: Change the NTP Server
By default, Vultr uses the time.constant.com time server, located on our high-speed infrastructure. If you want to use a different time server, you can change the value of the NtpServer parameter by following these steps.
-
Double-click NtpServer
-
Change the value data field to your preferred value. For example, to sync with the United States NTP pool, use:
us.pool.ntp.orgYou can find a list of NTP Pool servers at the official website.
-
Expand TimeProviders.
-
Click NtpServer.
-
Double click Enabled, change the value data from
0to1, and click OK to save changes. -
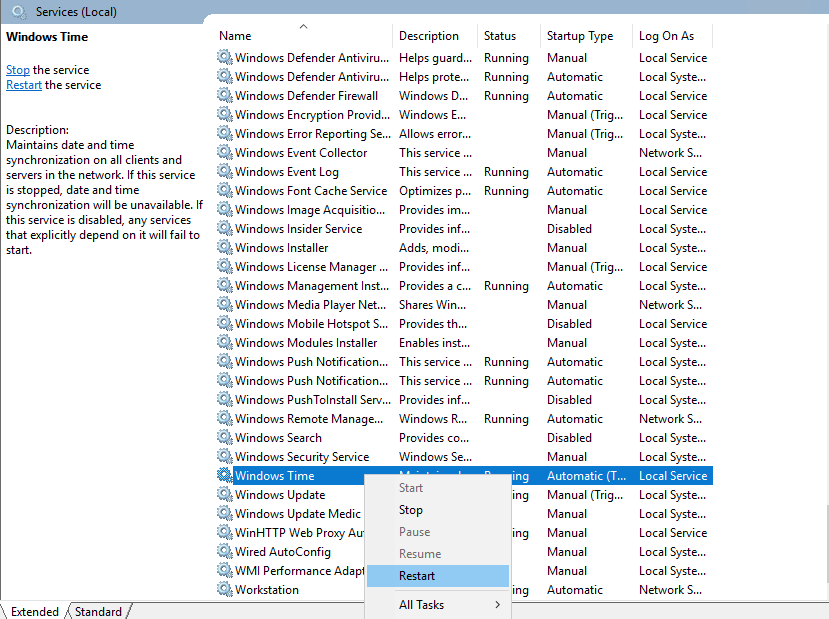
Close the registry editor, open the start menu, and search the keyword
services. -
In the services window, scroll through the list, select Windows Time, right-click, and select Restart to apply NTP changes.

Optional: Configure NTP Using PowerShell
If you prefer to use Powershell, you can use the following commands to configure NTP.
-
Open PowerShell with administrative privileges.
-
Check the NTP time synchronization status.
PS> w32tm /query /status -
Enter the following command to set the time AnnounceFlags to
5.PS> Set-ItemProperty -Path "HKLM:\SYSTEM\CurrentControlSet\services\W32Time\Config" -Name "AnnounceFlags" -Value 5 -
(Optional) If you want to use NTP pool servers instead of Vultr’s NTP server, run the following command.
PS> Set-ItemProperty -Path "HKLM:\SYSTEM\CurrentControlSet\Services\w32time\Parameters" -Name "NtpServer" -Value us.pool.ntp.org -
Enable NTP Server.
PS> Set-ItemProperty -Path "HKLM:\SYSTEM\CurrentControlSet\Services\w32time\TimeProviders\NtpServer" -Name "Enabled" -Value 1 -
Restart the Windows Time service.
PS> Restart-Service w32Time -
Test NTP synchronization.
PS> w32tm /resync
Next Steps
You have successfully set the timezone and configured NTP on Windows Server 2019. If you plan to have other machines on a Vultr VPC use your NTP server, allow port 123 in the Windows Server Firewall. For further information, refer to the following guides.
- Official NTP Documentation
- List of database TimeZones
- Configure the Firewall on Windows Server 2019
- Create A Vultr Virtual Private Cloud (VPC)
When attempting to change the timezone in Windows Server 2019 you may run into the following problems:
- The change button in Windows Settings for Date & Time is greyed out
- Receive an error message when clicking Change Time Zone button in Control Panel Date and Time, even though you are an administrator:
Unable to continue
You do not have permission to perform this task. Please contact your computer administrator for help.
The solution is to force the Control Panel Date and Time applet to run separately with administrator privileges:
- Click Start
- Type timedate.cpl
- Right click on the resulting Control panel item
- Choose Run as administrator
- Now you can adjust the time freely
This entry was posted in Uncategorized. Bookmark the permalink.
August
8
Problem:
Even logged in as a local admin/or a domain admin on a DC, you can not change local time. It is greyed out
Error showing:” some settings are hidden or managed by your organization”
Solutions:
to correct the time, run timedate.cpl
Related Posts:
- How to find AD users Password Expiration Date and…
- WDS server Error: Windows could not apply the…
- HP Server Ml310 Gen8 shutdown randomly
Posted August 8, 2022 by Ray in category «Windows Server
Leave a Reply
Your email address will not be published. Required fields are marked *
Comment *
Name *
Email *
Website
Notify me of followup comments via e-mail. You can also subscribe without commenting.
This site uses Akismet to reduce spam. Learn how your comment data is processed.