
-
Home
-
Partition Magic
- How to Change IP Address on Windows 10 [Step-by-Step Guide]
By Ariel | Follow |
Last Updated
Sometimes, we have to change IP address out of many reasons. How to change IP address on Windows 10? If you are also searching for the answer, you can follow this Windows 10 guide provided by MiniTool to change IP address.
Before You Do
How to change your IP address? In order to change IP address Windows 10 smoothly, it’s required to log in to Windows 10 using an administrator account. Besides, you need to find the IP address of your router and computer. To do so, follow the steps below.
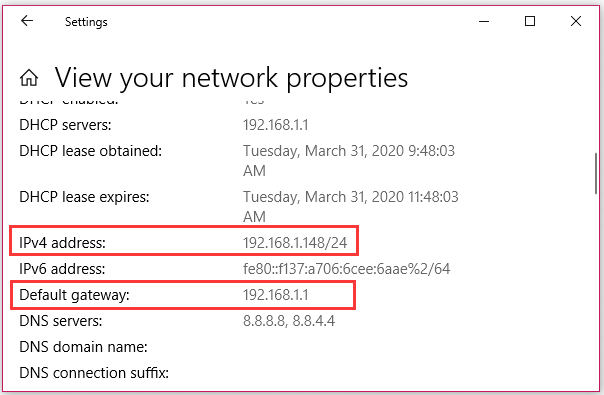
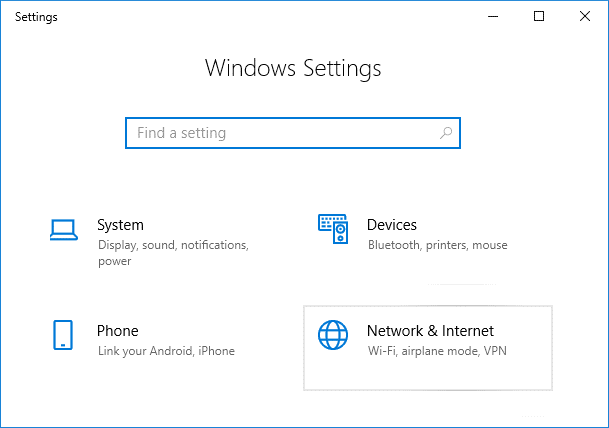
Step 1. Press the Win + I keys to open the Settings app and go to the Network & Internet section.
Step 2. In the Status tab, scroll down the right sidebar and click on the View your network properties option.
Step 3. Now, scroll down the new screen to find the Default gateway and IPv4 address sections. The router’s IP address is next to the Default gateway and the IPv4 address identifies your computer. Remember the IP addresses you have found.
Now, let’s see how to change IP address Windows 10 in the following part.
How to Change My IP Address in Windows 10
Here we will walk you through 2 methods. Each method will be discussed in detail. Now, let’s start learning how to change IP address Windows 10.
Method 1. Change IP Address Windows 10 Using the Settings App
The first and simplest way to change IP address is to use the Settings app. Here’s a full guide for you:
Step 1. Open the Settings app by pressing Win + I keys and then click on Network & Internet.
Step 2. In the pop-up window, select the network type based on your situation. If your device connects to the Internet through a wireless card, select the Wi-Fi section. If your device is using a wired connection, select the Ethernet section.
Step 3. Scroll down the right sidebar to locate the IP settings section and click on the Edit button.
Step 4. In the pop-up dialog box, select Manual from the drop-down menu and enable the IPv4 switch.
Tip: If you want the Windows 10 IP address is to be assigned by the router automatically, you can select Automatic (DHCP) option from the drop-down menu.
Step 5. Enter all the required details below including IP address, Subnet prefix length, Gateway, etc.
IP address: It refers to the static IP address that you want to use.
Subnet prefix length: It refers to the prefix length that determines the size of the subnet.
Gateway: It refers to the IP address of your router.
The Preferred DNS and Alternate DNS settings are not mandatory to enter. The setting will be automatically assigned by your router if they are blank.
Step 6. After the details are entered, click on the Save button to change IP address.
Method 2. Change IP Address Windows 10 in Control Panel
In addition to the above method, you can change IP address Windows 10 through the Control Panel. Here’s how to do that:
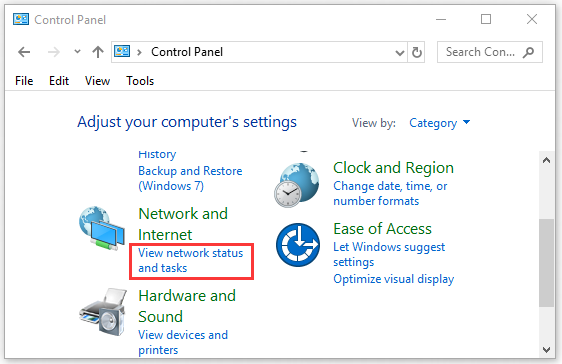
Step 1. Type control in the search window and select the Control Panel app from the best match.
Step 2. Change the View by to Category, and then click on View network status and tasks under the Network and Internet section.
Step 3. Navigate to the View your active networks tab and click on your Internet connection next to it.
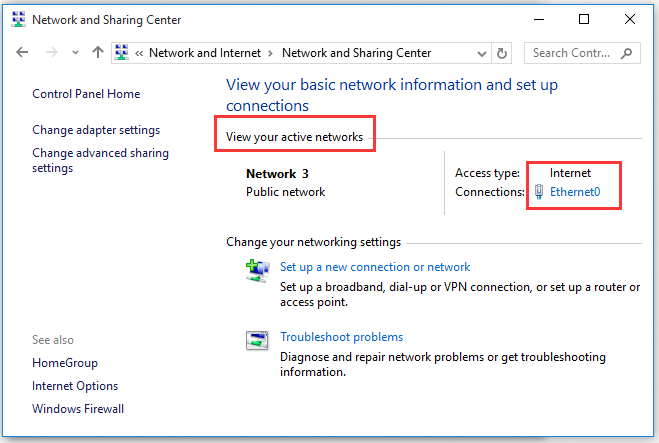
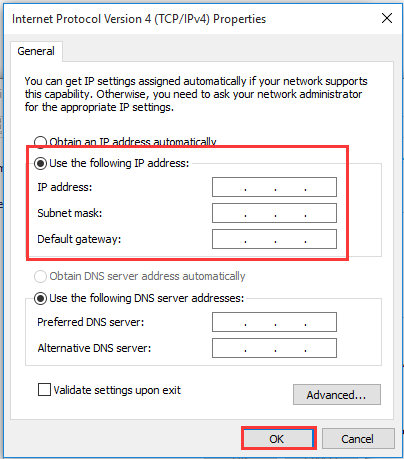
Step 4. In the pop-up window, click on Properties and then select the Internet Protocol Version 4 or IPv6, which depends on the IP address that you’re ready to change.
Step 5. Click on the Properties button.
Step 6. In the Properties window, select the Use the following IP address option if you want to set a static IP address.
Step 7. Then you need to enter all the required details manually including IP address, subnet mask, and Default gateway. After that, click on OK to save the changes and exit the window.
How to change your IP address in Windows 10? I believe that already have known detailed steps. Now, it’s your turn to have a try.
About The Author
Position: Columnist
Ariel has been working as a highly professional computer-relevant technology editor at MiniTool for many years. She has a strong passion for researching all knowledge related to the computer’s disk, partition, and Windows OS. Up till now, she has finished thousands of articles covering a broad range of topics and helped lots of users fix various problems. She focuses on the fields of disk management, OS backup, and PDF editing and provides her readers with insightful and informative content.
Перед тем как менять параметры IP самостоятельно, рекомендуем куда-то записать текущие значения, поскольку они могут пригодиться во время редактирования, а также на случай, когда потребуется вернуть предыдущие адреса.
Способ 1: «Параметры»
Обычно компьютеру автоматически присваивается IP-адрес провайдером. Но изменить его параметры можно вручную с помощью соответствующего раздела в системных «Параметрах». Этот вариант, скорее, подойдет для проводного типа соединения, когда ПК или ноутбук напрямую подсоединен к маршрутизатору:
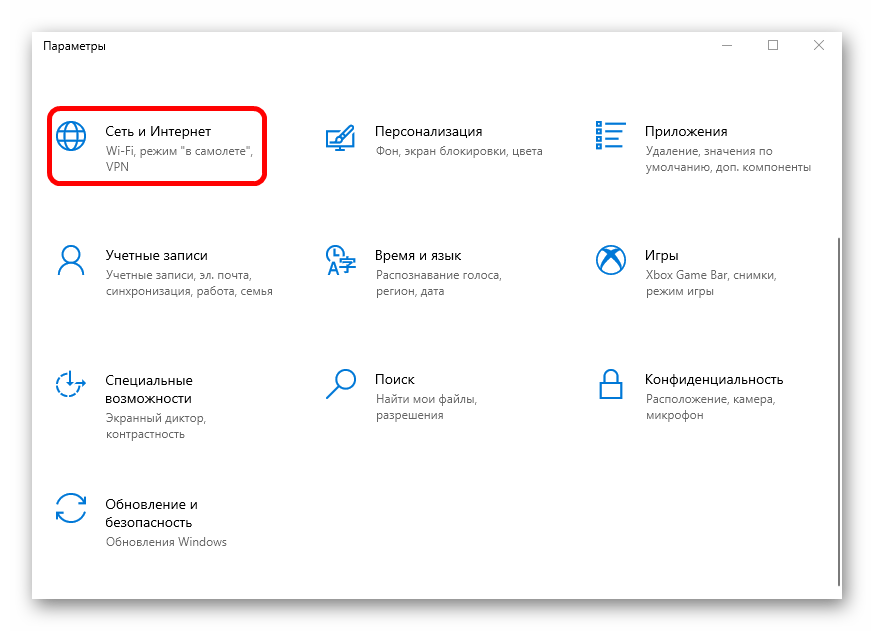
- Нажмите на кнопку «Пуск», затем выберите приложение «Параметры».
- Перейдите в раздел «Сеть и Интернет».
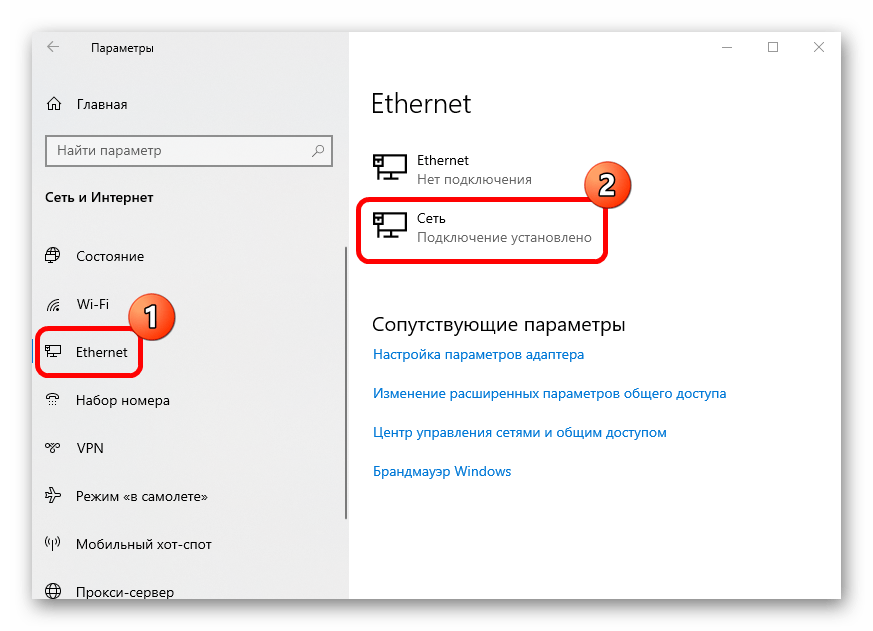
- Нажмите на вкладку слева «Ethernet», а в центральной части окна выберите активное соединение.
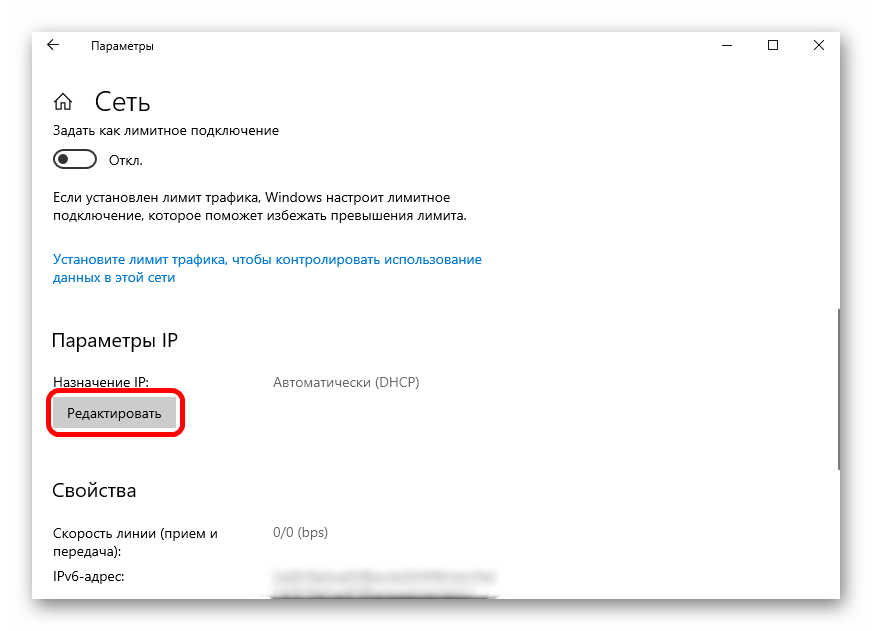
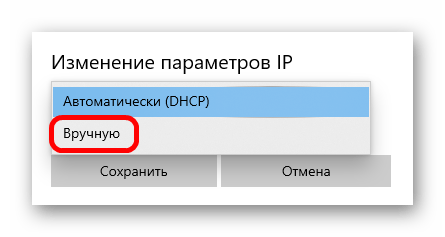
- Пролистайте до блока «Параметры IP» и кликните по кнопке «Редактировать».
- Во всплывающем окне нажмите на выпадающее меню и выберите пункт «Вручную».
- Отобразятся два варианта для изменения: «IPv4» и «IPv6». Чтобы изменить тот или иной протокол, переведите тумблер в активное состояние.
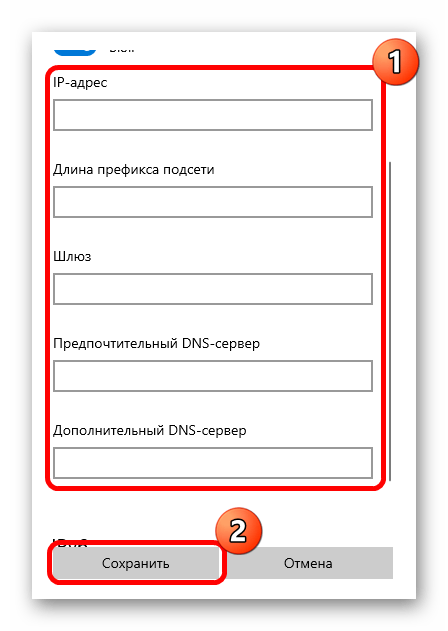
- Появятся дополнительные текстовые поля для ручного ввода параметров: IP-адрес, сервера DNS, шлюз и длина префикса подсети. Как только все данные будут введены, нажмите на кнопку «Сохранить».

Следует отметить, что при редактировании параметров необходимо быть уверенным, что все данные верны, иначе подключение к интернету может быть нарушено. Если у вас не получается сохранить новые параметры, то ознакомьтесь с нашей отдельной инструкцией:
Подробнее: Что делать, если не удается сохранить параметры IP-адреса в Windows 10
Способ 2: «Свойства сетевого адаптера»
Этот метод классический, поскольку используется «Панель управления», свойственная и предыдущим Windows. Через нее нужно перейти в окно с настройкой свойств сетевого адаптера:
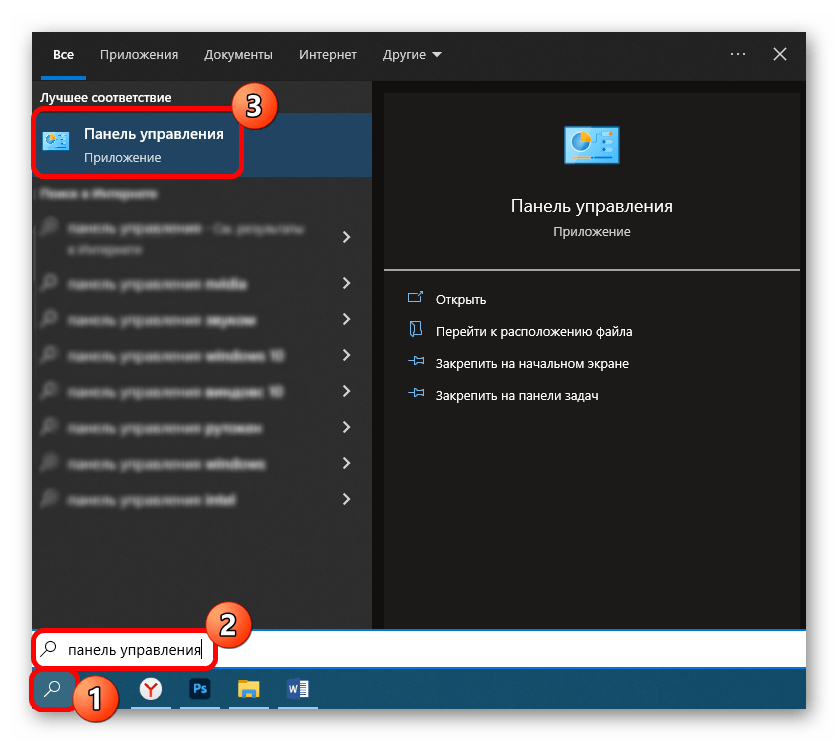
- Через строку системного поиска отыщите средство «Панель управления».
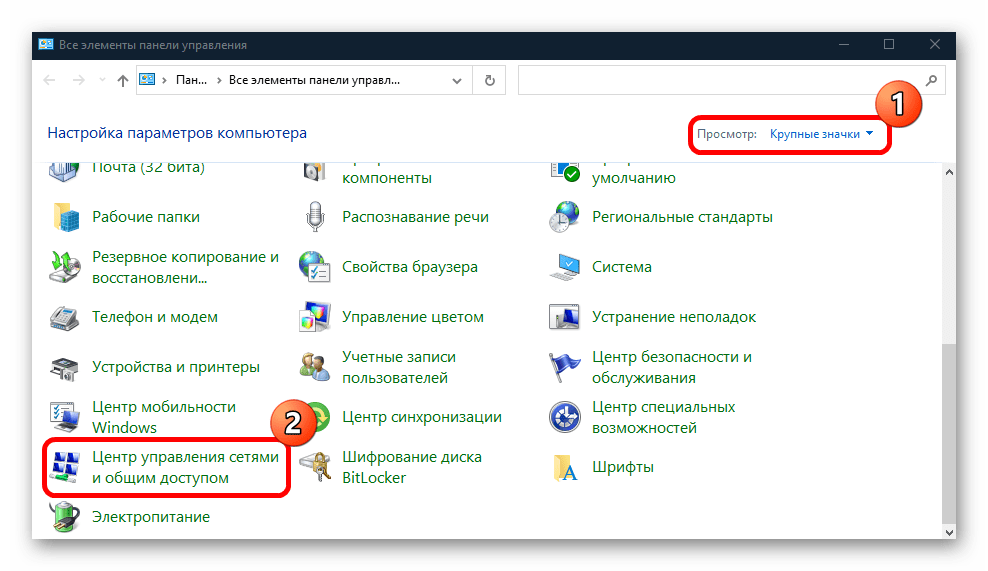
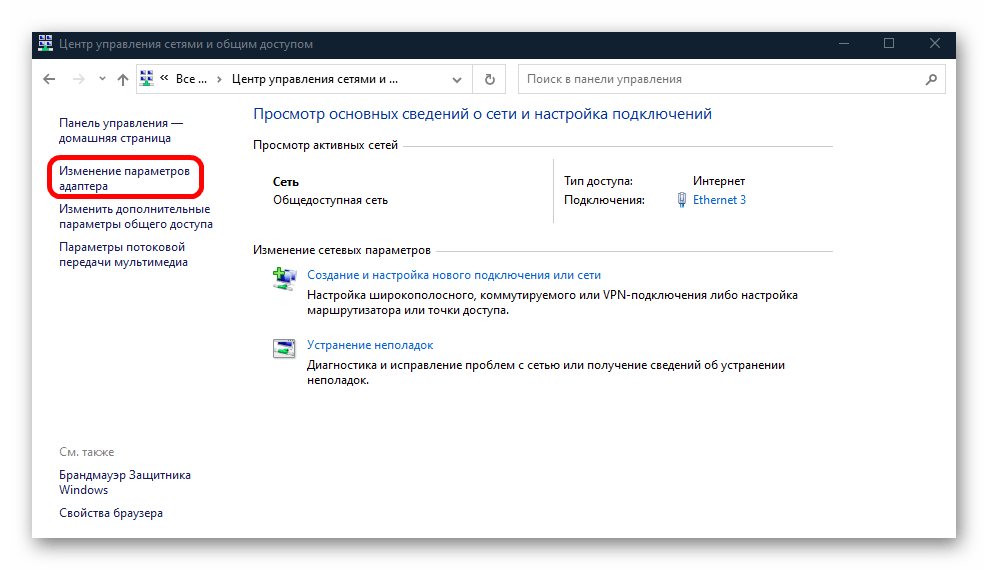
- Для удобства просмотра разделов выберите «Крупные значки» в верхнем правом углу, затем перейдите в «Центр управления сетями и общим доступом».
- В новом окне щелкните по ссылке «Изменение параметров адаптера» на левой панели.
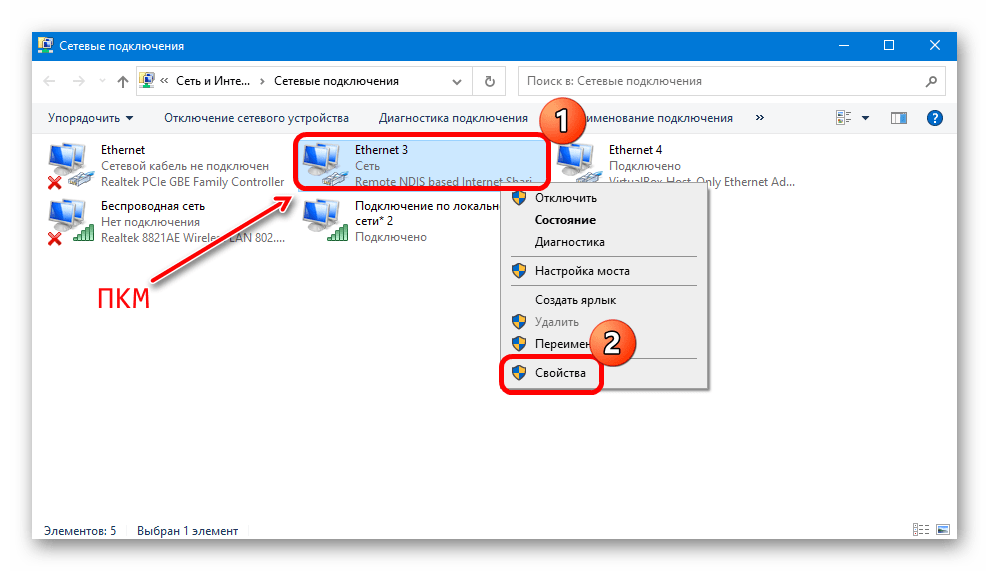
- Отобразится список всех подключений, которые были на ПК или ноутбуке. Отыщите нужное, затем щелкните по нему правой кнопкой мыши и из меню выберите пункт «Свойства».
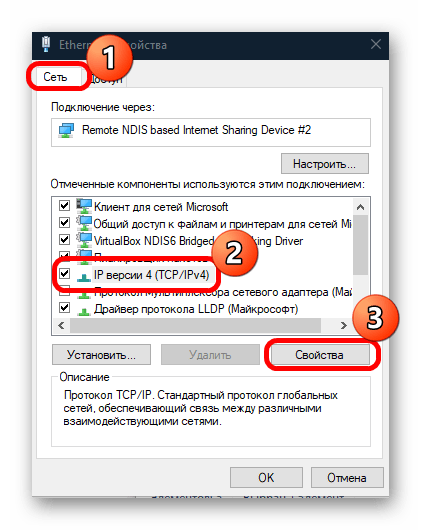
- На вкладке «Сеть» выделите нажатием левой кнопкой мыши пункт «IP версии 4 (TCP/IPv4)», а потом кликните по кнопке «Свойства».
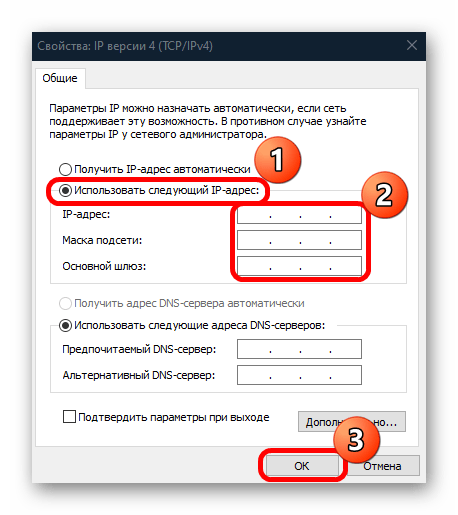
- Поставьте отметку у опции «Использовать следующий IP-адрес», после чего ниже поля станут доступными для редактирования. Введите нужные значения. Так же можно поступить и со сменой DNS-сервера. Сохраните настройки.
Аналогичные действия при необходимости есть возможность проделать и с протоколом «IP версии 6 (TCP/IPv6)», выбрав его в списке окна со свойствами сети.
Способ 3: «Командная строка»
Изменить некоторые параметры IP, в частности статический IP-адрес и DNS-сервер, можно, используя команды. Зная их, не придется копаться в настройках, что может сэкономить время:
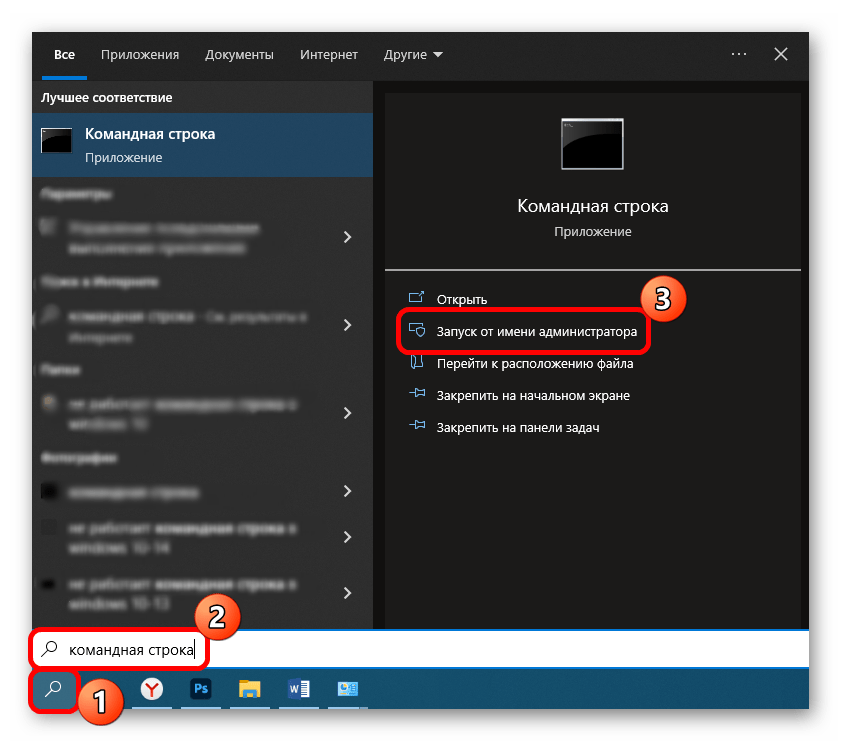
- Запустите «Командную строку» от имени администратора. Для этого воспользуйтесь поисковой строкой на нижней панели.
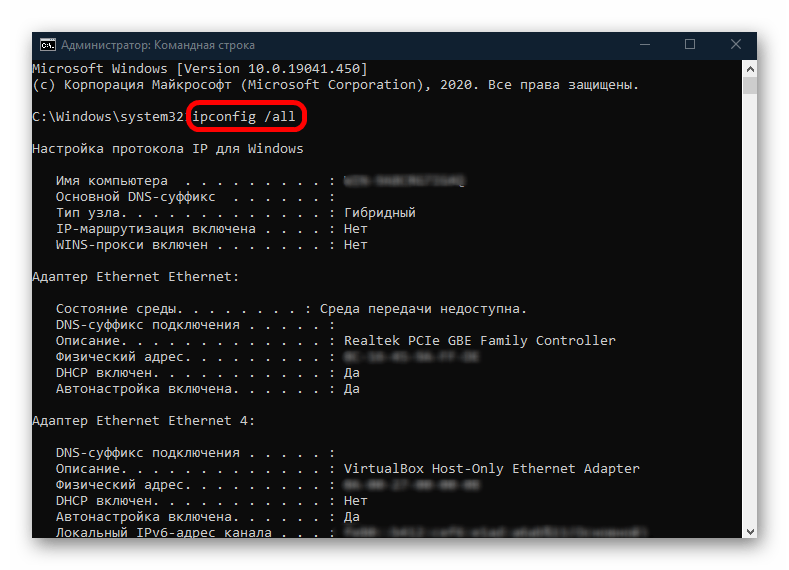
- Чтобы посмотреть все конфигурации сетевых адаптеров, введите команду
ipconfig /allи нажмите на клавишу «Enter». В списке отыщите тот адаптер, параметры IP которого собираетесь изменить. - Чтобы задать сетевому адаптеру статический IP-адрес, вставьте
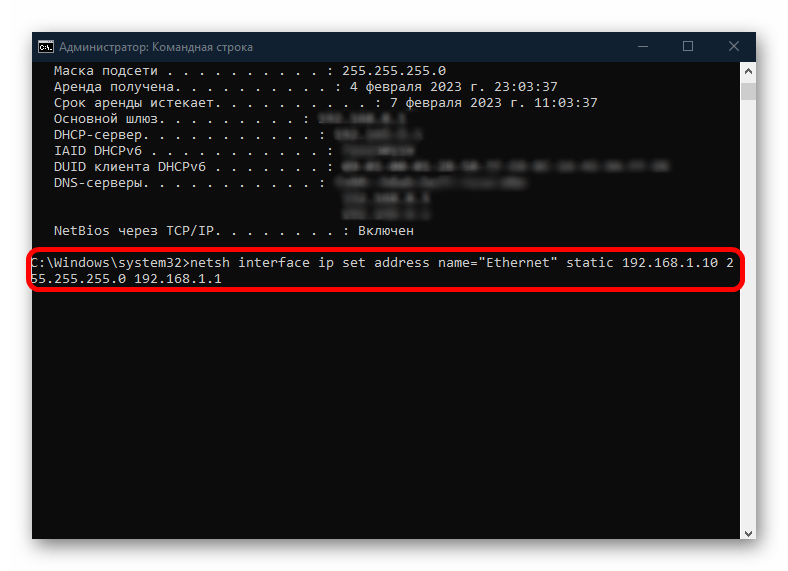
netsh interface ip set address name="Ethernet" static 192.168.1.10 255.255.255.0 192.168.1.1, где нужно прописать свои параметры: вместо «Ethernet» – имя вашего адаптера, а цифры обозначают данные IP-адресов. Выполните команду клавишей ввода. - Далее можете заменить предпочитаемый и альтернативный DNS-серверы, поочередно выполнив команды
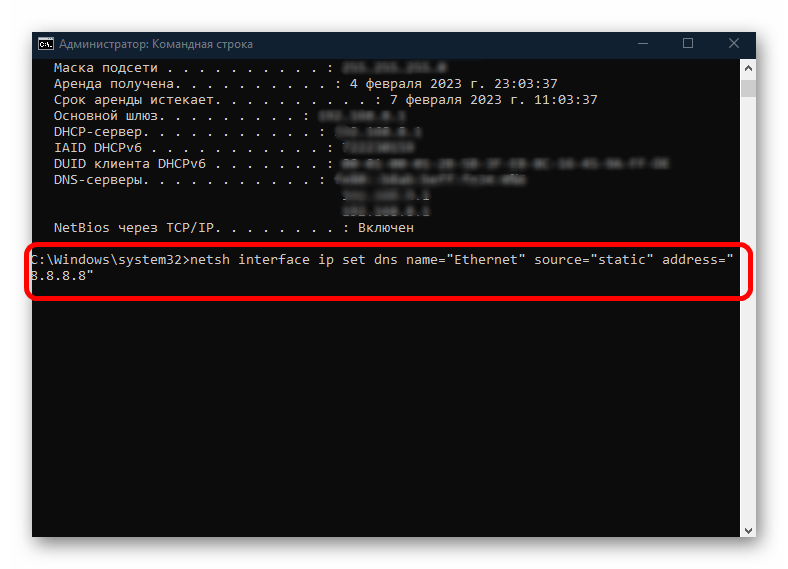
netsh interface ip set dns name="Ethernet" source="static" address="адрес_DNS-сервера"иnetsh interface ip add dns name="Ethernet" address="адрес_DNS-сервера" index=2, не забывая прописывать вместо «Ethernet» и цифр свои данные.
То же самое можно проделать и через консоль «Windows PowerShell», запущенную с расширенными правами.
Наша группа в TelegramПолезные советы и помощь
How to Change IP address in Windows 10: IP address is the unique numerical label each device possesses on any particular computer network. This address is used to send and receive messages between the devices on a network.
The dynamic IP address is provided by the DHCP server (your router). A device’s dynamic IP address changes every time it connects to the network. The static IP address, on the other hand, is provided by your ISP and remains the same until it manually changes by the ISP or the administrator. Having dynamic IP addresses reduces the risk of being hacked than having static IP addresses.

On a local network, you might want to have resource sharing or port forwarding. Now, both of these require a static IP address to work. However, the IP address assigned by your router is dynamic in nature and will change every time you restart the device. In such a situation, you will need to manually configure a static IP address for your devices. There are many ways to do it. Let’s check them out.
Table of Contents
Make sure to create a restore point just in case something goes wrong.
Method 1: USE CONTROL PANEL TO CHANGE IP ADDRESS
1.Use the search field beside the windows icon on the taskbar and search for the control panel.
2.Open control panel.
3.Click on ‘Network and Internet’ and then on ‘Network and sharing center’.

4.Click on ‘Change adapter settings’ on the left side of the window.

5.Network connection windows will open.

6.Right-click on the relevant network adapter and click on properties.
7.In the networking tab, select ‘Internet Protocol Version 4 (TCP/IPv4)’.
8.Click on Properties.
9.In the IPv4 Properties window, select the ‘Use the following IP address’ radio button.
10.Enter the IP address you want to use.
11.Enter the subnet mask. For a local network that you use at your home, subnet mask would be 255.255.255.0.
12.In the Default gateway, enter your router’s IP address.
13.In the Preferred DNS server, enter the IP address of the server which provides DNS resolutions. It is usually your router’s IP address.
14.You can also add an alternate DNS server to connect to in case your device can’t reach the preferred DNS server.
15.Click on OK to apply your settings.
16.Close the window.
17.Try navigating a website to see if it works.
This how you can easily Change IP Address in Windows 10, but if this method doesn’t work for you then make sure to try the next one.
Method 2: USE COMMAND PROMPT TO CHANGE IP ADDRESS
1.Press Windows Key + X then select Command Prompt(Admin).
2.To see your current configurations, type ipconfig /all and hit Enter.

3.You will be able to see the details of your network adapter configurations.

4.Now, type:
netsh interface ip set address name=”yourNetworkAdapter” static 10.20.30.40 255.255.255.0 2.4.6.8
Note: These three addresses being your device’s static IP address you want to assign, subnet mask, and default getaway address, respectively.

5.Press enter and this will assign a static IP address to your device.
6.To set your DNS server address type the following command and hit Enter:
netsh interface ip set dns name=”yourNetworkAdapter” static 10.20.30.1
Note: The last address being that of your DNS server.

7.To add an alternate DNS address, type
netsh interface ip add dns name=”alternateServer” 8.8.8.8 index=2
Note: This address will be the alternate DNS server address.

8.Try navigating a website to see if it works.
Method 3: USE POWERSHELL TO CHANGE IP ADDRESS
1.Press Windows Key + S to bring up the Search then type PowerShell.
2.Right-click on Windows PowerShell shortcut and select ‘Run as administrator’.
3.To see your current IP configurations, type Get-NetIPConfiguration and hit Enter.

4.Note down the following details:
InterfaceIndex
IPv4Address
IPv4DefaultGateway
DNSServer
5.To set a static IP address, run the command:
New-NetIPAddress -InterfaceIndex 13 -IPAddress 10.20.30.40 –PrefixLength 24 -DefaultGateway 2.4.6.8
Note: Here, replace InterfaceIndex number and DefaultGateway with the those you noted down in previous steps and IPAddress with the one you want to assign. For subnet mask 255.255.255.0, PrefixLength is 24, you can replace it if you require to with correct bit number for subnet mask.
6.To set DNS server address, run the command:
Set-DnsClientServerAddress -InterfaceIndex 3 -ServerAddresses 10.11.12.13
Or, if you want to add another alternate DNS address then use the command:
Set-DnsClientServerAddress -InterfaceIndex 3 –ServerAddresses 10.11.12.13, 8.8.8.8
Note: Use the relevant InterfaceIndex and DNS server addresses.
7.This how you can easily Change IP Address in Windows 10, but if this method doesn’t work for you then make sure to try the next one.
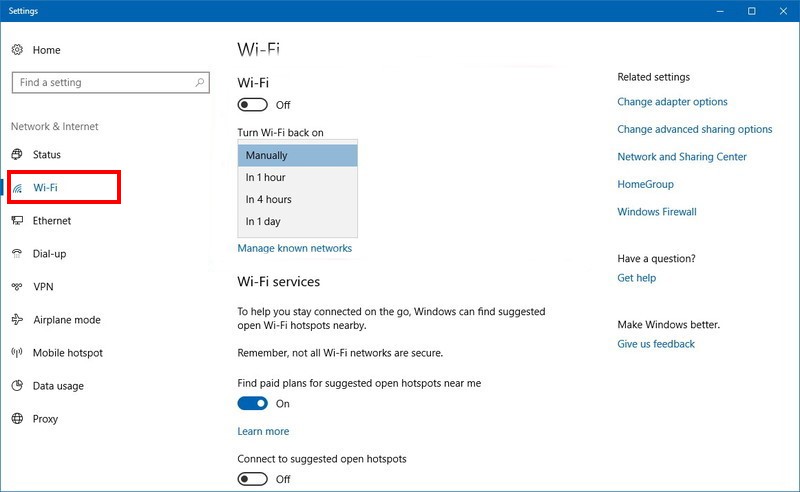
Method 4: CHANGE IP ADDRESS IN WINDOWS 10 SETTINGS
Note: This method works only for wireless adapters.
1.Press Windows Key + I to open Settings then click on ‘Network & Internet’.
2.Click on Wi-Fi from the left pane and select your required connection.

3.Scroll down and click on Edit button under IP settings.

4.Select ‘Manual’ from the drop-down menu and toggle on the IPv4 switch.

5.Set IP address, Subnet prefix length (24 for subnet mask 255.255.255.0), Gateway, Preferred DNS, Alternate DNS and click on Save button.
Using these methods, you can easily set a static IP address for your computer.
Recommended:
- How to Setup Gmail in Windows 10
- Add a Printer in Windows 10 [GUIDE]
- Microsoft Word has Stopped Working [SOLVED]
- How to Disable Google Chrome PDF Viewer
I hope the above steps were able to help you Change IP address in Windows 10 but if you still have any questions regarding this guide then feel free to ask them in the comment’s section.
Your public IP address is unique and visible to websites and network admins. It contains information about your internet service provider, city, region, and country.
As you can imagine, having your public IP address visible is not the best for privacy.
Moreover, the information provided by your IP is the reason why you can’t access a lot of sites due to geo-restrictions or governmental regulations.
For this reason, many people use VPNs to hide their IP. But VPNs do much more than that, and you may not want to pay for a full VPN service if you only need it for changing your IP.
Luckily, there are other ways you can change your IP address on Windows 10.
What is an IP address?

An Internet Protocol (IP) address is a long string of numbers assigned to every device connected to a network.
→ In version 4 of the internet protocol (IPv4), an IP address is a 32-bit number in the form x.x.x.x, where x is a value between 0 and 255.
→ However, if your internet provider offers IPv6 (internet protocol version 6) on its network, you will have something like this: 2001:0db8:85a3:0000:0000:8a2e:0370:7334
In theory, IPv6 is safer and more secure, but it’s not supported by a lot of ISPs and applications due to outdated infrastructure.
Both are equally safe for most online activities, but IPv4 is still the preferred choice because of this compatibility issue.
Now, let’s see how you can change your IP address.
How to change IP without VPN on Windows 10
If you want to change your IP address without using a VPN on Windows 10, you can try a few different methods.
1. Use a proxy server
Like a VPN, a proxy is a middleman between your device and the internet. Websites and apps see the IP address of the proxy server and not your actual IP address.
A VPN is technically a proxy that can be an SSL, SSH, or SOCKS proxy.
Here’s how to set up a proxy server on Windows 10:
- Open the Windows Settings.
- Click on “Network & Internet.“

- Select “Proxy” from the left-hand menu.

- Turn on the “Use a proxy server” toggle switch.

- Enter the IP address and port number of the proxy server you want.

- Click “Save” to apply the changes.
✅ Pros
- Configurable in existing apps like your browser
- There are free proxy servers available online
❌ Cons
- Real IP could be exposed if the proxy connection drops for some reason
- Susceptible to man-in-the-middle attacks
- They lack encryption and other security features
Changing your IP address using a proxy server can help protect your online privacy and security.
Moreover, it will allow you to access geographically restricted content and bypass network restrictions.
2. Use the Tor browser

When you connect to Tor, your internet traffic is encrypted and routed through a random sequence of these volunteer “nodes,” which are sort of like proxy servers.
Tor browser uses nodes that hide your IP address whenever you access any network. The nodes will change each time you use them. That guarantees your anonymity as well.
Websites can only see the IP address of the last server in the sequence, called the exit node.
Each time you visit a website, the nodes’ sequence changes, making tracing activity back to the original IP address practically impossible.
✅ Pros
- It’s completely free
- Easy to use
❌ Cons
- Some websites block connections from known Tor nodes
- May sometimes leak IP address
Tor is used to avoid censorship, ensure online privacy, and avoid targeted ads based on browsing history.
3. Use the Command Prompt
Changing your IP address using Command Prompt can help troubleshoot network issues or protect online privacy.
Following these simple steps, you can release your current IP address, renew it with a new one, and verify your new network configuration information.
- Press the Windows key + R to open the Run dialog box.
- Type “cmd” and hit Enter to open the Command Prompt.

- Now, type “ipconfig /release” and hit Enter.

- Type “ipconfig /renew” and hit Enter to obtain a new IP address from your network.

✅ Pros
- Helpful in diagnosing network problems
- Improves privacy
- It resolves network issues such as slow internet speed
- Free
- Changes IP within seconds
❌ Cons
- Disruption to the network connection.
- Changes IP to one belonging to your ISP
- It doesn’t stop tracking
When experiencing network issues and looking to protect your online privacy, this method can help with quick resolution.
4. Change your router’s MAC address.
The MAC address is a unique identifier for a computer’s network interface, with which websites can track online activities.
When using a router, every device on the network has a unique identifiable MAC address.
By changing your router’s or system’s MAC address, you can change your IP address or that of all devices connected to the router’s network.
Here’s how to change your system MAC address, hence IP address on Windows 10:
- Press the Windows key + X and select “Device Manager” from the menu.

- Expand the “Network adapters” section.

- Right-click on the network adapter you are using and select “Properties“.

- Click “Advanced” and select “Network address” from the list.

- Select “value” and enter the new MAC address you want to use.
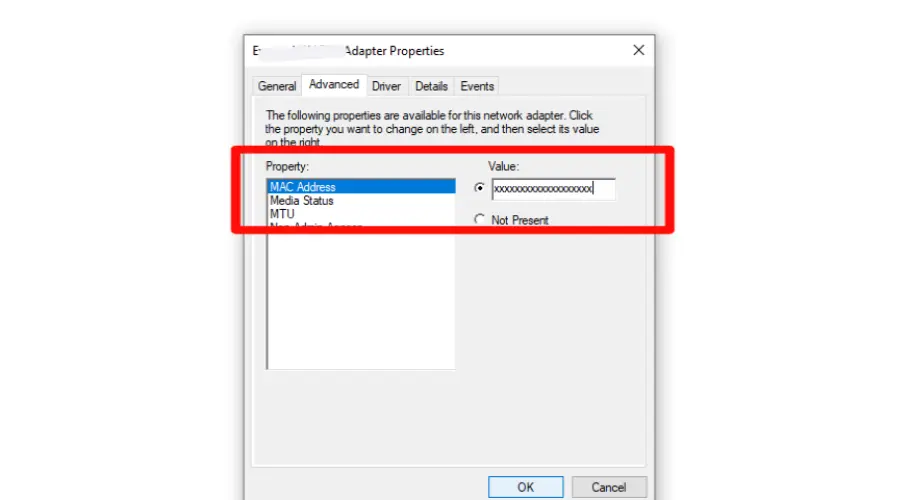
- Select “ok” to apply changes.
✅ Pros
- Bypass network traffic restrictions by allowing your device to appear as a different device on the network, potentially gaining access to restricted resources..
- Improves online security
- It makes it difficult for websites to link your device to your previous activities.
❌ Cons
- Limited effectiveness as some ISPs may not assign a new IP address
- Technical knowledge is required
- Can disrupt network connection
Some public WiFi networks may restrict access to specific devices based on MAC addresses.
If you cannot connect to a public WiFi network, changing your MAC address can help you bypass these restrictions and access the network.
How to change IP without VPN on Windows 11?
The methods of changing your IP address on Windows 11 are similar to that of Windows 10, as outlined above.
Therefore, you can change your IP address without VPN on Windows 11 using the Command Prompt, proxy server, or Tor browser.
The main difference between Windows 11 and Windows 10 is the location of some of the settings.
In Windows 11, the Settings app has a new design and layout, but the options for changing your IP address are still in the Network & Internet section.
Summary
Changing your IP address without a VPN on Windows 10 is possible, but it’s important to proceed cautiously and understand each method’s potential risks and benefits.
By using a proxy server, releasing and renewing your IP address, or changing your MAC address, you can take steps to protect your online privacy and access blocked content.
Изменение вашего IP-адреса может помочь решить проблемы с сетью, повысить безопасность в сети и обеспечить больший контроль над вашим подключением к Интернету. Независимо от того, испытываете ли вы ограничения из-за региональных ограничений, хотите защитить свою конфиденциальность от онлайн-трекеров или просто хотите устранить неполадки в сети, знание того, как изменить свой IP, может быть важным навыком. В этом руководстве мы проведем вас через процесс изменения вашего IP-адреса в основных операционных системах, включая Windows, macOS, Linux, Android и iOS. Мы также рассмотрим преимущества, потенциальные недостатки и передовые методы для обеспечения плавного и безопасного перехода на новый IP-адрес.
Зачем вам менять свой IP-адрес?
Ваш публичный IP-адрес — это уникальный идентификатор, назначенный вашей сети. Хотя он необходим для подключения к Интернету, есть несколько причин, по которым вам может понадобиться его изменить:
- Повышение конфиденциальности : Рекламодатели могут отслеживать вашу онлайн-активность, используя ваш IP-адрес. Его изменение может помочь восстановить анонимность, отключив ваши привычки просмотра от определенного профиля.
- Доступ к домашнему контенту во время путешествия : за границей веб-сайты могут отображать контент на разных языках или ограничивать доступ. Переключение на IP из вашей родной страны обеспечивает бесперебойный просмотр.
- Повышение безопасности : Киберпреступники могут использовать ваш IP-адрес для запуска атак или даже раскрытия личных данных. Изменение его может снизить эти риски.
- Устранение сетевых проблем : если у вас возникли проблемы из-за блокировки IP-адреса или проблем с подключением, переключение на другой IP-адрес может решить их.
Понимание статических и динамических IP-адресов
Ваш IP-адрес может быть статическим (постоянным) или динамическим (периодически меняющимся). В то время как публичные IP-адреса управляются вашим интернет-провайдером (ISP), частные IP-адреса в вашей локальной сети можно настраивать вручную.
Важно: Вы не можете вручную выбрать новый публичный IP-адрес. Вместо этого вы должны запросить изменение у своего интернет-провайдера или использовать VPN, чтобы предположить другое виртуальное местоположение. Однако вы можете изменить свой частный IP-адрес в любое время.
Как изменить свой частный IP-адрес
Пример из реальной жизни: почему важно изменить свой IP
Представьте, что вы работаете удаленно, находясь за границей, и вам нужен доступ к файлам, хранящимся во внутренней сети вашей компании, которая ограничивает соединения с иностранных IP-адресов. Изменив свой IP-адрес в соответствии с вашим домашним регионом, вы можете безопасно подключаться к ресурсам вашего рабочего места, не вызывая блокировки безопасности. Кроме того, если у вас медленный или ограниченный доступ к потоковым сервисам, быстрая смена IP-адреса может помочь обойти эти проблемы.
Другие распространенные сценарии включают в себя:
- Игровые ограничения : Многие онлайн-игры блокируют IP-адреса, если подозревают нечестную игру. Если ваш IP-адрес помечен неправильно, его изменение может помочь восстановить доступ.
- Проблемы с банковским доступом : некоторые платформы онлайн-банкинга блокируют входы с иностранных IP-адресов для предотвращения мошенничества. Если вы путешествуете и вам нужно получить доступ к своей учетной записи, изменение вашего IP-адреса на IP-адрес вашей родной страны может решить проблему.
- Избегание ценовой дискриминации : некоторые веб-сайты, включая авиалинии и платформы электронной коммерции, отображают разные цены в зависимости от местоположения. Изменение вашего IP-адреса иногда может привести к более выгодным сделкам.
Альтернативные методы изменения вашего IP-адреса
Помимо ручного изменения вашего частного IP-адреса, существуют и другие способы изменения вашего публичного IP-адреса:
- Использование VPN (виртуальной частной сети) : VPN шифрует ваш интернет-трафик и направляет его через сервер в другом месте, маскируя ваш реальный IP-адрес. Это один из самых безопасных и эффективных способов изменить ваш IP, особенно для конфиденциальности и безопасности.
- Использование прокси-сервера : прокси-сервер действует как посредник между вашим устройством и интернетом, изменяя ваш видимый IP-адрес. Однако прокси-серверы часто не обеспечивают шифрование и безопасность VPN.
- Сеть Tor : Tor направляет ваш интернет-трафик через несколько серверов, что делает отслеживание вашего настоящего IP-адреса крайне затруднительным. Хотя это отлично подходит для анонимности, это может значительно замедлить ваше соединение.
- Переключение на мобильную сеть : если ваш домашний IP-адрес Wi-Fi заблокирован или ограничен, переключение на мобильное соединение для передачи данных (4G/5G) может предоставить вам новый IP-адрес.
Как вручную изменить свой IP-адрес на разных устройствах
В Windows 10
- Нажмите кнопку «Пуск» .
- Откройте Настройки > Сеть и Интернет .
- Выберите Ethernet или Wi-Fi в зависимости от вашего подключения.
- В разделе «Назначение IP» нажмите «Изменить» .
- Выберите «Вручную» , включите IPv4 и введите новый IP-адрес.
- Нажмите «Сохранить» .
В Windows 11
- Нажмите кнопку «Пуск» .
- Перейдите в Настройки > Сеть и Интернет .
- Выберите Ethernet или Wi-Fi .
- Нажмите «Управление известными сетями» , затем выберите «Изменить» рядом с вашим текущим IP-адресом.
- Выберите «Вручную» , включите IPv4 и введите новый IP-адрес.
- Нажмите «Сохранить» .
На macOS
- Откройте меню Apple и выберите Системные настройки > Сеть .
- Выберите свою активную сеть.
- Нажмите «Подробнее» или «Дополнительно» , затем перейдите на вкладку TCP/IP .
- В разделе «Настроить IPv4» выберите «Вручную» .
- Введите новый IP-адрес и подтвердите, нажав OK .
На андроиде
- Откройте Настройки > Подключения > Wi-Fi .
- Нажмите на значок шестеренки рядом с вашей сетью.
- Выберите Настройки IP > Статический .
- Введите новый IP-адрес и нажмите «Сохранить» .
На iOS (iPhone и iPad)
- Откройте Настройки > Wi-Fi .
- Выберите сеть, к которой вы подключены.
- В разделе «Адрес IPv4» нажмите «Настроить IP» > «Вручную» .
- Введите ваш новый IP-адрес.
На Линуксе
- Откройте терминал и войдите в систему как root.
- Используйте команду: ifconfig для просмотра текущих сетевых настроек.
- Назначьте новый IP-адрес с помощью ifconfig [интерфейс] [новый IP-адрес].
- Нажмите Enter , чтобы применить изменения.
Чтобы проверить свой текущий IP-адрес, используйте такие команды, как ip addr или ifconfig.
Изменение вашего IP-адреса через маршрутизатор
Перезагрузка маршрутизатора может обновить ваш публичный IP. Проверьте ваш текущий IP, затем выключите маршрутизатор примерно на 10 минут перед его перезапуском. Если ваш интернет-провайдер использует динамическую адресацию, вы можете получить новый IP после перезагрузки.
Для более надежного способа смены IP-адреса рассмотрите возможность обращения к своему интернет-провайдеру или использования надежного VPN-сервиса.
Плюсы и минусы смены IP-адреса
Плюсы
- Повышенная конфиденциальность : помогает предотвратить отслеживание вашей онлайн-активности веб-сайтами и рекламодателями.
- Доступ к ограниченному контенту : позволяет обходить географические ограничения и получать доступ к контенту, заблокированному в определенном регионе.
- Повышенная безопасность : снижает риск кибератак и попыток взлома.
- Лучшая производительность сети : может решить проблемы с подключением, вызванные ограничениями, связанными с IP.
- Обход блокировок по IP-адресу : помогает обойти ограничения, установленные веб-сайтами или онлайн-сервисами.
Минусы
- Временное решение : изменения публичного IP-адреса часто носят временный характер, если только не используется VPN или поддержка интернет-провайдера.
- Возможные проблемы с подключением : изменение IP-адреса вручную иногда может привести к нарушению конфигурации сети.
- Ограниченный контроль над публичным IP-адресом : вы не можете свободно выбрать новый публичный IP-адрес без вмешательства интернет-провайдера.
- Возможное нарушение условий : некоторые сервисы запрещают использование VPN или манипуляцию IP-адресами.
- Неудобство : постоянная смена IP-адресов может потребовать частой перенастройки сетевых параметров.
Заключение
Изменение вашего IP-адреса может быть ценным инструментом для улучшения конфиденциальности, безопасности и доступности в Интернете. Независимо от того, хотите ли вы обойти географические ограничения, решить проблемы с сетью или защитить свою личную информацию, знание того, как вручную изменить свой IP-адрес на разных устройствах, является важным навыком.
Для тех, кто ставит конфиденциальность и безопасность на первое место, лучшим вариантом будет сеть VPN или Tor . Если вам нужно получить доступ к регионально заблокированному контенту , VPN или прокси-сервер, скорее всего, будут наиболее эффективными. Однако, если вы столкнулись с проблемами сети или запретом IP , ручная перезагрузка маршрутизатора или переключение на мобильную сеть может оказаться самым простым решением.
Прежде чем вносить какие-либо изменения, рассмотрите свои конкретные потребности и выберите метод, который лучше всего соответствует вашей ситуации. Если проблема, связанная с IP, сохраняется, обращение к вашему интернет-провайдеру за профессиональной поддержкой может быть наиболее надежным курсом действий.