
По умолчанию в Windows 11, как и в предыдущей версии ОС, для всех системных элементов используется встроенный шрифт Segoe UI. Если по какой-то причине он вас не устраивает, его можно поменять.
В этой инструкции подробно о способах смены шрифтов в Windows 11: для всей системы в целом (с некоторыми ограничениями) или для отдельных её элементов, таких как заголовки окон, подписи к иконкам, текст в окнах и другие. Также вас могут заинтересовать другие статьи по настройке оформления Windows 11.
Изменение шрифта Windows 11 вручную в реестре
Первый способ предполагает внесение изменений в реестр Windows 11 и подмену стандартного шрифта Segoe UI выбранным вами шрифтом, установленным в системе. При этом шрифт будет изменён для всех системных элементов, но останется прежним для приложений UWP: встроенных, например «Параметры» и скачанных из магазина Microsoft Store.
Внимание: настоятельно рекомендую создать точку восстановления системы на случай, если результат вам не понравится, чтобы быстро откатить сделанные изменения.
Шаги для изменения шрифта будут следующими:
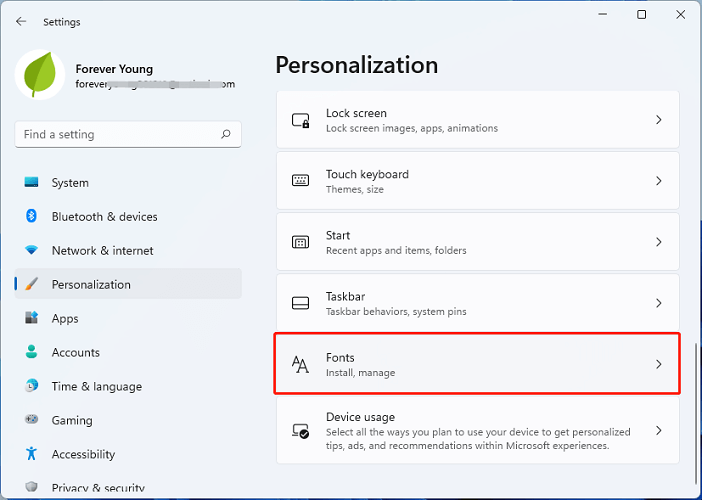
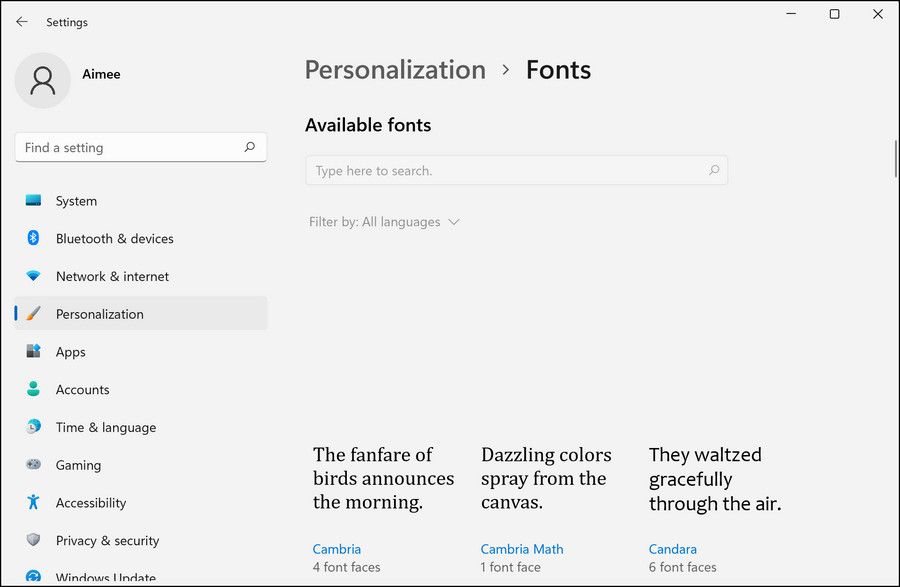
- В Параметры — Персонализация — Шрифты выберите нужный вам шрифт. Далее потребуется имя этого шрифта (отмечено стрелкой на скриншоте).

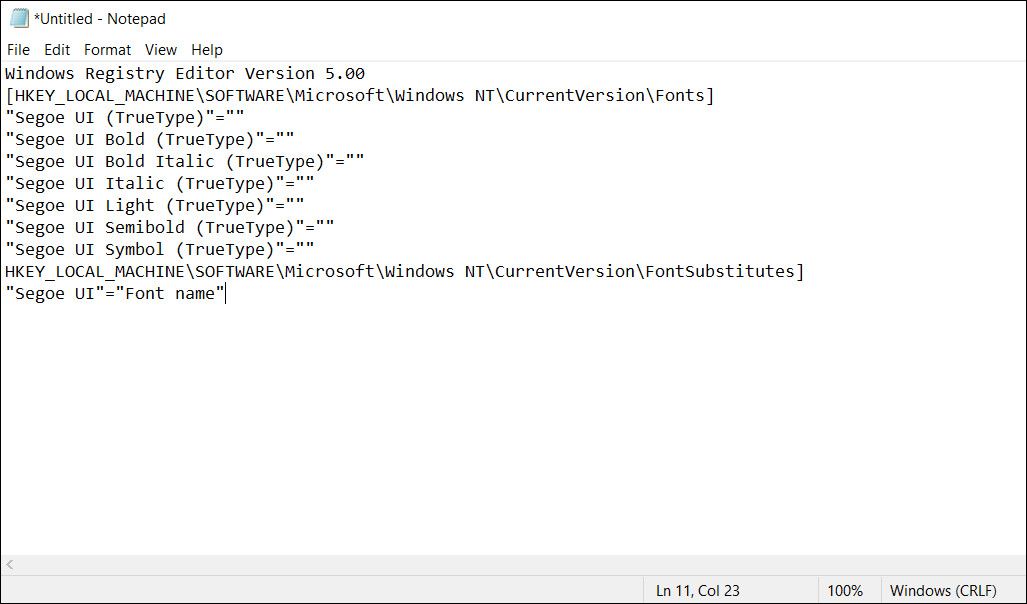
- Создайте файл .reg со следующим содержимым. Для создания можно запустить блокнот и вставить следующий текст, заменив имя шрифта на нужное:
Windows Registry Editor Version 5.00

[HKEY_LOCAL_MACHINE\SOFTWARE\Microsoft\Windows NT\CurrentVersion\Fonts]
"Segoe UI (TrueType)"=""
"Segoe UI Bold (TrueType)"=""
"Segoe UI Bold Italic (TrueType)"=""
"Segoe UI Italic (TrueType)"=""
"Segoe UI Light (TrueType)"=""
"Segoe UI Semibold (TrueType)"=""
"Segoe UI Symbol (TrueType)"=""

[HKEY_LOCAL_MACHINE\SOFTWARE\Microsoft\Windows NT\CurrentVersion\FontSubstitutes]
"Segoe UI"="Имя Нужного Шрифта"
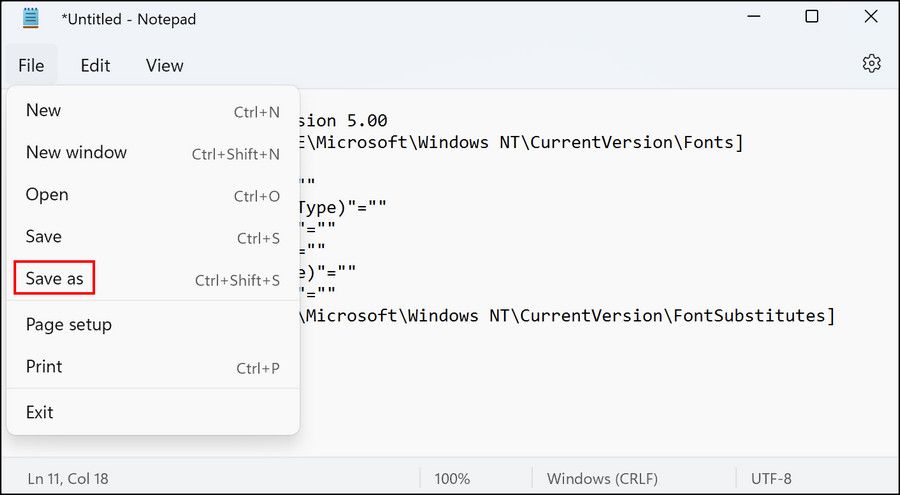
- Сохраните файл с расширением .reg. Если это делается в блокноте, в поле «Тип файла» выберите «Все файлы» и укажите любое имя файла с расширением .reg.

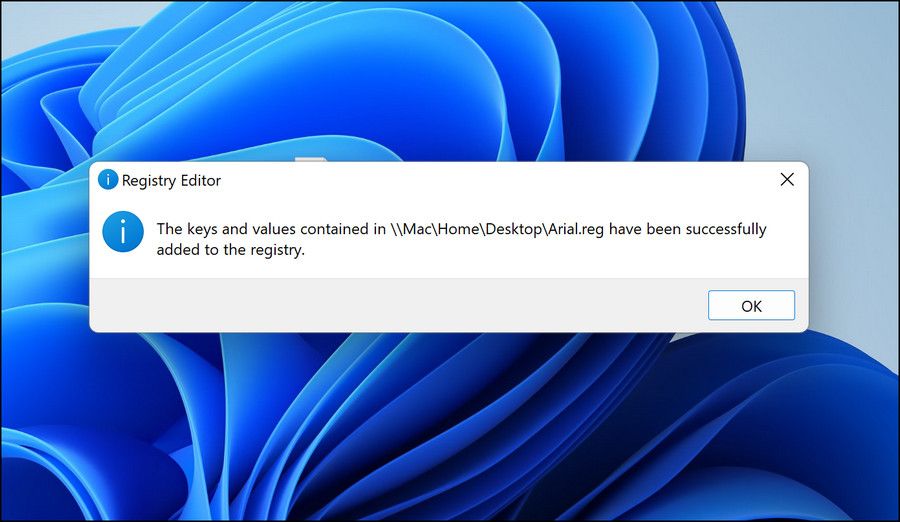
- «Запустите» созданный файл и согласитесь с добавлением данных в реестр.


Перезагрузите компьютер и в результате вы увидите, что шрифты изменились:

Как было отмечено выше: результат применения своего шрифта не всегда выглядит наилучшим образом и, кроме этого, в отдельных приложениях Windows 11 будут сохранены стандартные шрифты.
Для отката сделанных изменений тем же образом можно использовать .reg файл следующего содержания:
Windows Registry Editor Version 5.00

[HKEY_LOCAL_MACHINE\SOFTWARE\Microsoft\Windows NT\CurrentVersion\Fonts]
"Segoe UI (TrueType)"="segoeui.ttf"
"Segoe UI Black (TrueType)"="seguibl.ttf"
"Segoe UI Black Italic (TrueType)"="seguibli.ttf"
"Segoe UI Bold (TrueType)"="segoeuib.ttf"
"Segoe UI Bold Italic (TrueType)"="segoeuiz.ttf"
"Segoe UI Emoji (TrueType)"="seguiemj.ttf"
"Segoe UI Historic (TrueType)"="seguihis.ttf"
"Segoe UI Italic (TrueType)"="segoeuii.ttf"
"Segoe UI Light (TrueType)"="segoeuil.ttf"
"Segoe UI Light Italic (TrueType)"="seguili.ttf"
"Segoe UI Semibold (TrueType)"="seguisb.ttf"
"Segoe UI Semibold Italic (TrueType)"="seguisbi.ttf"
"Segoe UI Semilight (TrueType)"="segoeuisl.ttf"
"Segoe UI Semilight Italic (TrueType)"="seguisli.ttf"
"Segoe UI Symbol (TrueType)"="seguisym.ttf"
"Segoe MDL2 Assets (TrueType)"="segmdl2.ttf"
"Segoe Print (TrueType)"="segoepr.ttf"
"Segoe Print Bold (TrueType)"="segoeprb.ttf"
"Segoe Script (TrueType)"="segoesc.ttf"
"Segoe Script Bold (TrueType)"="segoescb.ttf"

[HKEY_LOCAL_MACHINE\SOFTWARE\Microsoft\Windows NT\CurrentVersion\FontSubstitutes]
"Segoe UI"=-
Изменения шрифта элементов Windows 11 в Winaero Tweaker
Winaero Tweaker — удобная утилита для тонкой настройки Windows 11 и Windows 10. Помимо прочего, она позволяет изменить шрифты (начертание, размер, включить полужирный шрифт) отдельных элементов системы:
- Скачайте Winaero Tweaker с официального сайта разработчика https://winaero.com/winaero-tweaker/ и установите программу.
- Запустив утилиту, перейдите к разделу «Advanced Appearance Settings». В этом разделе вы можете изменить шрифты для отдельных элементов: Icons, Window Title Bars и других, либо для системы целиком (пункт «System Font»).

- По завершении изменения настроек достаточно будет их применить, чтобы изменения вступили в силу.

Здесь же есть полезный пункт для сброса выполненных изменений — «Reset Advanced Appearance» на случай, если результат вас не впечатлил. Если интересно, можно прочесть и про другие возможности Winaero Tweaker.
Advanced System Font Changer
Ещё одна бесплатная программа, специально предназначенная для изменения шрифта элементов Windows 11 — Advanced System Font Changer, которую можно скачать с сайта разработчика: https://www.wintools.info/index.php/advanced-system-font-changer
В утилите присутствует русский язык интерфейса, который можно включить в пункте меню «Languages». А уже после его включения каких-либо вопросов о том, как именно пользоваться утилитой, думаю не возникнет: нажимаем по текущему шрифту элемента, для которого требуется внести изменения, выбираем нужные параметры.

После того, как вы настроили нужные шрифты, просто нажмите «Применить», чтобы увидеть результат их изменения. Помимо прочего, утилита позволяет сохранять настроенные профили шрифтов Windows, загружать их, быстро переключаться между несколькими сохраненными наборами настроек.
Choose an available font from the list in Personalization settings, and then create a REG file
What to Know
- Go to Settings > Personalization > Fonts to find the name of the font you want to use throughout Windows 11.
- Then, create a REG file using that name to replace the current system font. Open the REG file to change the font.
- Not all Windows fonts will change, but some do. It’s easy to restore the default font if you change your mind.
This article teaches you how to change the Windows 11 system font so that various areas of the OS will use the font type you prefer. It also covers how to undo these steps to restore the default font.
How to Change the System Font in Windows 11
The quickest way to change the Windows 11 font is through a Windows Registry edit, which we’ll do by creating a REG file.
-
Open Settings, then select Personalization on the left, followed by Fonts on the right. Another way to get there is through the Run command: ms-settings:fonts.
-
Scroll down to Available fonts, and find and select the font you’re interested in using.
If you don’t see the font you want, you can take this time to download it. Lots of websites have free fonts, but you can also buy fonts online. Then, return to this area of Settings to see it. Our How to Install Fonts in Windows 11 guide can help if you need it.
-
Locate the Full name line in the Metadata section, and write it down exactly as it’s written. In our example, we recorded Franklin Gothic Medium.
-
Open Notepad, or a different text editor if you prefer, and paste the following:
Windows Registry Editor Version 5.00[HKEY_LOCAL_MACHINE\SOFTWARE\Microsoft\Windows NT\CurrentVersion\Fonts]"Segoe UI (TrueType)"="""Segoe UI Bold (TrueType)"="""Segoe UI Bold Italic (TrueType)"="""Segoe UI Italic (TrueType)"="""Segoe UI Light (TrueType)"="""Segoe UI Semibold (TrueType)"="""Segoe UI Symbol (TrueType)"=""HKEY_LOCAL_MACHINE\SOFTWARE\Microsoft\Windows NT\CurrentVersion\FontSubstitutes]"Segoe UI"="Franklin Gothic Medium" -
In the last line of the document, replace Franklin Gothic Medium with the name of the font you recorded in Step 3 (keep the quotes around the name).
-
If you’re using Notepad, go to File > Save as, and type a name in the File name box.
-
Choose All files from the Save as type menu.
-
Type .reg at the end of the file name. Our example reads Franklin Gothic.reg, but yours can be called whatever you want; just make sure it ends with that file extension.
-
Choose a folder on your computer to save the file (the Desktop folder works), and then select Save.
-
Close the text editor, and then double-click or double-tap the REG file from the folder you just saved it to.
-
Press Yes on the User Account Control window, then Yes again on the Registry Editor prompt (pictured below), and finally OK on the success message.
-
Reboot your computer to see the font changes. The quickest method is to right-click the Start button and go to Shut down or sign out > Restart.
What Does Changing the System Font Do?
Changing the computer font in Windows 11 will switch up the way text looks throughout the operating system. Desktop icon text and the links in Control Panel are a couple of examples, but it’s most obvious in other areas, such as the Run dialog box.
However, not every part of Windows will change to the new font. All the text within Settings, Start menu, Clock, Quick Settings, and numerous other areas aren’t affected.
How to Restore the Default Font in Windows 11
The best way to get the original Windows 11 font back is to reverse the registry tweak that changed it in the first place. To do that, repeat the steps from above, but replace the Notepad text with different code.
You can do this one of two ways. This first method is easiest only if you still have the original REG file:
-
Right-click the REG file from wherever you saved it during Step 9, and select Edit in Notepad.
-
Highlight all the text that’s in there, and replace it with this:
Windows Registry Editor Version 5.00[HKEY_LOCAL_MACHINE\SOFTWARE\Microsoft\Windows NT\CurrentVersion\Fonts]"Segoe UI (TrueType)"="segoeui.ttf""Segoe UI Black (TrueType)"="seguibl.ttf""Segoe UI Black Italic (TrueType)"="seguibli.ttf""Segoe UI Bold (TrueType)"="segoeuib.ttf""Segoe UI Bold Italic (TrueType)"="segoeuiz.ttf""Segoe UI Emoji (TrueType)"="seguiemj.ttf""Segoe UI Historic (TrueType)"="seguihis.ttf""Segoe UI Italic (TrueType)"="segoeuii.ttf""Segoe UI Light (TrueType)"="segoeuil.ttf""Segoe UI Light Italic (TrueType)"="seguili.ttf""Segoe UI Semibold (TrueType)"="seguisb.ttf""Segoe UI Semibold Italic (TrueType)"="seguisbi.ttf""Segoe UI Semilight (TrueType)"="segoeuisl.ttf""Segoe UI Semilight Italic (TrueType)"="seguisli.ttf""Segoe UI Symbol (TrueType)"="seguisym.ttf""Segoe MDL2 Assets (TrueType)"="segmdl2.ttf""Segoe Print (TrueType)"="segoepr.ttf""Segoe Print Bold (TrueType)"="segoeprb.ttf""Segoe Script (TrueType)"="segoesc.ttf""Segoe Script Bold (TrueType)"="segoescb.ttf"[HKEY_LOCAL_MACHINE\SOFTWARE\Microsoft\WindowsNT\CurrentVersion\FontSubstitutes]"Segoe UI"=- -
Save the file.
-
Exit Notepad, and then open the REG file. Accept all the prompts to edit the registry.
-
If the changes don’t take effect immediately (they did for us), reboot your computer.
If you don’t have the original REG file readily available to edit, just repeat the steps at the top of this page. When you get to the part about pasting the code into Notepad, use the modified code from Step 2 above, and don’t make any changes to it.
Changing Other Fonts in Windows 11
The method outlined in this article isn’t how it typically works when you want to use a new font in Windows. The directions explained above are unique for two reasons: Windows doesn’t have a built-in way to change the system font, and you’re changing the system font, not just the font type for a single app.
Most programs have their own font settings so you can make changes that apply to just that one program. And doing it is extremely easy because Windows 11 does provide a way to easily install a font that can be used by any of your software.
For example, if you’ve downloaded a font you’d like to use in Microsoft Word, install the font to your computer, and it’ll be available the next time you open Word. That’s usually how it works: install the fonts to your computer to give all your programs access to them.
You can, for instance, change the default font and size in Outlook by choosing an installed font. The same applies when you pick a new default font for Thunderbird emails. Online apps need separate instructions since they don’t typically access local fonts: here’s how to edit Gmail’s default font options in your browser.
With some programs, there’s a special folder in the app’s installation directory that’s used to load fonts for that one piece of software. This is how you install fonts just for Photoshop.
FAQ
-
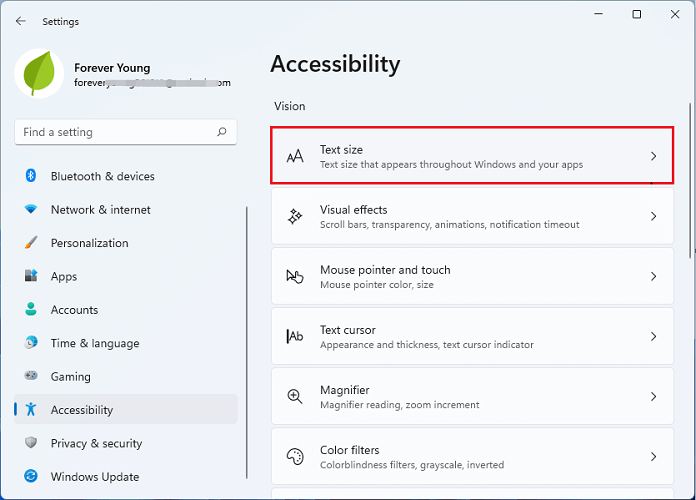
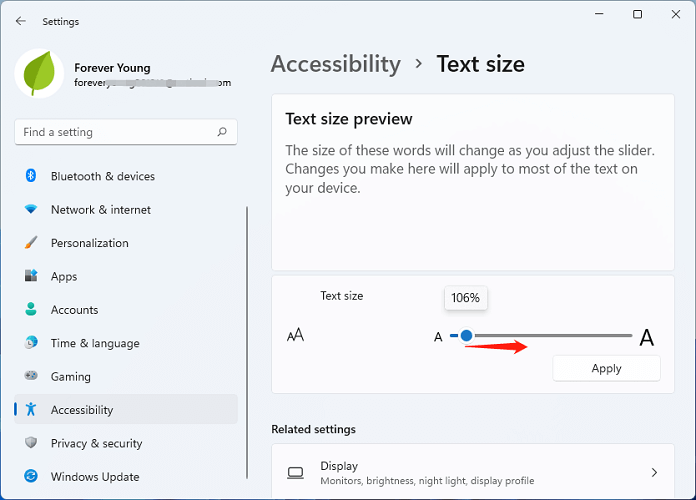
To change the default text size in Windows 11, go to Start > Settings > Accessibility > Text size. Use the slider to adjust the preview text size and select Apply.
-
The default system font for Windows 11 is called Segoe UI. Pronounced “see-go,” this is the standard font for all Microsoft products.
-
You can change the default font in Microsoft Office apps by creating a template. For example, in Microsoft Word, create a new template and go to the Home tab, then right-click any style. Select Modify, then choose a font under Formatting. Make sure New documents based on this template is selected, then select OK.
Thanks for letting us know!
Get the Latest Tech News Delivered Every Day
Subscribe
Applies ToWindows 11 Windows 10
Поддержка Windows 10 прекратится в октябре 2025 г.
После 14 октября 2025 г. корпорация Майкрософт больше не будет предоставлять бесплатные обновления программного обеспечения из Центра обновления Windows, техническую помощь и исправления безопасности для Windows 10. Ваш компьютер по-прежнему будет работать, но мы рекомендуем перейти на Windows 11.
Подробнее
Шрифты играют важную роль в общей эстетике и удобочитаемости документов и презентаций. Независимо от того, являетесь ли вы дизайнером, который хочет добавить уникальные штрихи к своей работе, или просто кто-то, кто хочет расширить свой творческий набор инструментов, важно знать, как управлять шрифтами в Windows.
В этой статье описаны действия по просмотру, установке и удалению шрифтов на устройстве с Windows. Вы узнаете, как изучить шрифты, доступные на вашем компьютере, добавить новые шрифты для улучшения проектов и удалить те, которые больше не нужны для поддержания системы в упорядочении и эффективности.
Проверьте, какие шрифты доступны на вашем устройстве
-
В приложении «Настройки» на устройстве с Windows, выберите Персонализация > Шрифты или используйте следующий ярлык:
Шрифты
-
Шрифты перечислены в разделе Доступные шрифты.
Примечание: Не все приложения поддерживают пользовательские шрифты. Если шрифт не отображается в приложении или программе, попробуйте другое приложение, чтобы проверка и проверить, установлен ли шрифт и работает ли он правильно.
В разделе Доступные шрифты предлагается несколько вариантов, которые помогут вам эффективно управлять шрифтами. Ниже приведены основные доступные функции:
-
Поиск и фильтрация. Вы можете легко найти конкретный шрифт, введя его имя в строке поиска. Это помогает быстро найти нужный шрифт, не прокручивая весь список.
-
Просмотр предварительного просмотра. Вы можете просмотреть предварительный просмотр каждого шрифта, который включает в себя различные размеры и грани. Это позволяет увидеть, как будет выглядеть шрифт в различных стилях и размерах, прежде чем использовать его.
-
Скрыть. Если у вас есть шрифты, которые вы не используете часто, но не хотите удалять, их можно скрыть. Это позволяет упорядочить список шрифтов без окончательного удаления шрифтов.
-
Удаление. Вы можете удалить шрифты, которые больше не нужны. Это помогает освободить место и обеспечить порядок в системе, удаляя ненужные шрифты
Общие операции
Разверните следующие разделы, чтобы узнать больше о распространенных операциях со шрифтами в Windows:
-
В приложении «Настройки» на устройстве с Windows, выберите Персонализация > Шрифты или используйте следующий ярлык:
Шрифты
-
Выберите Получить дополнительные шрифты в Microsoft Store или используйте следующий ярлык.
Изучение шрифтов в Microsoft Store
-
Выберите шрифт, который нужно добавить, а затем выберите Получить или Купить. Шрифт будет скачан и установлен автоматически.
-
Получите или скачайте файл шрифта и убедитесь, что файл имеет значение True Type (.ttf) или Файл OpenType (.otf)
-
Если файл сжат в файл.zip , щелкните его правой кнопкой мыши и выберите команду Извлечь , чтобы извлечь файлы.
-
-
Щелкните правой кнопкой мыши файл шрифта и выберите Установить. Чтобы установить для всех пользователей на компьютере, выберите Установить для всех пользователей.
-
Если вам будет предложено разрешить программе вносить изменения на компьютер, убедитесь, что вы доверяете источнику скачаемого файла, а затем нажмите кнопку Да.
-
В приложении «Настройки» на устройстве с Windows, выберите Персонализация > Шрифты или используйте следующий ярлык:
Шрифты
-
Выберите шрифт, который требуется удалить.
-
Нажмите Удалить
-
В приложении «Настройки» на устройстве с Windows, выберите Персонализация > Шрифты или используйте следующий ярлык:
Шрифты
-
В разделе Связанные параметры выберите Скачать fornts для всех языков и подтвердите, нажав кнопку ОК.
Нужна дополнительная помощь?
Нужны дополнительные параметры?
Изучите преимущества подписки, просмотрите учебные курсы, узнайте, как защитить свое устройство и т. д.
-
Home
-
Partition Magic
- How to Change the Default Font on Windows 11? Read This Post
By Sherry |
Last Updated
Have you upgraded your PC to Windows 11, the latest operating system provided by Microsoft? In this post, MiniTool Partition Wizard offers a tutorial on how to change the default font on Windows 11. You can have a try if you are using this operating system.
What Is the Windows 11 Default Font
A font is a particular size, weight, and style of a typeface. It is the visual representation of language. On Windows 11, an operating system announced by Microsoft a few months ago, the default system font is Segoe UI Variable. It is a new version of the classic Segoe and uses variable font technology.
Compared with previous versions of Segoe UI font, Windows 11 Segoe UI Variable is designed to scale better with monitors with a higher amount of dots per inch. It means that this new font provides higher legibility and readability in the UI (user interface).
If you don’t like the Windows 11 default font, don’t be upset. You can change the default font on Windows 11 easily. For more details, please keep reading.
How to Change the Default Font on Windows 11
Windows 11 provides many different fonts for users. If you don’t like the default one, you can follow the steps below to change the default font on Windows 11.
Step 1: Click the Search button on the Windows 11 taskbar and search for Notepad. Then open Notepad and paste the following content:
Windows Registry Editor Version 5.00
[HKEY_LOCAL_MACHINESOFTWAREMicrosoftWindows NTCurrentVersionFonts]
“Segoe UI (TrueType)”=””
“Segoe UI Bold (TrueType)”=””
“Segoe UI Bold Italic (TrueType)”=””
“Segoe UI Italic (TrueType)”=””
“Segoe UI Light (TrueType)”=””
“Segoe UI Semibold (TrueType)”=””
“Segoe UI Symbol (TrueType)”=””
[HKEY_LOCAL_MACHINESOFTWAREMicrosoftWindows NTCurrentVersionFontSubstitutes]
“Segoe UI”=”FONT-STYLE”
Step 2: Minimize Notepad and press Win + I to open the Windows 11 Settings.
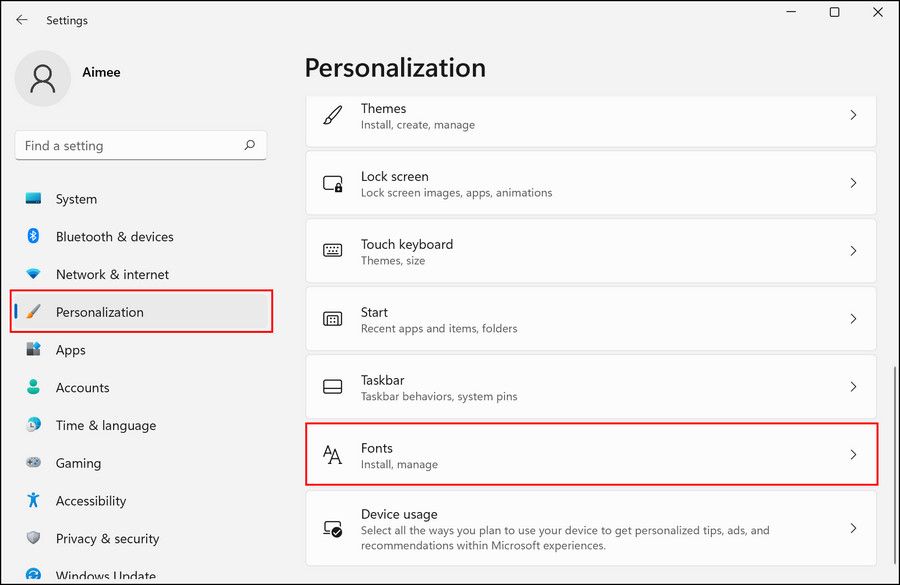
Step 3: In the left pane, select the Personalization tab. In the right pane, select Fonts. Then you can view the available fonts on Windows 11.
Step 4: Scroll down to find the font you want to use and copy its name.
Step 5: Go back to Notepad and replace FONT-STYLE with the desired font’s name.
Step 6: Click File > Save as. In the pop-up window, choose a location, name the file and add .reg at the end. Then click Save.
Step 7: Double-click the file you just saved to open it. In the pop-up window, click Yes to confirm the operation. This will change some Windows Registry entries.
Now, you can restart your computer and you should change the default font on Windows 11 successfully.
By the way, it seems to be more difficult to change desktop icon spacing on Windows 11. But don’t worry. You can click here to get the tutorial.
How to Change Windows 11 Font Size
If you just want to change the default font size on Windows 11, you can:
Step 1: Open Windows 11 Settings.
Step 2: In the left pane, click Accessibility. Then select Text size in the right pane.
Step 3: In the following window, drag the toggle next to the Text size to change the font size. Then click the Apply button to save the changes.
Tip: After changing the default font size, the text size of most of the built-in apps in Windows 11 will be changed as well, such as File Explorer, Control Panel, Settings, Paint, etc. the text size of third-party programs might not be changed.
If you want to get the default font back after you change fonts in Windows 11, don’t worry. It is easy to restore to the default font on Windows 11. You just need to:
Step 1: Search for Control Panel and open it.
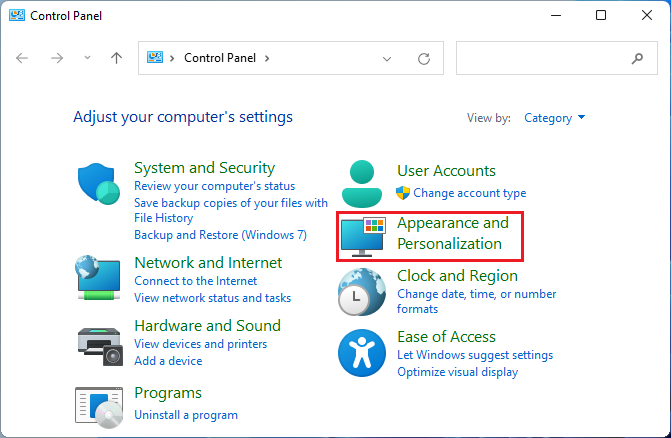
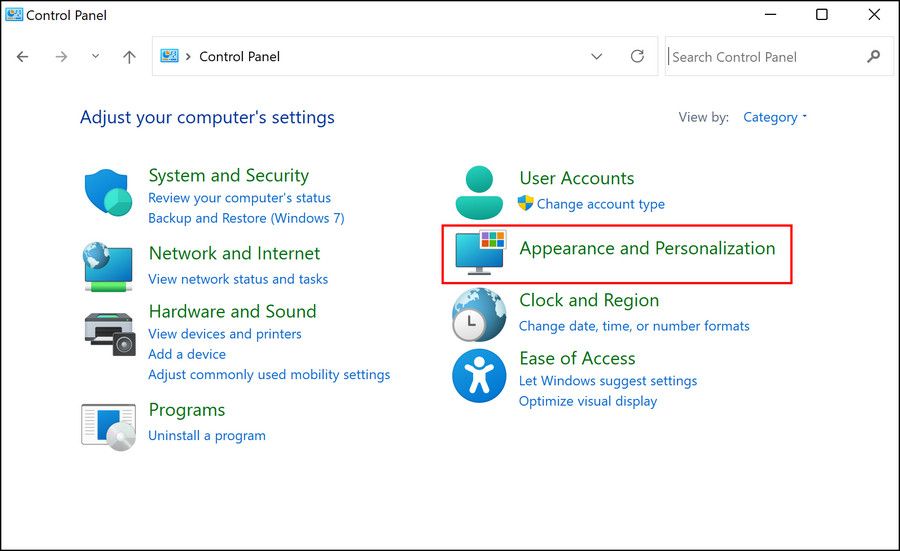
Step 2: Select View by Category at the top right corner of Control Panel. Then click Appearance and Personalization.
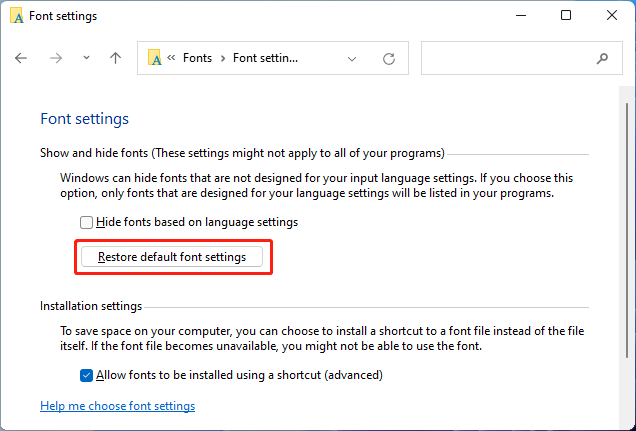
Step 3: In the following window, click Change Fonts settings > Restore default font settings.
About The Author
Position: Columnist
Sherry has been a staff editor of MiniTool for a year. She has received rigorous training about computer and digital data in company. Her articles focus on solutions to various problems that many Windows users might encounter and she is excellent at disk partitioning. She has a wide range of hobbies, including listening to music, playing video games, roller skating, reading, and so on. By the way, she is patient and serious.
Although Windows’ default font looks quite nice, you can switch to one of your choosing if you want something different.
However, the process of changing the font is not as simple as it used to be on Windows 7 and 8. The following guide will show you how to do that in detail, whether you are trying to choose a font from the Control Panel or install one from an online source.
1. How to Change the Default Font Using the Control Panel
Windows 11 includes different fonts by default that you can install and set up for free. These are available in the personalization section of the Control Panel. Once you select a font, you need to set it up using the Registry Editor, which is an administrative utility in Windows.
1. Pick a Font
To get started, here is all that you need to do:
- Type Control Panel in the Windows search and click Open.
-
In the following window, choose Appearance and Personalization.

-
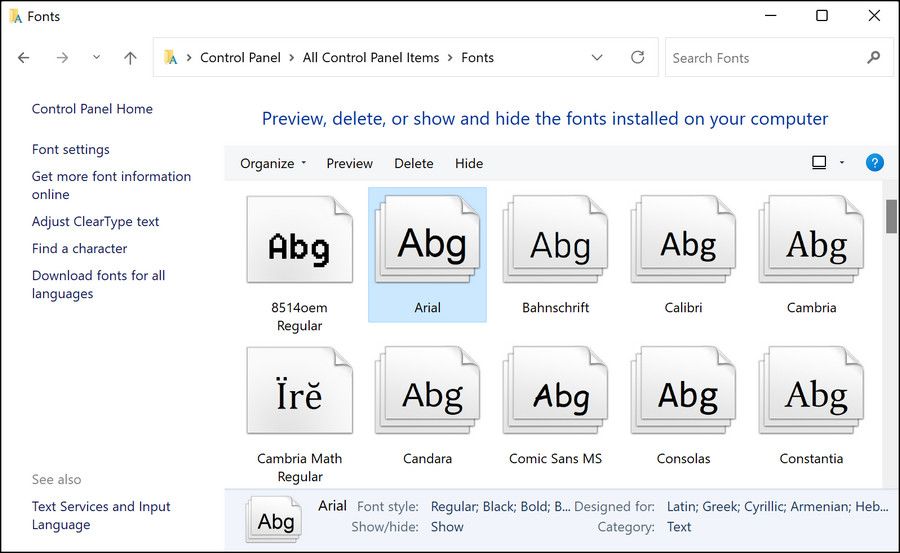
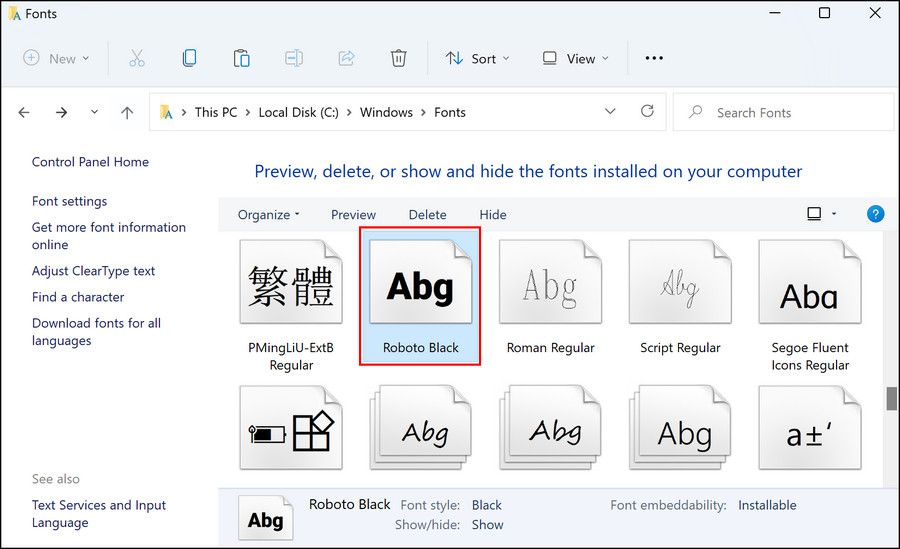
Click on Preview, delete, show, and hide fonts option under Fonts. You should now see a list of all the fonts available.

-
Choose a font family and then pick the desired font within it. Make sure you note down the font name.


You should now have successfully picked a font. However, if you are not comfortable using the Control Panel, you can also choose a font using the Settings app.
Follow these steps to proceed:
- Press Win + I together to open Settings.
-
Choose Personalization > Fonts.

-
In the next window, scroll down to see a list of the available fonts and pick one from them.

- Note down the full name of the selected font.
2. Install the Font Using the Registry Editor
Now that you have selected a font, it is time to set it up. For this, we will be using Windows Registry. Since the Registry Editor is an advanced tool, we highly recommend you create a Registry backup before proceeding, just to be safe.
Once you have created a backup, follow the steps below to proceed:
- Type Notepad in Windows search and click Open.
-
In the Notepad window, type the code mentioned below. Make sure you replace the Font name with the complete name of the font you selected earlier.
Windows Registry Editor Version 5.00
[HKEY_LOCAL_MACHINE\SOFTWARE\Microsoft\Windows NT\CurrentVersion\Fonts]
"Segoe UI (TrueType)"=""
"Segoe UI Bold (TrueType)"=""
"Segoe UI Bold Italic (TrueType)"=""
"Segoe UI Italic (TrueType)"=""
"Segoe UI Light (TrueType)"=""
"Segoe UI Semibold (TrueType)"=""
"Segoe UI Symbol (TrueType)"=""
HKEY_LOCAL_MACHINE\SOFTWARE\Microsoft\Windows NT\CurrentVersion\FontSubstitutes]
"Segoe UI"="Font name"
-
Once done, navigate to File > Save as.

- Enter a name for the file and add .reg with it. For instance, if you are choosing the Inter font, you can name the font as Inter.reg.
- Now, launch this document and choose Yes in the prompt by the Registry Editor.
-
Click OK to proceed.

- Finally, restart your PC to implement the changes.
2. How to Install and Set Up New Fonts From the Microsoft Store
If you do not like any of the fonts available in the Control Panel/Settings app, you can install the new ones from the Microsoft Store. The build-in store has quite a few both free and paid options for you to peruse.
Here is how you can install and setup new fonts from the Microsoft Store:
- Launch Settings and navigate to Personalization > Fonts.
-
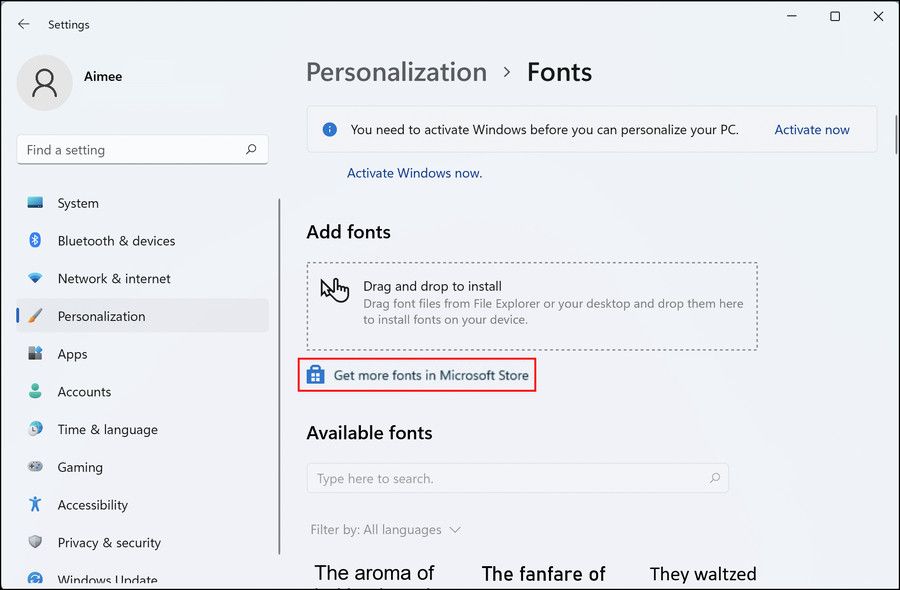
Scroll down in the following window and click on Get more fonts in Microsoft Store.

-
Once you are inside the Microsoft Store, choose the font you like.

- Click on the Get button and wait for the font to download.
- After the font is downloaded, click Open and the font will automatically add itself to the Font section of the Settings app.
- Note the complete name of the font and install it using the Registry Editor by following the steps we mentioned above.

3. How to Install and Setup New Fonts From Third-Party Apps
There are several font websites that offer hundreds of different free and paid options. Before you begin downloading fonts from the internet, it is important to know that Windows 11 supports the following font formats:
- TrueType (file extension .ttf)
- TrueType Collection (file extension .ttc)
- OpenType (file extension .otf)
- PostScript Type 1 (file extensions .pfb + .pfm)
The best place to find free fonts on the web is Google fonts.
Once you have downloaded the font of your choice, follow these steps to install it:
- If the font is already in one of the formats we listed above, simply double-click on it to install it.
- Now, go to the Appearance and Personalization > Fonts section of the Control Panel.
- You should see the font listed there. Select it and follow the steps mentioned in the first method to complete the process.
-
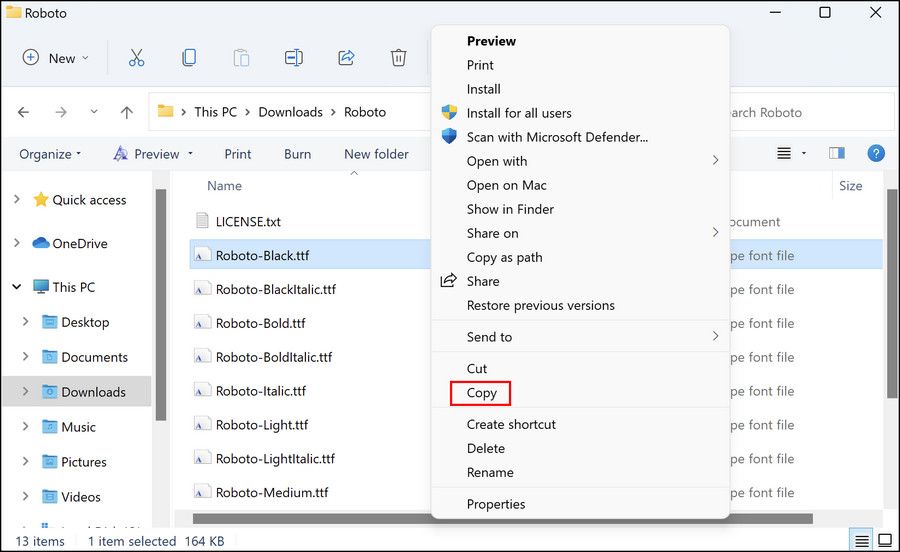
Alternatively, you can also right-click on the downloaded font file and choose Copy.

- Then, type C:\Windows\Fonts in the search bar of File Explorer and click Enter.
-
Paste the copied file anywhere in an empty space in the following window and use the steps outlined above in this article to set up the font.
4. How to Restore the Default Font
If at any point in the future you want to undo the changes and restore the default Windows font, follow these steps:
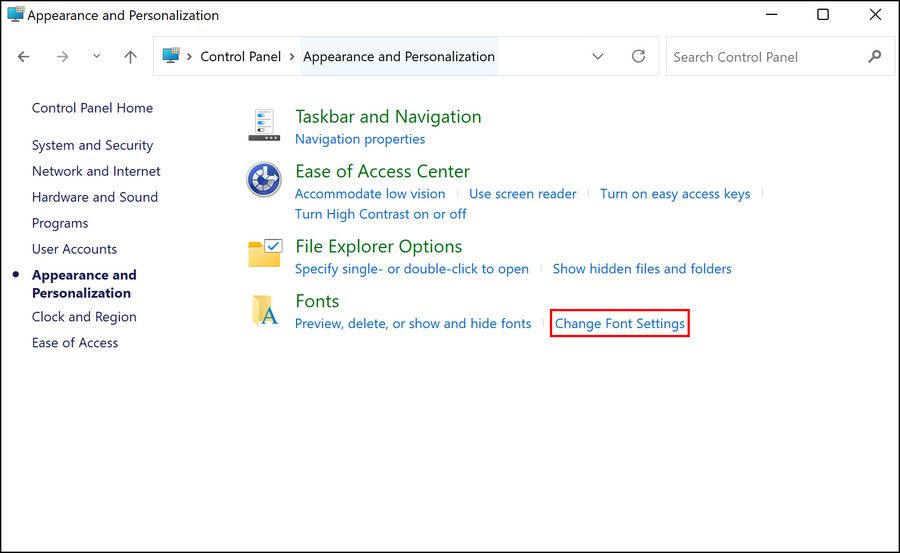
- Head over to the Appearance and Personalization > Fonts section of the Control Panel.
-
Select Change Font Settings.
-
Next, click on the Restore default font settings button.

- Restart your PC to make the changes.

If this does not work, then you can set up the default font using the Registry Editor. The default Windows format is Segoe UI Variable. Select this font in the Control Panel or Settings app and use the Registry Editor to install it by following the steps outlined in Method 1.
Add a Personal Touch to Windows
The overall design of Windows 11 is quite decent, but if you’re not pleased with it, you can customize it however you like. There is no doubt that fonts play a major role in determining how your operating system looks, and we hope that the methods listed above helped you switch to a better one.