Все способы:
- Способ 1: Приложение «Параметры»
- Способ 2: «Панель управления NVIDIA»
- Способ 3: Сторонние программы
- NirCmd
- Monitor Profile Switcher
- Вопросы и ответы: 0
Способ 1: Приложение «Параметры»
Проще всего изменить порядок подключенных к компьютеру мониторов в стандартных настройках приложения «Параметры».
- Кликните правой кнопкой мыши по рабочему столу и выберите из контекстного меню пункт «Параметры экрана» либо перейдите в приложении «Параметры» в раздел «Дисплей» или «Экран».
- В области «Выбрать дисплеи и изменить их порядок» захватите мышкой тот дисплей, который хотите сделать основным, и перетащите его влево.
- Прокрутите содержимое окна немного вниз, найдите и активируйте опцию «Сделать основным дисплеем».


Если один из мониторов не обнаруживается, что может быть со старыми устройствами вывода видеоизображения, в разделе «Дисплей» в блоке «Несколько дисплеев» нажмите кнопку «Обнаружить».

Способ 2: «Панель управления NVIDIA»
Если на компьютере имеется дискретная видеокарта от производителя NVIDIA, изменить порядок дисплеев можно в настройках панели управления видеокартой.
- Кликните правой кнопкой мыши по рабочему столу и выберите из контекстного меню пункт «Панель управления NVIDIA».
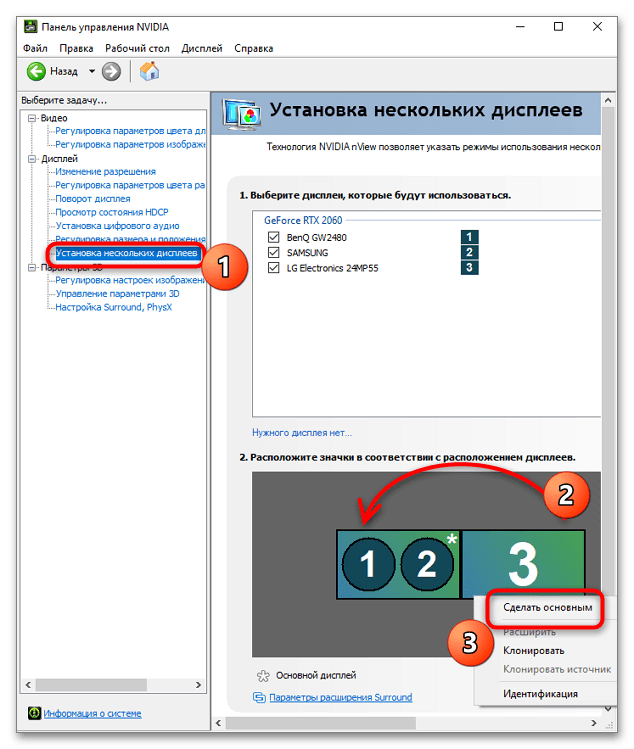
- Перейдите в раздел «Дисплей» → «Установка нескольких дисплеев», расположите перетаскиванием значки дисплеев в нужном порядке, а затем нажмите правой кнопкой мыши по монитору, который хотите сделать основным. Через контекстное меню задайте ему статус «Сделать основным».
Способ 3: Сторонние программы
Если менять порядок расположения мониторов приходится часто, удобнее использовать для переключения между ними сторонние приложения.
NirCmd
NirCmd – это небольшая бесплатная утилита, предназначенная для выполнения различных команд с использованием интерфейса классической «Командной строки».
Скачать NirCmd с официального сайта
- Скачайте архив с утилитой с официального сайта и распакуйте в расположение
C:\Windows\System32. - Чтобы переключить экран, вызовите нажатием клавиш Win + R окошко быстрого выполнения команд, введите в него команду
nircmdc setprimarydisplay 1и нажмите клавишу ввода. «1» в данном примере – это номер монитора, который нужно сделать основным.


Посмотреть номера подключенных к компьютеру мониторов можно в разделе «Дисплей» или «Экран» приложения «Параметры».
Monitor Profile Switcher
Еще один бесплатный инструмент, предназначенный для быстрого переключения между мониторами. Утилита позволяет сохранять конфигурации мониторов в виде профилей и переключаться между ними из системного трея.
Скачать Profile Switcher с официального сайта
- Посетите страницу разработчика на проекте GitHub и кликните там ссылку загрузки утилиты «v0700 Download from Sourceforge.net».
- Распакуйте архив с утилитой и запустите исполняемый файл MonitorSwitcherGUI.exe.
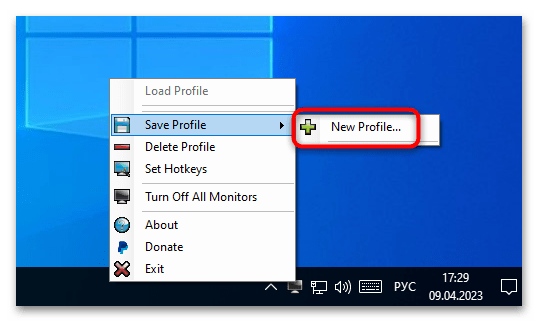
- Кликните правой кнопкой мыши по иконке приложения в области системного трея и выберите опцию «Save Profile» → «New Profile».
- В открывшемся диалоговом окошке дайте создаваемому профилю любое имя и нажмите «OK».
- Переключитесь средствами Windows 10 на другой экран и точно так же создайте второй профиль со своим именем.
- Используйте контекстное меню значка Monitor Profile Switcher для быстрого переключения между профилями, то есть мониторами.

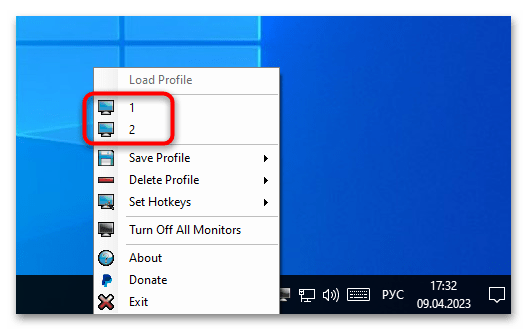
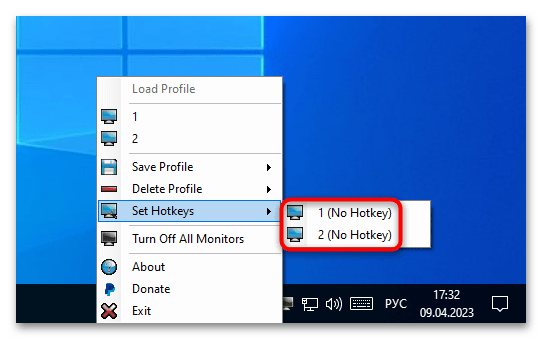
При желании каждому профилю можно назначить горячие клавиши, чтобы иметь возможность переключаться между мониторами с клавиатуры. Сделать это можно в подменю «Set Hotkeys».
Если переключаться между мониторами приходится часто, есть смысл добавить утилиту в автозагрузку.
Подробнее: Добавление программ в автозагрузку Windows 10
Наша группа в TelegramПолезные советы и помощь
После подключения компьютера с Windows 11 к внешним дисплеям вы можете настроить параметры для каждого из них.
Перед началом работы
Перед изменением параметров внешних мониторов обеспечьте правильное подключение. Вот что можно сделать:
-
Правильно подключите кабели к компьютеру или док-станции.
-
Проверьте наличие обновлений Windows. Чтобы проверить наличие обновлений, выберите Пуск , затем найдите параметры. Выберите Параметры > Центр обновления Windows > Проверить наличие обновлений.
Совет: Если вы используете адаптер беспроводного дисплея, подключите адаптер к порту HDMI на новых телевизорах, а затем подключите к нему компьютер по беспроводной сети. После подключения адаптера беспроводного дисплея к телевизору перейдите на Windows 11 компьютер, нажмите клавишу с логотипом Windows+ K, чтобы открыть приведение, а затем выберите адаптер беспроводного дисплея.
Изменение порядка мониторов
Этот параметр отображается, если Windows обнаруживает несколько мониторов. Каждый монитор будет пронумерован для упрощения идентификации.
Идентификация монитора
Чтобы узнать, какой номер соответствует дисплею, выберите Пуск , а затем найдите параметры. Выберите Параметры > Система > Дисплей > Идентифицировать. На экране монитора появится номер, который ему назначен.
Обнаружение монитора
Если вы подключили другой дисплей и он не отображается в настройках, выберите Пуск > Параметры > Система > Дисплей > Несколько дисплеев > Обнаружить.
Подключение беспроводного дисплея
Если вы подключили беспроводной дисплей и он не отображается в разделе Параметры, выберите Пуск > Параметры > Система > Дисплей > Несколько дисплеев > Подключиться.
Упорядочение мониторов
Если у вас несколько мониторов, вы можете изменить их порядок. Это удобно, если вы хотите, чтобы ваши мониторы соответствовали их настройке у вас дома или в офисе. В разделе параметров «Дисплей» выберите и перетащите монитор, куда хотите. Проделайте это для всех мониторов, которые нужно переместить. После получения нужного расположения нажмите Применить. Протестируйте свое новое расположение, перемещая указатель мыши на разных мониторах, чтобы убедиться в их правильной работе.
Совет: Используйте параметр Определить при упорядочении дисплеев, чтобы увидеть номер дисплея на экране.
Несколько параметров отображения

При отстыковке компьютера окна на внешнем мониторе сворачиваться. При повторной закреплении компьютера к монитору Windows помещает все точно так же, как раньше.
Чтобы настроить это поведение, выполните следующие действия:
-
Выберите Пуск > Параметры > Отображение системных >.
-
Прокрутите вниз и выберите Несколько дисплеев , чтобы развернуть этот раздел.
-
Установите флажки в соответствии со своими предпочтениями:
-
Запоминать расположения окон на основе подключения монитора
-
Свертывание окон при отключении монитора.
-
Изменение параметров мониторов
-
Изменение яркости и цвета дисплея
-
Изменение разрешения, масштабирования и макета дисплея
-
Изменение частоты обновления отображения
Выбор варианта отображения
Чтобы изменить то, что отображается на дисплеях, нажмите клавишу с логотипом Windows+ P. Вот параметры, которые можно выбрать.
|
Если необходимо: |
Выберите |
|
Просматривать элементы только на одном мониторе. |
Только экран компьютера |
|
Просматривать одинаковые элементы на всех мониторах. |
Повторяющийся |
|
Просматривать рабочий стол на нескольких экранах. При расширении мониторов вы можете перемещать элементы между двумя экранами. |
Расширить |
|
Просматривать все только на втором мониторе. |
Только второй экран |
PAGE CONTENT
Undoubtedly, using dual monitors increases productivity while simultaneously exhibiting a lot more information on the screen. Setting up multiple monitors on a Windows PC isn’t always as simple as it seems and may require fine-tuning before everything is exactly how you want it. Perhaps you want to use a different monitor as your primary display, or maybe you want to relocate one monitor. Whatever your motivation, switching displays on a Windows 11/10 computer is a simple operation that can be completed quickly. This post will show you how to switch between monitors 1 and 2 on a Windows PC.
What are Multiple Monitors? How’s It Beneficial
A multiple monitor arrangement refers to multiple screens connected to a single computer, offering the user more excellent screen real estate and much more control. A machine can be connected to multiple displays by HDMI, DisplayPort, VGA, or DVI cables or wirelessly via a wireless display adaptor.
Multiple monitors provide more screen space. When you connect multiple monitors to a computer, you may navigate your mouse between them, sliding apps between them as if you had an extra-large desktop. Multiple monitors enable users to work on multiple tasks simultaneously without frequently switching between windows. Gamers can use multiple monitors to get a broader field of view for a more immersive gaming experience. Traders can utilize multi-monitors to load several charts and trading platforms simultaneously, among other things.
You may be interested:
Why Switch Monitor Positions on Windows
Not everyone has the same room for two monitors, and Windows may not recognize the monitor arrangement immediately. For example, your setup may include a secondary monitor on the right, but Windows may have identified it as a left monitor. Switching displays give users more control over their work environment and can aid in reducing glare, improving viewing angles, and preventing eye strain.
Suppose you constantly work on different projects or have software components open. In that case, a larger monitor as your primary display may be advantageous because it lets you see more excellent material in one go.
It’s also crucial to evaluate each monitor’s resolution and refresh rate. Adopting that monitor as your primary display may benefit visual quality if one of your monitors has a higher resolution or refresh rate. Finally, your unique needs and usage will determine which monitor should be your primary and which should be your secondary. You can always try different setups to find the best one for you.
Prerequisites
Here’s all you need to know about dual monitor setup and switching positions.
- Two Monitors: To switch between two monitors, you must have at least two displays, which can be two display monitors or a laptop screen and an external monitor.
- HDMI/VGA/DisplayPort Cables: You’ll need the appropriate cables and wires to connect to the secondary monitor. You can acquire them based on your display’s compatibility.
- Compatible Graphics Card: To ensure a successful dual monitor setup, ensure that your graphics card supports the setting; otherwise, you may need to hunt for a graphics card upgrade.
- Drivers: While Windows usually takes care of this, in rare cases, you may need to manually install the secondary monitor drivers on your Windows PC.
- Administrator Privileges: To change the computer settings, you must be logged in with an administrator account.
How to Switch Monitors 1 and 2 on Windows 10
Switching monitors in Windows is only possible if the projection options are set to PC screen only, secondary screen, or extend. Here’s how to toggle between primary and secondary displays in Windows.
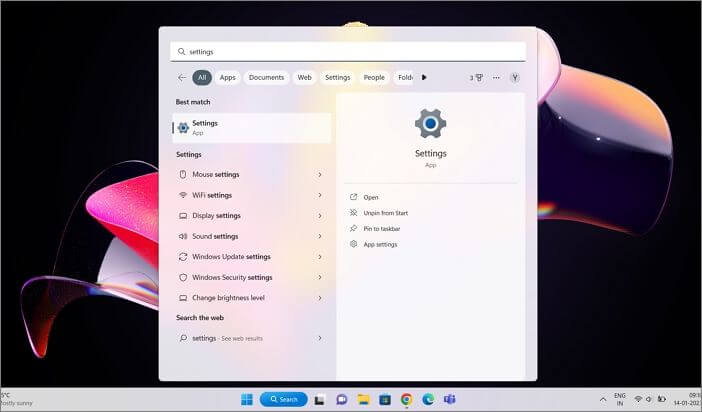
Step 1: First, locate the Settings application on your Windows 11 computer. This can usually be found by clicking the Start button, searching for Settings, or pressing the Win + I keys on your keyboard.
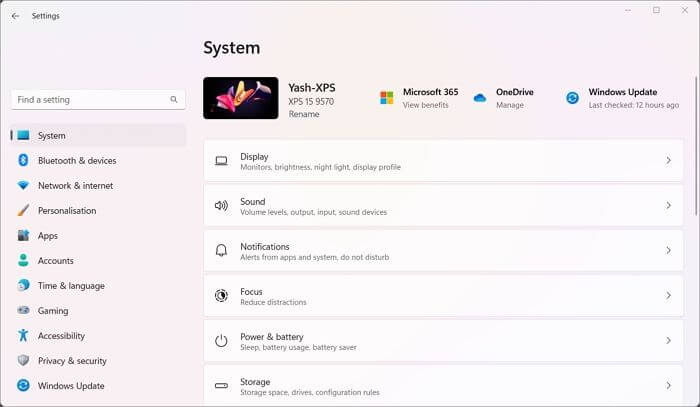
Step 2: Once in Settings, navigate to the System > Display menu to view a list of all the displays connected to your computer. The primary display is labeled 1 by default, and the secondary monitor is labeled 2.
Step 3: If you’re unsure which of your two monitors is 1 and which is 2, you can use the Identify button on this page to find out. This will lead to a large number appearing on the matching monitor, making it easier to determine which one you’re moving.
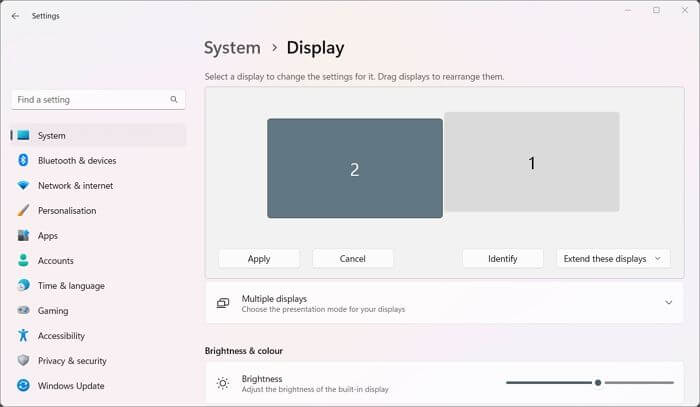
Step 4: To switch monitors, click on the monitor number you want to relocate, then click and drag the monitor’s representation to the desired spot. For example, if you wish to make monitor 1 your primary monitor, click and drag it to the left of monitor 2.
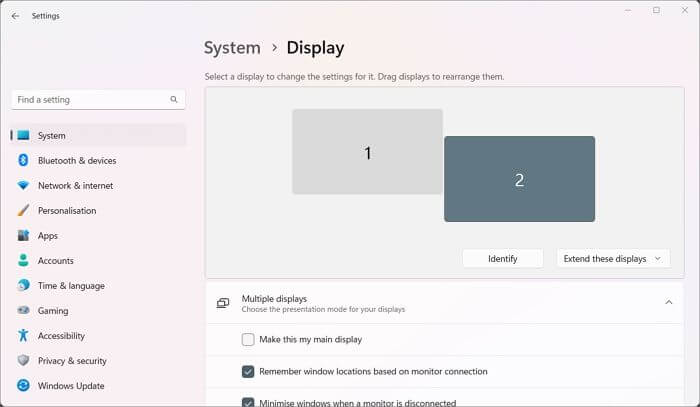
Step 5: Once you’ve done that, finally, click on the Apply button to save your changes, and you’re done.
You may also switch between primary and secondary displays by picking the display you want to make primary, tapping on the Multiple Displays sections to expand the available options, and selecting Make this my main display.
It’s crucial to note that the above instructions only apply to computers with two monitors. If you have more than two displays, you can still use the above steps to switch between them; merely make sure you accurately classify which monitors you wish to switch between.
Conclusion
Swapping monitors on a Windows 10 computer is a straightforward process that can be completed in simple steps. This article has presented all of the details you need to customize the settings of your monitors to fit your needs, whether you’re a professional or a home user.
You may easily switch between primary and secondary displays by browsing Settings, identifying the monitors, swiping the monitor locations on the screen, and clicking the Apply button. You can improve your productivity, enhance your gaming experience, tailor your work environment, and multitask more effectively with a dual-monitor configuration.
Морде
[43.6K]
более года назад
Пуск — Параметры — Система — Дисплей.
Или правой кнопкой кликнуть на рабочем столе — Параметры экрана.
Если у вас подключены 2 монитора — будут активны подменю — Несколько дисплеев и Изменение расположения экранов.

Для изменения порядка мониторов — сделайте то, что там написано — поменяйте дисплеи местами, нажмите — Сохранить.
Если дисплеи имеют разное разрешение — возможно придётся корректировать Дополнительные параметры дисплея.
автор вопроса выбрал этот ответ лучшим
комментировать
в избранное
ссылка
отблагодарить
(Image credit: Mauro Huculak)
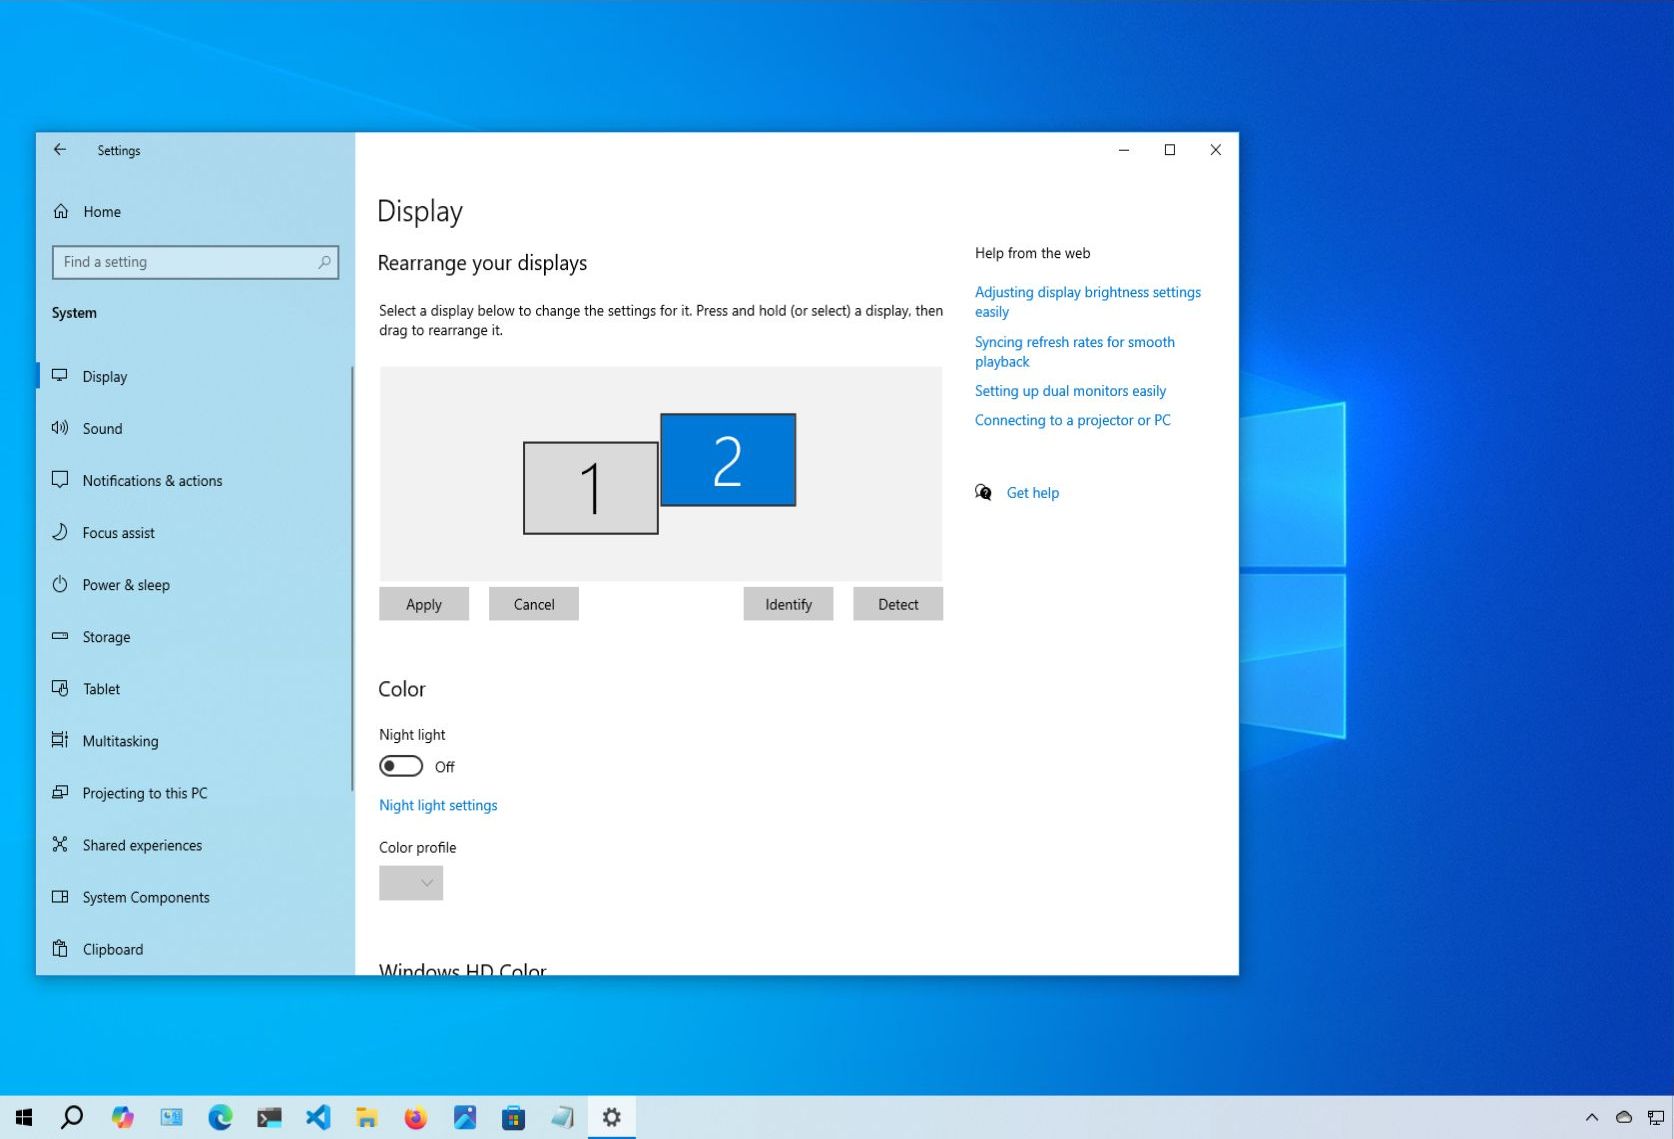
On Windows 11 (and 10), the system does a pretty good job detecting and configuring displays. However, when connecting multiple monitors, the system may not accurately understand their physical arrangement. This misalignment can cause issues, especially if the monitor setup doesn’t match the order of connections to the video card, if monitors are positioned differently, or if an external monitor was recently disconnected.
Regardless of the issue, Windows 10 provides settings to correctly arrange a multi-monitor setup. By configuring the system to recognize the physical layout, you can seamlessly move the mouse pointer across displays, enhancing the overall experience. (For additional tips on setting up multiple displays in Windows 10, refer to my other comprehensive guide.)
In this how-to guide, I’ll explain the easy steps for rearranging monitors to match the physical setup layout.
Recent updates
These instructions has been updated to ensure accuracy and reflect changes to the process in the operating system.
How to rearrange displays on Windows 11
To rearrange displays on Windows 11, use these steps:
- Open Settings.
- Click on System.
- Click the Display page.
- Click the Identify button to determine which displays you’ll be arranging.
- Quick tip: If one of the monitors is not showing up on the settings page, make sure it’s receiving power and connected correctly, and click the «Detect» button. If you are still having problems, reset their connections (or restart the device), and then try the «Detect» button one more time.
- Click, drag, and drop each display to arrange them according to their physical layout on the desk.
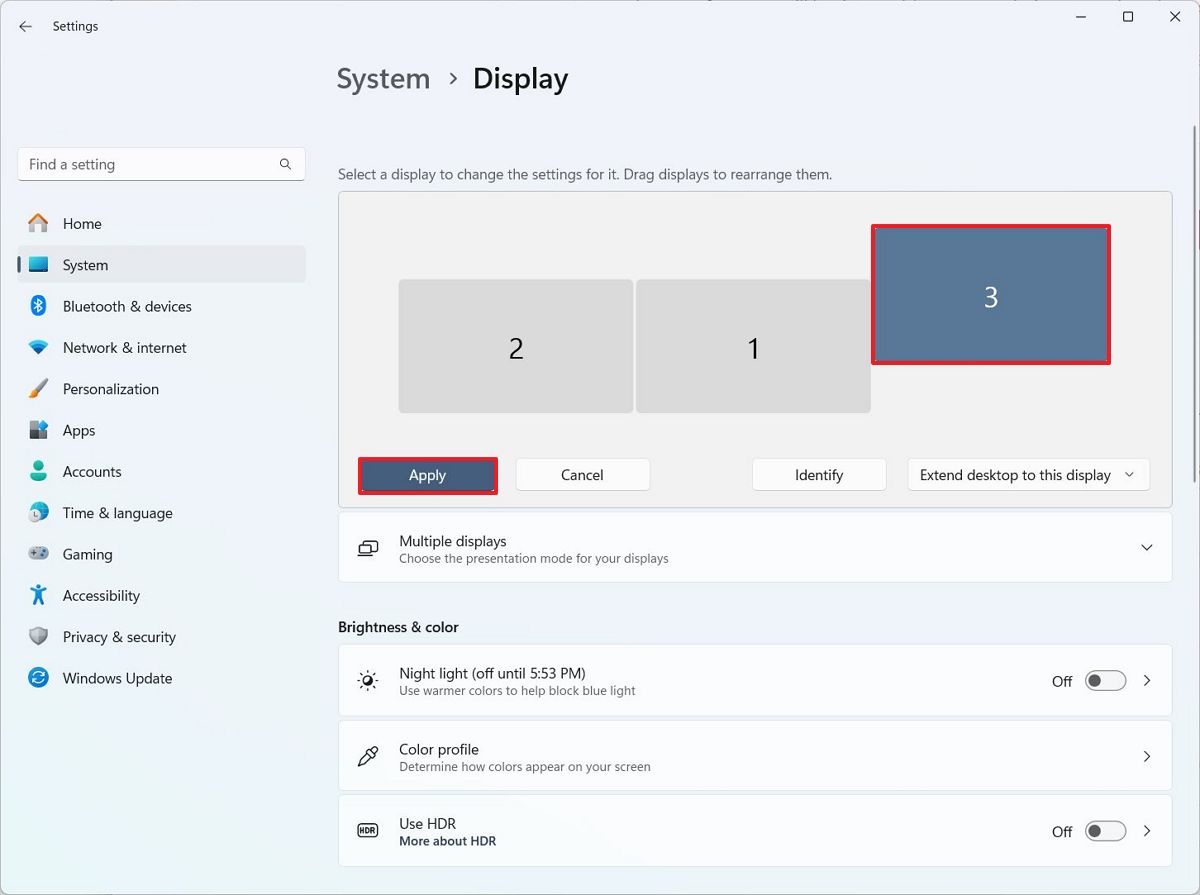
After you complete the steps, the monitors will be logically arranged like in your physical layout for a better navigation experience.
How to rearrange displays on Windows 10
To rearrange displays on Windows 10, use these steps:
- Open Settings.
- Click on System.
- Click on Display.
- Click the Identify button to determine which displays to arrange under the «Select and rearrange displays» section.
- Click, drag, and drop each display to arrange them according to their physical layout on the desk.
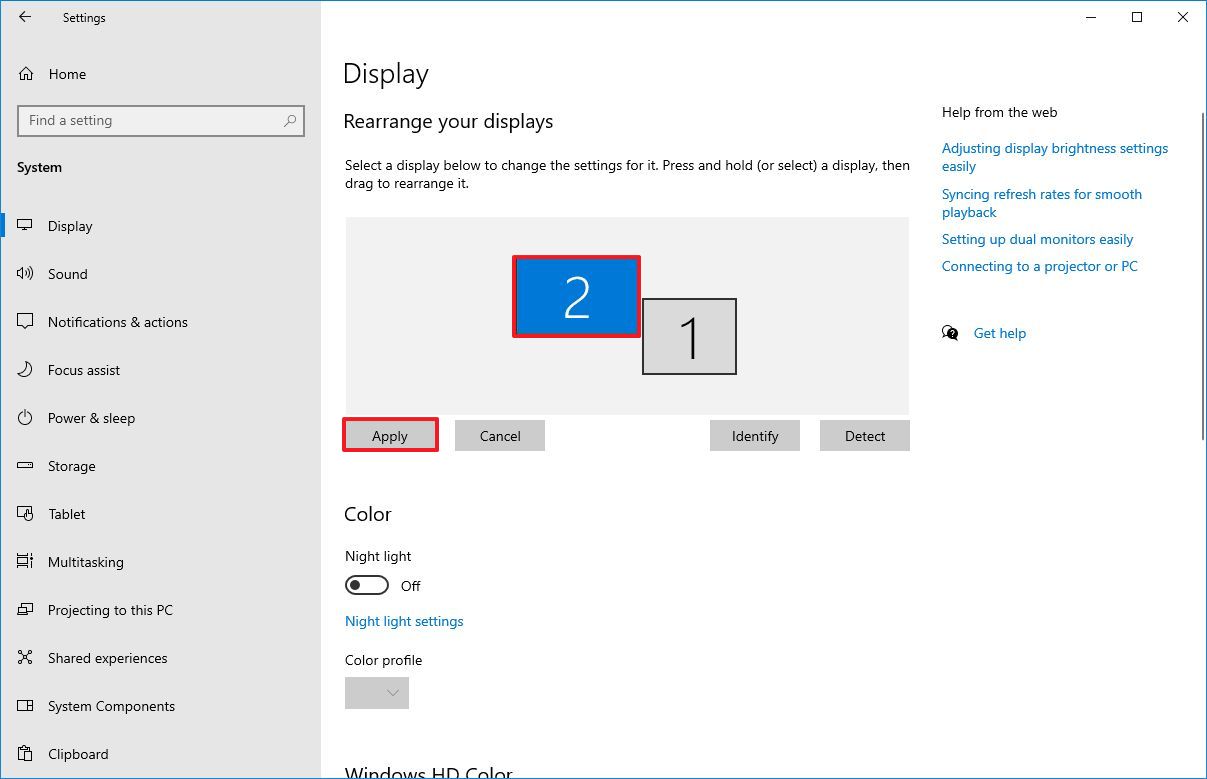
- Click the Apply button.
Once you complete the steps, you can start using the multi-monitor setup with a logical layout that matches the displays’ physical position.
All the latest news, reviews, and guides for Windows and Xbox diehards.
If you have two or more displays in line, make sure that all the devices align perfectly at the top. Otherwise, you’ll have problems moving the mouse cursor between monitors from the corners.
The setting is only available when connecting two or more displays, which means that if you only have one monitor, the rearrange option won’t be available.
More resources
If you’re having trouble with a second monitor not being detected in Windows 10 or Windows 11, you can follow our guide to fix that first. Find more in-depth guides, troubleshooting tips, and the latest updates on Windows 11 and 10 here:
- Windows 11 on Windows Central — All you need to know
- Windows 10 on Windows Central — All you need to know
Mauro Huculak has been a Windows How-To Expert contributor for WindowsCentral.com for nearly a decade and has over 15 years of experience writing comprehensive guides. He also has an IT background and has achieved different professional certifications from Microsoft, Cisco, VMware, and CompTIA. He has been recognized as a Microsoft MVP for many years.
