
В Windows для подключения к рабочему столу удаленного компьютера по протоколу RDP (Remote Desktop) по-умолчанию используется порт TCP 3389. В этой статье мы рассмотрим, как изменить номер стандартного порта для службы RDP на другой (применимо как к дестопным версиям Windows, так и к Windows Server).
Содержание:
- Изменить номер RDP порта в Windows
- PowerShell скрипт для смены номера RDP порта в Windows
После того, как вы включили RDP доступ в Windows, служба TermService (Remote Desktop Services) начинает слушать на порту 3389.
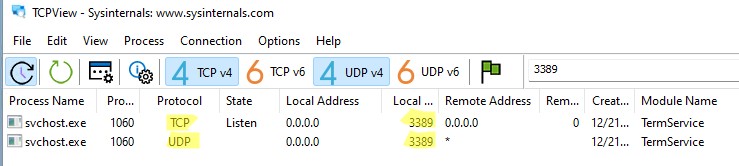
В современных версиях Windows для подключений удаленного рабочего стола также используется протокол UDP с тем же номером порта 3389. При использовании VPN, транспортный UDP протокол может вызывать проблемы с зависанием RDP сессий.
Для чего может понадобиться замена стандартного RDP порта 3389 на другой?
- Чаще всего это используется, чтобы спрятать RDP/RDS хост от автоматических сканеров портов, которые ищут в Интернете хосты Windows с открытым дефолтным RDP портом 3389.
- Смена RDP порта позволит уменьшить вероятность эксплуатации RDP уязвимостей, уменьшить количество попыток удалённого подбора паролей по RDP (не забывайте периодически анализировать логи RDP подключений), SYN и других типов атак.
- Обычно смена RDP порт используется на компьютерах с прямым подключением к интернету (VPS/VDS), или в сетях, где пограничный маршрутизатор перенаправляет порт 3389/RDP в локальную сеть на компьютер/сервер с Windows.
Несмотря на смену порта, не рекомендуется выставлять открытый RDP порт в Интернет. Сканеры портов по сигнатуре ответа могут понять, что на новом порту находится RDP Listener. Если вы хотите открыть внешний RDP доступ к компьютеру в локальной сети, лучше использовать такие технологии подключения, как VPN, RD Web Access, шлюз RD Gateway и другие.
При смене номера RDP порта на нестандартный, нежелательно использовать номера портов в диапазоне от 1 до 1023 (известные порты). Выберите неиспользуемый порт в пользовательском диапазоне (1024 до 49151) или из RPC (49152 — 65535). Проверьте, что выбранный порт не слушается другими процессами (например, порт 1350).
netstat -aon | findstr ":1350" | findstr "LISTENING"
Изменить номер RDP порта в Windows
В нашем примере мы изменим номер порта, на котором ожидает подключения служба TermService на 1350.
Для быстрой замены номера RDP порта на указанный, достаточно выполнить следующие команды с правами администратора:
set p=1350
reg add "HKLM\SYSTEM\CurrentControlSet\Control\Terminal Server\WinStations\RDP-Tcp" /v PortNumber /t REG_DWORD /d %p% /f
netsh advfirewall firewall add rule name="Custom-RDP-Port-TCP" protocol=TCP localport=%p% action=allow dir=IN
netsh advfirewall firewall add rule name="Custom-UDP-Port-UDP" protocol=UDP localport=%p% action=allow dir=IN
net stop TermService /y
net start TermService

Этот набор команд изменит номер RDP порта, создаст разрешающие правила для нового порта в файерволе и перезапустит службу TermService.
Рассмотрим, что делают эти команды и как изменить дефолтный номер RDP порта вручную.
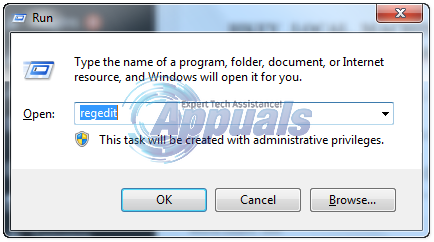
- Откройте редактор реестра (
regedit.exe
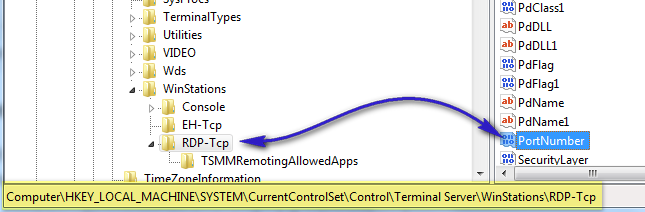
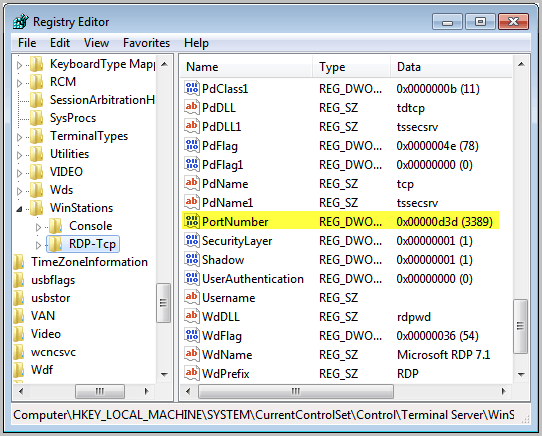
) и перейдите в ветку HKEY_LOCAL_MACHINE\System\CurrentControlSet\Control\Terminal Server\WinStations\RDP-Tcp - Найдите DWORD параметр реестра с именем PortNumber. В этом параметре указан порт, на котором ожидает подключения служба Remote Desktop. Значение по умолчанию 3389 (decimal)
- Измените значение этого порта. Я изменил RDP порт на 1350 в десятичном значении (Decimal);

хalert] Можно изменить значение параметра реестра с помощью PowerShell:
Set-ItemProperty -Path "HKLM:\System\CurrentControlSet\Control\Terminal Server\WinStations\RDP-Tcp\" -Name PortNumber -Value 1350
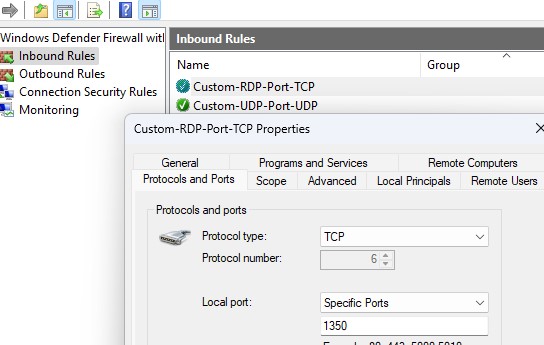
[/alert] - Создайте новые правила в Windows Firewall, разрешающие входящие подключения на новый номер RDP порта (если вы перенастраиваете удаленный сервер через RDP, создайте разрешающее правило в файерволе до перезапуска службы TermService, иначе вы потеряете доступ к хосту). Вы можете создать разрешающее входящее правило для нового TCP/UDP порта RDP вручную из консоли Windows Firewall with Advanced Security (
wf.msc
) или с помощью PowerShell команд:
New-NetFirewallRule -DisplayName "NewRDPPort-TCP-In" -Direction Inbound -LocalPort 1350 -Protocol TCP -Action allow
New-NetFirewallRule -DisplayName "NewRDPPort-UDP-In" -Direction Inbound -LocalPort 1350 -Protocol UDP -Action allow
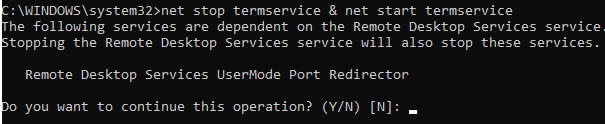
- Перезагрузите Windows или перезапустите службу удаленных рабочих столов командой:
net stop termservice & net start termservice
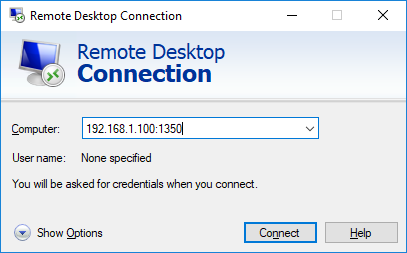
- Теперь для подключения к данному Windows компьютеру по RDP, в клиенте mstsc.exe нужно указывать порт RDP подключения через двоеточие следующим образом:
Your_Computer_Name:1350
или по IP адресу
192.168.1.100:1350
или из командной строки:
mstsc.exe /v 192.168.1.100:1350
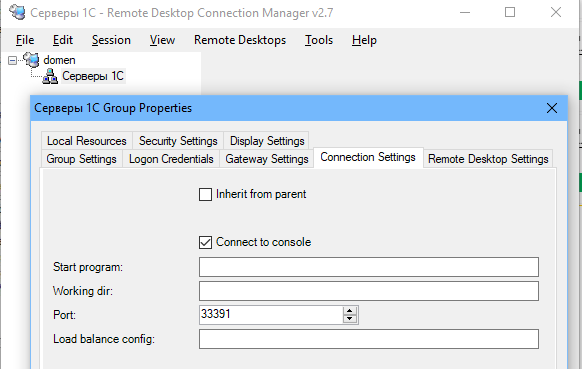
Если для управления RDP подключений вы используете менеджер RDCMan, новый номер RDP порта подключения указывается на вкладке “Connection Settings”.
- В результате вы должны успешно подключитесь к рабочему столу удаленного компьютера по новому номеру RDP порта (с помощью команды
netstat –na | Find "LIST"
убедитесь, что служба RDP теперь слушает на другом порту).


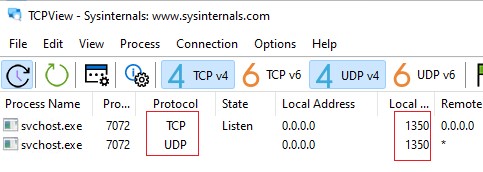
Обратите внимание, что номер UDP порта RDP также изменился на 1350 (проще всего проверить это с помощью утилиты TCPView).
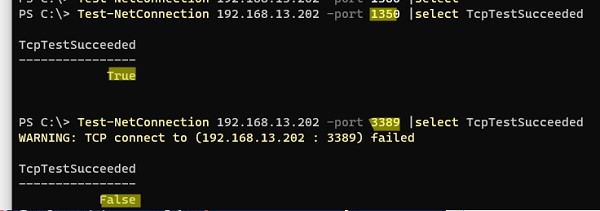
С помощью команды Test-NetConnection, проверьте что старый RDP порт теперь закрыт (
TcpTestSucceeded : False
):
Test-NetConnection 192.168.13.202 -port 3389 |select TcpTestSucceeded
Если вы хотите изменить номер RDP порта сразу на нескольких компьютерах в домене, можно воспользоваться групповыми политиками. Создайте новую GPO, которая распространит параметр реестра PortNumber с новым значением RDP порта на компьютеры домена.
PowerShell скрипт для смены номера RDP порта в Windows
Полный код PowerShell скрипта для смены номера RDP порта, создания правила в брандмауэре и перезапуска службы RDP может выглядеть так:
Write-host "Укажите номер нового RDP порта: " -ForegroundColor Yellow -NoNewline;$RDPPort = Read-Host
Set-ItemProperty -Path "HKLM:\SYSTEM\CurrentControlSet\Control\Terminal Server\WinStations\RDP-TCP\" -Name PortNumber -Value $RDPPort
New-NetFirewallRule -DisplayName "NewRDPPort-TCP-In-$RDPPort" -Direction Inbound –LocalPort $RDPPort -Protocol TCP -Action Allow
New-NetFirewallRule -DisplayName "NewRDPPort-UDP-In-$RDPPort" -Direction Inbound –LocalPort $RDPPort -Protocol UDP -Action Allow
Restart-Service termservice -force
Write-host "Номер RDP порта изменен на $RDPPort " -ForegroundColor Magenta
Если на удаленном компьютере включен WinRM, вы можно изменить номер порта RDP удаленно с помощью командлета Invoke-Command:
Invoke-Command -ComputerName PC1name -ScriptBlock {Set-ItemProperty -Path "HKLM:\SYSTEM\CurrentControlSet\Control\Terminal Server\WinStations\RDP-TCP\" -Name PortNumber -Value 1350}
Есть ситуации, когда необходимо изменить порт для подключения к серверу терминалов в Windows Server 2008 R2. Здесь я расскажу как это сделать.
1. Изменение порта в реестре
Заходим на сервер с правами администратора и запускаем редактор реестра (Для этого нажимаем «Пуск» , в строке поиска пишем «regedit» и запускаем regedit.exe из появившегося списка)

Делаем, на всякий случай, экспорт реееста. А затем, в редакторе реестра, в дереве слева, идем по пути:
HKEY_LOCAL_MACHINE\SYSTEM\CurrentControlSet\Control\Terminal Server\WinStations\RDP-Tcp
выделяем папку «RDR-Tcp» и справа находим параметр «PortNumber» . Кликаем по нему 2 раза и в открывшемся окне выбираем десятеричную систему счисления. Теперь текущее значение порта 3389 меняем на то, которое вам надо (В моем примере это 3394). Нажимаем «ОК» и закрываем редактор.

2. Добавление правила в Бредмауэр.
Теперь, когда мы изменили порт для RDP, надо добавить правило в бредмауэр для нового порта. Для этого заходим «Пуск» — «Панель управления» — «Система и безопасность» — «Бредмауэр Windows» . Слева нажимаем на «Дополнительные параметры» , откроется оснастка «Бредмауэр в режиме повышенной безопасности», заходим в ветку «Правила для входящих подключений» и нажимаем «Создать правило» .

Запустится «Мастер создания правила для нового входящего подключения», выбираем правило «Для порта», нажимаем «Далее» .

Указываем номер нашего нового порта (у меня 3394), жмем 3 раза «Далее», вводим название правила, и нажимаем «Готово» .

Чтобы все изменения вступили в силу, необходимо перезагрузить сервер.
Все, на этом настройка закончена. Теперь можно заходить на сервер через новый порт. Для этого при подключении к удаленному рабочему столу в поле «Компьютер» надо написать IP-адрес сервера, двоеточие и номер порта.

Запись опубликована в рубрике Windows Server 2008 R2 с метками RDP, Windows Server 2008. Добавьте в закладки постоянную ссылку.
Windows · September 28, 2024
Changing the default Remote Desktop Protocol (RDP) port on Windows Server 2008 can enhance security by making it less predictable for potential attackers. By default, RDP uses port 3389, which is widely known and often targeted. This article will guide you through the steps to change the RDP port, ensuring that your server remains secure while allowing remote access.
Why Change the RDP Port?
Changing the default RDP port can help mitigate the risk of unauthorized access. Attackers often scan for open ports, and by altering the default port, you can reduce the likelihood of automated attacks. Additionally, it can help in environments where multiple services are running on the same server, allowing for better organization and management of network traffic.
Prerequisites
- Administrative access to the Windows Server 2008 machine.
- Basic understanding of Windows Registry and networking concepts.
- Backup of the system or registry before making changes.
Steps to Change the RDP Port
Step 1: Modify the Windows Registry
To change the RDP port, you will need to edit the Windows Registry. Follow these steps:
- Press
Windows + Rto open the Run dialog box. - Type
regeditand pressEnterto open the Registry Editor. - Navigate to the following key:
- In the right pane, locate the
PortNumberentry. - Right-click on
PortNumberand selectModify. - Change the base to
Decimaland enter your desired port number (e.g., 3390). - Click
OKto save the changes.
HKEY_LOCAL_MACHINESystemCurrentControlSetControlTerminal ServerWinStationsRDP-TcpStep 2: Configure Windows Firewall
After changing the port in the registry, you must configure the Windows Firewall to allow traffic on the new port:
- Open the Control Panel and navigate to
System and Security. - Select
Windows Firewall. - Click on
Advanced settingson the left pane. - In the Windows Firewall with Advanced Security window, click on
Inbound Rules. - Select
New Rule...from the right pane. - Choose
Portand clickNext. - Select
TCPand specify the new port number you set in the registry. - Allow the connection and complete the wizard by naming the rule (e.g., RDP Port 3390).
Step 3: Restart the Server
For the changes to take effect, you will need to restart your Windows Server 2008. After the restart, the RDP service will listen on the new port.
Step 4: Connect Using the New Port
To connect to your server using the new RDP port, you will need to specify the port number in your Remote Desktop Connection client:
- Open Remote Desktop Connection.
- In the Computer field, enter your server’s IP address followed by a colon and the new port number (e.g.,
192.168.1.1:3390). - Click
Connectand enter your credentials when prompted.
Conclusion
Changing the RDP port on Windows Server 2008 is a straightforward process that can significantly enhance your server’s security. By following the steps outlined above, you can effectively change the default port and configure your firewall accordingly. Always remember to back up your system before making any changes to the registry or firewall settings.
For those looking for reliable and secure hosting solutions, consider exploring USA VPS Hosting options that provide robust performance and security features tailored to your needs.
Needed:
Question: How to change the listening port for Remote Desktop
To change the port that Remote Desktop listens on, follow these steps.
Important This section, method, or task contains steps that tell you how to modify the registry. However, serious problems might occur if you modify the registry incorrectly. Therefore, make sure that you follow these steps carefully. For added protection, back up the registry before you modify it. Then, you can restore the registry if a problem occurs. For more information about how to back up and restore the registry, click the following article number to view the article in the Microsoft Knowledge Base:
322756 How to back up and restore the registry in Windows
- Start Registry Editor.
- Locate and then click the following registry subkey:HKEY_LOCAL_MACHINE\System\CurrentControlSet\Control\Terminal Server\WinStations\RDP-Tcp\PortNumber
- On the Edit menu, click Modify, and then click Decimal.
- Type the new port number, and then click OK.
- Quit Registry Editor.
- Restart the computer.
Note When you try to connect to this computer by using the Remote Desktop connection, you must type the new port. Maybe you have to set the firewall to allow the new port number before you connect to this computer by using the Remote Desktop connection.
Question: Change Remote Desktop RDP Port
Port 3389 is the home of the remote desktop protocol that powers Remote Desktop Services on all modern versions of Windows. If your system has Remote Desktop enabled, it is listening for connections on port 3389. Since this port is both well known and can be used to attack accounts, it is low hanging fruit for script kiddies and bots looking for an easy target.
Theoretically on a system that does not have an account lockout policy in place, which by the way is not a system default, the RDP protocol can be used to get the administrator password with brute force. Brute force is a fancy way of saying trying all possible passwords. If the system never locks out the account then time is the only barrier to eventually getting you password and logging in.
The first defense is to implement a good account lockout policy but that does not solve the entire problem. Any administrator of a public facing Windows web server will notice that their server is continiously attacked by bots looking for an easy target. The bots will often lock out your accounts which can be very annoying.
To protect your system from the bots and script kiddies I always reccomend changing the default RDP port. This will not fool an intelligent attacker but it will weed out the noise.
Follow these steps to change the Remote Desktop server port:
- Open up Registry Editor by clicking on the Start Button, type in regedit and then hit Enter.
- In Registry Editor, navigate to HKEY_LOCAL_MACHINE, SYSTEM, CurrentControlSet, Control, Terminal Server, WinStations and RDP-Tcp.
- Right click on the PortNumber dword and select Modify.
- Change the base to Decimal and enter a new port between 1025 and 65535 that is not already in use.
- Click OK and reboot.
Make sure to reboot to activate the change.
Keep in mind that the next time you want to connect to your system with RDP you will need to provide the port number. You can do that from the Remote Desktop client by appending a colon after the host name or ip address followed by the port number. For example, if I have a computer with host name of tweak with RDP running on port 1234 I would use tweak:1234 in the remote desktop client hostname field.
Question: Windows Remote Desktop: Configuring Your Firewall and Router
Windows Remote Desktop: Configuring Your Firewall and Router
By Eric Geier
In Part 1 of this tutorial series, we configured Windows to accept remote desktop connections, so we can log into and use a PC anywhere in the World with Microsoft’s Remote Desktop Connection client application. In Part 2, we configured Windows to accept remote connections via a Web browser, so the client application doesn’t have to be installed on the computer from which you are connecting.
However, neither of these methods will work until your firewall is configured to allow remote connections. This tutorial addresses that. Plus, to connect to your PC via the Internet, your router must be properly configured.
In this tutorial, we’ll tell the firewall on the PC that’s hosting the remote connection that it is okay to allow incoming connections on the appropriate port. We’ll also tell your router where to forward remote desktop connections. Let’s get started.
Letting the Traffic Past Your Firewall
Since you will be trying to connect to your PC from the local network or Internet, your firewall software must be configured to let the traffic through. Enabling the Remote Desktop feature on Windows automatically configures Windows Firewall with the appropriate settings; however, you must manually configure any other third-party firewall software you have installed on your computer. To do this, add UDP port 3389 (which Remote Desktop uses) to your firewall’s authorized list. If needed, refer to the help and documentation of the firewall program for assistance.
It’s possible to change your Windows Firewall settings and accidentally mess up the setting automatically made when you enabled Remote Desktop. Therefore, to be on the safe side we’ll verify Remote Desktop connections can pass through.
If you are also setting up Web access to the Remote Desktop Connection, you must add TCP port 80 (or the port you choose for IIS if you changed from the default) to your Windows Firewall and any other third-party firewall. Windows doesn’t automatically add this port to the authorized list, so you will have to do it yourself.
Follow these steps in Windows Vista to verify the Windows Firewall settings or add the Web access port:
- Click the Start button and choose Control Panel.
- On the Control Panel window, under the Security category, click the Allow a program through Windows Firewall link. If User Account Control is enabled, select an account and enter a password, if required, and click Continue on the prompt.
- On the Windows Firewall Settings window that opened, click the General tab.
- Make sure the Block all incoming connections check box is NOT checked; as Figure 1 shows.
- Click the Exceptions tab and scroll down to make sure the Remote Desktop item is checked; as Figure 2 shows. This verifies Windows Firewall is set to allow the traditional Remote Desktop Connections.
- If you are setting up Web access with IIS, as well, click the Add Port button. Then, on the Add a Port dialog box, type in a Name (such as Remote Desktop Web Connection) and enter the default port 80 or the port you manually changed IIS to into the Port Number field, select TCP for the Protocol, and click OK.
- When you’re done, click OK.
If you’re using Windows XP, here’s how to verify the Windows Firewall settings and/or add the Web access port:
- Click the Start button and choose Control Panel.
- On the Control Panel window, click the Security Center category.
- On the Windows Security Center window that opened, near the bottom of the window, click the Windows Firewall icon.
- Make sure the Don’t allow exceptions check box is NOT checked.
- Click the Exceptions tab and scroll down to make sure the Remote Desktop item is checked.
- If you are setting up Web access with IIS, as well, click the Add Portbutton. Then on the Add a Port dialog box, type in a Name (such as Remote Desktop Web Connection) and enter the default port 80 or the port you manually changed IIS to into the Port Number field, select TCP for the Protocol, and click OK.
- When you’re done, click OK.
If you are using other third-party firewall utilities, make sure you add these ports to them as well. If you find you’re having problems later when connecting, consider disabling all firewall software except Windows Firewall.
Configuring Your Router
If your PC isn’t directly connected to your Internet modem, and it is running through a wired or wireless router, you must configure the router to connect to the Remote Desktop connection via the Internet. This configuration lets your router know where to direct Remote Desktop connections that originate from the Internet.
Configuring your router consists of setting it to forward data, which comes in to certain ports, to the computer you have set up with the Remote Desktop Connection. For either Windows XP or Vista, TCP port 3389 (which Remote Desktop uses) must be forwarded to the Remote Desktop PC. If you are setting up Web access, you also must forward TCP port 80 (or the non-default port you set) to the host computer.
If you aren’t sure exactly how to set up these port forwards, these steps should help:
- Access your router’s Web-based configuration utility by bringing up your Web browser, typing in the IP address of your router, and pressing Enter. If you don’t know the IP address, see your router’s documentation or reference the Default Gateway value that’s given in the connection status details of Windows.
- When prompted, enter the username and password of your router. You should have set these login credentials when you had set up your router; however if not, you can reference the default values in the router’s documentation.
- Find the Virtual Server or Port Forwarding tab of the router’s administration screens.
- Enter the port details, for each port you need to forward (discussed in the previous paragraphs) by entering information into the appropriate text boxes or selecting options from list boxes. Figure 3 offers an example.
Port details, for each port to be
forwarded(Click for larger image)You may have to enter a name, which would be for your reference, like remote desktop or remote desktop Web access. Sometimes you can pick the computer (identified by the Computer Name) you want to forward to from a drop-down menu list, or you may have to enter the IP address of the computer. You can find your computer’s IP address by referencing the connection status details of Windows. Lastly, you’ll probably have to enter the port you want to forward, which were given earlier for both Remote Desktop and Web access. - Click a Save or Apply button.
Now you must make sure the port(s) are always forwarded to the correct computer. If you are using dynamic IP addresses on your local network (which is the default method), meaning they’re automatically assigned to your computers using the router’s DHCP server, you’ll need to do some additional configuration. You must assign a static IP address to at least the computer that’s going to be hosting the Remote Desktop Connection. This is because the IP address you just set up to forward the ports to will sometime be given to another computer or become unused if it’s being automatically assigned.
You have two ways you can go about giving your computer a permanent IP address. You can reserve an IP address for the computer in the router’s configuration utility, if your router supports it. This is preferred so you don’t have to change your computer’s actual settings and connecting to other networks will be much easier. However, if the feature isn’t available you can always manually assign your computer (network adapter) with a static IP address in Windows, such as Figure 4 shows.
Stay tuned-in for the final installment of this series, where we’ll connect to the remote desktop connection via the client application and via Web access. Plus, we’ll discuss how to overcome having a dynamic (changing) IP address.
About the Author: Eric Geier is the Founder and President of Sky-Nets, a Wi-Fi Hotspot Network. He is also the author of many networking and computing books, including Home Networking All-in-One Desk Reference For Dummies (Wiley 2008) and 100 Things You Need to Know about Microsoft Windows Vista (Que 2007).
Question: Change RDP Port of Windows 2012 R2 server running in amazon AWS [duplicate]
1
This question is an exact duplicate of:
- Unable to RDP to a second computer on the same router after changing default RDP Listening Port 2 answers
How do I change the RDP port number of Windows 2012 R2 server running in Amazon AWS? I could change the port number by going here:
HKEY_LOCAL_MACHINE\System\CurrentControlSet\Control\TerminalServer\WinStations\RDP-Tcp\PortNumber
but then could not RDP into server even after changing the inbound rules of security group.
Answer:
This is resolved. I had to change the firewall settings to allow inbound connection on new port. –
Question: Changing the RDP Port on Windows 10
By default, remote desktop connections on windows use port 3389. If you find the need to change this port, the following should help. Make sure you have “Allow remote connections to this computer” checked under “System Properties > Remote” before you begin.
In my experience, you should avoid changing the mapped port for core Windows services if possible, as this can cause numerous configuration and management issues. Other options include:
– Using port mapping (forwarding) on your router (e.g. externalip:10000 -> serverip:3389), however not all routers offer this functionality.
– Installing a third party remote desktop app, like Chrome Remote Desktop or LogMeIn, however these require specific software and/or subscriptions
– Deploying a server/PC as a RDP “gateway”. You then access all further RDP hosts from this first point of contact.
– Using a RD gateway/RD Web access. This requires a server with the appropriate role installed, but can optionally be configured with two-factor authorisation like Duo.
To check what port your RDP is currently listening on, use the netstat command in an elevated command prompt.
netstat -abo
This will show information about current network connections and listening ports, as well as associated executables and processes. You’ll see port 3389 bound to “svchost.exe” on “TermService”.
To change the bound port you’ll need to open an elevated command prompt and run regedit.
regedit
Navigate to the PortNumber setting.
HKEY_LOCAL_MACHINE > SYSTEM > CurrentControlSet > Control > Terminal Server > WinStations > RDP-Tcp
Right click on the “REG_DWORD” named “PortNumber” and hit “Modify”. Change the base to Decimal and enter the new port (between 1025 and 65535). You can use NetStat to check if a particular port is already bound to a process.
Once you’ve changed the value, exit RegEdit and either reboot the computer, or simply restart the Remote Desktop Services service using the “Services” snap-in in “Computer Management”. You can confirm the port has been changed by running netstat again (in my case, to 10000).
Finally, open up Windows Firewall and add a new inbound rule for the new port. You won’t be able to change the existing rule as that’s a core system rule, but copy across the values into a new rule and you’ll be good to go.
Question: How to change Remote Desktop port (RDP) on Windows server on VPSie
This short tutorial will explain how to change the RDP (Remote Desktop port) server is listening on for use with Private Cloud Solution (PCS) with one public IP when client have more than Windows guests within his Private Cloud
In this example we will change default port 3389 with port 6000:
1- Login from console to DB server –
Click on the Windows VPSie you want to change the port for – Access then console access
Click Ctrl-ALt-Delete so you get login prompt:
User username : Administrator / Password emailed to you upon VPSie creation (If not changed by you)
Once logged in :
2- Click simultaneously on the Windows logo + R to open the “Run” dialog and execute the “cmd” command – Valid for 2012 R2, Or CMD on 2008 server editions.
3- Open the registry editor by typing the “regedit” command
4- Search for this registry subkey: HKEY_LOCAL_MACHINE\System\CurrentControlSet\Control\TerminalServer\WinStations\RDP-Tcp\PortNumber
5- Double-click or right-click on the “PortNumber” registry subkey, select the decimal base and type the port number of your choice (the default port is 3389, in this example, we selected port 6000). Click on “Ok” to save your selection.
6- Exit the registry editor
7- Restart your server
Note: Firewall is already enabled by default and allowing RDP connection on all VPSie(s).
Upon reboot you should be able to access RDP on the new port 6000.
In case new port is not allowed in Windows firewall – this is a quick method to add it :
ControlPanel–>System Security–>Windows Firewall–>Advance Settings–>inboundRules–>New Rule.
Select ports –> Input 6000 –> allow ALL incase you want to RDP one that port locally or public –> give it a name –> you done.
Question: Change Remote Desktop Port back to 3389
Hello Everyone,
I need a bit of ideas on a decent way to push out a GPO to change/verify that the RDP port on workstations are the default 3389.
The old Network admin changed the ports and had wan ip’s pointing to them. This now makes it tricky to RDP to the machines w/o knowing the port.
I figured I could run a registry script to change the port.
Any ideas?
Answer:
Hi Andrew,
First, you need to find out how the previous admin changed the port: script? GPO? because it might get re-applied.
Second, you can check the registry key for the currently used port for RDP (same key for WIndows 7 too): SYSTEM\CurrentControlSet\Control\Terminal Server\WinStations\RDP-Tcp\PortNumbersource: http://support.microsoft.com/kb/306759
The easiest thing to do for applying the “new” RDP port to the entire domain pc will be through GPO:
Computer Configuration > Preferences > Windows Settings > Registry
Just add a new registry item pointing to the above key:
Action: Update
Hive: SYSTEM\CurrentControlSet\Control\Terminal Server\WinStations\RDP-Tcp
Value Name: PortNumber
Value type: REG_WORD
Value data: 3389 (make sure to select the base as Decimal on bottom right)
Question: Change Remote Desktop Gateway Port
Q: Can I change the port that Remote Desktop Gateway uses?
A: By default, the Remote Desktop (RD) Gateway component that encapsulates RDP in HTTPS packets listens on port 443 (for TCP) and port 3391 (for UDP). You can use the RD Gateway Manager utility to change this as follows:
- Right-click the RD Gateway server name in the navigation pane and select Properties.
- Select the Transport Settings tab.
- Modify the HTTP and/or UDP port number. Set the custom port value to the same port if you change them, because there’s no way to do so in the client.
- Specify different custom ports for UDP versus TCP, then click OK.
Note that two firewall exceptions are enabled by default; however, they use the default ports, so you’ll need to add your own firewall exceptions for TCP and UDP for the custom port you selected.
When you connect from a client, you need to add the custom port to the end of the gateway server name, preceded by a colon (:); for example, mygateway.domain.com:9999. Note that this is only an RDP client that supports RDP 8.0 or later.
If you’re using RemoteApp, you need to manually update the gateway in the RDP file with the correct port because you can’t change it via Server Manager to specify a custom port for the gateway. You can modify the port used for the gateway by connecting to the Remote Desktop Session Host and navigating to HKEY_LOCAL_MACHINE\SOFTWARE\Microsoft\Windows NT\CurrentVersion\Terminal Server\CentralPublishedResources\PublishedFarms\\DeploymentSettings, then editing the DeploymentRDPSettings value to add the port to the gatewayhostname:s:mygateway.com:9999 part of the string. Note that you must set this before you publish any applications. A nicer way is to use PowerShell:
Set-RDSessionCollectionConfiguration –CollectionName “Your Collection” -CustomRdpProperty “gatewayhostname:s::” -ConnectionBroker
Others:
Question: Change RDP listening port without System Reboot
We can easily change remote desktop listening port to some other port than the default 3389.
By default RDP listens on TCP 3389. Once we change this port to some other port , We may need to restart the system to activate the new listening port .
open registry editor and navigate to
HKEY_LOCAL_MACHINE\SYSTEM\CurrentControlSet\Control\Terminal Server\WinStations\RDP-Tcp
Then click on PortNumber and select radio button Decimal which will show value in Decimal. Now enter a desired port number and close the registry editor.
To activate this new port , press Windows+R on keyborad which opens up run window. Type services.msc in run window and press enter now we can restart “Remote Desktop Services” from Sevices list . This will cause any existing remote desktop connection to close and one may need to reopen remotedesktop on new port by entering IPADDRESS:NEWPORT on Remote Desktop client (mstsc)
Question: How to Change Remote Desktop Port in Windows
Remote Desktop is a very useful feature of Windows operating system that allows the user to remotely connect to the computer from any computer to the computer where RDP is enabled. By default, Remote Desktop uses port 3389. Since this is a common port, and if RDP is enabled on Windows, it will use this port which poses a security risk therefore it is highly recommended to change this port.
You can implement an account lockout policy to lock the account after (X Number of failed log-in) attempts. However, you don’t want anyone to login to the RDP and attempt brute force attacks.
How to Change RDP (Remote Desktop Port)
There are two methods to change the default Remote Desktop Port. Let’s have a look at both methods.
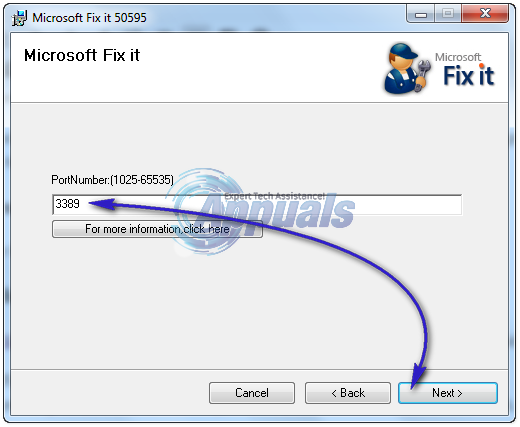
Method 1: Change RDP through Microsoft Fix It Utility
Click on this link to download Microsoft Fix it utility. When the file download dialogue box appears, click “Run”.
Follow the instructions in the Fix it wizard. Type a new port number between 1025 and 65535 in the PortNumbertext box. Make sure the port is not in use already, otherwise it can conflict and won’t work.
PRO TIP: If the issue is with your computer or a laptop/notebook you should try using the Reimage Plus Software which can scan the repositories and replace corrupt and missing files. This works in most cases, where the issue is originated due to a system corruption. You can download Reimage Plus by Clicking Here
Method 2: Change RDP through Registry Editor
Hold the Windows Key and Press R to open Run Dialog, In the run dialog box type regedit and click the OKbutton.
When registry editor opens, navigate to the following registry key:
HKEY_LOCAL_MACHINE\System\CurrentControlSet\Control\TerminalServer\WinStations\RDP-Tcp\PortNumber
On the Edit menu, click Modify, and then click Decimal. Type a new port number between 1025 and 65535, and click OK.
Note: When you change Remote Desktop Port, you must type the new port number when you try to connect to this computer. If you have a firewall installed, you may need to configure your firewall to allow the new port before you can connect to this computer using Remote Desktop.
Question: How to change default Remote Desktop listening port
By default, Remote Desktop Protocol (for Windows XP and Server 2003) listens on TCP port 3389.
Each PC needs to listen on a different port in order for the Remote Desktop request coming in from the client PC to be forwarded by your router to the proper host PC.
To make a host PC listen on a port other than the default port 3389, you must edit the registry.
IF YOU’VE NEVER EDITED THE REGISTRY BEFORE BE CAREFUL!
EDITING THE WRONG FILES CAN PERMANENTLY DESTROY YOUR OPERATING SYSTEM! :hotouch:
Run Regedit and go to this key:
HKEY_LOCAL_MACHINE\SYSTEM\CurrentControlSet\
Control\Terminal Server\WinStations\RDP-Tcp
Find the PortNumber subkey and notice the value of 0x00000d3d (3389).
Modify the port number to any unused port (ie-3390 or d3e in hex) and save the new value.
Reboot for this change to take effect.
Now you need to configure your router to forward the different port requests to the proper local IP address.
Question: Change Remote Desktop Port
By default, Remote Desktop listens on port 3389 (via TCP). Using a quick registry tweak, you can change that to any other valid port. The following steps describe the process:
- Start Registry Editor (by default, this is located at
c:\windows\regedit.exe). - Go to the following registry key:
HKEY_LOCAL_MACHINE\
System\CurrentControlSet\Control\TerminalServer\WinStations\RDP-Tcp - Open the PortNumber subkey.
- Pick the Decimal Base option.
- Enter the new port number, and then click OK.
Does Remote Desktop send traffic over any other ports?
Primary remote desktop traffic will go over the one port defined above. If sound is enabled, streaming will be attempted over UDP directly. If this connection can’t be made, Remote Desktop will stream sound over a virtual channel via the main remote desktop port.
No other ports are used.
How to connect to a non-standard remote desktop port
To connect to a different port than the default 3389 RDP port, specify the port using one of the following formats:
- <computername>:<port>
example: computer:23389 - <ip address>:<port>
example: 192.168.1.1:23389
Question: HOW TO CHANGE THE DEFAULT RDP (REMOTE DESKTOP) LISTENING PORT ON YOUR WINDOWS VPS?
By default Windows machines are remotely accessible via Remote Desktop on TCP port 3389. In certain situations changing the Remote Desktop port is useful, especially when you receive a huge number of failed Remote Desktop login attempts on default port. In order to change the default port of Remote Desktop, you’ll need to alter the registry of your server. Registry changes may cause some serious problems in your server when performed incorrectly, so be careful while performing the steps mentioned in this article.
Furthermore, to maintain the access to your server after changing the Remote Desktop port, be sure that you also change the port in Windows Firewall’s Remote Desktop Services rule OR create new rule with new RDP port by referring to this article. Otherwise, Windows firewall won’t allow you to access your server using new Remote Desktop port.
GET WINDOWS VPS
- Login to your Windows server via Remote Desktop.
- Click on Start >> Run >> Type REGEDIT and hit enter. This will open registry editor.
- Locate and click following registry subkey.
HKEY_LOCAL_MACHINE\System\CurrentControlSet\Control\TerminalServer\WinStations\RDP-Tcp
- Double click on the PortNumber registry subkey, select the Decimal base. Type new port number in Value data field and click OK to save the changes.
- Quit Registry Editor.
- Restart the VPS/server.
GET WINDOWS VPS
Question: CHANGE WINDOWS REMOTE DESKTOP (RDP) PORT
Change Windows VPS RDP port.
This article is based on Windows Server 2003 R2. Most of the steps should be similar for newer Windows Server versions.
Warning: Changing the default RDP port should be used as an addition to normal server security measures – not as an alternative.
Changing the default RDP port will require firewall and registry changes on the VPS, and changes to the RDP file configuration.
Warning: making these changes will prevent the default RDP file for your VPS(found in mPanel) from connecting to the VPS unless it is modified. If you are not sure you understand the changes being made, please back up your VPS first, or don’t change anything.
Contents
Part 1. Configuring The RDP File
1.1 Log into mPanel and browse to the remote access page for the VPS. Download the RDP file for your VPS, saving with a file name which can be easily identified as a modified version. e.g. newrdpport.rdp
1.2 Locate the downloaded RDP file to used to log into the VPS, then right-click it and select Edit from the menu dialogue.
1.3 In the Computer: field enter the IP address of your VPS followed by a colon and the new RDP port number you will be using. e.g. 103.1.188.189:23654
1.4 Click the Save button in the ‘Connection settings’ section just below where you entered the VPS IP and new RDP port to use.
Part 2. Configuring the VPS Firewall
2.1 Open the Windows Firewall configuration dialogue on the VPS. Click the Start menu and go to Settings -> Control Panel -> Windows Firewall(usually the last Control Panel item).
2.2 Click the ‘Exceptions’ tab in the Windows Firewall window.
2.3 Click the ‘Add Port’ button to bring up a new configuration window.
2.4 Enter a name for the new firewall rule being created, and the same port number entered into your RDP file in Part 1.3 of the guide. Leave the default TCP option selected and click OK.
Example:
Name: Alternate RDP Port
Port Number: 23654
Note: If you will only be accessing your VPS from a static IP address(or addresses), you can add the IP address in the ‘Change Scope’ section using the ‘Custom List’ option for additional security.
2.5 Click the OK button to exit the Windows Firewall configuration and save the changes.
Part 3. Editing the Windows registry on the VPS
3.1 Open the registry editor on the VPS by clicking the Start menu, go to Run… and type in ‘regedit’ (without including the quotation marks) and click OK or hit the enter key.
3.2 In the registry editor, navigate to the registry key ‘HKEY_LOCAL_MACHINE\SYSTEM\CurrentControlSet\Control\Terminal Server\WinStations\RDP-Tcp’.
3.3 Scroll down the right side of the window and double-click ‘PortNumber’.
3.4 Select the ‘Decimal’ option in the Edit DWORD Value’ window.
3.5 Enter the same port number you chose as your new RDP port in Part 1.3 of the guide, then click OK.
Part 4. Testing the changes
4.1 Restart your VPS with the facilities provided in mPanel or from the Shut down menu on the VPS.
4.2 Once mPanel indicates the VPS is back online and responding to pings, double-click the RDP file previously edited in Part 1. of the guide. A security warning dialogue will open. Check the ‘Don’t ask me again for connections to this computer’ box to prevent this popping up each time you want to connect to your VPS, then click Connect.
4.3 The VPS desktop login dialogue should appear if the change was successful. You should notice the port number in use is displayed in the window title. Enter your VPS login credentials and check your VPS’ desktop is as you left it.
4.4 After successfully logging into the VPS using the new RDP port the default RDP firewall rule can be disabled(deselected) and the configuration saved by clicking OK.
4.5 The new configuration can be tested by attempting to connect to the VPS with the original(unmodified) RDP file. Attempting to connect to the VPS with the original RDP file should fail.
Question: To change the default port for all new connections created on the Terminal Server
To change the default port for all new connections created on the Terminal Server
Run Regedit and go to this key:
HKEY_LOCAL_MACHINE’SYSTEM’CurrentControlSet’
Control’Terminal Server’WinStations’RDP-Tcp
- Find the “PortNumber” subkey and notice the value of 00000D3D, hex for (3389).
- Modify the port number in Hex and save the new value.
You can now connect to the new port by using the “old” Windows 2000 Terminal Server client.
A better option is to use the RDP client found in Windows XP, or even better,the newer Windows Server 2003 SP1 RDP 5.2 client.
You’ll need to configure your TS client to connect to the new port. Although changing the connection port on the RDP clients is quite easy, you CAN also change the connection port for the TS client. See Related Articles list for more info.
Question: How to: Custom RDP Port in Windows 2012
Introduction
In this How-To, we will walk you through changing the RDP Port in Windows Server 2012.
Remote Desktop Protocol (RDP) is a protocol that allows you to connect and control another computer via an existing network making it a remote connection. By default, Windows has assigned port 3389 as the default port to connect. To enable RDP on your Windows Server 2012, you can click here for more information.
Prerequisites
– A Server with Windows Server 2012. If you do not have a server already, why not consider a Windows Cloud Hosting from Atlantic.Net and be up in 30 seconds or less.
Change The RDP Port in Windows 2012
Connect to your server via Remote Desktop
On your keyboard hold down the Windows logo + R buttons which opens the “Run” dialog and execute the “cmd” command and click OK
This is the Run command window in Windows Server 2012
Type “regedit” and click enter
This is the regedit command in Windows Server 2012
Navigate to the following Registry key
HKEY_LOCAL_MACHINE\System\CurrentControlSet\Control\TerminalServer\WinStations\RDP-Tcp\PortNumber
This is the registry path to change the RDP Port in Windows 2012
Find the “PortNumber” registry subkey and either right-click or double-click it. A box should pop that says “edit DWORD.” Find the value data (it should say 3389 for standard installations) and change it to the port that you would like. In this example, we chose port 1050.
This is the Port value field in the Windows Server 2012 Registry
Exit the registry editor
IMPORTANT: Before restarting your server, be sure that you have enabled your new RDP port on your Windows firewall. Take a look at our guide if you do not know how to add a custom firewall port “Adding a custom firewall rule.”
Restart your server
To access your server over the new port simply type in your IP followed by :PORT (YOUR.IP.ADD.RESS:PORT / 192.168.10.25:1050)
Congratulations! You have just changed RDP port in Windows Server 2012. Thank you for following along in this How-To, check back with us for any new updates and to learn more about our reliable cloud hostingservices.
Question: How to Change the Default RDP Port on a Netgear Router
Remote Desktop Protocol, the specification used to define the operation of Remote Desktop Service, uses the transmission control protocol port 3389 by default. However, if your business uses Remote Desktop, consider changing the port configuration, as 3389 is a well-known port and is therefore vulnerable to hacking. Changing the RDP port in Windows entails altering the port forwarding settings in Netgear as well, as the router won’t automatically change the default RDP port to the new number.
1.
Press “Start,” type “regedit” or into the search field and press “Enter” to launch the Registry Editor. You may have to press “Yes” if a message comes up warning you of the dangers of changing registry entries.
2.
Double-click the following folders: “HKEY_LOCAL_MACHINE,” “System,” “CurrentControlSet,” “Control,” “TerminalServer” and “WinStations.”
3.
Click “RDP-TCP.” Right-click “PortNumber” from the right pane and choose “Modify” from the context menu.
4.
Click “Decimal” and enter a new port number into the Value Data field. Click “OK,” then close the Registry Editor and restart the workstation.
5.
Open a Web browser, type “192.168.0.1” (without quotes) into the address bar, then press “Enter.” If the browser fails to navigate to the address, try “192.168.1.1” instead.
6.
Type “admin” into the Username field and “password” into the Password field. Click “OK.”
7.
Select “Port Forwarding/Port Triggering” from the left pane, then select the “Port Forwarding” radio button.
8.
Select the RDP entry and click “Edit Service.” Enter the new port number into the Start Port and End Port fields.
9.
Click “Apply” to change the default RDP port on the Netgear router.
Question: How to change the default RDP port 3389 through registry on windows server?
Please follow the steps to change the default RDP port through Registry:
1. Login to the windows server and start Registry Editor.
Click Start >> Run >> enter “regedit” and click Ok.
2. Locate and click on registry subkey mentioned below:
HKEY_LOCAL_MACHINE >> System >> CurrentControlSet >> Control >> TerminalServer >> WinStations >> RDP-Tcp >> PortNumber
3. Right click PortNumber, select Modify, and then click Decimal.
4. Type the new port number, and then click OK.
5. Quit the Registry.
Once you change the port number of the server, restart the server
Question: How to change the Terminal Server or RDP listening port ?
By default, Terminal Server, and the Remote Desktop Protocol uses TCP port 3389. It is sometimes useful to change the port not to conflict with other machines on the network.
To change the default port, follow the simple steps below:
1. Navigate to Start > Run, type: regedit
2. Navigate to: HKEY_LOCAL_MACHINE\SYSTEM\CurrentControlSet\ Control\Terminal Server\WinStations\RDP-Tcp
3. Locate the “PortNumber” subkey and change the value from 00000D3D (hex for 3389) to some other port between 1025 and 65535.
Note: You will also need to configure your RDP/TS client to connect to the same port by specifying the port number with the IP address, as x.x.x.x:nnnn (where x.x.x.x is your RDP IP, and nnnn is the port number)
Question: How To Change Default Remote Desktop Protocol (RDP) port 3389 in Windows Server 2008?
Sometimes you need to change the Remote Desktop Protocol (RDP) from default 3389 to something else for better security.
To change the default port , there are two parts to be followed :-
A) First Open port in windows Firewall
B) Change the port
**If firewall is not enabled, just skip Part A
========================
A) First Open port in windows Firewall
1) Open Windows Exprloer, go to Control Panel\windows firewall, click Allow a programe through Windows Firewall.
2) Click Add port…, choose TCP, input Name and Port Number, click OK
3) Click OK in Windows Firewall Settings window.
B) Change the port
1) Start Registry Editor.
On desktop select menu: Start > Run, input ‘regedit’ and click OK
2) Locate the registry subkey for RDP port:
In Registry Editor find HKEY_LOCAL_MACHINE\System\CurrentControlSet\Contro l\TerminalServer\WinStations\RDP-Tcp\PortNumber
3) On the Edit menu, click Modify, and then click Decimal.
4) Type the new port number, and then click OK.
5) Quit Registry Editor.
6) At-last Restart the server and you are done !!
================================================== =====================
**Note :
If firewall is enabled , Please follow the part A first i.e
Open the port in the windows firewall or if any other firewall enabled other than windows, before changing the default port.
or your server will be inaccessible if you follow the part B first!
Question: Change RDP Listen Port
The default TCP port number for RDP is 3389.
This port can be changed using the registry editor:
- Start the Registry Editor.
- On the left side navigate to the following registry subkey:
HKEY_LOCAL_MACHINE\System\CurrentControlSet\Control\TerminalServer\WinStations\RDP-Tcp - On the right side locate and double-click the value “PortNumber” in order to open the edit window
- Select the “Decimal” option, type the new port number and click OK.
- Quit Registry Editor and reboot your computer
If you want to connect to XP/VS Server over the internet you will have to set up a port forwarding on your internet router to forward the external ip address/incoming tcp port 3389 (RDP) of your internet router to the internal ip address/tcp port 3389 (RDP) of your internal XP/VS Server computer.
To connect over the internet you would have to enter the external ip address of your internet router which is reachable from the internet into your RDP client.
Your internet router will receive this request when you try to connect with your RDP client over the internet and will forward this request to the internal ip address of your XP/VS Server computer.
Like that you will be able to reach your internal XP/VS Server with an RDP client over the internet.
Question: Improve PC Security by Changing the RDP Port
PC security is comprised of effective firewalls, efficient anti-malware software, WPA and WEP codes as well as several other software-related tweaks and applications. When Remote Desktop is enabled, additional precautions must be taken to minimize the possibility of malware infection and hacking. If the tech at a software company can remotely operate your computer, then so can anybody else with the knowledge and ability. To protect against bots and script kiddies, the RDP Port must be changed.
The remote desktop protocol drives Remote Desktop Services through Port 3389 by default. Any Remote Desktop connections are made through Port 3389. This is the case for every user reading this unless you have already changed the port. Basically, this means that this port is an easy target. By changing the RDP port, security is enhanced because bots and kiddies are designed to target RDP Port 3389. Change the port!
For this to be truly effective, implement a strong account lockout policy. This defends against the use of RDP protocol to obtain the administrator password. If the password is attainable due to the absence of an account lockout policy, then the RDP Port can be found regardless of what it has been changed to.
Changing the default RDP port is achieved through a simple registry hack. Another method is to change the RDP port with a third-party utility. Always set a restore point before making changes to the registry.
The Registry Hack
Run regedit from the start menu to open the Registry Editor. Navigate to HKEY_LOCAL_MACHINE, SYSTEM, CurrentControlSet, Control, Terminal Server, WinStations and RDP_Tcp. Find the PortNumber dword and right-click.
Select Modify. Alter the base to Decimal and enter the new port number with a value between 1025 and 65535, as long as the port is not in use. Click OK.
Question: How To Change The RDP Port (Remote Desktop) In Windows 10, 8.1 And 7
Here’s how to change the Remote Desktop Port (RDP) in Windows 10. This also applies to Windows 8.1 and Windows 7. Here are also the instructions if you are looking to add an additional Remote Desktop Port
Step 1
Open the Windows Registry (instructions)
Step 2
Browse to the following Registry Sub Key
HKEY_LOCAL_MACHINE\System\CurrentControlSet\Control\TerminalServer\WinStations\RDP-Tcp\PortNumber
Step 3
On the Edit Menu Click on Modify and Click on Decimal
Step 4
Type in the new Port Number and Click on OK
Step 5
Exit out of the Windows Registry Editor
Step 6
Restart the Computer and check.
Question: How To Change Remote Desktop Listening Port
By default, the Windows Remote Desktop service will automatically listen to TCP port 3389.
However, it’s perfectly fine to change or alter the default RDP listening port for any reasons that an administrator can think of. For example, to bypass Firewall that only allow web browsing but restrict Remote Desktop connection and others protocols.
In this case, you might need to change the default TCP 3389 to TCP 80 or 443 for the Remote Desktop service running on Vista Ultimate PC at home.
How to change the Remote Desktop listening port on Windows Vista?
This RDP trick is applicable to Remote Desktop service running on Windows Server 2003 and Windows XP as well (and likely working on Windows Server 2008 or later too)!
- Open up the Windows Registry Editor and browse to this Registry path:HKEY_LOCAL_MACHINE\System\CurrentControlSet\Control\Terminal Server\WinStations\RDP-Tcp
- Locate the
PortNumberRegistry key on the right-pane, double-click to open, click the Decimal option in the Base section, enter443in the text box and click OK (change 443 to the port number of your need).
Take note that:- The new TCP port for Remote Desktop service must not currently in used. To confirm the TCP port 443 is free or unused, type
netstat -an | find "443"at the Command Prompt window. If there is no output from the netstat command, meaning that the TCP 443 port number is not in used (and thus available for new RDP listening port).
- If you’re not comfortable with Windows Registry Editor, you can simply copy and paste the following Console Registry Tool command (Reg.exe) to an elevated Command Prompt window in Windows Vista:
You might need to download Reg.exe from Microsoft if it’s not currently in your Windows.
REG ADD “HKLM\System\CurrentControlSet\Control\Terminal Server\WinStations\RDP-Tcp” /v PortNumber /t REG_DWORD /d 443 /f - To change back to the default, simply replace the PortNumber Registry key (in this case, TCP 443) to TCP port 3389.
- The new TCP port for Remote Desktop service must not currently in used. To confirm the TCP port 443 is free or unused, type
How to restart Windows Remote Desktop service after changing its listening port?
There are at least two ways to enable/disable or restart Remote Desktop service – Group Policies or System Properties:
Using Group Policies (i.e. gpedit.msc)
- Click the Vista Orb, type
gpedit.mscin the Start Searchtext box (Vista Instant Search) and double-click the “gpedit” in the Program list
- For Windows XP SP2:
In Computer Configuration, Administrative Templates, Windows Components, Terminal Services, double-click the Allows users to connect remotely using Terminal Services setting.For Windows Vista Ultimate:
In Computer Configuration, Administrative Templates, Windows Components, Terminal Services, Terminal Server, Connections, double-click the Allows users to connect remotely using Terminal Services setting.
- Click Disable to deactivate Remote Desktop and then click Enable to reactivate the service again.
Using System Properties dialog box
If the “Allows users to connect remotely using Terminal Services” Group Policy setting is set to “Not Configured”, the “Enable Remote Desktop on this computer” setting (on the Remote tab of the System Properties dialog box) takes precedence. Otherwise, the “Allows users to connect remotely using Terminal Services” Group Policy setting takes precedence.
For Windows Vista computer:
- Click the Vista Orb, type
system, locate the “System” shortcut in the Program list and double-click to open it
- Click the Remote Setting shortcut (require administrative privilege if UAC is turned on) in the Task pane (on the left)
- In the Remote Desktop section, select the “Don’t allow connection to this computer” option and click Apply button.
- Select either “Allow connections from computers running any version of Remote Desktop (less secure)” or “Allow connections only from computers running Remote Desktop with Network Level Authentication (more secure)” option and click Apply button – to reactivate Remote Desktop service to listen on new TCP port number.
For Windows XP SP2 computer:
- Right-click My Computer icon
- Select Properties option from the pop-up context menu
- Click on the Remote tab of System Properties dialog box
- In the Remote Desktop section, untick the check box that labelled “Allow Users To Connect Remotely To This Computer” and click the Apply button
- Tick the check box that labelled “Allow Users To Connect Remotely To This Computer” and click the OK button
Now, the netstat -an | find "443" will showing the TCP 443 port listening for RDP connection!
How to connect to a Windows Remote Desktop service that is not listening on the default TCP 3389 port number?
Open the Remote Desktop Connection client and specify the host:port syntax (e.g. Vista-Ultimate:443) as the connection string.
Instruct the Windows Vista Remote Desktop Connection client to connect to localhost at TCP port 9999 (via SSH Port Forwarding) instead of the default RDP listening port
With reference to Microsoft Technet on Enable or Disable Remote Desktop and Microsoft Knowledge Base article KB306759 on How to change the listening port for Remote Desktop
Question: Change RDP 3389 port on Windows 2008 Server
Description:
To change the port you will need to:
1. Change registry at HKEY_LOCAL_MACHINE\System\CurrentControlSet\Control\TerminalServer\WinStations\RDP-Tcp\PortNumber from 3389 to your port number
2. Allow your port number within Windows 2008 Firewall (and specify scope of IP addresses that can access the server via RDP – this is optional but good security practice).
3. Restart the RDP service or reboot the server
See pics for details:
Lunch regedit via Start > Run :
Modify PortNumber in HKEY_LOCAL_MACHINE\System\CurrentControlSet\Control\TerminalServer\WinStations\RDP-Tcp\ from 3389 to your custom number in our case to 1970:
Go to Manage Console:
Disable current Remote Desktop firewall rule:
Create new Rule:
Allow only one or few more IP addresses to connect via Remote Desktop:
It should look like this:
Restart Remote Desktop Service (plus dependent services):
OR you can just reboot the whole server
In regards to security the setup is not security through obscurity but it prevents automated bots from discovering your servers open port and performing brute force password guessing on it. Also if you setup the scope properly with IP addresses or IP ranges the port will not even come up on standard port scan. There is nmap tool (now with GUI) that can sort of deduce the port but it is still useless unless you are expert network penetration expert.
As far as maintaining the information about the change of port I recommend you look into NOC software like Nagios. This will tell other admins about what you have done, what the port number for RDP is and who is allowed to access it.
All done!
Question: Changing the listening port for Remote Desktop
Changing the listening port for Remote Desktop: Remote Desktop is a very important feature of Windows which allows users to connect to a computer in another location and interact with that computer as if it’s present locally. For example, you are at work and you want to connect to your home PC then you can easily do if RDP is enabled on your home PC. By default, RDP (Remote Desktop Protocol) uses port 3389 and since it’s a common port, every user has information about this port number which can lead to a security risk. So it’s highly recommended to change the listening port for Remote Desktop Connection and to do so follow the below-listed steps.
Changing the listening port for Remote Desktop
Make sure to create a restore point just in case something goes wrong.
1.Press Windows Key + R then type regedit and hit Enter to open Registry Editor.
2.Navigate to the following registry key:
HKEY_LOCAL_MACHINE\System\CurrentControlSet\Control\TerminalServer\WinStations\RDP-Tcp\
3.Now make sure you have highlighted RDP-Tcp in the left pane then in the right pane look for the subkey “PortNumber.“
4.Once you have found PortNumber then double-click on it to change its value. Make sure to select Decimal under Base to see the edit its value.
5.You should see the default value (3389) but in order to change it’s value type a new port number between 1025 and 65535, and click OK.
6.Now, whenever you try to connect to you home PC (for which you changed the port number) using Remote Desktop Connection, make sure to type in the new port number.
Note: You may also need to change the firewall configuration in order to allow the new port number before you can connect to this computer using Remote Desktop Connection.
7.To check the result run cmd with administrative rights and type: netstat -a
Add a custom inbound rule to allow the port through the Windows Firewall
1.Press Windows Key + X then select Control Panel.
2.Now navigate to System and Security > Windows Firewall.
3.Select Advanced Settings from the left-hand side menu.
4.Now select Inbound Rules on the left.
5.Go to Action then click on New Rule.
6.Select Port and click Next.
7.Next, select TCP (or UDP) and Specific local ports, and then specify the port number which you want to allow connection for.
8.Select Allow the connection in the next window.
9.Select the options which you need from Domain, Private, Public (private and public are the network types that you select when you connect to the new network, and Windows ask you to select the network type, and the domain is obviously your domain).
10.Finally, write a Name and Description in the window that shows next. Click Finish.
Question: How to change default RDP (Remote Desktop Connection) port in Windows Server
Follow below steps to change default RDP port on Windows server:
By default, Remote Desktop Connection (RDP) uses port 3389. we can change this default settings for security reasons.
* Login to the server via RDP(Remote Desktop Connection).
* Open the port you wish to use for RDP connection in firewall.
Code: [Select]
* Click on “Start”>>Go To “Control Panel”>>Click on “Windows Firewall”
* Click on “Exceptions” tab .
* Click on “Add Port”.
* Specify the required details like Name, Port Number and choose TCP.
* Open Registry Editor.
Code: [Select]
Click on “Start”>>Go To “Run”>>Type “regedit” (without quotes) and click OK.
* Locate and then click the following registry subkey:
Code: [Select]
HKEY_LOCAL_MACHINE\System\CurrentControlSet\Control\TerminalServer\WinStations\RDP-Tcp\PortNumber
* On the Edit menu, click Modify, and then click Decimal.
* Type the new port number, and then click OK.
* Exit from Registry Editor.
* Restart the server to make the changes in effect.
* Verify connectivity to the new port using telnet.
Question: How to Change Windows VPS Default RDP Port?
How Can I Change my Default Remote Desktop Port?
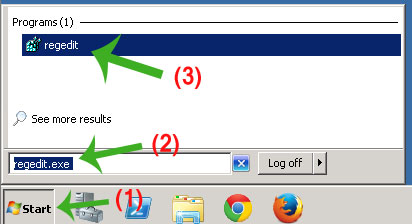
Step 1: Login to your Windows VPS RDP Account, Go To “Start Menu” and then type “regedit.exe” (without quota) in search box and then click on regedit.exe result.
Step 2: In Registry Editor(Regedit), Locate and then click the following registry subkey:
HKEY_LOCAL_MACHINE\System\CurrentControlSet\Control\TerminalServer\WinStations\RDP-Tcp\PortNumber
1. On the Edit menu, click Modify, and then click Decimal.
2. Type the new port number, and then click OK.
3. Exit from Registry Editor.
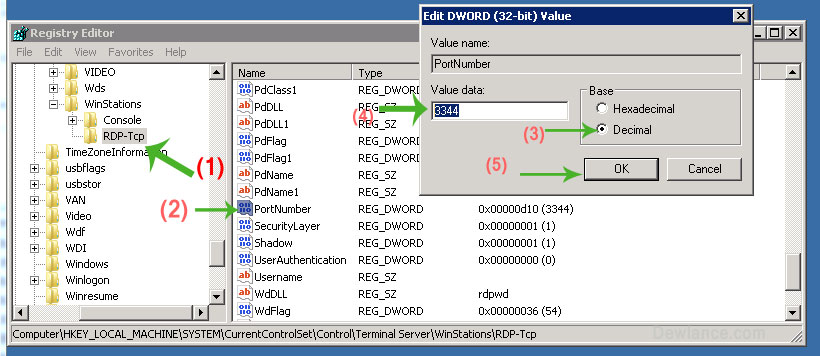
Allow your new custom RDP Port in Windows Firewall
Step 3: As you can see, we changed our default RDP Port from 3389 to 3344 but now we need to add our new custom port in Firewall Inbound TCP Rule.
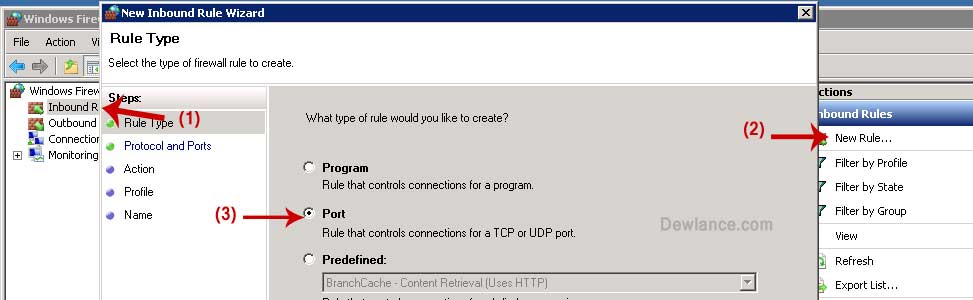
1. Go to Start Menu, Type “Firewall” and then click on “Windows Firewall with Advanced Security“
2. In Windows Firewall, Click on “Inbound Rules“(Left Side) and then click on “New Rules” (You can find this option In Right Side)
3.
In “New Inbound rule Wizard” Click on “Port Option” and then click on “Next” button.
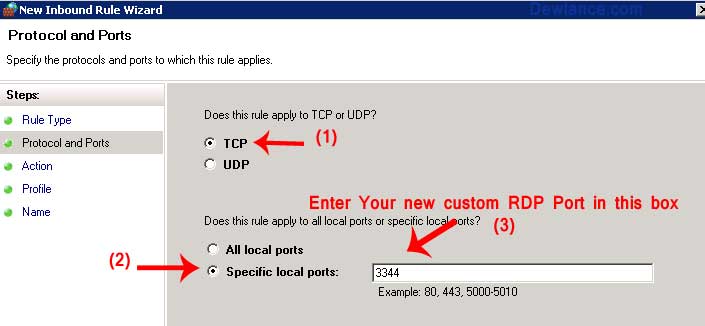
4. In Protocol and Ports,Select “TCP” and Enter your new RDP Custom Port number in “Specific Local Ports” and then click on “Next” button
5.
Again click on “Next” Button
6. Enter Firewall Rule name like “My Custom RDP Port”, Click on “Next” Button and Close Firewall Application and then Restart your VPS.
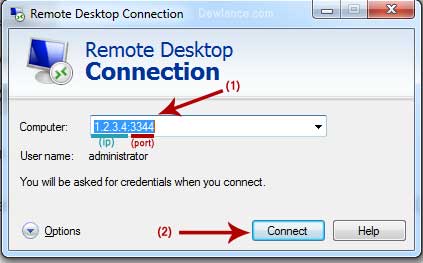
How can I access my Windows RDP with my New Custom Port?
After restarting your VPS, Wait for few minute and then open Remote Desktop Application on your Local PC and If your VPS IP Address is 1.2.3.4 and your new custom RDP Port is 3344 then enter 1.2.3.4:3344 (IP:Port) in Computer Field and then click on “Connect” Option.
Question: How to Change Windows VPS RDP/RDC Port & Allow New Port?
Changing a Default RDP Port to other port is recommended for your VPS Security, My English is good so I will add some images so you can easily understand this.
Only for Windows 2008 R2
Step 1:
How to Change Default RDP Port?
Login to your VPS Via RDP(Because VNC is slow so I recommended you to use RDP) and go to Start Menu and type “regedit.exe” in search box(without quota)
(See Screenshot)
In Registry Editor, Go to:
Code:
HKEY_LOCAL_MACHINE\System\CurrentControlSet\Control\TerminalServer\WinStations\RDP-Tcp\PortNumber
1. Now right click on “PortNumber” entry,
2. Click on “Modify” option and then Select “Decimal” and change value from “3389” to other port number like 3399
3. Press “OK” and Exit from Registry Editor.
(Screen Shot)
Step2:
Allow your New RDP Port to Firewall?
1. Go to Start Menu, Type “Windows Firewall” (without quota) and open “Windows Firewall with Advanced Security”
(Screenshot – Open Firewall)
2. In Firewall, Click on “Inbound Rules” and then click on “New Rules”
(Screenshot)
3. Select “Port” in list and then click on “Next”
(Screenshot – Select Port – Stp 1)
4. TCP is Selected by Default, We just need to enter our new RDP Port in “Specific Local Ports” so enter your new Port 3399(or your new other port) and then click “Next“
(Screenshot – Step 2)
5. We need to Select “Allow the connection” and then press “Next” button.
6. Click on “Next” Button without changing anything.
7. In name field enter “Remote Desktop Port” and then Press “Next” button.
(Screenshot)
8. Exit from Firewall and Reboot your VPS/Operating System.
After few minute, When your VPS will become online then you will be able to access your RDP Account by using your IP: PORT in RDP Application.
Eg: 233.233.233.x:3399 (Just for example)
(Screen shoot)
(Tip: Do not reboot your VPS without allowing your new port in Firewall otherwise you will be unable to access your RDP until you fix this via VNC/Console)
Thanks.
Question: Change the Remote Desktop Connection port to your Windows Server
Windows servers are remotely accessible with Remote Desktop via the TCP 3389 port (default port). In some situations, as when you wish to obtain a more secure environment, changing the remote access port can be useful. This article explains how to proceed.
Important note: In order to maintain the access to your server after you change the access port, make sure your firewall is properly configured. To be safe, request a KVMIP or a virtual console if you are making the change for a virtual server.
The instructions below apply to machines under Windows Server 2012, 2008 R2, 2008, and 2003. Follow these steps:
- Connect to your server via Remote Desktop
- Click simultaneously on the Windows logo + R to open the “Run” dialog and execute the “cmd” command
- Open the registry editor by typing the “regedit” command
- Search for this registry subkey: HKEY_LOCAL_MACHINE\System\CurrentControlSet\Control\TerminalServer\WinStations\RDP-Tcp\PortNumber
- Double-click or right-click on the “PortNumber” registry subkey, select the decimal base and type the port number of your choice (the default port is 3389, in this example, we selected port 3390). Click on “Ok” to save your selection.
- IMPORTANT: Make sure that remote access to your server through the new port is authorized in your Windows firewall before executing the next step.
- Exit the registry editor
- Restart your server
After the reboot, specify the Remote Desktop port number.
Question: How to modify RDP listening port on Windows Server 2012
RDP, known as the Remote Desktop Protocol, is a proprietary Microsoft protocol that is responsible for enabling remote desktop connections to a server. This protocol is highly customizable and its configuration can be edited to increase both its security and flexibility through options such as limiting the number of possible concurrent connections or changing the listening port. This second option, modifying the listening port (where new connections communicate with the server) for RDP, is useful as it can enhance your security setup in a very quick and easy way.
In order to modify the listening port for RDP on your Windows 2012 server, we have put together a short guide that will explain the configuration.
Getting Started
To complete this tutorial, you will need:
• 1 Windows 12 RDP Server (Cloud Server or Dedicated Server)
Tutorial
Before you proceed, you should note that if you want to change your RDP listening port, you must allow connections to the new port in your Windows Firewall. If you do not do this, you will be locked out of your server. Once you have allowed the new port number in your Windows Firewall and other firewalls on your system, you can continue with the guide.
Begin by opening an administrative session on the Windows 12 RDP server. Click the Start button. In the field that pops up, you will need to enter the following text and execute:
regedit
The command above will open up the Registry Editor utility window. This Microsoft tool is the central point for making tweaks to how your Windows 12 system runs, and is the location of the port number value for RDP.
With the window open, browse to the following view:
HKEY_LOCAL_MACHINE\SYSTEM\CurrentControlSet\Control\Terminal Server\WinStations\RDP-Tcp
Once you have the RDP-Tcp view open, find the PortNumber field. This field contains the value of your current RDP listening port. For our tutorial, we will change it to 9998 as our new listening port. You can select a different port number, but ensure beforehand that your chosen port number is not already in use on the system and, as a security bonus, is not a commonly-used port number. Edit the PortNumber value to your desired port number:
9998
Next, you will need to restart the remote desktop connection service in order for the port number changes to be implemented. This service, known as Remote Desktop Services can be reloaded within Control Panel. Open Control Panel now.
With Control Panel open, navigate to the following views:
System and Security > Administrative tools > Services
In the services list, you will need to find Remote Desktop Services. Right click on it to bring up the option menu, and click on Restart.
While the remote desktop connection service restarts itself, note that any RDP connections currently on will be disconnected. After RDP is running again, you will be able to connect using the new listening port you set.
Conclusion
Congratulations! You have successfully changed the value of the listening port for RDP on your Windows 12 server. If you liked this easy way to enhance your security setup, share it with your friends.
Question: Modify and Change Remote Desktop Listening Port
How to Change the Listening Port for Remote Desktop
Microsoft has a Knowledge Base article KB306759 that details how to modify and change the Remote Desktoplistening port by changing registry value.
- Start Registry Editor by clicking on Start -> Run, and type in regedit in the Run text box, and then press Enter or click OK.
- Navigate to the following registry branch/subkey:HKEY_LOCAL_MACHINE\SYSTEM\CurrentControlSet\Control\Terminal Server\WinStations\RDP-Tcp
- Locate the registry entry PortNumber in the right pane.
- Right click on PortNumber and choose Modify (or select PortNumber, then click on Edit menu and select Modify).
- On the Edit DWORD Value window, click on Decimal.
- Type in the new port number on the Value Data text box.
- Click OK when done.
Question: Changing the Remote Desktop Port
The default port that the Windows Remote Desktop Connection program listens on is 3389. However, you can change to any port you wish; maybe you find public networks block everything except port 80 and 433 (in which you could set it to 433) or you feel changing to a non-default port is better security wise. Whatever your case, you must edit the Windows Registry:
Hive: HKEY_LOCAL_MACHINE
Key: \System\CurrentControlSet\Control\TerminalServer\WinStations\RDP-Tcp\
Name: PortNumber
Type: REG_DWORD
Value: desired port number in Decimal format
Then if you use the Windows Remote Desktop Connection program to connect to the computer, follow the address you want to connect to with a colon and the port number that you changed to; for example 255.255.255.255:433.
Question: How to change rdp server port 3389 to 80?
You can change the listening port by tweaking the registry.
To change the port that Remote Desktop listens on, follow these steps:
>Start Registry Editor.(Start–>Run–>’regedit’)
>Locate the following key in the registry:
HKEY_LOCAL_MACHINE\System\CurrentControlSet\Control\TerminalServer\WinStatio
ns\RDP-Tcp\PortNumber
>On the Edit menu, click Modify, and then click Decimal.
>Type the new port number, and then click OK.
The same information is found in MS KB article 306759
Question: Change RDP port on a Windows Server
Windows servers are remotely accessible with Remote Desktop via the TCP 3389 port (default port). In some situations, when a more secure environment is needed, changing the remote access port can be useful. This article explains how to change the RDP port on a Windows Hosting Server.
Note: Make sure you have opened remote access to the new RDP port in Windows Firewall before starting to avoid locking yourself out of the server.
WARNING: Be careful when making changes to the Windows Registry as it contains critical configuration settings for your operating system.
The instructions below apply to machines running Windows Server 2012, 2008 R2, 2008, and 2003. Please follow the below steps to change the RDP port:
- 1. Connect to the server via Remote Desktop
- 2. Click simultaneously on the Windows logo + R to open the “Run” dialog
- 3. Open the registry editor by typing the “regedit” command
- 4. Search for this registry subkey: HKEY_LOCAL_MACHINE\System\CurrentControlSet\Control\TerminalServer\WinStations\RDP-Tcp\PortNumber
- 5. Double-click or right-click on the “PortNumber” registry subkey, select the decimal base and type the port number of your choice (the default port is 3389, in this example, the selected port is 3312). Click on “OK” to save the selection.
IMPORTANT: Make sure that remote access to your server through the new port is authorized in your Windows firewall before executing the next step.
- 6. Exit the registry editor
- 7. Restart your server
After the reboot, specify the Remote Desktop port number.
Question: Virtualization Station: Modify and Change Remote Desktop Listening Port
How to Change the Listening Port for Remote Desktop
Microsoft has a Knowledge Base article KB306759 that details how to modify and change the Remote Desktop listening port by changing registry value.
- Start Registry Editor by clicking on Start -> Run, and type in regedit in the Run text box, and then press Enter or click OK.
- Navigate to the following registry branch/subkey:
HKEY_LOCAL_MACHINE\SYSTEM\CurrentControlSet\Control\Terminal Server\WinStations\RDP-Tcp - Locate the registry entry PortNumber in the right pane.
- Right click on PortNumber and choose Modify (or select PortNumber, then click on Edit menu and select Modify).
- On the Edit DWORD Value window, click on Decimal.
- Type in the new port number on the Value Data text box.
- Click OK when done.
Credit to: https://techjourney.net/modify-and-change-remote-desktop-listening-port/
Kindly remember to open a new port in the Windows Firewall.
(port 3389 TCP, for video; UDP, to stream audio redirection)
How to:
- Open Windows Firewall by clicking the Start button , and then clicking Control Panel. In the search box, type firewall, and then click Windows Firewall.
- In the left pane, click Advanced settings. If you’re prompted for an administrator password or confirmation, type the password or provide confirmation.
- In the Windows Firewall with Advanced Security dialog box, in the left pane, click Inbound Rules, and then, in the right pane, click New Rule.
- Follow the instructions in the New Inbound Rule wizard.
- Then Restart.
More info, refer to: http://windows.microsoft.com
Now, try the Remote Desktop Connection:
- Computer: e.g.192.168.2.222:3390 *(computer IP/name follow by your;s RDP predefined port)
- Account/User name: example: e.g. window7-pc\alex.tin *(computer name follow by your computer user account)
- Password: cannot be blank *(computer user account)
Question: Windows Server 2008 R2 RDP Port Change
You need to do 3 steps to enable and change RDP Port in Windows Server 2008, 2008R2, 2012. You need to do this, if you have more servers at the same IP address, behind a router.
1st step: Enable RDP in System settings. You can go there by right clicking on Computer -> Propreties. Choose Advanced System Settings from the left side menu.
2nd Step: Change RDP Port: Open the registry editor (regedit: open cmd -> regedit.exe). Select HKEY_LOCAL_MACHINE\System\CurrentControlSet\Control\TerminalServer\WinStations\RDP-Tcp\PortNumber . Change to decimal mode, and change the port number, then click ok.
3rd Step: Enable the new Port in the Firewall settings. Open Server Manager, Select Firewall Settings in the left menu, right click on Inbound Rouls -> New. Choose TCP, set Port number, and name it.
Thats all. After this you should restart your server, then everything should work fine. Default port for RDP is 3389 (TCP). Enjoy.
Question: Securing Remote Desktop (RDP) for System Administrators
How secure is Windows Remote Desktop?
Remote Desktop sessions operate over an encrypted channel, preventing anyone from viewing your session by listening on the network. However, there is a vulnerability in the method used to encrypt sessions in earlier versions of RDP. This vulnerability can allow unauthorized access to your session using a man-in-the-middle attack(link is external). Remote Desktop can be secured using SSL/TLS in Windows Vista, Windows 7, and Windows Server 2003/2008.
While Remote Desktop is more secure than remote administration tools such as VNC that do not encrypt the entire session, any time Administrator access to a system is granted remotely there are risks. The following tips will help to secure Remote Desktop access to both desktops and server that you support.
Basic Security Tips for Remote Desktop
Use strong passwords
Use a strong password on any accounts with access to Remote Desktop. This should be considered a required step before enabling Remote Desktop. Refer to the campus password complexity guidelines for tips.
Update your software
One advantage of using Remote Desktop rather than 3rd party remote admin tools is that components are automatically updated to the latest security fixes in the standard Microsoft patch cycle. Make sure your are running the latest versions of both the client and server software by enabling and auditing automatic Microsoft Updates. If you are using Remote Desktop clients on other platforms, make sure they are still supported and that you have the latest versions. Older versions may not support high encryption and may have other security flaws.
Restrict access using firewalls
Use firewalls (both software and hardware where available) to restrict access to remote desktop listening ports (default is TCP 3389). Using an RDP Gateway is highly recommended for restricting RDP access to desktops and servers (see discussion below). As an alternative to support off-campus connectivity, you can use the campus VPN software to get a campus IP address, and add the campus VPN network address pool to your RDP firewall exception rule. See http://net.berkeley.edu/vpn/(link is external) for more information on the campus VPN service.
Enable Network Level Authentication
Windows Vista, Windows 7, and Windows Server 2008 also provide Network Level Authentication (NLA) by default. It is best to leave this in place, as NLA provides an extra level of authentication before a connection is established. You should only configure Remote Desktop servers to allow connections without NLA if you use Remote Desktop clients on other platforms that don’t support it.
Enabling NLA on Windows 2008 Server:
- https://technet.microsoft.com/en-us/library/cc732713(v=ws.11).aspx(link is external)
Enabling NLA on Windows 2012 Server, Windows 8, and Windows 10:
- NLA should be enabled by default on Windows 2012 Server, Windows 8, and Windows 10.
- To check you may look at Group Policy setting Require user authentication for remote connections by using Network Level Authentication found at Computer\Policies\Windows Components\Remote Desktop Services\Remote Desktop Session Host\Security. This Group Policy setting must be enabled on the server running the Remote Desktop Session Host role.
Limit users who can log in using Remote Desktop
By default, all Administrators can log in to Remote Desktop. If you have multiple Administrator accounts on your computer, you should limit remote access only to those accounts that need it. If Remote Desktop is not used for system administration, remove all administrative access via RDP and only allow user accounts requiring RDP service. For Departments that manage many machines remotely, remove the local Administrator account from RDP access at and add a technical group instead.
- Click Start–>Programs–>Administrative Tools–>Local Security Policy
- Under Local Policies–>User Rights Assignment, go to “Allow logon through Terminal Services.” Or “Allow logon through Remote Desktop Services”
- Remove the Administrators group and leave the Remote Desktop Users group.
- Use the System control panel to add users to the Remote Desktop Users group.
A typical MS operating system will have the following setting by default as seen in the Local Security Policy:
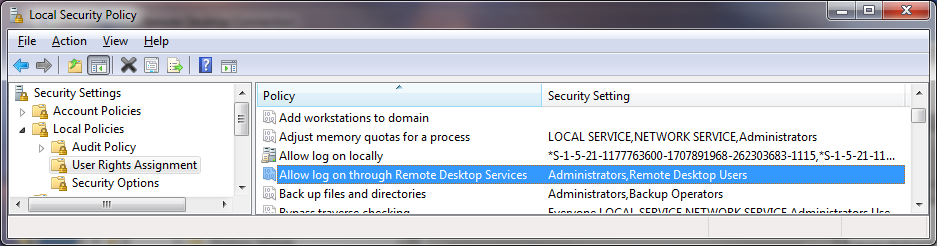
The problem is that “Administrators” is here by default, and your “Local Admin” account is in administrators. Although a password convention to avoid identical local admin passwords on the local machine and tightly controlling access to these passwords or conventions is recommended, using a local admin account to work on a machine remotely does not properly log and identify the user using the system. It is best to override the local security policy with a Group Policy Setting.
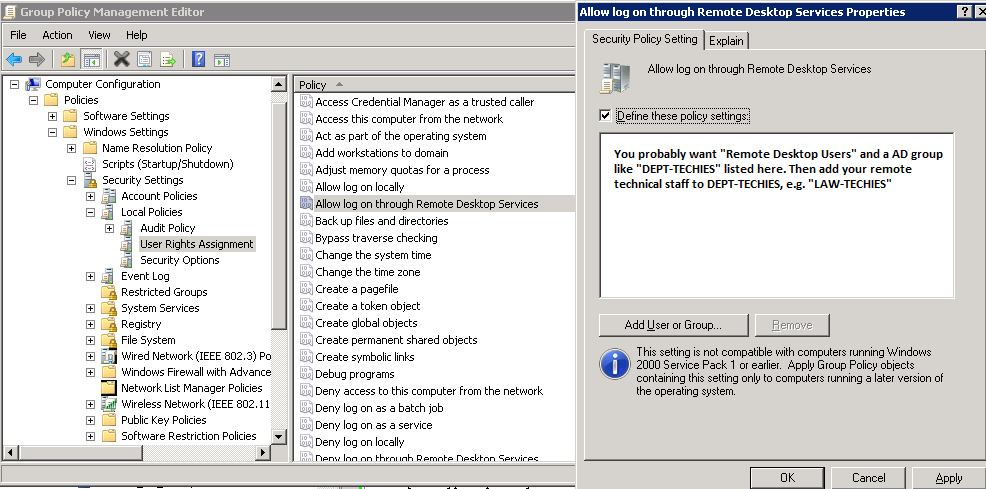
To control access to the systems even more, using “Restricted Groups” via Group Policy is also helpful.
If you use a “Restricted Group” setting to place your group e.g. “CAMPUS\LAW-TECHIES” into “Administrators” and “Remote Desktop Users”, your techies will still have administrative access remotely, but using the steps above, you have removed the problematic “local administrator account” having RDP access. Going forward, whenever new machines are added in the OU under the GPO, your settings will be correct.
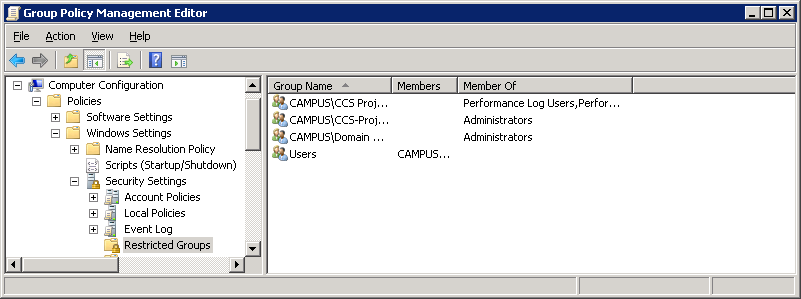
Set an account lockout policy
By setting your computer to lock an account for a period of time after a number of incorrect guesses, you will help prevent hackers from using automated password guessing tools from gaining access to your system (this is known as a “brute-force” attack). To set an account lockout policy:
- Go to Start–>Programs–>Administrative Tools–>Local Security Policy
- Under Account Policies–>Account Lockout Policies, set values for all three options. 3 invalid attempts with 3 minute lockout durations are reasonable choices.
Best Practices for Additional Security
Change the listening port for Remote Desktop
Changing the listening port will help to “hide” Remote Desktop from hackers who are scanning the network for computers listening on the default Remote Desktop port (TCP 3389). This offers effective protection against the latest RDP worms such, as Morto. To do this, edit the following registry key (WARNING: do not try this unless you are familiar with the Windows Registry and TCP/IP): HKEY_LOCAL_MACHINE\SYSTEM\CurrentControlSet\Control\Terminal Server\WinStations\RDP-Tcp. Change the listening port from 3389 to something else and remember to update any firewall rules with the new port. Although this approach is helpful, it is security by obscurity which is not the most reliable security approach. You should ensure that you are also using other methods to tighten down access as described in this article.
Use RDP Gateways
Using a RDP Gateway is strongly recommended. It provides a way to tightly restrict access to Remote Desktop ports while supporting remote connections through a single “Gateway” server. When using an RD Gateway server, all Remote Desktop services on your desktop and workstations should be restricted to only allow access only from the RD Gateway. The RD Gateway server listens for Remote Desktop requests over HTTPS (port 443), and connects the client to the Remote Desktop service on the target machine.
There are many online documents for configuring this embedded Windows 2008 component. The official documentation is here: http://technet.microsoft.com/en-us/library/dd983949(link is external)(WS.10).aspx
Installing the configuring the role service is mostly as described; however, using a Calnet issued trusted Comodo certificate is recommended. Using a self-signed cert is ok for testing, and using a CalnetPKI cert can work if all clients have trusted the UCB root. The Comodo cert is usually better accepted so that your end users do not receive certificate warnings.
Some campus units use a IST managed VPS as a RD Gateway, and a VPS seems fine for this purpose. A rough estimate might be that 30-100 concurrent users can use one RD Gateway. The HA at the virtual layer provides enough fault tolerant and reliable access, however a slightly more sophisticated RD gateway implementation can be done with network load balancing.
Configuring your client to use your RD Gateway is simple. The official documentation for the MS Client is here: http://technet.microsoft.com/en-us/library/cc770601.aspx(link is external)
In essence, a simple change on the advance tab of your RDP client is all that is necessary:

Tunnel Remote Desktop connections through IPSec or SSH
If using an RD Gateway is not feasible, you can add an extra layer of authentication and encryption by tunneling your Remote Desktop sessions through IPSec or SSH. IPSec is built-in to all Windows operating systems since Windows 2000, but use and management is greatly improved in Windows Vista/7/2008 (see: http://technet.microsoft.com/en-us/network/bb531150(link is external)). If an SSH server is available, you can use SSH tunneling for Remote Desktop connections. See https://kb.berkeley.edu/kb1266(link is external) for more information on IPSec and SSH tunneling.
Use existing management tools for RDP logging and configuration
Using other components like VNC or PCAnywhere are not recommended because they may not log in a fashion that is auditable or protected. With RDP, logins are audited to the local security log, and often to the domain controller auditing system. When monitoring local security logs, look for anomalies in RDP sessions such as login attempts from the local Administrator account. RDP also has the benefit of a central management approach via GPO as described above. Whenever possible, use GPOs or other Windows configuration management tools to ensure a consistent and secure RDP configuration across all your servers and desktops.
By enforcing the use of a RDP gateway, you also get a third level of auditing that is easier to read than combing through the domain controller logins, and is separate from the target machine so is not subject to tampering. This type of log can make it much easier to monitor how and when RDP is being used across all the machines in your environment.
Use Two-factor authentication on highly sensitive systems
Departments with sensitive data should also consider using a two-factor authentication approach. That is beyond the scope of this article, but RD Gateways do provide a simple mechanism for controlling authentication via two factor certificate based smartcards. Other two factor approaches need another approach at the Remote Desktop host itself e.g. YubiKey, RSA.
Additional security with Network Access Protection (NAP)
Highly motivated admins can also investigate the use Network Access Protection(NAP) with an RD Gateway, however, that technology and standard is not well developed or reliable yet. Many clients will not work if you enforce it, although by following the documentation, you can audit the system to see if it *thinks* the clients are security compliant.
Question: Changing the default RDP (Terminal Server) listening port 3389
In this tutorial i will explain how to change the Remote Desktop Protocol (RDP) port number using the registry editor (regedit).
I tested this procedure on :
– Windows Server 2003
– Windows XP
– Windows Vista
– Windows 7
– Windows 8
– Windows Server 2008
– Windows Server 2012
By default the Remote Desktop Protocol and Terminal Server listens on TCP port 3389, to change that port number for all new connections :
1 – Start -> Run… type ‘regedit.exe‘ then press OK
2 – Browse to this key : HKEY_LOCAL_MACHINE > SYSTEM > CurrentControlSet > Control > Terminal Server > WinStations > RDP-Tcp
3 – Find the ‘PortNumber‘ subkey, clic modify, choose decimal and change it’s value and finally save.
Note : The default value is “00000D3D” HEX for the decimal value “3389“.
4 – Make sure that the new configured port in open on the firewall.
5 – Restart the computer.
That’s all, now you’ll need to configure your TS client to connect to the new port.
Remember that it is important to change that port number to be protected against piracy and robots that try to get in by sending different passwords ‘with the root and administrator usernames’ on that ‘default’ port 3389.
Question: Remote Desktop Protocol
Remote Desktop Protocol (RDP) is a proprietary protocol developed by Microsoft, which provides a user with a graphical interface to connect to another computer over a network connection. The user employs RDP client software for this purpose, while the other computer must run RDP server software.
Clients exist for most versions of Microsoft Windows (including Windows Mobile), Linux, Unix, macOS, iOS, Android, and other operating systems. RDP servers are built into Windows operating systems; an RDP server for Unix and OS X also exists. By default, the server listens on TCP port 3389[1] and UDP port 3389.[2]
Microsoft currently refers to their official RDP client software as Remote Desktop Connection, formerly “Terminal Services Client”.
The protocol is an extension of the ITU-T T.128 application sharing protocol.[3]
History[edit]
Main article: Remote Desktop Services
Every version of Microsoft Windows from Windows XP onwards[4] includes an installed Remote Desktop Connection (RDC) (“Terminal Services”) client (mstsc.exe) whose version is determined by that of the operating system or by the last applied Windows Service Pack. The Terminal Services server is supported as an official feature on Windows NT 4.0 Terminal Server Edition, Windows 2000 Server, all editions of Windows XP except Windows XP Home Edition, Windows Server 2003, Windows Home Server, on Windows Fundamentals for Legacy PCs, in Windows Vista Ultimate, Enterprise and Business editions, Windows Server 2008 and Windows Server 2008 R2 and on Windows 7 Professional and above.[citation needed]
Microsoft provides the client required for connecting to newer RDP versions for downlevel operating systems. Since the server improvements are not available downlevel, the features introduced with each newer RDP version only work on downlevel operating systems when connecting to a higher version RDP server from these older operating systems, and not when using the RDP server in the older operating system.[clarification needed]
Version 4.0[edit]
Based on the ITU-T T.128 application sharing protocol (during draft also known as “T.share”) from the T.120 recommendation series, the first version of RDP (named version 4.0) was introduced by Microsoft with “Terminal Services”, as a part of their product Windows NT 4.0 Server, Terminal Server Edition. The Terminal Services Edition of NT 4.0 relied on Citrix‘s MultiWin technology, previously provided as a part of Citrix WinFrame atop Windows NT 3.51, in order to support multiple users and login sessions simultaneously. Microsoft required Citrix to license their MultiWin technology to Microsoft in order to be allowed to continue offering their own terminal-services product, then named Citrix MetaFrame, atop Windows NT 4.0. The Citrix-provided DLLs included in Windows NT 4.0 Terminal Services Edition still carry a Citrix copyright rather than a Microsoft copyright. Later versions of Windows integrated the necessary support directly. The T.128 application sharing technology was acquired by Microsoft from UK software developer Data Connection Limited.[5][6]
Version 5.0[edit]
This version was introduced with Windows 2000 Server, added support for a number of features, including printing to local printers, and aimed to improve network bandwidth usage.
Version 5.1[edit]
This version was introduced with Windows XP Professional and included support for 24-bit color and sound. The client is available for Windows 2000, Windows 9x, Windows NT 4.0.[7] With this version, the name of the client was changed from Terminal Services Client to Remote Desktop Connection; the heritage remains to this day, however, as the underlying executable is still named mstsc.exe.
Version 5.2[edit]
This version was introduced with Windows Server 2003, included support for console mode connections, a session directory, and local resource mapping. It also introduces Transport Layer Security (TLS) 1.0 for server authentication, and to encrypt terminal server communications.[8] This version is built into Windows XP Professional x64 Edition and Windows Server 2003 x64 & x86 Editions.
Version 6.0[edit]
This version was introduced with Windows Vista and incorporated support for Windows Presentation Foundation applications, Network Level Authentication, multi-monitor spanning and large desktop support, and TLS 1.0 connections.[9] Version 6.0 client is available for Windows XP SP2, Windows Server 2003 SP1/SP2 (x86 and x64 editions) and Windows XP Professional x64 Edition. Microsoft Remote Desktop Connection Client for Macintosh OS X is also available with support for Intel and PowerPC Mac OS versions 10.4.9 and greater.
Server 2012 can support RDC 6.0 or later.
Version 6.1[edit]
This version was released in February 2008 and is included with Windows Server 2008, as well as with Windows Vista Service Pack 1. The client is included with Windows XP SP3.[10] In addition to changes related to how a remote administrator connects to the “console”,[11] this version has new functionality introduced in Windows Server 2008, such as connecting remotely to individual programs and a new client-side printer redirection system that makes the client’s print capabilities available to applications running on the server, without having to install print drivers on the server.[12][13]
Version 7.0[edit]
This version was released to manufacturing in July 2009 and is included with Windows Server 2008 R2, as well as with Windows 7.[14] With this release, also changed from Terminal Services to Remote Desktop Services. This version has new functions such as Windows Media Player redirection, bidirectional audio, multi-monitor support, Aero glass support, enhanced bitmap acceleration, Easy Print redirection,[15] Language Bar docking. The RDP 7.0 client is available on Windows XP SP3 and Windows Vista SP1/SP2 through KB969084.[16] RDP 6.1 client and RDP 7.0 client are not supported on Windows Server 2003 x86 and Windows Server 2003 / Windows XP Professional x64 editions. RDP 7.0 is also not supported on Windows Server 2008. RDP 7.0 clients also do not support connecting to terminal servers running Windows 2000 Server.[17]
Most RDP 7.0 features like Aero glass remote use, bidirectional audio, Windows Media Player redirection, multiple monitor support and Remote Desktop Easy Print are only available in Windows 7 Enterprise or Ultimate editions.[18][19]
SP1 and Server 2008 R2 SP1. It adds RemoteFX functionality.
Version 8.0[edit]
This version was released in Windows 8 and Windows Server 2012. This version has new functions such as Adaptive Graphics (progressive rendering and related techniques), automatic selection of TCP or UDP as transport protocol, multi touch support, DirectX 11 support for vGPU, USB redirection supported independently of vGPU support, etc.[20][21] A “connection quality” button is displayed in the RDP client connection bar for RDP 8.0 connections; clicking on it provides further information about connection, including whether UDP is in use or not.[22]
The RDP 8.0 client and server components are also available as an add-on for Windows 7 SP1. The RDP 8.0 client is also available for Windows Server 2008 R2 SP1, but the server components are not. The add-on requires the DTLS protocol to be installed as prerequisite.[22] After installing the updates, for the RDP 8.0 protocol to be enabled between Windows 7 machines, an extra configuration step is needed using the Group Policy editor.[23]
A new feature in RDP 8.0 is limited support for RDP session nesting; it only works for Windows 8 and Server 2012 though, Windows 7 and Server 2008 R2 (even with the RDP 8.0 update) do not support this feature.[24]
The “shadow” feature from RDP 7, which allowed an administrator to monitor (snoop) on a RDP connection has been removed in RDP 8. The Aero Glass remoting feature (applicable to Windows 7 machines connecting to each other) has also been removed in RDP 8.[21][22]
Version 8.1[edit]
This version was released with Windows 8.1 and Windows Server 2012 R2. A RDP 8.1 client update exists for Windows 7 SP1 as well, but unlike the RDP 8.0 update for Windows 7, it does not add a RDP 8.1 server component to Windows 7. Furthermore, if RDP 8.0 server function is desired on Windows 7, the KB 2592687 (RDP 8.0 client and server components) update must be installed before installing the RDP 8.1 update.[25][26]
Support for session shadowing was added back in RDP version 8.1. This version also fixes some visual glitches with Microsoft Office 2013 when running as a RemoteApp.[25]
Version 8.1 of the RDP also enables a “restricted admin” mode. Logging into this mode only requires knowledge of the hashed password, rather than of its plaintext, therefore making a pass the hash attack possible.[27] Microsoft has released an 82-page document explaining how to mitigate this type of attack.[28]
Version 10.0[edit]
Version 10.0 of the RDP includes the following new features: AutoSize zoom (useful for HiDPI clients).[29] In addition graphics compression improvements were included utilizing H.264/AVC.[30]
Features[edit]
- 32-bit color support. 8-, 15-, 16-, and 24-bit color are also supported.
- 128-bit encryption, using the RC4 encryption algorithm, as of Version 6.[31]
- Audio Redirection allows users to process audio on a remote desktop and have the sound redirected to their local computer.
- File System Redirection allows users to use their local files on a remote desktop within the terminal session.
- Printer Redirection allows users to use their local printer within the terminal session as they would with a locally- or network-shared printer.
- Port Redirection allows applications running within the terminal session to access local serial and parallel ports directly.
- The remote computer and the local computer can share the clipboard.
Microsoft introduced the following features with the release of RDP 6.0 in 2006:
- Seamless Windows: remote applications can run on a client machine that is served by a Remote Desktop connection. It is available since RDP 6.[32]
- Remote Programs: application publishing with client-side file-type associations.
- Terminal Services Gateway: enables the ability to use a front-end IIS server to accept connections (over port 443) for back-end Terminal Services servers via an https connection, similar to how RPC over https allows Outlook clients to connect to a back-end Exchange 2003 server. Requires Windows Server 2008.
- Network Level Authentication
- Support for remoting the Aero Glass Theme (or Composed Desktop), including ClearType font-smoothing technology.
- Support for remoting Windows Presentation Foundation applications: compatible clients that have .NET Framework 3.0 support can display full Windows Presentation Foundation effects on a local machine.
- Rewrite of device redirection to be more general-purpose, allowing a greater variety of devices to be accessed.
- Fully configurable and scriptable via Windows Management Instrumentation.
- Improved bandwidth tuning for RDP clients.[citation needed]
- Support for Transport Layer Security (TLS) 1.0 on both server and client ends (can be negotiated if both parties agree, but not mandatory in a default configuration of any version of Windows).
- Multiple monitor support for allowing one session to use multiple monitors on the client (disables desktop composition)
Release 7.1 of RDP in 2010 introduced the following feature:
- RemoteFX: RemoteFX provides virtualized GPU support and host-side encoding; it ships as part of Windows Server 2008 R2 SP1.
Security issues[edit]
Version 5.2 of the RDP in its default configuration is vulnerable to a man-in-the-middle attack. Administrators can enable transport layer encryption to mitigate this risk.[33][34]
RDP sessions are also susceptible to in-memory credential harvesting, which can be used to launch pass the hash attacks.[citation needed]
In March 2012, Microsoft released an update for a critical security vulnerability in the RDP. The vulnerability allowed a Windows computer to be compromised by unauthenticated clients and computer worms.[35]
RDP client version 6.1 can be used to reveal the names and pictures of all users on the RDP Server (no matter which Windows version) in order to pick one, if no username is specified for the RDP connection.[citation needed]
In March 2018 Microsoft released a patch for CVE-2018-0886, a remote code execution vulnerability in CredSSP, which is a Security Support Provider involved in the Microsoft Remote Desktop and Windows Remote Management, discovered by Preempt.[36][37]
Non-Microsoft implementations[edit]
There are numerous non-Microsoft implementations of RDP clients and servers that implement subsets of the Microsoft functionality. For instance, the open-source command-line client rdesktopis available for Linux/Unix and Microsoft Windows operating systems. There are many GUI clients, like tsclient and KRDC, that are built on top of rdesktop; CoRD is such a client for the Macintosh.
In 2009, rdesktop was forked as FreeRDP, a new project aiming at modularizing the code, addressing various issues, and implementing new features.[38] FreeRDP comes with its own command-line-client xfreerdp, which supports Seamless Windows in RDP6. There’s also a GTK-Application named Remmina.
An open-source implementation of a Remote Desktop Protocol server on Unix is FreeRDP and xrdp. The Windows’ Remote Desktop Connection client can be used to connect to a server. Proprietary RDP client solutions such as rdpclient are available as a stand-alone application or embedded with client hardware.
A new access paradigm, browser-based access, has enabled users to access Windows desktops and applications on any RDP hosts, such as Microsoft Remote Desktop (RDS) Session Hosts (Terminal Services) and virtual desktops, as well as remote physical PCs.
There is also a so-called VRDP used in the VirtualBox virtual machine implementation by Oracle. This protocol is compatible with all RDP clients, such as that provided with Windows but, unlike the original RDP, can be configured to accept unencrypted and password unprotected connections, which may be useful in secure and trusted networks, such as home or office LANs. By default, Microsoft’s RDP server refuses connections to user accounts with empty passwords (but this can be changed with the Group Policy Editor[39]). External and guest authorization options are provided by VRDP as well. It does not matter which operating system is installed as a guest because VRDP is implemented on the virtual machine (host) level, not in the guest system. The proprietary VirtualBox Extension Pack is required.
Patents[edit]
Microsoft requires third-party implementations to license the relevant RDP patents.[40] As of February 2014, the extent to which open-source clients meet this requirement remains unknown.
Question: Change Default RDP Port on Windows Server 2008/2012
Change Default RDP Port on Windows Server 2008/2012
Posted on 03/04/2014 by Tomas
Change the default RDP port 3389 via registry editor and PowerShell.
Registry Editor
Run the registry editor C:\Windows\regedit.exe and change the following value:
HKEY_LOCAL_MACHINE\System\CurrentControlSet\Control\TerminalServer\WinStations\RDP-Tcp\PortNumber
PowerShell
Run the command below where new-port is the desired RDP port:
PS> Set-ItemProperty -Path HKLM:\SYSTEM\CurrentControlSet\Control\Terminal*Server\WinStations\RDP-TCP\ -Name PortNumber -Value new-port
Make sure any local and/or public firewalls are configured appropriately. Restart the system.
Optional: Security Layers and Encryption Levels, NLA
There are three security layer options available for RDP:
- RDP Security Layer – communication between the server and the client will use native RDP encryption.
- Negotiable – The most secure layer that is supported by the client will be used.
- SSL (TLS 1.0) – SSL will be used for server authentication and for encryption all data transferred between the server and the client.
There are four encryption level options for RDP:
- Low.
- Client Compatible (the one enabled by default) – all data sent between the client and the server is protected by encryption based on the maximum key strength supported by the client.
- High – all data sent between the client and the server is protected by encryption based on the server’s maximum key strength.
- FIPS Compliant – all data sent between the client and the server is protected by using FIPS 140-1 validated encryption methods. FIPS is US Federal Information Processing Standard, not a protocol.
Network Level Authentication (NLA) is also available for Remote Desktop Connection 6.0 and above.
To change remote desktop security level to high (TLS), do:
PS> Set-ItemProperty -Path HKLM:\SYSTEM\CurrentControlSet\Control\Terminal*Server\WinStations\RDP-TCP\ -Name SecurityLayer -Value 2
To change remote desktop encryption level to FIPS-Compliant, do:
PS> Set-ItemProperty -Path HKLM:\SYSTEM\CurrentControlSet\Control\Terminal*Server\WinStations\RDP-TCP\ -Name MinEncryptionLevel -Value 4
To enable Network Level Authentication, do:
PS> Set-ItemProperty -Path HKLM:\SYSTEM\CurrentControlSet\Control\Terminal*Server\WinStations\RDP-TCP\ -Name UserAuthentication -Value 1
As a security practice, it is recommended to update your Windows server’s RDP port (used for managing the server via Remote Desktop Conneciton). To update the RDP port from the default 3389, follow the steps below:
- Start the Registry Editor by navigating to Start > Run > regedit
- Locate the registry key HKEY_LOCAL_MACHINE\System\CurrentControlSet\Control\TerminalServer\WinStations\RDP-Tcp\PortNumber
- Click the subkey PortNumber, find the Edit menu, choose Modify, then select Decimal.
- Type your desired port number. It should be xxxx or xxxxx, and should not conflict with another running service (choose a high port number).
- Click OK. Exit Registry Editor. Restart the system.
The port accepted by the server for RDP connections will now be updated.
NOTE: To connect to the server on the new port, you will need to specify the port in Remote Desktop Connection or your RDP application of choice. This is usually done by entering the server’s IP address and port in the following format: 0.0.0.0:33994 (Where «0.0.0.0» is the server’s IP address, and «33994» is the RDP port number.)