
The default iTunes backup location is set to the PC or Mac’s primary disk, and in macOS 10.15, iOS backups as created by Finder are stored in the same place. Many users have large backups or backups from a number of iOS devices, and as a consequence they find themselves running low on disk space.
It is possible to configure a computer such that iTunes backs up to a secondary hard-disk, or to an external HDD or NAS.
Simply put, this is done by replacing the iTunes backup folder with a symbolic link to the desired location. This is an easily reversible change, so it is possible to restore the default backup location to its original directory.
Please note that if the iTunes backup location is changed to a volume that is not available at all times, the iTunes backup process will fail when the new location is unavailable.
What you’ll need
In order to change your computer’s default iTunes backup location, the following is necessary:
- Medium competency with a PC or Mac
- 10 minutes
- An understanding of the desired new backup location path
- A Mac running macOS 10.7 or newer, or a PC running Windows Vista or newer
- The Reincubate support team are on hand to help, and can advise customers on how to do this.
Changing the iTunes iOS backup folder automatically
The free version of iPhone Backup Extractor will automatically show you your computer’s default iTunes backup location — and let you change it.
- Download and install iPhone Backup Extractor.
- Choose
Preferencesfrom the main menu - Select
Backupsfrom thePreferenceswindow
The «Preferences» pane showing backup locations - Click the
Changebutton to start the process of changing your iTunes default backup folder.

Manually changing the iTunes iOS backup folder on Windows
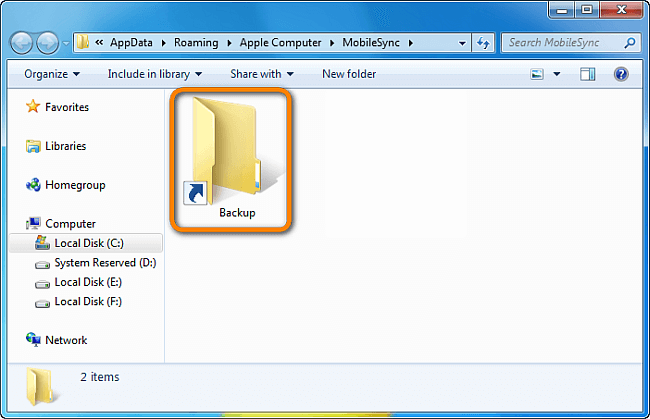
- Open the default Backup location in Explorer using the Windows Run command. Press
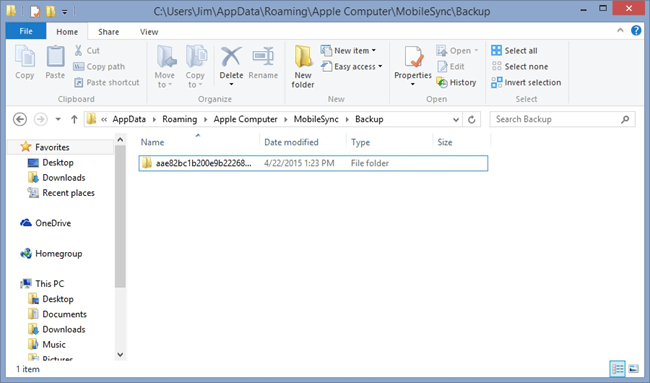
⊞ Win+Rand the Run window should appear. For Windows 7, 8 and Windows 10 iTunes Apple version, enter%APPDATA%\Apple Computer\MobileSyncand press⏎ Enter. For iTunes Microsoft Store version, enter\Users\[USERNAME]\Apple\MobileSync\Backup, where[USERNAME]is your Windows user name. - The Explorer window that opens will show a folder named «Backup». This contains any iTunes backups which are already present on the computer. In order to change the backup folder’s location, this folder must be renamed, moved or deleted. As an example, one could rename it to «Backup (Old)».
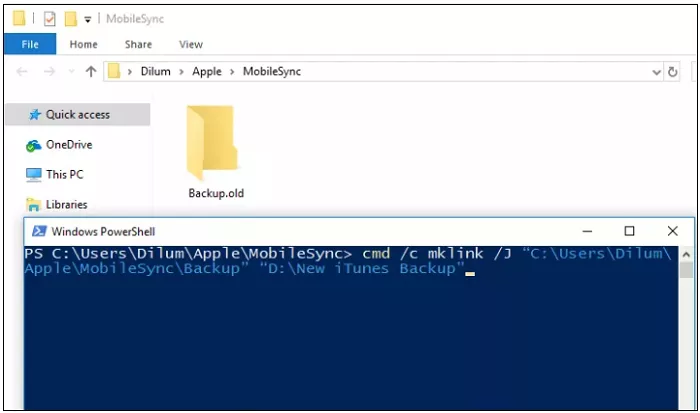
- Once the «Backup» folder has been renamed, moved or deleted, a symbolic link can be created to the desired backup location. In order to do this, a Command window must be opened. By holding
⇧ Shiftand right-clicking in the recently openedMobileSyncExplorer window, users will see a menu with the option «Open command window here» or «Open PowerShell window here». Click that. - Use the following command
mklink /d Backup "[desired-new-backup-path]". Once this command has been entered, press⏎ Enterand the change will be complete. - After restarting Windows, iTunes will store its backups in the new location.
Manually changing the iTunes iOS backup folder on macOS
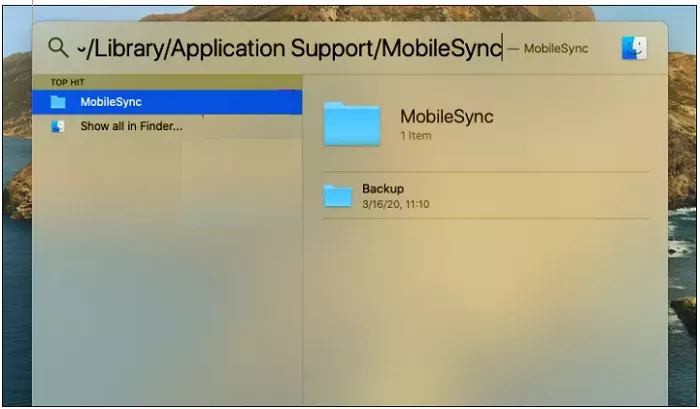
- Launch the macOS Terminal application. This can be found using Finder, under
Applications / Utilities / Terminal. Alternatively, it can be launched using Spotlight by pressing⌘ Cmd+and typing «Terminal» before pressing⏎ Enter. - Instruct the Terminal to change to the default iTunes backup location, by entering
cd ~/Library/Application\ Support/MobileSyncand then pressing⏎ Enter. - Reveal the current backup folder in Finder by entering
open .and then pressing⏎ Enter. - The Finder window that opens will show a folder named «Backup». This contains any iTunes backups which are already present on the computer. In order to change the backup folder’s location, this folder must be renamed, moved or deleted. As an example, one could rename it to «Backup (Old)».
- Once the «Backup» folder has been renamed, moved or deleted, a symbolic link can be created to the desired backup location. Use the following command
ln -s [desired-new-backup-path] ~/Library/Application\ Support/MobileSync/Backup. Once this command has been entered, press⏎ Enterand the change will be complete. - After restarting the Mac, iTunes will store its backups in the new location.
How to restore the iTunes backup folder to its original location
If you’ve taken the steps above, and you’d like to rever the change, the process is straightforward:
- Browse to the iTunes backup folder.
- Delete the
Backupsymlink that will appear there. - Drag your original
Backupfolder back in, renaming it if necessary to match its original name.
Other challenges?
We’ve had some users reach out who have already moved their iTunes backup folder to another location — simply by dragging it — and now lack the necessary symlink for iTunes to be able to see the backup.
It’s easy to solve this, and there are two options:
-
Drag the folder back to where you found originally. If you’ve forgotten, it should be called
Backup, and it lives in~/Library/Application Support/MobileSync. -
Create a symbolic link pointing to it — in the same way that the instructions above describe. If you’re at this stage, you should open a Terminal and do this:
cd [location of the folder which now has "Backup" in it]
ln -s Backup ~/Library/Application\ Support/MobileSync
It should be as simple as that.
Are there situations where this isn’t possible?
This technique works on every Mac, but it won’t work on Windows PCs built prior to 2000. Prior to the release of Windows 2000, Windows used FAT-formatted filesystems by default, and those aren’t capable of creating symlinks. Any Windows PC build since then will almost certainly be using NTFS-format disks, and these support symbolic links just fine. If you’re running FAT and try to create a link, you may see this error: Local volumes are required to complete the operation.
Fortunately, Microsoft provide some instructions on how to upgrade a disk from FAT to NTFS. It’s a little more technical, but it is possible.
Aidan Fitzpatrick
How can we help?
Our support team are here to help!
Our office hours are Monday to Friday, 9 AM to 5 PM GMT. The time is currently 4:10 AM GMT.
We aim to reply to all messages within one working day.
Related content
Comments (26)
Using iTunes for backing up your iPhone data may have caught your attention with its default storage location on your computer’s main hard drive. This could present challenges if your storage space is limited and also if you aim to enhance the organization of your backups.
Fortunately, there exists a solution to alter the iTunes backup location to any folder or external drive of your preference. Here in this article, we embark on a journey to unveil the intricacies of shifting the iTunes backup location on Windows 11/10/8/7, delving into the benefits that accompany such a modification.

Moreover, we extend our discourse to demonstrate how you can seamlessly back up your iPhone files to a PC, leveraging the functionalities of AirDroid Web to streamline your data management endeavors.
Where to Find the Default iTunes Backup Directory
- Windows 11/10/8 : C:\Users\Your username\AppData\Roaming\Apple Computer\MobileSync\Backup.
- Windows 7: C:\Users\Your username\AppData\Roaming\Apple Computer\MobileSync\Backup
- On Mac: Go to Finder>Option>»Library: ~/Library/Application Support/MobileSync/Backup/
- On Windows 11/10/8
- On Windows 7
- On Mac
- Why Change iTunes Backup Location
- Backup your iPhone Files to a PC
What to Know Before You Change iTunes Backup Location
If you want to free up some space on your computer or store your iTunes backups in a different location, you can change the default backup folder using a simple trick. This trick involves creating a symbolic link, or symlink, which is a shortcut that points to another folder.
By creating a symlink, you can fool iTunes into thinking that the backup folder is still in its original location, while storing the files elsewhere. Here is how to change the iTunes backup location:
Key Takeaway
- Ensure you have a current backup of your data before you make any changes.
- Be precise in entering the new backup path, as errors can cause issues.
- Make sure the new location has sufficient storage for your backups.
- Verify that iTunes can access and write to the new location.
FAQs About iTunes Backup Location
Is it safe to change my iTunes backup location?
Yes, if done correctly using the symlink method. However, ensure you back up your existing folder beforehand.
Any other useful tool to help me manage my iPhone files?
AirDroid is a wireless file transfer tool that allows you to manage your iPhone files from your computer without iTunes.
How can I change the default backup location for iPhone backups in iTunes?
You cannot change the backup location for iPhone backups directly within iTunes. However, you can manually move the backup folder to a new location after each backup is complete.
How to Change the iTunes Backup Location on Windows 11/10/8?
To change the iTunes backup location on Windows 11/10/8, you will need to use the Windows Command Prompt.
Don’t worry, it’s not as complicated as it sounds. Just follow these steps carefully and you’ll be able to change the iTunes backup location on Windows 11/10/8 in no time.
Step 1: Create a new folder where you want to store your iTunes backups. For example, you can create a folder called «iTunes backup» in the C:\ drive.
Step 2: Open the Command Prompt. You can do this by typing «cmd» in the Windows search box and hitting Enter.
Step 3: Navigate to the new folder using the «cd» command. For example, if you created the folder in the C:\ drive, type «cd c:\itunesbackup» and hit Enter.
Step 4: Delete the original backup folder and everything inside it using File Explorer. You can do this by right-clicking on the folder and choosing «Delete».
Step 5: Create a symlink using the «mklink» command. This command will create a shortcut from the original backup folder to the new folder. Type the following command and hit Enter: «mklink /J «%APPDATA%\Apple Computer\MobileSync\Backup» «c:\itunesbackup»». Make sure to replace «c:\itunesbackup» with the actual path of your new folder.
You can now choose any folder you want for your iTunes backups, such as «c:\itunesbackup».
How to Change the iTunes Backup Location on Windows 7?
To create a symlink in Windows 7, you will also need to use the Windows Command Prompt. Like on windows 11/10/8. Follow these steps carefully and you’ll be able to change the iTune backup location Windows 7 easily:
Step 1: Create a new folder where you want to store your iTunes backups. For example, you can create a folder called «itunesbackup» in the C:\ drive.
Step 2: Open the Command Prompt. You can do this by typing «cmd» in the Windows search box and hitting Enter. Navigate to the new folder using the «cd» command. For example, if you created the folder in the C:\ drive, type «cd c:\itunesbackup» and hit Enter.
Step 3: Delete the original backup folder and everything inside it using File Explorer. You can do this by right-clicking on the folder and choosing «Delete».
Step 4: Create a symlink using the «mklink» command. This command will create a shortcut from the original backup folder to the new folder. Type the following command and hit Enter: «mklink /J «%APPDATA%\Apple Computer\MobileSync\Backup» «c:\itunesbackup». Make sure to replace «c:\itunesbackup» with the actual path of your new folder.
That’s it! You can now choose any folder you want for your iTunes backups, such as «c:\itunesbackup».
How to Change the iTunes Backup Location on Mac?
If you’d like to change your iTunes backup location on Mac without additional software, you can facilitate this manually:
Fist you need to locate the iTunes Media Folder, to do this:
Step 1: Attach your external hard drive to your Mac.
Step 2: Navigate to Finder > Select your username > Click iTunes. This will take you to the default location of the iTunes folder.
Note :
If the iTunes folder isn’t in the default location, open iTunes.
- Navigate to Preference > Advanced. Note the path listed under ‘iTunes Media folder location’.
- Make sure the option ‘Copy files to iTunes Media folder when adding to library’ is checked.
- Click ‘OK’.
Step 3: Go to File > Library > Organize Library.
Step 4:Choose ‘Consolidate Files’ to centralize all library files for backup.
Step 5: If available, select ‘Reorganize files in the folder iTunes Media’. Confirm the settings by clicking ‘OK’.
Note: Remember to delete the duplicated files after the backup as ‘Consolidate Files’ creates copies instead of moving the files.
Step 6: Close iTunes and go to Finder to open your external hard drive.
Step 7: Locate your iTunes folder either at its default location or the one you noted earlier. Drag this folder over to your external hard drive to start the transfer.
Step 8: Once the transfer is complete, you can delete the original iTunes backups from your Mac to free up space.
Now you’ve successfully changed your iTunes backup location on your Mac.
Why You May Need to Change iTunes Backup Location?
By default, iTunes saves backups on your computer’s main hard drive, which can quickly fill up your storage space.
If you want to save more space or organize your backups better, you can change where iTunes stores them. Here are some reasons why you should change backup iTunes location:
Save More Space
You can free up more space on your computer’s hard drive by moving your iTunes backup location. Apple devices store more and more data as they get more advanced.
This means that backups can take up a lot of disk space, sometimes several gigabytes or more.
Improve Performance
You can make your computer run faster and avoid backup overload by moving your iTunes backups to another location. This way, you can prevent disk overflow and boost system performance.
Manage And Organize
You can also manage and organize your device backups better by changing your iTunes backup location. If you have multiple Apple devices, it can be hard to keep track of all the backups.
By moving backups to different folders or external drives with the device names, you can easily find and access the backup you need.
Protect Your Data
Even though iTunes backups are usually safe on your computer’s main hard drive, you can still lose data from accidents like virus attacks, disk failures, and system crashes. You can protect your data better by storing your backups on an external disk or in another location.
This way, you can have peace of mind that you have a secure backup copy of your main disk, even if something happens to it.
Share And Transfer
You can also share and transfer your backups more easily if you change the backup location for iTunes. The iTunes backup folder is easy to move to a new device or another computer.
This is very useful if you want to share backups with another user or if you are switching computers.
How to Backup Your iPhone Files to a PC with AirDroid?
AirDroid Web is a powerful tool that can meet all your mobile needs. You can do many things on your smartphone with it. You can also access your iPhone files easily with the AirDroid website.
With AirDroid online, you can access your files from anywhere and anytime, without any limits. Here are some benefits of using AirDroid online to access your iPhone files.
AirDroid empowers you with —
Key features of AirDroid Personal
- Selective and Secure Backups: Choose specific files or folders to backup, ensuring your valuable data remains protected on your PC.
- Wireless Convenience: Eliminate the hassle of cables. AirDroid’s wireless connectivity frees you from the constraints of physical connections.
- Lightning-Fast Transfers: Experience high-speed file downloads, regardless of file size, saving you precious time.
- Universal Compatibility: AirDroid transcends operating systems, seamlessly connecting your iPhone to Macs, Windows PCs, Linux machines, and Chromebooks.
- Web-Based Simplicity: No software installation is needed. Access AirDroid directly from your web browser for instant functionality.
Backup Your Important Files Quickly
Here is a quick guide on how to back up your important files with AirDroid Personal, even if you don’t have your computer with you. Make sure you download AirDroid first before you back up your data.
Step 1: Log in to your PC and iPhone with the same AirDroid account. After you connect your device to your PC, you can transfer your files offline whenever and wherever you want.
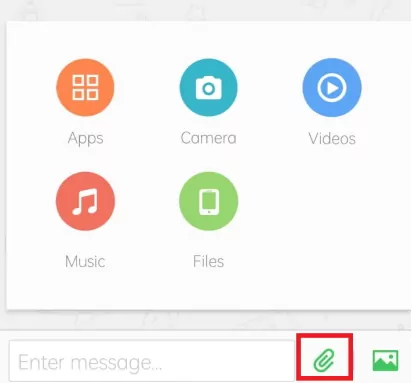
Step 2: On your phone, tap the Transfer button. Then, pick the device you want to back up from the list.
Step 3: Choose the file icon or the backup type you want, and then tap Send.
Backup Your Photos And Videos In Bulk
Follow these steps to learn how to backup your photos and videos from your iPhone to your PC or Mac.
Step 1: Download the AirDroid iOS app from the App Store on your iPhone. Then, sign up for an account on the AirDroid official website. Enter your login details and access your account.
Step 2: Go to https://web.airdroid.com on your computer and log in with the same details as your AirDroid account. You will use the same account to connect your PC and iPhone.

You can use your PC to check the media files from your iPhone and start transferring them to your computer for later use. Also, you can easily view, delete, and copy iPhone files with your PC.
You don’t need any other tools like iCloud or iTunes. With an AirDroid account, you can control your iPhone files wirelessly from your PC.
If you want to save space, enhance performance, better manage and protect your data, and share or transfer your backups with ease, changing the iTunes backup location can be a wise decision. We’ve broken down the process of altering the iTunes backup location above.
Additionally, we’ve gone over how to back up your iPhone files to your PC using AirDroid Web. This robust tool allows for effortless, wireless access to your iPhone files. If you want to try AirDroid Web, you can download the AirDroid iOS app from the App Store and sign up for an account on the AirDroid official website.
For Mac: Photos App > Settings or Photos > Preferences > iCloud > Turn on iCloud Photos.
«My C: drive is full (has only 2.5 GB free) and iTunes fails to backup my iPhone 6 (32GB) when trying to update
to the new iOS 11. The OTA updates keep on failing as well. Can anyone tell me how I can change the default
location of iTunes backup?»
iTunes keeps the iOS backup folder directly on the system drive, usually the C: drive. With the ever-expanding iOS
backup, the precious and often scarce space of the C: drive will be reduced constantly. And we are likely to run out
of space in Windows system partition soon. To avoid this happened, you have two choice: one is to backup iPhone/iPad to an external hard drive
(opens new window) and the other is to change iTunes backup
location. In this post, we will focus on how to change the default location of iTunes backup.
Can’t Miss:
Tricks to Delete Useless iTunes Files for Mac
(opens new window)
Windows Backup: How to Back Up Your Computer
(opens new window)
Note: Before any action, you should read this primer on iTunes backup and what we are going to do.
- By default, iTunes will store the backup files in the following path.
• iTunes backup location on Windows XP: \Documents and Settings(username)\Application Data\Apple
Computer\MobileSync\Backup\
• iTunes backup location on Windows Vista/Windows 7/8/10: \Users(username)\AppData\Roaming\Apple
Computer\MobileSync\Backup\
iTunes is configured to put all backups into the path shown above and we cannot select to save these backup files to
another drive directly.
2.We are going to create a new backup folder in another hard drive on the PC, such as D drive, E drive and so on. And
then link the original backup folder to the new backup folder. Once we have linked them, every time
iTunes tries to save a backup to the C: drive, the files get saved in the new created backup folder.
Step 1. Create a New iTunes Backup Folder on another drive
Firstly, you should create a new iTunes backup folder on D drive, E drive or any drive that has more free storage
space. Also, you can create the folder in a flash drove, thumb drive, external hard drive, etc. You can name the
folder as «New iTunes backup» and any name that is descriptive enough.
Step 2. Rename old iTunes backup folder on system drive
You can find the iTunes default location with the path we give above and rename the folder name from «Backup» to «Old
iTunes Backup» or anything else.
Step 3. Change iTunes backup location on Windows PC
You may find it is not easy to understand what symbolic links is. Actually, you don’t have to know much about it as
long as you can create a symbolic link by following our steps. But if you want to know, we provide the background
knowledge for you at the end of the page too.
- Once your rename the original iTunes backup folder, press SHIFT key and right click on the old iTunes backup file
location, you will get a pop-up menu.
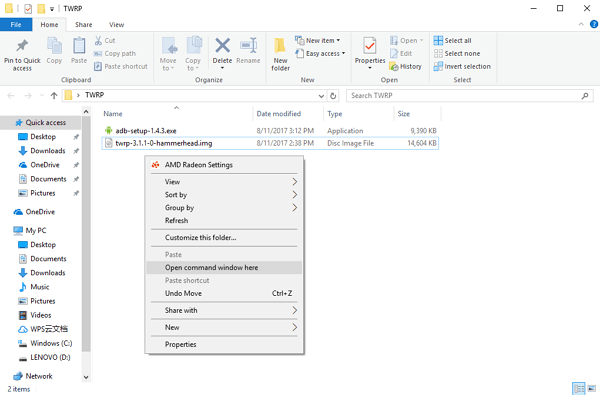
- Select «Open command window here», you will get a screen like this:
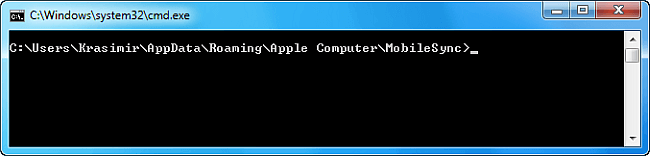
- In the prompt window, manually type in the following command where D:\ is the new drive location (drive letter may
vary) and «Backup» is the name of the iOS backup folder you just moved:
mklink /J «%APPDATA%\Apple Computer\MobileSync\Backup» «D:\Backup»
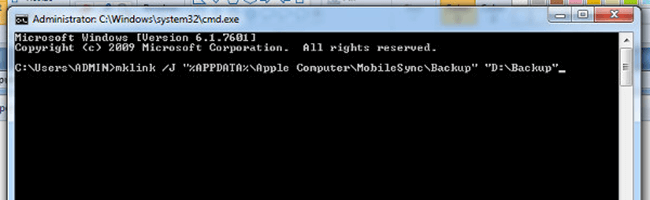
- You will now see the command prompt window return a success in creating a junction. And a new folder shortcut
called «Backup» will appear in the original location.
- Now, delete
old iTunes backup files(opens new window)
existing in the MobileSync folder. Then
connect your iPhone to PC and back up it with iTunes. You’ll find that the new backups are created in E: \Backup (or
wherever you created the new backup folder).
Changing iTunes backup location is a good start to save the storage of the system drive. But the steps could be a bit
complicated and technical. If you want to avoid these long steps, I would recommend you to use FonePaw iOS
Transfer
(opens new window). This software allows you to backup iPhone data
(opens new window) including photos, music, videos, movies,
contacts, text messages, iBooks, ringtones, playlists, etc. to computer and you can choose any folder you like to save
them.
Background Knowledge
In order to change iTunes location, we need to create a symbolic link (or called junction point) from the original
iTunes backup location. According to Wikipedia
(opens new window), «an NTFS junction point is a symbolic link to a
directory that acts as an alias of that directory. This feature of the NTFS file system offers benefits over a Windows
shell shortcut (.lnk) file, such as allowing access to files within the directory via Windows Explorer, the Command
Prompt, etc.» For detail explanation for symbolic link, you can refer to symbolic link in Windows system
(opens new window).
You are here:
Home » Windows 10 » How To Change iTunes (iPhone/iPad) Backup Location In Windows 10
The top of the line iPhone comes with 512 GB of storage capacity. When you need to back up this iPhone to your computer, you will have to make sure that the system drive (Windows 10 drive) has at least the same amount of free space (assuming that the iPhone’s storage is almost full).
Most iPhone and iPad users use the official iTunes software from Apple to back up their iOS devices to Windows 10 PC once in a while or at least before updating the iOS software to the latest version.

iTunes backs up all data from your iPhone and iPad to one of the following two locations depending on where iTunes is installed from:
If the iTunes is installed from Windows 10 Store:
%UserProfile%\Apple\MobileSync\Backup
If iTunes is installed using a setup file (outside the Store):
%AppData%\Apple Computer\MobileSync\Backup
If your Windows 10 drive is filling up fast or don’t have enough free space to back up your iPhone data, you might want to change the default backup location of iTunes.
By now, you might have discovered that iTunes doesn’t allow you to change the default backup location. This means that, if you don’t have enough free space on the drive where Windows 10 is installed, you cannot back up your iPhone or iPad to your PC.
Fortunately, there is a workaround out there to change the default backup location used by iTunes. We use the symbolic link functionality available in Windows OS to change the default iTunes backup location used to backup iPhone and iPad. Here is how to do just that.
We recommend changing the backup location before backing up your iPhone/iPad.
Method 1 of 2
Change iTunes default backup location via Command Prompt
Step 1: Create a new folder called MobileSync at the root of the drive that you would like to use the new backup location. Make sure that the drive where you have created the MobileSync folder has enough free space to back up your entire iOS device.
Step 2: Next, navigate to one of the following locations:
If the iTunes is installed from Windows 10 Store:
C:\Users\UserName\Apple\MobileSync
For the classic desktop version of iTunes:
C:\Users\UserName\AppData\Roaming\Apple Computer\MobileSync
Step 3: Cut (don’t copy) the Backup folder and paste it to the new MobileSync folder that you created in the first step. So, the path to the Backup folder would be:
D:\MobileSync\Backup
Where “D” is the drive letter.
Step 4: Open the Command Prompt as administrator. To do that, type CMD in Start/taskbar search, right-click on Command Prompt in the results and then click Run as administrator.
Step 5: Now, execute the following command:
If iTunes is installed from the Store:
MkLink /J “C:\Users\UserName\Apple\MobileSync\Backup” “D:\MobileSync\Backup”
If iTunes is installed outside the Store (using Setup file):
MkLink /J “C:\Users\UserName\AppData\Roaming\Apple Computer\MobileSync\Backup” “D:\MobileSync\Backup”
In the above commands, “C” is the drive letter of Windows 10 drive, UserName is your actual user name, and “D” is the drive letter of the drive (new location) where you intend to save iPhone and iPad backups.

Method 2 of 2
Use a third-party tool to change iTunes backup location
FolderMove is a small utility designed to move folders of installed programs. Here is how to use FolderMove program to change the default backup location of iTunes used to backup iPhone and iPad.
Step 1: At the root of the drive where you would like to save iPhone and iPad backup, create a folder called MobileSync and then create another subfolder called Backup. So, the path should be:
D:\MobileSync\Backup
Where “D” is the drive letter of the drive.
Step 2: Download FolderMove and run it as administrator.
Step 3: In the “Move from” field, type one of the following locations depending on where iTunes is installed from.
For iTunes app installed from Store:
C:\Users\UserName\Apple\MobileSync\Backup
For iTunes installed using the setup file (outside the Store)
C:\Users\UserName\AppData\Roaming\Apple Computer\MobileSync\Backup
Replace “C” with the actual drive letter of your Windows 10 drive and UserName with your user name.
Step 4: In the “Move to” field, type the new location (D:\MobileSync\Backup) which you would like to use as the new backup location. Click Move and set Symbolic link button.

You can now backup your iPhone or iPad using iTunes. The backup data will be saved to the new location instead of the default one.
How to change Netflix download location in Windows 10 guide might also interest you.
Всем категорический и пламенный привет! Давайте сразу перейдем к делу: совсем недавно у меня возникла небольшая проблема — закончилась свободная память на диске «C:\». Я долго и упорно ругался на Windows, но потом понял, что «корпорация добра» здесь ни при чём — во всём были виноваты резервные копии iPhone, которые занимали очень много места.
Нет, не так. Они занимали ОЧЕНЬ МНОГО МЕСТА!
И вот тут получается какая-то неразрешимая, на первый взгляд, дилемма. Удалять резервные копии нельзя (потому что… потому что просто нельзя!), а освобождать место ой как нужно — Windows ругается, негодует и настоятельно требует выделить ей хоть немного свободного пространства.
Думаю, ну я же умный! Сейчас просто возьму и поменяю папку хранения резервных копий в самой программе iTunes. Что может быть проще?
Смело и решительно открываю iTunes, начинаю искать нужную опцию и… ничего. Оказывается, в iTunes нельзя указать папку хранения резервных копий — вот где программа задумала (кстати, где?), там они и будут храниться!
Apple, ну ё-моё. Ведь я в тебя так верил!
И вот что теперь делать? Смириться с ограничениями?
Нет, это не наш метод:)
Тем более, что проблему можно решить аж двумя способами! Какими? Сейчас всё расскажу…
Способ №1. Изменить папку хранения копий через командную строку
У операционной системы Windows есть замечательная штука:
Символические ссылки.
Именно они помогут нам в переносе папки хранения резервных копий iTunes.
Если вкратце, то это почти как «ярлык», только одна папка будет ссылаться на другую. А программа (iTunes) при этом ничего не заподозрит.
Важно! Перед началом всех манипуляций, необходимо включить «отображение скрытых файлов и папок» в Windows:
Готово? Вот теперь точно поехали. Итак, что нужно сделать:
- Открыть место хранения резервной копии iTunes на компьютере (C:\Users\Здесь ваше имя пользователя\AppData\Roaming\Apple Computer\MobileSync) и найти там папку Backup.
- На всякий случай, скопировать папку Backup в надежное место (вдруг, что-то пойдёт не так?!).
- Обязательно! Удалить папку Backup из C:\Users\Здесь ваше имя пользователя\AppData\Roaming\Apple Computer\MobileSync.
")
- Обязательно! Создать ту папку, куда вы хотите перенести копии (в данном примере я создал папку D:\iTunes\Backup\).

- Запустите командную строку (CMD.EXE) с правами администратора. Как это сделать? Нажимаем «Пуск — Найти программы и файлы — CMD.EXE». После того, как программа будет найдена, нажимаем на нее правой кнопкой мыши — «Запуск от имени администратора».

- Открывается страшное черное окно. Не боимся!

- Нам нужно ввести команду вида MKLINK /D «Старое место хранения резервной копии» «Новое место хранения резервной копии».
- В моё случае, это выглядит вот так MKLINK /D «C:\Users\Здесь ваше имя пользователя\AppData\Roaming\Apple Computer\MobileSync\Backup» D:\iTunes\Backup\

- Нажать Enter.
")


Всё! После этого, резервные копии iTunes будут храниться по адресу D:\iTunes\Backup\
Несколько важных уточнений:
- Не забывайте указывать своё имя пользователя вместо «Здесь ваше имя пользователя».
- Если в пути названий файлов и папок есть пробелы (как например, в C:\Users\Здесь ваше имя пользователя\AppData\Roaming\Apple Computer\MobileSync\Backup), то весь путь нужно заключить в кавычки.
- Ошибка «Невозможно создать файл, так как он уже существует» возникает из-за того, что вы не удалили изначальную папку хранения резервных копий (C:\Users\Здесь ваше имя пользователя\AppData\Roaming\Apple Computer\MobileSync\Backup).
- Ошибка «Недостаточно привилегий для выполнений этой операции» возникает из-за того, что CMD.EXE была запущена без прав администратора.
- Обновлено (спасибо тем людям, кто написал об этом в комментариях)! Используйте ту форму кавычек, которая указана на скриншотах («» — такие НЕ подходят).
Вот такая вот история. Сложно? Есть немного. Но главное — это работает!
Способ №2. Меняем папку хранения копий при помощи программы
Если все эти команды из предыдущего пункта кажутся вам слишком сложными, то всегда есть альтернатива. И имя ей:
Программы для создания символических ссылок.
Здесь не нужно запускать CMD.EXE, самостоятельно прописывать пути и заниматься другими безобразиями — всё сделает специальная программа.
Какая? Например, Link Shell Extension.
Где взять? На официальном сайте — вот ссылка.
В чем плюсы? Бесплатно и на русском языке.
Как работает?
- Загружаем и устанавливаем программу.
- Открываем то место (в моём случае — D:\iTunes\Backup\), где вы хотите сохранять резервные копии iTunes. Нажимаем на папку Backup правой кнопкой мыши и выбираем пункт «Запомнить источник ссылки».

- Переходим в то место (C:\Users\Здесь ваше имя пользователя\AppData\Roaming\Apple Computer\MobileSync\Backup), где резервные копии iTunes хранятся по умолчанию. Обязательно удаляем папку Backup!
- Открываем C:\Users\Здесь ваше имя пользователя\AppData\Roaming\Apple Computer\MobileSync\, правой кнопкой мыши нажимаем на папку MobileSync и выбираем «Поместить как… Символическую ссылку».

- Можно создавать резервную копию — теперь все файлы будут располагаться по адресу D:\iTunes\Backup\


Победа!
Напоследок отмечу, что я всё проверил — оба способа прекрасно работают. Резервные копии без каких-либо проблем создаются в новом месте и так же чудесно оттуда восстанавливаются. И это просто здорово, ведь теперь у меня достаточно места на диске «C:\»!
Windows может спать спокойно:)
P.S. А каким способом воспользовались вы? Сделали всё вручную? Использовали программу? Личный опыт — это всегда круто, поделитесь им в комментариях! Лень что-то писать? Понимаю… тогда можно просто поставить «лайк»:)
P.S.S. Ничего не получилось? Остались какие-то вопросы? Обязательно пишите — все вместе мы постараемся решить вашу проблему!
Дорогие друзья! Минутка полезной информации:
1. Вступайте в группу ВК — возможно, именно там вы сможете получить всю необходимую вам помощь!
2. Иногда я занимаюсь ерундой (запускаю стрим) — играю в игрушки в прямом эфире. Приходите, буду рад общению!
3. Вы всегда можете кинуть деньги в монитор (поддержать автора). Респект таким людям!
P.S. Моя самая искренняя благодарность (карта *9644, *4550, *0524, *9328, *1619, *6732, *6299, *4889, *1072, *9808, *7501, *6056, *7251, *4949, *6339, *6715, *4037, *2227, *8877, *7872, *5193, *0061, *7354, *6622, *9273, *5012, *1962, *1687, *0965, *4638, *0115, *6948, *0214, *9311, *5070 + перевод *8953, *2735, *2760 + без реквизитов (24.10.2021 в 18:34; 10.12.2021 в 00:31; 16.02.2023 в 10:32; 21.05.2023 в 16:56; 01.06.2023 в 02:08; 05.08.2023 в 14:47; 22.08.2023 в 09:35; 18.09.2023 в 17:02; 28.06.2024 в 16.09; 11.07.2024 в 12:12)) — очень приятно!