
Как и в предыдущих версиях ОС, в Windows 11 есть два основных сетевых профиля или типа сети, определяющих основные параметры безопасности — общественная или общедоступная сеть и частная или личная сеть. Есть и третий вариант — сеть домена, но у домашних пользователей он, как правило, не используется.
В этой инструкции подробно о том, как изменить тип сети в Windows 11 несколькими способами — в Параметрах или списке сетевых подключений, а также альтернативными методами.
Изменение сетевого профиля Windows 11
В Windows 11 доступны следующие несколько способов изменить тип сети или сетевой профиль. Первые три позволяют быстро выполнить смену типа сети для активных подключений, четвертый — для всех сетей.
Тип сети в Параметрах
Первый метод — использование переключения типа сети в Параметрах, шаги будут следующими:
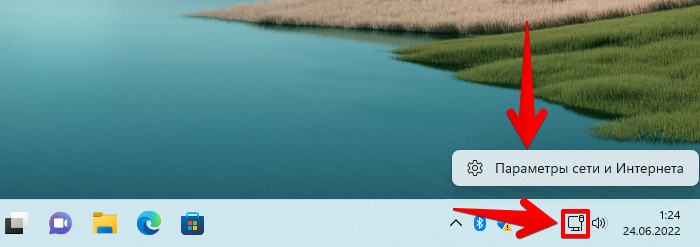
- Откройте «Параметры» — «Сеть и Интернет», либо нажмите правой кнопкой мыши по значку соединения в области уведомлений и выберите пункт «Параметры сети и Интернета».
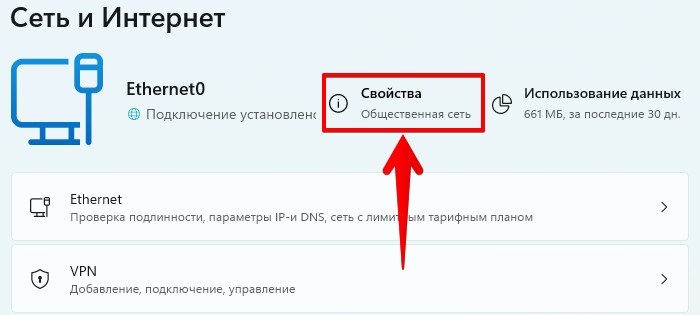
- Если вам нужно изменить тип текущей сети, нажмите по указанию типа в пункте «Свойства».

- Вверху страницы настроек подключения выберите нужный тип сетевого профиля — Общедоступная сеть или частная сеть.
- Если вы используете более одного сетевого подключения, например и Ethernet и Wi-Fi подключение, на странице параметров «Сеть и Интернет» можно отдельно выбрать соответствующие пункты: Ethernet — чтобы переключить тип локальной сети и Wi-Fi, а затем — свойства текущей беспроводной сети, чтобы изменить её тип.


Изменение типа сети в Терминале Windows (PowerShell)
Следующий способ — использование команды в Windows PowerShell для изменения типа сети. Для этого потребуется знать имя сети, для которой мы задаем применяемый сетевой профиль. Посмотреть его можно в «Центр управления сетями и общим доступом», а можно прямо в PowerShell.
- Нажмите правой кнопкой мыши по кнопке «Пуск» и выберите пункт «Терминал (Администратор)».
- Введите команду
Get-NetConnectionProfile
в результате выполнения которой вы получите информацию о текущих сетевых профилях. В следующей команде нам потребуется имя (Name) сети, для которой мы меняем тип.
- Введите команду
Set-NetConnectionProfile -Name "Имя_сети" -NetworkCategory Тип_сети
где Имя_сети меняем на полученное в предыдущей команде, а Тип_сети может быть Private или Public — частная или общедоступная соответственно.


Какие-либо сообщения об успехе выполнения команды не появятся, но профиль сети будет изменен.
Принудительная установка типа сети в Локальной политике безопасности
Локальная политики безопасности Windows позволяет переопределить типы сети, а также запретить выполнять изменения другими способами, включая описанные выше. Действия состоят из следующих шагов:
- Нажмите правой кнопкой мыши по кнопке «Пуск», выберите пункт «Выполнить», введите secpol.msc и нажмите Enter.
- В открывшемся окне выберите «Политики диспетчера списка сетей» и дважды нажмите по верхнему пункту: он может иметь название «Сеть» или имя текущей беспроводной сети.

- Перейдите на вкладку «Сетевое расположение» и установите «Тип расположения» (Личное — частная сеть, Общее — общедоступная или общественная сеть), а также установите «Пользователь не может изменить расположение», иначе изменения типа сети не произойдет.

- Примените настройки.


Учитывайте, что при этом подходе в дальнейшем тип сети можно будет изменить вновь только в локальной политике безопасности.
В редакторе реестра
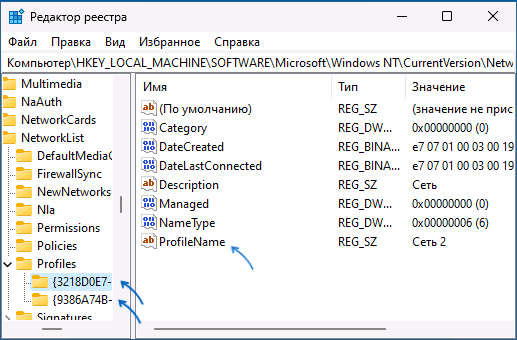
Информация о сетях и используемом сетевом профиле хранится в реестре, это позволяет изменить тип не только активной сети, но и для сетей, к которым мы когда-либо подключались и, возможно, будем подключаться в будущем.
- Нажмите клавиши Win+R на клавиатуре, введите regedit и нажмите Enter для запуска редактора реестра.
- В редакторе реестра перейдите к разделу
HKEY_LOCAL_MACHINE\SOFTWARE\Microsoft\Windows NT\CurrentVersion\NetworkList\Profiles
- Этот раздел содержит вложенные подразделы, каждый из которых представляет собой параметры сетей, к которым когда-либо производилось подключение. Выбрав такой подраздел, вы можете посмотреть на значение параметра ProfileName в правой панели редактора, чтобы определить, к какой сети он относится.

- Для изменения типа сети, дважды нажмите по параметру Category и установите нужное значение: 0 — общедоступная, 1 — частная, 2 — доменная.

- Примените настройки и закройте редактор реестра.

Для того, чтобы профиль сети изменился может потребоваться перезагрузка компьютера после выполнения указанных действий.
В ранних версиях ОС можно было применить дополнительный способ — выполнение сброса сети Windows, после чего появлялся запрос о предпочитаемом типе сети, однако в текущих версиях Windows 11 после сброса автоматически выбирается общественная (общедоступная) сеть и, если требуется изменить её на частную (ранее — домашняя), выполнять это требуется вручную.
Как посмотреть текущий тип сети и их отличия
Первоначальный выбор типа сети производится при первом к ней подключении: Windows показывает уведомление, запрашивающее разрешение на обнаружение компьютера другими компьютерами и устройствами в сети. Если ответить «Да» — будет включен профиль «Частная сеть», если «Нет» — «Общедоступная сеть».
Проверить текущий тип активной сети в Windows 11 можно одним из следующих способов:
- Зайти в Параметры — Сеть и Интернет и посмотреть на пункт «Свойства» в описании используемого Ethernet или Wi-Fi подключения, там будет указано «Общественная сеть» или «Частная сеть».
- Открыть окно «Безопасность Windows», перейти в раздел «Брандмауэр и безопасность сети», где будет указано три типа сетевых профилей и, рядом с одним из них — пометка «активный», именно этот профиль используется для текущего соединения.

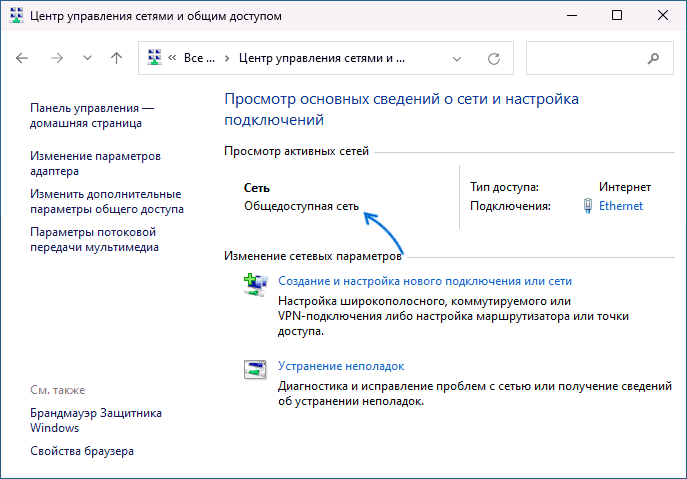
- Открыть «Центр управления сетями и общим доступом», который всё ещё доступен в панели управления Windows 11 — там будет указан тип сети для активного соединения.


Теперь об отличиях двух вариантов сетевых профилей или типов сети в Windows:
- Частная (личная) сеть — менее безопасная и предполагает, что используется локальная сеть. По умолчанию включены такие опции как сетевое обнаружение, общий доступ к файлам и принтерам. Предполагается, что этот профиль сети вы используете в окружении, где все подключенные устройства — ваши, которым вы доверяете.
- Общедоступная или общественная сеть — тип сети, при которой указанные функции отключены, то есть при обзоре сети ваши устройства видны не будут, во всяком случае в разделе «Сеть» Windows.
Помимо упомянутых функций общего доступа, для разных типов сетей отличаются некоторые предустановленные правила брандмауэра Windows.
Некоторые пользователи, исходя из названия «Общедоступная» предполагают, что этот тип сети менее безопасен для использования, хотя по факту дело обстоит ровно наоборот — тип сети «общественная» в большей степени изолирует вас от других устройств в сети.
Changing your network from public to private in Windows 11 is pretty straightforward. Essentially, you need to navigate to the network settings, identify your current network, and then switch it to a private network. This will enhance your network’s security and allow for easier sharing of resources.
Switching your network from public to private will improve your network security and enable more straightforward sharing. Let’s go through the steps to make this change.
Step 1: Open Settings
Click on the Start Menu and select the “Settings” icon.
Opening the Settings window is your first step. This is where you can access all the system settings, including your network preferences.
Step 2: Go to Network & Internet
In the Settings window, select “Network & Internet.”
Once you’re in the Network & Internet section, you’ll find all the relevant options to manage your network connections.
Step 3: Select Wi-Fi or Ethernet
Depending on your connection, click on either “Wi-Fi” or “Ethernet.”
This step is crucial because you need to select the type of connection you are currently using. Each connection type has its own settings page.
Step 4: Click on Your Connected Network
Under the Wi-Fi or Ethernet settings, click on the name of your connected network.
By clicking on your connected network, you’ll open more detailed settings where you can change your network profile.
Step 5: Change the Network Profile
Under “Network profile type,” select “Private.”
This option will change your network configuration. A private network is more secure and allows for easier file and printer sharing within your local network.
After completing these steps, your network will switch from public to private, improving security and making it easier to share files and devices within your network.
Tips for Changing Network from Public to Private Windows 11
- Make sure your device is connected to the network you want to change before starting this process.
- If you are on a public or shared Wi-Fi, it’s better to keep it as a public network for security reasons.
- Always check that your firewall and antivirus settings are updated when changing network profiles.
- Consider setting up a strong password for your home network to further enhance security.
- Regularly review your network settings to ensure they are optimized for your current needs.
Frequently Asked Questions
How do I know if my network is public or private?
You can check your network status in the Network & Internet settings. It will display the network profile type next to your connected network.
Why should I change my network to private?
Changing your network to private can enhance security and allow easier sharing of files and printers within your network.
Can I change my network back to public?
Yes, you can follow the same steps and select “Public” under the network profile type if you need to switch back.
What if I can’t find the network settings?
Make sure your Windows 11 is up to date. If the settings are still missing, try restarting your computer or checking for system updates.
Will changing my network profile affect my internet speed?
No, changing your network profile from public to private will not affect your internet speed. It only changes how your network is classified and how it interacts with other devices.
Summary of Steps
- Open Settings.
- Go to Network & Internet.
- Select Wi-Fi or Ethernet.
- Click on your connected network.
- Change the network profile to Private.
Conclusion
Changing your network profile from public to private in Windows 11 is a simple yet crucial step to ensure your home or office network is secure. By following these steps, you can make your network more secure and enable more straightforward sharing of files and printers among your devices.
If you have any troubles, don’t hesitate to consult the FAQs or seek additional support. Consider reviewing your network settings from time to time to ensure they are optimized for your needs. For further reading, check out other articles on network security and Windows 11 features. Now, go ahead and make your network secure!
Matthew Burleigh has been writing tech tutorials since 2008. His writing has appeared on dozens of different websites and been read over 50 million times.
After receiving his Bachelor’s and Master’s degrees in Computer Science he spent several years working in IT management for small businesses. However, he now works full time writing content online and creating websites.
His main writing topics include iPhones, Microsoft Office, Google Apps, Android, and Photoshop, but he has also written about many other tech topics as well.
Read his full bio here.
When it comes to managing network settings on Windows 11, one crucial aspect is the ability to change your network from public to private. Ensuring your network is set to the right configuration is essential for security and accessibility. In this guide, we will explore the steps to change your network from public to private on Windows 11, allowing you to have more control over your network settings.
To change your network from public to private on Windows 11, you can follow a few simple steps. First, open the Settings app by clicking on the Start button and then clicking on the gear icon. From the Settings menu, select the Network & Internet option. Next, click on the Wi-Fi tab on the left-hand side and scroll down to find the advanced network settings. Finally, click on your connected network, and in the Network profile section, switch from Public to Private. By following these steps, you can easily change your network settings and ensure the appropriate level of security and access.
To change your network from public to private on Windows 11, follow these steps:
1. Open the Start menu and click on Settings.
2. In the Settings menu, click on Network & Internet.
3. On the left-hand side, click on Ethernet or Wi-Fi, depending on your connection.
4. In the Network settings, click on the network you want to change.
5. Under Network profile, select Private.
6. Close the Settings menu.
Your network will now be changed from public to private, providing you with increased security and access to shared devices.

Understanding Public and Private Networks in Windows 11
When using a Windows 11 device, it is essential to distinguish between a public and a private network. Public networks are typically found in public places such as coffee shops, airports, or shopping malls. These networks are open to anyone and may have limited security measures in place. On the other hand, private networks refer to home or office networks that are secured and restricted to authorized users.
Windows 11 comes with advanced network settings that allow users to differentiate between public and private networks. By correctly configuring the network type, users can ensure proper security and privacy settings to protect their data. In this article, we will explore how to change the network from public to private in Windows 11.
Method 1: Using the Settings App
The most straightforward way to change the network from public to private in Windows 11 is through the Settings app. Follow these steps:
- Step 1: Open the Start menu by clicking on the Windows icon in the taskbar.
- Step 2: Click on «Settings» represented by a gear icon.
- Step 3: In the Settings window, click on «Network & Internet.»
- Step 4: On the left-hand side, select «Ethernet» or «Wi-Fi» depending on your network connection.
- Step 5: Locate and click on your active network connection.
- Step 6: In the network settings, scroll down to find the «Network profile» section.
- Step 7: Click on the dropdown menu and select «Private.»
- Step 8: Once selected, Windows will apply the changes, and your network will now be recognized as private.
By following these simple steps, you can easily change the network profile from public to private using the Settings app in Windows 11.
Method 2: Using Control Panel
If you prefer using the Control Panel instead of the Settings app, you can also change the network profile from public to private through these steps:
- Step 1: Right-click on the Start menu or press «Windows key + X» on your keyboard to open the power user menu.
- Step 2: From the menu, select «Control Panel.»
- Step 3: In the Control Panel window, click on «Network and Sharing Center.»
- Step 4: On the left-hand side, click on «Change adapter settings.»
- Step 5: Right-click on your active network connection and select «Properties.»
- Step 6: In the Properties window, scroll down and select «Private.»
- Step 7: Click on «OK» to save the changes.
Using the Control Panel provides an alternative method to change the network profile in Windows 11.
Setting Network Profile in Registry Editor
Another way to change the network profile from public to private in Windows 11 is by using the Registry Editor. Please note that editing the registry can have serious consequences if not done correctly, so be cautious and follow these steps:
- Step 1: Press «Windows key + R» on your keyboard to open the Run dialog box.
- Step 2: Type «regedit» and press Enter to open the Registry Editor.
- Step 3: In the Registry Editor, navigate to the following path:
HKEY_LOCAL_MACHINE\SOFTWARE\Microsoft\Windows NT\CurrentVersion\NetworkList\Profiles - Step 4: Under the «Profiles» folder, you will find several subfolders with random names. Click on each subfolder and look for the «ProfileName» value on the right-hand side.
- Step 5: Once you identify the correct subfolder for your network, double-click on the «Category» value.
- Step 6: In the «Edit DWORD (32-bit) Value» window, change the value data to
1(private) or0(public) and click on «OK.» - Step 7: Close the Registry Editor and restart your computer for the changes to take effect.
Using the Registry Editor gives advanced users more control over the network profiles in Windows 11. However, it is crucial to exercise caution when making changes to the registry.
Method 4: Using PowerShell
PowerShell, a command-line shell and scripting language, also offers a way to change the network profile in Windows 11. Here’s how:
- Step 1: Right-click on the Start menu or press «Windows key + X» on your keyboard to open the power user menu.
- Step 2: Select «Windows PowerShell (Admin)» to open PowerShell with administrative privileges.
- Step 3: In the PowerShell window, type the following command and press Enter:
Get-NetConnectionProfile - Step 4: Locate the interface index associated with your network connection under the «InterfaceIndex» column.
- Step 5: To change the network profile to private, type the following command and press Enter:
Set-NetConnectionProfile -InterfaceIndex [InterfaceIndex] -NetworkCategory PrivateReplace [InterfaceIndex] with the actual index number identified in Step 4.
PowerShell provides a command-line alternative to change the network profile without relying on graphical interfaces.
Why Change from Public to Private Network?
Changing the network profile from public to private can bring several benefits and ensure enhanced security on your Windows 11 device:
- Improved Security: Private networks have stricter security protocols to protect your devices from unauthorized access.
- Access to Network Resources: Private networks allow you to utilize printers, shared files, and other network resources within your home or office.
- Customizable Settings: Private networks offer more customization options for privacy and networking settings.
- Easier File Sharing: Changing to a private network simplifies the process of sharing files and folders with other devices on the same network.
It is crucial to ensure that your network is appropriately configured to guarantee the protection and accessibility of your devices.
Exploring Advanced Network Configuration in Windows 11
Aside from changing the network from public to private, Windows 11 offers additional advanced network configuration options:
Network Profiles and Firewall Settings
In Windows 11, you can manage and customize network profiles using the advanced firewall settings:
- Step 1: Open the Start menu, type «Windows Security,» and click on the app when it appears.
- Step 2: In the Windows Security app, click on «Firewall & network protection.»
- Step 3: Under the «Network profile» section, click on your active network connection.
- Step 4: In the network profile settings, you can toggle various options such as «Network discovery,» «File and printer sharing,» and «HomeGroup connections.»
- Step 5: Customize these settings according to your preferences and network requirements.
By adjusting these network profile options, you can fine-tune your Windows 11 device’s network behavior and security.
Using Group Policy Editor
Windows 11 Pro, Enterprise, and Education editions provide access to the Group Policy Editor, allowing more granular control over network profiles:
- Step 1: Open the Run dialog box by pressing «Windows key + R» on your keyboard.
- Step 2: Type «gpedit.msc» and press Enter to open the Group Policy Editor.
- Step 3: In the Group Policy Editor, navigate to the following path:
Computer Configuration\Administrative Templates\Network\Network Connections. - Step 4: Double-click on «Require domain users to elevate when setting a network location» on the right-hand side.
- Step 5: Select «Enabled» and click on «OK» to save the changes.
- Step 6: Restart your computer for the policy to take effect.
Using the Group Policy Editor, network administrators can enforce specific policies related to network profiles.
Third-Party Firewall Software
Windows 11 also allows users to install and configure third-party firewall software for advanced network protection. These software applications offer additional features and customization options beyond the built-in Windows firewall.
Users can choose from various reputable third-party firewall solutions available in the market to complement Windows 11’s network security features.
Conclusion
Changing the network from public to private in Windows 11 is crucial for ensuring the security and privacy of your devices and data. By following the methods outlined above, you can seamlessly switch your network profile and enjoy the benefits of private network settings. Additionally, exploring advanced network configuration options, such as firewall settings and group policies, allows for even more customization and control over your network behavior. Remember to always exercise caution when making changes to your network settings and seek professional assistance if needed. Keep your network secure and enjoy a seamless computing experience on Windows 11.

Changing Network from Public to Private in Windows 11
Changing the network type from public to private in Windows 11 is a crucial step to ensure your device’s security and access to other devices on the network. Follow these steps to switch your network:
| Step | Description |
| 1 | Click on the Start menu and select Settings. |
| 2 | Go to Network & Internet settings. |
| 3 | Select the Wi-Fi or Ethernet option, depending on your connection type. |
| 4 | Click on the network you’re connected to. |
| 5 | Under Network profile, choose Private. |
| 6 | Close the Settings window, and your network will now be set as private. |
Changing your network from public to private allows your device to communicate with other devices securely without exposing it to potential security risks. Remember to set your network to public when connecting to unfamiliar networks to prevent unauthorized access and protect your data.
Key Takeaways
- To change your network from Public to Private on Windows 11, go to the Settings app.
- In the Settings app, click on the «Network & internet» option.
- Under the «Network & internet» section, click on «Ethernet» or «Wi-Fi» depending on your network connection.
- Click on the network you want to change from Public to Private.
- In the network settings, click on the dropdown menu under «Network profile» and select «Private.»
Frequently Asked Questions
Here are some commonly asked questions about changing the network from public to private in Windows 11:
1. Can I change the network type in Windows 11?
Yes, it is possible to change the network type in Windows 11. By default, when you connect to a new network, Windows will classify it as either public or private based on certain criteria. However, you can manually change the network type if needed.
To change the network type from public to private, you will need to access the Network and Internet settings. From there, you can modify the network profile settings and switch from public to private. Keep in mind that administrative privileges may be required to make these changes.
2. Why would I want to change the network type?
Changing the network type from public to private can offer a more secure and customized network experience. Public networks are generally intended for use in public places, such as coffee shops or airports, and have more restricted access and security settings. On the other hand, private networks are usually used in trusted environments like home networks or offices, allowing for more flexibility and easy sharing of resources.
If you find that your network is classified as public when it should be private, changing the network type can help you unlock additional features and control over your network settings.
3. How can I identify the current network type in Windows 11?
To identify the current network type in Windows 11, you can follow these steps:
1. Open the Start menu and click on the Settings icon (gear-shaped).
2. In the Settings window, select Network & Internet.
3. On the left sidebar, click on the Wi-Fi or Ethernet (depending on your connection type).
4. On the right pane, under the network name, you will see the network type mentioned as either «Public network» or «Private network».
4. Can I change the network type for specific networks only?
No, in Windows 11, you cannot change the network type for specific networks only. When you change the network type from public to private, it will apply to all networks you connect to using the same network adapter. The network type is associated with the network adapter and not the individual networks.
This means that if you change the network type from public to private for a particular network, it will automatically switch to private for all networks you connect to using the same adapter.
5. What are the steps to change the network type in Windows 11?
To change the network type from public to private in Windows 11, follow these steps:
1. Open the Start menu and click on the Settings icon (gear-shaped).
2. In the Settings window, select Network & Internet.
3. On the left sidebar, click on the Wi-Fi or Ethernet (depending on your connection type).
4. On the right pane, under the network name, click on the «Properties» link.
5. In the Properties window, scroll down to the «Network profile» section.
6. Click on the dropdown menu next to «Make this PC discoverable» and select «Yes» to change the network type to private.
7. Save the changes and close the Settings window.
After following these steps, your network type will be changed from public to private, providing you with more control and customization options for your network settings.
To change your network from public to private in Windows 11, follow these simple steps. First, open the Settings menu by clicking on the Start button and selecting the gear-shaped icon. Then, select the «Network & Internet» option and click on «Wi-Fi» or «Ethernet,» depending on your connection type. Next, click on the network name you want to change. Under the network profile section, click on the drop-down menu and select «Private.» Finally, restart your computer to apply the changes.
Changing your network from public to private in Windows 11 is essential for ensuring the security and privacy of your device. By following these steps, you can easily switch to a private network and enjoy a safer browsing experience. Remember to always keep your network settings up to date and take necessary precautions to protect your personal information.
Если вы хотите сделать свой ПК доступным для других пользователей внутри сети, например, для общего доступа к файлам или принтерам, вам необходимо переключить тип сетевого профиля.
В чем разница между типами сетевых профилей?
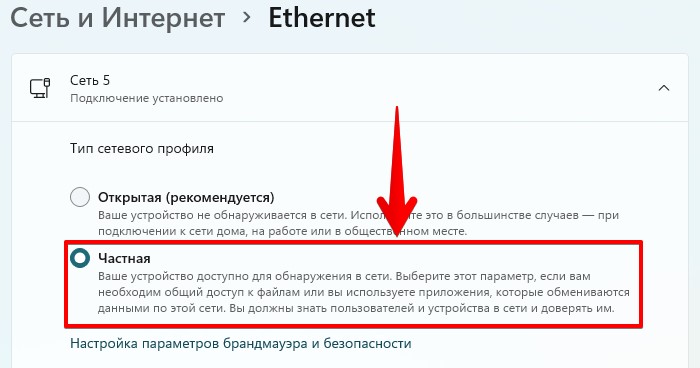
- Открытая — Устройство не обнаруживается в сети. Рекомендуется использовать на работе или общественном месте (кафе, аэропорт и тд).
- Частная — Устройство доступно для обнаружения в сети. Используем этот тип, если необходимо предоставить общий доступ к файлам или приложениям, которые обмениваются данными внутри сети. Рекомендуется использовать этот тип, если вы доверяете пользователям и устройствам внутри сети.
Переключение на частный профиль
Для того, чтобы переключиться на частный тип сетевого профиля, щелкаем правой кнопкой мыши по значку локальной сети или Wi-Fi в левой части панели задач. Затем щелкаем левой кнопкой мыши по появившемуся меню «Параметры сети и Интернета».
Мы попадем в приложение «Параметры» Windows 11 в раздел «Сеть и Интернет». Нажимаем на кнопку «Свойства» рядом с названием сети, будь то Ethernet или Wi-Fi.
Появится новое окно настроек Ethernet или Wi-Fi, в зависимости от типа сети. В пункте «Тип сетевого профиля» выбираем «Частная», чтобы сменить тип.
Теперь ваш компьютер будет использовать частный тип сетевого профиля в Windows 11.
- To change the network profile on Windows 11, open Settings > Network & internet, click on “Ethernet,” and choose the profile type (Public or Private). If the device has a wireless connection, then open Settings > Network & internet, click on “Wi-Fi,” click on “Manage known networks,” and choose the profile type.
- Alternatively, you can also change the Windows 11 network profile type using PowerShell commands or editing the Registry.
On Windows 11, you can set different network profile types with specific settings to improve security or share files, printers, and other resources in the network.
The system includes three network profiles, Private, Public, and Domain. The “Private” and “Public” are available for all computers, and the “Domain” is only available when a device is joined to the domain.
The Private profile is tailored for trusted networks like your home or work. This profile makes the computer discoverable, allowing you to share files, printers, and other resources with people you trust.
The Public profile makes the device invisible in the local network. This option is recommended for most locations, including public places, workplaces, and homes (unless you share resources).
The Domain profile will be set automatically when the computer joins an Active Directory domain.
In this guide, you will learn the different ways to change the network profile type on Windows 11.
- Change network from public or private on Windows 11
- Change network from public or private from PowerShell
- Change network from public or private from Registry
Change network from public to private on Windows 11
On Windows 11, you can change the network profile type, but the instructions will be slightly different depending on whether you use an Ethernet or Wi-Fi network adapter.
Change network profile type for Ethernet connection
To change the Windows 11 network profile type, use these steps:
-
Open Settings on Windows 11.
-
Click on Network & internet.
-
Click the Ethernet page on the right side.

-
Under the “Network profile type” section, select the profile type:
- Public: Your device is not discoverable in the local network. You should use this option in most locations like home, work, or public places.
- Private: Your device is discoverable in the local network. You would use this option to share files or other resources like printers over a trusted local area network.


Change network profile type for Wi-Fi connection
To change the network profile type for a wireless connection, use these steps:
-
Open Settings.
-
Click on Network & internet.
-
Click the Wi-Fi page on the right side.
-
Click the Manage known networks setting.

-
Click the active wireless connection.
-
Under the “Network profile type” section, select the profile type, including Public or Private.


Once you complete the steps, the connection will apply your selected profile type.
You must note that you can only change profile type per network. If you have an Ethernet and Wi-Fi connection connected to the same network, the new setting will not apply to all network adapters when changing the profile type.
Change network from public to private from PowerShell
To make a network private or public using PowerShell, use these steps:
-
Open Start.
-
Search for PowerShell, right-click the top result, and select the Run as administrator option.
-
Type the following command to determine the current network profile and press Enter:
Get-NetConnefctionProfile
-
Confirm the network’s profile type in the NetworkCategory field (InterfaceAlias).
-
Type the following command to change the network profile type on Windows 11 and press Enter:
Set-NetConnectionProfile -Name "NETWORK-NAME" -NetworkCategory TYPE
For example, this command sets the profile type to Private:
Set-NetConnectionProfile -Name "tsunami" -NetworkCategory Private

In the command, replace “NETWORK-NAME” with the connection name and “TYPE” with the network profile type, including Public or Private. The command also takes the “DomainAuthenticated” type on a domain-joined computer.

After you complete the steps, the settings will apply immediately to the connection and firewall settings.
Change network from public to private from Registry
Alternatively, setting the default network profile type through the Registry is possible. However, using this option is not recommended unless you can identify the connection in the Registry.
Warning: Changing system settings can further damage your Windows installation if done incorrectly. It’s assumed that you know what you’re doing and have previously created a full computer backup. Proceed with caution and use this as the last course of action.
To change the network profile type on Windows 11 using the Registry, use these steps:
-
Open Start.
-
Search for regedit and click the top result to open the Registry Editor.
-
Browse to the following path:
HKEY_LOCAL_MACHINE\SOFTWARE\Microsoft\Windows NT\CurrentVersion\NetworkList\Profiles
-
Select the subkeys and confirm the ProfileName to identify the network connection.
-
Double-click the Category DWORD.
-
Change the to 0 to change the network type to Public, 1 for Private, or 2 for Domain.
-
Click the OK button.
-
Restart the computer.

Once you complete the steps, the computer will start using the selected network profile.