
Обновлено:
Опубликовано:
В статье представлены распространенные способы смены имени компьютера:
Через графический интерфейс
В Windows 10
Через командную строку
С помощью Powershell
Через реестр
Читайте также
Данные рекомендации подойдут для разных версий операционной системы Windows от XP до 10.
Универсальный через графический интерфейс
Открываем свойства компьютера. Для этого открываем проводник и кликаем правой кнопкой мыши по Компьютер и выбираем Свойства:
… или вводим команду:
control /name microsoft.system
В открывшемся окне в разделе «Имя компьютера, имя домена и параметры рабочей группы» нажимаем Изменить параметры:

В следующем окне на вкладке Имя компьютера нажимаем Изменить:
Вводим имя компьютера:
* если кликнуть по кнопке Дополнительно, мы сможем добавить DNS-суффикс и поменять NetBIOS-имя компьютера.
Нажимаем OK два раза и перезагружаем компьютер.
Графический интерфейс Windows 10
В Windows 10 появился дополнительный вид панели управления. Ее также можно использовать для смены имени компьютера.
Кликаем по Пуск и нажимаем на изображение шестеренки:
Кликаем по Система:
В разделе О системе:
… кликаем по Переименовать этот ПК:
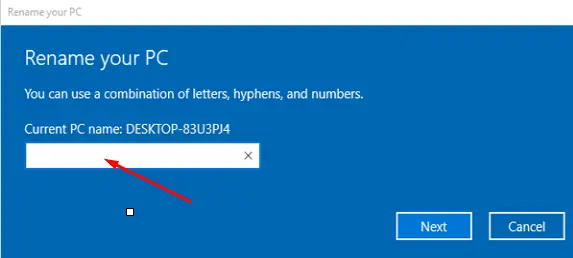
Вводим новое имя и нажимаем Далее:

Перезагружаем компьютер.
Через командную строку
Запускаем командную строку от имени администратора и вводим следующую команду:
> netdom renamecomputer %COMPUTERNAME% /Newname «computername»
* computername — новое имя компьютера
После ввода система запросит подтверждение — отвечаем Y и нажимаем Enter.
Для вступления изменений в силу, перезагружаем компьютер.
С помощью Powershell
Что такое Powershell простыми словами.
Запускаем Powershell от имени администратора и вводим следующую команду:
> netdom renamecomputer «$env:COMPUTERNAME» /Newname «computername»
Как и с командной строкой, система запросит подтверждение операции, на которое отвечаем Y.
После перезагружаем компьютер для завершения операции.
Через реестр
Для изменения компьютера в реестре нам нужно отредактироват два параметра:
- Ветка HKEY_LOCAL_MACHINE\SYSTEM\CurrentControlSet\Control\ComputerName\ComputerName, параметр ComputerName, значение — имя компьютера.
- Ветка HKEY_LOCAL_MACHINE\SYSTEM\CurrentControlSet\Services\Tcpip\Parameters, параметр NV HostName, значение — имя компьютера.
Для внесения изменений можно воспользоваться утилитой regedit или командами:
reg add «HKLM\SYSTEM\CurrentControlSet\Control\ComputerName\ComputerName» /v ComputerName /t REG_SZ /d «Office-3» /f
reg add «HKLM\SYSTEM\CurrentControlSet\Services\Tcpip\Parameters» /v ComputerName /t REG_SZ /d «Office-3» /f
* в данном примере мы задаем имя компьютеру Office-3.
После перезагружаемся.
Читайте также
Создание нового пользователя в Windows 10
Три способа добавить компьютер с Windows к домену
To show a computer’s name in Windows, simply execute the hostname command from a Windows command prompt (CMD) or PowerShell.
There may be multiple reasons to rename the computer.
In this article, i will show you how to change your computer’s name in Windows using the CMD and PowerShell.
Rename Computer using PowerShell
The name of the computer can be changed from the elevated PowerShell using the Rename-Computer command.
Press ⊞ Win + X to open the Start menu flyout and then click on “Windows PowerShell (Admin)”.
Enter the following PowerShell’s command, substituting <NewHostname> with your preferred name, and press the “Enter” to rename the computer:
PS C:> Rename-Computer -NewName "<NewHostname>"
- sample output -
WARNING: The changes will take effect after you restart the computer <OldHostname>.
Restarted the computer to complete the name changing.
Change Hostname using CMD
Alternatively, you can change the computer’s name from the elevated Windows command prompt (CMD).
Press ⊞ Win keybutton to open the Start menu, type in cmd to search for the command prompt and press Ctrl + Shift + Enter to start the CMD as administrator.
To change the computer’s hostname, execute the following command from the elevated Windows command prompt:
C:> wmic computersystem where name="%computername%" call rename name="<NewHostname>"
- sample output -
Executing (\\<OldHostname>\ROOT\CIMV2:Win32_ComputerSystem.Name="<OldHostname>")->rename()
Method execution successful.
Out Parameters:
instance of __PARAMETERS
{
        ReturnValue = 0;
};
As well as with the PowerShell, you need to restarted the computer to complete the name changing.
Was it useful? Share this post with the world!
Если текущее имя пользователя Windows, отображаемое при входе или в меню Пуск вам не по душе, его сравнительно легко можно изменить как для локальной учетной записи, так и для локальной учетной записи Майкрософт. Если вы также хотите поменять имя папки пользователя — здесь сложнее, но и эту тему мы также затронем.
В этой пошаговой инструкции подробно о том, как переименовать пользователя Windows 11 или Windows 10 с локальной учетной записью или учетной записью Майкрософт, а также кратко об изменении имени папки пользователя.
Как переименовать локального пользователя
Если требуется переименование локальной учетной записи пользователя, сделать это можно одним из следующих способов.
Управление учетными записями пользователей
Первый вариант — использование утилиты управления учетными записями пользователей, порядок действий будет следующим:
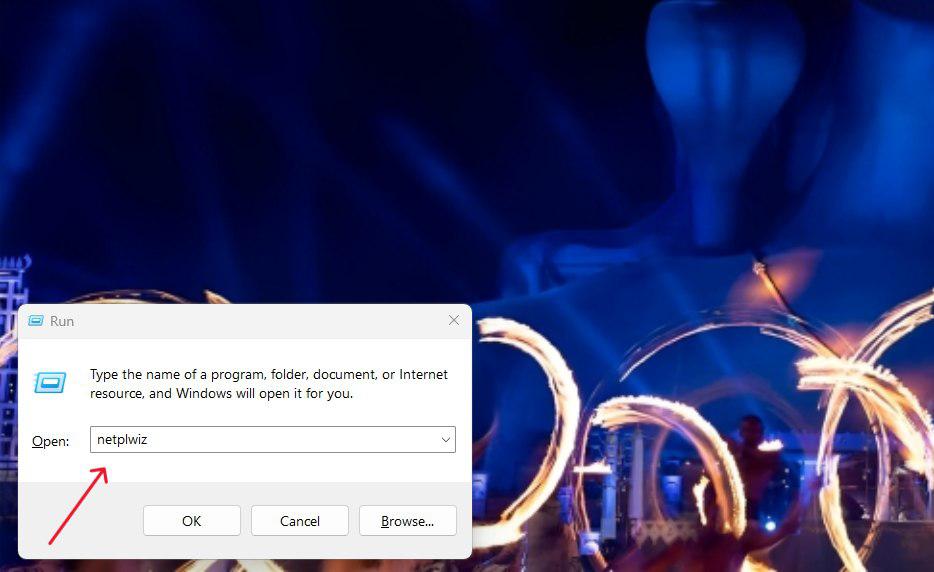
- Нажмите правой кнопкой мыши по кнопке «Пуск», выберите пункт «Выполнить» (или нажмите клавиши Win+R на клавиатуре), введите
netplwiz
или
control userpasswords2
и нажмите Enter.
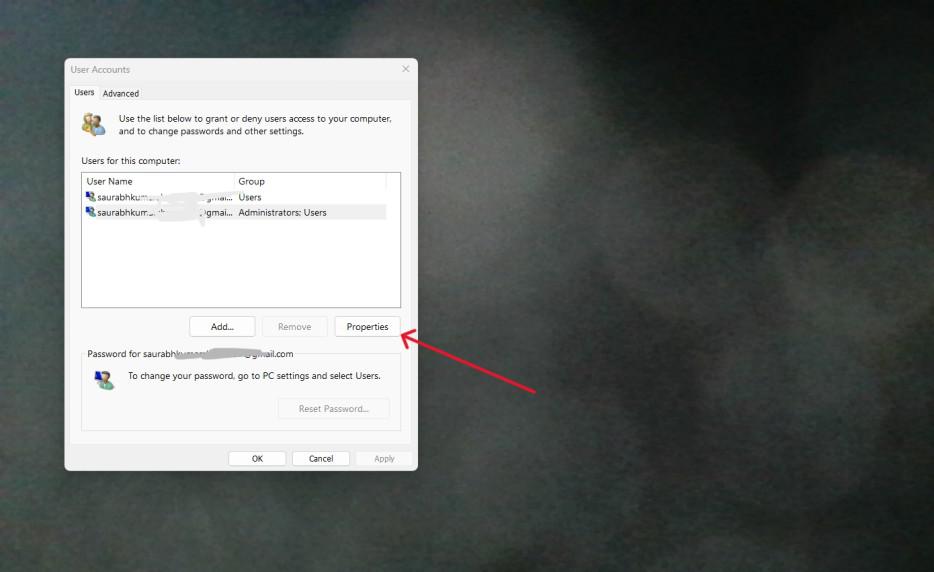
- В открывшемся окне выберите нужного пользователя и нажмите кнопку «Свойства».

- Задайте новое имя пользователя и нажмите «Ок», затем — «Ок» в окне управления учетными записями.
- Выйдите из системы и снова зайдите — имя вашего пользователя будет изменено.


Учитывайте, что несмотря на то, что имя пользователя изменится, название его папки останется прежним.
Локальные пользователи и группы
Второй способ подойдет только для Pro (Профессиональная) и Enterprise (Корпоративная) версий Windows 11/10. Необходимые шаги:
- Нажмите клавиши Win+R на клавиатуре, введите
lusrmgr.msc
и нажмите Enter.
- В окне «Локальные пользователи и группы» перейдите в раздел «Пользователи», нажмите правой кнопкой мыши по имени пользователя, которое нужно изменить и выберите пункт «Переименовать».

- Укажите новое имя пользователя, закройте окно, выйдите из системы и снова зайдите.

Командная строка
Ещё одна возможность — изменение имени пользователя в командной строке Windows:
- Запустите командную строку от имени администратора.
- Введите команду
wmic useraccount where name='старое_имя' rename новое_имя
и нажмите Enter.

- Закройте командную строку, выйдите из системы и вновь зайдите, уже под новым именем.

Изменение имени пользователя для учетной записи Майкрософт
Если вы используете учетную запись Майкрософт, изменение имени выполняется на соответствующем сайте:
- Зайдите на страницу вашей учетной записи Майкрософт https://account.microsoft.com/ с вашими учетными данными.
- Нажмите по вашему имени или перейдите на вкладку «Сведения».

- Нажмите «Изменить имя» и укажите новые имя и фамилию (необязательно).


После применения сделанных настроек они, через некоторое время (не сразу и, возможно, после перезагрузки) будут синхронизированы с вашим устройством, и вы увидите, что имя пользователя в Windows также изменилось.
Изменение имени папки пользователя
Изменить имя папки пользователя, если оно вам не нравится, в принципе, возможно, но часто приводит к неожиданным результатам: от неработоспособности некоторых программ, для которых были прописаны абсолютные пути, до невозможности зайти в Windows из-за ошибок профиля пользователя.
Простой и безопасный способ
Если вам нужен простой и безопасный способ, рекомендую использовать следующий подход:
- Создайте новую локальную учетную запись с нужным именем (рекомендую использовать латиницу), для нее будет создана папка с тем же именем, сделайте нового пользователя администратором. Подробно о том, как это сделать в статьях: Как создать пользователя Windows 11, Как создать пользователя Windows 10.
- Зайдите под вновь созданным пользователем, и, если нужно, прикрепите учетную запись Майкрософт (это можно сделать в Параметрах).
- Убедившись, что всё работает как нужно и перенеся все данные из старого профиля (например, хранящиеся в папках Документы, Изображения, Рабочий стол), удалите старого пользователя и работайте с новой учетной записью и новым именем папки.
Рискованный метод
Способ переименования папки текущего пользователя без создания нового выглядит иначе (и, ещё раз предупреждаю, небезопасный):
- Выйдите из текущей учетной записи и зайдите в систему с другой учетной записью Администратора (не с той, для которой мы изменяем имя папки), можно включить скрытую учетную запись Администратор.
- При желании измените имя пользователя, для которого меняется имя папки одним из способов, описанным ранее.
- Перейдите в папку C:\Пользователи (C:\Users\) и переименуйте папку нужного пользователя тем же способом, которым вы переименовываете другие папки.
- Запустите редактор реестра и перейдите в раздел
HKEY_LOCAL_MACHINE\SOFTWARE\Microsoft\Windows NT\CurrentVersion\ProfileList
- В подразделах этого раздела найдите такой, где для параметра с именем ProfileImagePath задан путь к изменяемой папке, дважды нажмите по этому параметру и измените путь на нужный.

- Закройте редактор реестра, перезагрузите компьютер и попробуйте вновь зайти в учетную запись, для которой менялся путь к папке.

Несмотря на то, что этот метод описан на официальном сайте Майкрософт , он остается крайне ненадежным и, если на почти чистой системе обычно работает, на ОС с множеством установленных программ зачастую вызывает неожиданные проблемы.
Иногда бывает достаточным изменить старые пути на новые в реестре, выполнив поиск по старому имени папки, а иногда даже это не позволяет избежать проблем: от необходимости повторно настраивать OneDrive и проблем с WinGet до, уже упоминавшихся проблем с профилем пользователя. О случаях неудачных попыток вы можете прочесть, например, в комментариях к статье Как изменить имя папки пользователя в Windows 10.
Whatever the reason you want to change computer name from the command line, Control Panel or PC Settings here’s our step-by-step tutorial showing three different ways how to do it.
How to get computer name from cmd
Before diving into three different ways how to change a computer name from the command line, the first thing you need to know is: how to get computer name?
In your workplace where the same computer can be used by many people or one person may be using multiple computers, it’s important to be able to tell your IT team which computer is experiencing the issue you’re reporting. Although your IT team should be able to walk you through finding this information, knowing it in advance will save you time and solve the problem more quickly. Once you’re familiar with the process, it will only take you a few seconds to locate the name of any computer. Here are three different ways how to get computer name:
Method 1 – How to get computer name from cmd
- Use the search bar in your taskbar and type in Command Prompt.
- Right-click on Command Prompt from the results and choose Run as administrator. If prompted, enter your password.
- Type in one of the commands such as cmd hostname or cmd computer name below and hit enter on your keyboard.
-
- cmd /k hostname
cmd computer name
-
- hostname
cmd hostname
Method 2 – How to get computer name from Control Panel
- Open the Control Panel.
- Click System and Security > System.
- On the View basic information about your computer page, see the Full computer name under the section Computer name, domain, and workgroup settings.
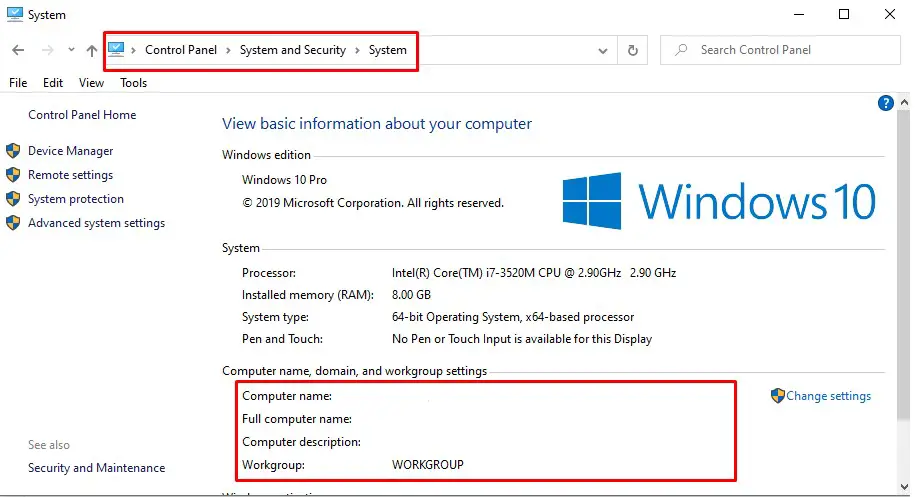
How to get computer name from Control Panel
Method 3 – How to get computer name from This PC
- Use the search bar in your taskbar and type in This PC
- Right-click and then click Properties.
The computer name appears under Computer name, domain, and workgroup settings.
How to Change computer name from the command line
Now that you have found your computer name you can change computer name from the command line, Control Panel, or PC Settings.
Method 1.1 – How to change computer name from the command line of your own computer
- Use the search bar in your taskbar and type in Command Prompt.
- Right-click on Command Prompt from the results and choose Run as administrator. If prompted, enter your password.
- Type in the command line the following command and hit enter on your keyboard.
WMIC computersystem where caption='OldComputerName' rename NewComputerName
Note: Replace “OldComputerName” with your current Computer Name and “NewComputerName” the new name you would like to have. After running the command, you need to reboot the computer to make the changes effective. This command works on all types of Windows editions. This command can also be used from a batch file to rename the computer.

Change computer name from the command line
Note: If you run it from a normal command prompt, you would get the below error.
C:\>wmic computersystem where caption='xp-pc' call rename windows7-pc

Executing (\\XP-PC\ROOT\CIMV2:Win32_ComputerSystem.Name="XP-PC")->rename()

Method execution successful.

Out Parameters:

instance of __PARAMETERS

{
ReturnValue = 5;
};

C:\>
Method 1.2 – How to change computer name from the command line of a remote computer
Besides changing the name of a local computer, you can also use the WMIC command to rename a remote computer on the same network. For example, if want to rename a remote PC named Alis-Laptop to Tom-Laptop and you know the login credentials:
- Use the search bar in your taskbar and type in Command Prompt.
- Right-click on Command Prompt from the results and choose Run as administrator. If prompted, enter your password.
- Type in the command line the following command and hit enter on your keyboard.
WMIC /node:"Alis-Laptop" /user:Admin /password:password123 computersystem call rename "Tom-Laptop"
The value following /node: indicates the name of the remote computer on the LAN. The value following /user: must be an admin account on the remote computer.
Method 2– From Control Panel
- Open the Control Panel.
- Click System and Security > System.
- On the View basic information about your computer page, see the Full computer name under the section Computer name, domain, and workgroup settings.
- Click Change Settings. Note: You need to be an Administrator in order to perform changes.
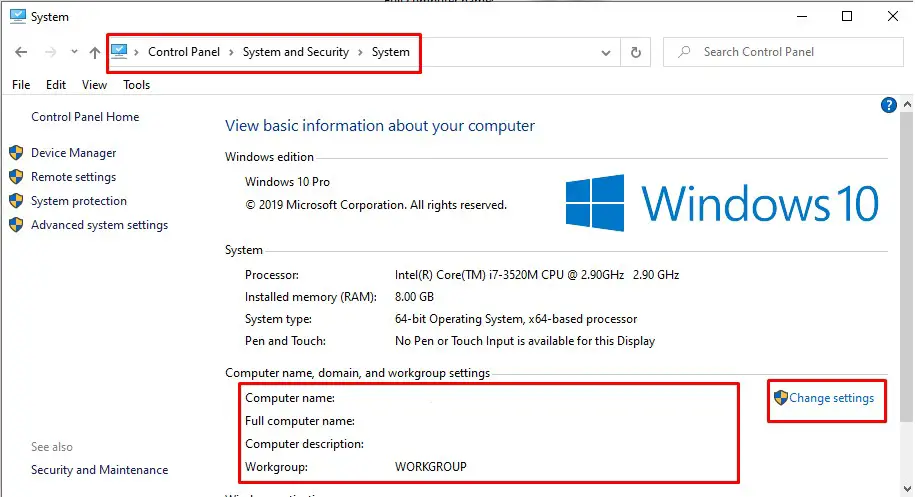
How to change computer name from Control Panel
- 5-The System Properties screen will open with the “Computer Name” tab already selected. Click on the Change… button.
How to change computer name from Control Panel
- 6- Now type the new name you want in the “Computer name” box and click OK.
How to change computer name from Control Panel
- 7- A restart will be required to complete the name change, and after that, you’re all set!
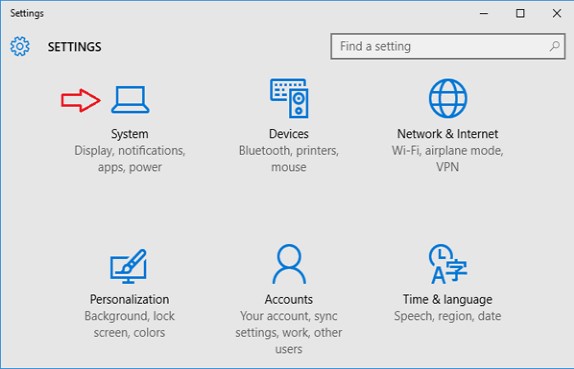
Method 3– From PC Settings
- Click on Start to access the Start Menu. Select Settings.
Settings
- When the PC Settings app opens, click on System.

System
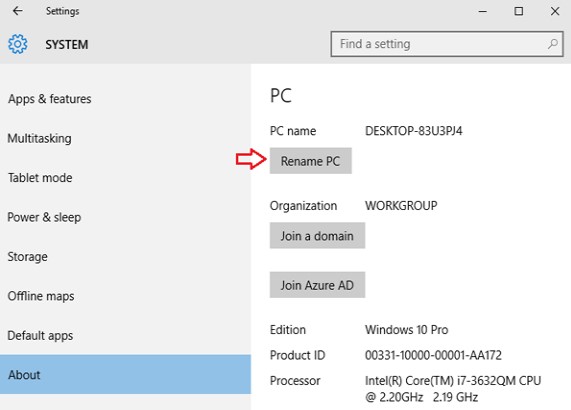
- Go to the About section and then click on “Rename PC“.

Rename PC
- Type the new name you want to use and click on Next.

Rename PC
- You will be prompted to restart your PC to apply your new settings, click on Restart Now to proceed.
Conclusions
Dear followers of Get IT Solutions, these are all the methods of how to change a computer name from the command line, Control Panel, or PC Settings. We hope you will find this method helpful. Have you managed to change it? Please let us know in the comments below.
Last Updated :
24 Nov, 2023
When it comes to Windows 11, our usernames form the unique identity that we bring with us inside the operating system. However, this need may stem from a desire for personalization, security, or a desire for a change of usernames. By following this article, you can change your user name with ease. so Let’s get started.
Table of Content
- Method 1: Changing Your Username Using the Run Command.
- Method 2: How to Change Your Username Using Windows PowerShell
- Method 3: How to Change Your Username Using the Control Panel
- Method 4: How to Change Your Profile Username From the Microsoft Website
- Conclusion
Methods to Change User Name in Windows 11
In Windows 11, There are several ways to change the User Name, including how to use the Control Panel and the Windows PowerShell command line. Whether you want to change your local account name or Microsoft account name, you will be provided all possible and easiest ways.
Method 1: Changing Your Username Using the Run Command.
Run command helps you to open various Windows utilities quickly as well as change your user name.
Step 1: Open the run dialog by pressing Win + R.
Step 2: Type «netplwiz» and press Enter.
Step 3: Choose an account, right-click on “properties”, and type in a new username.
Step 4: Enter the new username in the ‘User Name’ input field. Press ‘Apply’ and ‘OK’ system’s settings’.
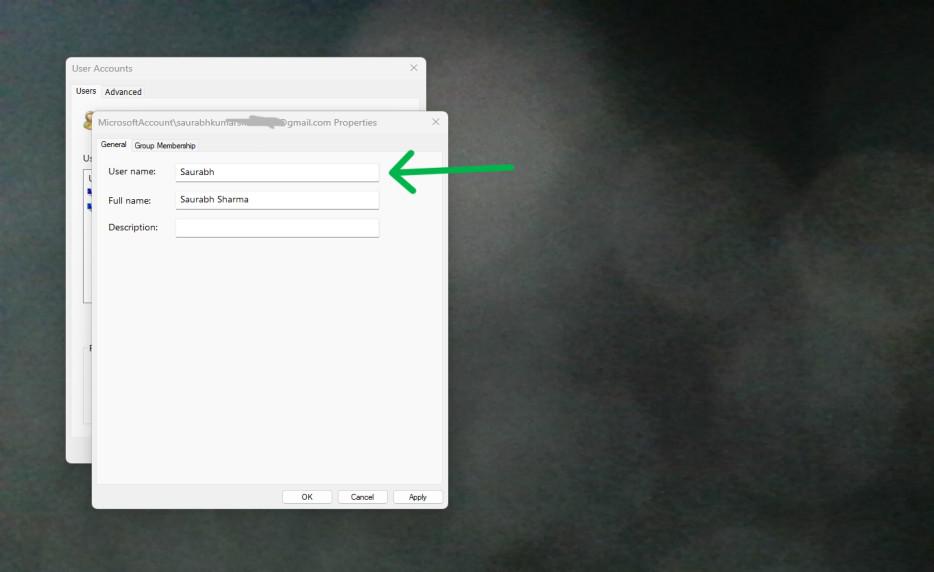
It is an easy to access way of updating the user name without having to go into so much depth in the system’s settings
Method 2: How to Change Your Username Using Windows PowerShell
In this section, the Windows PowerShell is one of the most convenient tools to change usernames amongst those users who feel comfortable with command-line interface.
Step 1: To run PowerShell as an administrator, press Win + X then choose Windows PowerShell (Admin).
Step 2: The Rename-Local User command followed by the current username and the new desired username. For example:
Get-LocalUser
Rename-LocalUser -Name "currentusername" -NewName "newusername"
Step 3: Press Enter to execute the command.
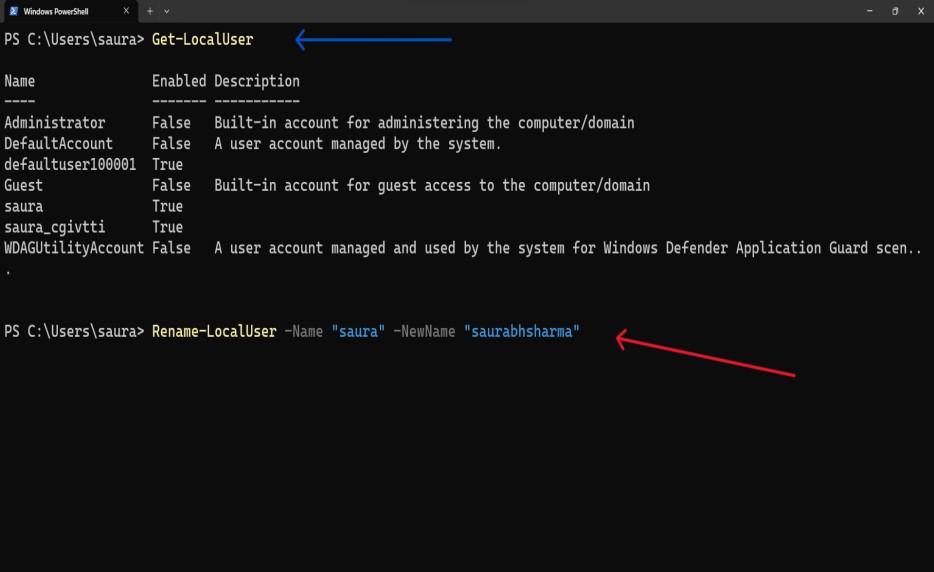
It works perfectly well for users who like command-line operations as well as automated solutions.
Method 3: How to Change Your Username Using the Control Panel
The Control Panel is a familiar interface for many Windows users, and it provides a straightforward method for changing your username. Here’s how you can do it:
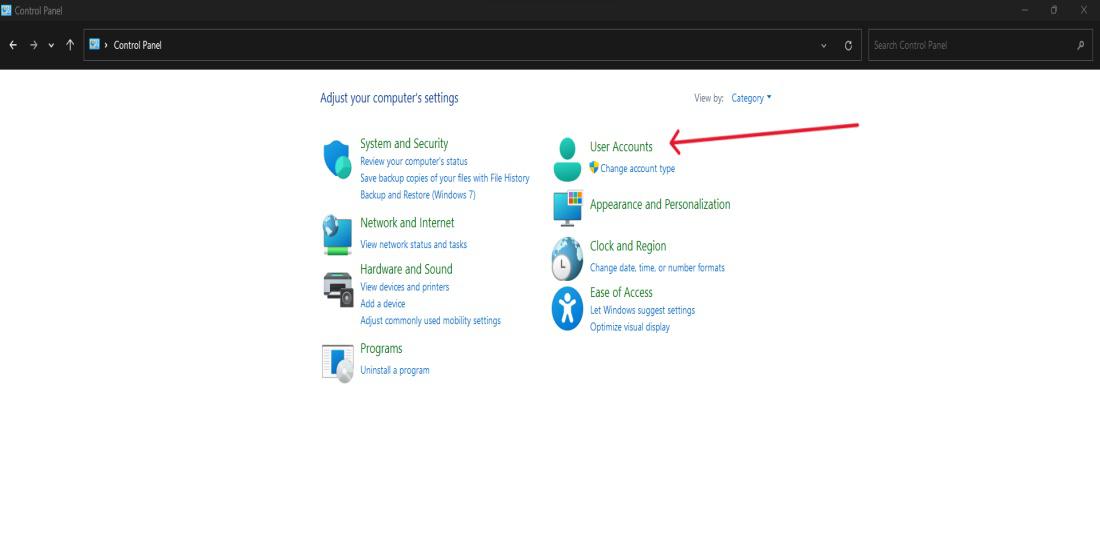
Step 1: Press Win + X and select «Control Panel» from the menu.
Step 2: Click «User Accounts» and then click «User Accounts» again.,
Step 3: Click on «Change your account name.»
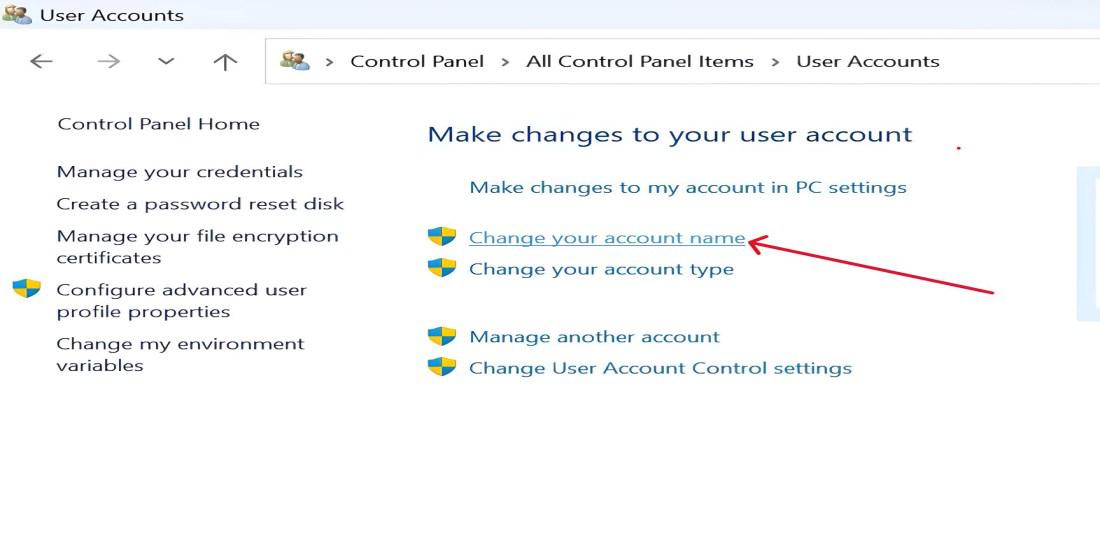
Step 4: Type a new name in the use name field and press «Change Name» button.
The new user name should reflect on your profile, and you are set to log in again using the fresh details.
Method 4: How to Change Your Profile Username From the Microsoft Website
You can also change your user name when signing in if you have a Microsoft account and you can do it through the Microsoft website.
Step 1: Go here Windows and log in or press Win+i, then Account on the right side menu.
Step 2: Click on «Your info» tab.
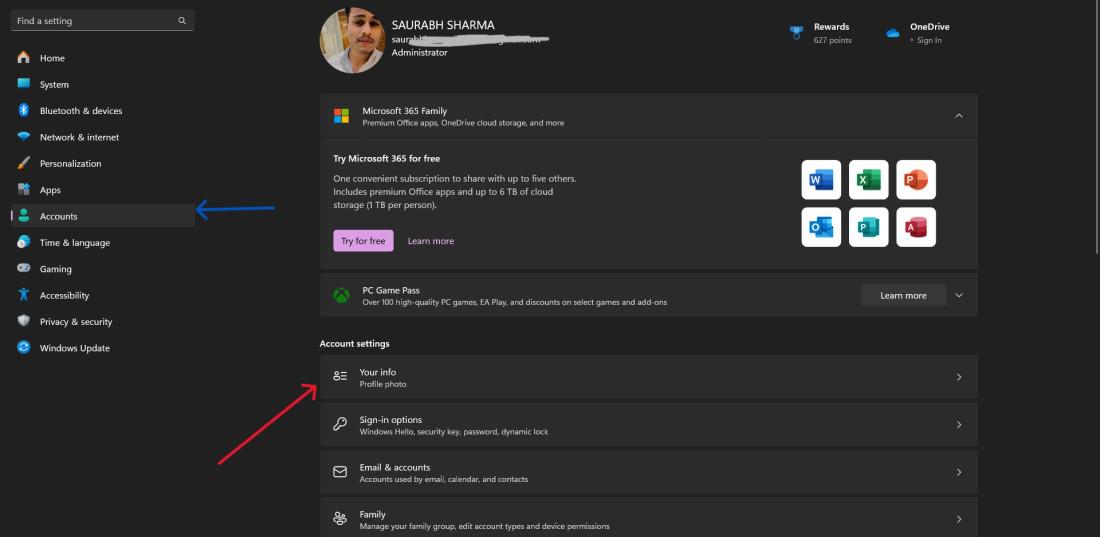
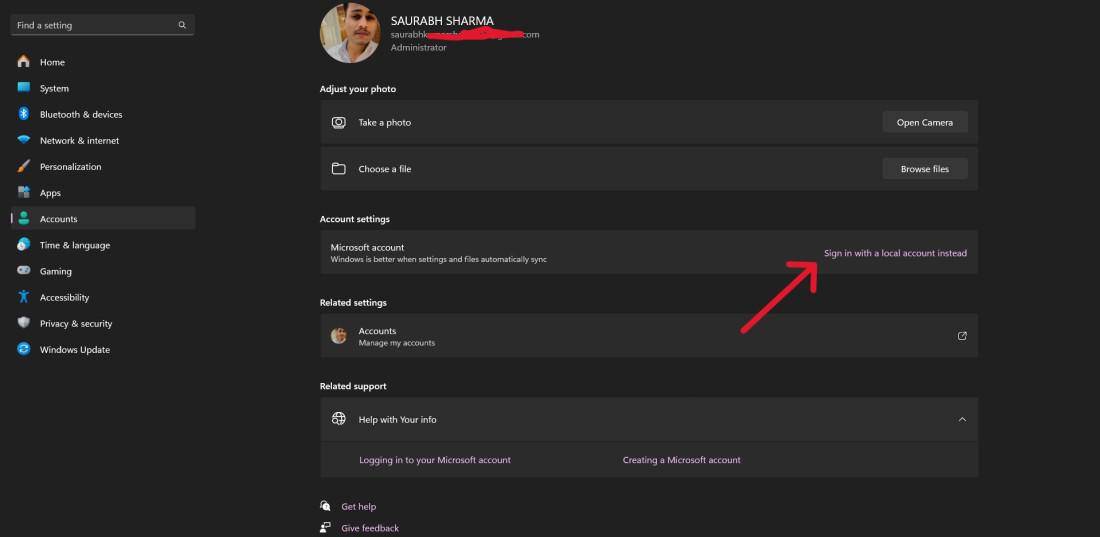
Step 3: Click on «Sign in with a local account instead» and update your first and last name.
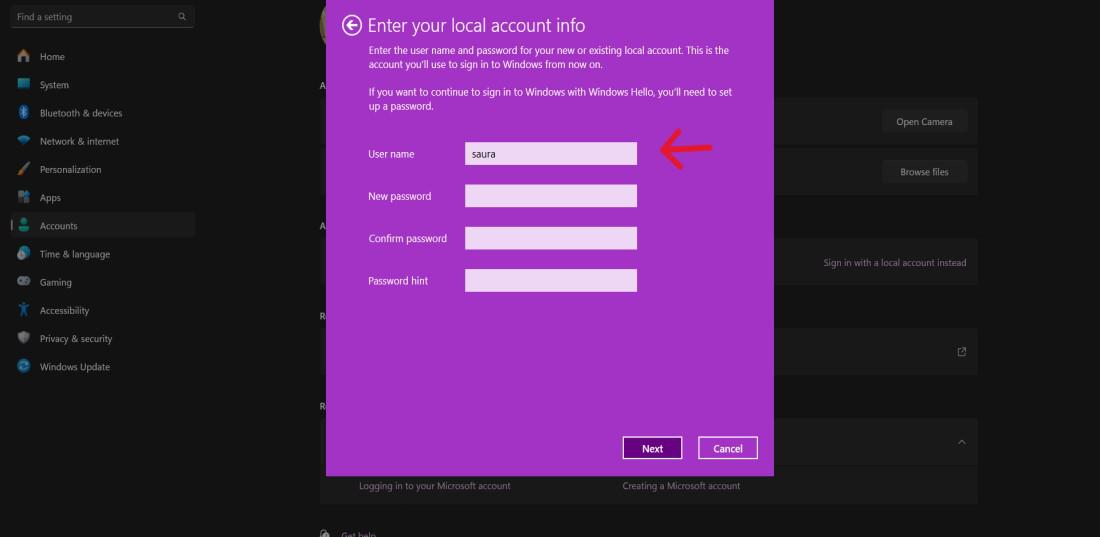
Step 4: Click on the Next button where enter your account password or system PIN then on the ‘User name’ input field, enter the new username
Updating your Microsoft account information will synchronize the changes across all devices linked to that account.
Conclusion
Changing the name of your user on Windows 11 is an easy but customizable procedure which provides multiple alternatives depending on the specifics of the case: if you are familiar or not familiar with other interfaces. The same goes with the easy to use Control Panel and the Run Command command line.
Also, the Windows PowerShell or any other tool, Windows 11 lets you choose how to arrange the computer. You should just select your name but in such a manner that it will protect you or adhere to any security requirements.
Also Read
- How to Create a New User Account in Windows?
- How to Install Windows 11 Without a Microsoft Account?
- How to Change Your Email Name and Address in Gmail?