
В Windows 11 для различных элементов: значков «Этот компьютер» и «Корзина», папок, файлов, дисков и других элементов используются привычные и стандартные значки, слегка обновленные по сравнению с предыдущими версиями системы. При желании, эти значки (или иконки) можно поменять.
В этой пошаговой инструкции подробно о том, как изменить значки для различных элементов в Windows 11, а также кратко о том, где взять файлы для значков/иконок.
Изменение значков системных элементов рабочего стола: Этот компьютер, Корзина, Папка пользователя, Сеть
На рабочем столе Windows 11 могут размещаться системные значки, не являющиеся папками или ярлыками: самые часто используемые — Этот компьютер (Мой компьютер) и Корзина. Изменить иконки для них можно в параметрах значков рабочего стола.
Шаги будут следующими:
- Откройте параметры значков рабочего стола, для этого можно нажать правой кнопкой мыши по кнопке «Пуск», выбрать пункт «Выполнить» и ввести desk.cpl ,5 (пробел перед запятой обязателен) или перейти в Параметры — Персонализация — Темы — Параметры значков рабочего стола. Подробнее на тему: Как включить значок компьютера на рабочем столе Windows 11.
- Выберите нужный элемент, иконку которого вы хотите изменить и нажмите «Сменить значок».

- Выберите нужный значок из файлов ICO, библиотек DLL или файлов EXE. Подробнее о том, где раздобыть значки — в конце инструкции.
- Примените сделанные настройки.
Аналогичным образом вы можете поменять другие системные значки, например, установить свои иконки полной и пустой корзины.
Как изменить значки папки или ярлыка
Изменение значков папок и ярлыков Windows 11 выполняется почти одинаково, необходимые шаги:
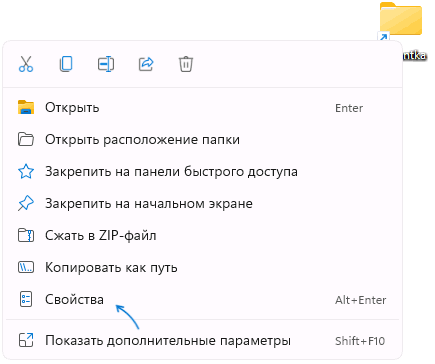
- Нажмите правой кнопкой мыши по папке или ярлыку и выберите пункт «Свойства» в контекстном меню.

- Если это папка, то перейдите на вкладку «Настройка» и нажмите кнопку «Сменить значок». Если это ярлык, то перейдите на вкладку «Ярлык» и нажмите кнопку «Сменить значок».

- Выберите нужный значок из файлов иконок (ICO) или содержащих значки библиотек DLL и файлов EXE, примените настройки.
В результате значок выбранного элемента будет изменён. Если этого не произошло, нажмите клавишу F5 на рабочем столе (если значок располагается на нём) или в нужной папке, чтобы обновить отображаемые значки. В контексте темы может пригодиться: Как убрать стрелки с ярлыков Windows 11.
Изменение значков дисков Windows 11
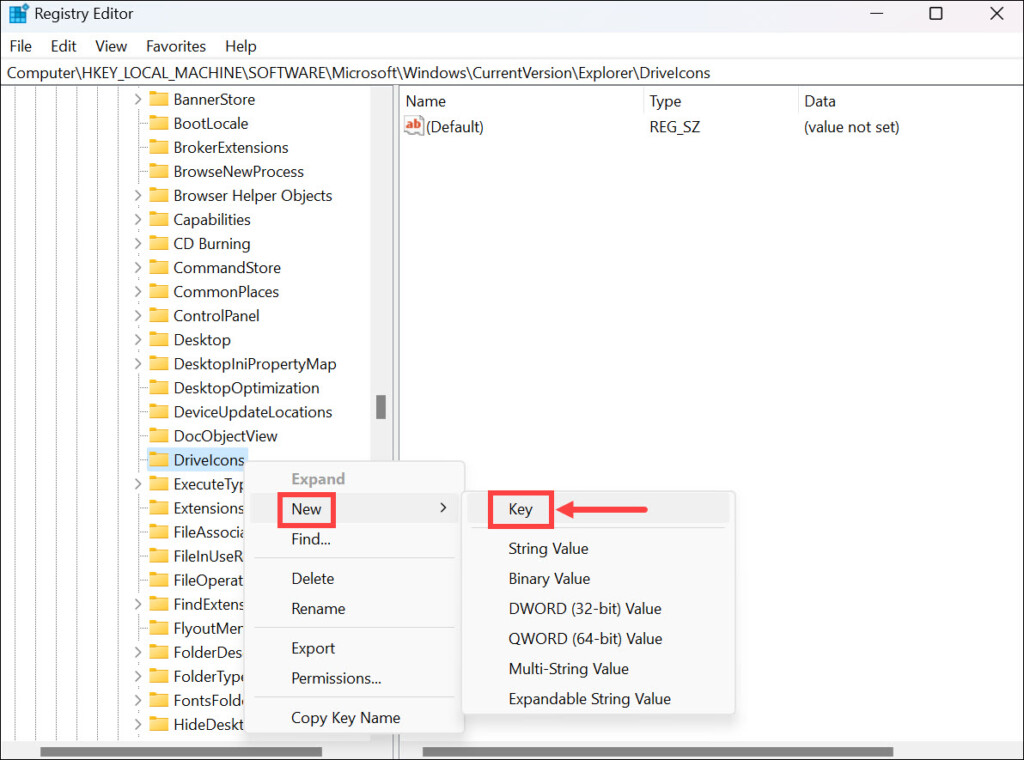
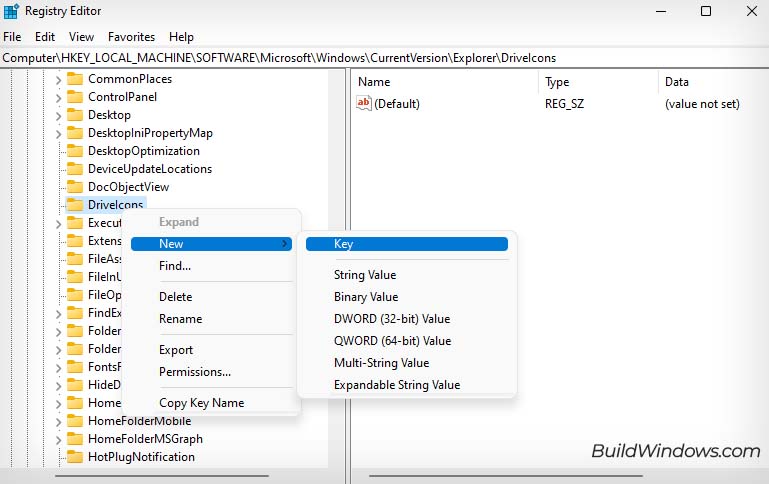
В отличие от выше рассмотренных элементов, изменение значков дисков выполняется не столь очевидными методами. Для выполнения этой задачи придётся использовать редактор реестра:
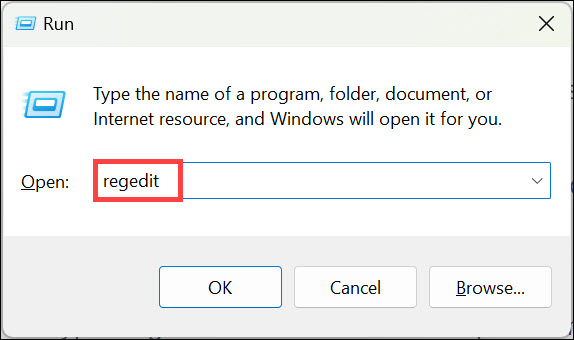
- Нажмите правой кнопкой мыши по кнопке «Пуск» и выберите пункт «Выполнить», введите regedit и нажмите Enter для открытия редактора реестра.
- Перейдите к разделу реестра
HKEY_LOCAL_MACHINE\SOFTWARE\Microsoft\Windows\CurrentVersion\Explorer\DriveIcons
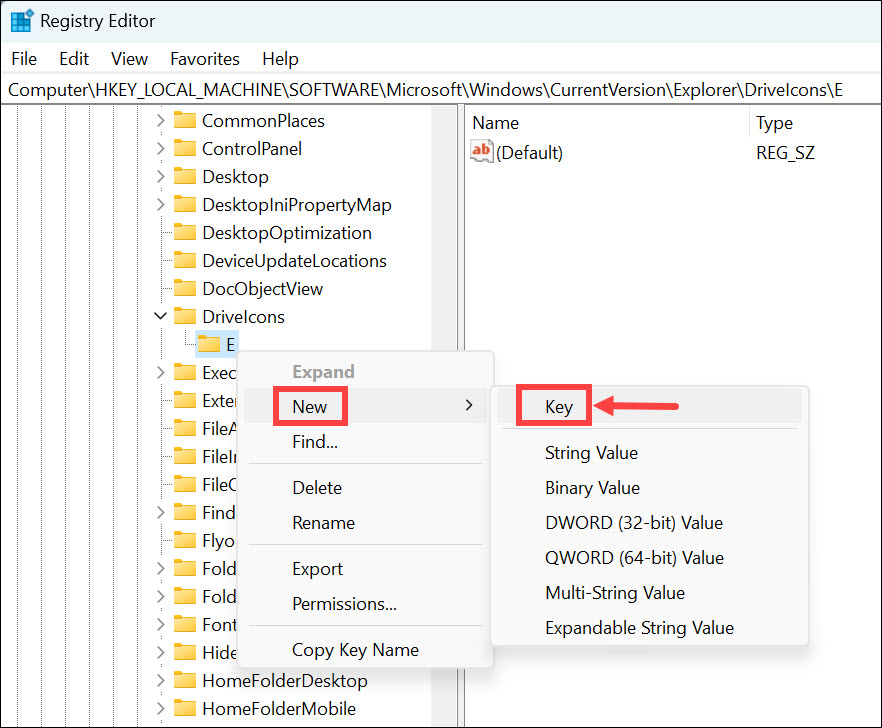
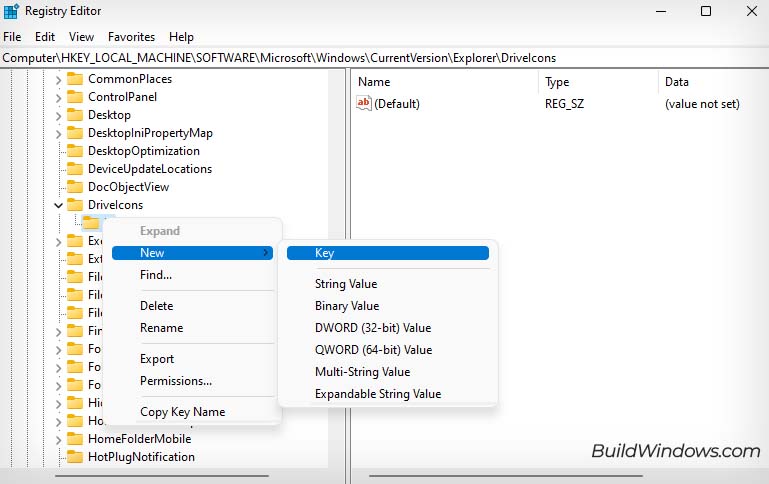
- Нажмите правой кнопкой мыши по разделу DriveIcons, выберите «Создать» — «Раздел» и создайте раздел с именем, соответствующим букве диска, например, C.
- Внутри созданного подраздела создайте ещё один с именем DefaultIcon.
- Выберите созданный подраздел и в правой панели редактора реестра дважды нажмите по значению «По умолчанию».

- В поле «Значение» укажите путь к файлу иконки (ICO) в кавычках, либо к индексу иконки в файле DLL без кавычек (пример: C:\Windows\system32\imageres.dll,-55).
- Примените сделанные настройки. Может потребоваться перезапуск проводника.

В результате, когда вы повторно откроете проводник, вы увидите изменённый значок диска. Есть и другие способы сделать это, более подробно в инструкции Как изменить значок (иконку) диска или флешки в Windows.
Изменение значков для типов файлов
При необходимости вы можете изменить значки для типов файлов. Ранее это была сравнительно простая задача, которая выполнялась почти так же, как смена значков для дисков в реестре: путем замены значения по умолчанию DefaultIcon для типа файла. Сегодня, когда для стандартных типов файлов многие иконки берутся из приложений Microsoft Store, выполнение задачи в реестре возможно, но трудоёмко.
Я рекомендую использовать бесплатную утилиту NirSoft FileTypesMan — в ней достаточно будет дважды нажать по нужному типу файла и задать нужный значок в пункте «Default Icon», как на изображении ниже.
Останется лишь применить настройки, чтобы значок всех файлов с указанным расширением изменился на выбранный.
Где взять значки для Windows
Значки для Windows 11 можно найти как в системе, так и скачать из Интернета или даже сделать самостоятельно.
- В папке C:\Windows\System32 есть несколько библиотек DLL с хорошими наборами системных значков: imageres.dll, shell32.dll, ddores.dll. Для определения индекса иконок в DLL можно использовать утилиту NirSoft IconsExtract.
- Файлы значков с расширением .ico можно найти в Интернете.
- Файлы PNG с прозрачным фоном можно найти в Интернете, а при необходимости — нарисовать самостоятельно, после чего использовать любой онлайн-конвертер PNG в ICO
- Есть программы для создания и редактирования иконок, причем в одном файле ICO могут быть значки с разными разрешениями. Можно обойтись и без программ, а с помощью онлайн-сервисов, например, xiconeditor.com
Если у вас остаются вопросы, касающиеся изменения значков различных элементов в Windows 11 — задавайте их в комментариях, не исключено, что решение найдётся.
Windows 11 offers a fresh and visually appealing interface, but you might still want to customize it further by changing the default icons. Whether you want to personalize your folders, desktop icons, app shortcut icons, or even drive icons, this guide will walk you through the step-by-step process.
By the end of this article, you’ll be able to give your Windows 11 system a unique touch that reflects your personal style.
How to Download Custom Icons for Windows 11
Custom icons can add a touch of personality and flair to your Windows 11 system. Before you change icons in Windows 11, you’ll need to find and download the best custom icons you want to use.
Follow these steps to download custom icons:
1. Open your web browser and visit a trusted website that offers custom icon packs. There are several websites available, such as IconArchive, DeviantArt, and WinCustomize, where you can find a wide range of icon collections.
2. Use the search function on the website to look for icon packs compatible with Windows 11. Remember, Windows OS supports the “.ico” format only. You can also browse through different categories to find the perfect icons for your customization needs.
3. Once you find an icon pack you like, click on the download button or link provided. Make sure to save the file to a location on your computer where you can easily access it later.
4. Extract the downloaded icon pack if it’s in a compressed format like ZIP or RAR. Most icon packs are already in a ready-to-use format, so extraction may not be necessary.
Congratulations! You now have a collection of custom icons ready to be applied to various elements in Windows 11.
How to Change Folder Icons in Windows 11
Changing folder icons in Windows 11 allows you to visually distinguish between folders and give them a more appealing look.
Follow these steps to change the icons of your folders in Windows 11:
1. Right-click on the folder you want to customize and select Properties from the context menu.
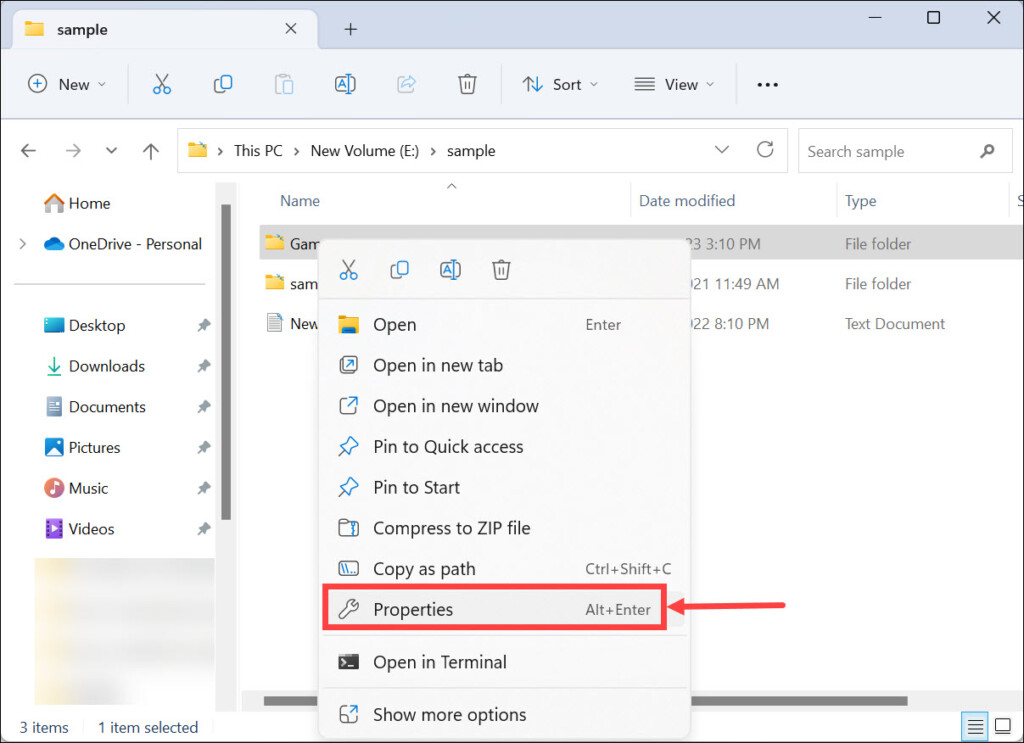
2. In the “Properties” window, navigate to the Customize tab.
3. Click on the Change Icon button located at the bottom of the window, under the “Folder icons” heading.
4. A new window will appear, showing a list of available icons. Select one of the available icons you like.
5. To use a custom icon, click the Browse button and locate the icon file you downloaded earlier.
5. Select the desired icon and click OK to confirm your selection.
6. Back in the “Properties” window, click Apply, and then OK to save the changes.
How to Customize Desktop Icons in Windows 11
Customizing your default desktop icons (This PC, Recycle Bin, etc.) can help you create a more visually pleasing and organized workspace.
To change the icons of shortcuts and files on your desktop, follow these steps:
1. Press Windows + I to launch Windows 11 Settings.
2. Scroll down and under “Related settings,” click the Desktop icon settings.
3. Select the icon you want to modify and click the Change Icon button.
4. Choose the new icon from the defaults or browse for the downloaded one. Click OK.
How to Change App Shortcut Icon in Windows 11
If you want to give your app shortcuts a unique appearance, for example, changing the Discord app icon, you can change their icons in Windows 11. Follow these steps to customize the icons of your app shortcuts:
1. Right-click on the shortcut whose icon you want to change.
2. From the context menu, select Properties.
3. In the “Properties” window, navigate to the Shortcut tab.
4. Click on the Change Icon button.
5. Similar to the previous method, a window with a list of available icons will appear. Either select one of the default icons or click the Browse button and locate the custom icon file you downloaded.
6. Choose the desired icon and click OK.
7. Finally, click Apply and then OK to save the changes.
How to Customize Drive Icon in Windows 11
You can change the icons of your drives in Windows 11 to help you easily identify and differentiate between different storage devices.
To give your drives a unique icon in Windows 11, follow these steps:
1. Copy and paste the icon you want to set as the drive icon at a specific location.
2. Navigate to that location, select the intended icon, click the three dots at the top bar to see more options, and select Copy path. Keep it safe somewhere.
3. Now, press Windows + R to launch Run Comand Box.
4. Type regedit in the command box and hit enter to launch the Registry Editor window.
5. Navigate to the following path: HKEY_LOCAL_MACHINE\SOFTWARE\Microsoft\Windows\CurrentVersion\Explorer\DriveIcons
6. Right-click on the DriveIcons folder and select New->Key. Name the key to the drive letter you are changing the icon for. For example, if you are changing the icon of drive E, name the key E.
7. Now, right-click on the newly created key and select New->Key. Name this key DefaultIcon.
8. Under the DefaultIcon key, double-click the (Default) registry string to launch its properties window.
9. Under “Value data,” paste the path of the icon you copied and click OK.
10. Close the Registry Editor window.
11. Launch the File Explorer, and you will notice that the drive icon has changed.
FAQs
Can I revert back to the default icons in Windows 11?
Yes, you can revert to the default icons by following the same steps as changing icons, but instead of selecting a custom icon, choose the original icon associated with the element.
Are there any risks involved in changing icons in Windows 11?
Changing icons in Windows 11 is a safe and reversible process. It doesn’t affect the functionality or stability of your system.
Can I create my own custom icons for Windows 11?
Yes, you can create your own custom icons using image editing software like Adobe Photoshop or free online icon editors. Just make sure to save the icon files in a compatible format, such as ICO or PNG.
Summing Up
Customizing icons in Windows 11 allows you to infuse your personality into the operating system’s appearance. By following the steps outlined in this guide, you now possess the knowledge to download custom icons, change folder icons, modify desktop shortcuts and app icons, and even give your drives a fresh look. Embrace your creativity and make Windows 11 truly your own!
The Windows 11 user interface is substantially different from older versions, and it also features new default icons. However, if you want to spice things up, you can change those boring default icons to custom ones.
The method to change your icons on Windows 11 will differ depending on the type of icon. If you want to change folder or shortcut icons, you can usually do so from their Properties window. For desktop icons, you will need to head to Desktop Icon Settings.
I predominantly change my folder icons to represent what they have inside. This makes my navigation much faster and looks cool as well. You can even stick with a theme in mind or add your own flair when changing icons.
Getting Icons Ready
To start, prepare the icons that you intend to change your default icons to. If you don’t have an icon in mind, you can search it online or on websites like DeviantArt or IconArchive. For others, Windows also has a pre-existing icon library to choose from.
In case you’ve downloaded your icon, make sure it is in .ico format. For those creative minds, you can even create custom icons and use them. You just have to convert those PNGs to .ico files.
Note: There are plenty of free online tools to convert PNG to .ico files.
If you’ve downloaded an icon pack, it will usually be in a zipped file. To unzip it, right-click the file, select Extract all, and click on Extract.
After getting your hands on your preferred icon, place them at a folder that is easy for you to locate.
As the methods to change icons for folder, desktop, and app differs, I have made individual sections for your ease.
Changing Folder Icons
You can pretty easily change individual folder icons by opening their Properties window and going to Customize. To do so,
- Right-click the folder whose icon you want to change.
- Select Properties.
- Go to the Customize tab.
- Click on the Change icon option.
- You can choose any of the pre-existing icons from the Windows icon library. If you want to instead set a custom icon, click on Browse.
- Navigate to the location of the corresponding replacement icon and double-click it.

- Click OK and Apply.
Changing App Shortcut Icons
If you want to change your app shortcut icons, it is pretty similar to changing folder icons. You’ll simply need to open their Properties window and go to Shortcut. Let’s see how,
- Right-click on the shortcut and select Properties.
- Go to the Shortcut tab and click on Change Icon.
- You can choose from the list of icons available. If there are no icons present or you want to set a custom one, click on Browse.
- Navigate to the location of the corresponding replacement icon and open it.
- Click on Ok and Apply.
Changing Desktop Icons
The desktop icons are shortcut icons of frequently used programs such as Network, Recycle Bin, and This PC. You can change these icons to whatever you want from the Desktop icon settings. Here’s how,
- Press Windows + I to open Settings.
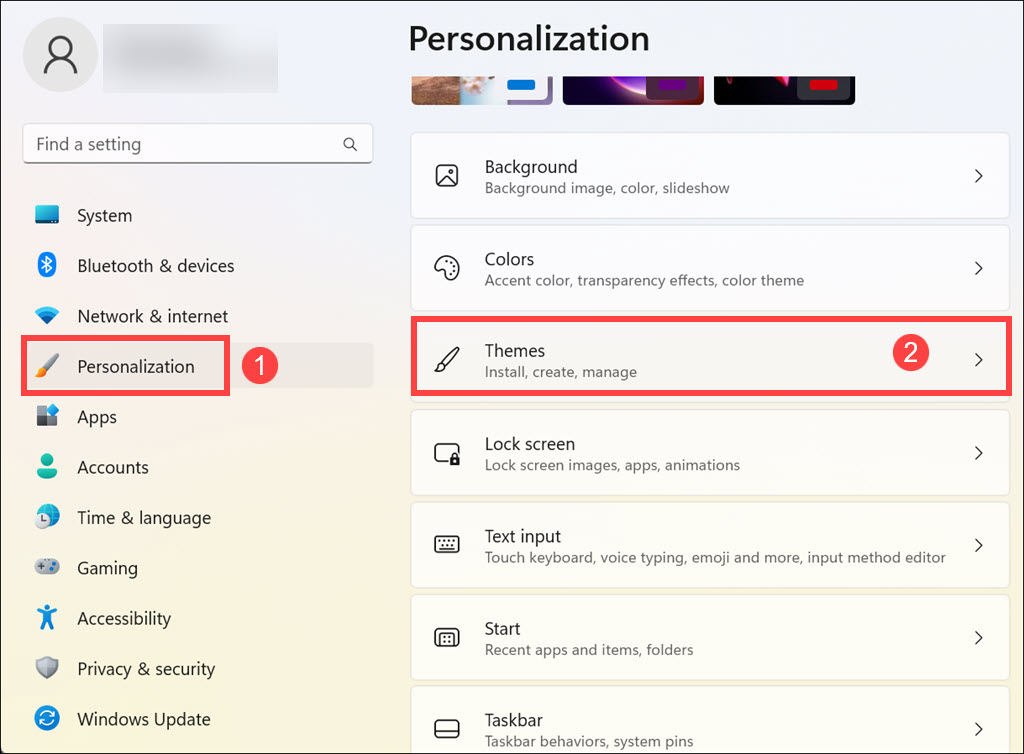
- Navigate to Personalization > Themes.
- Scroll down and click on Desktop icon settings.

- In the new window that pops up, select the icon you want to change and click on Change icon.
- Select an icon from the pre-existing library or click on Browse to set a custom one.
- Click Ok and Apply.
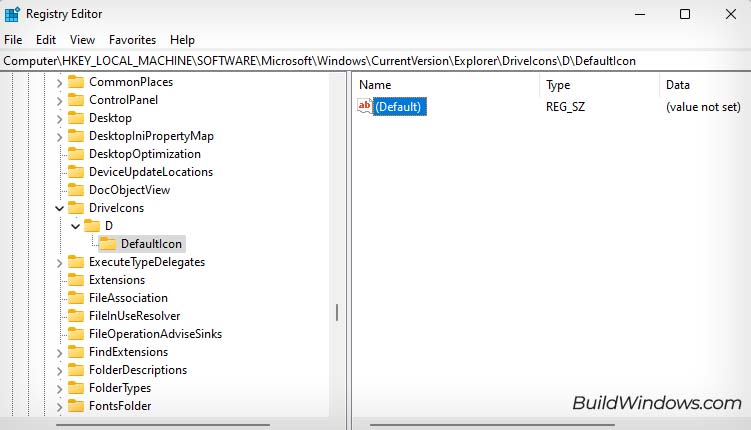
Changing Drive Partition Icon
You can also change the drive partition icon that appears on File Explorer. However, you will either need to do so from the registry or use third-party applications. Anyway, I’ll show you how you can change your drive partition icon from the Registry Editor.
- Press Windows + R to open the Run utility.
- Type
regeditand open Registry Editor. - Navigate to the location
Computer\HKEY_LOCAL_MACHINE\SOFTWARE\Microsoft\Windows\CurrentVersion\Explorer\DriveIcons - Right-click on DriveIcons and select New > Key.

- Name the new key as the drive letter you want to change the icon of. (I want to change the icon of
D:drive, so I’ll name it D.) - Right-click on the new key and select New > Key.
- Name the key as
DefaultIcon. - Open File Explorer, and navigate to the location of the replacement icon.
- Right-click the replacement icon and select Copy as path.

- Go back to the Registry Editor, select DefaultIcon, and double-click on the (Default) entry at the right panel.

- Press Ctrl + V to paste the file path under Value data and click OK.
- Close Registry Editor.
Lastly, if you want to change the icon size, it is pretty simple to do so. Right-click on an empty area to open the context menu, select View, and choose one of the icon sizes. The steps to change the icon size on the desktop and File Explorer are the same.
Содержание статьи:
- Настраиваем внешний вид папок
- Фон (в виде картинки, и заливка цветом)
- Значки, цвета
- Вопросы и ответы: 2
Компьютерный привет!
Эта заметка будет относительно-небольшой: по настройке внешнего вида папок в Windows 11 (10) — их фона, и значков (см. скриншот ниже 👇). Тем паче, что большинство утилит, которые позволяли настраивать оформление папок в Windows XP/7, — в современной 11-й ОС не работают…
Кто-то на подобные «украшательства» смотрит весьма скептически, однако, если в документах (или на раб. столе) много папок — то раскрасив их в разные цвета (или изменив значки) — можно существенно упростить и ускорить поиск нужных директорий (ведь даже мельком взглянув — можно быстро найти нужный каталог!). Согласитесь удобно? Да и полезно в офисной работе!👌
Кстати, эта заметка рекомендуется, как дополнение к инструкции по оформлению и настройке дизайна Windows — 📌https://ocomp.info/izmenit-oformlenie-win.html
Итак, по теме…
Было — стало. Задача выполнена!
*
Настраиваем внешний вид папок
Фон (в виде картинки, и заливка цветом)
Вариант 1
Эту статью хочу начать с утилиты QTTabBar. Она явл. своего рода дополнением для Windows 10/11, которое позволяет расширить возможности проводника и настроить его цветовую гамму под-себя! Разумеется, можно изменить и фон папки (что, кстати, бывает очень полезно, когда белый фон «бьет» по глазам…).
*
📌QTTabBar
Офиц. сайт: http://qttabbar.wikidot.com/ (для Windows 11 — см. внимательно описание, на офиц. сайте несколько ссылок).
Важно: после установки QTTabBar — перезагрузите компьютер!
*
1) Если на вашем ПК уже установлен QTTabBar — то, открыв любую папку, вы увидите в верхнем меню появл. вкладки (как в браузере). Попробуйте рядом с ней нажмите правой кнопкой мыши и откройте QTTabBar Options (либо сочетание Alt+O).
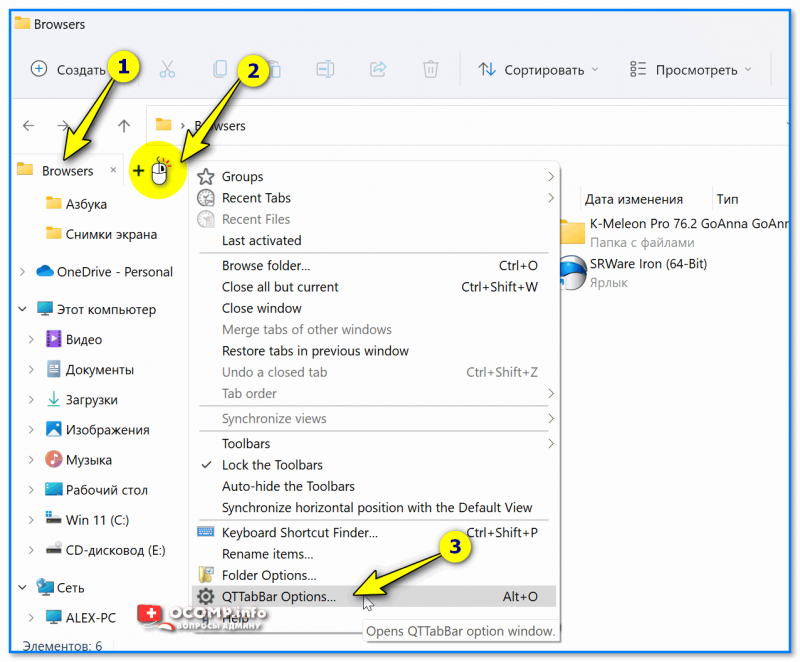
ПКМ — Alt+O — открываем настройки QTTabBar
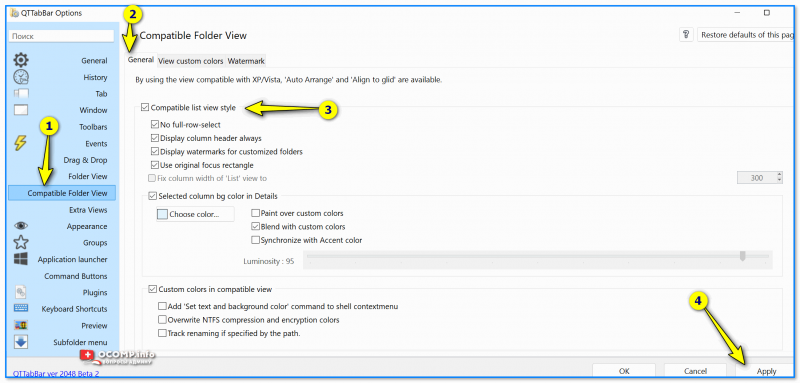
2) В настройках QTTabBar (для изменения фона папки) необходимо перейти в раздел «Compatible Folder View» и включить стили (флажок напротив пункта «Compatible list view style»). Не забудьте нажать на «Apply».
Вкл. стилей
3) Затем в этом же разделе («Compatible Folder View») необходимо открыть вкладку «Watermark» и указать фоновые картинки для разных папок: общие, документы, изображения и т.д. Еще раз нажать на «Apply».
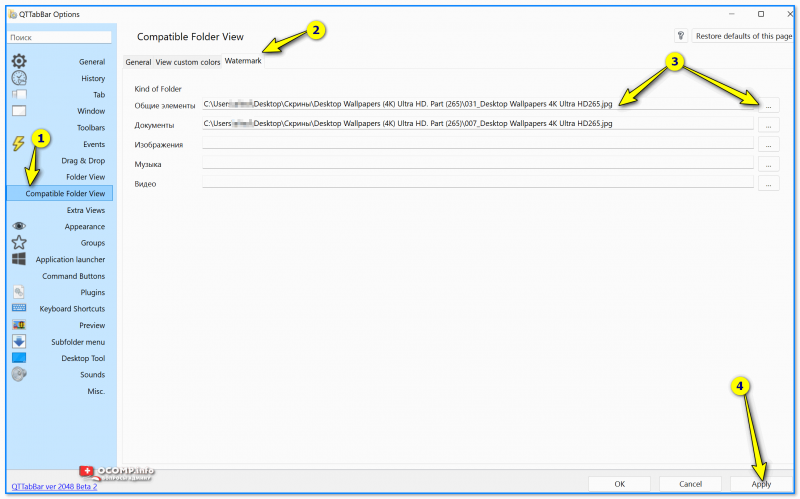
Указываем картинку в качестве фона для папки
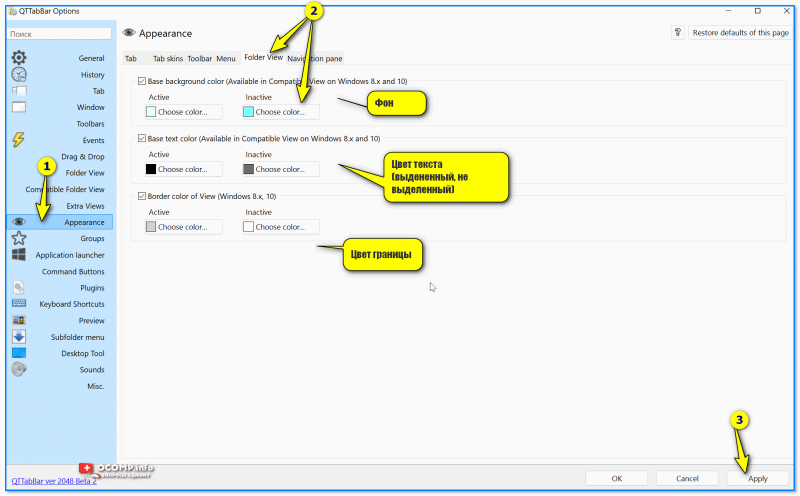
4) Поимо фона папки — рекомендую изменить цвет текста (названия файлов); фон, на котором он будет показан; границы. Сделать это можно во вкладке «Appearance / Folder View» — см. скрин ниже. 👇
Вид папки
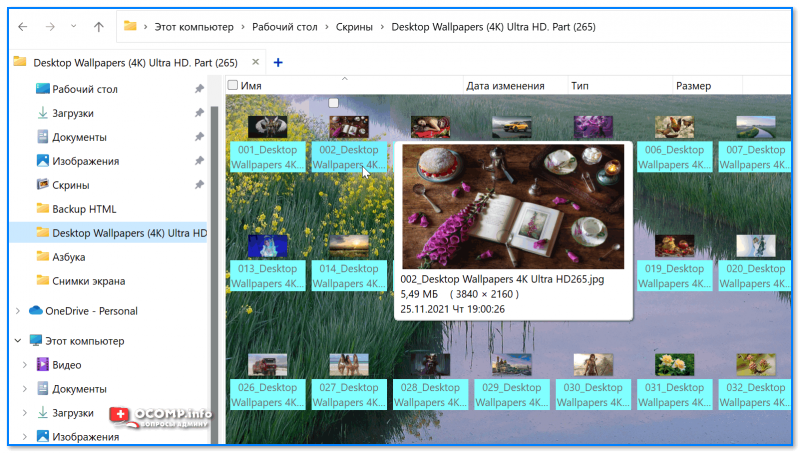
5) Собственно, теперь зайдя в любую папку — вы увидите, что ее фон изменился (да и цвет названий файлов), см. пример ниже 👇. Разумеется, всё это настраивается под-себя (под свой монитор)!
Что получилось
Вариант 2
6) Кстати, если «белое» меню слева в проводнике тоже есть желание изменить — откройте вкладку «Appearance / Navigation panel» и поставьте флажок «Back color» — теперь нажав на «Choose color» сможете выбрать цвет заливки бокового меню.
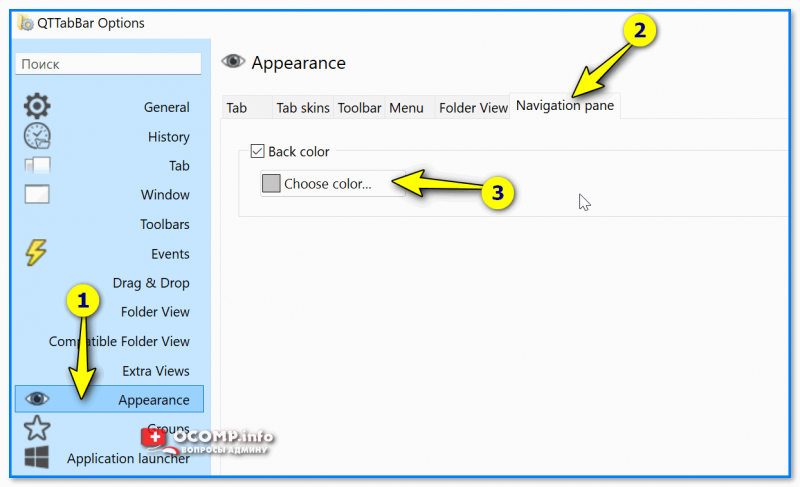
Цвет левой панели проводника
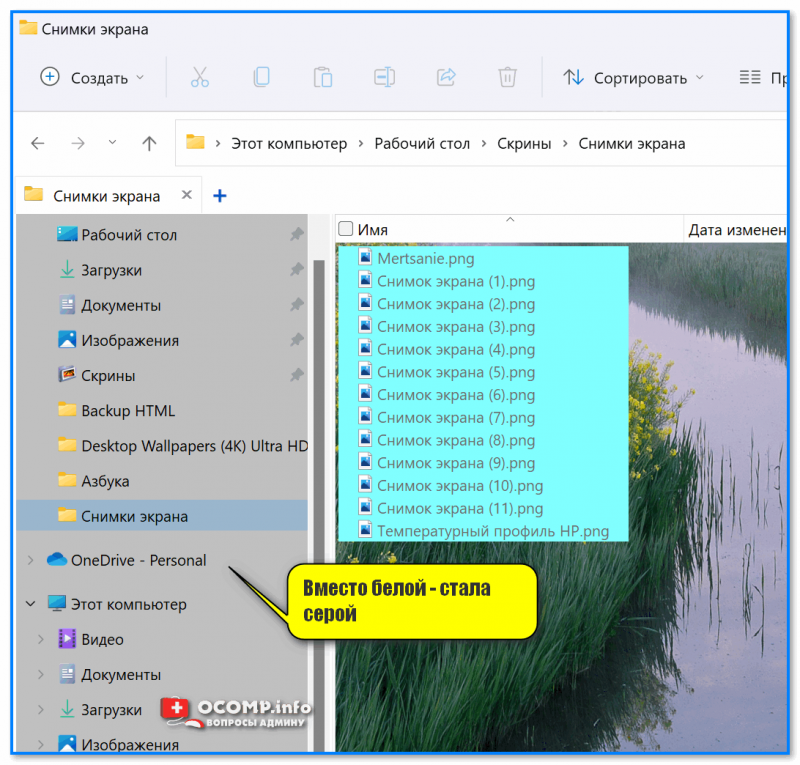
Вместо белой — стала серой
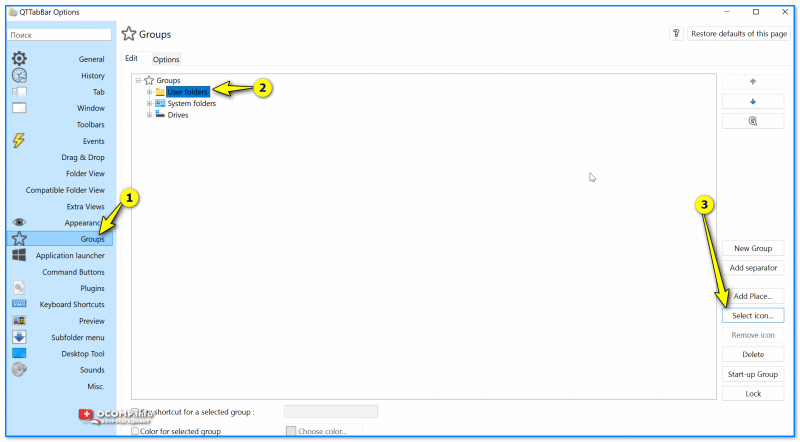
7) Кстати, QTTabBar позволяет изменить значки у папок — вкладка «Groups» 👇 (хотя для этого я бы рекомендовал использовать более удобную утилиту Folder Paint, о ней ниже).
Выбор иконок
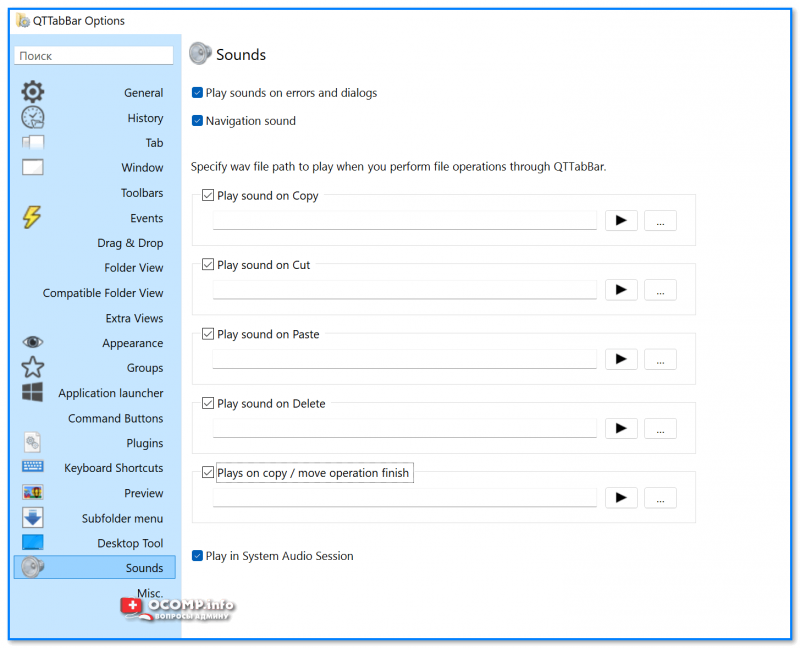
 Обратите также, что QTTabBar позволяет назначить быстрые сочетания клавиш для многих стандартных операций + включить звуки для рад операций (например, скопировали что-то в буфер — прозвучал колокольчик… Удобно?!).

Сочетания клавиш
Звуки
*
Вариант 2
Кстати, также снизить кол-ва белого света можно с помощью установки темного оформления в Windows — т.е. вместо белого фона папки будет темный (способ хорош хотя бы тем, что не нужно ставить стороннее ПО).
Для этого достаточно открыть параметры ОС и во вкладке «Персонализация / цвета» задать нужный вариант… См. пример ниже. 👇
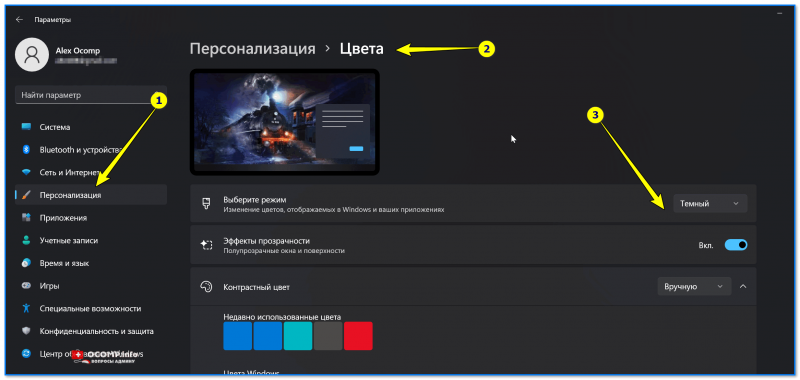
Персонализация — цвета — параметры Windows 11
Фон у папок темный стал!
📌 И еще одна ремарка…
Если вы много работаете с папками и файлами — не могу не порекомендовать Total Commander (это добротный менеджер для работы с файлами, явл. хорошей альтернативой проводнику). Разумеется, в его настройках можно задать цвета панелей, файлов, выделений и прочего. 👇
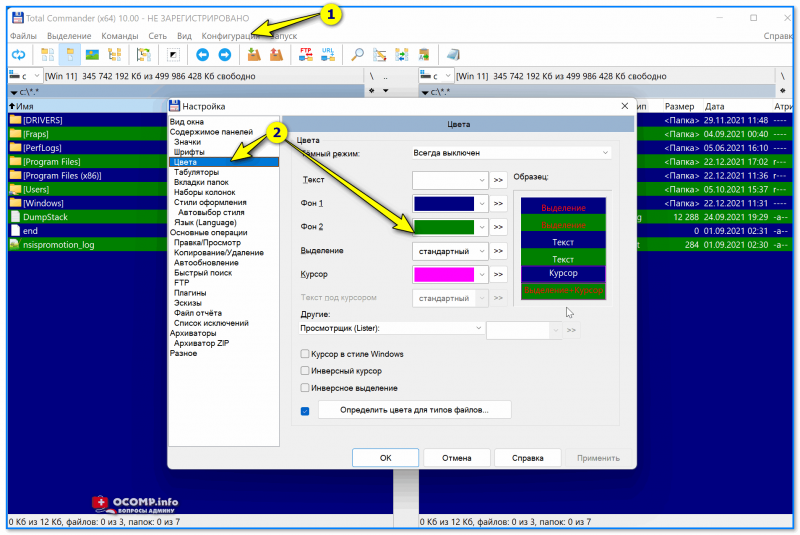
Total Commander — настройки цветов
*
Значки, цвета
Чтобы заменить для определенных папок стандартные значки на что-то отличное — довольно удобно пользоваться утилитой 📌Folder Painter (такая практика очень помогает в домашне-офисной работе — моментально находишь нужный каталог!).
Рассмотрю кратко, как ей пользоваться.
*
1) После запуска Folder Painter — в меню слева нужно выбрать наборы значков для установки и нажать кнопку «Установить».
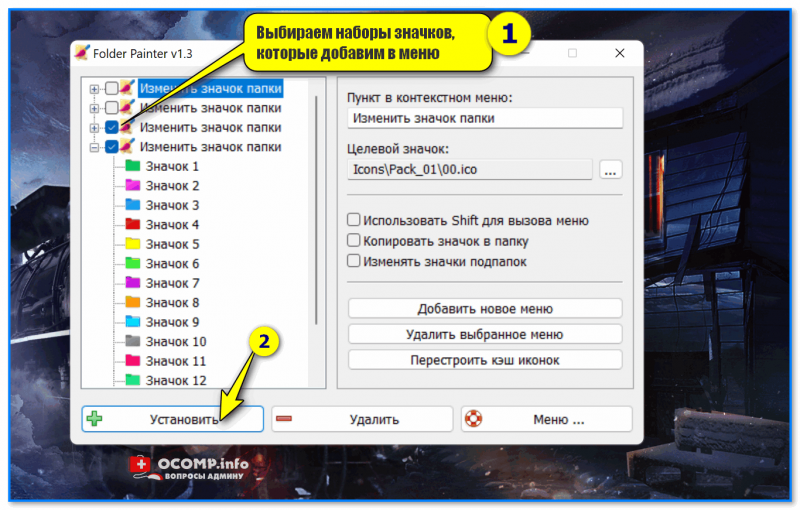
Установка значков в меню
2) Теперь, если нажать ПКМ по папке, в контекстном меню появится вкладка «Изменить значок папки» — можете выбрать тот, который вам нужен!
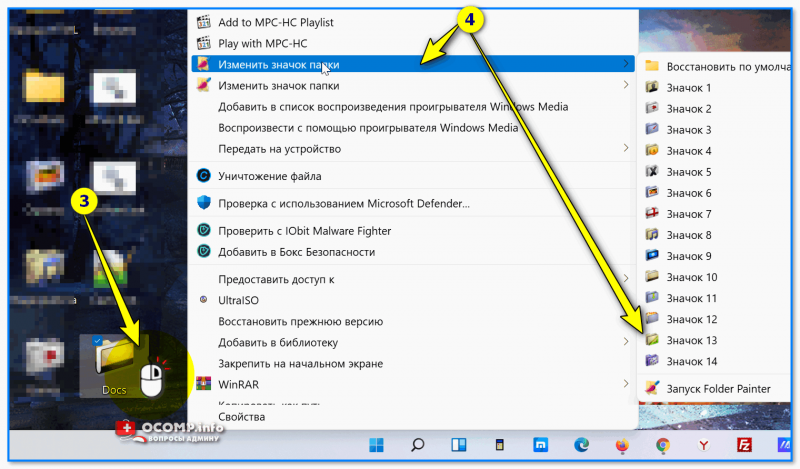
ПКМ по папке
3) Если значок сразу же не изменился — необходимо перезагрузить проводник (или пере-открыть нужную папку).
Прим.: для перезагрузки проводника — откройте командную строку от имени админа и используйте команду: taskkill /F /IM explorer.exe & start explorer

Перезапускаем
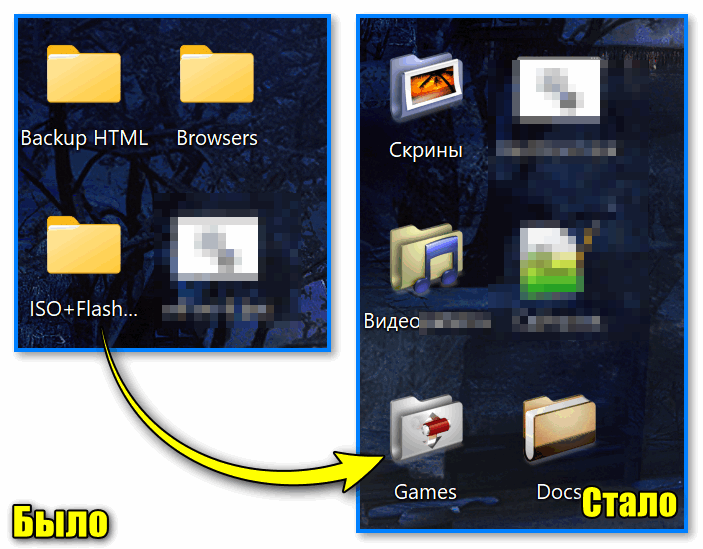
4) См. на парочку скринов ниже — «Было / стало». По-моему, стало довольно наглядно! 😉
Было — стало. Задача выполнена!
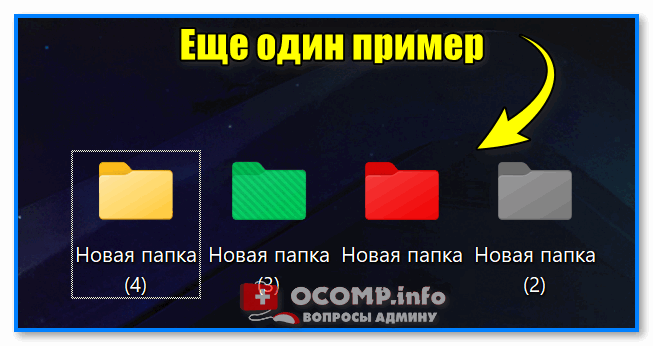
Еще один пример
*
Дополнения по теме — приветствуются ниже, в комментариях!
Успехов!
👋
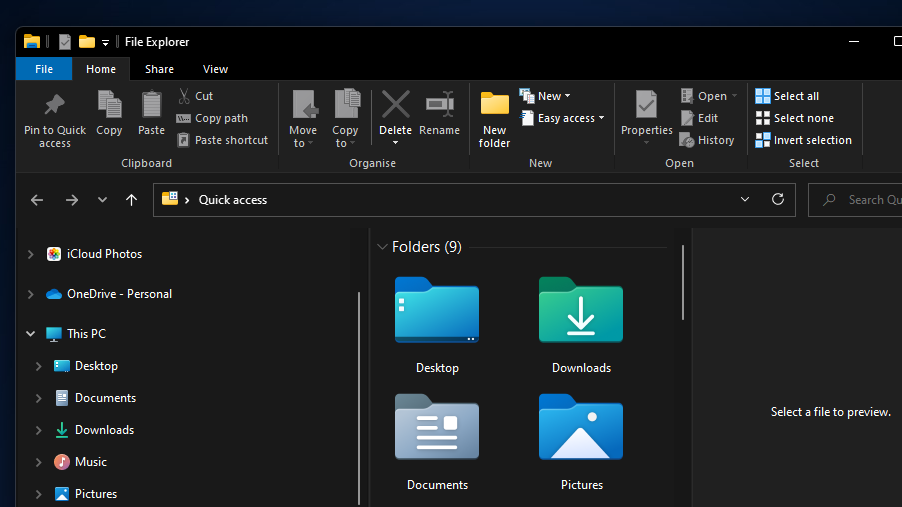
File Explorer is one of the best features in the Windows operating system. If you’re a Windows user, you’ll end up using it to view what’s on your hard drive, open all your software, and manage your files. Therefore, File Explorer is one of the Windows 11 apps you really can’t do without.
Microsoft has given File Explorer a new look in Windows 11. It still retains all its customization options, but how you access them has changed slightly. These are the various ways you can customize Explorer with those options.
Change File and Folder Icon Sizes
Windows 11’s File Explorer app includes all the same view options it did before, along with one new one. Those view options enable you to choose different icon sizes for folders and files displayed in Explorer. You can also select different layouts for viewing folders’ contents.
To change the icon sizes, click the File Explorer taskbar button. Then click the View button on Explorer’s new command bar to bring up the menu shown directly below. There you can select extra-large, large, medium-sized, and small icon options.
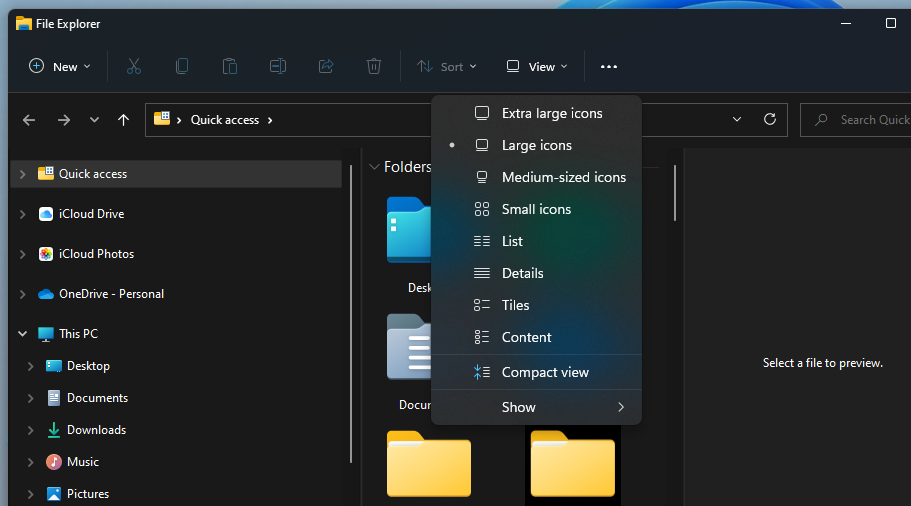
There are four layout options just below those icon size settings. You can select to view files with alternative list, detail, tile, or content layouts in Explorer. The List and Details options display additional date modified and size information for folders and files.
Compact view is the new File Explorer customization you can also select on that menu. That option removes the additional visual element padding added to Explorer in Windows 11. Selecting it makes the left panel’s folder navigation more compact as in the snapshot directly below.
Show or Hide Panes, Item Check Boxes, and File Extensions
The View menu includes an additional Show submenu. Select Show on that menu to reach the options in the snapshot directly below. Clicking Navigation, Details, and Pane options there will show or hide those Explorer features.
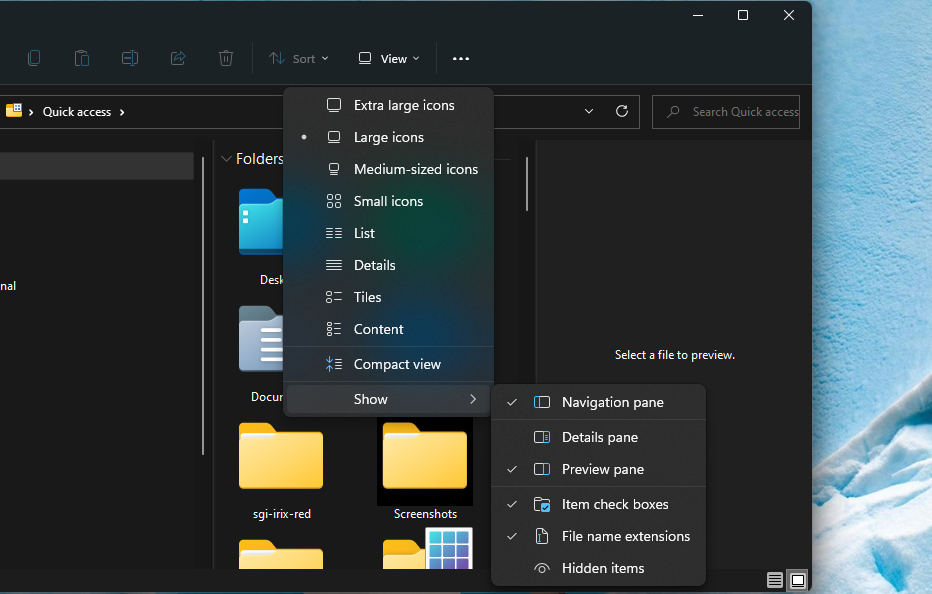
There are three other noteworthy customization settings below the pane options. Selecting the Item check boxes option will display small checkboxes beside selected folders and files. If you select File Name options, Explorer will include extensions for identifying formats at the end of all files. The Hidden Items option there shows all files and folders marked as hidden.
Change Folders’ Icons
There isn’t much variation in Explorer’s default folder icon scheme. However, you can customize folders by changing their icons. Adding new icons to your most important folders will make them more identifiable. This is how you can change folder icons in Explorer.
- Right-click a folder in Explorer and select Properties.
-
Then select the Customize tab shown directly below.

- Press the Change Icon button.
-
Choose an alternative icon for the folder from the System32 folder.

- Click the OK option.
- Select Apply on the properties window.
If you want to look for new File Explorer folder icons beyond the System32 folder, check out the IconArchive website. That site includes a multitude of visually appealing icons you can freely download and add to your folders. Enter the keyword folders in the IconArchive search box to find some new icons. To download one from there, select it and click the ICO button.
When you’ve downloaded some new icons, you can add them to your Explorer folders as outlined above. However, you’ll need to click Browse on the Change Icon window. Then select the downloaded icon from a different folder, and press the Open button.
Change Advanced Settings for Files and Folders
Explorer’s Folder Options window includes many advanced settings for folders and files. From that window’s View tab, you can configure how Explorer displays files and folders in greater detail. This is how you can change the way Explorer displays files and folders via Folder Options.
-
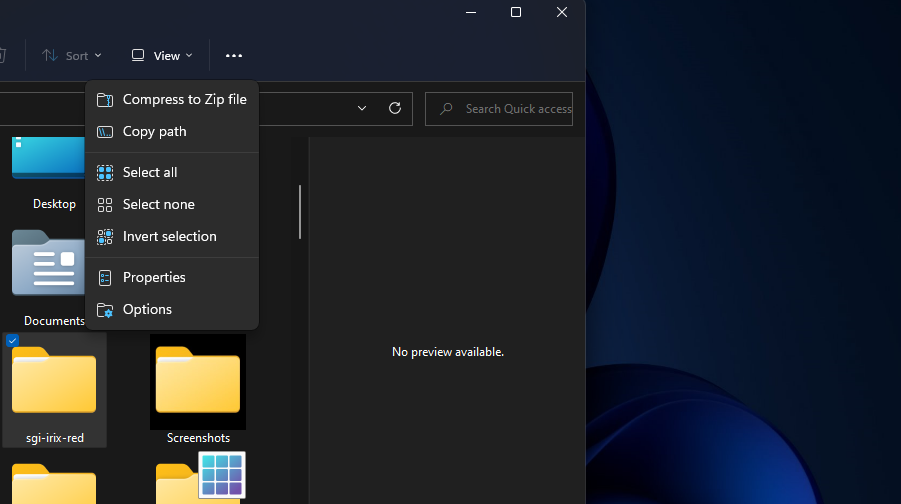
Click Explorer’s See more button (with three dots) to open the menu in the screenshot directly below.

- Select Options on that menu.
-
Then click the View tab shown directly below there.

- Select or deselect the advanced settings there to configure how Explorer displays files and folders.
- Press the Apply button to save your new settings.
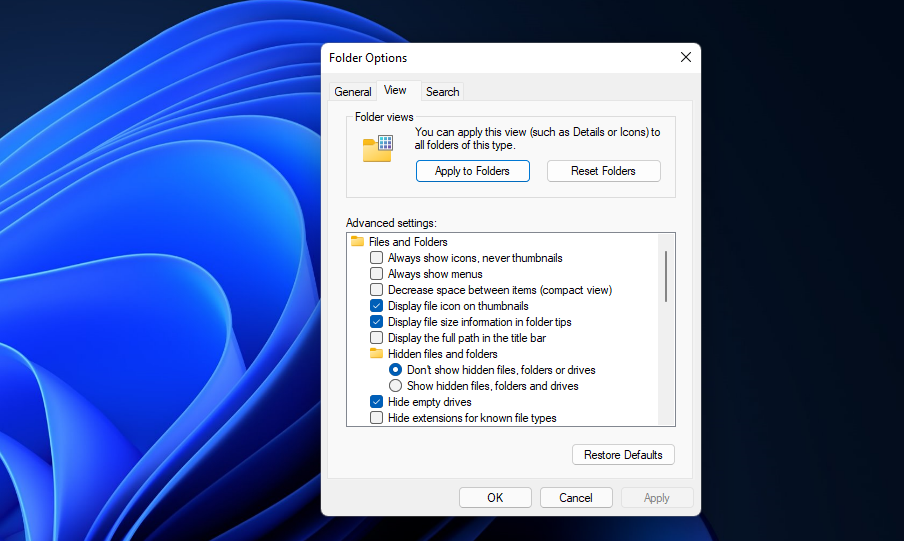
To get a better idea of how those advanced options change the way Explorer displays folders and files, experiment a bit by selecting and deselecting them. Then have a look through Explorer to see the effects. You can always restore the default configuration by clicking the Restore Defaults button.
Enable Single-Click For Opening Files and Folders
By default, Explorer is configured to open items when you double-click them. However, you can change that by selecting a Single-click to open an item option. Then Explorer will open files and folders when you single-click them instead. This is how you can enable single-click for opening items.
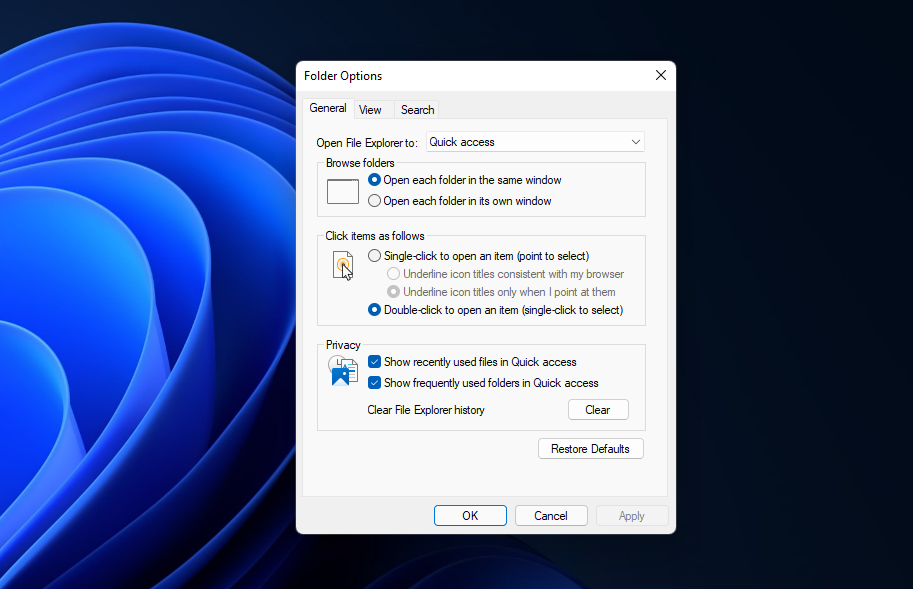
- Open Folder Options by clicking the See more button and Options in Explorer.
-
Select the Single-click to open an item radio button on the General tab.

- Then select either the Underline icon titles consistent with my browser or Underline icon titles only when I point at them option.
- Click Apply to save the new settings.
- Select OK to close Folder Options.
Customize File Explorer With Winaero Tweaker
If you want more File Explorer customization options, check out the freeware Winaero Tweaker. That’s an advanced customization program with which you can further tweak File Explorer to your liking. You can download and install Winaero in the following steps.
- Open the Winaero Tweaker website.
- Click the Download Winaero Tweaker option on that site to save the program’s ZIP archive.
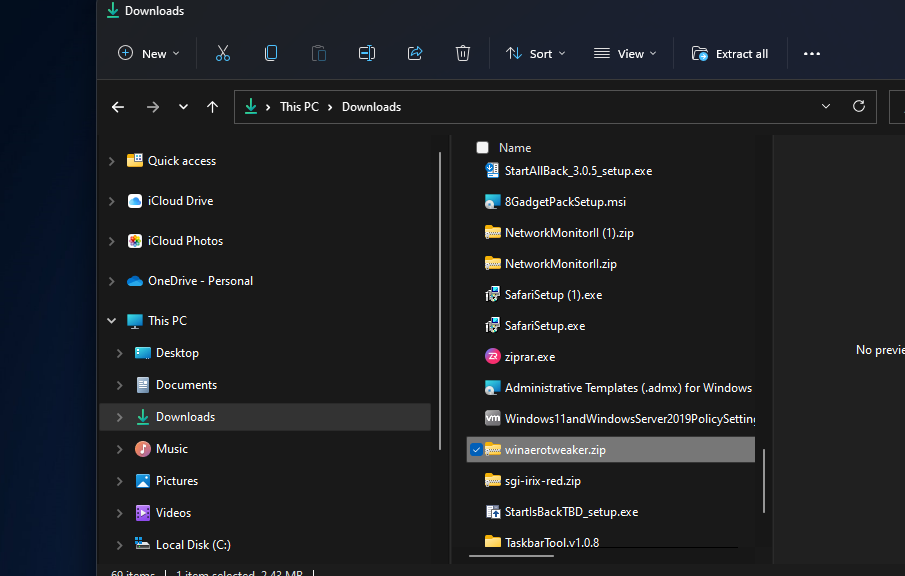
- Bring up File Explorer’s window.
- Open the Winaero ZIP archive you just downloaded.
-
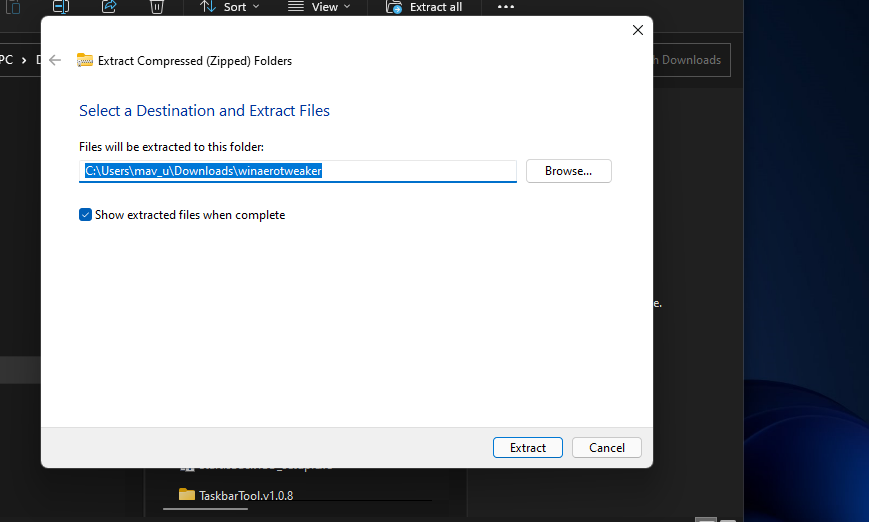
Click the Extract all option on Explorer’s command bar.

-
Select the checkbox for the Show extracted files when complete option.

- Click Extract to finish.
- Then double-click WinaeroTweaker-1.33.0.0-setup.exe in its extracted folder.
- Go through the setup wizard to install the Winaero Tweaker.
- Open the Winaero Tweaker software.
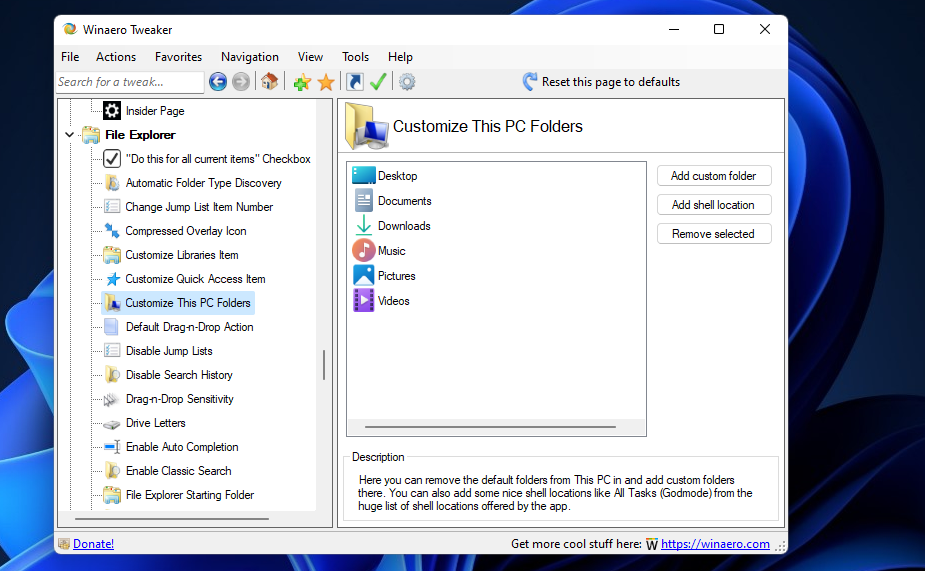
The File Explorer section of Winaero Tweaker includes 21 customization settings. Double-click File Explorer on the left side of the window to view its options. Winaero Tweaker includes full descriptions of what all those options do. These are some of its more notable customization settings or Explorer:
- Navigation Pane – Custom Items: A setting for adding Control Panel applets, system locations, or user folders to the navigation pane.
- Navigation Pane – Default Items: This option enables you to selectively remove default items from Explorer’s navigation pane.
- Customize This PC Folder: You can add custom icons to This PC folders with this setting.
- Customize Quick Access Item: This setting enables you to add a new icon to the Quick Access item and rename it.
- Customize Libraries Item: Select this option to change the Libraries item’s icon and rename it.
You can also restore the ribbon tabs from the old File Explorer with Winaero Tweaker. To do so, double-click the Windows 11 category and select Enable Ribbon in Winaero. Click the Enable the Ribbon UI in File Explorer checkbox. Then press the Restart Explorer button to apply.
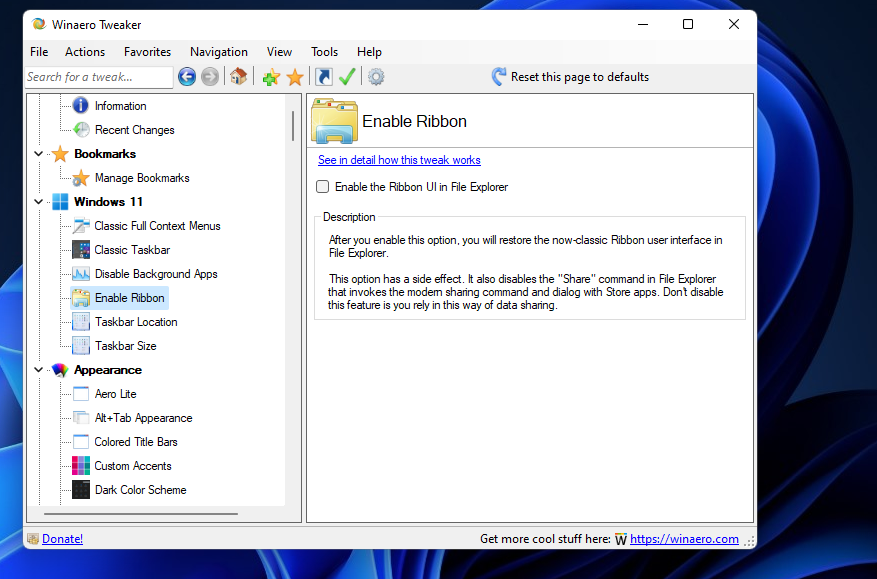
Now you’ll see the old View, Share, File, and Home tabs in File Explorer. You can select Explorer’s aforementioned customization options on the View tab. Press the Options button there to open the Folder Options window.
Configure File Explorer to Suit Your Preferences
So, there are many ways you can customize File Explorer with its built-in options and third-party software. With Explorer’s built-in customization settings, you can reconfigure how it displays files and folders. Winaero Tweaker’s additional settings are also a good extension to Explorer’s built-in options. You can make Explorer better suit your preferences with all those customization options.