
После подключения компьютера с Windows 11 к внешним дисплеям вы можете настроить параметры для каждого из них.
Перед началом работы
Перед изменением параметров внешних мониторов обеспечьте правильное подключение. Вот что можно сделать:
-
Правильно подключите кабели к компьютеру или док-станции.
-
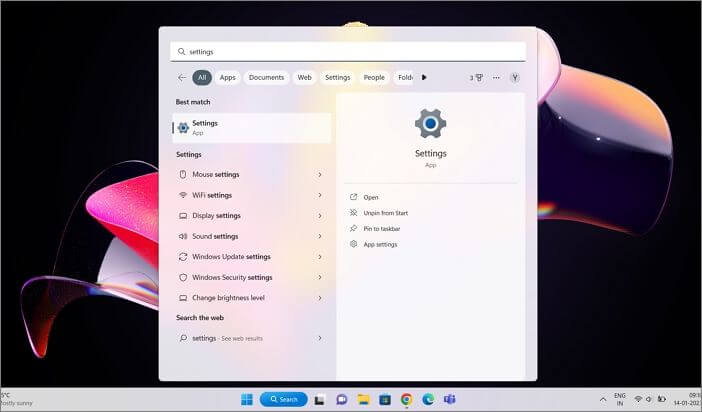
Проверьте наличие обновлений Windows. Чтобы проверить наличие обновлений, выберите Пуск , затем найдите параметры. Выберите Параметры > Центр обновления Windows > Проверить наличие обновлений.
Совет: Если вы используете адаптер беспроводного дисплея, подключите адаптер к порту HDMI на новых телевизорах, а затем подключите к нему компьютер по беспроводной сети. После подключения адаптера беспроводного дисплея к телевизору перейдите на Windows 11 компьютер, нажмите клавишу с логотипом Windows+ K, чтобы открыть приведение, а затем выберите адаптер беспроводного дисплея.
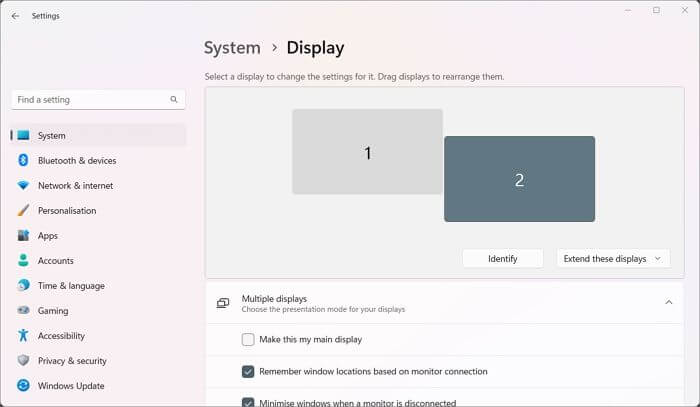
Изменение порядка мониторов
Этот параметр отображается, если Windows обнаруживает несколько мониторов. Каждый монитор будет пронумерован для упрощения идентификации.
Идентификация монитора
Чтобы узнать, какой номер соответствует дисплею, выберите Пуск , а затем найдите параметры. Выберите Параметры > Система > Дисплей > Идентифицировать. На экране монитора появится номер, который ему назначен.
Обнаружение монитора
Если вы подключили другой дисплей и он не отображается в настройках, выберите Пуск > Параметры > Система > Дисплей > Несколько дисплеев > Обнаружить.
Подключение беспроводного дисплея
Если вы подключили беспроводной дисплей и он не отображается в разделе Параметры, выберите Пуск > Параметры > Система > Дисплей > Несколько дисплеев > Подключиться.
Упорядочение мониторов
Если у вас несколько мониторов, вы можете изменить их порядок. Это удобно, если вы хотите, чтобы ваши мониторы соответствовали их настройке у вас дома или в офисе. В разделе параметров «Дисплей» выберите и перетащите монитор, куда хотите. Проделайте это для всех мониторов, которые нужно переместить. После получения нужного расположения нажмите Применить. Протестируйте свое новое расположение, перемещая указатель мыши на разных мониторах, чтобы убедиться в их правильной работе.
Совет: Используйте параметр Определить при упорядочении дисплеев, чтобы увидеть номер дисплея на экране.
Несколько параметров отображения
При отстыковке компьютера окна на внешнем мониторе сворачиваться. При повторной закреплении компьютера к монитору Windows помещает все точно так же, как раньше.
Чтобы настроить это поведение, выполните следующие действия:
-
Выберите Пуск > Параметры > Отображение системных >.
-
Прокрутите вниз и выберите Несколько дисплеев , чтобы развернуть этот раздел.
-
Установите флажки в соответствии со своими предпочтениями:
-
Запоминать расположения окон на основе подключения монитора
-
Свертывание окон при отключении монитора.
-
Изменение параметров мониторов
-
Изменение яркости и цвета дисплея
-
Изменение разрешения, масштабирования и макета дисплея
-
Изменение частоты обновления отображения
Выбор варианта отображения
Чтобы изменить то, что отображается на дисплеях, нажмите клавишу с логотипом Windows+ P. Вот параметры, которые можно выбрать.
|
Если необходимо: |
Выберите |
|
Просматривать элементы только на одном мониторе. |
Только экран компьютера |
|
Просматривать одинаковые элементы на всех мониторах. |
Повторяющийся |
|
Просматривать рабочий стол на нескольких экранах. При расширении мониторов вы можете перемещать элементы между двумя экранами. |
Расширить |
|
Просматривать все только на втором мониторе. |
Только второй экран |
Download Article
Easily change your primary and secondary monitors on Windows
Download Article
- Changing Your Primary Monitor
- Switching Monitor Numbers
- Video
|
|
Are you running into trouble with your Windows dual-monitor setup? Some video conferencing and screen-sharing software prioritizes Windows monitor numbers over your display settings, which can lead to accidentally sharing the wrong screen. While you can set any monitor as your main display, you cannot switch the «1» and «2» numbers without making a registry change, as these numbers are generated automatically. This wikiHow article will walk you through changing your primary monitor and editing the registry to switch monitors 1 and 2 on your PC.
Things You Should Know
- You can change which monitor is the main display in your Display Settings, but not the monitor number.
- If you are using a desktop PC and have two monitors connected, you can edit the registry to switch the numbers of Monitor 1 and Monitor 2.
- If you are using a PC laptop, your laptop’s built-in monitor will always be Monitor 1, even if it’s your primary display. There’s no way to change this in the registry.
-

Right-click any blank space on your desktop. Whether you’re using Windows 10 or Windows 11, right-click any part of your main desktop that doesn’t have any apps, programs, or icons. This will display a menu.
- Use this method if you’re using two monitors and want to make Monitor 2 your main display instead of Monitor 1.
- Even though this method will not change the numbers you see on your monitors, it will set your secondary monitor as your primary monitor, which should solve screen-sharing problems.
- If you are using dual desktop monitors (not a laptop screen) and need to switch the numbers of your monitors, you can edit your registry.
-
This opens your Display Settings.
Advertisement
-
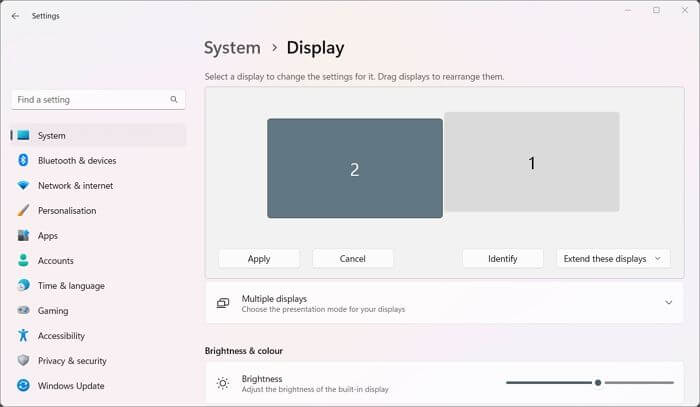
Each monitor is represented by a number in this window. You’ll usually want your displays arranged to replicate how you have your monitors positioned. For example, if display 1 is your laptop screen and your external monitor, display 2, is to the left of your laptop on your desk, you’d want to drag display 2 to the left of display 1.[1]
- If you only see one monitor number or are unable to drag your monitors to different locations, make sure Extend these displays is selected.
- If you’re unsure which monitor corresponds to which number, click one of the displays and click the Identify button. This makes a «1» or «2» appear at the bottom-left corner of each monitor.
- If you make any changes, click Apply to save them.[2]
-
This selects the monitor.[3]
-
If you’re using Windows 10, you’ll need to scroll down to see it. On Windows 11, you may need to click the Multiple displays menu first.
- To change the primary display to a different monitor, click that monitor at the top, and then check the box next to «Make this my main display» once selected.
-
This will apply the new display settings and swap the monitors.


Advertisement
-
To swap the monitor numbers on your Windows PC, you’ll need to change which port each monitor is connected to. However, just plugging each monitor into a different port isn’t enough—you’ll have to remove the registry keys that remember the monitor numbers so Windows can properly detect the new monitor order. Before opening the editor, unplug all monitors that aren’t the one that’s currently set as the primary monitor.
- The primary monitor must be the one that your PC currently recognizes as «Monitor 1.»
- This method will not work to make a laptop screen Monitor 2 and a secondary monitor Monitor 1. The built-in monitor on your laptop can only be Monitor 1.
-
To open the Registry Editor, type regedit into the Windows search bar, and then click Registry Editor in the search results.
-
An easy way to do this is to copy that address, paste it into the address bar at the top of the Registry Editor, and then press Enter. Another option is to navigate there using these steps:[4]
- Double-click HKEY_LOCAL_MACHINE in the left panel.
- Double-click the System folder beneath that.
- Double-click the CurrentControlSet folder beneath that.
- Double-click the Control folder beneath that.
- Double-click the GraphicsDrivers folder beneath that.
-
The idea is to delete this key, but renaming it can help you restore it in case anything goes wrong. Here’s how:
- Right-click the «Configuration» folder in the left panel.
- Click Rename.
- Type Configuration.old.
- Press Enter.
- If anything goes wrong later (it shouldn’t), you can always return here and rename the new «Configuration.old» folder to «Configuration» to restore your previous settings.
-
Here’s how:
- Right-click the Connectivity folder in the left panel.
- Click Rename.
- Type Connectivity.old.
- Press Enter.
- As with the last step, if anything goes wrong with your settings, you can return here and rename the new «Connectivity.old» folder to «Connectivity» to restore your settings.
-
Shut down your PC. Don’t restart it—you’ll want to shut it down. To do this, just click the Windows Start menu, click the Power icon at the bottom-left, and then select Shut down. Continue to the next step once your computer is shut down.
-
This monitor must be connected to your PC’s primary’ video port. If you have a multiple-port video card, plug it into the first port. If you have a monitor port built into your motherboard, that one is usually the primary port (Monitor 1).[5]
- If you have multiple video cards, there’s no surefire way to know which is the primary other than simply trying the reverse order.
- Do not plug in your second monitor yet.
-
Power on your PC. Press the power button on your laptop or desktop tower to do so. If your monitor is turned off, turn that back on as well.
-
This opens the Display settings window.
-
Plug in the second monitor. Windows will automatically detect the monitor and install any necessary drivers. Once the monitor is detected, you should see two monitors under «Multiple displays» in the right panel. The monitor labeled «Monitor 1» is the one that’s now plugged into the primary port. The one labeled «Monitor 2» is now the second one you just plugged in. If you connect a third monitor, it will be detected as Monitor 3, and so on.
- If you don’t see the second (and/or third) monitor in the Display Settings window, click the Detect button under «Multiple displays» to detect it now.
- Windows has automatically recreated the registry entries you renamed earlier, so there’s no need to return to the registry.


Advertisement
Ask a Question
200 characters left
Include your email address to get a message when this question is answered.
Submit
Advertisement
Video
Thanks for submitting a tip for review!
About This Article
Article SummaryX
1. Right-click the desktop.
2. Click Display Settings.
3. Click the monitor you want to set as primary.
4. Check «Make this my main display«.
5. Click Apply.
Did this summary help you?
Thanks to all authors for creating a page that has been read 1,082,068 times.
Is this article up to date?
Having a dual monitor setup is always a productivity boost. Thankfully, the Windows operating system natively allows users to manage primary and secondary monitors without having to use third-party software.
When the first display device is connected to a Windows 11/10 PC, it automatically becomes the primary display monitor. This means it will host your desktop, as well as all other windows that you have open. When more monitors are connected, they are then detected as the secondary monitor, tertiary, etc.
This article guides you through multiple ways to change the primary monitor on your Windows PC, and also how to align them according to your actual setup. For example, if your dial-monitor setup is placed on top of each other, you can adjust them so. This will allow you to move your mouse cursor and windows up and down (instead of sideways) to move between the two displays.
Table of Contents
Changing your primary display will allow you to select which display device hosts your main content. If you have 3 displays connected and are aligned in a horizontal series, you can set your middle screen to be the primary display.
Change Primary Monitor in Windows 11
Follow these steps to change your primary monitor if you are using Windows 11:
-
Navigate to the following: This will open the Display Settings menu. (Press the Windows key + I buttons to open Settings directly).
Settings app >> System >> Display
-
Click the Identify button, which displays a number on each screen to identify which screen is primary, secondary, etc.

Identify screens -
Now click on the screen number you want to make primary.
Select screen -
Now expand “Multiple displays” and then check the box next to “Make this my main display.”
Make it the primary display


The selected monitor will now be your primary display. When the “Make this my main display” option is grayed out – this means the selected monitor is already your primary one.

If you have a dedicated NVidia graphics card, you can also change the primary monitor in Windows 11 or Windows 10 using the NVidia Control Panel.
Change Primary Monitor in Windows 10
If you are using Windows 10, then follow these steps to change your primary monitor:
-
Navigate to the following:
Settings app >> System >> Display
-
Now select the monitor that you want to make primary, then scroll down and check the box next to “Make this my main display” under Multiple displays.

Change primary display in Windows 10

Similar to Windows 11, the option will then be grayed out and the selected monitor will become your primary display.
The methods we have discussed up until now are the Windows native methods that allow you to change your primary monitor. However, if you are a fan of the Windows command line, then the following methods might be your cup of tea.
How to Change Primary Monitor from Command Prompt in Windows
To change your primary monitor using Command Prompt, you must use third-party command-line tools.
Using NirSoft NirCmd
NirCmd is a command-line tool that allows you to perform multiple tasks directly from the Command Prompt, which otherwise is not possible. Here are the steps to change your primary display using this tool:
-
To start with, download the NirCmd tool from the given link and then extract its contents into a separate folder.
-
Now open Command Prompt with administrative privileges and then navigate to the extracted folder directory using this cmdlet. Replace PathToFolder with the complete path to the extract NirCmd folder.
cd /d PathToFolder
Change directory -
Now use the following cmdlet to change your primary monitor while replacing Integer with the display identifier of the monitor you want to set as your primary display.
nircmd.exe setprimarydisplay IntegerNote: The Integer used in the command line will not be the same as the one you see on your displays when you identify the monitors. This is because while using the command line, the monitor indexes (identifiers) are changed.
In our case, the Integer “10” sets the secondary monitor as the primary, and the Integer “9” sets the first monitor as primary. You may have to adapt the hit-and-trial method to check which monitor is configured as primary.

Change primary monitor using NirCmd


When the correct identifier is used, you will notice that your display kind of zooms out and then zooms back in, signifying a change in the display settings. However, you must confirm which monitor has been configured as the primary display.
Using NirSoft MultiMonitorTool
MultiMonitorTool is another command-line tool used to manage your display settings. Follow these steps to use the MultiMonitorTool to change your primary monitor:
-
Start by downloading MultiMonitorTool and then extract its content into a separate folder.
-
Now open Command Prompt with administrative privileges and then navigate to the extracted folder directory using this cmdlet. Replace PathToFolder with the complete path to extract MultiMonitorTool folder.
cd /d PathToFolder
Change directory -
Now use the following cmdlet to change your primary monitor while replacing Integer with the display identifier of the monitor you want to set as your primary display.
MultiMonitorTool.exe /SetPrimary IntegerNote: Similar to NirCmd, you will have to perform the hit-and-trial method while changing the Integer value to identify the correct index for the monitor you wish to set as the primary display.
Change primary monitor using MultiMonitorTool


This will now change your primary display as you can see that the screen zooms out and then zooms back in, which signifies a change in your display settings. However, you will still need to confirm that the correct monitor has been configured as your primary display.
How to Change Display Orientation in Windows
Display orientation is the way your monitors are aligned. If you have only two monitors connected, they could be side-by-side, or in the top-and-bottom orientation. If more than two monitors are connected, they can be aligned in any way!
Furthermore, as it happens with many of us, it could be possible that you drag the mouse cursor from the left end of your screen onto the second monitor, which is placed on its right side.
You can manage your screen’s orientation with respect to one another so your computer knows in which direction the other displays are correctly configured.
-
To change the orientation of the displays, navigate to the following:
Settings app >> System >> Display
-
Here, hold down your screen and then drag it into a different position that is identical to your real monitor setup.
Drag and drop the screens to adjust the orientation -
Once the settings are done, click Apply to save the changes.
Apply settings


You can now move across your multiple displays in the direction in which they are aligned.
If you encounter any errors while setting up your primary monitor and have any tips for us, you can always ask us in the comments section below.
Frequently Asked Questions
How to shift a window from one monitor to the other?
If a window opens on the wrong monitor when you have multiple displays connected, you can simply switch it to the right one using the Windows Key + Shift + Left/Right Arrow Key shortcut keys to shift it to the previous or next display device.
How to fix the new window opens on the wrong monitor?
To open a window on the correct monitor, you must set it as the primary display device. To do so, go to Settings app >> System >> Display, select the monitor you want to set as the primary display, then check the box next to “Make this my main display.”
How do I check which monitors are primary and secondary?
You can display the number on the screen to identify which monitor is primary, secondary, and so on. For the primary monitor, it will display “1,” for the secondary, it will display “2,” and so on.
To identify your displays, navigate to Settings app >> System >> Display then click Identify. This will show the indexes on your screen for almost 2 seconds.
PAGE CONTENT
Undoubtedly, using dual monitors increases productivity while simultaneously exhibiting a lot more information on the screen. Setting up multiple monitors on a Windows PC isn’t always as simple as it seems and may require fine-tuning before everything is exactly how you want it. Perhaps you want to use a different monitor as your primary display, or maybe you want to relocate one monitor. Whatever your motivation, switching displays on a Windows 11/10 computer is a simple operation that can be completed quickly. This post will show you how to switch between monitors 1 and 2 on a Windows PC.
What are Multiple Monitors? How’s It Beneficial
A multiple monitor arrangement refers to multiple screens connected to a single computer, offering the user more excellent screen real estate and much more control. A machine can be connected to multiple displays by HDMI, DisplayPort, VGA, or DVI cables or wirelessly via a wireless display adaptor.
Multiple monitors provide more screen space. When you connect multiple monitors to a computer, you may navigate your mouse between them, sliding apps between them as if you had an extra-large desktop. Multiple monitors enable users to work on multiple tasks simultaneously without frequently switching between windows. Gamers can use multiple monitors to get a broader field of view for a more immersive gaming experience. Traders can utilize multi-monitors to load several charts and trading platforms simultaneously, among other things.
You may be interested:
Why Switch Monitor Positions on Windows
Not everyone has the same room for two monitors, and Windows may not recognize the monitor arrangement immediately. For example, your setup may include a secondary monitor on the right, but Windows may have identified it as a left monitor. Switching displays give users more control over their work environment and can aid in reducing glare, improving viewing angles, and preventing eye strain.
Suppose you constantly work on different projects or have software components open. In that case, a larger monitor as your primary display may be advantageous because it lets you see more excellent material in one go.
It’s also crucial to evaluate each monitor’s resolution and refresh rate. Adopting that monitor as your primary display may benefit visual quality if one of your monitors has a higher resolution or refresh rate. Finally, your unique needs and usage will determine which monitor should be your primary and which should be your secondary. You can always try different setups to find the best one for you.
Prerequisites
Here’s all you need to know about dual monitor setup and switching positions.
- Two Monitors: To switch between two monitors, you must have at least two displays, which can be two display monitors or a laptop screen and an external monitor.
- HDMI/VGA/DisplayPort Cables: You’ll need the appropriate cables and wires to connect to the secondary monitor. You can acquire them based on your display’s compatibility.
- Compatible Graphics Card: To ensure a successful dual monitor setup, ensure that your graphics card supports the setting; otherwise, you may need to hunt for a graphics card upgrade.
- Drivers: While Windows usually takes care of this, in rare cases, you may need to manually install the secondary monitor drivers on your Windows PC.
- Administrator Privileges: To change the computer settings, you must be logged in with an administrator account.
How to Switch Monitors 1 and 2 on Windows 10
Switching monitors in Windows is only possible if the projection options are set to PC screen only, secondary screen, or extend. Here’s how to toggle between primary and secondary displays in Windows.
Step 1: First, locate the Settings application on your Windows 11 computer. This can usually be found by clicking the Start button, searching for Settings, or pressing the Win + I keys on your keyboard.
Step 2: Once in Settings, navigate to the System > Display menu to view a list of all the displays connected to your computer. The primary display is labeled 1 by default, and the secondary monitor is labeled 2.
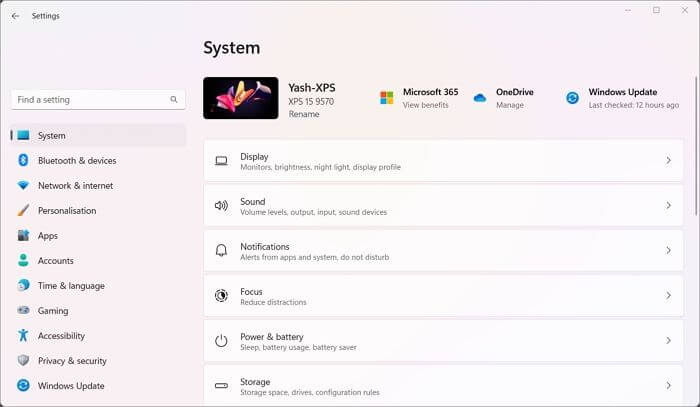
Step 3: If you’re unsure which of your two monitors is 1 and which is 2, you can use the Identify button on this page to find out. This will lead to a large number appearing on the matching monitor, making it easier to determine which one you’re moving.
Step 4: To switch monitors, click on the monitor number you want to relocate, then click and drag the monitor’s representation to the desired spot. For example, if you wish to make monitor 1 your primary monitor, click and drag it to the left of monitor 2.
Step 5: Once you’ve done that, finally, click on the Apply button to save your changes, and you’re done.
You may also switch between primary and secondary displays by picking the display you want to make primary, tapping on the Multiple Displays sections to expand the available options, and selecting Make this my main display.
It’s crucial to note that the above instructions only apply to computers with two monitors. If you have more than two displays, you can still use the above steps to switch between them; merely make sure you accurately classify which monitors you wish to switch between.
Conclusion
Swapping monitors on a Windows 10 computer is a straightforward process that can be completed in simple steps. This article has presented all of the details you need to customize the settings of your monitors to fit your needs, whether you’re a professional or a home user.
You may easily switch between primary and secondary displays by browsing Settings, identifying the monitors, swiping the monitor locations on the screen, and clicking the Apply button. You can improve your productivity, enhance your gaming experience, tailor your work environment, and multitask more effectively with a dual-monitor configuration.
Download Windows Speedup Tool to fix errors and make PC run faster
If you have a dual monitor setup and you want to change the primary and secondary monitor on Windows 11/10, here is what you can do. There is no need to install any third-party software since it is possible to get the job done via Windows 10 Settings panel. It is very easy to set up dual monitors on Windows. From changing the wallpaper to scaling – everything is possible using Windows Settings.
Many people use more than one monitor to increase productivity. If you have a dual monitor set up, you might know that your system can select any monitor as the primary monitor after Windows installation. The primary monitor contains all the icons, etc. If you want to change the priority or primary and secondary monitors on Windows 10, here is what you need to do.
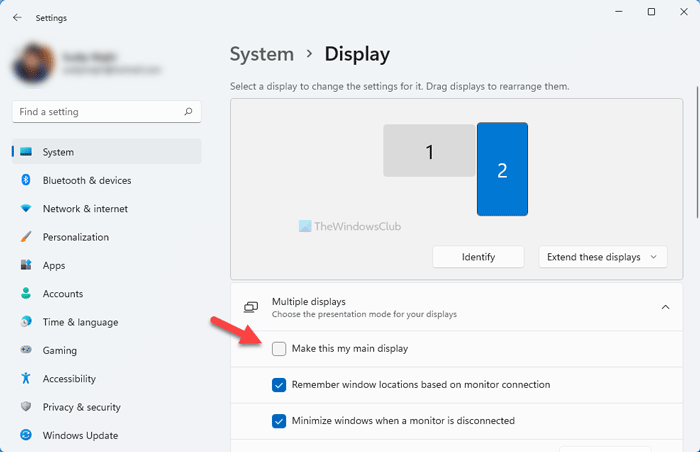
To change the primary and secondary monitors on Windows 11, follow these steps:
- Press Win+I to open Windows Settings.
- Make sure that you are in the System tab.
- Click on the Display option on the right-side.
- Expand the Multiple displays section.
- Click on a monitor you want to set as primary.
- Tick the Make this my main display checkbox.
Change Primary & Secondary monitor on Windows 10

To change the primary and secondary monitors on Windows 10, do follow these steps.
- Open Windows Settings
- Select Syatem> Display tab
- Navigate to Multiple display
- From the drop-down, select the desired monitor you want to be primary
- Check the Make this my main display setting.
Let us see this in more detail.
Press Win + I key together. After that, go to System > Display. On your right-hand side, you should find a button called Identify. You need to use this option to check which one is number 1 and which one is the number 2 monitor.
After that, select a monitor that you want to set as primary and scroll down until you get the option that says Make this my main display.
You need to make a mark in the checkbox to set the selected monitor as your primary monitor.
Once you choose the primary monitor, the other monitor will be set as the secondary monitor automatically.
Related: Windows is not detecting HDMI TV
How do I switch primary and secondary monitors?
To switch primary and secondary monitors in Windows 11, you need to open Windows Settings by pressing the Win+I button. Then, go to System > Display and expand the Multiple displays section. After that, if you see the Make this my main display checkbox is grayed out, it implies that your selected monitor is the primary monitor. If not, you need to select the desired monitor and tick that corresponding checkbox.
How to change Monitor Position in Windows 11?
There is an additional way in the same Display option of Settings app. Drag a display from its current number and drop it to re-arrange it, but that doesn’t change the monitor position actually. It is mainly helpful when using Extend mode with multi-monitors to move the mouse cursor and applications from one display to another.
How do you change which display is 1 and 2 in Windows 11/10?
To change or check which display is 1 and 2 in Windows 11/10, you need to open the Windows Settings panel. For that, press the Win+I button together. Then, go to System > Display and click on the Identify button. It displays the number of your monitor on the screen itself. If you want to change the primary monitor or rearrange them, you can follow the aforementioned guide or select the monitor and tick the Make this my main display checkbox.
That’s all.
Anand Khanse is the Admin of TheWindowsClub.com, a 10-year Microsoft MVP (2006-16) & a Windows Insider MVP (2016-2022). Please read the entire post & the comments first, create a System Restore Point before making any changes to your system & be careful about any 3rd-party offers while installing freeware.