
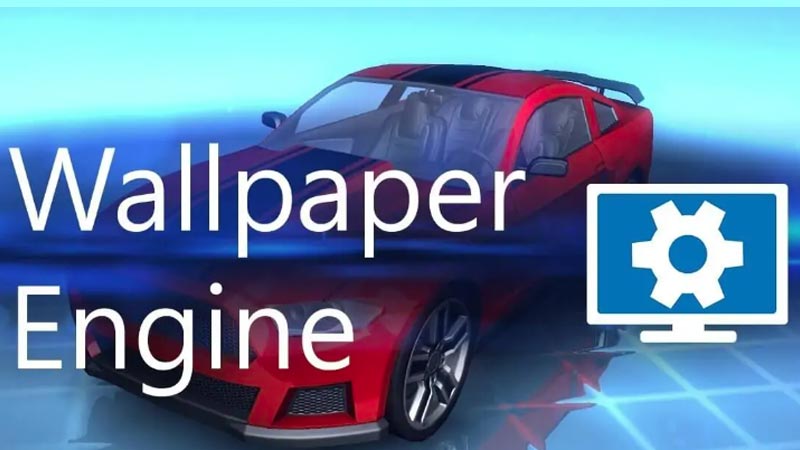
Wallpaper Engine is a great app for any PC enthusiast. Its vibrant community and intuitive editing features make it an accessible app for anyone looking to customize their desktop. Along with its base features, you can also set your lock screen using Wallpaper Engine. Down below are the steps need to set your Lock Screen.
Keep in mind that you can only use your current home screen wallpaper as your lock screen image.
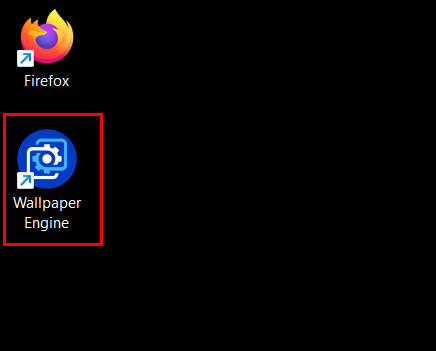
- Go to the bottom right on your screen to Hidden icons, right-click on Wallpaper engine, and go to settings.
- Go to the general tab in settings and scroll down till you see an option called “Override lock screen image“
- Enable this option, you should get a warning if you do this the first time but don’t worry it’s just a precautionary message.
Thats it! Now every time you start your PC you will see the non-animated version of your preferred desktop wallpaper. This can also be done on your Android smartphone with the help of the free companion Wallpaper Engine App that you get on purchasing Wallpaper Engine on Steam.
How to set the Lock Screen on your phone
- Go to settings and click on wallpaper and style
- Select the “My wallpaper” option
- Click on the three dots on the top right of the screen and Click on Live wallpaper
- If you have the Wallpaper Engine app installed, it should show up in this window, Now simply click on it and it should show you the wallpaper you currently have live on your PC.
- Now just press Set Wallpaper and choose between Home screen or home and lock screen as per your preference.
That’s all there is to Setting your lock screen using Wallpaper Engine. Check out our guides on Making Wallpaper Engine start automatically and other gaming-related guides on Gamer Tweak.
Wallpaper Engine lets users customize their desktops and also helps to setup lock screen on your PC. If you’ve been looking for a way to use Wallpaper Engine to set up this feature, you’ve come to the right place.
In this article, you’ll learn everything you need to know about setting up lock screen using your Wallpaper Engine.
How to Use Wallpaper Engine to Set the Lock Screen on Your PC
The process of setting up a lock screen on your PC using the Wallpaper Engine is simple and quick. Follow these steps to complete this process:
- Locate the app using hidden icon menu on your taskbar.

- Right-click on Wallpaper Engine and then open “Settings.”

- Click on the “General” tab under Settings.

- Scroll down the window till you locate the “Override lock screen image.”
- Turn on toggle to enable this option.


It’s important to remember that the only image that you can set up as your lock screen display is your current home screen wallpaper.
How to Use Wallpaper Engine to Set the Lock Screen on Your Phone
Steam offers you a free companion Wallpaper Engine for your smart phone once you purchase the Wallpaper Engine. Here’s how you can use it on your phone to setup lock screen:
- Open “Settings” and select “Wallpaper and Style.”
- Choose the “My wallpaper” option.
- Navigate to the top of your screen and tap on the three dots on the top right.
- Select “Live Wallpaper.”
- Tap the Wallpaper Engine appearing in this window and select “Set Wallpaper.”
- Choose “Lock Screen.”
It’s important to note that depending on your phone manufacturer, the wallpapers you set using the Wallpaper Engine can either be static or live.
How to Set Up Wallpaper Engine as Screen Saver
This is an alternative method to setting up the lock screen recommended by Wallpaper Engine developers. However, the process is quite complex. First, you’ll have to initiate screensaver setup.
Here’s how you can set up Wallpaper Engine as screensaver in combination the On resume display logon screen:
- Move your cursor over the installed tab in the Wallpaper Engine window.

- Click “Configure screensaver.”

- Screensaver will automatically be saved if it’s already installed.

- If not, a prompt will appear asking you to install screensaver.
- Window screensaver will open automatically after installation.


Configuring Screensaver Settings
You’ll have to first configure Windows. Here’s how you can do it:
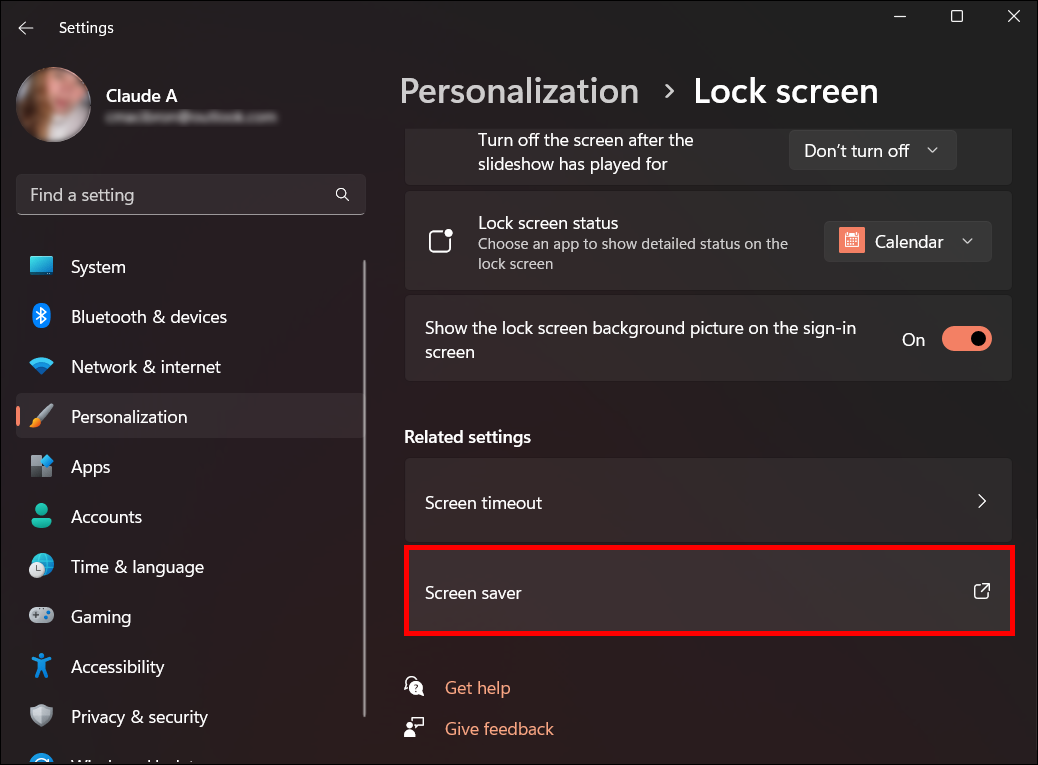
- Open “Settings” on your computer and click “Personalization.”

- Click on “Screen Saver.”
- Select Wallpaper Engine as your screensaver.

- Set wait time then check the box next to “On resume, display logon screen.”
- Click “Apply.”

- Select “OK.”


Wallpaper Engine Configuration
You can begin to set up the Wallpaper Engine screensaver after you’ve finished setting up your screensaver settings. Here’s how it’s done:
- Launch Wallpaper Engine.

- Move your cursor over the installed tab in the top left corner of your Wallpaper Engine.

- Select “Configure screensaver.”
- Wallpaper Engine will now preview your screensavers.
- You can go back to your wallpaper configuration by exiting screensaver mode.


The Wallpaper Engine typically operates the same way as the wallpapers that are actively running. But you can alter these settings by changing the screensaver settings to be configured separately. With the option to configure separately enabled, you can set up different wallpapers for different functions and profiles. Click on the red quit button in the upper left corner of the Wallpaper Engine window to restore your Wallpaper Engine to default settings.
How to Troubleshoot Screensaver
The screensaver function on the Wallpaper Engine is authorized by Windows. There are a few methods you can use if your screensaver refuses to run appropriately:
- Check Windows default screensaver to see if it’s working properly. If it is, you can restart your PC to see whether issue is resolved.
- Double-check your Windows screensaver settings to ensure that the wait time is correct. Also check your Windows energy settings. If battery power is low, ensure you connect your device to a power supply.
- You can also exempt the screensaver file from the PCs antivirus scan.
If you don’t want the wallpapers to fill your screen when your device is in sleep mode, you can disable Wallpaper Engine screensaver. You can do this by opening Windows screensaver settings and changing the screensaver option to “None.”
FAQs
What is the best method you can use to set up lock screen with Wallpaper Engine?
The best method to use is to override lock screen using the Wallpaper Engine setting.
Why is Wallpaper engine refusing to set up lock screen on your phone?
It’s likely that your phone manufacturers haven’t enabled these settings to ensure that your phone security isn’t undermined. Windows also treats the lock screen area as a protected area and blocks you from enabling this setup.
Is it worth it to invest in Wallpaper Engine?
Yes, this is an amazing tool especially for gamers. But, you can also use it to improve the overall look of your desktop.
Is Wallpaper Engine free?
It depends. The Wallpaper Engine from Steam for your PC is a paid for platform. But once you purchase it, Steam gifts you a free Wallpaper Engine companion designed for your Android phone.
There are limited options on how you can enable lock screen using Wallpaper Engine. The reason being, the manufacturers in the field believe that allowing these settings will compromise device security. There will hopefully be more positive updates on this as technology evolves.
Does your phone allow live wallpaper lock screen? If so, have you ever used it before? Let us know in the comments section below.
Guide to Setting Live Wallpapers in Windows 10
Published
5 min read
How to Set Live Wallpapers & Animated Desktop Backgrounds in Windows 10
In the era of personalization, making your operating system look and feel unique has become more crucial than ever. For Windows 10 users, live wallpapers and animated desktop backgrounds can add an extra layer of charm and aesthetics to your workspace. In this comprehensive guide, we’ll explore how to set live wallpapers and animated desktop backgrounds in Windows 10, along with some tools and tips to make your experience seamless.
Understanding Live Wallpapers and Animated Backgrounds
Before diving into the ‘how-to’ section, let’s clarify what live wallpapers and animated backgrounds are. Live wallpapers are animated backgrounds that make your desktop more dynamic compared to static images. These wallpapers can change based on system events or time, and they can react to user interactions. Animated backgrounds may not always be as interactive but still bring life to your desktop by including moving elements.
Benefits of Live Wallpapers
- Personalization: A live wallpaper allows you to express your personality or mood through your desktop.
- Dynamic Environment: Unlike a static image, live wallpapers can create an engaging and ever-changing workspace.
- Unique Features: Many live wallpaper apps come with special features like weather updates, clocks, or calendars integrated into the wallpaper.
Limitations to Consider
- System Resources: Live wallpapers can use more CPU and GPU resources compared to static wallpapers. This can detract from performance, particularly on lower-end machines.
- Distraction: While some users find live wallpapers engaging, others may find them distracting, affecting workflow and productivity.
- Compatibility Issues: Many live wallpaper applications can have varying levels of compatibility, so it’s essential to choose trusted sources.
Setting Up Live Wallpapers
Method 1: Using Third-Party Applications
Windows 10 does not support live wallpapers natively, so the easiest way to set live wallpapers is through third-party applications. Here are some popular options:
1. Wallpaper Engine
Overview: Wallpaper Engine is a highly popular paid application available on Steam that enables users to use live wallpapers created by the community or create their own.
Steps to Install and Use Wallpaper Engine:
-
Purchase and Download:
- Visit the Steam Store.
- Search for «Wallpaper Engine.»
- Purchase the software and install it.
-
Launch the Application:
- After installation, launch Wallpaper Engine from the Steam Library.
-
Browse for Wallpapers:
- You will find a plethora of live wallpapers available in the app.
- Use the search function or categories to filter the wallpapers you want.
-
Set the Wallpaper:
- Click on a wallpaper to preview it.
- Click the «Apply» button to set it as your desktop background.
-
Customization:
- Many wallpapers come with customizable settings, allowing you to adjust animations, color, and other features. Right-click on the wallpaper icon in the Wallpaper Engine app for more options.
2. DeskScapes
Overview: DeskScapes is another powerful tool for setting live wallpapers in Windows 10. It offers both animated and video wallpapers, allowing complete customization.
Steps to Install and Use DeskScapes:
-
Purchase and Download:
- Go to the DeskScapes official website.
- Download and install the software.
-
Open DeskScapes:
- Launch DeskScapes after installation.
-
Choose a Wallpaper:
- Browse through the collection of wallpapers available in the app.
- You can also create your own animated wallpapers using video files.
-
Apply the Wallpaper:
- Select the wallpaper you want and click on «Apply» to set it as your background.
-
Customization:
- You can adjust effects like brightness, contrast, and animation speed from the DeskScapes settings.
Method 2: Using Video Wallpapers
Another interesting alternative for live wallpapers includes using video files as your background. You can set a video as your wallpaper through different applications.
VLC Media Player
While primarily a media player, VLC can also be used to set a video as your wallpaper. Here’s how:
-
Download VLC:
- If you haven’t already, download and install VLC Media Player from its official website.
-
Open a Video:
- Launch VLC and play the video you want to use as your wallpaper.
-
Set Video as Wallpaper:
- Right-click on the video, go to «Video,» and select «Set as Wallpaper.»
Method 3: Using Windows Themes
For users who prefer a more traditional approach but still want some visual interest, using Windows themes can be a great option. While themes won’t offer live wallpaper functionality, they can provide a varied and colorful static experience.
-
Settings:
- Open the «Settings» app (Windows + I).
- Click on «Personalization» then «Themes.»
-
Choose a Theme:
- You can select a pre-installed theme or download new themes from the Microsoft Store. Choose one that reflects your personal style.
-
Apply:
- Once you find a theme you like, click on it to apply it to your desktop.
Tips for Choosing the Right Live Wallpaper
-
Performance Check: Ensure that your system can handle live wallpapers without affecting performance. Check your CPU and RAM usage when using live wallpapers.
-
Relevance: Choose wallpapers that resonate with you personally. If you love nature, find animated backgrounds depicting landscapes or animals.
-
Aspect Ratio: Ensure that the wallpaper aspect ratio matches your display resolution to avoid distortion.
-
Regular Update: Regularly change your live wallpapers to keep the desktop fresh and exciting.
-
Usage Consideration: If you are using your system for productivity or work, be mindful of how distracting a live wallpaper might be.
Troubleshooting Live Wallpapers Issues
-
Performance Issues:
- If you experience lag or performance issues with live wallpapers, consider lowering the graphic settings in the wallpaper application or switching to static images.
-
Wallpaper Not Applying:
- Ensure the application is running and configured to apply wallpapers correctly. Restart the application or your computer if the wallpaper fails to display.
-
Compatibility:
- If you face issues with a specific application, check if there are updates available or look for alternative applications that offer similar functionality.
Conclusion
Setting live wallpapers and animated backgrounds in Windows 10 brings a new level of personalization to your desktop experience. Through the use of third-party applications like Wallpaper Engine and DeskScapes, you can select from a wide range of engaging and dynamic wallpapers. While there are benefits, it’s essential to consider system performance and potential distractions.
Whether you choose to apply vibrant live wallpapers or simply explore Windows themes, take the time to find the right fit for your workflow and aesthetic. Your operating system should not only be a tool but also a reflection of your personality and creativity. Happy customizing!
Windows 10 offers a range of customization options to enhance your overall user experience. One such feature is the ability to set a live wallpaper on your lock screen. Live wallpapers are dynamic and visually pleasing, allowing you to add a touch of personalization to your Windows 10 lock screen. If you’re wondering how to set a live wallpaper on your lock screen in Windows 10, follow the steps below:
Step 1: Open the Microsoft Store on your Windows 10 device.
Step 2: Search for «Live Wallpapers» in the store’s search bar.
Step 3: Browse through the available live wallpaper apps and select the one you prefer.
Step 4: Click on the app to view its details and features.
Step 5: Click on the «Get» or «Install» button to download and install the app on your device.
Step 6: Once the app is installed, launch it and explore the available live wallpaper options.
Step 7: Select the live wallpaper you want to set as your lock screen background and follow the app’s instructions to apply it.
| Pros | Cons |
|---|---|
| 1. Adds visual appeal and personalization to your lock screen. | 1. Some live wallpaper apps may contain ads or require in-app purchases for additional features. |
| 2. Offers a wide range of dynamic and interactive wallpapers to choose from. | 2. Live wallpapers may utilize system resources and affect battery life on laptops and tablets. |
| 3. Easy to download, install, and customize according to your preferences. | 3. Limited options for customization compared to desktop wallpapers. |
Setting a live wallpaper on your lock screen in Windows 10 adds a touch of personality and liveliness to your device. Explore the Microsoft Store and find the perfect live wallpaper app that matches your style and preferences. Customize your lock screen with vibrant visuals that bring your Windows 10 experience to life.
Video Tutorial:Why won t my live wallpaper play on my Lock screen?
Can you set a video as a screensaver Windows?
Certainly! Setting a video as a screensaver in Windows can be done by following these steps:
1. Make sure the video you want to use as a screensaver is saved on your computer.
2. Right-click on an empty area on your desktop and select «Personalize» from the context menu.
3. In the Personalization settings, click on «Lock screen» in the left-hand sidebar.
4. Scroll down and click on «Screen saver settings» located under the «Screen saver» section.
5. In the Screen Saver Settings window that appears, select a screensaver from the drop-down menu. Choose «None» if you want a blank screen.
6. Click on the «Settings» button next to the screensaver drop-down menu.
7. In the Screensaver Settings dialog box, click the «Browse» button and navigate to the location where you have saved your video file.
8. Select the video file and click «OK» or «Apply» to save the changes.
9. Set the desired wait time before the screensaver starts using the «Wait» option.
10. Click «OK» or «Apply» again to exit the Screensaver Settings.
11. Finally, close the Personalization settings window.
Now, when your computer is idle for the specified time, your selected video will be played as the screensaver. Remember, it’s important to choose a video format that is supported by Windows for optimal compatibility.
Please note that the provided steps are based on the assumption of the Windows version and functionality available as of 2023. Different versions of Windows may have slight variations in the steps or options available.
Setting a live wallpaper on the lock screen of your iPhone can add some dynamic and visually appealing elements to your device. Here’s a step-by-step guide on how to do it:
1. Open the Settings app on your iPhone. This can be done by tapping the «Settings» icon on your home screen.
2. Scroll down and tap on «Wallpaper.» It is usually located in the list of options between «Control Center» and «Siri & Search.«
3. In the Wallpaper settings, tap on «Choose a New Wallpaper.«
4. You will see three options: «Dynamic,» «Stills,» and «Live.» Select the «Live» option.
5. Browse through the available live wallpapers and choose the one that you like by tapping on it. You can swipe left or right to see more options.
6. Once you’ve chosen a live wallpaper, you can preview how it will look on your lock screen. To do this, press and hold the screen to see the animation.
7. If you’re happy with the preview, tap on «Set» at the bottom of the screen.
8. You will be presented with three options: «Set Lock Screen,» «Set Home Screen,» or «Set Both.» Choose «Set Lock Screen» to set the live wallpaper only on your lock screen.
9. The live wallpaper will be applied to your lock screen, and you can exit the settings app to see the changes.
That’s it! You have successfully set a live wallpaper on your lock screen. Enjoy the dynamic visuals every time you wake up your iPhone.
Note: Live wallpapers are available on certain iPhone models with compatible software versions. Make sure your device supports live wallpapers and you have updated to the latest iOS version.
Can you have animated lock screen Windows 10?
Yes, it is possible to have an animated lock screen on Windows 10. Here’s how you can set it up:
1. Open the Settings app by clicking on the Start button and then selecting the gear-shaped icon.
2. In the Settings app, click on the «Personalization» category.
3. In the left sidebar, click on «Lock screen.«
4. On the right side, under the «Background» section, choose the «Slideshow» option from the drop-down menu.
5. Click on the «+ Add a folder» button to select a folder containing the animated images or videos you want to use for your lock screen.
6. Once you’ve added the folder, you can customize how your lock screen slideshow behaves by adjusting the settings below, such as the frequency of image changes and whether to shuffle the images or videos.
7. Optionally, you can enable the «Play a slide show on the lock screen» toggle switch to start the slideshow immediately when your screen is locked.
8. Close the Settings app, and now you should have an animated lock screen on Windows 10.
Please keep in mind that the folder you choose should only contain files with supported formats, such as images in JPEG, PNG, or GIF formats, and videos in MP4 or WMV formats. Additionally, animated lock screens may slightly impact system performance, so it’s recommended to use them on capable hardware for the best experience.
How do I set a GIF as my lock screen Windows?
To set a GIF as your lock screen in Windows, follow these steps:
1. Find the GIF: First, you need to have a GIF file that you want to set as your lock screen. Make sure it is saved on your computer.
2. Convert the GIF to a video format: Windows doesn’t directly support GIFs as lock screen wallpapers, so you’ll need to convert the GIF file to a video format like MP4 or WMV. There are many online tools and software available that can help you convert GIF to video. Choose a reliable one and convert your GIF file to the desired video format.
3. Open Windows Settings: Press the Windows key + I to open the Settings app.
4. Go to Personalization: In the Settings app, click on «Personalization.«
5. Select the Lock screen tab: On the left sidebar, click on «Lock screen.«
6. Choose a Background: Under the «Background» section, click on the drop-down menu and choose «Slideshow.«
7. Add your converted GIF video: Click on the «+ Add a folder» button to add the folder where you have saved your converted GIF video.
8. Customize slideshow settings: If needed, you can adjust the settings like frequency, shuffle, or slideshow order. You can also select multiple folders with different GIFs for a dynamic lock screen experience.
9. Save your settings: Once you’ve added the folder and customized the slideshow settings, close the Settings app. Your GIF video will now be set as the lock screen wallpaper.
10. Test it out: Lock your computer screen, and you should now see your GIF video playing as the lock screen wallpaper.
Remember, these steps may vary slightly depending on the version of Windows you are using.
How do I set a GIF as my lock screen Windows 10?
To set a GIF as your lock screen in Windows 10, follow these steps:
1. Find the GIF: Start by locating the GIF you want to use as your lock screen. You can either download a GIF from a website or create your own using various online GIF generators.
2. Convert GIF to MP4: To set a GIF as your lock screen, you’ll need to convert it to MP4 format since Windows 10 doesn’t directly support GIFs for lock screen backgrounds. You can use online tools like EZGIF or CloudConvert to convert the GIF to MP4. Make sure to keep the duration of the MP4 short to prevent excessive battery drain.
3. Rename the MP4 file: Once the GIF is converted to MP4, rename the file extension from «.mp4» to «.gif.» Although the file format is still MP4, this trick will allow Windows to recognize and use it as a lock screen background.
4. Copy the MP4 (renamed as GIF) to a specific folder: Navigate to the following path on your PC: «C:\Windows\Web\Screen.» Create a new folder within the «Screen» folder and give it a name (e.g., «GIF Lock Screen«).
5. Place the MP4 (renamed as GIF) in the new folder: Move the renamed MP4 file into the new folder you just created.
6. Set the GIF as your lock screen: Right-click on an empty space on your desktop and select «Personalize» from the context menu. In the left sidebar, click on «Lock screen.» Under the «Background» drop-down menu, choose «Slideshow.«
7. Configure slideshow settings: Click on the «Browse» button to locate the new folder you created in step 4 («GIF Lock Screen«). Select the folder and click «Choose this folder.» Finally, ensure that the «Change picture every» drop-down menu is set to «1 minute» to ensure smooth GIF animation playback.
That’s it! You’ve successfully set a GIF as your lock screen in Windows 10. Now, each time you lock your computer, you’ll see the animated GIF in action.