
Customize Folder Icons (Native Windows Feature)
4 STEPS
EASY
2 MIN
Rainbow Folders (Lightweight Third-Party Tool)
4 STEPS
EASY
2 MIN
Folder Marker (Category-Based Color Coding)
3 STEPS
EASY
2 MIN
Manual Registry Edit (Advanced Users Only)
7 STEPS
EASY
2 MIN

Sign in to your MUO account

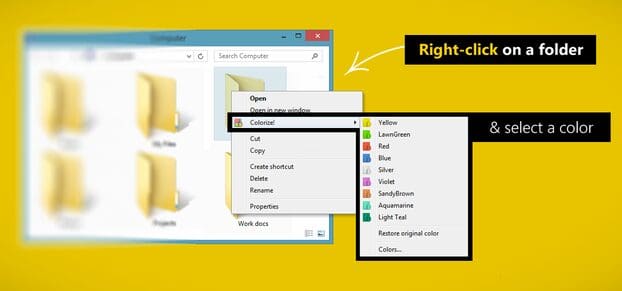
Wouldn’t it be great if you could change the color of your folders in Windows? Unfortunately, no version of Windows has given us a way to customize folder colors. As such, the only way to achieve this goal is to turn to third-party customization software.
There are a few software packages that enable you to customize folders’ colors on Windows 11. For this article, we’ll be exploring the freeware program Rainbow Folders to add a little bit of color to your desktop.
How to Install Rainbow Folders
The Rainbow Folder program is a lightweight tool that you can install onto most Windows platforms. This software enables you to adjust the color for selected folders with Hue and Saturation bars. It also includes three alternative folder style options.
Here’s how to download and install Rainbow Folders on Windows 11:
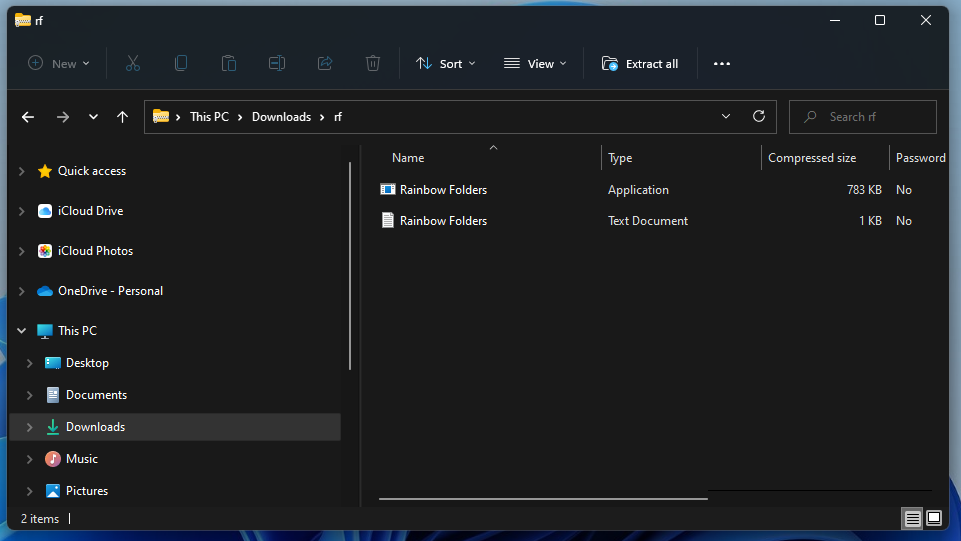
- First, open the Rainbow Folders Softpedia page within your browser.
- Click the Download Now button to save its ZIP file to a folder.
-
Select the rf ZIP archive, and click the Extract all button.

- Then click the Show extracted files when complete option.
-
Select the Extract option.

- Open the extracted rf folder.
-
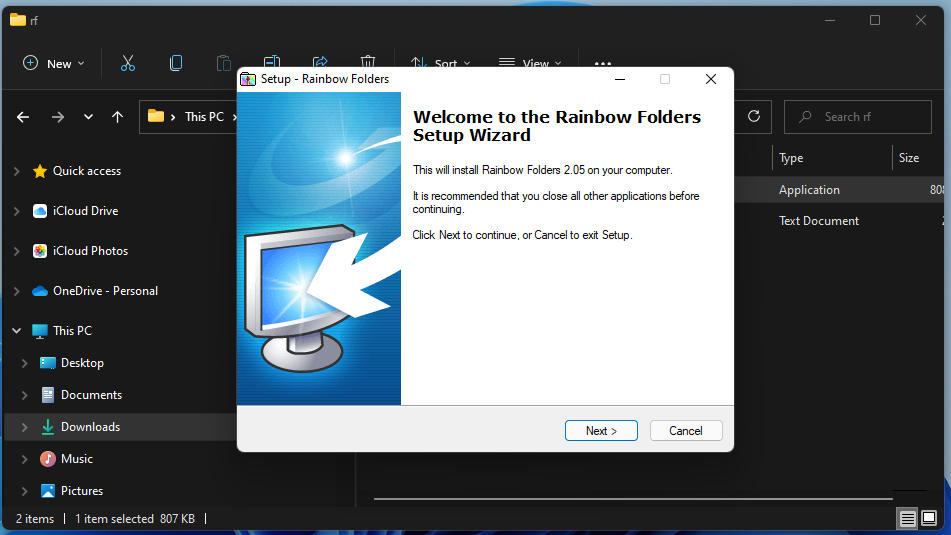
Click Rainbow Folders to open its setup wizard.

- Press the Next buttons, choose a folder for the software, and select the Install option.
- Also, select the Install system shell extension checkbox.

How to Change Folders’ Colors on Windows 11
Once you’ve installed the software, it’s time to change the colors of your folders.
To do so, open the Rainbow Folders window. If you’re not sure where installed it, press the Win + S hotkey to enter Rainbow Folders within Windows 11’s search box. Then you can select to open its window from there.
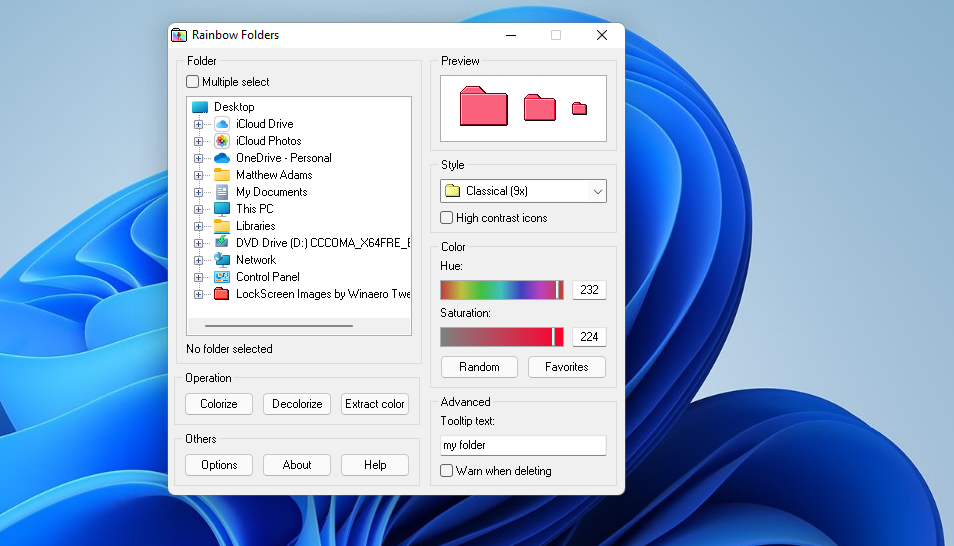
Click This PC within the directory selection section to expand that category. Then select Local Disk (C:) to view your directory tree. Choose a folder to change to the color for. You can choose multiple folders by clicking the Multiple select option.
Now drag the Hue bar slider left or right to choose a color. Drag the Saturation bar’s slider to further configure your selected color. Press the Colorize button to apply the selected color.
After that, open File Explorer’s window. Open the folder you changed the color for there to see the effect. It will have the color you chose for it with Rainbow Folder.

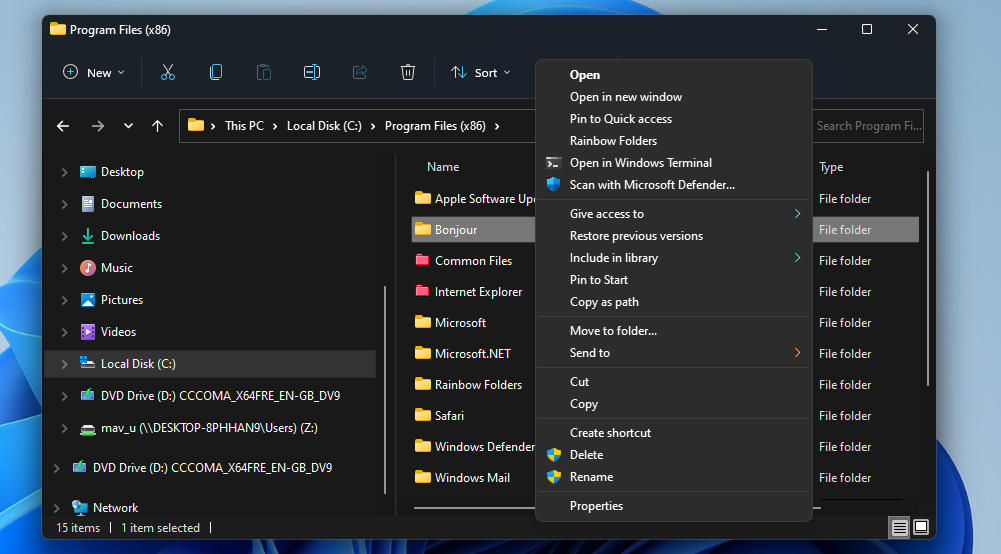
You can also select a Rainbow Folders context menu option. To do so, right-click a folder in File Explorer and select Show more options. Select the Rainbow Folders context menu option there to bring up the window.
Now you can apply a color change to the folder you right-clicked on. Note that you might have to close and reopen File Explorer for color changes to come into effect.
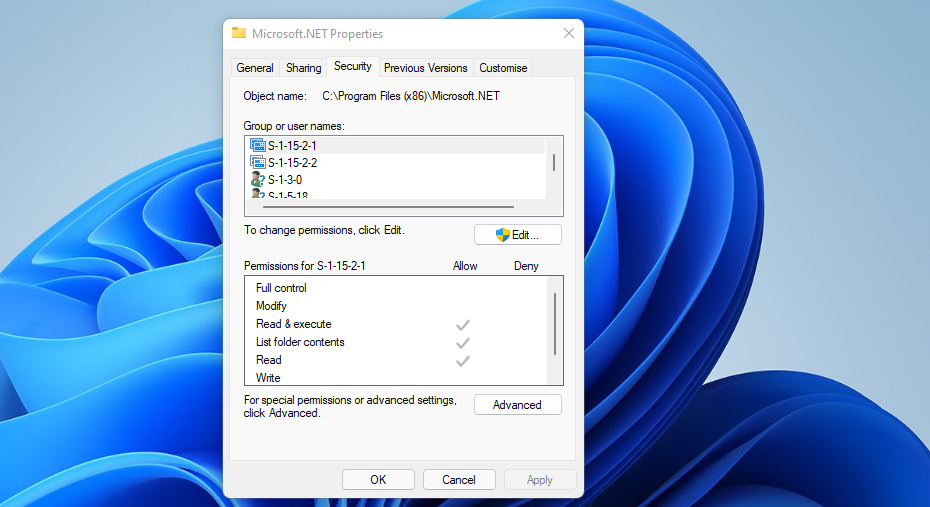
Adjust Permissions For Folders You Can’t Change the Color For
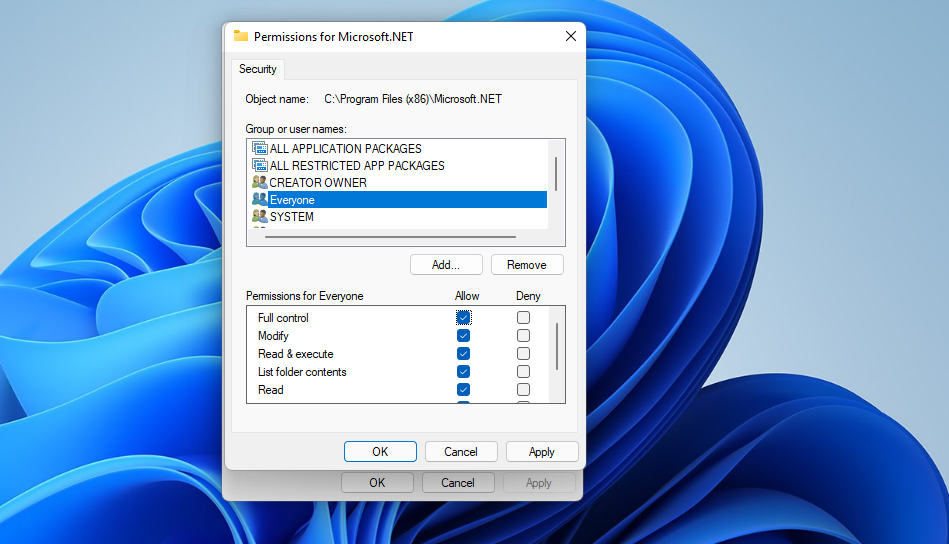
If a “Failed to write icon file” error message pops up and a folder’s color doesn’t change when you try to alter it, you probably need to adjust permissions for the folder. For Rainbow Folders to work, you need full control permissions to modify folders.HJere is how you can apply such permission to a folder you can’t change the color for.
- Right-click the folder you need to change the color for and select Properties.
-
Select the Advanced option on the Security tab shown directly below.

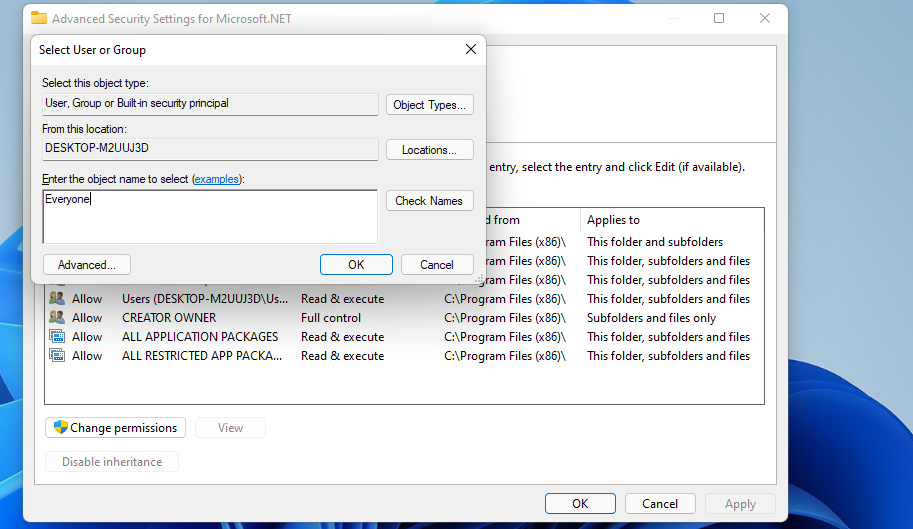
- Click Change on the Advanced Security Settings window.
-
Enter Everyone in the Select User or Group window, and click the OK button.

-
Then select the Replace owner on subcategories and objects checkbox.

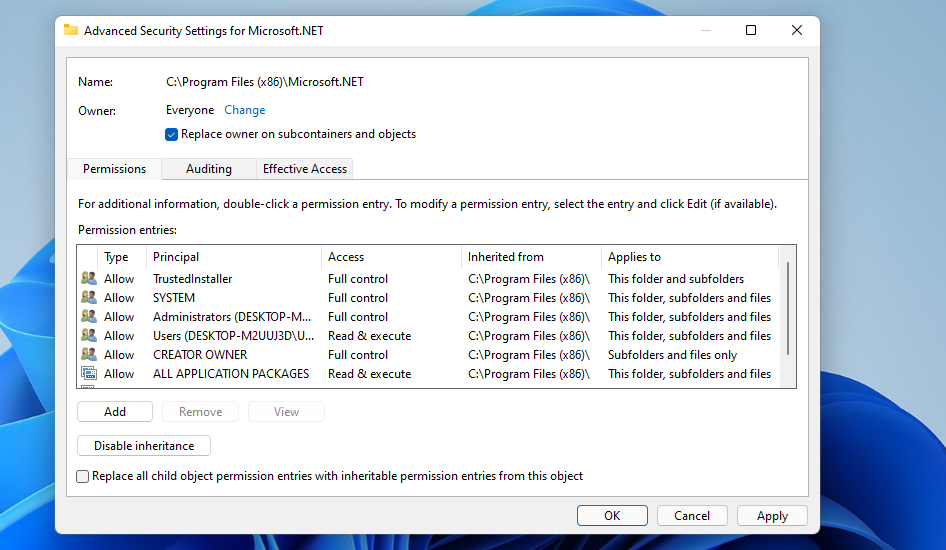
- Click Apply to save the options.
- Select OK to exit the Advanced Security Settings window.
- Press the Edit button on the folder’s properties window.
-
Press the Add button in the screenshot directly below.

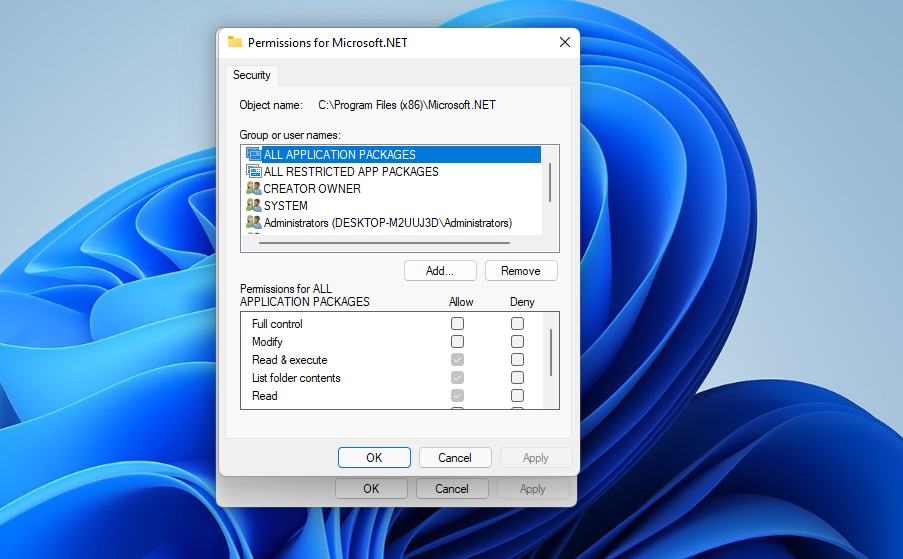
- Input Everyone within the text box on the Select User window, and click OK to exit.
- Select the Everyone group on the permissions window.
-
Then select the allow Full control and Modify checkboxes.

- Press the Apply and OK buttons.
- Finally, click OK within the folder properties window.
- Now try changing the color of the folder you changed permissions for.
Add More Colorful Folders to File Explorer With Rainbow Folders
That’s how you can apply all the colors of the rainbow to folders in Windows.
It’s a pity there aren’t any built-in Windows 11 options for doing so. However, Rainbow Folders is a nifty customization kit with which you can apply your favorite colors to folders. With it, you can add different colors to folders to highlight your most important ones or apply color-coding schemes for them. As such, Rainbow Folders is a freeware software package that’s worth using
Changing the color of a folder in Windows 11 is a simple way to personalize and organize your files. You can do this in a few quick steps without needing any additional software. Just follow the instructions below and you’ll have your folders looking exactly how you want them in no time!
Before we dive into the steps, it’s important to note that this process will help you easily identify folders by color-coding them, which can be a great productivity boost.
Step 1: Right-click on the folder you want to change
Right-click on the folder you wish to change the color of, and a menu will pop up.
This menu has a lot of options, but for now, we’re focusing on changing the folder color. Don’t click anything else just yet!
Step 2: Select «Properties»
In the menu that appears, find and click on «Properties» at the bottom.
This will open a new window with several tabs at the top. These tabs give you different ways to customize your folder, but we’re going to the «Customize» tab.
Step 3: Go to the «Customize» tab
In the Properties window, click on the «Customize» tab.
Here, you’ll find various options to change the look of your folder, including the option to change the icon which is what we need for changing the folder color.
Step 4: Click on «Change Icon…»
Under the «Folder icons» section, click the «Change Icon…» button.
A new window will open with a selection of different icons. You might see some colored icons here, but if not, don’t worry!
Step 5: Choose a new icon with the color you want
Browse through the icons and choose one with the color you’d like your folder to be.
If you don’t like any of the default icons, you can also download custom folder icons from the internet in the color of your choice. Make sure to download icons from reputable sources to avoid malware.
Step 6: Click «OK» to confirm
Once you’ve selected your new icon, click «OK» to confirm your choice.
You’ll be taken back to the «Customize» tab where you can now see the new icon next to the «Change Icon…» button. Click «Apply» then «OK» to finalize the changes.
After completing these steps, you’ll see the folder’s icon change to the color you selected. It’s a simple way to make your folders stand out and make your desktop or file explorer more colorful and organized.
Tips: Changing Folder Color in Windows 11
- Choose colors that are visually distinct from each other to make it easier to differentiate between folders.
- Use a consistent color-coding system across your folders for better organization.
- Remember that changing the folder icon will not change the color of the folder name.
- If you’re using the folder on a network, other users won’t see the color change unless they have the same icon settings.
- Create backups of your custom icons in case you need to reapply them after a system update or reset.
Frequently Asked Questions
Can I change the color of multiple folders at once?
No, you have to change the color of each folder individually following the same steps.
Do I need to download any software to change folder colors in Windows 11?
No, you can change folder colors using the built-in options in Windows 11 without any additional software.
Will changing the folder color affect the contents of the folder?
No, changing the folder color only affects the appearance of the folder icon. The contents remain unchanged.
What file types can be used for custom folder icons?
The most common file types for custom icons are .ico files, but you can also use .exe or .dll files that contain icon resources.
Can I revert the folder color back to default?
Yes, just follow the same steps and select the default folder icon to revert the changes.
Summary
- Right-click on the folder and select «Properties»
- Click on the «Customize» tab
- Press «Change Icon…»
- Choose a new icon with the color you want
- Click «OK» to confirm
Conclusion
Changing the color of a folder in Windows 11 is a quick and easy way to add a personal touch to your digital workspace. It’s not just about aesthetics; it can also help you stay organized and efficient by making important folders instantly recognizable. Whether you’re a student organizing schoolwork or a professional sorting through client files, color-coding your folders can be a real game-changer.
Remember, while it may seem like a small tweak, the impact on your productivity can be significant. Plus, who doesn’t love a splash of color in their daily routine? So go ahead, give it a try, and see how it transforms your file management experience. If you ever get tired of the colors or want to change things up, simply follow the steps again to choose a new hue.
And there you have it, folks! Now you’re all set to change folder color in Windows 11 and make your digital life a little brighter. Happy organizing!
Matt Jacobs has been working as an IT consultant for small businesses since receiving his Master’s degree in 2003. While he still does some consulting work, his primary focus now is on creating technology support content for SupportYourTech.com.
His work can be found on many websites and focuses on topics such as Microsoft Office, Apple devices, Android devices, Photoshop, and more.
Windows 10 and 11 were a huge upgrade from their predecessors. Microsoft added many cool features, including taskbar improvements, window sharing, and more. However, one thing that Microsoft forgot to include is new ways to customize your folder icons.
Do you ever wish that there was a way to label your folder icons in any way other than renaming them? Do you wish there was a fun way to customize your folder icons on Windows? Well, turns out there is! Read on to find out how to change folder color on Windows.
Video Guide How to Change Folder Color in Windows 11/10
How to Change Folder Color in Windows 10 and Windows 11?
Just like Folder Colorizer for Mac, Softorino has a dedicated folder colorizer for Windows 10 and 11. Released back in 2012 and being the first of its kind, Folder Colorizer 2 is the most popular and reliable folder colorizer for Windows. It brings an all new way to label your folders.
When you install Folder Colorizer 2 on your Windows PC, it will be integrated into the context menu. So you can simply right-click on any folder and find the option to colorize your folders. There are a number of preset colors in the list to choose from. However, if you want to choose a different color, you can always create your own shade by using a color wheel.
Wondering how it works? Check out this step-by-step guide below:
Step 1: Download and Install Folder Colorizer 2 on Your PC
Download and install Folder Colorizer 2 on your Windows PC. It is absolutely free to download and comes with a free trial. If you like the app and want to continue using it, you can purchase it for as low as $2.92 billed annually.
Step 2: Right Click on a Folder
Once you have downloaded and installed the app, Folder Colorizer 2 will integrate the option to colorize your folders in the context menu. Right-click on any folder and find the “Colorize!” option.
Step 3: Colorize!
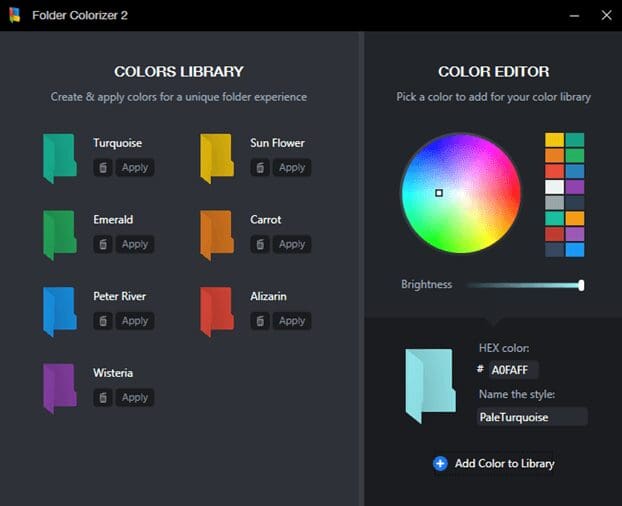
Hit that “Colorize!” option and select a color from the list of preset colors. If you don’t find the color that you are looking for, you can always create a new one by using the color wheel. Click on the Colorize! > “Colors…” to create a custom color of your choice.
That’s it! That’s how easy it is to colorize folders in Windows 10 and Windows 11. If you want to restore the original color of a colored folder, you can always roll back to the default one by right-clicking on a folder and selecting the “Restore the Original Color” option.
All it takes is 1 second to colorize your folders and label them in a unique way. You can similarly colorize hundreds of folders and make your Windows PC look more appealing.
Why Use Folder Colorizer 2?
Wondering what makes Folder Colorizer 2 the best app to colorize your folders? Here’s what:
- It has more than 5 million downloads from all over the world.
- It has been raved about by the top tech blogs.
- It is absolutely safe to use.
- It has ZERO ads or intrusive malware.
- It comes with a color palette of 30 colors and also lets you create custom colors.
- It is developed by a dedicated team at Softorino who also developed WALTR and Softorino YouTube Converter.
Final Thoughts
Now that you know how to change folder color in Windows 11/10, go ahead and try the app out. You will definitely fall in love with how Folder Colorizer 2 lets you personalize your folders and give them a colorful twist.
Содержание статьи:
- Настраиваем внешний вид папок
- Фон (в виде картинки, и заливка цветом)
- Значки, цвета
- Вопросы и ответы: 2
Компьютерный привет!
Эта заметка будет относительно-небольшой: по настройке внешнего вида папок в Windows 11 (10) — их фона, и значков (см. скриншот ниже 👇). Тем паче, что большинство утилит, которые позволяли настраивать оформление папок в Windows XP/7, — в современной 11-й ОС не работают…
Кто-то на подобные «украшательства» смотрит весьма скептически, однако, если в документах (или на раб. столе) много папок — то раскрасив их в разные цвета (или изменив значки) — можно существенно упростить и ускорить поиск нужных директорий (ведь даже мельком взглянув — можно быстро найти нужный каталог!). Согласитесь удобно? Да и полезно в офисной работе!👌
Кстати, эта заметка рекомендуется, как дополнение к инструкции по оформлению и настройке дизайна Windows — 📌https://ocomp.info/izmenit-oformlenie-win.html
Итак, по теме…
Было — стало. Задача выполнена!
*
Настраиваем внешний вид папок
Фон (в виде картинки, и заливка цветом)
Вариант 1
Эту статью хочу начать с утилиты QTTabBar. Она явл. своего рода дополнением для Windows 10/11, которое позволяет расширить возможности проводника и настроить его цветовую гамму под-себя! Разумеется, можно изменить и фон папки (что, кстати, бывает очень полезно, когда белый фон «бьет» по глазам…).
*
📌QTTabBar
Офиц. сайт: http://qttabbar.wikidot.com/ (для Windows 11 — см. внимательно описание, на офиц. сайте несколько ссылок).
Важно: после установки QTTabBar — перезагрузите компьютер!
*
1) Если на вашем ПК уже установлен QTTabBar — то, открыв любую папку, вы увидите в верхнем меню появл. вкладки (как в браузере). Попробуйте рядом с ней нажмите правой кнопкой мыши и откройте QTTabBar Options (либо сочетание Alt+O).
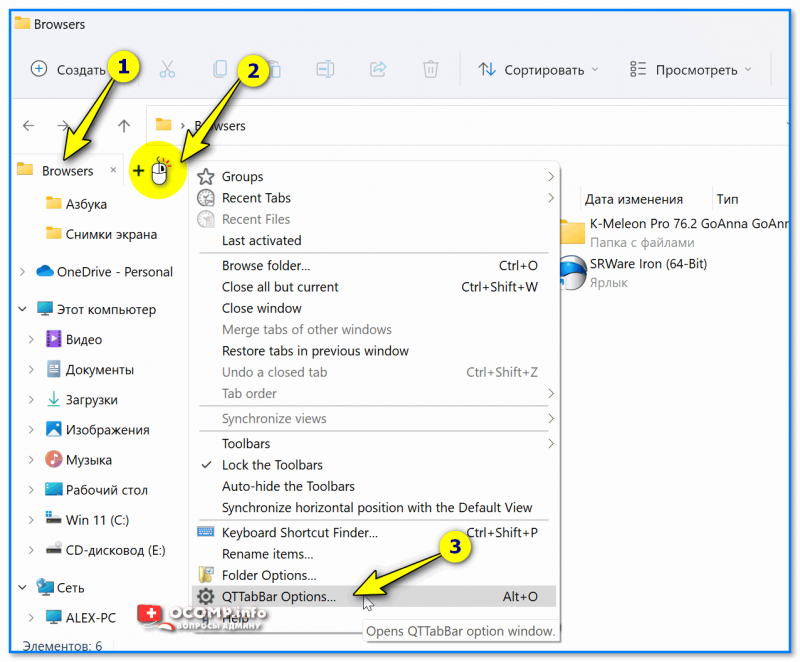
ПКМ — Alt+O — открываем настройки QTTabBar
2) В настройках QTTabBar (для изменения фона папки) необходимо перейти в раздел «Compatible Folder View» и включить стили (флажок напротив пункта «Compatible list view style»). Не забудьте нажать на «Apply».
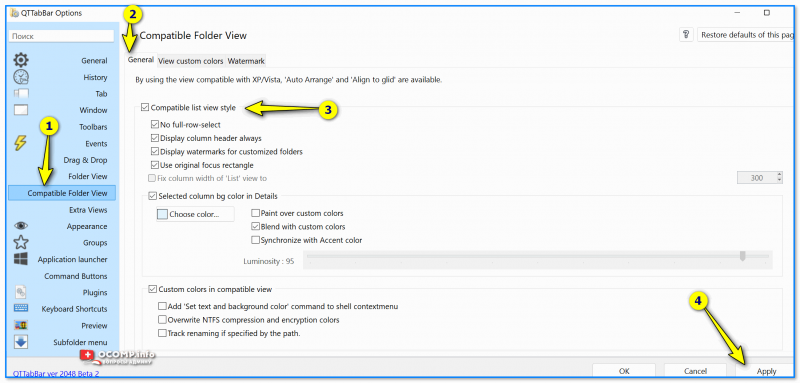
Вкл. стилей
3) Затем в этом же разделе («Compatible Folder View») необходимо открыть вкладку «Watermark» и указать фоновые картинки для разных папок: общие, документы, изображения и т.д. Еще раз нажать на «Apply».
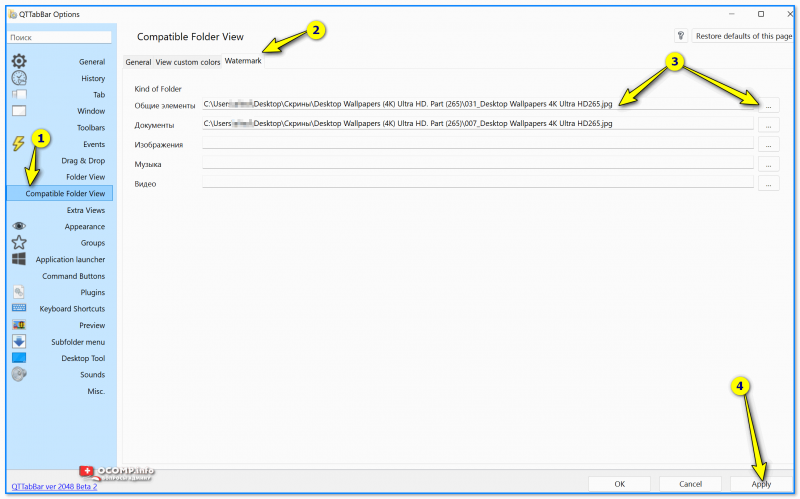
Указываем картинку в качестве фона для папки
4) Поимо фона папки — рекомендую изменить цвет текста (названия файлов); фон, на котором он будет показан; границы. Сделать это можно во вкладке «Appearance / Folder View» — см. скрин ниже. 👇
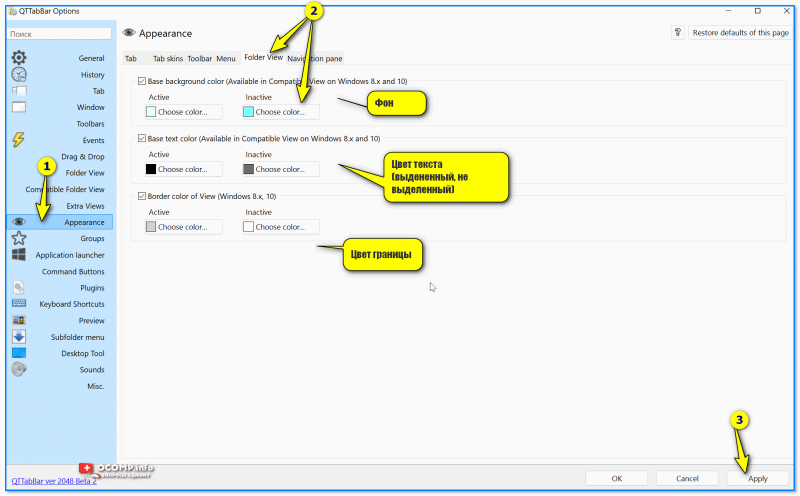
Вид папки
5) Собственно, теперь зайдя в любую папку — вы увидите, что ее фон изменился (да и цвет названий файлов), см. пример ниже 👇. Разумеется, всё это настраивается под-себя (под свой монитор)!
Что получилось
Вариант 2
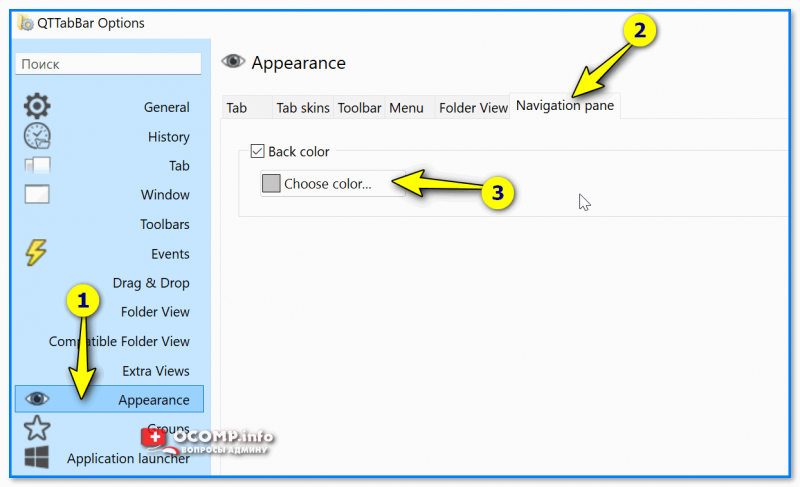
6) Кстати, если «белое» меню слева в проводнике тоже есть желание изменить — откройте вкладку «Appearance / Navigation panel» и поставьте флажок «Back color» — теперь нажав на «Choose color» сможете выбрать цвет заливки бокового меню.
Цвет левой панели проводника
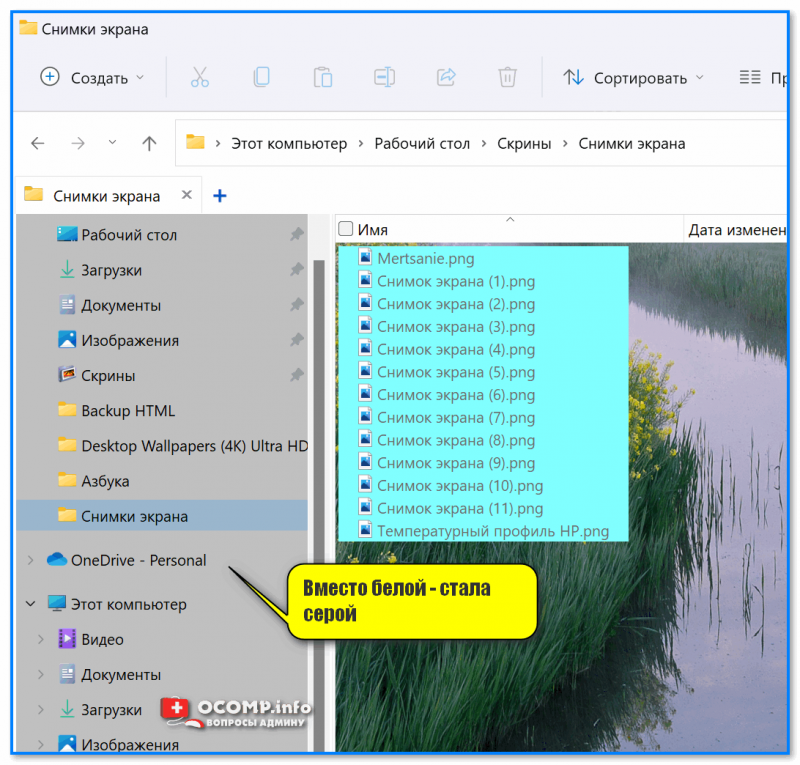
Вместо белой — стала серой
7) Кстати, QTTabBar позволяет изменить значки у папок — вкладка «Groups» 👇 (хотя для этого я бы рекомендовал использовать более удобную утилиту Folder Paint, о ней ниже).
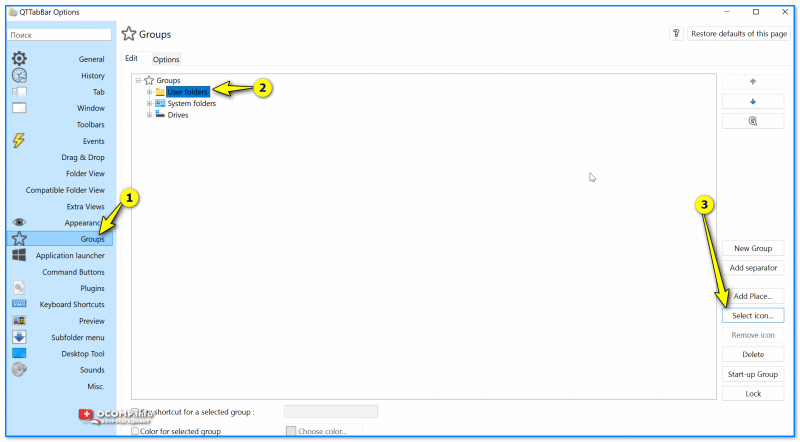
Выбор иконок
 Обратите также, что QTTabBar позволяет назначить быстрые сочетания клавиш для многих стандартных операций + включить звуки для рад операций (например, скопировали что-то в буфер — прозвучал колокольчик… Удобно?!).

Сочетания клавиш
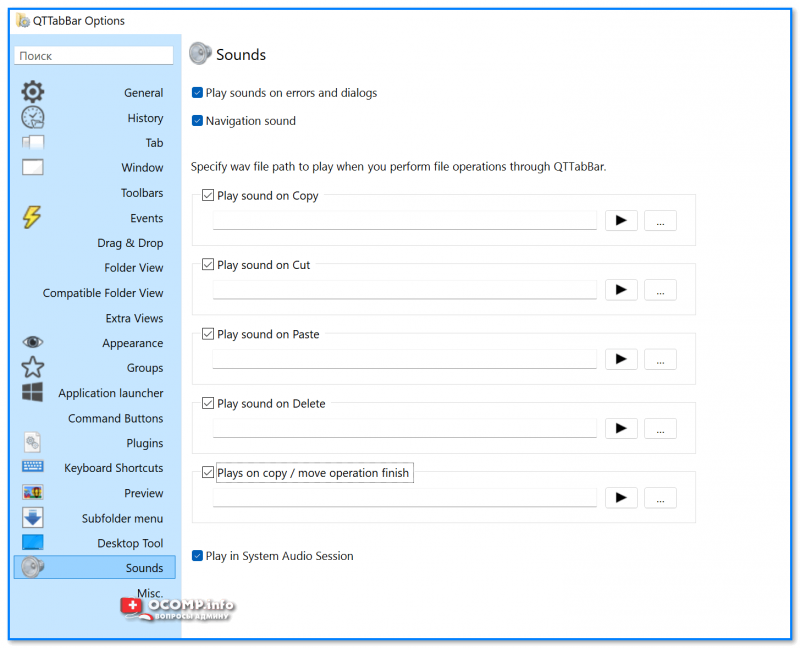
Звуки
*
Вариант 2
Кстати, также снизить кол-ва белого света можно с помощью установки темного оформления в Windows — т.е. вместо белого фона папки будет темный (способ хорош хотя бы тем, что не нужно ставить стороннее ПО).
Для этого достаточно открыть параметры ОС и во вкладке «Персонализация / цвета» задать нужный вариант… См. пример ниже. 👇
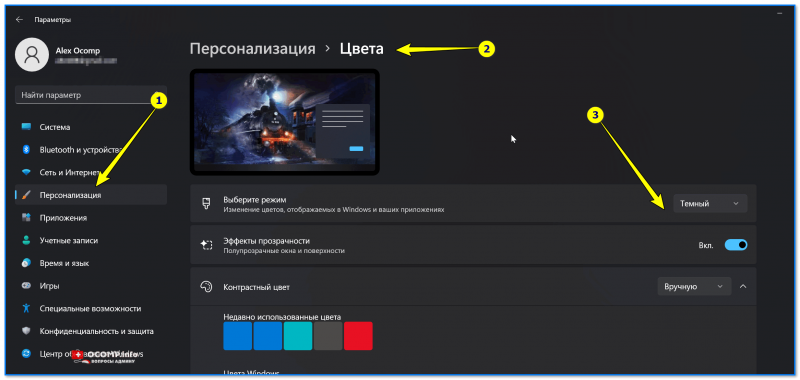
Персонализация — цвета — параметры Windows 11
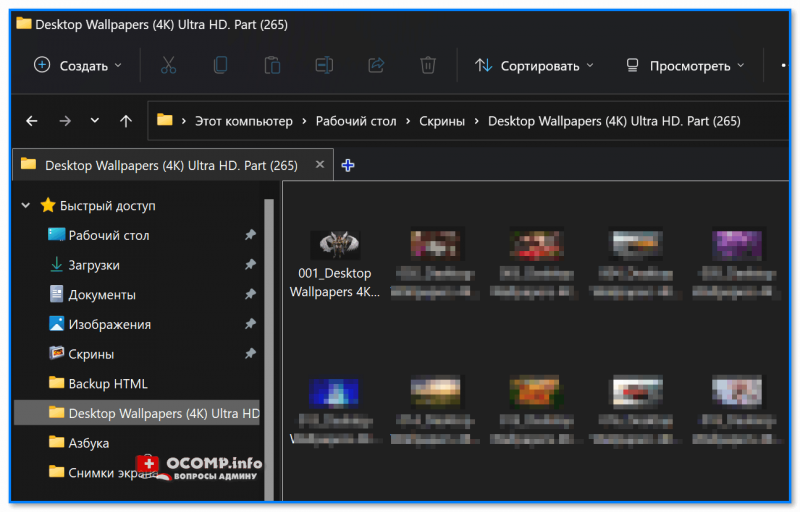
Фон у папок темный стал!
📌 И еще одна ремарка…
Если вы много работаете с папками и файлами — не могу не порекомендовать Total Commander (это добротный менеджер для работы с файлами, явл. хорошей альтернативой проводнику). Разумеется, в его настройках можно задать цвета панелей, файлов, выделений и прочего. 👇
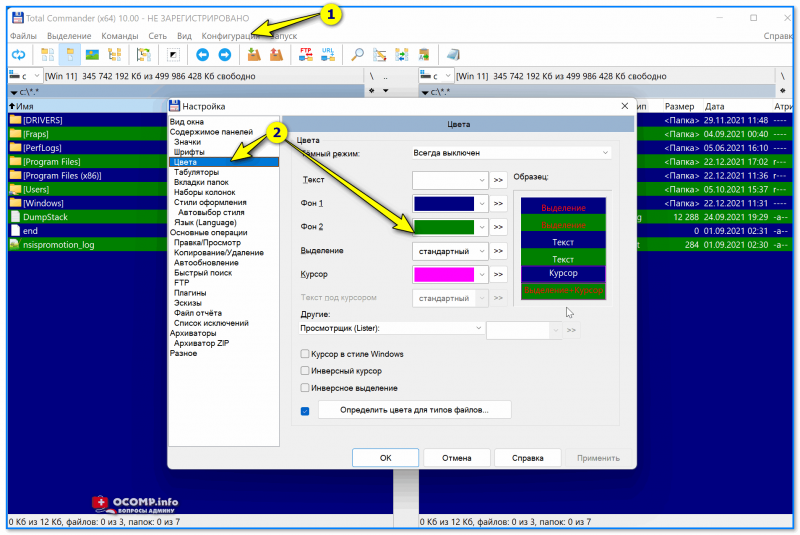
Total Commander — настройки цветов
*
Значки, цвета
Чтобы заменить для определенных папок стандартные значки на что-то отличное — довольно удобно пользоваться утилитой 📌Folder Painter (такая практика очень помогает в домашне-офисной работе — моментально находишь нужный каталог!).
Рассмотрю кратко, как ей пользоваться.
*
1) После запуска Folder Painter — в меню слева нужно выбрать наборы значков для установки и нажать кнопку «Установить».
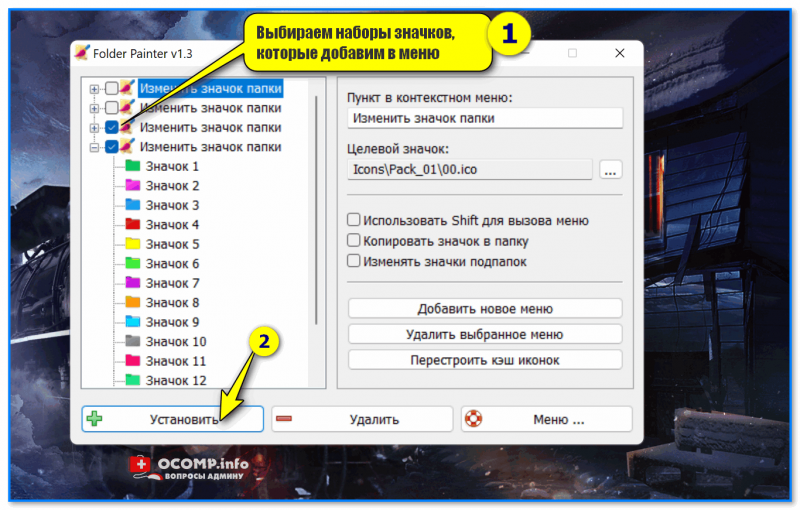
Установка значков в меню
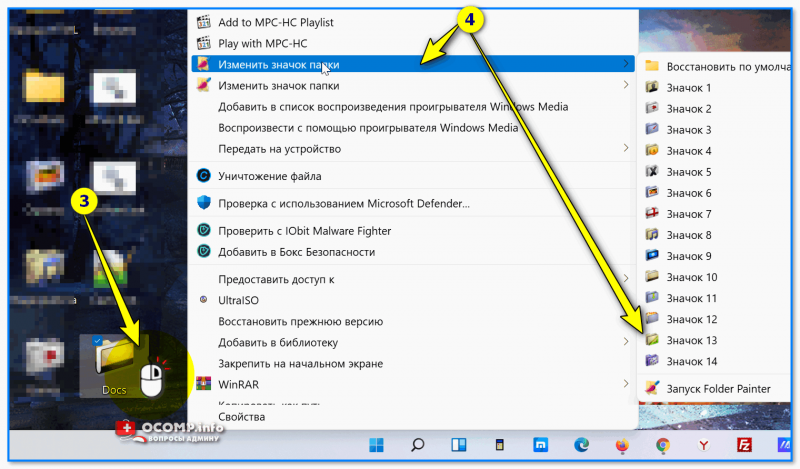
2) Теперь, если нажать ПКМ по папке, в контекстном меню появится вкладка «Изменить значок папки» — можете выбрать тот, который вам нужен!
ПКМ по папке
3) Если значок сразу же не изменился — необходимо перезагрузить проводник (или пере-открыть нужную папку).
Прим.: для перезагрузки проводника — откройте командную строку от имени админа и используйте команду: taskkill /F /IM explorer.exe & start explorer

Перезапускаем
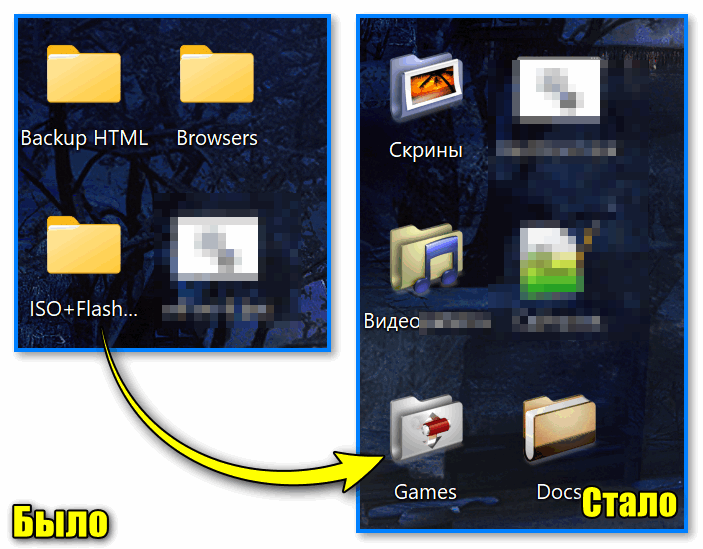
4) См. на парочку скринов ниже — «Было / стало». По-моему, стало довольно наглядно! 😉
Было — стало. Задача выполнена!
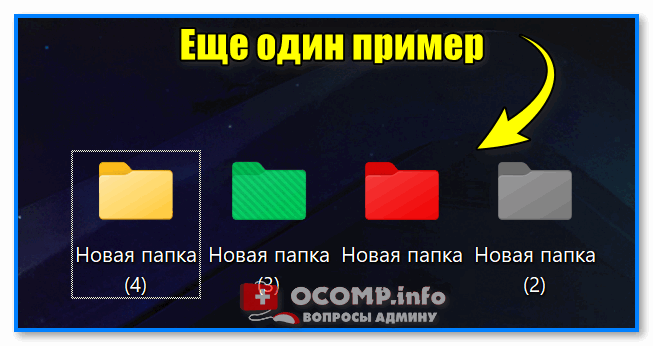
Еще один пример
*
Дополнения по теме — приветствуются ниже, в комментариях!
Успехов!
👋