
How to Enable 10-Bit Color in Windows 11
Enabling 10-bit color in Windows 11 can improve your visual experience, especially if you’re into photo editing or watching high-quality videos. To enable 10-bit color, you’ll need a compatible monitor and graphics card. Navigate to Display Settings, select the advanced display settings, and change the bit depth to 10 bits per channel.
Following these steps will guide you through the process to enable 10-bit color on your Windows 11 system, enhancing the visual depth and range of colors displayed. Let’s get started!
Step 1: Open the Settings App
Navigate to the «Start» menu and click on the «Settings» app.
Opening the Settings app is your gateway to modifying system preferences, including display settings. You can find the Settings app by clicking on the Start button in the lower-left corner or by pressing the Windows key + I.
Step 2: Go to System Settings
In the Settings window, click on the «System» category.
System settings include options for display, sound, notifications, and power. By accessing this section, you can manage various aspects of your computer’s functionality, including your display settings.
Step 3: Open Display Settings
Under the System menu, select «Display.»
The Display menu is where you can adjust screen resolution, orientation, and other display-related settings. This is where you’ll make the necessary changes to enable 10-bit color.
Step 4: Access Advanced Display Settings
Scroll down and click on «Advanced display settings.»
Advanced display settings allow you to fine-tune your monitor’s capabilities. This includes changing the bit depth, which is essential for enabling 10-bit color.
Step 5: Change Bit Depth to 10-Bit
In the Advanced display settings, find the «Bit Depth» option and set it to 10-bit.
This step is crucial. By selecting 10-bit, you enable a broader range of colors and more precise color representation on your monitor, provided your hardware supports it.
After completing these steps, your display should now be utilizing 10-bit color, offering a richer and more vibrant visual experience.
Tips for Enabling 10-Bit Color in Windows 11
- Ensure your monitor supports 10-bit color. Not all monitors have this capability.
- Update your graphics drivers to the latest version to avoid compatibility issues.
- Check that your graphics card supports 10-bit color output.
- Use a high-quality HDMI or DisplayPort cable to connect your monitor.
- Restart your computer after making these changes for optimal performance.
Frequently Asked Questions
What is 10-bit color?
10-bit color provides a broader range of colors and more precise color transitions compared to 8-bit color, resulting in a more vibrant and accurate display.
Do all monitors support 10-bit color?
No, only certain high-end monitors support 10-bit color. Check your monitor’s specifications to confirm compatibility.
Do I need specific hardware to enable 10-bit color?
Yes, you need a compatible monitor and a graphics card that supports 10-bit color.
Can I enable 10-bit color on a laptop?
It depends on your laptop’s display and graphics capabilities. Check your hardware specifications to see if 10-bit color is supported.
Will enabling 10-bit color affect performance?
Enabling 10-bit color might have a minimal impact on performance, but it generally shouldn’t be noticeable unless you’re running graphic-intensive applications.
Summary
- Open the Settings App.
- Go to System Settings.
- Open Display Settings.
- Access Advanced Display Settings.
- Change Bit Depth to 10-Bit.
Conclusion
Enabling 10-bit color in Windows 11 is like unlocking the full potential of your monitor, offering richer and more vibrant visuals. Whether you’re editing photos, watching high-definition videos, or simply enjoying the enhanced color range on your desktop, this feature can make a noticeable difference. Make sure your hardware supports 10-bit color and always keep your drivers updated. For further reading, explore more about color management and display calibration techniques. Now that you know how to enable 10-bit color in Windows 11, why not give it a try and see the difference for yourself? Happy viewing!
Kermit Matthews is a freelance writer based in Philadelphia, Pennsylvania with more than a decade of experience writing technology guides. He has a Bachelor’s and Master’s degree in Computer Science and has spent much of his professional career in IT management.
He specializes in writing content about iPhones, Android devices, Microsoft Office, and many other popular applications and devices.
Read his full bio here.
Win11 подключил через hdmi к TV почему показывает 8 или 12 бит, если подключаю через VGA то 24 бит? Как настроить через HDMI 24 бит? Видеокарта встроенная!
В общем через HDMI всё как то резко, шрифты не сглаженные, углы у окон также не сглаженные и цвета все резкие.


-
Вопрос задан
-
1714 просмотров
Пригласить эксперта
подключил через hdmi к TV почему показывает 8 или 12 бит
Это на каждый канал цвета (красный, зелёный, синий) по 8 бит, в сумме 8+8+8=24
если подключаю через VGA то 24 бит
А это — в сумме те же самые 24.
На самом деле интерфейсу VGA фиолетово до глубины цвета, т.к. он аналоговый, через него цвета не ходят в виде битов. Можно сказать, что по VGA-кабелю теоретически может проходить бесконечно большая глубина цвета, всё равно он замылит чёткость и исказит цвета, сколько бы их ни было на входе.  Даже если кабель очень хороший, всё равно двойное преобразование — из цифры в аналог и из аналога в цифру — всё замылит и исказит.

-
Показать ещё
Загружается…
Минуточку внимания
(Image credit: Future)
On Windows 11, when connecting a monitor, the system can automatically detect and determine the optimal configuration. However, since every monitor is different, it’s up to you to use calibration tools to ensure that the photos, videos, and games render on the screen with the most accurate color representation.
You can find many third-party tools on the internet to calibrate your monitor. However, you can also use the tool that comes as part of the operating system that comes with basic features that help you control the brightness, contrast, and color levels of any display.
This how-to guide will walk you through the easy steps to calibrate your computer monitor on Windows 11.
How to calibrate display on Windows 11
To calibrate your computer’s monitor on Windows 11, use these steps:
- Open Start.
- Search for Display Color Calibration and click the top result to open the app.
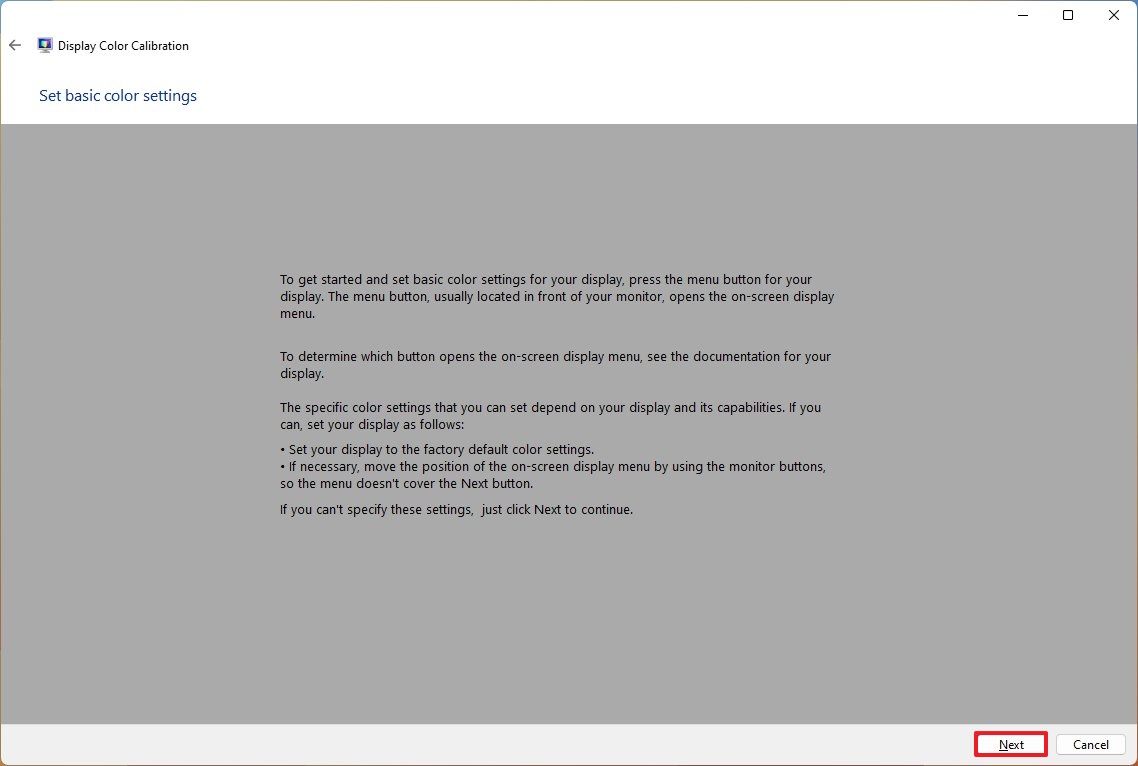
- Click the Next button.
- Quick note: It’s recommended to access the display menu and set the device to the default color settings. If you have a custom configuration, remember to note those settings in the event you need to apply them back. If you don’t know how to access the monitor’s menu, check your manufacturer support website for more specific details.
- Click the Next button again.
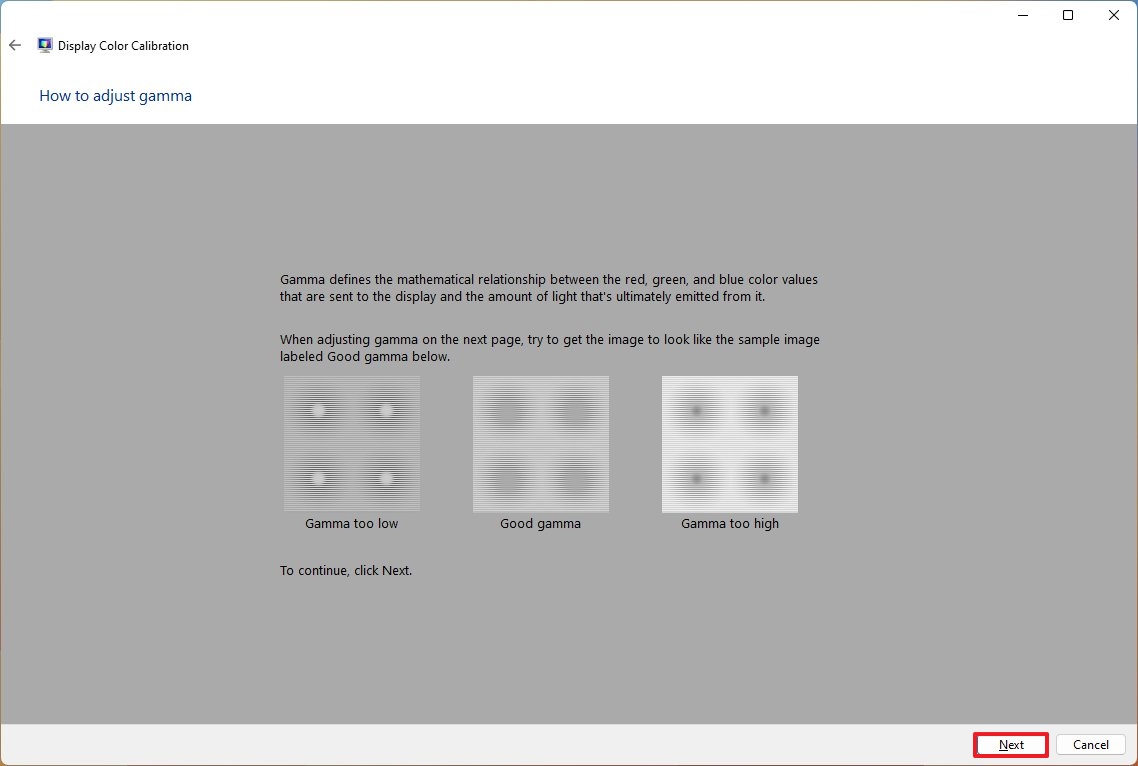
- Click the Next button one more time to continue.
- Change the gamma settings with the slider until the small dots are barely visible.
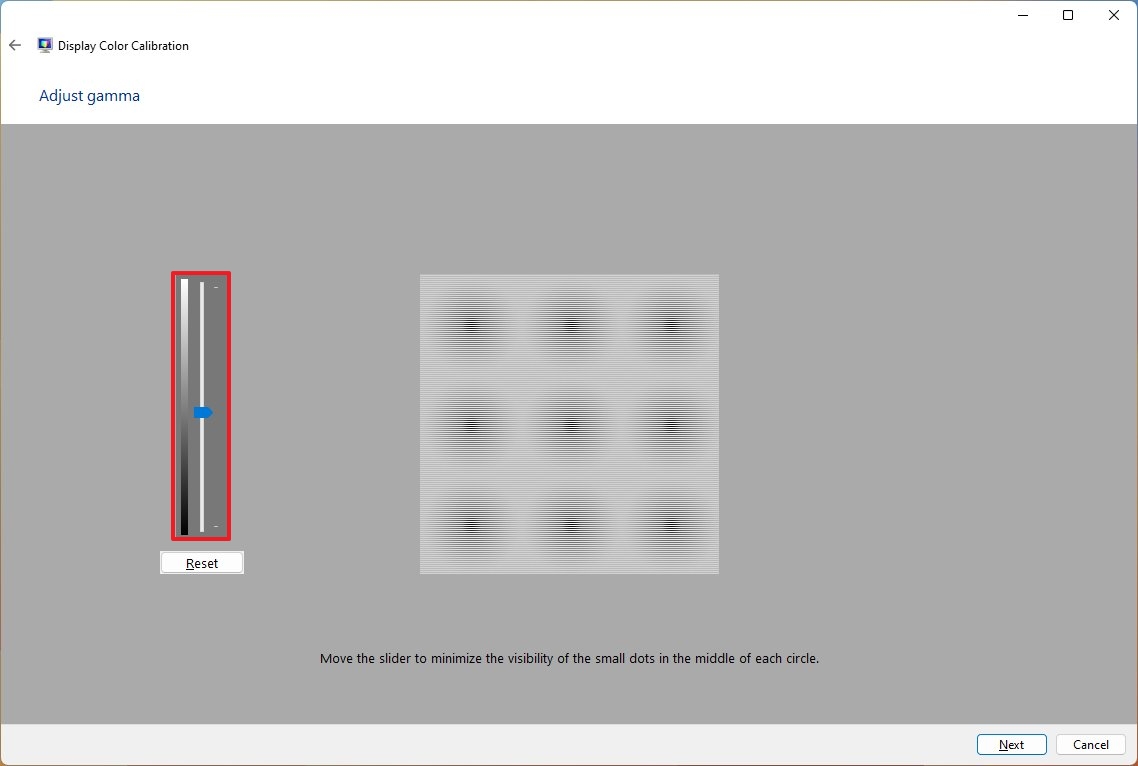
- Click the Next button one more time to continue.
- Change the gamma settings with the slider until the small dots are barely visible.
- Click the Next button.
- Click the Next button again.
- Click the Next button one more time to continue.
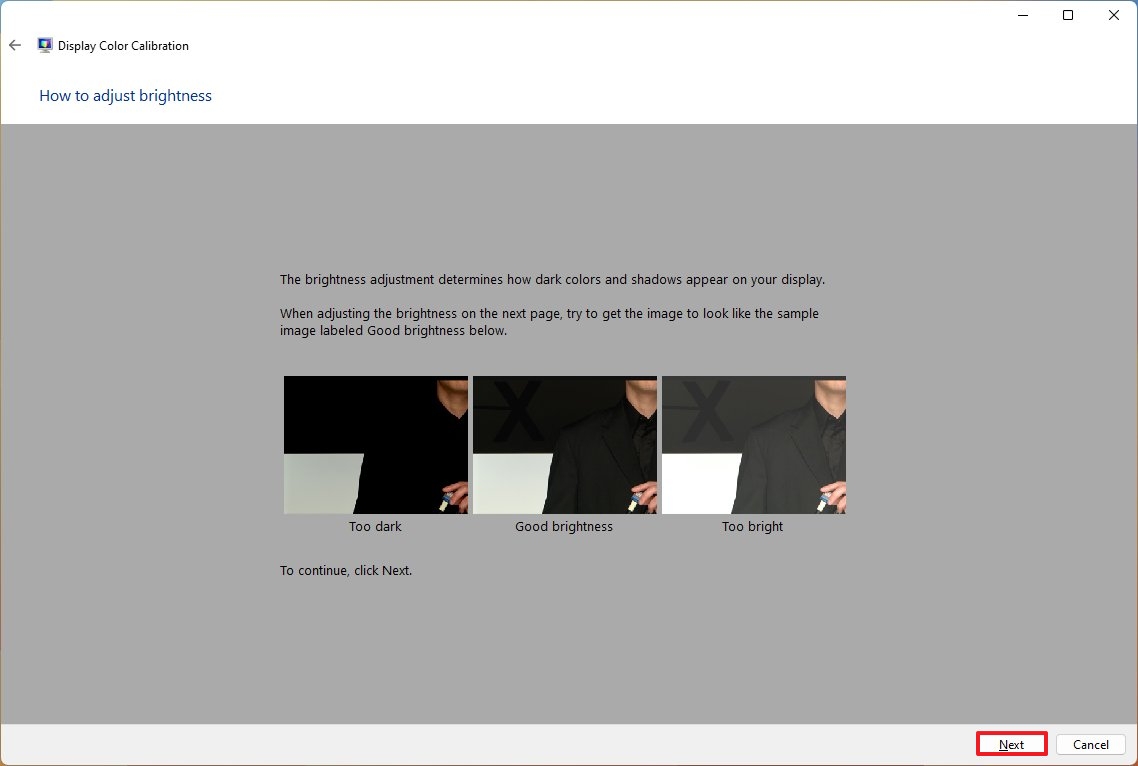
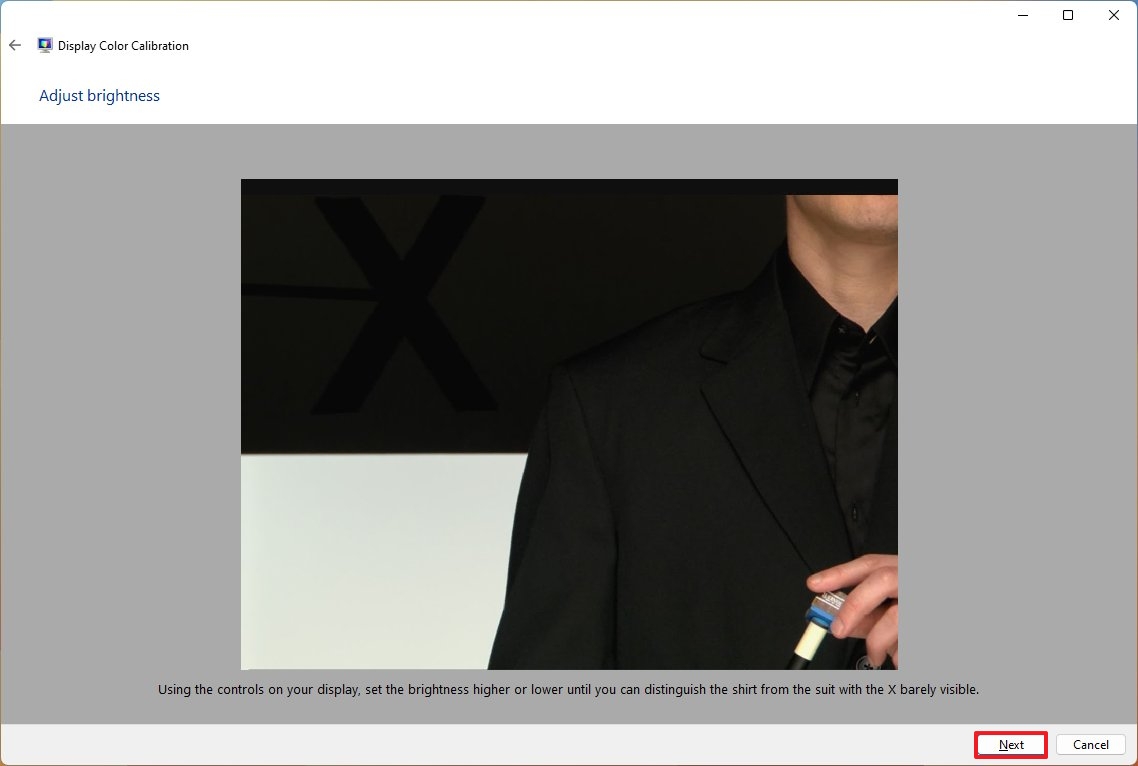
- Adjust the brightness level as noted in the description using the monitor’s hardware controls.
- Click the Next button.
- Click the Next button again.
- Click the Next button one more time to continue.
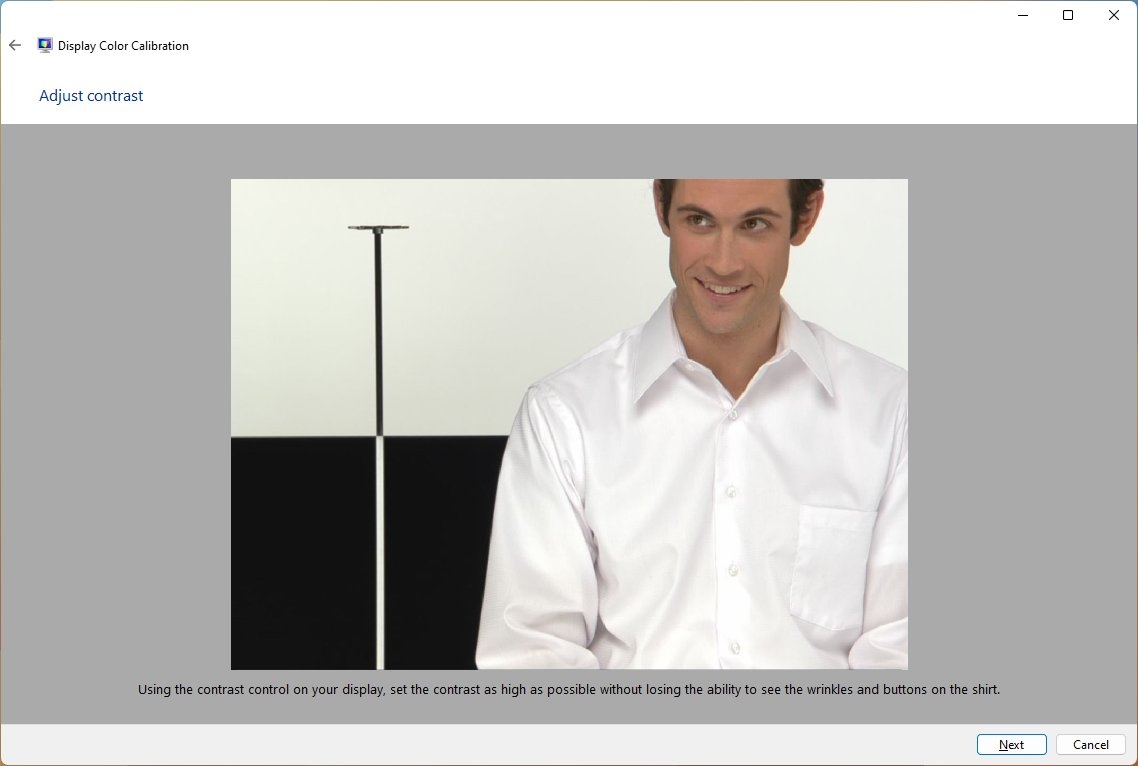
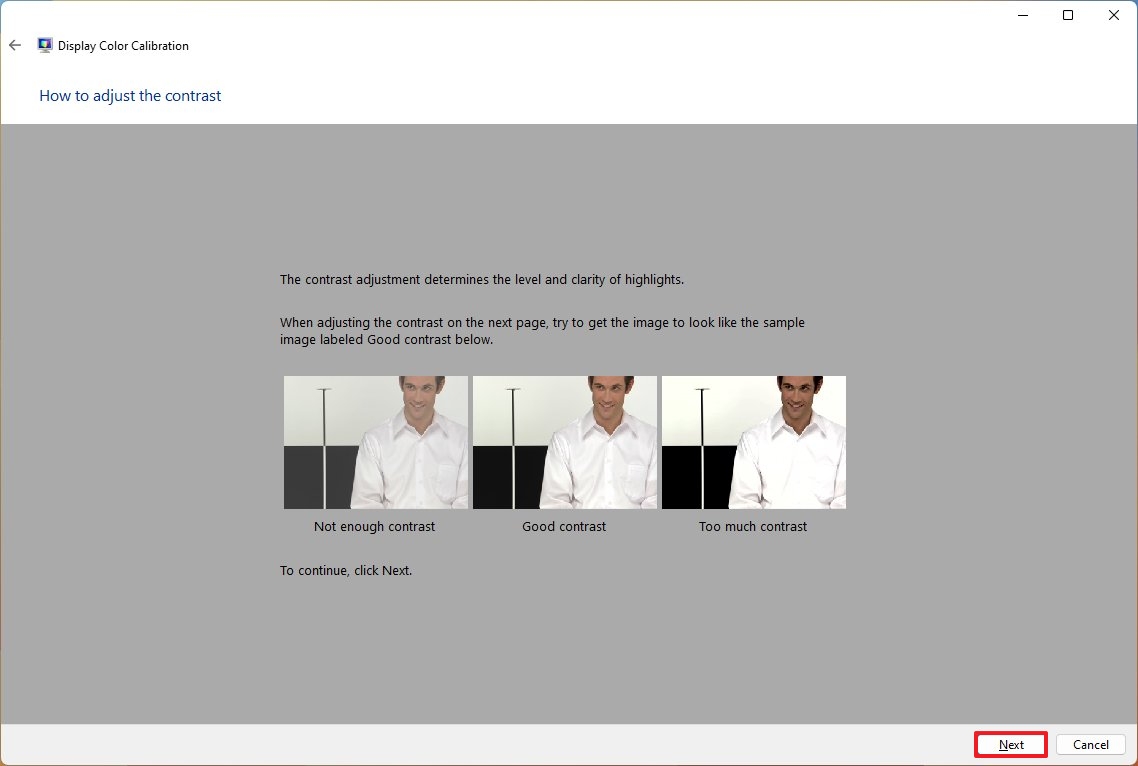
- Adjust the contrast level as noted in the description using the monitor’s hardware controls.
- Click the Next button.
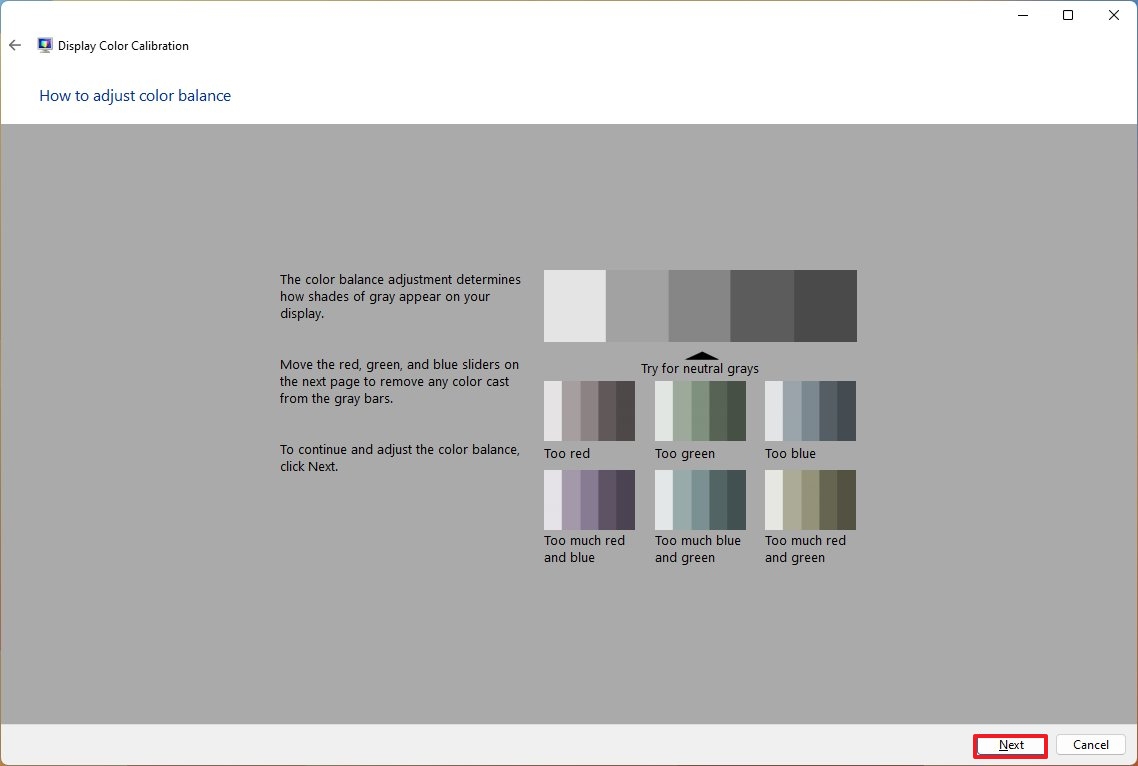
- Click the Next button again.
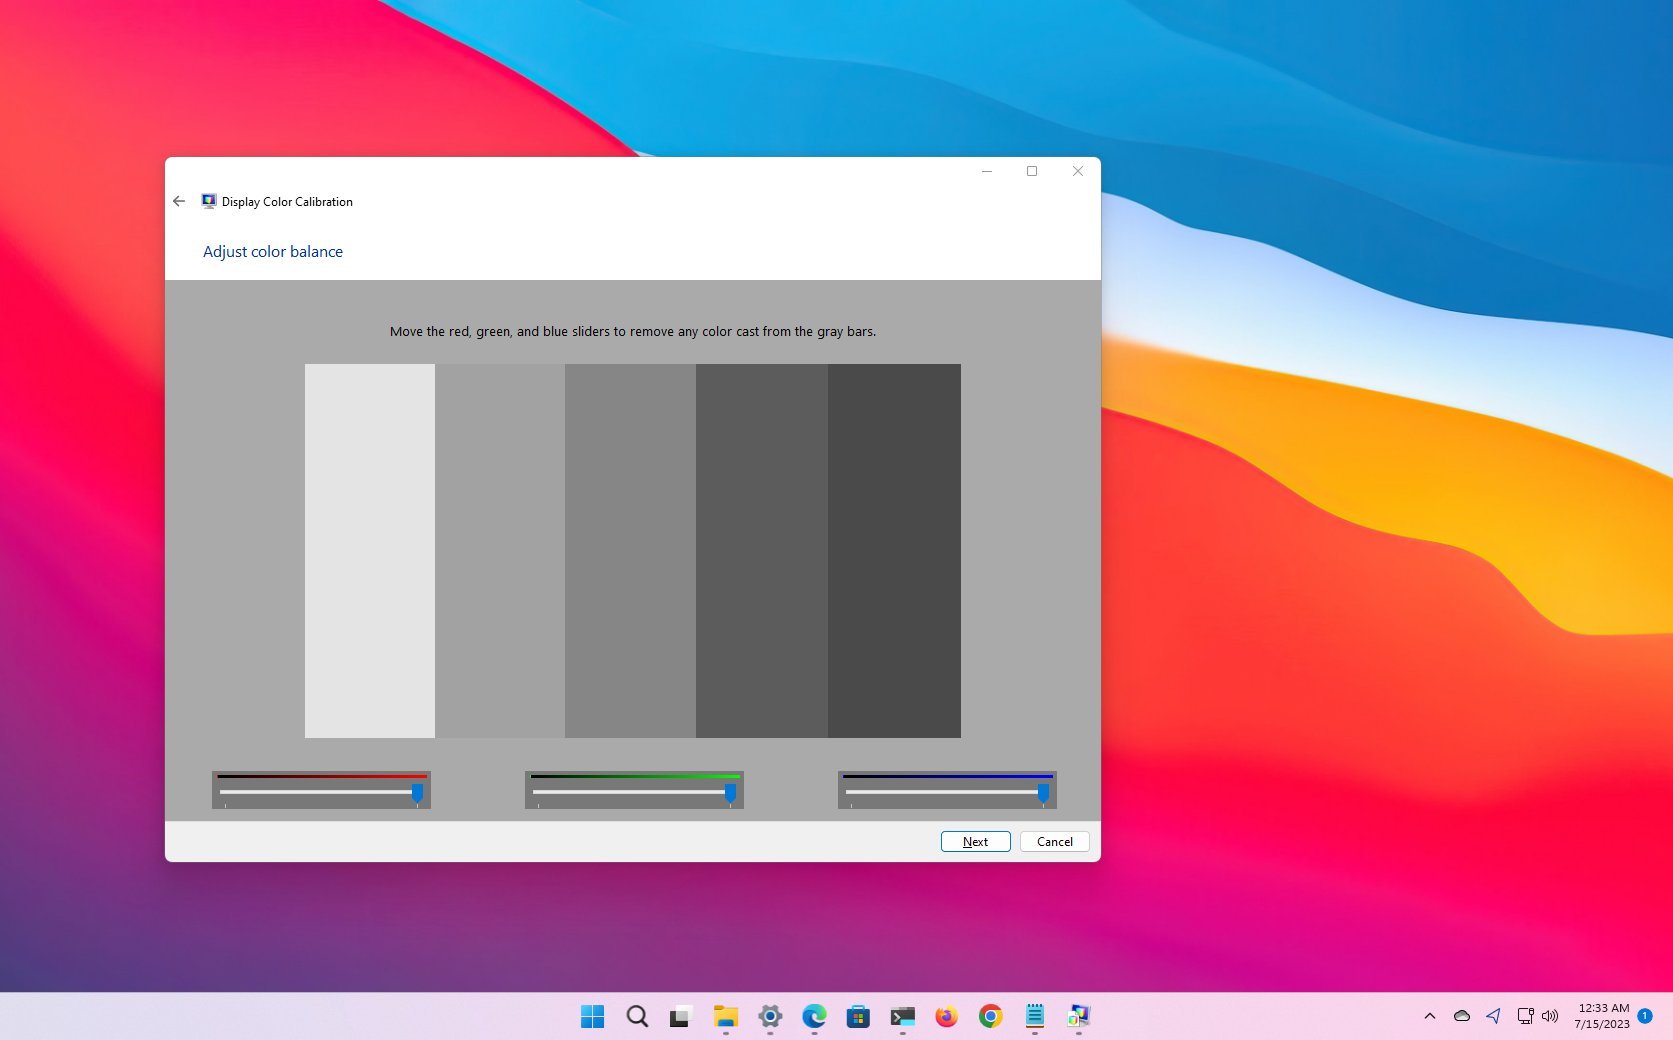
- Adjust the color balance using the red, green, and blue color sliders until removing any color cast from the gray bars.
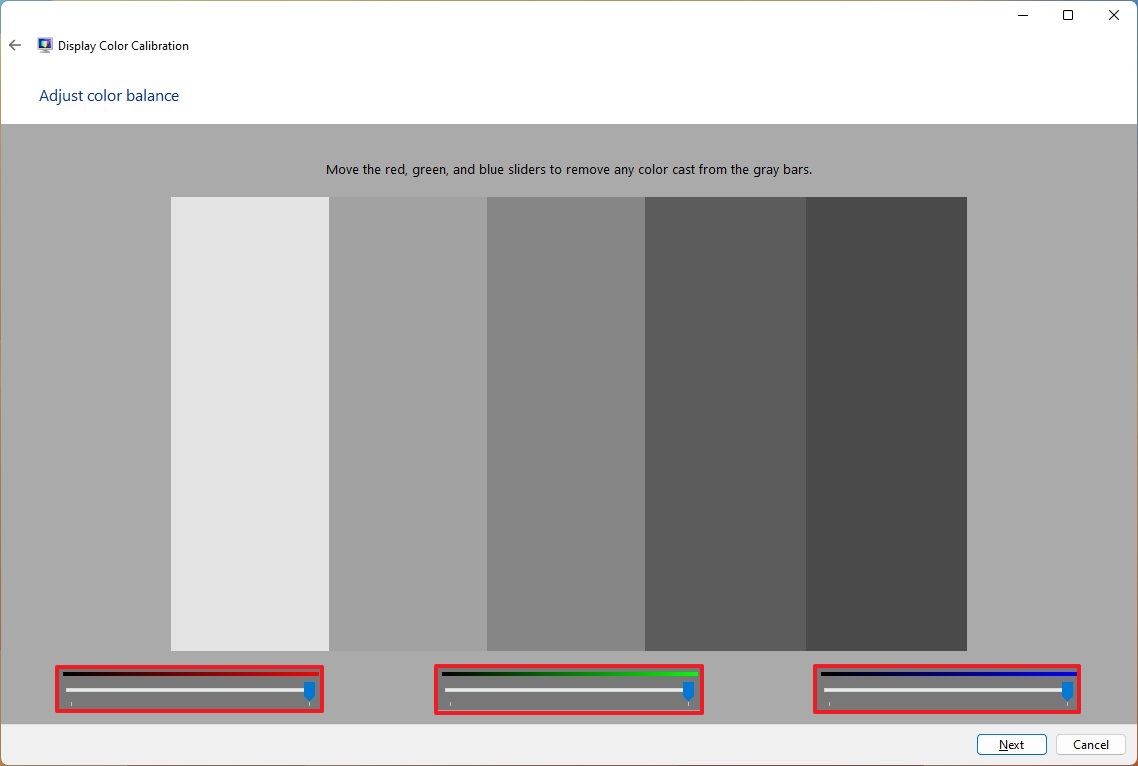
- Click the Next button.
- (Optional) Check the «Start ClearType Tuner» option to launch the calibration tool to adjust text rendering on the screen.
- Click the Finish button.
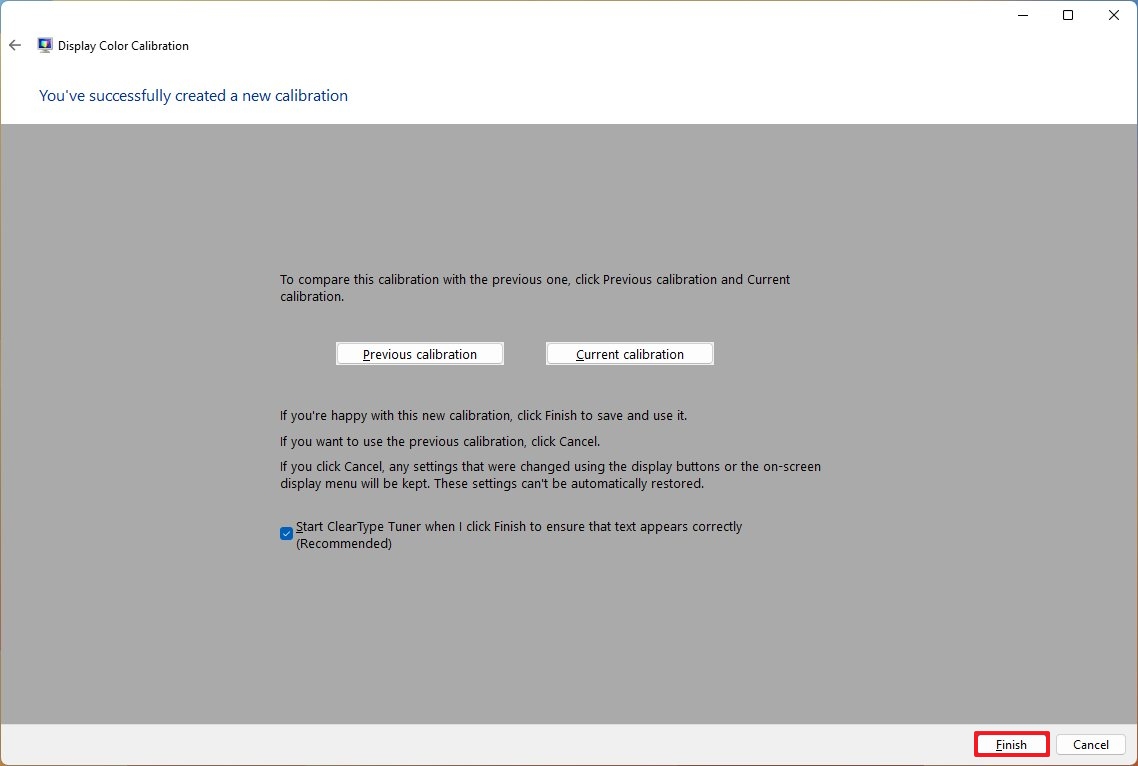
Once you complete the steps, you can start using the device with the new color calibration.
Since you’re changing the settings on the monitor itself, the new configuration will apply even if you click the «Cancel» button. If you want to revert the settings, open the monitor’s menu and use the reset option.
Although the Display Color Calibration tool should be more than enough for everyday users, if your job depends on color accuracy and you have a professional display, you may want to use third-party calibration tools instead of the tools available on Windows 11.
All the latest news, reviews, and guides for Windows and Xbox diehards.
More resources
For more helpful articles, coverage, and answers to common questions about Windows 10 and Windows 11, visit the following resources:
- Windows 11 on Windows Central — All you need to know
- Windows 10 on Windows Central — All you need to know
Mauro Huculak has been a Windows How-To Expert contributor for WindowsCentral.com for nearly a decade and has over 15 years of experience writing comprehensive guides. He also has an IT background and has achieved different professional certifications from Microsoft, Cisco, VMware, and CompTIA. He has been recognized as a Microsoft MVP for many years.
Windows 10: Windows 11 stuck at 8 bit color depth with a pair of 24 bit monitors
Discus and support Windows 11 stuck at 8 bit color depth with a pair of 24 bit monitors in Windows 10 Software and Apps to solve the problem; Title says it all.Running Windows 11 on Virtualbox 6.1.28, dual monitors….
Discussion in ‘Windows 10 Software and Apps’ started by SingeStheos, Oct 27, 2021.
-
Windows 11 stuck at 8 bit color depth with a pair of 24 bit monitors
Title says it all.Running Windows 11 on Virtualbox 6.1.28, dual monitors.

-
Color bit depth is at 6-bit on Display properties of Windows 10 proTry the below suggested steps and check if the suggested options are available to change the Color bit Depth value
- Right click on the desktop and select NVIDIA Control Panel.
- Expand the Display, and then highlight the Change resolution.
- On the right side, check if there is 8 bpc listed under
Output color depth. - You may select 8 bpc and restart the device to witness the changes.
Muralidhar
Microsoft Community Moderator
-
Color Bit Depth is Stuck at 8 bit — Display adapter mode says 32 bit
Build 17.rs_prerelease677.180520-0940 is my current release. There was an update that failed and changes were rolled back.
In Settings:
Now in the Windows Display settings says «Resolution: 1920 x 1080 (recommended)»
Click on «Advanced Settings» Both monitors say «Bit depth: 8-bit»
Click «Display adapter properties (either monitor)»
AMD Radeon HD 7700 Series Properties opens.
Click «List all modes»
«1920 by 1080, True Color (32 bit), 60 Hertz» is selected!
The Display, Desktop, Photos, Movies are in 8-bit 256 Color mode and look really bad!
How to fix this?
Windows has problems responding at times.
I rolled the Display driver back to a previous release… Had to reset the computer because it froze.
On reboot it is on the rolled-back driver level, but still wrong.
-
Windows 11 stuck at 8 bit color depth with a pair of 24 bit monitors
24 bit video color support settings for windows 10
Old title: 24 bit video color support windows 10 ati
im using old 42″ samsung plasma tv as monitor on Windows 10 with amd Radeon HD6970oc but in the tv manual the pc setup is for Windows XP and recommends 24 bit depth color so dose any one know if there’s a way to do 24 bit color in win 10 with ati graphics
Windows 11 stuck at 8 bit color depth with a pair of 24 bit monitors
-
Windows 11 stuck at 8 bit color depth with a pair of 24 bit monitors — Similar Threads — stuck bit color
-
Windows auto reduces the bit depth to 8 bit for my 32 bit depth monitor.
in Windows 10 Customization
Windows auto reduces the bit depth to 8 bit for my 32 bit depth monitor.: As you can see from the above screenshots, Windows 10 reduces the color depth to 8 bits for my 32-bit depth monitor. I don’t think or know if its going to make a difference at all but if it is there and it can work then why not use it?… -
Windows auto reduces the bit depth to 8 bit for my 32 bit depth monitor.
in Windows 10 Gaming
Windows auto reduces the bit depth to 8 bit for my 32 bit depth monitor.: As you can see from the above screenshots, Windows 10 reduces the color depth to 8 bits for my 32-bit depth monitor. I don’t think or know if its going to make a difference at all but if it is there and it can work then why not use it?… -
Windows auto reduces the bit depth to 8 bit for my 32 bit depth monitor.
in Windows 10 Software and Apps
Windows auto reduces the bit depth to 8 bit for my 32 bit depth monitor.: As you can see from the above screenshots, Windows 10 reduces the color depth to 8 bits for my 32-bit depth monitor. I don’t think or know if its going to make a difference at all but if it is there and it can work then why not use it?… -
Why is my laptop monitor color depth 6 bit
in Windows 10 Drivers and Hardware
Why is my laptop monitor color depth 6 bit: Why is my laptop monitor color depth 6 bithttps://answers.microsoft.com/en-us/windows/forum/all/why-is-my-laptop-monitor-color-depth-6-bit/49514766-4668-40c1-8ad4-64ecc80924fb
-
Windows 11 stuck at 8 bit color depth with a pair of 24 bit monitors
in Windows 10 Gaming
Windows 11 stuck at 8 bit color depth with a pair of 24 bit monitors: Title says it all.Running Windows 11 on Virtualbox 6.1.28, dual monitors.https://answers.microsoft.com/en-us/windows/forum/all/windows-11-stuck-at-8-bit-color-depth-with-a-pair/c302d4a9-517a-444a-b909-77642f9e2eef
-
Windows 10 display color depth stuck at 8-bit
in Windows 10 Customization
Windows 10 display color depth stuck at 8-bit: Hi,I am having problems with my display on windows 10. I have Asus zenbook 14 and I have just bought it less than 2 years ago. I noticed a while ago, that the display image, appear grainy and are not as smooth as needed. So I checked the advanced display properties, I saw… -
RDP and color depth won’t change from 24 bit
in Windows 10 Network and Sharing
RDP and color depth won’t change from 24 bit: Im trying to get server 2019 (host) to support the Mac RPD clients color depth setting of 32 bit. However, changes to the client or the various GPO and registry settings Ive come across appear to not have any impact. Is there anything special with 2019 and RPD color settings?… -
screen color bit depth
in Windows 10 Drivers and Hardware
screen color bit depth: my screen resolution on my Toshiba laptop looks like old time 8bit color with lots of distortion how do I get a better color depth display adpter is an intel 4600https://answers.microsoft.com/en-us/windows/forum/all/screen-color-bit-depth/a40f3cdb-cf31-4459-92f0-92d644026d7a
-
Windows 10 defaults to 8-bit color depth automatically.
in Windows 10 Customization
Windows 10 defaults to 8-bit color depth automatically.: I’ve recently configured my Apple Mac Pro to dual-boot with Windows 10. I’d done this a couple of times before (with a Mac Mini + Win7) and in the past it all went pretty smoothly. The Mac Pro is a much more powerful machine and offers AMD FirePro D300 GPUs (Display…
Users found this page by searching for:
-
How to change bit depth Windows 11
,
-
display color bit depth windows 11 wont change
Разрядность монитора обычно относится к количеству бит, используемых для представления каждого пикселя на экране. Она определяет количество различных цветов, которые монитор может отобразить.
Разрядность монитора измеряется в битах и указывает на количество уровней яркости или цветов, которые могут быть отображены для каждого пикселя. Чем больше разрядность, тем больше возможных комбинаций цветов, и тем более точное и плавное отображение цветов может быть достигнуто.
Глубина канала, оттенки и их колличество
| Глубина канала | Оттенков на канал на пиксель | Общее количество возможных оттенков |
|---|---|---|
| 1 бит | 2 | 2 |
| 2 бита | 4 | 16 |
| 4 бита | 16 | 256 |
| 8 бит | 256 | 16.78 миллионов |
| 10 бит | 1024 | 1.07 миллиарда |
| 12 бит | 4096 | 68.68 миллиардов |
| 16 бит | 65,536 | 281.47 триллиона |
| 24 бита | 16.7 миллионов | 16.7 миллионов (True Color) |
| 30 бит | 1.07 миллиарда | 1.07 миллиарда |
| 32 бита | 4.29 миллиарда | 4.29 миллиарда |
Это перечень основных битностей мониторов и соответствующих им количеств оттенков. Однако, стоит отметить, что фактические возможности и поддерживаемые битности могут различаться в зависимости от конкретного монитора и его настроек.
Важно отметить, что разрядность монитора связана не только с самим монитором, но и с графической картой компьютера. Чтобы насладиться полным потенциалом монитора, необходимо иметь подходящую графическую карту, способную выводить изображение с соответствующей разрядностью.
Битность матрицы — какую выбрать?
Битность матрицы обычно указывает на количество битов, используемых для представления каждого пикселя на мониторе. Большая битность матрицы позволяет отображать больше оттенков цвета, что может быть важно при играх, графическом дизайне и других задачах, требующих высокой точности цветопередачи.
- Дисплеи с разрядностью 6 бит обычно могут отобразить около 0,26 миллиона (260 тысяч) цветов. Они часто встречаются на бюджетных мониторах с технологией TN. Однако, из-за ограниченной цветовой гаммы, они могут быть не идеальным выбором для работы с графикой, где точность цветопередачи важна.
- Мониторы с разрядностью 8 бит могут отобразить около 16,7 миллионов цветов, что является стандартом для большинства мониторов. Они обычно подходят для широкого спектра задач, включая работу с графикой.
- Мониторы с разрядностью 10 бит способны отобразить около 1,07 миллиарда (1,07 млрд) цветов. Они предназначены для профессионалов в области фотографии и художников, которым требуется более широкая цветовая гамма и высокая точность цветопередачи. Однако, геймерские мониторы с поддержкой 10 бит встречаются реже, так как некоторые графические карты и игровые системы могут быть ограничены в поддержке этой разрядности на аппаратном уровне.
Сегодня большинство мониторов имеют минимум 8 бит на канал. Мониторы с 6 битами на канал были более распространены в прошлом и сейчас не являются основным выбором для современных пользователей.
Мониторы с 6 битами на канал обычно связаны с технологией VGA (аналоговое подключение). С VGA мониторами можно было получить ограниченный набор цветов и меньшую точность цветопередачи. Однако, с развитием технологий и переходом на цифровые интерфейсы, такие как DVI, HDMI или DisplayPort, большинство мониторов теперь предлагают более высокую разрядность цвета.
Выбор битности матрицы зависит от ваших конкретных потребностей и бюджета. Если вы занимаетесь профессиональным графическим дизайном или обработкой изображений, то 10-битная или 12-битная матрица может быть предпочтительнее. В противном случае, 8-битная матрица будет обеспечивать хорошее качество отображения цвета для большинства задач.
Изменить разрядность монитора в Windows
Физическую разрядность (битность) монитора нельзя изменить, так как она определяется его аппаратными характеристиками и технологией панели. Однако вы можете изменять настройки глубины цвета, которые влияют на отображение цветов на мониторе.
В большинстве операционных систем и графических драйверов есть возможность изменить глубину цвета. Вот общие шаги для изменения глубины цвета на Windows:
- Щелкните правой кнопкой мыши на рабочем столе и выберите «Параметры отображения» или «Настройки экрана».
- Перейдите на вкладку «Дисплей» или «Монитор».
- Найдите раздел «Глубина цвета», «Цвета» или «Цветовое качество».
- Выберите желаемую глубину цвета из доступных опций. Обычно варианты включают 8-бит (True Color), 16-бит и 32-бит.
- Нажмите кнопку «Применить» или «ОК» для сохранения изменений.
Стандартные опции глубины цвета могут различаться в зависимости от вашей системы и видеодрайвера, поэтому варианты могут называться иначе.
Как изменить разрядность монитора в настройках видеокарты
Изменение разрядности монитора может быть выполнено через настройки видеокарты. Вот общие шаги для изменения разрядности монитора в настройках видеокарты NVIDIA или AMD:
Для NVIDIA:
- Щелкните правой кнопкой мыши на свободной области рабочего стола и выберите «Панель управления NVIDIA».
- В панели управления NVIDIA выберите «Управление настройками 3D» или «Настроить параметры 3D».
- Перейдите на вкладку «Управление параметрами 3D» или «Настроить параметры цвета».
- Найдите опцию, связанную с разрядностью цвета или глубиной цвета. Обычно это «Глубина цвета», «Цветовое качество» или «Цветовая палитра».
- Выберите желаемую разрядность цвета, например, 32-бита или 16-бит, из доступных опций.
- Нажмите кнопку «Применить» или «ОК» для сохранения изменений.
Для AMD:
- Щелкните правой кнопкой мыши на свободной области рабочего стола и выберите «Центр управления AMD Catalyst» или «Центр управления Radeon».
- В центре управления AMD выберите «Цвет» или «Цветовые параметры».
- Найдите опцию, связанную с разрядностью цвета или глубиной цвета. Обычно это «Глубина цвета» или «Цветовой формат».
- Выберите желаемую разрядность цвета, например, 32-бита или 16-бит, из доступных опций.
- Нажмите кнопку «Применить» или «ОК» для сохранения изменений.
- Значение 32-бит обеспечивает отображение 16,7 миллионов цветов, а 16-бит — около 65 тысяч цветов.
Пожалуйста, обратите внимание, что доступные опции и расположение настроек могут отличаться в зависимости от версии драйвера видеокарты и используемой операционной системы.
Разрядность в «Сведениях о дисплее» и в «Списке всех режимов»
Частый вопрос — «Почем в Windows 10 В «Сведениях о дисплее» указано разрядность 8 бит, а в «Списке всех режимов» 32 бит?» Разрядность, указанная в «Сведениях о дисплее» и в «Списке всех режимов«, относится к различным аспектам дисплея.
- В «Сведениях о дисплее» обычно указывается разрядность, которая относится к цветовой глубине дисплея. Разрядность 8 бит означает, что каждый пиксель на дисплее может отображать 8 бит информации, что в свою очередь соответствует 256 различным уровням яркости или цветовым оттенкам. Это типичное значение для большинства стандартных дисплеев.
- В «Списке всех режимов» указываются возможные режимы разрешения и частоты обновления дисплея, которые поддерживаются вашим монитором или графической картой. Разрядность в этом контексте обычно указывает на количество бит, используемых для представления цвета в каждом пикселе, включая дополнительные биты для альфа-канала или прозрачности. Разрядность 32 бита означает, что каждый пиксель может использовать 32 бита информации, включая 24 бита для цвета и 8 бит для прозрачности или других целей.
Таким образом, разрядность, указанная в «Сведениях о дисплее» и в «Списке всех режимов», отражает различные аспекты дисплея, такие как цветовая глубина и количество бит, используемых для представления цвета и прозрачности.
Что такое True Color 32 бита
True Color (Истинный цвет) с разрядностью 32 бита представляет собой метод представления цвета на компьютере, который использует 8 бит для каждого из каналов красного (R), зеленого (G) и синего (B), а также 8 бит для канала альфа (A), который отвечает за прозрачность.
В итоге, при использовании True Color с разрешением 32 бита, каждый пиксель на экране может представлять до 16,7 миллиона различных цветов (256 уровней для каждого из каналов R, G и B). Комбинируя эти цвета с уровнями альфа-канала, можно достичь различных оттенков и прозрачности, что позволяет достичь более точного и реалистичного отображения изображений и графики.
True Color 32 бита является стандартом для большинства современных компьютерных систем и поддерживается широким спектром программ и приложений, работающих с графикой, фотографиями, видео и другими медиа-содержимым.
Что такое SDR и HDR
SDR и HDR — это два различных стандарта отображения, которые используются в контексте видео и изображений:
- SDR (Standard Dynamic Range) — это стандарт динамического диапазона, который используется на большинстве традиционных мониторов и телевизоров. Он предназначен для отображения изображений с ограниченным диапазоном яркости и контрастности. SDR обычно имеет битность матрицы 8 бит на канал, что позволяет отображать около 16,7 миллионов оттенков цвета. Изображения SDR воспроизводятся с насыщенными цветами, но ограниченным диапазоном яркости и детализацией.
- HDR (High Dynamic Range) — это стандарт высокого динамического диапазона, который позволяет отображать более широкий диапазон яркости, контрастности и цветовых оттенков. HDR обеспечивает более реалистичное и глубокое воспроизведение изображений с большей глубиной деталей в светлых и темных областях сцены. Он обычно требует мониторов или телевизоров с поддержкой HDR и более высокой битностью матрицы, такой как 10 или 12 бит на канал. HDR-изображения могут воспроизводиться с большим количеством оттенков цвета и улучшенной детализацией как в темных, так и в светлых областях.
Важно отметить, что для полноценного просмотра HDR-контента необходимы не только поддержка со стороны монитора или телевизора, но и поддержка HDR в самом контенте (например, в видео или играх). Также стоит отметить, что HDR является более новым стандартом и не все мониторы и телевизоры поддерживают его.
Подключение монитора для работы на 10 и 12 бит
Для подключения монитора с поддержкой 10 и 12 битной глубины цвета важно использовать правильные стандарты и кабели:
- DisplayPort является наиболее распространенным и рекомендуемым стандартом для подключения мониторов с поддержкой высокой глубины цвета. DisplayPort 1.4 и более поздние версии поддерживают 10 и 12 битную глубину цвета. Для поддержки 10 или 12 битной глубины цвета требуется использование DisplayPort кабеля версии 1.4 или выше.
- HDMI также может поддерживать 10 и 12 битную глубину цвета. Однако, не все версии HDMI поддерживают эти глубины цвета. Для подключения монитора с поддержкой 10 или 12 битной глубины цвета рекомендуется использовать HDMI 2.0 или более поздние версии. Кроме того, также необходимо убедиться, что используемый HDMI кабель также поддерживает требуемую глубину цвета.
Важно отметить, что не все мониторы и источники контента (например, видеокарты) поддерживают 10 и 12 битную глубину цвета. Перед приобретением монитора и выбором кабелей рекомендуется проверить спецификации и совместимость оборудования, чтобы убедиться, что они поддерживают требуемую глубину цвета и используемые стандарты подключения.