
К каждому медиафайлу должна быть прикреплена информация, которая сообщает вам об их деталях. Это включает в себя название, композитора, альбом, трек и т. д. Между тем, вы обнаружили, что информация в файле, который вы скачали из Интернета, нуждается в более точной информации. В этом случае вы хотите изменить их и ввести правильную информацию.
Обучение как изменить данные файла в Windows 10 это как прогулка в парке. Другими словами, это легко сделать в кратчайшие сроки. С другой стороны, мы познакомим вас с некоторыми практическими методами изменения атрибутов ваших медиафайлов. Без дальнейших объяснений, прочитайте, чтобы изучить эти методы с их учебными руководствами.

СОДЕРЖИМОЕ СТРАНИЦЫ
- Часть 1. Как легко изменить сведения о файле в Windows 10/11
- Часть 2. Как изменить сведения о файле в Windows, используя способ по умолчанию
- Часть 3. Как изменить информацию о файле онлайн
- Часть 4. Часто задаваемые вопросы об изменении сведений о файле
Часть 1. Как легко изменить сведения о файле в Windows 10/11
Первым в списке эффективных методов является использование специального программного обеспечения. Это верно. Видео конвертер Vidmore это настольное приложение, которое работает на компьютерах Windows и Mac. Эта программа поставляется с редактором метаданных для медиафайлов, таких как MP3, WAV, M4A, M4R и многих других. Он также может работать как редактор метаданных видео, позволяя вам изменять детали вашего MP4, MOV, WMV и т. д.
Кроме того, этого инструмента достаточно, чтобы предоставить вам последние теги деталей, которые вы можете редактировать. С его помощью вы можете изменять детали, такие как название, альбом, композитор и год, и даже добавлять комментарии к своим медиафайлам. Кроме того, вы также можете добавить обложку к своему аудио- или видеофайлу одним щелчком мыши. Кроме того, вы можете использовать программу, не будучи техническим специалистом. Его интерфейс построен так, чтобы быть удобным для пользователя для простоты навигации. Ознакомьтесь с шагами, чтобы узнать, как изменить детали файлов MP3.
Шаг 1. Приобретите и запустите программу
Прежде всего, получите установщик инструмента. Щелкните один из Скачать бесплатно кнопки, указанные ниже, чтобы начать работу. Убедитесь, что у вас есть правильная установка для операционной системы вашего компьютера. После этого завершите установку и запустите ее.
Шаг 2. Откройте редактор метаданных мультимедиа инструмента.
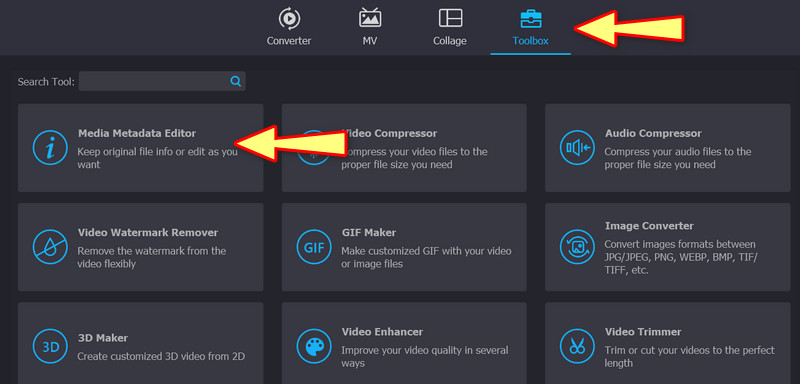
После запуска программы перейдите в Ящик для инструментов вкладка, расположенная в верхней части интерфейса. Вы должны найти список инструментов, предназначенных для различных целей. Затем нажмите на Редактор метаданных мультимедиа кнопку для доступа к этой опции.
Шаг 3. Загрузите медиафайл, чтобы отредактировать детали
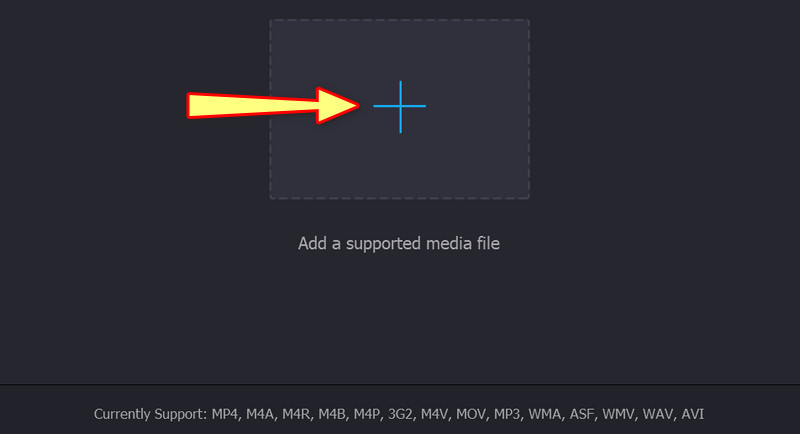
При нажатии на Редактор метаданных мультимедиа вариант, появится диалоговое окно. Отсюда вы сможете добавить свой медиафайл, содержащий детали, которые вы можете редактировать. Теперь отметьте Плюс кнопку подписи и получить доступ к аудио или видео файлу из папок вашего компьютера. Когда вы закончите, появится другое диалоговое окно, в котором отображаются детали, которые вы можете изменить.
Шаг 4. Проанализируйте и измените детали
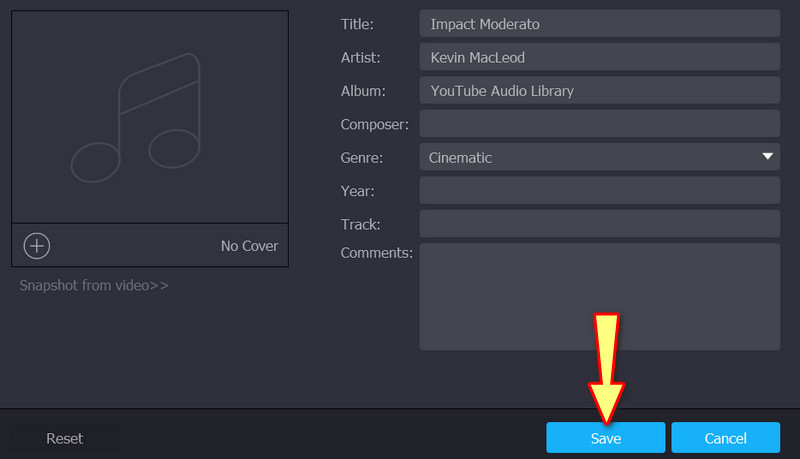
Из отображаемых деталей вы можете изменить их одну за другой, отметив поля их значений. Введите необходимую информацию и нажмите кнопку Сохранить кнопку для обновления сведений.
Часть 2. Как изменить сведения о файле в Windows, используя способ по умолчанию
Способ по умолчанию не включает загрузку программного обеспечения. Кроме того, он бесплатный и встроен в ваш компьютер с Windows 10 или 11. Недостатком является ограничение возможностей и функций, которые могут быть доступны в специальной программе. Тем не менее, вот упрощенное руководство о том, как изменить сведения о файле в Windows 10 по умолчанию.
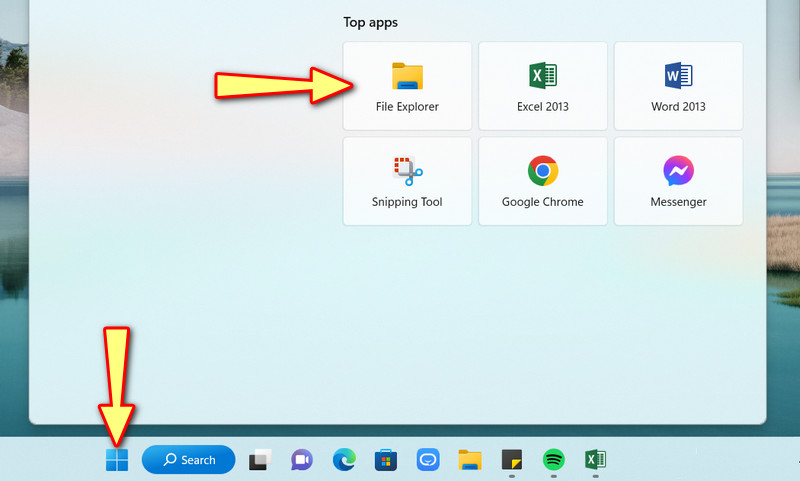
Шаг 1. На компьютере с Windows 10/11 откройте Проводник заявление. Вы также можете выполнить поиск проводника, нажав кнопку Windows. После этого найдите медиафайл, который вы загрузили или сохранили на свой компьютер.
Шаг 2. Затем перейдите к местоположению вашего медиафайла. Когда вы нашли аудиофайл, щелкните его правой кнопкой мыши, чтобы получить варианты его редактирования. Выберите Свойства вариант из выпадающего меню. Чтобы получить доступ к сочетаниям клавиш, используйте Альт + Ввод комбинация клавиш. Просто убедитесь, что аудиофайл выбран. Появится окно свойств.
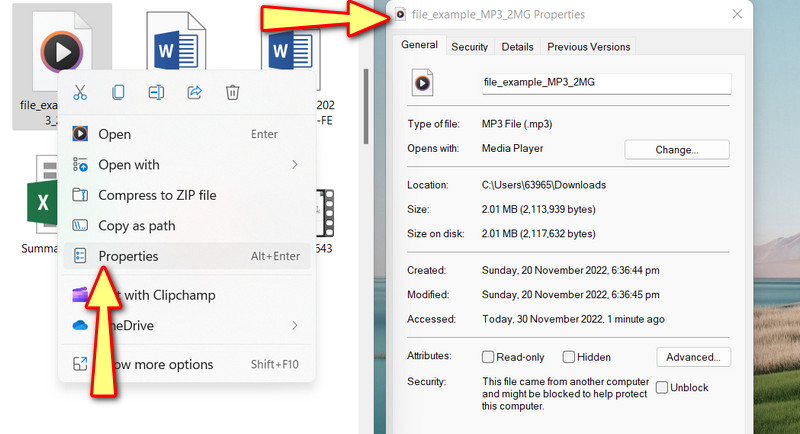
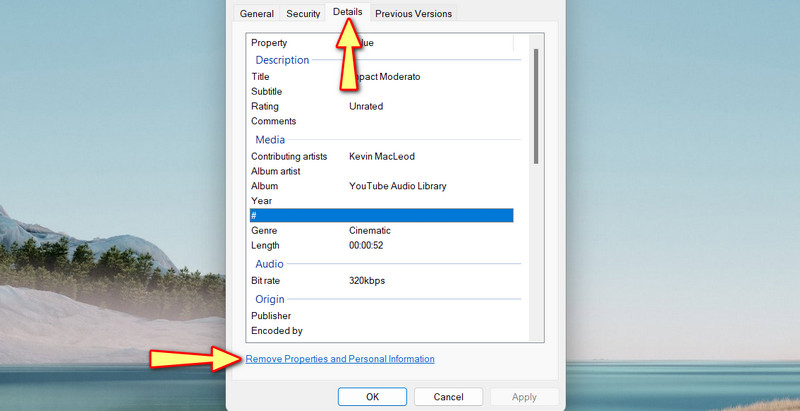
Шаг 3. Перейти к Подробности вкладку для просмотра и проверки свойств медиафайлов. Теперь щелкните выделенный текст, в котором говорится Удалить свойства а также Персональные данные в нижней части коробки.
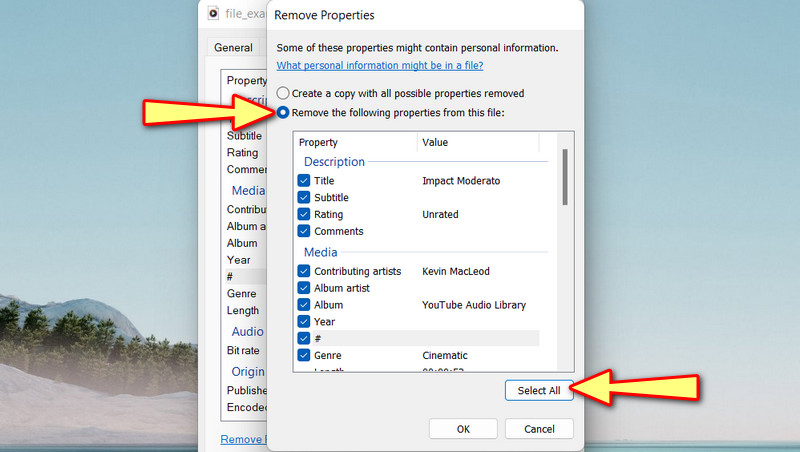
Шаг 4. Откроется новое диалоговое окно. Отметьте переключатель, который говорит Удалите следующие свойства из этого файла. Вы можете удалить все. Убедитесь, что выбрали Выбрать все. Затем нажмите в порядке чтобы подтвердить.
Часть 3. Как изменить информацию о файле онлайн
Предположим, вам нужно изменить информацию о файле в Интернете. Вам следует рассмотреть возможность использования TagMp3.net. Эта программа позволяет редактировать сведения о файле прямо с веб-страницы. Вы можете редактировать название песни, исполнителя, альбом и номер дорожки или MP3. Кроме того, эта веб-программа совместима с оптимизированными браузерами, такими как Google Chrome, Edge и Safari. См. приведенные ниже рекомендации, чтобы узнать, как изменить сведения о файле в Windows 10 в Интернете.
Шаг 1. Запустите любой браузер, который вам нравится, и зайдите на официальный сайт программы.
Шаг 2. На этот раз отметьте Выбрать файлы и загрузите медиафайл, который хотите отредактировать. Вы также можете перетащить файл из папки вашего компьютера в область загрузки программы.
Шаг 3. После этого отобразятся детали программы, которые можно редактировать. Отсюда вы можете добавить обложку и отредактировать название, альбом и т.п.
Шаг 4. Когда закончите, нажмите Готово! Создать новые файлы внизу страницы.

Часть 4. Часто задаваемые вопросы об изменении сведений о файле
Как я могу изменить атрибуты файла?
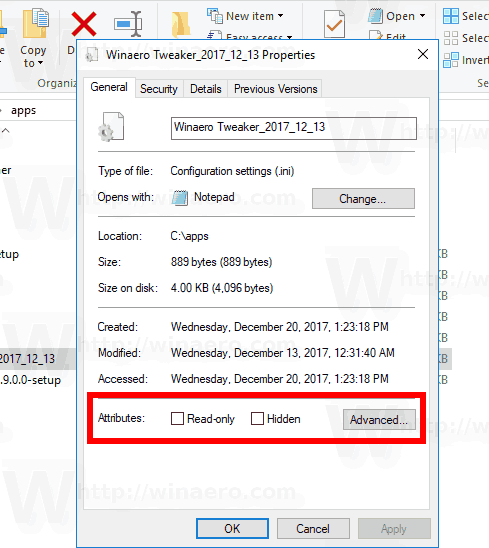
Чтобы изменить атрибуты файла, откройте свойства вашего медиафайла и нажмите «Дополнительно» на вкладке «Общие». На вкладке «Дополнительные атрибуты» установите флажки для атрибутов файла.
Могу ли я добавить категории свойств к деталям, используя способ по умолчанию?
К сожалению, единственное, что вы можете сделать, это удалить детали из ваших медиафайлов. Если вы хотите редактировать и добавлять категории свойств, вы можете использовать для этого такие программы, как Audacity.
Легко ли редактировать метаданные?
Редактировать метаданные не всегда просто. С помощью редакторов метаданных, таких как Vidmore Video Converter, можно мгновенно редактировать метаданные или свойства.
Вывод
Лучшие методы на как изменить данные файла в Windows 10 приведены выше. Способ по умолчанию может не дать вам лучших функций для редактирования деталей. Поэтому лучше иметь план на случай непредвиденных обстоятельств. В этом случае у вас есть приложение и онлайн-программа.
File attributes are special metadata or properties of files stored in the file system which instruct computer software to change its behavior. Some of them may be enforced by operating system. For example, the read-only attribute prevents apps from writing to such files and tells File Explorer to warn the user that the file or folder can be important. The console DEL command doesn’t remove files with the read-only attribute. In this article, we will review different methods to change file attributes in Windows 10.
Windows 10 offers the user a number of methods to change file system attributes for folders and files. Each attribute can have only one state at a moment: it can be set or disabled. While file attributes are part of file system metadata, they always considered separate from other metadata values like file date or permissions.
In Windows 10, you can use File Explorer (both the Ribbon option and the File Properties dialog), PowerShell, and the good old command prompt to modify or set file attributes. Let’s review each method in detail.
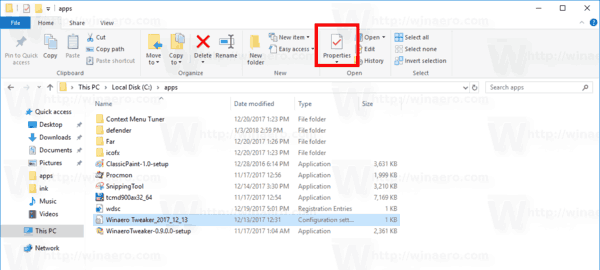
- Open File Explorer and go to the folder that contains your files.
- Select the file whose attributes you want to change.
- On the Home tab of the Ribbon, click on the Properties button.

- In the next dialog, under Attributes, you can set or remove the Read-only and Hidden attributes.

- Click on the Advanced button to set or clear extra attributes available for the file.


You are done.
The extra file attributes include:
- File is ready for archiving.
- Allow this file to have contents indexed in addition to file properties.
- Compress file contents to save disk space.
- Encrypt contents to secure data.
Tip: You can open the File Properties dialog using the context menu. Right-click a file and select the Properties command. Also, you can quickly open the file properties if you press and hold the Alt key and double-click the file or press Enter. See the article:
How to open file or folder properties quickly in Windows File Explorer
For the «Hidden» attribute, one more way is to use the button Hide selected items in the View tab of the Ribbon. See the following article:
How to hide and unhide files quickly in Windows 10.
Change file attributes with PowerShell
It is possible to change file attributes using the PowerShell console. There are a couple of cmdlets which can be used to view, set, or remove them. Here is how you can use them.
Open a new PowerShell console and use the following commands.
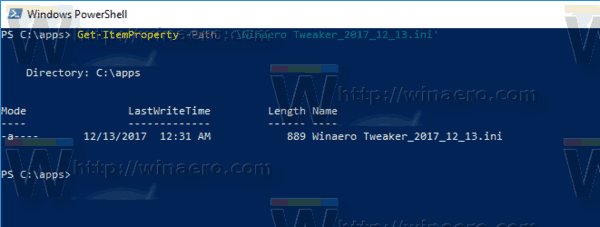
To view file attributes with PowerShell, run the following cmdlet:
Get-ItemProperty -Path path_to_file
Replace the path_to_file with the actual path to your file. The command will print all the attributes for the file.
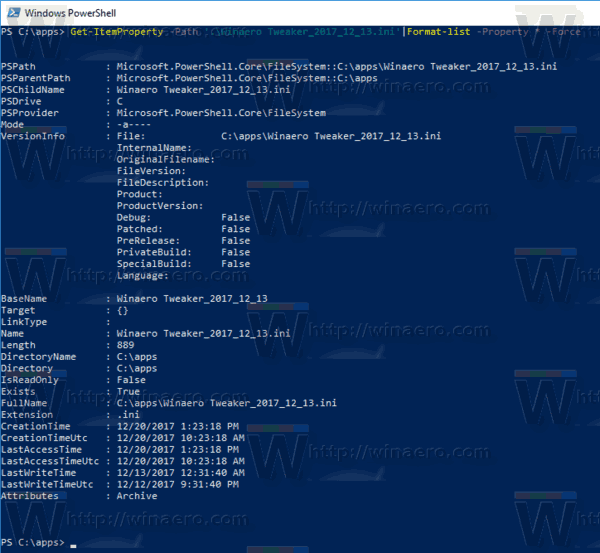
To view all of the information that is available, combine the output with the Format-List cmdlet, as shown below:
Get-ItemProperty -Path path_to_file | Format-list -Property * -Force
This will show more details about your file.
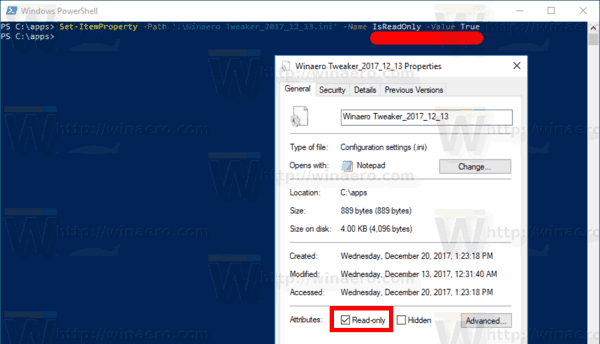
To change file attributes with PowerShell, run the following cmdlet:
Set-ItemProperty -Path path_to_file -Name IsReadOnly -Value True
This will set the ReadOnly attribute for the specified file.
The possible values for the -Name argument are as follows:
- Archive
- Hidden
- Normal
- ReadOnly
- System
Set the appropriate value to True to set the attribute. A value of False will clear the attribute.
Change file attributes using Command Prompt
The command prompt comes with a console attrib command which allows managing file attributes. It supports the following attributes:
R Read-only file attribute.
A Archive file attribute.
S System file attribute.
H Hidden file attribute.
O Offline attribute.
I Not content indexed file attribute.
X No scrub file attribute.
V Integrity attribute.
P Pinned attribute.
U Unpinned attribute.
B SMR Blob attribute.
Each attribute can be set using the syntax like this (for example, for read-only attribute):
attrib +R path_to_file
To remove the attribute, you can use the following command:
attrib -R path_to_file
So, «+» sets an attribute, and «-» clears an attribute.
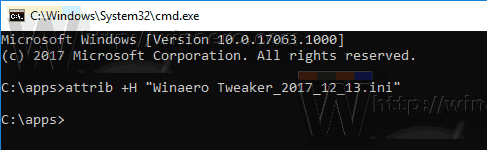
For example, here is how to set a hidden attribute using the command prompt.
Change the hidden attribute using the command prompt
- Open a new command prompt window.
- Type the following command to set the hidden attribute:
attrib +H c:\data\myfile.txt

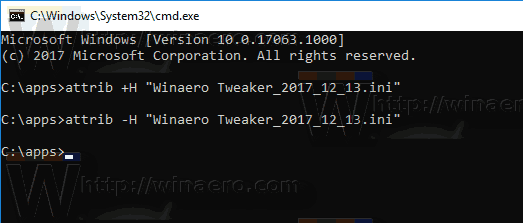
- To remove the attribute, use the command:
attrib -H c:\data\myfile.txt

You are done. For more information, run the attrib command as follows:
attrib /?
That’s it.
Support us
Winaero greatly relies on your support. You can help the site keep bringing you interesting and useful content and software by using these options:
If you like this article, please share it using the buttons below. It won’t take a lot from you, but it will help us grow. Thanks for your support!
File attributes are some settings options that determine whether a user or the operating system has permission to access and modify the files or not. It is quite a simple and straightforward approach to changing the file state.
Changing file attributes help you to safeguard your files from unwanted issues.
If other people have access to your computer, you need to ensure no one modifies your files. You can simply set the files to read-only mode to prevent others from modifying them. You can set the file attributes to be hidden so that no one can find them.
Well, in this article, I will guide you to change the file attributes on Windows 10/11. So without wasting any time, let’s get started!
Types of File Attributes
There are different types of attributes for files that you can find. But you can use a few from the properties menu of that file.
Here is the list of different file attributes:
| Attributes | What they do |
|---|---|
| Archive (A) | It shows if the file has been modified since the last update |
| Hidden (H) | You can hide any files from displaying on the File Explorer |
| System (S) | Which indicates the file is crucial to the operating system |
| Read-only (R) | It only gives permission to read the file |
| Compressed (C) | It will compress the files automatically if the attribute is enabled |
| Encrypted (E) | When enabled, your files will be encrypted |
| Directory (D) | This will indicate the file as a subdirectory |
| Offline (O) | Your files will be moved to the offline storage |
| Temporary (T) | It indicates if the file is used for temporary storage |
Check out the easiest way to Fix Windows 11 File History Element Not Found Error.
There are three file attribute-changing methods available out there. All of them are pretty easy but using the properties contextual menu is the most popular one. You can use any of them to change the file attributes.
Here are the methods to change the file attributes:
This is the most used method among all. You will need a minute to change the attributes of your files.
Here is how you can change file attributes using the properties menu:
Here’s a complete guide on how to Disable File Compression on Windows 11/10.
2. Use Powershell
You can use Windows Powershell to change the file attributes. There are some cmdlets available that you can use to view, set, or remove them.
Here are the steps to change file attributes using Powershell:
- Press Windows + X and open Windows Powershell.
- Run the following cmdlet to view file attributes on Powershell. *
Get-ItemProperty -Path path_to_file
- Run the following cmdlet to view all available information and combine the output. *
Get-ItemProperty -Path path_to_file | Format-list -Property * -Force
- Run the following cmdlet to change file attributes. *
Set-ItemProperty -Path path_to_file -Name IsReadOnly -Value True
Quick Note: replace the ReadOnly with Archive, Hidden, Normal, and System, according to your need
*Note: replace the path_to_file with your actual file path.
Read more on how to Password Protect a File or Folder in Windows 11.
3. Use Command Prompt
The command prompt can change the file attributes using the command attrib. It comes prebuilt in the command prompt.
Here is how you can change attributes of files using Command Prompt:
- Type Windows + R to open Windows Run.
- Type cmd and hit Enter.
- Use the following command to change the attribute to Read-only. *
attrib +R path_to_file
- Type the following command to remove the Read-only attribute. *
attrib -R path_to_file
You can replace the R with other attributes according to your need. R or Read-only is used as an example.
*Quick Note: replace the path_to_file with your actual file path.
Related guide: Enable or Disable Offline Files in Windows 11.
Frequently Asked Questions
How do I change file attributes on a Mac?
You can change the file attributes on Mac by following the method:
Select a file > Get Info > click the drop-down arrow > select a user group > change the attributes.
What are 4 common file attributes for Windows?
In the file system directories, file attributes are maintained. You can typically find four common file attributes that are, Read-only, Hidden, System, and Archive.
How can files be protected?
You can use different methods to access any files. However, the most straightforward way of protecting the files is to associate Identity-dependent access with all the files and directories, called an access-control list, aka ACL. It shows the names of the users and the access to files that associate with each user.
Final Thoughts
That’s all from me. You can quickly change the file attributes by following any of those three methods. No matter which way you choose, your job will be done in no time.
Thanks for reading this article. Feel free to share any queries in the comment section below. I’ll try my best to resolve that.
Signing out.
Farhan Max
Farhan Max is a tech geek with a particular interest in computer hardware. He’s been fascinated by gaming since childhood and is now completing his undergraduate studies while researching and testing the latest tech innovations. Alongside his love for all things geeky, Farhan is also a skilled photographer.
Download Article
Download Article
- Windows
- macOS
- FAQ
- Video
- Tips
|
|
|
|
This wikiHow teaches you how to access and change file properties, attributes, and permissions on a PC or Mac. On Windows, you can right-click a file and select Properties to access and change properties. On a Mac, select a file in Finder, click the File menu, select Get Info, and make your changes.
Editing File Properties on Windows & Mac
On a PC, right-click a file, select Properties, and edit the General, Security and Details tabs. To edit the properties of multiple files, hold Ctrl as you click each file, right-click the selection, and click Properties. On a Mac, select a file and go to File > Get Info to edit properties.
For popular FAQs on changing file properties, jump to more common questions.
-

You can do this by clicking the folder icon on your taskbar, or by pressing Windows key + E on the keyboard.
-
You can use the Search bar in the upper-right corner to search by name, or select a drive and/or folder to browse using the left panel.
Advertisement
-
A context menu will expand.
- If you want to modify the properties for more than one file at a time, select each file you want to edit while holding down the Control key. Then, right-click the highlighted area to bring up the menu.
-
This opens a window containing the properties you can modify for this file.
-
Each file type will have slightly different Properties options, but you can typically change the following information:
- File name: This will typically be at the top of the General tab.
- Opens with: Near the top of the General tab, clicking Change next to this option will allow you to pick a different default program for the selected file.
- Previous Versions: This tab lets you select and restore a previously saved version of the file if one exists. You must have set a restore point in order for this to work.
- Attributes: This section allows you to mark a file as read-only or hidden. If you click Advanced, you can choose whether to compress the file or allow it to be in an archive.
-
This saves the properties you’ve edited thus far.
-
This tab is going to look pretty different depending on the type of file you’re editing. If you’re looking at a photo, for example, you’ll see the image’s dimensions, resolution, and even some metadata from the camera that captured it.
-
To change a property on the Details tab, click the mouse cursor on the value of the property (such as the Date Taken on a photo, or the Genre on an MP3 file), erase what’s there, and then start typing.
- Click Remove Properties and Personal Information at the bottom to see which properties you can completely delete.
-
This saves the properties you’ve edited thus far.
-
It’s at the top of the window. This is where you’ll find all of the security and permissions you can adjust for the selected file.
- Click Edit to change who has permission to access the file, and what they can do with it.
-
This saves the changes you’ve made to the properties for the selected file(s).


Advertisement
-

Click the blue, smiling face icon in your Mac’s Dock to open Finder.
-

Clicking the file one time will select that file without opening it.
- To edit the properties of more than one file at a time, hold down the Control key as you click each file.
- You may first need to open a folder in which the file is located by clicking the folder on the left side of the Finder window.
-

This menu item is in the upper-left side of the Mac’s screen.
-

It’s about halfway down the menu. This will open a file information window.[1]
-
Most files on your Mac will have the following options located near the middle/bottom of the Get Info window:
- Tags: This section at the top allows you to enter some tags that you can associate with the file. This makes it easy to search for the file on your Mac by tag name.
- More Info: This tells you some information about the file, which will vary depending on the type of file you’re looking at. For example, if you’re looking at a photo, you’ll see the photo’s dimensions, some information about the camera that took it, and details about the colors included.
- Name & Extension: Change your file’s name or file type here. You can also check the «Hide extension» box to hide this particular file’s extension.
- Comments: Add notes about the file.
- Open with: Change the program with which your file opens.
- Preview: View a preview (e.g., thumbnail) of the file.
- Sharing & Permissions: Here’s where you can change who can read, edit, or modify the file.
- If you’re editing a music file, you may see options for changing the name of the song, artist, genre, or other specifics.
-
When you’re done making changes, you need only click the red circle in the top-left corner of Get Info window to save them.


Advertisement
How do you edit the metadata of a file in Windows?
Right-click the file, select Properties, and click the Details tab. For an audio file (such as an MP3), you can edit the artist, album, and other metadata tags here.
How do you change the attributes of a file?
In Windows, right-click the file, select Properties, and use the checkboxes to select or deselect different permissions like Read-only, Archive, and Hidden.
How do I change the properties for an Office file?
Open the file in Word, Excel, or PowerPoint, click the File tab, select Info, and click Properties. In Microsoft Access, select View and edit database properties instead. You can then add new properties to the Custom tab.[2]
Video
-
Don’t change a file’s properties unless you know what you are doing—making the wrong changes can break the file.
-
You will generally have more properties available to edit if you’re using an administrator account.
-
Sometimes you cannot modify certain attributes of a file.
Thanks for submitting a tip for review!
Advertisement
References
About This Article
Article SummaryX
1. Open File Explorer.
2. Right-click a file.
3. Click Properties.
4. Make changes.
5. Click Apply.
6. Click OK.
Did this summary help you?
Thanks to all authors for creating a page that has been read 382,892 times.
Is this article up to date?
Содержание статьи:
- Изменение расширения
- У одного файла (через проводник)
- У нескольких файлов сразу (через Total Commander)
- Изменение атрибутов
- Способ 1
- Способ 2
- Вопросы и ответы: 0
Доброго времени!
У пользователей Windows (в т.ч. и новой 11-й) периодически возникает необходимость в изменении расширения или атрибутов файла. Например, это может потребоваться для открытия файла в какой-то определенной программе, или для его редактирования, удаления и т.д. Собственно, эта заметка будет посвящена их изменению…
А начать, как я думаю, нужно с краткого пояснения (чтобы все правильно понимали о чем идет речь… 😉).
📌 Расширение файла — это 3÷4 символа добавленные к имени файла (например, «имя_файла.docx«, «имя_файла.mp3» и др.), которые позволяют Windows определять тип файла и правильно с ним «работать». Например, если у файла расширение «mp3» — Windows «узнает», что это музыка и открывает файл в проигрывателе.
Кстати, по умолчанию Windows скрывает от пользователя самые распространенные расширения и вы видите только имя файла. Именно поэтому у большинства пользователей и возникает сложность в изменении расширения…
📌 Атрибуты — это спец. данные, указывающие системе какие операции можно выполнять с файлом (папкой). Для каждого файла устанавливаются свои атрибуты. Атрибут может быть в двух состояниях: установлен и не установлен (т.е. стоит галочка или нет). Например, если у файла установлен атрибут «скрытый» — то проводник Windows вам его не покажет…
Теперь перейдем к практике…
📌 Кстати!
1) Как увидеть скрытые файлы и папки на диске — см. заметку.
2) Есть быстрый способ включить показ расширений в Windows — открыть командную строку и ввести:
reg add «HKCU\Software\Microsoft\Windows\CurrentVersion\Explorer\Advanced» /v HideFileExt /t REG_DWORD /d 00000000 /f
Затем перезапустите проводник (тоже набрать в CMD): taskkill /F /IM explorer.exe & start explorer
Для того, чтобы снова скрыть расширения — есть другая команда:
reg add «HKCU\Software\Microsoft\Windows\CurrentVersion\Explorer\Advanced» /v HideFileExt /t REG_DWORD /d 00000001 /f
*
Изменение расширения
❶
У одного файла (через проводник)
Давайте представим самую обычную ситуацию. Вы пытаетесь установить картинку в качестве аваторки, но сервис вам показывает ошибку и сообщает, что они принимают только JPG.
После чего вы заходите в папку и смотрите на свою картинку — и ничего не понимаете… Вроде бы изображение как изображение, что не так? (обратите внимание, что у файла в примере ниже невидно расширение)
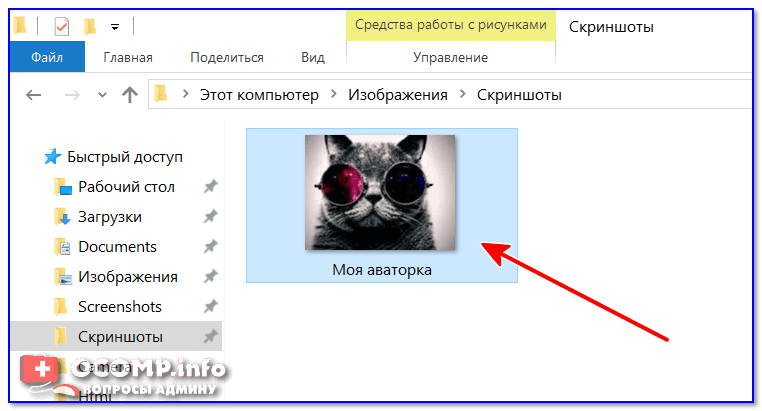
Пример картинки
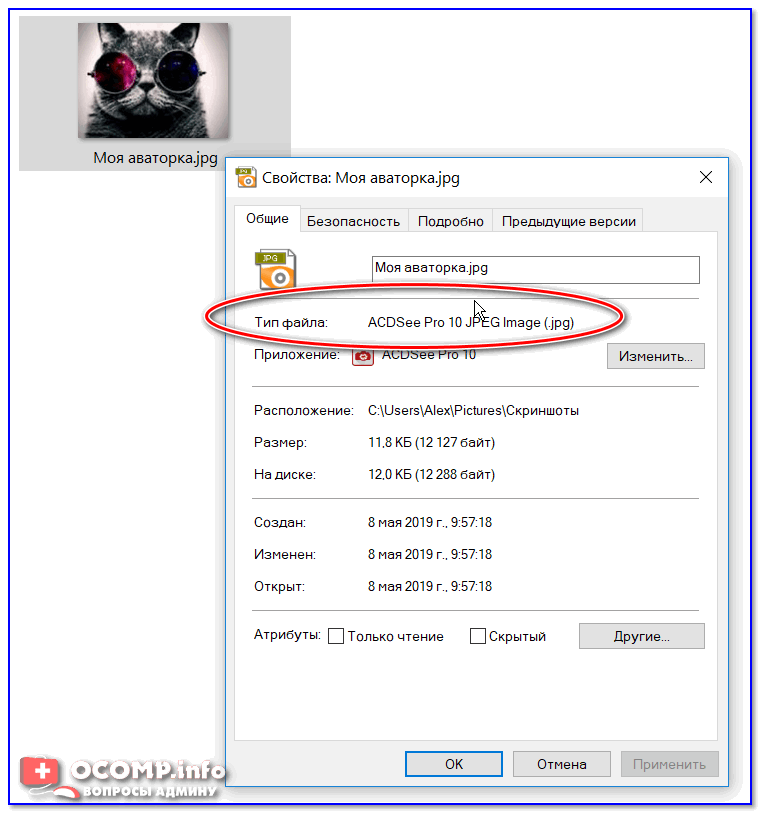
Чтобы узнать расширение файла можно просто открыть свойства файла (достаточно кликнуть правой кнопкой мышки по файлу для вызова контекстного меню). См. пример ниже — установлено, что тип файла PNG. 👇
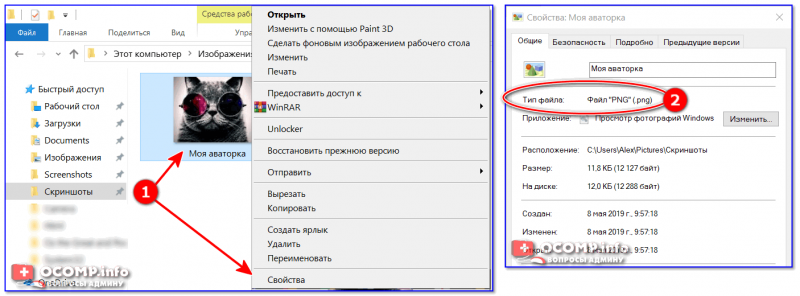
Свойства — тип файла
📌 Теперь попробуем изменить тип файла с PNG на JPG.
1) Сначала нам необходимо зайти в параметры проводника. Сделать это можно двумя путями:
- нажать Win+R, и использовать команду control folders (это универсальный вариант);
- для Windows 10: открыть любую из папок на диске — нажать в верхнем меню по вкладке «Вид» и после перейти в раздел «Параметры» (см. пример ниже). 👇
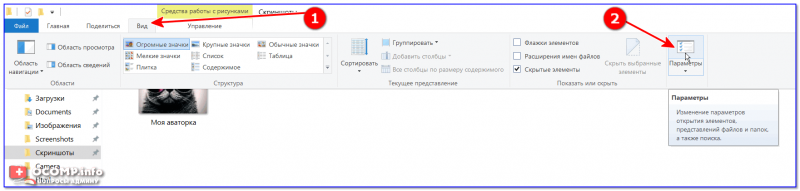
Меню вид — параметры (проводник Windows 10) / Кликабельно
2) Далее во вкладке «Вид» снимите галочку с пункта «Скрывать расширения для зарегистрированных типов файлов» и нажмите OK (пример ниже). 👇
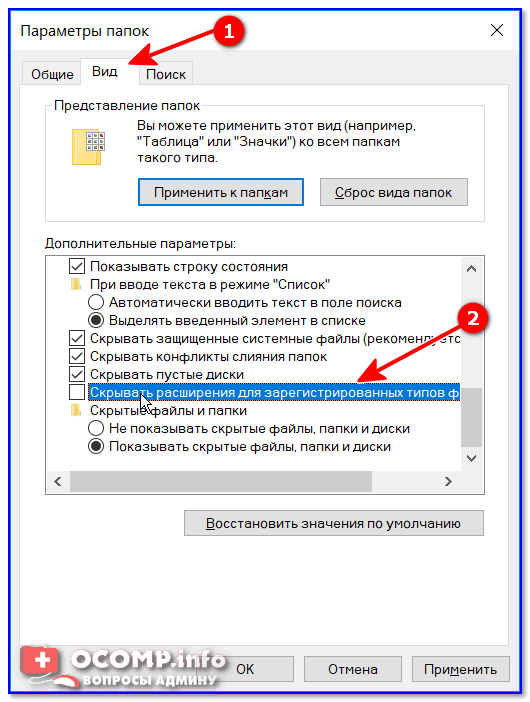
Снять галочку с скрытия расширений…
3) После чего вы увидите, что после имени файла появилось его расширение. Теперь можно просто изменить его, также, как имя файла. Я в своем примере меняю PNG на JPG.
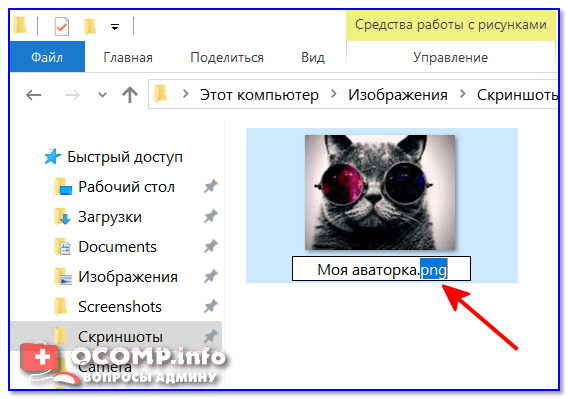
Меняем PNG на JPG
4) После, открыв свойства файла, вы увидите, что его тип изменился (по крайней мере для Windows). В общем-то, задача выполнена. 👌
Тип файла был изменен
📌 Важно!
Изменяя расширение у файла — вы не меняете его «суть», вы лишь указываете системе как с ним нужно работать. Далеко не всегда это помогает решить вопрос…
Т.е. изменив расширение PNG на JPG — мы лишь указали системе, что это другой тип файлов (но на самом деле он таким не является).
Чтобы получить из PNG реальный файл JPG — необходимо провести операцию конвертирования (с помощью граф. редактора). Конвертеры сейчас есть как для фото и видео, так и для документов и др. типов файлов.
❷
У нескольких файлов сразу (через Total Commander)
Для оперирования большим количеством файлов намного удобнее вместо проводника использовать файловый коммандер, например, Total Commander (ссылка на офиц. сайт). Именно в нем и покажу свой пример.
1) И так, представим у нас есть 5-10 (и более) файлов у которых нужно сменить расширение.
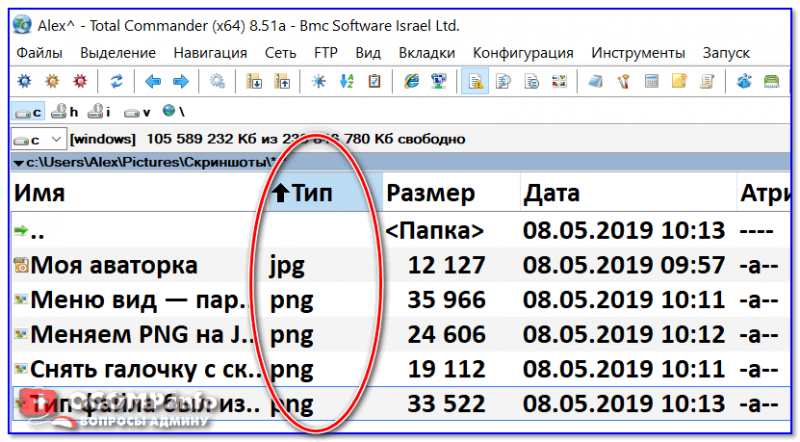
Тип файлов / Total Commander
2) Первое, что нужно сделать — выделить все файлы, которые вы хотите переименовать (примеч.: при выделении Total Commander помечает файлы красным цветом).
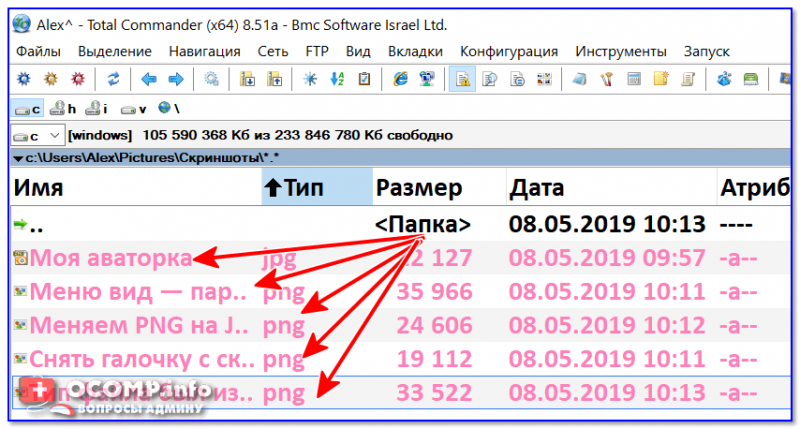
Выделяем все необходимые файлы
3) Далее зайти в меню «Файлы» и выбрать инструмент «Групповое переименование».
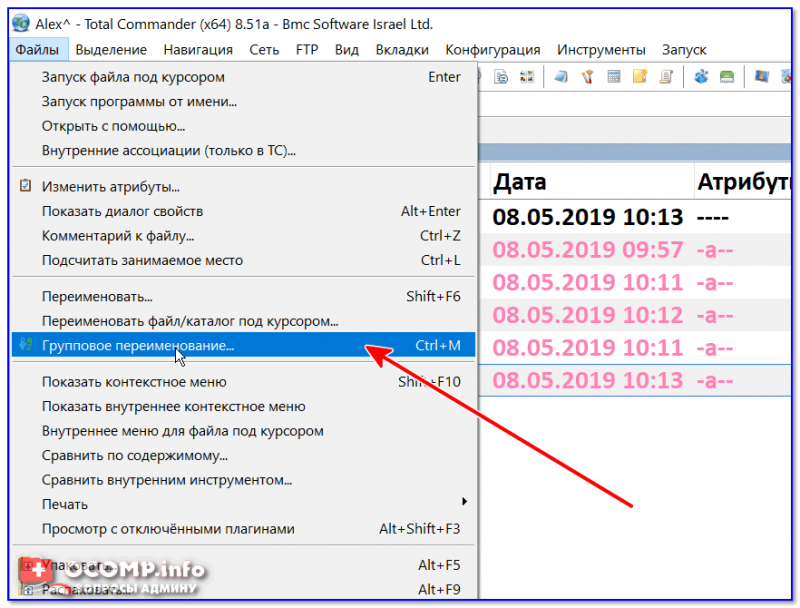
Групповое переименование
4) В строку «Расширения» указать то, что требуется вам (например, я использовал «GIF»). Обратите внимание, что в столбце «Новое имя» показывается какое имя будет у файла после проведенных изменений. Если вас эти изменения устраивают — просто нажмите «Выполнить».
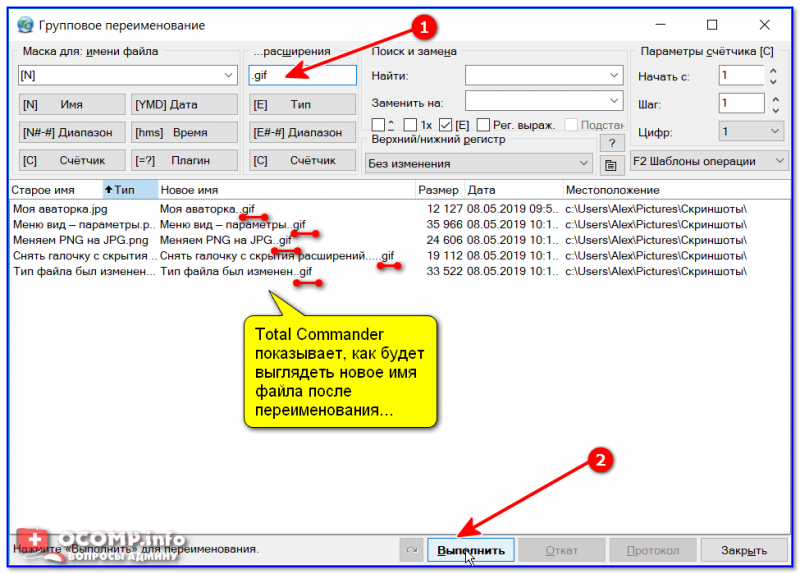
Total Commander показывает, как будет выглядеть новое имя файла после переименования…
5) В общем-то, на этом все. Теперь все выделенные файлы стали с новым расширением. Пример на скриншоте ниже.
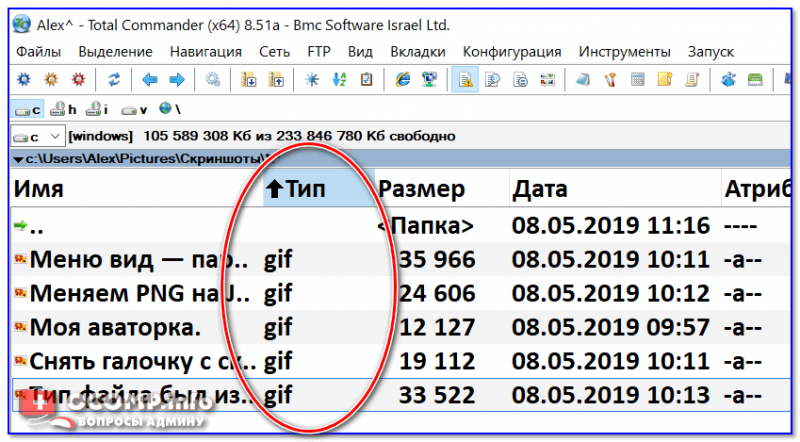
Тип файлов был изменен
*
Изменение атрибутов
Вообще, ранее в ОС DOS и Windows существовало 4 атрибута:
- архивный: если этот атрибут установлен — это означает, что этот файл был уже изменен после последнего резервного копирования;
- скрытый: при установке данного атрибута — проводник в Windows (и многие др. программы) не покажут вам эти файлы/каталоги;
- системный: файлы с данным атрибутом Windows запрещает удалять, редактировать, и всячески пытается скрыть;
- только для чтения: этот атрибут говорит, что файл нельзя редактировать или удалять (можно только читать информацию в нем). Часть программ игнорирует этот атрибут, другая — учитывает и просит у пользователя доп. разрешение на редактирование…
*
После, появились доп. атрибуты:
- сжатый: ясно и из названия — данный файл хранится в сжатом виде;
- зашифрованный: аналогично (файл был зашифрован ОС в целях безопасности);
- проиндексированный: индексация используется Windows, чтобы ускорить поиск файлов на диске. При установке атрибута — система не будет включать содержимое этого файла в индекс.
*
📌 Зачем может понадобиться поменять атрибут:
- чтобы отредактировать или удалить файл (если ваша программа «отказывается» это делать, с атрибутом «только для чтения»);
- чтобы легко можно было находить скрытые или системные файлы;
- прямо-противоположная ситуация — чтобы спрятать файлы от др. пользователей.
❶
Способ 1
1) Поменять атрибуты у файла можно прямо в проводнике (если, конечно, вы видите файл ✌). Просто откройте его свойства, щелкнув по нему правой кнопкой мышки и выбрав оное в контекстном меню.
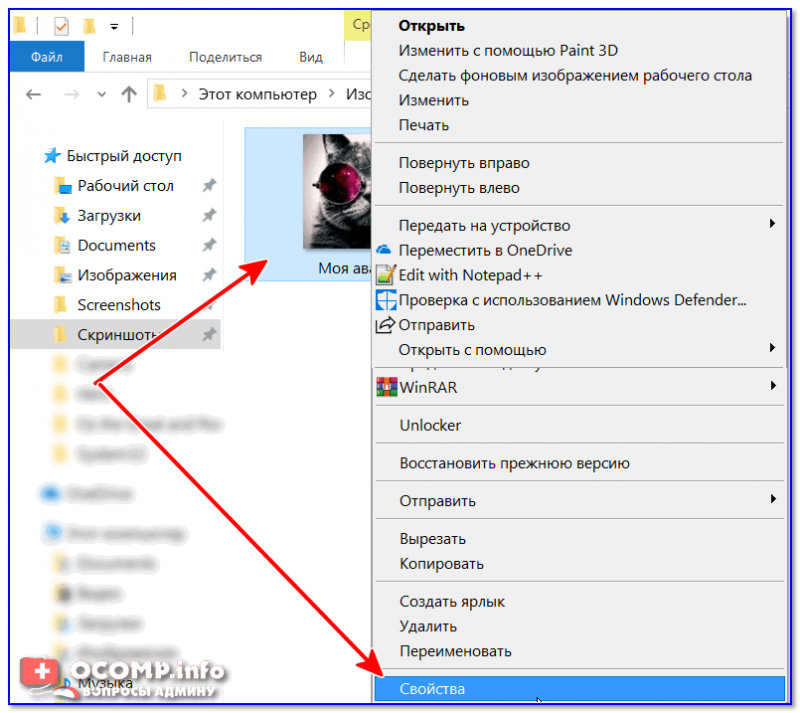
Свойства / Проводник
2) Во вкладке «Общие» в нижней части окна можно установить галочки (или снять их) напротив тех атрибутов, которые вам нужно изменить.
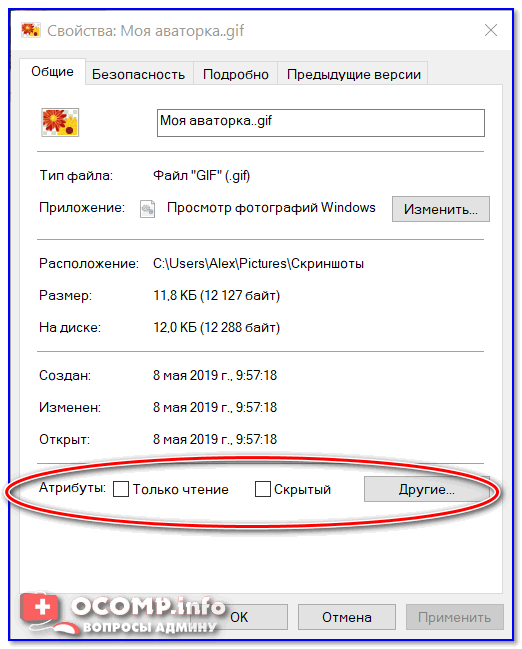
Атрибуты — только чтение, скрытый, и другие
❷
Способ 2
Гораздо удобнее работать с атрибутами при помощи коммандеров (например, того же Total Commander). Рассмотрю работу с ним по шагам…
1) После запуска программы рекомендую сразу же включить отображение скрытых файлов (см. стрелочку-1 на скрине ниже). Далее выберите файл (стрелка-2) и нажмите по кнопке «Изменить атрибуты» (стрелка-3).
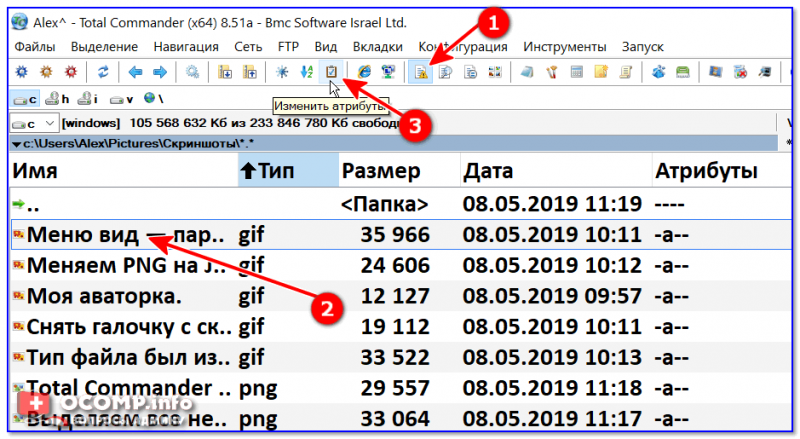
Изменить атрибуты (Total Commander)
Далее перед вами появится небольшое окно, в котором нужно поставить (или снять) галочки напротив нужных (ненужных) вам атрибутов. После чего нажать OK — атрибуты у файла будут изменены!
Примечание: для изменения атрибутов у некоторых файлов — могут понадобится администраторские права.
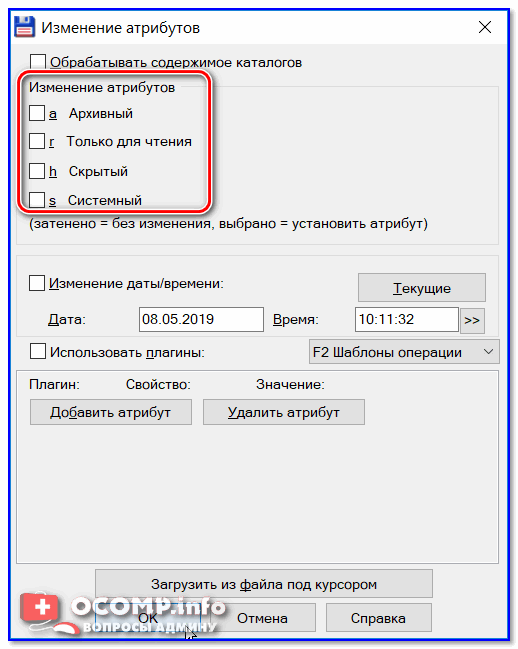
Изменение атрибутов
*
На этом пока все. Всех с наступающим большим праздником — с Днем Победы!
Удачи!
✌
Первая публикация: 08.05.2019
Корректировка: 15.11.2022