
Applies ToWindows 11 Windows 10
When you initially setup your Windows device, you might have opted to use a local account instead of a Microsoft account.
The main difference between a local account and a Microsoft account is that a local account is specific to one device, while a Microsoft account can be used across multiple devices and Microsoft services.
-
A local account is created on the device and doesn’t require Internet connectivity to sign in. It’s independent of other services, and it’s not connected to the cloud. Your settings, files, and applications are limited to that single device
-
A Microsoft account, on the other hand, is associated to an email address and password that you use with Outlook.com, Hotmail, Office, OneDrive, Skype, Xbox, and Windows. When you sign in to your PC with a Microsoft account, you’re connected to a Microsoft cloud service, and your settings and files can sync across various devices. You can also use it to access other Microsoft services
Tip: Discover the benefits of a Microsoft account and how it enhances your experience by visiting the What is a Microsoft account article.
Change from a local account to a Microsoft account
You can use the Settings app to switch your local account to a Microsoft account.
-
In the Settings app on your Windows device, select Accounts > Your info, or use the following shortcut:
Your info
-
Select Sign in with a Microsoft account instead. You’ll see this link only if you’re using a local account
-
Follow the prompts to switch to your Microsoft account
-
Select Next, then select Sign out and finish. Sign back in with your new local account
Change from a Microsoft account to a local account
You can use the Settings app to switch your Microsoft account to a local account.
Important: Microsoft recommends using a Microsoft account, not a local account, when signing in to Windows. Using a Microsoft account in Windows allows for seamless integration of Microsoft services, enhanced security, and sync across devices, unlike a local account.
-
In the Settings app on your Windows device, select Accounts > Your info, or use the following shortcut:
Your info
-
Select Sign in with a local account instead. You’ll see this link only if you’re using a Microsoft account
-
Type the username, password, and password hint. The username must be different than any others on the device
-
Select Next, then select Sign out and finish. Sign back in with your new local account
Warning: when using a local account, it’s a good idea to create a password reset disk. If you don’t do this and then forget your password, you won’t be able to recover it.
Need more help?
Want more options?
Explore subscription benefits, browse training courses, learn how to secure your device, and more.
Changing your Microsoft account on Windows 11 is easy! It lets you personalize your user experience and access new features. To switch to a different Microsoft account, just follow these few steps:
- Go to the Settings app.
- Then, go to Accounts and select “Your info”.
- Here, pick “Sign in with a Microsoft account instead”.
- Follow the prompts to sign in with the desired account credentials.
After signing in with the new Microsoft account, you get access to features and settings. This includes syncing personalization preferences across devices, accessing OneDrive files, and using various Microsoft services.
Don’t miss out on the perks of changing your Microsoft account. Pick an account that suits your needs and preferences and unlock a world of customization options and better functionality.
Preparing for the Change
Ready to make a change to your Microsoft account on Windows 11? Here’s a step-by-step guide to help you prepare:
- Backup important data. Safeguard your files and info. Don’t lose anything during transition.
- Review account settings. Make note of connected apps or services. You may need to reconnect them later.
- Update contact info. Check and update email, phone number, and recovery options. Keep these accurate in case you need access to your account.
- Remove unnecessary apps or services. Clean up your system. Minimize conflicts. Streamline transition.
- Familiarize yourself with Windows 11 features. Navigate any changes during transition.
Do the prep and take action! Changing your Microsoft account will be a smooth experience.
Steps to Change Microsoft Account on Windows 11
Changing your Microsoft account on Windows 11 is easy! Just follow these steps:
- Click the Start button and select the gear-shaped Settings icon from the left-side menu.
- In the Settings app, go to the “Accounts” tab.
- At the left-hand side of the window, click on “Your info.”
- Under “Your info,” select “Sign in with a local account instead.”
- Windows 11 will guide you through the process. Enter your current password and create a new username and password for your local account.
Your Microsoft account will be changed to a local account! Keep in mind that some features, like syncing settings across devices, may no longer be available. This change allows you to use your device without connecting to online services or sharing personal information with Microsoft.
Pro Tip: Before changing your Microsoft account on Windows 11, back up any important files or data associated with your current Microsoft account.
Troubleshooting Tips
Issues changing your Microsoft account on Windows 11? Here are some tips to help:
- Double-check internet connection. Have a stable, reliable connection.
- Verify account credentials. Enter the correct email & password. No typos or forgotten passwords.
- Restart device. This may fix temporary glitches or conflicts.
- Update Windows 11. Get bug fixes & improvements for account changes.
- Contact Microsoft Support. Experts are ready to help with complex problems.
Plus, check if there’s anything specific related to your region or device when changing the account.
For a successful switch, remember these tips:
- Stable internet connection.
- Accurate credentials.
- Restart device.
- Regularly update Windows 11.
- Seek help from Microsoft Support.
Follow these steps, and soon you’ll be on your way to your new Microsoft account on Windows 11!
Conclusion
- To change your Microsoft account on Windows 11, do this:
Go to Settings. Click on the Start button, then the gear icon. Choose Accounts. Click “Your info”. Select “Manage my Microsoft account”. Choose “Sign in with a local account instead”. - Enter your current password. Make a new local account. Give it a username and password. This will replace your existing Microsoft account.
- Sign out of your session. Log back in with the new account. That’s it!
Pro Tip: Before changing your Microsoft account, back up any important data. This stops you from losing important files or settings.
Changing your Microsoft account on Windows 11 can be a breeze if you know the steps. This process involves signing out of your current Microsoft account and then signing in with the new one. You’ll need access to both accounts and your computer settings. By following the steps outlined below, you’ll be able to switch accounts quickly and easily.
The following steps will guide you through changing your Microsoft account on a Windows 11 device. This process will log you out of your current account and let you log in with a new one.
Step 1: Open Settings
Open the Start menu and click on the Settings icon.
The Settings app is your gateway to changing many aspects of your computer, including your Microsoft account. Clicking on the gear icon, commonly seen in the Start menu, will take you directly there.
Step 2: Go to Accounts
In the Settings menu, select the “Accounts” option.
The Accounts section is where you manage user information on your PC. This includes everything from login details to sync settings, so it’s the place you need to be when changing your Microsoft account.
Step 3: Access Your Info
Click on “Your info” within the Accounts menu.
Your info will show you details about the account currently signed in. This is also where you can make changes to the account or switch to a different one.
Step 4: Sign Out
Click on the link that says “Sign in with a local account instead.”
This will sign you out of your current Microsoft account. It’s a crucial step before you can sign in with another account.
Step 5: Confirm Sign Out
Follow the prompts to sign out of your Microsoft account.
You may be asked for your current account password to confirm the sign-out. Make sure you have this information handy.
Step 6: Sign In with New Account
After signing out, go back to the Accounts menu and click “Sign in with a Microsoft account instead.”
This step will allow you to sign in with a different Microsoft account. Enter the email and password for the new account to complete the process.
After you complete these steps, your Windows 11 device will be linked to a new Microsoft account. You will have access to your new account’s settings, files, and apps.
Tips for Changing Microsoft Account on Windows 11
- Backup Important Files: Always back up any important files before making changes to your account.
- Update Passwords: Make sure you know the passwords for both your current and new Microsoft accounts.
- Ensure Internet Connection: You’ll need a stable internet connection to successfully sign in and out of Microsoft accounts.
- Check for Updates: Ensure your Windows 11 is up-to-date to avoid any issues during the process.
- Keep Information Handy: Have all necessary information, like account emails and passwords, readily available.
Frequently Asked Questions
Will I lose my files when I change my Microsoft account?
No, your personal files won’t be deleted, but some settings and apps may need to be reconfigured.
Can I switch back to my old Microsoft account?
Yes, you can always switch back by following the same steps to sign out and then sign back in with the preferred account.
Is it safe to change my Microsoft account?
Yes, it’s safe. Just ensure you have all the necessary information and backup your files.
What if I forget my new account password?
You can reset your password using the “Forgot password” option on the Microsoft sign-in screen.
Do I need to sign out of all devices?
No, changing the Microsoft account on one device won’t affect your sign-in status on other devices.
Summary of Steps to Change Microsoft Account on Windows 11
- Open Settings.
- Go to Accounts.
- Access Your Info.
- Sign Out.
- Confirm Sign Out.
- Sign In with New Account.
Conclusion
Changing your Microsoft account on Windows 11 involves a few straightforward steps and can be done in just a matter of minutes. By following the steps outlined in this guide, you’ll be able to switch accounts without a hitch. Always remember to back up important files and have your account information ready to make the process as smooth as possible.
If you encounter any issues or have any questions, refer back to our FAQs or seek further assistance through Microsoft support. By mastering this simple process, you can easily manage multiple Microsoft accounts on your Windows 11 device, ensuring that you have access to the right settings, files, and applications whenever you need them. Dive in and make the most of your Windows 11 experience!
Matthew Burleigh has been writing tech tutorials since 2008. His writing has appeared on dozens of different websites and been read over 50 million times.
After receiving his Bachelor’s and Master’s degrees in Computer Science he spent several years working in IT management for small businesses. However, he now works full time writing content online and creating websites.
His main writing topics include iPhones, Microsoft Office, Google Apps, Android, and Photoshop, but he has also written about many other tech topics as well.
Read his full bio here.
Changing your Microsoft account on Windows 11 can seem daunting at first, but it’s actually pretty straightforward. By following a few simple steps, you can switch accounts seamlessly. This guide will show you how to get it done quickly and easily.
Changing your Microsoft account in Windows 11 involves logging out of your current account and logging into the new one. This process will update your settings, apps, and files to the new account.
Step 1: Open Settings
Head to the Start menu and click on the «Settings» icon.
Opening the Settings is your gateway to making adjustments to your account. You can find the Settings icon by either searching for «Settings» in the Start menu or by clicking the gear icon if it’s pinned there.
Step 2: Navigate to Accounts
In the Settings window, find and click on «Accounts.»
The «Accounts» section is where you handle everything related to user profiles on your computer. It’s located on the left side panel of the Settings window.
Step 3: Access Your Info
Under «Accounts,» select «Your info.»
«Your info» displays your current account information. This allows you to see which account you’re currently signed into and helps you manage it.
Step 4: Sign Out of Current Account
Click on «Sign Out» to log out of your current Microsoft account.
Before switching accounts, you need to log out of the one currently in use. Make sure to save any work, as this process will close all applications.
Step 5: Sign In With New Account
After logging out, you’ll be prompted to sign in again. Enter your new Microsoft account credentials.
Once logged out, you’ll see a sign-in screen. Here, you can enter the email and password of the new Microsoft account you want to use.
Step 6: Verify Your Account
You’ll need to verify the new account using the verification method you set up (email, phone, etc.).
Verification ensures that your new account is secure. Follow the prompts to verify through the method you chose when setting up the account.
Once you’ve completed these steps, your new Microsoft account will be linked to your Windows 11 system. Your settings, files, and apps will adjust to reflect your new account.
Tips for Changing Microsoft Account on Windows 11
- Ensure you have your new Microsoft account credentials handy before starting.
- Backup any important data to avoid losing it during the switch.
- Double-check that your new account has the necessary permissions if it’s for work or school.
- Make sure you verify your new account immediately to avoid any access issues.
- Keep a record of your verification methods (email, phone) for future reference.
Frequently Asked Questions
Will I lose my apps and files if I change my Microsoft account?
No, your apps and files will remain on your computer, but their settings and data associated with the old account won’t transfer over.
How do I verify my new Microsoft account?
You can verify your new Microsoft account through the method you set up: it could be an email, a text message, or an authentication app.
Can I switch back to my old Microsoft account?
Yes, you can switch back by logging out of the current account and logging back in with your old account credentials.
Do I need an internet connection to change my Microsoft account?
Yes, you need an internet connection to sign in and verify your new Microsoft account.
What if I forget my new Microsoft account password?
You can reset your password through the Microsoft account recovery process online.
Summary
- Open Settings.
- Navigate to Accounts.
- Access Your Info.
- Sign Out of Current Account.
- Sign In With New Account.
- Verify Your Account.
Conclusion
Changing your Microsoft account on Windows 11 is a breeze once you know the steps. By following this guide, you can make the switch in no time. Remember to keep your new account details and verification methods close by, just in case. If you run into any snags, Microsoft’s support site is a great resource for additional help. Now that you’re equipped with all the knowledge you need, go ahead and make that change! For more tips on managing your Windows 11 account, stay tuned to our upcoming articles.
Kermit Matthews is a freelance writer based in Philadelphia, Pennsylvania with more than a decade of experience writing technology guides. He has a Bachelor’s and Master’s degree in Computer Science and has spent much of his professional career in IT management.
He specializes in writing content about iPhones, Android devices, Microsoft Office, and many other popular applications and devices.
Read his full bio here.
Все способы:
- Способ 1: Меню «Пуск»
- Способ 2: Окно завершения работы
- Способ 3: Окно параметров безопасности
- Способ 4: «Диспетчер задач»
- Способ 5: «PowerShell» (только Windows 11 Pro и Enterprise)
- Способ 6: Создание ярлыка (только Windows 11 Pro и Enterprise)
- Вопросы и ответы: 0
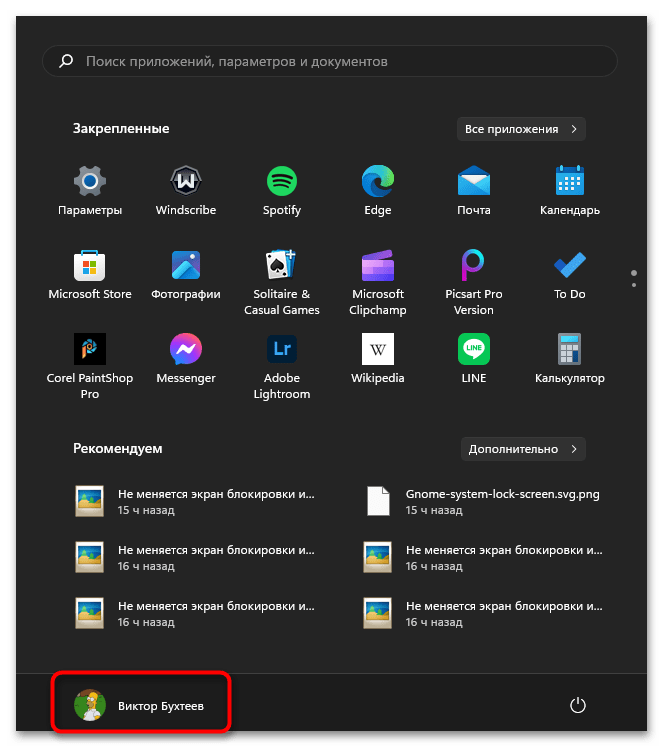
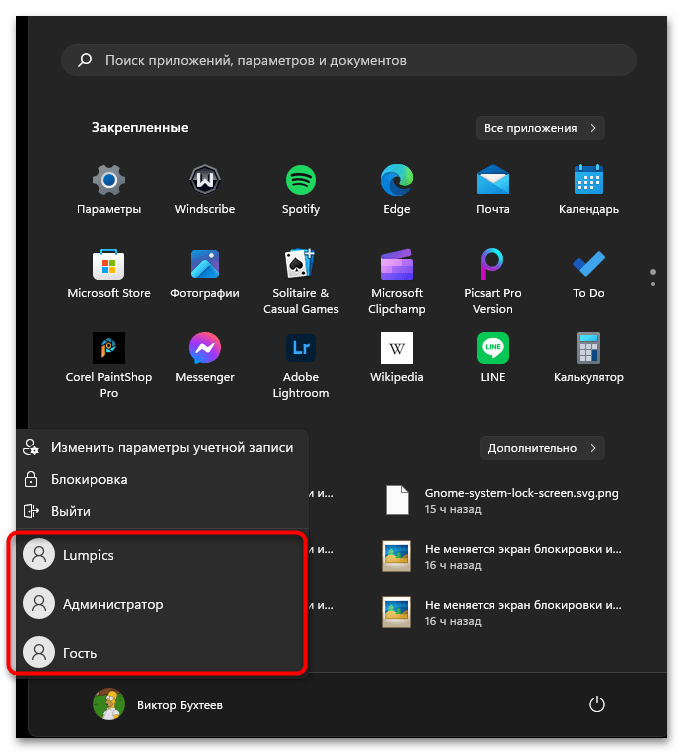
Способ 1: Меню «Пуск»
Смена пользователя в Windows 11 осуществляется несколькими разными методами, каждый из которых будет удобен в определенных ситуациях. При помощи нужного списка в «Пуске» можно вызвать список существующих учетных записей и выбрать, на которую из них переключиться. Это самый удобный вариант для тех, кто не хочет использовать горячие клавиши.
- Вызовите меню «Пуск» и нажмите по имени текущей учетной записи.
- В списке вы увидите перечень других созданных профилей. Достаточно кликнуть левой кнопкой мыши по нужной, чтобы запустить процесс переключения.
- Дополнительно можно выбрать вариант «Блокировка» или «Выйти». Одним из этих действий вы переключаетесь на экран блокировки, с которого можно не только повторно войти в текущую учетную запись, но и выбрать другую для переключения.

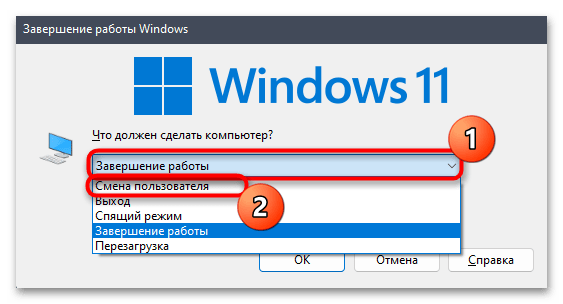
Способ 2: Окно завершения работы
В Виндовс 11 можно при помощи сочетания клавиш Alt + F4 вызвать окно завершения работы, в котором по умолчанию выбирается действие выключения, но его можно поменять, раскрыв список и выбрав пункт «Смена пользователя». Если собираетесь использовать данное сочетание, то учитывайте, что зажимать его нужно на рабочем столе. Если сделать это в активном окне, то оно будет просто закрыто.
Способ 3: Окно параметров безопасности
Вы наверняка слышали о комбинации клавиш Ctrl + Alt + Del и, возможно, даже использовали ее, когда не получалось взаимодействовать с графическим меню операционной системы, но нужно было выключить компьютер, перезагрузить его или открыть тот же «Диспетчер задач» для завершения процессов. Эта комбинация клавиш отвечает за открытие окна с параметрами безопасности. Ниже вы видите обозначение каждой клавиши из сочетания на клавиатуре.
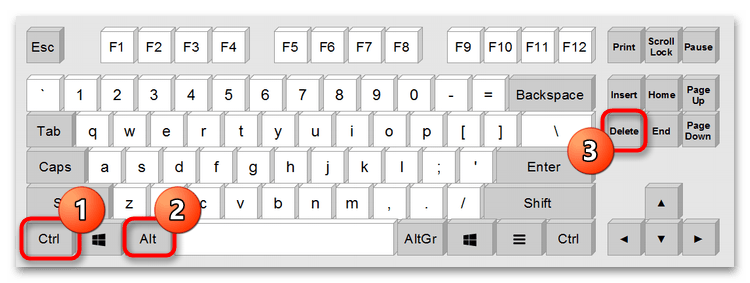
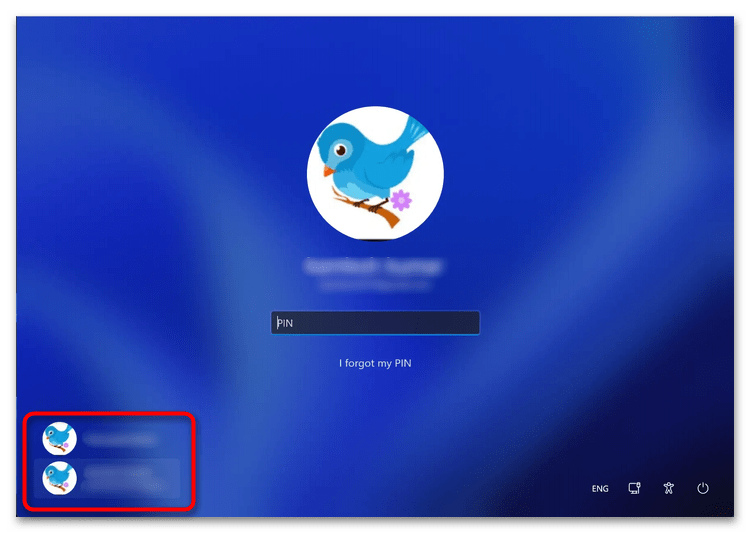
Нажмите Ctrl + Alt + Del и дождитесь отображения списка с доступными действиями. Выберите пункт «Сменить пользователя» и ожидайте перехода на приветственный экран операционной системы.
Учитывайте, что все задачи и активные процессы, которые сейчас развернуты для текущей учетной записи, будут завершены при переключении. Не забудьте перед этим сохранить все изменения, чтобы не потерять важную информацию.
Способ 4: «Диспетчер задач»
Метод с использованием «Диспетчера задач» подойдет в тех случаях, когда вы уже авторизовали в операционной системе второго пользователя, то есть переключались между учетными записями одним из других предложенных методов. В таком случае в соответствующем разделе данного приложения создается запись об активности профиля, через контекстное меню которой можно выбрать пункт для быстрого переключения.
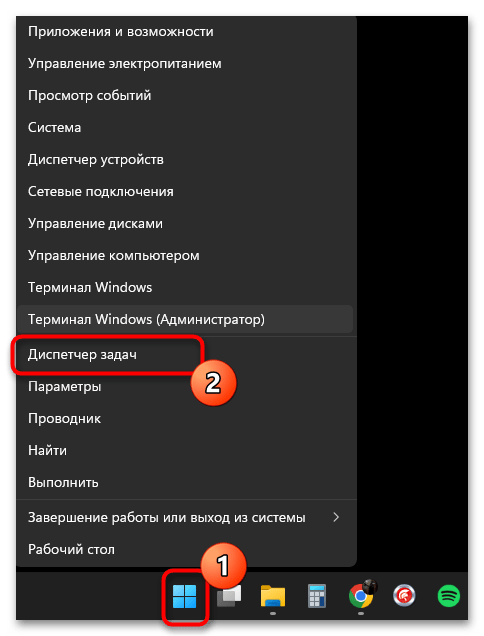
- Щелкните правой кнопкой мыши по «Пуску» и из появившегося контекстного меню выберите пункт «Диспетчер задач».
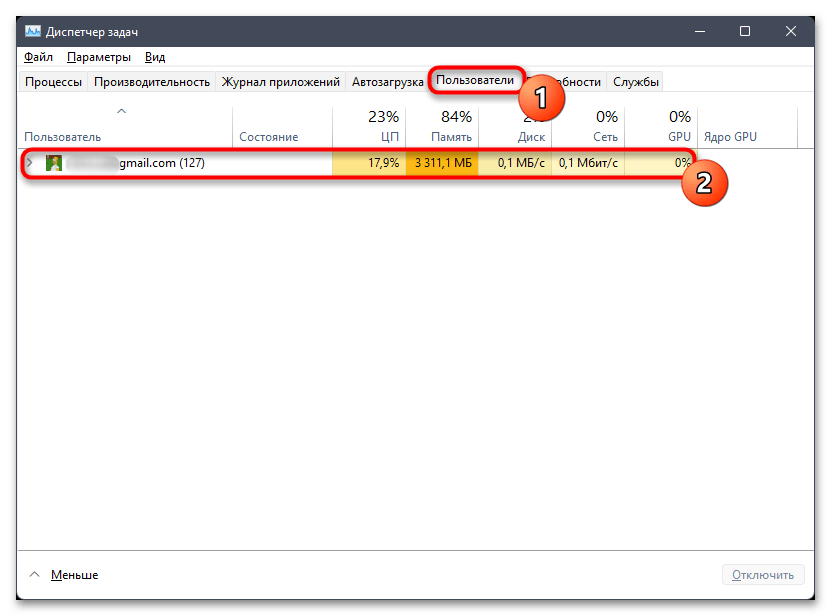
- Перейдите на вкладку «Пользователи» и посмотрите, есть ли здесь дополнительные профили помимо текущего.
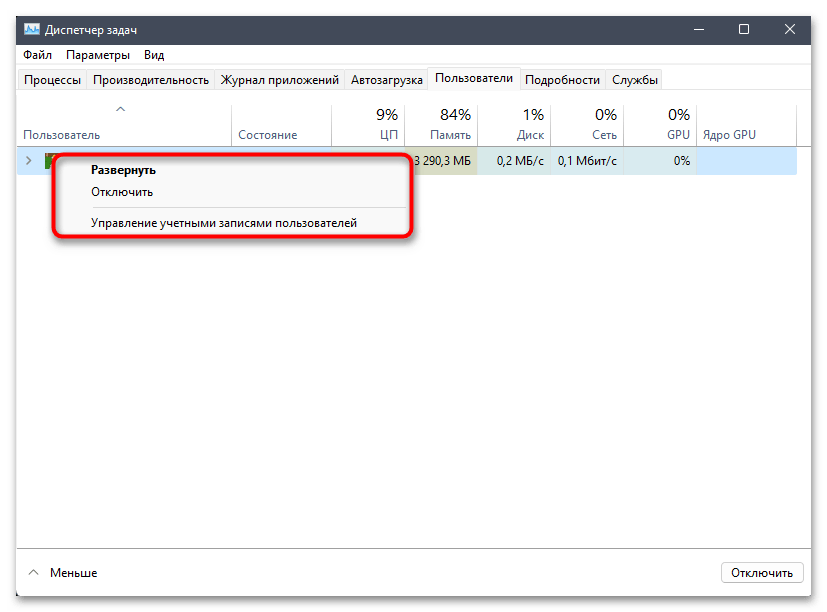
- Если да, нажмите по тому, на который хотите переключиться, ПКМ и выберите из появившегося меню пункт «Сменить учетную запись». Далее произойдет стандартное переключение на профиль другого пользователя.
Способ 5: «PowerShell» (только Windows 11 Pro и Enterprise)
Для редакций Windows 11 Pro и Enterprise доступны некоторые уникальные функции, которые отсутствуют в других. Сюда относится и одна из команд для «PowerShell», при помощи которой можно быстро перейти к смене учетной записи. Она инициирует переход на экран блокировки, откуда вы уже вызываете список профилей и выбираете нужный для авторизации в операционной системе.
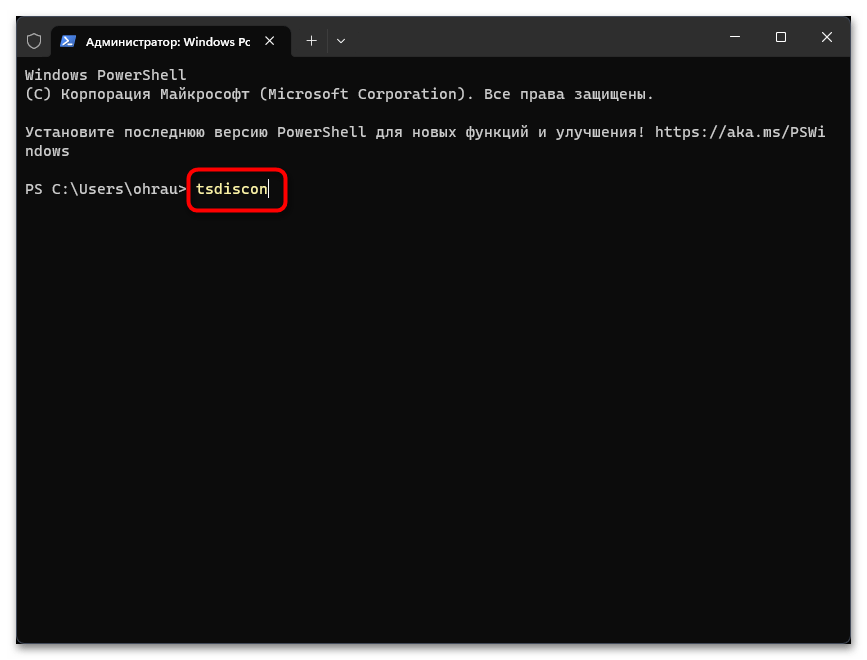
- Нажмите правой кнопкой мыши по «Пуску» и из списка выберите пункт «Терминал Windows (Администратор)».
- В появившемся окне консоли введите команду
tsdisconи нажмите Enter для ее подтверждения. - После перехода на экран блокировки посмотрите на список пользователей слева и выберите, на который из них вы хотите переключиться. При наличии PIN-кода или пароля понадобится сначала ввести его, чтобы разблокировать аккаунт.
Способ 6: Создание ярлыка (только Windows 11 Pro и Enterprise)
Следующий способ тоже подходит исключительно для Windows 11 Pro и Enterprise, поскольку подразумевает обращение к той же самой утилите, которая использовалась в предыдущем методе. Однако на этот раз ее вызов будет инициирован через ярлык на рабочем столе или в любой удобном для вас каталоге. Нужно только создать его с правильными параметрами и для красоты поставить иконку.
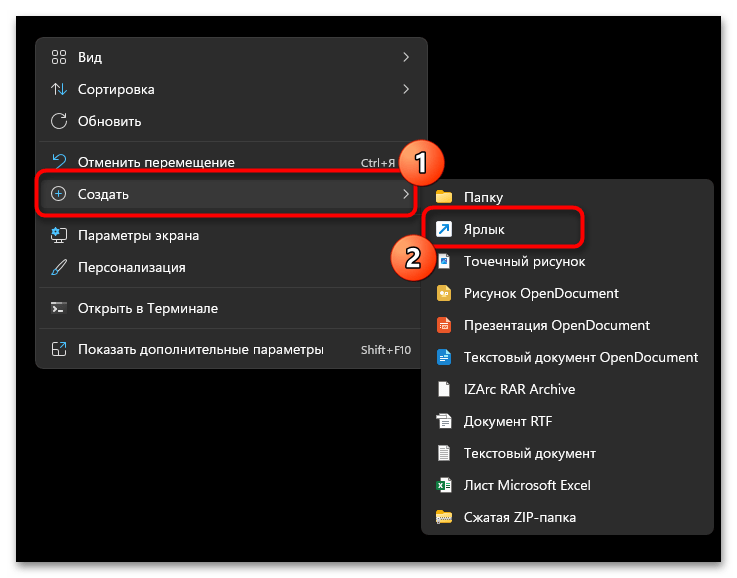
- Нажмите по пустому месту на рабочем столе правой кнопкой мыши, наведите курсор на «Создать» и выберите пункт «Ярлык».
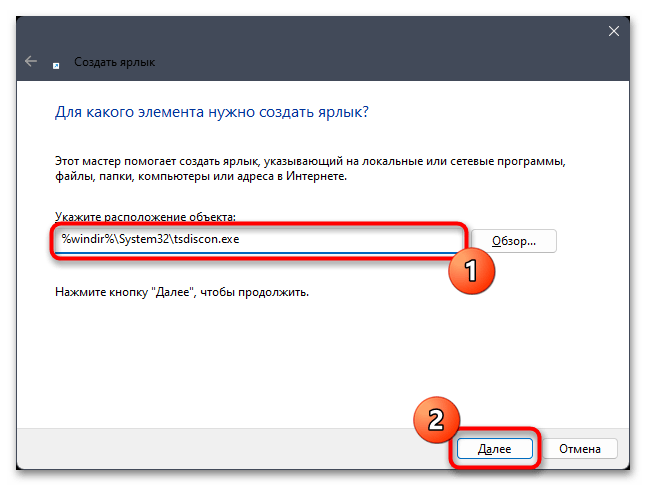
- В качестве расположения объекта укажите
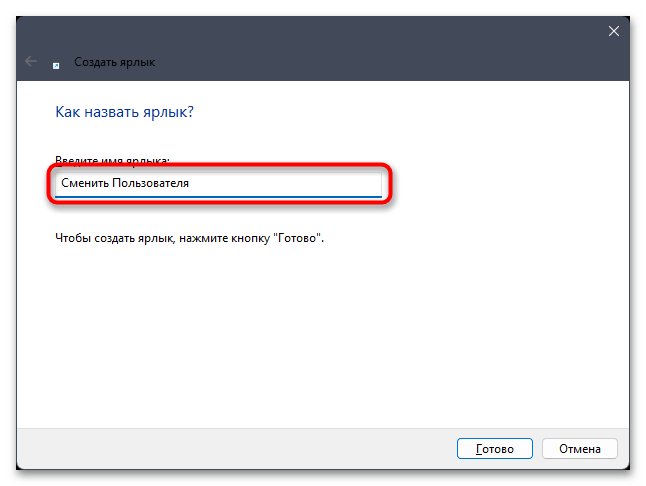
%windir%\System32\tsdiscon.exeи переходите к следующему шагу, нажав по «Далее». - Задайте любое удобное название для данного ярлыка, чтобы вы понимали, для чего он предназначен.
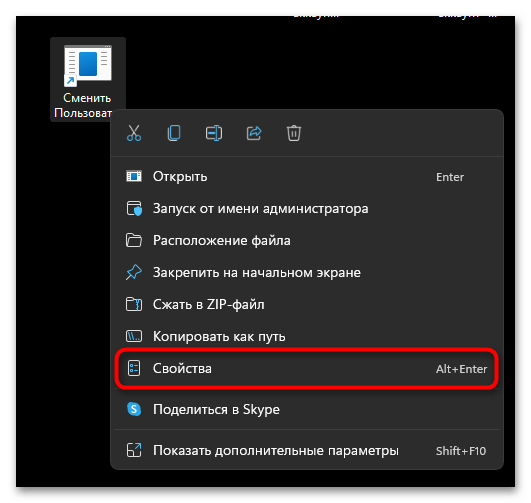
- Его создание заканчивается после нажатия по кнопке «Готово», и ярлык уже можно использовать для смены пользователя. Однако для него не будет присвоена иконка. Давайте поменяем это, перейдя в «Свойства» ярлыка через его контекстное меню.
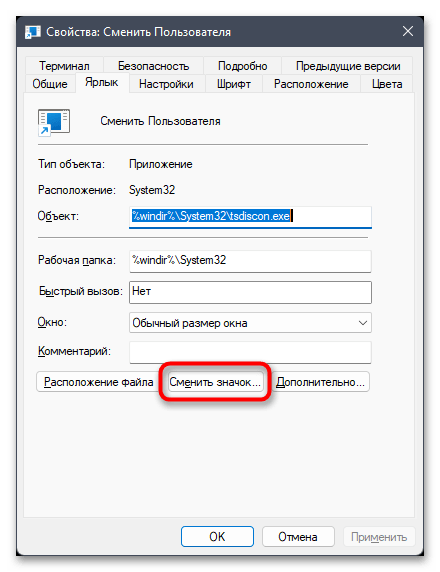
- В новом окне нажмите по «Сменить значок».
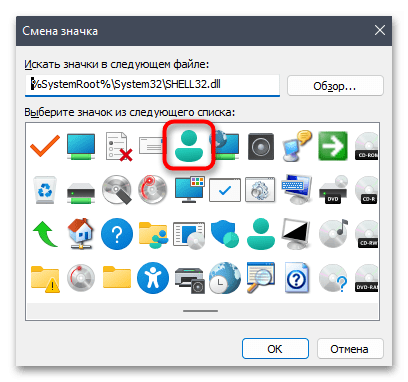
- Найдите в списке стандартных иконок ту, которая кажется вам наиболее подходящей. Вы также можете скачать иконку из интернета (в формате ICO) и воспользоваться ей.
- Подтвердите свой выбор и переходите к использованию ярлыка. Щелкните по нему дважды и дождитесь отображения экрана блокировки. Через него переключите пользователя, чтобы войти в ОС.
Наша группа в TelegramПолезные советы и помощь