
You can effortlessly uninstall graphics drivers through the Display Driver Uninstaller (DDU). This article explains the process to use it.
Drivers are the driver force of a computer. They help the operating system communicate with various peripherals, such as the graphics card for the correct execution of your commands. However, in certain circumstances, such as if the driver is incompatible or corrupted, it becomes essential to uninstall it. Since manual driver uninstallation is a lengthy process, you can use a Display Driver Uninstaller to uninstall the graphic card drivers from your computer.
The DDU uninstaller is an application tool to entirely remove the Nvidia and AMD graphics card drivers from your PC. It leaves no trace of the driver and wipes out all its folders, files, and registry keys.
You can use the Windows 10/Windows 11 Display Driver Uninstaller in any situation where you are experiencing problems with the standard driver uninstallation via Windows Control Panel. However, if you are confused about how to use this utility, this article is here to help you.
Through this article, we guide you through the complete process of using the DDU Display Driver Uninstaller on your device. Let us begin with some crucial points you should keep in mind when using it.
Points to Remember When Using the Display Driver Uninstaller
Here is what you should know while using the DDU uninstaller on your computer to uninstall the AMD and Nvidia graphics drivers.
- Always create a backup or system restore point before making any changes to your PC
- Exclude the Display Driver Uninstaller completely from all security programs to avoid problems
- Safe mode is always recommended when using the uninstaller
Now that you are quite familiar with the uninstaller for your display driver, let us understand how to use it in the following section.
Also Read: Best Uninstaller Software For Windows 10, 11
Steps to Use the Display Driver Uninstaller
Here are the steps you can follow to uninstall your computer’s display driver using the DDU uninstaller.
- Firstly, download the Display Driver Uninstaller’s latest version for your Windows 10/11 computer.
- Now, locate and double-click the downloaded zip file.

- Now, select the location where you want to extract the file and click the Extract button.
- You can now double-click the Display Driver Uninstaller to run it on your PC.

- Now, it is recommended that you run the application in Safe Mode. Hence, select the Safe Mode from the Launch Options. Alternatively, you can follow the path Settings>Update & Security>Recovery>Advanced Startup>Restart Now>Troubleshoot>Advanced Options>Startup Settings>Restart>key number 4 to enable safe mode without internet.
- Choose the Reboot option after selecting the safe mode.
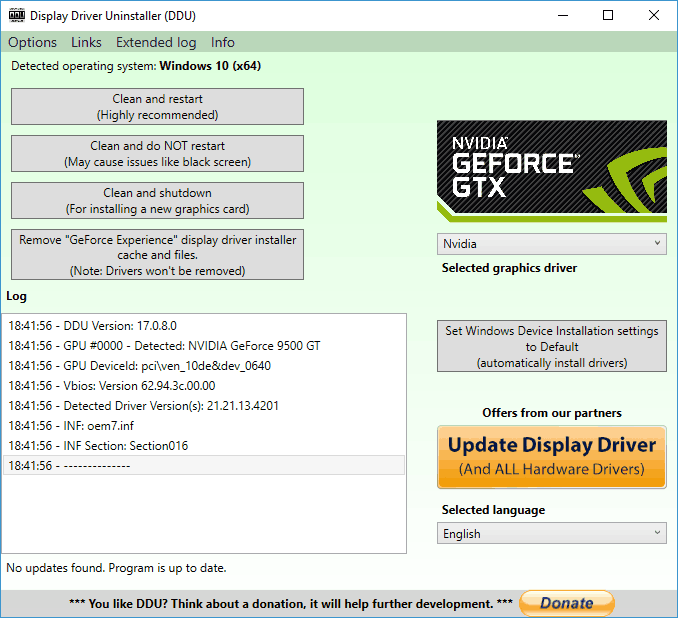
- After opening the Display Driver Uninstaller (DDU), you can view the details about the graphic cards installed on your computer.
- If the uninstaller application does not detect the graphics card driver automatically, select it from the menu present on the right of the application window.
- Three options will become available to you on the left side. You can choose to clean and restart if you want to install a new graphics card driver.
- If you wish to install a new graphics card, remove the driver using the clean and shutdown option.
- After selecting the appropriate option, wait until DDU gets the driver removed.
- Lastly, you can restart your computer and install a new driver for your graphics card.


After installing the graphics driver, it is recommended you keep it updated to avoid performance issues. You can update the driver effortlessly through a program like Win Riser.
The Win Riser is an excellent driver update and PC optimization software. It updates all drivers instantly with one click and offers a lot of interesting features, such as driver backup and restoration, malware detection, junk removal, scheduled scanning, and more.
All you have to do is download and install the Win Riser software from the following link, run the program, scan your computer, review the results, and select the option to Fix Issues Now.
Also Read: How to Fix Program won’t Uninstall in Windows 10, 11 PC
Concluding the Display Driver Uninstaller Guide
This article guided you through the process of reinstalling the graphics drivers on your computer through Windows 10/Windows 11 Display Driver Uninstaller. You can follow the above guide to use this utility and fix the problems you may be experiencing. If you have any questions or concerns about this article or wish to share something, leave a comment in the comments section.
We will be back shortly after a while with another useful tech guide. Until then, stay connected to this blog, and if you wish, you can explore our other articles to gain more insight into the world of technology.
Having the latest drivers installed on your Windows 10 PC is crucial if you want to ensure maximum performance and stability.
However, sometimes issues with drivers can emerge, and you might have to remove certain drivers from your PC.
If you’re having problems with your graphics card and you need to remove its drivers, you might be interested in a tool called DDU: Display Driver Uninstaller.
Is DDU available for download?
Yes, this software is available for download, and you can use it if you need to uninstall Nvidia drivers completely from your PC. The software will remove the drivers and all their traces from your computer.
It’s also possible to use this software if you want to roll back NVIDIA drivers to the older version if the current one is giving you issues.
It’s important to mention that you can use this tool to uninstall AMD drivers and any other type of GPU drivers, so be sure to give it a try.
Display Driver Uninstaller is a great tool and, in this article, we’re going to cover the following issues:
- Uninstall Nvidia drivers Windows 10 – If you have problems with your Nvidia drivers, you should be able to completely uninstall them using this tool.
- How to use DDU – Display Driver Uninstaller is a simple to use a tool, and in this article, we’ll show you how to use it properly.
- Display Driver Uninstaller AMD, Intel, Nvidia – DDU can remove almost any graphics card driver from your PC. The tool fully works with AMD, Nvidia and Intel drivers.
- Display Driver Uninstaller Safe Mode – Sometimes in order to remove a certain driver, it’s advised that you remove it from Safe Mode. Display Driver Uninstaller can automatically enter Safe Mode and remove the problematic driver from your PC.
- Nvidia display driver deletion of old versions – If you want to completely delete old versions of Nvidia drivers, DDU might be the perfect tool for you.
- Display Driver Uninstaller portable – Display Driver Uninstaller is a fully portable application and you don’t have to install it in order to run it.
- AMD display driver uninstall clean – If you’re having any problems with the AMD display driver and you want to completely remove it from your PC, DDU is the perfect tool for you.
Should I use DDU before installing new GPU?
When doing a driver upgrade, it is not necessary to run DDU prior to installing newer drivers on top of the previous versions of the drivers.
If you are experiencing problems that are related to your graphics card, you can use DDU to check and make sure that there are no hidden files that are influencing the drivers.
How do you use DDU 2022?
Display Driver Uninstaller is a freeware third-party application designed to remove your graphics card drivers.
Sometimes you might experience issues with your graphics card. In order to fix those issues, you might have to reinstall the graphics card drivers.
What does DDU do?
You can always remove the graphics card driver from Device Manager or by using its dedicated uninstaller.
However, the Display Driver Uninstaller allows you to thoroughly remove the driver from your PC. As you might have noticed, certain drivers can leave installation packages or registry entries once you uninstall them.
The Display Driver Uninstaller will remove all files associated with your graphics card including the installation packages and registry entries.
Sometimes it can occur that you can’t uninstall the graphics card driver due to a certain error in Windows 10, and this is why tools such as DDU can be helpful.
If you’re worried that the currently installed driver is causing any issues on your system, you can completely remove it from your PC by using this tool.
Since this is such a powerful tool, it’s recommended that you create a System Restore point before using it.
In case anything goes wrong while removing the driver you can easily restore your system by using the System Restore point.
If you’re interested in more info on how to create a restore point and how would that help you, take a look at this simple article to find out everything you need to know.
It’s also recommended that you add DDU to the list of exclusions in your antivirus software so it can have full control over your system while removing the driver.
Can I use DDU in normal mode?
Yes, you can. But if you wonder If you wonder how to use DDU in Safe Mode, you can follow the steps above, right after you enter Safe Mode.
-
1. Download the latest version of Display Driver Uninstaller.
-
2. The installer tool for DDU will be downloaded as a 7zip archive. Locate the downloaded file and double-click it.

-
3. Now you’ll be asked to extract the tool. Choose the extract location and click Extract.
-
4. After the tool is extracted, double click the Display Driver Uninstaller icon to start it.

-
5. You should see a warning message saying that it’s recommended to use this tool in Safe Mode. You can boot to Safe Mode simply by choosing the Safe Mode option from the Launch option menu.
-
6. After selecting Safe Mode click the Reboot button. You can also run the application without using the Safe Mode simply by choosing the Normal option from the Launch option menu.
-
7. When Display Driver Uninstaller opens, the log will show you the information regarding your graphics card. You can also choose the graphics card driver from the menu on the right, but in most cases, Display Driver Uninstaller should automatically detect your graphics card driver.
-
8. You’ll see three buttons available on the left side. If you’re installing a new driver for your graphics card, simply select Clean and restart button.

-
9. If you’re installing a new graphics card, you can use Clean and shutdown button to remove the driver and turn off the PC.
-
10. There’s also an option to clean the driver without a system restart, but this option can sometimes cause some minor issues with your PC.
-
11. After selecting the desired option, wait while Display Driver Uninstaller removes the driver.
How to use DDU
In order to remove drivers using DDU, all you have to do is download and install the app. Then, select the desired removal option.
Display Driver Uninstaller works with Nvidia, AMD, and Intel drivers.
After the PC restarts, your display driver will be completely removed, and all driver-related issues with your graphics card will be resolved.
Now you just need to install a new driver for your graphics card and check if the problem is resolved.
⇒ Get Display Driver Uninstaller
How to uninstall drivers in Safe Mode in Windows 10?
- Click the Start button, hold the Shift key and click the Power button. While holding the Shift key select the Restart option.
- When your PC restarts select Troubleshoot, select Advanced options, choose Startup Settings and click the Restart button.
- You’ll see a list of options. Select any version of Safe Mode by pressing the appropriate number on your keyboard.
- After Safe Mode starts, run Display Driver Uninstaller and follow the instructions above to delete your display driver.
- How to rollback NVIDIA drivers in Windows 10/11
- Display driver failed to recover from timeout [Windows 10/11]
- Microsoft Office Lens: A Powerful Tool for Capturing and Organizing Information
- Swap Left/Right Speaker in Realtek Audio Console [How to]
- How to Get DirectX 12 End-User Runtime and Fix Installation Issues
- Overclocking in OMEN Gaming Hub: How to Use it
If you don’t manage to access Safe Mode from Display Driver Uninstaller, you can run the tool directly from Safe Mode by performing the steps above.
And if Windows won’t boot into Safe Mode from the first try, don’t panic. We will help you overcome any booting problems that might come along.
As you can see, the Display Driver Uninstaller is a simple yet powerful tool. You don’t even need to install it on your PC to make the most of it.
Needless to say, this means that you can easily run the tool on any PC.
As far as compatibility is concerned, Display Driver Uninstaller will seamlessly work with older versions of Windows, plus it supports both 32-bit and 64-bit systems.
We also have to mention that this tool has support for multiple languages, so it’s quite possible that your native language is available in the list of translations.
Alternatively, you can go for an even better-equipped program such as expert driver removal software to get the job done.
Simple, yet highly effective, DDU will be useful to both advanced and rookie-level users. So, make sure you give it a go.
This is a great tool that can help you if the GeForce Experience driver downloads but doesn’t install, or with other problems, so don’t miss it.
If you have any other questions about DDU, feel free to leave them in the comments section below.
Milan Stanojevic
Windows Toubleshooting Expert
Milan has been enthusiastic about technology ever since his childhood days, and this led him to take interest in all PC-related technologies. He’s a PC enthusiast and he spends most of his time learning about computers and technology.
Before joining WindowsReport, he worked as a front-end web developer. Now, he’s one of the Troubleshooting experts in our worldwide team, specializing in Windows errors & software issues.
- Display Driver Uninstaller (DDU) removes Intel, AMD, and Nvidia drivers from scratch, and leaves no trace.
- To uninstall your display driver, download the tool, extract it, boot the computer into safe mode, run the DDU utility, choose your preferences, select the type of driver and manufacturer, and then proceed to clean.
An up-to-date graphics driver is always an integral part of a smooth, seamless computer experience. However, you may often encounter issues with graphics drivers, especially when it is time to upgrade them.
Often, you may find yourself wanting to perform a clean display driver, which means completely removing the older driver and all of its traces, and then installing the new driver. This approach is especially useful when troubleshooting the display or its drivers. But do you know how to completely remove a graphics driver?
While it is easier to uninstall or roll back a graphics driver using the Device Management console or the vendor-provided control panel, they still do not completely remove a graphics driver. You can still find traces of files and values inside the Windows Registries from the uninstalled drivers, which isn’t always favorable for the new driver, as it can hinder their installation process, or cause other performance issues.
This is where the “Display Driver Uninstaller (DDU)” comes in handy. DDU is an open-source tool designed to uninstall Intel, AMD, and Nvidia graphics drivers from scratch so that you can perform a clean install with ease. In this post, we are going to show you how to use DDU to completely uninstall your existing display driver and make room for a new one.
Table of Contents
Download Display Driver Uninstaller (DDU)
The DDU utility does not have an official website and you need to use third-party mirrors to download it. Which is why we have provided our own download link for you to use.
The downloaded DDU utility has been scanned and tested for viruses and is completely safe to use. Simply click on the following link to download Display Driver Uninstaller.
Display Driver Uninstaller (1.0 MiB, 2,713 hits)
Once you click, your download should begin automatically.
Support and requirements for Display Driver Uninstaller
Like all software, the DDU also has a few limitations that need to be considered before using it. Here are a few things you need to consider:
- DDU can only be used on Windows 7 and above.
- At the moment, it is only applicable to Nvidia, AMD, and Intel GPUs
- It requires Microsoft .NET Framework 4.8 or higher
Make sure that your system satisfies these requirements before proceeding to use DDU to uninstall a driver.
Uninstall display graphics driver with Display Driver Uninstaller
Once you have downloaded the tool from the given link, use the following steps to uninstall your display driver from scratch:
-
Once DDU is downloaded, right-click on it and extract its contents.

Extract the contents -
Navigate to the extracted folder and run the DDU application.

Run the uninstaller -
Click Extract to extract the setup contents.
Extract the setup contents -
Now press the Windows Key + R to open the Run Command box.
-
Type in “msconfig” and press Enter to open the System Configuration window.
-
Switch to the Boot tab.
-
Select “Safe boot,” then select “Network” below it, and then click Apply and OK.

Boot into safe mode using System Configuration -
In the confirmation dialog box, click Restart.

Restart the computer into safe mode The computer will now restart into safe mode with networking.
Explore other methods to boot the computer into safe mode.
-
Once restarted, navigate to the extracted DDU folder again, and open a sub-folder named “DDU vXX.X.X.X“. Run the “Display Driver Uninstaller” application.

Run the DDU app -
If you are running the tool for the first time, you will see a dialog box. Click Ok.
Proceed with first-time prompt -
In the Options window, adjust the settings for the tool and click Close.
Adjust the settings for the tool -
Expand the top drop-down menu and select the type of driver that you want to uninstall.
Select the type of driver to remove -
Then expand the other drop-down menu and select the manufacturer of the driver.
Select the vendor for the driver -
Click “Clean and restart.”
Clean and restart The tool will now begin removing the selected and then automatically restart the computer. When the computer restarts, you may proceed to boot it normally and out of safe mode, then continue to install a new display driver.


Conclusion
The purpose of the Display Driver Uninstaller is to give the users the experience as if they were going to be installing a display driver for the first time. The DDU utility uninstalls the graphics driver and removes all of its traces from the computer, which is exactly what is needed when troubleshooting corrupting drivers.
Display Driver Uninstaller (DDU) Tutorial/Guide
By — /u/GhostMotley
This tutorial was written for version V17.0.8.2, future versions may differ slightly. Please feel free to contact me via PM on Reddit if you think I should update the guide.
DISCLAIMER: I take no responsibility for any damages caused if you don’t follow the steps correctly, you proceed at your own risk and take full responsibility. It should also be noted any settings or profiles you’ve created in your GPU control panel will be removed — you may need to re-enable settings like SLI, Crossfire, tweak colour settings, refresh rates etc…
Q: What is DDU?
A: Display Driver Uninstaller (DDU) is a driver removal tool that can help you completely remove AMD (ATI), NVIDIA and Intel graphics drivers, Realtek audio driver from your system, without leaving leftovers behind (such as registry keys, folders, files, driver store). Over time these leftover files can cause compatibility issues, such as drivers failing to install, reducing performance or system crashes/freezes. By using DDU you can remove these leftovers and solve many common issues related with GPU drivers.
Step 1 — Have your GPU/Audio drivers ready (but do not run them yet)
Before we go ahead and use DDU to remove our GPU drivers I highly recommend beforehand you head to your GPU manufacturers website and download the appropriate drivers for your GPU and OS configuration (I recommend you use the latest drivers available, however you can use older drivers if you want)
Here are the official download links for NVIDIA, AMD (ATI) and Intel drivers. Make sure you select the right options such as language, OS version and architecture etc.
NVIDIA: www.nvidia.com/Download/index.aspx
AMD (ATI): support.amd.com/en-us/download
Intel: https://downloadcenter.intel.com/
— Note: With some computers you may have to download your GPU/Audio drivers from the OEMs website (HP, Dell, Lenovo etc.) — some GPUs may have custom hardware IDs that only officially work with the OEM specific drivers; however this isn’t common.
Step 2 — Download DDU
After you’ve downloaded your GPU drivers we can now go ahead and download DDU, I recommend you download DDU from Wagnard’s official site.
DDU Download: https://www.wagnardsoft.com/display-driver-uninstaller-ddu-
I always recommend you download the latest version of DDU, it gets updated quite regularly to keep up with the changes made to GPU drivers and Windows.
Step 2.5 — Disconnect from the Internet (Windows 10 only)
If you’re using Windows 10, I recommend (if not mandatory) you disconnect your PC from the Internet, this will prevent Windows 10 from automatically downloading GPU drivers.
There is an alternative option in the option menu of DDU that you can select that should prevent the download of drivers from window update.
Step 3 — Extract and run DDU
Once you’ve download DDU, simply double click the exe and extract it wherever you want (except on a network drive, it must be on a local disk), I recommend you extract DDU to a ‘DDU’ folder on the desktop, for ease of access.
Once you’ve extracted DDU, open the DDU folder (or wherever you extracted it) and you should see several files, read the ‘Readme’ file, then launch ‘Display Driver Uninstaller’.
After you run ‘Display Driver Uninstaller’ you’ll be presented with a warning box, advising you to launch DDU in Safe Mode, I highly recommend you use DDU in Safe Mode to minimize any potential issues, however it’s optional. If you do not want to launch DDU in Safe Mode, just click ‘OK’ and proceed as normal.
If you do want to launch DDU in Safe Mode click the OK button, in the top left-hand corner select ‘Options’ and at the bottom click ‘Enable Safe Mode dialog’, exit out of DDU and relaunch it, upon relaunching select «Safe Mode (Recommended)» and click «Reboot to Safe Mode». Your PC should reboot into Safe Mode and DDU will start.
*Note1: It is preferable to use the «Enable Safe Mode dialog» option only after you have at least tried once to go into safe mode the usual way or YOU MAY GET STUCK in safe mode.
*Note2: If you use DDU in normal mode I recommend you close down any background programs, such as games, browsers, media players etc…
After launching DDU you will be presented with this screen, instead of simply clicking one of the removal buttons I recommend you head to the options and tweak how DDU removes the drivers.
I recommend you select the C:\NVIDIA and C:\AMD folders
These folders are the default locations where the NVIDIA or AMD driver installation files are unpacked, once the driver is installed these folders can safely be deleted.
Once this has been done exit the options menu and now we can begin using DDU to remove our GPU drivers.
On the right side you’ll see a drop down box that allows you to select what GPU drivers you want to remove.
If you previously had an AMD (ATI) GPU in your system and then made the switch to NVIDIA (or vice versa) in the same Windows installation, you will want to remove the AMD drivers and then the NVIDIA drivers (or vice versa) to avoid any conflicts
Intel iGPU (HD, Iris graphics) drivers shouldn’t cause any conflicts between AMD or NVIDIA drivers. However, having assets of AMD drivers installed on an NVIDIA system, or vice versa can cause issues.
On the left side of the interface you’ll see three buttons, all are relatively quite simple but I’ll run through them quickly.
- Clean and restart
Will remove the current selected GPU drivers and reboot. This is great if you’ve only had a single GPU installed and you want to clean your drivers. It will reboot and you can start clean with the drivers you downloaded earlier
- Clean and do NOT restart
This is the option you’d want to select if you’ve had multiple GPUs installed in the past, remove the AMD (ATI) drivers, change it to NVIDIA and remove those drivers (or vice versa)This allows you to completely remove any GPU drivers from your system and start completely fresh.
- Clean and shutdown
Will remove the currently selected GPU drivers and shutdown your system. This should be used if you intend to swap out your GPU
- Remove “GeForce Experience” display driver installer cache/files (NVIDIA only) (Older DDU version)
This will remove cache/temporary files that are created when installing NVIDIA drivers or the GeForce experience, this is intended for use after you’ve installed your NVIDIA drivers, it typically will remove 600MB or more
Now all we have left to do is remove our drivers, your screen may go black for a few seconds while DDU is removing the GPU drivers — this is perfectly normal and should only last a few seconds.
Select your GPU vendor
Select one of the removal options, I recommend you click ‘Clean and do NOT restart’ if you wish to look at the logs or by default, click ‘Clean and restart’.
DDU will now remove the selected GPU drivers from your system, this will vary depending on the speed of your system.
I just want to reiterate one more time, if you’ve had an AMD (ATI) or NVIDIA GPU in the same install of Windows I highly recommend you select and remove both GPU drivers to make sure there aren’t any conflicts. Once DDU has completed the removal of the selected GPU drivers you will be prompted with this message — Select ‘Yes’ to exit the program.
Now DDU will reboot your PC, from here you can install the GPU drivers you downloaded earlier, restart if applicable and then connect your PC back to the internet.
(NVIDIA only, OLD DDU VERSION) After you’ve installed your GPU drivers, you can go ahead and open up DDU (you don’t need to do this in Safe Mode) and remove temporary/cache NVIDIA driver/GFE installation files, for me it was around 1GB
As a side note I always recommend you update your GPU drivers using the official installer, programs like GeForce Experience can cause issues when updating drivers.
If you found DDU useful, please consider donating to Wagnard so he can continue improving DDU by adding new features and updating it when changes are made to Windows or the drivers themselves. Patreon Link | PayPal Link | Discord Link
Hopefully this guide has helped you resolve any GPU driver related issues you may have encountered, although I realise this guide won’t help everyone. GPU drivers are incredibly complex pieces of software and this is merely one fix. Below I have other tutorials that may help you resolve any issues that are related to GPU drivers.
On Windows 10, you can always use the manufacturer uninstaller and Device Manager to uninstall graphics drivers. However, sometimes the process won’t complete successfully, or it’ll remove the packages, leaving behind leftovers that may cause problems when installing new drivers, and this is when “Display Driver Uninstaller” (DDU) comes in handy.
“Display Driver Uninstaller” is a tool that uninstalls AMD and Nvidia graphics drivers completely without leaving behind any registry keys, files, folders, or driver store when the uninstall fails, or you need to delete the graphics card driver completely.
In this guide, you will learn the steps to use the Display Driver Uninstaller tool to delete Nvidia and AMD graphics drivers from Windows 10.
Warning: This is a third-party application offered “as-is.” Use it at your own risk. Before continuing, creating a full backup is highly recommended to revert the changes if something wrong happens. In addition, it’s recommended to disconnect your computer from the internet until you reinstall the display driver.
Uninstall Nvidia and AMD graphics with Display Driver Uninstaller
To use the Display Driver Uninstaller to completely remove the graphics driver on Windows 10, use these steps:
-
Open the guru3d website.
-
Under the “Download Locations” section, click the Display Driver Uninstaller download link nearest to your location to save the file.

-
Double-click the zip folder.
-
Click the Extract all button from the “Compressed Folder Tools” ribbon.
-
Click the Extract button.

-
Double-click the DDUvxx.x.x.x.exe file.
-
Click the Extract button.

-
Save your work and close any running applications.
-
Open Start.
-
Press and hold the Shift key, click the Power button, and select the Restart option to launch the Advanced startup experience to access Safe mode.
-
Click the Troubleshoot button.
-
Click on Advanced Options.
-
Click on Startup Settings.
-
Click the Restart button.

-
Select the Enable Safe Mode option (F4).
-
Open the “DDU vxx.x.x.x.exe” folder with the extracted files.
-
Double-click the Display Driver Uninstaller.exe file.
-
Select the settings to use to remove Nvidia or AMD drivers on Windows 10. (The default settings should work in most cases unless you know what you’re doing.)

-
Select the Nvidia or AMD graphics card using the drop-down menu on the right side.
-
Click the Clean and restart button.


Once you complete the steps, the tool will thoroughly delete the current Nvidia or AMD driver, and the computer will restart automatically. After the restart, you can reinstall the new graphic driver on Windows 10.
While these instructions will help you to completely remove the graphics driver from your device, according to the author of the software, you should only use this tool when having a problem uninstalling or installing a driver or when switching GPU brands. And you shouldn’t use it every time you need to update the driver.
If you’re having issues with the Display Driver Uninstaller software, you should check the guru3d website for more details and help.
Why You Can Trust Pureinfotech
The author combines expert insights with user-centric guidance, rigorously researching and testing to ensure you receive trustworthy, easy-to-follow tech guides. Review the publishing process.