
Все способы:
- Правильная деинсталляция Джава
- Способ 1: Java Uninstall Tool
- Способ 2: Удаление вручную
- Заключение
- Вопросы и ответы: 0
Технология Java используется на множестве устройств под управлением разных операционных систем – многие приложения, написанные на этом языке программирования, не работают без установленной исполняемой среды. Однако это решение часто становится причиной проблем, и потому пользователи нередко прибегают к его деинсталляции. Сегодня мы хотим познакомить вас с методами удаления Java SE Runtime с компьютера под управлением Windows 10.
Правильная деинсталляция Джава
Компания Oracle, которая разрабатывает и поддерживает этот исполняемый пакет, пошла навстречу пользователям и выпустила специальный инструмент для удаления старых версий под названием Java Uninstall Tool. Можно обойтись и без этой утилиты, удалив пакет в ручном режиме системными средствами или с помощью приложения для деинсталляции программ.
Способ 1: Java Uninstall Tool
Самый простой и удобный способ раз и навсегда удалить Джаву с компьютера – воспользоваться специальной утилитой.
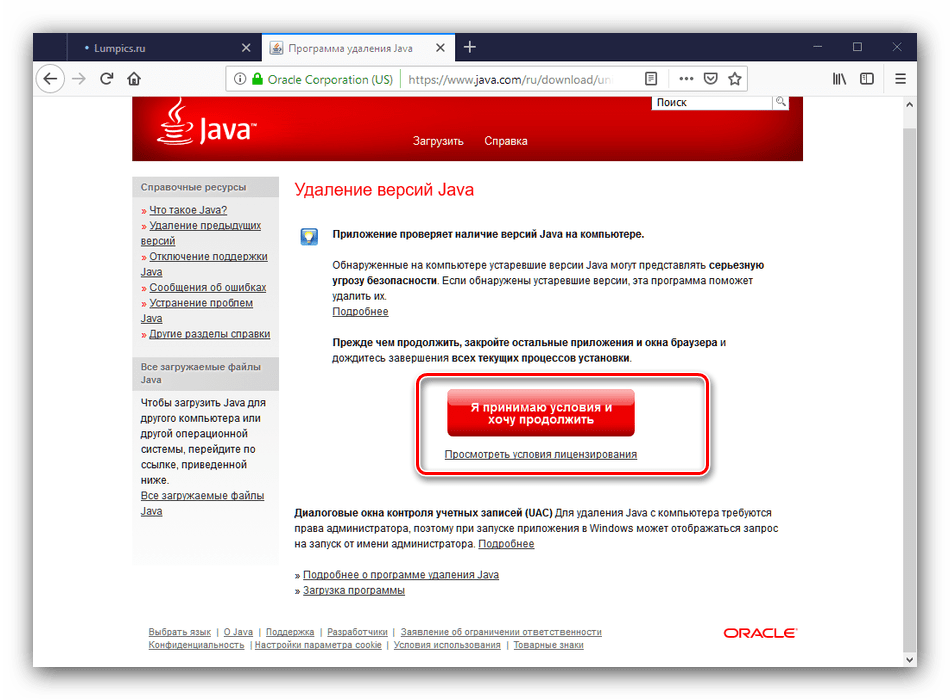
Страница загрузки Java Uninstall Tool
- Откройте любой подходящий браузер и перейдите по ссылке выше. Найдите и нажмите кнопку «Я принимаю условия и хочу продолжить». Если желаете ознакомиться с лицензионными условиями, то ниже кнопки расположена ссылка на текст.
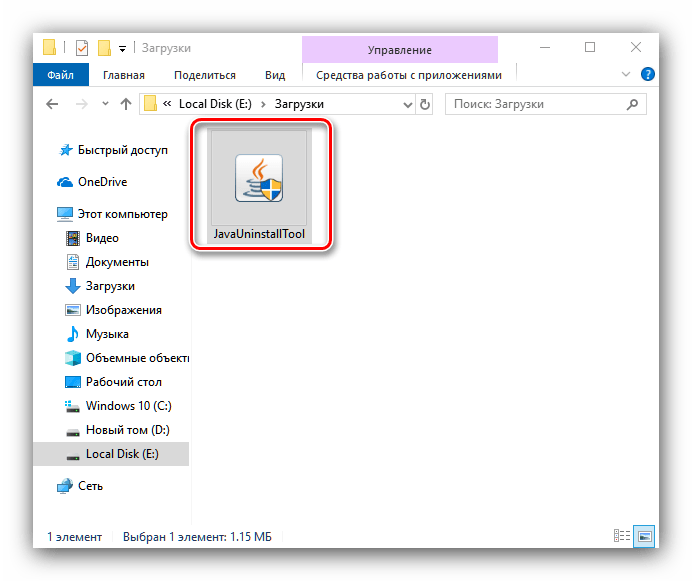
- Сохраните исполняемый файл утилиты на жесткий диск. По окончании загрузки закройте браузер, перейдите к местоположению скачанного файла и запустите его.

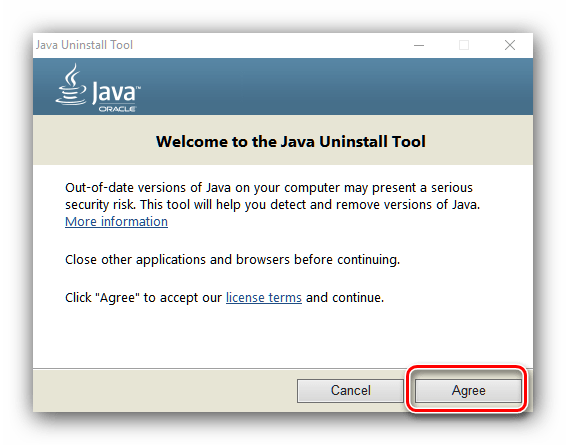
Обратите внимание, что для использования этого средства вашей учётной записи нужно обладать правами администратора.
Подробнее: Как получить права администратора в Windows 10
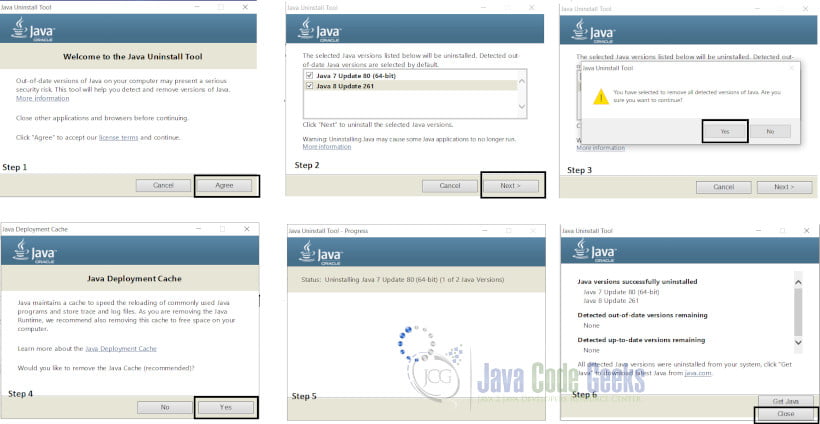
- В стартовом окне утилиты кликните по кнопке «Agree».
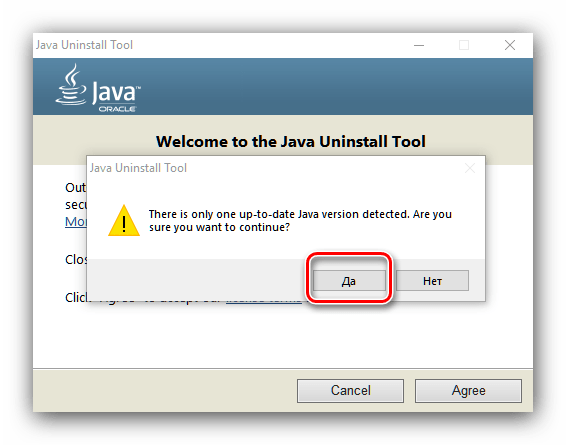
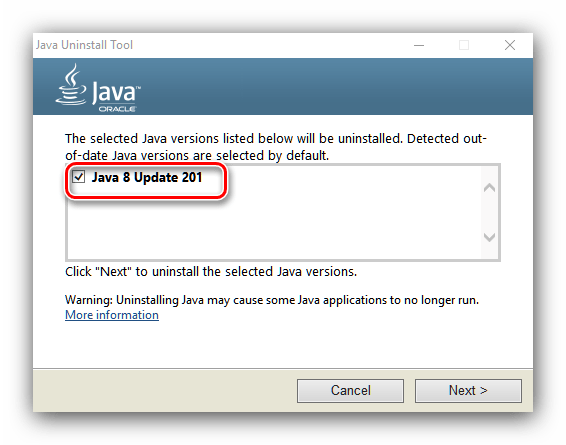
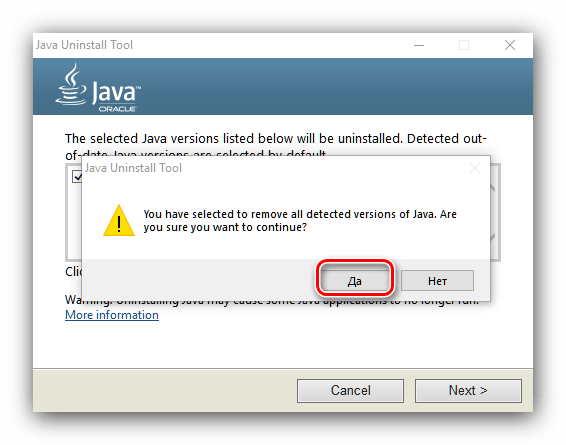
- Появится предупреждение о том, что на компьютере обнаружена только самая новая версия Java. Нажмите «Да», поскольку именно её и следует удалить.
- В этом окне потребуется выбрать версию, которая будет деинсталлирована. Как правило, в списке должна быть только одна позиция – отметьте её и нажимайте «Next».
- Появится ещё одно предупреждение, в котором также нажмите «Да».
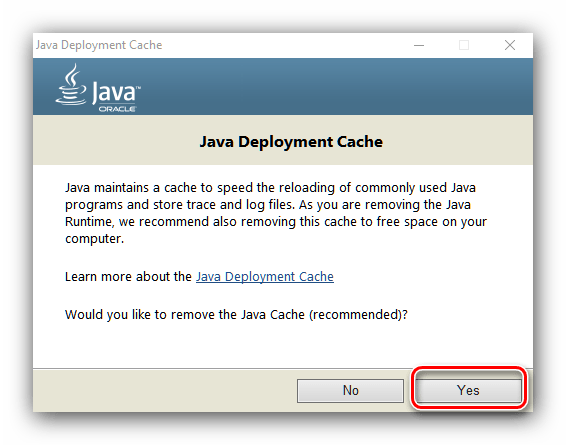
- Далее вам будет предложено удалить кэш приложений, связанных с Джавой. Как правило, без самого пакета он бесполезен, поэтому смело жмите «Yes».
- Подождите некоторое время, пока утилита сделает свою работу. По окончании процедуры нажмите «Close» для закрытия приложения и перезагружайте компьютер.
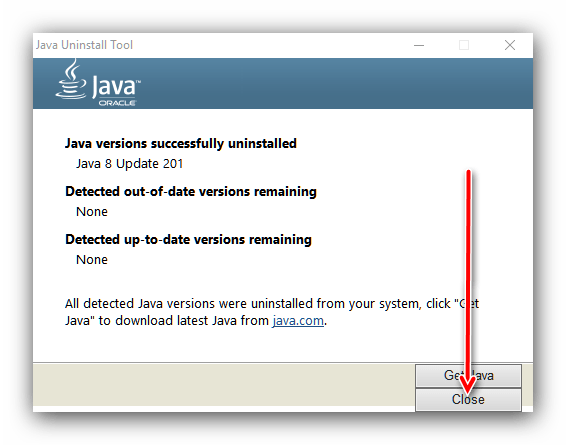
Готово – Java SE Runtime полностью удалён с вашего компьютера. Мы рекомендуем использовать именно этот метод, поскольку утилита также удаляет и следы Джавы из системного реестра, чего не всегда получается достичь ручным удалением.
Способ 2: Удаление вручную
Если по каким-то причинам воспользоваться упомянутой выше утилитой невозможно, деинсталлировать рассматриваемое ПО можно и ручным способом. Доступны два варианта: системные средства или стороннее решение. Начнем с последнего.
Утилита-деинсталлятор
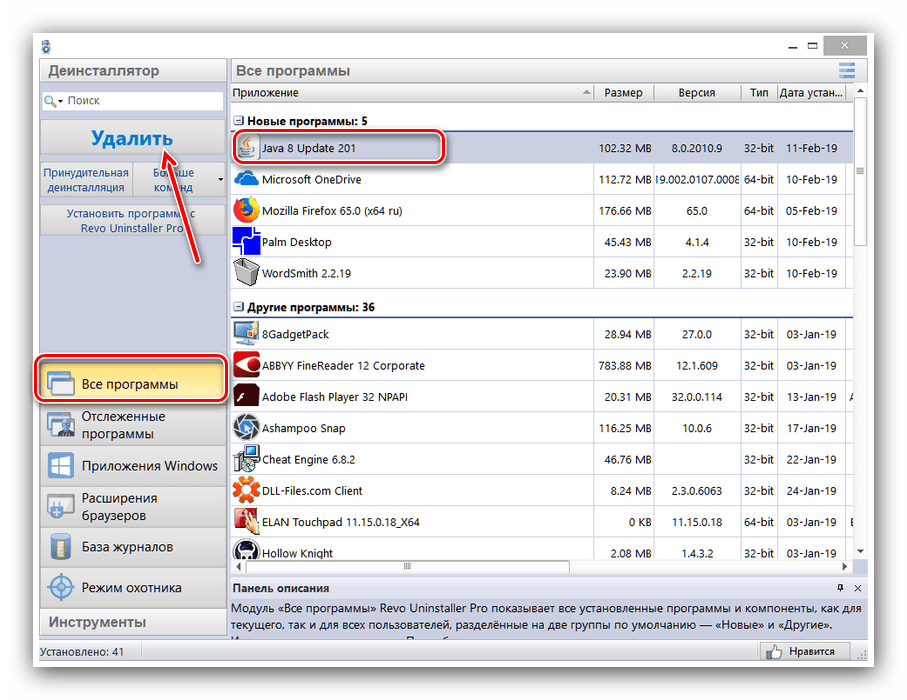
В качестве удобного решения подойдёт программа Revo Uninstaller, ею и воспользуемся.
Скачать Revo Uninstaller
- Запустите приложение и воспользуйтесь списком для поиска Java. Если не получается найти, удостоверьтесь, что открыта вкладка «Все программы». Отыскав нужное, используйте кнопку «Удалить».
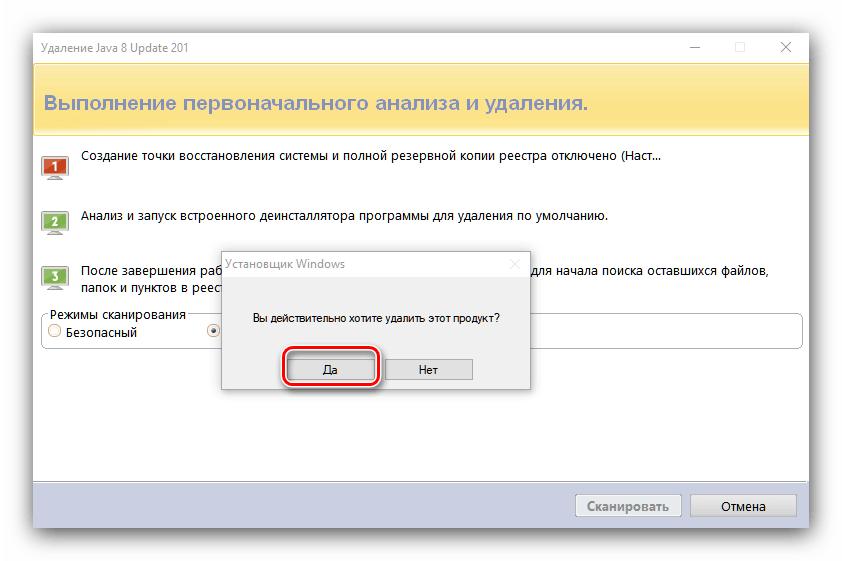
- Подождите, пока Рево проделает все подготовительные процедуры, и нажмите «Да», когда появится сообщение о деинсталляции.
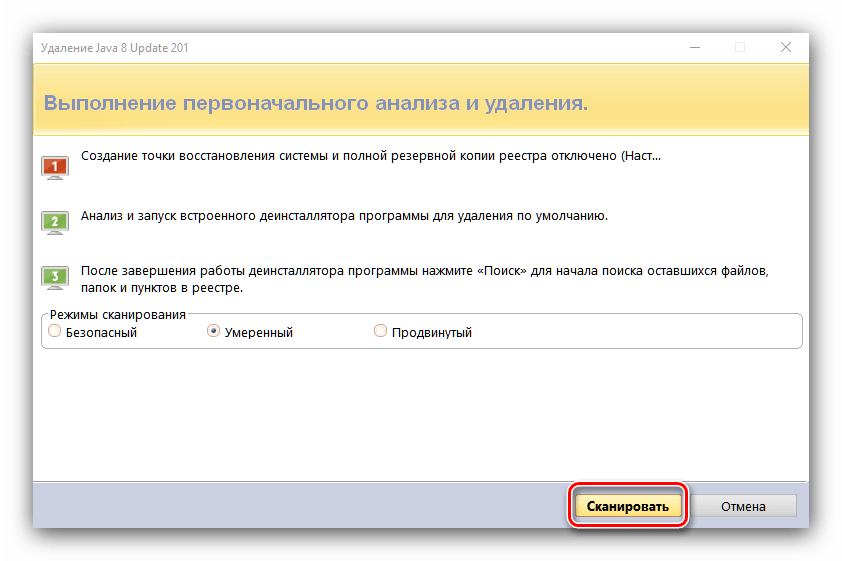
- После удаления основных файлов Java установите желаемый уровень сканирования на наличие «хвостов» и нажмите «Сканировать».
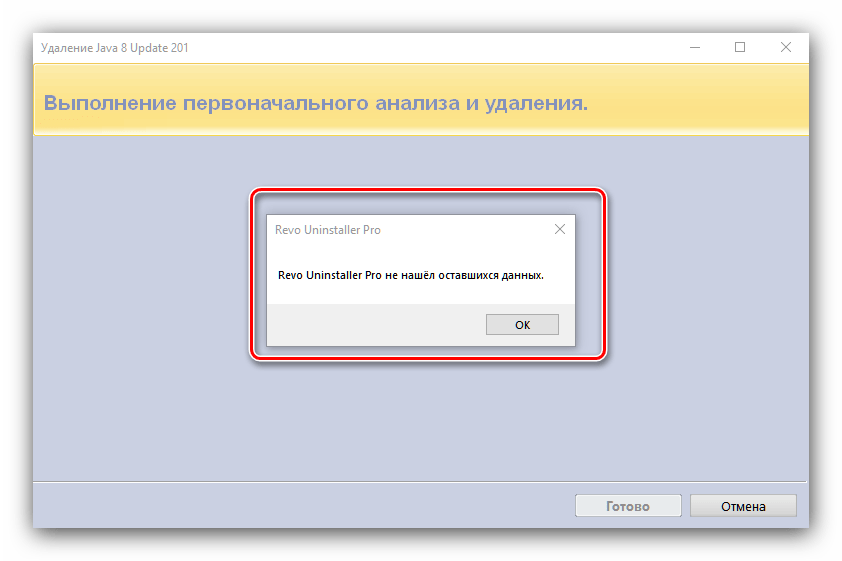
- Дождитесь окончания работы модуля сканера. Поскольку деинсталлятор работает чисто, следов остаться не должно.
Закрывайте программу и перезагружайте машину.
Системные средства
Если не можете или не хотите использовать стороннее решение, удалить Java с компьютера можно и имеющимися в системе решениями.
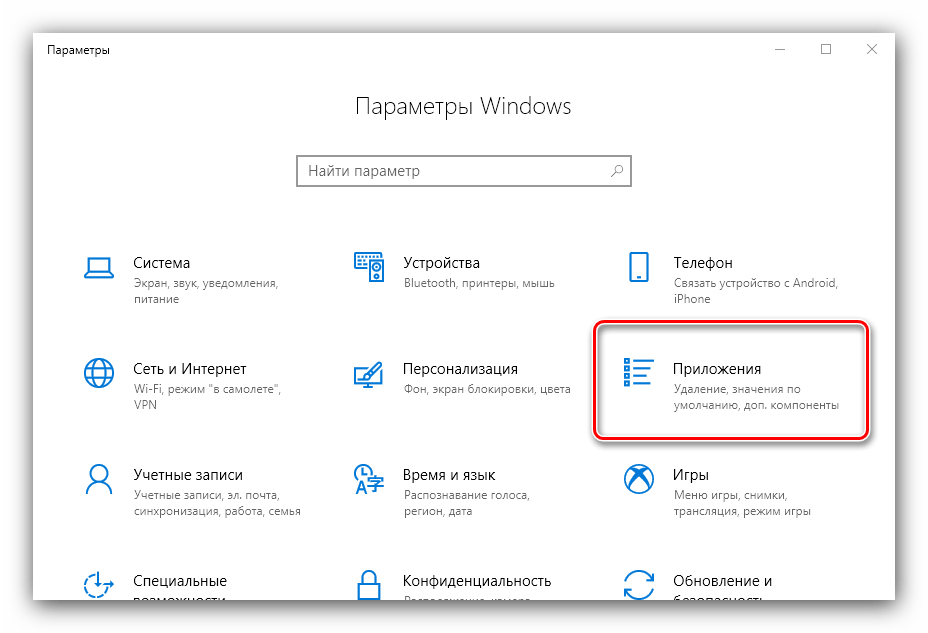
- Вызовите «Параметры» сочетанием клавиш Win+I, и выберите категорию «Приложения».
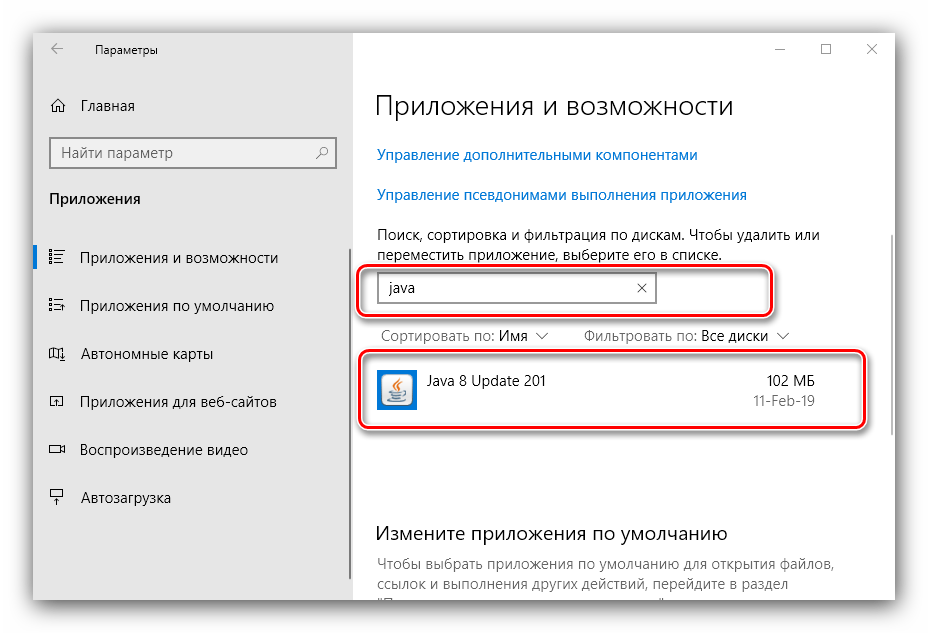
- Можете выбрать нужное ПО вручную из списка либо воспользоваться поисковой строкой вверху перечня для ввода названия компонента – достаточно просто написать java.
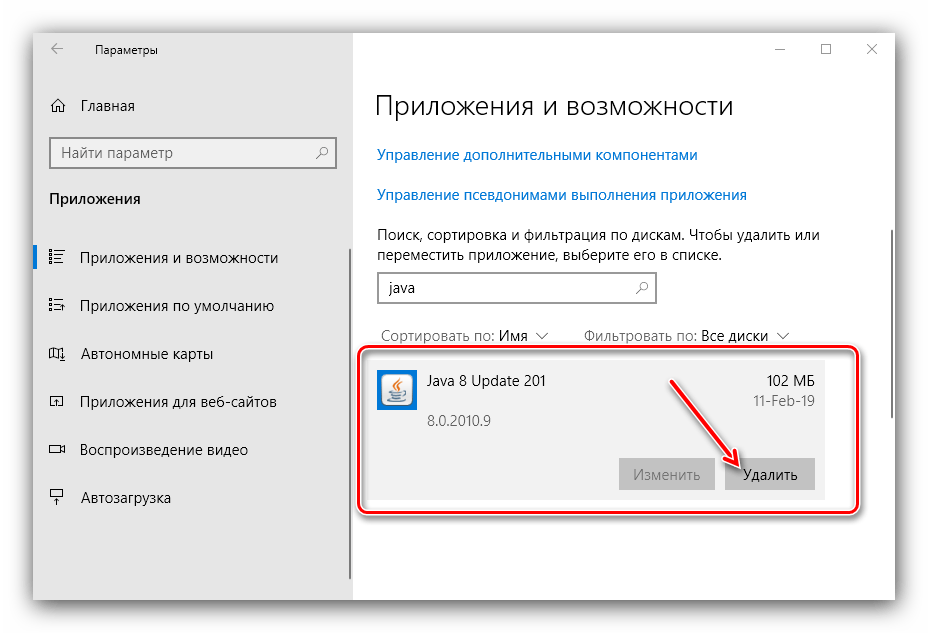
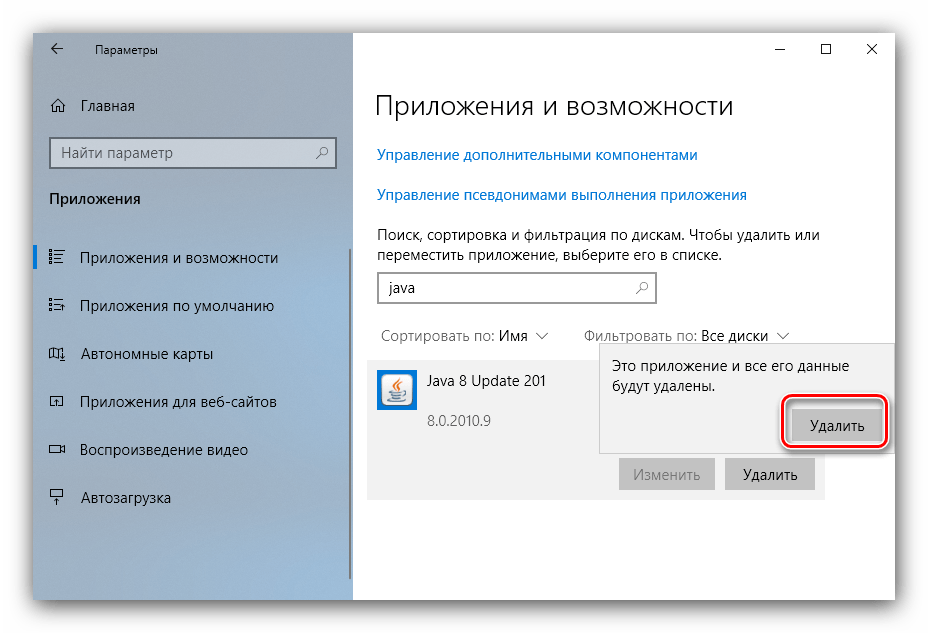
- Выделите Java SE Runtime и нажмите на кнопку «Удалить».

Подтвердите решение повторным нажатием «Удалить».
- Приложение будет деинсталлировано.
Заключение
Деинсталляция пакета Java Runtime с компьютера с ОС Виндовс 10 почти ничем не отличается от подобной процедуры для других приложений.
Наша группа в TelegramПолезные советы и помощь
We will look at how to uninstall and remove Java completely from a Windows 10 system through tools. Invented by James Gosling, Java is an extremely popular, object-oriented programming language. The first version came out in 1996. Since then, there have been many versions of Java released. In this article, we will learn why and how to uninstall older versions of Java from a Windows 10 system.
1. Introduction
A new version of Java comes roughly every 6 months (prior to Java 8, this cycle was about 2-3 years). The newer versions contain fixes for issues in the earlier version, newer features, classes, and packages. Oracle recommends upgrading to the newer versions and uninstalling the older one.
1.1 Why should I uninstall Java versions which are old?
Before we see the steps to uninstall, we will first understand why keeping and using older versions of Java is dangerous.
We highly recommend that you uninstall all older versions of Java from your system.
Keeping old versions of Java on your system presents a serious security risk.
Uninstalling older versions of Java from your system ensures that Java applications will run with the latest security and performance improvements on your system.Oracle on Java.com
Every new Java version releases fixes related to security and bugs from the older version. Using an older version of Java poses serious security threats. Flashback which affected Apple Macs is the most dramatic example of the security threat of old Java versions.
2. Why does Java not Uninstall the older version when I upgrade?
Java lets you install more than one version of Java on a system. The user can choose which version to run their Java application with. So, Java itself does not uninstall the earlier versions while upgrading. However, Oracle does not recommend this as it leaves your system open to security leaks.
2.1 Why would I need to run multiple versions of Java?
- Java generally provides back-compatibility i.e. all the features that worked in the earlier version will work in the same way in the next version as well.
- However, at times, some features of java do not work the same way as the older version due to changes in the code.
- Also, some features may be deprecated in the newer version of Java. Example: Applets were deprecated in Java 9 and later removed from Java 11 onwards. So, if we have an application that relies on these deprecated/removed features, we will require an older version of Java.
- In some cases, some legacy applications specify that they require a certain version of Java to run. In this case, as well we would require an older version.
3. How do I check which Java versions are installed on my system?
We can check the installed Java versions using 2 methods.
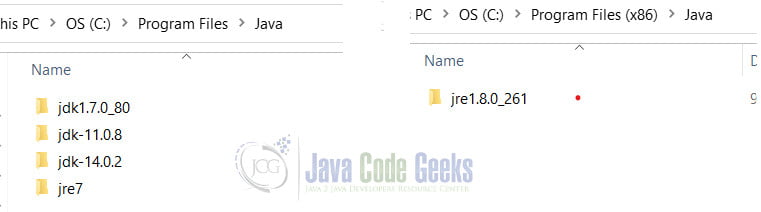
3.1 In the Program Files
When installed using the executable, Java is installed in either the Program Files or Program Filesx86. To check the installed versions.
- Open the Windows Explorer.
- Navigate to the path: C:/Program Files OR C:/Program Filesx86
- Check for the folder named: Java.
- In this folder, you will see the Java Development Kit (JDK) and/or Java Runtime Environment (JRE) installed on your system including the version numbers. For example I have Java version 7 (
jdk1.7.0_80), Java version 8 (jre1.8.0_261), Java version 11 (jdk-11.0.8) an Java version 14 (jdk-14.0.2) installed on my system.
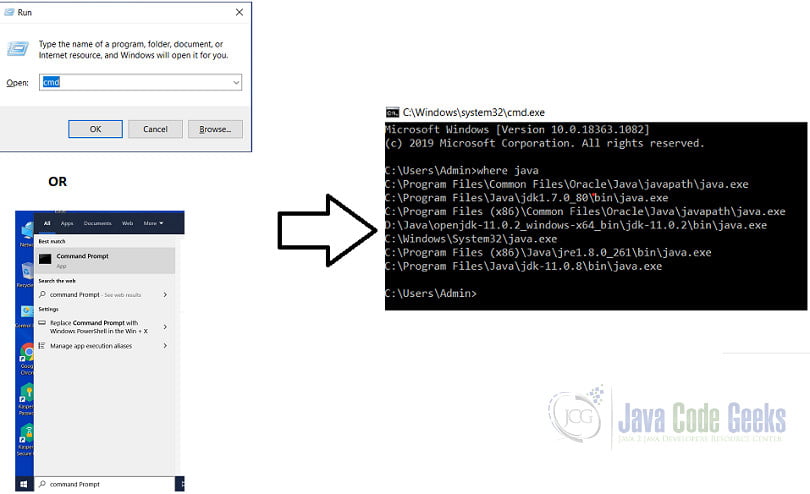
3.2 Using the “where” command
The other way to check is using the “where” command in the Command Prompt.
- Open the Command Prompt by typing
cmdin the “Type here to search” box and click on the first option. - Another way is to press the
Windows icon + Ron the keyboard to open run and then typecmd. - Then type in where command. This will show the path all the different versions of java executables present in the system. (They need to be added to the classpath)
4. How do I uninstall the Older versions of Java?
There are 3 methods with which we can uninstall Java on our system.
4.1 Using the Java uninstall tool
Oracle provides the Java uninstall tool for removing Older versions of Java in the system. Go to the page, accept the Terms and download the JavaUninstallTool.exe file. Once downloaded we need to run it and follow the steps in the tool. The output should be similar to the image.
4.2 Uninstall through the Control Panel
Java versions installed using Oracle JDK are listed under the Programs list in the Control Panel and can be uninstalled from there.
- In the search box type “Programs”.
- Select the “Add or remove programs” option. This opens the path <Control Panel\Programs\Programs and Features>
- In the Search List, type Java. This should show you all the Java versions installed on the System.
- Click on the uninstall button for the version you want to uninstall.
4.3 OpenJDK uninstall
For uninstalling OpenJDK java installs, simply delete the extracted folder for Java.
5. How to remove Java completely from my system?
To remove all versions of Java installed on the system, repeat the steps for “Uninstall Java through the Control Panel.” That we have seen for removing older versions of Java. Repeat the steps for every installed version of Java. Example: On my system I would have to repeat twice because there are 2 versions Java version 11 and Java version 14 installed on my system.
If the Java versions installed are OpenJDK versions, delete the extracted folders.
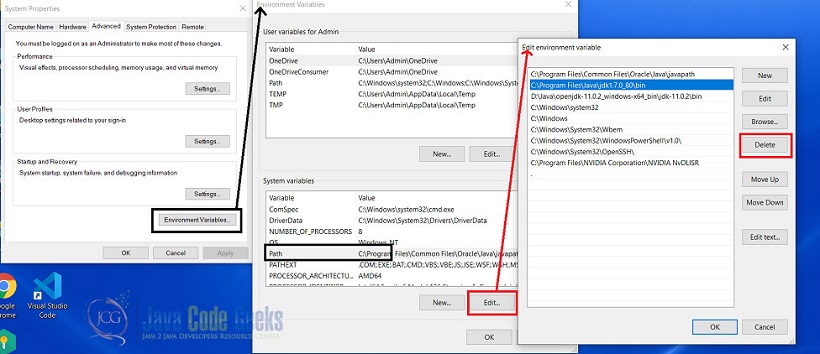
6. Clearing the PATH variable
Even after the java version is uninstalled from the system, most times the entry in the PATH variable remains as-is. While not essential, it is always a good practice to clear out the deleted Java version paths from the PATH variable.
- In the type box, type “Environment Variables” and select the first option.
- Open the Environment Variables and select the “PATH” variables from the System variables list and click on “Edit”.
- In the environment variables, remove all the Java Paths for the versions we have removed.
- Repeat the same steps for the PATH variable in the “User variables” as well.
7. What if a Java uninstall fails?
In the rare scenario that a Java uninstall fails for any reason, Oracle recommends using the Microsoft Utility to correct the registry entries. Alternatively, we can correct the registry entries manually too. For more details, please check here.
8. Verify successful un-installation
To check if we have uninstalled Java correctly we have three ways.
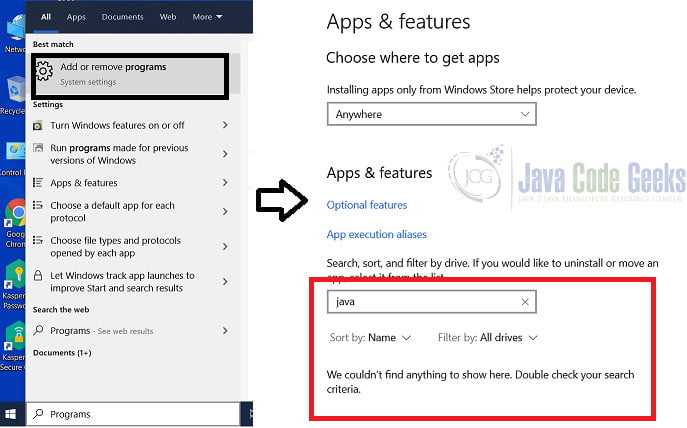
8.1 Through the Control Panel
Once all the versions of Java have been uninstalled successfully, there is no entry in the List of Programs for Java.
- Type “Programs” in the search box.
- Select the “Add or remove programs” which opens the path: Control Panel\Programs\Programs and Features
- In the Search, type “Java”. It should not return any results.
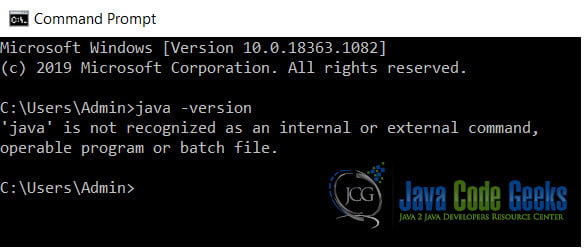
8.2 Using the java -version command
Open the Command Prompt and type in java -version command. It gives give a message : “Java is not recognized.” . This means that Java is not installed on our system.
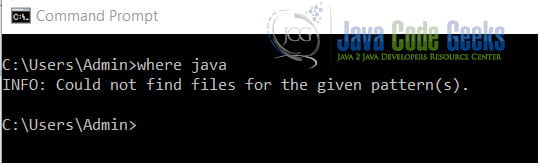
8.3 Using the where command
- The other way to check is using the
wherecommand in the Command Prompt. - Open the Command Prompt by typing
cmdin the “Type here to search” box and click on the first option. - Another way is to press the “Windows icon” + R on the keyboard to open run and then type
cmd. - It should return an error message saying “Could not find the files for the given pattern(s)”.
9. Summary
In the article, we learned how and why to uninstall older versions of Java from a Windows system. We also learned how remove Java completely. Further, we can also Disable Java on web browsers used on the Windows system. Visit the Oracle Java page for instructions to disable java.
I am a recent Master of Computer Science degree graduate from the University Of Illinois at Urbana-Champaign.I have previously worked as a Software Engineer with projects ranging from production support to programming and software engineering.I am currently working on self-driven projects in Java, Python and Angular and also exploring other frontend and backend technologies.
How To Uninstall Java From Windows 10
Java is a widely-used programming language that runs on a variety of platforms, making it a powerful tool for developers and users alike. However, there may be times when you need to uninstall Java from your Windows 10 machine—whether to resolve issues, free up space, or simply because you no longer require it. This comprehensive guide will walk you through the steps to uninstall Java from Windows 10 effectively.
Understanding Java and Its Importance
Before diving into the uninstallation process, it’s essential to understand what Java is and why it might be installed on your system. Java is a platform used for developing and running applications, and it exists in two main forms: the Java Runtime Environment (JRE) and the Java Development Kit (JDK). The JRE allows users to run Java applications, while the JDK is used by developers to create them.
Given its importance in various applications, you might find Java installed on your computer due to the following reasons:
-
Software Requirements: Many applications require Java to function. For instance, various games, enterprise applications, and development tools rely on Java.
-
Programming Needs: If you’re a developer, you might have installed Java to develop applications or run servers like Apache Tomcat.
-
Web Browsing: Many websites and web applications previously required Java plugins to run content.
However, if you’re encountering issues such as performance degradation, software conflicts, or if you no longer need Java, uninstalling it can help restore functionality or free up system resources.
Reasons to Uninstall Java
-
Performance Issues: Java can sometimes cause slowdowns on your computer, particularly if there are multiple versions installed.
-
Security Risks: Java has been known to have security vulnerabilities that can be exploited. Keeping it uninstalled when not needed is a good security practice.
-
Storage Space: Though Java installations are not large, every bit counts, especially on devices with limited storage.
-
Software Conflicts: Conflicts can arise between different versions of Java, or between Java and other software you may have installed.
-
Outdated Version: If you need to install a newer version of Java but get stuck due to an outdated one, uninstallation may be necessary.
Now that you are aware of the reasons for uninstalling Java, let’s walk through the steps to do so on Windows 10.
Step-by-Step Guide to Uninstall Java
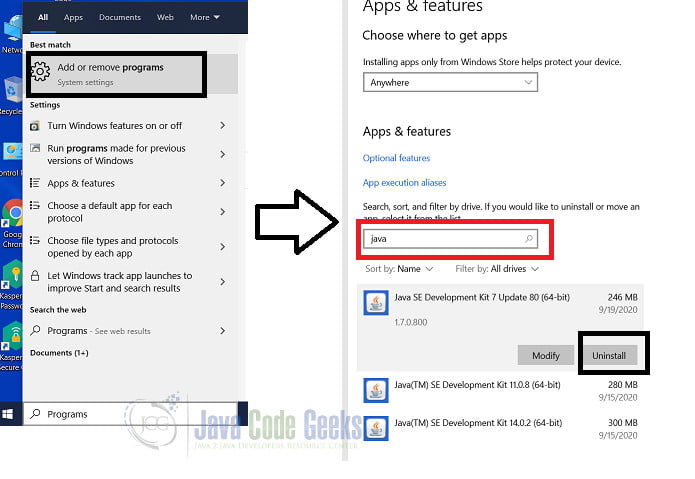
Step 1: Access Settings
-
Open Your Settings App
- Click on the Windows Start menu (the Windows logo located at the bottom left of your screen).
- Select the gear icon to open the Settings app.
-
Navigate to Apps
- In the Settings window, click on Apps. This section contains all installed applications on your operating system.
Step 2: Locate Java in the Apps List
- Find Installed Java Versions
- In the Apps & features section, scroll down to locate Java. You may find entries such as «Java SE Development Kit» or «Java Platform (JRE)» depending on the version installed.
- Alternatively, you can use the search bar to type «Java,» which will filter the list to show Java-related applications.
Step 3: Uninstall Java
-
Selecting Java for Uninstallation
- Once you find Java in the list, click on the entry to highlight it.
- You will see an Uninstall button appear. Click on it.
-
Confirm Uninstallation
- A pop-up window will appear asking you to confirm the uninstallation. Click Uninstall to continue.
- If you have multiple versions of Java installed, you should repeat this process for each version.
-
Follow the Uninstallation Wizard
- The Java uninstaller will launch. Follow the prompts in the wizard to complete the process.
- Typically, you’ll want to keep the default settings suggested by the uninstaller.
Step 4: Verify the Uninstallation
-
Check Installed Programs
- After the uninstallation process completes, you can return to the Apps & features section to ensure that all entries related to Java have been removed.
- It is advisable to restart your computer to finalize changes.
-
Test Java Not Being Recognized
- You can also open the Command Prompt (press Windows + R, type
cmd, and hit Enter), then typejava -version. If Java has been successfully uninstalled, you should see a message indicating that it is not recognized as a command.
- You can also open the Command Prompt (press Windows + R, type
Removing Java Residual Files
Uninstalling Java via the Windows Settings usually removes most of its components, but sometimes residual files may remain. For a comprehensive clean-up, you can follow these extra steps:
-
Open File Explorer
- Press Windows + E to open File Explorer.
-
Locate Java Folders
- Navigate to
C:Program FilesJavaandC:Program Files (x86)Java(if you have a 64-bit system) and delete any remaining folders. - Check in
%APPDATA%(by typing it into the File Explorer address bar) to see if there are any related Java files in your application data folders.
- Navigate to
-
Delete Environment Variables
- Right-click on This PC or My Computer on your desktop or File Explorer and select Properties.
- Click on Advanced system settings, and in the System Properties window, click on the Environment Variables button.
- Under both User variables and System variables, check for JAVA_HOME or similar entries related to Java and delete them.
Summary
Uninstalling Java from a Windows 10 machine is a straightforward process that involves accessing the settings, locating the Java entries, and following a few prompts to remove it. Whether you’re doing it for performance improvements, security reasons, or simply to free up space, this process can help streamline your operating system.
If you have uninstalled Java but later decide you need it back, you can easily download the latest version from the official Java website. Always ensure that you download software from reliable sources to prevent security issues.
Final Thoughts
Uninstalling Java can be an essential maintenance task that helps keep your computer performing efficiently. If you run into any issues during the uninstallation process, many resources and forums are available online to provide troubleshooting assistance. Always remember to back up any important data before making significant changes to your system settings to avoid data loss.
By following this guide, you should now have a clear understanding of how to uninstall Java from your Windows 10 computer. Know that keeping your system clean and free from unnecessary software can enhance performance and security.
Undeniably, Java is not frequently used by users nowadays. And it is also said that older versions of Java on PC would pose various threats to the system. Or for some people, you may need Java for a moment, for instance, Java application is required to install the NVIDIA graphics card drivers.
But after that, you just want to remove Java from Windows 10. As per user reports, many of you hope to uninstall Java 11 or 8 on Windows or Mac. What Java version you feel like uninstalling, ways below can help you get rid of Java completely and permanently.
How to Uninstall Java on Windows 10, 8, 7?
To avoid risks brought by Java, especially the outdated Java versions, you may as well completely remove Java from Windows or Mac. And it is worth mentioning that if you do need Java, you can download a newer Java version (Java 8 (8u20 and above)), which would delete all older versions of Java from the system. Or if you hope to remove Java from your PC without leaving any trace, you can choose to uninstall Java manually or automatically via Java Uninstall Tool.
Methods:
- 1: Uninstall Java Manually
- 2: Uninstall Java using Java Uninstall Tool
Method 1: Uninstall Java Manually
If you prefer to delete Java on Windows 10, 8, 7 on your own, you can finish that with the following steps. While depending on different versions of the Windows system, the steps differ due to the different interfaces. Hence, you can turn directly to the procedure according to your system.
Uninstall Java on Windows 10:
You can completely get rid of Windows 10 Java in Control Panel.
- Open Control Panel.
- Try to View by Categories and then find out Programs > Uninstall a program.
- In Programs and Features window, scroll down to locate and then right click Java application to Uninstall it.
Reboot your PC if prompted. After that, as you can see, Java is nowhere to be seen on Windows 10.
Remove Java from Windows 8:
- In Control Panel, go to Programs > Uninstall a program.
- Locate Java and then hit Uninstall > Yes.
Delete Java on Windows 7:
- Open the Control Panel.
- Then find out Programs and Features > Programs.
- Click the Java app and then choose to Uninstall.
Therefore, you may have completely uninstalled Java from Windows 7, 8, 10 manually. And there will be no risks caused by the Java app. And you can also uninstall Java from Windows XP and Vista. Particularly, if you still need to use Java plugin on browsers, you can also try to enable Java in Chrome.
Method 2: Uninstall Java using Java Uninstall Tool
If you are not proficient in dealing with computer issues manually, it is also viable for you to make the best use of the Java removal tool, Java Uninstall Tool to help get rid of Java application for Windows 10, 8, 7, XP, Vista, Windows Server 2008 R2, Windows Server 2012. While prior to use this automatic Java removal tool, you need to pay attention to the following parts:
1. Ensure there is a network connection on your PC. Since this tool is offered by Java online, it is natural that you need to make sure the network works well to allow you to download it on your device. Besides, this tool needs to check updates for itself, so it would be better to let it run with a high-speed network.
2. This tool is designed for users to remove Java on Windows. Hence, if you wish to uninstall Java on Mac or Linux, you may have to achieve that manually (refer to Method 1 for similar steps on Mac or Linux systems).
3. This tool would remove Java versions 1.4.2 and above on Windows systems, so you need to manually delete versions of Java lower than 1.4.2.
4. You can select which Java versions are to be removed once Java Uninstall Tool scans the system for all Java versions installed on Windows.
5. Once you deleted a Java version via this tool, it can be retrieved from this tool, so you have to re-download it from Java archives.
With these basic understandings about the Java removal tool, it is time to use it to uninstall Java completely and permanently from Windows 10, 8, 7, etc.
Steps to get rid of Java with Java Uninstall Tool:
1. Navigate to Java Uninstall Tool webpage.
2. Click I Agree to the Terms and Want to Continue to Download this tool on your PC.
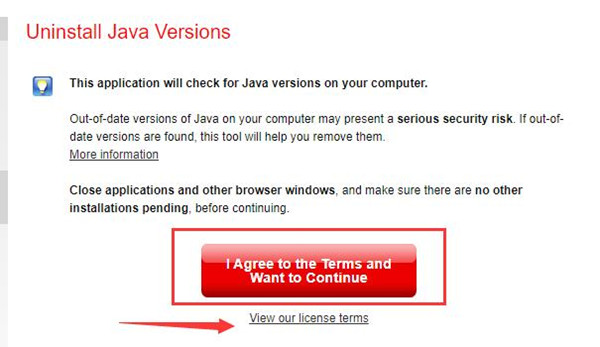
Here, you would better hit View our license terms to ensure you are determined to download it and this tool is safe and useful for you.
3. Hit the downloaded file to activate it.
4. Then in User Control Account (UAC) window, click Yes to permit this operation.
Then you can run this Java Uninstall Tool to check all the Java versions on your PC and then choose to uninstall the outdated or any version you don’t want by this tool.
Note: What if I encountered problems in using the Java Uninstall tool to uninstall Java from Windows? What if this tool failed to remove the Java version for me?
If there are any errors in applying this Java removal tool, try to reboot the system or re-download Java Uninstall Tool. If that could not fix Java Uninstall Tool not working issue, perhaps you have to manually remove it.
In a word, you can learn how to uninstall Java from Windows or Mac with references to this tutorial, either manually or automatically by the Java Uninstall tool. Just find a suitable way to remove Java traces from your system.
More Articles:
Fixed: Microsoft Visual C++ Runtime Library Error on Windows 10
Fixed: Twitch Black Screen in Chrome on Windows 10
Brian Peng
Brian Peng is a PC technician and network engineer with over 13 years of IT experience. He has worked in the IT industry for a long time, providing IT support and network service support for various companies. Currently, he has written over 1000 articles about computers, games, and mobile.
There are a few different ways to uninstall Java on Windows 10. The most common way is to use the Windows Control Panel. To do this, go to the Start menu and search for «Control Panel.» Once you’re in the Control Panel, go to «Programs and Features» and find the listing for Java. Click «Uninstall» and follow the prompts to remove Java from your computer.
Another way to uninstall Java is to use the Java Uninstall Tool. This tool will automatically remove any older versions of Java that are on your computer. To use the Java Uninstall Tool, go to the Java website and download the latest version of the tool. Once it’s downloaded, double-click the file to run it and follow the prompts.
If you’re having trouble uninstalling Java, you can always contact customer support for help.
How do I uninstall Java properly?
How do I completely remove JDK?
There are a few different ways to remove JDK from your system, depending on what operating system you are using.
On Windows, you can use the Add/Remove Programs feature in the Control Panel to remove JDK.
On Mac OS X, you can use the Java Preferences application to remove JDK.
On Linux, you can use the rpm or yum command to remove JDK.
Should I just uninstall Java?
If you’re not using Java and don’t plan to use it in the future, then yes, you should uninstall it. If you’re not sure whether or not you need Java, then it’s probably best to leave it installed.
Does uninstalling Java require a reboot?
Yes, uninstalling Java requires a reboot.
Should I delete Java on Windows 10?
There is no one-size-fits-all answer to this question, as the decision of whether or not to delete Java from your Windows 10 computer depends on your individual needs and usage habits. However, if you are not using Java regularly or do not need it for any specific purpose, then uninstalling it may be a good option. To uninstall Java from your Windows 10 computer, you can follow the steps below:
1. Open the Control Panel.
2. Click on «Programs and Features.«
3. Select Java from the list of installed programs.
4. Click on the «Uninstall» button.
5. Follow the prompts to complete the uninstallation process.
How do I remove all Java from my computer?
There are a few different ways to remove Java from your computer. One way is to use the «Add or Remove Programs» feature in the Windows Control Panel. Another way is to use a third-party uninstaller program. Finally, you can manually remove Java by deleting the Java files from your computer.
To remove Java using the «Add or Remove Programs» feature, follow these steps:
1. Open the «Add or Remove Programs» control panel.
2. Select «Java» from the list of installed programs.
3. Click the «Remove» button.
4. Follow the prompts to uninstall Java.
To remove Java using a third-party uninstaller program, follow these steps:
1. Download and install a Java uninstaller program.
2. Run the uninstaller program.
3. Follow the prompts to uninstall Java.
To remove Java manually, follow these steps:
1. Close all programs that are using Java.
2. Delete the following files:
* jvm.dll
* javaw.exe
* java.exe
* javaws.exe
3. Delete the following directories:
* C:\Program Files
How do I completely remove Java from Windows?
To remove Java from Windows, you will need to uninstall the Java Runtime Environment (JRE). To do this, go to Control Panel > Programs > Programs and Features, select Java from the list of installed programs, and click Uninstall. You may be prompted to restart your computer to complete the uninstall process. Once Java has been uninstalled, you can delete the Java folder from your Program Files directory.
Is it safe to delete Java?
Yes, it is safe to delete Java from your computer. However, doing so may cause some programs to stop working if they rely on Java. If you are unsure whether you need Java or not, it is best to leave it installed.
Is Java harmful to my computer?
No, Java is not harmful to your computer. In fact, Java is one of the most popular programming languages in the world and is used by millions of developers to create a wide variety of applications.
Is deleting Java safe?
Deleting Java is generally safe, but there are a few things to keep in mind. First, if you have any programs that rely on Java, they will no longer work. Second, some websites may not work properly if you don’t have Java installed. Finally, if you’re not sure whether you need Java or not, it’s usually best to leave it installed.
Will Java mess up my computer?
No, Java will not mess up your computer. However, if you have an older computer, you may want to check to see if your computer can run Java. To do this, go to http://www.java.com and click on the «Do I have Java?» link.
Can Java be uninstalled?
Yes, Java can be uninstalled. The steps to do so will vary depending on the operating system you are using. For Windows, you can use the «Add or Remove Programs» feature in the Control Panel. For Mac, you can use the «Java Preferences» app. Once you have located the Java program, simply follow the prompts to uninstall it.
Is Java really needed?
There is no one-size-fits-all answer to this question, as the need for Java depends on the specific industry and project requirements. However, Java is a versatile and powerful programming language that can be used for a wide range of applications. If you are considering using Java for a project, it is worth considering the benefits that Java can offer.
Can I disable Java?
Yes, you can disable Java from your web browser. Instructions for doing so can be found here: https://www.java.com/en/download/help/disable_browser.xml. Once Java is disabled, you will no longer be able to run Java applications in your web browser.