
- Details
- Written by
- Last Updated on 31 October 2021 | Print Email
In this short post, I’d like to share with you how to completely remove an instance of IntelliJ IDEA from Windows operating system, either it is installed by installer or from ZIP archive.
Basically, to completely uninstall IntelliJ IDEA, you need to:
— Run installer program, or delete folder extracted from Zip archive
— Delete folders that store settings and cache
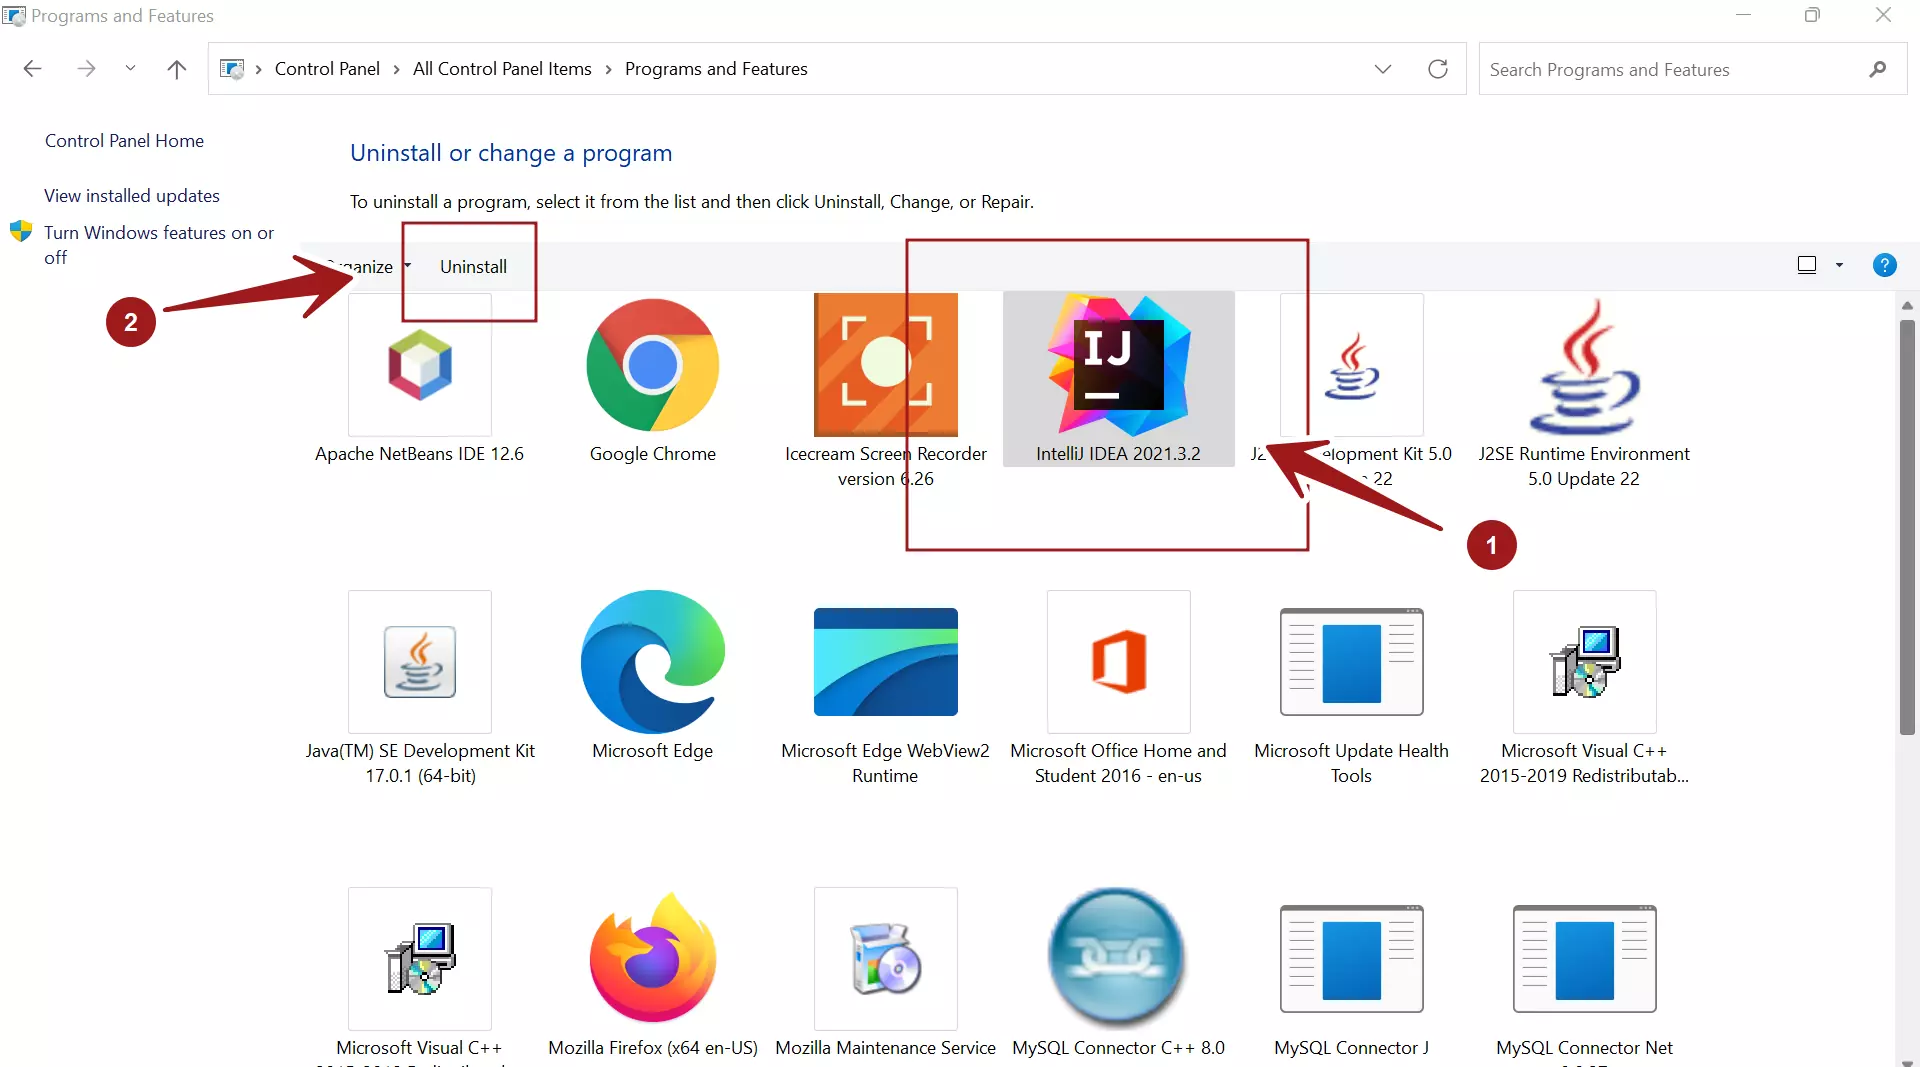
1. Remove IntelliJ IDEA using Uninstaller
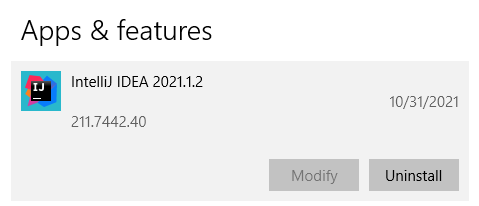
On Windows, click Start menu > Settings, and click Apps in Settings window. Under Apps & Features, look for IntelliJ IDEA, and click Uninstall:
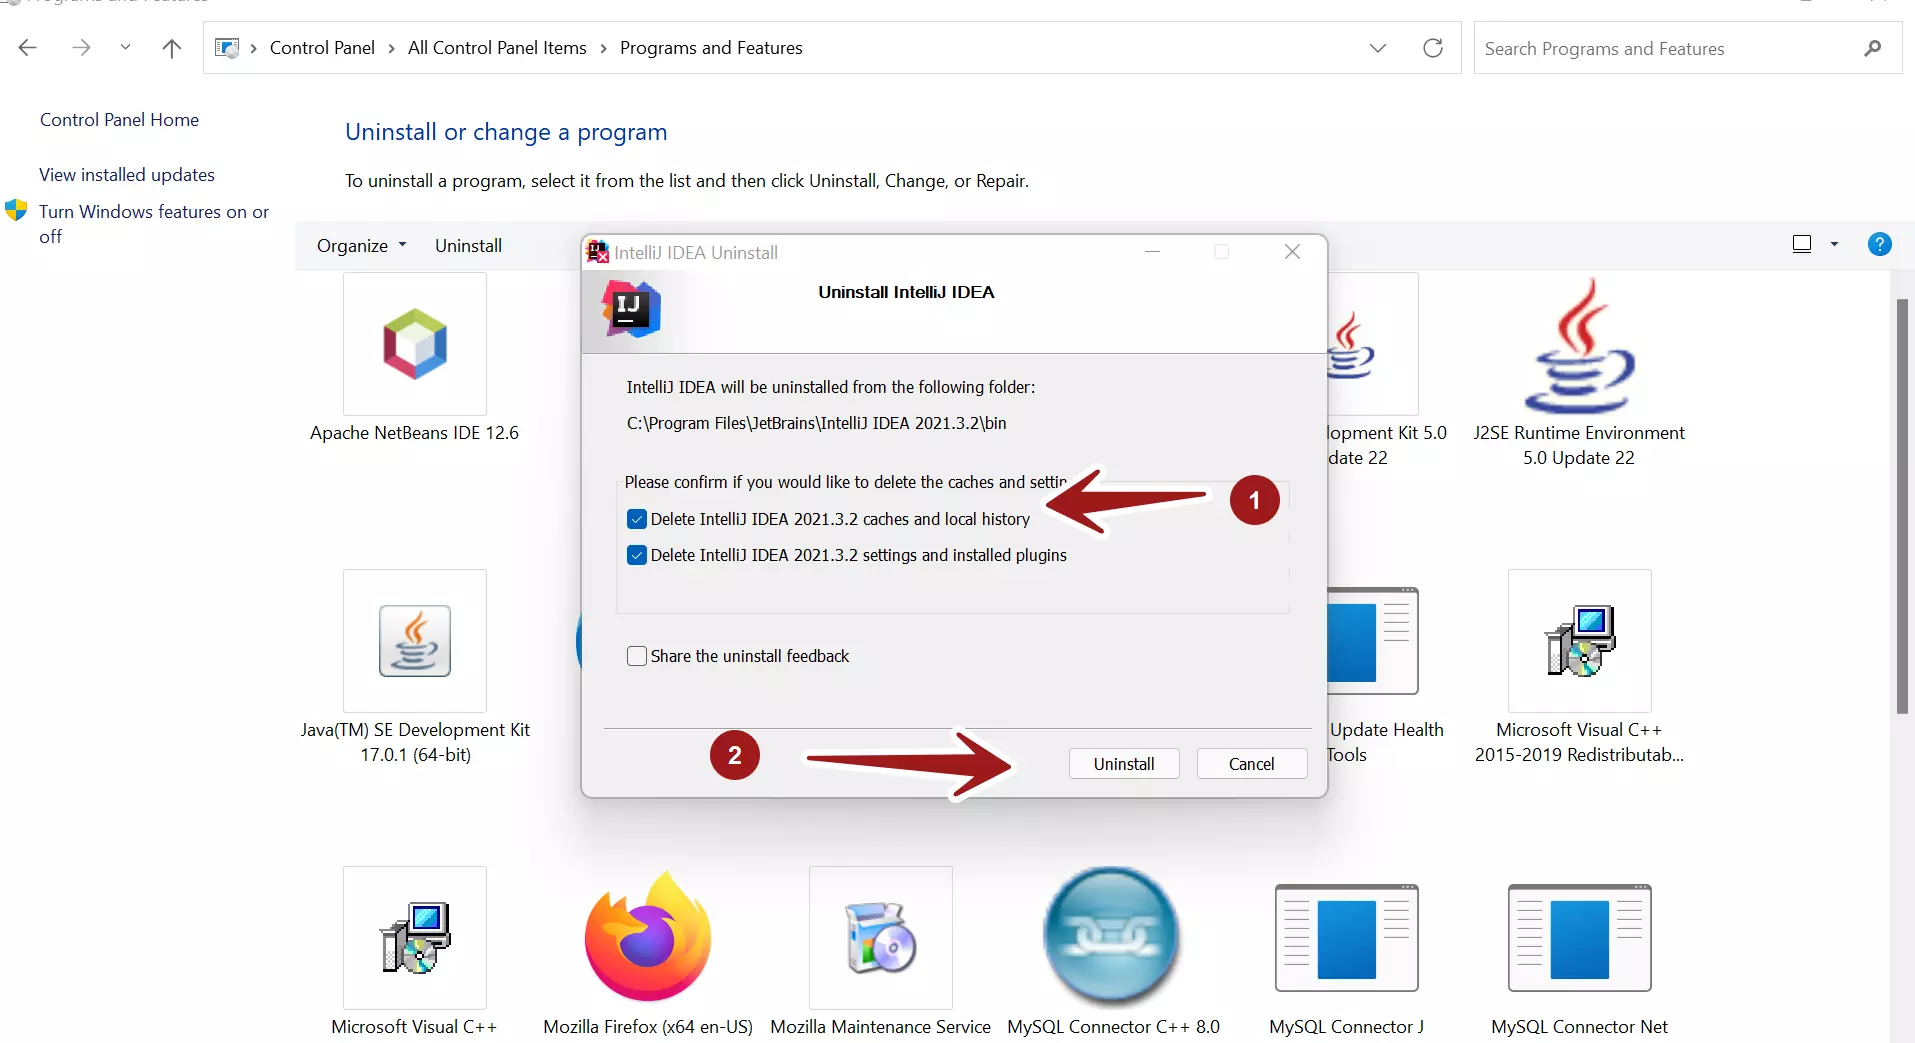
Click Uninstall again to confirm. You will the Intellij IDEA uninstaller:
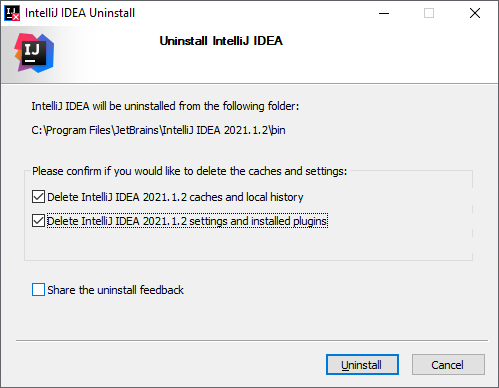
Check the two delete options to delete caches and settings of IntelliJ IDEA. Then click Uninstall to proceed. It will remove the IDE under 1 minute or 2.
2. Uninstall IntelliJ IDEA installed from Zip archive
If you have an instance of IntelliJ IDEA extracted from ZIP archive, just delete the whole directory. And then you have to manually delete some folders that store settings and caches.
With IntelliJ IDEA 2020.1 or newer. Delete these folders:
%APPDATA%\JetBrains\<product><version>
%LOCALAPPDATA%\JetBrains\<product><version>
Example:
C:\Users\Username\AppData\Roaming\JetBrains\IntelliJIdea2021.2
C:\Users\Username\AppData\Local\JetBrains\IntelliJIdea2021.2
With IntelliJ IDEA 2019.3 or older, delete this folder:
%USERHOME%\.<product><version>\config
Example:
C:\Users\Username\.IntelliJIdea2019.3\config
That’s how to completely uninstall IntelliJ IDEA from Windows computer. To see the steps in action, I recommend you watch the video below:
Other Uninstallation Guides:
- How to Uninstall NetBeans IDE completely from Windows
- How to Completely Uninstall Eclipse IDE from Windows computer
About the Author:
Nam Ha Minh is certified Java programmer (SCJP and SCWCD). He began programming with Java back in the days of Java 1.4 and has been passionate about it ever since. You can connect with him on Facebook and watch his Java videos on YouTube.
Add comment
Need Space in PC or only want to remove or uninstall IntelliJ idea On PC ( Windows 7, 8, 10, and Mac )? but how to, after it still having files in C: drive? With this article, you will able to delete or kick out all of those files also after uninstalling the intelliJ idea.
Are you bored, or tired of using intelliJ idea? Now, wanna kick-off this software from your PC ( Windows 7, 8, 10, and Mac )? There is no condition to follow up before installing, so, you can remove it without getting any confusion about it.
There are 10 methods that users can adapt if they want to uninstall intelliJ idea :
Method #1
-
- Go to Start Menu, then click on the Control Panel.
- In Control Panel, under programs, go through the list of the ones that are installed on your computer
- Right-click on intelliJ idea, and then click on uninstall a program
- Follow the prompt on the screen, and you will get to see a progress bar that will take you to remove the intelliJ idea from the computer.


Method #2
The second method involves uninstaller.exe, through which intelliJ idea can be uninstalled. Just follow the instructions below to execute this step:
-
- Go to the installation folder of intelliJ idea.
- Find a file that is named uninstall.exe or unins000.exe
- Double click on the file, and then follow the instructions that appear on the screen.


Method #3
The third method involves System Restore. For those who don’t know, System Restore is a utility, which helps the user restore their system to its previous state. System Restore removes all those programs, which interfere with the operation and performance of the computer.


If you have created a system restore point before you installed intelliJ idea, then you can use this software to restore the system, and remove such unwanted programs. However, before you do so, make sure that you save all the important data.
Follow the steps below to know more from this method:
-
- Close all the files and programs, which are currently running on your PC
- Open Computer from the desktop, and then select Properties
- System Window will open
- On the left side and click on System Protection
- System Properties will open.
- Then do click on the option of System Restore, and a new window will again open.
- Now, choose the ‘different restore point’ option, and click on Next.
- You have to select a date and time from the given options; when you select a date, the drivers that you installed after the chosen date won’t work.
- Click on Finish and then Confirm the ‘Restore Point’ on the screen.
- When you click Yes to confirm, the intelliJ idea would be uninstalled.
Method #4
If you have an antivirus, then you can use it to uninstall intelliJ idea.
There is much malware or intelliJ idea software in the computer applications that we download nowadays. They have become very difficult to remove from the system, like Trojan and spyware.
If you cannot remove intelliJ idea with the above methods.
It means that there is malware or intelliJ idea in it, and only a good antivirus can be used for removing it.
You can either download Norton Antivirus or AVG antivirus, as these are reputable software and will surely remove the malware, intelliJ idea on the system.

Method #5
If the files that are required for uninstalling the software are corrupted, then it is best to reinstall intelliJ idea.
-
- Once you have reinstalled the program, then you will get access to non-corrupted files, and it will become very easy to uninstall it.
- Simply go to Control Panel once the intelliJ idea is installed, and then remove it from there.
Method #6
If you want to uninstall intelliJ idea, then you can do so using Command Displayed in the Registry. A registry is a place where all the settings of Windows, along with information, are stored. This also includes the command to uninstall a software or program. You can try this method with intelliJ idea as well, but it is a very risky method. If you make any mistake and delete the wrong information, then the system is most likely to crash. It would become difficult for you to bring it back from deletion.

To execute this method, To follow the steps given below:
-
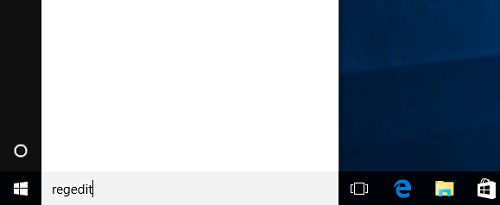
- Hold Windows + R together, and then Run command
- When the command box opens, type Regedit in the box and then click on OK
- You have to navigate and find the registry key for the intelliJ idea
- You will see an uninstall string on the next window; double click on it, and also copy ‘Value Data’
- Again hold Windows + R keys, and run the Command; paste the value data that you just copy and click on OK
Follow what comes on the screen and then uninstall intelliJ idea.
Method #7
The seventh method is to uninstall the intelliJ idea using a third-party uninstaller.
At times, those who don’t have any knowledge of computer language, won’t be able to manually uninstall the software fully.
Many files occupy the hard disk of the computer, so it is best to use third-party software to uninstall them.

Method #8
There are some codes that users can type into the command prompt, and they would be able to uninstall the intelliJ idea. For example, if they want to remove the package, then just type
sudo apt-get remove intelliJ idea
If you want to uninstall intelliJ idea and its dependencies as well, then type:
sudo apt-get remove –auto-remove intelliJ idea
For those who don’t know, some of the dependencies of intelliJ idea are GCC-5, libc6, libgcc1, intelliJ idea –dev, and gc++-5.

Method #9
If the user wants to remove the configuration and data files of intelliJ idea, then they need to run the following code on the Command Prompt:
sudo apt-get purge intelliJ idea

Method # 10
It depends on you that are you willing to kick-out the data or you want to remove the configuration data or data files, along with the dependencies, then the following code is most likely to work for you:
sudo apt-get auto-remove -purge intelliJ idea

To uninstall intelliJ idea on mac because anytime we need space or only want to remove from pc due to some viruses and also many problems which are needed to remove or uninstall from pc. so I will show you some steps of uninstalling intelliJ idea on the mac so follow my this step or method if you have still confusion so you may contact with us for uninstall of intelliJ idea on pc or mac.
How to Uninstall intelliJ idea on Mac?
For uninstalling intelliJ idea on the mac so as I told you that there is a simple method to uninstall apps on mac. As there are installed some apps on your Mac and now you want to remove or uninstall from your pc successfully and want to install some other apps on my mac so follow my these steps to uninstall intelliJ idea on mac.
Method #1
In method 1, you have to open mac on your pc as I’m showing in the image follow the images to uninstall intelliJ idea on your mac.

In the image, there is a intelliJ idea app on your mac dashboard and now we have to uninstall it from our mac we will uninstall this app and will remove it in of mac now double-click-on-app showing in the image.

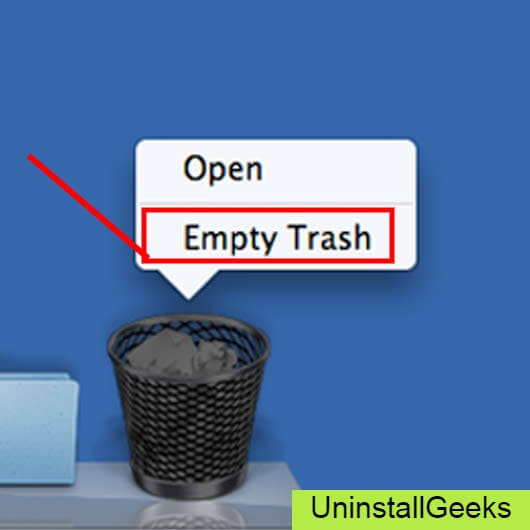
Now you double-clicked on the app mac will ask that are you sure to uninstall intelliJ idea click on the Delete button so go to Trash of mac to uninstall completely from mac. Showing in image trash bin click on trash bin and go inside there will be intelliJ idea which we had to delete before so have to uninstall completely from mac.

Not right-click on trash to remove all data or app which we had uninstalled before seeing in the image. Click on Empty Trash the whole data which is in the trash will auto remove successfully.
Now we uninstalled intelliJ idea on the mac so as you see that how to uninstall or remove any app on the mac so if you liked this so share once. This method doesn’t require any antivirus or uninstaller software from them we are to uninstall. I described only a simple method of uninstalling intelliJ idea on mac.
This method more people are using but some people take it is too hard uninstalling in mac but in this step, anyone can understand this simple method.
How To Install?
For those who don’t know much about intelliJ idea, they might lean more towards uninstalling it. These intelliJ idea create an environment, where users can create a high GPU-accelerated application. If you want to install this intelliJ idea, then make sure that your system is compatible with it.
Firstly, verify that the system you are using has a intelliJ idea capable GPU, and then download the intelliJ idea.
Install it, and then test that the software runs smoothly on the system.
If it doesn’t run smoothly, then it could be because its communication with the hardware is corrupted.


Recommended Softwares To Uninstall:
-
- How To Uninstall Chromium On PC
- How To Uninstall Microsoft Edge On PC
- How To Uninstall Nvidia Cuda Toolkit In PC
- How To Uninstall Avast In PC
- How To Uninstall Google Chrome On PC
- How To Uninstall Python In PC
- How To Uninstall Internet Explorer On PC
- How To Uninstall Adobe Creative Cloud On PC
- How To Uninstall Skype for Business
- How To Uninstall Discord In PC
- How To Uninstall Avast Premium Security In PC
- How To Uninstall Skype On PC
Conclusion
There are other methods of uninstalling the intelliJ idea as well as in pc or windows, but these could be difficult for those, who don’t have much technical expertise.
Execute these methods, and they will surely work. These methods don’t require the user to have much knowledge of the technical side of an operating system. They can follow simple steps and uninstall intelliJ idea.
IntelliJ IDEA
Uninstall IntelliJ IDEA on Windows 11
In this tutorial, we will learn the steps to uninstall IntelliJ IDEA IDE on the Windows 11 operating system. Proper uninstall gracefully removes the installation files and other settings.
Steps
Steps to uninstall the IntelliJ software are as follows:
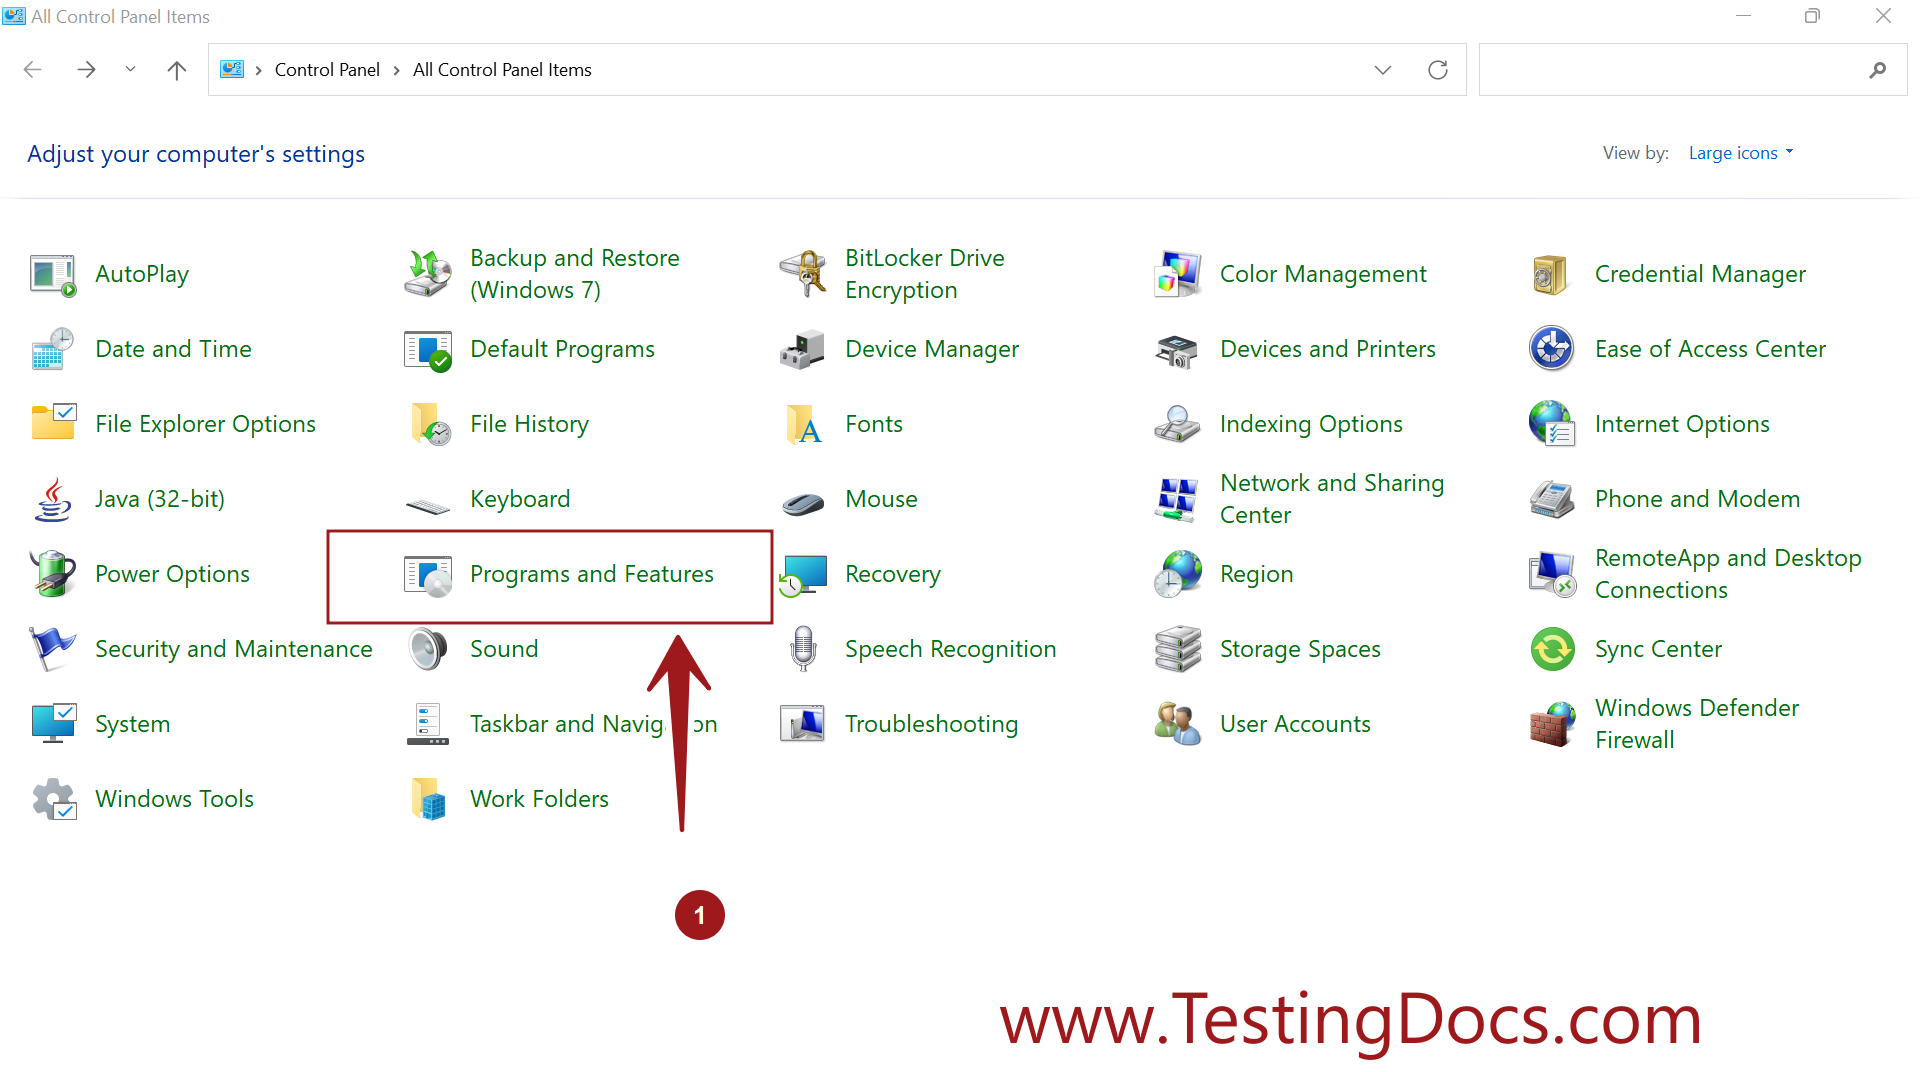
- Click on the Search icon in the Toolbar
- Search for Control Panel
- Click on the Control Panel App.
- Click on the Programs link.
- Click on the Programs and Features icon.
Select the IntelliJ IDEA application and click on the Uninstall link.
We can change the display icons view by clicking on the drop-down beside the help icon.
For example to Small, Medium, Large icons, List, Tiles or Detail content, etc.
For clean uninstall select the checkboxes options to delete caches and local history, settings, and installed plugins.
- Delete IntelliJ IDEA caches and local history
- Delete IntelliJ IDEA settings and installed plugins
In case, you are planning to reinstall again, you can leave these options unchecked.
Optionally, you can share the uninstall feedback with the organization.
Click on the Uninstall button. This will uninstall the application and delete all the install files and settings.
Click on the Close button to complete the Uninstall process. Save your work and restart the machine.
That’s it. We have successfully uninstalled IntelliJ IDEA IDE on the Windows 11 machine.
We can reinstall the tool and follow the install process.
IntelliJ IDEA Tutorials
IntelliJ IDE tutorials on this website can be found at:
How can Uninstall IntelliJ IDEA Community Edition Completely from Computer
IntelliJ IDEA Community Edition removal has been a tough problem on your PC? Do you need an effective way to uninstall IntelliJ IDEA Community Edition quickly with simple steps? Don’t worry, you will be able to solve the problem via the following removing instructions of the program.
Get Bloatware Uninstaller Now
IntelliJ IDEA Community Edition may be great in providing its specific function for the users, but it also can turn out to be a problem when the program get some running issues or you don’t want to keep it on your computer any more. In this case, removing IntelliJ IDEA Community Edition will be the common and also effective means to resolve the problem, and the real difficulty just come out when people try to uninstall IntelliJ IDEA Community Edition from their PCs.
What usually make people to remove IntelliJ IDEA Community Edition
- IntelliJ IDEA Community Edition is not compatible with other installed applications
- Program gets a corrupted issue unexpectedly
- IntelliJ IDEA Community Edition is not as good as the user expected, and need to be erased from the computer
- IntelliJ IDEA Community Edition should be uninstalled first and reinstalled on the PC
- The application is regarded by the user and some websites as a suspect malware
Most common problems of removing the software
- IntelliJ IDEA Community Edition program is not available on the Windows uninstall panel
- IntelliJ IDEA Community Edition can’t be removed from the Windows and always receive a notification
- Nothing happen when click on the uninstall button on Windows
- IntelliJ IDEA Community Edition or the related process still keep running on the computer after removing it
- Some files and traces of the program still can be found
- Removing process running for a long time and does not come to the end
If must be a headache if encountering such a problem on the computer, and there are still many other problems people might come across when perform the program removal on their own computers. Therefore, you should know the right way about how to uninstall IntelliJ IDEA Community Edition from PC, or the way to fix/avoid the removing issue on the computer. Here are just several options that can support you to remove the application well.
How can uninstall IntelliJ IDEA Community Edition well on PC? Check these guides
Option 1: Use the product’s uninstall tool
There are many applications in nowadays provides an uninstall process on the program’s installation folder, or the publisher gets an uninstaller which is specifically used to remove its own products. To remove IntelliJ IDEA Community Edition in this way, please refer to the following uninstall instructions:
- 1. Right-click on IntelliJ IDEA Community Edition icon on the desktop, and select «Open file location»
- 2. Scroll down the list of files and find the uninstall process, usually named «uninst000», «Uninstall», or «Uninstaller»
- 3. Double click on the uninstall process to start the removal
- 4. Follow the uninstall wizard to finish the removal, and restart your computer
- 5. Open the directory of the installation folder again, and make sure everything has been cleared well
- 6. Click on the Windows button on the bottom-left-corner, and enter «regedit» on the search box
-

- 7. Click to open «regedit» or Registry Editor on the search result
-
- 8. Unfold the registry group inside, and find out those registry keys or entries which contains the program’s name
- 9. Back up these files, and then remove them from your computer system

Note: once problems occur after deleting the registry, please restore the back-up registry to Registry Editor.
When using the publisher’s uninstaller, you should download and install the uninstall application additionally, and choose to uninstall IntelliJ IDEA Community Edition from its interface. Similar to the above removal, you should restart your computer after finish the uninstall process, and clear its remnants again which are still staying on the PC.
Things you need to know about Registry Editor
Registry Editor is a place that stores many important registry keys and entries which closely related to the system operation and program’s performance on the computer, removing a wrong file inside usually cause serious problem for the system, so you should be very careful when you have to manually delete some registries inside.
Get Bloatware Uninstaller Now
Option 2:Remove it with Windows uninstall feature
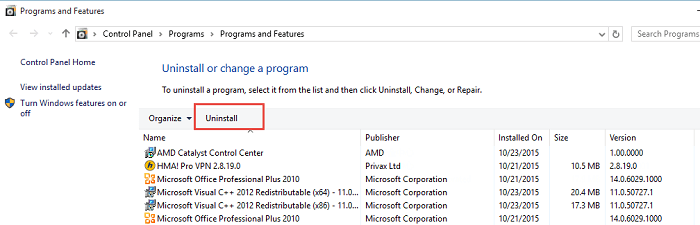
Windows system provide an uninstall feature in Control Panel that support the user to remove unwanted program on the PC, to access this applet in different operating system, you can follow these instructions:
- 1. Open the uninstall panel on Windows system
- 2. Select IntelliJ IDEA Community Edition on the programs list, click on Remove/Uninstall button
-
- 3. Confirm the program removal, and complete the removing steps with guides
- 4. When finish, reboot the computer
- 5. The same to the removing steps in Option 1, you should clear the leftovers in the installation folder as well as Registry Editor
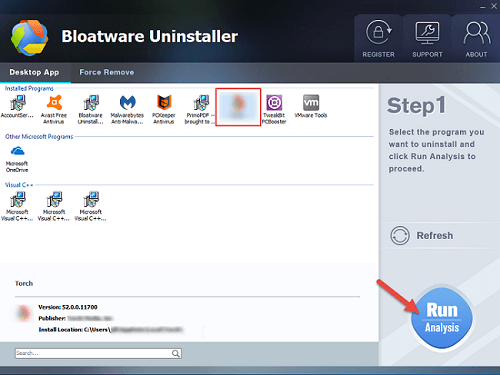
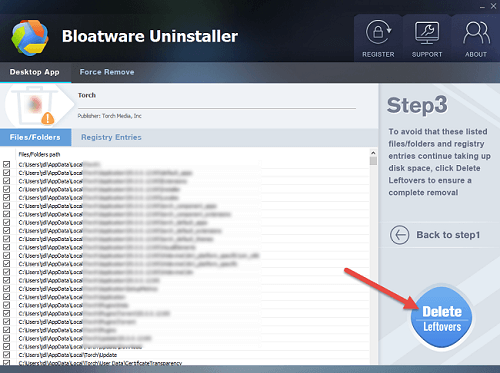
Option 3:Uninstall IntelliJ IDEA Community Edition with Bloatware Uninstaller
If you want to totally avoid the risky manual removal of registry, and handle IntelliJ IDEA Community Edition uninstall more easily and quickly, taking a professional uninstall tool will be a great help for you, because it can count all of the files (including registry keys and temporary files) and provide a complete and automatic removal, thus, many risky and annoying manual steps could be skipped can you can totally remove IntelliJ IDEA Community Edition on the PC more quickly.
Bloatware Uninstaller is an advanced uninstall utility that can give a good example about how uninstall IntelliJ IDEA Community Edition well:
- 1. Install and launch the uninstaller on PC
- 2. Find and select IntelliJ IDEA Community Edition from the programs list, and click on Scan button
-
- 3. When all of files being detected, click on the uninstall or remove button
-
- 4. Follow the uninstall wizard to remove all of components from the computer
-
- 5. Exit the uninstaller when finish, and reboot the computer system

Get Bloatware Uninstaller Now
This is a very effective way to uninstall IntelliJ IDEA Community Edition and other applications, while the manual removal usually resulted in an unsuccessful removal, and the most important point is it is much easier for the common user to take and get rid of the program they want. So it is currently the best way we found and would like to recommend you to remove unneeded programs with a good app uninstaller.
Одна из самых шикарных IDE для full-stack разработки — Intellij IDEA. Community версия бесплатна, и для разработки на Java/Android ее хватит за глаза.
А если приходится писать на Python, PL/SQL, Groovy, JavaScript, и еще горсточке языков? Тут только Professional вариант, вот только он стоит денег, хоть он того и стоит.
Конечно, для начала вам предлагается пробный период на месяц, в течении которого можно успеть по достоинству оценить эту IDE.
Но что, если пробный период закончился, а денег на приобретение все еще нет?
Простая переустановка ничего не даст, удаление приложения и новая установка — тоже. Дело в том, что в системе есть несколько мест, где работающая среда разработки оставляет
следы, и видимо в том числе относительно момента первого запуска. Удивительно, но где именно их искать, никто и не скрывает. Из этого следует вывод — удаляя приложение, удаляйте и эти остатки, не забывая предварительно экспортировать свои настройки (File -> Export Settings).
После этого вновь установленная IDEA будет считать пробный период сначала. Вся процедура займет от силы 5 минут.
Итак, пройдемся по этим каталогам и удалим все каталоги и файлы, которые имеют в имени название компании и продукта (пример для MacOS):
- /Applications
- ~/Library/Preferences/
- ~/Library/Caches/
- ~/Library/Application Support/
- ~/Library/Logs/
Последовательность можно описать такой bash-командой:
ls -d -1 /Applications/* ~/Library/Preferences/* \
~/Library/Caches/* ~/Library/Application\ Support/* \
~/Library/Logs/* | grep -i "jetbrains\|idea" | xargs rm -rf
Такой способ подойдет и к другим продуктам JetBrains.